
BR-S200B - Lighting BRESSER - Free user manual and instructions
Find the device manual for free BR-S200B BRESSER in PDF.


| Product Type | LED Desk Lamp |
| Brand | Bresser |
| Model | BR-S200B |
| Dimensions (approx.) | 15 x 15 x 30 cm |
| Weight | 0.5 kg |
| Power Supply | DC 5V, 1A (USB powered) |
| Power Consumption | 5W |
| Light Source | LED (non-replaceable) |
| Color Temperature | 3000K - 6000K (adjustable) |
| Brightness Levels | 3 levels (low, medium, high) |
| Dimmable | Yes |
| Material | Aluminum and ABS plastic |
| Flexible Neck | Yes, adjustable |
| Base | Stable, non-slip |
| Maintenance | Wipe with a soft, dry cloth |
| Safety | Indoor use only; keep away from moisture |
| Spare Parts | LED module not replaceable ; contact support for warranty |
| Accessories Included | USB cable, user manual |
| Warranty | 2 years |
| Certifications | CE, RoHS |
Frequently Asked Questions - BR-S200B BRESSER
User questions about BR-S200B BRESSER
0 question about this device. Answer the ones you know or ask your own.
Ask a new question about this device
Download the instructions for your Lighting in PDF format for free! Find your manual BR-S200B - BRESSER and take your electronic device back in hand. On this page are published all the documents necessary for the use of your device. BR-S200B by BRESSER.
USER MANUAL BR-S200B BRESSER
natural_image
Black circular light bulb mounted on a stand, no text or symbols visibleStudio Light · Studiolamp · Studiolicht ·
BR-S200B
EN Instruction manual
Visit our website via the following QR Code or web link to find further information on this product or the available translations of these instructions.

This documentation is valid for the products with the following article numbers:
F004597
Manual version: 1221
Manual designation:
Manual_F004597_BRS200B_en-nl-de_BRESSER_v122021a
Always provide information when requesting service.
2 About this Instruction Manual

NOTICE
These operating instructions are to be considered a component of the device.
Read the safety instructions and the operating manual carefully before using this device.
Keep this instruction manual in a safe place for future reference. When the device is sold or given to someone else, the instruction manual must be provided to the new owner/user of the product.
3 Intended use
- This device is not intended for use by persons (including children) with impaired physical, sensory or mental abilities, or for lack of experience and/or knowledge, unless they are supervised by or have received instructions from a person responsible for their safety on how to use this device.
- This device is for personal use only.
- The device was developed as an electronic accessory and may only be used to connect and operate the devices for private use described in this manual.
- The device is intended only for indoor use.
4 General safety instructions

! DANGER
Risk of an electric shock!
This device contains electronic parts that are powered by a power source (AC adapter and/or batteries). Improper use of this product may result in electric shock. Electric shock can cause serious or fatal injuries. It is therefore imperative that you observe the following safety information.
- Disconnect the power supply by pulling the mains plug when the appliance is not in use, in case of a longer interruption of operation and before any maintenance and cleaning work.
- Place your device so that it can be disconnected from the power supply at any time. The power outlet should always be near your appliance and should be easily accessible, as the plug of the power cord serves as a disconnect device from the mains supply.
- To disconnect the unit from the mains, always pull the mains plug and never pull the cable!
- Check this device, cables and connections for damage before use.
- Never attempt to operate a damaged device, or a device with damaged electrical parts! Damaged parts must be replaced immediately by an authorized service agent.
-
Discharge the device before maintenance work and cleaning.
-
Operate the device only in a completely dry environment and do not touch the device with wet or damp body parts.
- Never use the device with defective or damaged components (e.g. housing, cable, lamp, etc.).

! DANGER
Danger of suffocation!
Improper use of this product may result in suffocation, especially for children. It is therefore imperative that you observe the following safety information.
- Keep packaging materials (plastic bags, rubber bands, etc.) away from children! There is a danger of choking!

⚠ WARNING
Danger of glare!
Make sure people and animals do not stare into the light. Due to the high power of illumintaion, your eyes can be glared or after-images may achieve. This visual impairment can cause accidents.

CAUTION
Risk of burns!
Never touch parts of the device during operation or until it has sufficiently cooled down (about 45 min. after switching off)!

CAUTION
Risk of body injury!
This device contains components and/or accessories that can cause minor or serious body injury if used improperly. It is therefore essential that you observe the following safety information in order to prevent body injuries.
• Always handle flash tubes and lamps with special care. Pieces of glass may cause serious or fatal injury to eyes and skin!
- Sharp-edged and pointed tools are often used for working with this device. Therefore, keep this device and all accessories and tools in a place inaccessible to children. Danger of body injury!

! DANGER
Explosion hazard!
Improper use of this product may result in fire. It is essential that you observe the following safety information in order to avoid fires.
- Do not expose the device to high temperatures. Use only the supplied AC adapter. Do not short-circuit the device or batteries or dispose of in fire! Excessive heat and improper handling can cause short circuits, fires and even explosions!

CAUTION
Fire hazard!
Improper use of this product may result in fire. It is essential that you observe the following safety information in order to avoid fires.
- Due to extreme heat development of some components of up to 250^ there is an acute FIRE HAZARD! Always set up the device securely, so that it may not turn over. Ensure for a safe storage.
- Keep children and animals away from the device! They could overturn the device.
- Make sure that no one can trip over the connection cables of the device. The device could be overturned.
- Never turn on the device with its protection cap fitted.
- Never cover the ventilation slots or cooling fins of the device during operation or until it has cooled down completely!
- Keep flammable materials away from the device!
- Operate this device only installed with open softboxes to prevent fire hazard due to heat build!

NOTICE
Danger of material damage!
Improper handling may result in damage to the unit and/or accessories. Therefore, use the device only in accordance with the following safety information.
- Do not disassemble the device! In the event of a defect, please contact your dealer. They will contact the Service Center and can arrange the return of this device for repair if necessary.
- Perform all cleaning and maintenance work at the device only as described in the instruction manual.
- Do not expose the device to high temperatures and protect it from water and high humidity.
- Do not subject the device to excessive vibrations.
- Only use accessories and spare parts for this device that comply with the technical specifications.
- Never touch flash tubes or lamps with bare hands! Use clean cotton gloves or a clean cloth when inserting or suspending them.
5 Parts overview and scope of delivery
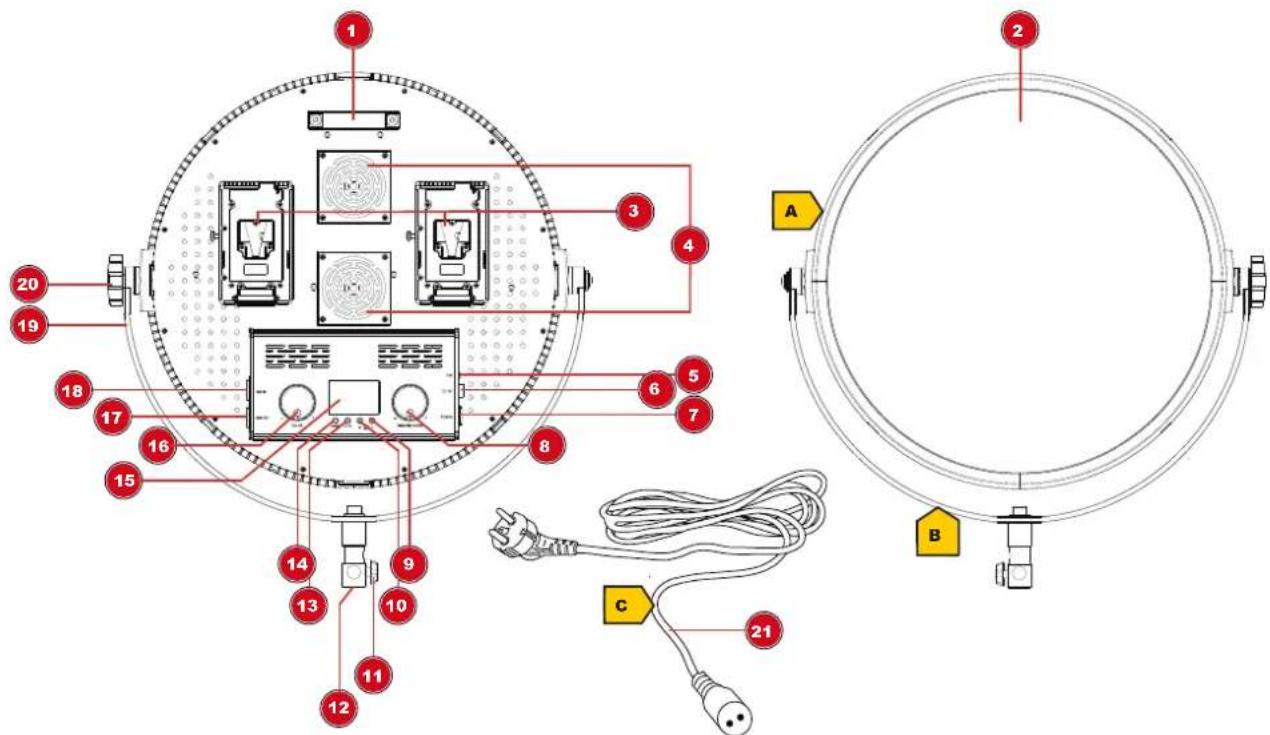
Illustration 1: All parts of the LED lamp, model BR-S 200 B
1 Handle 2 LED panel
3 V-Lock battery socket (for suitable battery ^1 for mobile operation) (optional) 4 Fan
5 Fan switch 6 Power connection socket
7 ON/OFF toggle switch (switch device on/off) 8 Rotary control for brightness and channel selection (stepless control)
9 UP button (color temperature) 10 DOWN button (colour temperature)
11 Locking knob (spigot/tripod connection) 12 Spigot/tripod connection
13 CHANNEL button (enable/disable channel selection) 14 DMX/2.4G button (enable/disable DMX or 2.4G connection)
15 LCD display 16 Rotary control for colour temperature setting (stepless control)
17 DMX OUT socket 18 DMX IN socket
19 Fork holder 20 Locking knob (fork holder)
21 Power cable with 2-pin DC plug and Euro plug
^1 V-Lock battery not included
Scope of delivery:
LED Light (A), fork mount with tripod connection (B), power cable (C)
6 Establishing the power supply (mains operation)
WARNING! The device cannot be operated by mains adapter and battery at the same time! To avoid voltage damage, always operate with only one of the two possible voltage sources!
- Insert the 2-pin DC plug of the power cable into the power connection socket on the device.
- Insert the Euro plug of the power cable into the power socket (230V max. voltage).
CAUTION! When switching on the device, make sure that the ON/OFF toggle switch is moved to the correct position for the desired voltage source (mains adapter or battery)!
- Move the ON/OFF toggle switch to the 'II' position to operate the device from mains power and switch on.
- Move the ON/OFF toggle switch to the '0' position to turn off the device.
NOTICE! If the device is not used for a longer period of time, disconnect it from the power supply (pull out Euro plug or remove battery).
7 Power supply via battery (optional)
WARNING! The device can not be operated at the same time by mains power adapter and by battery! To avoid voltage damage, always operate with only one of the two possible voltage sources!
As an alternative to the power supply through mains voltage, the device can also be powered by a battery*.
NOTICE! Only use the type of battery described in this manual. Use of an unsuitable or unauthorized battery will damage the device and void the warranty.
- Charge the rechargeable battery* completely.
- Insert the battery into the battery socket at the backside of the housing.
CAUTION! Before switching on the device, make sure that only one voltage source is used (power adapter or battery)!
- Move ON/OFF toggle switch to position 'I' to operate the device by battery and to turn on the device.
- Move ON/OFF toggle switch to position '0' to turn off the device.
*not included
8 Lighting settings
- Turn the brightness adjustment knob to set the desired brightness.
Only for bicolor models:
- Turn colour vtemperature adjustment knob to set the desired colour temperature (3,200 to 5,600 K, stepless).
9 Changing the lighting angle
- Carefully loosen the locking knobs on both sides of the U-mount.
- Move the light to the desired angle.
- Hand-tighten the locking knobs again.
DANGER! Allow the housing surface to cool down before touching it! Touching hot components can cause serious burns.
WARNING! Hold the light when the locking knobs have been loosened to avoid damage to the panel!
10 Connection with an lighting console (DMX-RJ11) (optional)
One or more LED lights can be controlled centrally when connecting them with a RJ11 compatible lighting console* through suitable connection cables*.
- Insert the RJ11 modular plug of the connection cable* into the corresponding socket on the lighting console* and into the socket of the LED light.
- Press the control selection knob to enable control via DMX lighting console. The DMX function lamp lights up.
NOTICE! In DMX control mode, the LED light can be controlled only through the console.
- For the manual control or remote control*, press the control selection knob again. The 2.4G function light will light up.
*not included
11 Technical data
Model BR-S-200B
(bicolor)
| Electricity consumption 200W |
| Number of Bearings 1280 |
| Luminous flux 20,000 LM |
| LED illuminant LED, not replaceable |
| Colour temperature 3,200K - 5,600K |
| Dimmer 10% to 100% |
Model BR-S-200B
(bicolor)
Operating voltage DC 36V via power cable
or optionally
via 2 x Sony V-Lock
lithium batteries
Permissible operating conditions Dry, 0°C to +40°C
Storage conditions Dry and dust-free, 0°C to +40°C
Table 1: BR-S200B
NOTICE! The LEDs used in this device have a very long lifespan and do not need to be changed. The LEDs can not be changed due to technical reasons!
12 Disposal

Dispose of the packaging materials properly, according to their type, such as paper or cardboard. Contact your local waste-disposal service or environmental authority for information on the proper disposal.
Do not dispose of electronic devices in the household garbage!
According to the European Directive 2012/19/EU on Waste Electrical and Electronic Equipment and its transposition into national law, used electrical equipment must be collected separately and recycled in an environmentally sound manner.
13 EC declaration of conformity

A "Declaration of conformity" in accordance with the applicable directives and corresponding standards has been prepared by Bresser GmbH. The full text of the EC declaration of conformity is available at the following Internet address: www.bresser.de/download/F004597/CE/F004597_CE.pdf
14 UKCA Declaration of Conformity

Bresser GmbH has issued a "Declaration of Conformity" in accordance with applicable guidelines and corresponding standards. The full text of the UKCA declaration of conformity is available at the following internet address: www.bresser.de/download/F004597/UKCA/F004597_UKCA.pdf
Bresser UK Ltd. • Suite 3G, Eden House, Enterprise Way, Edenbridge, Kent TN8 6HF, Great Britain
15 Warranty
The regular guarantee period is 2 years and begins on the day of purchase. To benefit from an extended voluntary guarantee period as stated on the gift box, registration on our website is required.
You can consult the full guarantee terms as well as information on extending the guarantee period and details of our services at www.bresser.de/warranty_terms.
- About this Instruction Manual
- NOTICE
- Intended use
- General safety instructions
- ! DANGER
- Risk of an electric shock!
- Danger of suffocation!
- ⚠ WARNING
- Danger of glare!
- CAUTION
- Risk of burns!
- Risk of body injury!
- Explosion hazard!
- Fire hazard!
- Danger of material damage!
- Establishing the power supply (mains operation)
- Power supply via battery (optional)
- Lighting settings
- Changing the lighting angle
- Connection with an lighting console (DMX-RJ11) (optional)
- Technical data
- Model BR-S-200B
- (bicolor)
- Disposal
- EC declaration of conformity
- UKCA Declaration of Conformity
- Warranty
Brand : BRESSER
Model : BR-S200B
Category : Lighting