Vivo Fresh - Car seat Caretero - Free user manual and instructions
Find the device manual for free Vivo Fresh Caretero in PDF.


| Product Type | Child Car Seat (Forward-Facing) |
| Brand | Caretero |
| Model | Vivo Fresh |
| Weight Groups | Group I (9-18 kg), Group II (15-25 kg), Group III (22-36 kg) |
| Age Range | Approximately 9 months to 12 years |
| Dimensions (Approximate) | Height: 65 cm, Width: 44 cm, Depth: 45 cm |
| Weight (Approximate) | 6 kg |
| Power Supply | None (Manual operation) |
| Installation | Forward-facing using 3-point vehicle seat belt |
| Harness System | Integrated 5-point harness (Group I); 3-point vehicle belt with guide (Groups II & III) |
| Safety Certification | ECE R44/04 |
| Main Features | Adjustable headrest height, removable fabric cover, belt guides for groups II/III |
| Cleaning | Cover: hand or machine wash at 30°C, mild detergent. Buckle: soak in warm soapy water. Plastic parts: damp cloth. |
| Spare Parts | Contact distributor for replacement harness, cover, or belt guides |
| Repair | Do not modify; contact manufacturer for any repairs |
| Warranty | Subject to printing errors, mistakes, and technical changes |
Frequently Asked Questions - Vivo Fresh Caretero
User questions about Vivo Fresh Caretero
0 question about this device. Answer the ones you know or ask your own.
Ask a new question about this device
Download the instructions for your Car seat in PDF format for free! Find your manual Vivo Fresh - Caretero and take your electronic device back in hand. On this page are published all the documents necessary for the use of your device. Vivo Fresh by Caretero.
USER MANUAL Vivo Fresh Caretero
IMPORTANT! Please read these instructions carefully before the first use of the product. This manual should be kept for future use.
natural_image
Line drawing of a car seat assembly with no text or symbolsCARETERO
Vivo Fresh
Thank you for choosing the Caretero Vivo Fresh car seat.
You purchased a modern and high-quality product.
We are sure that it will provide your child with safety and will ensure hir or her proper, harmonous growth.
We encourage you to learn about our full offer by visiting our website www.caretero.pl.
We are also eager to hear your opinions on our products. Should you have any remarks, feel free to share them with us.
Caretero brand Team.
natural_image
Line drawing of a car seat with a hand holding a tool, showing mechanical components and a black arrow indicating direction (no text or symbols)A-2A-1
natural_image
Illustration of a child wearing a car seatbelt and red straps, labeled A-6 (no text or symbols on the diagram itself)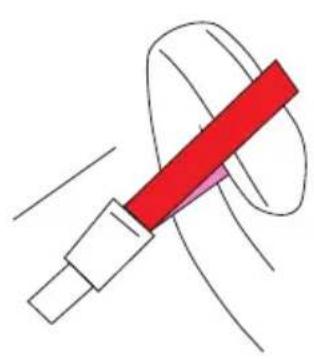
natural_image
Simple line drawing of a red object being cut out by a curved wire (no text or symbols)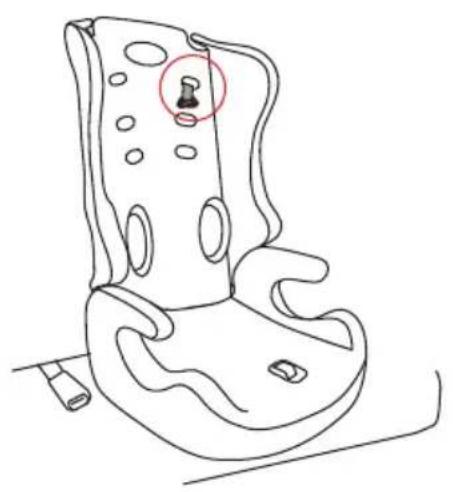
natural_image
Line drawing of a car seat with a highlighted seat and mounting bracket (no text or symbols)B-2B-1
natural_image
Line drawing of a child seated in a car seat, no text or symbols presentB-3
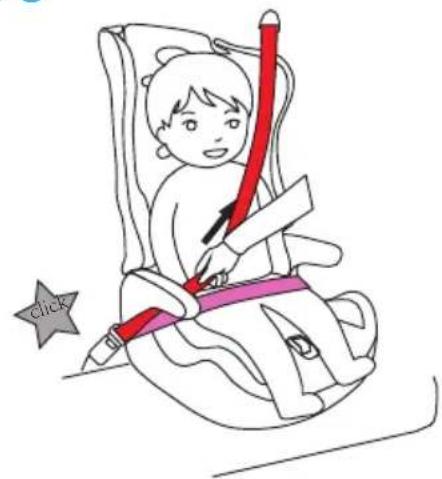
B-4
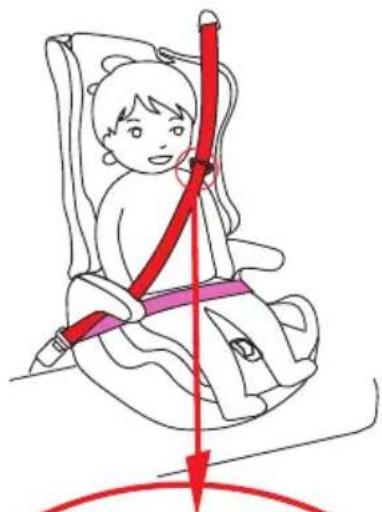
natural_image
Illustration of a child wearing a seatbelt and holding a red belt, with a red arrow indicating direction (no text or symbols)B-5
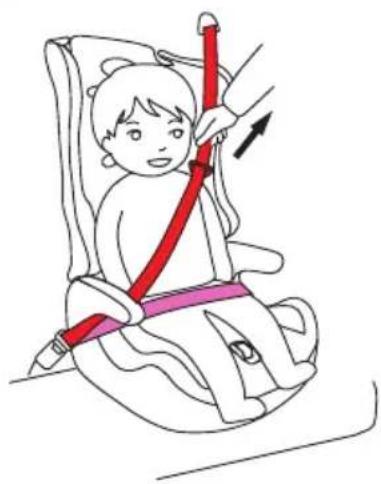
natural_image
Illustration of a child sitting in a car seat using a red safety belt, with an arrow indicating the motion (no text or symbols present)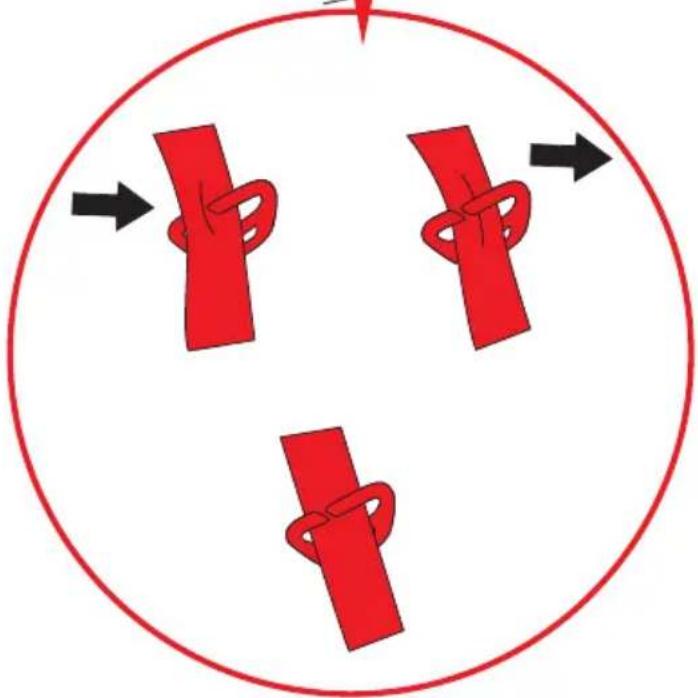
natural_image
Three red ribbon knot diagrams arranged in a circular pattern with black arrows indicating direction (no text or symbols)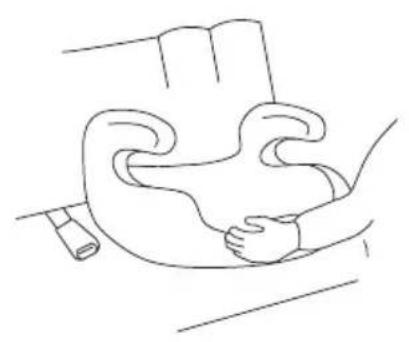
natural_image
Line drawing of a person lying down with hands placed on the back (no text or symbols)C-2C-1
natural_image
Line drawing of a person sitting on an inflatable chair with a red object inserted, no text or symbols presentC-3
natural_image
Illustration of a child sitting on a cushion with a red pencil and arrow, pointing at a star labeled 'click' (no text or symbols beyond the arrow)C-4
natural_image
Illustration of a child sitting on a chair with a red curved object and a pink band, no text or symbols present.C-5
natural_image
Illustration of a child sitting on a cushion with a red bandage and directional arrow indicating motion (no text or symbols)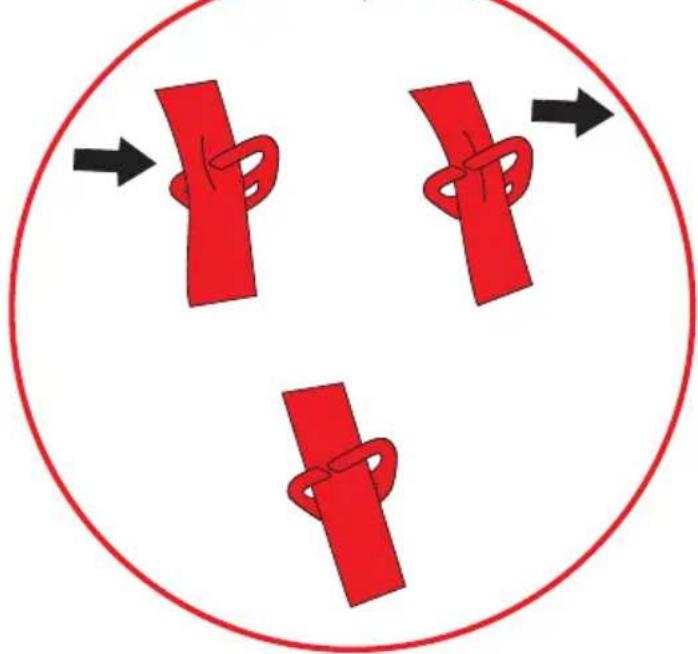
natural_image
Three red ribbon knot diagrams arranged in a circular pattern with black arrows indicating direction (no text or symbols)14
natural_image
Technical diagram of a mechanical component with a close-up inset showing a hand holding a cable or wire (no text or symbols present)D-2D-1
natural_image
Technical line drawing of a mechanical component with two views: top shows internal structure, bottom shows assembly or assembly (no text or symbols)D-3
natural_image
Illustration of a car seat assembly and its corresponding medical procedure diagram (no text or labels)D-4
D-5 D-6 D-7
natural_image
Three identical line drawings of a smiling child with bandages, showing head and shoulders (no text or symbols)E-1 E-2
natural_image
Illustration of a child wearing a full-body safety harness, with hands adjusting the seat (no text or symbols present)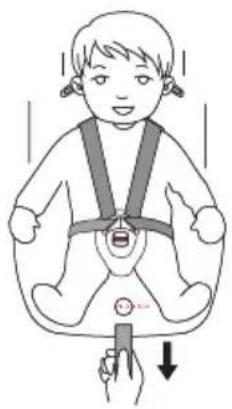
natural_image
Illustration of a child wearing a full-body safety harness and holding a weight, with no text or symbols present.F-1
natural_image
Illustration of a person's seatbelt buckle being lifted by hands (no text or symbols)F-2
F-3
G-1 G-2 G-3
natural_image
Illustration showing three steps of a hairpin being adjusted, with no text or symbols present.G-4 G-5
natural_image
Illustration of a seatbelt buckle being adjusted for a person's seatbelt (no text or symbols present)G-6 G-7 G-8
natural_image
Three line drawings showing a mechanical joint with red arrows indicating motion or rotation (no text or symbols)H-1 H-2 H-3
I-1 I-2 I-3
2 WSKAZÓWKI BEZPIECZEŃSTWA
PONIŻSZE INSTRUKCJE OBSŁUGI SĄ WAŻNE.
PRZED UŻYTKOWANIEM NALEŻY PRZECZYTAĆ NINIEJSZĄ INSTRUKCJĘ I ZACHOWAĆ JĄ NA PRZYSZŁOŚĆ. BEZPIECZEŃSTWO DZIECKA MOŻE BYĆ ZAGROŻONE, JEŚLI ZALECENIA NINIEJSZEJ INSTRUKCJI NIE BĘDA STOSOWANE.
UWAGA!!!

5 INSTALACJA FOTELIKA W GRUPIE I (9-18 kg)
2 SAFETY INSTRUCTIONS
THE INSTRUCTIONS BELOW ARE IMPORTANT.
PLEASE READ THESE INSTRUCTION CAREFULLY AND KEEP IT FOR FUTURE REFERENCE. THE SAFETY OF YOUR CHILD MAY BE IN DANGER IF THESE INSTRUCTIONS WILL NOT BE COMPLIED WITH.
WARNING!
Only suitable for use in vehicles fitted with approved 3-point safety belts that conform with ECE Regulation No. 16 or comparable standards.
This is a seat in the Weight Class I, II, III for babies weighing from 9 to 36 kg.
These Assembly and Usage Instructions must be given to the client.
Subject to printing errors, mistakes and technical changes.
WARNING! For the safety of the person installing the car seat:
- While installing or uninstalling the seat no object may be able to slide between the car seat and the child seat base. It could trap the person's fingers.
- In ordered to avoid damage, take care not to jam the seat between solid elements of the car (doors, seat guides etc.).
- Store the car seat in a safe place when not in use. Avoid putting heavy objects on the seat and do not store near heat sources or in direct sunlight.
WARNING! For the safety of the car:
- Some car seat covers are made of delicate fabrics (velour, leather etc.) and may become worn-out due to the child seat use. In order to protect the upholstery, we recommend using car seat covers available as accessories.
DANGER! For the safety of your child:
- Please use the Caretero Vivo Fresh car seat only to secure your child in the car.
- This car seat must be installed forward-facing only for the I, II, III (9-36kg) weight groups with use of 3-point car seat belts
- This car seat should be used with the integrated 5-point seat belts for weight group from 9 to 18kg (approx. from 9 months up to about 4 years).
- Do not place the car seat on a passenger seat with active air bag.
- Check if the car seat is installed properly before each trip.
- The rear passenger seats are the safest place to install the car seat.
- Please make sure that all the elements are properly installed and that the car seat is not jammed by foldable seats or doors.
- This car seat may not be used if the seat belts securing the child have not been properly engaged.
- Do not use or transport the car seat when it is not properly installed in the car.
- Do not use other fixing points other than those described in this manual and marked on the car seat itself.
- The shoulder belt pads are important in keeping the child safe. Please use them at all times.
- Regularly check the seat belts, especially the fixing points, stitchings and adjustment devices.
- In urgent cases it is necessary to unfasten the child quickly. This means the 5-point seat belt buckle is not very resistant to tinkering by your child. Please teach the baby not to play with the belt buckle.
- Do not use the car seat if any parts of it have been damaged or became loose during an accident.
- It is important to ensure that all lap belts are running low enough, to keep the child's pelvis secure.
- Please take special notice that all the belts securing the child car seats are tightened, that the child seat belts are adjusted to the child's body and are not twisted.
- Stiff points and plastic elements must be placed and fixed in such manner, as not to be jammed by moving car seats or doors during everyday use of the car seat.
- Do not modify the car seat's construction in any way or install additional elements to it without the permission of appropriate authorities.
- After installing the seat and securing the child, make sure that the car seat belt buckle is located properly, which guarantees safe fixing of the seat. The belt buckle should not be placed directly near the shell of the seat or in any openings of the seat shell. If such situation happens, try a different fixing place in the car or shorten the buckle belt by twisting it.
- The car seat may not be used without the fabric cover. The cover may not be replaced with a different one, which is not recommended by the manufacturer, as the cover is an integral part of the seat.
-
It is not recommended to use the seat for a longer period of time than 5 years since the production date, as the physical properties of the product may deteriorate (eg. plastic aging).
-
It is forbidden to use the car seat as a chair or a toy.
- During a car crash at speed higher than 10km / h the car seat may become damaged without clear visual marks. In such case the car seat should be scrapped and replaced with a new one.
- Please remember to recycle the seat properly when it won't be used anymore.
- Commission a full check of the car seat after a possible damaging (eg. when the seat falls to the ground).
- Regularly check all vital elements of the car seat for signs of damage. Make sure all mechanical parts of the seat are functioning properly.
- It is forbidden to lubricate any parts of the seat.
- Never leave the child in the car seat unattended.
- Make sure that the child enters and exits the car on the sidewalk side of the street.
- Protect the car seat against sunlight while it's not in use.
- The car seat may become very hot while under direct sunlight. The child's skin is very delicate and may become easily damaged during contact with a hot car seat.
- The closer the car seat belts are to the child's body, the higher the safety level. Therefore do not put thick clothes on the child.
- Make regular stops during longer trips, so the child may play and rest after removing it from the car seat.
- When using the car seat in the rear passenger seats: slide the front passenger seat to the front, so the child will not reach the backrest with its feet (this will prevent from damaging the legs during an accident).
- Not complying with these instruction may cause danger.
DANGER! For the safety of car passengers.
In case of an accident or emergency braking, persons or objects that are not secured properly, may damage other users of the car. Therefore it is important to ensure the following:
- The backrests of the seats are fixed (make sure the foldable rear seat backrests have been locked properly).
- All heavy objects or objects with sharp edges have been secured (eg. objects on the rear window shelf are not loose).
- All persons in the car have fastened their seat belts.
- The child seat is always secured, even when there is no child in the seat.
3 GENERAL INFORMATION
This car seat has been designed, tested and certified according to the European Norm for baby car seats (ECE R 44/04). The evaluation mark E (in a circle) and the certificate number are located on an orange sticker placed on the seat shell.
DANGER!
In case of any modifications done to the car seat, the warranty will become void.
Only the manufacturer may apply any changes to the car seat.
DANGER!
Please comply with safety regulations present in your car manual.
4 ADVICE ON PROPER CHILD SEAT PLACEMENT IN YOUR CAR

Proper placement

Forbidden placement
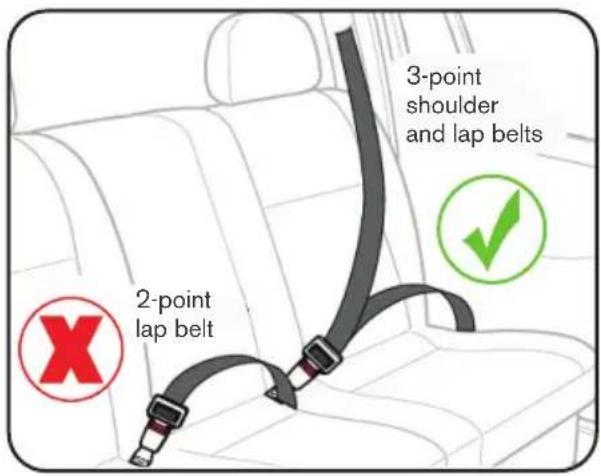
A car seat of this type may be used only in a car equipped with seat belts with a 3-point tensor and a 3-point rolling-up element, which complies with the UN/ECE Regulation nr 16 or other equivalent standards.
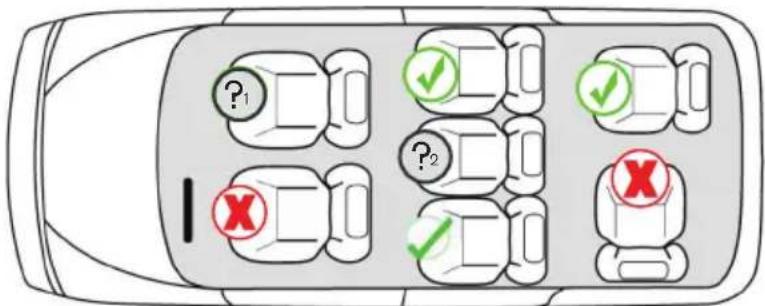

Installation of the child seat is NOT RECOMMENDED if the passenger seat airbag is active.

Installation of the child seat is FORBIDDEN if the passenger seat is equipped with a 2-point seat belt only.
5 INSTALLATION OF THE SEAT IN GROUP I (9-18 kg)
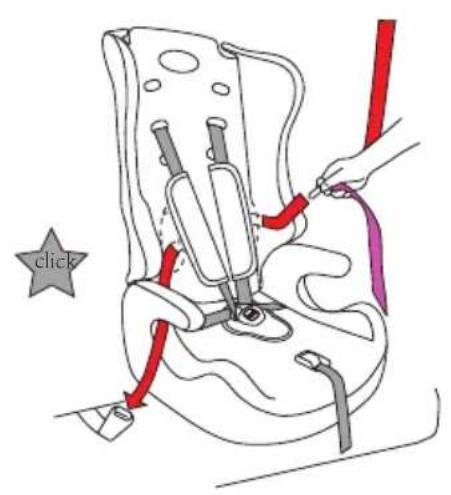
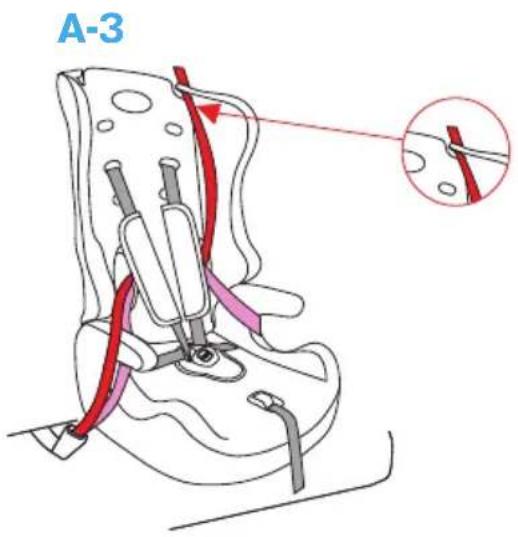
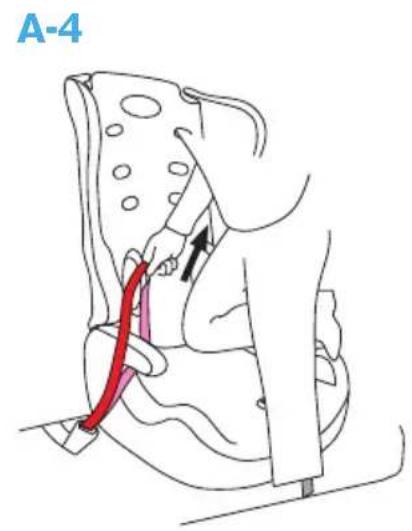
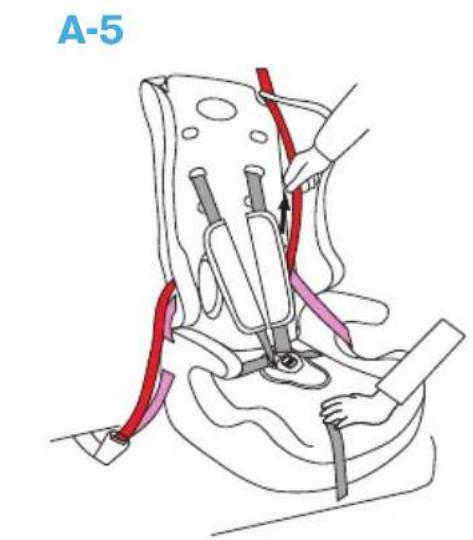
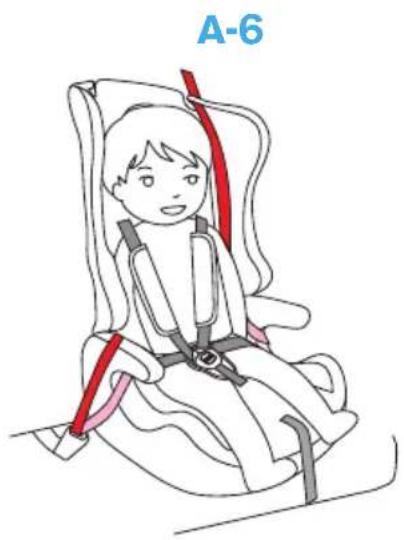
Place the car seat on a forward-facing car seat in a seat equipped with a 3-point car seat belt. Push the car seat against the backrest of the car (A-1). Pass the car belt through the seat belt guides, inserting it from the front, passing it behind the seat backrest. Clip the car belt into the buckle located in the sofa (A-2). Make sure the straps are not tangled. The belts should go through the guides as indicated in the figure (A-3), the chest belt should be hooked to the guides in the headrest, the lap belt should be hooked to the seat guides. Kneeling on the seat, tighten the belt to make sure the seat is securely fastened (A-4). Make sure that the belt is not slack in any of the splices (A-5). Put the child in the seat and fasten the 5-point seat belts (A-6). Make sure that the car seat is snug against the backrest of the car seat and that the belts are properly tightened and not twisted.
6 INSTALLATION OF THE SEAT IN GROUP II (15-25 kg)
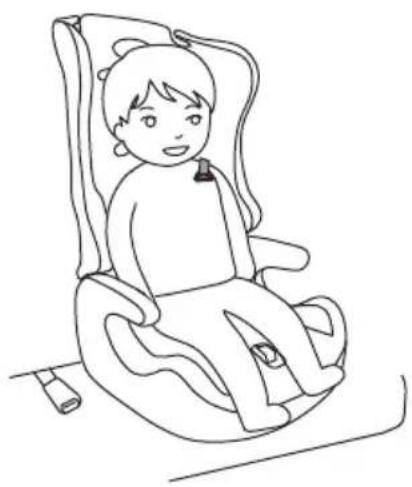
To install the seat in group II, remove the 5-point belts from the seat - the instructions for loosening the belts are shown in chapter 10, points F-1 to F-3. The additional belt guide must be fitted, see chapter 11, points G-1 to G-8. Place the car seat on a forward-facing car seat in a seat equipped with a 3-point car seat belt. Push the seat against the backrest of the car, make sure that the belt guide is threaded from the back through one of the highest holes for the 5-point belts in the backrest (B-1). Place the child in the seat (B-2). Secure the child with the 3-point car seat belt as shown in the figure (B-3). Thread the belt through the previously installed guide as shown in the figure (B-4). Tighten the belt so that it is tight (B-5). Make sure that the car seat is snug against the backrest of the car seat and that the belts are properly tightened and not twisted.
7 INSTALLATION OF THE SEAT IN GROUP III (22-36 kg)
To install the seat in group III, remove the 5-point belts from the seat - the instructions for loosening the belts are shown in chapter 10, points F-1 to F-3. The seat backrest must be removed, instructions are shown in chapter 13, I-1 to I-3. The additional belt guide must be fitted, see chapter 11, points G-1 to G-8.
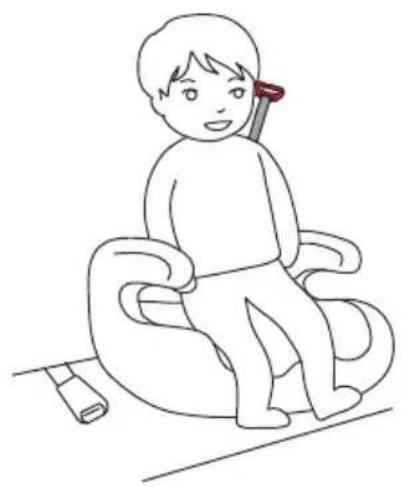
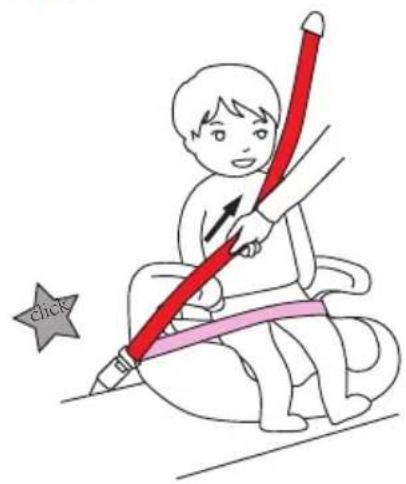
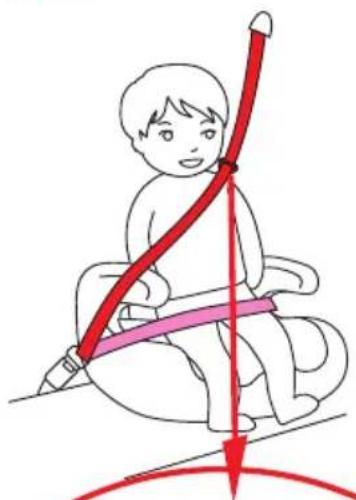
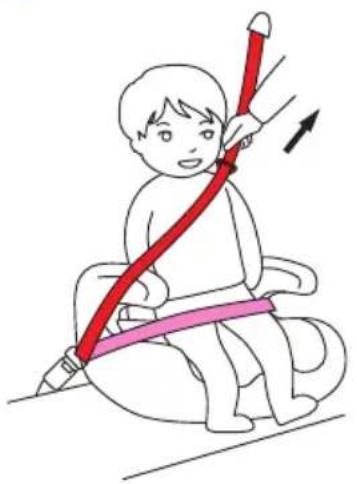
Place the seat of the car seat on the seat of the car equipped with 3-point belts (C-1).. Place the child in the seat (C-2). Fasten the child with the 3-point car belts, threading the belt through the guides as shown in the figure (C-3). Thread the belt through the guide behind the child's back as shown in the picture (C-4). Tighten the belt so that it is tight (C-5). Make sure that the car seat is snug against the backrest of the car seat and that the belts are properly tightened and not twisted.
8 ADJUSTING THE 5-POINT HARNESS HEIGHT
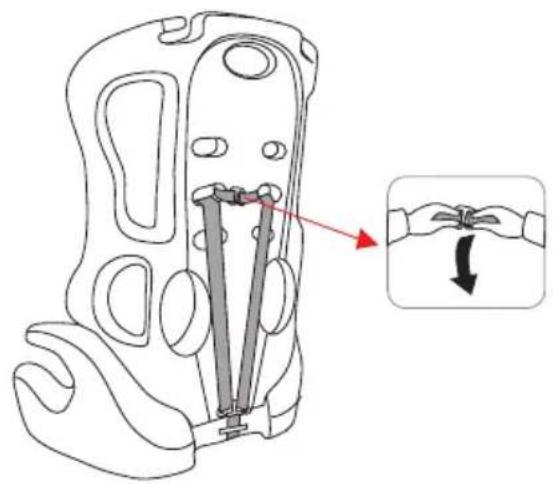
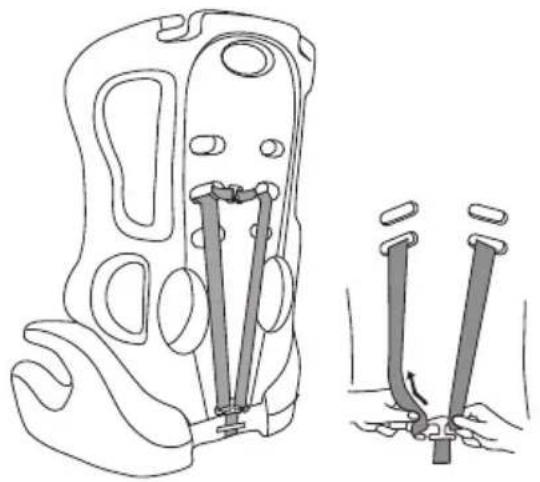
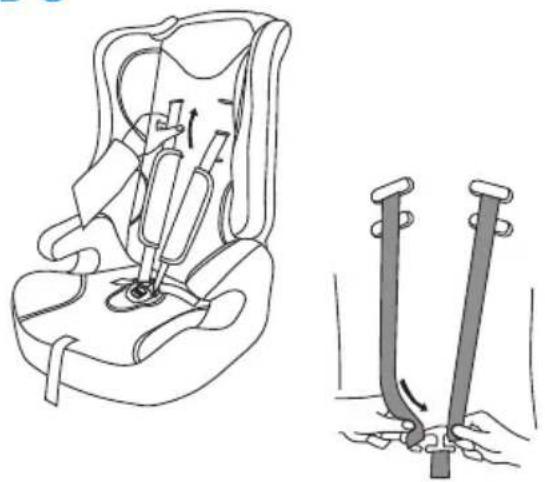
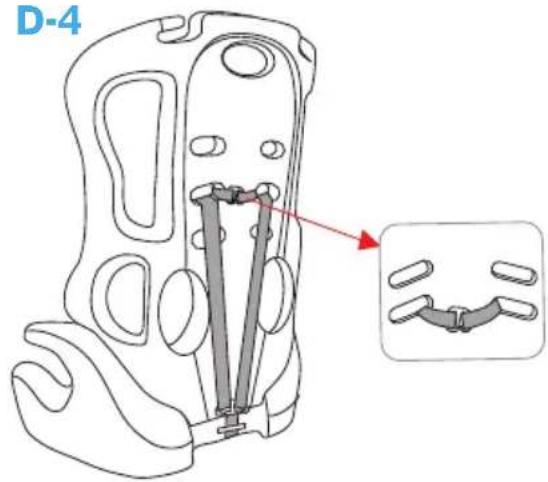
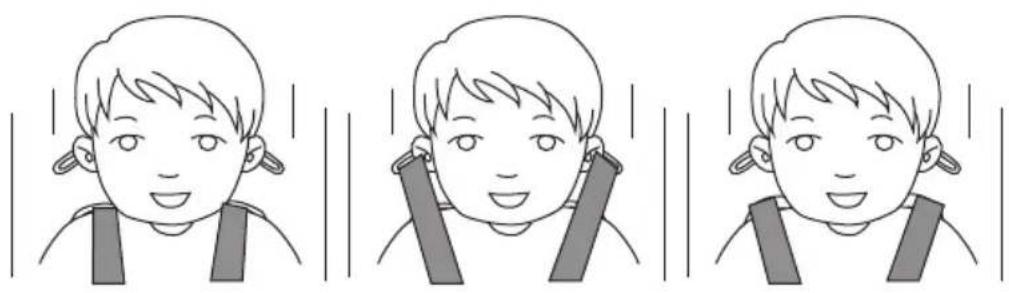
Loosen the shoulder straps by pressing the button on the front of the seat and pulling both shoulder straps at the same time. Turn the seat over, disconnect the connector of the chest straps (D-1). Remove the straps from the connector at the bottom of the seat (D-2). Remove the belts by pulling them at the front of the backrest. Thread the straps through the holes that match the height of the child's shoulders (D-3). Insert the straps into the connector at the bottom of the base at the back of the seat and then connect them with the connector on the chest strap (D-4). Tighten the straps using the strap protruding from the front of the seat base.
Adjusting the height of the belts is an important element of a safe journey in the car seat.
D-5 too low
D-6 too high
D-7 correct
9 ADJUSTING THE 5-POINT HARNESS LENGTH
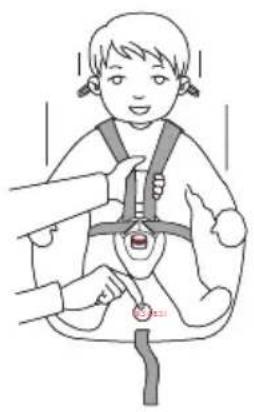
Loosen the shoulder straps by pressing the button on the front of the seat and pulling both shoulder straps at the same time (E-1). To tighten the straps, pull the tension strap (E-2).
10 REMOVING THE 5-POINT BELTS
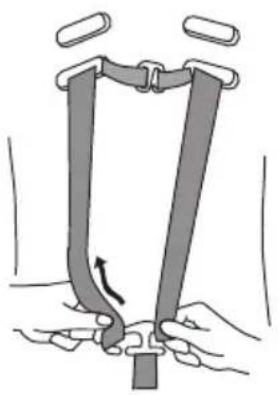
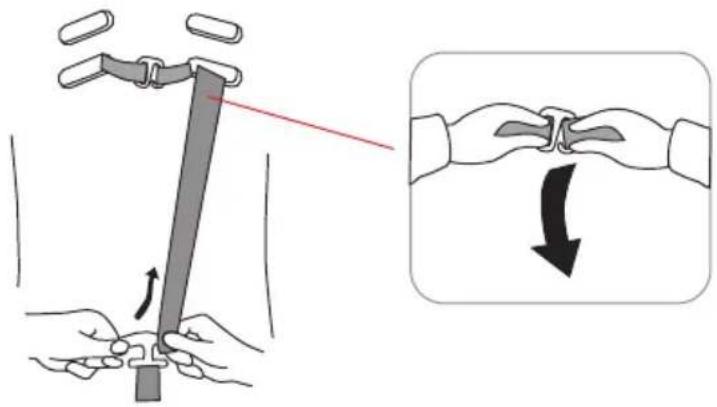
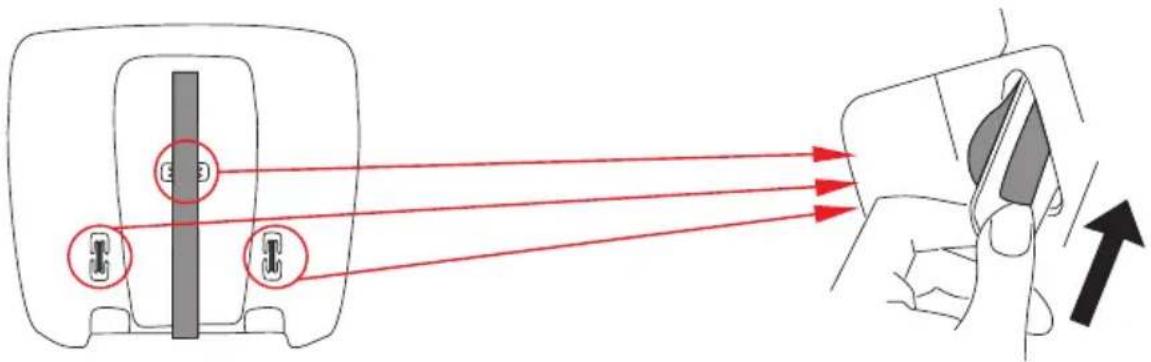
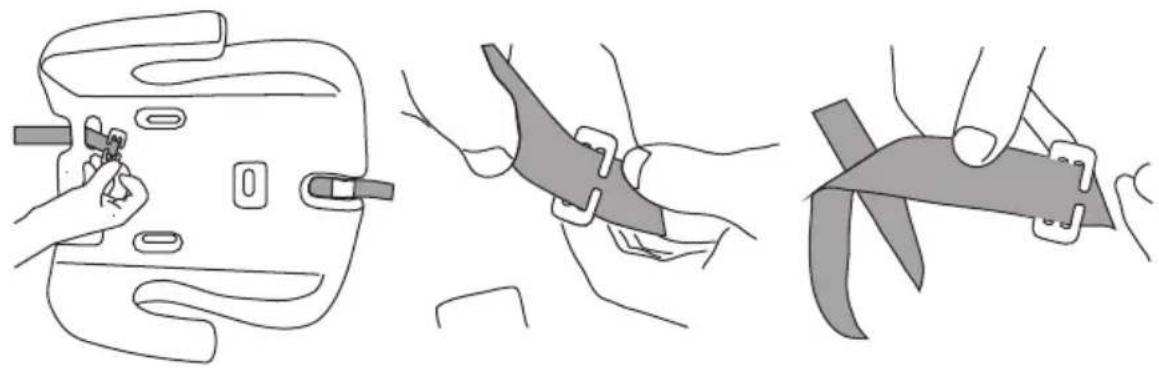
Loosen the shoulder straps by pressing the button on the front of the seat and pulling both shoulder straps at the same time. Turn the seat over, disconnect the connector of the chest straps (F-1). Remove the straps from the connector at the bottom of the seatRemove the belts by pulling them at the front of the backrest. Turn the seat so that you can see its base. Turn the 3 clips at the ends of the straps in your fingers, thread them through the holes from which the straps protrude and pull them out from the top of the seat (F-3). To reinstall the belts, perform all the steps in reverse order.
11 ASSEMBLY OF THE BELT GUIDE (15-36 KG)
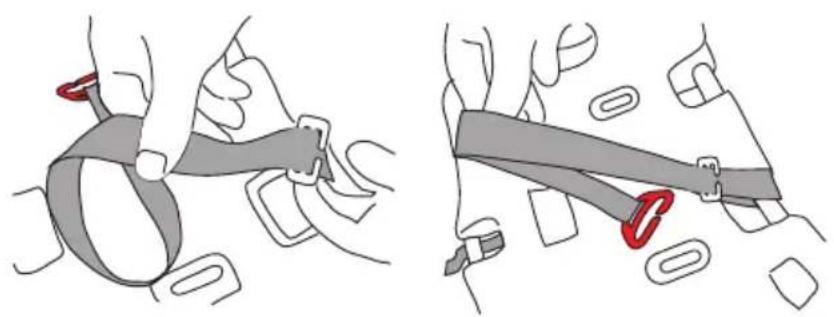
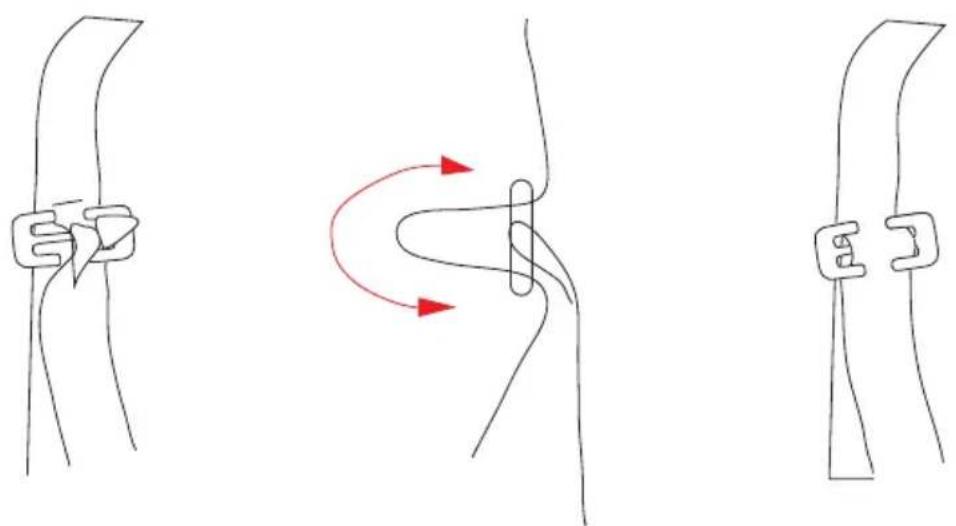
Thread one part of the belt with the guide through the hole in the upper part of the seat base (G-1). Slide the other part of the belt into the buckle on the belt (G-2 to G-5). Guidelines for connecting the belt to the buckle explained in figures G-6 to G-8.
12 FASTENING THE 5-POINT HARNESS
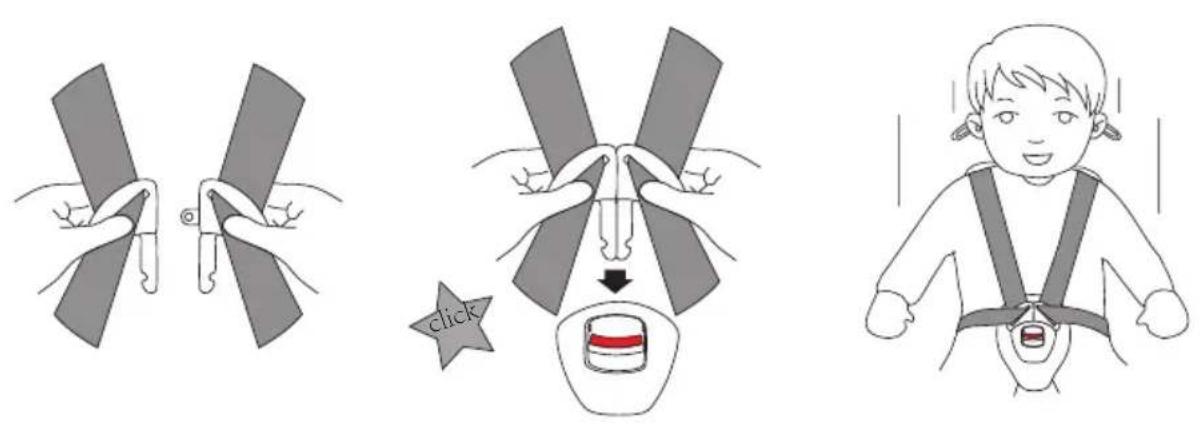
Connect the parts of the buckle on the shoulder straps (H-1). Clip both parts into the buckle located on the hip belt of the seat (H-2). Make sure the belts are tight (H-3).
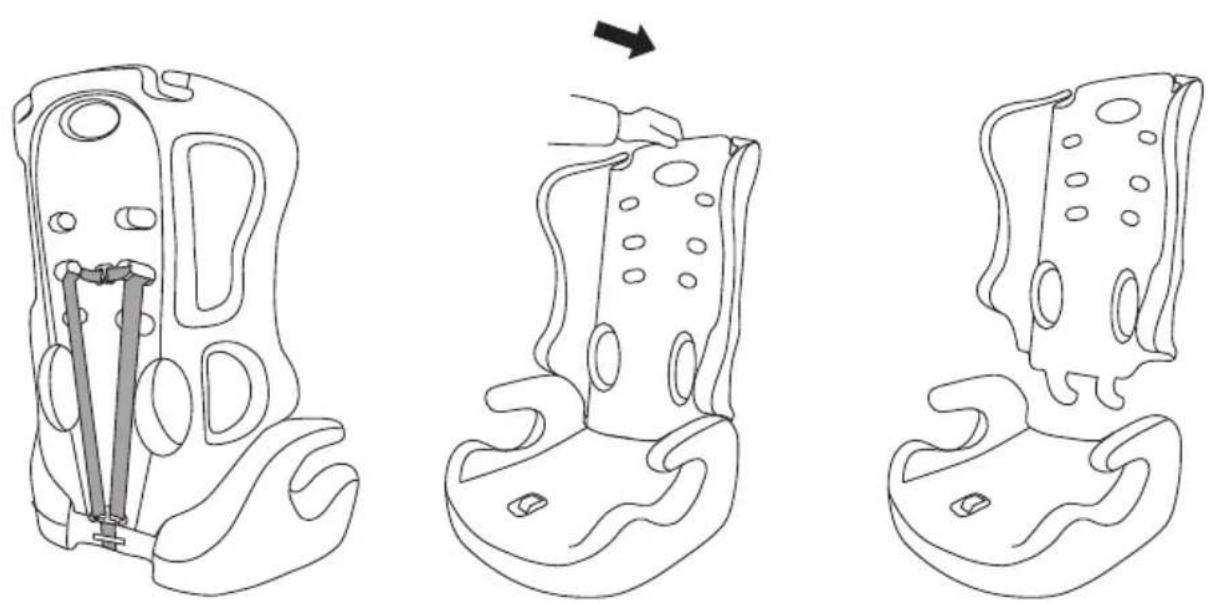
13 REMOVING THE BACKREST
Remove the 5-point harness (I-1) from the seat. Grasp the backrest with one hand and the seat (I-2) with the other. Tilt the seat back so that it disengages from the seat (I-3).
14 CLEANING AND MAINTENANCE
Proper functioning of the 5-point belt buckle has a great impact on the safety of your child. The most common cause of buckle malfunctioning is dust and dirt getting into the buckle slot. This gives the following signs:
- the belt tongue exits the buckle slot very slowly after the red button is pressed
- the belt tongue does not fix in the buckle (it slides back out)
- the belt tongue can be fastened but no ‘click’ sound can be heard
- it is necessary to put much force into closing the buckle
- it is necessary to put much force into pressing the button and releasing the tongue from the buckle
If any of the problems mentioned above occur, it is required to clean the belt buckle:
- Unfasten the belts (press the red button on the buckle).
- Remove the crotch pad.
- Adjust the seat tilt into the most reclining position.
- Thread the metal plate fixing the buckle strap through the slot in the seat shell (from the bottom upwards).
- Put the belt buckle into warm water with addition of few drops of dishwashing liquid for at least an hour.
Rinse the buckle with clean water and leave it until it is completely dry.
Remember to ONLY use the original upholstery for the Caretero Vivo Fresh seat, as it is an integral part of the seat and plays an important role in its proper functioning.
The upholstery may be removed for washing (hand wash or machine wash - delicate fabrics programme, max 30°C).
Do not tumble dry. Use only mild detergents.
Plastic parts of the seat may be cleaned with a damp cloth with addition of soap.
Never use strong detergenst such as bleaches etc.
Never iron the upholstery.

Learn more about brand Caretero.
Scan the code QR.
DISTRIBUTOR:
IKS 2 - Children's Goods Distribution Centre
9 Rybnicka Street, 43-190 Mikolow, Poland
+48 32 226 06 06
e-mail: caretero@caretero.pl, www.caretero.pl
IKS 2 - Children's Goods Distribution Centre
9 Rybnicka Str., 43-190 Mikolow, Polen
+48 32 226 06 06
e-mail: caretero@caretero.pl, www.caretero.pl

- Vivo Fresh
- WSKAZÓWKI BEZPIECZEŃSTWA
- PONIŻSZE INSTRUKCJE OBSŁUGI SĄ WAŻNE.
- UWAGA!!!
- INSTALACJA FOTELIKA W GRUPIE I (9-18 kg)
- SAFETY INSTRUCTIONS
- THE INSTRUCTIONS BELOW ARE IMPORTANT.
- WARNING!
- DANGER! For the safety of car passengers.
- GENERAL INFORMATION
- DANGER!
- ADVICE ON PROPER CHILD SEAT PLACEMENT IN YOUR CAR
- INSTALLATION OF THE SEAT IN GROUP I (9-18 kg)
- INSTALLATION OF THE SEAT IN GROUP II (15-25 kg)
- INSTALLATION OF THE SEAT IN GROUP III (22-36 kg)
- ADJUSTING THE 5-POINT HARNESS HEIGHT
- ADJUSTING THE 5-POINT HARNESS LENGTH
- REMOVING THE 5-POINT BELTS
- ASSEMBLY OF THE BELT GUIDE (15-36 KG)
- FASTENING THE 5-POINT HARNESS
- REMOVING THE BACKREST
- CLEANING AND MAINTENANCE
- DISTRIBUTOR:
Brand : Caretero
Model : Vivo Fresh
Category : Car seat