
OSI Lamistar A3 - Laminator Opus - Free user manual and instructions
Find the device manual for free OSI Lamistar A3 Opus in PDF.


| Product Type | A3 Laminator |
| Brand | Opus |
| Model | OSI Lamistar A3 |
| Heating System | 2 heated rollers |
| Preheating Time | 3-4 minutes |
| Recommended Pouch Thickness | 75 - 125 microns |
| Maximum Lamination Thickness | 0.5 mm (document + pouch) |
| Laminating Width | 330 mm |
| Laminating Speed | 290 mm/min |
| Power Supply | AC 220-240 V, 50-60 Hz |
| Power Consumption | 260 W |
| Rated Current | 1.2 A |
| Dimensions (H x W x D) | 57 x 450 x 112 mm |
| Net Weight | 0.9 kg |
| Gross Weight | 1.07 kg |
| Anti-block System | Lever to separate rollers |
| Readiness Indicator | Red (heating) / Green (ready) |
| Temperature Settings | Position I (75 µm) / Position II (100-125 µm) |
| Operation Type | Hot lamination only |
| Safety Features | Overheat protection; do not operate with wet hands; keep away from flammables |
| Maintenance | Clean with damp cloth; run thick paper through to remove glue residues |
| Repairs | Only authorized personnel; do not open cover |
| Recommended Accessories | Use OPUS pouches only |
| Fuse Rating | Replace with fuse of same rating (not specified) |
| Disposal | Do not dispose with household waste; recycle as WEEE |
Frequently Asked Questions - OSI Lamistar A3 Opus
User questions about OSI Lamistar A3 Opus
0 question about this device. Answer the ones you know or ask your own.
Ask a new question about this device
Download the instructions for your Laminator in PDF format for free! Find your manual OSI Lamistar A3 - Opus and take your electronic device back in hand. On this page are published all the documents necessary for the use of your device. OSI Lamistar A3 by Opus.
USER MANUAL OSI Lamistar A3 Opus
5 KONSERWACJA I NAPRAWA LAMINATORA:
1 HEALTH & SAFETY PRECAUTIONS:
- Before operating the equipment please read the Health & Safety precautions, manufacturer's recommendations and the operation manual.
- The operation manual should be easily available at any time for the operator.
- The equipment should be installed on a sturdy level surface near a AC 220-240 V 50-60 Hz, correctly earth socket.
-
The equipment:
-
Should be protected against dust and moisture.
- Must not be operated with wet hands. Risk of electric shock.
- Must not be placed near a heating or ventilation unit.
- Should not be used in vicinity of inflammable liquids or gases.
- The power supply cable must be protected against damage.
Must not be used to pull or move the equipment or to remove the plug from the socket. Do not place heavy objects on the power supply cable.
Risk of electric shock or fire.
- During long standstill or moving the equipment and to ensure that it is turned off completely, remove the plug from the mains socket.
- Should be kept away and out of the reach from children and animals.
- Must not be used for any other purposes, than those indicated in the instruction manual.
- The equipment must not be located outside, should be operated in room temperature higher than +8°C.
Danger!
- The equipment contains electrically driven rollers. Ensure long hair, loose jewellery, ties and other loose clothing are kept away from the entry slot they could get entangled in the rollers.
- It is necessary to check and supervise, if the equipment is operated and used correctly, if there should be a malfunction, you must contact the dealer or service team.
- The equipment must not be located outside and should be operated in a room temperature higher than +8^ .
- Before removing any covers from the equipment, remove the power plug from a mains socket.
- Using inappropriate lubricants such as petroleum based cleaning materials, can cause a fire hazard.
- Only authorized and qualified staff may carry out any repairs during the Guarantee/Warranty period.
- The equipment must be operated in accordance with the general Health & Safety rules.
- Do not leave the equipment operating without an operator.
- After use turn the equipment off by the switch on unit, next remove the plug from the socket if not in regular use.
• Always remove the plug from the socket before moving the equipment.
WARNING! The equipment contains heating elements, be aware of high temperatures! !! BURN HAZARD !!
WARNING! The rollers start turning when you switch on the laminator and run until you switch off.
2 MANUFACTURER'S RECOMMENDATIONS:
- Use only recommended supplies and accessories from OPUS (see www.opus.pl)
- If the equipment is switched on and is not operated for more than one hour, it could get overheated in such an instance, to avoid bad quality laminating put 1 or 2 sheet of A4 paper through in order to cool the rollers down.
• Always insert the pouch with the closed end, first into the laminator. Putting the open end first can cause bubbling and the film may rap and get stuck round the rollers inside the laminator. - Should a document with pouch get stuck inside the laminator first use the anti-block system lever (6) the top of the unit, which separates the roller so you can pull the pouch plus document out. If unsuccessfully call your Dealer or the service team.
- When cutting shapes from the pouch it can make the rollers sticky and dirty from the glue which can cause the pouch to wind round the rollers, you must use a carrier. ASK YOUR DEALER FOR INFORMATION.
- Remove any sharp or metal elements from the document like (staples & paper clips, etc.) before laminating.
WARNING!
Not compliance with the rules and recommendations above can void the Guarantee/Warranty
3 LAYOUT:
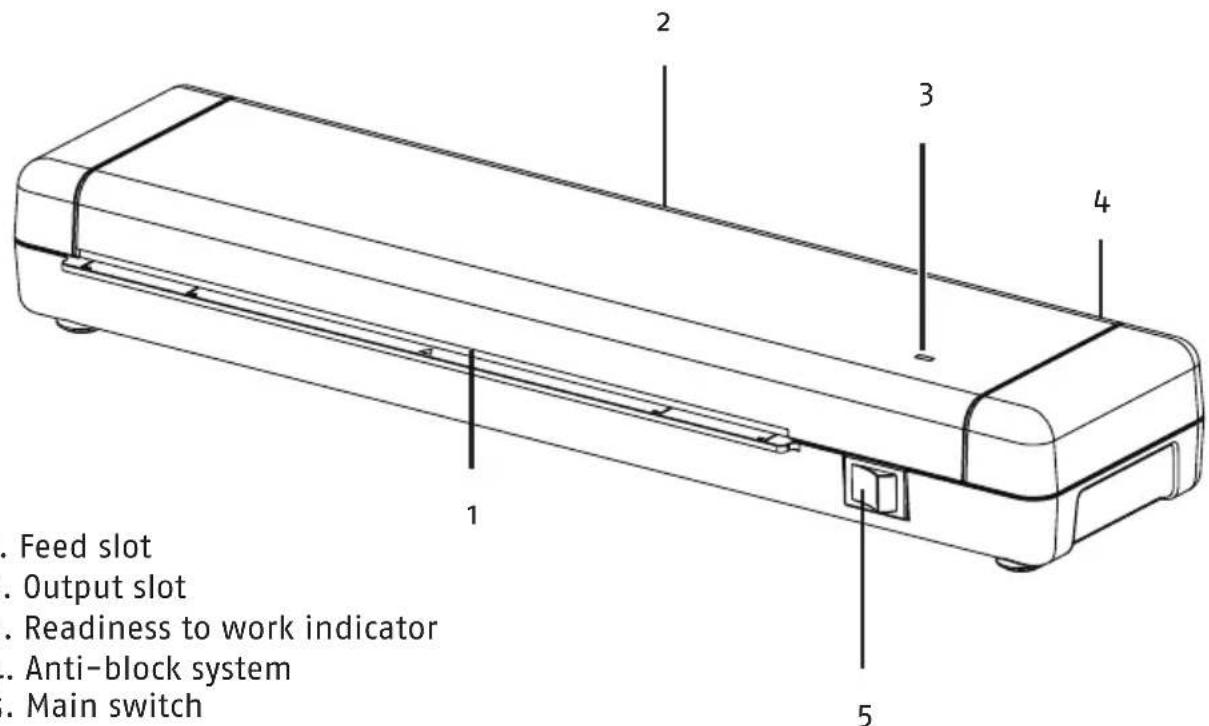
- Feed slot
- Output slot
- Readiness to work indicator
- Anti-block system
- Main switch
4 OPERATION:
-
Preparation before laminating
-
Choose the correct thickness and type of pouch.
-
Put the document into the pouch insuring it is even and fits in the pouch with 2 mm free round the edges to ensure the pouch is sealed.
-
Hot lamination
-
Plug in the power socket.
- Set the main switch to the position "I" for 75 µm pouch or to the position "II" for 100–125 µm pouch.
- The Readiness to work indicator (3) lights up red. This means that the equipment is heating up and the temperature is not yet appropriate to start lamination. When the equipment reaches the set temperature, the indicator (3) lights up green and lamination can begin.
- Insert the pouch and document, sealed edge first into the feed slot. The pouch will be pulled through and laminated.
NOTE! Sealed edge first always!
- Pouch with document is pulled through the inside of the laminator and exits at the back. Wait 2–3 seconds → your document is ready!
- If the laminator jams, switch the anti-block system button (4) to the left and carefully remove the jammed pouch.
- After lamination, set the main switch to the "o" position.
5 MAINTENANCE AND SERVICE:
• To remove glue residues that may have a negative impact on the lamination process, insert thicker paper into the feed slot, which will remove the glue residues as it passes through the laminator. The operation should be repeated several times.
- Before cleaning the equipment always remove the plug from the mains socket. The device should be cleaned with a slightly damp cloth, do not use gasoline, alcohol or solvents. To clean rubber rollers, do not use metal elements, including a metal brush, which may damage the surface of the rollers.
- If the laminator will not be used for a long time, cover it to prevent dust from entering the device.
- If a fuse needs to be replaced, use a fuse with the same rating.
| Malfunction Cause Remedy | ||
| Laminating pouch stuck inside the laminator. | Too high laminating temperature.The laminating pouch was inserted into the opening with the wrong end.Maximum laminating thickness exceeded. | Pull the laminated document out of the feed opening. If it is not possible, contact the dealer or service team. Do not take the cover out of the laminator! |
| The Readiness to work indicator is off | Main switch is in the "o" position or Major break-down. | Make sure the equipment is connected to the power supply and turn the main switch to the position "1" or "2". If this does not solve the prob lem, contact the dealer or the service team. |
In case of any other problems switch off the equipment, remove the plug from a socket and contact the Dealer or service team.
6 TECHNICAL DATA:
Heating system:....2 rollers
Preheating time: 3 - 4 minute
Recommended pouch / foil thickness:....75 - 125 microns
Maximum foil thickness:....0.5 mm*
Laminating width: 330 mm
Laminating speed: 290 mm per minute
Power voltage:AC 220-240 V 50-60 Hz
Power load: 260 W
Rated current:....1.2 Amps
Dimensions:....H 57 x W 450 x D 112 mm
Net weight: 0.9 kg
Gross weight: 1.07 kg
* Document and foil/pouch
Equipment and products marked with this symbol cannot be deposed together with normal or municipal waste. The user is required to take their used product to a collection point for recycling of waste electrical and electronic equipment. Proper segregation of used equipment reduces the negative impact of hazardous substances that may be in there, in to the environment which could impact, human and wild life health. For more detailed information concerning the disposal of used equipment, please contact your local authority, waste disposal service or the point of sale where you purchased the product. By ensuring proper disposal of equipment we are helping to protect the environment, humanity and wild life health.

8.04.24
OPUS Sp. z o.o. ● ul. Toruńska 8 ● 44 – 122 Gliwice ● Poland ● www.opus.pl

Brand : Opus
Model : OSI Lamistar A3
Category : Laminator