FCGS61129H - Cooker Hansa - Free user manual and instructions
Find the device manual for free FCGS61129H Hansa in PDF.


| Type | Gas Cooker |
| Brand | Hansa |
| Model | FCGS61129H |
| Dimensions (H x W x D) | 85 x 60 x 60 cm |
| Power Supply | 230V 1N~50 Hz |
| Gas Type (Factory Setting) | Natural gas G20 20 mbar |
| Convertible Gas Type | LPG G30 3B/P 37 mbar |
| Number of Gas Burners | 4 |
| Burner Configuration | 1 Large, 2 Medium, 1 Auxiliary |
| Oven Type | Gas oven with thermostat |
| Oven Functions | Baking, roasting, grilling (with electric grill*), rotisserie* |
| Oven Timer | Mechanical minute timer (0-60 min) and programmable timer with auto shut-off (0-120 min) |
| Oven Light | Halogen bulb 25W G9 |
| Safety Features | Flame failure safety device on all burners, overturning prevention bracket |
| Ignition | Knob ignition or push-button ignition (depending on model) |
| Door Type | Removable oven door with removable inner glass panels |
| Included Accessories | Baking tray, grill rack, frying tray, spit with forks* |
| Cleaning | Enamel oven chamber, removable telescopic runners* |
| Height Adjustment | Adjustable feet (+/- 5 mm) |
| Energy Saving Tips | Use proper pans, cover, match pan size, utilize residual heat |
Frequently Asked Questions - FCGS61129H Hansa
User questions about FCGS61129H Hansa
0 question about this device. Answer the ones you know or ask your own.
Ask a new question about this device
Download the instructions for your Cooker in PDF format for free! Find your manual FCGS61129H - Hansa and take your electronic device back in hand. On this page are published all the documents necessary for the use of your device. FCGS61129H by Hansa.
USER MANUAL FCGS61129H Hansa
natural_image
Line drawing of a standard open oven with four stoves and four panes (no text or symbols)KASUTUSJUHEND / GAASIPLIIT E T
LIETOŠANAS INSTRUKCIJA / GĀZES PLĪTS LV
INSTRUCTION MANUAL EN
RU
RO
BG
SR
1a
natural_image
Simple line drawing of a square frame with a circular label containing the number 3a (no text or symbols on the frame itself)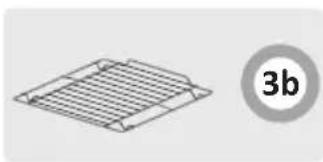
natural_image
Isometric view of a grid-like structure with a circular badge labeled '3b' (no text or symbols on the diagram itself)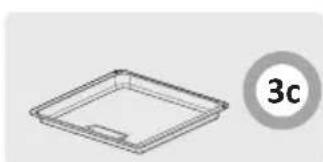
natural_image
Simple line drawing of a rectangular tray with a small slot, labeled '3c' in a circle (no text or symbols on the tray itself)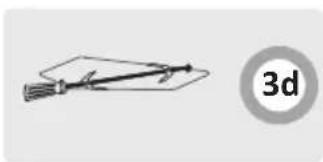
natural_image
Simple line drawing of a pen or tool with a 3D circle labeled '3d' (no text or symbols on the diagram itself)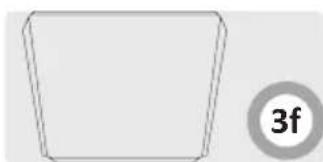
natural_image
Simple geometric shape resembling a trapezoid with a circular label containing '3f' (no text or symbols on the shape itself)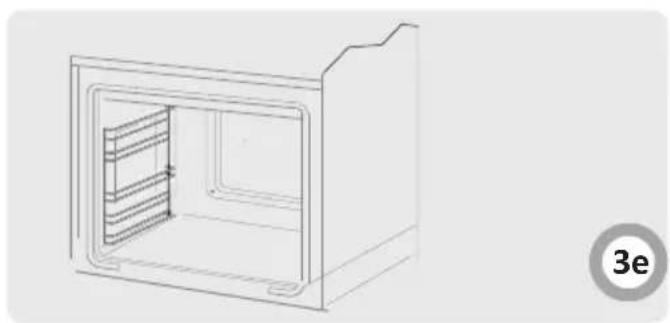
natural_image
Line drawing of a 3D cabinet or enclosure with internal compartments and mounting feet, no text or symbols present.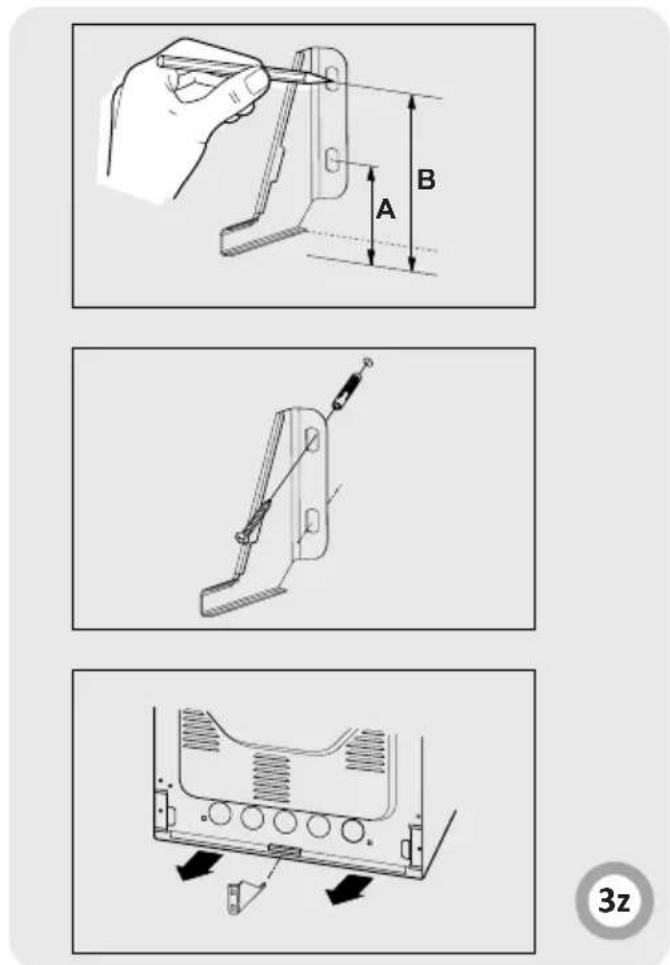
natural_image
Mechanical component diagrams showing two views of a gear mechanism with arrows indicating direction (no text or symbols)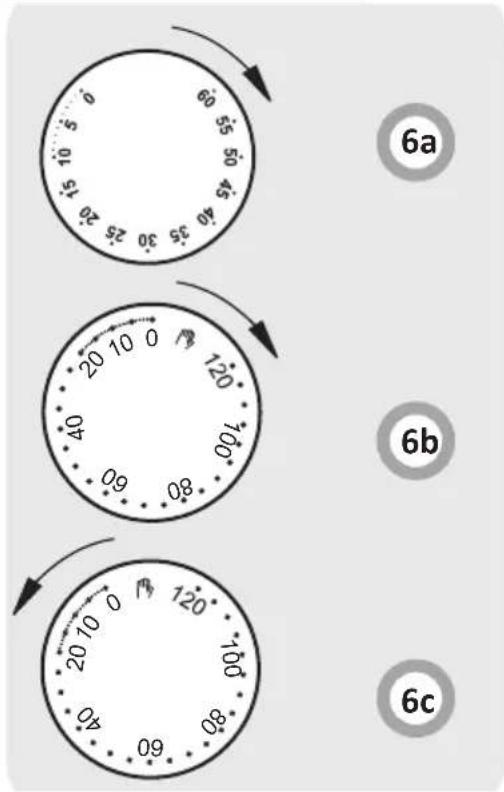
natural_image
Two identical cooking pots labeled a and b placed on a flat surface, with the other circled in blue (no text or symbols on pots)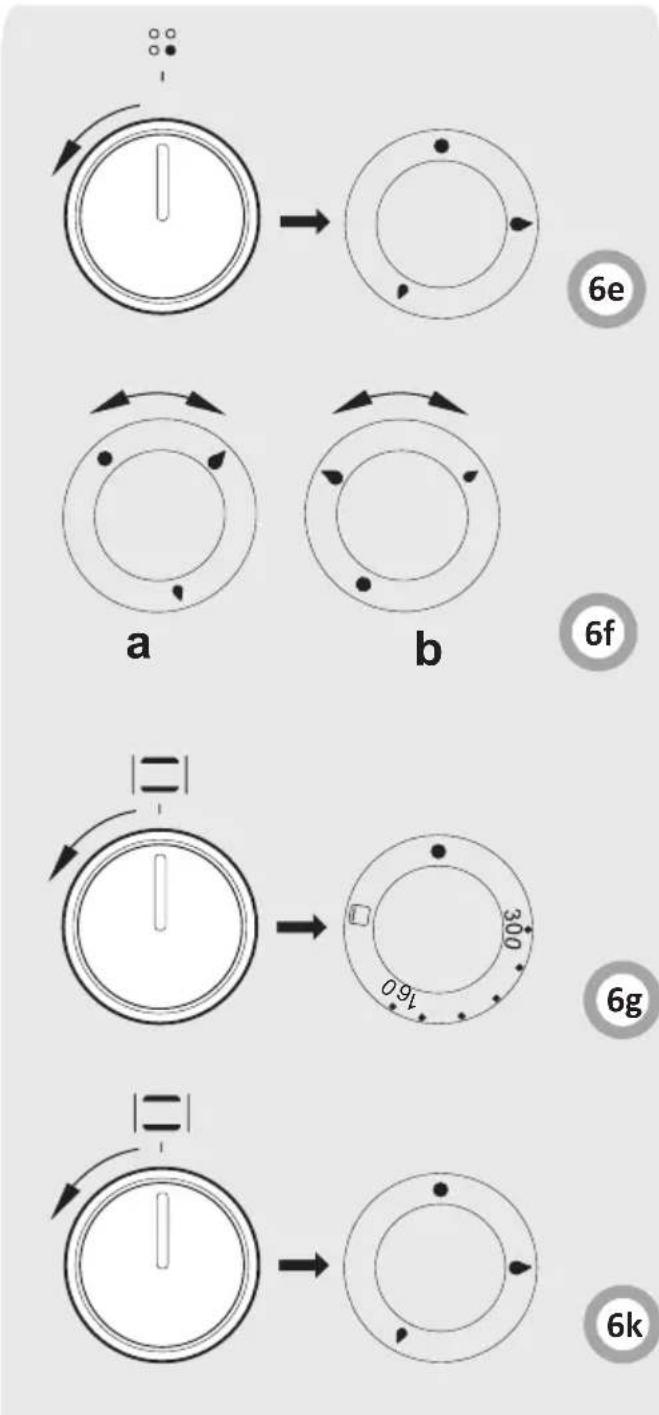
flowchart
graph TD
    A["Start"] --> B["Step a: Rotation of circular dial"]
    B --> C["Step b: Rotation of circular dial"]
    C --> D["Step c: Rotation of circular dial"]
    D --> E["Step d: Rotation of circular dial"]
    E --> F["Step e: Rotation of circular dial"]
    F --> G["Step f: Rotation of circular dial"]
    G --> H["Step g: Rotation of circular dial"]
    H --> I["Step k: Rotation of circular dial"]
natural_image
Technical line drawing of a rectangular electronic device casing with internal components and an arrow pointing to a component (no text or symbols present)9
natural_image
Technical line drawing of a rectangular electronic device casing with internal components and a small inset component (no text or symbols)9a
10
natural_image
Three diagrams showing mechanical assembly steps with arrows indicating motion (no text or symbols)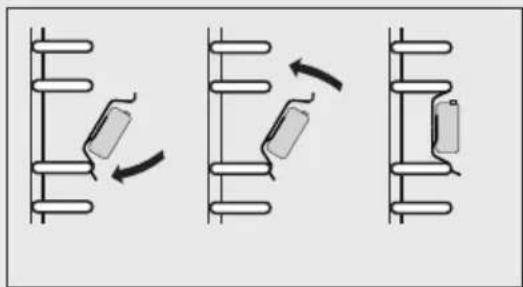
natural_image
Diagram showing three sequential mechanical or electrical assembly steps with no visible text or symbols10a
natural_image
Line drawing of a microwave oven with vent and airflow direction indicators (no text or symbols)10b
natural_image
Technical line drawing of a mechanical assembly with an inset showing a worker on a platform (no text or symbols)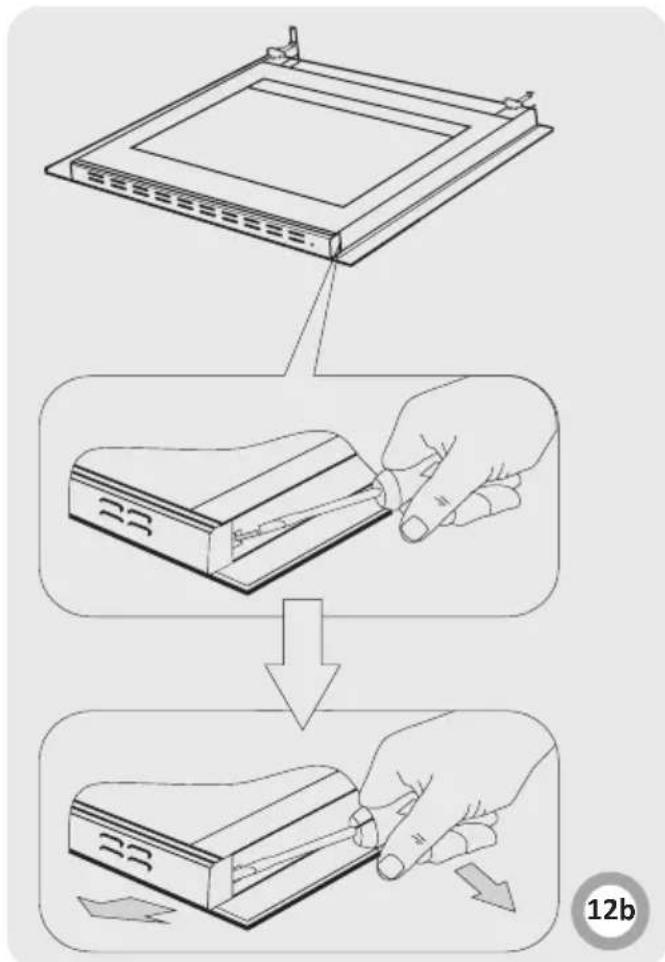
flowchart
graph TD
    A["Device Mount"] --> B["Assembly"]
    B --> C["Hand Tool Pulling to Cover Paper"]
    C --> D["Product Packaging"]
    D --> E["Arrow Down"]
    E --> F["Final Package"]
12d
natural_image
Technical diagram showing two views of a mechanical component with labeled parts (1 and 2), no readable text or symbols present.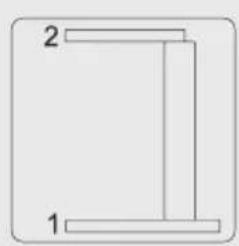
natural_image
Simple line drawing of a T-shaped structure with labeled parts 1 and 2 (no text or symbols beyond labels)12d1
RU
SAFETY INSTRUCTIONS 150
DESCRIPTION OF THE APPLIANCE
INSTALLATION
OPERATION
149
[Non-Text]
153
154
158
natural_image
Simple line drawing of a tree with cloud-like canopy and two horizontal lines below (no text or symbols)natural_image
Recycling symbol composed of three chasing arrows forming a triangle (no text or labels)natural_image
Simple black-and-white line drawing of a tree with cloud-like canopy and two wavy lines below (no text or symbols)natural_image
Recycling symbol composed of three chasing arrows forming a triangle (no text or labels)natural_image
Simple line drawing of a tree with cloud-like canopy and two wavy lines at base (no text or symbols)natural_image
Recycling symbol composed of three chasing arrows forming a triangle (no text or labels)natural_image
Simple line drawing of a tree with cloud-like canopy and two horizontal lines below (no text or symbols)natural_image
Recycling symbol composed of three chasing arrows forming a triangle (no text or labels)РАЗОПАКОВАНЕ
natural_image
Simple line drawing of a tree with two wavy lines at the base (no text or symbols)Svako ko pravilno upotrebljava energiju ne štedi samo novac, već i savesno učestvuje u očuvanju životne sredine. Stoga čuvajte el.energiju! Na ovaj način to možete učiniti:
- Koristite pravo posuđe za kuvanje.
Serpa' nikada ne sme biti manja une gorionika.
Imajte na umu da poklapate šerpe.
natural_image
Recycling symbol composed of three chasing arrows forming a triangle (no text or labels)OTPAKIVANJE
Uređaj je tokom transporta zaštićen od oštećenja ambalažom. Nakon otpakivanja, molimo da zaštitnu ambalažu odložite na način da ne predstavlja štetu za životnu sredinu.
Svi materijali koji su upotrebljeni za ambalažu su bezopasni za ži-
natural_image
Simple black-and-white line drawing of a tree with cloud-like canopy and two wavy lines at the base (no text or symbols)natural_image
Recycling symbol composed of three chasing arrows forming a triangle (no text or labels)IŠPAKAVIMAS
natural_image
Simple line drawing of a tree with cloud-like canopy and two wavy lines at base (no text or symbols)natural_image
Recycling symbol composed of three chasing arrows forming a triangle (no text or labels)LAHTIPAKKIMINE
natural_image
Simple black-and-white line drawing of a cloud with two wavy lines at the base (no text or symbols)natural_image
Simple line drawing of a recycling symbol (three chasing arrows), no text or labels present.IZSAINOŠANA
The cooker is exceptionally easy to use and extremely efficient. After reading the instruction manual, operating the cooker will be easy.
Before being packaged and leaving the manufacturer, the cooker was thoroughly checked with regard to safety and functionality.
Before using the appliance, please read the instruction manual carefully.
By following these instructions carefully you will be able to avoid any problems in using the appliance.
It is important to keep the instruction manual and store it in a safe place so that it can be consulted at any time.
It is necessary to follow the instructions in the manual carefully in order to avoid possible accidents.
Caution!
Do not use the cooker until you have read this instruction manual.
The cooker is intended for household use only.
The manufacturer reserves the right to introduce changes which do not affect the operation of the appliance.
HOW TO SAVE ENERGY

natural_image
Simple black-and-white line drawing of a tree with cloud-like canopy and two wavy lines at base (no text or symbols)Using energy in a responsible way not only saves money but also helps the environment. So let's save energy! And this is how you can do it:
- Use proper pans for cooking. Pans with thick, flat bases can save up to 1/3 on electric energy. Remember to cover pans if possible otherwise you will use
four times as much energy!
- Match the size of the saucepan to the surface of the heating zone.
A saucepan should never be smaller than a heating zone.
- Ensure heating zones and pan bases are clean. Soils can prevent heat transfer – and repeatedly burnt-on spillages can often only be removed by products which cause damage to the environment.
- Do not uncover the pan too often (a watched pot never boils!).
Do not open the oven door unnecessarily often. Switch off the oven in good time and make use of residual heat.
For long cooking times, switch off heating zones 5 to 10 minutes before finishing cooking. This saves up to 20% on energy.
Only use the oven when cooking larger dishes. Meat of up to 1 kg can be prepared more economically in a pan on the cooker hob.
● Make use of residual heat from the oven. If the cooking time is greater than 40 minutes switch off the oven 10 minutes before the end time.
Important! When using the timer, set appropriately shorter cooking times according to the dish being prepared.
● Only grill with the ultrafan after closing the oven door.
● Make sure the oven door is properly closed. Heat can leak through spillages on the door seals. Clean up any spillages immediately.
- Do not install the cooker in the direct vicinity of refrigerators/freezers.
Otherwise energy consumption increases unnecessarily.
UNPACKING

natural_image
Simple line drawing of a recycling symbol (three chasing arrows), no text or labels present.During transportation, protective packaging was used to protect the appliance against any damage. After unpacking, please dispose of all elements of packaging in a way that will not cause damage to the environment.
All materials used for packaging the appliance are environmentally friendly; they are 100% recyclable
and are marked with the appropriate symbol.
Caution! During unpacking, the packaging materials (polythene bags, polystyrene pieces, etc.) should be kept out of reach of children.
DISPOSAL OF THE APPLIANCE
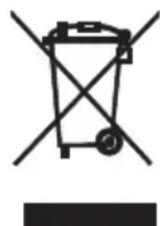
Old appliances should not simply be disposed of with normal household waste, but should be delivered to a collection and recycling centre for electric and electronic equipment. A symbol shown on the product, the instruction manual or the packaging shows that it is suitable for recycling.
Materials used inside the appliance are recyclable and are labelled with information concerning this. By recycling materials or other parts from used devices you are making a significant contribution to the protection of our environment.
Information on appropriate disposal centres for used devices can be provided by your local authority.
Warning: The appliance and its accessible parts become hot during use. Care should be taken to avoid touching heating elements. Children less than 8 years of age shall be kept away unless continuously supervised.
This appliance can be used by children aged from 8 years and above and persons with reduced physical, sensory or mental capabilities or lack of experience and knowledge if they have been given supervision or instruction concerning use of the appliance in a safe way and understand the hazards involved. Children shall not play with the appliance. Cleaning and user maintenance shall not be made by children without supervision.
Warning: Unattended cooking on a hob with fat or oil can be dangerous and may result in fire.
NEVER try to extinguish a fire with water, but switch off the appliance and then cover flame e.g. with a lid or a fire blanket.
Warning: Danger of fire: do not store items on the cooking surfaces.
During use the appliance becomes hot. Care should be taken to avoid touching heating elements inside the oven.
Accessible parts may become hot during use. Young children should be kept away.
Warning: Do not use harsh abrasive cleaners or sharp metal scrapers to clean the oven door glass since they can scratch the surface, which may result in shattering of the glass.
Warning: Ensure that the appliance is switched off before replacing the lamp to avoid the possibility of electric shock.
Before opening the cover, cleaning it of any dirt is recommended. The cooker hob surface should be cooled down before closing the cover.
You should not use steam cleaning devices to clean the appliance.
Danger of burns! Hot steam may escape when you open the oven door. Be careful when you open the oven door during or after cooking. Do NOT lean over the door when you open it. Please note that depending on the temperature the steam can be invisible.
Warning: The cooking process has to be supervised. A short term cooking process has to be supervised continuously.
Warning: Use only hob guards designed by manufacturer of the cooking appliance or indicated by the manufacturer of the appliance in the instructions for use as suitable or hob guards incorporated in the appliance. The use of inappropriate guards can cause accidents.
Caution: The use of a gas cooking appliance results in the production of heat, moisture and products of combustion in the room in which it is installed. Ensure that the kitchen is well ventilated especially when the appliance is in use.
Prolonged intensive use of the appliance may require additional ventilation, for example the increasing of mechanical ventilation where present, additional ventilation to safely remove the products of combustion to outside (external) air whilst also providing room air changes with additional ventilation.
Consult a professional before installation of the additional ventilation.
Caution: This appliance is for cooking purposes only. It shall not be used for other purposes, for example room heating.
This appliance is for typical housekeeping functions (e.g. cooking) by non-expert users.
Examples of household environment are:
- house or apartments;
- shops, offices and other similar working environments;
- farm houses;
- hotels, motels, bed and breakfast and other residential type environments where appliances are used by non-expert users.
- Please pay attention to children whilst the cooker is in operation, as children do not know the rules of cooker use. In particular, hot surface burners, the oven chamber, grates, the door pane, and pans containing hot liquids standing on the hob may cause burns to children.
● Mind that electrical connection leads from other home appliances (e.g. of a food mixer) do not touch hot parts of the cooker. - Do not place flammable material into the drawer whilst using the oven, as it may catch a fire.
- Do not leave the cooker unattended when frying. Oils and fats may catch fire due to overheating.
- At the point of boiling, mind to avoid spills on the burner.
- If the cooker is damaged, it may be used again only after the fault has been fixed by a specialist.
- Do not open the tap on the gas connection or cylinder valve before checking that all burner knobs are closed.
- Do not allow the burners to be soiled or liquids to spill on the burners. If soiled, clean and dry burners immediately after they have cooled down.
- Do not put pans directly onto burners.
- Do not place pans with a weight greater than 10 kg onto the grate over one burner, or pans with a total weight of over 40 kg on the whole grate.
- Do not hit the knobs and burners.
- Do not put objects with a weight greater than 15 kg onto the open oven door.
● Alterations and repairs carried out by an unqualified person are not allowed. - Do not open the cooker knobs before already having a lighted match or a gas lighter in your hand.
- Do not put out a burner flame by blowing.
- A glass cover may crack when heated. Switch off all the burners before lowering the cover. (Cookers with a glass cover).
- Do not make your own alterations to the cooker in order to adapt it to a different type of gas, move the cooker to another place or make changes to the power supply. These operations may only be carried out by an authorised electrician or fitter.
-
Do not use harsh cleaning agents or sharp metal objects to clean the door as they can scratch the surface, which could then result in the glass cracking.
-
Keep young children and people not acquainted with the instruction manual away from the cooker.
- IN CASE OF ANY SUSPICION OF GAS LEAKAGE YOU MUST NOT: light matches, smoke cigarettes, switch electrical receivers (door bell or light switch) on and off, or use other electric and mechanical devices that create electrical or percussive sparks. In such a case, immediately close the cylinder valve or tap cutting off gas supply, air the room, and then call a person authorised to repair the source of the leakage.
- In the event of any incident caused by a technical fault, disconnect the power (applying the above rule) and report the fault to the service centre to be repaired.
- Do not attach any antenna cords (e.g. radio) to the gas supply.
- In a case of gas escaping from leaky piping and catching fire, close gas supply immediately using a cutting-off valve.
- In a case of gas escaping from a leaky cylinder and catching fire: throw a wet blanket over the cylinder to cool it down and turn off the cylinder valve. After it has cooled down, take the cylinder out to an open space. Do not use the damaged cylinder.
- When the cooker is not to be used for several days, close the main valve on the gas piping; when using a gas cylinder, close it after each use.
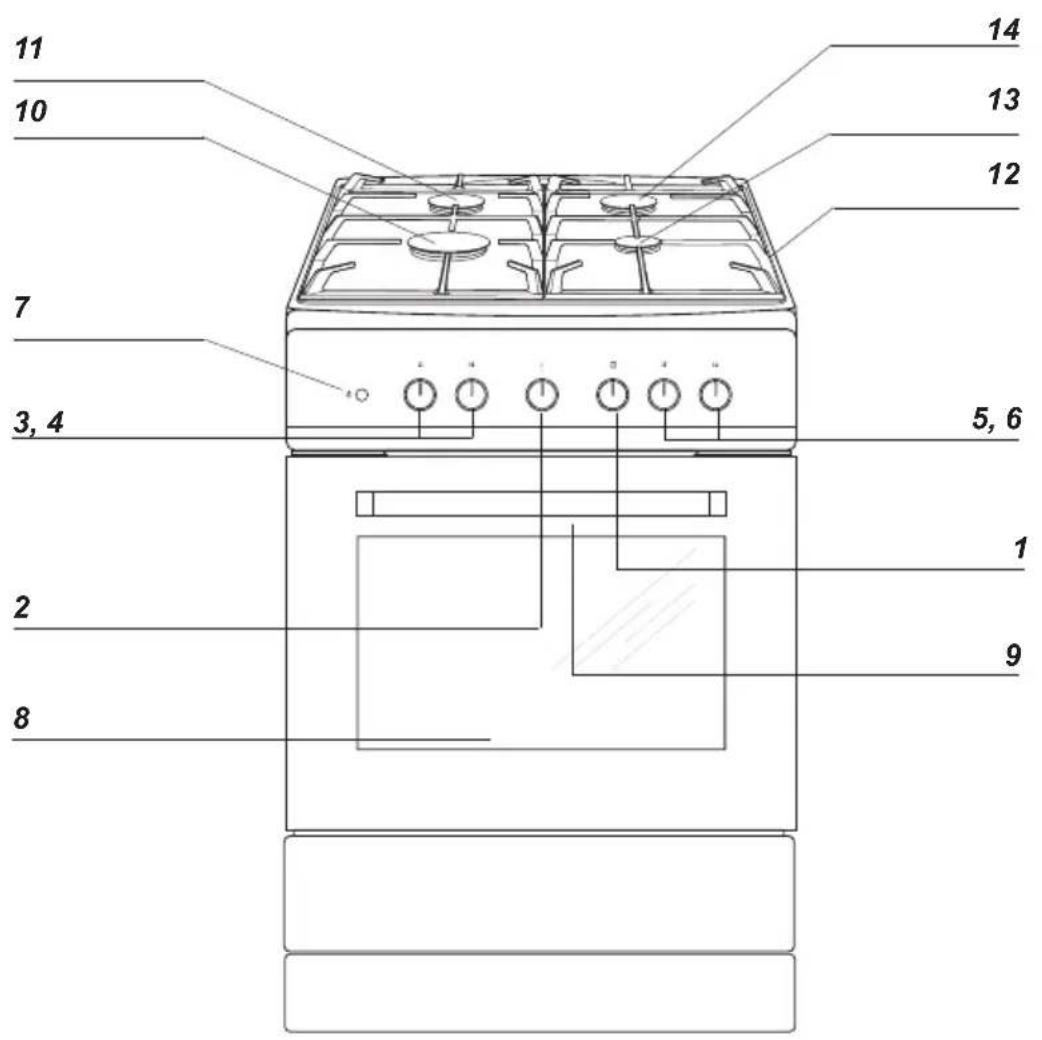
DESCRIPTION OF THE APPLIANCE
1a
1 Oven temperature control knob
2 minute timer
3, 4, 5, 6 Control knobs for gas burners
7 Oven light button*
8 thermometer
9 Securing the oven door
10 Large burner
11 Middle burner
12 Grille
13 Auxiliary hotplate
14 Middle burnèr
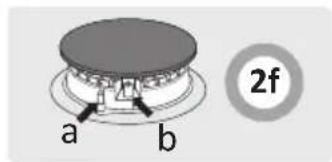
2f-burner
a- Flame sensor*
b- Spark plug*
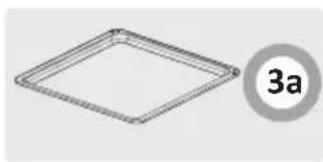
Stove equipment - list:
3a Baking tray*
3b Grill rack (drying rack)
3c Frying tray
3d Spit – and forks*
3e Side stairs
3z Blockade
3f Baking tray*
The following instructions are addressed to the qualified specialist installing the cooker. These instructions aim at ensuring that installation and maintenance activities are performed as professionally as possible.
- Prior to installation, ensure that the local distribution conditions (nature of the gas and gas pressure) and the adjustment of the appliance are compatible.
● The adjustment conditions are stated on the label (or data plate). - This appliance is not connected to a combustion products evacuation device. It shall be installed and connected in accordance with current installation regulation. Particular attention shall be given to the relevant requirements regarding ventilation.
Installing the cooker
● The kitchen should be dry and airy and have effective ventilation according to the existing technical provisions.
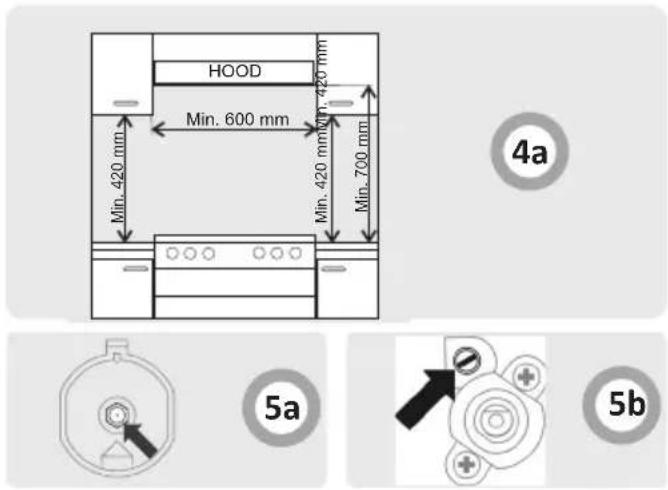
- The room should be equipped with a ventilation system that pipes away exhaust fumes created during combustion. This system should consist of a ventilation grid or hood. Hoods should be installed according to the manufacturer's instructions. The cooker should be placed so as to ensure free access to all control elements.
- The room should also enable the necessary air supply for proper gas combustion. Air supply should be not less than 2m^3/h per 1 kW of burner heat. The air can be delivered from outside by a duct with a section of at least 100cm^2 , or indirectly from adjoining rooms which are fitted with ventilation ducts leading outside.
- If the appliance is used intensively and for a long time, it may be necessary to open a window in order to improve ventilation.
- In terms of protection against the overheating of surrounding surfaces, the gas cooker is an X – class appliance and can be built into furniture only up to the level of the cooking hob, that is around 850 mm above the floor. Raising furniture construction over this level is inadvisable. Coating or veneer used on fitted furniture must be applied with a heat resistant adhesive (100°C). This prevents surface deformation or detachment of the coating. If you are unsure of your furniture's heat resistance, you should leave approximately 2 cm of free space around the cooker. The wall behind the cooker should be resistant to high temperatures. During operation, its back side can warm up to around 50°C above the ambient temperature.
● The cooker should stand on a hard, even floor (do not put it on a base).
- Before you start using the cooker it should be leveled, which is particularly important for fat distribution in a frying pan. To this purpose, adjustable feet are accessible after removal of the drawer. The adjustment range is +/- 5 mm.
Mounting the overturning prevention bracket.\*
The bracket is mounted to prevent overturning of the cooker. When the overturning prevention bracket is installed, a child who climbs on the oven door will not overturn the appliance.
Fig.3z
Cooker, height 850 mm
A=60 mm
B=103 mm
Cooker, height 900 mm
A=104 mm
B=147 mm
Gas connection
Caution!
The cooker should be connected to a gas supply of the particular type of gas that the appliance is manufactured to function with. Information about the type of gas that the cooker has been adapted to by the factory is shown on the data plate. The cooker should be connected exclusively by an appropriately authorised fitter and only he or she has the right to adapt the cooker to a different type of gas.
Fitting guidelines
A fitter should:
- have a gas fitter's authorisation,
- be acquainted with the information included on the data plate of the cooker about the type of gas to which the cooker is adapted; the information should be compared with gas supply conditions at the place of installation,
- check:
- airing efficiency, that is efficiency of air exchange in the rooms,
- tightness of gas fitting connections,
- effectiveness of all functional elements of the cooker,
- if the electricity supply is adapted to function with a safety ground lead (zero).
● provide the user with a connection certificate and give him or her instructions in cooker use.
Caution!
The cooker may only be connected to a liquid gas cylinder or the existing gas supply by an authorised fitter, observing all safety rules.
Connection with a flexible steel hose
If the cooker is connected according to the class 2 specifications, sub-class I, only flexible metal hose can be used which meet the valid national regulations. Gas feeding connector must be G 12 " threaded coupling.
Use only pipes and fittings that meet the requirements of the valid standards. Maximum admissible length of the flexible hose is 2000 mm.
Make sure the connection is not touching any mobile elements which could damage the hose.
Connection with a stable pipework
The cooker comes with a 'G 1/2" threaded coupling. The connection to gas supply must be done in a manner that excludes stresses in any point of the pipework or parts of the appliance.
Make sure you do not exceed the torque when making the connection (maximum torque is 20 Nm). Otherwise, the connection may be faulty or leaks may occur.
The gas hose should not touch metal elements of the cooker back shield.
Important!
Each time you replace a reducer carry out technical inspection of the cooker that covers gas valves and proper operation of the flame failure cut-off device.
Caution!
On completion of the cooker installation, the tightness of all connections should be checked, e.g. applying water with soap.
Do not use fire to check tightness.
Electrical connection
● The cooker is manufactured to work with a one-phase alternating current (230V
1 N\~50 Hz) and is equipped with a 3 x 1,5 mm ^2 connection lead of 1,5 m length with a plug including a protection contact*.
● A connection socket for electricity supply should be equipped with a protection pin and may not be located above the cooker. After the cooker is positioned, it is necessary to make the connection socket accessible to the user.
- Before connecting the cooker to the socket, check if:
- the fuse and electricity supply are able to withstand the cooker load,
- the electricity supply is equipped with an efficacious ground system which meets the requirements of current standards and provisions,
- the plug is within easy reach.
Important!
If the fixed power supply cable is damaged, it should be replaced at the manufacturer or at an authorized servicing outlet, or by a qualified person to avoid danger.
INSTALLATION
Adapting the cooker to another type of gas.
This operation may only be carried out by an appropriately authorised fitter.
If the gas the cooker is to be supplied with differs from the gas provided for the cooker by the manufacturer, that is G20 20 mbar, burner nozzles must be exchanged and the flame needs to be adjusted.
In order to adapt the cooker to burn a different type of gas, you should:
● exchange nozzles (see tables below),
- adjust the "economical" flame.
Caution!
The cookers provided by the manufacturer have burners which are factory-adapted to use the gas specified on their data plates and guarantee cards.
| Defendi burner (marked DEFENDI on the burner body) | Gas type | |||
| G20 2E20 mbar | G30 3B/P37 mbar | |||
| Auxiliary | Nozzle diameter mm | 0,77 0,50 | ||
| Heat load kW 1,00 1,00 | ||||
| Gas consumption g/h | -73 | |||
| Medium | Nozzle diameter mm | 0,97 0,65 | ||
| Heat load kW 1,75 1,75 | ||||
| Gas consumption g/h | -127 | |||
| Large | Nozzle diameter mm | 1,29 0,87 | ||
| Heat load kW 3,00 3,00 | ||||
| Gas consumption g/h | -218 | |||
| Oven | Nozzle diameter mm | 1,30 0,84 | ||
| Heat load kW 2,80 2,80 | ||||
| Gas consumption g/h | -204 | |||
In order to perform adjusting operations, take off the knobs. Adjusting elements of the oven burner are accessible after drawing out the oven chamber floor.
Exchange of a burner nozzle – unscrew the nozzle with special socket spanner No 7 and replace with a new one according to a type of gas (see tables).
*for certain models
The procedure for changing the gas type
| Burner | Flame | Conversion from LPG to natural gas | Conversion from natural gas to LPG |
| hob | full flame | 1.Replace burner nozzle with the appropriate nozzle according to the table. | 1.Replace burner nozzle with the appropriate nozzle according to the table. |
| small flame | 2.Gently tighten the adjusting screw and check the flame size. | 2.Gently tighten the adjusting screw and check the flame size. | |
| oven | full flame | 1.Replace burner nozzle with the appropriate nozzle according to the table. | 1.Replace burner nozzle with the appropriate nozzle according to the table. |
| small flame | 2.Gently tighten the adjusting screw and adjust the flame. The temperature in the oven should be 150 °C. | 2.Gently tighten the adjusting screw and adjust the flame. The temperature in the oven should be 150 °C. |
Adjustment valve
Surface burners applied do not require adjustment of primary air. A correct flame has distinct internal cones of blue and green colour. A short, humming flame or long, yellow and smoking one, without clearly outlined cones, shows improper quality of gas in the household piping or a damaged or soiled burner. In order to check a flame, heat a burner for around 10 minutes with a full flame, and next turn the valve knob to the economical flame position. The flame should not go out or jump onto the nozzles.
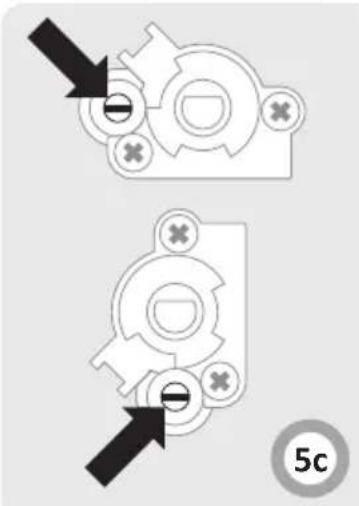
In cookers with a safety device, a knob with a surface burner safety valve is used, fig. Knobs should be adjusted with the burner switched on and set to the economical flame position, using an adjustment screwdriver of the 2.5 mm size.
A professional installer must adjust the small flame on-site in your home. The adjustment depends on the type of gas and its pressure. Fig.5b Fig.5c
Caution!
After adjustment is completed, place a label indicating the type of gas to which the cooker is now adapted.
Before first use
- remove packaging elements,
- gently (slowly) remove labels from the oven door, trying not to break the glue tape. If any visible trace is left on the glass, warm up the oven chamber (see below), spray the warmed-up glass with a glass cleaner, and wipe off with a soft cloth.
- empty the drawer, clean off factory preservatives from the oven chamber,
- take out and wash the oven fittings with warm water and a little washing-up liquid,
- switch on the ventilation in the room or open a window,
- heat the oven (to a temperature of 250^ C, for approximately 30 min.), remove any stains and wash carefully.
- when handling the cooker, follow the safety instructions carefully.
Important!
To clean the oven, only use a cloth well rang out with warm water to which a little washing-up liquid has been added.
Mechanical minute timer M*
The minute timer does not control the operation of the stove. This is simply a sound alarm device that reminds you to perform short-term culinary actions. The time range is from 0 to 60 minutes.
Fig.6a
Timer\*
The function of this timer is not only to provide a warning signal about an expiring of time given before, but also have a built-in automatic switch off-function of an oven. These timers have a sign on a scale.
To put such a timer in action one has turn the ignition knob clockwise until it will be stuck and then set the necessary time within the limits of 0-120 minutes. If this time is expired, the warning signal occurs and the oven will be switched off. Fig.6b
In order to have the oven functioning without any using of an automatic switch off-timer one has to turn the timer into a position. If that position the function of an automatic switch-off of an oven will be not activated.
Important! If this timer with an automatic switch off-function* pointed at "0", the use of an oven is not possible. Fig.6c
How to use surface burners
Choice of cookware
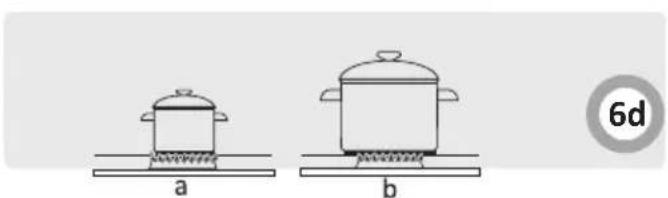
Mind that the diameter of a pan base is always larger than the burner flame crown, and that the pan itself is covered. The recommended pan diameter is around 2.5 to 3 times larger than the burner diameter, that is, for:
- an auxiliary burner – a pan with a diameter of 90 to 150 mm,
- a medium burner – a pan with a diameter of 160 to 220 mm,
- a large burner – a pan with a diameter of 200 to 240 mm, and the pan height should not be greater than its diameter.
Ignition without an ignitor*
- light a match,
- press in the knob to the end and turn it left to the "large flame" position
- ignite gas with a match,
- set required flame size (e.g. "economical")
- switch off the burner after finishing cooking, turning the knob right (to the off position●).
Push-button ignition\*☆○
- press the spark ignition push-button marked with
- press in the knob to the end and turn it left to the "large flame" position
• hold down until gas has lit, - set the required flame size (e.g. "economical")
- switch off the burner after finishing cooking, turning the knob right (to the off position●).
Knob ignition*
- press in the knob to the end and turn it left to the "large flame" position,
• hold until gas is lit, - after the flame is lighted release the pressure on the knob and set a required flame size.
Caution!
In cooker models equipped with a surface burner safety valve, hold the knob pressed down to the end when igniting for 10 seconds at the "large flame" position to activate the safety device.
Selection of the appropriate flame
A correctly adjusted burner has a light blue flame with a clearly visible internal cone. Selection of flame size depends on the position of the burner knob which has been set:
large flame
small flame ("economical flame")
- burner switched off (gas supply is cut off)
Depending on requirements, flame size can be set in a continuous manner.
Caution!
Do not adjust the flame between the off position ● and the large flame position ●.
Selection of the appropriate flame
A correctly adjusted burner has a light blue flame with a clearly visible internal cone. Selection of flame size depends on the position of the burner knob which has been set:
large flame
small flame ("economical flame")
● burner switched off (gas supply is cut off)
Depending on requirements, flame size can be set in a continuous manner.
Caution!
Do not adjust the flame between the off position ● and the large flame position
Operation of the burner protection valve
Some models are equipped with an automatic system that cuts off gas supply to a burner when the flame has disappeared.
This system protects the cooker against gas leakage when the flame on a burner goes out e.g. in case of spillage.
The user's intervention is needed to re-ignite the burner.
Oven functions and operation.
The oven can be heated by oven gas burner or by electric grill*. The oven function is controlled by one knob, which contains a digital scale corresponding to thermoregulator* settings.
Fig.6g
The oven can be heated by oven gas burner. The oven function is controlled by one knob.
Fig.6k
Oven is equipped with gas valve with temperature regulator and anti-outflow protection.
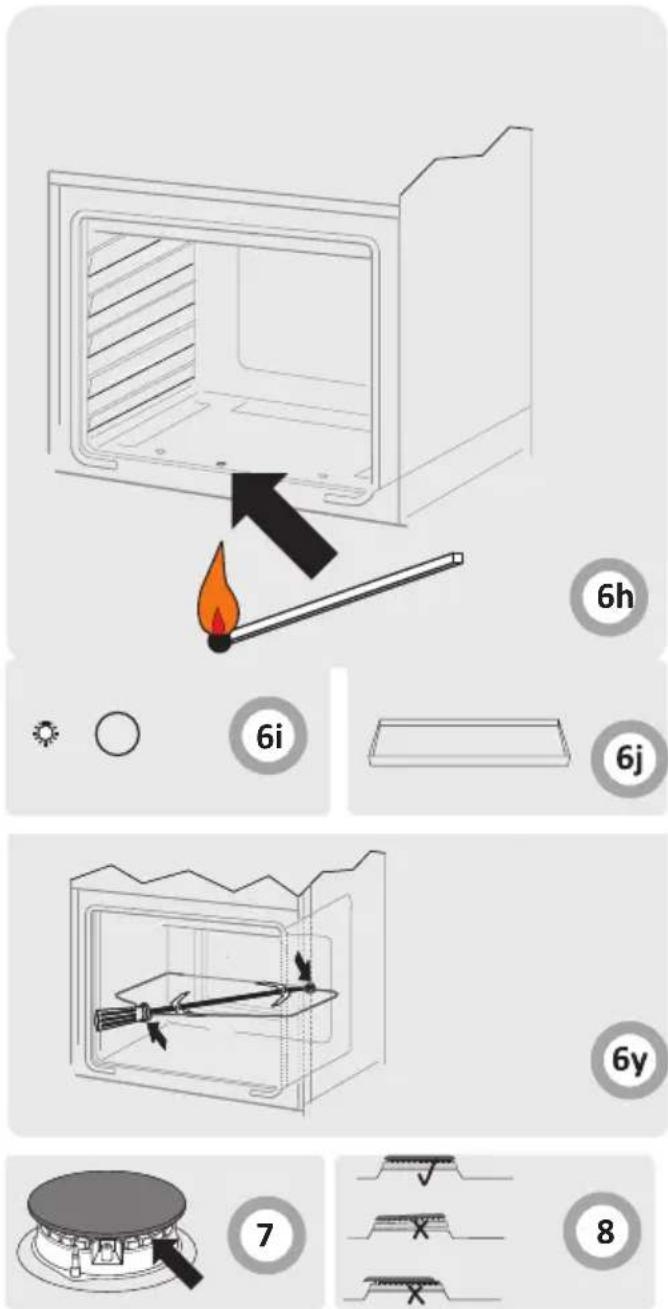
To ignite the oven, as in the description below, keep down the pressed knob during about 3 s. This is the time necessary to warm the sensor and to make the protection function. If the flame goes out, repeat ignition operations after a lapse of 3 sec. If the flame does not start burning within 10 sec., repeat the ignition operation after lapse of about 1 min, i.e. after the oven ventilation.
To ignite the oven:
●strike a match,
- press down the knob to the stop and turn left to the position corresponding to the temperature chosen, - put the match to the ignition opening
(see the figure below) and keep the knob pressed down about 3 sec. from the gas ignition moment. If the flame has gone out, repeat the ignition operation after lapse of 3 sec.,
Fig.6h
Note!
The temperature control is possible at closed oven door only.
Turn the knob right to the stop in order to turn the oven off.
Knob ignition
- press in the knob to the end and turn it left to the position 8.
● hold until gas is lit,
● after the flame is lighted release the pressure on the knob and set a required position.
Use of the grill\*
The grilling process operates through infrared rays emitted onto the dish by the incandescent grill heater.
In order to switch on the grill you need to:
● set the oven knob to the position marked with,
- heat the oven for approximately 5 minutes (with the oven door shut).
- insert a tray with a dish onto the appropriate cooking level, and if you are grilling on the grate insert a tray for dripping on the level immediately below (under the grate).
● the oven door shut.
Caution!
The grill should be used with the oven door shut.
When the grill is in use, accessible parts can become hot.
It is recommended to keep children away from the oven.
The usage of the electric grill is forbidden, when the oven gas burner is on.
Use of the rotisserie\*
The rotisserie enables rotating grilling in the oven. It is intended for grilling poultry, kebabs, sausages and similar dishes. Switching the rotisserie motor on and off is done at the same time as switching the grilling function.
When using these funtions during grilling the rotis-serie motor can stop momentarily or the rotating direction can be changed. This does not affect the functionality and the grilling quality.
Preparing dishes using the rotisserie: (see the diagram below)
- put the food on the rötisserie spit and secure it using the forks;
- insert the rotisserie frame into the oven on the third level from the bottom;
- insert the spit end into the motor drive coupling, making sure that the groove of the metal part of the rotisserie handle rests on the frame;
- unscrew the handle;
- insert the tray onto the lowest level of the oven chamber and close the door.
Fig.6y
Baking
- for baking you can use commercially available moulds and trays, which should be placed on the wire grid. It is recommended that you use aluminium or silver-coloured tins, which should fit within the outline of the wire grid. Muffin and cupcake tins and moulds should be placed transversely in the oven cavity.
- before the cake is taken out of the oven, check if it is ready using a wooden stick (if the cake is ready the stick should come out dry and clean after being inserted into the cake);
● after switching off the oven it is advisable to leave the cake inside for about 5 min.;
● the baking parameters given in Tables are approximate and can be corrected based on your own experience and cooking preferences;
- if information given in recipe books is significantly different from the values included in this instruction manual, please apply the instructions from the manual.
Fig.6j
| CAKE TYPE | TEMPERATURE [°C] warmed up | LEVEL FROM THE BOTTOM | ||
| Fruit cake | 170 | 160 | 60-70 | 2 |
| Victoria sponge | 170 | 150-160 | 20-40 | 2-3 |
| Sponge layer cake | 170 | 150-160 | 20-30 | 2-3 |
| Buns | 180 | 170 | 30-50 | 3 |
| Teacake | 180 | 180 | 40-50 | 3 |
| Cake (crispy base) | 200 | 180 | 40-60 | 3 |
| Shortcake | 220 | 200 | 25-40 | 3 |
| Puff pastry | 230-250 | 200-220 | 15-20 | 3 |
Gas burner
| Type of dish | Position on the knob [large flame] Initial warm up 1) | Position on the knob [small flame] Baking | Level From the Bottom | Baking time In minutes |
| Fruit cake 2 60 - 70 | ||||
| Victoria sponge 2 - 3 | 20 - 40 | |||
| Sponge layer cake 2 | - 3 20 - 30 | |||
| Buns 3 30 - 50 | ||||
| Teacake 3 40 - 50 | ||||
| Cake (crispy base) 3 | 40 - 60 | |||
| Short pastry 3 25 - 40 | ||||
| Puff pastry 3 15 - 20 |
^1) about 5 minutes.
Note: The figures given in Tables are approximate and can be adapted based on your own experience and cooking preferences.
Roasting meat
- cook meat weighing over 1 kg in the oven, but smaller pieces should be cooked on the gas burners.
- use heatproof ovenware for roasting, with handles that are also resistant to high temperatures;
- when roasting on the drying rack or the grate we recommend that you place a baking tray with a small amount of water on the lowest level of the oven;
- it is advisable to turn the meat over at least once during the roasting time and during roasting you should also baste the meat with its juices or with hot salty water – do not pour cold water over the meat.
| TYPE OF MEAT | LEVELFROM THE BOTTOM | TEMPERATURE [°C] | TIME*IN MINUTES |
| BEEF | per 1 cm | ||
| Roast beef or fillet rare | 3 | 250 | 12-15 |
| oven warmed up juicy (“medium”) | 3 | 250 | 15-25 |
| oven warmed up “well done” | 3 | 210-230 | 25-30 |
| oven warmed up Roast joint | 2 | 200-220 | 120-140 |
| PORK | |||
| Roast joint | 2 | 200-210 | 90-140 |
| Ham | 2 | 200-210 | 60-90 |
| Fillet | 3 | 210-230 | 25-30 |
| VEAL | 2 | 200-210 | 90-120 |
| LAMB | 2 | 200-220 | 100-120 |
| VENISON | 2 | 200-220 | 100-120 |
| POULTRY | |||
| Chicken | 2 | 220-250 | 50-80 |
| Goose (approx. 2 kg) | 2 | 190-200 | 150-180 |
| FISH | 2 | 210-220 | 40-55 |
* the figures presented in the table refer to a portion of 1 kg, if the portion is larger than that an additional 30 – 40 minutes should be added for each additional kilogram.
Gas burner
| Type of dish | Position on the knob [large flame] Preliminary baking | Position on the knob [small flame] Baking | Level From the Bottom | Time [min] | |
| Beef | Roast beef or fillet rare ("english") | 5 min. | ♠ | 3 | 12 - 15 per 1cm |
| oven warmed up juicy (medium) | 5 min. | ♠ | 3 | 15 - 25 per 1cm | |
| oven warmed up (well done) | 5 min. | ♠ | 3 | 25 - 30 per 1cm | |
| oven warmed up Roast joint | 15-25 min. | ♠ | 2 120 - 140 | ||
| Pork | Roast joint | 15-25 min. | ♠ | 2 90 - 140 | |
| Ham | 15-25 min. | ♠ | 2 60 - 90 | ||
| Fillet | 5 min. | ♠ | 3 25 - 30 | ||
| Veal | 15-25 min. | ♠ | 2 90 - 120 | ||
| Lamb | 15-25 min. | ♠ | 2 100 - 120 | ||
| Venison | 15-25 min. | ♠ | 2 100 - 120 | ||
| Poultry | Chicken | 15-25 min. | ♠ | 2 50 - 80 | |
| Goose (approx. 2 kg) | 15-25 min. | ♠ | 2 150 - 180 | ||
| Fish | 5 min. | ♠ | 2 40 - 55 | ||
Note: The figures given in Tables are approximate and can be adapted based on your own experience and cooking preferences.
The figures presented in the table refer to a portion of 1 kg, if the portion is larger than that an additional 30 – 40 minutes should be added for each additional kilogram.
Oven functions: grill heater
| TYPE OF DISH | LEVEL FROM THE BOTTOM | TEMPERATURE [°C] | GRILLING TIME [MINUTES] | |
| SIDE 1 | SIDE 2 | |||
| Pork chop | 4 | 250 (220)* | 8-10 | 6-8 |
| Pork schnitzel | 3 | 250 (220)* | 10-12 | 6-8 |
| Shish kebab | 4 | 250 (220)* | 7-8 | 6-7 |
| Sausages | 4 | 250 (220)* | 8-10 | 8-10 |
| Roastbeef, (steak approx. 1kg) | 3 | 250 (220)* | 12-15 | 10-12 |
| Veal cutlet | 4 | 250 (220)* | 8-10 | 6-8 |
| Veal steak | 4 | 250 (220)* | 6-8 | 5-6 |
| Mutton chop | 4 | 250 (220)* | 8-10 | 6-8 |
| Lamb chop | 4 | 250 (220)* | 10-12 | 8-10 |
| Chicken half (per 500 g) | 3 | 250 (220)* | 25-30 | 20-25 |
| Fish fillet | 4 | 250 (220)* | 6-7 | 5-6 |
| Trout (per approx. 200 – 250g) | 3 | 250 (220)* | 5-8 | 5-7 |
| Bread (toast) | 4 | 250 (220)* | 2-3 | 2-3 |
* oven door with two glass panels
By ensuring proper cleaning and maintenance of your cooker you can have a significant influence on the continuing fault-free operation of your appliance.
Before you start cleaning, the cooker must be switched off and you should ensure that all knobs are set to the “●”/“0” position. Do not start cleaning until the cooker has completely cooled.
Burners, the burner hob grate, the cooker housing
- In the case of soiled burners and grate, these elements must be removed from the cooker and washed with warm water and washing – up products intended for fats and soils. Next, wipe them dry. After the grate has been removed, wash the burner hob carefully and wipe with a dry and soft cloth. In particular, ensure flame openings in rings under caps are clean, see the figure below. Do not use steel wire or drill holes.
Caution!
Burner elements must always be clean. Water particles may hamper gas flow and produce an incorrect burner flame.
Make sure that burner is correctly reassembled after cleaning. Misalignment of the burner cap can result in permanent damage to the burner.
- Wash enamel elements of the cooker with light washing products. When cleaning do not use cleaning agents with a strong abrasive effect, such as scouring powders containing an abrasive, abrasive compounds, abrasive stones, pumice stones, wire brushes and so on.
- Before you start using the cooker with stainless steel hob, its cooking zone first needs to be carefully washed. It is important to remove glue residues from the foils taken off trays during installation, as well as adhesive tape applied during packaging. The hob should be cleaned regularly after each use. Do not allow the hob to get heavily stained, particularly from burnt-on spillages from boiled over liquids.
Oven
- The oven should be cleaned after every use. When cleaning the oven the lighting should be switched on to enable you to see the surfaces better.
- The oven chamber should only be washed with warm water and a small amount of washing-up liquid.
• After cleaning the oven chamber wipe it dry.
Caution!
Do not use cleaning products containing abrasive materials for the cleaning and maintenance of the glass front panel.
Replacing the halogen bulb in the oven\*
Before replacing the halogen bulb, make sure the appliance is disconnected from the electric mains to avoid a possible electric shock.
- Unplug the appliance
- Remove shelves and trays from the oven.
- Unscrew and wash the lamp cover and then wipe it dry.
- Pull the halogen bulb out using a cloth or paper. If necessary, replace the halogen bulb with a new one.
- voltage 230V
- power 25W
- Replace the halogen bulb in its socket.
- Screw in the lamp cover.
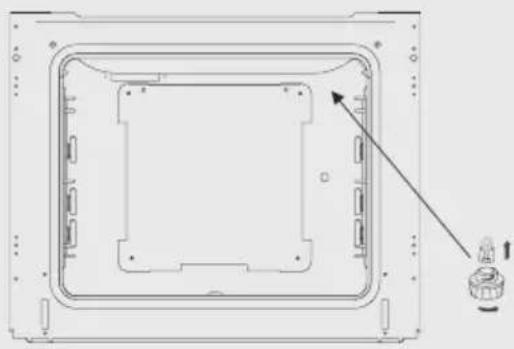
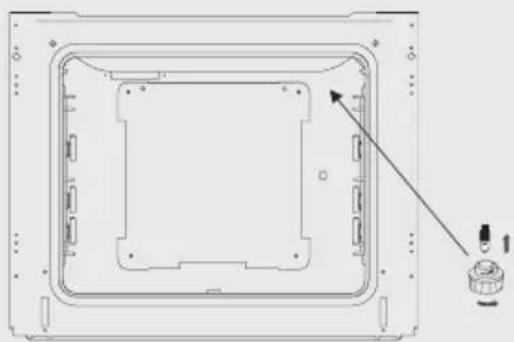
Oven lighting Fig.9
Replacing the halogen bulb in the oven\*
Before replacing the halogen bulb, make sure the appliance is disconnected from the electric mains to avoid a possible electric shock.
- Set all control knobs to the position “●”/“0” and disconnect the mains plug,
- Unscrew and wash the lamp cover and then wipe it dry.
- Pull the halogen bulb out using a cloth or paper. If necessary, replace the halogen bulb with a new one.
- voltage 230V
- power 25W
- G9
- Replace the halogen bulb in its socket.
- Screw in the lamp cover.
Note! Make sure not to touch the halogen directly with your fingers.
Oven lighting Fig.9a
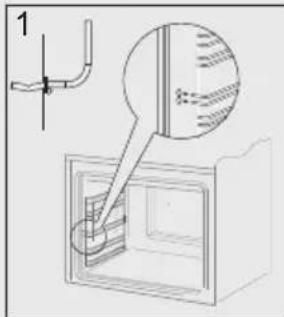
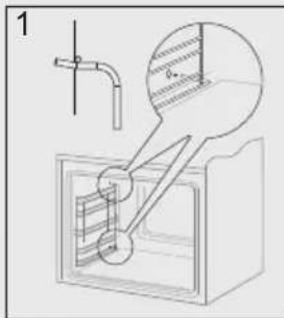
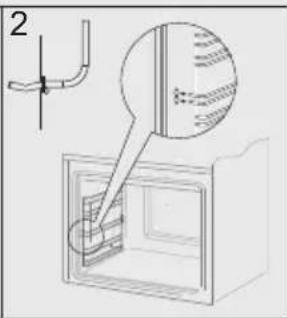
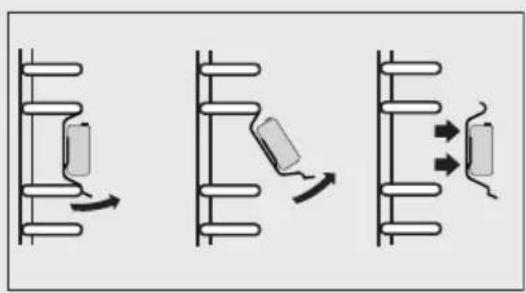
- Ovens in cookers marked with the letter D* are equipped with easily removable wire shelf supports. To remove them for washing, pull the front catch, then tilt the support and remove from the rear catch.
Fig.10
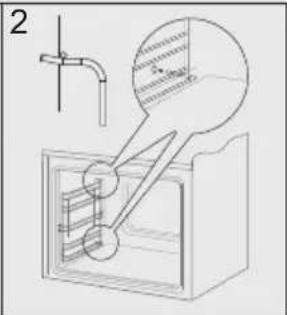
- Ovens in cookers marked with the letters Dp* have stainless steel sliding telescopic runners attached to the wire shelf supports. The telescopic runners should be removed and cleaned together with the wire shelf supports. Before you put the baking tray on the telescopic runners, they should be pulled out (if the oven is hot, pull out the telescopic runners by hooking the back edge of the baking tray on the bumpers in the front part of the telescopic runners) and then insert them together with the tray.
Fig.10a
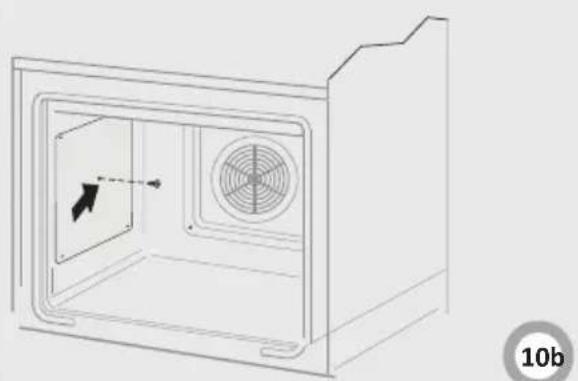
Oven types marked with the letter K* in the model number are equipped with liners covered with special self-cleaning enamel. The enamel removes fat stains or leftover food automatically, providing they are not dried on and burnt (food and fat remnants should be removed when they are not dried on and burnt to avoid a long self-cleaning process). To activate self-cleaning switch on the oven for 1 hour, setting the temperature to 250°C. If remnants of food are small the process can be shortened.
If the self-cleaning per for mance is no ticeably reduced, replace the liners with new ones: take out the wire rails from the in side and unscrew the catalytic enamel screw from the center of the liner. New liners can be obtained at service outlets.
Fig.10b
Regular inspections
Besides keeping the oven clean, you should:
- carry out periodic inspections of the control elements and cooking units of the cooker. After the guarantee has expired you should have a technical inspection of the cooker carried out at a service centre at least once every two years,
- fix any operational faults,
- carry out periodical maintenance of the cooking units of the oven.
Caution!
All repairs and regulatory activities should be carried out by the appropriate service centre or by an appropriately authorised fitter.

Door removal
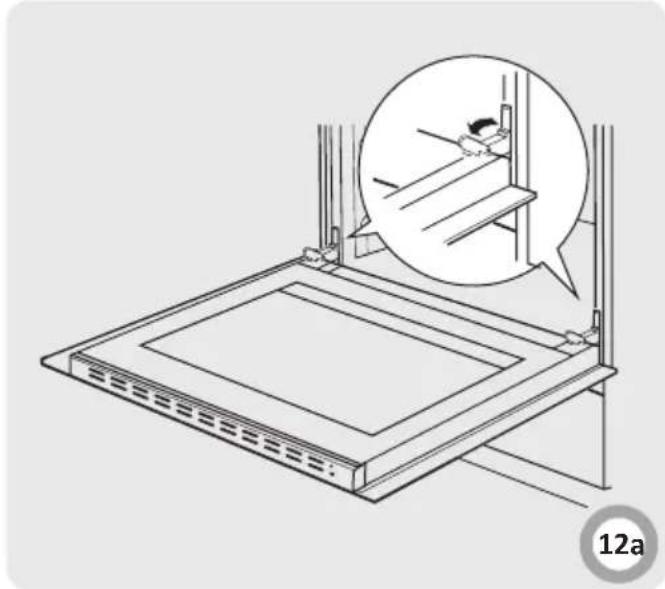
In order to obtain easier access to the oven chamber for cleaning, it is possible to remove the door. To do this, tilt the safety catch part of the hinge upwards (fig. A). Close the door lightly, lift and pull it out towards you. In order to fit the door back on to the cooker, do the inverse. When fitting, ensure that the notch of the hinge is correctly placed on the protrusion of the hinge holder. After the door is fitted to the oven, the safety catch should be carefully lowered down again. If the safety catch is not set it may cause damage to the hinge when closing the door.
Removing the inner panel
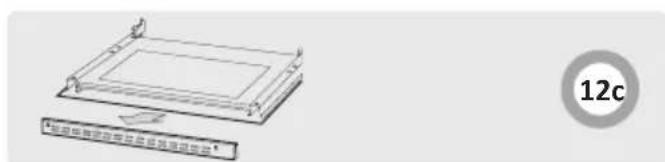
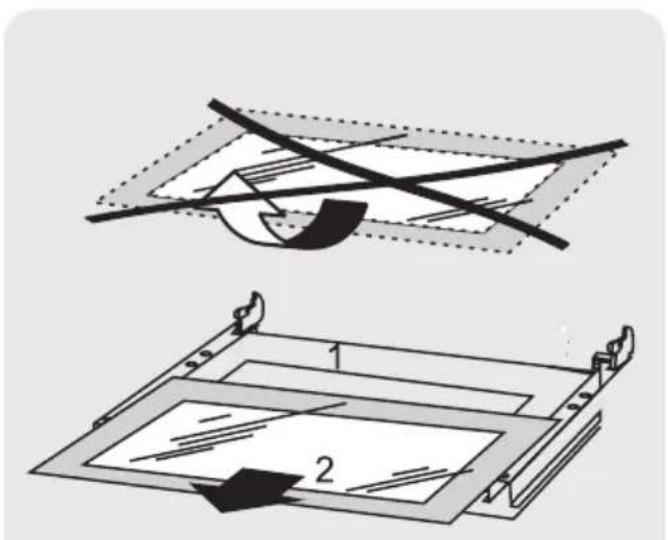
- Pull the upper door slat loose. (fig. 12B, 12C)
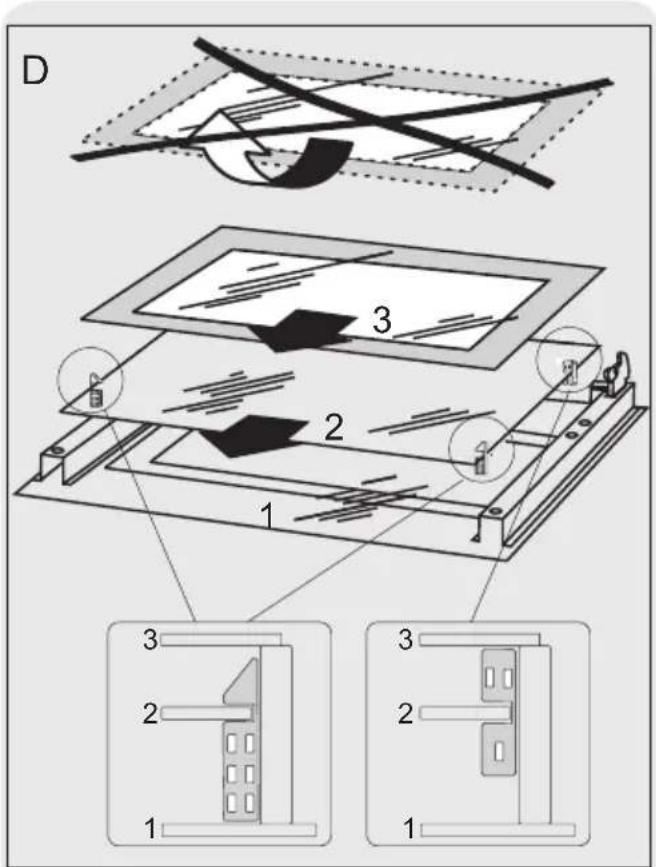
- Pull the inner glass panel from its seat (in the lower section of the door). Remove the inner panel (fig. 12D, 12D1).
- Clean the panel with warm water with some cleaning agent added.
Carry out the same in reverse order to reassemble the inner glass panel. Its smooth surface shall be pointed upwards.
Important! Do not force the upper strip in on both sides of the door at the same time. In order to correctly fit the top door strip, first put the left end of the strip on the door and then press the right end in until you hear a "click". Then press the left end in until you hear a "click".
Fig.12D Removal of the internal glass panel 3 glass Fig.12D1 Removal of the internal glass panel 2 glass
Regular inspections
Besides keeping the cooker clean, you should:
- carry out periodic inspections of the control elements and cooking units of the cooker. After the guarantee has expired you should have a technical inspection of the cooker carried out at a service centre at least once every two years,
- fix any operational faults,
- carry out periodical maintenance of the cooking units of the cooker.
Caution!
All repairs and regulatory activities should be carried out by the appropriate service centre or by an appropriately authorised fitter.
In the event of an emergency, you should:
● switch off all working units of the cooker
- disconnect the mains plug
- call the service centre
- some minor faults can be fixed by referring to the instructions given in the table below. Before calling the customer support centre or the service centre check the following points that are presented in the table.
| PROBLEM | REASON | ACTION |
| 1. A burner does not light | flame openings soiled | close the gas by cutting off valve, close burner knobs, air the room, take out and clean the burner, blow on flame openings |
| 2. A gas ignitor does not light | break in power supply | check the household fuse box; if there is a blown fuse, replace it with a new one |
| break in gas supply | open the gas supply valve | |
| soiled (greasy) gas ignitor | clean the gas ignitor | |
| knob not pressed in long enough | hold the knob pressed in until a full flame appears around the burner crown | |
| 3. The flame goes out when lighting a burner | knob released too quickly | hold the knob down longer at the “large flame” position |
| 4. electrical fittings do not work | break in power supply | check the household fuse box, if there is a blown fuse replace it with a new one |
| 5. the oven lighting does not work | the bulb is loose or dama- ged | tighten up or replace the blown bulb (see Chapter Cleaning and Maintenance) |
Voltage rating 230V 1 N\~50 Hz
Power rating max. 0,025 kW
Cooker dimensions H/W/D 85/60/60 cm
Complies with EU regulations EN-30-1-1, EN 60335-1, EN 60335-2-6 standards
Компанія виробник
- РАЗОПАКОВАНЕ
- OTPAKIVANJE
- IŠPAKAVIMAS
- LAHTIPAKKIMINE
- IZSAINOŠANA
- Caution!
- HOW TO SAVE ENERGY
- UNPACKING
- DISPOSAL OF THE APPLIANCE
- DESCRIPTION OF THE APPLIANCE
- Installing the cooker
- Mounting the overturning prevention bracket.\*
- Fig.3z
- Gas connection
- Fitting guidelines
- A fitter should:
- - check:
- Electrical connection
- INSTALLATION
- Adapting the cooker to another type of gas.
- Adjustment valve
- Before first use
- Important!
- Timer\*
- How to use surface burners
- Push-button ignition\*☆○
- Selection of the appropriate flame
- Operation of the burner protection valve
- Oven functions and operation.
- To ignite the oven:
- Knob ignition
- Use of the grill\*
- Use of the rotisserie\*
- Baking
- Roasting meat
- Burners, the burner hob grate, the cooker housing
- Oven
- Replacing the halogen bulb in the oven\*
- Before replacing the halogen bulb, make sure the appliance is disconnected from the electric mains to avoid a possible electric shock.
- Note! Make sure not to touch the halogen directly with your fingers.
- Regular inspections
- Door removal
- Removing the inner panel
Brand : Hansa
Model : FCGS61129H
Category : Cooker