
RN-40 - Video Converter Kiloview - Free user manual and instructions
Find the device manual for free RN-40 Kiloview in PDF.


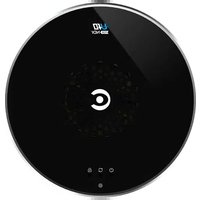
| Product Type | 4K UHD HDMI/NDI Bi-Directional Converter |
| Brand | Kiloview |
| Model | RN-40 |
| Dimensions (W x D x H) | 100 x 80 x 24 mm |
| Weight | 235 g |
| Power Supply | DC 5V-2A or PoE (5-18 V DC input) |
| Power Consumption | 5 W |
| Video Input Interface | HDMI 2.0 |
| Video Output Interface | HDMI |
| NDI Encoding/Decoding | Up to 4Kp60, 4:2:2 8-bit |
| Network Interface | 100/1000 Mbps Ethernet with PoE |
| Tally Light | Built-in, indicates PGM/PVW status |
| PTZ Control | Supported (not available in this version) |
| Voice Intercom | Supported (not available in this version) |
| Management | Web control |
| Audio Input/Output | 3.5 mm audio port (for intercom) |
| Camera Mount | Standard 1/4" screw (6.5 mm) |
| Working Temperature | -20°C to 45°C |
| Package Contents | Converter, TYPE-C power cable, TYPE-C to TYPE-A cable, power adapter, hot shoe, quick start guide, warranty card |
Frequently Asked Questions - RN-40 Kiloview
User questions about RN-40 Kiloview
0 question about this device. Answer the ones you know or ask your own.
Ask a new question about this device
Download the instructions for your Video Converter in PDF format for free! Find your manual RN-40 - Kiloview and take your electronic device back in hand. On this page are published all the documents necessary for the use of your device. RN-40 by Kiloview.
USER MANUAL RN-40 Kiloview
natural_image
Photograph of a camera with a digital display showing an interior scene, no visible text or symbols on the device itself.4K UHD HDMI/NDI Bi-Directional Converter
USER MANUAL
Changsha KILOVIEW Electronics CO.,LTD.
Legal Notices
Subject to the receiving of this document from Changsha Kiloview Electronics Co., Ltd., (Hereinafter referred to “Kiloview”), the following terms are understood and agreed. Or else, please stop using this document.
This document is copyright of Kiloview, all rights reserved. The document covers the proprietary information of the company. No company or individual may copy, transmit, distribute, use or disclose the document and any images, forms, data and other information contained in the document without the prior written permission of the company.

is the registered trademark of Kiloview. The name and logo are the trademarks or registered trademarks of the company. Other products or company names mentioned in this document may be the trademarks or registered trademarks of their respective owners. The reading of this document without the prior written consent of the company or the third party rights holder does not imply that the reader is given any right to use any of the marks appearing in this document by implication, non-evidence or otherwise.
This product complies with the design requirements related to environmental protection and personal safety.
The storage, usage and disposal of the product shall be in accordance with the product manual, relevant contract or relevant national laws and regulations.
This document is provided "as is" and "only in this state". Products and technical updates are subject to change without prior notice.
For matters not covered in this document, please visit our website www.kiloview.com for information and technical support.
NDI ^® is a registered trademark of NewTek, Inc..
COTENTS
1 PRODUCT INTRODUCTION ....3
1.1 PRODUCT FEATURES....4
1.2 TECHNICAL PARAMETERS....5
2 USER GUIDE....6
3 PACKING LIST AND INTERFACE DESCRIPTION ....7
3.1 PACKING LIST....7
3.2 INTERFACE DESCRIPTION....7
3.3 LED INDICATORS 8
4 INSTALLATION AND CONNECTION....9
4.1 CONNECT VIDEO SIGNAL....9
4.2 CONNECT NETWORK....9
4.3 CONNECT AUDIO 10
4.4 CONNECT POWER SUPPLY 10
5 LOGIN AND NETWORK CONFIGURATION ....11
5.1 LOGIN TO THE DEVICE VIA ETHERNET 11
5.2 NETWORK CONFIGURATION....12
5.3 LOCAL-LINK (FAILSAFE).... 13
6 NDI DISCOVERY AND MONITORING....14
6.1 NDI TOOLS INSTALLATION 14
6.2 NDI DISCOVERY AND CONNECTION 14
6.3 NDI ENCODE BIT RATE 16
7 ENCODING PARAMETER CONFIGURATION ....16
7.1 STATUS COLUMN 16
7.2 BASIC SETTINGS.... 16
7.3 ADVANCED SETTINGS 17
7.3.1 NDI Connection 17
7.3.2 PTZ control (Not available in this version) 18
8 NDI DECODING CONFIGURATION....20
8.1 DISCOVER NDI SOURCE 21
8.2 OUTPUT OF NDI DECODING 22
8.3 DECODING PARAMETERS SETTING 24
8.4 DISCOVERY SERVICE 24
9 SYSTEM SETTINGS....27
9.1 USER MANAGEMENT....27
9.2 QUICK RESET.... 27
9.3 REBOOT 27
9.4 RESTORE FACTORY SETTINGS....27
9.5 FIRMWARE UPGRADE....28
1 Product Introduction
NDI ^ is the world's leading standard for video-over-IP technology. Kiloview N40 for NDI converts 4K p60 video and NDI ^ in both directions with the advantages of NDI ^ .
This converter is small and compact enough to put in your pocket. N40 for NDI® supports up to 4K p60 video input (Encoder) or 4K p60 video output (Decoder). A tally system with a big tally light is built-in for indicating which camera is in program or preview. N40 supports wide DC input range from 5V to 18V which can be easily powered by USB, power bank or camera battery, or PoE. A threaded screw camera mount is equipped for camera mounting. PTZ control over USB adapter/Ethernet is supported.
It also has the 3.5mm audio input/output which supports intercom (Note: Voice intercom function not realized in this version).

1.1 Product Features
● Bi-Directional converting, encoder and decoder, all-in-one
● Plug and play, converting SDI to NDI, or NDI to the monitor easily;
● A big tally light is built-in for indicating which camera is PGM or PVW status;
- Support PoE, and 5-18V DC input, the device can be powered by USB, power bank or camera easily.
- Configured with 1x HDMI input and 1x output interface, looped for monitoring on the display while NDI streaming or output while decoding.
➢ Support up to 4Kp60 video resolution, to ensure high quality video transmission.
● Support encoding and decoding resolution up to 4Kp60;
- Provide standard camera screw to install on the camera;
- Optional control cable/Ethernet for PTZ control over Visca/Visca over IP/Pelco etc. supported (Note: Customize available for other unlisted PTZ protocols; PTZ function is not available in this version);
- YCbCr4:2:2 NDI high quality coding ensures excellent picture quality, lossless audio coding ensures high fidelity sound quality.
- Precise clock and intelligent algorithms ensure frame synchronization and accurate video and audio synchronization.
1.2 Technical Parameters
| Item | N40 |
| Input interface | HDMI 2.0 |
| Output interface | HDMI |
| NDI Features | Up to 4Kp60 encoding and decoding.Up to 4:2:2 8bit stream input and output. |
| NDI Encoding and decoding | SupportNote: NDI encoding mode and decoding mode cannot work simultaneously. When in encoding mode, the output interface will loop the original video. |
| Internet interface | 100/1000Mbps Ethernet PortSupport PoE |
| PTZ control | Support (not available in this version) |
| Tally | Support |
| Voice Intercom | Support (not available in this version) |
| Management type | Web control |
| Hotshoe Screw | Standard 1/4” screw(6.5mm). |
| Power Supply | DC 5V-2A or POE |
| Power consumption | 5W |
| Working temperature | -20°C~45°C |
| Dimension | 100x80x24mm |
| Weight | 235g |
2 USER GUIDE
● Installation and Connection
Connect the power and video input source correctly, power on the device.
● Network Connection and Configuration
The easiest way for network connection is to connect the device to the network by wire, automatically obtain the IP address and DNS from the network without any settings on the device. After that, use NewTek Studio Monitor and connect the NDI stream of the device, click the gear button ( ) in the lower right corner of the software interface, you can directly open the login link of the encoder WEB page without manually entering the URL. (For the first login or the first login after restoring the factory settings, you will need to agree to the “EULA” that pops up. Otherwise, the NDI stream service of the device cannot be used normally.)
If you want to set the network manually, you can use the default IP address 192.168.1.168 to login the web page and set. The default username and password is “admin/admin”.
- NDI Streaming
NDI has the function of automatic discovery. After the encoder is normally connected to the network, other NDI-supporting tools (such as Newtek studio monitor, OBS, vMix) can automatically discover the encoder and pull the NDI stream directly.
- NDI Decoding
To find the NDI source in the same LAN and decode the corresponding source to the display.
3 Packing List and Interface Description
3.1 Packing List
| Name | Unit | Quantity |
| NDI® Converter | PCS | 1 |
| TYPE-C power cable | PCS | 1 |
| TYPE-C to TYPE-A cable | PCS | 1 |
| Certificate/ Warranty card | PCS | 1 |
| Power adapter | PCS | 1 |
| Hot shoe | PCS | 1 |
| Quick start guide | PCS | 1 |
3.2 Interface Description

-
100/1000M Ethernet (PoE)
-
HDMI Input
-
HDMI Output
-
Audio port
-
TYPE-C Power Input
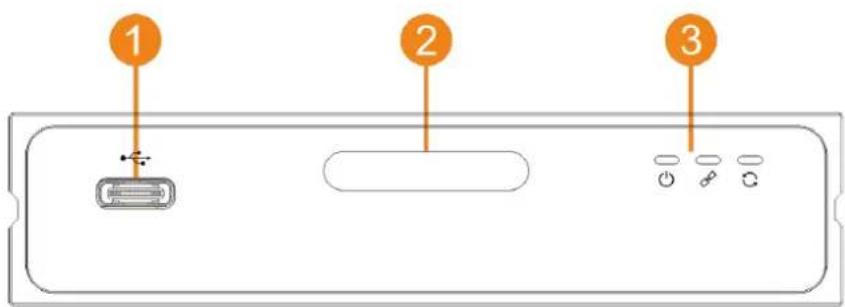
-
TYPE-C Expansion port
-
Tally
-
Status Indicator

- Reset
3.3 Led indicators
| IconPOWERLINKRUN | Color | Status | Descriptions |
| White | Always onFlashingOff | Power connectedPower failureNo power supplied or power failure | |
| White | Quick flashingSlow flashingOff | Network connectedNetwork connection abnormal or when restore device to factory settings (RUN light will be flashing as well)Network abnormal or disconnected | |
| White | FlashingOff | Device works properlyThe device is abnormal or not started |
4 Installation and connection
4.1 Connect Video Signal
Connect an HDMI video cable from a video source (such as a camera) to the N40's HDMI input connector. The HDMI output is connected to the display device via a HDMI cable.


Note: The output interface can be loop for encoding or output for decoding but cannot be used at the same time.
4.2 Connect Network
Connect the network cable to Ethernet of the device. The other end of the network cable is connected to the switch. You can also connect directly to the network port of the computer.

Connect to the switch or directly to the network port of the computer.
4.3 Connect Audio
Using a 3.5mm interface headset with a Microphone to connect to the device for voice intercom (Note: Voice intercom not available in this version).

Using a 3.5mm interface headset with a call function to connect to the device for voice intercom.
4.4 Connect Power Supply
After connecting the power adapter (DC 5v), the power light will be on and the device starts working. (If you use PoE for power supply, there is no need to connect to the adapter.
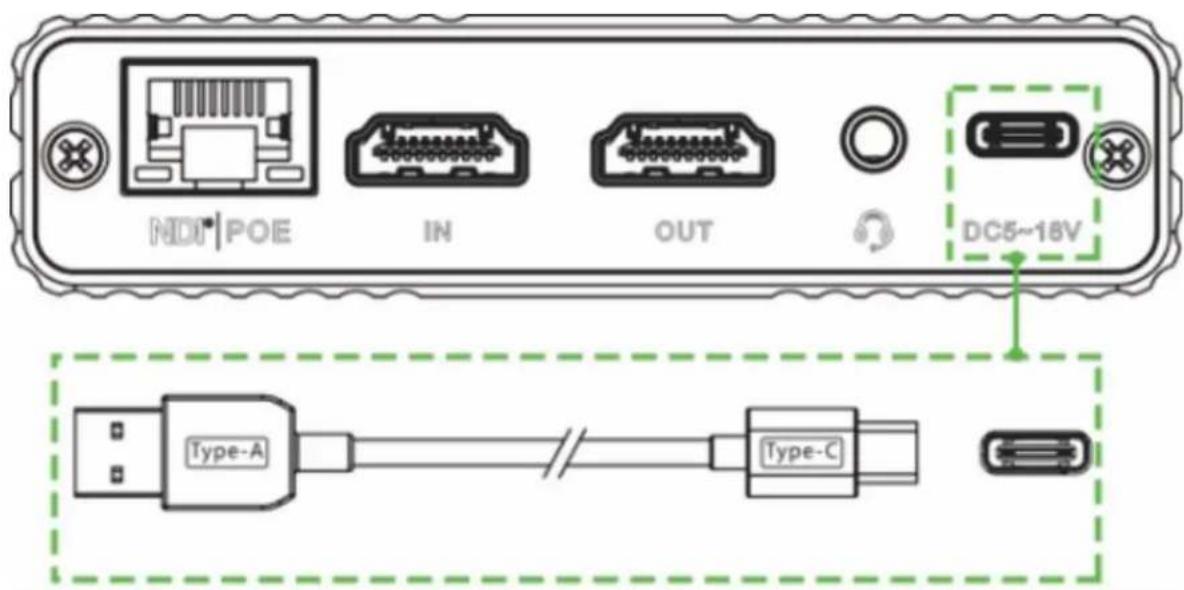
It is packed with one USB charging cable, which can power the device by a DC5-18V power supply.
5 Login and Network Configuration
5.1 Login to the Device via Ethernet
First connect the Ethernet port of the NDI encoder and the computer to the same switch, or connect the encoder directly to the computer network port. Then configure the encoder and computer to the same network segment so that the computer can access to the web page of the encoder.
The default management IP address of the encoder is 192.168.1.168. (This is the failsafe address of the device. Generally, do not modify this IP address.) If the IP address of the computer is not in the segment of 192.168.1.*, please set the IP address of the computer network port to 192.168.1.*.
Open the WEB browser, directly input the IP address of the encoder (default is 192.168.1.168) or the URL http://192.168.1.168 and press Enter to open the login interface. After opening the page, an authentication dialog will pop up, please fill in the username and password, the default username is admin, the default password is admin, and then click "Login".

Note: Due to the browser compatibility issues, it may cause the web page display abnormal, it
is recommended to use Chrome or Firefox.
For the first login or the first login after restoring the factory settings, you will need to agree to the "EULA" that pops up. Otherwise, the NDI stream service cannot be used normally.
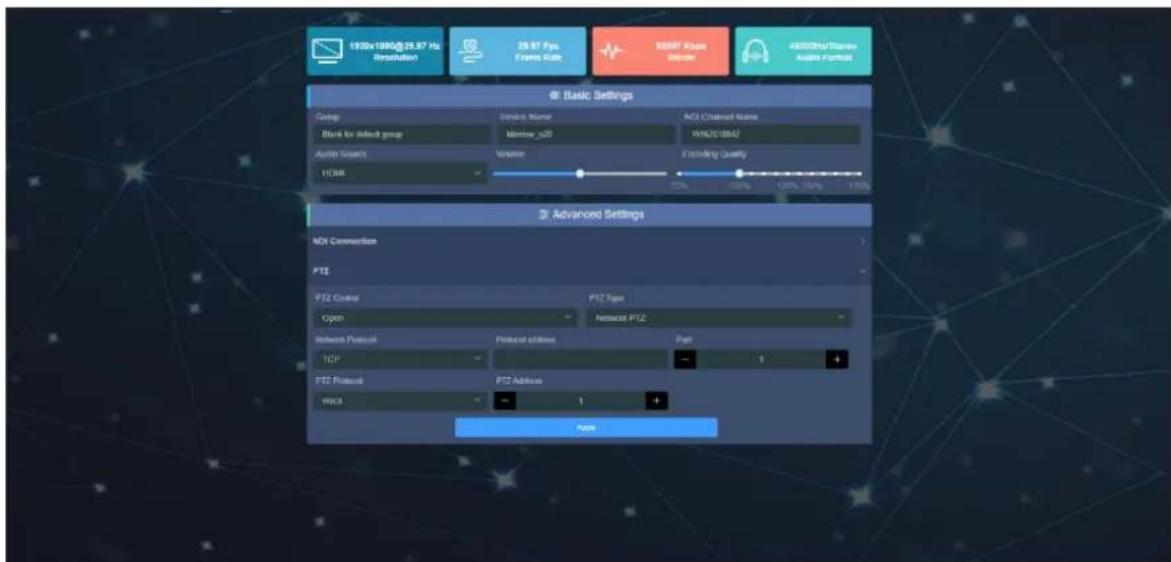
After login, the encoding and function parameters can be set on the encoder management web page. The page is shown as below:
5.2 Network Configuration
The Ethernet port of the device is connected through the network cable and it can be configured with an IP address. The device network port can be configured with dual IP addresses. The IP address configured here is not the default management IP address. The Ethernet port defaults to DHCP to obtain an IP address. It will automatically obtain a complete IP address, Gateway and DNS according to this LAN.
Click “Network” to view the device Ethernet address configuration and Failsafe address The Failsafe address is the default management IP address. Generally, you do not need to make special settings.
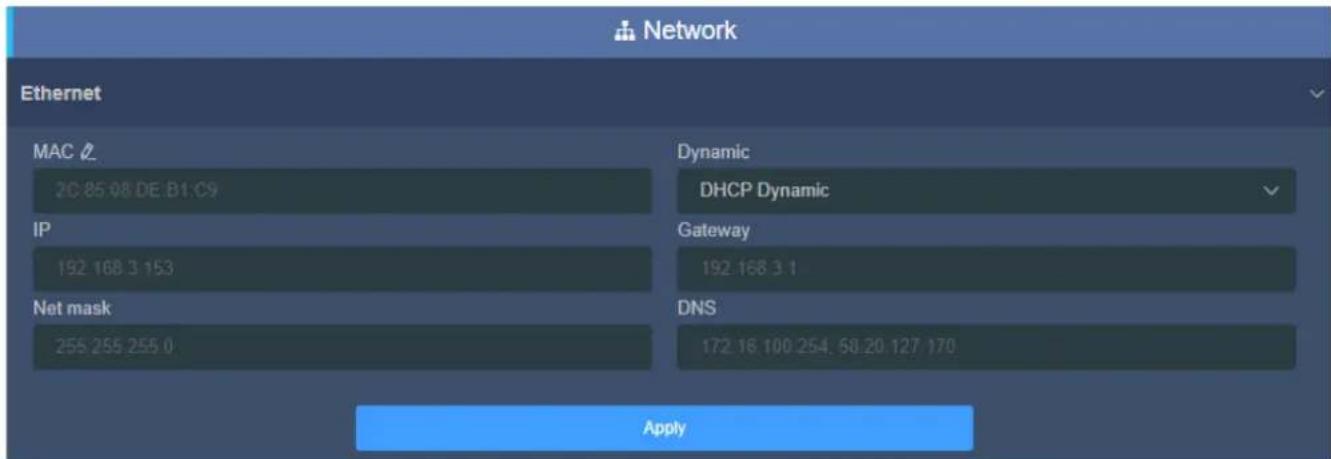
There are two ways to get the address, one is DHCP, and the other is manual setting. To use DHCP to automatically obtain IP, you must first ensure that the router or switch has enabled
the DHCP service. This method is simple and convenient, but the IP obtained by DHCP changes continuously, and you cannot directly know what IP address the encoder gets. To set the IP manually, you need to enter a fixed IP to the encoder, and this IP address is fixed as long as the encoder does not restore factory settings, this method is more stable. Therefore, each method has its own advantages, and can be selected accordingly.
5.3 Local-link (Failsafe)
The Failsafe is specifically configured with a dedicated IP address on the Ethernet interface (It is the default management IP address of Ethernet port). Even if you forget the Ethernet IP settings, or if the IP address obtained by DHCP and cannot be known, you can still connect and access the device through the default IP address.

"Failsafe" is to bind the device to an independent IP address. This IP address does not affect the use of other network cards. In special cases, it can be used to manage the encoder. This address can be changed manually (Usually no need to change), the default address is 192.168.1.168.

Note: When accessing the device by Failsafe address, your computer must have an IP address the same network segment.
6 NDI discovery and monitoring
N40 for NDI converter is a professional video encoding/decoding device for NDI video production industry. It can convert HDMI video source into NDI stream and transmit video through Ethernet for any compatible systems, devices or software in the network.
6.1 NDI Tools Installation
Download and install NDI Tools from NewTek website:
https://www.newtek.com/ndi/tools/#
| NDI®Tools for Windows | NDI®Tools for Mac |
| NDI Studio Monitor NDI Scan Converter NDI Virtual Input NDI VLC Plugin NDI for Adobe Creative Cloud NDI Import I/O for Adobe CC NDI Access Manager NDI Test Patterns NDI||HX Driver | NDI Video Monitor NDI Scan Converter NDI Virtual Input NDI for Adobe Creative Cloud NDI Import I/O for Adobe CC Access Manager NDI||HX Driver* *Separate installer provided |
| DOWNLOAD | DOWNLOAD |
6.2 NDI Discovery and Connection
On the PC side, other NDI-enabled tools of the same subnet can discover the encoder automatically. Currently there are many NDI-enabled software. The following is an example of how to automatically discover and pull NDI video streams by using NewTek studio monitor and vMix.
Open NewTek studio monitor software, click the icon in the upper left corner to display the list of device names that have been discovered. The device list will be displayed according to different channel names. Select the device you want to connect, and then you can pull the current video stream of the converter.
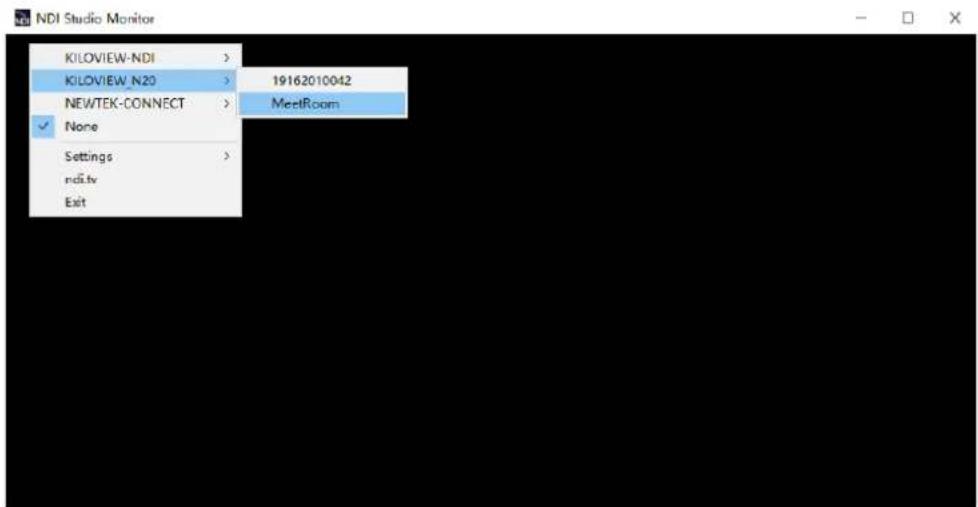
Note: After opening the selected video of the converter by Studio Monitor, click a lower right corner of the player to open the Web page of the converter directly, which is convenient for the management of the converter.
Open vMix, click “Add Input” of the left corner, select “more”, which shows it can add various sources. Click “NDI/desktop capture”, it shows NDI devices list. According to device names and channel names, you could select the device you want to add, then click “OK”, the video source will be added into vMix play source list.

Note: NDI discovery is implemented through multicast. Therefore, the NDI converter and other NDI devices should be in the same subnet. The device is configured with the IP address of the same subnet and can communicate with each other (It can be obtained automatically). Otherwise, NDI stream may not be automatically discovered NDI stream.
6.3 NDI Encode Bit Rate
The N40 device transmission requires high bit rate, so the device needs to be connected to a Gigabit network. The pulling stream device also needs a Gigabit network. Otherwise, the stream play will be abnormal or not smooth. The following table shows the reference bit rate at different resolution.
| Resolution | Coded output bandwidth |
| 4KP60 | 250Mbps |
| 4KP30 | 200Mbps |
| 1080P60 | 125Mbps |
| 720P60 | 90Mbps |
7 Encoding Parameter Configuration
7.1 Status Column

● Resolution shows the input video resolution
● Framerate shows the input video framerate
● Bitrate shows the real-time encoding bitrate
● Audio format shows the encoding audio sample rate and audio channel
7.2 Basic settings
NDI is a protocol developed by NewTek which is used for video-over-IP transmission in LAN with features of high quality and low latency. Set NDI related parameters in “Basic settings”

- Group: To configure the devices to a group, the name of the group can be the combination of characters and figures. To configure multiple groups is allowed and the group names should be separated by comma(,). The default group name is “public”.
● Device Name: The device name of NDI source. - NDI channel name: When there are multiple NDI sources in the same network, as the default channel names are the same, so it's required to modify the channel name with different parameters to identify each device correctly.
- Audio source: Default is HDMI embedded audio. Selecting analog audio input is not valid. Analog audio input can't be encoded as audio source, only for intercom.
● Volume: For gain adjustment of input line-in audio or HDMI embedded audio. - Encoding quality: When the encoding quality is reduced/increased, the encoding quality and encoding bitrate will also be lowered/increased.
Note: It's not required to save after modifying the device group, device name and channel name. After the modification, it will take effect immediately if clicking on other places on the web page.
7.3 Advanced settings
7.3.1 NDI Connection
If choosing multicast mode, NDI transmission will be executed in multicast mode. Click “Generate”, a multicast IP will be generated randomly, or you can configure it manually
and click "Apply" to take effect.

7.3.2 PTZ control (Not available in this version)
The device supports PTZ control, both protocol types of PTZ over Ethernet and serial port are supported.
PTZ over Ethernet needs to correctly configure the protocol address and port of the connected PTZ, and specify the PTZ control protocol (Sony Visca, Pelco-D/P supported).

A USB to RS232/RS422/RS485 adaptor is required through TYPE-C to USB. Inserting the USB to RS232/RS422/RS485 adaptor, the device supports PTZ control over serial port.

After configuring the control parameters correctly, PTZ control service can be realized by PTZ control panel of NewTek Studio Monitor.

8 NDI Decoding Configuration
Click "Decoding" to switch to decoding function on Web Page.
Before using decoding function, please check the Ethernet IP address and log in the WEB page for management with this address, and then switch to decoding function.


Note: Encoding and decoding functions of the device cannot be carried out simultaneously. If device is switched to decoding function, encoding function will be stopped.
Decoding mode will generate one NDI stream for discovery, and the channel name is “Decoding Channel”. Using Studio Monitor to connect the NDI stream and click the gear button in the lower right corner to go to the WEB page.

8.1 Discover NDI Source
In the same LAN, NDI sources can be displayed in the source list through automatic discovery. Click the icon to update NDI source in real time. Click the NDI source corresponded icon , you can add the source to the decoding preset box; Click the NDI source corresponded icon , which can directly decode and output the video.

Click to add NDI sources from different groups or different network segments in the same local area network.
If you want to search for devices with different group names in the same subnet, filling in the specified group name in “Group” box, then click the “Enter” button. At this time, two group names will be displayed in the "Group" box, and then click "OK" (no need to fill in the IP address), the device will search for the NDI sources of these two group names at the same time (You are allowed to add multiple group names to search).
When you need to search for NDI sources across network segments, if the group name is a non-public group, you need to fill in the specified group name firstly, and then fill in the specified IP address in the "IP" box, click the button , this IP address will be added to the "Manual Scan Address List". You can add multiple IP addresses to search at the same time, and then press "OK" to save.
8.2 Output of NDI decoding
You can add up to nine preset decoding sources, by clicking the NDI sources, the device will start decoding the corresponding NDI source. It can be quickly switched and decoded by clicking different NDI sources. By clicking x in the upper right corner of the NDI source in the preset box, you can delete the added source.

There is a blank output box in decoding preset, if switching to a source without video output, the device will output the set color. It can also be used for testing the output to the monitor by choosing a different color.
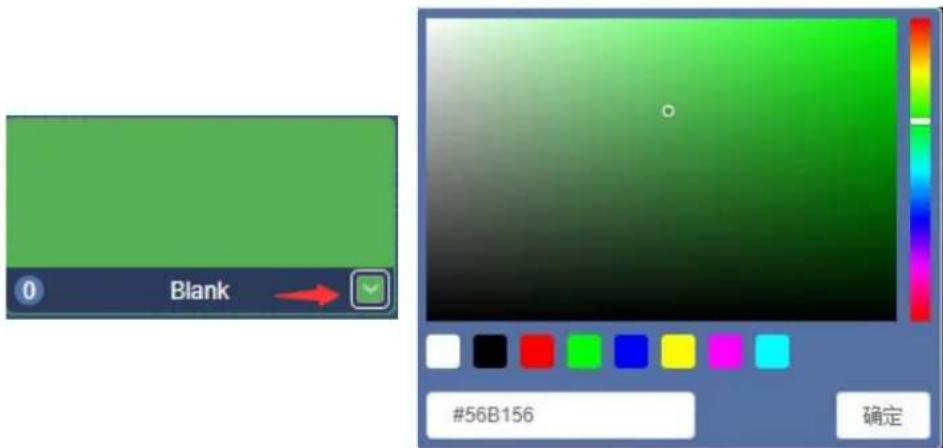
Click the icon ☐ on the right to set parameters for smooth switch. To make sure the smooth switch, if it is a big video or slow transmission, a longer smooth time can be set.
Otherwise it will show the blank screen set previously when output is not ready after switching.

The decoding output switch can also be controlled via keypad (connect with USB), and first you need to connect the keypad by USB.

Press 【NumLock】on the keypad, if the light is on, you can operate the decoding switch. Press 1\~9 to select the corresponding 1\~9 preset decoding source, and press 0 to select blank output.
![Switch Indicator is on 1. Press [NumLock] key (Indicator on) 2. Press 1, 2, 3, 4, 5, 6, 7, 8, 9 to select the corresponding 1-9 preset decoding source, press 0 to select Blank 返回错误项](/content/2026/05/913699/images/47777f78b696735552efe7bf554319dbf5c0ece98efeecc19318d7f3f9ec0353.jpg)
8.3 Decoding Parameters Setting
“Current decoding output” will display the information of the current decoding NDI source name, channel name, resolution/refresh rate, audio parameters, source IP address, real time bit rate and frame rate and so on.

If the current decoding source is disconnected, a warming notice will be displayed at the up-right corner showing the device is offline.
Click 📋 on the right, you can configure the output parameters. The resolution of decoding output will be the same as that of the source. Frame rate and audio sample rate can be set accordingly.

8.4 Discovery service
NDI discovery server can replace NDI auto discovery with server. All NDI sources are registered with server in a centralized way, and the receiving end obtains NDI source from the server. Through this, the device can also send the output video stream to the receiving end of the cross-network segment.
First, download and install the NDI SDK on a Windows computer at the receiving end. After installation, run bin/ utilities/x64/NDI discovery Service.exe.
![DHProgram Files\NewTek\NDI 4 SDK(BH)\Unibesud4\NewTek NDI Discovery Service.exe NDI Discovery Service v1.00 (c)2019 NewTek, inc. 0:00:01 [----] 0 Sources, 0 Listeners.](/content/2026/05/913699/images/597ff21bdab32327b5b2921025dfcf4c59dc4b523af0ca67f0eca98966681f1f.jpg)
NDI encoder configures the receiving IP address in the discovery server, and NDI will be registered with the server. It is recommended that the receiving address should be configured as a static IP address to prevent the loss of NDI connection due to IP reallocation
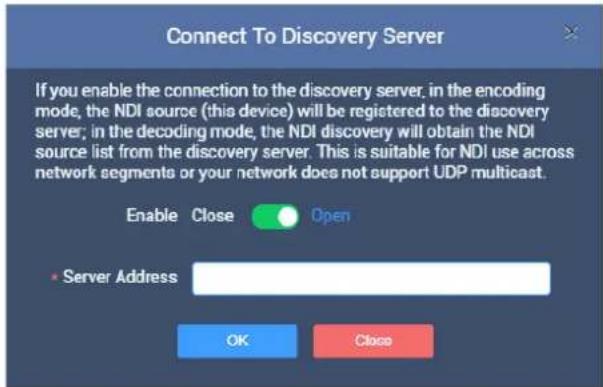
1) Receiving via Kiloview FULL NDI decoder
Switch the FULL NDI device to decoding mode, click "discover server", and "Enable" it. Fill in the server address with the same registered address of the NDI encoder. Click "OK", all NDI sources registered to the discovery server can be found by scanning the list.

2) Receiving via computer-based software
Install NDI tools on the receiving end and open “NDI access manager”. Click to enter the "advanced", cancel the "multicast sending enabled" function, select "Use discovery server", and set the "Server IP" address to the IP address of your computer that enables the discovery server function. After configured, the receiving end can discover the NDI stream registered with the server.

Note: after this function is enabled, the mDNS auto discovery function is invalid. The stream of the decoder can only be sent to the specified server, and the receiver end must register with the same discovery server to pull the NDI stream.
9 System Settings
9.1 User Management
You can add and delete users, modify the user password and so on.

9.2 Quick Reset
"Quick reset" is used to reset the coding service. It is usually applied after the parameters modifications to take effect immediately or abnormal encoding/ decoding. It takes about 3 seconds and current coding service will be interrupted.
9.3 Reboot
"Reboot" is used to restart device software, it takes about 1 minute.
9.4 Restore Factory Settings
If the device can't work properly after parameters modification (typical case is after modifying the IP address which makes network not accessible to the device), you can restore the factory settings to restore the device configuration to the default parameters.
Two Ways of Restore Factory Settings:
1) In Web page, select "System Setup"> "Restore".
2) RESET Button: Press the reset button at the bottom of the device and hold the for more than 5 seconds. The device will be restored to the factory settings. Restoring the factory settings will lead to a hard reboot and the reboot process will take
approximately 1 minute.
9.5 Firmware Upgrade
Our product will be constantly improved, so we will continue to upgrade the device for bug fixing. Please contact our technical support to obtain the upgrade package or download it on our website.
Click “System Setup”, select “Firmware” go to the firmware upgrade interface. After uploading the firmware to the device, click "Upgrade" to start. The entire upgrade process will last for 2-3 minutes (depending on the firmware size and network conditions). The device will automatically restart, remember not to power off during the upgrade process, otherwise the upgrade may fail and the device will be abnormal. If you need help, please contact our technical support to complete the upgrade.

After upgrading, click 📄 at the upper right corner of the WEB page to confirm whether the current software version and the latest upgrade package are the same, to make ensure the device upgrading is successful.

Thank you for reading!
Changsha KILOVIEW Electronics CO.,LTD.
Service Hotline: 86-731-88315979
Website: en.kiloview.com
Technical support Email: support@kiloview.com
Skype: kiloview-support/keqiu wang
WhatsApp: +86-18573195156/18573195256
Address: 188#, Middle Huanbao Rd, Yuhua District, Changsha, Hunan Province, China

- 4K UHD HDMI/NDI Bi-Directional Converter
- USER MANUAL
- Legal Notices
- COTENTS
- PRODUCT INTRODUCTION ....3
- USER GUIDE....6
- PACKING LIST AND INTERFACE DESCRIPTION ....7
- INSTALLATION AND CONNECTION....9
- LOGIN AND NETWORK CONFIGURATION ....11
- NDI DISCOVERY AND MONITORING....14
- ENCODING PARAMETER CONFIGURATION ....16
- NDI DECODING CONFIGURATION....20
- SYSTEM SETTINGS....27
- Product Introduction
- Product Features
- USER GUIDE
- Packing List and Interface Description
- Packing List
- Interface Description
- Led indicators
- Installation and connection
- Connect Video Signal
- Connect Network
- Connect Audio
- Connect Power Supply
- Login and Network Configuration
- Login to the Device via Ethernet
- Network Configuration
- Local-link (Failsafe)
- NDI discovery and monitoring
- NDI Tools Installation
- NDI Discovery and Connection
- NDI Encode Bit Rate
- Encoding Parameter Configuration
- Status Column
- Basic settings
- Advanced settings
- NDI Connection
- PTZ control (Not available in this version)
- NDI Decoding Configuration
- Discover NDI Source
- Output of NDI decoding
- Decoding Parameters Setting
- Discovery service
- 2) Receiving via computer-based software
- System Settings
- User Management
- Quick Reset
- Reboot
- Restore Factory Settings
- Two Ways of Restore Factory Settings:
- Firmware Upgrade
- Thank you for reading!
Brand : Kiloview
Model : RN-40
Category : Video Converter