DAT-100 - Testeur audio numérique USL - Free user manual and instructions
Find the device manual for free DAT-100 USL in PDF.


| Brand | USL |
| Model | DAT-100 |
| Product Type | Handheld AES/EBU Digital Audio Generator |
| Primary Application | Cinema audio troubleshooting and diagnostics |
| Number of Audio Channels | 16 (8 pairs AES/EBU) |
| Output Connectors | 2 x DB25 female (USL pinout and DMA8 pinout) |
| Audio Sources | 1 kHz tone at -20dBFS, pink noise, spoken channel identifier |
| Channel Modes | Manual 8/16 channel, Automatic 8/16 channel |
| Power Source | 2 x AA batteries (alkaline included or optional NiMH rechargeable) |
| Battery Life (alkaline) | Approximately 8-10 hours (estimated) |
| Charger | External USL-supplied charger for NiMH batteries (optional) |
| Firmware Update | Via USB port using terminal emulation (e.g., TeraTerm Pro) |
| Dimensions (approx.) | 1.5 x 3.0 x 6.0 inches (38 x 76 x 152 mm) |
| Weight (approx.) | 0.5 lb (0.23 kg) |
| Warranty | One Year Limited Warranty |
| Compliance | WEEE Directive 2002/96/EC |
| Manufacturer | USL, Inc., San Luis Obispo, CA, USA |
Frequently Asked Questions - DAT-100 USL
User questions about DAT-100 USL
0 question about this device. Answer the ones you know or ask your own.
Ask a new question about this device
Download the instructions for your Testeur audio numérique in PDF format for free! Find your manual DAT-100 - USL and take your electronic device back in hand. On this page are published all the documents necessary for the use of your device. DAT-100 by USL.
USER MANUAL DAT-100 USL
One Year Limited Warranty

USL, Inc. warrants that each product manufactured by it will be free from defects in material and workmanship under normal usage for a period of one (1) year after its purchase new from an authorized dealer. Our obligation under this warranty is limited to repairing or replacing any product or component which we are satisfied does not conform with the foregoing warranty and which is returned to our factory, freight paid, or serviced by one of our authorized contractors. The forgoing warranty is exclusive and in lieu of all other warranties, whether expressed or implied. Such warranty shall not apply to any product or component (A) repaired or altered by anyone other than USL, Inc. or an authorized service contractor; (B) tampered with or altered in any way or subjected to misuse, negligence or accident or (C) which has been improperly connected installed or adjusted other than in accordance with USL, Inc.'s instruction.
TABLE OF CONTENTS
Introduction......4
Batteries....4
AES/EBU Outputs....5
Switches, Indicators & Connectors....6
DAT-100 Operation....7
Mode Selection....7
Output Channel Selection....6
Source....8
Battery Indicator......8
Charger....8
Firmware Update....9
Connector Guide....10
Introduction
The DAT-100 is a simple handheld AES/EBU digital audio generator designed to assist cinema technicians debugging digital audio problems. The DAT-100 has two 25 pin output connectors to drive equipment with the USL or DMA8 digital audio pinout. Substitution of the DAT-100 for an AES/EBU source allows the technician to determine if a problem is in the source, the destination, or the cable between the two. The DAT-100 can also be used for a quick check of downstream equipment such as crossovers, power amplifiers, speakers, and the speaker wiring. If audio from the DAT-100 is heard in the auditorium, the equipment is working properly. The DAT-100 allows the user to select which of the 16 audio channels are being driven. It may also be used as a quick check that the appropriate speaker is being driven by each audio channel.
The USL pin out is an industry standard pin out that was a proposed SMPTE standard that was never adopted. Note that the front panel of the DAT-100 shows this as a “DCI Pinout.”
Batteries
The DAT-100 is shipped with two alkaline AA batteries installed. As an option, it is available with NiMH rechargeable batteries and an external charger.
When using rechargeable batteries and the USL supplied charger, turn the DAT-100 power switch to the off position to charge the batteries. The batteries will not be recharged when the DAT-100 is on. The DAT-100 cannot be powered by the external charger.
Use only the USL supplied charger and only with rechargeable batteries. Use of other chargers or batteries may damage the charger, the batteries or the DAT-100.
AES/EBU Outputs
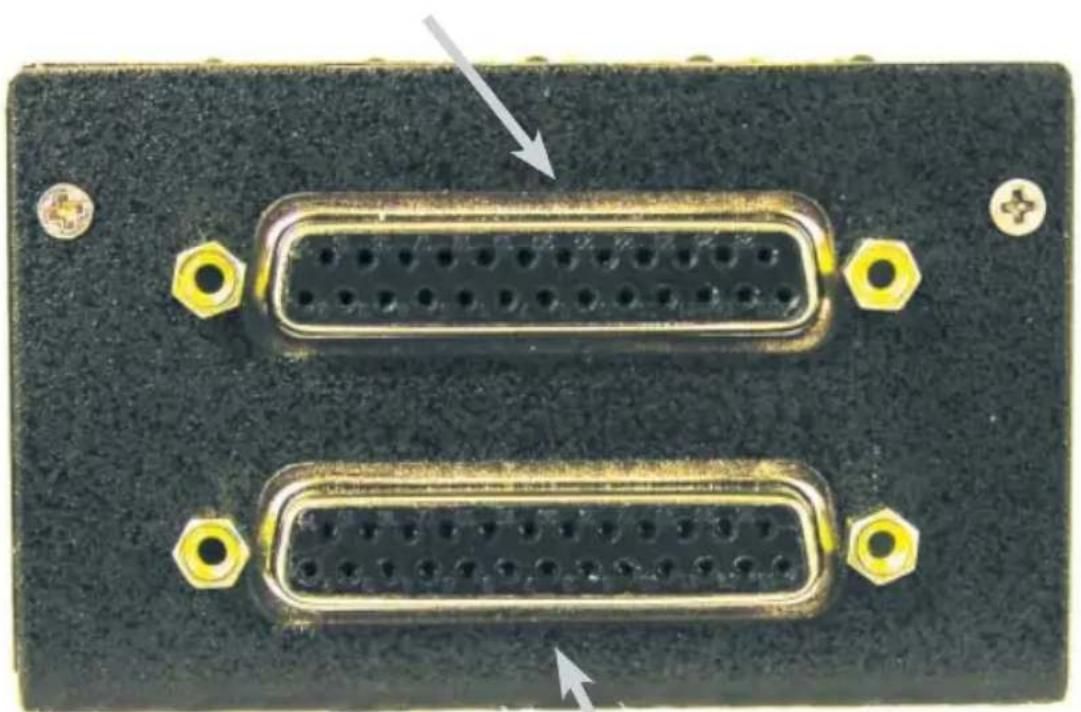
The DAT-100 has two 25 pin D connectors providing AES/EBU digital audio outputs. The top connector provides eight AES/EBU pairs (16 audio channels) using the USL pinout. The bottom connector provides 8 AES/EBU pairs (16 audio channels) using the Dolby DMA8 pinout.
| DAT-100 Channel Name | AES/EBU Channel Number | SMPTE Channel Name (Interop Assignments) | Channel Name | DMA-8 Pins +, -, shield | USL Pins +, -, shield |
| L | 1 | L | Left | 14, 2, 1 | 24, 12, 25 |
| R | 2 | R | Right | 14, 2, 1 | 24, 12, 25 |
| C | 3 | C | Center | 3, 16, 15 | 10, 23, 11 |
| SW | 4 | LFE | Low Frequency Effects | 3, 16, 15 | 10, 23, 11 |
| LS | 5 | Ls | Left Surround | 17, 5, 4 | 21, 9, 22 |
| RS | 6 | Rs | Right Surround | 17, 5, 4 | 21, 9, 22 |
| LC | 7 | HI | Hearing Impaired | 6, 19, 18 | 7, 20, 8 |
| RC | 8 | VI-N | Visually Impaired Narrative | 6, 19, 18 | 7, 20, 8 |
| 9 | 9 | Lc | Left Center | 8, 21, 20 | 18, 6, 9 |
| 10 | 10 | Rc | Right Center | 8, 21, 20 | 18, 6, 9 |
| 11 | 11 | Lrs | Left Rear Surround | 22, 10, 9 | 4, 17, 5 |
| 12 | 12 | Rrs | Right Rear Surround | 22, 10, 9 | 4, 17, 5 |
| 13 | 13 | Motion Data | 11, 24, 23 | 15, 3, 16 | |
| 14 | 14 | 11, 24, 23 | 15, 3, 16 | ||
| 15 | 15 | 25, 13, 12 | 1, 14, 2 | ||
| 16 | 16 | 25, 13, 12 | 1, 14, 2 |
Switches, Indicators & Connectors
On/Off Switch
Slide the switch to the on position to turn on the unit. Slide the switch to the off position to turn the unit off and enable the optional external battery charger.
Power Indicator
The power indicator lights when the unit is on. It flashes when the batteries are low and need replacement or recharging.
Source Button and Indicators
The source indicators show which audio source (tone, pink noise, or channel ID) is currently driving the output. Press the source button to advance to the next source.
Mode Button and Indicators
Press the mode button to change between manual and automatic channel changes. There are actually four modes: Manual 8 channel, Manual 16 channel, Automatic 8 channel, and Automatic 16 channel. When a mode is selected, the mode LED shows whether it is manual or automatic. The channel LED shows whether 8 or 16 channels will be used.
Channel Select
When in manual mode, the channel select advances the audio to the next output channel. The LEDs indicate the channel currently being driven.
Audio Output Connectors
As discussed above, the output connectors provide 8 or 16 channels of AES/EBU audio (one channel at a time) with either DMA8 or USL pinout.
Charger Connector
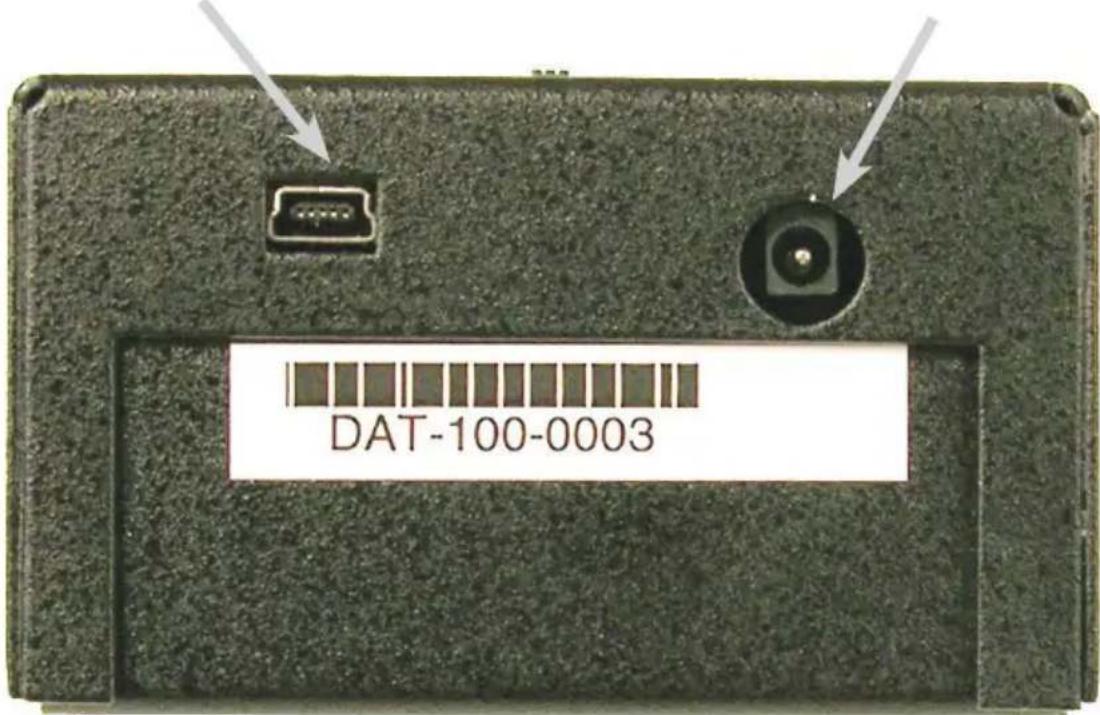
Plug the USL supplied charger for the DAT-100 in to this connector. The internal NiMH batteries may only be recharged when the DAT-100 power switch is off.
USB Connector
Use this connector to connect to a host computer to update the firmware in the DAT-100.
DAT-100 Operation
Plug an AES/EBU cable in to the appropriate output jack. Slide the power switch to ON. The BATTERY, TONE, MANUAL and "L" LEDs light. The BATTERY LED indicates the unit is on. If the BATTERY LED is flashing, the batteries need to be replaced or recharged. The TONE LED indicates the DAT-100 is producing a 1kHz tone at -20dBFS. The MANUAL LED indicates the unit is in Manual Mode. "L" LED indicates that the Left output is being driven in 8 channel mode.
Mode Select
The DAT-100 can send audio to one of 16 channels. The channel can be selected Manually or advance Automatically. In addition, the DAT-100 can scan through the first 8 channels or all 16 channels. Pressing and releasing the MODE button selects one of these four modes. In the MANUAL modes, the user advances the output to the next channel by pressing the Channel Select button. In the AUTO modes, the DAT-100 sequences through the 8 or 16 channels automatically.
Pressing and releasing the MODE button sequences through the following modes:
- Manual, 8 channels (L LED lit)
- Manual, 16 channels, (9 LED lit)
- Automatic, 8 channels (L LED initially lit, then automatic advance starts)
- Automatic, 16 channels (9 LED initially lit, then automatic advance starts
Note that the DAT-100 enters the Manual 8 channel mode each time it is powered up.
Channel Select
Pressing and releasing the CHANNEL SELECT button changes the output channel being driven to the next channel in the 8 or 16 channel sequence (as set using the MODE button). In MANUAL modes, the channel does not advance until the CHANNEL SELECT button is pressed. In the AUTO modes, the output channel advances automatically, but the sequence can be sped up by pressing the CHANNEL SELECT button between automatic advances.
Source
Pressing the source button advances the source selection to the next source. The DAT-100 can output a 1kHz tone at -20dBFS, pink noise, and a spoken channel identifier. The source LEDs indicate which type of sound is currently being output. The spoken channel identifier speaks the channel name (ie, L, LC, C, RC, etc.) or number (9, 10, 11, etc.) in English.
The SW channel produces a 100Hz tone at -20dBFS in the tone and channel identifier source modes.
Battery Indicator
The battery indicator glows steadily when the DAT-100 is on. If the indicator flashes, the batteries are low and need to be replaced or recharged.
Charger
As an option, the DAT-100 is available with rechargeable NiMH batteries and an external charger. To recharge the batteries, turn off the DAT-100, plug the charger in to the DAT-100, and the charger into an AC outlet. The charger has an LED that is red when the battery is charging and green when the battery has completed charging. The LED is also green when the charger is not connected to the DAT-100. Users may want to connect the DAT-100 to its charger each night to ensure the batteries are fully charged for the next day's use.
Use only the USL supplied charger and only with rechargeable batteries. Use of other chargers or batteries may damage the charger, the batteries or the DAT-100.
Firmware Update
The DAT-100 firmware can be updated in the field through the USB port. Firmware and the required host update software is available at http://uslinc.com/ftp/DAT-100/. Firmware updates are done using a terminal emulation program to send a ASCII text to the DAT-100. A “virtual communications port” is set up to direct terminal communications to the DAT-100 through USB. A driver for this “VCP” needs to be installed. Drivers for various operating systems are available. TeraTerm Pro is suggested as a terminal program for Windows systems. It is easily configurable and reliable. It can also be downloaded from the URL above. Here is a step by step procedure to do a firmware update on the DAT-100 using a Windows host computer. Make appropriate substitutions for other operating systems.
- Download and install the appropriate VCP for your operating system.
- Download and install TeraTermPro (if you're using Windows).
- Download the latest DAT-100 firmware. It has a filename of DAT100-YYMMDD.hex where YYMMDD is the year, month, and date of the revision.
- Push the Channel Select button while moving the on/off switch from off to on. No LEDs will light.
- Plug a USB cable in to the DAT-100 and the host computer. A new hardware dialog may appear. Go through the procedure to install the VCP driver. It will be identified as a Silicon Labs Virtual Com Port.
- Open the Device Manager to view the available COM ports. You should see a COM port identified as SiLabs VCP. Note the COM number it is assigned.
- Open TeraTermPro. Select Serial Port in the setup menu.
- Set TeraTermPro to use the COM port identified above. Set the Baud Rate to 19200. Set Data to 8 bit. Set Parity to none. Set Stop to 1 bit. Set Flow Control to hardware. Leave transmit delays at 0.
- Press the ENTER key on the host computer. You should see a greater than symbol (>) appear in TeraTermPro window. The bootloader is ready to accept new firmware.
- In the TeraTermPro File menu, select Send File. Select the previously downloaded firmware update file and press OK.
- TeraTermPro will display the data as it is being sent to the DAT-100. The power LED on the DAT-100 will fl icker as it receives data.
- When the download is complete, the data will stop on TeraTermPro. The DAT-100 will immediately start executing the new firmware version. The USB cable may be disconnected and TeraTermPro closed at any time after the download completes.
DCI PINOUT
natural_image
Close-up of a black electronic device with two connected 24-pin D-sub port (no text or symbols visible)DMA8 PINOUT
USB
CHARGER

natural_image
Simple line drawing of a trash bin with no text or symbolsWHEELIE-BIN SYMBOL
The Wheelie-Bin symbol is attached to this product in compliance with the EU Directive 2002/96/EC on Waste Electrical and Electronic Equipment (WEEE). Its purpose is to deter the improper disposal of this product and to promote reuse and recycling.
PROPER DISPOSAL
In conformance with the Directive, at end of life this product should be either: 1) sent to an appropriate recycling facility for disassembly and recycling; or 2) returned to the supplier.
Under no circumstances should this product be deposited in a landfill for disposal.
HAZARDS OF NON-COMPLIANCE
Electrical and electronic products may contain chemicals which can leach into the groundwater and cause health concerns through contaminated drinking water. Failure to dispose of this product in compliance with the WEEE Directive may result in penalties as determined by local ordinance.
Revision History
120901 – Original Release
130610 – Revise to show 16 channel DMA8 pin outs. Other editorial revisions.

Precision Sound • Light • Color
181 Bonetti Drive San Luis Obispo, CA 93401 ph: 805-549-0161 fax: 805-549-0163 e-mail: usl@uslinc.com
- One Year Limited Warranty
- TABLE OF CONTENTS
- Introduction
- Batteries
- AES/EBU Outputs
- Switches, Indicators & Connectors
- On/Off Switch
- Power Indicator
- Source Button and Indicators
- Mode Button and Indicators
- Channel Select
- Audio Output Connectors
- Charger Connector
- USB Connector
- DAT-100 Operation
- Mode Select
- Source
- Battery Indicator
- Charger
- Firmware Update
- WHEELIE-BIN SYMBOL
- PROPER DISPOSAL
- HAZARDS OF NON-COMPLIANCE
Brand : USL
Model : DAT-100
Category : Testeur audio numérique