
Rubicon R8a - Loudspeaker SAMSON - Free user manual and instructions
Find the device manual for free Rubicon R8a SAMSON in PDF.


| Product Type | Active 2-way ribbon studio reference monitor |
| Woofer | 8-inch copolymer cone with butyl rubber surround |
| Tweeter | 1 x 2-inch velocity ribbon (planar) transducer |
| Amplifier Power | Bi-amped: 75W RMS (low frequency) + 25W RMS (high frequency) |
| Frequency Response | 40 Hz – 27 kHz ±3 dB |
| Crossover Frequency | 3 kHz, 4-pole (24 dB/octave) filter |
| Inputs | Balanced XLR (+4 dBu), balanced 1/4-inch TRS (+4 dBu), unbalanced RCA (-10 dBV) |
| Ribbon Level Control | 4-position switch: -2 dB, 0 dB (flat), +2 dB, +4 dB at 12 kHz |
| Volume Control | Rear panel rotary knob for overall output level |
| Enclosure Construction | MDF (Medium Density Fiberboard) with tuned port |
| Finish | Black textured epoxy paint (scuff resistant) |
| Magnetic Shielding | Yes, for use near computer monitors |
| Power Requirements | 115VAC or 230VAC (rear panel selector), 60/50 Hz |
| Power Consumption | 100W (maximum, estimated) |
| Dimensions (H x W x D) | 17.25 x 11.18 x 12 inches (437 x 284 x 305 mm) |
| Weight | 26.5 lbs (12.02 kg) |
| Included Accessories | IEC power cable, owner's manual |
| Warranty | Three-year extended warranty (registration required) |
Frequently Asked Questions - Rubicon R8a SAMSON
User questions about Rubicon R8a SAMSON
0 question about this device. Answer the ones you know or ask your own.
Ask a new question about this device
Download the instructions for your Loudspeaker in PDF format for free! Find your manual Rubicon R8a - SAMSON and take your electronic device back in hand. On this page are published all the documents necessary for the use of your device. Rubicon R8a by SAMSON.
USER MANUAL Rubicon R8a SAMSON
Two-way Active Ribbon Reference Monitor
Owners Manual
Safety Instructions/Consignes de sécurité/Sicherheitsvorkehrungen/Instrucciones de seguridad
WARNING
DO NOT EXPOSE THIS EQUIPMENT
TO RAIN OR MOISTURE
AVIS
RISQUE DE CHOC ELECTRONIQUE
NE PAS OUVRIR
CAUTION
FOR CONTINUED PROTECTION AGAINST RISK OF FIRE, REPLACE ONLY WITH SAME TYPE FUSE
ATTENTION
UTILISER UN FUSIBLE DE
RECHANGE DE MÊME TYPE

CAUTION
RISK OF ELECTRIC SHOCK
DO NOT OPEN

WARNING: To reduce the risk of fire or electric shock, do not expose this unit to rain or moisture. To reduce the hazard of electrical shock, do not remove cover or back. No user serviceable parts inside. Please refer all servicing to qualified personnel. The lightning flash with an arrowhead symbol within an equilateral triangle, is intended to alert the user to the presence of uninsulated "dangerous voltage" within the products enclosure that may be of sufficient magnitude to constitute a risk of electric shock to persons. The exclamation point within an equilateral triangle is intended to alert the user to the presence of important operating and maintenance (servicing) instructions in the literature accompanying the product. Important Safety Instructions
- Please read all instructions before operating the unit.
- Keep these instructions for future reference.
- Please heed all safety warnings.
- Follow manufacturers instructions.
- Do not use this unit near water or moisture.
- Clean only with a damp cloth.
- Do not block any of the ventilation openings. Install in accordance with the manufacturers instructions.
- Do not install near any heat sources such as radiators, heat registers, stoves, or other apparatus (including amplifiers) that produce heat.
- Do not defeat the safety purpose of the polarized or grounding-type plug. A polarized plug has two blades with one wider than the other. A grounding type plug has two blades and a third grounding prong. The wide blade or third prong is provided for your safety. When the provided plug does not fit your outlet, consult an electrician for replacement of the obsolete outlet.
- Protect the power cord from being walked on and pinched particularly at plugs, convenience receptacles and at the point at which they exit from the unit.
- Unplug this unit during lightning storms or when unused for long periods of time.
- Refer all servicing to qualified personnel. Servicing is required when the unit has been damaged in any way, such as power supply cord or plug damage, or if liquid has been spilled or objects have fallen into the unit, the unit has been exposed to rain or moisture, does not operate normally, or has been dropped.
Connecting to the Rubicon R10s Subwoofer 11
Rubicon R8a Connections 12
Rubicon R8a Specifications 1 3
Copyright 2005 - 2006, Samson Technologies Corp.
Printed December, 2006 v1.2
Samson Technologies Corp.
45 Gilpin Avenue
Hauppauge, New York 11788-8816
Phone: 1-800-3-SAMSON (1-800-372-6766)
Fax: 631-784-2201
www.samsontech.com
Introduction
Thank you for purchasing the Rubicon R8a Studio Reference Monitors by Samson Audio. The Samson Rubicon R8a are self-powered, near-field monitors featuring bi-amp power, superior electronics, robust woofers and advanced designed velocity ribbon tweeters. The proper implementation of these elements results in a monitor with a linear response from bottom to top with tight lows and articulate highs. The R8a features Samson's proprietary 1 x 2-inch velocity ribbon tweeter, which offer extremely low distortion and sweet highs that are clear and precise. For the thunderous lows, the R8a features an 8-inch copolymer woofer. Like all Rubicon monitors, the R8a is bi-amped, with 75 watts of low frequency power and 25 watts for the highs. The Rubicon R8a monitors provide an ideal near-field monitor system for studios, video post production suites, fixed installations or where great sound is desired.
In these pages, you'll find a detailed description of the features of the Rubicon R8a monitors, as well as a guided tour through its control panel, step-by-step instructions for its setup and use, and full specifications. You'll also find a warranty card enclosed—please don't forget to fill it out and mail it in so that you can receive online technical support and so we can send you updated information about these and other Samson products in the future. Also, be sure to check out our website (www.sam-sontech.com) for complete information about our full product line.
With proper care and adequate air circulation, your Rubicon R8a will operate trouble free for many years. We recommend you record your serial number in the space provided below for future reference.
Serial number:
Date of purchase: ____
Should your unit ever require servicing, a Return Authorization number (RA) must be obtained before shipping your unit to Samson. Without this number, the unit will not be accepted. Please call Samson at 1-800-3SAMSON (1-800-372-6766) for a Return Authorization number prior to shipping your unit. Please retain the original packing materials and if possible, return the unit in the original carton and packing materials. If you purchased your Samson product outside the United States, please contact your local distributor for warranty information and service.
Rubicon R8a Features
natural_image
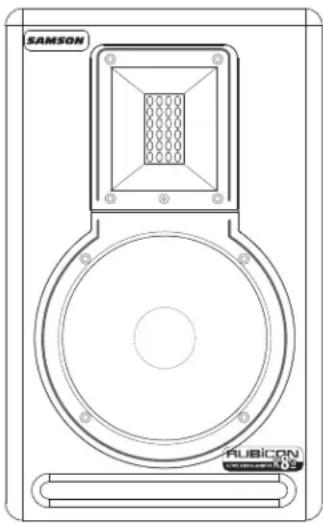
Line drawing of a Samsung audio speaker with no text or symbolsThe Samson Rubicon R8a reference monitors provide a smooth response that is accurate, and at the same time, pleasant to listen to. Here are some of its main features:
- Two-way, active ribbon studio monitor with ported tuned enclosure providing extremely accurate monitoring for recording studio, post-production and multi-media applications.
- The Rubicon R8a employs a 8" Copolymer Butyl Surround woofer providing both monitors with a tight and controlled low frequency response.
- 1 x 2" Planer Ribbon tweeter provides sweet and accurate high frequency response for the R8a with low distortion.
- The Rubicon R8a features active electronics including a Bi-Amp power amplifier with 75 watts on the low frequency driver and 25 watts on the high frequency ribbon.
- Four-position high frequency Ribbon Level control allows the listener to contour the response curve to custom tailor the response that works best in the mix environment.
- Active crossover utilizing a multi-pole design for linear response from bottom to top.
- Interfacing the monitors to most any -10 or +4db signal source is quick and easy thanks to the R8a's balanced input on an XLR and 1/4-inch jack and unbalanced input on an RCA jack.
- A/V shielded for multimedia applications providing clean operation near computer monitors.
- Solid MDF (Medium Density Fiberboard) construction, extremely rigid delivering maximum SPL.
- Black satin finish is attractive and durable thanks to the heavy textured epoxy paint.
- Three-year extended warranty.
Rubicon R8a Layout
Front View Layout

1 1" X 2" RIBBON TWEETER - Planer ribbon transducer provides low distortion with a linear high frequency response resulting in a clear, precise and sweet top end.
2 POWER LED - Red LED illuminates indicating the unit is powered on, ready for operation.
3 LOW FREQUENCY DRIVER - Heavy duty 8" extended range low frequency transducer.
4 ENCLOSURE - Rigid MDF construction.
5 TUNED PORT - Quiet port design offering linear extended low frequency response.
6 FINISH - Sleek black textured finish.
Rubicon R8a Layout
Rear Panel Layout - R8a
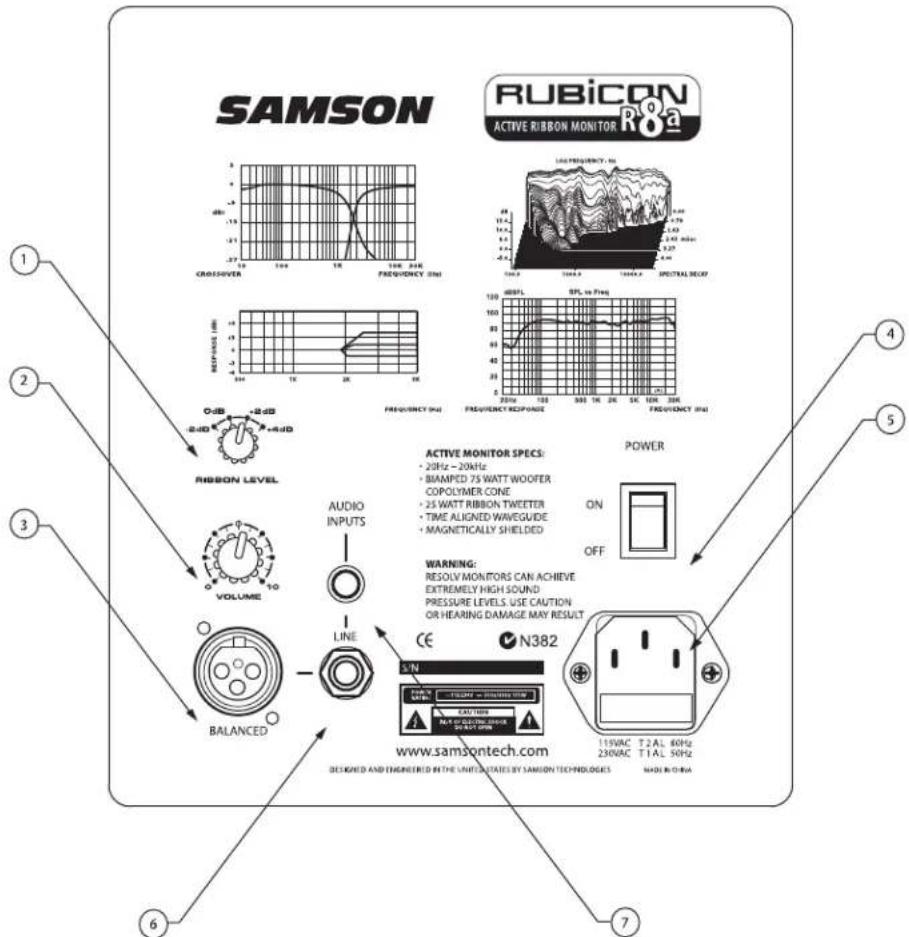
1 RIBBON LEVEL – Four-position switch used to adjust the high frequency response (in 2dB increments).
2 VOLUME - Controls the amount of output level.
3 XLR INPUT - Balanced, +4dBu line level input is connected here via standard XLR (microphone) cable.
4 POWER SWITCH – Main power switch.
5 AC INLET - Connect the supplied IEC power cable here.
6 1/4-INCH PHONE – Balance TRS (Tip, Ring, Sleeve) 1/4-inch phone plug used to connect balanced or unbalanced +4dBu line level signals.
7 RCA – Used to connect signals from unbalanced, -10dBV devices.
Setting up the Rubicon R8a
Background on the Rubicon R8a Studio Reference Monitor
The Rubicon R8as' are self-powered, near-field reference monitors, featuring robust power, advanced electronics and custom designed drive units. For pristine highs, the Rubicon R8a boasts a 1-inch by 2-inch velocity ribbon tweeter. The Rubicon ribbon tweeters are constructed using a Kapton diaphragm with vaporized aluminum applied to the surface. The diaphragm is then set between an array of neodymium magnets creating an opposing magnetic field. Since the ribbon is both the coil and the diaphragm, the diaphragm can accelerate and decelerate quickly resulting in un-matched transient response. Unlike conventional dome tweeters, the ribbon tweeter exhibits no coloration due to resonance, as well as, extremely low intermodulation distortion. The result is a wide, linear response producing high frequencies that are sweet, while clear and accurate. For the low frequency response, the R8a employees an 8-inch, copolymer, low frequency drive unit with butyl rubber surround. The woofer is well matched to the tuned enclosure and provides punchy and focused bass frequency response. The monitor's crossover has been carefully designed with high quality components insuring a linear frequency and phase response. The Rubicon R8a enclosures are constructed from MDF (Medium Density Fiberboard) and are finished in scuff resistant, textured paint. The monitor's enclosure also includes a tuned vent port that provides extended low-end response, and with a low turbulence design, the low frequency driver can move freely with minimal effect on the overall impedance. On the rear of the enclosure, you'll find the Rubicon R8a control panel, which features a variety of input connections including both XLR balanced input, and a 1/4-inch TRS balanced input plus an RCA unbalanced input. These inputs are connected to Rubicon R8a's internal active crossover and bi-amp power module providing 75 watts of power for the low frequency woofer and 25 watts of power to the high frequency ribbon. You will also find the pre-amp controls, including VOLUME knob, used to adjust the overall level of the internal power amplifier, as well as the innovative Ribbon Level control. This four-position switch allows the mix engineer to contour the high frequency response of the monitor allowing you to adjust for room acoustics or listening preference. The Rubicon R8a has been designed to provide flat, accurate monitoring, and at the same time, to provide an adjustable response curve so that the sound of other popular near-field monitors can be easily emulated.
Positioning the Rubicon R8a
Near field monitoring has become the choice of many engineers in large and small studios because it minimizes the effect of room acoustics. This is especially important in today's project studios since the budget for room acoustics is often close to nothing. By positioning the reference monitors in the near field (close to the listeners), you can greatly reduce the effects of room acoustics. The most important considerations when evaluating the effects of room acoustics are reflective surfaces that are around the monitoring area. These can include flat tabletops, glass mirrors or framed pictures, large open walls and even the surface of your mixing console. Mostly all reflecting sound will eventually reach the listening position, but since it is slightly delayed from the direct source, the result is random cancellation of some frequencies, or comb filtering. If possible, remove any and all reflective surfaces. You may also want to hang some acoustic foam on walls that are close to the monitors. When positioning the monitors you'll want to set up what is commonly referred to as the "mix triangle". In this ideal configuration, the space between the left and right monitor is equal to the distance from the listener to each monitor, forming an equilateral triangle. (Figure 1.)

Figure 1.
Prime Listening Spot
Setting up the Rubicon R8a
Positioning the Rubicon R8a - continued
Speaker Orientation
The Rubicon R8as' can be used in either the vertical or horizontal position, however for best results they should be set up in the vertical position. When using the monitors in the horizontal position, be certain to place the left and right side tweeters on the outer most sides. (Figure 2) This will improve the stereo imaging and bass response by increasing the coupling of the low-end drivers.

natural_image
Technical line drawing of a CD or DVD drive with no visible text or symbolsA Moment of Reflection

natural_image
Technical line drawing of a circular mechanical component with mounting base and central hub (no text or symbols)Figure 2.
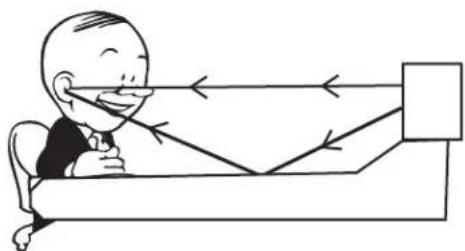
When choosing the height of your monitor system, be careful to avoid reflections off the surface of the mixing console. (Figure 3.) These reflections arrive at the listening position slightly delayed from the original sound resulting in strange cancellations and overall unpredictable response. Visualize straight lines representing the beams of sound radiating from the monitors and choose a height that reduces the occurrence of reflections that will end up in the prime listening spot. (Figure 4.) In most cases, the ideal position is slightly behind and above the mixing console's meter bridge.
natural_image
Cartoon illustration of a person sitting at a desk with arrows pointing toward a square (no text or symbols)Figure 3.

natural_image
Cartoon illustration of a person sitting at a desk with arrows pointing toward a screen (no text or symbols)Figure 4.
Connecting the Rubicon R8a
Rubicon R8a Quick Connections
Note: Before plugging in and turning on, remember the "last on, first off" rule of power amplifiers (and powered monitors). When powering up your system, be sure that all the wires are connected, turn your mixer and any other outboard gear on, and then last turn your Rubicon R8as' on. When powering down, turn your Rubicon R8as' off first and then your mixer and outboard gear.
The Rubicon R8a connections can be made via one of the three rear panel Audio Inputs. You can use RCA inputs for unbalanced -10dBV level signals, or either the 1/4-inch or XLR inputs for balanced +4dBu level signals. Follow the simple steps and diagram below for a quick connection using a standard recording console's control room outputs.

flowchart
graph TD
    A["SAMSON PL1BCLDN"] --> B["FROM MIXER'S CONTROL ROOM OUTPUTS"]
    C["SAMSON PL1BCLDN"] --> B
    B --> D["SAMSON PCCPLA"]
    style A fill:#f9f,stroke:#333
    style C fill:#f9f,stroke:#333
    style D fill:#ccf,stroke:#333
- Lower your mixer's master outputs to all the way off.
- Connect the mixer's Left Control Room output to the left-side Rubicon R8a LINE INPUT and the mixer's Right Control Room output to the right-side Rubicon R8a LINE INPUT.
- Set the Rubicon R8a's input Volume control to the 2 o'clock position.
- Run an audio signal (like some music from a CD) through your mixer and raise the Control Room level to a comfortable listening level.
Operating the Rubicon R8a
Rubicon R8a Control Panel
The Rubicon R8as' rear control panels are where you will make your connections for both AC power and audio signals. The rear panel also contains the controls to make adjustments to the overall volume and frequency response curve. The following section details the rear panel controls and connections.
Powering the Rubicon R8a
Since the Rubicon R8as' are active studio monitors with an on-board power amplifier and electronic crossover, it is necessary to connect the unit to an AC power supply. Make sure that the main Power switch is set to the OFF position and connect the supplied IEC power cable into the AC inlet.
Things that go Hum!
When running power cables, be careful not to run the AC power cords or AC extension cords in parallel to your input cables. This will help reduce any AC hum that can be picked up. If your have to cross an AC line with an audio line, try to cross them at a 90 degree angle for the least amount of induced hum. Using the Rubicon R8a's balanced input connectors will greatly protect against the induced hum thanks to the common mode rejection (the induced hum is phase canceled) that it's balanced input circuit provides.
1 POWER SWITCH – The POWER switch is used to turn on the Rubicon R8a's active electronics. When set to the ON position, the front panel LED will illuminate red, indicating the Rubicon R8a is powered up and ready for operation.
② AC INLET - Connect the supplied IEC power cable here.
The Rubicon R8a's rear panel provides two important controls for adjusting the overall sound of the monitor, RIBBON LEVEL and Volume. Eventually, you will adjust these controls to your preferable position and "set it and forget it".
That's assuming that the monitors
remain in the same spot, in the same studio. If you take your monitors to other studios you may find the controls extremely useful in adjusting the sound for the new room.

Operating the Rubicon R8a
Rubicon R8a Control Panel - continued
The four-position Ribbon Level control switch is used to adjust the monitor's high-frequency response, providing four equalization curves to select from. By using the Ribbon Level control, the Rubicon's high frequency response is adjusted with the application of a high-end tilt (equalization circuit) centered at 12kHz, with selectable levels of -2dB, 0dB (flat), +2dB and +4dB. You'll find that the change is very subtle. Many mix engineers prefer the sound of near field monitors with a little lift in the high frequency response, some like more focus on the midrange, and therefore, desire a flatter or rolled off high frequency response. The best way to set the controls is what sounds good to you. Therefore, you should experiment with the various settings to find the combination of the Ribbon Level and Volume controls you like. To do this, play several CD's of music that you are familiar with. Remember, if you think you're getting lost, the Rubicon R8a is flat when the Ribbon Level control is set to the "0" position.
④ VOLuME cCONTROL
The volume control is used to adjust the overall output level of the Rubicon R8a. When operating the unit for the first time, start with the volume control set all the way off. Slowly raise the Volume control to reach a comfortable listening level.
The Ins and The Outs
The Rubicon R8a features a full complement of input connectors providing easy installation with a variety of audio devices like recording consoles, hard disk recorders, CD players and computer sound cards, to name a few. The following section details the Rubicon R8a's input connectors. In addition, there is a detailed cable-wiring diagram on page 12.
⑤ BALANCED XLR AUDIO INPUT - The
Rubicon R8a features a female XLR connector that will accept balanced or unbalanced +4dBU line level signal. If you are using a mixer that has balanced outputs on XLR connectors, you can make the connections via standard XLR (microphon
6 1/4-INCH PHONE AUDIO INPUT – A balanced TRS (Tip, Ring, Sleeve) 1/4-inch phone plug is used to connect balanced or unbalanced line level signals. The 1/4-inch input is a switching jack, so when a 1/4-inch connector is inserted into the jack, the RCA and/or XLR inputs are switched off and the 1/4-inch input is switched on. This provides a convenient patch-point for quick insertion of a secondary input signal source for testing or expanded operation.
RCA AUDIO INPUT – The RCA input accepts unbalanced signals used to connect signals from unbalanced -10dBV devices.

ACTIVE MONITOR SPECS: 20Hz - 20kHz
• BIAMPED 75 WATT WOOFER
COPOLYMER CONE
- 25 WATT RIBRON TWEFTER
- TIME ALIGNED/WAVE/GLIDE
• TIME ALIGNED WAVEGUIDE
• MAGNETICALLY SHIELDED
WARNING:
RESOLV MONITORS CAN ACHIEVE
EXTREMELY HIGH SOUND
EXTREMELT HIGH SOUND
PRESSURE LEVELS USE CAUTION
PRESSURE LEVELS. USE CAUTION
DESIGNED AND ENGINEERED IN THE UNITED STATES BY SAMSON TECHNOLOGIES
Connecting to the Rubicon R10s Subwoofer
Rubicon R8a with Mono Sub
Adding a subwoofer and extended low frequency response to your Rubicon R8a's system is easy using the Rubicon R8a's LINE LEVEL inputs. Below is a typical system set-up using the Samson Rubicon R10s 1 with a mixer and a pair of Rubicon R8a satellite speakers. The Rubicon R8a's inputs utilize industry standard RCA and XLR connectors. For a detailed wiring diagram, see the section "Rubicon R8a Connections" on page 12. Follow the steps in the diagram below to set up your system.

- Lower your mixer's master outputs to all the way off.
- Connect the mixer's left output to the Rubicon R10s' LEFT LINE INPUT and the mixer's right output to the Rubicon R10s' RIGHT LINE INPUT. Now connect the Rubicon R10s' LEFT LINE OUTPUT to the input of the left Rubicon R8a, and the Rubicon R10s' RIGHT LINE OUTPUT to the input of the right Rubicon R8a.
- Run an audio signal (like some music from a CD) through your mixer and raise the level to a comfortable listening level.
- Now adjust the FREQUENCY control to the desired frequency. You can also use your ears by adjusting the FREQUENCY control to the frequency that sounds good to you. A good place to start is about 70 Hz.
Rubicon R8a Connections
Rubicon R8a Wiring Guide
There are several ways to interface the Rubicon R8a, depending on your exact monitoring set-up. Follow the cable diagrams below for connecting your monitor system.
RCA to RCA Cable

Un-Balanced 1/4" to 1/4" Cable


Balanced 1/4" to 1/4" Cable


Balanced XLR to XLR Cable

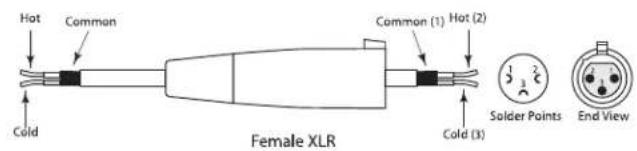
Unbalanced 1/4" to RCA Cable
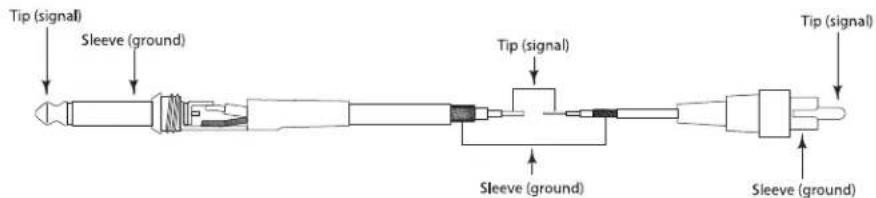
Un-Balanced XLR to RCA Cable

Rubicon R8a Specifications
Specifications
Transducers: 8.0", copolymer woofer with butyl surround, 1x 2-inch velocity ribbon tweeter
Frequency response:
R8a 40Hz - 27KHz +/-3 dB
Amplifier:
Power Rating: Low-frequency - 75 Watts RMS High-frequency - 25 Watts RMS
Crossover Frequency: 3KHz, 4 pole (24dB/Oct) filter
Inputs:
Unbalanced Connector: -10dBV Line Level RCA
Balanced Connector: +4dBu Line Level 1/4-inch Phone TRS (Tip Ring Sleeve) XLR
Enclosure:
Construction: MDF (Medium Density Fiberboard)
Finish: Black Textured Epoxy Paint
Dimensions: 17.25 (H) x 11.18 (W) x 12 (D)
437 mm x 284 mm x 305 mm
Weight: 26.5 lbs. (12.02 kg)

Rubicon R8a Frequency Plot with Ribbon Level Set to 0dB
Samson Technologies Corp.
45 Gilpin Avenue
Hauppauge, New York 11788-8816
Phone: 1-800-3-SAMSON (1-800-372-6766)
Fax: 631-784-2201
www.samsontech.com

- Owners Manual
- Safety Instructions/Consignes de sécurité/Sicherheitsvorkehrungen/Instrucciones de seguridad
- WARNING
- AVIS
- CAUTION
- ATTENTION
- Introduction
- Rubicon R8a Features
- Rubicon R8a Layout
- Rear Panel Layout - R8a
- Setting up the Rubicon R8a
- Background on the Rubicon R8a Studio Reference Monitor
- Positioning the Rubicon R8a
- Positioning the Rubicon R8a - continued
- Speaker Orientation
- Connecting the Rubicon R8a
- Rubicon R8a Quick Connections
- Operating the Rubicon R8a
- Rubicon R8a Control Panel
- Powering the Rubicon R8a
- Things that go Hum!
- ④ VOLuME cCONTROL
- The Ins and The Outs
- ⑤ BALANCED XLR AUDIO INPUT - The
- Connecting to the Rubicon R10s Subwoofer
- Rubicon R8a with Mono Sub
- Rubicon R8a Connections
- Rubicon R8a Wiring Guide
- Rubicon R8a Specifications
- Specifications
Brand : SAMSON
Model : Rubicon R8a
Category : Loudspeaker