
CK 1706 - Alarm Clock ADE - Free user manual and instructions
Find the device manual for free CK 1706 ADE in PDF.


| Product Type | Alarm Clock Radio |
| Brand | ADE |
| Model | CK 1706 |
| Dimensions (approx.) | 6.3 x 3.9 x 2.8 inches (16 x 10 x 7 cm) |
| Weight (approx.) | 1.1 lbs (0.5 kg) |
| Power Supply | AC adapter (5V 1A) or 2 x AAA batteries (backup) |
| Radio Bands | FM 87.5-108 MHz, AM 520-1710 kHz (or FM only) |
| Alarm Modes | Radio, Buzzer, or Progressive beep |
| Dual Alarms | Yes, independently settable |
| Snooze Function | Yes, 9-minute interval |
| Sleep Timer | Yes, 15, 30, 45, 60 minutes |
| Display | LED with adjustable brightness (high/low/off) |
| Built-in Speaker | Yes, mono speaker |
| Headphone Jack | 3.5mm stereo output |
| Date Display | Yes |
| Temperature Display | Yes (indoor) |
| USB Charging Port | Yes, 5V 1A output for mobile devices |
| Cleaning Instructions | Wipe with a soft, dry cloth. Do not use liquid cleaners. |
| Safety Warnings | Do not expose to water or moisture. No user-serviceable parts inside. |
| Spare Parts / Batteries | Use standard AAA batteries for backup. AC adapter model: ADE-5V1A |
Frequently Asked Questions - CK 1706 ADE
User questions about CK 1706 ADE
0 question about this device. Answer the ones you know or ask your own.
Ask a new question about this device
Download the instructions for your Alarm Clock in PDF format for free! Find your manual CK 1706 - ADE and take your electronic device back in hand. On this page are published all the documents necessary for the use of your device. CK 1706 by ADE.
USER MANUAL CK 1706 ADE
Radio alarm clock with Bluetooth® speaker


natural_image
Icon of a person using a laptop inside a circular frame (no text or symbols)Sleeptimer nutzen (Auto off)....12
Ausschalten....13
Radio-Betrieb 13
Wiedergabe über USB/SD-Micro....13
Allgemeines....13
Wiedergabe 14
BZ = Buzzer, FM = Radio, SD = SD-Micro-Karte
22089 Hamburg, Germany
22089 Hamburg, Germany

Garantie
You have chosen to purchase a high-quality product from the brand ADE, which combines intelligent functions with an exceptional design.
With this radio alarm clock, you always have the exact time in view. The many years of experience of the brand ADE ensures a high technical standard and proven quality.
We wish you easy timing at any time!
Your ADE Team
Scope of delivery
- Radio alarm clock
- Mains adaptor
- CR2032, 3 V battery
- Operating Manual
Table of Contents
Scope of delivery 22
General information 24
Intended Use....24
Safety 25
What the radio alarm clock with Bluetooth® speaker provides......27
At a glance 28
Display 30
Start-up 31
Setting the time 31
Basic functions....32
Switching on and selecting the audio source....32
Adjust volume 32
Enabling surround sound 32
Using the sleeptimer (auto-off) 32
Switching off....33
Radio operation 33
Playback via USB/micro SD....33
General information....33
Playback 33
Playback via Bluetooth ^® 34
Pairing the radio alarm clock with a Bluetooth® device ....34
Playback ....34
Making calls during playback....34
Disconnecting the Bluetooth ^® connection....34
Playback via AUX....35
Alarm....35
Setting the alarm time 35
Being awakened....35
Charging function via USB 36
Other functions 36
Setting the display lighting 36
Replacing the backup battery....36
Cleaning....37
Fault/Remedy....37
Technical Data 37
Declaration of Conformity....38
Guarantee....39
Disposal....39
About this manual

This operating manual describes how to safely use and care for your products. Keep this operating manual in a safe place in case you would like to refer to it later. If you pass this item on to someone else, pass on this manual as well.
Failure to observe the recommendations in this operating manual can lead to injuries or damage to your product.
Explanation of symbols

This symbol, combined with the word DANGER, warns against serious injury.

This symbol, combined with the word WARNING, warns against moderate and mild injuries.

This symbol, combined with the word NOTE, warns against material damage.

This symbol signifies additional information and general advice.
Intended Use
- The radio alarm clock receives FM radio stations and displays the room temperature.
- Via Bluetooth® or via the existing interfaces, the radio alarm clock is also used as a playback device for devices such as smartphones, tablet PCs, MP3 players, etc.
- This radio alarm clock is designed exclusively for private use in dry indoor areas.
Safety
- This device can be used by children 8 years of age and older, as well as by persons with reduced physical, sensory, or mental capabilities or lacking experience and/or knowledge, if they are being supervised or have been instructed in the safe use of the device and understand the dangers that may arise.
- The device and the mains adaptor must be kept away from children younger than 8 years.
- Cleaning and maintenance by the user must not be carried out by children unless they are 8 years of age or older and are being supervised.
- Children must be supervised to ensure that they do not play with the device.
- The radio alarm clock and mains adaptor must not be submerged in water or other liquids. Risk of electric shock! You should therefore not use the radio alarm clock in the vicinity of sources of moisture, such as wash basins.
- Only use the supplied mains adaptor and replace it only with one of the same type. The mains adaptor may only be used in dry indoor spaces and must be protected from moisture.
DANGER for children
- Batteries, when swallowed, can be life-threatening. You should therefore keep the radio alarm clock and batteries out of reach of small children. If a battery is swallowed, medical assistance must be sought immediately.
- Keep children away from packaging material and other small parts included in the scope of delivery. Risk of choking if swallowed.
Danger from electricity
- Connect the device to a correctly installed socket that has a voltage corresponding to that described under "Technical Data".
- Ensure that the socket is easily accessible, so that the mains adaptor can be pulled out quickly if necessary.
- Do not use the radio alarm clock if the mains adaptor or mains adaptor cable are damaged.
- Do not cover the mains adaptor with curtains, newspapers, etc., and ensure sufficient ventilation. The mains adaptor can become hot.
- Completely uncoil the mains adaptor cable before connecting it. In doing so, take care to keep the cable from being damaged by sharp corners or hot objects.
- Pull the mains adaptor out of the socket:
-before cleaning the radio alarm clock,
-if, during operation, there appears to be interference,
-during a storm.
When doing so, always pull on the mains adapter, not on the cable.
- Do not make any modifications to the item. Only allow repairs to be carried out at a specialist workshop, since inexpertly repaired devices can present hazards to the user.
- Do not replace the mains adaptor cable. When the cable or mains adaptor is damaged, it must be disposed of and replaced with a mains adaptor of the same type.
Risk of injuries
- Attention: Risk of explosion if batteries are improperly used. Batteries must not be recharged, reactivated by other means, dismantled, thrown into fire, or short-circuited.
- Avoid contact of the battery fluid with skin, eyes, and mucosa. If you do come into contact with the fluid, you must immediately flush the affected areas thoroughly with clean water and promptly see a doctor.
Note on material damage
- Protect the radio alarm clock from dust, impacts, extreme temperatures and direct sunlight.
- Protect the radio alarm clock from moisture. Place it exclusively in a dry, closed room.
- Remove the battery from the radio alarm clock once it has been consumed or when you are no longer using the device. You will thus avoid damage that may result from the leakage of battery acid.
- Do not expose the batteries to any extreme conditions, e.g. by storing them on heaters or under direct sunlight. Increased risk of leakage!
- Clean the battery and device contacts, as needed, before inserting the battery.
- Do not make any modifications to the device. Only allow repairs to be carried out at a specialist workshop and pay attention to the guarantee conditions.
- There are feet on the underside of the radio alarm clock. Since furniture surfaces are made of various materials and are treated with various care products, it cannot be completely ruled out that some of these substances contain ingredients that attack and soften the feet of the device. If necessary, place a non-slip pad underneath the device.
- Do not under any circumstances use hard, scratching, or abrasive cleaning agents or the like in order to clean the weather station. Doing so may scratch the surfaces.
What the radio alarm clock with Bluetooth® speaker provides
- FM radio reception
- Automatic and manual station search in radio mode
- Play music via external sources via Bluetooth®, micro SD card and AUX and USB interface
- Alarm function through various audio sources or by buzzer
- 2 alarm times
- Snooze function
- Alarm volume adjustable to three levels
- Room temperature display
- Charging function via USB
- Sleep timer (auto off)
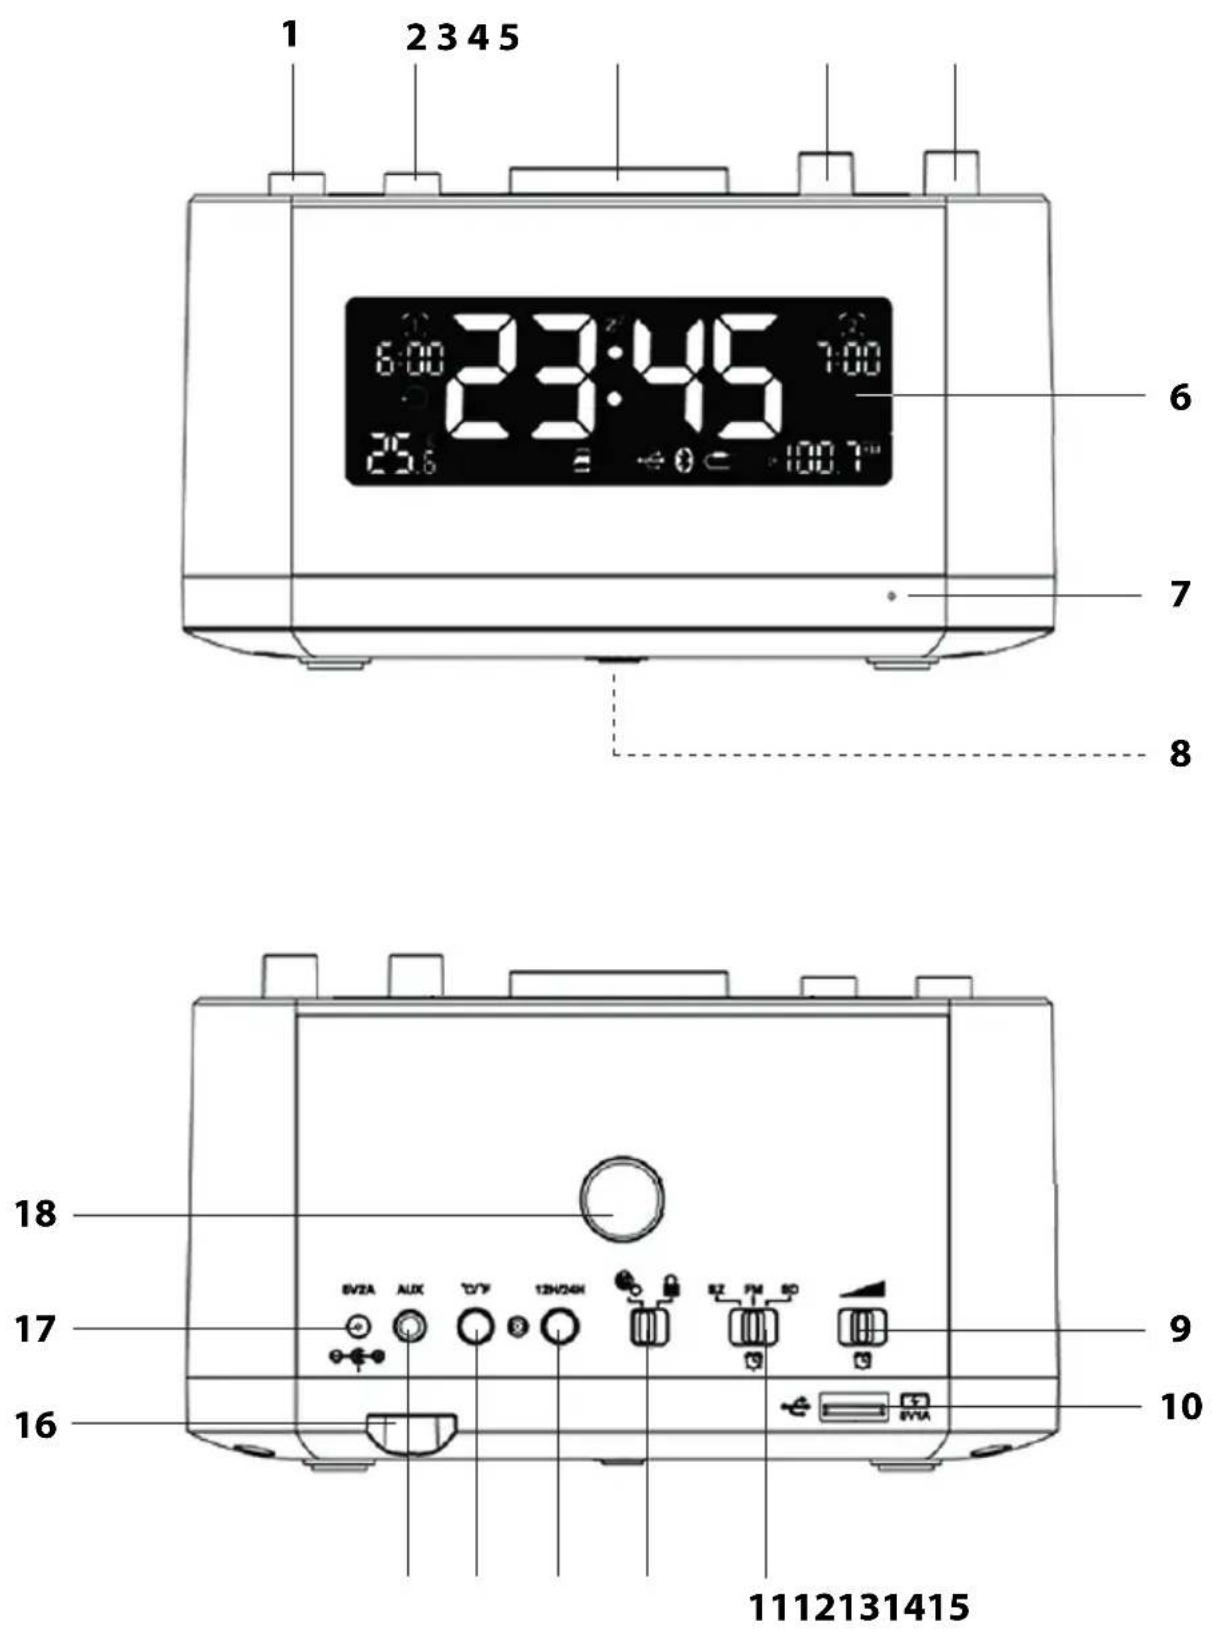
| 1 | Button 1 | Enable/disable alarm time 1 |
| 2 | Button 2 | Enable/disable alarm time 2 |
| 3 | Multi-function knob | Increase and decrease the volumeSet display brightnessMake calls during Bluetooth playbackEnable snooze functionInterrupting the alarm for 24 hoursSet the time and alarm time |
| 4 | Button | Turn the radio on and offSelect audio sourceInterrupting the alarm for 24 hours |
| 5 | Button | Select radio stationEnable/disable surround sound |
| 6 Display see page after next | ||
| 7 Microphone Make calls during Bluetooth® playback | ||
| 8 | Battery compartment | · for CR2032/3 V battery (backup battery)· Slot for micro SD card |
| 9 | switch | Select alarm volume (3 levels) |
| 10 | USB port | · Connection port for USB stick· Charging function for USB devices, e.g. smartphones |
| 11 | BZ/FM/SD switch | Select alarm source (buzzer, radio, micro SD card) |
| 12 | switch | Enable/disable setting mode |
| 13 | 12H/24H button Switch between 12-hour display (AM/PM) and 24-hour display | |
| 14 | °C/°F button Switch between degrees Celsius display and degrees Fahrenheit display | |
| 15 | AUX connection port Connect external audio device via 3.5 mm jack | |
| 16 | Wire antenna for FM radio reception | |
| 17 | 5V2A | Connection socket for mains adaptor |
| 18 | Speaker opening | |
| Not depicted: Mains adaptor | ||

1 Alarm time 1
2 Time in 12-hour or 24-hour format
3 Snooze function enabled
4 Alarm time 2
5 Radio frequency received
6 Radio mode
7 AUX mode: External device playback
8 Bluetooth® mode: Playback via Bluetooth
9 USB mode: Playback via USB
10 SD mode: Playback via micro SD card
11 Room temperature in °C or °F
12 Sleep timer enabled

NOTE on material damage
-Use only the supplied mains adapter.

You can also operate the radio alarm clock without a backup battery. It is not possible to operate only with the battery without connecting to the mains.
In the event of a power outage, a 3 V CR2032 battery ensures that settings made (e.g. alarm times) remain stored for several hours. Upon delivery, the backup battery is already inserted and is provided with an iso strip to protect against premature discharge.
- Loosen the screw on the battery compartment cover on the underside using a fine Phillips screwdriver.
- Remove the battery compartment cover.
- Pull out the iso-strips.
- Replace the battery compartment cover and secure it in place using the fastening screw.
- Uncoil the FM wire antenna completely and attach the end as high as possible to a wall or a shelf, with adhesive tape for example.
- Insert the plug of the supplied mains adaptor into the 5V2A connection socket of the radio alarm clock.
- Plug the mains adaptor into a socket that has a voltage corresponding to that described under "Technical Data".
Setting the time

If there is more than approx. 20 seconds between two pushes of a button, the setting process automatically ends and you will have to repeat it. Settings you have already made remain saved.
- Use the 12H/24H button to select the desired display format for the time. If you select 12H, morning hours will be marked with "AM" and afternoon hours with "PM".
- Slide the 🎨 switch to the left.
The display flashes. - Set the correct time by turning the multi-function knob:
- Turn counterclockwise: reduces values
- Turn clockwise: increases values
- Finally, slide the 🎨 🏠 switch to the right (lock icon) when you have set the correct time.
Switching on and selecting the audio source
- Press the Button to switch on the device.
The display shows "on" and starts playback of the last selected audio source.
- Select the desired audio source by turning ⚠.
Setting Display Function
| SD | Playback via USB | |
| USB | Playback via micro SD | |
| BT | Playback via Bluetooth (e.g. from a tablet or smartphone) | |
| AUX | Playback via AUX input (e.g. from an MP3 or CD player) | |
| FM | Playback from a radio station |
Adjust volume
-Adjust the desired volume with the multi-function knob.
Max. volume: 32.
Increase the volume: turn clockwise.
Decrease the volume: turn counterclockwise.
Enabling surround sound
This function can be used with all types of audio playback.
During ongoing audio playback:
-Enabling: Press and hold the 📋 button until "3d" is shown on the display.
-Disabling: Press and hold the ▶ button until "--" is shown on the display
Using the sleeptimer (auto-off)
This function can be used with all types of audio playback.
- During playback, press and hold the multi-function knob until a number appears in the display, e.g. "30" (default setting).
- Turn the multi-function knob to set the desired time value in minutes (max.: 60 minutes).
After the set time has elapsed, the device switches off automatically.

- When the timer is active flashes in the display.
- If you want to deactivate the function again, select the option "OFF" instead of a time value.
Switching off
-Press the button to switch off the device.
"off" is shown on the display.
Radio operation
- Switch on the radio alarm clock and select FM as the audio source.
- Press the 🔊 button repeatedly to set the desired radio station. If a station is received in stereo quality, "ST" is also shown in the display.
- If necessary, improve the radio reception by first setting a different frequency. Turn the 🔒 Solution to set the frequency very precisely. If this does not work, change the position of the wire antenna.

Refer to the chapter "Basic functions" for further information.
Playback via USB/micro SD
General information
- Playback via USB and micro SD card works identically and is therefore described together.
- The radio alarm clock supports various audio formats, such as MP3, WAV or FLAC.
- The audio files can be located directly on the data storage device ("flat") or in directories, where the directories should preferably not contain any sub-directories.
- The slot for the micro SD card is located in the battery compartment.
-Insert: Slide the card to the bottom as shown.
- Remove: Push the card slightly into the slot. The card is then pushed out by spring force.
- Use a USB stick, not a USB disk.
Playback
- Connect the USB stick or insert the micro SD card into the card slot.
- Switch on the radio alarm clock and select USB or SD as the audio source.
Playback starts automatically.
-Pause and restart playback: Press the 🔊 button.
-Select next track: Turn 🔒 towards ▶▶
-Select previous track: Turn 🔒 towards |

Refer to the chapter "Basic functions" for further information.

- Refer to the operating manual of your mobile device.
- The Bluetooth® range is a maximum of 10 metres.
- There must be no plug inserted in the AUX port.
Pairing the radio alarm clock with a Bluetooth® device
- Switch on the radio alarm clock and select BT as the audio source.
The Bluetooth ^® icon flashes in the display.
- Switch on your mobile device (smartphone, tablet PC, etc.).
- Enable the Bluetooth® function on your mobile device.
- Start the device search on your mobile device.
- Select "P1" from the list and connect the devices.
A beep sounds and the Bluetooth ^® icon is displayed continuously.
Playback
- Start playback by enabling the corresponding function on your mobile device.
- The other functions (track selection, pause playback, etc.) can be set on the radio alarm clock or on the mobile device.
Operation on the radio alarm clock:
-Pause and restart playback: Press the 🔊 button.
-Select next track: Turn 🔒 towards ▶▶
-Select previous track: Turn 🔒 towards l.
Making calls during playback
If you are called on your smartphone during Bluetooth playback:
- Press the multi-function knob.
- Now talk to the caller via the microphone of the radio alarm clock.
The microphone is located on the bottom right of the front side.
- End the call by pressing the multi-function knob again.
Disconnecting the Bluetooth® connection
Only one device at a time can be connected to the radio alarm clock via Bluetooth®. If you want to pair another device, first disconnect an existing connection by turning off the Bluetooth® connection on the mobile device.

Refer to the chapter "Basic functions" for further information.
For example, you can connect an MP3 or CD player using the AUX port.
- Connect the audio output of the external device to the AUX port using an audio cable (3.5 mm jack, not included).
- Switch on the external device.
- Switch on the radio alarm clock and select AUX as the audio source.
- Start audio playback on the external device.

- The other functions (track selection, pause playback, etc.) are enabled on the external device.
-
Refer to the chapter "Basic functions" for further information.
-
Switch off both devices again before disconnecting the cable connection.
Alarm
You can set two different alarm times with the radio alarm clock: The procedures for setting are identical.
Setting the alarm time

If there is more than approx. 10 seconds between two pushes of a button, the setting process automatically ends and you will have to repeat it. Settings you have already made remain saved.
- Press the ① or ② button.
① or ②ashes in the display, as well as a time display directly below the icon.
- While it is flashing, set the desired alarm time by turning the multi-function knob:
- Turn counterclockwise: reduces values
- Turn clockwise: increases values
- Press the multi-function knob to save the setting.

If you want to correct the alarm time, press the button. The corresponding indicator in the display goes out. Then repeat steps 1-3.
- Select the desired alarm source using the BZ/FM/SD switch:
BZ = Buzzer, FM = Radio, SD = Micro SD card
- Use the ▲ switch to set the desired maximum alarm volume (3 levels).
Being awakened
At the set time, you will be awakened by the selected alarm source.
Interrupting the alarm for 24 hours
- Press the multi-function knob for approx. 2 seconds or 1x on the ⏻ button to stop the alarm. After 24 hours, the alarm will be triggered again.
Auto-stop function
- The alarm switches off automatically after approx. 30 minutes if you do not press a button. After 24 hours, the alarm will be triggered again.
Repeat alarm (snooze function)
-Press the multi-function knob 1x when the alarm sounds.
The alarm signal becomes silent and the alarm icon 1 or 3 flashes in the display and ^ is displayed.
After 9 minutes, the radio alarm clock switches on again and wakes you up again.
This procedure can be repeated multiple times.
Turning the alarm off completely
- Press the ① or ② switch to completely turn off the respective alarm function. If an alarm function is disabled, it no longer appears on the display.
Charging function via USB
You can charge devices such as smartphones or MP3 players via the USB ports.

- Pay attention to the manufacturer's instructions for the device you are connecting.
- Do not use the charging function during radio operation, as this may result in noise interference.
- Connect the USB socket and the external device using a USB cable (not included).
During the charging process, an animated battery icon appears in the display next to the temperature indicator.
Other functions
Setting the display lighting
- Briefly press the multi-function knob repeatedly to select the desired brightness level or completely turn off the display lighting.
Replacing the backup battery
- Open the battery compartment on the underside using a fine Phillips screwdriver.
- Remove the battery compartment cover and remove the old battery.
- Slide the new battery under the two retaining tabs and then push them down with a little force so that the battery is firmly under the retaining tab and audibly clicks
into place. Pay attention to the correct polarity (+/-). The plus pole (+) must point upwards.
- Replace the battery compartment cover and secure the battery compartment cover with the Phillips screw.
Cleaning
- Disconnect the radio alarm clock from the mains.
- Wipe the radio alarm clock clean with a lightly dampened cloth.
- Dry the device completely before you reconnect it with the mains adaptor.
Fault/Remedy
| Fault Possible Cause | |
| No Bluetooth® connection. Check... | ... whether your mobile device is Bluetooth®-capable. Refer to the operating manual of the device for further information.... whether the Bluetooth® function of the mobile device is enabled.... the distance between the devices. Place both devices close together. |
| Nothing can be heard. | If necessary, increase the volume on the playback device or the radio alarm clock.Check whether you have selected the correct audio source. |
| The temperature indication in the display appears too high. | Check whether the device is exposed to direct sunlight. |
| The indicator is illegible, the function is unclear, or the values are obviously false. | Disconnect the radio alarm clock for a few moments from the power supply. |
Technical Data
General
Model: Radio alarm clock CK 1706
Input:
5 V
Backup battery:
1x CR2032/3 V ____
Max. power consumption: approx. 10 W
Standby: approx. 0.8 W
Temperature range: -0 °C - 60 °C (32 °F - 140 °F)
Mains adaptor
Type: HX12-0502000-AG
Input: 100-240 V\~, 50/60 Hz
Output:
5 V ____/2 A
Protection class:
||回
Other
Radio frequency range: 87.5 -108 MHz
Dimensions: approx. 160 x 125 x 95 mm
Weight: approx. 720 g
Bluetooth ^® version: 4.0
Distributor: Waagen-Schmitt GmbH
Hammer Steindamm 27-29
22089 Hamburg, Germany
Our products are constantly being developed and improved. For this reason, design and technical modifications are possible at any time.
Declaration of Conformity
Waagen-Schmitt GmbH hereby declares that the radio alarm clock CK 1706 complies with the directives 2014/53/EU, 2014/30/EU, 2014/35/EU and 2011/65/EU. The full text of the EU Declaration of Conformity is available at the following Internet address:
The declaration loses its validity if modifications have been made to the device without our approval.
Hamburg, June 2017
Waagen-Schmitt GmbH
Hammer Steindamm 27-29
22089 Hamburg, Germany

Guarantee
The company Waagen-Schmitt GmbH guarantees for 3 years from the purchase date the cost-free rectification of defects on the basis of material or fabrication errors through repair or exchange.
In the event of a guarantee claim, please return the product with the proof of purchase (stipulating the reason for claim) to your dealer.
Disposal
Disposing of the packaging

Dispose of the packaging with similar materials. Put cardboard with waste paper, films with recyclable materials.
Disposing of the product
Dispose of the product in accordance with the regulations that apply in your country.

Devices must not be disposed of in normal household waste
At the end of its life, the product must be disposed of in an appropriate way. In this way, valuable materials contained in the device will be recycled and the burden on the environment avoided. Hand in the old device at a collection point for electronic waste or at a recycling depot.
For more information, contact your local waste disposal firm or your local administrative body.

Recyclable and disposable batteries do not belong in household waste
All batteries must be handed in at a collection point in your community, suburb, or at the retailer. Such batteries can thus be disposed of in an environmentally friendly way.
- Radio alarm clock with Bluetooth® speaker
- Garantie
- Scope of delivery
- Table of Contents
- About this manual
- Explanation of symbols
- Intended Use
- Safety
- DANGER for children
- Danger from electricity
- Risk of injuries
- Note on material damage
- What the radio alarm clock with Bluetooth® speaker provides
- Setting the time
- Switching on and selecting the audio source
- Adjust volume
- Enabling surround sound
- Using the sleeptimer (auto-off)
- Switching off
- Radio operation
- Playback via USB/micro SD
- General information
- Playback
- Pairing the radio alarm clock with a Bluetooth® device
- Making calls during playback
- Disconnecting the Bluetooth® connection
- Alarm
- Setting the alarm time
- Being awakened
- Interrupting the alarm for 24 hours
- Auto-stop function
- Repeat alarm (snooze function)
- Turning the alarm off completely
- Charging function via USB
- Other functions
- Setting the display lighting
- Replacing the backup battery
- Cleaning
- Technical Data
- General
- Mains adaptor
- Other
- Declaration of Conformity
- Guarantee
- Disposal
- Disposing of the packaging
- Disposing of the product
- Devices must not be disposed of in normal household waste
- Recyclable and disposable batteries do not belong in household waste
Brand : ADE
Model : CK 1706
Category : Alarm Clock