
DAV-6100 - Weather Station DAVIS - Free user manual and instructions
Find the device manual for free DAV-6100 DAVIS in PDF.


| Product Type | Weather Station (WeatherLink Live) |
| Model Number | 6100, 6100EU, 6100UK, 6100USB |
| Power Supply | AC adapter 5 VDC, 1000 mA; battery backup (4 AA, not included) |
| Connectivity | Wi-Fi 2.4 GHz (802.11b/g/n), Ethernet, Bluetooth (BLE) |
| Wireless Range (sensor) | Up to 1000 ft line-of-sight, 200-400 ft through walls |
| Sensor IDs | 8 unique IDs, supports up to 8 transmitter stations |
| Internal Sensors | Barometric pressure, inside temperature, inside humidity |
| Barometric Pressure Range | 16.00" to 32.50" Hg (410-820 mm Hg, 540-1100 hPa) |
| Inside Temperature Range | +32°F to +140°F (0°C to +60°C) |
| Inside Humidity Range | 1 to 100% RH |
| Update Interval (current data) | 2.5 seconds (local network), 1 minute (cloud) |
| Archive Rate (historical) | Default 15 minutes; options: 1, 5, 30, 60, 120 min (1/5 min require subscription) |
| Operating Temperature | 32°F to +140°F (0°C to +60°C) |
| Housing Material | Rugged ABS plastic |
| Indicator Light | Blue LED for status |
| Control Input | Capacitive touchpad |
| Compliance | FCC Part 15 Class B, ICES-003, CE (RED & EMC) |
| Dimming / Sleep | Auto sleep after inactivity; wake by touchpad |
| Data Backup | Battery backup stores data during power loss; uploads when power restored |
| Smart Assistant Support | Amazon Alexa (via WeatherLink skill) |
| App Required | Davis WeatherLink app (iOS/Android) for setup |
| Included Accessories | AC adapter, Ethernet cable |
| Dimensions | Approximately 5.5" x 3.5" x 1.2" (estimated) |
| Weight | Approximately 0.5 lb (without batteries) |
Frequently Asked Questions - DAV-6100 DAVIS
User questions about DAV-6100 DAVIS
0 question about this device. Answer the ones you know or ask your own.
Ask a new question about this device
Download the instructions for your Weather Station in PDF format for free! Find your manual DAV-6100 - DAVIS and take your electronic device back in hand. On this page are published all the documents necessary for the use of your device. DAV-6100 by DAVIS.
USER MANUAL DAV-6100 DAVIS
Product number 6100

FCC Part 15 Class B Registration Warning
This equipment has been tested and found to comply with the limits for a Class B digital device, pursuant to Part 15 of the FCC Rules. These limits are designed to provide reasonable protection against harmful interference in a residential installation. This
equipment generates, uses, and can radiate radio frequency energy and, if not installed and used in accordance with the instructions, may cause harmful interference to radio communications.
However, there is no guarantee that interference will not occur in a particular installation.
This device complies with part 15 of the FCC Rules. Operation is subject to the following two conditions: (1) this device may not cause harmful interference, and (2) this device must accept any interference, including interference received, including inference that may cause undesired operation.
If this equipment does cause harmful interference to radio or television reception, which can be determined by turning the equipment on and off, the user is encouraged to try to correct the interference by one or more of the following measures:
- Reorient or relocate the receiving antenna.
- Increase the separation between the equipment and receiver.
- Connect the equipment into an outlet on a circuit different from that to which the receiver is connected.
- Consult the dealer or an experienced radio/TV technician for help.
This device complies with Industry Canada license-exempt RSS standard(s). Operation is subject to the following two conditions: (1) this device may not cause interference, and (2) this device must accept any interference, including interference that may cause undesired operation of the device.
Innovation, Science and Economic Development Canada ICES-003 Compliance Label: CAN ICES-3 (B)/NMB-3(B)
Changes or modification not expressly approved in writing by Davis Instruments may void the warranty and void the user's authority to operate this equipment.
FCC ID: IR2DWW6100 IC: 3788A-6100
Contains: FCCID: 2AC7Z-ESPWROOM02 IC: 21098-ESPWROOM02
Information Regarding Exposure to Radio Frequency Energy: The antenna used for this transmitter must be installed to provide a separation distance of at least 20 cm from all persons and must not be co-located or operating in conjunction with any other antenna or transmitter.
Power Supply Model identifier: DSA-5PF07-05 FUK 050100 or DSA-5PF07-05 FEU 050100
| Input voltage: 100-240 VAC Input | AC frequency: 50/60 Hz | |
| Output voltage: 5.0 VDC Output current: 1.0 A | ||
| Output power: 5.0 W Average active efficiency: 73.77% | ||
| Efficiency at low load (10%): N/A% No-load power consumption 0.075 W |

EC-Declaration of Conformity
Directive 2014/53/EU (RED) and 2014/30/EU (EMC)
Manufacturer/responsible person: Davis Instruments
Compliance Engineer
3465 Diablo Ave., Hayward, CA 94545 USA
Declares that the products:
6100EU, 6100UK, 6100USB
Comply with the essential requirements of
2014/53/EU, if used for its intended use. The complete Declaration of Conformity is on our website at https://www.davisinstruments.com/lcgal.
The technical documentation relevant to the above equipment will be held at:
Davis Instruments at 3465 Diablo Ave, Hayward CA 94545
WeatherLink Live makes your weather data available to you anywhere you can access the internet -- on your phone, PC, or tablet. It automatically uploads your data from up to 8 different Davis sensor suites or other transmitters to the WeatherLink Cloud via Wi-Fi or Ethernet. The WeatherLink app will live-stream your data to your phone with updates every 2.5 seconds when your phone is on the same local network (Wi-Fi or Ethernet) as the WeatherLink Live. Your current conditions will be updated on WeatherLink.com and the WeatherLink app (when not on the same Wi-Fi network) every minute.
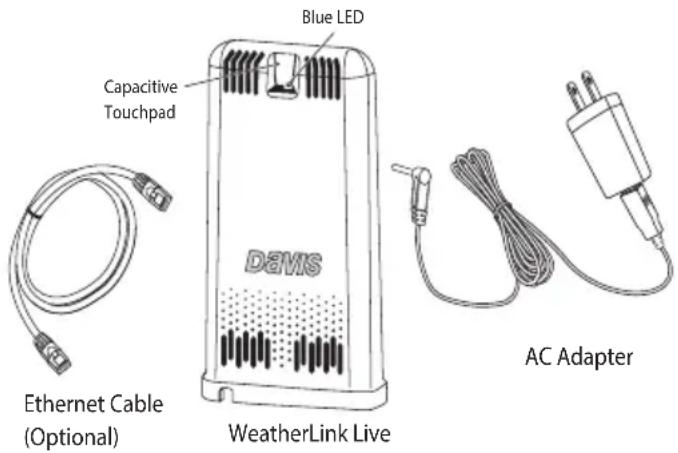
If a Wi-Fi connection is unavailable or unreliable, you may also use the included Ethernet cable to connect your WeatherLink Live to your internet router.
You can also use WeatherLink Live with Amazon Alexa. Enable the WeatherLink Alexa skill then just say, “Alexa, ask WeatherLink to get my current conditions.”
Components
WeatherLink Live Requirements & Tools
- Wi-Fi or router Ethernet internet connection (2.4 GHz)
- Wi-Fi password
- Smartphone
• 4 AA batteries (not included)
Install the WeatherLink App and Create Your Account
- Install the WeatherLink mobile app on your smartphone. Find the app by searching for the Davis WeatherLink app in the iOS App Store or Google Play Store. If you don't already have one, use the app to create your WeatherLink account and log in.

-
Make sure your smartphone's "Bluetooth" function is on. With your phone near your WeatherLink Live, tap the Account icon: In the upper right corner of the app's home screen.
-
Scroll down to Devices, and tap the Add button.
-
Choose WeatherLink Live.
Devices

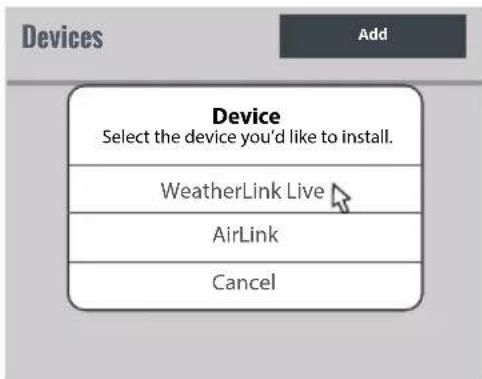
The WeatherLink app will walk you through powering up and connecting your device as shown in the steps below.
Power Up and Connect Your WeatherLink Live
-
Plug the AC adapter into the socket on the bottom of the WeatherLink Live, and plug the adapter into the wall. There are cable channels to the front and back, as well as the side, in which to run the cable.
-
Install the batteries. Open the battery compartment on the bottom of the WeatherLink Live. To do this, slide the cover forward then lift up. Insert four AA batteries, making sure you insert them with the positive and negative ends oriented as indicated on the underside of the battery compartment
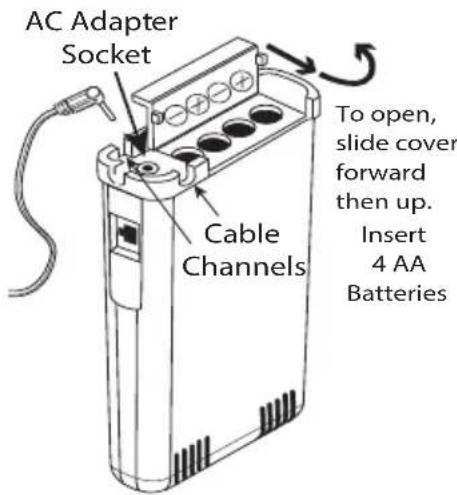
Note: WeatherLink Live is powered by AC power with battery backup. AC power is required; it cannot be set up or run on batteries alone. It is highly recommended that you install batteries to prevent loss of data if AC power is lost. If AC power is lost and you have installed batteries, the WeatherLink Live will stop trying to communicate with your network, but it will continue to receive and store sensor data. When AC power is resumed, it will reconnect and send the records it stored during the outage to the WeatherLink Cloud.
- The blue LED light will begin flashing indicating that the device is ready to connect to the smartphone app.
Tip: The device will "go to sleep" and the blue LED will turn off if you don't connect the device within a few minutes. You can "wake it up" when you are ready to proceed by touching the capacitive touch pad. (See the image on page 1.)
- With WeatherLink Live “awake,” and your phone next to it, follow the prompts to connect WeatherLink Live to the internet.
Tip: If the device doesn't find your Wi-Fi network, make sure you have entered the correct password and that you are connecting the WeatherLink Live to a 2.4 GHz network. It will not connect to a 5 GHz network. Then try repeating these steps.
- The LED will go solid when the phone is connected to the WeatherLink Live.
Note: Connecting via Ethernet cable: If wireless internet is intermittent or not available, you can use an Ethernet cable to connect your device to the internet. You will still need to use the phone app to setup the WeatherLink Live. Plug the included Ethernet cable into the socket on the WeatherLink Live. Connect the other end of the cable to your router. You will see green and amber lights when the connection has been established.

Set Up Your WeatherLink Live
- When you are prompted, enter a name for your WeatherLink Live, such as “Downtown Hayward Weather.” This name will be visible to all WeatherLink users if you make your station “public.” The Device ID and activation date will be entered automatically.
Note: The field labeled "Archive Rate" refers to the frequency at which we store historical data (archive records) for review later. (It is not the update rate.) The default rate of 15 minutes is appropriate for most users. To learn how to change this rate, see page 5: How can I change my archive rate?
- In the next screen, a map opens with the location of your station. You can change this by moving the pin. Tap Next.
- Agree to the conditions on the next screen.
- In the next screens, choose Wi-Fi or Ethernet. For Wi-Fi, select your Wi-Fi network and enter the network password.
Set Up the Transmitting Station(s)
Once your WeatherLink Live is successfully installed, you will add your transmitting station, or stations, to which it will “listen.”
- Tap Add Station & Sensors.
- In the next screen, tap the ID of the transmitting station. (This will probably be ID 1, because Davis transmitters are set at the factory to transmit on ID 1.)
- In the next screens, you will specify the type of transmitter: Vantage Vue or Vantage Pro2 sensor suite (choose this one if you have a Vantage Pro2 Plus sensor suite), Sensor Transmitter, or Leaf/Soil/Temp Station. You will be prompted to choose model type and if appropriate, what sensors are installed.
Tip: Tapping Advanced Settings allows you calibrate your sensor data. Most users will not need to change these settings. However, you can calibrate wind, humidity, and temperature, if needed. You can also change the type of anemometer or rain collector. See page 5: My readings do not seem correct. Can I calibrate my sensors?
- Enter a name for the station, and, if you have more than one transmitters, whether or not it should be your primary station. Tap Done then Save or,
- Add More Stations to continue adding transmitting stations. WeatherLink Live can “listen” to up to 8 different transmitting stations, in any combination of Vantage Pro2 or Vantage Vue sensor suites, Sensor Transmitters with up to five different Davis sensors (anemometer, rain collector, temperature, temperature/humidity, UV, or Solar), or Wireless Leaf & Soil Moisture/Temp Stations. Each transmitter must be set to a unique ID. Refer to the User Guides for more information on setting the Transceiver ID.
Tip: You can add, delete or edit your WeatherLink Live and transmitting station information at any time. Tap the Account icon in the upper right corner of the app's home screen. Scroll down to your WeatherLink Live and tap the > next to its name. Tap Edit next to your WeatherLink Live a
Devices
Downtown Hayward Weather
- Your WeatherLink Live station will now appear in the opening “snapshot” screen of the WeatherLink app, and on your page on WeatherLink.com.
Troubleshooting
? The blue LED on my WeatherLink Live is not on.
The device may have “gone to sleep.” Touch the capacitive touch pad (see image on page 1) to “wake it up.” If the LED still does not come on, make sure your WeatherLink Live is connected to AC power. If so, try removing power (AC and batteries) and re-powering the WeatherLink Live.
? My WeatherLink Live will not connect to the internet.
If using a Wi-Fi connection: Check to make sure you entered the correct Wi-Fi password.(The app requires a Wi-Fi with a password.) If using an Ethernet connection: Reseat the Ethernet cable. Plug the Ethernet cable into a different jack on the router.
? There is no weather data on my WeatherLink.com page and app.
Check to make sure the WeatherLink Live's receiver ID and the sensor suite's transmitting ID are the same.
![ID Number ID 1 My WeatherLink Live WEATHER STATION [PRIMARY] Vantage Pro2 Plus, Includes UV & Solar Radiation Sensors Edit](/content/2026/05/906336/images/093f0d566d6f633dd6a9df85c0915c4fe81cb407ae7932618273f6736e343728.jpg)
To check your WeatherLink Live ID: open your WeatherLink.com page. Click the Tools icon; select Device Configuration. To change the ID, click Edit by your WeatherLink Live, then choose the ID in the Change Transmitter ID menu. (Do not click the X. This will delete all your data permanently.)
Check the station type in the WeatherLink app. If data still does not appear, check the signal strength. Click the Tools icon . Choose Health Data. The
DavisTalk RSSI signal strength should be above -90. If is not, find a location with a stronger signal or fewer RF barriers. You can bring the WeatherLink Live and weather station close together, then move them further and further apart to find a location with a signal strength >-90.
? How can I change my archive rate?
The archive rate is the rate at which archive data is permanently stored on the WeatherLink Cloud. (It does not affect the update rate for current conditions.) The default setting for WeatherLink Live's archive rate is 15 minutes. You can change this to 1 or 5 minutes by purchasing an annual device upgrade subscription for your WeatherLink Live. You can select 30-, 60- or 120-minute archive rates without upgrading.
To change your rate to 30 or 60 minutes:
- In the WeatherLink app tap the Account icon at the top of the home screen.
- Scroll down to your WeatherLink Live's name and tap the > next to it. Tap Edit next to your WeatherLink Live's name, then tap Settings.
- In Archive Rate choose 30, 60 or 120 minutes. (You can choose 1 or 5 minutes if you have upgraded to Pro or Pro+.) Click Save.
To upgrade and change your rate to 1 or 5 minutes:
- Log in to your account on WeatherLink.com.
- On the right side of your account page, under your name, click “Purchase Upgrade” and follow the prompts to purchase a Pro (for 5-minute archive intervals) or Pro+ (for 1-minute archive intervals) device upgrade subscription.
- With WeatherLink Live selected as the “current station,” click Device Tier at the top of the page and apply the device upgrade to your WeatherLink Live.
- Click the Tools icon, then choose Device Configuration.
- In the top box on the next screen, click Edit Settings. Choose 1 or 5 minutes in the Archive Rate menu. Click Save.
? How can I change what units I want to use?
In the WeatherLink app, tap the Account icon at the top of the home screen. Tap Units to change them.
? My readings do not seem correct. Can I calibrate my sensors?
Yes, however, Davis sensors are factory-tested for accuracy, so consider carefully before calibrating. Television/radio reports are not good comparisons for your data. In the WeatherLink app, tap the Account icon on your home screen, scroll down to your WeatherLink Live, click the >, then tap Edit next to your WeatherLink Live. To calibrate the barometer or inside temp/humidity; or to change elevation, click Settings. To calibrate outdoor sensors, tap Stations and Sensors, then tap Edit on your sensor suite's name then tap Advanced Settings.
Contacting Davis Technical Support
For questions about installing or operating your WeatherLink Live, please contact Davis Technical Support. We'll be glad to help.
Online www.davisinstruments.com
See user manuals, product specifications, application notes, software updates, and more.
E-mail support@davisinstruments.com
Telephone (510) 732-7814 Monday - Friday, 7:00 a.m. - 5:30 p.m. Pacific Time.
Specifications (See www.davisinstruments.com for more information)
Operating Temperature 32° to +140°F; 0° to +60°C
Current Draw....Average: 100 mA; Peak 700mA
Housing Material .... Rugged ABS Plastic
Backup Batteries .... 4 AA (not included)
Battery Life 5 days
AC Adapter 5 VDC, 1000 mA
Wi-Fi Frequency Range & Power ..... 2412-2472 MHz, 802.11b/g/n; less than 72mW
BLE Frequency Range & Power ..... 2402-2480 MHz, less than 1mW
Sensor Data (internal sensors)
Barometric Pressure
Resolution and Units 0.01" Hg, 0.1 mm, 0.1 hPa, 0.1mb. (user selectable)
Range. 16.00" to 32.50" Hg, 410 to 820 mm Hg,
540 to 1100 hPa or mb
Elevation Range. -1500' to +15,300' (-460 m to 4670 m)
Update Interval 1 minute
Inside Relative Humidity
Resolution and Units 0.1%
Range & Accuracy .... 1 to 100% RH; ±2%
Accuracy....±2%
Update Interval.... 1 minute
Inside Temperature
Resolution and Units .... Current Data: 0.1°
Range. +32° to +140°F (0° to +60°C)
Sensor Accuracy. . . . . . . . . . . . . . ±0.5°F (±0.3°C) (typical)
Update Interval 1 minute
Weather Station Wireless Communications
ID Codes Available 8
Range
Line-of-Sight up to 1000 feet (300 m)
Through Walls 200 to 400 feet (60 to 120 m)
Receive Frequency (abridged list)
US. 902.0 - 928.0 MHz FHSS
EU. 868.0 - 868.6 MHz FHSS
Australia, Brazil 918.0 - 926.0 MHz FHSS
India 865.0 - 867.0 MHz FHSS
Japan 928.15 - 929.65 MHz FHSS
New Zealand, Peru 921.0 - 928.0 MHz FHSS
Pakistan, Taiwan. 920 - 925 MHz FHSS
Russia. 868.7 - 869.2 MHz FHSS
WeatherLink Live™
Product Number 6100, 6100EU, 6100UK, 6100USB Document Number: 07395.356 Rev. G 12/13/23
Vantage Pro ® , Vantage Pro2 ™ , Vantage Vue ® , and WeatherLink ® are trademarks of Davis Instruments Corp., Hayward, CA. Amazon, Alexa and all related logos are trademarks of Amazon.com, Inc. or its affiliates.
© Davis Instruments Corp. 2023. All rights reserved.
Information in this document subject to change without notice. Davis Instruments Quality Management System is ISO 9001 certified.
DAVIS
Davis Instruments
3465 Diablo Avenue, Hayward, CA 94545-2778 U.S.A.
510-732-9229 • Fax: 510-732-9188
info@davisinstruments.com • www.davisinstruments.com
- FCC PART 15 CLASS B REGISTRATION WARNING
- EC-DECLARATION OF CONFORMITY
- DIRECTIVE 2014/53/EU (RED) AND 2014/30/EU (EMC)
- COMPONENTS
- WEATHERLINK LIVE REQUIREMENTS & TOOLS
- INSTALL THE WEATHERLINK APP AND CREATE YOUR ACCOUNT
- DEVICES
- POWER UP AND CONNECT YOUR WEATHERLINK LIVE
- SET UP YOUR WEATHERLINK LIVE
- SET UP THE TRANSMITTING STATION(S)
- TROUBLESHOOTING
- THE BLUE LED ON MY WEATHERLINK LIVE IS NOT ON
- MY WEATHERLINK LIVE WILL NOT CONNECT TO THE INTERNET
- THERE IS NO WEATHER DATA ON MY WEATHERLINK.COM PAGE AND APP
- HOW CAN I CHANGE MY ARCHIVE RATE
- TO CHANGE YOUR RATE TO 30 OR 60 MINUTES
- TO UPGRADE AND CHANGE YOUR RATE TO 1 OR 5 MINUTES
- HOW CAN I CHANGE WHAT UNITS I WANT TO USE
- MY READINGS DO NOT SEEM CORRECT. CAN I CALIBRATE MY SENSORS
- CONTACTING DAVIS TECHNICAL SUPPORT
- SPECIFICATIONS (SEE WWW.DAVISINSTRUMENTS.COM FOR MORE INFORMATION)
- SENSOR DATA (INTERNAL SENSORS)
- BAROMETRIC PRESSURE
- INSIDE RELATIVE HUMIDITY
- INSIDE TEMPERATURE
- WEATHER STATION WIRELESS COMMUNICATIONS
- WEATHERLINK LIVE™
Brand : DAVIS
Model : DAV-6100
Category : Weather Station