
WEC-S - Microphone GODOX - Free user manual and instructions
Find the device manual for free WEC-S GODOX in PDF.


| Product Type | Wireless Lavalier Microphone System |
| Model | WEC-S Kit1 / WEC-S Kit2 |
| Wireless Technology | 2.4GHz Frequency Hopping System |
| Maximum Wireless Range | 200m (sight distance) |
| Transmitter Pickup Pattern | Omnidirectional |
| Frequency Response | 20Hz - 20kHz |
| Maximum SPL | 110dB |
| Dynamic Range | 86dB |
| Audio Output | 3.5mm TRS/TRRS, digital/analog switchable |
| Audio Modes | Mono/Stereo switchable, denoise function |
| Receiver Features | Can be used as standalone microphone with built-in mic |
| Transmitter Battery | 3.7V, 140mAh lithium-ion, approx. 8h working time |
| Receiver Battery | 3.8V, 200mAh lithium-ion, approx. 8h working time |
| Charging Case Battery (Kit2) | 3.7V, 1400mAh, charges all devices about twice |
| Charging Time | Approx. 2h for each device |
| Charging Method | USB-C cable or charging case (Kit2) |
| Transmitter Dimensions | 1.89" x 0.87" x 0.63" (48 x 22 x 16 mm) |
| Receiver Dimensions | 2.05" x 0.94" x 1.18" (52 x 24 x 30 mm) |
| Charging Case Dimensions | 2.48" x 3.35" x 1.72" (63 x 85 x 44 mm) |
| Transmitter Weight | Approx. 12g |
| Receiver Weight | Approx. 19g |
| Charging Case Weight | Approx. 87g |
| Operating Temperature | -10°C to 50°C |
| Maintenance | Avoid dropping, keep dry, avoid sudden temperature changes, keep away from strong magnetic fields |
| Safety Precautions | Keep out of reach of children; do not use in flammable/explosive environments; do not expose to temperatures above 50°C |
| Warranty (Main Body) | 12 months |
| What's in the Box (Kit1) | Transmitter x1, Receiver x1, USB-A to USB-C Cable x1, Furry Windscreen x2, 3.5mm TRS-TRS Cable x1, 3.5mm TRS-TRRS Cable x1, Storage Box x1, Hot Shoe Cover x1, Manual x1 |
| What's in the Box (Kit2) | Same as Kit1 plus: additional Transmitter, Charging Case, extra Windscreen |
Frequently Asked Questions - WEC-S GODOX
User questions about WEC-S GODOX
0 question about this device. Answer the ones you know or ask your own.
Ask a new question about this device
Download the instructions for your Microphone in PDF format for free! Find your manual WEC-S - GODOX and take your electronic device back in hand. On this page are published all the documents necessary for the use of your device. WEC-S by GODOX.
USER MANUAL WEC-S GODOX
GODOX Photo Equipment Co., Ltd.
Add. Building 2 Yaochuan Industrial Zone, Tangwei Community, Fural Street, Baoyan
District, Shenzhen 518103, China Tel: +85-755-29609320(8052)
Fax: +86-755-25723123 E-mail: godox@godox.com
www.godox.com
Made in China 706 WEOSK2 08



Godox
natural_image
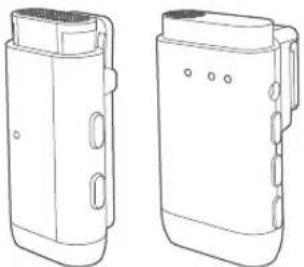
Line drawings of two electronic devices with ports and connectors (no text or symbols)WEC-S Kit1/WEC-S Kit2
无线领夹麦克风系统
Wireless Lavalier Microphone System
使用手册
Instruction Manual
前言
感谢购买神牛产品!
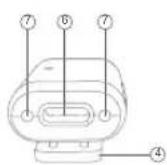
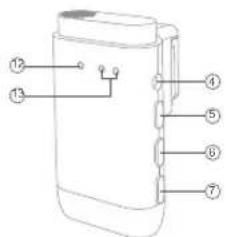
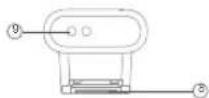
- 电源键
- 配对/降噪键
- 内置麦克风
- 背夹
5 指示灯
6. USB-C充电口
7.充电触点
接收器
natural_image
Line drawing of a DSLR camera with an attached sensor device (no text or symbols)natural_image
Diagram showing two devices connected via a cable, one with an attached plug and the other a smartphone (no text or symbols present)规格参数
Thank you for purchasing!
WEC-S Kit1 and WEC-S Kit2 are the latest wireless lavaller microphone systems designed for Sony cameras. With the characteristics of compact and portable, long duration of use, as well as 2.4GHz wireless transmission, it's quite suitable for live streaming, interview, family lecturing, short video recording, outdoor shooting, etc.
Please read this manual carefully before using to make sure the correct operation and exert the optimum function.
Main Feature
• Globally universal 2.4GHz wireless transmission technology.
• The maximum wireless transmission distance up to 200m (sight distance).
- Clear and stable sound quality with dencise function.
• Output volume adjustment and switchable mono/stereo mode.
• Support digital and analog audio mode.
- Receiver is workable as an individual microphone.
• Built-in lithium battery support charging through USB-C cable or charging case.
Warning
This product is high-precision instrument, please avoid falling, collision or pounding.
Do not disassemble. Should repairs become necessary, this product must be sent to our Company or an authorized maintenance center.
△ Always keep this product dry. Do not use in rain or damp conditions.
Do not leave or store this product in the environment of direct sunlight, near heating devices, or in hot, humid or dusty.
⚠️ Keep out of reach of children.
Do not use in flammable and explosive environments. Pay attention to the relevant warning signs.
Do not leave or store the product if the ambient temperature reads over 50°C.
⚠️ Please read carefully and follow the warnings or instructions provided by the manufacturer.
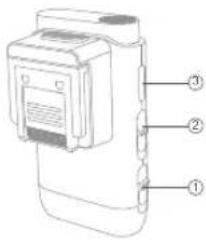
Structure of Product
Transmitter
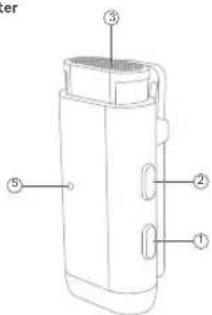
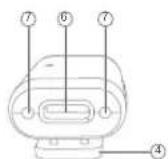
-
Power Switch Button
-
Indicator
-
Pairing/Denoise Button
-
USB-C Charging Port
-
Built-in Microphone
-
Charging Points
-
Back Clip
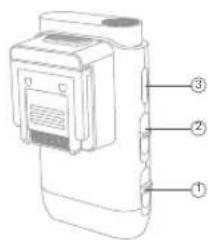
Receiver
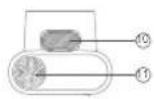
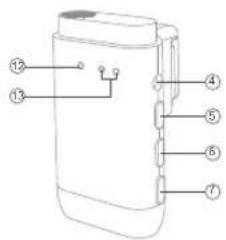
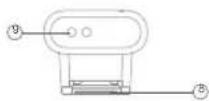
- Digital/Analog Audio Mode Switch Button
- Receiver's Mic Switch Button
3 USB-C Port - 3.5mm Audio Output Port
-
Power Switch Button
-
Pairing/Volume - Button
7 Mode/Volume - Button - Hot Shoe
-
Charging Points
-
Hot Shoe Detaching Button
11 Built-in Microphone - Hot Shoe Connecting Indicator
- Pairing Indicator
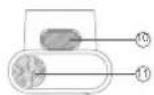
Charging Case
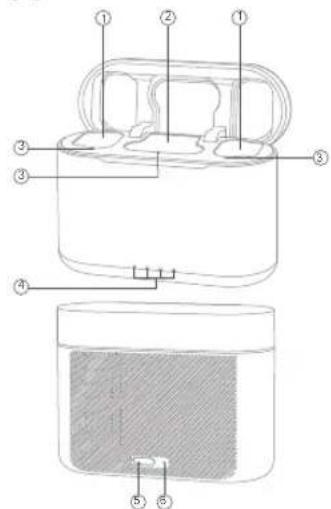
1 Transmitter's Slot
2. Receiver's Slot
3. Internal Status Indicator
4. External Charging Indicator
5 USB-C Charging Port
6 Reset Hole
What's Inside
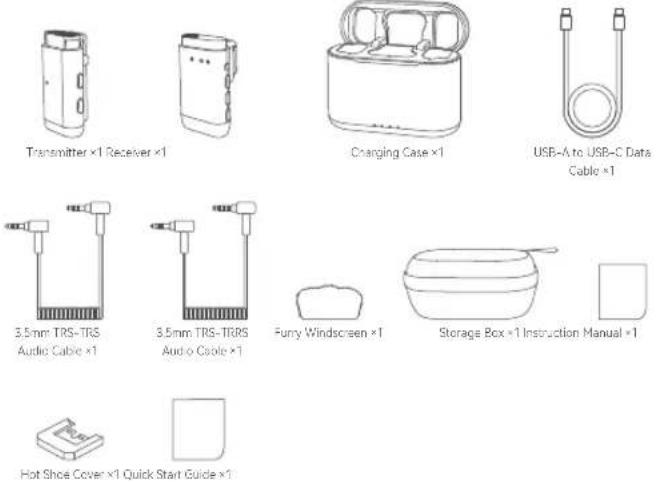
| Product Name | Model | Package List |
| Wireless Lavalier Microphone System | WEC-S Kit1 | Transmitter ×1, Receiver ×1, USB-A to USB-C Data Cable ×1, Furry Windscreen ×2, 3.5mm TRS-TRS Audio Cable ×1, 3.5mm TRS-TRRS Audio Cable ×1, Storage Box ×1, Hot Shoe Cover ×1, Instruction Manual ×1, Quick Start Guide ×1 |
| Wireless Lavalier Microphone System | WEC-S Kit2 | Transmitter ×2, Receiver ×1, Charging Case ×1, USB-A to USB-C Data Cable ×1, Furry Windscreen ×3, 3.5mm TRS-TRS Audio Cable ×1, 3.5mm TRS-TRRS Audio Cable ×1, Storage Box ×1, Instruction Manual ×1, Quick Start Guide ×1 |
Note: Due to continuous updates and upgrades of the products, there may be differences between the actual products and the pictures. Therefore, the pictures are for reference only. products to prevail in kind.
Instructions for Use
1. Power Switch
1.1 Operating Instructions
Press and hold the power switch button< >for 3s to turn on or off the transmitter and receiver. Take out the devices from the charging case, they will boot up automatically, while put them into the charging case, they will be turned off.
Note: The transmitter and receiver will be turned off if they stay unpaired in 5min after powered on.
1.2 Indicator Instructions
| Indicator Status Meaning | |
| Indicator of transmitter flashes green every 0.5s Unpaired after powered on | |
| Both indicators of receiver flash green every 0.5s Unpaired after powered on | |
2. Pairing
2.1 Operating Instructions
Press and hold the pairing/denoise button< /DNR >of transmitter and pairing/volume + button< /+ >of receiver for 2s to pairing them. They will exit pairing status once paired, while exit after 10s if unpaired.
2.2 Indicator Instructions
| Indicator Status Meaning | |
| Indicator of transmitter flashes green rapidly every 0.25s Pairing status | |
| Indicator of transmitter is constant on green | Paired |
| Both indicators of receiver flash green rapidly every 0.25s Pairing status | |
| TX1 indicator of receiver is constant on green, TX2 indicator of receiver is off | One transmitter and one receiver are paired |
| Both indicators of receiver are constant on green | Two transmitters and one receiver are paired |
Note: If two transmitters are paired with the receiver but one of which is turned off later, then its corresponding TX1/TX2 indicator will be off in 30s
3. Denoise
3.1 Operating Instructions
Press the pairing/denoise button< C/DNR >of transmitter to turn on or off the denoise function. When the denoise function of one transmitter in WEC: S KIT2 is turned on, the other transmitter will be turned on simultaneously, and the same applies when the denoise function is turned off.
3.2 Indicator Instructions
| Indicator Status Meaning | |
| Indicator of transmitter is constant on orange Denoise function is on | |
4. Mono/Stereo Mode Switch
4.1 Operating Instructions
The sound track mode is mono by default, press and hold the mode/volume - button< M / -> of receiver for 5s can switch to stereo mode.
4.2 Indicator Instructions
| Indicator Status Meaning | |
| Both indicators of receiver are constant on green Mono mode | |
| Both indicators of receiver are constant on blue | Stereo mode |
5. Output Volume Adjustment
Press and hold the pairing/volume + button< G /+>or mode/volume - button< M /->of receiver can adjust the output volume in 3 levels (high, medium and low). The volume is the medium level by default after first boot.
6. Digital/Analog Audio Mode Switch
Slide the digital/analog audio mode switch button < DIGITAL ANALOG > can switch to digital audio mode or analog audio mode. Note: Please do not switch during recording to avoid problems with the recorded audio.
7. Receiver's Mic
Slide the receiver's mic switch button < RX MIC > to turn on or turn off the receiver's mic, the receiver is workable as a microphone to record individually when it's turned on.
8. Charging
8.1 Charging through USB-A to USB-C Cable
The transmitter and receiver can be charged after connecting to power source through USB-A to USB-C cable.
| Indicator Status Meaning | |
| Indicators of transmitter and receiver flash white Charging | |
| Indicators of transmitter and receiver are constant on white | Fully charged |
| Indicator of Transmitter flashes red every 0.5s Battery | level of transmitter is below 10% |
| TX1 indicator of receiver is constant on red, TX2 indicator of receiver displays normally | Battery levels of receiver and transmitter TX2 are normal, while battery level of transmitter TX1 is below 10% |
| TX1 indicator of receiver displays normally. TX2 indicator of receiver is constant on red | Battery levels of receiver and transmitter TX1 are normal, while battery level of transmitter TX2 is below 10% |
| TX1 and TX2 indicators of receiver are constant on red | Battery level of receiver is normal, while battery levels of transmitter TX1 and TX2 are below 10% |
| TX1 and TX2 indicators of receiver flash red every 0.9s | Battery level of receiver is below 10% |
8.2 Charging Through Charging Case
Put the transmitter/receiver into the charging case, the case will first detect whether the transmitter/receiver is correctly inserted into the corresponding slot, the corresponding internal status indicator will light up if the pins inside touched the charging points of the transmitter/receiver. Then it will detect whether the transmitter/receiver is fully charged, if not, it will start charging until it's fully charged. The internal status indicators and external charging indicators will light up at the same time to show the battery level of the transmitter/receiver and the charging case itself if the charging case lid is open.
When charging the case itself, the four external charging indicators will flash white incrementally, and be constant on white after the charging case is fully charged.
| Indicator Status Meaning | |
| Internal status indicator flashes white The transmitter | receiver being charged |
| Internal status indicator is constant on white The transmitter/receiver is fully charged | |
| Four external charging indicators are constant on white | Charging case battery level is 100% |
| The first three external charging indicators from left to right are constant on white after the lid is open, while the last one is off | Charging case battery level is 75% |
| The first two external charging indicators from left to right are constant on white after the lid is open, while the other two are off | Charging case battery level is 50% |
| The first external charging indicator from left to right is constant on white after the lid is open, while the last three are off | Charging case battery level is 25% |
| The first external charging indicator from left to right flashes white after the lid is open, while the last three are off | Charging case battery level is low, please charge in time |
| Four charging indicators are all off after the lid is open | Charging case battery level is 0%, it will automatically turn off |
Instructions for Installation
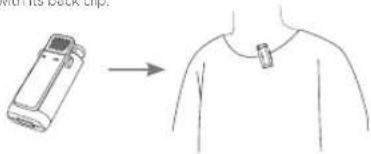
Clip the transmitter to the collar with its back clip.
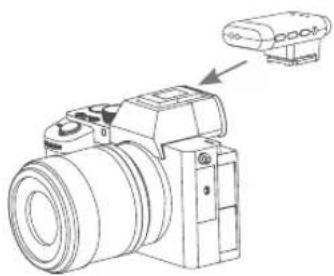
Clip the receiver to Sony camera directly through the hot shoe, the hot shoe connecting indicator will light up after connection. Push the hot shoe detaching button and pull out the receiver to detach it from the camera.
natural_image
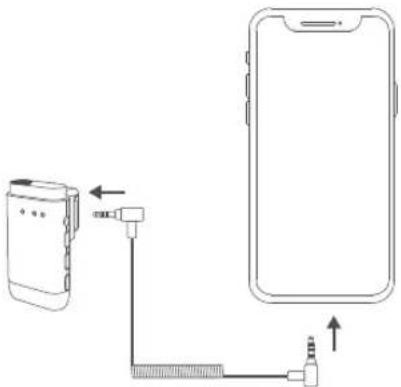
Line drawing of a DSLR camera with an attached sensor (no text or symbols)Connect the 3.5mm audio output port of receiver to the 3.5mm earphone jack port of smartphone with the 3.5mm TRS-TRRS audio cable.
33 34
Technical Data
| Name Transmitter | Receiver Charging Case | ||
| Model WEC TX | WEC SRX WEC-CS | ||
| Transmission Type | 2.4GHz Frequency Hopping System | 2.4GHz Frequency Hopping System | / |
| Pickup Pattern Omnicidirectional | / | / | |
| Frequency Range | 20Hz-20KHz | / | / |
| Max. SPL 110dB | / | / | |
| Dynamic Range | 86dB | / | / |
| Max. Wireless Distance | 200m (sight distance) | / | |
| Lithium Battery Parameters | 3.7V = 140mAh, 0.518Wh | 3.8V = 200mAh, 0.76Wh | 3.7V = 1400mAh, 5.18Wh |
| USB-C Input | 5V = 160mA | 5V = 200mA | 5V = 1.3A |
| Working Time Approx. 8h | Approx. 8h Charge 3 devices for about twice | ||
| Charging Time | Approx. 2h Approx. 2h Approx. 2h | |
| Working Environment Temperature | -10~50°C | -10~50°C -10~50°C |
| Dimension | 1.89"×0.87"×0.63" 2.05"×0.94"×1.18" 2.48"×3.35"×1.72" | |
| Net Weight(= 12g) | 19g 87g | |
Specifications and data may subject to changes without notice.
Maintenance
Avoid falling. Strong collision or vibration may malfunction the device
Keep dry. This product is not water-proof. Malfunction, rust, and corrosion may occur and go beyond repair if soaked in water or exposed to high humidity.
Avoid sudden temperature changes. Condensation happens in sudden temperature changes such as the circumstance when taking the product out of a building with higher temperature to outside in winter. Please put the product in a handbag or plastic bag beforehand.
Keep away from strong magnetic field. The strong static or magnetic field produced by devices such as radio transmitters leads to malfunction.
Specifications and data may subject to changes without notice.
FCC Statement
This device complies with part 15 of the FCC Rules. Operation is subject to the following two conditions:
(1) This device may not cause harmful interference, and
(2) this device must accept any interference received, including interference that may cause undesired operation.
Any Changes or modifications not expressly approved by the party responsible for compliance could void the user's authority to operate the equipment.
Note: This equipment has been tested and found to comply with the limits for a Class B digital device, pursuant to part 15 of the FCC Rules. These limits are designed to provide reasonable protection against harmful interference in a residential installation. This equipment generates uses and can radiate radio frequency energy and, if not installed and used in accordance with the instructions, may cause harmful interference to radio communications. However, there is no guarantee that interference will not occur in a particular installation. If this equipment does cause harmful interference to radio or television reception, which can be determined by turning the equipment off and on, the user is encouraged to try to correct the interference by one or more of the following measures:
-Reorient or relocate the receiving antenna.
- Increase the separation between the equipment and receiver
-Connect the equipment into an outlet on a circuit different from that to which the receiver is connected.
-Consult the dealer or an experienced radio/TV technician for help.
The device has been evaluated to meet general RF exposure requirement.
The device can be used in portable exposure condition without restriction.
Warning
Operating frequency: 2402MHz - 2480MHz (WEC TX/WEC SRX)
Maximum EIRP Power: 0.73dBm (WEC TX)/ -7.69dBm (WEC SRX)
Declaration of Conformity
GODOX Photo Equipment Co., Ltd. hereby declares that this equipment are in compliance with
the essential requirements and other relevant provisions of Directive 2014/53/EU. In
accordance with Article 10(2) and Article 10(10), this product is allowed to be used in all
EU member states
For more information of DoC, Please click this web link:
https://www.godox.com/eu-declaration-of-conformity
The device complies with RF specifications when the device used at 0mm from your body.
Marking Information
Model WEC TX
No. 5
L
Type Chgo
Lethan
(1)
④

(1) 2017年,美国与美国
A、应选第1款必填内容
Model WEC SAX
图2-3
图
- 2014年
16.12.57
G
①

记你讲话
(五)表决情况
[Non-Text]
[Non-Text]
产品保修
Dear customers, as this warranty card is an important certificate to apply for our maintenance service, please fill in the following form in coordination with the seller and safe-keep it. Thank you!
| Product Information | Model | Product Code Number |
| Customer Information | Name | Contact Number |
| Address | ||
| Seller Information | Name | |
| Contact Number | ||
| Address | ||
| Date of Sale | ||
| Note | ||
Note: This form shall be sealed by the seller.
Applicable Products
The document applies to the products listed on the Product Maintenance Information (see below for further information). Other products or accessories (e.g. promotional items, giveaways and additional accessories attached, etc.) are not included in this warranty scope.
Warranty Period
The warranty period of products and accessories is implemented according to the relevant Product Maintenance Information. The warranty period is calculated from the day(purchase date) when the product is bought for the first time, and the purchase date is considered as the date registered on the warranty card when buying the product.
How to Get the Maintenance Service
If maintenance service is needed, you can directly contact the product distributor or authorized service institutions. You can also contact the Godox after-sale service call and we will offer you service. When applying for maintenance service, you should provide valid warranty card. If you cannot provide valid warranty card, we may offer you maintenance service once confirmed that the product or accessory is involved in the maintenance scope, but that shall not be considered as our obligation.
Inapplicable Cases
The guarantee and service offered by this document are not applicable in the following cases: ①. The product or accessory has expired its warranty period; ②. Breakage or damage caused by inappropriate usage, maintenance or preservation, such as improper packing, improper usage, improper plugging in/out external equipment, falling off or squeezing by external force, contacting or exposing to the Improper temperature, solvent, acid, base, flooding and damp environments, etc; ③. Breakage or damage caused by non-authorized institution or staff in the process of installation, maintenance, alternation, addition and detachment; ④. The original identifying information of product or accessory is modified, alternated, or removed; ⑤. No valid warranty card; ⑥. Breakage or damage caused by using illegally authorized, nonstandard or non-public released software; ⑦. Breakage or damage caused by force majeure or accident; ⑧. Breakage or damage that could not be attributed to
the product itself. Once met these situations above, you should seek solutions from the related responsible parties and Coox assumes no responsibility. The damage caused by parts, accessories and software that beyond the warranty period or scope is not included in our maintenance scope. The normal discoloration, abrasion and consumption are not the breakage within the maintenance scope.
Maintenance and Service Support Information
The warranty period and service types of products are implemented according to the following Product Maintenance Information.
| Product Type | Name Maintenance | Period(month) | Warranty Service Type |
| Parts | Product Main Body Customer sends the Product | To designated site | |
| Battery | 3 | Customer sends the productTo designated site | |
| Charger, Electric Part(sic | 17 | Customer sends the productTo designated site | |
| Other Items | Battery Case, Windscreen Lamp, Wine Cap, Locking Device, Lanyard, Tie Velloo Tape, Clip, Bag, Package etc. | No | Without warranty. |
Godox After-sale Service Call 0755-29609320-8062
- GODOX Photo Equipment Co., Ltd.
- www.godox.com
- Godox
- WEC-S Kit1/WEC-S Kit2
- 无线领夹麦克风系统
- 使用手册
- 前言
- Main Feature
- Warning
- Structure of Product
- Instructions for Use
- Power Switch
- Operating Instructions
- Pairing
- Operating Instructions
- Denoise
- Mono/Stereo Mode Switch
- Output Volume Adjustment
- Digital/Analog Audio Mode Switch
- Receiver's Mic
- Charging
- Instructions for Installation
- Maintenance
- FCC Statement
- Declaration of Conformity
- Marking Information
- 产品保修
- Applicable Products
- Warranty Period
- How to Get the Maintenance Service
- Inapplicable Cases
- Maintenance and Service Support Information
Brand : GODOX
Model : WEC-S
Category : Microphone