
OM360MAT - Oven Pelgrim - Free user manual and instructions
Find the device manual for free OM360MAT Pelgrim in PDF.


| Product Type | Combi Microwave Oven |
| Brand | Pelgrim |
| Model | OM360MAT |
| Oven Capacity | 72 L |
| Microwave Power Output | 800 W |
| Maximum Power Input | 2880 W |
| Voltage / Frequency | 230 V ~ 50 Hz |
| External Dimensions (WxDxH) | 595 x 546 x 596 mm |
| Building-in Dimensions (WxDxH) | 560 x 550 x 590 mm |
| Oven Functions | Conventional, Convection, Convection + Fan, Radiant Grilling, Double Grill + Fan, Double Grilling, Pizza, Lower Heater, Defrost, Dough Proving |
| Microwave Power Levels | 5 levels: 800 W, 560 W, 400 W, 240 W, 80 W |
| Combi Functions | Microwave + Convection, Microwave + Double Grill + Fan, Microwave + Pizza |
| Automatic Programs | 10 cooking programs, 3 defrost programs |
| Control Type | Touch keys and selection dial knob |
| Interior Lighting | LED |
| Safety Features | Childproof lock, Pause function |
| Accessories Included | Oven rack, enamel baking tray |
| Cleaning | Enamel interior, wipe with damp cloth; no abrasive cleaners or steam cleaners |
| Display | Digital LED display |
| Installation | Built-in; separate installation instructions |
Frequently Asked Questions - OM360MAT Pelgrim
User questions about OM360MAT Pelgrim
0 question about this device. Answer the ones you know or ask your own.
Ask a new question about this device
Download the instructions for your Oven in PDF format for free! Find your manual OM360MAT - Pelgrim and take your electronic device back in hand. On this page are published all the documents necessary for the use of your device. OM360MAT by Pelgrim.
USER MANUAL OM360MAT Pelgrim
Instructions for use
Combi microwave oven
natural_image
Line drawing of a rectangular tray or container with three horizontal lines and small wheels at the bottom (no text or symbols)
natural_image
Simple line drawing of a rectangular baking tray with side handles (no text or symbols)natural_image
Line drawing of a multi-tiered coiled spring or rack structure (no text or symbols)natural_image
Line drawing of a coiled spring or coiled tube structure (no text or symbols)
natural_image
Two circular diagrams showing interior layout of a kitchen or bathroom with grid lines and a curved pipe (no text or symbols)
- De beugels monteren:
natural_image
Two identical 3D-rendered circular buttons with white tops and black bases, no text or symbols visible.natural_image
Two circular dial indicators with tick marks, one checked and one crossed (no text or symbols)natural_image
Simple circular icon with a horizontal line and a small 'X' symbol at the bottom right (no text or numbers)Onjuist
Algemeen
Vermogensniveaus magnetron

Ovenfuncties

Your combi microwave oven
| Introduction | 4 | |
| Control panel 5 | ||
| Description | 6 |
Before use
| Before you begin 7 |
| Setting the clock 7 |
| Microwave use 8 |
| Installation of hooks 10 |
| Install the rail brackets 10 |
| Instructions for the control panel knob (only for COM316) 12 |
Operation
| General | 13 |
| Microwave functions 16 | |
| Oven functions 17 | |
| Combi microwave functions 17 | |
| Automatic cooking programs 18 | |
| Preheating | 19 |
| Minute minder 20 | |
| Cooking end time 20 | |
| Childproof lock 21 | |
| Pause | 21 |
Cooking tips
| Heating and cooking with the microwave functions 22 |
Maintenance
| Keeping your appliance neat | 24 |
| Lighting | 24 |
Faults
| What to do if... | 25 |
Installation instructions
| Product specifications | 26 |
Your oven and the environment
| Disposing of the appliance and the packaging | 27 |
Introduction
Cooking with your new microwave oven is safe and relaxing. You can have the tastiest dishes on the table in no time at all. The appliance is extremely easy to use, partly thanks to the automatic cooking and defrosting programmes.
You will find information about the installation, safety, operation and maintenance of your appliance in this instruction manual.

Read the separate safety instructions before using the appliance!
Read this user instruction before using the appliance and keep it in a safe place for future use.
The installation instructions are included separately.
You can find the most recent version of the instructions for use on our website.
Control panel
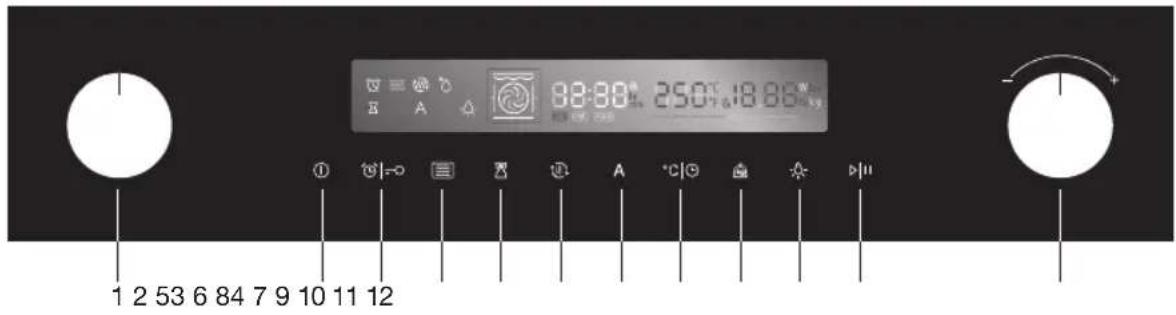
| 1. | Oven function knob Turn this knob to change heating mode. | |
| 2. |  Switch Off the oven. Switch Off the oven. | |
| 3. |  Kitchen timer / Childproof lock key Kitchen timer / Childproof lock key | Use timer function / use child-proof lock with 3s press. |
| 4. |  ave key Touch to set microwave. ave key Touch to set microwave. | |
| 5. |  g end time key Set an end time to the cooking duration. g end time key Set an end time to the cooking duration. | |
| 6. |  preheat key Use this to preheat quickly. preheat key Use this to preheat quickly. | |
| 7. |  menu key Touch to set auto menu. menu key Touch to set auto menu. | |
| 8. |  Clock / Temperature setting key Clock / Temperature setting key | Touch to set temperature / time. |
| 9. |  key Touch to set weight. key Touch to set weight. | |
| 10. |  lighting On / Off key Switch oven lighting On or Off. lighting On / Off key Switch oven lighting On or Off. | |
| 11. |  Pause key Start or pause the cooking process. Pause key Start or pause the cooking process. | |
| 12. |  ion dial knob Change the adjustment values shown in the display. ion dial knob Change the adjustment values shown in the display. | |
Description

- Control panel
- Light
- Grill element
- Rack levels
- Hinge
- Door glass

natural_image
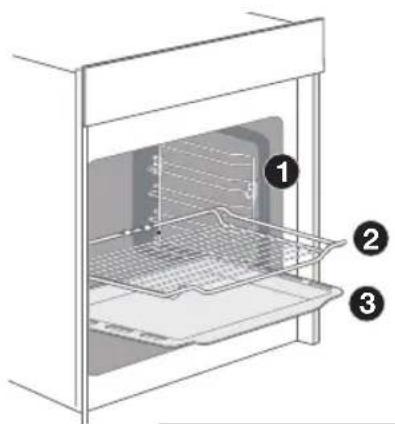
Line drawing of a rectangular tray or container with three horizontal lines and a small circular base (no text or symbols)The following accessories are provided with your oven:
- Ovenrack
Mainly used for grilling. A steam dish or pan with food can also be placed on the oven rack.
For microwave and oven use.
- Enamel baking tray
To be used for roasting meat and baking moist pastry. It can also be used as a drip tray. Place the baking tray into the first level for use as a drip tray during grilling.
Do not use the enamelled baking tray for microwave functions!

natural_image
Simple line drawing of a rectangular tray with side handles (no text or symbols)
Note
The accessories may deform when they become hot. This does not affect their function. Once they have cooled down again, they regain their original shape.
Before you begin
- Open the door and remove the packaging material.
- Do not use the microwave oven when it is damaged, but contact the manufacturer.
- Remove the protection foil from the outside of the microwave oven.
- Clean the inside of the oven and the accessories with a damp cloth. Do not use abrasive cleaners or any strongly smelling detergents.
Setting the clock
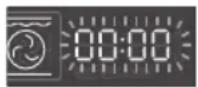
When the oven is connected to the mains power, '00:00' will appear in the display.




- Touch the clock / temperature setting key.
The hour display will flash. - Use the selection dial knob to enter the correct hour.
- Touch the clock / temperature setting key.
The minute indicator will flash. - Use the selection dial knob to enter the correct minute.
- Touch the clock / temperature setting key again to confirm the set time.
▶After you have set the right time, the time will stop blinking.
The clock has been set.
Notes
- To change the time later on, touch the clock / temperature setting key. The actual time will blink in the display.
- Use the selection dial knob to set the time and then touch the clock / temperature setting key again to confirm.
Microwave use
Microwaves are high-frequency electromagnetic waves; the energy released enables food to be cooked or reheated without changing either the form or the colour.
Microwave is used in:
- Microwave mode
- Combi-function
Cooking Principle
- The microwaves generated by the microwave are distributed uniformly. The food is thus cooked evenly.
- The microwaves are absorbed by the food up to a depth of about 1 inch (2.5 cm). Cooking then continues as the heat is dissipated within the food.
- Cooking times vary according to the container used and the properties of the food:
▶Quantity and density
▶Water content
▶Initial temperature (refrigerated or not)

Important
As the centre of the food is cooked by heat dissipation, cooking continues even when you have taken the food out of the oven. Standing times specified in recipes and in this booklet must therefore be respected to ensure:
• Even cooking of the food right to the centre.
- An even temperature throughout the food.
Microwave cookware guide
Cookware used for ‘Microwave Mode’ must allow microwaves to pass through and penetrate food. Metals such as stainless steel, aluminum and copper reflect microwaves. That is why cookware made of metallic materials should not be used. Cookware marked ‘microwave - safe’ is always safe for use. For additional information on appropriate cookware refer to the following guide.
| Cookware | Microwave-Safe | Comments |
| Aluminium foil | √X | Can be used in small quantities to protect areas against overcooking. Arcing can occur if the foil is too close to the oven wall or if too much foil is used. |
| China and earthenware | √ | Porcelain, pottery, earthenware and bone china are usually suitable, unless decorated with a metal trim. |
| Disposable polyester cardboard dishes | √ | Some frozen foods are packaged in these dishes. |
| Fast food packaging• Polystyrene cups containers• Paper bags or newspaper• Recycled paper or metal trims | √ | Can be used to warm food. Overheating may cause the polystyrene to melt.May catch fire.May cause arcing. |
| Glassware• Oven-to-table ware• Fine glassware• Glass jars | √ | Can be used, unless decorated with a metal trim.Can be used to warm foods or liquids. Delicate glass may break or crack if heated suddenly.Must remove the lid. Suitable for warming only. |
| Metal | X | May cause arcing or fire. |
| Paper• Plates, cups, Kitchen paper• Recycled paper | √ | For short cooking times and warming. Also to absorb excess moisture.May cause arcing. |
| Plastic | √ | Particularly if heat-resistant thermoplastic. Some other plastics may warp or discolour at high temperatures. Do not use Melamine plastic.Can be used to retain moisture. Should not touch the food. Take care when removing the film as hot steam will escape. Only if boilable or oven-proof. Should not be airtight. Prick with a fork, if necessary. |
√ : Recommended
√X : Use with caution
X : Unsafe
Installation of hooks
Install 4 hooks
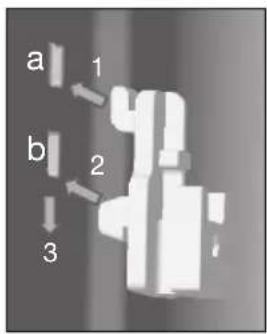
- Install the hook into hole (a).
- Push the hook into hole (b).
- Push the hook down into the right place.

Install hook 'R' at the rear and hook 'F' at the front.
Install the rail brackets
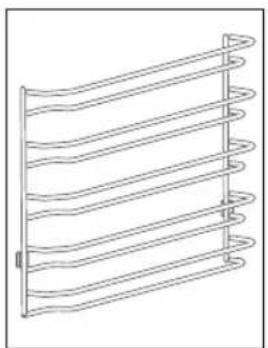
natural_image
Line drawing of a multi-tiered coiled spring or tube structure (no text or symbols)Distinguish the left and right rail bracket
- The left rail bracket
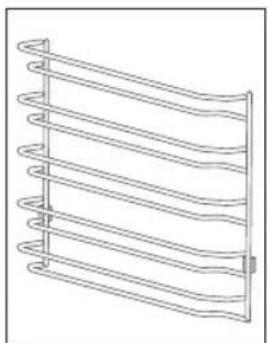
natural_image
Line drawing of a multi-tiered coiled spring or coiled tube structure (no text or symbols)- The right rail bracket

natural_image
Two circular diagrams showing a grid structure and a roof-like structure, both with numbered annotations (2 and 3), no readable text or symbols.
- Mounting the brackets:
Place the bracket against the groove of the hook.
▶Push the rail bracket backwards.
▶Move down the rail bracket into the bottom of the groove hook.

Important!
Be aware of the right positing of the bracket in the hooks. Wrong installing of the bracket will result in sparks in the oven!
Locking function
The accessories can be pulled out approximately halfway until they lock in place. The locking function prevents the accessories from tilting when they are pulled out. The accessories must be inserted into the cavity correctly for the tilt protection to work properly.
- When inserting the wire rack, ensure the wire rack is onto the right facing direction.
- When inserting the backing tray, ensure the backing tray is onto the right facing direction.
Instructions for the control panel knob (only for COM316)

natural_image
Two identical 3D-rendered circular buttons with white segments, placed on a dark surface (no text or symbols)The knob can only be rotated for use when the knob protrudes from the control panel.
- Press the knob to let it protrude from the front panel.

natural_image
Two circular dial indicators with tick marks, one marked with a checkmark and the other with an 'X' symbol (no text or numbers present)The knob can only be pushed into the control panel when the bar on the knob is vertical.
- Press the knob back into the front panel.
Right

natural_image
Simple circular dial with a pointer and 'X' mark, no text or symbols presentWrong
General
Microwave power levels
You can see from the table below from which five power levels you can choose and for which foods the power levels are suitable. During use it is possible to change the power by pressing the microwave key.
| Power level Food | |
| 800 W - Boiling water, reheating- Cooking chicken, fish, vegetables | |
| 560 W - Reheating- Cooking mushrooms, shellfish- Cooking dishes containing eggs and cheese | |
| 400 W - Cooking rice, soup | |
| 240 W - Defrosting- Melting chocolate and butter | |
| 80 W - Defrosting sensitive / delicate foods- Defrosting irregularly-shaped foods- Softening ice cream- Allowing dough to rise |
Changing the temperature
During use it is possible to change the temperature. The temperature status can be viewed in the LED status bar. The set temperature is reached when all LED units in the status bar are lit.
Changing the cooking time
During use it is possible to change the cooking time. The step quantities for adjusting the time are as follow (the maximum cooking time that can be set depends on the chosen mode):
| Adjust 0 - 15 | min. 15 min.+ | |
| Step 10 sec. | 30 sec. |
All functions:
| Oven Function Temperature Use | |||
 | Conventional 30 ~ 250 °C | The top and bottom elements work together to provide conventional cooking. The oven needs to be preheated to the required temperature: ideal for slow cooking dishes such as casseroles and stews. | |
 | Convection 50 ~ 250 °C | For baking on several levels (e.g. baking trays of chocolate chip cookies). | |
 | Conventional + Fan | 50 ~ 250 °C | Convenient and time savings, up to 4 dishes can be cooked simultaneously on different shelves without mixing of taste or smell. |
 | Radiant Grilling 150 ~ 250 °C | Best results can be obtained from using the top shelf for small items and lower shelves for larger items. | |
 | Double Grill + Fan 50 ~ 250 °C For gratin dishes and finishing roasted vegetables. | ||
 | Double Grilling 150 ~ 250 °C | The inside radiant elements and outside top element work simultaneously giving a rapid and even grilling heat, therefore effectively browning the top surface of the food. | |
 | Pizza 50 ~ 250 °C | Pizza is perfectly cooked with extra heat from both bottom and sides of the oven, guaranteeing pizza bases are crispy. | |
 | Lower Heater Element | 30 ~ 220 °C | This is ideal for slow cooking dishes such as casseroles, stews. |
 | Defrost For gently defrosting frozen food. | ||
 | Dought proving 30 ~ 45 °C | For making yeast dough and sourdough to prove and culturing yogurt. | |
OPERATION
| Microwave + combi microwave function | Temperature | Use | |
 | Microwave - Defrost, | reheat and cooking. | |
 | Microwave + Convection | 50 ~ 250 °C | For reducing large portions' cooking time with browning finish. |
 | |||
 | Microwave + Double Grill + Fan | 50 ~ 250 °C | This function is suitable where quick browning is required; will cook the ingredients down to the core. |
 | |||
 | Microwave + Pizza | 50 ~ 250 °C | This function is suitable where quick under browning is required; will cook the ingredients down to the core. |
| [T73S] | |||
| Auto functions Temperature Use | |||
 | Defrost 3 defrosting | programmes | |
 | Auto programs | 10 cooking programmes, from A 01 to A 10. The type of heating and cooking time are set by weight. | |
Microwave functions

Warning!
- Microwave heating of liquids (such as water) can result in delayed eruptive boiling. This means that liquid starts boiling without you seeing any movement. Once removed from the oven, the liquid can start to boil rapidly and spatter out of the cup with the risk of injury. The effect of eruptive boiling can be eliminated by placing a plastic / glass spoon in the fluid before cooking it in the microwave oven.
• Take care with baby food and jars:
The contents of feeding bottles and baby food jars must be stirred or shaken after heating.
▶Carefully check the temperature of the contents before consumption, in order to avoid burns.
- Utensils can be hot after use in the microwave oven!
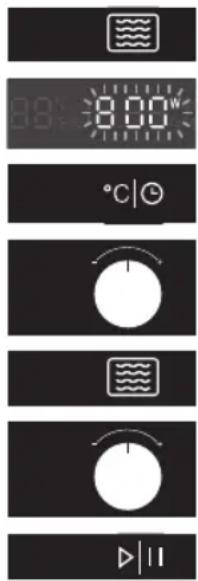
- Remove the enamelled baking tray.
- Place the dish on the oven rack.
- When the oven is in standby mode, touch the microwave key to activate the microwave function.
-
'01:00' flashes in the display. '800' and the microwave function icon are visible.
-
Touch the clock / temperature setting key.
- Use the selection dial knob to set the cooking time.
- Touch the microwave key.
The power indication will flash in the display.
▶You will hear an audible signal.
- Use the selection dial knob to set the power level.
- Touch the start / pause key to start the cooking process.
▶When the cooking process is ready, a signal sounds.
The fan continues to operate for some time and then stops automatically.


The combi microwave oven goes to standby automatically after
5 minutes if you do not touch the start/pause key.
Oven functions

- Use the oven function knob to select an oven mode.
- You can change the time and / or temperature of each mode (if desired) For this, touch the clock / temperature setting key. - The time or temperature (setting) will flash.
- Use the selection dial knob to set the desired time and / or temperature.
The time and temperature that can be set depends on the oven function that you have chosen.
- Touch the start / pause key to start the cooking process.
- When the cooking process is ready, a signal sounds. - The fan continues to operate for some time and then stops automatically.

The combi microwave oven goes to standby automatically after 5 minutes if you do not touch the start/pause key.
Combi microwave functions
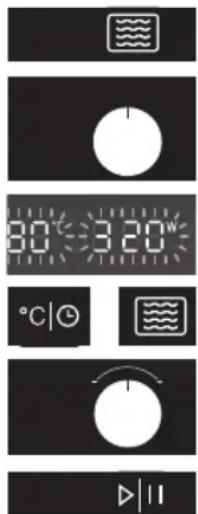
- When the oven is in standby mode, touch the microwave key.
- Use the oven function knob to select a mode. There are 3 combinations possible (see 'combi microwave function table').
▶ You can change the power, time and / or temperature of each mode (if desired). For this, touch the microwave key or the clock / temperature setting key.
The power, time or temperature (setting) will flash.
- Use the selection dial knob to set the desired power, time and / or temperature setting.
The power, time and temperature that can be set depends on the mode that you have chosen.
- Touch the start / pause key to start the cooking process.
▶When the cooking process is ready, a signal sounds.
The fan continues to operate for some time and then stops automatically.

The combi microwave oven goes to standby automatically after
5 minutes if you do not touch the start/pause key.
Automatic cooking programs
You can choose from 10 automatic cooking programmes and 3 automatic defrost programmes. All you have to do is select the programme and then set the correct weight. The power, time and temperature are already set in the selected programme.
| Recipe Preheat Default time | Default weight range | ||||
| d01** | Meat No 08:00 min. 200 g 100 - 1500 g | ||||
| d02** | Poultry No 04:48 min. | 200 g 100 - 1500 g | |||
| d03** | Fish No 04:00 min. 200 g 100 - 1000 g | ||||
| A01** | Popcorn No 03:05 min. 100 g | - | |||
| A02** | Potato cheese gratin | No | 00:35 hr | 500 g | - |
| A03 | Cheese cake | No | 01:16 hr | - | - |
| A04* | Quiche Lorraine | 10 min. | 00:40 hr | - | - |
| A05 | Meatloaf | No | 01:15 hour (standard) / 00:30 hour | 1000 g | 500 g / 1000 g |
| A06 | Marmor cake | No | 01:20 hr | - | - |
| A07* | Flat bread | 8 min. | 00:35 hr | - | - |
| A08* | Apple pie | 7 min. | 01:00 hr | - | - |
| A09* | Fresh pizza on a tray | 8 min. | 00:35 hr | - | - |
| A10 | Apple cake with crumbles | No | 01:00 hr | - | - |
** The programme only uses the microwave function. Do not use the baking tray.
* The programme uses preheating.


Attention!
- During the automatic cooking programmes, the microwave function is switched on. Therefore do not use metal utensils.
- The programmes with a * are preheated. During preheating, the cooking time pauses and the quick preheat key is on.
• After preheating, you will hear an alarm. - Put the dish on the oven rack (with microwave function) or baking tray and insert it in the oven on level 1. Touch the start / pause key.
- The programmes with ** only use the microwave function.
OPERATION


- Touch the auto menu key.
- Use the oven function knob to select an automatic cooking programme (A) or a defrost programme (d).
▶Time, weight (if present) and the number of the programme appear in the display. - Touch (if necessary) the weight key to set the weight.
The weight flashes in the display. - Use the selection dial knob to set the desired weight.
The weight you set depends on the selected programme. - Press the start / pause key to start the automatic cooking programme.
▶When the cooking process is ready, a signal sounds.
The fan continues to operate for some time and then stops automatically..
The combi microwave oven goes to standby automatically after
5 minutes if you do not touch the start/pause key.
Preheating


The preheating function can only be used when an oven function is selected.
- Touch the quick preheat key.
The preheat icon appears in the display. - Touch the start / pause key to start the preheating.
▶If the right temperature is reached, a signal sounds. - You can stop the preheating by opening the oven door or by touching the Off key.
- Put the dish in the oven.
- Touch the start / pause key to start the previously set cooking process.

The combi microwave oven goes to standby automatically after
5 minutes if you do not touch the start/pause key.
Minute minder

natural_image
Three horizontal black panels with white circular symbols and curved arrows, no text or labels present.You can only use the minute minder if the combi microwave oven is switched off. The (current) time appears in the display.
- Touch the kitchen timer / childproof lock key. ▶The hour display will flash.
- Use the selection dial knob to enter the correct hour.
- Touch the kitchen timer / childproof lock key. ▶The minute indicator will flash.
- Use the selection dial knob to enter the correct minute.
- Touch the kitchen timer / childproof lock key to confirm the setting.
Cooking end time
You can set the time the oven should switch off. A cooking time first needs to be set. Ensure that the clock is set precisely to the current time.
Example:
Current time: 12:30
Cooking time: 2 hours
End of cooking: 18:30 hours
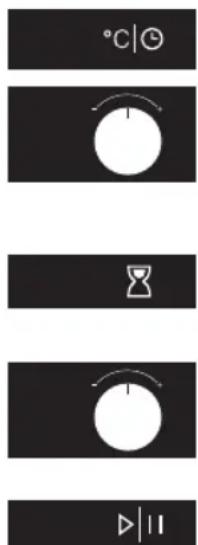
- Put the dish in the oven and choose an oven function and temperature.
- Touch the clock / temperature setting key. ▶The hour display will flash.
- Use the selection dial knob to enter the hours (12).
- Touch the clock / temperature setting key. ▶The minute indicator will flash.
- Use the selection dial knob to enter the minutes (30).
- Touch the cooking end time key. ▶The hour display will flash.
- Use the selection dial knob to enter the hours (18).
- Touch the cooking end time key. ▶The minute indicator will flash.
- Use the selection dial knob to enter the minutes (30).
- Press the start / pause key.
The symbol for the cooking end time flashes on the display. The oven will switch on automatically (16:30 hours) and switch off at the selected time (18:30 hours).
Childproof lock

You can ‘lock’ your combi microwave oven, to prevent a cooking process from starting.
Attention:
You can only activate the childproof lock if the combi microwave oven is switched off. The (current) time appears in the display.

- Touch and hold the kitchen timer / childproof lock key until an audio prompt is heard.
In the display the corresponding icon appears. You cannot operate the combi microwave oven. - Touch and hold the kitchen timer / childproof lock key until an audio prompt is heard.
In the display the corresponding icon disappears. You can now operate the combi microwave oven again.
Pause
If your combi microwave oven is working, you can set it to 'pause'.
- Touch the start / pause key.
The settings in the display will flash. - Touch the start / pause key to re-start the cooking process.
The symbol of the set mode will stop flashing.
Heating and cooking with the microwave functions

- The microwave oven always heats with the same intensity. The more you put in the microwave oven, the longer the cooking time.
- Wide, flat dishes become hot more quickly than narrow, tall dishes.
- Covering dishes with cling film or a suitable lid prevents spattering, shortens cooking time and helps maintaining humidity of the dish.

Caution!
- Remove the cling film or lid carefully afterwards. The steam that comes off can be very hot!
- If necessary, moisten foods that quickly dehydrate. First soak potatoes and vegetables in cold water for a moment before placing them in the microwave oven. This prevents a skin forming on them.
- For uniform results, it is best to stir or turn meals once or twice.
- When reheating foods that have already been cooked before, always select the highest microwave power level.
- When cooking in a microwave oven, only small quantities of water, salt and seasoning are necessary. Best add salt after cooking. This prevents moisture being drawn out of the food.
- Food continues to cook for some time after the microwave oven has been switched off. Keep this in mind, don't overcook your meals.
- When heating small quantities of powdery products (such as when drying herbs), always place a glass of water in the microwave. Of herwise, due to the small quantity, there is a chance of spontaneous combustion.

Defrosting

- Always defrost large, dense pieces using the defrosting programme. The food will defrost gradually and evenly, you will not run the risk of the outside drying while the centre is still frozen.
- To speed up the defrosting process, it is recommended that after a while the food be divided up into smaller pieces.
- For large pieces of meat and dense food, introduce a couple of breaks into the defrosting process.
- When defrosting irregularly shaped food, halfway through the defrosting time you can cover or wrap the thin parts with aluminium foil.
Factors that affect the cooking process

- The temperature of the ingredients affects the cooking times. A cold meal will require a longer cooking time than a meal that is already at room temperature.
- Light, delicate foods cook more quickly than heavy, solid foods, such as stews and rolled meats. Take care when cooking light, delicate foods. The edges quickly become dry and tough.
- Small pieces of food are heated more evenly if you place them separately in the microwave, preferably in a circle.
- Bones and fat conduct heat better than meat. Covering chicken legs and wings with aluminium foil prevents burning these parts.
- Microwaves penetrate food to a depth of about 3 cm. The centre of thick foods is heated as a result of heat from the heated part (the outside) spreading to the inside.
- Meat and poultry that is cooked in the microwave for more than about 15 minutes becomes lightly browned. Any food cooked for a shorter time can be rubbed beforehand with a ‘browning’ sauce, such as Worcestershire sauce, soya bean oil or barbecue sauce.
- Greaseproof paper prevents splattering. It also retains heat better.
Cooking vegetables

- Use fresh vegetables if possible. If the vegetables have become limp because they have been kept for too long, you can refresh them by soaking them in cold water for a little while.
- Use a large dish to cook vegetables, so the bottom of the dish is not covered by too thick a layer.
- Preferably cook vegetables with the water that clings to them.
• Always cover the dish with a lid or microwave cling film. - Do not add salt. The salts naturally present in the vegetables usually provide enough flavour. If you must add salt, do so after cooking.
- Cook vegetables for as short a time as possible. Allow for them continuing to cook after the microwave has been switched off.
- Check whether the vegetables are done by pricking them with a fork or skewer.
Cooking fish
- Fish should be cooked gradually. With thin fish, fatty fish or small portions, therefore, set the power level to 30%. In other cases, you can safely set the power level a bit higher. Allow, however, for the food continuing to cook after the microwave has been switched off. Fish is done when the flesh has become opaque.
Keeping your appliance neat

- The cooking compartment in your appliance is made of enamel. Improper care can lead to corrosion in the cooking compartment.
- Salts are very abrasive. If salt is deposited in the cooking compartment, rust could develop in places.
- Acidic sauces, such as ketchup and mustard, or salted foods, e.g. cured roasts, contain chloride and acids. These affect the stainless steel surface. Clean the cooking compartment after each use.
- DO NOT use harsh abrasive cleaners or sharp metal scrapers to clean the oven door glass since they can scratch the surface, which may result in shattering of the glass (if provided).
- DO NOT use a steam cleaner to clean the microwave oven.
- If the seal on the outside of the cooking compartment is very dirty, the cooking compartment door will no longer close properly during operation. The fronts of adjacent units could be damaged. Keep the seal clean.
- Clean the inside and outside of the oven regularly using soapy water and dry it thoroughly with a dry cloth. Make sure that the microwave distributor cover (inside the oven on the right) is clean. A cover which is not clean may cause sparking.
- Clean the inside immediately after use. Use a damp cloth to remove any condensation, liquid that has boiled over and food remains. Crumbs and liquid that remain behind absorb microwave energy and lengthen cooking times.
- Clean the accessories regularly; use soapy water and a brush and dry the accessories thoroughly with a dry cloth. The accessories may also be washed in a dishwasher.
- Odours will disappear if you put a glass of vinegar or water - with lemon juice added - in the oven space. Switch the microwave on for two minutes on full power. Then wipe with a damp cloth.

Lighting

- This appliance is fitted with LED lighting.
- LED lamps guarantee you optimum lighting, a service life of up to 10 times longer than conventional lamps and energy savings of as much as 90%.
Contact the technical department when LED lighting needs to be replaced.
FAULTS
What to do if...
If the microwave oven does not cook as well as it should do, if there is sparking inside it, or if it does not start, etc., first try to find the reason for the problem yourself before calling the service department.
Check:
• Is the plug in the socket?
• Is the door closed properly?
- Have the power level and the cooking time been set properly?
- Are there any objects in the microwave oven which shouldn't be there?
- Are you using the correct cooking utensils?
- Are the vents blocked?
- Has the food been defrosted sufficiently?
• Did you stir or turn the food during cooking?
• Is the childproof lock turned on?
Product specifications
On the label on the inside of this equipment, you will find the total wattage, the required voltage and the frequency.
| External dimensions (wxdxh) 595 | mm x 546* mm x 596 mm |
| Building in dimensions 560 mm x | 550 mm x 590 mm |
| Oven capacity 72 liter | |
| Rated voltage 230 V ~ / 50 Hz | |
| Rated maximum power input 2880 W | |
| Rated microwave power output 800 W | |
* Depth excluding the 20 mm depth of the dashboard.
Disposing of the appliance and the packaging
This product is made from sustainable materials. However, it must be disposed of in a responsible manner at the end of its useful life. The government can provide you with information about this.
The packaging of the appliance can be recycled. The following materials have been used:
- cardboard
• polyethylene wrap (PE)
• CFC-free polystyrene (hard PS foam)
You should dispose of these materials in a responsible manner, according to the government regulations.

The product shows a pictogram of a crossed-out waste container to point out that domestic electrical appliances must be disposed of separately. Thus the appliance may not be processed via the regular waste flow at the end of its useful life. It must be handed in at a special municipal waste depot or at a sales outlet which does this for you.
By collecting household appliances separately, we prevent negative consequences to the environment and our health which could be the result of incorrect disposal. The materials used to make this appliance can be re-used, which means tremendous savings in energy and raw materials.

Declaration of conformity
We hereby declare that our products comply with the relevant European directives, standards and regulations as well as all requirements referred to in the standards.

The appliance rating label is located on the inside of the appliance.
When contacting the service department,
have the complete type number to hand.
You will find the addresses and phone numbers of the service organisation on the guarantee card.
www.pelgrim.nl
www.pelgrim.be

810868
Pelgrim


- Algemeen
- Vermogensniveaus magnetron
- Ovenfuncties
- Introduction
- Read the separate safety instructions before using the appliance!
- Control panel
- Description
- The following accessories are provided with your oven:
- Note
- Before you begin
- Setting the clock
- Notes
- Microwave use
- Microwave is used in:
- Cooking Principle
- Important
- Microwave cookware guide
- Installation of hooks
- Install 4 hooks
- Install the rail brackets
- Distinguish the left and right rail bracket
- Important!
- Locking function
- Instructions for the control panel knob (only for COM316)
- General
- Microwave power levels
- Changing the temperature
- Changing the cooking time
- OPERATION
- Microwave functions
- Warning!
- Oven functions
- Combi microwave functions
- Automatic cooking programs
- Attention!
- Preheating
- Minute minder
- Cooking end time
- Example:
- Childproof lock
- Attention:
- Pause
- Heating and cooking with the microwave functions
- Caution!
- Defrosting
- Factors that affect the cooking process
- Cooking vegetables
- Cooking fish
- Keeping your appliance neat
- Lighting
- FAULTS
- What to do if...
- Check:
- Product specifications
- Disposing of the appliance and the packaging
- Declaration of conformity
Brand : Pelgrim
Model : OM360MAT
Category : Oven