
Design Basic 46009 - Vacuum Sealer Gastroback - Free user manual and instructions
Find the device manual for free Design Basic 46009 Gastroback in PDF.


| Product Type | Vacuum Sealer (Presse à vide) |
| Model | Design Basic 46009 |
| Brand | Gastroback |
| Dimensions (W x D x H) | Approx. 394 x 164 x 87 mm (15.5 x 6.5 x 3.4 in) |
| Weight | Approx. 1.4 kg (3.1 lb) |
| Power Supply | 220 - 240 V AC, 50/60 Hz, at least 8 A |
| Power Consumption | 150 W |
| Maximum Vacuum (Pressure Reduction) | -0.6 to -0.8 bar |
| Pump Performance | Approx. 11 L/min (at normal pressure) |
| Max Continuous Pump Operation | 30 seconds (automatic functions); Pulse function up to 30 seconds |
| Maximum Foil/Bag Width | 300 mm (12 in) |
| Power Cord Length | Approx. 100 cm (40 in) |
| Control Panel | Touch sensors with Dry, Moist, Seal Only/Cancel, Canister, Pulse buttons |
| Vacuum Modes | Dry (full power for dry items), Moist (reduced power for moist/powder items) |
| Additional Functions | Pulse (manual pump control), Seal Only (seal without vacuum), Canister (container evacuation) |
| Pressure Detection System | Automatic stop when target pressure reached or after 10 seconds if leak |
| Overheat Protection | Self-resetting; unplug and cool 30 min if triggered |
| Drip Tray | Removable, catches liquids/powders during operation |
| Foil Cutter | Integrated cutter bar and slider for straight cuts |
| Vacuum Port | For optional vacuum hose to evacuate containers (hose not included) |
| Optional Accessories | Vacuum container sets (item 46110, 46111), foil hose sets (item 46100, 46101) |
| Cleaning | Wipe exterior with damp cloth; wash drip tray in warm dishwater; dab gaskets, do not rub |
| Safety Certifications | CE |
| Warranty | 2 years for household use; 1 year for commercial use (Germany/Austria service center) |
Frequently Asked Questions - Design Basic 46009 Gastroback
User questions about Design Basic 46009 Gastroback
0 question about this device. Answer the ones you know or ask your own.
Ask a new question about this device
Download the instructions for your Vacuum Sealer in PDF format for free! Find your manual Design Basic 46009 - Gastroback and take your electronic device back in hand. On this page are published all the documents necessary for the use of your device. Design Basic 46009 by Gastroback.
USER MANUAL Design Basic 46009 Gastroback
natural_image
Exterior view of a Gastroback® air purifier device (no visible text or symbols beyond branding)BEDIENUNGSANLEITUNG
Art.- Nr. 46009 » Design Vakuumierer Basic «
Art-No.46110Art-No.46111Art-No.46100Art-No.46101


DIE TROPFSCHALE AUSLEEREN
natural_image
Exterior view of a GASTROBACK electric heater (no visible text or symbols on body)OPERATING INSTRUCTIONS
Item No. 46009 » Design Vacuum Sealer Basic«
Read all provided instructions before first usage! Model and attachments are subject to change For household use only!
Deutsch
English
www.gastroback.de

We attach a certain importance to your safety. Thus, we ask you to read all provided instructions and information in this booklet carefully and completely, before you start running the appliance. This will help you to know all functions and properties of your new appliance. We especially ask you to adhere strictly to the safety information mentioned in these instructions.
TABLE OF CONTENTS
Important Safeguards 44
General Safety Instructions....44
Important Safeguards for Electrical Appliances 46
Low Pressure - Risk of Implosion 47
Technical Specifications....48
Knowing Your New Design Vacuum Sealer Basic 49
Properties of Your New Design Vacuum Sealer Basic 50
Using the Buttons 51
Pulse Function 52
Pressure Detection System 53
Overheat Protection 53
Vacuum Containers 54
Important Tips for Vacuum Sealing 55
Before First Use 56
Operation 56
Using the Foil Cutter 57
Emptying the Drip Troy 58
Sealing Foils under Normal Pressure 58
Vacuum Scaling a Bag 59
Evacuating a Container 61
Manually Controlling the Vacuum Pump 63
Solving Problems....64
Care and Cleaning 71
Storage 72
Notes for disposal....73
Information and Service....73
Warranty....74
IMPORTANT NOTE - PLEASE READ CAREFULLY - BEFORE YOU USE THE DEVICE!
All GASTROBACK® products are intended for food processing of food products and groceries. For reasons of health protection and hygiene, products that are used on a daily basis or used only once, are not allowed to be returned. Check the goods just as you would do in a retail store.
You only have to pay for a possible loss in value of the goods, if this loss of value is due to a non-necessary for the examination of the nature, characteristics and function of the goods handling.
An unnecessary way to check the nature, characteristics and function of the goods is the processing of food products or groceries into food and drinks.
If you have any questions about GASTROBACK® products, if your unit is not working properly straight away or if you need any accessories or spare parts for your GASTROBACK® product please contact our customer service before returning.
Monday to friday (except on holidays) from 8am to 4pm
E-Mail: info@gastroback.de
DEAR CUSTOMER!
Your new Design Vacuum Sealer Basic will help you preserving freshness and taste of your food for an elongated time. What's more, in home and leisure time the Design Vacuum Sealer Basic will be a useful assistant, protecting delicate objects from water and dirt.
The instructions for use will inform you on the properties and features of the appliance, which makes it easy to get used to the handling. We hope that you will enjoy your new Design Vacuum Sealer Basic.
Carefully read all instructions before operating this appliance.
These instructions are an essential part of the appliance. Save them for further reference. Do not pass over this appliance without these instructions. Do not attempt to use this appliance for any other than the intended use, described in this booklet. Any other use, especially misuse, can cause severe injuries or damage by overheating, electric shock, low pressure, or fire.
Any operation, repair, replacement, and technical maintenance of the appliance or any part of it (e.g. power cord) other than described in these instructions may only be performed at an authorised service centre. Please contact your vendor.

GENERAL SAFETY INSTRUCTIONS
- This appliance is for household use only and NOT intended for use in boats or moving vehicles. Do not operate or store the appliance in humid or wet areas or outdoors. Do not use any accessories, attachments, consumables, or spare parts (e.g. foils, bags, containers, vacuum hoses, bottle tops) not recommended by the manufacturer. Do not operate the appliance, when the appliance or any part of it is likely to be damaged. Damaged or unsuited parts could cause injuries and damage due to overheating, fire, implosion, and electric shock.
- Regularly check the appliance and power cord for proper operation. Do not operate the appliance, when any part of it is not working properly, or has been subject to inadmissible strain (e.g. mechanical or electric shock, moisture in the housing). Immediately unplug the appliance, when a severe problem occurs during operation (e.g. water is sucked into the vacuum pump, overheating). Do not attempt to open or repair the appliance on your own, but return the appliance to an authorised service centre for examination and repair.
-
Operate the appliance on a well accessible, stable, level, dry and suitable large table or counter. During operation keep the appliance in an appropriate distance of at least 10 cm on each side to other objects. Keep at least 50 cm of free space in front and above the appliance for free access. Do not place any hard, sharp-edged, or heavy objects on or in the appliance to avoid damage to the appliance.
-
Do not place any clothes or tissue or other objects under or on the appliance during operation to avoid risk of fire, electric shock and overheating. Do not place the appliance or any part of it on or near hot surfaces (e.g. burner, heater, range, or oven).
- Risk of Explosion and Fire! Do not seal or evacuate any type of containers or bags containing inflammable and/or volatile substances (e.g. alcoholic beverages and foodstuffs, spirits, organic solvents). Volatile substances may be sucked in and catch fire!
- The appliance may be used by persons (including children from 8 years on) with reduced physical, sensory or mental capabilities, or lack of experience and knowledge, if they have been given supervision or instruction concerning the use of the appliance by a person responsible for their safety and if they understand and consider the inherent hazards. Children must be supervised to ensure that they do not play with the appliance, or any parts of the appliance, or the packaging materials (e.g. foils, bags, and containers). Do not leave the appliance and evacuated containers unattended, when they are in reach of children younger than 8 years. Even cleaning may not be performed by children without supervision.
- Before starting a sealing session, ensure that the drip tray in the vacuum chamber is completely empty (see: 'Operation / Emptying the Drip Tray'). Immediately cancel the evacuation process (touch the "Seal Only" button), when any material from the bags or containers is sucked in. Do not overfill the bags or containers.
- The Design Vacuum Sealer Basic is intended for evacuating and sealing suitable foils, bags, and containers only. Unsulted or damaged containers may cause risk of injuries and damage according to overheating, fire, implosion and splinters and splashes being hurled about.
-
Do not use violence, especially when opening the lid or foil cutter of the appliance! Press the release buttons for opening the lid. Push the cutter bar at both sides to the rear of the appliance for opening the foil cutter. Do not hold the appliance by the power cord, foil cutter, or lid for moving the appliance.
-
Keep in mind that the heating bar and sealing bar will get hot during operation. Do not touch the heating bar or sealing bar with your skin or any delicate objects shortly after operation.
- Do not use abrasive cleaners, cleaning pads, or any corrosive chemicals (e.g. disinfectants, bleach) for cleaning the appliance or any part of it. Do not use any hard or sharpedged objects for operation or cleaning. Always handle the heating bar, sealing bar, vacuum gaskets, and foil cutter with special care (see: 'Care and Cleaning'). Do not re-use bags and containers for any type of food, after storing foreign objects or chemicals (e.g. cleaning agents) within them, because harmful substances (e.g. mineral oil, surfactants, lubricants, solvents, softening agents) could infuse plastics or build an invisible microscopic layer on plastic surfaces, that persists even after thorough cleaning, therefore contaminating your food with foreign odours and toxic substances.
IMPORTANT SAFEGUARDS FOR ELECTRICAL APPLIANCES
- Ensure that the ratings of your power supply correspond to the requirements of the appliance: 220 - 240 V, 50/60 Hz, AC, at least 8 A. Connect the appliance to an appropriate wall power outlet. The installation of a residual current operated circuit breaker (r.c.c.b.) with a maximum rated residual operating current of 30 mA is strongly recommended. If in doubt, contact your electrician. In various foreign countries, the specifications for power supplies are subject to incompatible norms. Therefore it is possible that power supplies in foreign countries do not meet the requirements for safe operation of the appliance. Thus, before operating the appliance abroad, ensure that safe operation is possible.
- Do not leave the appliance unattended, while it is connected to the power supply. Always unplug the appliance, when it is not in use, and before moving or cleaning the appliance (see: 'Care and Cleaning').
- Do not use any remote control systems, extension cords, or multi-socket outlets. Power cords may never be knotted, twisted, pulled, strained
or squeezed or touch hot surfaces or sharp edges. Do not let the plug or power cord hang over the edge of the working space. Ensure that no one will pull the appliance by the power cord, or entangle in the power cord. Always grasp the plug to disconnect the power cord from the power supply. Do not touch the appliance or any part of it with wet hands, while the appliance is connected to the power supply.
- To avoid risk of electric shock: Always immediately wipe dry spilled liquids. Do not place or immerse the appliance or the power cord in water or any other liquid. Do not spill or drip any liquids on or in the appliance. If liquids are sucked in or are spilled in the interior of the appliance, immediately unplug the appliance. Then dry and clean the appliance (see: 'Care and Cleaning') and leave the appliance dry naturally for at least 1 day.
- DO NOT place the appliance or any part of it in an automatic dishwasher.
LOW PRESSURE - RISK OF IMPLOSION
- The appliance generates low pressure and can be used for evacuating containers. Adhere to the following safeguards to avoid the risk of implosion, causing splinters and splashes being hurled about.
- Only use the designated containers for vacuum packing. Unsulted containers could implode during evacuation or thereafter. Always check the container and container lid for proper condition, before evacuation. Do not evacuate containers that may be damaged in any way (e.g. brittle, worn, distorted, scratched or cracked) or had been subject to inadmissible strain (e.g. mechanical or thermal shock, abrasion, inadmissible heat, long-term exposure to direct sunlight).
- DO NOT leave children play with evacuated containers! Always handle any evacuated containers with special care to avoid risk of implosion.
- Do not attempt to open evacuated containers with violence, to avoid that the container gets damaged and implodes in your hand. Always ventilate the container via the ventilation valve of the container, before opening the lid. Do not warm up containers, while they
are closed air-tightly. Always remove the lid, before warming up the container. Ensure that the container material will endure the temperature you wish to apply (refer to the instructions given by the manufacturer). In general, do not let containers come in direct contact with sources of high heat (e.g. fire, range, or oven). Avoid freezing pure water in containers, because they may crack or burst, even when evacuated.
TECHNICAL SPECIFICATIONS
| Model: | 46009 Design Vacuum Sealer Basic |
| Power supply: | 220 - 240 V AC, 50/60 Hz at least rated for 8 A |
| Power consumption | 150 W |
| Length of power cord: | approx. 100 cm (40 inch) |
| Weight: | approx. 1.4 kg |
| Dimensions: | approx. 394 x 164 x 87 mm (width x depth x height) |
| Pressure reduction: | -0.6 to -0.8 bar |
| Maximum pumping performance: | approx. 11 litres per minute (on normal pressure) |
| Maximum operating time (vacuum pump): | approx. 30 seconds (continuous operation) |
| Foil / bag width: | max. 300 mm (12 inch) |
| Certificate: | CE |
These specifications may change without notice.
KNOWING YOUR NEW DESIGN VACUUM SEALER BASIC
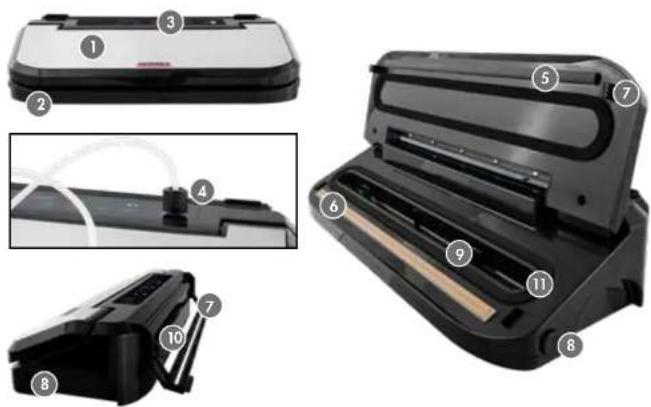
1 LID
2 BASE
3 CONTROL PANEL holding the touch sensor buttons
4 VACUUM PORT, covered via a protection plug—connect the vacuum hose here for evacuating containers.
5 SEALING BAR for pressing the foils against the heating bar during sealing.
6 HEATING BAR (coated) for sealing the foils.
7 LOCK CATCH – keeps the lid closed stably during operation.
8 RELEASE BUTTONS on both sides of the base: press here, before opening the lid.
9 DRIP TRAY — for catching liquids and powders during operation.
10 INTAKE OPENING — via the small hole, the air is sucked into the vacuum pump.
11 VACUUM GASKETS in lid and base of the appliance: for sealing the vacuum chamber.
FOIL CUTTER consisting of CUTTER BAR and CUTTER SLIDER for making a smooth cut at right angle.
CORD STORAGE at the bottom of the appliance.
POWER CORD
Optional Accessories
1 2 different Container sets — each with pressure indicator and date scale — including the vacuum hose for connecting the containers to the vacuum port of the appliance, perfectly suited for vacuum sealing delineate food.
2 Set of 3 Vacuum containers: Item No. 46110.
3 Set of 2 Vacuum containers: Item No. 46111
4 Foil hose set suitable for vacuumizing: Item No. 46100 and 46101

Item No: 46110

Item No. 46111

Item No. 46100

Item No 45101
If required, please contact your vendor or GASTROBACK Customer Care Center by phone: +49 (0)4165/22 25-0 or e-mail info@gastrobank.de.
PROPERTIES OF YOUR NEW DESIGN VACUUM SEALER BASIC
The Design Vacuum Sealer Basic applies low pressure (vacuum) to bags made of a special type of plastic or suited containers equipped with an appropriate valve operated manually or automatically. You may purchase ready-to-use bags or make bags on your own from suited loils. Even sous-vide cooking is enabled via vacuum packaging your food before cooking.
IMPORTANT - Only use foils and bags that are suited for sealing devices. Common plastic bags for storing food (e.g. freezer bags, fat-proof bags) are NOT suited for vacuum sealing. Containers used for vacuumizing must be pressure-proof, air-fight, and must have a ventilation feature. The pressure valve of the container must fit to the vacuum hose of the appliance (see: "Vacuum Containers").
- The various functions of the appliance can be selected via the assigned function buttons [see: 'Using the Buttons']. Touch sensors enable a smooth surface of the control panel, without gaps and slits. There is no need to press down the buttons, simply touch them. Under normal pressure, the professional vacuum pump achieves 1.1 litres per minute and generates low pressure of approx. -0.6 to -0.8 bar.
- Vacuumizing (evacuating) and sealing bags up to the width of 30 cm can be performed completely automatically or manually.
- For vacuumizing bags, 2 different functions are provided.
- Use the "Dry" button for applying the full power and low pressure of the vacuum pump.
- When using the "Moist" function, the vacuum pump is operated at reduced power and stops after 30 seconds at the latest.
- The appliance creates broad seals automatically, thus ensuring a safe and air-tight sealing.
- The mechanic locking system of the lid ensures a stable sealing performance. After engaging the lid correctly, in most cases you do not need to do more than touching the desired button for getting an air-tight seal.
- For special tasks (e.g. sensitive types of food), you may connect various types of containers dedicated for evacuation (e.g. canisters, bottles) via the vacuum hose of the appliance.
- The pump may be controlled manually via the "Pulse" function. Use this function for any evacuating tasks that need special treatment (see: 'Pulse Function'). Additionally, this function may be useful, when you find it difficult to get the system really air-light and the appliance stops the vacuum pump after 10 seconds.
- When closed air-tightly, the vacuum chamber will always keep the low pressure until you unlock the lid manually via the release buttons. You may cancel or
interrupt any running process at any time via touching the "Seal Only" button, while the process is still running, the appliance terminates the current action immediately with the vacuum chamber keeping the vacuum already reached. For example, you may seal an evacuated bag by touching the "Seal Only" button again, or carry on operation via another function. A control panel lock prevents any unintended operation during handling. Using the foil cutter at the rear of the appliance you get a smooth and straight cut of the foils at right angle.
USING THE BUTTONS
IMPORTANT - The buttons of the appliance are touch sensors. There is no need to press down the buttons, but simply touch the assigned area with your finger. When a function has been selected, the appropriate button illuminates. It gets dark again, when the function is finished.
The following operating elements are provided.
| Taste Verwendung | |
| Dry(Vacuum & Seal) | Press one of these buttons to start the automatic vacuum sealing cycle for your bag. The bags will be evacuated first and then sealed. Select the appropriate type of food or object, you wish to vacuum seal:“Dry”: Use this button for dry food or solid objects (e.g. dried legumes, dried fruit). Using this function, the vacuum pump is operated on full power.“Moist”: Use this button for moist food containing a lot of liquid (e.g. fish or meat with gravy, fresh vegetables and fruit) or powder (e.g. flour, ground spices, ground coffee). The vacuum pump will be operated on reduced power. |
| Moist(Vacuum & Seal) | |
| Seal Only / Cancel | This button solves 2 functions:Sealing bags and foils air-tight without evacuation. Use this function for making your own bags of individual size or for sealing bags air-tight under the current pressure within the vacuum chamber.Terminating any currently running process.Note:When pressing this button during evacuation, the vacuum pump stops immediately. The bag will not be sealed, but the vacuum chamber will keep the low pressure already reached. |
Taste Verwendung
| Canister | This button serves 2 functions:Evacuating containers: Touch this button shortly. The vacuum pump operates until the pre-defined low pressure is reached. Thereafter it stops automatically. If the reached pressure is not sufficient, start the function repeatedly. The container is sealed via the pressure valve in the container lid.Note: You need the appropriate vacuum hose for using this function (see: 'Knowing Your New Design Vacuum Sealer Basic / Optional Accessories').Locking the control panel: Hold the button touched for approx. 1 second. All buttons illuminate shortly and a beep is heard. Touch this button again for approx. 1 second for unlocking the control panel. |
| Pulse | Use this function for being in full manual control of the evacuating process (see below: 'Pulse Function'). |
PULSE FUNCTION
Using this function, the vacuum pump is operated as long as you keep your finger on the "Pulse" button, without ventilating the vacuum chamber, when the button is released. Therefore, you can start and stop the vacuum pump repeatedly.
CAUTION - When using the "Pulse" function, the pressure detection system is inactive [see: 'Operation / Manually Controlling the Vacuum Pump'].
To avoid overload: Do not let the vacuum pump operate continuously for more than 30 seconds. Additionally, when the limit of pressure reduction is reached, the working noise of the vacuum pump will change audibly. Then, at the latest, release the "Pulse" button. Control the vacuum pump manually, when it is required to reduce the pressure really carefully and/or stop the pressure reduction exact at the right level:
- You may apply short pulses for carefully vacuumizing sensitive items or let the vacuum pump operate continuously until the appropriate low pressure is reached
- Controlling the pressure within a container or bag manually may help to protect liquids and powders from being sucked out.
- During evacuation, food with high content of moisture could get undesirable dry, because the liquid may evaporate and be sucked out—even when placing this type of food for a short time into a freezer, before vacuum sealing. Carefully reducing the pressure may minimize the amount of liquid that is lost.
- While evacuating a bag, a considerable pressure will be applied to the objects within. Sensitive objects may be crushed and smashed. While evacuating a container, airy types of food could remarkably blow up and/or burst (e.g., bakery products, eggs).
- The automatic functions may fail to evacuate bags and containers sufficiently, when an excessively large amount of air is locked in your bags or containers. In these cases, the "Pulse" function may help to reduce the pressure to the optimum level. When you find it really difficult to get the vacuum system completely air-tight (e.g., due to some particles or moisture on the vacuum gaskets or in the valves), it may be helpful to use the "Pulse" function for vacuumizing the bag or container. If required, press on the lid of the appliance (when sealing bags) or on the container lid for getting the complete vacuum system (appliance and bag / container) as leak-free as possible.
When vacuumizing bags, you need to start the sealing process manually via the "Seal Only" button, after the desired low pressure is reached.
PRESSURE DETECTION SYSTEM
- The appliance monitors the pressure during operation. The vacuum pump stops automatically, when the pre-defined low pressure is reached. However, if the pressure cannot be reduced within the preset time duration, the vacuum pump stops after approx. 10 seconds of operation. The vacuum pump may stop prematurely in the following cases: Any part of the complete vacuum system may be leaking: from bags or containers to the vacuum gaskets of the appliance. Check, all parts for leakage (see 'Solving Problems').
- There is too much air in the bags and containers. The pressure is reduced too slowly. This may occur, when airy items are vacuumized in very large containers or bags.
In these cases, you may try the "Pulse" function (see above: 'Pulse Function' or 'Operation / Manually Controlling the Vacuum Pump').
OVERHEATPROTECTION
A self-resetting overheat protection device switches off the appliance automatically when it gets overheated, saving your Design Vacuum Sealer Basic from damage. With the overheat protection triggered, the appliance cannot be operated again. The overheat protection may be activated, when evacuating and sealing many items in short time, when operating the vacuum pump continuously via the "Pulse" function for more than 30 seconds, or when operating the appliance at high environmental temperature.
NOTE
To avoid overheating, the automatic vacuum functions work continuously for max. 30 seconds.
IMPORTANT - Make a short break of approx. 20 seconds after each cycle of operation. Following this advice is quite simple, when using this time for preparing the next bag or container.
When the overheat protection has been triggered, unplug the appliance and wait for approx. 30 minutes, leaving the lid open. Thereafter, you can re-assume operation as normal.
VACUUMCONTAINERS
⚠ WARNING – Only use pressure-proof containers. Ensure that the container and container lid are in proper condition, before connecting the container to the appliance. Evacuated containers must be handled with special care. Always ventilate evacuated containers, before attempting to open the lid. Do not let children play with the containers—especially when they are evacuated!
IMPORTANT - To prevent germs from getting into your food, you should sterilize the containers, before filling in food. For this, you may rinse most types of containers using hot water (at least 80°C). However, ensure that the container will tolerate the high temperature. If in doubt, got in contact with the manufacturer. After sterilization, do not wipe the container but leave it dry naturally on a clean surface. When wiping with a cloth, germs could get onto the surfaces of the container again.
NOTE
The vacuum hose of the appliance may not fit to the pressure valve of containers not recommended by the manufacturer. Before operation, check whether your container is suited for usage with the appliance. You may order appropriate containers via your vendor.
Before placing evacuated containers into the freezer, check whether your containers are suited for freezing (e.g. check for appropriate icons), because some types of plastic gel brittle under freezing temperature conditions. Especially when taking the container out of the freezer, these containers could burst causing risk of injuries and damage according to splinters and splashes being hurled about. Always remove the lid of the container completely, before warming up any food within it. Do not heat the container via sources of high heat (e.g. oven, range, fire). It is best to use a bainmaric. Microwave safe containers may be warmed up within a microwave oven.
- Types of Vacuum Containers Some containers are operated via a check valve that will be opened and closed automatically. For ventilating the container the additional ventilation feature must be agitated manually.
- Manual pressure valves must be set to the "Open" or "Closed" position manually. For ventilating the container, manually set the pressure valve to "Open".
- Some containers offer a pressure indicator for controlling the pressure within the container.
IMPORTANT TIPS FOR VACUUM SEALING
IMPORTANT - Vacuum sealing is NO substitute for refrigeration or freezing. Any perishable food that requires refrigeration must still be refrigerated or frozen after vacuumizing. As with any other storage method, food must be checked carefully before storage and, as well, before consumption.
Vacuumizing extends the shelf life of food by removing most of the air from sealed bags and containers, and additionally preventing air and germs from getting into the sealed packaging again. Additionally, vacuumizing helps inhibiting the growth of a lot of microorganisms. However, please keep in mind that mould and some types of bacteria (e.g. the highly toxic botulism causing bacterium) can grow even without air. Some produce spores still viable after evacuation. In general, bags may be reused, but do not reuse bags that had been filled with any fatty and/or highly perishable types of food (e.g. meat, sausages, cheese, fish, or seafood). Some types of food contain aromas and colours that infuse plastics and cause persistent odours and discolouration (e.g. red cabbage, capsicum, onion, garlic, some types of cheese or sausages). Before re-utilisation of bags and containers, you should check whether any odours of the recently stored food persist within the bags or containers.
- Before vacuumizing, some types of food (e.g. vegetables) need to be blanched or cooked until they are completely done. This stops enzyme reactions causing loss in quality.
- Some vegetables (broccoli, sprouts, cabbage, cauliflower, kale, turnips) naturally emit gases during storage. Therefore, even after blanching, they are not suited for vacuum packaging.
• Vacuum containers are perfectly suited for marinating food in a short time, because the micro-pores of the food are opened under low pressure.
BEFORE FIRST USE
⚠ WARNING – DO NOT let children play with the appliance, or any part of it, or the packaging!
CAUTION - Do not use violence! Opening the lid: Press the release buttons. Opening the foil cutter: Push the cutter bar at both sides to the rear of the appliance. Do not hold the appliance by the power cord, foil cutter, or lid for moving the appliance.
- Unpack the appliance and all accessories carefully and check that no parts are damaged or missing (see: 'Knowing Your New Design Vacuum Sealer Basic').
- Carefully remove all shipping materials and promotional materials, but DO NOT remove any warning labels or the model label.
- Before first use and after an elongated period of storage, clean the appliance (see: 'Care and Cleaning').
OPERATION
⚠ WARNING – RISK OF SUFFOCATION! Always keep the appliance and packaging material (foils, bags, containers and bottles) out of reach of children younger than 8 years.
RISK OF EXPLOSION AND FIRE! DO NOT evacuate containers or bags containing any inflammable substances (e.g. spirits, organic solvents)! Under low pressure, large amounts of inflammable substances may vaporize and catch fire at the inner parts of the appliance, causing risk of injuries and damage by explosion and fire.
RISK OF IMPLOSION! Insufficient or damaged containers may burst (implode) during evacuation or thereafter, leading to a high risk of injuries and damage due to splinters and splashes being hurled about. Before operation, always check the containers for any type of damage (e.g. cracks, distortions, or brittle surfaces). Additionally, evacuated containers must always be protected against inadmissible strain (e.g. mechanical shock, heat, direct sunlight).
CAUTION - Before operation, ensure that the vacuum chamber and drip tray are completely empty. Always ensure that the vacuum pump will not suck in any liquid or powder. If substances are sucked in, immediately cancel the evacuation process (press "Seal Only") to avoid risk of electric shock and overheating. For sealing foils and bags, an electrically powered heating bar is used that will get hot during operation. Avoid touching the heating bar shortly after operation. Do not place any foreign objects on the heating bar.
CAUTION - Do not attempt to open the lid with violence. Press the release buttons at both sides of the base, before opening the lid.
IMPORTANT • Always leave some free space in bags and containers (3-5 cm; 1-2 inch). When vacuumizing moist or ground food, you should leave some more free space in your bags and containers to avoid that the contents will be sucked in. Up to 8 cm (3 inch) must be left free, when vacuumizing very large items in bags. Otherwise, it may be impossible to get an air-right seal, because the foil cannot be smoothed out over the heating bar.
The appliance stops operation automatically, when the selected function is complete. However, you may cancel any running process at any time via the "Seal Only" button. The vacuum chamber will keeping the vacuum already reached. Therefore, you may seal an evacuated bag at the currently reached pressure by touching the "Seal Only" button again, or carry on operation via any other function.
USING THE FOIL CUTTER
Frayed, lopsided, or crooked edges interfere the evacuation and/or sealing process. Therefore, we recommend to use the foil cutter at the rear of the appliance. This way, you can easily get an even and neat cut at right angle.
IMPORTANT - Handle the foil cutter with care to avoid damage to the hinges. When the foil cutter is not in use, it is good advice to click the cutter bar in place for protecting it against inadmissible strain.
- Close the lid of the appliance. Push the cutter slider completely to one side of the cutter bar. Then push the cutter bar at both sides to the rear of the appliance for opening the foil cutter.
- Lay the foil to be cut flat onto the lid of the appliance and push the foil to the rear of the appliance. When the foil cutter is closed, the foil must protrude the cutter bar approx. 2 cm (1 inch). Fold the cutter bar up and over the foil and, at each side, press the cutter bar against the base of the appliance, until it clicks in place, clamping the foil. If required, pull the foil to the desired position.
- Press down the foil below and above the cutter bar with one hand, while pushing the cutter slider to the opposite end of the cutter bar. Then, pull the foil out from under the cutter bar.
CAUTION - Before starting operation, always ensure that the drip tray in the vacuum chamber is completely empty to avoid that any liquids or powders will be sucked into the vacuum pump and damage the vacuum pump or clog the internal hoses. Do not operate the appliance without the drip tray. This holds as well, when only using the "Seal Only" function.
- Press the release buttons, open the lid and, simply take the drip tray out of the vacuum chamber. If required, the drip tray may be washed in warm dishwater (see: 'Care and Cleaning').
- Ensure that the drip tray is completely dry and the vacuum chamber is completely empty, before replacing the drip tray in correct orientation. The drip tray may not protrude the vacuum gasket.
SEALING FOILS UNDER NORMAL PRESSURE
Using the "Seal Only" button, you can seal foils without evacuation. This function is useful for making your own bags of individual size and sealing already prepared bags under normal pressure.
NOTE
To get an air-tight seal, the foil must be clean, dry, and without wrinkles and gaps in the sealing area. The seal must be smooth, even and tear-proof all over without melted areas at the rim of the sealing. Select the foil material accordingly. If in doubt, order an appropriate foil material via the GASTROBACK Customer Care Center by phone: +49 (0)4165/22 25-0 or e-mail info@gastroback.de.
- Preparing the Appliance: Place the appliance onto a suitable surface and connect it to a suitable wall power outlet. Press the release buttons at both sides of the base and open the lid. Ensure that the drip tray is completely empty (see: "Emptying the Drip Tray").
- Preparing the Foil Material: From the bag material (foil tube) measure out a sufficient length to hold the items to be packed, with additional 5.8 cm (2.3 inches) of tree space on top and at the bottom. We recommend, to use the foil cutter at the rear of the appliance for cutting the desired bag length, because it is crucial to make a neat, straight cut (see: "Using the Foil Cutter").
- Lay the rim of the bag onto the heating bar. Ensure to spread out the foil smooth and without any wrinkles and gaps. Close the lid by pressing it down onto the base until it engages at both sides with a click. The bag must be clamped now.
NOTE
During the sealing process, the vacuum pump will be operated shortly for getting a proper seal. For improving the sealing performance, when using thick foil material, you may press down the centre of the lid, while the sealing process is running.
- Touch the "Seal Only" button. The "Seal Only" button illuminates and the sealing process starts.
- Wait until the "Seal Only" button gets dark again. Then, press both release buttons at the sides of the base, open the lid and remove the bag. Ensure that the seal is smooth and airtight, before filling the bag. After making a break of approx. 20 seconds, you can make another seal, starting with step 2. You could use the required waiting time for preparing the next bag.
- After Usage: Unplug the appliance from the mains power supply.
VACUUM SEALING A BAG
When you are using the "Dry" button (dry and solid items) or "Moist" button (moist, ground or sensitive items), your bags will be evacuated before sealing (see: 'Properties of Your New Design Vacuum Sealer Basic'). While reducing the pressure, the foil of the bag will get close-fitted to the items inside the bag. Select the required function according to the items you wish to vacuumize.
IMPORTANT - Check, whether the bag is air-tight, before filling it. Ensure to keep the top rim of the bag clean and dry. Particles and moisture at the area of the seal (exterior and interior) prevent getting an air-tight sealing of the bag and vacuum chamber. Folding the upper rim of the bag outwardly may help to keep the sealing area clean. Leave at least 5-8 cm (2-3 inches) of free space between the contents and the top of the bag.
NOTE
When the vacuum system (including the bag) is leaking, the vacuum pump will stop operation after approx. 10 seconds. Nevertheless, the bag may be sealed (see: 'Properties of Your New Design Vacuum Sealer Basic / Pressure Detection System'). You should stop the process immediately touch "Seal Only", when the bag is evacuated very slowly. If the leakage is localized in the area of the vacuum chamber and you find it difficult to get the system leak-free, you may be successful, when evacuating the bag via the "Pulse" function (see: 'Manually Controlling the Vacuum Pump' and 'Properties of Your New Design Vacuum Sealer Basic / Pulse Function').
NOTE
We recommend to use the "Pulse" function in short pulse operation, when evacuating sensitive items that may be crushed or smashed even via the function "Moist", or in continuous operation, when pressure reduction in the bags is not sufficient via the automatic functions "Dry" and "Moist". Immediately after evacuation start the "Seal Only" function.
- Preparing the Appliance: Place the appliance onto a suitable surface and connect it to an appropriate wall power outlet. Press the release buttons and open the lid. Ensure that the drip tray is completely empty (see: 'Emptying the Drip Tray').
- Preparing the Bag: Fill an appropriate bag, ensuring that the top of the bag will be left dry and clean. Try to press out the air within the bag as far as possible. This will improve the vacuumizing process.
- Push the upper rim of the bag onto the heating bar and vacuum gasket. Ensure that the foil of the bag is spread out smooth and without wrinkles and gaps. It is crucial that the upper rim of the bag is positioned completely in the vacuum chamber.
- Close the lid firmly by pressing it down at both sides until it engages with a click. The bag must be clamped between the lid and base of the appliance.
IMPORTANT - When any liquid or powder is sucked into the vacuum pump, immediately press the "Seal Only" button, for terminating the process. The bag will not be sealed. In most cases it is useless, attempting to seal the bag, when liquid or powder has been sucked into the area of the seal, because this seal would probably not be airtight.
- Touch the appropriate button ("Dry" or "Moist"), depending on the type of items you wish to vacuumize. The used button illuminates and the vacuum pump starts operation, sucking the air out of the bag. Thereafter, the bag is sealed automatically.
- Wait until the vacuumizing process is complete and all buttons get dark again. Then press the release buttons at both sides of the base and open the lid. Remove the sealed bag. If required, before sealing another bag, wait approx 20 seconds. You may use this time for filling the next bag. Start the next cycle with step 2.
- After Usage: Unplug and clean the appliance (see: 'Care and Cleaning').
EVACUATING A CONTAINER
⚠ WARNING - Do not let children play with evacuated containers. Only use the designated vacuum containers with the appliance. Before evacuation, always ensure that the container is in proper condition. To prevent harmful germs from getting into your food, it is good advice to sterilize the container and lid before filling in food (see: 'Properties of Your New Design Vacuum Sealer Basic / Vacuum Containers'). Always handle evacuated containers with special care. Ventilate the container via the container valve, before opening the lid. Do not warm up firmly closed containers. Always remove the lid first.
CAUTION - Handle the vacuum hose with care, to avoid damage. Do not bent or pull the hose. Always grasp the plug of the vacuum hose, when connecting or disconnecting the vacuum hose. Keep the protection plug of the vacuum port carefully. It protects the vacuum port from particles and splashes that could damage the vacuum system of the appliance.
NOTE
It is possible, that the vacuum hose of the appliance does not fit to the valves of your containers (see: 'Properties of Your New Design Vacuum Sealer Basic / Vacuum Containers').
IMPORTANT - When filling the container, ensure that the seal is kept clean and dry. Particles and moisture on the seals prevent the container from getting airtight. Additionally, the vacuum gaskets of the appliance must be clean and dry. Otherwise the vacuum system cannot be closed airtightly.
NOTE
You may use the "Pulse" function for controlling the vacuum pump manually, when vacuumizing sensitive, airy, finely grounded or moist items (see: 'Manually Controlling the Vacuum Pump'). In any case, the vacuum system of the appliance will keep the low pressure until you press the release buttons.
- Preparing the Appliance: Place the appliance onto a suitable surface. Pull the protection plug out of the vacuum port and push one plug of the vacuum hose into the vacuum port. Connect the appliance to a suitable wall power outlet.
- Preparing the Container: Ensure that the container and container lid are undamaged, airtight and hygienically clean. Fill your food into the container, leaving at least 2.5 cm (1 inch) of free space between your food and the rim of the container. Ensure that the rim of the container and container lid are clean and dry. Close the container via the container lid.
IMPORTANT - Even when evacuating containers, the lid of the appliance must be closed and engaged for getting the vacuum system air-tight. When the vacuum system is leaking and/or the amount of air to be sucked out is really large (e.g. large container with only some small items) the pressure control may be triggered and the vacuum pump will stop operation after approx. 10 seconds. After approx. 30 seconds of operation, the vacuum pump may stop automatically to avoid overheating.
- Ensure that the drip tray is completely empty. Then close the lid of the appliance and, at both sides, press the lid to the base until it engages firmly with a click.
- Connect the vacuum hose to the pressure valve of your container. Ensure that the vacuum hose is connected firmly and airtightly. With a manually operated pressure valve at the container lid, ensure that the valve is in the "Open" position (see: 'Properties of Your New Design Vacuum Sealer Basic / Vacuum Containers').
- While pressing the container lid down for getting a better seal, touch the "Canister" button for starting the evacuation. The "Canister" button illuminates. The vacuum pump will be working until the predefined low pressure is reached. The "Canister" button gets dark again.
- When the pressure control stops the vacuum pump prematurely, it may be possible to evacuate the container nevertheless. Touch the "Canister" button again for reducing the pressure furthermore. Additionally, you may use the "Pulse" function (see: 'Manually Controlling the Vacuum Pump').
NOTE
You may stop the vacuum pump manually any time you like via pressing the "Seal Only" button. The low pressure already reached will be kept within the system. Alternatively, when using containers with a manually operated valve, you may stop the evacuation simply by shutting the valve at the lid of the container. In this case, the appliance stops operation automatically.
- After Evacuation: With a manually operated valve at the container lid, close the valve. Other types of valves (check valves) close automatically. Press both release buttons for ventilating the vacuum chamber and vacuum hose. Then, remove the vacuum hose from the container. Check the lid of the container: After evacuation, it is impossible to lift it.
- If you wish to evacuate another container, wait approx. 20 seconds before operating the appliance again. You may use this time for preparing the next container (see step 2).
- After Usage: Unplug the power cord from the mains power supply. Remove the vacuum hose from the appliance and replace the protection plug. Clean the appliance (see: 'Care and Cleaning').
Via the "Pulse" button, you get the complete control on the working method of the appliance (see: 'Properties of Your New Design Vacuum Sealer Basic / Pulse Function').
⚠️ CAUTION – to avoid overloading the vacuum pump: Do not operate the vacuum pump continuously for more than 30 seconds. When the working noise of the vacuum pump changes audibly, the maximum pressure reduction is reached. It is useless and will reduce the lifetime of the vacuum pump, if you let the vacuum pump operate any further.
CAUTION - When any liquid or powder is sucked in, immediately release the "Pulse" button to avoid damage to the vacuum pump. When evacuating a container, it may be impossible to get any material from the container out of the vacuum hose. When sealing a bag, it is unlikely that this seal is going to get air-tightly.
IMPORTANT - When filling your bags and containers, always ensure that the upper rim of your bags/containers is kept clean and dry. Particles and moisture in the sealing areas may cause leakage.
- Prepare the bag or container and the appliance for operation as described in the sections above. Ensure that the drip tray is completely empty and the vacuum gaskets are clean and dry. For vacuumizing a bag, push the upper rim of the bag onto the heating bar and vacuum gasket. See: "Vacuum Sealing a Bag" or "Evacuating a Container".
- Close the lid of the appliance firmly and ensure to engage the lid on the base with a click at each side. This is required even for evacuating containers.
- For operating the vacuum pump, hold the "Pulse" button pressed. Release the "Pulse" button for stopping operation. The low pressure already reached will be kept in the vacuum system. If required, repeat this procedure several times, or let the vacuum pump operate continuously [max. 30 seconds], until the desired low pressure is reached.
NOTE
If required, press on the lid of the appliance (sealing bags) or container for getting the vacuum system as leak-free as possible. At the latest, when the working noise of the vacuum pump changes audibly, seal your bag or, if required, close the container valve.
IMPORTANT - After sealing a bag, the heating bar will be hot. Do not touch the sealing bar with your skin or heat-sensitive objects.
- Vacuumizing Bags: When the desired low pressure is reached, release the "Pulse" button and immediately thereafter, shortly touch the "Seal Only" button for starting the sealing process. Wait, until the "Seal Only" button gets dark again.
- Vacuumizing Containers: With a manually operated valve at your container, close the valve immediately, for keeping the vacuum already reached. Check valves close automatically.
- Press the release buttons at both sides of the appliance for ventilating the vacuum chamber. Thereafter, you can remove the bag or vacuum hose. The container is evacuated, if it is impossible to remove the container lid. If you wish to evacuate another bag or container, wait approx. 20 seconds before operating the appliance again, beginning with step 1. You may use this time for preparing the bag or container.
- After Usage: Unplug the appliance. If required, remove the vacuum hose from the appliance and replace the protection plug. Clean the appliance (see: 'Care and Cleaning').
SOLVING PROBLEMS
If any problems occur during operation, you will find solutions in this section.
| Problem Possible Reasons The Easy Solution | ||
| The appliance does not work. | The appliance is not live. | Ensure that the power cord is undamaged and connected correctly to an appropriate mains power supply (see: 'Technical Specifications').By connecting a lamp, ensure that the power outlet is live. |
| The control panel is locked. | Hold the "Canister" button touched for approx. 1 second for re-activating all buttons. Then try again. | |
| The overheat protection is active. | Unplug the appliance and leave the appliance cool down with the lid open for approx. 30 minutes. Then try again. | |
| A severe problem occurred. | Send the appliance to an authorized Service centre for examination and repair.Do not attempt to repair the appliance on your own. | |
| Problem Possible Reasons The Easy Solution | ||
| You cannot close the lid correctly. The lid is not locked to the base. | The drip tray is not inserted correctly. | The drip tray must slide completely into the vacuum chamber and may not stick out. Turn the drip tray by 180° and try again.Ensure that the vacuum chamber is completely empty and clean. |
| Some items within the bag get clamped between the lid and base of the appliance. | Do not overfill the bags. When sealing large items, leave some more free space at the top of the bag: with thick objects approx. 8 cm (3 inch). If required, remove some parts from the bag or use a larger bag. | |
| A foreign object is in a lock catch. | Check the openings at both sides of the heating bar (lock catches) for any obstacles. Remove foreign objects. Then try again. | |
| You did not press the lid down sufficiently. | The lid locks are really tight. After checking the other possible reasons, press somewhat harder at both sides of the lid. | |
| When touching a button, a beeging noise is heard and the "Seal Only" button flashes. | The control panel is locked. | Hold the "Canister" button touched for approx. 1 second for re-activating the control panel. Then try again. |
| You cannot open the lid. | The lid may be still locked to the base. | Press the release buttons at both sides of the base until the lock opens audibly.DO NOT attempt to open the lid with violence. |
| Although you have selected the "Seal Only" function, the vacuum pump is operated shortly. | This is normal operation. | No action required. |
| The vacuum pump is working audibly but the bag is not evacuated,AND / ORthe air flows back into the bag. | The bag is not positioned correctly. Under the lid of the appliance are wrinkles, folds, or gaps in the bag. | The upper rim of the bag must reach into the drip tray. Additionally, ensure that the foil of the bag lays even and smooth without any folds or gaps on the heating bar AND vacuum gasket.Ensure a smooth and straight cut of the bag. We recommend to use the foil cutter at the rear of the appliance. |
Problem Possible Reasons The Easy Solution
| You are using the wrong foil material. | Bags for vacuum sealing are made of a special foil type with a somewhat uneven surface at the inner side. Any other type of foil cannot be evacuated, although it may be suitable for sealing appliances. |
| The appliance is too hot. | Unplug and leave the appliance cool down for approx. 30 minutes with the lid open. Wait approx. 20 seconds after each sealing cycle, before starting the next cycle. |
| The lid is not closed correctly. | The lid of the appliance must be locked securely, before starting operation. Ensure that there is no obstacle blocking the lid (e.g. the content of the bag). Press the lid down at both sides until it engages audibly. |
| Particles and/or liquids are in the area of the vacuum gaskets or heating bar. | For getting an air-tight seal, the top of the bag must be absolutely clean and dry (interior and exterior as well). Cut off the upper rim and wipe the top of the bag clean and dry. Then try again.Press on the lid of the appliance during evaporation for improving the seal at the vacuum gaskets. If required, carefully clean the vacuum gaskets (Do not rub! See: 'Care and Cleaning').If required, remove some items from the bag for getting some more free space for the seal. This may help avoiding that liquids and powders are sucked out.Before evacuating, very moist food may be placed into the freezer (approx. for 1 hour).Place a folded piece of kitchen towel onto the food for sucking off liquids and filtering powders.Start the appliance via the "Aloist" button or use the "Pulse" function for lowering the pressure in short steps (see: 'Properties of Your New Design Vacuum Sealer Basic / Pulse Function'). |
| The bag is not air-tight. Check the prepared bags for leakage, before attempting to vacuumize them. You may try to reseal the bag at the bottom. Use another bag. | |
Problem Possible Reasons The Easy Solution
| Parts of the contents in the bag perforate the bag during evacuation. | Remove sharp-edged items (e.g. bones) from the bag or turn the edges inwards. Wrap sharp-edged items in kitchen towel. Use a new bag.May be, you should use a container. | |
| You attempt to seal liquids or vary moist or hot food. Too much evaporated liquid prevents the pressure reduction. | Always leave hot food cool down to room temperature and place very moist food into the freezer (approx. for 1 hour), before vacuum sealing.Place a folded piece of kitchen towel onto the food for sucking off liquids and filtering powders.It may help to remove some food from the bag, thus leaving some more free space on top of the bag. This way, liquids and powders will not be sucked out so easily.Cut off the upper rim and wipe the top of the bag clean and dry, before trying again.Start the appliance via the "Moist" button, or use the "Pulse" function for lowering the pressure in short steps (see: 'Properties of Your New Design Vacuum Sealer Basic / Pulse Function'). | |
| The vacuum gaskets on the lid and base of the appliance are polluted, worn out, or damaged. | Dab the vacuum gaskets via a soft damp cloth. DO NOT rub! If the problem persists, send the appliance to an authorized Service centre for examination and repair. | |
| The noise of the vacuum pump changes audibly during evacuation. | The maximum feasible low pressure is reached. | Press the "Seal Only" button or release the "Pulse" button for stopping evacuation. Seal your bag or close the pressure valve of your container. |
| The bag or foil melts or is ripped at the seal. | You have used improper foils or bags. | Some types of foil are not suited for sealing appliances. Select an appropriate type of foil and try again. |
| The appliance may be overhected. | Unplug the appliance and leave it cool down for approx. 30 minutes with the lid open. Then try again. After each sealing process, wait approx. 20 seconds with the lid open, before starting the next cycle.. |
Problem Possible Reasons The Easy Solution
| The vacuum pump stops after a short time, before reaching a sufficient low pressure. | The vacuum system (appliance and bag / container) is leaking | Check the following items:— Is the lid of the appliance closed and engaged correctly (see: 'Operation')?— Are the vacuum gaskets in proper condition and clean (see: 'Care and Cleaning')?— Is the bag positioned correctly and without wrinkles and gaps in the vacuum chamber?— Is the bag or container really air-tight? Check, if the air flows back into the bag or container after the vacuum pump has stopped. While starting the evacuation, press the lid of the appliance (vacuumizing bags) or the container lid down.— Is the container damaged in any way? Do not use vacuum containers any more for vacuum sealing, when they are cracked, worn, melted, brittle, or damaged in any other way!— Is the vacuum hose connected air-tightly? If the plug of the vacuum hose does not fit correctly to the pressure valve of the container, use an appropriate container.— Is the vacuum hose damaged? Especially check the areas between the plugs and hose.If you find it difficult to get the vacuum system completely air-tight, although the bag / container is air-tight, you may try the "Pulse" function (see: 'Operation / Manually Controlling the Vacuum Pump'). |
Problem Possible Reasons The Easy Solution
| You are using a bag or container containing a large volume of air. | In some cases, the pressure detection system stops operation because the pressure reduction is too low. This is normal operation. Try the following methods:— Before vacuum sealing the bag: try to press out surplus air.— For evacuating the container: start the conister function repeatedly, until the desired low pressure is reached.— If required, use the "Pulse" function (see: 'Operation / Manually Controlling the Vacuum Pump'). |
| Vacuumizing Bags:The vacuum system including the bag is obstructed. | Check the following items:— Did you use a suited foil type? The surface of the foil must be raw at the inner side of the bag.— Did the upper rim of the bag reach the interior of the vacuum chamber?— Is the drip tray filled with liquid or powder and/or the intake opening in the vacuum chamber clogged? Thoroughly empty and clean the drip tray and vacuum chamber. If the problem persists, return the appliance to your vendor for examination and repair. |
| Vacuumizing Containers:The air flow from the container to the appliance is blocked. | Check the following items:— Is the pressure valve turned open? Before evacuation, manually operated pressure valves need to be turned to the "Open" position.— Is the pressure valve or vacuum hose clogged? You may try to blow out the obstacle. If this is not successful, contact your vendor for replacement.Always ensure that the contents of the container is not sucked in during evacuation. |
Problem Possible Reasons The Easy Solution
| The vacuum system within the appliance is clogged or leaking. | Stop the evacuation immediately, when any type of liquid or powder is sucked in.DO NOT use the appliance for vacuumizing any food or objects containing alcohol or solvents!Contact your vendor for examination and repair. | |
| After some time of storage, the container or bag is filled with gas again. | The food is not suited for vacuum packaging. | Some types of food produce gases during storage. These types of food are not suited for vacuum sealing. |
| The food has gone bad. | Perishable food produces gases, when going bad.In any case, discard the food! | |
| The sealing area of the container or bag has not been absolutely clean and dry. | Before vacuum sealing, ensure that the sealing areas of the container or bag are undamaged and completely clean and dry (interior and exterior).When the food is still in perfect condition, you should consume it in time. Some types of dry food may be vacuum sealed again. | |
| The container or bag is damaged. | When the food is still in perfect condition, you should consume it in time. Some types of dry food may be vacuum sealed again.- Clean the sealing gasket of the container. Replace the sealing gasket, when it is brittle, scratched, broken or worn.- Ensure that the used bags or containers are completely undamaged and air-tight. If in doubt, use another bag or container.Handle vacuumized bags and containers with care (see also: 'Properties of Your New Design Vacuum Sealer Basic / Vacuum Containers'). This holds especially, when freezing the bag or container. Protect containers and bags from excessive mechanical or thermal stress and direct sunlight. Do not place any heavy or sharp-edged objects on the bags or containers, even when they are not vacuumized. |
CARE AND CLEANING
⚠ WARNING – Ensure that the appliance, vacuum containers, foils and bags are always out of reach of children younger than 8 years and animals. Always unplug the power cord from the mains power supply, before cleaning the appliance. Do not spill or pour any liquids on or into the appliance or power cord. Do not immerse the appliance or any part of it in water or any other liquid. Do not place the appliance or power cord on wet surfaces to avoid risk of electric shock. Do not place the appliance or any part of it in an automatic dishwasher.
CAUTION - Do not use any hard or sharp-edged objects, corrosive chemicals, disinfectants, abrasive cleaners, or scouring pads for cleaning the appliance or any part of it. Do not attempt to open the lid or foil cutter with violence. To open the lid: press the release buttons at both sides of the appliance. To open the foil cutter: push the cutter bar at both sides to the rear of the appliance. Do not poke or scratch with any foreign objects in the appliance or vacuum port. Special care is required, when cleaning the vacuum gaskets. Always ensure that liquids may not run into the vacuum port or intake opening in the vacuum chamber. Always grasp the plugs for connecting or disconnecting the power cord or vacuum hose. Do not pull the cord or hose.
- Unplug the appliance and remove the vacuum hose. Ensure to close the vacuum port via the protection plug. This will prevent that liquids and contaminants get into the vacuum port.
- If required, clean the power cord and vacuum hose using a soft, slightly damp cloth. Particles and liquids within the vacuum hose may be blown out.
IMPORTANT - There is no way to clean the interior of the vacuum hose, if you cannot blow out liquids or particles clogging the interior. In this case, replace the vacuum hose by the designated spare part, recommended by the manufacturer. Please, contact your vendor. DO NOT rinse the vacuum hose with any type of liquid, because the liquid can not evaporate completely from within the vacuum hose and would be sucked into the vacuum pump of the appliance on later use.
- Open the lid and pull out the drip tray from the vacuum chamber. Ensure that liquids within the drip tray are not spilled into the appliance. Wash the drip tray in warm dishwater. Carefully, remove any residues in the vacuum chamber via a soft damp cloth.
IMPORTANT - Do not rub on the vacuum gaskets. Handle the foil cutter with care to avoid damage to the hinges.
-
If required, clean the vacuum gaskets by dabbing them with a soft damp cloth. Carefully wipe the heating bar and sealing bar with a soft cloth, moistened with warm dishwater.
-
Wipe the outer surface via a soft cloth damped with a little dishwater. Ensure that the liquid does not run into the interior of the appliance.
- Dry all surfaces via a soft dry cloth but, again, the vacuum gaskets may only be dabbed.
- With the lid left open, leave all parts dry naturally for approx. 1/2 hour out of reach of young children and animals.
- Replace the drip tray. Fold the cutter bar up and click it into place.
STORAGE
⚠ WARNING – To avoid hazards due to overheating, fire, and electric shock, always unplug the appliance from the mains power supply, when it is not in use. Always ensure that all parts and accessories of the appliance and the packaging material are out of reach of children younger than 8 years and animals.
Before storage, empty the drip tray and clean the appliance to avoid the build-up of harmful germs and unpleasant colours (see: 'Care and Cleaning'). Ensure that the foil cutter bar is engaged at the rear of the appliance to avoid damage to the hinges. Additionally, you should lock the lid to the base of the appliance (see: 'Operation').
Power cords may never be knotted, twisted, pulled, strained or squeezed. Do not leave the power cord hang down. Ensure that nobody will pull the appliance by the power cord. We recommend to lay the power cord loosely around the cord storage at the bottom of the appliance.
For moving the appliance, do not hold the appliance by the power cord, foil cutter, or open lid. Grasp the appliance at its base. Ensure to store the appliance and all its parts and accessories (e.g. the vacuum hosel where it is clean, dry and safe from inadmissible strain. Do not place any hard or heavy objects on or in the appliance or any part of it.
NOTES FOR DISPOSAL

Dispose of the appliance and packaging must be effected in accordance with the corresponding local regulations and requirements for electrical appliances and packaging. Please contact your local disposal company.
Do not dispose of electrical appliances as unsorted municipal waste. Use separate collection facilities. Contact your local government for information regarding the collection systems available. If electrical appliances are disposed of in landfills, dumps, or refuse incineration, hazardous substances can leak into the groundwater or can be emitted into air poisoning flora and fauna for years, thus getting into the food chain and damaging your health and well-being. When replacing old appliances with new once, the retailer is legally obligated to take back your old appliance for disposal at least for free of charge.
INFORMATION AND SERVICE
Please check www.gastroback.de for further information. For technical support, please contact CASTROBACK Customer Care Center by phone: +49 10/4165/22 25-0 or e-mail info@gastroback.de.
WARRANTY
We guarantee that all our products are free of defects at the time of purchase. Any demonstrable manufacturing or material defects will be to the exclusion of any further claim and within 2 years after purchasing the appliance free of charge repaired or substituted. There is no Warranty claim of the purchaser if the damage or defect of the appliance is caused by inappropriate treatment, over loading or installation mistakes. The Warranty claim expires if there is any technical interference of a third party without a written agreement. The purchaser has to present the sales slip in assertion-of-claim and has to bear all charges of costs and risk of the transport.
Restricted use of this appliance for commercial, trade or industrial purposes in offices, guest houses, cafés and baker's shops, and similar facilities is possible. In this case the warranty period is reduced to 1 year.
NOTE
Customers from Germany and Austria: For repair and service, please send GASTROBACK® products to the following address: Gastroback GmbH, Gewerbestr. 20, D-21279 Hollenstedt, Germany.
Customers from other countries: Please contact your dealer.
Please agree that we cannot bear the charge of receipt. Submission of appliances: Please ensure packing the appliance ready for shipment without accessories. Add the sales slip and a short fault description. The processing time after receipt of the defective appliance will be approx. 2 weeks; we will inform you automatically. After the warranty period, please send defective appliances to the given address. You will get a free quotation and, thereafter, can decide, whether we shall repair the appliance to the costs possibly accrued, send back the defective appliance for free of charge, or dispose of the appliance for free of charge.
The appliance is intended for household use only and not suited for commercial, industrial or trade usage. Do not attempt to use this appliance in any other way or for any other purpose than the intended use, described in these instructions. Any other use is regarded as unintended use or misuse, and can cause severe injuries or damage. There is no warranty claim of the purchaser if any injuries or damages are caused by unintended use.
GASTROBACK®
GASTROBACK GmbH
Gewerbestraße 20 • 21279 Hollenstedt / Germany Telefon +49(0)4165/2225-0 • Telefax +49(0)4165/2225-29 info@gastroback.de • www.gastroback.de

- BEDIENUNGSANLEITUNG
- DIE TROPFSCHALE AUSLEEREN
- OPERATING INSTRUCTIONS
- TABLE OF CONTENTS
- IMPORTANT NOTE - PLEASE READ CAREFULLY - BEFORE YOU USE THE DEVICE!
- DEAR CUSTOMER!
- GENERAL SAFETY INSTRUCTIONS
- IMPORTANT SAFEGUARDS FOR ELECTRICAL APPLIANCES
- LOW PRESSURE - RISK OF IMPLOSION
- Optional Accessories
- PROPERTIES OF YOUR NEW DESIGN VACUUM SEALER BASIC
- USING THE BUTTONS
- PULSE FUNCTION
- PRESSURE DETECTION SYSTEM
- OVERHEATPROTECTION
- NOTE
- VACUUMCONTAINERS
- IMPORTANT TIPS FOR VACUUM SEALING
- BEFORE FIRST USE
- OPERATION
- USING THE FOIL CUTTER
- SEALING FOILS UNDER NORMAL PRESSURE
- VACUUM SEALING A BAG
- EVACUATING A CONTAINER
- CARE AND CLEANING
- STORAGE
- NOTES FOR DISPOSAL
- INFORMATION AND SERVICE
- WARRANTY
- GASTROBACK®
- GASTROBACK GmbH
Brand : Gastroback
Model : Design Basic 46009
Category : Vacuum Sealer