
Action One - Camcorder ROLLEI - Free user manual and instructions
Find the device manual for free Action One ROLLEI in PDF.


| Product Type | Action Camcorder |
| Model | Rollei Action One |
| Sensor | Sony IMX377 1/2.3" CMOS, 12 MP |
| Chip | Ambarella H22 S85 |
| Lens | 7-layer glass with 2 aspherical lenses, 170° field of view |
| Video Resolution | 4K (3840x2160) up to 60 fps; 2.7K, 1440p, 1080p up to 120 fps, 720p up to 240 fps |
| Photo Resolution | Up to 12 MP (4000x3000) |
| Video Format | MP4 (H.264 / H.265) |
| Photo Format | JPG |
| WiFi | 2.4/5.0 GHz (802.11 a/b/g/n), max 17.5 dBm |
| Gyro Stabilization | 6-axis, up to 4K 30 fps (not at 4K 60 fps) |
| Digital Zoom | 8x |
| Battery | Rechargeable Li-ion, 3.8 V, 1300 mAh (4.94 Wh) |
| Battery Life | ~70 min (4K 60 fps), ~80 min (4K 30 fps), ~90 min (2.7K 60 fps), ~100 min (1080p 30 fps) |
| Rear Display | 2.33" UHD IPS touch display |
| Front Display | 1.3" (non-touch) |
| Storage | microSD up to 64 GB, Class 10 U3 or higher |
| Modes | Video, Video Lapse, Slow Motion, Video+Photo, Loop Recording, Photo, Photo Lapse, Burst |
| Waterproof | Camera up to 5 m, with housing up to 30 m |
| Dimensions | 6.45 x 4.45 x 3.06 cm |
| Weight | 91 g (without battery), 116 g (with battery) |
| Input | 5 V = 2 A via USB-C |
| Box Contents | Camera, battery, waterproof housing, cage, lens cover, base mount, adhesive stickers, curved/straight mount, USB-C cable, screw, quick start guide |
| Care & Cleaning | Wipe with dry cloth; avoid high temperatures; keep away from strong magnetic fields |
| Safety | Keep away from children; do not disassemble; use only designated charger; dispose batteries properly |
Frequently Asked Questions - Action One ROLLEI
User questions about Action One ROLLEI
0 question about this device. Answer the ones you know or ask your own.
Ask a new question about this device
Download the instructions for your Camcorder in PDF format for free! Find your manual Action One - ROLLEI and take your electronic device back in hand. On this page are published all the documents necessary for the use of your device. Action One by ROLLEI.
USER MANUAL Action One ROLLEI
natural_image
Rolloi digital camera with a circular lens and photo of a person on a rocky terrain (no text or symbols visible on the device body)natural_image
Collection of black-and-white product icons including cameras, bonding, camera, and electronic devices (no text or labels)Achtung
WiFi 2,4/5,0 GHz (802.11 A/B/G/N)
natural_image
Silhouette of a person riding a bicycle against a sunset sky (no text or symbols visible)flowchart
graph LR
    A["Switching screen for wireless home"] --> B["Device with icons"]
    B --> C["Switching Department Button"]
Before the First Use
Read the operating instructions and the safety instructions carefully before using the device for the first time.
Keep the operating instructions together with the device for future use. If other people use this device, make this manual available to them. If you pass on the device to a third party, this manual belongs to the device and must be supplied with it.
Explanation of Symbols
The following symbols are used in this manual on the packaging.

Products marked with this symbol comply with all relevant community regulations of the European Economic Area.

Products marked with this symbol are operated with direct current.
What's in the Box
1x Rollei Action one
1x Exchangeable battery
1x Waterproof housing
1x Cage
1x Lens cover
1x Base mount
2x 3M adhesive stickers
1x Curved and 1x straight mount
1x USB-C cable
1x Screw
1x Quick start guide

natural_image
Collection of black-and-white icons representing various devices and accessories (no text or labels)Attention
- This product is a delicate product, do not drop or hit it anywhere.
- Do not place the camera near to streng magnetism, such as magnets and motors. Avoid to place the product near anything emitting strong radio waves, a strong magnetic field may cause the product to malfunction or damage the image and sound.
- Do not place the camera at high temperatures or direct sunlight.
- Use brand Micro SD cards as ordinary cards do not guarantee the proper use.
- Da not use Micro SD cards in or near magnetic places to avoid lass of data.
- During the charging process, if there is overheating, smoke or odor, unplug the power immediately and stop charging to avoid fire.
- Keep away the camera and its accessories from children to avoid choking or electric shocks.
- Store the product in a cool and dry place.
- Da not use the camera when it is low power or in charging.
- Do not attempt to open or modify the camera housing in any way as this will invalidate the warranty.
Technical Data
| Model Rollei Action one | |
| Sensor/-type Sony IMX377 | 1/2.3 CMOS | with 12 M pixels | |
| Chip Ambarella H22 S85 | |
| Lens Lens 7-layer glass with 2 aspherical glass lenses, 170° | |
| Video resolution 4 K 3840 x 2160 60/50/30/25/24 FPS | 4 K Ultra 3840 x 2160 30/24 FPS | 2.7 K 2720 x 1520 60/50/30/25/24 FPS | 1440 P 2560 x 1440 60/50/30/25/24 FPS | 1080 P 1920 x 1080 120/60/50/30/25/24 FPS | 1080 P Ultra 1920 x 1080 60/30 FPS | 720 P 1280 x 720 240 FPS | |
| Photo resolution 12 MP 4000 x 3000 4:3 | 10 MP 3648 x 2736 4:3 | |
| 8 MP 3840 x 2160 16:9 | 8 MP 3364 x 2448 4:3 | |
| 5 MP 2592 x 1944 4:3 | 3 MP 2048 x 1536 4:3 | |
| 2 MP 1920 x 1080 16:9 | |
| Video/photo format MP4 (H.264 / H.265 HVEC) / JPG | |
| WiFi 2.4 / 5.0 GHz (802.11 A/B/G/N) | |
| Max. radiated 17.5 dBm | |
| transmitting power | |
| Gyro stabilisation Internal six-axis gyroscope (usable up to 4K 30 FPS, not available at 4K 60 FPS) | |
| Digital zoom 8x | |
| Input 5 V =2 A | |
| Battery capacity Rechargeable Li-ion battery, 3.8 V / 1,300 mAh / 4.94 Wh | |
| Battery life Approx. 70 / 80 min. at 4 K 60 FPS / 30 FPS | approx. 90 min. at 2.7 K 60 FPS | approx. 100 min. at 1080 P 30 FPS | |
| Microphone Input via USB-C | |
| Rear display 2.33" UHD IPS touch display | |
| Front display 1.3" screen (no touch) | |
| Storage Supports microSD cards up to 64GB, Class 10 or higher | |
| Modes Video, Video Lapse, Slow Motion, Video+Photo, Loop Recording, Photo, Photo Lapse, Burst Mode | |
| Additional Language / WiFi / Auto Power Off / Screen Saver / | |
| options Input Sound / Brightness / Colour Temperature | |
| Connections USB-C | |
| Waterproof Camera housing waterproof up to 5 metres, in underwater housing up to 30 metres | |
| Size 6.45 x 4.45 x 3.06 cm | |
| Weight 91 g / 116 g (without / with battery) | |
| Box content Rollei Action one, exchangeable battery, waterproof housing, cage, lens cover, base mount, 2x 3M adhesive stickers, curved mount, straight mount, USB-C cable, screw, quick start guide |
Technical details are subject to change without notice. Misprints and errors excepted. Reproduction of these operating instructions – even in part – is not permitted. *interpolated
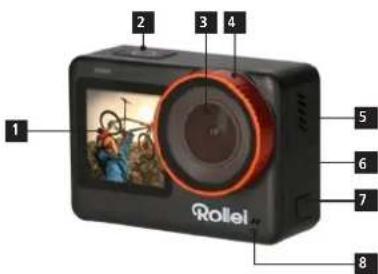
Camera Description
1 Selfie / Front Display
2 Power/ Record button
3 Lens
4 Lens Hood
5 Built-in Speaker
6 Removable connector door
7 USB-C Port
8 Built-in Microphone
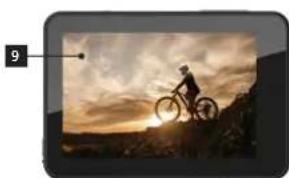
9 Touch Screen
10 Battery Compartment
11 1/4" tripod connection

natural_image
Silhouette of a person riding a bicycle against a sunset sky (no text or symbols visible)Waterproof Case
– Insert Camera into Waterproof Case
- Ensure the case is clean.
- Insert the camera and make sure the lens fits neatly in the lens cavity.
- Close the locking clamps.
- The camera can be mounted using the accessories provided.
Battery
Before using the device for the first time, you must fully charge the battery.
- Charging the Battery
- Connect the camera to a computer or USB power supply (DC 5 V=2 A).
- The charging status light turns on while the battery is charging.
- The charging status light turns off when the battery is fully charged.
- Changing the Battery
- Hold the camera so that you can see the camera's monitor and gently push in the button on the battery cover and slide the battery cover to the right to open the battery compartment.
- Remove the battery.
- Insert the new battery so the contacts line up with those of the camera.
Note: Operation is also possible while charging (e. g. via a power bank).
Getting Started
- Turn On: Press and hold the Power / Record button for 3 seconds. When the camera is turned on, the
Operation Indicator turns on. - Turn Off: Press and hold the Power / Record button for 3 seconds.
Modes of the Camera
The Rollei Action one offers various photo and video modes. In the following we give you a short explanation of how they work. On the following pages you can find detailed descriptions how to change the settings for each mode.
– Video mode: You can record a single video at normal speed.
- Loop recording: When the memory card is full, the oldest recording is overwritten to continue recording.
– Video lapse: In video lapse mode, the camera takes individual pictures at predefined intervals and then stitches them together in a video. Possible picture intervals are 1, 2, 5, 10 and 20 seconds.
Timelapse recordings can be made in lengths of 1, 2, 3, 5, 10, 15 and 20 minutes, with 4K, 1440p and 1080p available as resolution and format.
- SlowMotion video mode: The camera records a sequence and plays it back in slow motion. The camera offers the following options: 2x: 1080P30FPS | 4x: 1080P30FPS | 8x: 720P30FPS. Slow motion videos can be made in lengths of 1, 2, 3, 5, 10, 15 and 20 minutes.
- "Single" / single frame mode: You take a single picture.
- "Burst" / continuous shooting mode: This allows you to take 3 shots / 1s, 7 shots / 2s, 15 shots / 4s, 30 shots / 8s.
- Photo Lapse: In Photo Lapse mode, the camera takes a picture every 3, 5, 10, 20, 30, 60 seconds or 5, 15 or 30 minutes.
- Long exposure: The shutter speed of the Action one can be adjusted in photo mode between 1/500, 1/240, 1/120, 1/60, 1/30, 1/20, 1/10, 1/5, 1/2, 2, 5, 10, 15, 20, 30 or 60 seconds.
– Time stamp: You can add a watermark to your pictures or videos, either with the date only or with the date and time.
Touch Function
You can use the rear touch screen to access the functions of the camera.
- Swipe to the left or right to change between the video mode and the photo mode.
In the video or photo mode you can access the playback mode via the symbol in the left lower corner and the settings with the symbol in the right lower corner. To access the mode menu, touch the lower middle part.
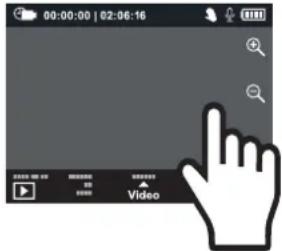
- Swipe up to access the mode menu of video and photo or tap the mode indicator in the lower middle part (2) of the screen to access the mode menu.
- Swipe down to open shortcuts for locking the screen, enabling and disabling WiFi, locking the dual screen option and pairing the remote control.
- To unlock, touch the screen and swipe from left to right following the arrow.
Settings
In System Setup mode, you can make settings for the system and select various parameters for the camera. Note that the parameters are activated or deactivated depending on the selected video / photo mode.
You can access the mode-specific settings (such as white balance) by tapping the magic wand symbol at the bottom of the screen, to the right of the mode display.
Parameters for the camera in video mode, video lapse mode, slow motion, video + photo mode:
– Video resolution and frame rate: To set video resolution and frame rate, tap the resolution/FPS indicator in the lower half-left of the screen.
- Exposure correction: You can set this between -2.0 (picture becomes darker) and +2.0 (picture becomes brighter) by tapping on the display.
- White balance: Set different white balances for optimal shooting. There is also a white balance for underwater photography.
– Power-On Recording: The camera automatically starts recording video after it is turned on.
- Metering mode: Here you can set which area of the picture the camera focuses on, e.g. in the middle (centre), at different points (multi) or at one point (spot).
- Gyro stabilisation: Here you can activate or deactivate gyro stabilisation. Note that gyro stabilisation is not supported on all resolutions.
- Encoding: Choose between the H.264 or H.265 codec.
– Sharpness: Choose between Standard, Sharp or Soft.
- Distortion correction: Activate or deactivate distortion correction (not available at 4K / 60FPS).
- Loop recording: When the memory card is full, the oldest recording is overwritten to continue recording.
- File size: Select the length of the recorded videos between 1, 2, 3, 5, 10, 15 or 20 minutes in length.
– Video quality: Set the video quality between Economy, Standard and Fine.
- Iso: Set the maximum automatic iso value or a manually set iso value.
– Volume: Adjust the volume of the sound when recording video.
– Audio: Enable or disable audio recording during video recording.
- Timestamp: Activate or deactivate the superimposed timestamp.
– Video Lapse: Set the video lapse interval (only in Video Lapse mode).
- Slow motion: Set the desired deceleration (only in slow motion mode).
- Photo Interval: Set the interval at which a photo is to be taken during video recording (only in Photo and Video modes).
Settings
Parameters for the camera in photo mode, photo lapse mode, burst mode:
- Resolution: To set the photo resolution, tap the resolution/format indicator in the lower half-left of the screen.
- Exposure compensation: You can set this between -2.0 (picture becomes darker) and +2.0 (picture becomes brighter) by tapping on the display.
- White balance: Set different white balances for optimal shooting. There is also a white balance for underwater shots.
- Metering mode: Here you can set which area of the picture the camera focuses on, e.g. in the middle (centre), at different points (multi) or at one point (spot).
- Photo Iso: Set a manual iso value for your photos or switch on the automatic iso.
- Shutter speed: Set the shutter speed manually or activate the automatic shutter.
– Photo Sharpness: Choose between Standard, Sharp or Soft. - Timestamp: Activate or deactivate the superimposed timestamp.
- Distortion correction: Activate or deactivate the distortion correction (not available at 4K / 60FPS).
– Picture quality: Select the picture quality between Economy, Standard or Fine. - Photo Interval: Set the desired time interval for pictures (only in Photo Lapse mode).
– Time Photo Shutter: Set the shutter speed of the interval photos or activate the automatic shutter (only in Photo Lapse mode). - Burst mode: Set the number of photos to be taken in series (only in Burst mode).
System settings – access these by tapping on the cogwheel symbol in the lower right corner of the picture:
– Language: Change the language of the camera menu here.
- WiFi: Activate or deactivate the WiFi connection of your Action one.
– WiFi frequency: Choose between 2.4 GHz and 5 GHz.
- Format: Format your SD card.
– Auto Power Off: Set your Action one to turn off after a set period of inactivity.
- Screen display: Choose between single screen and dual screen. With single screen, switching between front and rear display is locked.
- LCD switch-off time: Set when the screen of your Action one should be deactivated to save energy.
- Indicator lights: Activate or deactivate the indicator lights on your Action one.
- Button sound: Activate or deactivate the button sound on your Action one.
- Rotate: Rotate the display on your Action one screen 180^ .
- Brightness: Adjust the display brightness of your Action one.
- Colour temperature: Set the colour temperature of the display on your Action one.
– Date / Time: Set the date and time.
– Frequency: Set the desired light frequency.
- Default setting: Reset your Action one to default settings.
- Display Iso: Activate or deactivate the iso display in the picture.
- User interface: Choose between the „Classic“ or „Rollei“ profile.
- Version: Displays the firmware version of your Action one.
Playback of Videos and Photos
In playback mode, you can view the videos and photos you have taken.
- Playing back files on the camera: Tap the bin icon in the lower right corner of the screen, then select the photos or videos you want to delete by tapping it. Confirm the process by tapping the bin icon again and then confirm the deletion.
Selfie Mode / Switching to the Front Display
To switch between the two screens, press the Power / Record button twice in quick succession or tap the touch display twice quickly. Please note that the „dual screen“ function must be activated under „Screen display“ in the settings.
Remote Control (not included)
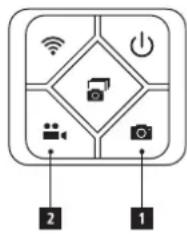
With the remote control which can be bought separately you can operate the action cam from a distance. There are two shutter buttons, one for the photo mode and one for the video mode, which take a photo (1) or start and end the recording of a video (2).
Radio frequency of the remote control: 2.412 - 2.472 GHz; transmitting power: 10 dBm
Please note: the remote control is waterproof for a depth of up to 2 meters.
flowchart
graph TD
    A["Smart Home Control Panel"] --> B["Power Icon"]
    A --> C["Camera Icon"]
    A --> D["Camera Icon"]
    A --> E["Camera Icon"]
    A --> F["Camera Icon"]
    A --> G["Camera Icon"]
    A --> H["Camera Icon"]
    A --> I["Camera Icon"]
    A --> J["Camera Icon"]
    A --> K["Camera Icon"]
    A --> L["Camera Icon"]
    A --> M["Camera Icon"]
    A --> N["Camera Icon"]
    A --> O["Camera Icon"]
    A --> P["Camera Icon"]
    A --> Q["Camera Icon"]
    A --> R["Camera Icon"]
    A --> S["Camera Icon"]
    A --> T["Camera Icon"]
    A --> U["Camera Icon"]
    A --> V["Camera Icon"]
    A --> W["Camera Icon"]
    A --> X["Camera Icon"]
    A --> Y["Camera Icon"]
    A --> Z["Camera Icon"]
Connection with remote control
(not included)
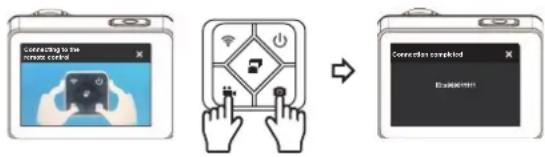
- Turn on the camera and swipe down on the display. Then select "Connect remote control" to start the connection.

- Follow the instructions and press and hold both buttons at the same time. To connect the remote control to the camera.
flowchart
graph LR
    A["Connecting to the network control"] --> B["Switch icon with 'P' symbol"]
    B --> C["Connection completed"]
Storage / Micro Cards
This camera is compatible with up to 64 GB capacity Micro SD and Micro SDXC memory card. You must use a micro SD card with a Class 10 U3 speed rating at least. We recommend using brand-name memory cards for maximum reliability in high vibration activities.
Please note:
- The memory card is not included in the standard package, you will need to buy an extra memory card.
- Please format the Micro SD or Micro SDXC memory card on the camera before using.
- Please restart the camera after formatting.
- Please insert the memory card in the correct way, otherwise the card slot might get damaged.
WiFi Setting / Operation via App
You can connect the camera to your smartphone via the integrated WiFi function. Switch on the camera and swipe down on the touchscreen to switch on the WiFi via the shortcut, or open the system settings to activate the WiFi there. Here you can also choose between a 2.4 GHz and a 5 GHz WiFi connection. The WiFi of the camera is activated; you will find the SSID and password of your Action one in the settings under "WiFi". Then connect the camera to the smartphone by going to the WLAN settings of your smartphone and selecting the network of the camera there and connecting it. Download the free app "Rollei Action one" (Android) from the Google Play Store, from the Amazon App Store for Android or the iOS version "Rollei Action one" from the App Store and install it on your smartphone. After installation, open the app and connect your app to the camera. You will see the camera on the phone screen. To exit WiFi mode, briefly press the shutter / select button.
Here you can download the app:


Download on the App Store

GET IT ON Google Play

Available on amazonappstore
Firmware Updates
If the firmware changes, we bring out new updates that you can download and install yourself from our product page in the "Downloads" area. You can find the current firmware version on your camera in the menu under System / System Info. To install an update, please copy the file with the extension.BRN to your micro SD card using a card reader. Disconnect the memory card from the PC and insert it into the camera. Turn on the camera and confirm the firmware update by selecting the "Yes" option with the Power Button and then confirming with the Shutter Button. After the update is complete, the camera switches off. Format the Micro SD card in the actioncam via the settings menu before using it again.
Disposal

Dispose of the packaging according to its type. Use the local possibilities for collecting paper, cardboard and other materials. (Applicable in the European Union and other European countries with systems for the separate collection of recyclable materials).

Devices that are marked with this symbol must not be disposed of with household waste! You are legally obliged to dispose of old devices separately from to dispose of household waste. Information on collection points that accept old appliances free of charge can be obtained from your local authority or town council.
Disposal

Batteries and rechargeable accumulators must not be disposed of in household waste! As a consumer you are legally obliged to dispose of all batteries and accumulators, whether they contain harmful substances* or not, to be disposed of in an environmentally sound manner. Accumulators and batteries are therefore marked with the symbol shown opposite. For more information, contact your dealer or contact return and collection points in your community. *marked with: Cd = Cadmium, Hg = Mercury, Pb = Lead
Battery Warning
- Never dismantle, crush, or pierce the battery, or allow the battery to short-circuit. Da not expose the battery in high temperature environment, if battery leaks or bulges, stop continue to use.
- Always charge using the designated charger. Risk of explosion if battery is replaced by an incorrect type.
- Keep the battery out of reach of children.
- Batteries may explode if exposed to naked fire. Never dispose batteries in a fire.
– Follow your local regulations for disposing used batteries.
– Before disposing the device, remove the battery.
Safety instructions
Hazards for children and persons with reduced physical, sensory or mental abilities (e.g. partially disabled, older persons with reduced physical and mental abilities) or lack of experience and knowledge (e.g. older children).
- This product can be used by children aged 14 and over. Cleaning and user maintenance must not be carried out by children without supervision.
- The packaging material is not a toy. Do not let children play with the packaging material. They can get caught in it and suffocate while playing.
- Supervise children to ensure that they do not play with small parts (screws, plugs, memory card, batteries / rechargeable batteries). If you suspect that a small part has been swallowed, consult a doctor immediately.
- Store small parts so that they are inaccessible to children and animals.
CAUTION! Risk of injury!
Improper handling of the product can lead to injuries.
- Remove the battery and, if necessary, the charging cable immediately if there are unusual noises or smells or smoke from the housing.
NOTE! Risk of damage to property!
Improper handling of the product can lead to damage.
- Never place the device on or near hot surfaces (e.g. hotplates etc.) or open fire. Never expose the device to excessive temperatures (heating, etc.).
– Never pour liquid into the unit.
– Never use a steam cleaner for cleaning. - Do not use the unit if the plastic or metal parts of the unit have cracks or crazing or have become deformed.
- Handle the device with care. Impacts, falling or knocks can damage the device.
- Remove the battery if you are not going to use the product for a long period of time to prevent damage from a leaking battery.
- Only use the product in a temperature range between -10^ and +60^ . The product is suitable for use in a tropical climate.
- Do not modify the product.
Safety instructions
- Never open the casing, leave the repair to qualified personnel. Contact a specialist workshop for this purpose. Liability and warranty claims are excluded in the event of repairs carried out independently, improper connection or incorrect operation.
- Do not operate the unit if it shows visible damage or defects.
- When not using the unit, cleaning it or if a fault occurs, always switch off the unit, remove the battery and disconnect all connections.
- If the product has problems due to static discharge, switch the device off and then switch it on again after about 10 seconds.
Conformity
The Rollei GmbH & Co. KG herewith declares, that the radio system type "Rollei Action one" complies with the directive 2014 / 53 / EU;
The complete text of the EU Declaration of Conformity can be downloaded at the following Internet address: www.rollei.com/egk/actionone

Rollei GmbH & Co. KG, In de Tarpen 4, D-22848 Norderstedt Germany

Rollei


- Achtung
- Before the First Use
- Explanation of Symbols
- What's in the Box
- Attention
- Technical Data
- Camera Description
- Waterproof Case
- – Insert Camera into Waterproof Case
- Battery
- - Charging the Battery
- - Changing the Battery
- Getting Started
- Modes of the Camera
- Touch Function
- Settings
- Playback of Videos and Photos
- Selfie Mode / Switching to the Front Display
- Remote Control (not included)
- Connection with remote control
- Storage / Micro Cards
- Please note:
- WiFi Setting / Operation via App
- Firmware Updates
- Disposal
- Battery Warning
- Safety instructions
- CAUTION! Risk of injury!
- NOTE! Risk of damage to property!
- Conformity
- Rollei
Brand : ROLLEI
Model : Action One
Category : Camcorder