MGSW-28240F - Switch Planet - Free user manual and instructions
Find the device manual for free MGSW-28240F Planet in PDF.


| Product Type | L2+ Multi-Port Managed Gigabit Ethernet Switch |
| Brand | Planet |
| Model | MGSW-28240F |
| Ports | 24 Gigabit Ethernet ports (10/100/1000Mbps) + 4 10Gigabit Ethernet ports |
| Console Port | 1 RJ45 console port |
| Management | CLI (Console, Telnet, SSH), Web, SNMP |
| VLAN Support | 802.1Q VLAN, IP subnet VLAN, MAC VLAN, protocol VLAN |
| Quality of Service | 802.1p, DSCP, port-based QoS, queue scheduling |
| Redundancy | ERPS (Ethernet Ring Protection), STP/RSTP/MSTP |
| Multicast | IGMP snooping, MLD snooping, MVR |
| Security | 802.1X, ACL, port security, DHCP snooping, ARP inspection |
| PoE | Not supported |
| Dimensions | 440 x 200 x 44 mm (approx.) |
| Weight | ~3 kg (approx.) |
| Power Supply | AC 100-240V, 50-60Hz |
| Power Consumption | ~45W (approx.) |
| Operating Temperature | 0°C to 50°C (approx.) |
| Storage Temperature | -10°C to 70°C (approx.) |
| Humidity | 10% to 90% non-condensing |
| Maintenance | Clean with a dry cloth; do not use liquid cleaners |
| Safety | Use only provided power cord; keep away from water and heat sources |
| Spare Parts | No user-serviceable parts inside; contact support for repairs |
Frequently Asked Questions - MGSW-28240F Planet
User questions about MGSW-28240F Planet
0 question about this device. Answer the ones you know or ask your own.
Ask a new question about this device
Download the instructions for your Switch in PDF format for free! Find your manual MGSW-28240F - Planet and take your electronic device back in hand. On this page are published all the documents necessary for the use of your device. MGSW-28240F by Planet.
USER MANUAL MGSW-28240F Planet
natural_image
Exterior view of a 36Port Capital Manager switch and Ethernet ports (no text or symbols on the devices themselves)L2+ Multi-Port
Managed Gigabit Ethernet Switch
natural_image
Man in white shirt and tie using laptop in server rack (no visible text or symbols)Contents
Chapter 1 COMMAND LINE INTERFACE....20
1.1 Accessing the CLI....20
1.2 Command Line Modes....20
1.3 Requirements....21
1.4 Command Support....22
Chapter 2 CONSOLE CLI MANAGEMENT 24
2.1 Terminal Setup 24
2.2 Logon to the Console 26
2.3 Configuring IP Address 26
Chapter 3 TELNET CLI MANAGEMENT....29
3.1 Telnet Login....29
Chapter 4 Commands for CLI Configuration....30
4.1 clear 30
4.1.1 clear access management statistics....30
4.1.2 clear access-list ace statistics....30
4.1.3 clear dot1x statistics interface ....31
4.1.4 clear eps....31
4.1.5 clear erps....31
4.1.6 clear erps statistics....32
4.1.7 clear evc statistics ....32
4.1.8 clear ip arp....33
4.1.9 clear ip dhcp detailed statistics all 33
4.1.10 clear ip dhcp detailed statistics client....34
4.1.11 clear ip dhcp detailed statistics helper ....34
4.1.12 clear ip dhcp detailed statistics server 35
4.1.13 clear ip dhcp detailed statistics snooping ....35
4.1.14 clear ip dhcp relay statistics....36
4.1.15 clear ip dhcp server binding....36
4.1.16 clear ip dhcp server binding automatic....36
4.1.17 clear ip dhcp server binding expired....37
4.1.18 clear ip dhcp server binding manual....37
4.1.19 clear ip igmp snooping statistics....38
4.1.20 clear ip igmp snooping vlan....38
4.1.21 clear ip statistics icmp icmp-msg 39
4.1.22 clear ip statistics icmp interface vlan ....39
4.1.23 clear ip statistics system icmp icmp-msg....40
4.1.24 clear ip statistics system icmp interface vlan....40
4.1.25 clear ipv6 mld snooping statistics....41
4.1.26 clear ipv6 mld snooping vlan ....41
4.1.27 clear ipv6 neighbors 42
4.1.28 clear ipv6 statistics icmp icmp-msg 42
4.1.29 clear ipv6 statistics icmp interface vlan....43
4.1.30 clear ipv6 statistics system icmp icmp-msg....43
4.1.31 clear ipv6 statistics system icmp interface vlan ....44
4.1.32 clear lacp statistics .... 44
4.1.33 clear lldp statistics .... 45
4.1.34 clear logging error info....45
4.1.35 clear logging error warning....45
4.1.36 clear logging info error....46
4.1.37 clear logging info warning....46
4.1.38 clear logging warning error....47
4.1.39 clear logging warning info....47
4.1.40 clear mac address-table 47
4.1.41 clear mep....48
4.1.42 clear mvr name....48
4.1.43 clear mvr statistics....49
4.1.44 clear mvr vlan....49
4.1.45 clear network-clock clk-source ....49
4.1.46 clear spanning-tree detected-protocols interface * ....50
4.1.47 clear spanning-tree detected-protocols interface * ....50
4.1.48 clear spanning-tree detected-protocols interface GigabitEthernet....51
4.1.49 clear spanning-tree detected-protocols interface 10GigabitEthernet....51
4.1.50 clear spanning-tree statistics interface * 52
4.1.51 clear spanning-tree statistics interface GigabitEthernet....52
4.1.52 clear spanning-tree statistics interface 10GigabitEthernet....52
4.1.53 clear statistics * 53
4.1.54 clear statistics GigabitEthernet....53
4.1.55 clear statistics 10GigabitEthernet ....54
4.2 configure terminal....54
4.2.1 aaa authentication login console local....54
4.2.2 aaa authentication login console radius....55
4.2.3 aaa authentication login console tacacs....55
4.2.4 aaa authentication login http local ....55
4.2.5 aaa authentication login http radius....56
4.2.6 aaa authentication login http tacacs ....56
4.2.7 aaa authentication login ssh local....57
4.2.8 aaa authentication login ssh radius ....57
4.2.9 aaa authentication login ssh tacacs....58
4.2.10 aaa authentication login telnet local....58
4.2.11 aaa authentication login telnet radius ....59
4.2.12 aaa authentication login telnet tacacs....59
4.2.13 access management 60
4.2.14 access-list ace....60
4.2.15 access-list ace update....61
4.2.16 access-list rate-limiter....63
4.2.17 access-list rate-limiter pps 63
4.2.18 aggregation mode....64
4.2.19 aggregation mode....64
4.2.20 banner 65
4.2.21 banner exec....66
4.2.22 banner login....66
4.2.23 banner motd 67
4.2.24 clock summer-time 68
4.2.25 clock time zone....68
4.2.26 default access-list rate-limiter 69
4.2.27 dot1x authentication timer inactivity....69
4.2.28 dot1x authentication timer re-authenticate....70
4.2.29 dot1x feature 70
4.2.30 dot1x guest-vlan....70
4.2.31 dot1x guest-vlan supplicant....71
4.2.32 dot1x max-reauth-req....71
4.2.33 dot1x system-auth-control 72
4.2.34 dot1x timeout quiet-period....72
4.2.35 dot1x timeout tx-period....73
4.2.36 enable password ....73
4.2.37 enable password level....74
4.2.38 enable secret....75
4.2.39 end 76
4.2.40 erps <1-64> guard....76
4.2.41 erps <1-64> holdoff ....77
4.2.42 erps <1-64> major....77
4.2.43 erps <1-64> mep 78
4.2.44 erps <1-64> mep....78
4.2.45 erps <1-64> rpl neighbor ....79
4.2.46 erps <1-64> rpl owner ....79
4.2.47 erps <1-64> sub 80
4.2.48 erps <1-64> topology-change propagate....80
4.2.49 erps <1-64> topology-change propagate....81
4.2.50 erps <1-64> vlan....81
4.2.51 evc....82
4.2.52 evc ece....83
4.2.53 evc ece update....86
4.2.54 evc policer 88
4.2.55 evc policer update 89
4.2.56 evc update....90
4.2.57 exit....91
4.2.58 green-ethernet led interval....92
4.2.59 green-ethernet led on-event....92
4.2.60 gvrp 93
4.2.61 gvrp max-vlans 93
4.2.62 gvrp time....94
4.2.63 help....94
4.2.64 hostname....95
4.2.65 interface * | 10GigabitEthernet | GigabitEthernet....96
4.2.65.1 access-list action permit....96
4.2.65.2 access-list action deny 97
4.2.65.3 access-list logging....97
4.2.65.4 access-list policy 98
4.2.65.5 access-list port-state 98
4.2.65.6 access-list rate-limiter....99
4.2.65.7 access-list redirect interface....99
4.2.65.8 access-list shutdown 100
4.2.65.9 aggregation group....100
4.2.65.10 description....101
4.2.65.11 do 101
4.2.65.12 dot1x guest-vlan....102
4.2.65.13 dot1x port-control 102
4.2.65.14 dot1x radius-qos....103
4.2.65.15 dot1x radius-vlan....103
4.2.65.16 dot1x re-authenticate....104
4.2.65.17 duplex....104
4.2.65.18 end 105
4.2.65.19 evc dei....105
4.2.65.20 evc l2cp discard(GG)....106
4.2.65.21 evc l2cp forward(GG)....106
4.2.65.22 evc l2cp peer(GG)....107
4.2.65.23 evc update dei....108
4.2.65.24 excessive-restart 108
4.2.65.25 exit....109
4.2.65.26 flow control 109
4.2.65.27 green-ethernet energy-detect(GG)....110
4.2.65.28 green-ethernet short-reach(GG)....110
4.2.65.29 gvrp join-request vlan(GG) 111
4.2.65.30 gvrp leave-request vlan(GG) 111
4.2.65.31 ip arp inspection check-vlan 112
4.2.65.32 ip arp inspection logging....112
4.2.65.33 ip arp inspection trust 113
4.2.65.34 ip dhcp snooping trust 113
4.2.65.35 ip igmp snooping filter 114
4.2.65.36 ip igmp snooping immediate-leave....114
4.2.65.37 ip igmp snooping max-groups 115
4.2.65.38 ip igmp snooping mrouter....115
4.2.65.39 ip verify source 116
4.2.65.40 ip verify source limit....116
4.2.65.41 ipv6 mld snooping filter....117
4.2.65.42 ipv6 mld snooping immediate-leave 117
4.2.65.43 ipv6 mld snooping max-groups....118
4.2.65.44 ipv6 mld snooping mrouter 118
4.2.65.45 lacp....119
4.2.65.46 lacp key 119
4.2.65.47 lacp port-priority....120
4.2.65.48 lacp role....120
4.2.65.49 lacp timeout....121
4.2.65.50 lldp cdp-aware 121
4.2.65.51 lldp med media-vlan policy-list....122
4.2.65.52 lldp med transmit-tlv 122
4.2.65.53 lldp receive 123
4.2.65.54 lldp tlv-select management-address....123
4.2.65.55 lldp tlv-select port-description....124
4.2.65.56 lldp tlv-select system-capabilities....124
4.2.65.57 lldp tlv-select system-description....125
4.2.65.58 lldp tlv-select system-name ....125
4.2.65.59 lldp transmit....126
4.2.65.60 loop-protect 126
4.2.65.61 loop-protect action....127
4.2.65.62 loop-protect tx-mode 127
4.2.65.63 loop-protect tx-mode 128
4.2.65.64 mac address-table learning 128
4.2.65.65 media-type....129
4.2.65.66 mtu 129
4.2.65.67 mvr immediate-leave 130
4.2.65.68 mvr name....130
4.2.65.69 mvr vlan....131
4.2.65.70 network-clock synchronization ssm....132
4.2.65.71 no 132
4.2.65.72 ping ip....133
4.2.65.73 poe mode 133
4.2.65.74 poe pdcheck IP....134
4.2.65.75 poe pdcheck action 134
4.2.65.76 poe pdcheck enable 135
4.2.65.77 poe pdcheck interval 136
4.2.65.78 poe pdcheck reboot-time....136
4.2.65.79 poe pdcheck retry-count....137
4.2.65.80 poe power limit....137
4.2.65.81 poe priority....138
4.2.65.82 poe time-range....138
4.2.65.83 port-security....139
4.2.65.84 port-security maximum....139
4.2.65.85 port-security violation 140
4.2.65.86 port-security violation 141
4.2.65.87 pvlan....141
4.2.65.88 pvlan isolation....142
4.2.65.89 qos cos....142
4.2.65.111 shutdown....155
4.2.65.112 spanning-tree....156
4.2.65.113 spanning-tree auto-edge....156
4.2.65.114 spanning-tree bpdu-guard 157
4.2.65.115 spanning-tree edge....157
4.2.65.116 spanning-tree link-type ....158
4.2.65.117 spanning-tree mst
4.2.65.118 spanning-tree mst
4.2.65.119 spanning-tree restricted-role 159
4.2.65.120 spanning-tree restricted-tcn....160
4.2.65.121 speed 160
4.2.65.122 switchport access vlan 161
4.2.65.123 switchport forbidden vlan add....162
4.2.65.124 switchport forbidden vlan remove....162
4.2.65.125 switchport hybrid acceptable-frame-type....163
4.2.65.126 switchport hybrid allowed vlan....163
4.2.65.127 switchport hybrid egress-tag....164
4.2.65.128 switchport hybrid ingress-filtering 165
4.2.65.129 switchport hybrid native vlan 165
4.2.65.130 switchport hybrid port-type 166
4.2.65.131 switchport mode 166
4.2.65.132 switchport vlan ip-subnet....167
4.2.65.133 switchport vlan mac....168
4.2.65.134 switchport vlan mapping....168
4.2.65.135 switchport vlan protocol group....169
4.2.65.136 switchport voice vlan discovery-protocol 169
4.2.65.137 switchport voice vlan mode 170
4.2.65.138 switchport voice vlan security....171
4.2.66 interface vlan....171
4.2.66.1 do 172
4.2.66.2 end 172
4.2.66.3 exit....173
4.2.66.4 ip address....173
4.2.66.5 ip address dhcp....174
4.2.66.6 ip address dhcp fallback....174
4.2.66.7 ip dhcp server....175
4.2.66.8 ip igmp snooping ....175
4.2.66.9 ip igmp snooping compatibility....176
4.2.66.10 ip igmp snooping last-member-query-interval....177
4.2.66.11 ip igmp snooping priority....177
4.2.66.12 ip igmp snooping querier address 178
4.2.66.13 ip igmp snooping querier election....178
4.2.66.14 ip igmp snooping query-interval....179
4.2.66.15 ip igmp snooping query-max-response-time....180
4.2.66.16 ip igmp snooping robustness-variable ....180
4.2.66.17 ip igmp snooping unsolicited-report-interval....181
4.2.66.18 ipv6 address....181
4.2.66.19 ipv6 mld snooping 182
4.2.66.20 ipv6 mld snooping compatibility....182
4.2.66.21 ipv6 mld snooping last-member-query-interval....183
4.2.66.22 ipv6 mld snooping priority....183
4.2.66.23 ipv6 mld snooping querier election....184
4.2.66.24 ipv6 mld snooping query-interval....185
4.2.66.25 ipv6 mld snooping query-max-response-time....185
4.2.66.26 ipv6 mld snooping robustness-variable 186
4.2.66.27 ipv6 mld snooping unsolicited-report-interval 186
4.2.66.28 no 187
4.2.67 ip arp inspection ....187
4.2.68 ip arp inspection entry interface....188
4.2.69 ip arp inspection translate....189
4.2.70 ip arp inspection translate interface....189
4.2.71 ip arp inspection vlan....190
4.2.72 ip dhcp excluded-address....191
4.2.73 ip dhcp pool....191
4.2.73.1 broadcast....192
4.2.73.2 client-identifier fqdn 192
4.2.73.3 client-identifier mac-address....193
4.2.73.4 client-name....193
4.2.73.5 default-router....194
4.2.73.6 dns-server 194
4.2.73.7 do 195
4.2.73.8 domain-name ....195
4.2.73.9 end 196
4.2.73.10 exit....196
4.2.73.11 hardware-address....197
4.2.73.12 host 197
4.2.73.13 lease....198
4.2.73.14 netbios-name-server .... 198
4.2.73.15 netbios-node-type....199
4.2.73.16 netbios-scope....199
4.2.73.17 network....200
4.2.73.18 nis-domain-name....200
4.2.73.19 nis-server....201
4.2.73.20 no 201
4.2.73.21 ntp-server....202
4.2.73.22 vendor 202
4.2.74 ip dns proxy ....203
4.2.75 ip helper-address....203
4.2.76 ip http secure-redirect....204
4.2.77 ip http secure-server....204
4.2.78 ip igmp host-proxy 205
4.2.79 ip igmp host-proxy leave-proxy....205
4.2.80 ip igmp snooping ....206
4.2.81 ip igmp snooping vlan....206
4.2.82 ip igmp ssm-range....207
4.2.83 ip igmp unknown-flooding....208
4.2.84 ip name-server ....208
4.2.85 ip name-server dhcp....209
4.2.86 ip name-server dhcp interface vlan....209
4.2.87 ip route ....210
4.2.88 ip routing....210
4.2.89 ip source binding interface....211
4.2.90 ip ssh....211
4.2.91 ip verify source ....212
4.2.92 ip verify source translate....212
4.2.93 ipmc profile....213
4.2.94 ipmc profile
4.2.94.1 default range 214
4.2.94.2 description....214
4.2.94.3 do 215
4.2.94.4 end 215
4.2.94.5 exit....216
4.2.94.6 no 216
4.2.94.7 range....217
4.2.95 ipv6 mld host-proxy 217
4.2.96 ipv6 mld host-proxy leave-proxy 218
4.2.97 ipv6 mld snooping....218
4.2.98 ipv6 mld snooping vlan....219
4.2.99 ipv6 mld ssm-range....219
4.2.100 ipv6 mld unknown-flooding 220
4.2.101 ipv6 route....221
4.2.102 lacp system-priority....222
4.2.103 line....222
4.2.103.1 do 223
4.2.103.2 editing....223
4.2.103.3 end 224
4.2.103.4 exec-banner 224
4.2.103.5 exec-timeout....225
4.2.103.6 exec-timeout....225
4.2.103.7 exit....226
4.2.103.8 history size ....226
4.2.103.9 length 227
4.2.103.10 location....227
4.2.103.11 motd-banner....228
4.2.103.12 no 228
4.2.103.13 privilege level....229
4.2.103.14 width 229
4.2.104 lldp holdtime ....230
4.2.105 lldp med datum....230
4.2.119 loop-protect shutdown-time....238
4.2.120 loop-protect transmit-time....238
4.2.121 mac address-table aging-time ....239
4.2.122 mac address-table static....239
4.2.123 mep
4.2.124 mep
4.2.125 mep
4.2.126 mep
4.2.127 mep
4.2.128 mep
4.2.129 mep
4.2.130 mep
4.2.131 mep
4.2.132 mep
4.2.133 mep
4.2.134 mep
4.2.135 mep
4.2.136 mep
4.2.137 mep
4.2.138 mep
4.2.139 mep
4.2.140 mep
4.2.141 mep
4.2.142 mep
4.2.143 mep
4.2.144 mep
4.2.147 monitor destination....257
4.2.148 monitor source....257
4.2.149 mvr 258
4.2.150 mvr name
4.2.151 mvr name
4.2.152 mvr name
4.2.153 mvr name
4.2.154 mvr name
4.2.155 mvr name
4.2.156 mvr vlan
4.2.157 mvr vlan
4.2.158 mvr vlan
4.2.159 mvr vlan
4.2.160 mvr vlan
4.2.161 mvr vlan
4.2.162 mvr vlan
4.2.163 mvr vlan
4.2.164 network-clock clk-source
4.2.165 no 267
4.2.166 ntp 267
4.2.167 ntp server 268
4.2.168 poe admin-mode enable....268
4.2.169 poe management mode....269
4.2.170 poe sequential enable 269
4.2.171 poe sequential interval....270
4.2.172 poe sequential rule 270
4.2.173 poe supply....271
4.2.174 poe temperature-protection enable....271
4.2.175 poe temperature-threshold ....272
4.2.176 poe usage-threshold....272
4.2.177 poe-time-range ....273
4.2.177.1 do 274
4.2.177.2 end 274
4.2.177.3 exit....275
4.2.177.4 no 275
4.2.177.5 periodic....275
4.2.177.6 reboot-only 277
4.2.178 port-security....277
4.2.179 port-security aging....278
4.2.180 port-security aging time....278
4.2.181 privilege 279
4.2.182 qos map cos-dscp 280
4.2.183 qos map dscp-classify ....281
4.2.184 qos map dscp-cos ....282
4.2.185 qos map dscp-egress-translation....283
4.2.186 qos map dscp-ingress-translation....284
4.2.187 qos qce....285
4.2.188 qos qce update....287
4.2.189 qos qce refresh....288
4.2.190 qos wred....289
4.2.191 radius-server attribute 32....290
4.2.192 radius-server attribute 4....290
4.2.193 radius-server attribute 95....291
4.2.194 radius-server deadtime....291
4.2.195 radius-server host....292
4.2.196 radius-server key....293
4.2.197 radius-server retransmit....293
4.2.198 radius-server timeout....294
4.2.199 rmon alarm 294
4.2.200 rmon event 295
4.2.201 sflow agent-ip 296
4.2.202 sflow collector-address 297
4.2.203 sflow collector-port....297
4.2.204 sflow max-datagram-size....298
4.2.205 sflow timeout 298
4.2.206 sfp temperature-threshold 299
4.2.207 snmp-server 299
4.2.208 snmp-server access 300
4.2.209 snmp-server community ....301
4.2.210 snmp-server contact....301
4.2.211 snmp-server engine-id....302
4.2.212 snmp-server host....302
4.2.212.1 do 303
4.2.212.2 end 303
4.2.212.3 exit....304
4.2.212.4 host 304
4.2.212.5 no 305
4.2.212.6 informs 306
4.2.212.7 shutdown....306
4.2.212.8 traps 307
4.2.212.9 version....308
4.2.213 spanning-tree aggregation....308
4.2.213.1 do 309
4.2.213.2 end 309
4.2.213.3 exit....310
4.2.213.4 no 310
4.2.213.5 spanning-tree auto-edge .... 311
4.2.213.6 spanning-tree bpdu-guard 311
4.2.213.7 spanning-tree edge 312
4.2.213.8 spanning-tree link-type 312
4.2.213.9 spanning-tree mst
4.2.213.10 spanning-tree mst
4.2.213.11 spanning-tree restricted-role 314
4.2.213.12 spanning-tree restricted-tcn....315
4.2.214 switchport vlan mapping....315
4.2.215 tacacs-server deadtime 316
4.2.216 tacacs-server host....316
4.2.217 transport email authentication ....317
4.2.218 transport email from....317
4.2.219 transport email smtp-server....318
4.2.220 transport email to....319
4.2.221 upnp 319
4.2.222 upnp advertising-duration....320
4.2.223 upnp ttl....320
4.2.224 username ....321
4.2.225 vlan....321
4.2.225.1 do 322
4.2.225.2 end 322
4.2.225.3 exit....323
4.2.225.4 name 323
4.2.225.5 no 324
4.2.226 vlan ethertype s-custom-port....324
4.2.227 vlan protocol....325
4.2.228 voice vlan ....326
4.2.229 voice vlan aging-time....326
4.2.230 voice vlan class 327
4.2.231 voice vlan oui....327
4.13.1 firmware swap 335
4.13.2 firmware upgrade....336
4.14 ip....336
4.14.1 ip dhcp retry interface vlan ....336
4.15 logout....337
4.15.1 logout....337
4.16 more....338
4.16.1 more 338
4.17 no 338
4.17.1 no 338
4.18 ping 339
4.18.1 ping ip....339
4.18.2 ping ipv6....340
4.19 reload 341
4.19.1 reload cold....341
4.19.2 reload defaults....341
4.20 send 342
4.20.1 send....342
4.21 show....343
4.21.1 show aaa....343
4.21.2 show access management....343
4.21.3 show access-list 344
4.21.4 show access-list 345
4.21.5 show access-list ace-status....347
4.21.6 show aggregation....348
4.21.7 show aggregation mode 348
4.21.8 show clock....349
4.21.9 show clock detail 350
4.21.10 show dot1x statistics....351
4.21.11 show dot1x status....352
4.21.12 show eps 353
4.21.13 show erps 354
4.21.14 show evc 355
4.21.15 show evc statistics....356
4.21.16 show green-ethernet....356
4.21.17 show green-ethernet energy-detect....357
4.21.18 show green-ethernet short-reach....357
4.21.19 show history 358
4.21.20 show interface
4.21.21 show interface
4.21.22 show interface
4.21.23 show interface
4.21.24 show interface
4.21.25 show interface
4.21.26 show interface vlan....362
4.21.27 show ip arp....363
4.21.28 show ip arp inspection....364
4.21.29 show ip arp inspection....364
4.21.30 show ip arp inspection entry....365
4.21.31 show ip dhcp detailed statistics ....366
4.21.32 show ip dhcp excluded-address 367
4.21.33 show ip dhcp pool....368
4.21.34 show ip dhcp relay....369
4.21.35 show ip dhcp server....369
4.21.36 show ip dhcp server binding (GG) 370
4.21.37 show ip dhcp server declined-ip (GG) 371
4.21.38 show ip dhcp server statistics....371
4.21.39 show ip dhcp snooping....372
4.21.40 show ip dhcp snooping table 373
4.21.41 show ip http server secure status....374
4.21.42 show ip igmp snooping....374
4.21.43 show ip igmp snooping mrouter....375
4.21.44 show ip interface brief....376
4.21.45 show ip name-server 376
4.21.46 show ip route....377
4.21.47 show ip source binding....377
4.21.48 show ip ssh....378
4.21.49 show ip statistics....378
4.21.50 show ip verify source....380
4.21.51 show ipmc profile....381
4.21.52 show ipmc range 381
4.21.53 show ipv6 interface....382
4.21.54 show ipv6 mld snooping ....383
4.21.55 show ipv6 mld snooping mrouter....384
4.21.56 show ipv6 neighbor....384
4.21.57 show ipv6 route 385
4.21.58 show ipv6 statistics....386
4.21.59 show lacp 388
4.21.60 show line 388
4.21.61 show lldp med media-vlan-policy....389
4.21.62 show lldp med remote-device....390
4.21.63 show lldp neighbors....390
4.21.64 show lldp statistics....391
4.21.65 show logging 391
4.21.66 show loop-protect 392
4.21.67 show mac address-table....393
4.21.68 show mep....394
4.21.69 show mvr 395
4.21.70 show network-clock....396
4.21.71 show ntp status....396
4.21.72 show platform phy ....397
4.21.73 show platform phy failover....398
4.21.74 show platform phy id....398
4.21.75 show platform phy status....399
4.21.76 show port-security port 399
4.21.77 show port-security switch 400
4.21.78 show privilege....401
4.21.79 show pvlan 401
4.21.80 show pvlan isolation 402
4.21.81 show qos 402
4.21.82 show radius-server 405
4.21.83 show rmon alarm....405
4.21.84 show rmon event....406
4.21.85 show rmon history ....407
4.21.86 show rmon statistics 407
4.21.87 show running-config ....408
4.21.88 show snmp 410
4.21.89 show snmp access....412
4.21.90 show snmp community v3 413
4.21.91 show snmp host....413
4.21.92 show snmp mib context 414
4.21.93 show snmp mib ifmib ifIndex 416
4.21.94 show snmp security-to-group 418
4.21.95 show snmp user 419
4.21.96 show snmp view....419
4.21.97 show spanning-tree 420
4.21.98 show switchport forbidden 421
4.21.99 show tacacs-server....422
4.21.100 show terminal 422
4.21.101 show upnp....423
4.21.102 show users 424
4.21.103 show version 425
4.21.104 show vlan 426
4.21.105 show vlan ip-subnet....426
4.21.106 show vlan mac....427
4.21.107 show vlan protocol....427
4.21.108 show voice vlan 428
4.21.109 show web privilege group....429
4.22 terminal....431
4.22.1 terminal editing....431
4.22.2 terminal exec-timeout 431
4.22.3 terminal history size....432
4.22.4 terminal length....432
4.22.5 terminal width 433
Chapter 1 COMMAND LINE INTERFACE
1.1 Accessing the CLI
When accessing the management interface for the switch over a direct connection to the server's console port, or via a Telnet connection, the switch can be managed by entering command keywords and parameters at the prompt. Using the switch's command-line interface (CLI) is very similar to entering commands on a UNIX system.
This chapter describes how to use the Command Line Interface (CLI).
1.2 Command Line Modes
The CLI groups all the commands in appropriate modes according to the nature of the command. A sample of the CLI command modes is described below. Each of the command modes supports specific software commands.
Mode-based Command Hierarchy
The Command Line Interface (CLI) groups all the commands in appropriate modes by the nature of the commands. Examples of the CLI command modes are described below. Each of the command modes supports specific switch's commands. The CLI Command Modes table captures the command modes, the prompts visible in that mode and the exit method from that mode.
| Command Mode | Access Method | Prompt | Exit or Access Previous Mode |
| User Mode | This is the first level of access. Perform basic tasks and list system information. | COMMAND> | Enter Logout command |
| Privileged Mode | From the User Mode, enter the enable command. | Switch# | To exit to the User Mode, enter exit or logout. |
| Global Config Mode | From the Privileged Mode, enter the configuration command. | Switch (Config)# | To exit to the Privileged Mode, enter the exit command. |
| Interface Config Mode | From the Global Config mode, enter the interfacecommand. | Switch (Interface#) | To exit to the Global Config mode, enter exit. |
Table 1-1 CLI Command Modes
The CLI is divided into various modes. The commands in one mode are not available until the operator switches to that particular mode. The commands available to the operator at any point in time depend upon the mode. Entering a question mark (?) at the CLI prompt will display a list of the available commands and descriptions of the commands.
The CLI provides the following modes:
■ User Mode
When the operator logs into the CLI, the User Mode is the initial mode. The User Mode contains a limited set of commands. The command prompt shown at this level is:
Command Prompt: switch>
■ Privileged Mode
To have access to the full suite of commands, the operator must enter the Privileged Mode. The Privileged Mode requires password authentication. From Privileged Mode, the operator can issue any Exec command to enter the Global Configuration mode. The command prompt shown at this level is:
Command Prompt: switch#
■ Global Config Mode
This mode permits the operator to make modifications to the running configuration. General setup commands are grouped in this mode. From the Global Configuration mode, the operator can enter the Interface Configuration mode. The command prompt at this level is:
Command Prompt: switch (Config)#
From the Global Config mode, the operator may enter the following configuration modes:
■ Interface Config Mode
Many features are enabled for a particular interface. The Interface commands enable or modify the operation of an interface. In this mode, a physical port is set up for a specific logical connection operation. The command prompt at this level is:
Command Prompt: Switch(Interface
1.3 Requirements
■ Workstations running Windows XP/Vista/7/8/, Windows 2003/2008, MAC OS X or later, Linux, UNIX, or other platforms are compatible with TCP/IP protocols.
■ Workstations are installed with Ethernet NIC (Network Interface Card)
■ Serial Port Connection (Terminal)
The above Workstations come with COM Port (DB9) or USB-to-RS-232 converter.
The above Workstations have been installed with terminal emulator, such as Hyper Terminal included in Windows XP/2003.
Serial cable -- one end is attached to the RS-232 serial port, while the other end to the console port of the Industrial Managed Switch.
■ Ethernet Port Connection
Network cables -- Use standard network (UTP) cables with RJ45 connectors.
The above PC is installed with Web browser and JAVA runtime environment plug-in.
1.4 Command Support
As shown in the following table, some command groups or commands are supported on particular switch models.
| Command Group or Command | 10Gigabit Ethernet | Power over Ethernet | E.R.P.S (Ring) | DIDO | IEEE1588 PTP |
| Standalone Commercial Switches | |||||
| WGSD-10020(v2) - - - - | |||||
| WGSD-10020HP(v3) | - | ■ | - | - | - |
| WGSW-24040/R | - | - | - | - | - |
| WGSW-20160HP | - | ■ | - | - | - |
| WGSW-24040HP/HP4 | - | ■ | - | - | - |
| GS-5220-16S8C/16S8CR | - | - | - | - | - |
| GS-5220-16T4S2X/16T4S2XR | ■ | - | - | - | - |
| GS-5220-20T4C4X/20T4C4XR | ■ | ||||
| GS-5220-24P4X/24P4XR | ■ | ■ | - | - | - |
| GS-5220-24PL4X/24PL4XR | ■ | ■ | - | - | - |
| GS-5220-16UP4S2X/16UP4S2XR | ■ | ■ | - | - | - |
| GS-5220-24UP4X/24UP4XR | ■ | ■ | - | - | - |
| GS-5220-24UPL4X/24UPL4XR | ■ | ■ | - | - | - |
| GS-5220-48P4X/R | ■ | ■ | - | - | - |
| GS-5220-48PL4X/R | ■ | ■ | - | - | - |
| GS-6320-24UP2T2XV | ■ | ■ - - - | |||
| GS-6320-46S2C4XR | ■ - - - - | ||||
| GS-6322-24P4X | ■ | ■ - - - | |||
| Stackable Commercial Switches | |||||
| SGS-5220-24T2X | ■ | - | - | - | - |
| SGS-5220-24P2X | ■ | ■ | - | - | - |
| SGS-5220-24S2XR | ■ | ■ | |||
| Metro Ethernet Switches | |||||
| MGSW-24160F(v3) | - | - | - | ■ | |
| MGSW-28240F | ■ | - | ■ | ■ | - |
| Industrial Grade Ethernet Switches | |||||
| IGS-10020MT(v2) | - | - | ■ | - | - |
| IGS-10020PT | - | ■ | ■ | ■ | - |
| IGS-10020HPT | - | ■ | ■ | ■ | - |
| IGS-10080MFT | - | - | ■ | ■ | - |
| IGS-20040MT | - | - | ■ | ■ | ■ |
| Command Group or Command | 10Gigabit Ethernet | Power over Ethernet | E.R.P.S (Ring) | DIDO | IEEE1588 PTP |
| Industrial Grade Ethernet Switches | |||||
Command Guide
| IGSW-24040T(v3) | - | - | ■ | ■ | ■ |
| IGS-5225-16T4S | - | - | ■ | ■ | ■ |
| IGS-5225-20T4C2X | ■ | - | ■ | ■ | ■ |
| IGS-604HPT-RJ | - | ■ | ■ | - | ■ |
| IGS-604HPT-M12 | - | ■ | ■ | - | ■ |
| IGS-5226-4P2T | - | ■ | ■ | - | ■ |
■ = Supported, - = Not supported
Chapter 2 CONSOLE CLI MANAGEMENT
2.1 Terminal Setup
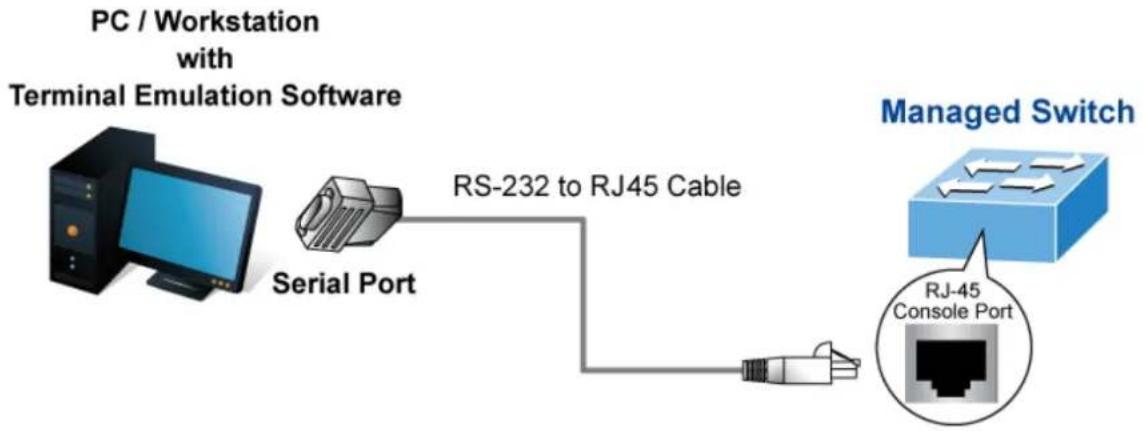
To configure the system, connect a serial cable to a COM port on a PC or notebook computer and to RJ45 type of serial (console) port of the Industrial Managed Switch.
flowchart
graph LR
    A["PC / Workstation with Terminal Emulation Software"] --> B["Serial Port"]
    B --> C["RS-232 to RJ45 Cable"]
    C --> D["Managed Switch"]
    D --> E["RJ-45 Console Port"]
Figure 2-1 Industrial Managed Switch Console Connectivity
The console port of the Industrial Managed Switch is an RJ45 type, RS-232 serial port connector. It is an interface for connecting a terminal directly. Through the console port, it provides rich diagnostic information including IP address setting, factory reset, port management, link status and system setting. Users can use the attached RS-232 cable in the package and connect to the console port on the device. After the connection, users can run any terminal emulation program (Hyper Terminal, ProComm Plus, Telix, Winterm and so on) to enter the startup screen of the device.
A terminal program is required to make the software connection to the Industrial Managed Switch. Windows' Hyper Terminal program may be a good choice. The Hyper Terminal can be accessed from the Start menu.
- Click START, then Programs and Accessories, and then Hyper Terminal.
- When the following screen appears, make sure that the COM port should be configured as:
♦ Baud : 115200
◆ Data bits : 8
♦ Parity : None
♦ Stop bits : 1
◆ Flow control : None
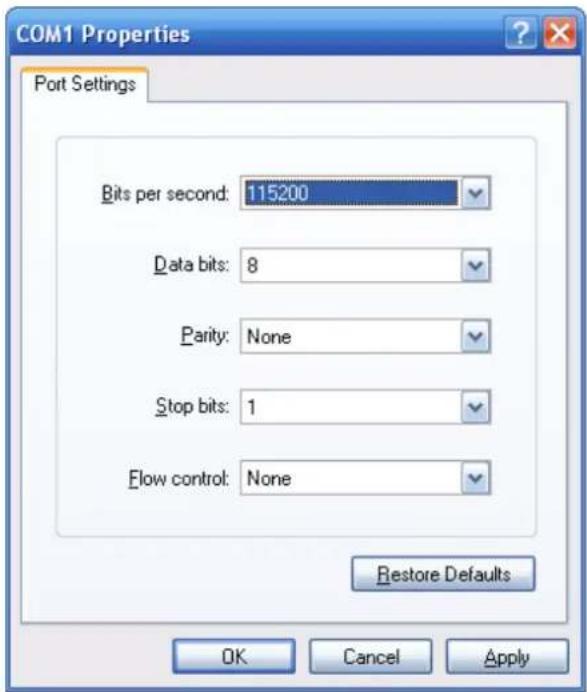
Figure 2-3 Hyper Terminal COM Port Configuration
You can change these settings, if desired, after you log on. This management method is often preferred because you can remain connected and monitor the system during system reboots. Also, certain error messages are sent to the serial port, regardless of the interface through which the associated action was initiated. A Macintosh or PC attachment can use any terminal-emulation program for connecting to the terminal serial port. A workstation attachment under UNIX can use an emulator such as TIP.
2.2 Logon to the Console
Once the terminal is connected to the device, power on the Industrial Managed Switch, and the terminal will display "running testing procedures". Then, the following message asks to log-in user name and password. The factory default user name and password are shown as follows and the login screen in Figure 3-1 appears.
Username: admin
Password: admin
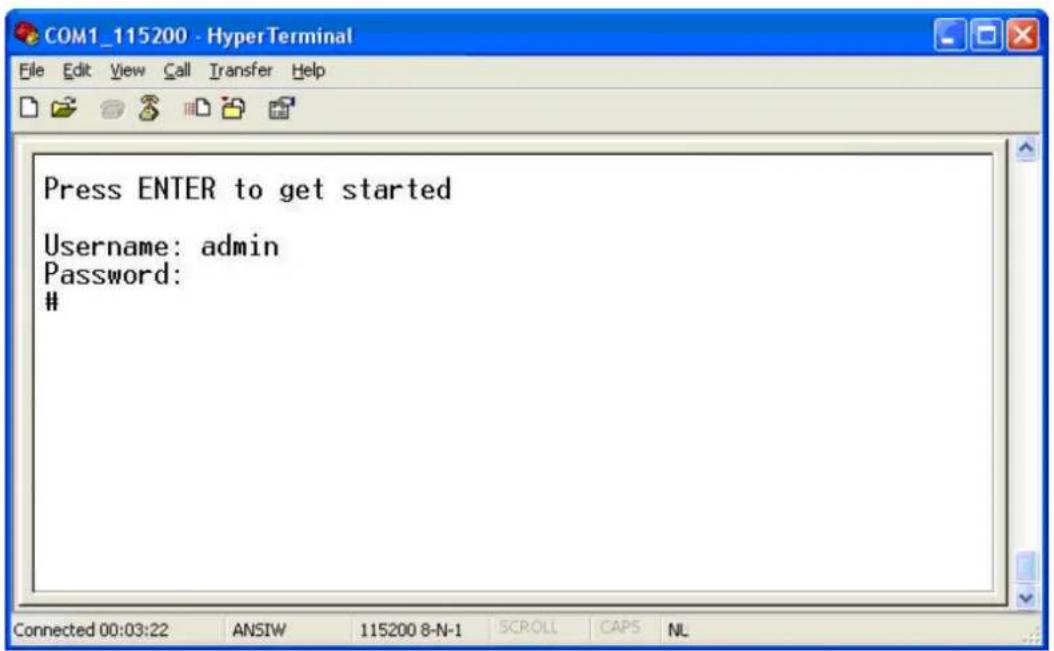
Figure 3-1: Industrial Managed Switch Console Login Screen
The user can now enter commands to manage the Industrial Managed Switch. For a detailed description of the commands, please refer to the following chapters.

- For security reason, please change and memorize the new password after this first setup.
- Only accept command in lowercase letter under console interface.
2.3 Configuring IP Address
The Industrial Managed Switch is shipped with default IP address shown below.
IP Address: 192.168.0.100
Subnet Mask: 255.255.255.0
To check the current IP address or modify a new IP address for the Switch, please use the procedures as follows:
■ Show the current IP Address
- At the “#” prompt, enter “show ip interface brief”.
- The screen displays the current IP address and subnet mask as shown in Figure 3-2.
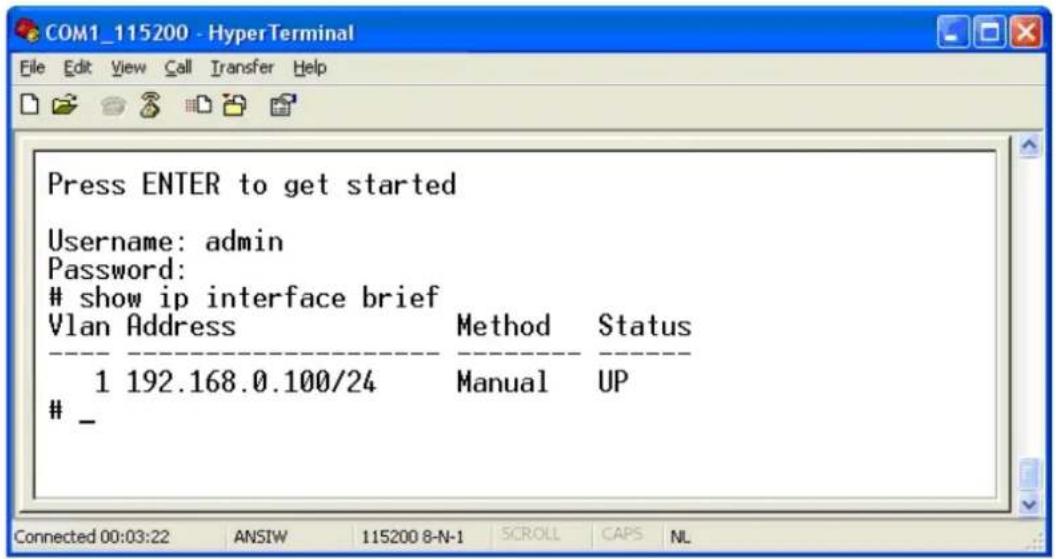
Figure 3-2: IP Information Screen
■ Configuring IP Address
- At the “#” prompt, enter the following command and press
as shown in Figure 3-3.
<h1 id="configure-terminal">configure terminal</h1>
(config)# interface vlan 1
(config-if-vlan)# ip address 192.168.1.100 255.255.255.0
The previous command would apply the following settings for the Industrial Managed Switch.
IP Address: 192.168.1.100
Subnet Mask: 255.255.255.0
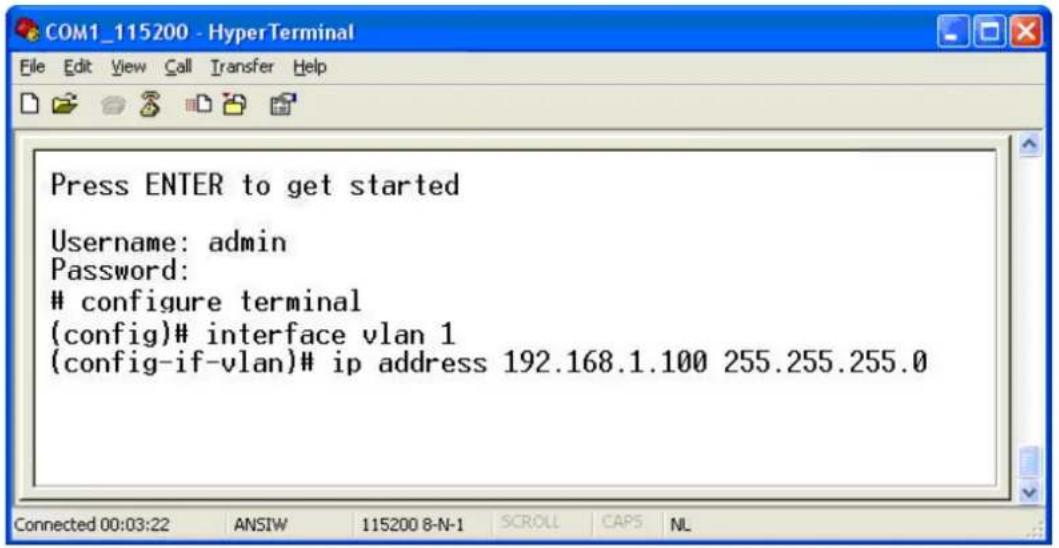
Figure 3-3: Configuring IP Address Screen
- Repeat step 1 to check if the IP address has changed.
■ Storing current switch configuration
- At the “#” prompt, enter the following command and press
.
copy running-config startup-config
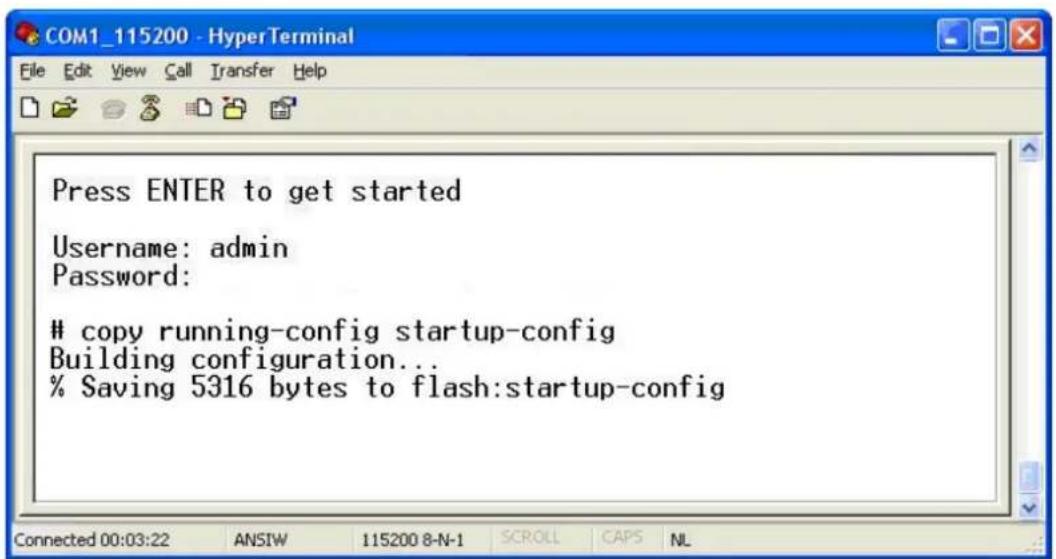
Figure 3-4: Saving Current Configuration Command Screen
If the IP is successfully configured, the Industrial Managed Switch will apply the new IP address setting immediately. You can access the Web interface of the Industrial Managed Switch through the new IP address.

If you are not familiar with the console command or the related parameter, enter “ ?” anytime in console to get the help description.
Chapter 3 TELNET CLI MANAGEMENT
3.1 Telnet Login
The Industrial Managed Switch also supports telnet for remote management. The switch asks for user name and password for remote login when using telnet; please use "admin" for both username and password.
Default IP address: 192.168.0.100
Username: admin
Password: admin
![Microsoft Windows XP [ 5.1.2600] (C) Copyright 1985-2001 Microsoft Corp. C:\>telnet 192.168.0.100 Username: admin Password: IGS-20040MT#](/content/2026/05/900960/images/a4b7612c042f21decb44f57b7c6f99fbf7adcbc7726e453e4aa828e92a6b708f.jpg)
Figure 3-1 Industrial Managed Switch Telnet Login Screen
Chapter 4 Commands for CLI Configuration
4.1 clear
4.1.1 clear access management statistics
Command:
clear access management statistics
Default:
N/A
Usage Guide:
To clear the access management statistics.
Example:
To clear the Switch's access management statistics.
Switch# clear access management statistics
4.1.2 clear access-list ace statistics
Command:
clear access-list ace statistics
Default:
N/A
Usage Guide:
To clear the Access list entry statistics.
Example:
To clear the Switch's Access list entry statistics.
Switch# clear access-list ace statistics
4.1.3 clear dot1x statistics interface
Command:
clear dot1x statistics interface GigabitEthernet | 10GigabitEthernet
Default:
N/A
Usage Guide:
To clear the dot1x statistics.
Example:
To clear the Switch's GigabitEthernet 1/25 dot1x statistics.
Switch# clear dot1x statistics interface GigabitEthernet 1/25
4.1.4 clear eps
Command:
clear eps
Default:
N/A
Usage Guide:
To clear the EPS instance number.
4.1.5 clear erps
Command:
clear erps < ERPS group numbers > statistics
Default:
N/A
Usage Guide:
To clear the ERPS group numbers statistics.
Example:
To clear the Switch's ERPS group 1 statistics.
Switch# # clear erps 1 statistics
4.1.6 clear erps statistics
Command:
clear erps statistics
Default:
N/A
Usage Guide:
To clear the ERPS statistics.
Example:
To clear the Switch's ERPS statistics.
Switch# clear erps statistics
4.1.7 clear evc statistics
Command:
clear evc statistics
Default:
N/A
Usage Guide:
To clear the Ethernet Virtual Connections statistics.
Example:
To clear the Switch's Ethernet Virtual Connections statistics.
Switch# clear evc statistics
4.1.8 clear ip arp
Command:
clear ip arp
Default:
N/A
Usage Guide:
To clear the ARP cache.
Example:
To clear the Switch's ARP cache.
Switch# clear ip arp
4.1.9 clear ip dhcp detailed statistics all
Command:
clear ip dhcp detailed statistics all
Default:
N/A
Usage Guide:
To clear the DHCP detailed statistics for all.
Example:
To clear the Switch's DHCP detailed statistics for all.
Switch# clear ip dhcp detailed statistics all
4.1.10 clear ip dhcp detailed statistics client
Command:
clear ip dhcp detailed statistics client
Default:
N/A
Usage Guide:
To clear the DHCP client statistics.
Example:
To clear the Switch's DHCP client statistics.
Switch# clear ip dhcp detailed statistics client
4.1.11 clear ip dhcp detailed statistics helper
Command:
clear ip dhcp detailed statistics helper
Default:
N/A
Usage Guide:
To clear the DHCP normal L2 or L3 forward statistics.
Example:
To clear the Switch's DHCP normal L2 or L3 forward statistics.
Switch# clear ip dhcp detailed statistics helper
4.1.12 clear ip dhcp detailed statistics server
Command:
clear ip dhcp detailed statistics server
Default:
N/A
Usage Guide:
To clear the DHCP server statistics.
Example:
To clear the Switch's DHCP server statistics.
Switch# clear ip dhcp detailed statistics server
4.1.13 clear ip dhcp detailed statistics snooping
Command:
clear ip dhcp detailed statistics snooping
Default:
N/A
Usage Guide:
To clear the DHCP snooping statistics.
Example:
To clear the Switch's DHCP normal L2 or L3 forward statistics.
Switch# clear ip dhcp detailed statistics snooping
4.1.14 clear ip dhcp relay statistics
Command:
clear ip dhcp relay statistics
Default:
N/A
Usage Guide:
To clear the DHCP relay statistics.
Example:
To clear the Switch's DHCP relay statistics.
Switch# clear ip dhcp relay statistics
4.1.15 clear ip dhcp server binding
Command:
clear ip dhcp server binding
Default:
N/A
Usage Guide:
To clear the DHCP server binding cache.
Example:
To clear the Switch's DHCP server(192.168.0.100) binding cache.
Switch# clear ip dhcp server binding 192.168.0.100
4.1.16 clear ip dhcp server binding automatic
Command:
clear ip dhcp server binding automatic
Default:
N/A
Usage Guide:
To clear the DHCP automatic bindings cache.
Example:
To clear the Switch's DHCP automatic bindings cache.
Switch# clear ip dhcp server binding automatic
4.1.17 clear ip dhcp server binding expired
Command:
clear ip dhcp server binding expired
Default:
N/A
Usage Guide:
To clear the DHCP expired bindings for free.
Example:
To clear the Switch's DHCP expired bindings for free.
Switch# clear ip dhcp server binding expired
4.1.18 clear ip dhcp server binding manual
Command:
clear ip dhcp server binding manual
Default:
N/A
Usage Guide:
To clear the DHCP server manual binding cache.
Example:
To clear the Switch's DHCP server manual binding cache.
Switch# clear ip dhcp server binding manual
4.1.19 clear ip igmp snooping statistics
Command:
clear ip igmp snooping statistics
Default:
N/A
Usage Guide:
To clear the IGMP snooping statistics.
Example:
To clear the Switch's IGMP snooping statistics.
Switch# clear ip igmp snooping statistics
4.1.20 clear ip igmp snooping vlan
Command:
clear ip igmp snooping vlan < vlan_list> statistics
VLAN identifier(s): VID
Default:
N/A
Usage Guide:
To clear the IGMP snooping vlan < vlan_list> statistics.
Example:
To clear the Switch's IGMP snooping vlan 1 statistics.
Switch# clear ip igmp snooping vlan 1 statistics
4.1.21 clear ip statistics icmp icmp-msg
Command:
clear ip statistics icmp icmp-msg <Type : 0~255>
Default:
N/A
Usage Guide:
To clear the IPv4 ICMP traffic for designated message type.
Example:
To clear the Switch's IPv4 ICMP traffic for designated message type 0.
Switch# clear ip statistics icmp icmp-msg 0
4.1.22 clear ip statistics icmp interface vlan
Command:
clear ip statistics icmp interface vlan <vlan_list>
Default:
N/A
Usage Guide:
To clear the IPv4 interface/ICMP statistics for specific VLAN.
Example:
To clear the Switch's IP interface/ICMP statistics for specific VLAN 1.
Switch# clear ip statistics icmp interface vlan 1
4.1.23 clear ip statistics system icmp icmp-msg
Command:
clear ip statistics system icmp icmp-msg <Type : 0~255>
Default:
N/A
Usage Guide:
To clear the IPv4 ICMP statistics for specific ICMP message type.
Example:
To clear the Switch's IPv4 ICMP statistics for specific ICMP message type 0.
Switch# clear ip statistics system icmp icmp-msg 0
4.1.24 clear ip statistics system icmp interface vlan
Command:
clear ip statistics system icmp interface vlan
Default:
N/A
Usage Guide:
To clear the IPv4 ICMP interface statistics for specific VLAN.
Example:
To clear the Switch's IPv4 ICMP interface statistics for specific VLAN 1.
Switch# clear ip statistics system icmp interface vlan 1
4.1.25 clear ipv6 mld snooping statistics
Command:
clear ipv6 mld snooping statistics
Default:
N/A
Usage Guide:
To clear the ipv6 mld snooping statistics.
Example:
To clear the Switch's ipv6 mld snooping statistics.
Switch# clear ipv6 mld snooping statistics
4.1.26 clear ipv6 mld snooping vlan
Command:
clear ipv6 mld snooping vlan
VLAN identifier(s): VID
Default:
N/A
Usage Guide:
To clear the ipv6 mld snooping statistics for specific VLAN.
Example:
To clear the Switch's ipv6 mld snooping statistics for specific VLAN 1.
Switch# clear ipv6 mld snooping vlan 1 statistics
4.1.27 clear ipv6 neighbors
Command:
clear ipv6 neighbors
Default:
N/A
Usage Guide:
To clear the ipv6 neighbors.
Example:
To clear the Switch's ipv6 neighbors.
Switch# clear ipv6 neighbors
4.1.28 clear ipv6 statistics icmp icmp-msg
Command:
clear ipv6 statistics icmp icmp-msg
ICMP message type ranges from 0 to 255
Default:
N/A
Usage Guide:
To clear the IPv6 ICMP traffic for designated message type.
Example:
To clear the Switch's IPv6 ICMP traffic for designated message type 0.
Switch# clear ipv6 statistics icmp icmp-msg 0
4.1.29 clear ipv6 statistics icmp interface vlan
Command:
clear ipv6 statistics icmp interface vlan
Default:
N/A
Usage Guide:
To clear the IPv6 interface/ICMP statistics for specific VLAN.
Example:
To clear the Switch's IPv6 interface/ICMP statistics for specific VLAN 1.
Switch# clear ipv6 statistics icmp interface vlan 1
4.1.30 clear ipv6 statistics system icmp icmp-msg
Command:
clear ipv6 statistics system icmp icmp-msg
Default:
N/A
Usage Guide:
To clear the IPv6 ICMP statistics for specific ICMP message type.
Example:
To clear the Switch's IPv6 ICMP statistics for specific ICMP message type 0.
Switch# clear ipv6 statistics system icmp icmp-msg 0
4.1.31 clear ipv6 statistics system icmp interface vlan
Command:
clear ipv6 statistics system icmp interface vlan
Default:
N/A
Usage Guide:
To clear the IPv6 ICMP interface statistics for specific VLAN.
Example:
To clear the Switch's IPv6 ICMP interface statistics for specific VLAN 1.
Switch# clear ipv6 statistics system icmp interface vlan 1
4.1.32 clear lacp statistics
Command:
clear lacp statistics
Default:
N/A
Usage Guide:
To clear the lacp statistics.
Example:
To clear the Switch's lacp statistics.
Switch# clear lacp statistics
4.1.33 clear lldp statistics
Command:
clear lldp statistics
Default:
N/A
Usage Guide:
To clear the lldp statistics.
Example:
To clear the Switch's Ildp statistics.
Switch# clear lldp statistics
4.1.34 clear logging error info
Command:
clear logging error info
Default:
N/A
Usage Guide:
To clear the logging error info.
Example:
To clear the Switch's logging error info.
Switch# clear logging error info
4.1.35 clear logging error warning
Command:
clear logging error warning
Default:
N/A
Usage Guide:
To clear the logging error warning.
Example:
To clear the Switch's logging error warning.
Switch# clear logging error warning
4.1.36 clear logging info error
Command:
clear logging info error
Default:
N/A
Usage Guide:
To clear the logging info error.
Example:
To clear the Switch's logging info error.
Switch# clear logging info error
4.1.37 clear logging info warning
Command:
clear logging info warning
Default:
N/A
Usage Guide:
To clear the logging info warning.
Example:
To clear the Switch's logging info warning.
Switch# clear logging info warning
4.1.38 clear logging warning error
Command:
clear logging warning error
Default:
N/A
Usage Guide:
To clear the logging warning error.
Example:
To clear the Switch's logging warning error.
Switch# clear logging warning error
4.1.39 clear logging warning info
Command:
clear logging warning info
Default:
N/A
Usage Guide:
To clear the logging warning info.
Example:
To clear the Switch's logging warning info.
Switch# clear logging warning info
4.1.40 clear mac address-table
Command:
clear mac address-table
Default:
N/A
Usage Guide:
To clear the mac address-table.
Example:
To clear the Switch's mac address-table.
Switch# clear mac address-table
4.1.41 clear mep
Command:
clear mep
Default:
N/A
Usage Guide:
To clear the MEP instance profiles.
4.1.42 clear mvr name
Command:
clear mvr name
Default:
N/A
Usage Guide:
To clear the mvr name profiles.
4.1.43 clear mvr statistics
Command:
clear mvr statistics
Default:
N/A
Usage Guide:
To clear the mvr statistics.
Example:
To clear the Switch's mvr statistics.
Switch# clear mvr statistics
4.1.44 clear mvr vlan
Command:
clear mvr vlan
MVR multicast VLAN list
Default:
N/A
Usage Guide:
To clear the mvr vlan statistics for specific VLAN.
Example:
To clear the Switch's mvr vlan statistics for specific VLAN 1.
Switch# clear mvr vlan 1 statistics
4.1.45 clear network-clock clk-source
Command:
clear network-clock clk-source
Clock source number
Default:
N/A
Usage Guide:
To clear the ERPS WTR timer for a specific profile.
Example:
To clear the Switch's ERPS WTR timer for a specific profile 1.
Switch# clear network-clock clk-source 1
4.1.46 clear spanning-tree detected-protocols interface \*
Command:
clear spanning-tree detected-protocols interface *
Default:
N/A
Usage Guide:
To clear the spanning-tree detected-protocols for all.
Example:
To clear the Switch's spanning-tree detected-protocols for all.
Switch# clear spanning-tree detected-protocols interface *
4.1.47 clear spanning-tree detected-protocols interface \*
Command:
clear spanning-tree detected-protocols interface *
Default:
N/A
Usage Guide:
To clear the spanning-tree detected-protocols for all.
Example:
To clear the Switch's spanning-tree detected-protocols for all.
Switch# clear spanning-tree detected-protocols interface *
4.1.48 clear spanning-tree detected-protocols interface
GigabitEthernet
Command:
clear spanning-tree detected-protocols interface GigabitEthernet
Default:
N/A
Usage Guide:
To clear the spanning-tree detected-protocols for specific GigabitEthernet port.
Example:
To clear the Switch's spanning-tree detected-protocols for specific GigabitEthernet 1/1.
Switch# clear spanning-tree detected-protocols interface GigabitEthernet 1/1
4.1.49 clear spanning-tree detected-protocols interface
10GigabitEthernet
Command:
clear spanning-tree detected-protocols interface 10GigabitEthernet
Default:
N/A
Usage Guide:
To clear the spanning-tree detected-protocols for specific 10GigabitEthernet port.
Example:
To clear the Switch's spanning-tree detected-protocols for specific 10GigabitEthernet 1/1.
Switch# clear spanning-tree detected-protocols interface 10GigabitEthernet 1/1
4.1.50 clear spanning-tree statistics interface \*
Command:
clear spanning-tree statistics interface *
Default:
N/A
Usage Guide:
To clear the spanning-tree statistics for all.
Example:
To clear the Switch's spanning-tree statistics for all.
Switch# clear spanning-tree statistics interface *
4.1.51 clear spanning-tree statistics interface GigabitEthernet
Command:
clear spanning-tree statistics interface GigabitEthernet
Default:
N/A
Usage Guide:
To clear the spanning-tree statistics for specific GigabitEthernet port.
Example:
To clear the Switch's spanning-tree statistics for specific GigabitEthernet 1/1.
Switch# clear spanning-tree statistics interface GigabitEthernet 1/1
4.1.52 clear spanning-tree statistics interface 10GigabitEthernet
Command:
clear spanning-tree statistics interface 10GigabitEthernet
Default:
N/A
Usage Guide:
To clear the spanning-tree statistics for specific 10GigabitEthernet port.
Example:
To clear the Switch's spanning-tree statistics for specific 10GigabitEthernet 1/1.
Switch# clear spanning-tree statistics interface 10GigabitEthernet 1/1
4.1.53 clear statistics \*
Command:
clear statistics *
Default:
N/A
Usage Guide:
To clear the statistics for all.
Example:
To clear the Switch's statistics for all.
Switch# clear statistics *
4.1.54 clear statistics GigabitEthernet
Command:
clear statistics GigabitEthernet
Default:
N/A
Usage Guide:
To clear the statistics for specific GigabitEthernet port.
Example:
To clear the Switch's statistics for specific GigabitEthernet 1/1.
Switch# clear statistics GigabitEthernet 1/1
4.1.55 clear statistics 10GigabitEthernet
Command:
clear statistics 10GigabitEthernet <PORT_LIST>
<PORT_LIST> Port list in X/X-XX
Default:
N/A
Usage Guide:
To clear the statistics for specific 10GigabitEthernet port.
Example:
To clear the Switch's statistics for specific 10GigabitEthernet 1/1.
Switch# clear statistics 10GigabitEthernet 1/1
4.2 configure terminal
4.2.1 aaa authentication login console local
Command:
aaa authentication login console local
Default:
console : local
Usage Guide:
To authenticate the local account via console only.
Example:
To authenticate the local account via console.
Switch# configure terminal
Switch (config)# aaa authentication login console local
4.2.2 aaa authentication login console radius
Command:
aaa authentication login console radius
Default:
console : local
Usage Guide:
To authenticate the radius account via console only.
Example:
To authenticate the local and radius account via console.
Switch# configure terminal
Switch (config)# aaa authentication login console local radius
4.2.3 aaa authentication login console tacacs
Command:
aaa authentication login console tacacs
Default:
console : local
Usage Guide:
To authenticate the tacacs account via console only.
Example:
To authenticate the local and radius and tacacs account via console.
Switch# configure terminal
Switch (config)# aaa authentication login console local radius tacacs
4.2.4 aaa authentication login http local
Command:
aaa authentication login http local
Default:
http : local
Usage Guide:
To authenticate the local account via http only.
Example:
To authenticate the local account via http.
Switch# configure terminal
Switch (config)# aaa authentication login http local
4.2.5 aaa authentication login http radius
Command:
aaa authentication login http radius
Default:
http : local
Usage Guide:
To authenticate the radius account via http only.
Example:
To authenticate the local and radius account via http.
Switch# configure terminal
Switch (config)# aaa authentication login http local radius
4.2.6 aaa authentication login http tacacs
Command:
aaa authentication login http tacacs
Default:
http : local
Usage Guide:
To authenticate the tacacs account via http only.
Example:
To authenticate the local and radius and tacacs account via http.
Switch# configure terminal
Switch (config)# aaa authentication login http local radius tacacs
4.2.7 aaa authentication login ssh local
Command:
aaa authentication login ssh local
Default:
ssh : local
Usage Guide:
To authenticate the local account via ssh only.
Example:
To authenticate the local account via ssh.
Switch# configure terminal
Switch (config)# aaa authentication login ssh local
4.2.8 aaa authentication login ssh radius
Command:
aaa authentication login ssh radius
Default:
ssh : local
Usage Guide:
To authenticate the radius account via ssh only.
Example:
To authenticate the local and radius account via ssh.
Switch# configure terminal
Switch (config)# aaa authentication login ssh local radius
4.2.9 aaa authentication login ssh tacacs
Command:
aaa authentication login ssh tacacs
Default:
ssh : local
Usage Guide:
To authenticate the tacacs account via ssh only.
Example:
To authenticate the local and radius and tacacs account via console.
Switch# configure terminal
Switch (config)# aaa authentication login ssh local radius tacacs
4.2.10 aaa authentication login telnet local
Command:
aaa authentication login telnet local
Default:
telnet : local
Usage Guide:
To authenticate the local account via telnet only.
Example:
To authenticate the local account via telnet.
Switch# configure terminal
Switch (config)# aaa authentication login telnet local
4.2.11 aaa authentication login telnet radius
Command:
aaa authentication login telnet radius
Default:
telnet : local
Usage Guide:
To authenticate the radius account via telnet only.
Example:
To authenticate the local and radius account via telnet.
Switch# configure terminal
Switch (config)# aaa authentication login telnet local radius
4.2.12 aaa authentication login telnet tacacs
Command:
aaa authentication login telnet tacacs
Default:
telnet : local
Usage Guide:
To authenticate the tacacs account via telnet only.
Example:
To authenticate the local and radius and tacacs account via telnet.
Switch# configure terminal
Switch (config)# aaa authentication login telnet local radius tacacs
4.2.13 access management
Command:
access management <AccessId : 1-16> <AccessVid : 1-4095> <AddrRangeStart : ipv4_addr | ipv6_addr> all | snmp | telnet | to | Web
<AccessId : 1-16> ID of access management entry
<AccessVid : 1-4095> The VLAN ID for the access management entry
<AddrRangeStart : ipv4_addr> Start IPv4 address
<AddrRangeStart : ipv6_addr> Start IPv6 address
all All services
snmp SNMP service
telnet TELNET/SSH service
to End address of the range
web Web service
Default:
access management : disable
Usage Guide:
To enable the access management profile to allow SNMP / Telnet / HTTP services.
Example:
To create a Profile 1 enabling all services for VLAN 1 (IPv6 address 2001::7788).
Switch# configure terminal
Switch (config)# access management 1 1 2001::7788 all
4.2.14 access-list ace
Command:
access-list ace <Aceld : 1-512> action {deny, permit} | dmac-type {any, broadcast, multicast, unicast} | frametype {any, arp, etype, ipv4, ipv4-icmp, ipv4-tcp, ipv4-udp, ipv6, ipv6-icmp, ipv6-tcp, ipv6-udp} | ingress {any, interface 10GigabitEthernet | GigabitEthernet <PORT_ID>} | logging {disable, next, policy, rate-limiter, shutdown, tag-priority, vid} | next {<Aceld : 1-512>, last} | policy <PolicyId : 0-255> | rate-limiter {<RateLimiterId : 1-16>, disable} | redirect {disable, interface 10GigabitEthernet | GigabitEthernet <PORT_ID>} | tag-priority {0-1, 0-3, 2-3, 4-5, 4-7, 6-7, <TagPriority : 0-7>, any} | vid {<Vid : 1-4095>, any}
| action | Access list action |
| dmac-type | The type of destination MAC address |
| frametype | Frame type |
| ingress | Ingress |
| logging | Logging frame information. Note: The logging feature only works when the packet length is less than 1518 (without VLAN tags) and the System Log memory size and logging rate are limited. |
| next | Insert the current ACE before the next ACE ID |
| policy | Policy |
| rate-limiter | Rate limiter |
| redirect | Redirect frame to specific port |
| shutdown | Shutdown incoming port. The shutdown feature only works when the packet length is less than 1518 (without VLAN tags). |
| tag-priority | Tag priority |
| vid | VID field |
Default:
N/A
Usage Guide:
To create and set up a profile for the access list.
Example:
To set a Profile 1 up (action: permit, dmac-type: unicast, frametype: ipv4-icmp, ingress: any, logging: disable, policy: 1, rate-limiter: 1, tag-priority: 1. vid: 1).
Switch# configure terminal
Switch (config)# access-list ace 1 action permit dmac-type unicast frametype ipv4-icmp ingress any logging disable policy 1 rate-limiter 1 tag-priority 1 vid 1
4.2.15 access-list ace update
Command:
access-list ace update <Aceld : 1-512> action {deny, permit} | dmac-type {any, broadcast, multicast, unicast} | frametype {any, arp, etype, ipv4, ipv4-icmp, ipv4-tcp, ipv4-udp, ipv6, ipv6-icmp, ipv6-tcp, ipv6-udp} | ingress {any, interface 10GigabitEthernet | GigabitEthernet <PORT_ID>} | logging {disable, next, policy, rate-limiter, shutdown, tag-priority, vid} | next {<Aceld : 1-512>, last}| policy <PolicyId : 0-255> | rate-limiter {<RateLimiterId : 1-16>, disable} | redirect {disable,
interface 10GigabitEthernet | GigabitEthernet
action Access list action
dmac-type The type of destination MAC address
frametype Frame type
ingress Ingress
logging Logging frame information. Note: The logging feature only
works when the packet length is less than 1518 (without
VLAN tags) and the System Log memory size and logging rate are limited.
next Insert the current ACE before the next ACE ID
policy Policy
rate-limiter Rate limiter
redirect Redirect frame to specific port
shutdown Shutdown incoming port. The shutdown feature only works
when the packet length is less than 1518 (without VLAN tags).
tag-priority Tag priority
vid VID field
Default:
N/A
Usage Guide:
To update the specific profile for the access list.
Example:
Original:
Profile 1 (action: permit, dmac-type: unicast, frametype: ipv4-icmp, ingress: any, logging: disable, policy: 1, rate-limiter: 1, tag-priority: 1. vid: 1).
Updated:
Profile 1 (action: deny, dmac-type: any, frametype: ipv4-icmp, ingress: any, logging: disable, policy: 1, rate-limiter: 1, tag-priority: 1. vid: 1).
Switch# configure terminal
Switch (config)# access-list ace update 1 action deny dmac-type any
4.2.16 access-list rate-limiter
Command:
access-list rate-limiter <RateLimiterList : 1~16> pps <PpsRate : 0-131071>
Default:
0
Usage Guide:
To set pps rate for specific rate-limiter ID.
Example:
To set pps rate(10000 pps) for specific rate-limiter ID 1.
Switch# configure terminal
Switch (config)# access-list rate-limiter 1 pps 10000
4.2.17 access-list rate-limiter pps
Command:
access-list rate-limiter pps <PpsRate : 0-131071>
Default:
0
Usage Guide:
To set pps rate for all rate-limiter ID.
Example:
To set pps rate(10000 pps) for all rate-limiter ID.
Switch# configure terminal
Switch (config)# access-list rate-limiter pps 100
4.2.18 aggregation mode
Command:
aggregation mode dmac | ip | port | smac
dmac Destination MAC affects the distribution
ip IP address affects the distribution
port IP port affects the distribution
smac Source MAC affects the distribution
Default:
SMAC : Enabled
DMAC : Disabled
IP : Enabled
Port : Enabled
Usage Guide:
To configure static aggregation mode type.
Example:
To configure static aggregation mode type with Destination MAC affects the distribution and Source MAC affects the distribution only.
Switch# configure terminal
Switch (config)# access-list rate-limiter pps 100
4.2.19 aggregation mode
Command:
aggregation mode dmac | ip | port | smac
dmac Destination MAC affects the distribution
ip IP address affects the distribution
port IP port affects the distribution
smac Source MAC affects the distribution
Default:
SMAC : Enabled
DMAC : Disabled
IP : Enabled
Port : Enabled
Usage Guide:
To configure static aggregation mode type.
Example:
To configure static aggregation mode type with Destination MAC affects the distribution and Source MAC affects the distribution only.
Switch# configure terminal
Switch (config)# access-list rate-limiter pps 100
4.2.20 banner
Command:
banner
Default:
N/A
Usage Guide:
To configure banner-text.
Example:
To configure banner-text with word "ddddd".
Switch# configure terminal
Switch (config)# banner 1
Enter TEXT message. End with the character '1'.
dddd
1
Telnet 192.168.0.100
dddd
Username:
4.2.21 banner exec
Command:
banner login <LINE>
Default:
N/A
Usage Guide:
To configure login banner-text.
Example:
To configure login banner-text with word "wwwwwwwwwwww".
Switch# configure terminal
Switch (config)# banner exec 1
Enter TEXT message. End with the character '1'.
ggggggg
1
Telnet 192.168.0.100:
Username: admin
Password:
ggggggg
#
4.2.22 banner login
Command:
banner login <LINE>
Default:
N/A
Usage Guide:
To configure login banner-text.
Example:
To configure login banner-text with word "wwwwwwwwwwww".
Switch# configure terminal
Switch (config)# banner login 1
Enter TEXT message. End with the character '1'.
WWWWWWWW
1
Console:
Press ENTER to get started
WWWWWWWWWW
Username: admin
Password:
4.2.23 banner motd
Command:
banner motd
Default:
N/A
Usage Guide:
To configure motd banner-text.
Example:
To configure motd banner-text with word "ffffff".
Switch# configure terminal
Switch (config)# banner motd 1
Enter TEXT message. End with the character '1'.
fffff
1
Console:
ffff
Press ENTER to get started
Username:
4.2.24 clock summer-time
Command:
clock summer-time <WORD> date <Monthstart: 1-12> <Daystart: 1-31> <Yearstart: 1-12> <Timestart: hh:mm> <Monthend: 1-12> <Dayend: 1-31> <Yearend: 1-12> <Timeend: hh:mm> <Offset minutes: 1-1440>
Default:
N/A
Usage Guide:
To set daylight saving.
Example:
To set daylight saving (Started time: Feb, 3. 2013 8:8AM, End time: Dec, 31. 2013 8:8AM, Offset time: 60 minutes).
Switch# configure terminal
Switch (config)# clock summer-time 1 date 2 3 2013 8:8 12 31 2013 8:8 60
4.2.25 clock time zone
Command:
clock timezone
Default:
0
Usage Guide:
To set time zone.
Example:
To set time zone (GMT -15) with profile 1.
Switch# configure terminal
Switch (config)# clock timezone 1 -15
4.2.26 default access-list rate-limiter
Command:
default access-list rate-limiter
Default:
0
Usage Guide:
To default the Rate limiter.
Example:
To default the Rate limiter ID 1.
Switch# configure terminal
Switch (config)# default access-list rate-limiter 1
4.2.27 dot1x authentication timer inactivity
Command:
dot1x authentication timer inactivity <10-1000000>
Default:
Aging period: 300
Usage Guide:
To set the Aging period for Network Access Server.
Example:
To set the Aging period (147 seconds).
Switch# configure terminal
Switch (config)# dot1x authentication timer inactivity 147
4.2.28 dot1x authentication timer re-authenticate
Command:
dot1x authentication timer re-authenticate <1-3600>
Default:
Re-authenticated Period: 3600
Usage Guide:
To set the Re-authenticated Period for Network Access Server.
Example:
To set the Re-authenticated Period (777 seconds).
Switch# configure terminal
Switch (config)# dot1x authentication timer re-authenticate 777
4.2.29 dot1x feature
Command:
dot1x feature guest-vlan | radius-qos | radius-vlan
Default:
Disable
Usage Guide:
To enable the guest-vlan, radius-qos, radius-vlan for Network Access Server
Example:
To enable the guest-vlan, radius-qos, radius-vlan for Network Access Server.
Switch# configure terminal
Switch (config)# dot1x authentication timer re-authenticate 777
4.2.30 dot1x guest-vlan
Command:
dot1x guest-vlan <1-4095>
<1-4095> Guest VLAN ID used when entering the Guest VLAN.
Default:
1
Usage Guide:
To set the value of guest-vlan for Network Access Server
Example:
To set the value of guest-vlan(2) for Network Access Server
Switch# configure terminal
Switch (config)# dot1x guest-vlan 2
4.2.31 dot1x guest-vlan supplicant
Command:
dot1x guest-vlan supplicant
supplicant The switch remembers if an EAPOL frame has been received on the port for the life-time of the port. Once the switch considers whether to enter the Guest VLAN, it will first check if this option is enabled or disabled.
Default:
Disable
Usage Guide:
To allow all frames automatically entering guest-vlan for Network Access Server
Example:
To allow all frames automatically entering guest-vlan for Network Access Server
Switch# configure terminal
Switch (config)# dot1x guest-vlan supplicant
4.2.32 dot1x max-reauth-req
Command:
dot1x max-reauth-req <1-255>
Default:
2
Usage Guide:
To define 802.1X re-authentication frequency for Network Access Server
Example:
To define 802.1X re-authentication frequency with 78 times for Network Access Server
Switch# configure terminal
Switch (config)# dot1x max-reauth-req 78
4.2.33 dot1x system-auth-control
Command:
dot1x system-auth-control
Default:
Disable
Usage Guide:
To enable 802.1X service for Network Access Server
Example:
To enable 802.1X service for Network Access Server
Switch# configure terminal
Switch (config)# dot1x system-auth-control
4.2.34 dot1x timeout quiet-period
Command:
dot1x timeout quiet-period <10-1000000>
quiet-period Time in seconds before a MAC-address that failed authentication gets a new authentication chance.
Default:
10
Usage Guide:
To configure 802.1X hold time for Network Access Server
Example:
To configure 802.1X hold time(12 seconds) for Network Access Server
Switch# configure terminal
Switch (config)# dot1x timeout quiet-period 12
4.2.35 dot1x timeout tx-period
Command:
dot1x timeout tx-period <1-65535>
tx-period
The time between EAPOL retransmissions.
Default:
30
Usage Guide:
To configure 802.1X EPOAL timeout for Network Access Server
Example:
To configure 802.1X EPOAL timeout (45 seconds) for Network Access Server
Switch# configure terminal
Switch (config)# dot1x timeout tx-period 45
4.2.36 enable password
Command:
enable password
The UNENCRYPTED (cleartext) password.
Default:
Disable
Usage Guide:
To configure enable password for user
Example:
To configure enable password(admin) for user
Switch# configure terminal
Switch (config)# enable password admin
Press ENTER to get started
Username:
Password:
> enable
Password: *****
#
4.2.37 enable password level
Command:
enable password level <1-15> <WORD>
<1-15> Level number
<WORD> The UNENCRYPTED (cleartext) password.
Default:
Disable
Usage Guide:
To configure enable password and specific level for user
Example:
To configure enable password(admin) and specific level(15) for user
Switch# configure terminal
Switch (config)# enable password level 15 admin
Press ENTER to get started
Username:
Password:
> enable
Password: admin
#
4.2.38 enable secret
Command:
enable secret 0 | 5 level <1-15> <WORD>
0 Specifies an UNENCRYPTED password will follow
5 Specifies an ENCRYPTED secret will follow
<1-15> Level number
<WORD> The UNENCRYPTED (cleartext) / ENCRYPTED(MD5) password.
Default:
Disable
Usage Guide:
To configure enable password to encrypted secret in the system configurations and specific level for user
Example:
To configure enable password(cisco) to encrypted secret in the system configurations and specific level(15) for user
Switch# configure terminal
Switch (config)# enable secret 0 level 15 cisco
# show running-config
Building configuration...
enable secret 5 level 15 FC89368B9513DE0760290BCE9A1DA90A
......
Press ENTER to get started
Username:
Password:
enable
Password: cisco
#
4.2.39 end
Command:
end
Default:
N/A
Usage Guide:
To level the configure terminal mode
Example:
To level the configure terminal mode
Switch# configure terminal
Switch (config)# end
#
4.2.40 erps <1-64> guard
Command:
erps <1-64> guard <10-2000>
<1-64> ERPS group number
<10-2000> Guard time in ms
Default:
500
Usage Guide:
To configure the Guard Time for ERPS.
Example:
To configure the Guard Time(178 ms) for ERPS(Profile 1)
Switch# configure terminal
Switch (config)# erps 1 guard 178
4.2.41 erps <1-64> holdoff
Command:
erps <1-64> holdoff <0-10000>
<1-64> ERPS group number
< 0-10000> Holdoff time in ms
Default:
0
Usage Guide:
To configure the Hold Off Time for ERPS
Example:
To configure the Hold Off Time (178 ms) for ERPS(Profile 1)
Switch# configure terminal
Switch (config)# erps 1 holdoff 900
4.2.42 erps <1-64> major
Command:
erps <1-64> major port0 interface {10GigabitEthernet, GigabitEthernet} <PORT0_ID> port1 interface {10GigabitEthernet, GigabitEthernet} <PORT1_ID> [interconnect]
<1-64> ERPS group number
interconnect Major ring is interconnected
Default:
0
Usage Guide:
To create a profile and configure the Major ERPS interface port 0, port 1.
Example:
To create a profile 1 and configure the Major ERPS interface port 0(GigabitEthernet 1/1), port 1(GigabitEthernet 1/2) without interconnected mode
Switch# configure terminal
Switch (config)# erps 1 major port0 interface GigabitEthernet 1/1 port1 interface
GigabitEthernet 1/2
4.2.43 erps <1-64> mep
Command:
erps <1-64> mep port0 sf <p0_sf: 1-100>aps <p0_aps: 1-100> port1 sf <p1_sf: 1-100>aps <p1_aps: 1-100>
<1-64> ERPS group number
<p0_sf: 1-100> Index of Port 0 SignalFail MEP
<p0_aps: 1-100> Index of Port 0 APS MEP
<p1_sf: 1-100> Index of Port 1 SignalFail MEP
<p1_aps: 1-100> Index of Port 1 APS MEP
Default:
0
Usage Guide:
To configure ERPS Instance Data for specific ERPS profile.
Example:
To configure ERPS Instance Data(Port0: SF MEP = 2, APS MEP = 1. Port1: SF MEP = 4, APS MEP = 3) for specific ERPS profile(1).
Switch# configure terminal
Switch (config)# erps 1 mep port0 sf 2 aps 1 port1 sf 4 aps 3
4.2.44 erps <1-64> mep
Command:
erps <1-64> revertive <wtr_time_minutes: 1-12>
<1-64> ERPS group number
<wtr_time_minutes: 1-12> Wait-to-restore time in minutes
Default:
0
Usage Guide:
To configure WTR time for specific ERPS profile.
Example:
To configure WTR time(5 minutes) for specific ERPS profile 1.
Switch# configure terminal
Switch (config)# erps 1 revertive 5
4.2.45 erps <1-64> rpl neighbor
Command:
erps <1-64> rpl neighbor { port0 | port1 }
port0 ERPS Port 0 interface
port1 ERPS Port 1 interface
Default:
N/A
Usage Guide:
To configure Ring Protection Link Neighbor Role for specific ERPS interface.
Example:
To configure Ring Protection Link Neighbor Role for specific ERPS interface..
Switch# configure terminal
Switch (config)# erps 1 rpl neighbor port0
4.2.46 erps <1-64> rpl owner
Command:
erps <1-64> rpl owner { port0 | port1 }
port0 ERPS Port 0 interface
port1 ERPS Port 1 interface
Default:
N/A
Usage Guide:
To configure Ring Protection Link Owner Role for specific ERPS interface.
Example:
To configure Ring Protection Link Owner Role for specific ERPS interface..
Switch# configure terminal
Switch (config)# erps 1 rpl owner port0
4.2.47 erps <1-64> sub
Command:
erps <1-64> sub port0 interface {10GigabitEthernet, GigabitEthernet} <PORT0_ID> { { port0 interface {10GigabitEthernet, GigabitEthernet} <PORT1_ID> }, {interconnect <major_ring_id: 1-64> [ virtual-channel ] } }
<1-64> ERPS group number
interconnect Sub ring is interconnected
<major_ring_id: 1-64> Major ring group number
virtual-channel Enable virtual channel for sub-ring
Default:
0
Usage Guide:
To create a profile and configure the Sub ERPS interface port 0, port 1.
Example 1:
To create a profile 3 and configure the Sub ERPS interface port 0(GigabitEthernet 1/5), port 1(GigabitEthernet 1/6) without interconnected mode and Major Ring group and virtual-channel
Switch# configure terminal
Switch (config)# erps 3 sub port0 interface GigabitEthernet 1/5 port1 interface GigabitEthernet 1/6
Example 2:
To create a profile 2 and configure the Sub ERPS interface port 0(GigabitEthernet 1/3), port 1(GigabitEthernet 1/4) with interconnected mode and Major Ring group 1 and virtual-channel
Switch# configure terminal
Switch (config)# erps 1 sub port0 interface GigabitEthernet 1/3 interconnect 1 virtual-channel
4.2.48 erps <1-64> topology-change propagate
Command:
erps <1-64> topology-change propagate
<1-64> ERPS group number
topology-change Topology Change
propagate Propagate
Default:
N/A
Usage Guide:
To configure topology change notification (TCN) propagation for the specific profile.
Example:
To configure topology change notification (TCN) propagation for the specific profile 1
Switch# configure terminal
Switch (config)# erps 1 topology-change propagate
4.2.49 erps <1-64> topology-change propagate
Command:
erps <1-64> version 1 | 2
<1-64>
ERPS group number
version
Version
Default:
V2
Usage Guide:
To configure ERPS version number for the specific profile.
Example:
To configure ERPS version 1 for the specific profile 1.
Switch# configure terminal
Switch (config)# erps 1 version 1
4.2.50 erps <1-64> vlan
Command:
erps <1-64> vlan { none | [ add | remove ]
<1-64>
ERPS group number
List of VLANs
add
Add to set of included VLANs
none
Do not include any VLANs
remove
Remove from set of included VLANs
Default:
V2
Usage Guide:
To configure ERPS VLANs for the specific profile.
Example:
To configure ERPS VLANs(VLAN5 - VLAN8) for the specific profile 1.
Switch# configure terminal
Switch (config)# erps 1 vlan add 5-8
4.2.51 evc
Command:
evc <EvcId : 1-4096> vid <evc_vid> ivid <ivid> interface ( * | 10GigabitEthernet | GigabitEthernet [ <port_list> ] ) learning [ disable ] policer { <PolicerId : 1-2048> | none | discard }
learning Setup learning
policer Policer (ingress bandwidth profile)
discard Map to policer discarding all frames
none Map to policer allowing all frames
Default:
0
Usage Guide:
To configure Ethernet Virtual Circuits (EVC).
Example:
To configure Ethernet Virtual Circuits (EVC identifier: 1, EVC VLAN ID: 2, GigabitEthernet Port: 1/1, 1/2, Internal VLAN ID: 3, Disable learning, Policer ID: 4).
Switch# configure terminal
Switch (config)# evc 1 vid 2 interface GigabitEthernet 1/1-2 ivid 3 learning disable policer 4
4.2.52 evc ece
Command:
evc ece <Eceld : 1-4096> direction {both | nni-to-uni | uni-to-nni} evc {<Evcld : 1-4096> | none} frame-type {any | ipv4 | ipv6} inner-tag { add {dei <AddDei : 0-1> | pcp <AddPcp : 0-7> | preserve | type [c-tag | none | s-custom-tag | s-tag] | vid <AddVid : vlan_id>}, match {dei [<MatchDei : 0-1> | any]| pcp [<MatchPcp : pcp> | any] | type [any | c-tagged | s-tagged | tagged | untagged] | vid [<Vid : 0-4095> | any]} } interface [* | 10GigabitEthernet | GigabitEthernet] <PORT_ID> next [<Eceld : 1-4096> | last] outer-tag { add {dei <AddDei : 0-1> | pcp <AddPcp : 0-7> | preserve | type [c-tag | none | s-custom-tag | s-tag] | vid <AddVid : vlan_id>}, match {dei [<MatchDei : 0-1> | any]| pcp [<MatchPcp : pcp> | any] | mode [disable | enable] | vid [<Vid : 0-4095> | any]} policer {<PolicerId : 1-2048> | discard | evc | none} policy <PolicyNo : 0-255> pop <Pop : 0-2>
direction Setup ECE direction
both Bidirectional traffic flow
nni-to-uni NNI-to-UNI traffic flow
uni-to-nni UNI-to-NNI traffic flow
evc EVC mapping
none Map to no EVC ID
frame-type Setup matched frame type
any Match any frame type
ipv4 Match IPv4 frames
ipv6 Match IPv6 frames
inner-tag Setup inner tag options
add Setup inner tag add properties.
pcp Setup added tag PCP
preserve Setup tag PCP/DEI preservation
type Setup added tag type
c-tag Add C-tag
none No tag added
s-custom-tag Add custom S-tag
s-tag Add S-tag
vid Setup added tag VLAN ID
match Setup inner tag match properties
pcp Setup matched PCP
any Match any PCP
type Setup matched tag type
any Match tagged and untagged frames
c-tagged Match C-tagged frames
s-tagged Match S-tagged frames
tagged Match tagged frames
untagged Match untagged frames
vid Setup matched VLAN ID
any Match any VLAN ID
interface Setup UNI
next Setup the ECE ID of the next entry
last Make the ECE the last entry
outer-tag Setup outer tag options
add Setup outer tag add properties
disable No tag added when forwarding to UNI
enable Add tag when forwarding to UNI
pcp Setup added tag PCP
preserve Setup tag PCP/DEI preservation
vid Setup added tag VLAN ID
match Setup outer tag match properties
policer Policer (ingress bandwidth profile)
discard Map to policer discarding all frames
evc Use policer setup for EVC
none Map to policer allowing all frames
policy Setup ACL policy
pop Setup tag popping
Default:
N/A
Usage Guide:
To configure EVC Control Entry.
Example:
To configure EVC Control Entry as tabled below.
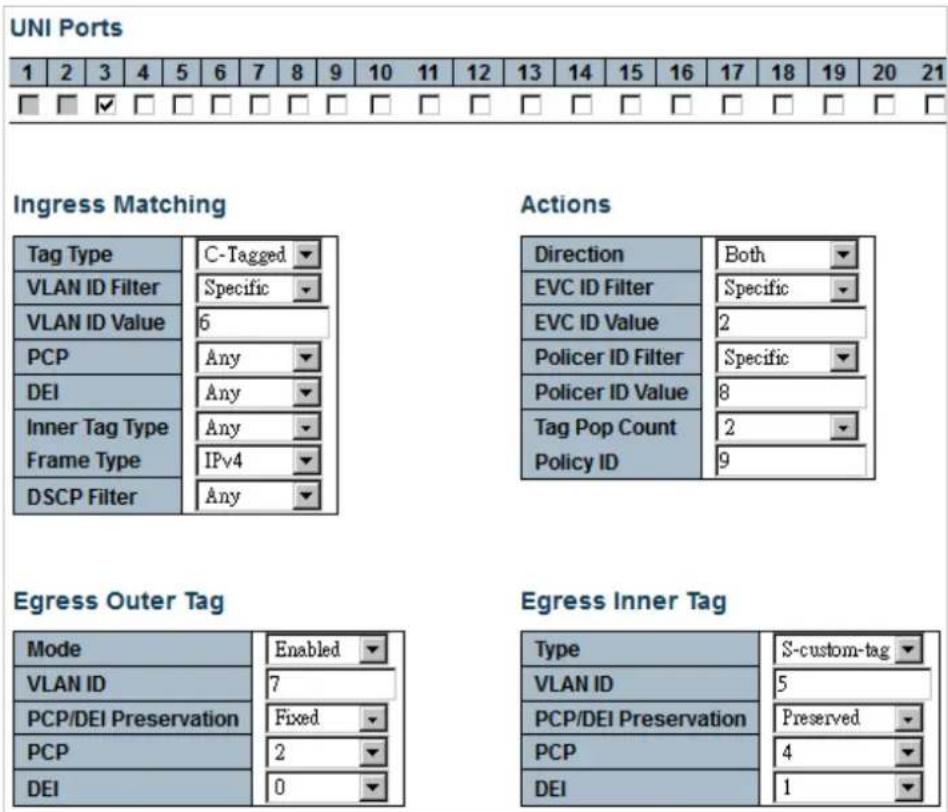
Switch# configure terminal
Switch (config)# evc ece 1 direction both evc 2 frame-type ipv4 inner-tag add dei 1 pcp 4 preserve type s-custom-tag vid 5 interface GigabitEthernet 1/3 outer-tag add dei 0 mode enable pcp 2 vid 7 match dei any pcp any type c-tagged vid 6 policer 8 policy 9 pop 2
4.2.53 evc ece update
Command:
evc ece update <Eceld : 1-4096> direction {both | nni-to-uni | uni-to-nni} evc {{<Evcld : 1-4096> | none} frame-type {any | ipv4 | ipv6} inner-tag { add {dei <AddDei : 0-1> | pcp <AddPcp : 0-7> | preserve | type [c-tag | none | s-custom-tag | s-tag] | vid <AddVid : vlan_id>}, match {dei [<MatchDei : 0-1> | any]| pcp [<MatchPcp : pcp> | any] | type [any | c-tagged | s-tagged | tagged | untagged] | vid [<Vid : 0-4095> | any]} } interface [* | 10GigabitEthernet | GigabitEthernet] <PORT_ID> next [<Eceld : 1-4096> | last] outer-tag { add {dei <AddDei : 0-1> | pcp <AddPcp : 0-7> | preserve | type [c-tag | none | s-custom-tag | s-tag] | vid <AddVid : vlan_id>}, match {dei [<MatchDei : 0-1> | any]| pcp [<MatchPcp : pcp> | any] | mode [disable | enable] | vid [<Vid : 0-4095> | any]} } policer {{<PolicerId : 1-2048> | discard | evc | none} policy <PolicyNo : 0-255> pop <Pop : 0-2>
direction Setup ECE direction
both Bidirectional traffic flow
nni-to-uni NNI-to-UNI traffic flow
uni-to-nni UNI-to-NNI traffic flow
evc EVC mapping
none Map to no EVC ID
frame-type Setup matched frame type
any Match any frame type
ipv4 Match IPv4 frames
ipv6 Match IPv6 frames
inner-tag Setup inner tag options
add Setup inner tag add properties.
pcp Setup added tag PCP
preserve Setup tag PCP/DEI preservation
type Setup added tag type
c-tag Add C-tag
none No tag added
s-custom-tag Add custom S-tag
s-tag Add S-tag
vid Setup added tag VLAN ID
match Setup inner tag match properties
pcp Setup matched PCP
any Match any PCP
type Setup matched tag type
any Match tagged and untagged frames
c-tagged Match C-tagged frames
s-tagged Match S-tagged frames
tagged Match tagged frames
untagged Match untagged frames
vid Setup matched VLAN ID
any Match any VLAN ID
interface Setup UNI
next Setup the ECE ID of the next entry
last Make the ECE the last entry
outer-tag Setup outer tag options
add Setup outer tag add properties
disable No tag added when forwarding to UNI
enable Add tag when forwarding to UNI
pcp Setup added tag PCP
preserve Setup tag PCP/DEI preservation
vid Setup added tag VLAN ID
match Setup outer tag match properties
policer Policer (ingress bandwidth profile)
discard Map to policer discarding all frames
evc Use policer setup for EVC
none Map to policer allowing all frames
policy Setup ACL policy
pop Setup tag popping
Default:
N/A
Usage Guide:
To update EVC Control Entry for specific ECE profile.
Example 1:
To update "direction nni-to-uni" for ECE profile 1.
Switch# configure terminal
Switch (config)# evc ece 1 direction nni-to-uni
4.2.54 evc policer
Command:
evc policer <PolicerId : 1-2048> [enable | disable] cbs <Cbs : 0-100000> cir <Cir : 0-10000000> ebs <Ebs : 0-100000> eir <Eir : 0-10000000> mode [aware | blind | coupled] rate-type [data | line] type [mef | single]
cbs Setup CBS
cir Setup CIR
disable Disable policer
ebs Setup EBS for MEF policer
eir Setup EIR for MEF policer
enable Enable policer
mode Setup policer mode
aware Color-aware mode
blind Color-blind mode
coupled Coupling mode
rate-type Setup rate type
data Data rate policing
line Line rate policing
type Setup policer type
mef MEF ingress bandwidth profile
single Single bucket policer
Default:
N/A
Usage Guide:
To configure a profile for EVC Policer (Ingress Bandwidth Profile).
Example:
To configure EVC Policer (Ingress Bandwidth Profile) as tabled below.
| Policer ID | State | Type | Policer Mode | Rate Type | CIR (kbps) | CBS (bytes) | EIR (kbps) | EBS (bytes) |
| 1 | Enabled | MEF | Aware | Data | 30 | 20 | 50 | 40 |
Switch# configure terminal
Switch (config)# evc policer 1 enable cbs 20 cir 30 ebs 40 eir 50 mode aware rate-type data type mef
4.2.55 evc policer update
Command:
evc policer update <PolicerId : 1-2048> [enable | disable] cbs <Cbs : 0-100000> cir <Cir : 0-10000000> ebs <Ebs : 0-100000> eir <Eir : 0-10000000> mode [aware | blind | coupled] rate-type [data | line] type [mef | single]
Policer ID
cbs Setup CBS
cir Setup CIR
disable Disable policer
ebs Setup EBS for MEF policer
eir Setup EIR for MEF policer
enable Enable policer
mode Setup policer mode
aware Color-aware mode
blind Color-blind mode
coupled Coupling mode
rate-type Setup rate type
data Data rate policing
line Line rate policing
type Setup policer type
mef MEF ingress bandwidth profile
single Single bucket policer
Default:
N/A
Usage Guide:
To update a profile for EVC Policer (Ingress Bandwidth Profile).
Example:
To update EVC Policer (Ingress Bandwidth Profile) with EIR 1000 for policer 1
Switch# configure terminal
Switch (config)# evc policer update 1 eir 1000
4.2.56 evc update
Command:
evc update <EvcId : 1-4096> vid <evc_vid> ivid <ivid> interface ( * | 10GigabitEthernet | GigabitEthernet [ <port_list> ] ) learning [ disable ] policer { <PolicerId : 1-2048> | none | discard }
learning Setup learning
policer Policer (ingress bandwidth profile)
discard Map to policer discarding all frames
none Map to policer allowing all frames
Default:
0
Usage Guide:
To update an ID for Ethernet Virtual Circuits (EVC).
Example:
To update Ethernet Virtual Circuits (EVC identifier: 1, EVC VLAN ID: 10).
Switch# configure terminal
Switch (config)# evc update 1 vid 10
4.2.57 exit
Command:
exit
Default:
N/A
Usage Guide:
To exit configure terminal mode.
Example:
To exit configure terminal mode.
Switch# configure terminal
Switch (config)# exit
#
4.2.58 green-ethernet led interval
Command:
green-ethernet led interval <0\~24> intensity <0-100>
<0\~24> Interval from 00.00 to 24.00 (00 is used to start at midnight, while 24 is used to stop at midnight).
intensity LEDs intensity.
<0-100> Intensity from 0% (LEDs OFF) to 100%
Default:
N/A
Usage Guide:
To configure LED Power reduction for interval time.
Example:
To configure LED Power reduction as tabled below.
| Start Time | End Time | Intensity | |||
| 08:00▼ | 13:00▼ | 80▼ | % | ||
| 13:00▼ | 08:00▼ | 20▼ | % | ||
Switch# configure terminal
Switch (config)# green-ethernet led interval 8-13 intensity 80
4.2.59 green-ethernet led on-event
Command:
green-ethernet led on-event error | link-change <0-65535>
error Set LEDs intensity to 100% if an error occurs.
link-change Specifies how long to turn LEDs intensity into 100%, when a link changes state.
<0-65535> Number of seconds to set LEDs intensity at 100% at link change.
Default:
N/A
Usage Guide:
To configure LED Power on-event to trigger LED light
Example:
To configure LED Power on-event as tabled below:
| On time at link change | On at errors | |
| 55 | Sec. | ☑ |
Switch# configure terminal
Switch (config)# green-ethernet led on-event error link-change 55
4.2.60 gvrp
Command:
gvrp
Default:
Disable
Usage Guide:
To enable GVRP.
Example:
To enable GVRP.
Switch# configure terminal
Switch (config)# gvrp
4.2.61 gvrp max-vlans
Command:
gvrp max-vlans <1-4095>
Default:
20
Usage Guide:
To configure how many VLANs will be in GVRP.
Example:
To configure 200 VLANs in GVRP.
Switch# configure terminal
Switch (config)# gvrp max-vlans 200
4.2.62 gvrp time
Command:
gvrp time join-time <Jointime : 1-20> leave-all-time <Leavealltime : 1000-5000>
leave-time <Leavetime : 60-300>
join-time Set GARP protocol parameter JoinTime. See IEEE 802.1D-2004, clause 12.11
leave-all-time Set GARP protocol parameter LeaveAllTime. See IEEE 802.1D-2004, clause 12.11
leave-time Set GARP protocol parameter LeaveTime. See IEEE 802.1D-2004, clause 12.11
Default:
| Join-time: | 20 |
| Leave-time: | 60 |
| LeaveAll-time: | 1000 |
Usage Guide:
To configure Join-time, Leave-time, Leave all-time for GVRP.
Example:
To configure Join-time, Leave-time, Leave all-time for GVRP as tabled below.
| Join-time: | 5 |
| Leave-time: | 150 |
| LeaveAll-time: | 1200 |
Switch# configure terminal
Switch (config)# gvrp time join-time 5 leave-all-time 1200 leave-time 150
4.2.63 help
Command:
help
Default:
N/A
Usage Guide:
To explain how to use commands.
Example:
To explain how to use commands.
Switch# configure terminal
Switch (config)# help
Help may be requested at any point in a command by entering a question mark '?' If nothing matches, the help list will be empty and you must back up until entering a '?' showing the available options.
Two styles of help are provided:
- Full help is available when you are ready to enter a command argument (e.g. 'show ?') and describes each possible argument.
- Partial help is provided when an abbreviated argument is entered and you want to know what arguments match the input (e.g. 'show pr?').
4.2.64 hostname
Command:
hostname < WORD >
< WORD > This system's network name
Default:
N/A
Usage Guide:
To configure switch's hostname.
Example:
To configure switch's hostname with "planetbestswitch"
Switch# configure terminal
Switch (config)# hostname planetbestswitch
planetbestswitch(config)#
4.2.65 interface \* | 10GigabitEthernet | GigabitEthernet
Command:
interface * | 10GigabitEthernet
*
All switches or All ports
GigabitEthernet
1 Gigabit Ethernet Port
10GigabitEthernet
10 Gigabit Ethernet Port
Default:
N/A
Usage Guide:
To enter the interface mode.
Example:
To enter the interface 10GigabitEthernet 1/2
Switch# configure terminal
Switch (config)# interface 10GigabitEthernet 1/2
Switch (config-if) #
4.2.65.1 access-list action permit
Command:
access-list action permit
action
Access list action
Default:
Permit
Usage Guide:
To configure Permit for the ACL action.
Example:
To configure Permit ACL action for the GigabitEthernet X/X.
Switch# configure terminal
Switch (config)# interface GigabitEthernet X/X
Switch (config-if) # access-list action permit
4.2.65.2 access-list action deny
Command:
access-list action deny
action
Access list action
Default:
Deny
Usage Guide:
To configure Deny for the ACL action.
Example:
To configure Deny ACL action for the GigabitEthernet X/X.
Switch# configure terminal
Switch (config)# interface GigabitEthernet X/X
Switch (config-if) # access-list action deny
4.2.65.3 access-list logging
Command:
access-list logging
logging
Logging frame information. Note: The logging feature only works when the packet length is less than 1518 (without VLAN tags) and the System Log memory size and logging rate is limited.
Default:
Disable
Usage Guide:
To enable Logging function for the ACL.
Example:
To enable ACL Logging function for the GigabitEthernet X/X.
Switch# configure terminal
Switch (config)# interface GigabitEthernet X/X
Switch (config-if) # access-list logging
4.2.65.4 access-list policy
Command:
access-list policy <PolicyId : 0-255>
policy
Policy
Policy ID
Default:
Policy ID: 0
Usage Guide:
To configure Policy ID for the ACL.
Example:
To configure ACL Policy ID 1 for the GigabitEthernet X/X.
Switch# configure terminal
Switch (config)# interface GigabitEthernet X/X
Switch (config-if) # access-list policy 1
4.2.65.5 access-list port-state
Command:
access-list port-state
port-state
Re-enable shutdown port that was shutdown by access-list module
Default:
Enable
Usage Guide:
To enable Port-state function for the ACL.
Example:
To configure ACL Port-state function for the GigabitEthernet X/X.
Switch# configure terminal
Switch (config)# interface GigabitEthernet X/X
Switch (config-if) # access-list port-state
4.2.65.6 access-list rate-limiter
Command:
access-list rate-limiter <RateLimiterId : 1-16>
rate-limiter Rate limiter
Default:
Disable
Usage Guide:
To apply Rate Limiter ID for the ACL.
Example:
To apply ACL Rate Limiter ID 1 for the GigabitEthernet X/X.
Switch# configure terminal
Switch (config)# interface GigabitEthernet X/X
Switch (config-if) # access-list rate-limiter 1
4.2.65.7 access-list redirect interface
Command:
access-list redirect interface 10GigabitEthernet <port_type_list> | GigabitEthernet <port_type_list>
redirect Redirect frame to specific port
Default:
Disable
Usage Guide:
To redirect frames to specific Port.
Example:
To redirect GigabitEthernet X/X frames to GigabitEthernet 1/2.
Switch# configure terminal
Switch (config)# interface GigabitEthernet X/X
Switch (config-if) # access-list redirect interface GigabitEthernet 1/2
4.2.65.8 access-list shutdown
Command:
access-list shutdown
shutdown Shut down incoming port. The shutdown feature only works when the packet length is less than 1518 (without VLAN tags).
Default:
Disable
Usage Guide:
To enable Shutdown function for the ACL.
Example:
To enable ACL Shutdown function for the GigabitEthernet X/X.
Switch# configure terminal
Switch (config)# interface GigabitEthernet X/X
Switch (config-if) # access-list shutdown
4.2.65.9 aggregation group
Command:
aggregation group
aggregation
Create an aggregation
group
Create an aggregation group
The aggregation group id
Default:
N/A
Usage Guide:
To configure aggregation group.
Example:
To configure aggregation group 7 for the GigabitEthernet X/X.
Switch# configure terminal
Switch (config)# interface GigabitEthernet X/X
Switch (config-if) # aggregation group 7
4.2.65.10 description
Command:
description <string>
description
Port description
Default:
N/A
Usage Guide:
To configure port description.
Example:
To configure port description (IPTV_Port) for the GigabitEthernet X/X.
Switch# configure terminal
Switch (config)# interface GigabitEthernet X/X
Switch (config-if) # description IPTV_Port
4.2.65.11 do
Command:
do < exec commands >
do To run exec commands in config mode
Default:
N/A
Usage Guide:
To run exec commands in configure terminal mode
Example:
To run "show aaa" in configure terminal mode.
Switch# configure terminal
Switch (config)# interface GigabitEthernet X/X
Switch (config-if) # do show aaa
console : local
telnet : local
ssh : local
http : local
4.2.65.12 dot1x guest-vlan
Command:
dot1x guest-vlan
dot1x
IEEE Standard for port-based Network Access Control
guest-vlan
Enables/disables guest VLAN
Default:
Disable
Usage Guide:
To enable Guest VLAN
Example:
To enable Guest VLAN for GigabitEthernet X/X.
Switch# configure terminal
Switch (config)# interface GigabitEthernet X/X
Switch (config-if) # dot1x guest-vlan
4.2.65.13 dot1x port-control
Command:
dot1x port-control auto | force-authorized | force-unauthorized | mac-based | multi | single
dot1x
IEEE Standard for port-based Network Access Control
port-control
Sets the port security state.
auto
Port-based 802.1X Authentication
force-authorized
Port access is allowed
force-unauthorized
Port access is not allowed
mac-based
Switch authenticates on behalf of the client
multi
Multiple Host 802.1X Authentication
single
Single Host 802.1X Authentication
Default:
Force-authorized
Usage Guide:
To configure Port-control mode for 802.1X
Example:
To configure Port-Based 802.1X(Auto) mode for GigabitEthernet X/X.
Switch# configure terminal
Switch (config)# interface GigabitEthernet X/X
Switch (config-if) # dot1x port-control auto
4.2.65.14 dot1x radius-qos
Command:
dot1x radius-qos
dot1x
IEEE Standard for port-based Network Access Control
radius-qos
Enables/disables per-port state of RADIUS-assigned QoS.
Default:
Disable
Usage Guide:
To enable RADIUS-assigned QoS for 802.1X
Example:
To enable RADIUS-assigned QoS for GigabitEthernet X/X.
Switch# configure terminal
Switch (config)# interface GigabitEthernet X/X
Switch (config-if) # dot1x radius-qos
4.2.65.15 dot1x radius-vlan
Command:
dot1x radius-vlan
dot1x
IEEE Standard for port-based Network Access Control
radius-vlan
Enables/disables per-port state of RADIUS-assigned VLAN.
Default:
Disable
Usage Guide:
To enable RADIUS-assigned VLAN for 802.1X
Example:
To enable RADIUS-assigned VLAN for GigabitEthernet X/X.
Switch# configure terminal
Switch (config)# interface GigabitEthernet X/X
Switch (config-if) # dot1x radius-vlan
4.2.65.16 dot1x re-authenticate
Command:
dot1x re-authenticate
dot1x
IEEE Standard for port-based Network Access Control
re-authenticate
Refresh (restart) 802.1X authentication process.
Default:
N/A
Usage Guide:
To restart 802.1X authentication process.
Example:
To restart 802.1X authentication process for GigabitEthernet X/X.
Switch# configure terminal
Switch (config)# interface GigabitEthernet X/X
Switch (config-if) # dot1x re-authenticate
4.2.65.17 duplex
Command:
duplex auto | full | half
duplex Interface duplex
auto Auto negotiation of duplex mode.
full Forced full duplex.
half Forced half duplex.
Default:
Auto
Usage Guide:
To configure duplex mode for interface.
Example:
To configure auto duplex mode for GigabitEthernet X/X.
Switch# configure terminal
Switch (config)# interface GigabitEthernet X/X
Switch (config-if) # duplex auto
4.2.65.18 end
Command:
end
end Go back to EXEC mode
Default:
Auto
Usage Guide:
To back to EXEC mode
Example:
To back to EXEC mode
Switch# configure terminal
Switch (config)# interface GigabitEthernet X/X
Switch (config-if) # end
Switch#
4.2.65.19 evc dei
Command:
colored Allow policer to set DEI
fixed Use classified DEI
Default:
Fixed
Usage Guide:
To configure EVC DEI mode
Example:
To configure EVC DEI mode (Colored) for GigabitEthernet X/X.
Switch# configure terminal
Switch (config)# interface GigabitEthernet X/X
Switch (config-if) # evc dei colored
4.2.65.20 evc l2cp discard(GG)
Command:
evc l2cp discard
evc Ethernet Virtual Connections
I2cp Setup L2CP forwarding
discard Discard L2CP frames
Default:
N/A
Usage Guide:
To configure policy ID of L2CP discard
Example:
To configure policy ID 1 of L2CP discard for GigabitEthernet X/X.
Switch# configure terminal
Switch (config)# interface GigabitEthernet X/X
Switch (config-if) # evc l2cp discard 1
4.2.65.21 evc l2cp forward(GG)
Command:
evc l2cp forward
evc Ethernet Virtual Connections
I2cp Setup L2CP forwarding
forward Allow forwarding of L2CP frames
Default:
N/A
Usage Guide:
To configure policy ID of L2CP forward
Example:
To configure policy 1 for L2CP forward for GigabitEthernet X/X
Switch# configure terminal
Switch (config)# interface GigabitEthernet X/X
Switch (config-if) # evc l2cp forward 1
4.2.65.22 evc l2cp peer(GG)
Command:
evc l2cp forward
evc Ethernet Virtual Connections
I2cp Setup L2CP forwarding
peer Redirect L2CP frames to local protocol entity
Default:
N/A
Usage Guide:
To configure policy ID of L2CP peer
Example:
To configure policy 1 of L2CP peer for GigabitEthernet X/X.
Switch# configure terminal
Switch (config)# interface GigabitEthernet X/X
Switch (config-if) # evc l2cp peer 1
colored Allow policer to set DEI
fixed Use classified DEI
Default:
Fixed
Usage Guide:
To update EVC DEI mode
Example:
To update EVC DEI mode (Colored) for GigabitEthernet X/X.
Switch# configure terminal
Switch (config)# interface GigabitEthernet X/X
Switch (config-if) # evc update dei colored
4.2.65.24 excessive-restart
Command:
excessive-restart
excessive-restart Restart backoff algorithm after 16 collisions (No excessive-restart means discard frame after 16 collisions)
Default:
Discard
Usage Guide:
To enable Backoff Algorithm for the specific interface
Example:
To enable Backoff Algorithm for the GigabitEthernet X/X.
Switch# configure terminal
Switch (config)# interface GigabitEthernet X/X
Switch (config-if) # excessive-restart
4.2.65.25 exit
Command:
exit
exit Exit from current mode
Default:
None
Usage Guide:
To exit current mode
Example:
To exit current mode.
Switch# configure terminal
Switch (config)# interface GigabitEthernet X/X
Switch (config-if) # exit
Switch (config)#
4.2.65.26 flow control
Command:
flowcontrol off | on
flowcontrol
Traffic flow control.
off
Disable flow control.
on
Enable flow control.
Default:
Disable
Usage Guide:
To enable Flow-control for specific interface
Example:
To enable Flow-control for GigabitEthernet X/X
Switch# configure terminal
Switch (config)# interface GigabitEthernet X/X
Switch (config-if) # flowcontrol on
4.2.65.27 green-ethernet energy-detect(GG)
Command:
green-ethernet energy-detect
green-ethernet Green ethernet (Power reduction)
energy-detect Enable power saving for ports with no link partner.
Default:
N/A
Usage Guide:
To enable power saving for ports with no link partner
Example:
To enable power saving for ports with no link for GigabitEthernet X/X
Switch# configure terminal
Switch (config)# interface GigabitEthernet X/X
Switch (config-if) # green-ethernet energy-detect
4.2.65.28 green-ethernet short-reach(GG)
Command:
green-ethernet short-reach
green-ethernet Green ethernet (Power reduction)
short-reach Enable power saving for ports which is connect to link partner with short cable.
Default:
N/A
Usage Guide:
To enable power saving for ports with short cable
Example:
To enable power saving for ports with short cable for GigabitEthernet X/X
Switch# configure terminal
Switch (config)# interface GigabitEthernet X/X
Switch (config-if) # green-ethernet short-reach
4.2.65.29 gvrp join-request vlan(GG)
Command:
gvrp join-request vlan
gvrp
Enable GVRP on port(s)
join-request
Emit a Join-Request for test purpose
Default:
N/A
Usage Guide:
To send GVRP Join-Request to specific interface
Example:
To send GVRP Join-Request(VLAN 1) to GigabitEthernet X/X
Switch# configure terminal
Switch (config)# interface GigabitEthernet X/X
Switch (config-if) # gvrp join-request vlan 1
4.2.65.30 gvrp leave-request vlan(GG)
Command:
gvrp leave-request vlan
gvrp
Enable GVRP on port(s)
leave-request
Emit a Leave-Request for test purpose
Default:
N/A
Usage Guide:
To send GVRP Leave-Request to specific interface
Example:
To send GVRP Leave-Request(VLAN 1) to GigabitEthernet X/X
Switch# configure terminal
Switch (config)# interface GigabitEthernet X/X
Switch (config-if) # gvrp leave-request vlan 1
4.2.65.31 ip arp inspection check-vlan
Command:
ip arp inspection check-vlan
arp
Address Resolution Protocol
inspection
ARP inspection
check-vlan
ARP inspection VLAN mode config
Default:
Disable
Usage Guide:
To configure Check-VLAN mode into ARP inspection for specific interface
Example:
To configure Check-VLAN mode (Enabled) into ARP inspection for GigabitEthernet X/X
Switch# configure terminal
Switch (config)# interface GigabitEthernet X/X
Switch (config-if) # ip arp inspection check-vlan
4.2.65.32 ip arp inspection logging
Command:
ip arp inspection logging all | deny | permit
arp
Address Resolution Protocol
inspection
ARP inspection
logging
ARP inspection logging mode config
all
log all entries
deny
log denied entries
permit
log permitted entries
Default:
None
Usage Guide:
To configure Logging type into ARP inspection for specific interface
Example:
To configure Logging type (All) into ARP inspection for GigabitEthernet X/X
Switch# configure terminal
Switch (config)# interface GigabitEthernet X/X
Switch (config-if) # ip arp inspection logging all
4.2.65.33 ip arp inspection trust
Command:
ip arp inspection trust
arp
Address Resolution Protocol
inspection
ARP inspection
trust
ARP inspection trust config
Default:
Trusted
Usage Guide:
To configure Trusted into ARP inspection for specific interface
Example:
To configure Trusted into ARP inspection for GigabitEthernet X/X
Switch# configure terminal
Switch (config)# interface GigabitEthernet X/X
Switch (config-if) # ip arp inspection trust
4.2.65.34 ip dhcp snooping trust
Command:
ip dhcp snooping trust
Default:
Trusted
Usage Guide:
To configure Trusted into DHCP Snooping for specific interface
Example:
To configure Trusted into DHCP Snooping for GigabitEthernet X/X
Switch# configure terminal
Switch (config)# interface GigabitEthernet X/X
Switch (config-if) # ip dhcp snooping trust
4.2.65.35 ip igmp snooping filter
Command:
ip igmp snooping filter
Default:
N/A
Usage Guide:
To apply the IGMP Snooping filter ID for specific interface
Example:
To apply the IGMP Snooping filter ID 1 for GigabitEthernet X/X
Switch# configure terminal
Switch (config)# interface GigabitEthernet X/X
Switch (config-if) # ip igmp snooping filter 1
4.2.65.36 ip igmp snooping immediate-leave
Command:
ip igmp snooping immediate-leave
Default:
Disabled
Usage Guide:
To enable IGMP Snooping Immediate-leave (Fast Leave) for specific interface
Example:
To enable IGMP Snooping Immediate-leave (Fast Leave) for GigabitEthernet X/X
Switch# configure terminal
Switch (config)# interface GigabitEthernet X/X
Switch (config-if) # ip igmp snooping immediate-leave
4.2.65.37 ip igmp snooping max-groups
Command:
ip igmp snooping max-groups
max-groups
IGMP group throttling configuration
Maximum number of IGMP group registration
Default:
Unlimited
Usage Guide:
To limit maximum number of IGMP group for specific interface
Example:
To limit 5 groups of IGMP for GigabitEthernet X/X
Switch# configure terminal
Switch (config)# interface GigabitEthernet X/X
Switch (config-if) # ip igmp snooping max-groups 5
4.2.65.38 ip igmp snooping mrouter
Command:
ip igmp snooping mrouter [ automatic | fix | none ]
mrouter
Multicast router port configuration
automatic
auto mode
fix
fix mode
none
none mode
Default:
Auto
Usage Guide:
To configure Multicast router port mode for specific interface
Example:
To configure Multicast router port mode (fix) for GigabitEthernet X/X
Switch# configure terminal
Switch (config)# interface GigabitEthernet X/X
Switch (config-if) # ip igmp snooping mrouter fix
4.2.65.39 ip verify source
Command:
ip verify source
Default:
Disabled
Usage Guide:
To enable IP Source Guard for specific interface
Example:
To enable IP Source Guard for GigabitEthernet X/X
Switch# configure terminal
Switch (config)# interface GigabitEthernet X/X
Switch (config-if) # ip verify source
4.2.65.40 ip verify source limit
Command:
ip verify source limit <0-2>
<0-2>
the number of limit
Default:
Unlimited
Usage Guide:
To limit numbers of Dynamic Client for specific interface
Example:
To limit 2 numbers of Dynamic Client for GigabitEthernet X/X
Switch# configure terminal
Switch (config)# interface GigabitEthernet X/X
Switch (config-if) # ip verify source limit 2
4.2.65.41 ipv6 mld snooping filter
Command:
ipv6 mld snooping filter
filter
Access control on MLD multicast group registration
Profile name in 16 words
Default:
N/A
Usage Guide:
To apply the MLD Snooping filter ID for specific interface
Example:
To apply the MLD Snooping filter ID 1 for GigabitEthernet X/X
Switch# configure terminal
Switch (config)# interface GigabitEthernet X/X
Switch (config-if) # ipv6 mld snooping filter 1
4.2.65.42 ipv6 mld snooping immediate-leave
Command:
ipv6 mld snooping immediate-leave
Default:
Disabled
Usage Guide:
To enable MLD Snooping Immediate-leave (Fast Leave) for specific interface
Example:
To enable MLD Snooping Immediate-leave (Fast Leave) for GigabitEthernet X/X
Switch# configure terminal
Switch (config)# interface GigabitEthernet X/X
Switch (config-if) # ipv6 mld snooping immediate-leave
4.2.65.43 ipv6 mld snooping max-groups
Command:
ipv6 mld snooping max-groups
max-groups
IGMP group throttling configuration
Maximum number of IGMP group registration
Default:
Unlimited
Usage Guide:
To limit maximum number of MLD group for specific interface
Example:
To limit 5 groups of MLD for GigabitEthernet X/X
Switch# configure terminal
Switch (config)# interface GigabitEthernet X/X
Switch (config-if) # ipv6 mld snooping max-groups 5
4.2.65.44 ipv6 mld snooping mrouter
Command:
ipv6 mld snooping mrouter [ automatic | fix | none]
mrouter
Multicast router port configuration
automatic
auto mode
fix
fix mode
none
none mode
Default:
Auto
Usage Guide:
To configure MLD router port mode for specific interface
Example:
To configure MLD router port mode (fix) for GigabitEthernet X/X
Switch# configure terminal
Switch (config)# interface GigabitEthernet X/X
Switch (config-if) # ipv6 mld snooping mrouter fix
4.2.65.45 lacp
Command:
lapc
lapp Enable LACP on this interface
Default:
Disabled
Usage Guide:
To enable LACP for specific interface
Example:
To enable LACP for GigabitEthernet X/X
Switch# configure terminal
Switch (config)# interface GigabitEthernet X/X
Switch (config-if) # lacp
4.2.65.46 lacp key
Command:
Iacp key <1-65535> | auto
lapp Enable LACP on this interface
key Key of the LACP aggregation
<1-65535> Key value
auto Choose a key based on port speed
Default:
Auto
Usage Guide:
To configure LACP key for specific interface
Example:
To configure LACP key (555) for GigabitEthernet X/X
Switch# configure terminal
Switch (config)# interface GigabitEthernet X/X
Switch (config-if) # lacp key 555
4.2.65.47 lacp port-priority
Command:
Iacp port-priority <1-65535>
lapp Enable LACP on this interface
port-priority LACP priority of the port
<1-65535> Priority value, lower means higher priority
Default:
32768
Usage Guide:
To configure LACP port-priority for specific interface
Example:
To configure LACP port-priority (555) for GigabitEthernet X/X
Switch# configure terminal
Switch (config)# interface GigabitEthernet X/X
Switch (config-if) # lacp port-priority 555
4.2.65.48 lacp role
Command:
Iacp role active | passive
Iacp Enable LACP on this interface
role Active / Passive (speak if spoken to) role
active Transmit LACP BPDUs continuously
passive Wait for neighbour LACP BPDUs before transmitting
Default:
Active
Usage Guide:
To configure LACP role for specific interface
Example:
To configure LACP role (passive) for GigabitEthernet X/X
Switch# configure terminal
Switch (config)# interface GigabitEthernet X/X
Switch (config-if) # lacp role passive
4.2.65.49 lacp timeout
Command:
Iacp timeout fast | slow
Iacp Enable LACP on this interface
timeout The period between BPDU transmissions
fast Transmit BPDU each second (fast timeout)
slow Transmit BPDU each 30th second (slow timeout)
Default:
Fast
Usage Guide:
To configure LACP timeout type for specific interface
Example:
To enable LACP timeout type (slow) for GigabitEthernet X/X
Switch# configure terminal
Switch (config)# interface GigabitEthernet X/X
Switch (config-if) # lacp timeout slow
4.2.65.50 lldp cdp-aware
Command:
Ildp cdp-aware
Ildp LLDP configurations
cdp-aware Configures if the interface shall be CDP aware (CDP discovery information is added to the LLDP neighbor table)
Default:
Passive
Usage Guide:
To configure MIB variable retrieve local info or remote info of LLDP for specific interface
Example:
To configure MIB variable retrieve (local info) of LLDP for GigabitEthernet X/X
Switch# configure terminal
Switch (config)# interface GigabitEthernet X/X
Switch (config-if) # lldp cdp-aware
4.2.65.51 Ildp med media-vlan policy-list
Command:
Ildp med media-vlan policy-list
Ildp LLDP configurations
med Media Endpoint Discovery
media-vlan Media VLAN assignment
policy-list Assignment of policies
Default:
N/A
Usage Guide:
To apply MED Media-VLAN policy of LLDP for specific interface
Example:
To apply MED Media-VLAN policy 2 of LLDPfor GigabitEthernet X/X
Switch# configure terminal
Switch (config)# interface GigabitEthernet X/X
Switch (config-if) # lldp med media-vlan policy-list 2
4.2.65.52 lldp med transmit-tlv
Command:
Ildp med transmit-tlv [ capabilities ] [ location ] [ network-policy ]
Ildp LLDP configurations
med Media Endpoint Discovery
transmit-tlv LLDP-MED Location Type Length Value parameter.
capabilities Enable transmission of the optional capabilities TLV.
location Enable transmission of the optional location TLV.
network-policy Enable transmission of the optional network-policy TLV.
Default:
N/A
Usage Guide:
To configure LLDP-MED TLV Type for specific interface
Example:
To enable LLDP-MED TLV (capabilities and location) for GigabitEthernet X/X
Switch# configure terminal
Switch (config)# interface GigabitEthernet X/X
Switch (config-if) # lldp med transmit-tlv capabilities location
4.2.65.53 lldp receive
Command:
Ildp receive
Ildp
LLDP configurations
receive
Enable/Disable decoding of received LLDP frames.
Default:
Both (Tx + Rx)
Usage Guide:
To configure LLDP Rx only mode for specific interface
Example:
To configure LLDP Rx only mode for GigabitEthernet X/X
Switch# configure terminal
Switch (config)# interface GigabitEthernet X/X
Switch (config-if) # lldp receive
4.2.65.54 lldp tlv-select management-address
Command:
Ildp tlv-select management-address
Ildp
LLDP configurations
tlv-select
To transmit which optional TLVs.
management-address
Enable/Disable transmission of management address.
Default:
Enabled
Usage Guide:
To enable management address of LLDP TLV for specific interface
Example:
To enable management address of LLDP TLV for GigabitEthernet X/X
Switch# configure terminal
Switch (config)# interface GigabitEthernet X/X
Switch (config-if) # lldp tlv-select management-address
4.2.65.55 lldp tlv-select port-description
Command:
Ildp tlv-select port-description
Ildp LLDP configurations
tlv-select To transmit which optional TLVs.
port-description Enable/Disable transmission of port description.
Default:
Enabled
Usage Guide:
To enable port-description of LLDP TLV for specific interface
Example:
To enable port-description of LLDP TLV for GigabitEthernet X/X
Switch# configure terminal
Switch (config)# interface GigabitEthernet X/X
Switch (config-if) # lldp tlv-select port-description
4.2.65.56 lldp tlv-select system-capabilities
Command:
Ildp tlv-select system-capabilities
Ildp LLDP configurations
tlv-select To transmit which optional TLVs.
system-capabilities Enable/Disable transmission of system capabilities.
Default:
Enabled
Usage Guide:
To enable system-capabilities of LLDP TLV for specific interface
Example:
To enable system-capabilities of LLDP TLV for GigabitEthernet X/X
Switch# configure terminal
Switch (config)# interface GigabitEthernet X/X
Switch (config-if) # lldp tlv-select system-capabilities
4.2.65.57 lldp tlv-select system-description
Command:
Ildp tlv-select system-description
Ildp LLDP configurations
tlv-select To transmit which optional TLVs.
system-description Enable/Disable transmission of system description.
Default:
Enabled
Usage Guide:
To enable system-description of LLDP TLV for specific interface
Example:
To enable system-description of LLDP TLV for GigabitEthernet X/X
Switch# configure terminal
Switch (config)# interface GigabitEthernet X/X
Switch (config-if) # lldp tlv-select system-description
4.2.65.58 lldp tlv-select system-name
Command:
Ildp tlv-select system-name
Ildp LLDP configurations
tlv-select To transmit which optional TLVs.
system-name Enable/Disable transmission of system name.
Default:
Enabled
Usage Guide:
To enable system-name of LLDP TLV for specific interface
Example:
To enable system-name of LLDP TLV for GigabitEthernet X/X
Switch# configure terminal
Switch (config)# interface GigabitEthernet X/X
Switch (config-if) # lldp tlv-select system-name
4.2.65.59 lldp transmit
Command:
Ildp transmit
Ildp
LLDP configurations
transmit
Enable/Disabled transmission of LLDP frames.
Default:
Both (Tx +Rx)
Usage Guide:
To configure LLDP Tx only mode for specific interface
Example:
To configure LLDP Tx only mode for GigabitEthernet X/X
Switch# configure terminal
Switch (config)# interface GigabitEthernet X/X
Switch (config-if) # lldp transmit
4.2.65.60 loop-protect
Command:
loop-protect
loop-protect
Loop protection configuration
Default:
Enabled
Usage Guide:
To enable loop-protect for specific interface
Example:
To enable loop-protect for GigabitEthernet X/X
Switch# configure terminal
Switch (config)# interface GigabitEthernet X/X
Switch (config-if) # loop-protect
4.2.65.61 loop-protect action
Command:
loop-protect action [log] [shutdown]
loop-protect
Loop protection configuration
action
Action if loop detected
log
Generate log
shutdown
Shutdown port
Default:
Shutdown
Usage Guide:
To configure action mode of Loop protection for specific interface
Example:
To configure action mode (log and shutdown) of Loop protection for GigabitEthernet X/X
Switch# configure terminal
Switch (config)# interface GigabitEthernet X/X
Switch (config-if) # loop-protect action shutdown log
4.2.65.62 loop-protect tx-mode
Command:
loop-protect tx-mode
loop-protect
Loop protection configuration
tx-mode
Actively generate PDUs
Default:
Enabled
Usage Guide:
To enable tx-mode of Loop protection for specific interface
Example:
To enable tx-mode of Loop protection for GigabitEthernet X/X
Switch# configure terminal
Switch (config)# interface GigabitEthernet X/X
Switch (config-if) # loop-protect tx-mode
4.2.65.63 loop-protect tx-mode
Command:
loop-protect tx-mode
loop-protect
Loop protection configuration
tx-mode
Actively generate PDUs
Default:
Enabled
Usage Guide:
To enable tx-mode of Loop protection for specific interface
Example:
To enable tx-mode of Loop protection for GigabitEthernet X/X
Switch# configure terminal
Switch (config)# interface GigabitEthernet X/X
Switch (config-if) # loop-protect tx-mode
4.2.65.64 mac address-table learning
Command:
mac address-table learning [secure]
mac
MAC keyword
address-table
MAC table configuration
learning
Port learning mode
secure
Port Secure mode
Default:
Enabled (Auto)
Usage Guide:
To enable learning of MAC address table for specific interface
Example:
To enable learning of MAC address table for GigabitEthernet X/X
Switch# configure terminal
Switch (config)# interface GigabitEthernet X/X
Switch (config-if) # mac address-table learning
4.2.65.65 media-type
Command:
media-type dual | rj45 | sfp
media-type Media type.
dual Dual media interface (copper & fiber interface).
rj45 rj45 interface (copper interface).
sfp sfp interface (fiber interface).
Default:
N/A
Usage Guide:
To configure Copper or Fiber mode of media type for specific interface
Example:
To configure Copper mode of media type for GigabitEthernet X/X
Switch# configure terminal
Switch (config)# interface GigabitEthernet X/X
Switch (config-if) # media-type rj45
4.2.65.66 mtu
Command:
mtu <1518-10056>
mtu Maximum transmission unit <1518-10056> Maximum frame size in bytes.
Default:
10056
Usage Guide:
To configure MTU sizes for specific interface
Example:
To configure MTU sizes (9000) for GigabitEthernet X/X
Switch# configure terminal
Switch (config)# interface GigabitEthernet X/X
Switch (config-if) # mtu 9000
4.2.65.67 mvr immediate-leave
Command:
mvr immediate-leave
mvr
Multicast VLAN Registration configuration
immediate-leave
Immediate leave configuration
Default:
Disabled
Usage Guide:
To enable Immediate-leave of MVR for specific interface
Example:
To enable Immediate-leave of MVR for GigabitEthernet X/X
Switch# configure terminal
Switch (config)# interface GigabitEthernet X/X
Switch (config-if) # mvr immediate-leave
4.2.65.68 mvr name
Command:
mvr name
mvr
Multicast VLAN Registration configuration
name
MVR multicast name
MVR multicast VLAN name
type
MVR port role configuration
receiver
MVR receiver port
source
MVR source port
Default:
Inactive
Usage Guide:
To configure port role of specific MVR profile for specific interface
Example:
To configure port role (source) of MVR profiles (111) for GigabitEthernet X/X
Switch# configure terminal
Switch (config)# interface GigabitEthernet X/X
Switch (config-if) # mvr name 111 type source
4.2.65.69 mvr vlan
Command:
mvr vlan <v_vlan_list> type [source | receiver]
mvr Multicast VLAN Registration configuration
vlan MVR multicast vlan
type MVR port role configuration
receiver MVR receiver port
source MVR source port
Default:
Inactive
Usage Guide:
To configure port role of specific MVR VLAN ID for specific interface
Example:
To configure port role (source) of MVR VLAN ID (111) for GigabitEthernet X/X
Switch# configure terminal
Switch (config)# interface GigabitEthernet X/X
Switch (config-if) # mvr name 111 type source
4.2.65.70 network-clock synchronization ssm
Command:
network-clock synchronization ssm
network-clock
network-clock
synchronization
SSM enable/disable.
ssm
SSM enable/disable.
Default:
Disable
Usage Guide:
To enable SSM of SyncE for specific interface
Example:
To enable SSM of SyncE for GigabitEthernet X/X
Switch# configure terminal
Switch (config)# interface GigabitEthernet X/X
Switch (config-if) # network-clock synchronization ssm
4.2.65.71 no
Command:
no
no
Negate a command or set its defaults
Default:
N/A
Usage Guide:
To default the function for specific interface
Example:
To enable the function (network-clock synchronization ssm) for GigabitEthernet X/X.
Switch# configure terminal
Switch (config)# interface GigabitEthernet X/X
Switch (config-if) # no network-clock synchronization ssm
4.2.65.72 ping ip
Command:
ping ip <ipv4_addr> size <size: 2-1452>
ping The ping command allows you to test connectivity to a network host from the appliance
ip ip
<ipv4_addr> IP address
size size
<size: 2-1452> Default is 56 (excluding MAC, IP and ICMP headers)
Default:
N/A
Usage Guide:
To run Ping function for specific interface
Example:
To run Ping function (IP address: 10.10.10.10 with size 88 bytes) for GigabitEthernet X/X.
Switch# configure terminal
Switch (config)# interface GigabitEthernet X/X
Switch (config-if) # ping ip 10.10.10.10 size 88
4.2.65.73 poe mode
Command:
poe mode { standard | plus }
poe Power Over Ethernet.
mode PoE mode.
plus Set mode to PoE+ (Maximum power 30.0 W)
standard Set mode to PoE (Maximum power 15.4 W)
Default:
N/A
Usage Guide:
To configure 802.3at/af mode for specific interface
Example:
To configure 802.3at mode for GigabitEthernet X/X.
Switch# configure terminal
Switch (config)# interface GigabitEthernet X/X
Switch (config-if) # poe mode plus
4.2.65.74 poe pdcheck IP
Command:
poe pdcheck IP <ipv4_addr>
poe Power Over Ethernet.
pdcheck Allows user to enable or disable per port PD Alive Check function.
IP To set PoE device IP address here for system making ping to the PoE device.
<ipv4_addr> <ipv4_addr>
Default:
N/A
Usage Guide:
To configure Ping PD IP Address of PoE for specific interface
Example:
To configure Ping PD IP Address (10.101.10.10) of PoE for GigabitEthernet X/X.
Switch# configure terminal
Switch (config)# interface GigabitEthernet X/X
Switch (config-if) # poe pdcheck IP 10.101.10.10
4.2.65.75 poe pdcheck action
Command:
poe pdcheck action { reboot | alarm | reboot-alarm }
poe Power Over Ethernet.
pdcheck Allows user to enable or disable per port PD Alive Check function.
action Allows user to set which action will be applied if the
PD is without any response
alarm It means system will issue an alarm message via Syslog, SMTP.
reboot It means system will reset the PoE port that is connected to the PD.
reboot-alarm It means system will reset the PoE port and issue an alarm message via Syslog, SMTP.
Default:
N/A
Usage Guide:
To configure PD Ping Alive Check Action of PoE for specific interface
Example:
To configure PD Ping Alive Check Action (Alarm) of PoE for GigabitEthernet X/X.
Switch# configure terminal
Switch (config)# interface GigabitEthernet X/X
Switch (config-if) # poe pdcheck action alarm
4.2.65.76 poe pdcheck enable
Command:
poe pdcheck enable
poe
Power Over Ethernet.
pdcheck
Allows user to enable or disable per port PD Alive Check function.
enable
PD alive check enable.
Default:
Disabled
Usage Guide:
To enable PD Ping Alive Check function of PoE for specific interface.
Example:
To enable PD Ping Alive Check function of PoE for GigabitEthernet X/X.
Switch# configure terminal
Switch (config)# interface GigabitEthernet X/X
Switch (config-if) # poe pdcheck enable
4.2.65.77 poe pdcheck interval
Command:
poe pdcheck interval <10-300>
poe Power Over Ethernet.
pdcheck Allows user to enable or disable per port PD Alive Check function.
interval set how long system should be issue a ping request to PD for detecting whether PD is alive or dead.
<10-300> interval <10~300>
Default:
30
Usage Guide:
To configure PD Ping Alive Check interval of PoE for specific interface.
Example:
To configure PD Ping Alive Check interval (100 seconds) of PoE for GigabitEthernet X/X.
Switch# configure terminal
Switch (config)# interface GigabitEthernet X/X
Switch (config-if) # poe pdcheck interval 100
4.2.65.78 poe pdcheck reboot-time
Command:
poe pdcheck reboot-time <30-180>
poe Power Over Ethernet.
pdcheck Allows user to enable or disable per port PD Alive Check function.
reboot-time set the PoE device rebooting time.
<30-180> reboot-time <30-180>
Default:
90
Usage Guide:
To configure PD Ping Alive Check rebooting time of PoE for specific interface.
Example:
To configure PD Ping Alive Check rebooting time (100 seconds) of PoE for GigabitEthernet X/X.
Switch# configure terminal
Switch (config)# interface GigabitEthernet X/X
Switch (config-if) # poe pdcheck reboot-time 100
4.2.65.79 poe pdcheck retry-count
Command:
poe pdcheck retry-count <1-5>
poe
Power Over Ethernet.
pdcheck
Allows user to enable or disable per port PD Alive Check function.
retry-count
set how many times system retry ping to PD.
<1-5>
retry-count <1-5>
Default:
2
Usage Guide:
To configure PD Ping Alive Check retry count of PoE for specific interface.
Example:
To configure PD Ping Alive Check retry count (5) of PoE for GigabitEthernet X/X.
Switch# configure terminal
Switch (config)# interface GigabitEthernet X/X
Switch (config-if) # poe pdcheck retry-count 5
4.2.65.80 poe power limit
Command:
poe power limit { <Power in watts>}
poe
Power Over Ethernet.
power
Setting maximum power for port in allocation mode.
limit
The maximum power.
Maximum power for the interface (0-15.4 Watt
standard mode, 0-30.0 Watt for PoE plus mode)
for PoE
Default:
2
Usage Guide:
To configure maximum power of PoE for specific interface.
Example:
To configure maximum power (29 watts) of PoE for GigabitEthernet X/X.
Switch# configure terminal
Switch (config)# interface GigabitEthernet X/X
Switch (config-if) # poe power limit 29
4.2.65.81 poe priority
Command:
poe priority { low | high | critical }
poe Power Over Ethernet.
priority Interface priority.
critical Set priority to critical.
high Set priority to high.
low Set priority to low.
Default:
2
Usage Guide:
To configure interface priority of PoE for specific interface.
Example:
To configure interface priority (low) of PoE for GigabitEthernet X/X.
Switch# configure terminal
Switch (config)# interface GigabitEthernet X/X
Switch (config-if) # poe priority low
4.2.65.82 poe time-range
Command:
poe time-range { profile1 | profile2 | profile3 | profile4 }
poe Power Over Ethernet.
time-range To bind a PoE time-range to the corresponding port.
profile1 The profile name of the PoE time-range to be bound to the port.
profile2 The profile name of the PoE time-range to be bound to the port.
profile3 The profile name of the PoE time-range to be bound to the port.
profile4 The profile name of the PoE time-range to be bound to the port.
Default:
Profile 1
Usage Guide:
To configure time-range profile of PoE for specific interface.
Example:
To configure time-range profile (Profile 3) of PoE for GigabitEthernet X/X.
Switch# configure terminal
Switch (config)# interface GigabitEthernet X/X
Switch (config-if) # poe time-range profile3
4.2.65.83 port-security
Command:
port-security
port-security
Enable/disable port security per interface.
Default:
Disabled
Usage Guide:
To enable Port-security for specific interface
Example:
To enable Port-security for GigabitEthernet X/X
Switch# configure terminal
Switch (config)# interface GigabitEthernet X/X
Switch (config-if) # port-security
4.2.65.84 port-security maximum
Command:
port-security maximum
port-security
Enable/disable port security per interface.
maximum
Maximum number of MAC addresses that can be learned on this set of interfaces.
Number of addresses
Default:
None
Usage Guide:
To configure number of Port-security addresses for specific interface
Example:
To configure 100 Port-security addresses for GigabitEthernet X/X
Switch# configure terminal
Switch (config)# interface GigabitEthernet X/X
Switch (config-if) # port-security maximum 100
4.2.65.85 port-security violation
Command:
port-security violation [protect | shutdown | trap | trap-shutdown]
port-security Enable/disable port security per interface.
violation The action involved with exceeding the limit.
protect Don't do anything
shutdown Shut down the port
trap Send an SNMP trap
trap-shutdown Send an SNMP trap and shut down the port
Default:
None (Protected)
Usage Guide:
To configure protected mode of Port-security for specific interface
Example:
To configure protected mode (trap-shutdown) of Port-security for GigabitEthernet X/X
Switch# configure terminal
Switch (config)# interface GigabitEthernet X/X
Switch (config-if) # port-security violation trap-shutdown
4.2.65.86 port-security violation
Command:
port-security violation [protect | shutdown | trap | trap-shutdown]
port-security Enable/disable port security per interface.
violation The action involved with exceeding the limit.
protect Don't do anything
shutdown Shutdown the port
trap Send an SNMP trap
trap-shutdown Send an SNMP trap and shut down the port
Default:
None (Protected)
Usage Guide:
To configure protected mode of Port-security for specific interface
Example:
To configure protected mode (trap-shutdown) of Port-security for GigabitEthernet X/X
Switch# configure terminal
Switch (config)# interface GigabitEthernet X/X
Switch (config-if) # port-security violation trap-shutdown
4.2.65.87 pvlan
Command:
pvlan
pvlan Private VLAN
Default:
None
Usage Guide:
To create PVLAN ID for specific interface
Example:
To create PVLAN ID (5) for GigabitEthernet X/X
Switch# configure terminal
Switch (config)# interface GigabitEthernet X/X
Switch (config-if) # pvlan 5
4.2.65.88 pvlan isolation
Command:
pvlan isolation
pvlan
Private VLAN
isolation
Port isolation
Default:
None
Usage Guide:
To enable PVLAN isolation for specific interface
Example:
To enable PVLAN isolation for GigabitEthernet X/X
Switch# configure terminal
Switch (config)# interface GigabitEthernet X/X
Switch (config-if) # pvlan isolation
4.2.65.89 qos cos
Command:
qos cos
qos
Quality of Service
cos
Class of service configuration
Specific class of service
Default:
0
Usage Guide:
To configure CoS of QoS for specific interface
Example:
To configure CoS (4) of QoS for GigabitEthernet X/X
Switch# configure terminal
Switch (config)# interface GigabitEthernet X/X
Switch (config-if) # qos cos 4
4.2.65.90 qos dei
Command:
qos dei <Dei : 0-1>
qos Quality of Service
dei Drop Eligible Indicator configuration
Default:
0
Usage Guide:
To configure DEI of QoS for specific interface
Example:
To configure DEI (1) of QoS for GigabitEthernet X/X
Switch# configure terminal
Switch (config)# interface GigabitEthernet X/X
Switch (config-if) # qos dei 1
4.2.65.91 qos dpl
Command:
qos dpl <Dei : 0-1>
qos Quality of Service
dpl Drop precedence level configuration
Default:
0
Usage Guide:
To configure DPL of QoS for specific interface
Example:
To configure DPL (1) of QoS for GigabitEthernet X/X
Switch# configure terminal
Switch (config)# interface GigabitEthernet X/X
Switch (config-if) # qos dpl 1
4.2.65.92 qos dscp-classify
Command:
qos dscp-classify any | selected | zero
qos
Quality of Service
dscp-classify
DSCP ingress classification
any
Classify to new DSCP always
selected
Classify to new DSCP if classify is enabled for specific DSCP value in global dscp-classify map
zero
Classify to new DSCP if DSCP is 0
Default:
Disabled
Usage Guide:
To configure DSCP Classify of QoS for specific interface
Example:
To configure DSCP Classify (Any) of QoS for GigabitEthernet X/X
Switch# configure terminal
Switch (config)# interface GigabitEthernet X/X
Switch (config-if) # qos dscp-classify any
4.2.65.93 qos dscp-remark
Command:
qos dscp-remark remap | rewrite
qos
Quality of Service
dscp-remark
DSCP egress remarking
remap
Rewrite DSCP field using classified DSCP remapped through global dscp-egress-translation map
rewrite
Rewrite DSCP field with classified DSCP value (no translation)
Default:
Disabled
Usage Guide:
To configure DSCP egress remarking of QoS for specific interface
Example:
To configure DSCP egress remarking (Remap) of QoS for GigabitEthernet X/X
Switch# configure terminal
Switch (config)# interface GigabitEthernet X/X
Switch (config-if) # qos dscp-remark remap
4.2.65.94 qos dscp-translate
Command:
qos dscp-translate
qos
Quality of Service
dscp-translate
DSCP ingress translation
Default:
Disabled
Usage Guide:
To configure DSCP ingress translation of QoS for specific interface
Example:
To configure DSCP ingress translation of QoS for GigabitEthernet X/X
Switch# configure terminal
Switch (config)# interface GigabitEthernet X/X
Switch (config-if) # qos dscp-translate
4.2.65.95 qos map cos-tag
Command:
qos map cos-tag cos
qos
Quality of Service
map
QoS Map/Table configuration
cos-tag
Map for cos to tag configuration
cos
Specify class of service
Specific class of service or range
dpl Specify drop precedence level
pcp Specify PCP (Priority Code Point)
dei Specify DEI (Drop Eligible Indicator)
Default:
Disabled
Usage Guide:
To configure (QoS class, DP level) to (PCP, DEI) Mapping of QoS for specific interface
Example:
To configure (QoS class, DP level) to (PCP, DEI) Mapping of QoS as below table for GigabitEthernet X/X

Switch# configure terminal
Switch (config)# interface GigabitEthernet X/X
Switch (config-if) # qos map cos-tag cos 1 dpl 1 pcp 6 dei 0
4.2.65.96 qos map tag-cos
Command:
qos map tag-cos pcp <Pcp : 0-7> dei <Dei : 0-1> cos <Cos : 0~7> dpl <Dpl : 0~1>
qos Quality of Service
map QoS Map/Table configuration
tag-cos Map for tag to cos configuration
pcp Specify PCP (Priority Code Point)
dei Specify DEI (Drop Eligible Indicator)
cos Specify class of service
dpl Specify drop precedence level
Default:
Disabled
Usage Guide:
To configure (PCP, DEI) to (QoS class, DP level) Mapping of QoS for specific interface
Example:
To configure (PCP, DEI) to (QoS class, DP level) Mapping of QoS as below table for GigabitEthernet X/X
| PCP | DEI | QoS class | DP level |
| 4 | 0 | 5 | 1 |
Switch# configure terminal
Switch (config)# interface GigabitEthernet X/X
Switch (config-if) # qos map tag-cos pcp 4 dei 0 cos 5 dpl 1
4.2.65.97 qos pcp
Command:
qos pcp
qos Quality of Service
pcp Priority Code Point configuration
Default:
0
Usage Guide:
To configure PCP of QoS for specific interface
Example:
To configure PCP (6) of QoS for GigabitEthernet X/X
Switch# configure terminal
Switch (config)# interface GigabitEthernet X/X
Switch (config-if) # qos pcp 6
4.2.65.98 qos policer
Command:
qos policer <Rate : 100-13200000>
qos
Quality of Service
policer
Policer configuration
Policer rate (default kbps)
Default:
0
Usage Guide:
To configure Ingress Port Policers Rate of QoS for specific interface
Example:
To configure Ingress Port Policers Rate (9999 Kbps) of QoS for GigabitEthernet X/X
Switch# configure terminal
Switch (config)# interface GigabitEthernet X/X
Switch (config-if) # qos policer 9999
4.2.65.99 qos queue-policer queue
Command:
qos queue-policer queue <Queue : 0~7> <Rate : 100-13200000>
qos
Quality of Service
queue-policer
Queue policer configuration
queue
Specify queue
Specific queue or range
Policer rate in kbps
Default:
0
Usage Guide:
To configure Ingress Queue Policers Rate of QoS for specific interface
Example:
To configure Ingress Queue (4) Policers Rate (9999 Kbps) of QoS for GigabitEthernet X/X
Switch# configure terminal
Switch (config)# interface GigabitEthernet X/X
Switch (config-if) # qos queue-policer queue 4 9999
4.2.65.100 qos queue-shaper queue
Command:
qos queue-shaper queue <Queue : 0~7> <Rate : 100-13200000>
qos
Quality of Service
queue-shaper
Queue shaper configuration
queue
Specify queue
Specific queue or range
Policer rate in kbps
Default:
0
Usage Guide:
To configure Egress Queue Shapers Rate of QoS for specific interface
Example:
To configure Egress Queue (4) Shapers Rate (9999 Kbps) of QoS for GigabitEthernet X/X
Switch# configure terminal
Switch (config)# interface GigabitEthernet X/X
Switch (config-if) # qos queue-shaper queue 4 9999
4.2.65.101 qos shaper
Command:
qos shaper <Rate : 100-13200000>
qos
Quality of Service
shaper
Shaper configuration
Shaper rate in kbps
Default:
0
Usage Guide:
To configure Egress Port Shapers Rate of QoS for specific interface
Example:
To configure Egress Port (4) Shapers Rate (9999 Kbps) of QoS for GigabitEthernet X/X
Switch# configure terminal
Switch (config)# interface GigabitEthernet X/X
Switch (config-if) # qos queue-shaper queue 4 9999
4.2.65.102 qos storm broadcast
Command:
qos storm broadcast
qos Quality of Service
storm Storm policer
broadcast Police broadcast frames
fps Rate is fps
Default:
500
Usage Guide:
To configure Broadcast Frames Storm Control Rate of QoS for specific interface
Example:
To configure Broadcast Frames Storm Control Rate (999 fps) of QoS for GigabitEthernet X/X
Switch# configure terminal
Switch (config)# interface GigabitEthernet X/X
Switch (config-if) # qos storm broadcast 999 fps
4.2.65.103 qos storm unicast
Command:
qos storm unicast
qos Quality of Service
storm Storm policer
unicast Police unicast frames
fps Rate is fps
Default:
500
Usage Guide:
To configure Unicast Frames Storm Control Rate of QoS for specific interface
Example:
To configure Unicast Frames Storm Control Rate (999 Kbps) of QoS for GigabitEthernet X/X
Switch# configure terminal
Switch (config)# interface GigabitEthernet X/X
Switch (config-if) # qos storm unicast 999
4.2.65.104 qos storm unknown
Command:
qos storm unknown
qos
Quality of Service
storm
Storm policer
unknown
Police unknown (flooded) frames
Policer rate (default kbps)
fps
Rate is fps
Default:
500
Usage Guide:
To configure Unknown Frames Storm Control Rate of QoS for specific interface
Example:
To configure Unknown Frames Storm Control Rate (999 fps) of QoS for GigabitEthernet X/X
Switch# configure terminal
Switch (config)# interface GigabitEthernet X/X
Switch (config-if) # qos storm unicast 999 fps
4.2.65.105 qos tag-remark
Command:
qos tag-remark pcp <Pcp : 0-7> dei <Dei : 0-1>
qos
Quality of Service
tag-remark
Tag remarking configuration
pcp
Specify default PCP
Specific PCP
dei
Specify default DEI
Specific DEI
Default:
0
Usage Guide:
To enable Tag-remark default mode of QoS for specific interface
Example:
To enable Tag-remark default mode (PCP:1, DEI:1) of QoS for GigabitEthernet X/X
Switch# configure terminal
Switch (config)# interface GigabitEthernet X/X
Switch (config-if) # qos tag-remark pcp 1 dei 1
4.2.65.106 qos tag-remark mapped
Command:
qos tag-remark mapped
qos
Quality of Service
tag-remark
Tag remarking configuration
mapped
Used mapped values (cos,dpl -> pcp,dei)
Default:
Classified
Usage Guide:
To enable Tag-remark mapped mode of QoS for specific interface
Example:
To enable Tag-remark mapped mode of QoS for GigabitEthernet X/X
Switch# configure terminal
Switch (config)# interface GigabitEthernet X/X
Switch (config-if) # qos tag-remark mapped
4.2.65.107 qos trust dscp
Command:
qos trust dscp
qos Quality of Service
trust Trust configuration
dscp DSCP value
Default:
Disabled
Usage Guide:
To enable DSCP Classification of QoS for specific interface
Example:
To enable DSCP Classification of QoS for GigabitEthernet X/X
Switch# configure terminal
Switch (config)# interface GigabitEthernet X/X
Switch (config-if) # qos trust dscp
4.2.65.108 qos trust tag
Command:
qos trust tag
qos Quality of Service
trust Trust configuration
tag VLAN tag
Default:
Disabled
Usage Guide:
To enable VLAN tag Classification of QoS for specific interface
Example:
To enable VLAN tag Classification of QoS for GigabitEthernet X/X
Switch# configure terminal
Switch (config)# interface GigabitEthernet X/X
Switch (config-if) # qos trust tag
4.2.65.109 rmon collection history
Command:
rmon collection history <1-65535> buckets <1-65535> interval <1-3600>
rmon Configure Remote Monitoring on an interface
collection Configure Remote Monitoring Collection on an interface
history Configure history
buckets Requested buckets of intervals. Default is 50 buckets
interval Interval to sample data for each bucket. Default is 1800 seconds
Default:
N/A
Usage Guide:
To configure RMON History Configuration for specific interface
Example:
To configure RMON History Configuration as below table for GigabitEthernet X/X
| ID | Data Source | Interval | Buckets | |
| 1 | .1.3.6.1.2.1.2.2.1.1. | X | 3 | 5 |
Switch# configure terminal
Switch (config)# interface GigabitEthernet X/X
Switch (config-if) # rmon collection history 1 buckets 5 interval 3
4.2.65.110 rmon collection stats
Command:
rmon collection stats <1-65535>
rmon Configure Remote Monitoring on an interface
collection Configure Remote Monitoring Collection on an interface
stats Configure statistics
Default:
0
Usage Guide:
To configure RMON Statistics Configuration for specific interface
Example:
To configure RMON Statistics Configuration (2) as below table for GigabitEthernet X/X
| ID | Data Source | |
| 2 | .1.3.6.1.2.1.2.2.1.1. | X |
Switch# configure terminal
Switch (config)# interface GigabitEthernet X/X
Switch (config-if) # rmon collection stats 2
4.2.65.111 shutdown
Command:
shutdown
shutdown Shutdown of the interface.
Default:
No shutdown
Usage Guide:
To shut down specific interface
Example:
To shut down GigabitEthernet X/X
Switch# configure terminal
Switch (config)# interface GigabitEthernet X/X
Switch (config-if) # shutdown
4.2.65.112 spanning-tree
Command:
spanning-tree
spanning-tree
Spanning Tree protocol
Default:
Disabled
Usage Guide:
To enable STP for specific interface
Example:
To enable STP for GigabitEthernet X/X
Switch# configure terminal
Switch (config)# interface GigabitEthernet X/X
Switch (config-if) # spanning-tree
4.2.65.113 spanning-tree auto-edge
Command:
spanning-tree auto-edge
spanning-tree
Spanning Tree protocol
auto-edge
Auto detects edge status
Default:
Enabled
Usage Guide:
To enable Auto Edge of CIST Normal Port Configuration for specific interface
Example:
To enable Auto Edge of CIST Normal Port Configuration for GigabitEthernet X/X
Switch# configure terminal
Switch (config)# interface GigabitEthernet X/X
Switch (config-if) # spanning-tree auto-edge
4.2.65.114 spanning-tree bpdu-guard
Command:
spanning-tree bpdu-guard
spanning-tree
Spanning Tree protocol
auto-edge
Auto detects edge status
Default:
Disabled
Usage Guide:
To enable BPDU Guard of CIST Normal Port Configuration for specific interface
Example:
To enable BPDU Guard of CIST Normal Port Configuration for GigabitEthernet X/X
Switch# configure terminal
Switch (config)# interface GigabitEthernet X/X
Switch (config-if) # spanning-tree bpdu-guard
4.2.65.115 spanning-tree edge
Command:
spanning-tree edge
spanning-tree
Spanning Tree protocol
edge
Edge port
Default:
Non-Edge
Usage Guide:
To enable edge port of CIST Normal Port Configuration for specific interface
Example:
To enable edge port of CIST Normal Port Configuration for GigabitEthernet X/X
Switch# configure terminal
Switch (config)# interface GigabitEthernet X/X
Switch (config-if) # spanning-tree edge
4.2.65.116 spanning-tree link-type
Command:
spanning-tree link-type auto | point-to-point | shared
| spanning-tree | Spanning Tree protocol |
| link-type | Port link-type |
| auto | Auto detect |
| point-to-point | Forced to point-to-point |
| shared | Forced to Shared |
Default:
Auto
Usage Guide:
To configure point to point mode of CIST Normal Port Configuration for specific interface
Example:
To enable point to point mode (shared) of CIST Normal Port Configuration for GigabitEthernet X/X
Switch# configure terminal
Switch (config)# interface GigabitEthernet X/X
Switch (config-if) # spanning-tree edge
4.2.65.117 spanning-tree mst cost
Command:
spanning-tree mst
| spanning-tree | Spanning Tree protocol |
| mst | STP bridge instance |
| instance 0-7 (CIST=0, MST2=1...) | |
| cost | STP Cost of this port |
| Cost range | |
| auto | Use auto cost |
Default:
Auto
Usage Guide:
To configure Path Cost of CIST / MST Normal Port Configuration for specific interface
Example:
To enable Path Cost (100) of CIST / MST Normal Port Configuration (CIST) for GigabitEthernet X/X
Switch# configure terminal
Switch (config)# interface GigabitEthernet X/X
Switch (config-if) # spanning-tree mst 0 cost 100
4.2.65.118 spanning-tree mst cost
Command:
spanning-tree mst
spanning-tree Spanning Tree protocol
mst STP bridge instance
port-priority STP priority of this port
auto Use auto cost
Default:
Auto
Usage Guide:
To configure Path Cost of CIST / MST Normal Port Configuration for specific interface
Example:
To enable Path Cost (32) of CIST / MST Normal Port Configuration (CIST) for GigabitEthernet X/X
Switch# configure terminal
Switch (config)# interface GigabitEthernet X/X
Switch (config-if) # spanning-tree mst 0 port-priority 32
4.2.65.119 spanning-tree restricted-role
Command:
spanning-tree restricted-role
spanning-tree Spanning Tree protocol
restricted-role Port role is restricted (never root port)
Default:
Disabled
Usage Guide:
To enable Restricted-role of CIST Normal Port Configuration for specific interface
Example:
To enable Restricted-role of CIST Normal Port Configuration for GigabitEthernet X/X
Switch# configure terminal
Switch (config)# interface GigabitEthernet X/X
Switch (config-if) # spanning-tree restricted-role
4.2.65.120 spanning-tree restricted-tcn
Command:
spanning-tree restricted-tcn
spanning-tree
Spanning Tree protocol
restricted-tcn
Restrict topology change notifications
Default:
Disabled
Usage Guide:
To enable Restrict topology change notifications of CIST Normal Port Configuration for specific interface
Example:
To enable Restrict topology change notifications of CIST Normal Port Configuration for GigabitEthernet X/X
Switch# configure terminal
Switch (config)# interface GigabitEthernet X/X
Switch (config-if) # spanning-tree restricted-tcn
4.2.65.121 speed
Command:
speed [10 | 100 | 1000 | 10g | auto]
speed
Configures interface speed. If you use 10, 100, or 1000 keywords with the auto keyword the port will only advertise the specified speeds.
10 10Mbps
100 100Mbps
1000 1Gbps
10g 10Gbps
auto Auto negotiation
Default:
Auto
Usage Guide:
To configure line speed for specific interface
Example:
To configure line speed (1Gbps) for GigabitEthernet X/X
Switch# configure terminal
Switch (config)# interface GigabitEthernet X/X
Switch (config-if) # speed 1000
4.2.65.122 switchport access vlan
Command:
switchport access vlan
switchport Switching mode characteristics
access Set access mode characteristics of the interface
vlan Set VLAN when interface is in access mode
Default:
1
Usage Guide:
To configure access VLAN ID for specific interface
Example:
To configure access VLAN ID (5) for GigabitEthernet X/X
Switch# configure terminal
Switch (config)# interface GigabitEthernet X/X
Switch (config-if) # switchport access vlan 5
4.2.65.123 switchport forbidden vlan add
Command:
switchport forbidden vlan add
switchport Switching mode characteristics
forbidden Adds or removes forbidden VLANs from the current list of forbidden VLANs
vlan Add or modify VLAN entry in forbidden table.
add Add to existing list.
Default:
1
Usage Guide:
To add forbidden VLAN ID for specific interface
Example:
To add forbidden VLAN ID (5) for GigabitEthernet X/X
Switch# configure terminal
Switch (config)# interface GigabitEthernet X/X
Switch (config-if) # switchport forbidden vlan add 5
4.2.65.124 switchport forbidden vlan remove
Command:
switchport forbidden vlan remove
switchport Switching mode characteristics
forbidden Adds or removes forbidden VLANs from the current list of forbidden VLANs
vlan Add or modify VLAN entry in forbidden table.
remove Remove from existing list.
Default:
1
Usage Guide:
To remove forbidden VLAN ID for specific interface
Example:
To remove forbidden VLAN ID (5) for GigabitEthernet X/X
Switch# configure terminal
Switch (config)# interface GigabitEthernet X/X
Switch (config-if) # switchport forbidden vlan remove 5
4.2.65.125 switchport hybrid acceptable-frame-type
Command:
switchport hybrid acceptable-frame-type all | tagged | untagged
switchport Switching mode characteristics
hybrid Change PVID for hybrid port
acceptable-frame-type Set acceptable frame type on a port.
all Allow all frames
tagged Allow only tagged frames
untagged Allow only untagged frames
Default:
All
Usage Guide:
To configure acceptable-frame-type of Hybrid VLAN for specific interface
Example:
To configure acceptable-frame-type (tagged) of Hybrid VLAN for GigabitEthernet X/X
Switch# configure terminal
Switch (config)# interface GigabitEthernet X/X
Switch (config-if) # switchport hybrid acceptable-frame-type tagged
4.2.65.126 switchport hybrid allowed vlan
Command:
switchport hybrid allowed vlan [all | none | add <vlan_list> | remove <vlan_list> | except <vlan_list>]
switchport Switching mode characteristics
hybrid Change PVID for hybrid port
allowed Set allowed VLAN characteristics when interface is in hybrid mode
add Add VLANs to the current list
all All VLANs
except All VLANs except the following
none No VLANs
remove Remove VLANs from the current list
Default:
All
Usage Guide:
To configure VLAN list of Hybrid VLAN for specific interface
Example:
To configure VLAN list (None) of Hybrid VLAN for GigabitEthernet X/X
Switch# configure terminal
Switch (config)# interface GigabitEthernet X/X
Switch (config-if) # switchport hybrid allowed vlan none
4.2.65.127 switchport hybrid egress-tag
Command:
switchport hybrid egress-tag [none | all | all except-native]
switchport Switching mode characteristics
hybrid Change PVID for hybrid port
egress-tag Egress VLAN tagging configuration
all Tag all frames
none No egress tagging
except-native Tag all frames except frames classified to native VLAN of the hybrid port
Default:
Untagged Port VLAN
Usage Guide:
To configure Egress Tagging VLAN mode for specific interface
Example:
To configure Egress Tagging VLAN mode (None) for GigabitEthernet X/X
Switch# configure terminal
Switch (config)# interface GigabitEthernet X/X
Switch (config-if) # switchport hybrid egress-tag none
4.2.65.128 switchport hybrid ingress-filtering
Command:
switchport hybrid ingress-filtering
switchport Switching mode characteristics
hybrid Change PVID for hybrid port
ingress-filtering VLAN Ingress filter configuration
Default:
Enabled
Usage Guide:
To enable Ingress-filtering with Hybrid VLAN mode for specific interface
Example:
To enable Ingress-filtering with Hybrid VLAN mode for GigabitEthernet X/X
Switch# configure terminal
Switch (config)# interface GigabitEthernet X/X
Switch (config-if) # switchport hybrid ingress-filtering
4.2.65.129 switchport hybrid native vlan
Command:
switchport hybrid native vlan
switchport Switching mode characteristics
hybrid Change PVID for hybrid port
native Set native VLAN
vlan Set native VLAN when interface is in hybrid mode
Default:
1
Usage Guide:
To configure PVID in Hybrid VLAN mode for specific interface
Example:
To enable PVID (5) in Hybrid VLAN mode for GigabitEthernet X/X
Switch# configure terminal
Switch (config)# interface GigabitEthernet X/X
Switch (config-if) # switchport hybrid native vlan 5
4.2.65.130 switchport hybrid port-type
Command:
switchport hybrid port-type c-port | s-custom-port | s-port | unaware
switchport Switching mode characteristics
hybrid Change PVID for hybrid port
port-type Set port type
c-port Customer port
s-custom-port Custom Provider port
s-port Provider port
unaware Port in not aware of VLAN tags.
Default:
C-port
Usage Guide:
To configure Port type in Hybrid VLAN mode for specific interface
Example:
To enable Port type (Unaware) in Hybrid VLAN mode for GigabitEthernet X/X
Switch# configure terminal
Switch (config)# interface GigabitEthernet X/X
Switch (config-if) # switchport hybrid port-type unaware
4.2.65.131 switchport mode
Command:
switchport mode c-port | s-custom-port | s-port | unaware
switchport Switching mode characteristics
mode Set mode of the interface
port-type Set port type
c-port Customer port
s-custom-port Custom Provider port
s-port Provider port
unaware Port in not aware of VLAN tags.
Default:
unaware
Usage Guide:
To configure VLAN mode for specific interface
Example:
To configure VLAN mode (trunk) for GigabitEthernet X/X
Switch# configure terminal
Switch (config)# interface GigabitEthernet X/X
Switch (config-if) # switchport mode trunk
4.2.65.132 switchport vlan ip-subnet
Command:
switchport vlan ip-subnet id <1-128> <ipv4_subnet> vlan <vlan_id>
switchport Switching mode characteristics
vlan VLAN commands
ip-subnet VCL IP Subnet-based VLAN configuration.
id id keyword
<1-128> Unique VCE ID for each VCL entry (1-128)
xx.xx.xx.xx/mm.mm.mm.mm).
vlan vlan keyword
Default:
None
Usage Guide:
To configure IP Subnet-based VLAN for specific interface
Example:
To configure IP Subnet-based VLAN as below table for GigabitEthernet X/X
| VCE ID | IP Address | Mask Length | VLAN ID |
| 1 | 192.168.1.0 | 24 | 5 |
Switch# configure terminal
Switch (config)# interface GigabitEthernet X/X
Switch (config-if) # switchport vlan ip-subnet id 1 192.168.1.0/255.255.255.0 vlan 5
4.2.65.133 switchport vlan mac
Command:
switchport vlan mac <mac_ucast> vlan <vlan_id>
switchport Switching mode characteristics
vlan VLAN commands
mac MAC-based VLAN commands
<mac_ucast> 48 bit unicast MAC address: xx:xx:xx:xx:xx:xx
vlan vlan keyword
<vlan_id> VLAN ID required for the group to VLAN mapping (Range: 1-4095)
Default:
None
Usage Guide:
To configure MAC-based VLAN for specific interface
Example:
To configure MAC-based VLAN as below table for GigabitEthernet X/X
| MAC Address | VLAN ID |
| 00-55-44-33-22-11 | 5 |
Switch# configure terminal
Switch (config)# interface GigabitEthernet X/X
Switch (config-if) # switchport vlan mac 00:55:44:33:22:11 vlan 5
4.2.65.134 switchport vlan mapping
Command:
switchport vlan mapping <group id : 1-29>
switchport Switching mode characteristics
vlan VLAN commands
mapping Maps an interface to a VLAN translation group.
<group id : 1-29> Group id
Default:
None
Usage Guide:
To configure Group mapping Table for specific interface
Example:
To configure Group mapping (Group 25) for GigabitEthernet X/X
Switch# configure terminal
Switch (config)# interface GigabitEthernet X/X
Switch (config-if) # switchport vlan mapping 25
4.2.65.135 switchport vlan protocol group
Command:
switchport vlan protocol group <word16> vlan <vlan_id>
switchport Switching mode characteristics
vlan VLAN commands
protocol Protocol-based VLAN commands
group Protocol-based VLAN group commands
vlan vlan keyword
Default:
None
Usage Guide:
To configure VLAN protocol group for specific interface
Example:
To configure VLAN protocol group as tabled below for GigabitEthernet X/X
| Group Name | VLAN ID |
| 8081 | 5 |
Switch# configure terminal
Switch (config)# interface GigabitEthernet X/X
Switch (config-if) # switchport vlan protocol group 8081 vlan 5
4.2.65.136 switchport voice vlan discovery-protocol
Command:
switchport voice vlan discovery-protocol both | lldp | oui
switchport Switching mode characteristics
voice Voice appliance attributes
vlan Vlan for voice traffic
discovery-protocol Set Voice VLAN port discovery protocol
both Detect telephony device by OUI address and LLDP
Ildp Detect telephony device by LLDP
oui Detect telephony device by OUI address
Default:
OUI
Usage Guide:
To configure Discovery-protocol in the Voice VLAN for specific interface
Example: To configure Discovery-protocol (LLDP) in the Voice VLAN for GigabitEthernet X/X
Switch# configure terminal
Switch (config)# interface GigabitEthernet X/X
Switch (config-if) # switchport voice vlan discovery-protocol lldp
4.2.65.137 switchport voice vlan mode
Command:
switchport voice vlan mode auto | disable | force
switchport Switching mode characteristics
voice Voice appliance attributes
vlan Vlan for voice traffic
mode Set Voice VLAN port mode
auto Enable auto detect mode
disable disjoin Voice VLAN
force Force to join Voice VLAN
Default:
Disabled
Usage Guide:
To configure Voice VLAN mode for specific interface
Example:
To configure Voice VLAN mode (Auto) for GigabitEthernet X/X
Switch# configure terminal
Switch (config)# interface GigabitEthernet X/X
Switch (config-if) # switchport voice vlan mode auto
4.2.65.138 switchport voice vlan security
Command:
switchport voice vlan security
switchport Switching mode characteristics
voice Voice appliance attributes
vlan Vlan for voice traffic
security Enable Voice VLAN port security mode
Default:
Disabled
Usage Guide:
To enable Voice VLAN security for specific interface
Example:
To enable Voice VLAN security for GigabitEthernet X/X
Switch# configure terminal
Switch (config)# interface GigabitEthernet X/X
Switch (config-if) # switchport voice vlan security
4.2.66 interface vlan
Command:
interface vlan
vlan VLAN interface configurations
Default:
N/A
Usage Guide:
To enter the VLAN interface mode.
Example:
To enter the VLAN 1 interface mode
Switch# configure terminal
Switch (config)# interface vlan 1
Switch (config-if-vlan)#
4.2.66.1 do
Command:
do < exec commands >
do To run exec commands in config mode
Default:
N/A
Usage Guide:
To run exec commands in configure terminal mode
Example:
To run "show aaa" in configure terminal mode.
Switch# configure terminal
Switch (config)# interface vlan X
Switch (config-if-vlan)# do show aaa
console : local
telnet : local
ssh : local
http : local
4.2.66.2 end
Command:
end
end Go back to EXEC mode
Default:
Auto
Usage Guide:
To back to EXEC mode
Example:
To back to EXEC mode
Switch# configure terminal
Switch (config)# interface vlan X
Switch (config-if-vlan)# end
Switch#
4.2.66.3 exit
Command:
exit
exit Exit from current mode
Default:
None
Usage Guide:
To exit current mode
Example:
To exit current mode.
Switch# configure terminal
Switch (config)# interface vlan X
Switch (config-if-vlan)# exit
Switch (config)#
4.2.66.4 ip address
Command:
ip address
ip Interface Internet Protocol config commands
address Address configuration
Default:
None
Usage Guide:
To configure IP address mode for specific VLAN
Example:
To configure IP address mode (192.168.1.10/24) for VLAN X
Switch# configure terminal
Switch (config)# interface vlan X
Switch (config-if-vlan)# ip address 192.168.1.10 255.255.255.0
4.2.66.5 ip address dhcp
Command:
ip address dhcp
ip Interface Internet Protocol config commands
address Address configuration
dhcp Enable DHCP
Default:
None
Usage Guide:
To configure IP address mode for specific VLAN
Example:
To configure IP address mode (DHCP) for VLAN X
Switch# configure terminal
Switch (config)# interface vlan X
Switch (config-if-vlan)# ip address dhcp
4.2.66.6 ip address dhcp fallback
Command:
ip address dhcp fallback
ip Interface Internet Protocol config commands
address Address configuration
dhcp Enable DHCP
Default:
None
Usage Guide:
To configure DHCP fallback IP address for specific VLAN
Example:
To configure DHCP fallback IP address (192.168.1.10/24) for VLAN X
Switch# configure terminal
Switch (config)# interface vlan X
Switch (config-if-vlan)# ip address dhcp fallback 192.168.1.10 255.255.255.0
4.2.66.7 ip dhcp server
Command:
ip dhcp server
ip Interface Internet Protocol config commands
dhcp Configure DHCP server parameters
server Enable DHCP server per VLAN
Default:
None
Usage Guide:
To enable IPv4 DHCP Server for specific VLAN
Example:
To enable IPv4 DHCP Server for VLAN X
Switch# configure terminal
Switch (config)# interface vlan X
Switch (config-if-vlan)# ip dhcp server
4.2.66.8 ip igmp snooping
Command:
ip igmp snooping
ip Interface Internet Protocol config commands
igmp Internet Group Management Protocol
snooping Snooping IGMP
Default:
Disabled
Usage Guide:
To enable IGMP snooping for specific VLAN
Example:
To enable IGMP snooping for VLAN X
Switch# configure terminal
Switch (config)# interface vlan X
Switch (config-if-vlan)# ip igmp snooping
4.2.66.9 ip igmp snooping compatibility
Command:
compatibility Interface compatibility
auto Compatible with IGMPv1/IGMPv2/IGMPv3
v1 Forced IGMPv1
v2 Forced IGMPv2
v3 Forced IGMPv3
Default:
Auto
Usage Guide:
To configure IGMP snooping version for specific VLAN
Example:
To configure IGMP snooping V2 for VLAN X
Switch# configure terminal
Switch (config)# interface vlan X
Switch (config-if-vlan)# ip igmp snooping compatibility v2
4.2.66.10 ip igmp snooping last-member-query-interval
Command:
ip igmp snooping last-member-query-interval
ip Interface Internet Protocol config commands
igmp Internet Group Management Protocol
snooping Snooping IGMP
last-member-query-interval Last Member Query Interval in tenths of seconds
Default:
10
Usage Guide:
To configure Last-member-query-interval of IGMP snooping for specific VLAN
Example:
To configure Last-member-query-interval (100 seconds) of IGMP snooping for VLAN X
Switch# configure terminal
Switch (config)# interface vlan X
Switch (config-if-vlan)# ip igmp snooping last-member-query-interval 1000
4.2.66.11 ip igmp snooping priority
Command:
ip igmp snooping priority
ip Interface Internet Protocol config commands
igmp Internet Group Management Protocol
snooping Snooping IGMP
priority Interface CoS priority
Default:
0
Usage Guide:
To configure CoS priority of IGMP snooping for specific VLAN
Example:
To configure CoS priority (5) of IGMP snooping for VLAN X
Switch# configure terminal
Switch (config)# interface vlan X
Switch (config-if-vlan)# ip igmp snooping priority 5
4.2.66.12 ip igmp snooping querier address
Command:
ip igmp snooping querier address
ip Interface Internet Protocol config commands
igmp Internet Group Management Protocol
snooping Snooping IGMP
querier IGMP Querier configuration
address IGMP Querier address configuration
<ipv4_ucast> A valid IPv4 unicast address
Default:
0.0.0.0
Usage Guide:
To configure Querier address of IGMP snooping for specific VLAN
Example:
To configure Querier address (192.168.1.15) of IGMP snooping for VLAN X
Switch# configure terminal
Switch (config)# interface vlan X
Switch (config-if-vlan)# ip igmp snooping querier address 192.168.1.15
4.2.66.13 ip igmp snooping querier election
Command:
ip igmp snooping querier election
ip Interface Internet Protocol config commands
igmp Internet Group Management Protocol
snooping Snooping IGMP
querier IGMP Querier configuration
election Act as an IGMP Querier to join Querier-Election
Default:
Enabled
Usage Guide:
To enable Querier-election of IGMP snooping for specific VLAN
Example:
To enable Querier-election of IGMP snooping for VLAN X
Switch# configure terminal
Switch (config)# interface vlan X
Switch (config-if-vlan)# ip igmp snooping querier election
4.2.66.14 ip igmp snooping query-interval
Command:
ip igmp snooping query-interval
ip Interface Internet Protocol config commands
igmp Internet Group Management Protocol
snooping Snooping IGMP
query-interval Query Interval in seconds
Default:
125
Usage Guide:
To configure Querier-interval of IGMP snooping for specific VLAN
Example:
To configure Querier-interval (600 seconds) of IGMP snooping for VLAN X
Switch# configure terminal
Switch (config)# interface vlan X
Switch (config-if-vlan)# ip igmp snooping query-interval 600
4.2.66.15 ip igmp snooping query-max-response-time
Command:
ip igmp snooping query-max-response-time
ip Interface Internet Protocol config commands
igmp Internet Group Management Protocol
snooping Snooping IGMP
query-max-response-time Query Response Interval in tenths of seconds
Default:
125
Usage Guide:
To configure Querier-interval of IGMP snooping for specific VLAN
Example:
To configure Querier-interval (60 seconds) of IGMP snooping for VLAN X
Switch# configure terminal
Switch (config)# interface vlan X
Switch (config-if-vlan)# ip igmp snooping query-max-response-time 600
4.2.66.16 ip igmp snooping robustness-variable
Command:
ip igmp snooping robustness-variable
ip Interface Internet Protocol config commands
igmp Internet Group Management Protocol
snooping Snooping IGMP
robustness-variable Robustness Variable
Default:
2
Usage Guide:
To configure Robustness Variable of IGMP snooping for specific VLAN
Example:
To configure Robustness Variable (88) of IGMP snooping for VLAN X
Switch# configure terminal
Switch (config)# interface vlan X
Switch (config-if-vlan)# ip igmp snooping robustness-variable 88
4.2.66.17 ip igmp snooping unsolicited-report-interval
Command:
ip igmp snooping unsolicited-report-interval
ip Interface Internet Protocol config commands
igmp Internet Group Management Protocol
snooping Snooping IGMP
robustness-variable Robustness Variable
Default:
1
Usage Guide:
To configure Unsolicited-Report-Interval of IGMP snooping for specific VLAN
Example:
To configure Unsolicited-Report-Interval (99 seconds) of IGMP snooping for VLAN X
Switch# configure terminal
Switch (config)# interface vlan X
Switch (config-if-vlan)# ip igmp snooping unsolicited-report-interval 99
4.2.66.18 ipv6 address
Command:
Ipv6 address X:X:X:X::X/<0-128>
ipv6 IPv6 configuration commands
address Configure the IPv6 address of an interface
X:X:X:X::X/<0-128> IPv6 prefix x:x::y/z
Default:
None
Usage Guide:
To configure IPv6 address for specific VLAN
Example:
To configure IPv6 address (2001::7788/64) for VLAN X
Switch# configure terminal
Switch (config)# interface vlan X
Switch (config-if-vlan)# ipv6 address 2001::7788/64
4.2.66.19 ipv6 mld snooping
Command:
ipv6 mld snooping
ipv6 IPv6 configuration commands
mld Multicast Listener Discovery
snooping Snooping MLD
Default:
Disabled
Usage Guide:
To enable MLD snooping for specific VLAN
Example:
To enable MLD snooping for VLAN X
Switch# configure terminal
Switch (config)# interface vlan X
Switch (config-if-vlan)# ipv6 mld snooping
4.2.66.20 ipv6 mld snooping compatibility
Command:
ipv6 mld snooping compatibility auto | v1 | v2
ipv6 IPv6 configuration commands
mld Multicast Listener Discovery
snooping Snooping MLD
compatibility Interface compatibility
auto Compatible with MLDv1/MLDv2
v1 Forced MLDv1
v2 Forced MLDv2
Default:
Auto
Usage Guide:
To configure MLD snooping version for specific VLAN
Example:
To configure MLD snooping V2 for VLAN X
Switch# configure terminal
Switch (config)# interface vlan X
Switch (config-if-vlan)# ipv6 mld snooping compatibility v2
4.2.66.21 ipv6 mld snooping last-member-query-interval
Command:
ipv6 mld snooping last-member-query-interval
ipv6 IPv6 configuration commands
mld Multicast Listener Discovery
snooping Snooping MLD
last-member-query-interval Last Member Query Interval in tenths of seconds
Default:
10
Usage Guide:
To configure Last-member-query-interval of MLD snooping for specific VLAN
Example:
To configure Last-member-query-interval (100 seconds) of MLD snooping for VLAN X
Switch# configure terminal
Switch (config)# interface vlan X
Switch (config-if-vlan)# ipv6 mld snooping last-member-query-interval 1000
4.2.66.22 ipv6 mld snooping priority
Command:
ipv6 mld snooping priority
ipv6 IPv6 configuration commands
mld Multicast Listener Discovery
snooping Snooping MLD
priority Interface CoS priority
Default:
0
Usage Guide:
To configure CoS priority of MLD snooping for specific VLAN
Example:
To configure CoS priority (5) of MLD snooping for VLAN X
Switch# configure terminal
Switch (config)# interface vlan X
Switch (config-if-vlan)# ipv6 mld snooping priority 5
4.2.66.23 ipv6 mld snooping querier election
Command:
ipv6 mld snooping querier election
ipv6 IPv6 configuration commands
mld Multicast Listener Discovery
snooping Snooping MLD
querier MLD Querier configuration
election Act as an MLD Querier to join Querier-Election
Default:
Enabled
Usage Guide:
To enable Querier-election of MLD snooping for specific VLAN
Example:
To enable Querier-election of MLD snooping for VLAN X
Switch# configure terminal
Switch (config)# interface vlan X
Switch (config-if-vlan)# ipv6 mld snooping querier election
4.2.66.24 ipv6 mld snooping query-interval
Command:
ipv6 mld snooping query-interval
ipv6 IPv6 configuration commands
mld Multicast Listener Discovery
snooping Snooping MLD
query-interval Query Interval in seconds
Default:
125
Usage Guide:
To configure Querier-interval of MLD snooping for specific VLAN
Example:
To configure Querier-interval (600 seconds) of MLD snooping for VLAN X
Switch# configure terminal
Switch (config)# interface vlan X
Switch (config-if-vlan)# ipv6 mld snooping query-interval 600
4.2.66.25 ipv6 mld snooping query-max-response-time
Command:
ipv6 mld snooping query-max-response-time
ipv6 IPv6 configuration commands
mld Multicast Listener Discovery
snooping Snooping MLD
query-max-response-time Query Response Interval in tenths of seconds
Default:
125
Usage Guide:
To configure Querier-interval of MLD snooping for specific VLAN
Example:
To configure Querier-interval (60 seconds) of MLD snooping for VLAN X
Switch# configure terminal
Switch (config)# interface vlan X
Switch (config-if-vlan)# ipv6 mld snooping query-max-response-time 600
4.2.66.26 ipv6 mld snooping robustness-variable
Command:
ipv6 mld snooping robustness-variable
ipv6 IPv6 configuration commands
mld Multicast Listener Discovery
snooping Snooping MLD
robustness-variable Robustness Variable
Default:
2
Usage Guide:
To configure Robustness Variable of MLD snooping for specific VLAN
Example:
To configure Robustness Variable (88) of MLD snooping for VLAN X
Switch# configure terminal
Switch (config)# interface vlan X
Switch (config-if-vlan)# ipv6 mld snooping robustness-variable 88
4.2.66.27 ipv6 mld snooping unsolicited-report-interval
Command:
ipv6 mld snooping unsolicited-report-interval
ipv6 IPv6 configuration commands
mld Multicast Listener Discovery
snooping Snooping MLD
robustness-variable Robustness Variable
Default:
1
Usage Guide:
To configure Unsolicited-Report-Interval of MLD snooping for specific VLAN
Example:
To configure Unsolicited-Report-Interval (99 seconds) of MLD snooping for VLAN X
Switch# configure terminal
Switch (config)# interface vlan X
Switch (config-if-vlan)# ipv6 mld snooping unsolicited-report-interval 99
4.2.66.28 no
Command:
no
no Negate a command or set its defaults
Default:
N/A
Usage Guide:
To default the function for specific interface
Example:
To disable the function (ip address dhcp) for VLAN X
Switch# configure terminal
Switch (config)# interface vlan X
Switch (config-if-vlan)# no ip address dhcp
4.2.67 ip arp inspection
Command:
ip arp inspection
ip Internet Protocol
arp Address Resolution Protocol
inspection ARP inspection
Default:
N/A
Usage Guide:
To enable ARP inspection
Example:
To enable ARP inspection
Switch# configure terminal
Switch (config)# ip arp inspection
4.2.68 ip arp inspection entry interface
Command:
ip arp inspection entry interface [10GigabitEthernet | GigabitEthernet] <vlan_id> <mac_ucast> <ipv4_ucast>
ip Internet Protocol
arp Address Resolution Protocol
inspection ARP inspection
entry arp inspection entry
interface arp inspection entry interface config
GigabitEthernet 1 Gigabit Ethernet Port
10GigabitEthernet 10 Gigabit Ethernet Port
Default:
N/A
Usage Guide:
To configure Static ARP Inspection Table.
Example:
To configure Static ARP Inspection Table as below table.
| Port | VLAN ID | MAC Address | IP Address |
| 1 | 1 | 00-11-22-33-44-55 | 192.168.0.18 |
Switch# configure terminal
Switch (config)# ip arp inspection entry interface GigabitEthernet 1/1 1
00:11:22:33:44:55 192.168.0.18
4.2.69 ip arp inspection translate
Command:
ip arp inspection translate
ip Internet Protocol
arp Address Resolution Protocol
inspection ARP inspection
translate arp inspection translate all entries
Default:
N/A
Usage Guide:
To translate dynamic entries into static ARP inspection table.
Example:
To translate dynamic entries into static ARP inspection table.
Switch# configure terminal
Switch (config)# ip arp inspection translate
ARP Inspection:
Translate 1 dynamic entries into static entries.
4.2.70 ip arp inspection translate interface
Command:
ip arp inspection translate interface [10GigabitEthernet | GigabitEthernet] <vlan_id> <mac_ucast> <ipv4_ucast>
ip Internet Protocol
arp Address Resolution Protocol
inspection ARP inspection
translate arp inspection translate all entries
interface arp inspection entry interface config
GigabitEthernet 1 Gigabit Ethernet Port
10GigabitEthernet 10 Gigabit Ethernet Port
Default:
N/A
Usage Guide:
To translate dynamic entries into static ARP inspection table for specific interface.
Example:
To translate below dynamic entries into static ARP inspection table for GigabitEthernet 1/1.
| Port | VLAN ID | MAC Address | IP Address |
| 1 | 1 | 00-11-22-33-44-55 | 192.168.0.18 |
Switch# configure terminal
Switch (config)# ip arp inspection translate interface GigabitEthernet 1/1 1
00:11:22:33:44:55 192.168.0.18
4.2.71 ip arp inspection vlan
Command:
ip arp inspection vlan
ip Internet Protocol
arp Address Resolution Protocol
inspection ARP inspection
vlan arp inspection vlan setting
logging ARP inspection vlan logging mode config
all log all entries
deny log denied entries
permit log permitted entries
Default:
N/A
Usage Guide:
To configure VLAN mode of ARP inspection.
Example:
To configure VLAN mode (VLAN 1, Log type: Permit) of ARP inspection.
Switch# configure terminal
Switch (config)# ip arp inspection vlan 1 logging permit
4.2.72 ip dhcp excluded-address
Command:
ip dhcp excluded-address
ip Internet Protocol
dhcp Dynamic Host Configuration Protocol
excluded-address Prevent DHCP from assigning certain addresses
Default:
N/A
Usage Guide:
To configure excluded IP range of DHCP Server.
Example:
To configure excluded IP range (192.168.0.100\~192.168.0.101) of DHCP Server.
Switch# configure terminal
Switch (config)# ip dhcp excluded-address 192.168.0.100 192.168.0.101
4.2.73 ip dhcp pool
Command:
ip dhcp pool
ip Internet Protocol
dhcp Dynamic Host Configuration Protocol
pool Configure DHCP address pools
Default:
N/A
Usage Guide:
To create a DHCP pool.
Example:
To create a DHCP pool (Name: planetbestswitch).
Switch# configure terminal
Switch (config)# ip dhcp pool planetbestswitch
Switch (config-dhcp-pool)#
4.2.73.1 broadcast
Command:
broadcast
broadcast Broadcast address in use on the client's subnet
Default:
None
Usage Guide:
To configure Broadcast IP address (DHCP option 28) of DHCP Server
Example:
To configure Broadcast IP address (192.168.0.66) of DHCP Server for pool "planetbestswitch"
Switch# configure terminal
Switch (config)# ip dhcp pool planetbestswitch
Switch (config-dhcp-pool)# broadcast 192.168.0.66
4.2.73.2 client-identifier fqdn
Command:
client-identifier fqdn
client-identifier
Client identifier
fqdn
FQDN type of client identifier
FQDN in 128 characters
Default:
None
Usage Guide:
To configure FQDN of DHCP Server
Example:
To configure FQDN (123) of DHCP Server for pool "planetbestswitch"
Switch# configure terminal
Switch (config)# ip dhcp pool planetbestswitch
Switch (config-dhcp-pool)# client-identifier fqdn 123
4.2.73.3 client-identifier mac-address
Command:
client-identifier mac-address
client-identifier
Client identifier
mac-address
MAC address type of client identifier
MAC address of client
Default:
None
Usage Guide:
To configure Bind IP to MAC of DHCP Server
Example:
To configure Bind IP to MAC (00:11:22:33:44:55) of DHCP Server for pool "planetbestswitch"
Switch# configure terminal
Switch (config)# ip dhcp pool planetbestswitch
Switch (config-dhcp-pool)# client-identifier mac-address 00:11:22:33:44:55
4.2.73.4 client-name
Command:
client-name
client-name
Client host name
Default:
None
Usage Guide:
To configure Client-name of DHCP Server
Example:
To configure Client-name (555) of DHCP Server for pool "planetbestswitch"
Switch# configure terminal
Switch (config)# ip dhcp pool planetbestswitch
Switch (config-dhcp-pool)# client-name 555
4.2.73.5 default-router
Command:
default-router <A.B.C.D>
default-router
Default routers
Router's IP address
Default:
None
Usage Guide:
To configure Default Gateway of DHCP Server
Example:
To configure Default Gateway (192.168.0.1) of DHCP Server for pool "planetbestswitch"
Switch# configure terminal
Switch (config)# ip dhcp pool planetbestswitch
Switch (config-dhcp-pool)# default-router 192.168.0.1
4.2.73.6 dns-server
Command:
dns-server <A.B.C.D>
dns-server
DNS servers
Server's IP address
Default:
None
Usage Guide:
To configure DNS Server of DHCP Server
Example:
To configure DNS Server (168.95.1.1, 8.8.8.8) of DHCP Server for pool "planetbestswitch"
Switch# configure terminal
Switch (config)# ip dhcp pool planetbestswitch
Switch (config-dhcp-pool)# dns-server 168.95.1.1 8.8.8.8
4.2.73.7 do
Command:
do < exec commands >
do To run exec commands in config mode
Default:
N/A
Usage Guide:
To run exec commands
Example:
To run "show aaa".
Switch# configure terminal
Switch (config)# ip dhcp pool planetbestswitch
Switch (config-dhcp-pool)# do show aaa
console : local
telnet : local
ssh : local
http : local
4.2.73.8 domain-name
Command:
domain-name <word128>
domain-name Domain name
Default:
None
Usage Guide:
To configure Domain Name of DHCP Server
Example:
To configure Domain Name (planet.com) of DHCP Server for pool "planetbestswitch"
Switch# configure terminal
Switch (config)# ip dhcp pool planetbestswitch
Switch (config-dhcp-pool)# domain-name planet.com
4.2.73.9 end
Command:
end
end Go back to EXEC mode
Default:
Auto
Usage Guide:
To back to EXEC mode
Example:
To back to EXEC mode
Switch# configure terminal
Switch (config)# ip dhcp pool planetbestswitch
Switch (config-dhcp-pool)# end
Switch#
4.2.73.10 exit
Command:
exit
exit Exit from current mode
Default:
None
Usage Guide:
To exit current mode
Example:
To exit current mode.
Switch# configure terminal
Switch (config)# ip dhcp pool planetbestswitch
Switch (config-dhcp-pool)# exit
Switch (config)#
4.2.73.11 hardware-address
Command:
hardware-address
hardware-address
Client hardware address
Client MAC address
Default:
None
Usage Guide:
To configure MAC address of DHCP Server while the pool is in the host type.
Example:
To configure MAC address (00:11:22:33:44:55) of DHCP Server for pool "planetbestswitch" while the pool is in the host type.
Switch# configure terminal
Switch (config)# ip dhcp pool planetbestswitch
Switch (config-dhcp-pool)# hardware-address 00:11:22:33:44:55
4.2.73.12 host
Command:
host
host
Client IP address and mask
Network number
Network mask in dotted-decimal notation, excluding 255.255.255.255
Default:
None
Usage Guide:
To configure Host IP address of DHCP Server.
Example:
To configure Host IP address (192.168.1.10/24) of DHCP Server for pool "planetbestswitch".
Switch# configure terminal
Switch (config)# ip dhcp pool planetbestswitch
Switch (config-dhcp-pool)# host 192.168.1.10 255.255.255.0
4.2.73.13 lease
Command:
lease <0-365> <0-23> <0-59> | infinite
lease Address lease time
<0-365> Days
<0-23> Hours
<0-59> Minutes
infinite Infinite lease
Default:
1 day
Usage Guide:
To configure Lease Time of DHCP Server.
Example:
To configure Lease Time (119 minutes) of DHCP Server for pool "planetbestswitch".
Switch# configure terminal
Switch (config)# ip dhcp pool planetbestswitch
Switch (config-dhcp-pool)# lease 0 1 59
4.2.73.14 netbios-name-server
Command:
Default:
None
Usage Guide:
To configure NetBIOS scope of DHCP Server.
Example:
To configure NetBIOS scope (planet) of DHCP Server for pool "planetbestswitch".
Switch# configure terminal
Switch (config)# ip dhcp pool planetbestswitch
Switch (config-dhcp-pool)# netbios-scope planet
4.2.73.17 network
Command:
network
network
Network number and mask
Network number
Network mask in dotted-decimal notation, excluding 255.255.255.255
Default:
None
Usage Guide:
To configure Network IP address of DHCP Server.
Example:
To configure Network IP address (192.168.1.11/24) of DHCP Server for pool "planetbestswitch".
Switch# configure terminal
Switch (config)# ip dhcp pool planetbestswitch
Switch (config-dhcp-pool)# network 192.168.0.11 255.255.255.0
4.2.73.18 nis-domain-name
Command:
nis-domain-name
nis-domain-name
NIS domain name
Domain name
Default:
None
Usage Guide:
To configure NIS Domain Name of DHCP Server
Example:
To configure NIS Domain Name (planet.com) of DHCP Server for pool "planetbestswitch"
Switch# configure terminal
Switch (config)# ip dhcp pool planetbestswitch
Switch (config-dhcp-pool)# nis-domain-name planet.com
4.2.73.19 nis-server
Command:
nis-server <A.B.C.D>
nis-server Network information servers
Default:
None
Usage Guide:
To configure NIS Server of DHCP Server
Example:
To configure NIS Server (1.1.1.1) of DHCP Server for pool "planetbestswitch"
Switch# configure terminal
Switch (config)# ip dhcp pool planetbestswitch
Switch (config-dhcp-pool)# nis-server 1.1.1.1
4.2.73.20 no
Command:
no
no Negate a command or set its defaults
Default:
N/A
Usage Guide:
To default the function
Example:
To disable the function (nis-domain-name planet.com) for pool "planetbestswitch"
Switch# configure terminal
Switch (config)# ip dhcp pool planetbestswitch
Switch (config-dhcp-pool)# no nis-domain-name planet.com
4.2.73.21 ntp-server
Command:
ntp-server <A.B.C.D>
ntp-server NTP servers
Default:
None
Usage Guide:
To configure NTP Server of DHCP Server
Example:
To configure NTP Server (1.1.1.1) of DHCP Server for pool "planetbestswitch"
Switch# configure terminal
Switch (config)# ip dhcp pool planetbestswitch
Switch (config-dhcp-pool)# ntp-server 1.1.1.1
4.2.73.22 vendor
Command:
vendor class-identifier < 0x ">specific-info
vendor Vendor configuration
class-identifier Vendor class identifier
"<0x>" Class identifier in 64 characters
specific-info Vendor specific information
Default:
None
Usage Guide:
To configure Vendor ID and info of DHCP Server
Example:
To configure Vendor ID and info as below table of DHCP Server for pool "planetbestswitch"
| Vendor 1 Class Identifier |
| Vendor 1 Specific Information |
| 0x8 |
| 0x08 |
Switch# configure terminal
Switch (config)# ip dhcp pool planetbestswitch
Switch (config-dhcp-pool)# vendor class-identifier "0x8" specific-info 0x8
4.2.74 ip dns proxy
Command:
ip dns proxy
ip Internet Protocol
dns Domain Name System
proxy DNS proxy service
Default:
Disabled
Usage Guide:
To enable DNS proxy.
Example:
To enable DNS proxy.
Switch# configure terminal
Switch (config)# ip dns proxy
4.2.75 ip helper-address
Command:
ip helper-address
ip Internet Protocol
helper-address DHCP relay server
Default:
None
Usage Guide:
To configure IP address of DHCP.
Example:
To configure IP address (1.1.1.1) of DHCP.
Switch# configure terminal
Switch (config)# ip helper-address 1.1.1.1
4.2.76 ip http secure-redirect
Command:
ip http secure-redirect
ip Internet Protocol
http Hypertext Transfer Protocol
secure-redirect Secure HTTP web redirection
Default:
Disabled
Usage Guide:
To redirect WebUI from HTTP to HTTPS
Example:
To redirect WebUI from HTTP to HTTPS
Switch# configure terminal
Switch (config)# ip http secure-redirect
4.2.77 ip http secure-server
Command:
ip http secure-server
ip Internet Protocol
http Hypertext Transfer Protocol
secure-server Secure HTTP web server
Default:
Disabled
Usage Guide:
To enable HTTPS WebUI.
Example:
To enable HTTPS WebUI.
Switch# configure terminal
Switch (config)# ip http secure-server
4.2.78 ip igmp host-proxy
Command:
ip igmp host-proxy
ip Internet Protocol
igmp Internet Group Management Protocol
host-proxy IGMP proxy configuration
Default:
Disabled
Usage Guide:
To enable IGMP Proxy
Example:
To enable IGMP Proxy.
Switch# configure terminal
Switch (config)# ip igmp host-proxy
4.2.79 ip igmp host-proxy leave-proxy
Command:
ip igmp host-proxy leave-proxy
ip Internet Protocol
igmp Internet Group Management Protocol
host-proxy IGMP proxy configuration
leave-proxy IGMP proxy for leave configuration
Default:
Disabled
Usage Guide:
To enable IGMP leave-proxy
Example:
To enable IGMP leave-proxy.
Switch# configure terminal
Switch (config)# ip igmp host-proxy leave-proxy
4.2.80 ip igmp snooping
Command:
ip igmp snooping
ip Internet Protocol
igmp Internet Group Management Protocol
snooping Snooping IGMP
Default:
Disabled
Usage Guide:
To enable IGMP Snooping.
Example:
To enable IGMP Snooping.
Switch# configure terminal
Switch (config)# ip igmp snooping
4.2.81 ip igmp snooping vlan
Command:
ip igmp snooping vlan
ip Internet Protocol
igmp Internet Group Management Protocol
snooping Snooping IGMP
vlan IGMP VLAN
Default:
Disabled
Usage Guide:
To enable IGMP Snooping for specific VLAN.
Example:
To enable IGMP Snooping for VLAN 1.
Switch# configure terminal
Switch (config)# ip igmp snooping vlan 1
4.2.82 ip igmp ssm-range
Command:
ip igmp ssm-range
ip Internet Protocol
igmp Internet Group Management Protocol
ssm-range IPv4 address range of Source Specific Multicast
Default:
232.0.0.0/8
Usage Guide:
To enable SSM Range of IGMP.
Example:
To enable SSM Range (239.239.239.239/32) of IGMP.
Switch# configure terminal
Switch (config)# ip igmp ssm-range 239.239.239.239 32
4.2.83 ip igmp unknown-flooding
Command:
ip igmp unknown-flooding
ip Internet Protocol
igmp Internet Group Management Protocol
unknown-flooding Flooding unregistered IPv4 multicast traffic
Default:
Enabled
Usage Guide:
To flood unregistered IPv4 multicast traffic.
Example:
To flood unregistered IPv4 multicast traffic.
Switch# configure terminal
Switch (config)# ip igmp unknown-flooding
4.2.84 ip name-server
Command:
ip name-server
ip Internet Protocol
name-server Domain Name System
Default:
Enabled
Usage Guide:
To configure DNS server IP address.
Example:
To configure DNS server IP address (8.8.8.8).
Switch# configure terminal
Switch (config)# ip name-server 8.8.8.8
4.2.85 ip name-server dhcp
Command:
ip name-server dhcp
ip
Internet Protocol
name-server
Domain Name System
dhcp
Dynamic Host Configuration Protocol
Default:
None
Usage Guide:
To configure DNS IP address via DHCP Server.
Example:
To configure DNS IP address via DHCP Server.
Switch# configure terminal
Switch (config)# ip name-server 8.8.8.8
4.2.86 ip name-server dhcp interface vlan
Command:
ip name-server dhcp interface vlan
ip
Internet Protocol
name-server
Domain Name System
dhcp
Dynamic Host Configuration Protocol
vlan
VLAN Interface
VLAN identifier(s): VID
Default:
None
Usage Guide:
To configure DNS IP address via specific VLAN DHCP Server.
Example:
To configure DNS IP address via specific VLAN 5 DHCP Server.
Switch# configure terminal
Switch (config)# ip name-server dhcp interface vlan 5
4.2.87 ip route
Command:
ip route <ipv4_addr> <ipv4_netmask> <ipv4_gateway>
ip Internet Protocol
route Add IP route
<ipv4_addr> Network
<ipv4_netmask> Netmask
<ipv4_gateway> Gateway
Default:
None
Usage Guide:
To configure static route
Example:
To configure static route as below table.
| Network | Mask Length | Gateway |
| 192.168.1.0 | 24 | 192.168.0.1 |
Switch# configure terminal
Switch (config)# ip route 192.168.1.0 255.255.255.0 192.168.0.1
4.2.88 ip routing
Command:
ip routing
ip Internet Protocol
routing Enable routing for IPv4 and IPv6
Default:
None
Usage Guide:
To enable IP routing
Example:
To enable IP routing
Switch# configure terminal
Switch (config)# ip routing
4.2.89 ip source binding interface
Command:
ip source binding interface 10GigabitEthernet | GigabitEthernet <port_type_id> <ipv4_ucast> <ipv4_netmask>
ip Internet Protocol
source source command
binding ip source binding
interface ip source binding entry interface config
Default:
None
Usage Guide:
To enable Static IP Source Guard Table for specific interface
Example:
To enable Static IP Source Guard Table as below table for GigabitEthernet 1/1
| Port | VLAN ID | IP Address | IP Mask |
| 1 | 1 | 192.168.0.77 | 255.255.255.255 |
Switch# configure terminal
Switch (config)# ip source binding interface GigabitEthernet 1/1 1 192.168.0.77
255.255.255.255
4.2.90 ip ssh
Command:
ip ssh
ip Internet Protocol
ssh Secure Shell
Default:
None
Usage Guide:
To enable SSH service
Example:
To enable SSH service
Switch# configure terminal
Switch (config)# ip ssh
4.2.91 ip verify source
Command:
ip verify source
ip Internet Protocol
verify verify command
source verify source
Default:
Disabled
Usage Guide:
To enable IP Source Guard
Example:
To enable IP Source Guard
Switch# configure terminal
Switch (config)# ip verify source
4.2.92 ip verify source translate
Command:
ip verify source translate
ip Internet Protocol
verify verify command
source verify source
translate ip verify source translate all entries
Default:
Disabled
Usage Guide:
To translate dynamic entries to IP Source Guard table
Example:
To translate dynamic entries to IP Source Guard table
Switch# configure terminal
Switch (config)# ip verify source translate
4.2.93 ipmc profile
Command:
ipmc profile
ipmc IPv4/IPv6 multicast configuration
profile IPMC profile configuration
Default:
Disabled
Usage Guide:
To enable IPMC profile
Example:
To enable IPMC profile
Switch# configure terminal
Switch (config)# ipmc profile
4.2.94 ipmc profile
Command:
ipmc profile
ipmc IPv4/IPv6 multicast configuration
profile IPMC profile configuration
Default:
Disabled
Usage Guide:
To enter IPMC profile mode
Example:
To enter IPMC profile mode (planet)
Switch# configure terminal
Switch (config)# ipmc profile planet
Switch (config-ipmc-profile)#
4.2.94.1 default range
Command:
default range
default Set a command to its defaults
range A range of IPv4/IPv6 multicast addresses for the profile
Default:
None
Usage Guide:
To default IPMC Profile Rule for specific IPMC Profile
Example:
To default IPMC Profile Rule (Entry 1) for specific IPMC Profile (planet)
Switch# configure terminal
Switch (config)# ipmc profile planet
Switch (config-ipmc-profile)# default range 1
4.2.94.2 description
Command:
description
description Additional description about the profile
Default:
None
Usage Guide:
To configure description for specific IPMC Profile
Example:
To configure description (999) for specific IPMC Profile (planet)
Switch# configure terminal
Switch (config)# ipmc profile planet
Switch (config-ipmc-profile)# description 999
4.2.94.3 do
Command:
do < exec commands >
do To run exec commands in config mode
Default:
N/A
Usage Guide:
To run exec commands
Example:
To run "show aaa".
Switch# configure terminal
Switch (config)# ipmc profile planet
Switch (config-ipmc-profile)# do show aaa
console : local
telnet : local
ssh : local
http : local
4.2.94.4 end
Command:
end
end
Go back to EXEC mode
Default:
Auto
Usage Guide:
To back to EXEC mode
Example:
To back to EXEC mode
Switch# configure terminal
Switch (config)# ipmc profile planet
Switch (config-ipmc-profile)#end
Switch#
4.2.94.5 exit
Command:
exit
exit
Exit from current mode
Default:
None
Usage Guide:
To exit current mode
Example:
To exit current mode.
Switch# configure terminal
Switch (config)# ipmc profile planet
Switch (config-ipmc-profile)# exit
Switch (config)#
4.2.94.6 no
Command:
no
no
Negate a command or set its defaults
Default:
N/A
Usage Guide:
To default the function.
Example:
To enable the function (description 999).
Switch# configure terminal
Switch (config)# ipmc profile planet
Switch (config-ipmc-profile)# no description 999
4.2.94.7 range
Command:
range
description Additional description about the profile
deny Deny matching addresses
permit Permit matching addresses
Default:
Deny
Usage Guide:
To configure action of entry for specific IPMC Profile
Example:
To configure action (permit) of entry (1) for specific IPMC Profile (planet)
Switch# configure terminal
Switch (config)# ipmc profile planet
Switch (config-ipmc-profile)# range 1 permit
4.2.95 ipv6 mld host-proxy
Command:
ipv6 mld host-proxy
ipv6
IPv6 configuration commands
mld Multicast Listener Discovery
host-proxy MLD proxy configuration
Default:
Disabled
Usage Guide:
To enable MLD Proxy
Example:
To enable MLD Proxy.
Switch# configure terminal
Switch (config)# ipv6 mld host-proxy
4.2.96 ipv6 mld host-proxy leave-proxy
Command:
ipv6 mld host-proxy leave-proxy
ipv6 IPv6 configuration commands
mld Multicast Listener Discovery
host-proxy MLD proxy configuration
leave-proxy MLD proxy for leave configuration
Default:
Disabled
Usage Guide:
To enable MLD leave-proxy
Example:
To enable MLD leave-proxy.
Switch# configure terminal
Switch (config)# ipv6 mld host-proxy leave-proxy
4.2.97 ipv6 mld snooping
Command:
ipv6 mld snooping
ipv6 IPv6 configuration commands
mld Multicast Listener Discovery
snooping Snooping MLD
Default:
Disabled
Usage Guide:
To enable MLD Snooping.
Example:
To enable MLD Snooping.
Switch# configure terminal
Switch (config)# ipv6 mld snooping
4.2.98 ipv6 mld snooping vlan
Command:
ipv6 mld snooping vlan
ipv6 IPv6 configuration commands
mld Multicast Listener Discovery
snooping Snooping MLD
vlan MLD VLAN
Default:
Disabled
Usage Guide:
To enable MLD Snooping for specific VLAN.
Example:
To enable MLD Snooping for VLAN 1.
Switch# configure terminal
Switch (config)# ipv6 mld snooping vlan 1
4.2.99 ipv6 mld ssm-range
Command:
ipv6 mld ssm-range
ipv6 IPv6 configuration commands
mld Multicast Listener Discovery
ssm-range IPv6 address range of Source Specific Multicast
Default:
ff3e::/96
Usage Guide:
To enable SSM Range of MLD.
Example:
To enable SSM Range (ff3e::7788/128) of MLD.
Switch# configure terminal
Switch (config)# ipv6 mld ssm-range ff3e::7788 128
4.2.100 ipv6 mld unknown-flooding
Command:
ipv6 mld unknown-flooding
ipv6 IPv6 configuration commands
mld Multicast Listener Discovery
unknown-flooding Flooding unregistered IPv6 multicast traffic
Default:
Enabled
Usage Guide:
To flood unregistered IPv6 multicast traffic.
Example:
To flood unregistered IPv6 multicast traffic.
Switch# configure terminal
Switch (config)# ipv6 mld unknown-flooding
4.2.101 ipv6 route
Command:
Ipv6 route <X:X:X:X::X/<0-128>> {<X:X:X:X::X>, interface vlan <vlan_id> <FE80::X:X:X>}
ipv6 IPv6 configuration commands
route Add IP route
<X:X:X:X::X/<0-128>> IPv6 prefix x:x::y/z
interface Select an interface to configure
vlan VLAN Interface
Default:
None
Usage Guide:
To configure static route for IPv6
Example 1:
To configure static route as below table for IPv6.
| Network | Mask Length | Gateway | Next Hop VLAN |
| 2001::7788 | 128 | 2002::1 | 0 |
Switch# configure terminal
Switch (config)# ipv6 route 2001::7788/128 2002::1
Example 2:
To configure static route as below table for IPv6.
| Network | Mask Length | Gateway | Next Hop VLAN |
| 2001::7788 | 128 | fe80::1 | 1 |
Switch# configure terminal
Switch (config)# ipv6 route 2001::7788/128 interface vlan 1 fe80::1
4.2.102 lacp system-priority
Command:
Iacp system-priority <1-65535>
Iacp
LACP settings
system-priority
System priority
<1-65535>
Priority value, lower means higher priority
Default:
32768
Usage Guide:
To configure LACP system-priority.
Example:
To configure LACP system-priority (99).
Switch# configure terminal
Switch (config)# lacp system-priority 99
4.2.103 line
Command:
line { <0~16> | console 0 | vty <0~15>}
line
Configure a terminal line
<0\~16>
List of line numbers
console
Console terminal line
vty
Virtual terminal
Default:
N/A
Usage Guide:
To enter line mode
Example:
To enter line mode (vty 1)
Switch# configure terminal
Switch (config)# line vty 1
Switch (config-line)#
4.2.103.1 do
Command:
do < exec commands >
do
To run exec commands.
Default:
N/A
Usage Guide:
To run exec commands.
Example:
To run "show aaa".
Switch# configure terminal
Switch (config)# line vty 1
Switch (config-line)# do show aaa
console : local
telnet : local
ssh : local
http : local
4.2.103.2 editing
Command:
editing
editing
Enable command line editing
Default:
Enabled
Usage Guide:
To allow user editing command line.
Example:
To allow user editing command line.
Switch# configure terminal
Switch (config)# line vty 1
Switch (config-line)# editing
4.2.103.3 end
Command:
end
end
Go back to EXEC mode
Default:
None
Usage Guide:
To back to EXEC mode
Example:
To back to EXEC mode
Switch# configure terminal
Switch (config)# line vty 1
Switch (config-line)#end
Switch#
4.2.103.4 exec-banner
Command:
exec-banner
exec-banner
Enable the display of the EXEC banner
Default:
Enabled
Usage Guide:
To enable the display of the EXEC banner
Example:
To enable the display of the EXEC banner
Switch# configure terminal
Switch (config)# line vty 1
Switch (config-line)# exec-banner
4.2.103.5 exec-timeout
Command:
exec-timeout <0-1440>
exec-timeout
Set the EXEC timeout
<0-1440>
Timeout in minutes
Default:
N/A
Usage Guide:
To configure EXEC timeout
Example:
To configure EXEC timeout (10 minutes)
Switch# configure terminal
Switch (config)# line vty 1
Switch (config-line)# exec-timeout 10
4.2.103.6 exec-timeout
Command:
exec-timeout <0-1440>
exec-timeout
Set the EXEC timeout
<0-1440>
Timeout in minutes
Default:
N/A
Usage Guide:
To configure EXEC timeout
Example:
To configure EXEC timeout (10 minutes)
Switch# configure terminal
Switch (config)# line vty 1
Switch (config-line)# exec-timeout 10
4.2.103.7 exit
Command:
exit
exit
Exit from current mode
Default:
None
Usage Guide:
To exit current mode
Example:
To exit current mode.
Switch# configure terminal
Switch (config)# line vty 1
Switch (config-line)# exit
Switch (config)#
4.2.103.8 history size
Command:
history size <0-32>
history
Control the command history function
size
Set history buffer size
<0-32>
Number of history commands, 0 means disable
Default:
None
Usage Guide:
To exit current mode
Example:
To exit current mode.
Switch# configure terminal
Switch (config)# line vty 1
Switch (config-line)# history size 1
4.2.103.9 length
Command:
length <0 or 3-512>
length
Set number of lines on a screen
<0 or 3-512>
Number of lines on screen (0 for no pausing)
Default:
None
Usage Guide:
To configure displayed lines on a screen.
Example:
To configure displayed lines on a screen.
Switch# configure terminal
Switch (config)# line vty 1
Switch (config-line)# length 10
4.2.103.10 location
Command:
location
location
Enter terminal location description
One text line describing the terminal's location
Default:
None
Usage Guide:
To configure description of location.
Example:
To configure description (taiwan) of location.
Switch# configure terminal
Switch (config)# line vty 1
Switch (config-line)# location taiwan
4.2.103.11 motd-banner
Command:
motd-banner
motd-banner Enable the display of the MOTD banner
Default:
Enabled
Usage Guide:
To enable MOTD banner.
Example:
To enable MOTD banner..
Switch# configure terminal
Switch (config)# line vty 1
Switch (config-line)# motd-banner
4.2.103.12 no
Command:
no
no Negate a command or set its defaults
Default:
N/A
Usage Guide:
To default the function
Example:
To disable the function (motd-banner) for vty 1
Switch# configure terminal
Switch (config)# line vty 1
Switch (config-line)# no motd-banner
4.2.103.13 privilege level
Command:
privilege level <0-15>
privilege Change privilege level for line
level Assign default privilege level for line
<0-15> Default privilege level for line
Default:
15
Usage Guide:
To configure privilege level
Example:
To configure privilege level (5) for vty 1.
Switch# configure terminal
Switch (config)# line vty 1
Switch (config-line)# privilege level 5
4.2.103.14 width
Command:
width <0 or 40-512>
width Set width of the display terminal
<0 or 40-512> Number of characters on a screen line (0 for unlimited width)
Default:
0
Usage Guide:
To configure width of the display terminal.
Example:
To configure width (50) of the display terminal for vty 1.
Switch# configure terminal
Switch (config)# line vty 1
Switch (config-line)# width 50
4.2.104 lldp holdtime
Command:
Ildp holdtime <2-10>
Ildp LLDP configurations.
holdtime Sets LLDP hold time (The neighbor switch will discarded the LLDP information after "hold time" multiplied with "timer" seconds).
<2-10> 2-10 seconds
Default:
4
Usage Guide:
To enable LLDP hold time
Example:
To enable LLDP hold time (5)
Switch# configure terminal
Switch (config)# lldp holdtime 5
4.2.105 lldp med datum
Command:
Ildp med datum nad83-mllw | nad83-navd88 | wgs84
Ildp LLDP configurations.
med Media Endpoint Discovery
To configure Datum type of LLDP
Example:
To configure Datum type (nad83-mllw) of LLDP
Switch# configure terminal
Switch (config)# lldp med datum nad83-mllw
| lldp | LLDP configurations. |
| med | Media Endpoint Discovery |
| fast | Number of times to repeat LLDP frame transmission at fast start. |
Default:
4
Usage Guide:
To configure frame transmission time of LLDP
Example:
To configure frame transmission time (6) of LLDP
Switch# configure terminal
Switch (config)# lldp med fast 6
4.2.107 lldp med location-tlv altitude
Command:
Ildp med location-tlv altitude [floors
| lldp | LLDP configurations. |
| med | Media Endpoint Discovery |
| location-tlv | LLDP-MED Location Type Length Value parameter |
| altitude | Altitude parameter |
| floors | Specify the altitude in floor. |
| Altitude value. | |
| meters | Specify the altitude in meters. |
Default:
0
Usage Guide:
To configure altitude of LLDP-MED
Example:
To configure altitude (Floors 5) of LLDP-MED
Switch# configure terminal
Switch (config)# lldp med location-tlv altitude floors 5
4.2.108 lldp med location-tlv elin-addr
Command:
Ildp LLDP configurations.
med Media Endpoint Discovery
location-tlv LLDP-MED Location Type Length Value parameter
elin-addr Emergency Location Identification Number, (e.g. E911 and others), such as defined by TIA or NENA.
Default:
0
Usage Guide:
To configure Emergency Location Identification Number of LLDP-MED
Example:
To configure Emergency Location Identification Number (911) of LLDP-MED
Switch# configure terminal
Switch (config)# lldp med location-tlv elin-addr 911
4.2.109 lldp med location-tlv latitude
Command:
Ildp med location-tlv latitude north
Ildp LLDP configurations.
med Media Endpoint Discovery
location-tlv LLDP-MED Location Type Length Value parameter
north Setting latitude direction to north.
south Setting latitude direction to south
Default:
North, 0
Usage Guide:
Ildp LLDP configurations.
med Media Endpoint Discovery
location-tlv LLDP-MED Location Type Length Value parameter
east Setting longitude direction to east.
west Setting longitude direction to west.
Default:
North, 0
Usage Guide:
To configure longitude direction (east, 5) of LLDP-MED
Switch# configure terminal
Switch (config)# lldp med location-tlv longitude east 5
4.2.111 lldp med media-vlan-policy
Command:
Ildp med media-vlan-policy
Ildp LLDP configurations.
med Media Endpoint Discovery
media-vlan-policy Use the media-vlan-policy to create a policy, which can be assigned to an interface.
guest-voice Create a guest voice policy.
guest-voice-signaling Create a guest voice signaling policy.
softphone-voice Create a softphone voice policy.
streaming-video Create a streaming video policy.
video-conferencing Create a video conferencing policy.
video-signaling Create a video signaling policy.
voice Create a voice policy.
voice-signaling Create a voice signaling policy.
tagged The policy uses tagged frames.
untagged The policy uses un-tagged frames.
dscp Differentiated Services Code Point.
I2-priority Layer 2 priority.
<0-7> Priority 0-7
Default:
0
Usage Guide:
To configure media-VLAN-policy of LLDP-MED
Example:
To configure media-VLAN-policy as below table of LLDP-MED
| Policy ID | Application Type | Tag | VLAN ID | L2 Priority | DSCP |
| 1 | Guest Voice | Tagged | 1 | 5 | 45 |
Switch# configure terminal
Switch (config)# lldp med media-vlan-policy 1 guest-voice tagged 1 dscp 45 l2-priority
5
4.2.112 lldp reinit
Command:
Ildp reinit <1-10>
Ildp LLDP configurations.
reinit LLDP tx reinitialization delay in seconds
<1-10> 1-10 seconds.
Default:
2
Usage Guide:
To configure Tx re-initialization delay time of LLDP
Example:
To configure Tx re-initialization delay time (5) of LLDP
Switch# configure terminal
Switch (config)# lldp reinit 5
4.2.113 lldp timer
Command:
Ildp timer <5-32768>
Ildp LLDP configurations.
timer Sets LLDP TX interval (The time between each LLDP frame transmitted in seconds)
<5-32768> 5-32768 seconds.
Default:
30
Usage Guide:
To configure Tx interval time of LLDP
Example:
To configure Tx interval time (555) of LLDP
Switch# configure terminal
Switch (config)# lldp timer 555
4.2.114 lldp transmission-delay
Command:
Ildp transmission-delay <1-8192>
Ildp
LLDP configurations.
transmission-delay Sets LLDP transmission-delay. LLDP transmission delay (the amount of time that the transmission of LLDP frames will delayed after LLDP configuration has changed) in seconds.)
<1-8192> 1-8192 seconds.
Default:
2
Usage Guide:
To configure Tx transmission-delay time of LLDP
Example:
To configure Tx transmission-delay time (88) of LLDP
Switch# configure terminal
Switch (config)# lldp transmission-delay 88
4.2.115 logging host
Command:
logging host
logging Syslog
host host
Default:
0
Usage Guide:
To configure address of log server
Example:
To configure address of log server
Switch# configure terminal
Switch (config)# logging host 192.168.5.5
4.2.116 logging level
Command:
logging level error | info | warning
logging Syslog
level level
error Error
info Information
warning Warning
Default:
Info
Usage Guide:
To configure level of log server
Example:
To configure level of log server
Switch# configure terminal
Switch (config)# logging level error
4.2.117 logging on
Command:
logging on
logging Syslog
on Enable syslog server
Default:
Disabled
Usage Guide:
To enable log server
Example:
To enable log server
Switch# configure terminal
Switch (config)# logging on
4.2.118 loop-protect
Command:
loop-protect
loop-protect
Loop protection configuration
Default:
Disabled
Usage Guide:
To enable Loop Protection
Example:
To enable Loop Protection
Switch# configure terminal
Switch (config)# loop-protect
4.2.119 loop-protect shutdown-time
Command:
loop-protect shutdown-time <0-604800>
loop-protect
Loop protection configuration
shutdown-time
Loop protection shutdown time interval
<0-604800>
Shutdown time in second
Default:
180
Usage Guide:
To configure shutdown time interval of Loop Protection
Example:
To configure shutdown time interval (888) of Loop Protection
Switch# configure terminal
Switch (config)# loop-protect shutdown-time 888
4.2.120 loop-protect transmit-time
Command:
loop-protect transmit-time <0-10>
loop-protect
Loop protection configuration
transmit-time
Loop protection transmit time interval
<1-10>
Transmit time in second
Default:
5
Usage Guide:
To configure Transmission Time of Loop Protection
Example:
To configure Transmission Time (8) of Loop Protection
Switch# configure terminal
Switch (config)# loop-protect transmit-time 8
4.2.121 mac address-table aging-time
Command:
mac address-table aging-time <0,10-1000000>
mac MAC table entries/configuration
address-table MAC table entries/configuration
<0,10-1000000> Aging time in seconds, 0 disables aging
Default:
300
Usage Guide:
To configure Aging Time of MAC Address Table
Example:
To configure Aging Time (888) of MAC Address Table
Switch# configure terminal
Switch (config)# mac address-table aging-time 888
4.2.122 mac address-table static
Command:
mac address-table static
mac MAC table entries/configuration
address-table MAC table entries/configuration
static Static MAC address
vlan VLAN keyword
interface Select an interface to configure
* All switches or All ports
GigabitEthernet 1 Gigabit Ethernet Port
10GigabitEthernet 10 Gigabit Ethernet Port
Default:
300
Usage Guide:
To configure Static MAC Address Table
Example:
To configure Static MAC Address Table as below table
mep
mep Maintenance Entity Point
ais Alarm Indication Signal
fr1m Frame rate is 1 f/min.
fr1s Frame rate is 1 f/s.
protect The AIS can be used for protection. At the point of state change three AIS PDU is transmitted as fast as possible.
Default:
None
Usage Guide:
To configure AIS of MEP
Example:
To configure AIS of MEP 1 as below table
| Priority | Frame Rate | Protection |
| 1 f/sec | ☑ |
Switch# configure terminal
Switch (config)# mep 1 ais fr1s
4.2.124 mep aps
Command:
mep
mep Maintenance Entity Point
aps Automatic Protection Switching protocol
laps Linear Automatic Protection Switching protocol.
multi OAM PDU is transmitted with multicast MAC. Must me 'multi' in case of RAPS.
uni OAM PDU is transmitted with unicast MAC. The MAC is taken from peer MEP MAC database. Only possible in case of LAPS.
raps Ring Automatic Protection Switching protocol.
octet Then last OCTET in the multicast MAC. Only possible in case of RAPS.
uni OAM PDU is transmitted with unicast MAC. The MAC is taken from peer MEP MAC database. Only possible in case of LAPS.
Default:
None
Usage Guide:
To configure APS of MEP
Example:
To configure APS of MEP 1 as below table
| APS Protocol | |||
| Priority | Cast | Type | Last Octet |
| 7 | Multi | L-APS | 1 |
Switch# configure terminal
Switch (config)# mep 1 aps 7 laps
4.2.125 mep cc
Command:
mep <Instance> cc <Prio : 0-7> fr100s | fr10s | fr1m | fr1s | fr300s | fr6h | fr6m
mep Maintenance Entity Point
cc Continuity Check
fr100s Frame rate is 100 f/s.
fr10s Frame rate is 10 f/s.
fr1m Frame rate is 1 f/min.
fr1s Frame rate is 1 f/s.
fr300s Frame rate is 300 f/s.
fr6h Frame rate is 6 f/hour.
fr6m Frame rate is 6 f/min.
Default:
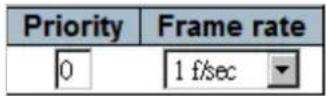
Usage Guide:
To configure CC of MEP
Example:
To configure CC of MEP 1 as below table
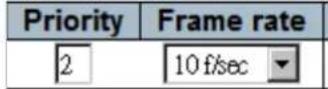
Switch# configure terminal
Switch (config)# mep 1 cc 2 fr10s
4.2.126 mep client domain
Command:
mep <Instance> client domain { evc | vlan }
mep Maintenance Entity Point
client Transport layer Client
evc EVC Domain.
vlan Vlan Domain
Default:
EVC
Usage Guide:
To configure Client Domain of MEP
Example:
To configure Client Domain (EVC) of MEP 1
Switch# configure terminal
Switch (config)# mep 1 client domain evc
4.2.127 mep client flow
Command:
mep <Instance> client flow <cflow> level <level> [ais-prio [<aisprio> | ais-highest] ]
[ lck-prio [<lckprio> | lck-highest] ]
mep Maintenance Entity Point
level The MEG level on the client layer
ais-prio AIS injection priority
ais-highest Request the highest possible AIS priority
lck-prio LCK injection priority
Ick-highest Request the highest possible LCK priority.
Default:
0
Usage Guide:
To configure Client Flow of MEP
Example:
To configure Client Flow of MEP 1 as below table.
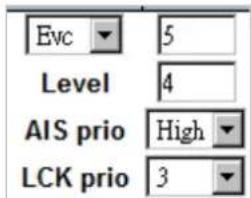
Switch# configure terminal
Switch (config)# mep 1 client flow 5 level 4 ais-prio ais-highest lck-prio 3
4.2.128 mep dm
Command:
mep <instance> dm <prio> [ multi | { uni mep-id <mepid>} ] [ single | dual ] [ rdtrp | flow ] interval <interval> last-n <lastn>
mep Maintenance Entity Point
dm Delay Measurement
dual Delay Measurement based on 1DM PDU transmission.
flow The two way delay is calculated as round trip symmetrical flow delay. The far end residence time is subtracted.
interval Interval between PDU transmission in 10ms. Min value is 10.
multi OAM PDU is transmitted with multicast MAC.
rdtrp The two way delay is calculated as round trip delay. The far end residence time is not subtracted.
single Delay Measurement based on DMM/DMR PDU.
uni OAM PDU is transmitted with unicast MAC. The MAC is taken from peer MEP MAC database.
mep-id Peer MEP-ID for unicast DM. The MAC is taken from peer MEP MAC database.
last-n The last N delays used for average last N calculation. Min value is 10.
Default:
0
Usage Guide:
To configure Delay Measurement of MEP
Example:
To configure Delay Measurement of MEP 1 as below table.
| Priority | Cast | Peer MEP | Way | Tx Mode | Calc | Gap | Count |
| 5 | Multi | 0 | Two-way | Standardize | Round trip | 10 | 10 |
Switch# configure terminal
Switch (config)# mep 1 dm 5 rdtrp interval 10 last-n 10
4.2.129 mep dm ns
Command:
mep
mep
Maintenance Entity Point
The MEP instance number.
dm
Delay Measurement
ns
Nano Seconds
Default:
US
Usage Guide:
To configure Delay Measurement of MEP
Example:
To configure Delay Measurement unit (ns) of MEP 1 as below table.
| Priority | Cast | Peer MEP | Way | Tx Mode | Calc | Gap | Count |
| 5 | Multi | 0 | Two-way | Standardize | Round trip | 10 | 10 |
Switch# configure terminal
Switch (config)# mep 1 dm ns
4.2.130 mep dm overflow-reset
Command:
mep
mep
Maintenance Entity Point
The MEP instance number.
dm
Delay Measurement
overflow-reset
Reset all Delay Measurement results on total delay counter overflow.
Default:
Keep
Usage Guide:
To reset Delay Measurement of MEP while overflowing
Example:
To reset Delay Measurement of MEP 1 while overflowing
Switch# configure terminal
Switch (config)# mep 1 dm overflow-reset
4.2.131 mep dm proprietary
Command:
mep
mep Maintenance Entity Point
dm Delay Measurement
proprietary Proprietary Delay Measurement
Default:
Standard
Usage Guide:
To configure Tx mode (proprietary) of MEP.
Example:
To configure Tx mode (proprietary) of MEP 1
Switch# configure terminal
Switch (config)# mep 1 dm proprietary
4.2.132 mep dm synchronized
Command:
mep
mep Maintenance Entity Point
dm Delay Measurement
synchronized Near end and far end is real time synchronized.
Default:
Enabled
Usage Guide:
To configure Time Sync of MEP.
Example:
To configure Time Sync of MEP 1
Switch# configure terminal
Switch (config)# mep 1 dm synchronized
4.2.133 mep down
Command:
mep <Instance> [ mip ] down domain { port | evc | vlan } [ vid <vid> ] flow <flow>
level <level> interface <port_type> <port>
mep Maintenance Entity Point
mip This MEP instance is a half-MIP
down This MEP is a Down-MEP
domain The domain of the MEP
evc This MEP is a EVC domain MEP.
port This MEP is a Port domain MEP.
vlan This MEP is a VLAN domain MEP.
flow The flow instance that the MEP is related to.
vid In case the MEP is a port Up-MEP or a EVC customer MIP the VID must be given.
Default:
None
Usage Guide:
To configure Down-MEP of MEP.
Example:
To configure Down-MEP of MEP 1 as below table
| Instance | Domain | Mode | Direction | Residence Port | Level | Flow Instance | Tagged VID |
| 1 | Port | Mep | Down | 1 | 0 | 1 | 0 |
Switch# configure terminal
Switch (config)# mep 1 down domain port flow 1 level 0 interface GigabitEthernet 1/1
4.2.134 mep Ib
Command:
mep <Instance> lb <prio> [ dei ] [ multi | { uni { { mep-id <mepid>} } | { mac <mac>} } ] count <count> size <size> interval <interval>
mep Maintenance Entity Point
lb Loop Back
count The number of LBM PDU to send in one loop test. The value 0 indicate infinite transmission (test behavior). This is HW based LBM/LBR and Requires VOE.
size The number of bytes in the LBM PDU Data Pattern TLV
interval The number of bytes in the LBM PDU Data Pattern TLV
dei Drop Eligible Indicator in case of tagged OAM.
multi OAM PDU is transmitted with multicast MAC.
uni OAM PDU is transmitted with unicast MAC. The MAC is taken from peer MEP MAC database.
mac Loop Back unicast MAC to be used in case of LB against MIP.
mep-id Peer MEP-ID for unicast LB. The MAC is taken from peer MEP MAC database.
Default:
None
Usage Guide:
To configure Loop Back of MEP.
Example:
To configure Loop Back of MEP 2 as below table
| Dei | Priority | Cast | Peer MEP | Unicast MAC | To Send | Size | Interval |
| ☑ | 1 | Multi | 1 | 00-00-00-00-00-00 | 10 | 64 | 100 |
Switch# configure terminal
Switch (config)# mep 2 lb 1 dei count 10 size 64 interval 100
4.2.135 mep lck
Command:
mep
mep Maintenance Entity Point
Ick Locked Signal
fr1m Frame rate is 1 f/min.
fr1s Frame rate is 1 f/s.
Default:
1 frame/sec
Usage Guide:
To configure Locked Frame Rate of MEP.
Example:
To configure Locked Frame Rate (1 frame/sec) of MEP 2.
Switch# configure terminal
Switch (config)# mep 2 lck
Switch (config)# mep 2 lck fr1s
4.2.136 mep level
Command:
mep
mep Maintenance Entity Point
level The MEG level of the MEP
Default:
0
Usage Guide:
To configure MEG level of MEP.
Example:
To configure MEG level (2) of MEP 2.
Switch# configure terminal
Switch (config)# mep 2 level 2
4.2.137 mep Im
Command:
mep <Instance> lm <prio> [ multi | uni ] [ single | dual ] [ fr10s | fr1s | fr6m | fr1m | fr6h ] [ flr <flr> ]
mep Maintenance Entity Point
Im Loss Measurement
fr10s Frame rate is 10 f/s.
fr1m Frame rate is 1 f/min.
fr1s Frame rate is 1 f/s.
fr6h Frame rate is 6 f/hour.
fr6m Frame rate is 6 f/min.
dual Dual ended LM is based on CCM PDU.
single Single ended LM is based on LMM/LMR PDU.
multi OAM PDU is transmitted with multicast MAC.
uni OAM PDU is transmitted with unicast MAC. The MAC is taken from peer MEP MAC database. In case of LM there is only one peer MEP.
flr The Frame Loss Ratio interval.
Default:
| Priority | Frame rate | Cast | Ended | FLR Interval |
| 0 | 1 f/sec | Multi | Single | 5 |
Usage Guide:
To configure Loss Measurement of MEP.
Example:
To configure Loss Measurement of MEP 2 as below table
| Priority | Frame rate | Cast | Ended | FLR Interval |
| 5 | 1 f/sec | Uni | Single | 4 |
Switch# configure terminal
Switch (config)# mep 2 lm 5 uni flr 4
4.2.138 mep It
Command:
mep <Instance> It <prio> { { mep-id <mepid>} | { mac <mac>} } ttl <ttl>
mep Maintenance Entity Point
It Link Trace
mac Link Trace target unicast MAC to be used in case of LT against MIP.
mep-id Peer MEP-ID for Link Trace target unicast MAC. The MAC is taken from peer MEP MAC database.
ttl Time To Live.
Default:
| Priority | Peer MEP | Unicast MAC | Time To Live |
| 0 | 1 | 00-00-00-00-00-00 | 1 |
Usage Guide:
To configure Link Trace of MEP.
Example:
To configure Link Trace of MEP 1 as below table
| Priority | Peer MEP | Unicast MAC | Time To Live |
| 4 | 0 | 11-3A-15-A3-53-44 | 5 |
Switch# configure terminal
Switch (config)# mep 1 lt 4 mac 11-3A-15-A3-53-44
4.2.139 mep meg-id
Command:
mep <Instance> meg-id <megid> { itu | itu-cc | { ieee [ name <name> ] } }
mep Maintenance Entity Point
meg-id The ITU/IEEE MEG-ID
ieee The MEG-ID (Short MA Name) has IEEE Character String format. The meg-id max. is 16 characters.
itu The MEG-ID has ITU format (ICC - UMC). The meg-id max. is 13 characters.
itu-cc The MEG-ID has ITU Country Code format (CC - ICC - UMC). The meg-id max. is 15 characters
name Only relevant for IEEE. The MAID is with Maintenance Domain Name
Default:
| Format | Domain Name | MEG id | MEP id |
| ITU ICC | ICC000MEG0000 | 1 |
Usage Guide:
To configure MEG-ID of MEP.
Example:
To configure MEG-ID of MEP 1 as below table
| Format | Domain Name | MEG id | MEP id |
| IEEE String | planet.com | ICC000MEG0000 | 1 |
Switch# configure terminal
Switch (config)# mep 1 meg-id ICC000MEG0000 ieee name planet.com
4.2.140 mep mep-id
Command:
mep-id The MEP-ID
Default:
None
Usage Guide:
mep
mep Maintenance Entity Point
mac The peer MAC. this will be overwritten by any learned MAC – through CCM reception.
Default:
None
Usage Guide:
To configure Peer MEP-ID of MEP.
Example:
To configure Peer MEP-ID of MEP 1 as below table
| Peer MEP ID | Unicast Peer MAC |
| 0 | 11-3A-05-A1-53-11 |
Switch# configure terminal
Switch (config)# mep 1 peer-mep-id 0 mac 11-3A-05-A1-53-11
4.2.142 mep performance-monitoring
Command:
mep
mep Maintenance Entity Point
performance-monitoring Performance monitoring Data Set collection (MEF35)
Default:
Disabled
Usage Guide:
To enable Performance Monitoring of MEP.
Example:
To enable Performance Monitoring of MEP 1
Switch# configure terminal
Switch (config)# mep 1 performance-monitoring
4.2.143 mep tst
Command:
mep <Instance> tst <prio> [dei] mep-id <mepid> [sequence] [all-zero | all-one | one-zero] rate <rate> size <size>
mep Maintenance Entity Point
tst Test Signal
dei Drop Eligible Indicator in case of tagged OAM.
mep-id Peer MEP-ID for unicast TST. The MAC is taken from peer MEP MAC database.
sequence Enable sequence number in TST PDU
all-one Test pattern is set to all one.
all-zero Test pattern is set to all zero.
one-zero Test pattern is set to 10101010.
rate The TST frame transmission bit rate - in Mega bits pr. second. Limit on Caracal is 400 Mbps. Limit on Serval is 1Gbps. This is the bit rate of a standard frame without any encapsulation. If 1 Mbps rate is selected in a EVC MEP, the added tag will give a hi
size The TST frame size. This is entered as the wanted size (in bytes) of a un-tagged frame containing TST OAM PDU - including CRC (four bytes). Example when 'Size' = 64 => Un-tagged frame size = DMAC(6) + SMAC(6) + TYPE(2) + TST PDU LENGTH(46) + CRC(4) = 64
Default:
| Dei | Priority | Peer MEP | Rate | Size | Pattern | Sequence Number |
| 0 | 1 | 1 | 64 | All Zero | □ |
Usage Guide:
To enable Test Signal of MEP.
Example:
To enable Test Signal of MEP 1 as below table
| Dei | Priority | Peer MEP | Rate | Size | Pattern | Sequence Number |
| ☑ | 3 | 2 | 10 | 68 | 10101010 | ☑ |
Switch# configure terminal
Switch (config)# mep 1 tst 3 dei mep-id 2 sequence one-zero rate 10 size 68
4.2.144 mep up
Command:
mep <Instance> [mip] up domain { port | evc | vlan } [ vid <vid> ] flow <flow> level
<level> interface <port_type> <port>
mep Maintenance Entity Point
mip This MEP instance is a half-MIP
up This MEP is a Up-MEP
domain The domain of the MEP
evc This MEP is a EVC domain MEP.
port This MEP is a Port domain MEP.
vlan This MEP is a VLAN domain MEP.
flow The flow instance that the MEP is related to.
vid In case the MEP is a port Up-MEP or a EVC customer MIP the VID must be given.
Default:
None
Usage Guide:
To configure Up-MEP of MEP.
Example:
To configure Up-MEP of MEP 2 as below table
| Instance | Domain | Mode | Direction | Residence Port | Level | Flow Instance | Tagged VID |
| 2 | Port | Mep | Up | 1 | 2 | 1 | 1 |
Switch# configure terminal
Switch (config)# mep 2 up domain port vid 1 flow 1 level 2 interface GigabitEthernet 1/1
4.2.145 mep vid
Command:
mep
mep
Maintenance Entity Point
The MEP instance number.
vid
The MEP VID
The MEP VID value
Default:
0
Usage Guide:
To set VID of MEP.
Example:
To set VID (8) of MEP 1.
Switch# configure terminal
Switch (config)# mep 1 vid 8
4.2.146 mep voe
Command:
mep
mep
Maintenance Entity Point
voe MEP is VOE based
Default:
0
Usage Guide:
To set VOE of MEP.
Example:
To set VOE (8) of MEP 1
Switch# configure terminal
Switch (config)# mep 1 voe
4.2.147 monitor destination
Command:
monitor destination interface 10GigabitEthernet <port_type_list> | GigabitEthernet <port_type_list>
monitor Set monitor configuration
destination The destination port. That is the port that trafficked should be mirrored to
Default:
Disabled
Usage Guide:
To configure Mirroring Port
Example:
To set Mirroring Port (GigabitEthernet 1/2)
Switch# configure terminal
Switch (config)# monitor destination interface GigabitEthernet 1/2
4.2.148 monitor source
Command:
monitor source interface * | 10GigabitEthernet <port_type_list> | GigabitEthernet <port_type_list> { both | rx | tx }
monitor Set monitor configuration
source The source port(s). That is the ports to be mirrored to the destination port.
Default:
Disabled
Usage Guide:
To configure Mirrored Port
Example:
To set Mirrored Port (GigabitEthernet 1/1, Tx + Rx)
Switch# configure terminal
Switch (config)# monitor source interface GigabitEthernet 1/1 both
4.2.149 mvr
Command:
mvr
mvr Multicast VLAN Registration configuration
Default:
Disabled
Usage Guide:
To enable MVR
Example:
To enable MVR
Switch# configure terminal
Switch (config)# mvr
4.2.150 mvr name channel
Command:
mvr name
mvr Multicast VLAN Registration configuration
name MVR multicast name
channel MVR channel configuration
Default:
None
Usage Guide:
To configure channel interface of MVR profile
Example:
To configure channel interface (1) of MVR profile (123)
Switch# configure terminal
Switch (config)# mvr name 123 channel 1
4.2.151 mvr name frame priority
Command:
mvr name
mvr Multicast VLAN Registration configuration
name MVR multicast name
frame MVR control frame in TX
priority Interface CoS priority
Default:
0
Usage Guide:
To configure frame priority of MVR profile
Example:
To configure frame priority (5) of MVR profile (123)
Switch# configure terminal
Switch (config)# mvr name 123 frame priority 5
4.2.152 mvr name frame tagged
Command:
mvr name
mvr Multicast VLAN Registration configuration
name MVR multicast name
frame MVR control frame in TX
tagged Tagged IGMP/MLD frames will be sent
Default:
None
Usage Guide:
To configure frame tagged of MVR profile
Example:
To configure frame tagged (frame tagged) of MVR profile (123)
Switch# configure terminal
Switch (config)# mvr name 123 frame tagged
4.2.153 mvr name igmp-address
Command:
mvr name
mvr Multicast VLAN Registration configuration
name MVR multicast name
igmp-address MVR address configuration used in IGMP
Default:
0.0.0.0
Usage Guide:
To configure the MVR address of MVR profile
Example:
To configure the MVR address (192.168.0.55) of MVR profile (123)
Switch# configure terminal
Switch (config)# mvr name 123 igmp-address 192.168.0.55
4.2.154 mvr name last-member-query-interval
Command:
mvr name
mvr Multicast VLAN Registration configuration
name MVR multicast name
last-member-query-interval Last Member Query Interval in tenths of seconds
Default:
5
Usage Guide:
To configure the Last Member Query Interval of MVR profile
Example:
To configure the Last Member Query Interval (50 seconds) of MVR profile (123)
Switch# configure terminal
Switch (config)# mvr name 123 last-member-query-interval 500
4.2.155 mvr name mode
Command:
mvr name
mvr Multicast VLAN Registration configuration
name MVR multicast name
mode MVR mode of operation
compatible Compatible MVR operation mode
dynamic Dynamic MVR operation mode
Default:
Dynamic
Usage Guide:
To configure the mode of MVR profile
Example:
To configure the mode (compatible) of MVR profile (123)
Switch# configure terminal
Switch (config)# mvr name 123 mode compatible
4.2.156 mvr vlan
Command:
mvr vlan <vlan_list>
mvr Multicast VLAN Registration configuration
vlan MVR multicast vlan
Default:
None
Usage Guide:
To create a profile of MVR VLAN
Example:
To create a profile of MVR VLAN (5)
Switch# configure terminal
Switch (config)# mvr vlan 5
4.2.157 mvr vlan channel
Command:
mvr vlan <vlan_list> channel <ProfileName : word16>
mvr Multicast VLAN Registration configuration
vlan MVR multicast vlan
channel MVR channel configuration
Default:
0
Usage Guide:
To configure the channel of MVR profile
Example:
To configure the channel (1) of MVR VLAN (5)
Switch# configure terminal
Switch (config)# mvr vlan 5 channel 1
4.2.158 mvr vlan frame priority
Command:
mvr vlan <vlan_list> frame priority <CosPriority : 0-7>
mvr Multicast VLAN Registration configuration
vlan MVR multicast vlan
frame MVR control frame in TX
priority Interface CoS priority
Default:
0
Usage Guide:
To configure the frame priority of MVR VLAN
Example:
To configure the frame priority (5) of MVR VLAN (123)
Switch# configure terminal
Switch (config)# mvr vlan 123 frame priority 5
4.2.159 mvr vlan tagged
Command:
mvr vlan <vlan_list> tagged
mvr Multicast VLAN Registration configuration
vlan MVR multicast vlan
tagged Tagged IGMP/MLD frames will be sent
Default:
Enabled
Usage Guide:
To enable the IGMP/MLD frame tagged of MVR VLAN
Example:
To enable the IGMP/MLD frame tagged of MVR VLAN (123)
Switch# configure terminal
Switch (config)# mvr vlan 123 tagged
4.2.160 mvr vlan igmp-address
Command:
mvr vlan <vlan_list> igmp-address <ipv4_ucast>
mvr Multicast VLAN Registration configuration
vlan MVR multicast vlan
igmp-address MVR address configuration used in IGMP
Default:
0.0.0.0
Usage Guide:
To configure the MVR address of MVR VLAN
Example:
To configure the MVR address (192.168.0.55) of MVR VLAN (123)
Switch# configure terminal
Switch (config)# mvr vlan 123 igmp-address 192.168.0.55
4.2.161 mvr vlan last-member-query-interval
Command:
mvr vlan <vlan_list> last-member-query-interval <lpmcLmqi : 0-31744>
mvr Multicast VLAN Registration configuration
vlan MVR multicast vlan
last-member-query-interval Last Member Query Interval in tenths of seconds
Default:
5
Usage Guide:
To configure the Last Member Query Interval of MVR VLAN
Example:
To configure the Last Member Query Interval (50 seconds) of MVR VLAN (123)
Switch# configure terminal
Switch (config)# mvr vlan 123 last-member-query-interval 500
4.2.162 mvr vlan mode
Command:
mvr vlan
mvr Multicast VLAN Registration configuration
vlan MVR multicast vlan
mode MVR mode of operation
compatible Compatible MVR operation mode
dynamic Dynamic MVR operation mode
Default:
Dynamic
Usage Guide:
To configure the mode of MVR VLAN
Example:
To configure the mode (compatible) of MVR VLAN (123)
Switch# configure terminal
Switch (config)# mvr vlan 123 mode compatible
4.2.163 mvr vlan name
Command:
mvr vlan <vlan_list> name
mvr Multicast VLAN Registration configuration
vlan MVR multicast vlan
name MVR multicast name
Default:
None
Usage Guide:
To configure profile name of MVR VLAN
Example:
To configure profile name (6) of MVR VLAN (5)
Switch# configure terminal
Switch (config)# mvr vlan 5 name 6
4.2.164 network-clock clk-source aneg-mode
Command:
network-clock clk-source <clk-source> aneg-mode { master | slave | forced }
network-clock network-clock
clk-source clk-source - commands related to a specific clock source.
aneg-mode Sets the preferred negotiation.
forced Activate forced slave negotiation
master Activate prefer master negotiation
slave Activate prefer slave negotiation
Default:
None
Usage Guide:
To configure preferred negotiation of network-clock
Example:
To configure preferred negotiation (slave) of network-clock (source 1)
Switch# configure terminal
Switch (config)# network-clock clk-source 1 aneg-mode slave
4.2.165 no
Command:
no
no Negate a command or set its defaults
Default:
N/A
Usage Guide:
To default the function
Example:
To disable the function (loop-protect)
Switch# configure terminal
Switch (config)# no loop-protect
4.2.166 ntp
Command:
ntp
ntp Configure NTP
Default:
Disabled
Usage Guide:
To enable the NTP service
Example:
To enable the NTP service
Switch# configure terminal
Switch (config)# ntp
4.2.167 ntp server
Command:
ntp server <1-5> ip-address { <ipv4_var> | <ipv6_var> | <name_var> }
ntp Configure NTP
server Configure NTP server
<1-5> index number
<hostname> domain name
<ipv4_ucast> ipv4 address
<ipv6_ucast> ipv6 address
Default:
None
Usage Guide:
To configure the IP addresses of NTP Server
Example:
To configure the IP address (9.9.9.9) of NTP Server for index 1
Switch# configure terminal
Switch (config)# ntp server 1 ip-address 9.9.9.9
4.2.168 poe admin-mode enable
Command:
poe admin-mode enable
poe Power Over Ethernet
admin-mode Enable or disable global PoE management function.
enable poe admin-mode enable
Default:
Enabled
Usage Guide:
To enable System PoE Admin Mode.
Example:
To enable System PoE Admin Mode.
Switch# configure terminal
Switch (config)# poe admin-mode enable
4.2.169 poe management mode
Command:
poe management mode { class-consumption | class-reserved-power | allocation-consumption | allocation-reserved-power | lldp-consumption | lldp-reserved-power }
poe Power Over Ethernet
management Use management mode to configure PoE power management method.
mode mode
allocation-consumption Max. port power determined by allocated, and power is managed according to power consumption.
allocation-reserved-power Max. port power determined by allocated, and is managed according to reserved power.
class-consumption Max. port power determined by class, and power is managed according to power consumption.
class-reserved-power Max. port power determined by class, and power managed according to reserved power.
Ildp-consumption Max. port power determined by LLDP Media protocol, and power is managed according to consumption.
lldp-reserved-power Max. port power determined by LLDP Media protocol, and power is managed according to reserved power.
Default:
Allocation-consumption
Usage Guide:
To configure PoE Management Mode.
Example:
To configure PoE Management Mode as LLDP-consumption mode.
Switch# configure terminal
Switch (config)# poe management mode lldp-consumption
4.2.170 poe sequential enable
Command:
poe sequential enable
poe
Power Over Ethernet
sequential PoE sequential is to delay power feeding when the switch is completely booted.
enable poe sequential enable
Default:
Enabled
Usage Guide:
To enable Sequential Power up Option.
Example:
To enable Sequential Power up Option.
Switch# configure terminal
Switch (config)# poe sequential enable
4.2.171 poe sequential interval
Command:
poe sequential interval <1-30>
poe Power Over Ethernet
sequential PoE sequential is to delay power feeding when the switch is completely booted.
interval Set how long system should feeding power to next PoE interface <1-30>
<1-30> poe sequential enable
Default:
5
Usage Guide:
To configure Sequential Power up Interval.
Example:
To configure Sequential Power up Interval (30 seconds per port).
Switch# configure terminal
Switch (config)# poe sequential interval 30
4.2.172 poe sequential rule
Command:
poe sequential rule { port | priority }
poe Power Over Ethernet
sequential rule PoE sequential is to delay power feeding when the switch is completely booted.
port System sequential feeding power the PoE interfaces based port number.
priority Use priority command to configure sequential feeding power to PoE interfaces based on port PoE priority.
Default:
Port
Usage Guide:
To configure Sequential Power up Port Option.
Example:
To configure Sequential Power up Port Option (Priority).
Switch# configure terminal
Switch (config)# poe sequential rule priority
4.2.173 poe supply
Command:
poe supply <1-XXX>
poe Power Over Ethernet
supply Use poe supply to specify the maximum power the power supply can deliver.
<1-XXX> Maximum power the power supply can deliver.
Default:
Maximum
Usage Guide:
To configure Power Supply Budget.
Example:
To configure Power Supply Budget (200 watts).
Switch# configure terminal
Switch (config)# poe supply 200
4.2.174 poe temperature-protection enable
Command:
poe temperature-protection enable
poe
Power Over Ethernet
temperature-protection Configure PoE over temperature protection to enable or disable.
enable poe temperature-protection enable
Default:
Enabled
Usage Guide:
To enable PoE Temperature Protection.
Example:
To enable PoE Temperature Protection.
Switch# configure terminal
Switch (config)# poe temperature-protection enable
4.2.175 poe temperature-threshold
Command:
poe temperature-threshold <0-100>
poe Power Over Ethernet
temperature-threshold Set a lower high temperature threshold for the secondary temperature alarm in degrees C.
<0-100> Specifies the new threshold temperature.
Default:
80
Usage Guide:
To enable PoE Temperature Protection.
Example:
To enable PoE Temperature Protection (70 degrees C).
Switch# configure terminal
Switch (config)# poe temperature-threshold 70
4.2.176 poe usage-threshold
Command:
poe usage-threshold <1-99>
poe
Power Over Ethernet
usage-threshold The poe usage-threshold command sets a percentage threshold above which the system sends a log or SNMP trap.<1-99>: The -threshold percentage configured with this command.
<1-99> The usage-threshold percentage configured with this command.
Default:
85
Usage Guide:
To configure PoE Usage Threshold.
Example:
To configure PoE Usage Threshold (90 %).
Switch# configure terminal
Switch (config)# poe usage-threshold 90
4.2.177 poe-time-range
Command:
poe-time-range {profile1 | profile2 | profile3 | profile4}
poe-time-range Used to create PoE time-range for the switch and enter Power Time-range Create Configuration Mode.
profile1 The PoE time-range profile name, ranging from Profile 1
profile2 The PoE time-range profile name, ranging from Profile 2
profile3 The PoE time-range profile name, ranging from Profile 3
profile4 The PoE time-range profile name, ranging from Profile 4
Default:
N/A
Usage Guide:
To enter PoE time-range profile mode.
Example:
To enter PoE time-range profile 1 mode
Switch# configure terminal
Switch (config)# poe-time-range profile1
Switch (config-poe-time-range)#
4.2.177.1 do
Command:
do < exec commands >
do
To run exec commands
Default:
N/A
Usage Guide:
To run exec commands
Example:
To run "show aaa".
Switch# configure terminal
Switch (config)# poe-time-range profile1
Switch (config-poe-time-range)#do show aaa
console : local
telnet : local
ssh : local
http : local
4.2.177.2 end
Command:
end
end
Go back to EXEC mode
Default:
Auto
Usage Guide:
To back to EXEC mode
Example:
To back to EXEC mode
Switch# configure terminal
Switch (config)# poe-time-range profile1
Switch (config-poe-time-range)#end
Switch#
4.2.177.3 exit
Command:
exit
exit Exit from current mode
Default:
None
Usage Guide:
To exit current mode
Example:
To exit current mode.
Switch# configure terminal
Switch (config)# poe-time-range profile1
Switch (config-poe-time-range)#exit
Switch (config)#
4.2.177.4 no
Command:
no
no Negate a command or set its defaults
Default:
N/A
Usage Guide:
To default the function.
Example:
To enable the function (description 999).
Switch# configure terminal
Switch (config)# poe-time-range profile1
Switch (config-poe-time-range)#no description 999
4.2.177.5 periodic
Command:
periodic { Mon | Tue | Wed | Thu | Fri | Sat | Sun } <start_h> <start_m> to <end_h> <end_m> [ reboot <reboot_h> <reboot_m>]
periodic To create a periodic mode time-range for the PoE time-range of the switch.
Fri Periodic Mode, with Friday.
Mon Periodic Mode, with Monday.
Sat Periodic Mode, with Saturday.
Sun Periodic Mode, with Sunday.
Thu Periodic Mode, with Thursday.
Tue Periodic Mode, with Tuesday.
Wed Periodic Mode, with Wednesday.
< start_h: 0-23> <0-23> start hour
< start_m: 0-59> <0-59> start minute
to start to end
< end_h: 0-23> <0-23> end hour
< end_m: 0-59> <0-59> end minute
reboot Enable reboot function
< reboot_h: 0-23> <0-23> reboot hour
< reboot_m:0-59> <0-59> reboot minute
Default:
N/A
Usage Guide:
To configure the Power Over Ethernet Schedule for specific profile.
Example:
To configure the Power Over Ethernet Schedule (below table) for specific profile 1.
| Week Day | Start Hour | Start Min | End Hour | End Min | Reboot Enable | Reboot Only | Reboot Hour | Reboot Min |
| Mon ▼ | 11 ▼ | 59 ▼ | 22 ▼ | 50 ▼ | ☑ | □ | 11 ▼ | 44 ▼ |
Switch# configure terminal
Switch (config)# poe-time-range profile1
Switch (config-poe-time-range)# periodic Mon 11 59 to 22 50 reboot 11 44
4.2.177.6 reboot-only
Command:
reboot-only { Mon | Tue | Wed | Thu | Fri | Sat | Sun } <reboot_h> <reboot_m>
reboot-only To create a periodic mode time-range for the PoE time-range of the switch.
Fri Periodic Mode, with Friday.
Mon Periodic Mode, with Monday.
Sat Periodic Mode, with Saturday.
Sun Periodic Mode, with Sunday.
Thu Periodic Mode, with Thursday.
Tue Periodic Mode, with Tuesday.
Wed Periodic Mode, with Wednesday.
< reboot_h: 0-23> <0-23> reboot hour
< reboot_m:0-59> <0-59> reboot minute
Default:
N/A
Usage Guide:
To configure the Power Over Ethernet Reboot Schedule for specific profile.
Example:
To configure the Power Over Ethernet Reboot Schedule (below table) for specific profile.
| Week Day | Start Hour | Start Min | End Hour | End Min | Reboot Enable | Reboot Only | Reboot Hour | Reboot Min |
| Mon |
Switch# configure terminal
Switch (config)# poe-time-range profile1
Switch (config-poe-time-range)# reboot Mon 0 0
4.2.178 port-security
Command:
port-security
port-security Enable/disable port security globally
Default:
Disabled
Usage Guide:
To enable the Port Security
Example:
To enable the Port Security
Switch# configure terminal
Switch (config)# port-security
4.2.179 port-security aging
Command:
port-security aging
port-security Enable/disable port security globally
aging Enable/disable port security aging
Default:
Disabled
Usage Guide:
To enable the Port Aging
Example:
To enable the Port Aging
Switch# configure terminal
Switch (config)# port-security port-security aging
4.2.180 port-security aging time
Command:
port-security aging time <10-10000000>
port-security Enable/disable port security globally
aging Enable/disable port security aging
time Time in seconds between check for activity on learned MAC addresses
<10-10000000> seconds
Default:
3600
Usage Guide:
To configure the Aging Period of Port Security
Example:
To configure the Aging Period (159) of Port Security
Switch# configure terminal
Switch (config)# port-security aging time 159
4.2.181 privilege
Command:
privilege { exec | configure | config-vlan | line | interface | if-vlan | ipmc-profile | snmps-host | stp-aggr | dhcp-pool | rfc2544-profile } level <privilege> <cmd>
privilege Command privilege parameters
config-vlan VLAN Configuration Mode
configure Global configuration mode
dhcp-pool DHCP Pool Configuration Mode
exec Exec mode
if-vlan VLAN Interface Mode
interface Port List Interface Mode
ipmc-profile IPMC Profile Mode
line Line configuration mode
rfc2544-profile RFC2544 Profile Mode
snmps-host SNMP Server Host Mode
stp-aggr STP Aggregation Mode
level Set privilege level of command
<0-15> Privilege level
Default:
None
Usage Guide:
To configure the Privilege Level for Command Line
Example:
To configure the Privilege Level (DHCP Pool mode, Level 12, Command: host) for Command Line
Switch# configure terminal
Switch (config)# privilege dhcp-pool level 12 host
4.2.182 qos map cos-dscp
Command:
qos map cos-dscp <cos> dpl <dpl> dscp { <dscp_num> | { be | af11 | af12 | af13 | af21 | af22 | af23 | af31 | af32 | af33 | af41 | af42 | af43 | cs1 | cs2 | cs3 | cs4 | cs5 | cs6 | cs7 | ef | va }}
qos Quality of Service
map Global QoS Map/Table
cos-dscp Map for cos to dscp
dscp Specify DSCP
af11 Assured Forwarding PHB AF11(DSCP 10)
af12 Assured Forwarding PHB AF12(DSCP 12)
af13 Assured Forwarding PHB AF13(DSCP 14)
af21 Assured Forwarding PHB AF21(DSCP 18)
af22 Assured Forwarding PHB AF22(DSCP 20)
af23 Assured Forwarding PHB AF23(DSCP 22)
af31 Assured Forwarding PHB AF31(DSCP 26)
af32 Assured Forwarding PHB AF32(DSCP 28)
af33 Assured Forwarding PHB AF33(DSCP 30)
af41 Assured Forwarding PHB AF41(DSCP 34)
af42 Assured Forwarding PHB AF42(DSCP 36)
af43 Assured Forwarding PHB AF43(DSCP 38)
be Default PHB(DSCP 0) for best effort traffic
cs1 Class Selector PHB CS1 precedence 1(DSCP 8)
cs2 Class Selector PHB CS2 precedence 2(DSCP 16)
cs3 Class Selector PHB CS3 precedence 3(DSCP 24)
cs4 Class Selector PHB CS4 precedence 4(DSCP 32)
cs5 Class Selector PHB CS5 precedence 5(DSCP 40)
cs6 Class Selector PHB CS6 precedence 6(DSCP 48)
cs7 Class Selector PHB CS7 precedence 7(DSCP 56)
ef Expedited Forwarding PHB(DSCP 46)
va Voice Admit PHB(DSCP 44)
Default:
0
Usage Guide:
To configure the DSCP Classification
Example:
To configure the DSCP Classification (QoS Class 3: DSCP CS1)
Switch# configure terminal
Switch (config)# qos map cos-dscp 3 dscp cs1
4.2.183 qos map dscp-classify
Command:
qos map dscp-classify { <dscp_num> | { be | af11 | af12 | af13 | af21 | af22 | af23 | af31 | af32 | af33 | af41 | af42 | af43 | cs1 | cs2 | cs3 | cs4 | cs5 | cs6 | cs7 | ef | va } }
qos Quality of Service
map Global QoS Map/Table
dscp-classify Map for dscp classify enable
af11 Assured Forwarding PHB AF11(DSCP 10)
af12 Assured Forwarding PHB AF12(DSCP 12)
af13 Assured Forwarding PHB AF13(DSCP 14)
af21 Assured Forwarding PHB AF21(DSCP 18)
af22 Assured Forwarding PHB AF22(DSCP 20)
af23 Assured Forwarding PHB AF23(DSCP 22)
af31 Assured Forwarding PHB AF31(DSCP 26)
af32 Assured Forwarding PHB AF32(DSCP 28)
af33 Assured Forwarding PHB AF33(DSCP 30)
af41 Assured Forwarding PHB AF41(DSCP 34)
af42 Assured Forwarding PHB AF42(DSCP 36)
af43 Assured Forwarding PHB AF43(DSCP 38)
be Default PHB(DSCP 0) for best effort traffic
cs1 Class Selector PHB CS1 precedence 1(DSCP 8)
cs2 Class Selector PHB CS2 precedence 2(DSCP 16)
cs3 Class Selector PHB CS3 precedence 3(DSCP 24)
cs4 Class Selector PHB CS4 precedence 4(DSCP 32)
cs5 Class Selector PHB CS5 precedence 5(DSCP 40)
cs6 Class Selector PHB CS6 precedence 6(DSCP 48)
cs7 Class Selector PHB CS7 precedence 7(DSCP 56)
ef Expedited Forwarding PHB(DSCP 46)
va Voice Admit PHB(DSCP 44)
Default:
Disabled
Usage Guide:
To enabled the DSCP Ingress Classification
Example:
To configure the DSCP Ingress Classification (DSCP 36)
Switch# configure terminal
Switch (config)# qos map dscp-classify af42
4.2.184 qos map dscp-cos
Command:
qos map dscp-cos { <dscp_num> | { be | af11 | af12 | af13 | af21 | af22 | af23 | af31 | af32 | af33 | af41 | af42 | af43 | cs1 | cs2 | cs3 | cs4 | cs5 | cs6 | cs7 | ef | va } } cos <cos> dpl <dpl>
qos Quality of Service
map Global QoS Map/Table
dscp-cos Map for dscp to cos
af11 Assured Forwarding PHB AF11(DSCP 10)
af12 Assured Forwarding PHB AF12(DSCP 12)
af13 Assured Forwarding PHB AF13(DSCP 14)
af21 Assured Forwarding PHB AF21(DSCP 18)
af22 Assured Forwarding PHB AF22(DSCP 20)
af23 Assured Forwarding PHB AF23(DSCP 22)
af31 Assured Forwarding PHB AF31(DSCP 26)
af32 Assured Forwarding PHB AF32(DSCP 28)
af33 Assured Forwarding PHB AF33(DSCP 30)
af41 Assured Forwarding PHB AF41(DSCP 34)
af42 Assured Forwarding PHB AF42(DSCP 36)
af43 Assured Forwarding PHB AF43(DSCP 38)
be Default PHB(DSCP 0) for best effort traffic
cs1 Class Selector PHB CS1 precedence 1(DSCP 8)
cs2 Class Selector PHB CS2 precedence 2(DSCP 16)
cs3 Class Selector PHB CS3 precedence 3(DSCP 24)
cs4 Class Selector PHB CS4 precedence 4(DSCP 32)
cs5 Class Selector PHB CS5 precedence 5(DSCP 40)
cs6 Class Selector PHB CS6 precedence 6(DSCP 48)
cs7 Class Selector PHB CS7 precedence 7(DSCP 56)
ef Expedited Forwarding PHB(DSCP 46)
va Voice Admit PHB(DSCP 44)
cos Specify class of service
dpl Specify drop precedence level
Default:
0
Usage Guide:
To configure the DSCP-Based QoS Ingress Classification
Example:
To configure the DSCP-Based QoS Ingress Classification (DSCP: 44, QoS Class: 6, DPL: 2)
Switch# configure terminal
Switch (config)# qos map dscp-cos va cos 6 dpl 2
4.2.185 qos map dscp-egress-translation
Command:
qos map dscp-egress-translation { <dscp_num> | { be | af11 | af12 | af13 | af21 | af22 | af23 | af31 | af32 | af33 | af41 | af42 | af43 | cs1 | cs2 | cs3 | cs4 | cs5 | cs6 | cs7 | ef | va } } to { <dscp_num_tr> | { be | af11 | af12 | af13 | af21 | af22 | af23 | af31 | af32 | af33 | af41 | af42 | af43 | cs1 | cs2 | cs3 | cs4 | cs5 | cs6 | cs7 | ef | va } }
qos Quality of Service
map Global QoS Map/Table
dscp-egress-translation Map for dscp egress translation
af11 Assured Forwarding PHB AF11(DSCP 10)
af12 Assured Forwarding PHB AF12(DSCP 12)
af13 Assured Forwarding PHB AF13(DSCP 14)
af21 Assured Forwarding PHB AF21(DSCP 18)
af22 Assured Forwarding PHB AF22(DSCP 20)
af23 Assured Forwarding PHB AF23(DSCP 22)
af31 Assured Forwarding PHB AF31(DSCP 26)
af32 Assured Forwarding PHB AF32(DSCP 28)
af33 Assured Forwarding PHB AF33(DSCP 30)
af41 Assured Forwarding PHB AF41(DSCP 34)
af42 Assured Forwarding PHB AF42(DSCP 36)
af43 Assured Forwarding PHB AF43(DSCP 38)
be Default PHB(DSCP 0) for best effort traffic
cs1 Class Selector PHB CS1 precedence 1(DSCP 8)
cs2 Class Selector PHB CS2 precedence 2(DSCP 16)
cs3 Class Selector PHB CS3 precedence 3(DSCP 24)
cs4 Class Selector PHB CS4 precedence 4(DSCP 32)
cs5 Class Selector PHB CS5 precedence 5(DSCP 40)
cs6 Class Selector PHB CS6 precedence 6(DSCP 48)
cs7 Class Selector PHB CS7 precedence 7(DSCP 56)
ef Expedited Forwarding PHB(DSCP 46)
va Voice Admit PHB(DSCP 44)
Default:
None
Usage Guide:
To configure the DSCP Egress Translation
Example:
To configure the DSCP Egress Translation (AF11 to AF12)
Switch# configure terminal
Switch (config)# qos map dscp-egress-translation af11 to af12
4.2.186 qos map dscp-ingress-translation
Command:
qos map dscp-ingress-translation { <dscp_num> | { be | af11 | af12 | af13 | af21 | af22 | af23 | af31 | af32 | af33 | af41 | af42 | af43 | cs1 | cs2 | cs3 | cs4 | cs5 | cs6 | cs7 | ef | va } } to { <dscp_num_tr> | { be | af11 | af12 | af13 | af21 | af22 | af23 | af31 | af32 | af33 | af41 | af42 | af43 | cs1 | cs2 | cs3 | cs4 | cs5 | cs6 | cs7 | ef | va } }
qos Quality of Service
map Global QoS Map/Table
dscp-ingress-translation Map for dscp ingress translation
af11 Assured Forwarding PHB AF11(DSCP 10)
af12 Assured Forwarding PHB AF12(DSCP 12)
af13 Assured Forwarding PHB AF13(DSCP 14)
af21 Assured Forwarding PHB AF21(DSCP 18)
af22 Assured Forwarding PHB AF22(DSCP 20)
af23 Assured Forwarding PHB AF23(DSCP 22)
af31 Assured Forwarding PHB AF31(DSCP 26)
af32 Assured Forwarding PHB AF32(DSCP 28)
af33 Assured Forwarding PHB AF33(DSCP 30)
af41 Assured Forwarding PHB AF41(DSCP 34)
af42 Assured Forwarding PHB AF42(DSCP 36)
af43 Assured Forwarding PHB AF43(DSCP 38)
be Default PHB(DSCP 0) for best effort traffic
cs1 Class Selector PHB CS1 precedence 1(DSCP 8)
cs2 Class Selector PHB CS2 precedence 2(DSCP 16)
cs3 Class Selector PHB CS3 precedence 3(DSCP 24)
cs4 Class Selector PHB CS4 precedence 4(DSCP 32)
cs5 Class Selector PHB CS5 precedence 5(DSCP 40)
cs6 Class Selector PHB CS6 precedence 6(DSCP 48)
cs7 Class Selector PHB CS7 precedence 7(DSCP 56)
ef Expedited Forwarding PHB(DSCP 46)
va Voice Admit PHB(DSCP 44)
Default:
None
Usage Guide:
To configure the DSCP Ingress Translation
Example:
To configure the DSCP Ingress Translation (AF11 to AF12)
Switch# configure terminal
Switch (config)# qos map dscp-ingress-translation af11 to af12
4.2.187 qos qce
Command:
qos qce <qce_id> [ { next <qce_id_next> } | last ] [ interface (<port_type> [<port_list>]) ] [ smac { <smac> | <smac_24> | any } ] [ dmac { <dmac> | unicast | multicast | broadcast | any } ] [ tag { [ type { untagged | tagged | c-tagged | s-tagged | any } ] [ vid { <ot_vid> | any } ] [ pcp { <ot_pcp> | any } ] [ dei { <ot_dei> | any } ] } ] [ inner-tag { [ type { untagged | tagged | c-tagged | s-tagged | any } ] [ vid { <it_vid> | any } ] [ pcp { <it_pcp> | any } ] [ dei { <it_dei> | any } ] } ] [ frame-type { any | { etype
[ { <etype_type> | any } ] } | { llc [ dsap { <llc_dsap> | any } ] [ ssap { <llc_ssap> | any } ] [ control { <llc_control> | any } ] } | { snap [ { <snap_data> | any } ] } | { ipv4 [ proto { <pr4> | tcp | udp | any } ] [ sip { <sip4> | any } ] [ dip { <dip4> | any } ] [ dscp { <dscp4> | { be | af11 | af12 | af13 | af21 | af22 | af23 | af31 | af32 | af33 | af41 | af42 | af43 | cs1 | cs2 | cs3 | cs4 | cs5 | cs6 | cs7 | ef | va } | any } ] [ fragment { yes | no | any } ] [ sport { <sp4> | any } ] [ dport { <dp4> | any } ] } | { ipv6 [ proto { <pr6> | tcp | udp | any } ] [ sip { <sip6> | any } ] [ dip { <dip6> | any } ] [ dscp { <dscp6> | { be | af11 | af12 | af13 | af21 | af22 | af23 | af31 | af32 | af33 | af41 | af42 | af43 | cs1 | cs2 | cs3 | cs4 | cs5 | cs6 | cs7 | ef | va } | any } ] [ sport { <sp6> | any } ] [ dport { <dp6> | any } ] [ action { [ cos { <action_cos> | default } ] [ dpl { <acton_dpl> | default } ] [ pcp-dei { <action_pcp> <action_dei> | default } ] [ dscp { <action_dscp_dscp> | { be | af11 | af12 | af13 | af21 | af22 | af23 | af31 | af32 | af33 | af41 | af42 | af43 | cs1 | cs2 | cs3 | cs4 | cs5 | cs6 | cs7 | ef | va } | default } ] [ policy { <action_policy> | default } ] ]
qos Quality of Service
qce QoS Control Entry
action Setup action
dmac Setup matched DMAC
frame-type Setup matched frame type
interface Interfaces
last Place QCE at the end
next Place QCE before the next QCE ID
smac Setup matched SMAC
tag Setup tag options
Default:
None
Usage Guide:
To configure the QCE
Example:
To configure the QCE 1 (below table) for interface GigabitEthernet 1/1-2
Key Parameters
Action Parameters
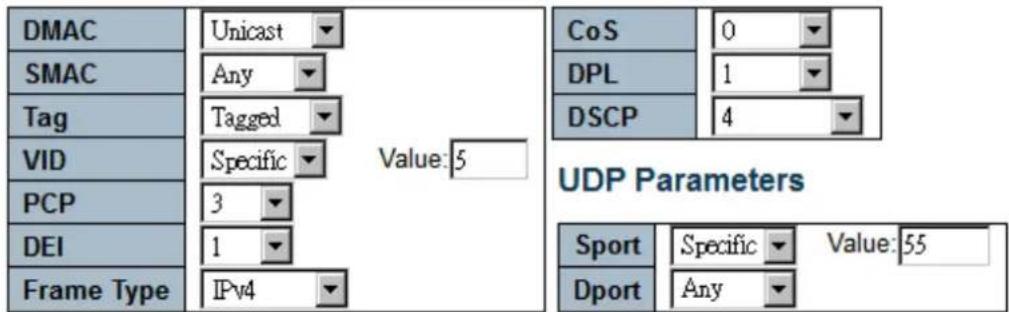
IPv4 Parameters
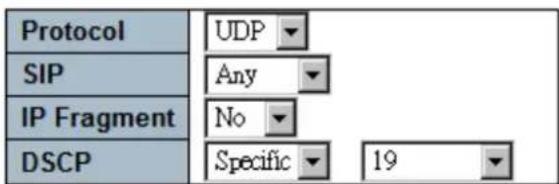
Switch# configure terminal
Switch (config)# qos qce 1 interface GigabitEthernet 1/1-2 tag type tagged vid 5 pcp 3 dei 1 dmac unicast frame-type ipv4 proto udp dscp 19 frag no sport 55 action cos 0 dpl 1 dscp 4
4.2.188 qos qce update
Command:
qos qce update <qce_id> [ { next <qce_id_next> } | last ] [ interface (<port_type> [<port_list> ]) ] [ smac { <smac> | <smac_24> | any } ] [ dmac { <dmac> | unicast | multicast | broadcast | any } ] [ tag { [ type { untagged | tagged | c-tagged | s-tagged | any } ] [ vid { <ot_vid> | any } ] [ pcp { <ot_pcp> | any } ] [ dei { <ot_dei> | any } ] } ] [ inner-tag { [ type { untagged | tagged | c-tagged | s-tagged | any } ] [ pcp { <it_pcp> | any } ] [ dei { <it_dei> | any } ] } ] [ frame-type { any | { etype { { <etype_type> | any } ] } | { llc [ dsap { <llc_dsap> | any } ] [ ssap { <llc_ssap> | any } ] [ control { <llc_control> | any } ] } | { snap { { <snap_data> | any } ] } | { ipv4 [ proto { <pr4> | tcp | udp | any } ] [ sip { <sip4> | any } ] [ dip { <dip4> | any } ] [ dscp { <dscp4> | { be | af11 | af12 | af13 | af21 | af22 | af23 | af31 | af32 | af33 | af41 | af42 | af43 | cs1 | cs2 | cs3 | cs4 | cs5 | cs6 | cs7 | ef | va } | any } ] [ fragment { yes | no | any } ] [ sport { <sp4> | any } ] [ dport { <dp4> | any } ] } | { ipv6 [ proto { <pr6> | tcp | udp | any } ] [ sip { <sip6> | any } ] [ dip { <dip6> | any } ] [ dscp { <dscp6> | { be | af11 | af12 | af13 | af21 | af22 | af23 | af31 | af32 | af33 | af41 | af42 | af43 | cs1 | cs2 | cs3 | cs4 | cs5 | cs6 | cs7 | ef | va } | any } ] [ sport { <sp6> | any } ] [ dport { <dp6> | any } ] } ] [ action { [ cos { <action_cos> | default } ] [ dpl { <action_dpl> | default } ]
[ pcp-dei { <action_pcp> <action_dei> | default } ] [ dscp { <action_dscp_dscp> | { be | af11 | af12 | af13 | af21 | af22 | af23 | af31 | af32 | af33 | af41 | af42 | af43 | cs1 | cs2 | cs3 | cs4 | cs5 | cs6 | cs7 | ef | va } | default } ] [ policy { <action_policy> | default } ] ]
qos Quality of Service
qce QoS Control Entry
update Update an existing QCE
action Setup action
dmac Setup matched DMAC
frame-type Setup matched frame type
interface Interfaces
last Place QCE at the end
next Place QCE before the next QCE ID
smac Setup matched SMAC
tag Setup tag options
Default:
None
Usage Guide:
To update the QCE
Example:
To update the QCE 1 (DMAC: Unicast, Action: Cos 0).
Switch# configure terminal
Switch (config)# qos qce update 1 dmac unicast action cos 0
4.2.189 qos qce refresh
Command:
qos qce refresh
qos Quality of Service
qce QoS Control Entry
refresh Refresh QCE tables in hardware
Default:
None
Usage Guide:
To refresh the QCE
Example:
To refresh the QCE.
Switch# configure terminal
Switch (config)# qos qce refresh
4.2.190 qos wred
Command:
qos wred queue <queue> min-th <min_th> mdp-1 <mdp_1> mdp-2 <mdp_2> mdp-3 <mdp_3>
qos Quality of Service
wred Weighted Random Early Discard
queue Specify queue
min-th Specify minimum threshold
mdp-1 Specify drop probability for drop precedence level 1
mdp-2 Specify drop probability for drop precedence level 2
mdp-3 Specify drop probability for drop precedence level 3
Default:
| Queue | Enable | Min. Threshold | Max. DP 1 | Max. DP 2 | Max. DP 3 |
| 0 | 0 | 1 | 5 | 10 | |
| 1 | 2 | 3 | 4 | 5 | |
| 2 | 0 | 1 | 5 | 10 | |
| 3 | 0 | 1 | 5 | 10 | |
| 4 | 0 | 1 | 5 | 10 | |
| 5 | 0 | 1 | 5 | 10 |
Usage Guide:
To configure the Weighted Random Early Detection
Example:
To configure the Weighted Random Early Detection (below table)
| Queue | Enable | Min. Threshold | Max. DP 1 | Max. DP 2 | Max. DP 3 |
| 0 | 0 | 1 | 5 | 10 | |
| 1 | 0 | 1 | 5 | 10 | |
| 2 | 0 | 1 | 5 | 10 | |
| 3 | 0 | 1 | 5 | 10 | |
| 4 | 0 | 1 | 5 | 10 | |
| 5 | 0 | 1 | 5 | 10 |
Switch# configure terminal
Switch (config)# qos wred queue 1 min-th 2 mdp-1 3 mdp-2 4 mdp-3 5
4.2.191 radius-server attribute 32
Command:
radius-server attribute 32
radius-server
Configure RADIUS
32
NAS-Identifier
Default:
None
Usage Guide:
To configure the NAS-Identifier
Example:
To configure the NAS-Identifier (planet)
Switch# configure terminal
Switch (config)# radius-server attribute 32 planet
4.2.192 radius-server attribute 4
Command:
radius-server attribute 4
radius-server
Configure RADIUS
4
NAS-IP-Address
Default:
None
Usage Guide:
To configure the NAS-IP-Address
Example:
To configure the NAS-IP-Address (7.7.7.7)
Switch# configure terminal
Switch (config)# radius-server attribute 4 7.7.7.7
4.2.193 radius-server attribute 95
Command:
radius-server attribute 95
radius-server
Configure RADIUS
95
NAS-IPv6-Address
Default:
None
Usage Guide:
To configure the NAS-IPv6-Address
Example:
To configure the NAS-IPv6-Address (2001::7788)
Switch# configure terminal
Switch (config)# radius-server attribute 95 2001::7788
4.2.194 radius-server deadtime
Command:
radius-server deadtime
radius-server
Configure RADIUS
deadtime
Time to stop using a RADIUS server that doesn't respond
Time in minutes
Default:
0
Usage Guide:
To configure the Deadtime of Radius-Server
Example:
To configure the Deadtime (15) of Radius-Server
Switch# configure terminal
Switch (config)# radius-server deadtime 15
4.2.195 radius-server host
Command:
radius-server host <host_name> [ auth-port <auth_port> ] [ acct-port <acct_port> ]
[ timeout <seconds> ] [ retransmit <retries> ] [ key <key> ]
radius-server Configure RADIUS
host Specify a RADIUS server
acct-port UDP port for RADIUS accounting server
auth-port UDP port for RADIUS authentication server
key Server specific key (overrides default)
retransmit Specify the number of retries to active server (overrides default)
timeout Time to wait for this RADIUS server to reply (overrides default)
Default:
None
Usage Guide:
To configure the Host of Radius-Server
Example:
To configure the Host (below table) of Radius-Server
| Hostname | Auth Port | Acct Port | Timeout | Retransmit | Key |
| planet.com.tw | 1812 | 1813 | 10 | 6 | 123456789 |
Switch# configure terminal
Switch (config)# radius-server host planet.com.tw timeout 10 retransmit 6 key 123456789
4.2.196 radius-server key
Command:
radius-server key
radius-server Configure RADIUS
key Set RADIUS encryption key
Default:
None
Usage Guide:
To configure the Key of Radius-Server
Example:
To configure the Key (123456789) of Radius-Server
Switch# configure terminal
Switch (config)# radius radius-server key 123456789
4.2.197 radius-server retransmit
Command:
radius-server retransmit
radius-server Configure RADIUS
retransmit Specify the number of retries to active server
Default:
3
Usage Guide:
To configure the retransmitted time of Radius-Server
Example:
To configure the retransmitted time (5) of Radius-Server
Switch# configure terminal
Switch (config)# radius-server retransmit 5
4.2.198 radius-server timeout
Command:
radius-server timeout <Seconds : 1-1000>
radius-server Configure RADIUS
timeout Time to wait for a RADIUS server to reply
Default:
5
Usage Guide:
To configure the timeout of Radius-Server
Example:
To configure the timeout (10) of Radius-Server
Switch# configure terminal
Switch (config)# radius-server timeout 10
4.2.199 rmon alarm
Command:
rmon alarm <id> {<oid_str> | {{ ifInOctets | ifInUcastPkts | ifInNUcastPkts | ifInDiscards | ifInErrors | ifInUnknownProtos | ifOutOctets | ifOutUcastPkts | ifOutNUcastPkts | ifOutDiscards | ifOutErrors } <ifIndex>}} <interval: 1-2147483647> { absolute | delta } rising-threshold <rising_threshold: -2147483648-2147483647> [<rising_event_id: 0-65535>] falling-threshold <falling_threshold: -2147483648-2147483647> [<falling_event_id: 0-65535>] { [ rising | falling | both ] }
rmon Remote Monitoring
alarm Configure an RMON alarm
ifInDiscards The number of inbound packets that are discarded even the packets are normal
ifInErrors The number of inbound packets that contained errors preventing them from being deliverable to a higher-layer protocol
ifInNUcastPkts The number of broad-cast and multi-cast packets delivered to a higher-layer protocol
ifInOctets The total number of octets received on the interface, including framing characters
ifInUcastPkts The number of uni-cast packets delivered to a higher-layer protocol
ifInUnknownProtos The number of the inbound packets that were discarded because of the unknown or un-support protocol
ifOutDiscards The number of outbound packets that are discarded event the packets is normal
ifOutErrors The number of outbound packets that could not be transmitted because of errors
ifOutNUcastPkts The number of broad-cast and multi-cast packets that request to transmit
ifOutOctets The number of octets transmitted out of the interface, including framing characters
absolute Test each sample directly
delta Test delta between samples
rising-threshold Configure the rising threshold
falling-threshold Configure the falling threshold
both Trigger alarm when the first value is larger than the rising threshold or less than the falling threshold (default)
falling Trigger alarm when the first value is less than the falling threshold
rising Trigger alarm when the first value is larger than the rising threshold
Default:
None
Usage Guide:
To configure the Alarm of RMON
Example:
To configure the Alarm (below table) of RMON
| ID | Interval | Variable | Sample Type | Value | Startup Alarm | Rising Threshold | Rising Index | Falling Threshold | Falling Index | |
| 1 | 50 | .1.3 | 6.1.2.1.2.2.1. | 10.15 | Absolute | 0 | Falling | 1000 | 1 | 520 |
Switch# configure terminal
Switch (config)# rmon alarm 1 .1.3.6.1.2.1.2.2.1.10.15 50 absolute rising-threshold
1000 1 falling-threshold 520 1 falling
4.2.200 rmon event
Command:
rmon event
rmon Remote Monitoring
event Configure an RMON event
description Specify a description of the event
log Generate RMON log when the event fires
trap Generate SNMP trap when the event fires
Default:
None
Usage Guide:
To configure the Event of RMON
Example:
To configure the Event (below table) of RMON
| ID | Desc | Type | Community | Event Last Time |
| 1 | error | logandtrap | planet | 0 |
Switch# configure terminal
Switch (config)# rmon event 1 log trap planet description error
4.2.201 sflow agent-ip
Command:
sflow agent-ip { ipv4 <v_ipv4_addr> | ipv6 <v_ipv6_addr>}
sflow Statistics flow
agent-ip The agent IP address used as agent-address in UDP datagrams. Defaults to IPv4 loopback address.
Default:
None
Usage Guide:
To configure the agent IP address of sFlow
Example:
To configure the agent IP address (10.10.10.10) of sFlow
Switch# configure terminal
Switch (config)# sflow agent-ip ipv4 10.10.10.10
4.2.202 sflow collector-address
Command:
sflow collector-address
sflow
Statistics flow
collector-address
Collector address
IPv4 address or IPv6 address or hostname identifying the collector receiver
Default:
None
Usage Guide:
To configure the Collector address of sFlow
Example:
To configure the Collector address (10.10.10.10) of sFlow
Switch# configure terminal
Switch (config)# sflow collector-address 10.10.10.10
4.2.203 sflow collector-port
Command:
sflow collector-port
sflow
Statistics flow
collector-port
Collector UDP port
Port number
Default:
None
Usage Guide:
To configure the Collector port number of sFlow
Example:
To configure the Collector port number (555) of sFlow
Switch# configure terminal
Switch (config)# sflow collector-port 555
4.2.204 sflow max-datagram-size
Command:
sflow max-datagram-size
sflow Statistics flow
max-datagram-size Maximum datagram size
Default:
None
Usage Guide:
To configure the Collector Maximum datagram size of sFlow
Example:
To configure the Collector Maximum datagram size (555 bytes) of sFlow
Switch# configure terminal
Switch (config)# sflow max-datagram-size 555
4.2.205 sflow timeout
Command:
sflow timeout
sflow Statistics flow
timeout Receiver timeout measured in seconds. The switch decrements the timeout once per second, and as long as it is non-zero, the receiver receives samples. Once the timeout reaches 0, the receiver and all its configuration is reset to defaults.
Default:
None
Usage Guide:
To configure the Collector timeout of sFlow
Example:
To configure the Collector timeout (555 seconds) of sFlow
Switch# configure terminal
Switch (config)# sflow timeout 555
4.2.206 sfp temperature-threshold
Command:
sfp temperature-threshold <0-100>
sfp temperature-threshold Set a lower high temperature threshold for the secondary temperature alarm in degrees C.
<0-100> Specifies the new threshold temperature.
Default:
None
Usage Guide:
To configure the SFP temperature-threshold of sFlow
Example:
To configure the SFP temperature-threshold (55 degrees C) of sFlow
Switch# configure terminal
Switch (config)# sfp temperature-threshold 55
4.2.207 snmp-server
Command:
snmp-server
snmp-server Set SNMP server's configurations
Default:
Enabled
Usage Guide:
To enable the SNMP Service
Example:
To enable the SNMP Service
Switch# configure terminal
Switch (config)# snmp-server
4.2.208 snmp-server access
Command:
snmp-server access <group_name> model { v1 | v2c | v3 | any } level { auth | noauth | priv } [ read <view_name> ] [ write <write_name> ]
snmp-server Set SNMP server's configurations
access access configuration
<GroupName : word32> group name
model security model
any any security model
v2c v2c security model
level security level
auth authNoPriv Security Level
noauth noAuthNoPriv Security Level
priv authPriv Security Level
read specify a read view for the group
<viewName : word255> read view name
write specify a write view for the group
<WriteName : word255> write view name
Default:
None
Usage Guide:
To configure the Access of SNMP
Example:
To configure the Access (below table) of SNMP
| Group Name | Security Model | Security Level | Read View Name | Write View Name |
| default_rw_group | v2c | Auth, Priv | default_view | default_view |
Switch# configure terminal
Switch (config)# snmp-server access default_rw_group model v2c level priv read default_view write default_view
4.2.209 snmp-server community
Command:
snmp-server community { v2c <comm> [ ro | rw ] | v3 <v3_comm> [<v_ipv4_addr> <v_ipv4_netmask>] }
snmp-server Set SNMP server's configurations
community Set the SNMP community
v2c SNMPv2c
<comm> Community word
ro Read only
rw Read write
v3 SNMPv3
<V3Comm : word127> Community word
<ipv4_addr> IPv4 address
<ipv4_netmask> IPv4 netmask
Default:
None
Usage Guide:
To configure the Read / Write / Source network Community of SNMP
Example:
To configure the Read / Write / Source network Community (below table) of SNMP
| Community | Source IP | Source Mask |
| public | 192.168.0.15 | 255.255.255.0 |
Switch# configure terminal
Switch (config)# snmp-server community v3 public 192.168.0.15 255.255.255.0
4.2.210 snmp-server contact
Command:
snmp-server contact <line255>
snmp-server Set SNMP server's configurations
contact Set the SNMP server's contact string
<line255> contact string
Default:
None
Usage Guide:
To configure the sysContact string of SNMP
Example:
To configure the sysContact string (Server123) of SNMP
Switch# configure terminal
Switch (config)# snmp-server contact Server123
4.2.211 snmp-server engine-id
Command:
snmp-server engine-id local
snmp-server Set SNMP server's configurations
engine-id Set SNMP engine ID
local Set SNMP local engine ID
Default:
None
Usage Guide:
To configure the Engine IDof SNMP
Example:
To configure the Engine ID (1234567890) of SNMP
Switch# configure terminal
Switch (config)# snmp-server engine-id local 1234567890
4.2.212 snmp-server host
Command:
snmp-server host
snmp-server Set SNMP server's configurations
host Set SNMP host's configurations
Default:
None
Usage Guide:
To enter the SNMP host mode
Example:
To enter the SNMP host mode (planet)
Switch# configure terminal
Switch (config)# snmp-server host planet
Switch (config-snmps-host)#
4.2.212.1 do
Command:
do < exec commands >
do To run exec commands.
Default:
N/A
Usage Guide:
To run exec commands.
Example:
To run "show aaa".
Switch# configure terminal
Switch (config)# snmp-server host planet
Switch (config-snmps-host)#do show aaa
console : local
telnet : local
ssh : local
http : local
4.2.212.2 end
Command:
end
end Go back to EXEC mode
Default:
Auto
Usage Guide:
To back to EXEC mode
Example:
To back to EXEC mode
Switch# configure terminal
Switch (config)# snmp-server host planet
Switch (config-snmps-host)#end
Switch#
4.2.212.3 exit
Command:
exit
exit Exit from current mode
Default:
None
Usage Guide:
To exit current mode
Example:
To exit current mode.
Switch# configure terminal
Switch (config)# snmp-server host planet
Switch (config-snmps-host)#exit
Switch (config)#
4.2.212.4 host
Command:
host [<hostname> | <ipv4_ucast> | <ipv6_ucast>] <UdpPort : 1-65535> { informs | traps }
host host configuration
informs Send Inform messages to this host
traps Send Trap messages to this host
Default:
None
Usage Guide:
To configure Trap Host of SNMP
Example:
To configure Trap Host (below table) of SNMP
| Trap Destination Address | planet.com |
| Trap Destination Port | 66 |
| Trap Inform Mode | Enabled |
Switch# configure terminal
Switch (config)# snmp-server host planet
Switch (config-snmps-host)# host planet.com 66 informs
4.2.212.5 no
Command:
no
no Negate a command or set its defaults
Default:
N/A
Usage Guide:
To default the function
Example:
To disable the function (host planet.com 66 informs)
Switch# configure terminal
Switch (config)# snmp-server host planet
Switch (config-snmps-host)# no ip address dhcp
4.2.212.6 informs
Command:
informs retries
informs Send Inform messages to this host
retries retires inform messages
timeout timeout parameter
Default:
None
Usage Guide:
To configure Trap Inform time of SNMP
Example:
To configure Trap Inform time (below table) of SNMP
| Trap Inform Timeout (seconds) | 55 |
| Trap Inform Retry Times | 2 |
Switch# configure terminal
Switch (config)# snmp-server host planet
Switch (config-snmps-host)# informs retries 2 timeout 55
4.2.212.7 shutdown
Command:
shutdown
shutdown Disable the trap configuration
Default:
Disabled
Usage Guide:
To disable Trap mode of SNMP
Example:
To disable Trap mode of SNMP
Switch# configure terminal
Switch (config)# snmp-server host planet
Switch (config-snmps-host)# shutdown
4.2.212.8 traps
Command:
traps [ aaa authentication ] [ system [ coldstart ] [ warmstart ] ] [ switch [ stp ] [ rmon ] ]
traps trap event configuration
aaa AAA event group
authentication Authentication fail event
switch Switch event group
system System event group
coldstart Cold start event
warmstart Warm start event
rmon RMON event
stp STP event
Default:
Disabled
Usage Guide:
To configure Trap event of SNMP
Example:
To configure Trap event (STP, RMON) of SNMP
Switch# configure terminal
Switch (config)# snmp-server host planet
Switch (config-snmps-host)# traps switch rmon stp
4.2.212.9 version
Command:
version { v1 [ <v1_comm> ] | v2 [ <v2_comm> ] | v3 [ probe | engineID <v_word10_to_32> ] [<securityname>] }
version Set SNMP trap version
v1 SNMP trap version 1
<V1Comm : word127> SNMP trap community
v2 SNMP trap version 2
<V2comm : word127> SNMP trap community
v3 SNMP trap version 3
<Securtyname : word32> security name
engineID Configure trap server's engine ID
probe Probe trap server's engine ID
Default:
Disabled
Usage Guide:
To configure Version of SNMP
Example:
To configure Version (below table) of SNMP
Trap Version
SNMP v2c
Trap Community
planet
Switch# configure terminal
Switch (config)# snmp-server host planet
Switch (config-snmps-host)# version v2 planet
4.2.213 spanning-tree aggregation
Command:
spanning-tree aggregation
spanning-tree Spanning Tree protocol
aggregation Aggregation mode
Default:
None
Usage Guide:
To enter aggregation mode of STP
Example:
To enter aggregation mode of STP
Switch# configure terminal
Switch (config)# spanning-tree aggregation
Switch (config-stp-aggr)#
4.2.213.1 do
Command:
do < exec commands >
do To run exec commands.
Default:
N/A
Usage Guide:
To run exec commands.
Example:
To run "show aaa".
Switch# configure terminal
Switch (config)# spanning-tree aggregation
Switch (config-stp-aggr)#do show aaa
console : local
telnet : local
ssh : local
http : local
4.2.213.2 end
Command:
end
end Go back to EXEC mode
Default:
Auto
Usage Guide:
To back to EXEC mode
Example:
To back to EXEC mode
Switch# configure terminal
Switch (config)# spanning-tree aggregation
Switch (config-stp-aggr)#end
Switch#
4.2.213.3 exit
Command:
exit
exit Exit from current mode
Default:
None
Usage Guide:
To exit current mode
Example:
To exit current mode.
Switch# configure terminal
Switch (config)# spanning-tree aggregation
Switch (config-stp-aggr)#exit
Switch (config)#
4.2.213.4 no
Command:
no
no Negate a command or set its defaults
Default:
N/A
Usage Guide:
To default the function
Example:
To disable the function (spanning-tree auto-edge)
Switch# configure terminal
Switch (config)# snmp-server host planet
Switch (config-snmps-host)# no spanning-tree auto-edge
4.2.213.5 spanning-tree auto-edge
Command:
spanning-tree auto-edge
spanning-tree
Spanning Tree protocol
auto-edge
Auto detect edge status
Default:
Enabled
Usage Guide:
To enable the Auto Edge of CIST Aggregated Port
Example:
To enable the Auto Edge of CIST Aggregated Port
Switch# configure terminal
Switch (config)# snmp-server host planet
Switch (config-snmps-host)# spanning-tree auto-edge
4.2.213.6 spanning-tree bpdu-guard
Command:
spanning-tree bpdu-guard
spanning-tree
Spanning Tree protocol
bpdu-guard
Enable/disable BPDU guard
Default:
Disabled
Usage Guide:
To enable the BPDU Guard of CIST Aggregated Port
Example:
To enable the BPDU Guard of CIST Aggregated Port
Switch# configure terminal
Switch (config)# snmp-server host planet
Switch (config-snmps-host)# spanning-tree bpdu-guard
4.2.213.7 spanning-tree edge
Command:
spanning-tree edge
spanning-tree
Spanning Tree protocol
edge
Edge port
Default:
Disabled
Usage Guide:
To enable the Admin Edge of CIST Aggregated Port
Example:
To enable the Admin Edge of CIST Aggregated Port
Switch# configure terminal
Switch (config)# snmp-server host planet
Switch (config-snmps-host)# spanning-tree edge
4.2.213.8 spanning-tree link-type
Command:
spanning-tree link-type link-type { point-to-point | shared | auto }
spanning-tree
Spanning Tree protocol
link-type
Port link-type
auto
Auto detect
point-to-point
Forced to point-to-point
shared
Forced to Shared
Default:
Point to Point
Usage Guide:
To configure the Point to Point mode (Shared) of CIST Aggregated Port
Example:
To configure the Point to Point mode (Shared) of CIST Aggregated Port
Switch# configure terminal
Switch (config)# snmp-server host planet
Switch (config-snmps-host)# spanning-tree link-type shared
4.2.213.9 spanning-tree mst cost
Command:
spanning-tree mst <instance> cost { <cost> | auto }
spanning-tree Spanning Tree protocol
mst STP bridge instance
cost STP Cost of this port
auto Use auto cost
Default:
Auto
Usage Guide:
To configure the Path Cost of MSTI Port
Example:
To configure the Path Cost (321) of MSTI Port (MST 2)
Switch# configure terminal
Switch (config)# snmp-server host planet
Switch (config-snmps-host)# spanning-tree mst 2 cost 321
4.2.213.10 spanning-tree mst port-priority
Command:
spanning-tree mst <instance> port-priority <prio>
spanning-tree Spanning Tree protocol
mst STP bridge instance
port-priority STP priority of this port
Default:
Auto
Usage Guide:
To configure the Port Priority of MSTI Port
Example:
To configure the Port Priority (96) of MSTI Port (MST 2)
Switch# configure terminal
Switch (config)# snmp-server host planet
Switch (config-snmps-host)# spanning-tree mst 2 port-priority 96
4.2.213.11 spanning-tree restricted-role
Command:
spanning-tree restricted-role
spanning-tree Spanning Tree protocol
restricted-role Port role is restricted (never root port)
Default:
Disabled
Usage Guide:
To enable the Restricted Role of CIST
Example:
To enable the Restricted Role of CIST
Switch# configure terminal
Switch (config)# snmp-server host planet
Switch (config-snmps-host)# spanning-tree restricted-role
4.2.213.12 spanning-tree restricted-tcn
Command:
spanning-tree restricted-tcn
spanning-tree Spanning Tree protocol
restricted-tcn Restrict topology change notifications
Default:
Disabled
Usage Guide:
To enable the Restricted TCN of CIST
Example:
To enable the Restricted TCN of CIST
Switch# configure terminal
(config)# spanning-tree aggregation
(config-stp-aggr)# spanning-tree restricted-tcn
4.2.214 switchport vlan mapping
Command:
switchport vlan mapping
switchport Set switching mode characteristics
vlan vlan - Vlan translation
mapping Add VLAN translation entry into a group
Default:
NoneUsage Guide:
To configure the VLAN TranslationExample:
To enable the VLAN Translation (below table)| Group ID | VLAN ID | Translated to VID |
| 1 | 3 | 5 |
4.2.215 tacacs-server deadtime
Command:
tacacs-server deadtimeDefault:
0Usage Guide:
To configure the Deadtime of TACACS+ ServerExample:
To enable the Deadtime (6) of TACACS+ Server Switch# configure terminal Switch (config)# tacacs-server deadtime 64.2.216 tacacs-server host
Command:
tacacs-server hostDefault:
NoneUsage Guide:
To configure the Host of TACACS+ ServerExample:
To enable the Host (below table) of TACACS+ Server Switch# configure terminal Switch (config)# tacacs-server host planet.com port 55 timeout 6 key 77884.2.217 transport email authentication
Command:
transport email authentication usernameDefault:
N/AUsage Guide:
To configure SMTP authentication's username and passwordExample:
To configure SMTP authentication's username (123@planet.com.tw) and password (456) Switch# configure terminal Switch (config)# transport email authentication username 123@planet.com.tw password 4564.2.218 transport email from
Command:
transport email from- L2+ Multi-Port
- Managed Gigabit Ethernet Switch
- Contents
- Chapter 1 COMMAND LINE INTERFACE....20
- Chapter 2 CONSOLE CLI MANAGEMENT 24
- Chapter 3 TELNET CLI MANAGEMENT....29
- Chapter 4 Commands for CLI Configuration....30
- configure terminal....54
- ip....336
- logout....337
- more....338
- no 338
- ping 339
- reload 341
- send 342
- show....343
- terminal....431
- Chapter 1 COMMAND LINE INTERFACE
- Accessing the CLI
- Command Line Modes
- Mode-based Command Hierarchy
- ■ User Mode
- ■ Privileged Mode
- ■ Global Config Mode
- ■ Interface Config Mode
- Requirements
- Command Support
- Chapter 2 CONSOLE CLI MANAGEMENT
- Terminal Setup
- Logon to the Console
- Configuring IP Address
- ■ Show the current IP Address
- show ip interface brief
- _
- ■ Configuring IP Address
- configure terminal
- ■ Storing current switch configuration
- copy running-config startup-config
- Chapter 3 TELNET CLI MANAGEMENT
- Telnet Login
- Chapter 4 Commands for CLI Configuration
- clear
- clear access management statistics
- clear access-list ace statistics
- clear dot1x statistics interface
- clear eps
- clear erps
- Example:
- clear erps statistics
- Command:
- Default:
- Usage Guide:
- clear evc statistics
- clear ip arp
- clear ip dhcp detailed statistics all
- clear ip dhcp detailed statistics client
- clear ip dhcp detailed statistics helper
- clear ip dhcp detailed statistics server
- clear ip dhcp detailed statistics snooping
- clear ip dhcp relay statistics
- clear ip dhcp server binding
- clear ip dhcp server binding automatic
- clear ip dhcp server binding expired
- clear ip dhcp server binding manual
- clear ip igmp snooping statistics
- clear ip igmp snooping vlan
- clear ip statistics icmp icmp-msg
- clear ip statistics icmp interface vlan
- clear ip statistics system icmp icmp-msg
- clear ip statistics system icmp interface vlan
- clear ipv6 mld snooping statistics
- clear ipv6 mld snooping vlan
- clear ipv6 neighbors
- clear ipv6 statistics icmp icmp-msg
- clear ipv6 statistics icmp interface vlan
- clear ipv6 statistics system icmp icmp-msg
- clear ipv6 statistics system icmp interface vlan
- clear lacp statistics
- clear lldp statistics
- clear logging error info
- clear logging error warning
- clear logging info error
- clear logging info warning
- clear logging warning error
- clear logging warning info
- clear mac address-table
- clear mep
- clear mvr name
- clear mvr statistics
- clear mvr vlan
- clear network-clock clk-source
- clear spanning-tree detected-protocols interface \*
- clear spanning-tree detected-protocols interface \*
- clear spanning-tree detected-protocols interface
- GigabitEthernet
- clear spanning-tree detected-protocols interface
- 10GigabitEthernet
- clear spanning-tree statistics interface \*
- clear spanning-tree statistics interface GigabitEthernet
- clear spanning-tree statistics interface 10GigabitEthernet
- clear statistics \*
- clear statistics GigabitEthernet
- clear statistics 10GigabitEthernet
- configure terminal
- aaa authentication login console local
- aaa authentication login console radius
- aaa authentication login console tacacs
- aaa authentication login http local
- aaa authentication login http radius
- aaa authentication login http tacacs
- aaa authentication login ssh local
- aaa authentication login ssh radius
- aaa authentication login ssh tacacs
- aaa authentication login telnet local
- aaa authentication login telnet radius
- aaa authentication login telnet tacacs
- access management
- access-list ace
- access-list ace update
- access-list rate-limiter
- access-list rate-limiter pps
- aggregation mode
- aggregation mode
- banner
- Telnet 192.168.0.100
- banner exec
- banner login
- Console:
- banner motd
- clock summer-time
- clock time zone
- default access-list rate-limiter
- dot1x authentication timer inactivity
- dot1x authentication timer re-authenticate
- dot1x feature
- dot1x guest-vlan
- dot1x guest-vlan supplicant
- dot1x max-reauth-req
- dot1x system-auth-control
- dot1x timeout quiet-period
- dot1x timeout tx-period
- enable password
- enable password level
- enable secret
- end
- erps <1-64> guard
- erps <1-64> holdoff
- erps <1-64> major
- erps <1-64> mep
- erps <1-64> mep
- erps <1-64> rpl neighbor
- erps <1-64> rpl owner
- erps <1-64> sub
- erps <1-64> topology-change propagate
- erps <1-64> topology-change propagate
- erps <1-64> vlan
- evc
- evc ece
- evc ece update
- evc policer
- evc policer update
- evc update
- exit
- green-ethernet led interval
- green-ethernet led on-event
- gvrp
- gvrp max-vlans
- gvrp time
- help
- hostname
- interface \* | 10GigabitEthernet | GigabitEthernet
- access-list action permit
- access-list action deny
- access-list logging
- access-list policy
- access-list port-state
- access-list rate-limiter
- access-list redirect interface
- access-list shutdown
- aggregation group
- description
- do
- dot1x guest-vlan
- dot1x port-control
- dot1x radius-qos
- dot1x radius-qos
- dot1x radius-vlan
- dot1x radius-vlan
- dot1x re-authenticate
- dot1x re-authenticate
- duplex
- duplex auto | full | half
- end
- evc dei
- evc l2cp discard(GG)
- evc l2cp forward(GG)
- evc l2cp peer(GG)
- excessive-restart
- exit
- flow control
- green-ethernet energy-detect(GG)
- green-ethernet energy-detect
- green-ethernet short-reach(GG)
- green-ethernet short-reach
- gvrp join-request vlan(GG)
- gvrp leave-request vlan(GG)
- ip arp inspection check-vlan
- ip arp inspection logging
- ip arp inspection trust
- ip arp inspection trust
- ip dhcp snooping trust
- ip dhcp snooping trust
- ip igmp snooping filter
- ip igmp snooping immediate-leave
- ip igmp snooping max-groups
- ip igmp snooping mrouter
- ip verify source
- ip verify source limit
- ipv6 mld snooping filter
- ipv6 mld snooping immediate-leave
- ipv6 mld snooping max-groups
- ipv6 mld snooping mrouter
- lacp
- lacp key
- lacp port-priority
- lacp role
- lacp timeout
- lldp cdp-aware
- Ildp med media-vlan policy-list
- lldp med transmit-tlv
- lldp receive
- Ildp receive
- lldp tlv-select management-address
- Ildp tlv-select management-address
- lldp tlv-select port-description
- Ildp tlv-select port-description
- lldp tlv-select system-capabilities
- Ildp tlv-select system-capabilities
- lldp tlv-select system-description
- Ildp tlv-select system-description
- lldp tlv-select system-name
- Ildp tlv-select system-name
- lldp transmit
- Ildp transmit
- loop-protect
- loop-protect
- loop-protect action
- loop-protect tx-mode
- loop-protect tx-mode
- mac address-table learning
- media-type
- mtu
- mvr immediate-leave
- mvr name
- mvr vlan
- network-clock synchronization ssm
- no
- ping ip
- poe mode
- poe pdcheck IP
- poe pdcheck action
- poe pdcheck enable
- poe pdcheck interval
- poe pdcheck reboot-time
- poe pdcheck retry-count
- poe power limit
- poe priority
- poe time-range
- port-security
- port-security maximum
- port-security violation
- port-security violation
- pvlan
- pvlan isolation
- qos cos
- qos dei
- qos dpl
- qos dscp-classify
- qos dscp-remark
- qos dscp-translate
- qos map cos-tag
- qos map tag-cos
- qos pcp
- qos policer
- qos queue-policer queue
- qos queue-shaper queue
- qos shaper
- qos storm broadcast
- qos storm unicast
- qos storm unknown
- qos tag-remark
- qos tag-remark mapped
- qos trust dscp
- qos trust dscp
- qos trust tag
- qos trust tag
- rmon collection history
- rmon collection stats
- shutdown
- spanning-tree
- spanning-tree auto-edge
- spanning-tree bpdu-guard
- spanning-tree edge
- spanning-tree link-type
- spanning-tree mst cost
- spanning-tree mst cost
- spanning-tree restricted-role
- spanning-tree restricted-tcn
- speed
- switchport access vlan
- switchport forbidden vlan add
- switchport forbidden vlan remove
- switchport hybrid acceptable-frame-type
- switchport hybrid allowed vlan
- switchport hybrid egress-tag
- switchport hybrid ingress-filtering
- switchport hybrid native vlan
- switchport hybrid port-type
- switchport mode
- switchport vlan ip-subnet
- switchport vlan mac
- switchport vlan mapping
- switchport vlan protocol group
- switchport voice vlan discovery-protocol
- switchport voice vlan mode
- switchport voice vlan security
- switchport voice vlan security
- interface vlan
- interface vlan
- do
- end
- exit
- ip address
- ip address dhcp
- ip address dhcp fallback
- ip dhcp server
- ip dhcp server
- ip igmp snooping
- ip igmp snooping
- ip igmp snooping compatibility
- ip igmp snooping last-member-query-interval
- ip igmp snooping priority
- ip igmp snooping querier address
- ip igmp snooping querier election
- ip igmp snooping query-interval
- ip igmp snooping query-max-response-time
- ip igmp snooping robustness-variable
- ip igmp snooping unsolicited-report-interval
- ipv6 address
- ipv6 mld snooping
- ipv6 mld snooping
- ipv6 mld snooping compatibility
- ipv6 mld snooping compatibility auto | v1 | v2
- ipv6 mld snooping last-member-query-interval
- ipv6 mld snooping priority
- ipv6 mld snooping querier election
- ipv6 mld snooping querier election
- ipv6 mld snooping query-interval
- ipv6 mld snooping query-max-response-time
- ipv6 mld snooping robustness-variable
- ipv6 mld snooping unsolicited-report-interval
- no
- ip arp inspection
- ip arp inspection entry interface
- ip arp inspection translate
- ip arp inspection translate
- ip arp inspection translate interface
- ip arp inspection vlan
- ip dhcp excluded-address
- ip dhcp pool
- broadcast
- client-identifier fqdn
- client-identifier mac-address
- client-name
- default-router
- dns-server
- do
- domain-name
- end
- exit
- hardware-address
- host
- lease
- netbios-name-server
- network
- nis-domain-name
- nis-server
- no
- ntp-server
- vendor
- ip dns proxy
- ip dns proxy
- ip helper-address
- ip http secure-redirect
- ip http secure-server
- ip igmp host-proxy
- ip igmp host-proxy
- ip igmp host-proxy leave-proxy
- ip igmp host-proxy leave-proxy
- ip igmp snooping
- ip igmp snooping vlan
- ip igmp ssm-range
- ip igmp unknown-flooding
- ip name-server
- ip name-server dhcp
- ip name-server dhcp interface vlan
- ip route
- ip routing
- ip source binding interface
- ip ssh
- ip verify source
- ip verify source translate
- ipmc profile
- ipmc profile
- default range
- description
- do
- end
- exit
- no
- range
- ipv6 mld host-proxy
- ipv6 mld host-proxy leave-proxy
- ipv6 mld snooping
- ipv6 mld snooping vlan
- ipv6 mld ssm-range
- ipv6 mld unknown-flooding
- ipv6 route
- Example 1:
- Example 2:
- lacp system-priority
- line
- do
- editing
- end
- exec-banner
- exec-timeout
- exec-timeout
- exit
- history size
- length
- location
- motd-banner
- no
- privilege level
- width
- lldp holdtime
- lldp med datum
- lldp med location-tlv altitude
- lldp med location-tlv elin-addr
- lldp med location-tlv latitude
- lldp med media-vlan-policy
- lldp reinit
- lldp timer
- lldp transmission-delay
- logging host
- logging level
- logging on
- loop-protect
- loop-protect shutdown-time
- loop-protect transmit-time
- mac address-table aging-time
- mac address-table static
- mep aps
- mep cc
- mep client domain
- mep client flow
- mep dm
- mep dm ns
- mep dm overflow-reset
- mep dm proprietary
- mep dm synchronized
- mep down
- mep Ib
- mep lck
- mep level
- mep Im
- mep It
- mep meg-id
- mep mep-id
- mep performance-monitoring
- mep tst
- mep up
- mep vid
- mep voe
- monitor destination
- monitor source
- mvr
- mvr name channel
- mvr name frame priority
- mvr name frame tagged
- mvr name igmp-address
- mvr name last-member-query-interval
- mvr name mode
- mvr vlan
- mvr vlan channel
- mvr vlan frame priority
- mvr vlan tagged
- mvr vlan igmp-address
- mvr vlan last-member-query-interval
- mvr vlan mode
- mvr vlan name
- network-clock clk-source aneg-mode
- no
- ntp
- ntp server
- poe admin-mode enable
- poe management mode
- poe sequential enable
- poe sequential interval
- poe sequential rule
- poe supply
- poe temperature-protection enable
- poe temperature-threshold
- poe usage-threshold
- poe-time-range
- do
- end
- exit
- no
- periodic
- reboot-only
- port-security
- port-security aging
- port-security aging time
- privilege
- qos map cos-dscp
- qos map dscp-classify
- qos map dscp-cos
- qos map dscp-egress-translation
- qos map dscp-ingress-translation
- qos qce
- Key Parameters
- Action Parameters
- IPv4 Parameters
- qos qce update
- qos qce refresh
- qos wred
- radius-server attribute 32
- radius-server attribute 4
- radius-server attribute 95
- radius-server deadtime
- radius-server host
- radius-server key
- radius-server retransmit
- radius-server timeout
- rmon alarm
- rmon event
- sflow agent-ip
- sflow collector-address
- sflow collector-port
- sflow max-datagram-size
- sflow timeout
- sfp temperature-threshold
- snmp-server
- snmp-server access
- snmp-server community
- snmp-server contact
- snmp-server engine-id
- snmp-server host
- do
- end
- exit
- host
- no
- informs
- shutdown
- traps
- version
- spanning-tree aggregation
- do
- end
- exit
- no
- spanning-tree auto-edge
- spanning-tree bpdu-guard
- spanning-tree edge
- spanning-tree link-type
- spanning-tree mst cost
- spanning-tree mst port-priority
- spanning-tree restricted-role
- spanning-tree restricted-tcn
- switchport vlan mapping
- tacacs-server deadtime
- tacacs-server host
- transport email authentication
- transport email from
Brand : Planet
Model : MGSW-28240F
Category : Switch