Ultra Encode HDMI - Uncategorized Magewell - Free user manual and instructions
Find the device manual for free Ultra Encode HDMI Magewell in PDF.


| Product Type | Universal Live Media Encoder |
| Model | Ultra Encode HDMI |
| Manufacturer | Magewell |
| Dimensions (approx.) | 120 mm x 80 mm x 30 mm |
| Weight (approx.) | 200 g |
| Power Supply | 5V DC via included power adapter |
| Video Input | HDMI (up to 4K) |
| Video Encoding | H.264, H.265 (HEVC), NDI HX2, NDI HX3 |
| Streaming Protocols | RTMP, RTMPS, SRT, RTSP, RTP, HLS, TS over UDP, TS over RTP, TVU ISSP |
| Simultaneous Streams | Up to 6 sessions (with protocol limitations) |
| Recording | To SD card, USB drive, or NAS (MP4, MOV, TS) |
| Audio Encoding | AAC (up to 8 channels) |
| Network Interfaces | 10/100/1000 Ethernet, Wi-Fi 802.11 a/b/g/n/ac, USB 4G/5G modem |
| Web UI Access | Via Ethernet, USB NET (192.168.66.1), or Wi-Fi AP (192.168.48.1) |
| Overlay Support | Text, clock, and image overlays for main and sub streams |
| Maintenance | Keep dry, avoid dust and extreme temperatures; clean with dry cloth |
| Safety | Use correct power adapter; do not attempt to repair; keep away from moisture |
| Spare Parts / Repairability | Power adapter replaceable; contact Magewell for service |
| Warranty | 2 years for encoder, 1 year for power adapter |
Frequently Asked Questions - Ultra Encode HDMI Magewell
User questions about Ultra Encode HDMI Magewell
0 question about this device. Answer the ones you know or ask your own.
Ask a new question about this device
Download the instructions for your Uncategorized in PDF format for free! Find your manual Ultra Encode HDMI - Magewell and take your electronic device back in hand. On this page are published all the documents necessary for the use of your device. Ultra Encode HDMI by Magewell.
USER MANUAL Ultra Encode HDMI Magewell
Our Ultra Encode family of universal live media encoders offers systems integrators, streaming professionals, and OEM partners a flexible and affordable encoding solution for applications including live streaming, AV over IP, remote contribution, IP production workflows and much more. Available in HDMI and SDI models, it builds on the functionality of the Ultra Encode family with expanded features including 4K encoding and streaming from the HDMI input; simultaneous multi-protocol streaming; higher streaming bitrates; file recording; and much more. This device is ideal for high-quality live streaming of content including sports, education, and live events as well as IP-based production and AV-over-IP.
Encoder supports multiple video encoding formats – including H.264, H.265 (HEVC), NDT ^® HX2, and NDT ^® X3 – and a wide array of delivery protocols including RTMP, RTMPS, SRT, RTSP, RTP, HLS, TS over UDP, TS over RTP, and TVU's ISSP technology. Up to eight channels of audio can be encoded in AAC format.
Encoder is ideal for broadcast video and audio, natively support live broadcast for Facebook, YouTube, and Twitch, as well as WOWZA, your own site, with multi-platform distribution. To customize encoder perfectly for your session, we have Web UI, where device work status, a thumbnail preview window and tabs for streaming settings, analytics, and stream health monitoring are provided.
Key Features System Requirements
- Support RTSP/RTMP/RTMPS/SRT Caller/SRT
Listener/NDI|PHX2/NDI |PHX3/HLS/TS over UDP/TS over RTP/TVU ISSP streaming protocols
• Dual stream encoding - main-stream and sub-stream
• 8 overlays for main and sub streams each - Specify main stream or sub stream for each streaming session
- Multi-streaming to various video platforms simultaneously and up to 8 schedules are supported for each session.
• H.264 and H.265 (HEVC) Video encoders - Recording main or sub streams to SD card, USB drive, and NAS. Up to 8 schedules are supported for each task.
- AAC Audio encoder
- Web UI - a remote network management system - provides webpage configuration with kinds of customization for device functions
Network
• 10/100/1000Mbps Ethernet
• Wi-Fi 802.11 a/b/g/n/ac
• USB 4G/5G mobile broadband modem (not included)
USB Net
Web UI Supported Web Browser
- Microsoft Edge
• Mozilla Firefox version 61 and above
• Google Chrome version 49 and above
• Apple Safari 11.1 and above
• Opera 55.0.2994.44 and above
Ultra Encode Family
- Ultra Encode HDMI Plus
- Ultra Encode SDI Plus
Tutorial
Let's learn by example.
Throughout this tutorial, we'll walk you through the creation of a basic YouTube live streaming with Ultra Encode.
It'll consist of two parts:
Part 1. Ultra Encode setup
Part 2. YouTube setup
Part 1. Ultra Encode Setup
-
Find Ultra Encode
-
Connect the encoder to a LAN and power it up.
- Connect input signal.
- Access Web UI
i. In Windows 10, open a File Explorer window, find the encoder in Network > Other Devices.
ii. Double click a encoder icon to open the Web UI of the device in your default web browser.
- Log in with your username and password.
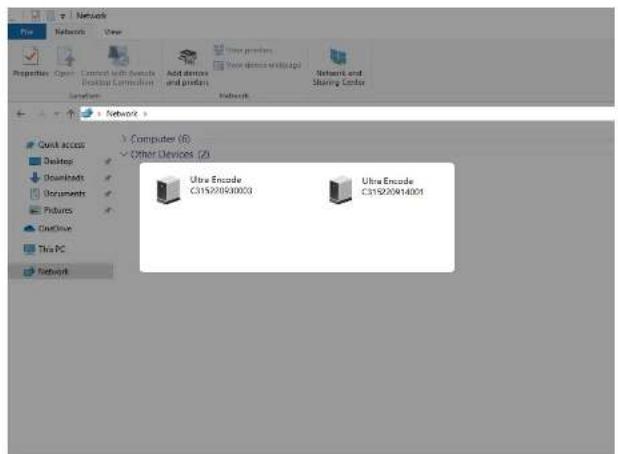
Find your Device
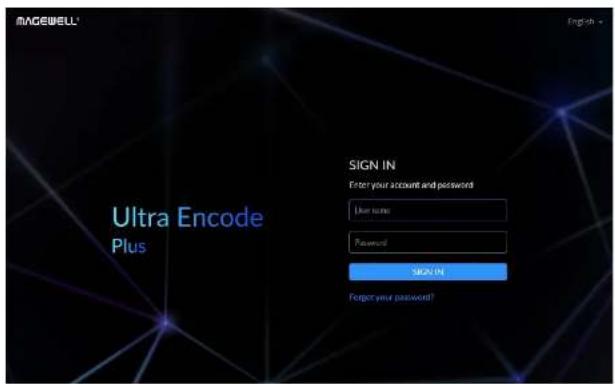
Sign In
2. Add YouTube streaming session
If you need low latency, then YouTube RTMP is the better option. However, if you need adaptive bitrate streaming, then YouTube HLS is the better option.
- In the left control pane, go to Live tab. Click Add Destination and choose YouTube RTMP or YouTube HLS.
- Go to YouTube https://www.google.com/device, and paste the code prompted.
YouTube RTMP

Next, visit
https://www.google.com/device on
your smartphone or computer and
enter this code:
YQFG-TGWL

Go to YouTube
Connect a device
Enter the code displayed on your device
Enter code
YQFG-TGWL
Next
- Follow the page instructions to log in and trust your device.
YouTube RTMP
×
Next, visit
https://www.google.com/device on
your smartphone or computer and enter this code:
YQFG-TGWL
Go to YouTube

Sign in with Google

Choose an account
to continue to Ultra Streamer



Use another account
To continue, Google will share your name, email address, language preference, and profile picture with Ultra Streamer. Before using this app, you can review Ultra Streamer's privacy policy and terms of service.
- Choose the Event where you want to show your video clips.
Then you can simply save the server with default parameters for streaming. - Content made for kids switch is off by default. You can go to Youtube Help to get detailed requirements.
- Go back to the Live tab and turn on the switch before YouTube icon to start the streaming session.
Now the encoder is ready to bring your content to YouTube directly with all these settings.
Part 2. YouTube Setup
Create a live stream task in YouTube Studio to go live, and specify the Title, Category, Privacy, etc.
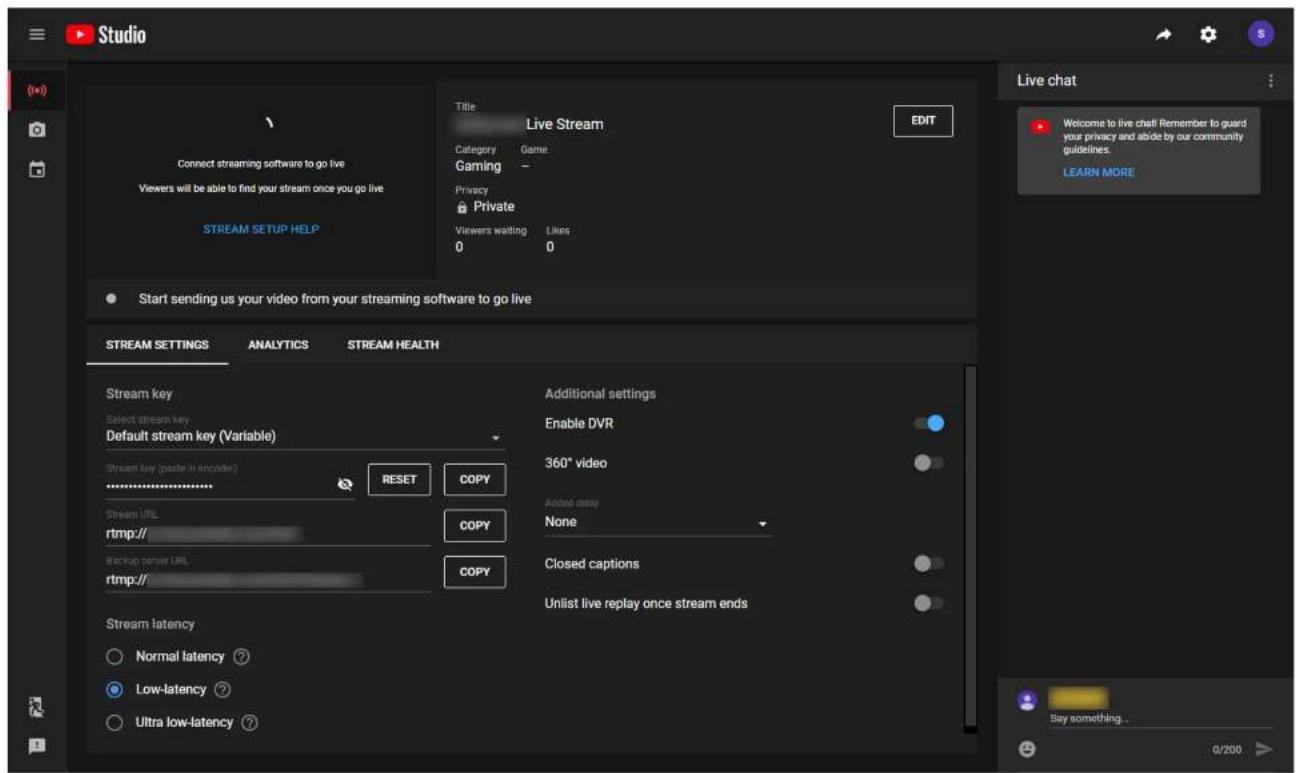
Installation
Safety Information
Electrical Safety Operation Safety
- Seek professional assistance before using an adapter or extension cord. These devices could interrupt the grounding circuit.
- Make sure that you are using the correct power adapter for the local voltage. If you are not sure about the voltage of the electrical outlet you are using, contact your local power company.
-
If the power adapter is broken, do not try to fix it by yourself. Contact a qualified service technician or your retailer for help.
-
Before using the product, make sure all cables are correctly connected and the power cables are not damaged. If you notice any damage, contact your dealer immediately.
- To avoid short circuits, keep paper clips, screws, and staples away from connectors, slots, sockets and circuitry.
- Avoid dust, humidity, and temperature extremes. Do not place the product in any area where it may become wet.
- If you encounter technical problems with the product, contact your dealer or the Magewell Support Team via support@magewell.net.
FCC Compliance Statement
This device complies with Part 15 of the FCC Rules. Operation is subject to the following two conditions:
(1) this device may not cause harmful interference, and cause undesired operation
(2) this device must accept any interference received, including interference that may cause undesired operation.
FCC Statement
This device has been tested and found to comply with the limits for a Class B digital device, pursuant to Part 15 of the FCC Rules. These limits are designed to provide reasonable protection against harmful interference in a residential installation. This device generates, uses and can radiate radio frequency energy and, if not installed and used in accordance with the instructions, may cause harmful interference to radio communications.
However, there is no guarantee that interference will not occur in a particular installation. If this device does cause harmful interference to radio or television reception, which can be determined by turning the device off and on, the user is encouraged to try to correct the interference by one or more of the following measures:
- Reorient or relocate the receiving antenna.
- Increase the separation between the device and receiver.
- Connect the device into an outlet on a circuit different from that to which the receiver is connected.
- Consult the dealer or an experienced radio/TV technician for help.
Changes or modifications not expressly approved by the party responsible for compliance could void the user's authority to operate the equipment.
FCC Radiation Exposure Statement
The antennas used for this transmitter must be installed to provide a separation distance of at least 20cm from all persons and must not be co-located for operating in conjunction with any other antenna or transmitter.
Interfaces & Indicators
Ultra Encode HDMI Plus
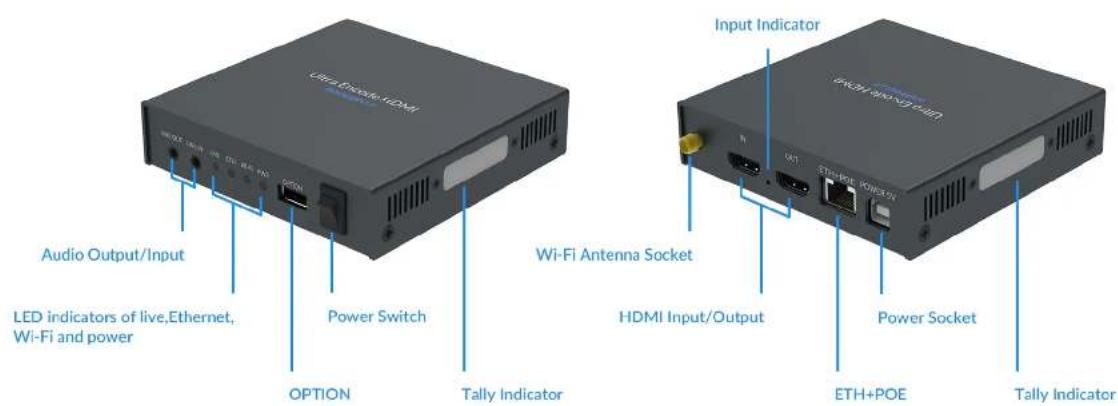
Figure 1 Ultra Encode - OMC
⚠️ Plug included Wi-Fi antenna when you want to connect to a wireless network.
Ultra Encode SDI Plus
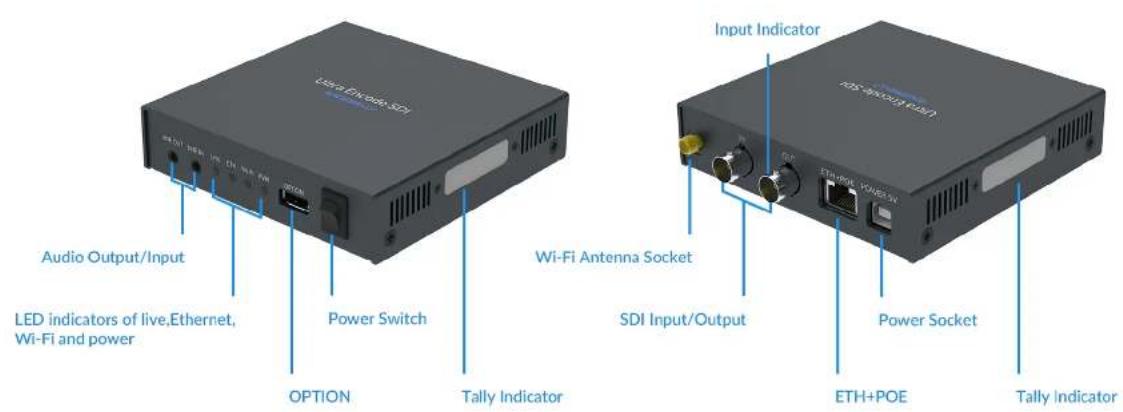
Figure 2: Ultra Encode SIO
⚠️ Plug included Wi-Fi antenna when you want to connect to a wireless network.
Indicators
Indicators status is as follows.
PWR (Power)
- On: power on.
- Off: power off.
IN (HDMI/SDI)
- On: input signal detected.
- Breathing: input signal undetected.
LIVE
- On: the encoder is streaming to at least one streaming address.
- Breathing: none of the live sessions is enabled.
ETH
- On: Ethernet connected.
- Off: Ethernet unconnected.
Wi-Fi
- On: Wi-Fi connected.
- Breath: Wi-Fi not connected or connecting.
Tally (For NDI)
- Two-green-on: Preview
- Two-red-on: Program
Multiple indicators flash:
- The indicator lights of live, Eth, Wi-Fi flash once simultaneously: system is booting up or rebooting.
• The indicator lights of live, Eth, Wi-Fi flash in turn: firmware is updating.
⚠️ If any other status appear, please try to unplug and re-plug in the power cable to recover your encoder.
Get Started With Ultra Encode
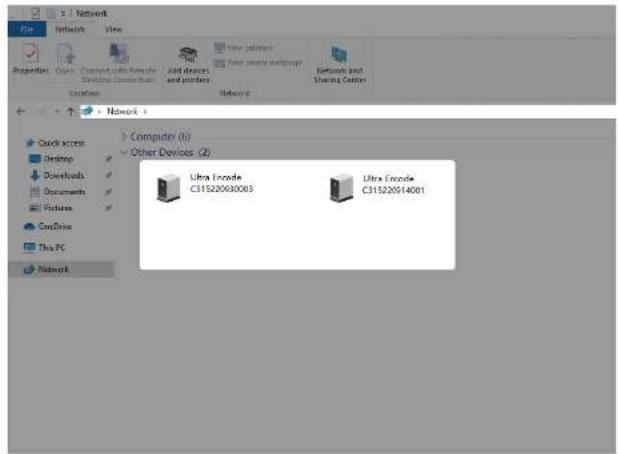
Access Web UI
Manage your device via wired networks, USB NET, or Wi-Fi.
- Connect your device to your LAN and power it up.
To ensure a smooth video, you are recommended to connect to a wired network.
- Open Web UI:
• Via File Explorer on Windows 7 and above
i. Open File Explorer in your PC, then locate your device in Network > Other Devices.
ii. Double click the device icon, open the sign page of Web GUI.
• Via USB NET, IP Address: 192.168.66.1
i. Connect the device to your computer using provided USB cable.
ii. Type the USB NET IP address 192.168.66.1 in your web browser to access the Web UI.
• Via device Wi-Fi AP, IP Address: 192.168.48.1
⚠️ Plug included Wi-Fi antenna when you want to connect to a wireless network.
i. In your smartphone/tablet/laptop, turn on WLAN, search for and join the device AP named Ultra Encode + (Serial number).
The AP names after your gear's Serial number, and the password is the last 8-number of the serial number. For example, a serial number 311210101001 indicates the initial AP password is 10101001.
We recommend that the distance between the Web UI and the encoder should be within 10m.
ii. In your web browser, enter 192.168.48.1 to open the Web UI.
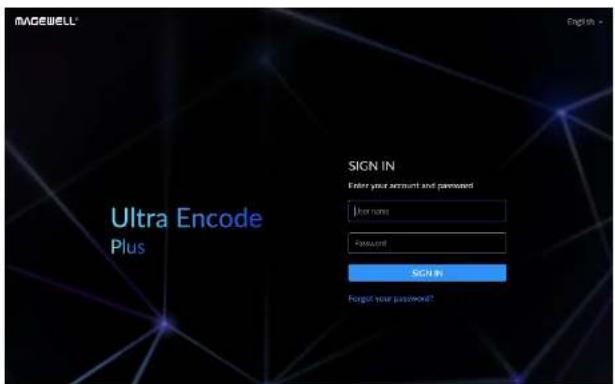
- Input your username and password.
• The default administrator name and password are both Admin.
• We recommend you to modify the admin password after initial logging-in.
Set Device Name

Initialization
Follow the instructions of the Web UI to perform the device initialization and set a new device name.
Next
Web UI Configuration
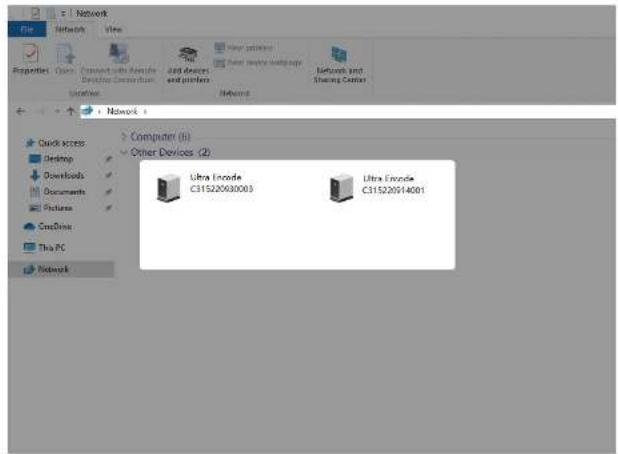
Fig1 Find your device in Windows > Network
Accessing the Web UI
A free tool, Web UI, is provided to monitor and manage device status and configuration. If you know your device's IP address, type it into your web browser to access the Web UI. Alternatively, you can access the Web UI via wired Ethernet, USB NET, or Wi-Fi following the steps below.
- Connect your device to your LAN and power it up.
⚠️ To ensure a smooth video, you are recommended to connect to a wired network.
- Access Web UI:
• Via File Explorer on Windows 7 and above
i. Open File Explorer in your PC, then locate your device in Network > Other Devices.
ii. Double click the device icon to open the sign page of Web UI.
• Via USB NET, IP Address: 192.168.66.1
i. Connect the device to your computer using provided USB cable.
ii. Type the USB NET IP address 192.168.66.1 in your web browser to access the Web UI.
• Via device Wi-Fi AP, IP Address: 192.168.48.1
⚠️ Plug included Wi-Fi antenna when you want to connect to a wireless network.
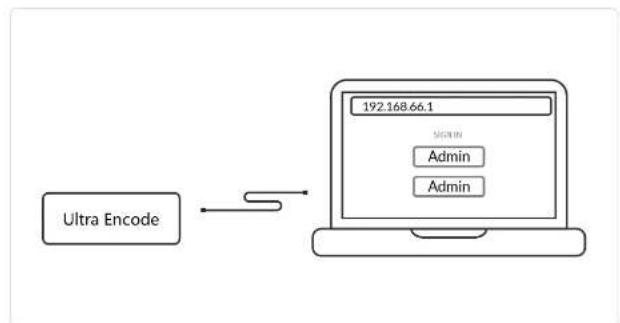
flowchart
graph LR
    A["Ultra Encode"] --> B["Encoder"]
    B --> C["192.168.66.1"]
    B --> D["Admin"]
    B --> E["Admin"]
Hg2 USB NFT connection
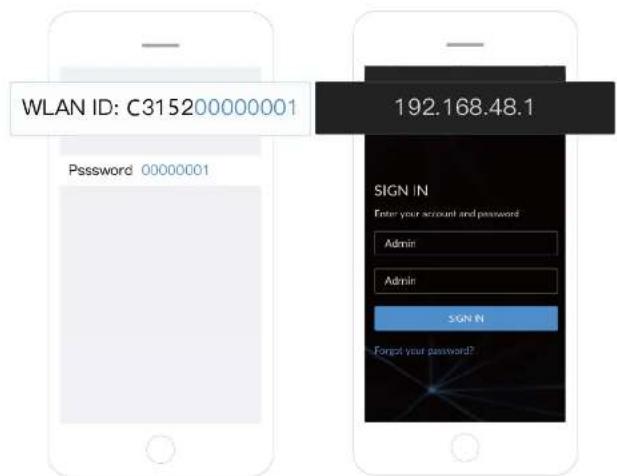
Hq3 AP connection
i. In your smartphone/tablet/laptop, turn on WLAN, search for and join the device AP named Ultra Encode + (Serial number).
The AP names after your gear's Serial number, and the password is the last 8-number of the serial number by default. For example, a serial number 311210101001 indicates the initial AP password is 10101001.
We recommend that the distance between the Web UI and the encoder should be within 10m.
ii. In your web browser, enter 192.168.48.1 to open the Web UI.
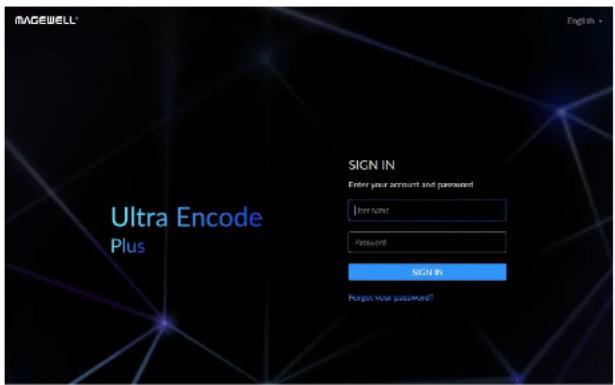
Signing In/Out
The Web UI allows multiple users to have read/write access to make configuration settings at the same time after logging-in. However, to avoid configuration conflicts, we do not recommend you to operate one device simultaneously.
• The default administrator name and password are both Admin.
• We recommend you to modify the admin password after initial logging-in.
- Sign Out: click the down arrow symbol behind the logging-in username at the top-right of the Web UI, and select Sign out.
Dashboard
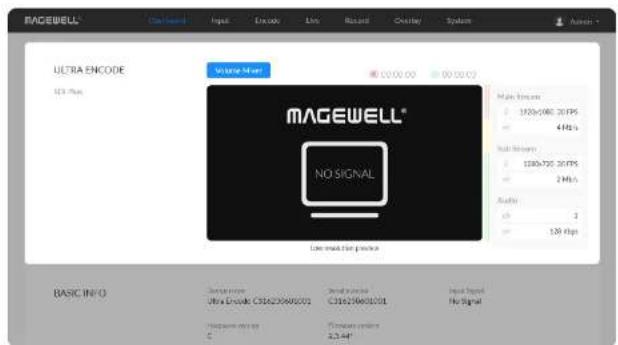
On Dashboard page, you can
• preview the thumbnail of the encoded video
- check device hardware information
- check system status
- set global volume mixer
- check product module at the upper left corner
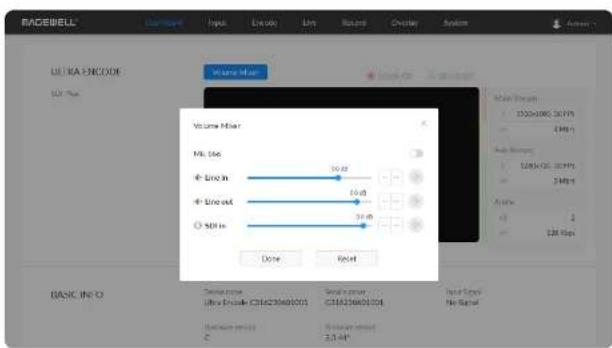
Setting Volume Mixer
- Mic Bias: turn it on when connecting a microphone via line in. It allows flowing way power (around 2.3V) to the jack which makes the microphone sound. It is off by default.
- LINE IN: adjust the audio connected to the LINE IN. Click to fine tone the volume at 0.1dB.
- LINE OUT: adjust the LINE OUT audio which remixes audio embedded in input signal and LINE IN. Click to fine tone the volume at 0.1dB.
• HDMI/SDI IN: adjust input signal volume - mute current channel. Click to fine tone the volume at 0.1dB.
• : restore current channel to default value - Reset: restore all settings of the volume to default settings
• Done: click to save your configuration
Previewing Thumbnails
Thumbnails, with a low resolution of 640x360, give you a quick snapshot of video being encoded.
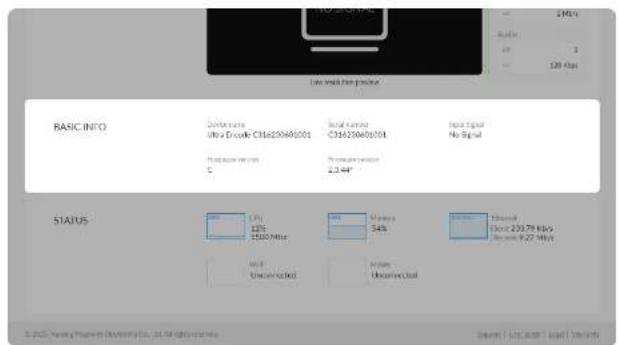
Checking BASIC INFO
• Device name: device name of your unit. You can modify the device name in the System > General > Device name section.
- Serial number: serial number of your unit, which is also marked on your device.
- Input Signal: current input signal format.
- Hardware version: hardware version of your unit.
- Firmware version: current firmware version that is installed in your unit. You can update the firmware, via the System > Firmware tab.
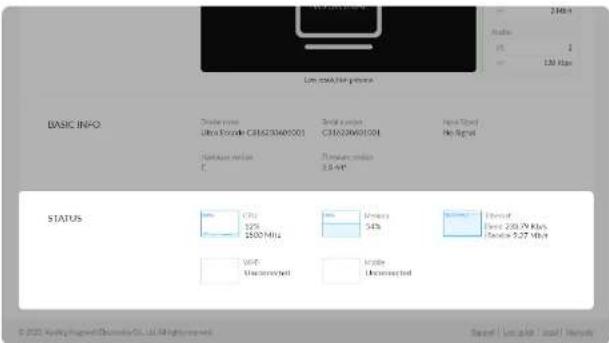
Checking STATUS
• Gives you an overview of your system CPU, memory usage, network usage in real-time in order to evaluate the device performance & health.
Input
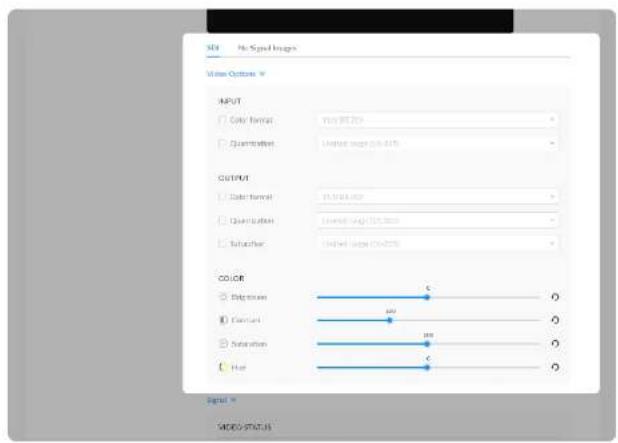
Click and enter the Input tab to check the input signal information detected by the device.
Set Input Source
• Color format: input video color format. Check the box to select other options, including RGB, YUV BT.601, YUV BT.709, YUV BT.2020.
- Quantization: input quantization range. Check the box to select other options, including Full range(0-255), Limited range(16-235).
Setting OUTPUT
• Color format: check the box to select other options, including YUV BT.601, YUV BT.709.
- Quantization: check the box to select other options, including Full range(0-255), Limited range(16-235).
- Saturation: check the box to select other options, including Full range(0-255), Limited range(16-235), Extended GAMUT range(1-254).
Setting Color
Set color format of preview and stream video.
- Brightness: range from -100 to 100, the default value is 0.
- Contrast: range from 50 to 200, the default value is 100.
- Saturation: range from 0 to 200, the default value is 100.
• Hue: range from -90 to 90, the default value is 0. - Reset: Click icon to restore the current setting to default value.
Signal w
| DESCRIPTION | 1920+1880g, 64.001g |
| Color depth | 10 |
| Sampling | 4-52 |
| Aspecting | 16-9 |
| Color range | 87-79 |
| Pressure duct | 20 |
| Quantitation range | Limited |
| Extension range | Limited |
AUDIT STATUS
| Sampling | 44100.24 obs |
| Charges | 8 |
SCHI STATUS
| Line type | Singleton |
| Unmarked | 92 |
| Stem type | Single stem |
| Good II | Fine |
| Stemled | Fine |
| Alignment | 0 |
| ST 352 (normal 10) | 686000000 |
| Fixed | 2200 Points |
| Value | 1.125 Litter |
| Hubble | 1920 Points |
| Values | 1040 Litter |
Check VIDEO STATUS
• Resolution shows the input video pixel resolution & frame rate.
• Color depth shows the input video color depth, in bits.
• Sampling shows the input video color sampling format.
- Aspect ratio shows the input video aspect ratio.
• Color format shows the input video color encoding format.
• Frame struct shows the input video frame type, 2D or 3D.
• Quantization range shows the quantization range, Full or Limited.
• Saturation range shows the saturation range, e.g. Full or Limited.
Check AUDIO STATUS
• Sampling shows the input audio sampling rate and bit depth.
• Channels shows the number of input audio channels detected.
Check SDI STATUS
NOTE: This parameter is available for SDI products.
- Link type shows link type of input SDI signal, including single link, dual link, quad link.
• Link speed shows the current data speed. - Stream type shows the number of streams that is contained in the data source.
• Level B shows whether the input signal is level B format.
• Interlaced shows whether the input signal is interlaced. - Assignment shows the link number, especially when be fed into a source of
| MEOD STATUS | |
| Resolution | 1520-6000 at 000pb |
| Color depth | 8 |
| Sampling | 4.04 |
| Approximate | 15.9 |
| Color time | 87.70# |
| Power draw | 20 |
| Quantitation range | Limited |
| Saturation range | Limited |
| AUDIO STATUS | |
| Sampling | 48.00, 16 bits |
| Churns | ? |
| HOME STATUS | |
| Hood | HOME |
| HDD Procedural | Fine |
| MIC | 5 |
| Current | Fine |
| Periode | 74.23 MHz |
| Timing Interval | 2000 Pads |
| Timing in water | 1920 Pads |
| Timing Offshore pack | 80 Pads |
| Timing Offshore width | 40 Pads |
| Timing Offshore pack | 140 Pads |
| Timing Vertical | 1125 Pads |
| Timing Varies | 240 Pads |
| Timing Vertical pack | 2 Pads |
| Timing Vases width | 2 Pads |
| Timing Vases pack | 15 Pads |
multi-link interfaces.
• ST 352 payload ID shows the SMPTE ST 352 video payload identification code for SDI.
• H total shows the total number of pixels, horizontally.
• V total shows the total number of pixels, vertically.
• H active shows the number of active pixels, horizontally.
• V active shows the number of active pixels, vertically.
Check HDMI STATUS
NOTE: This parameter is available for HDMI products.
• Mode shows the signal type (which is always HDMI for the HDMI product).
- HDCP encrypted shows whether the signal source is HDCP encrypted. In accordance with the related laws and regulations, the device doesn't process HDCP encrypted signals, so the value is None.
- VIC Video Identification Code, which is defined for CEA formats.
• IT content shows whether the transmission package is content.
- Pixel rate shows the maximum number of pixels the unit could possibly write to the memory in one second.
• Timing-H total shows the total number of pixels, horizontally.
- Timing-H active shows the number of active pixels, horizontally.
- Timing-H front porch shows the Front Porch width in pixels.
• Timing-H sync width shows the Sync Pulse width in pixels.
30/17/2021
Manage EDO of the major part.
The 100% technology is after increasing a loop through the
- Timing-H back porch shows Back Porch width in pixels.
- Timing-V total shows the total number of pixels, vertically.
• Timing-V active shows the number of active pixels, vertically. - Timing-V front porch shows the size of the vertical Front Porch in pixels.
- Timing-V sync width shows the width of the vertical Sync Pulse in pixels.
- Timing-V back porch shows the size of the vertical Back Porch in pixels.
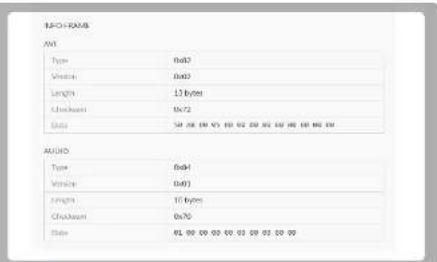
Check HDMI INFO FRAME
The info frames vary from different signal sources, AVI/AUDIO/SPD/VS may be included.
• Type shows the packet type.
• Version shows the packet Version.
• Length shows the length of the AVI InfoFrame payload.
- Checksum shows the packet checksum.
• Data shows the InfoFrame payload.
EDID
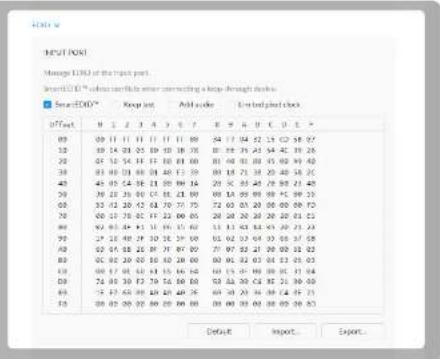
Click the EDID to check the EDID information. By clicking Reset to Default, you can cancel your settings.
EDID is only available for products supporting HDMI signal.
Set SmartEDID ^TM
NOTE: This function is available for HDMI products.
- SmartEDID™
- SmartEDID™ enabled by default. When it is disabled, other related functions can not be set.
• Depending on the input capability of the encoder and that of the device connected to the loop-through interface, the encoder will smartly select to send the EDID to the video source device, to ensure both the encoder and the loop-through device can obtain the signal they support.
- Keep last
- Keep the last EDID value used.
- This function is disabled by default. To enable it, the SmartEDID function should also be enabled. When Keep Last is enabled and the loop-through device is disconnected, the current EDID will still be used. The encoder will continue receiving signal so the video capture and encoding continues. Otherwise, the encoder will resend its EDID to the source device for it to redetermine what format of signal to send. As a result, there could be an interruption to the source signal for a short time.
- Add audio
• Force the source device to output audio.
- If users connect a monitor which doesn't support audio to the loop-through output, the source device will decide not to output audio. As a result, the device will not get any audio input. If Add Audio is enabled, the device will communicate with the video source device, forcing it to output audio.
- Limited pixel clock
- If enabled, when the pixel resolution of the loop-through device is beyond the capability of the device, a lower pixel resolution will be used in order to avoid the output producing a blank screen.
Set INPUT EDID
Any of the following actions can be performed on the input EDID of the device.
- Default: Click Default to reset the current EDID to default values.
- Import: Click and select an EDID file to import a EDID file.
- Export: Click and set the file name to export the current EDID as a .bin file.
Check Loop-through EDID
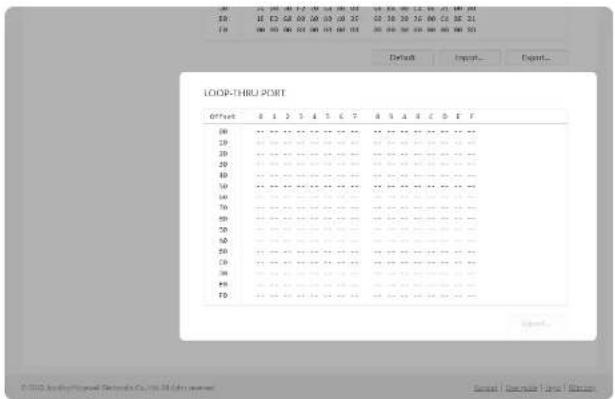
Loop-through EDID shows the EDID of the connected loop-through device.
NOTE: This section is available for HDMI products.
- Export: Click and set the file name to export the current EDID as a .bin file.
No Signal Images
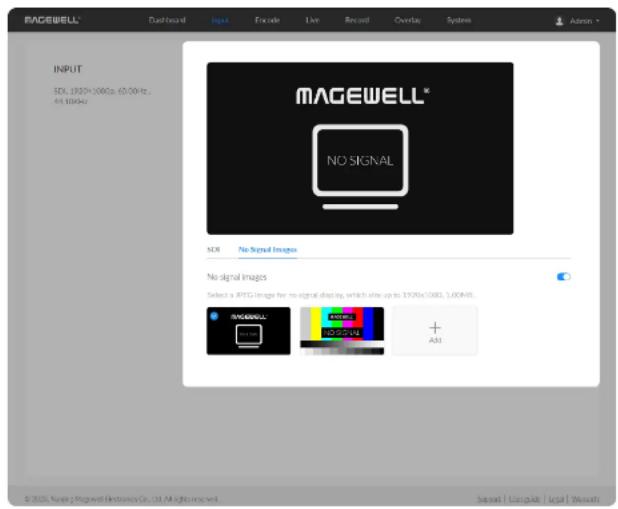
- Select a JPEG image for no signal display, which size up to 1920x1080, 1MB. The device provided 2 pictures can not be deleted. By default, the switch is on.
- Add: you can add 2 more JPEG photos sizing up to 1920x1080, 1.00 MB.
- Delete: click the delete icon to remove the uploaded image from your device.
Encode
![MAGOBELL Container Input Output Live Record Overlay System Action DE-INTER-LACING: View Off-Inter- Current mechanical parts has a progressive design that can be displayed or not installed. double thickness 3D 3D [ ] 500 mm extra a progressive input input MAIN STREAM Current preferences: Current parameters for the model setting options 12 Loop Advanced Settings 6 Model settings: CLK](/content/2026/05/900456/images/dc0fa6671e000bd5dca952df6e2f2eedeeaba398a5d8f02a13e580b7f8d040ee.jpg)
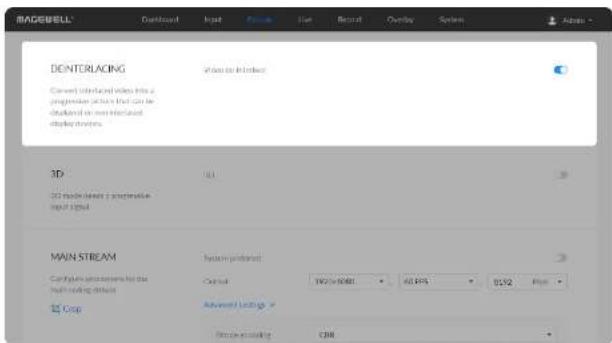
Deinterlacing
For interlaced signals, the output can be interlaced HEVC stream, if de-interlace function is turned off, and the stream encoders both are HEVC.
- Video de-interlace: by default, the switch is on. The dual streams must be HEVC(H.265) for turning off de-interlace. After turning off, only HEVC is available for the code type of the dual streams.
3D
- 3D: by default, the switch is off. To output 3D video, you need to input progressive signal with resolution lower than 2048x1080.
Setting MAIN STREAM
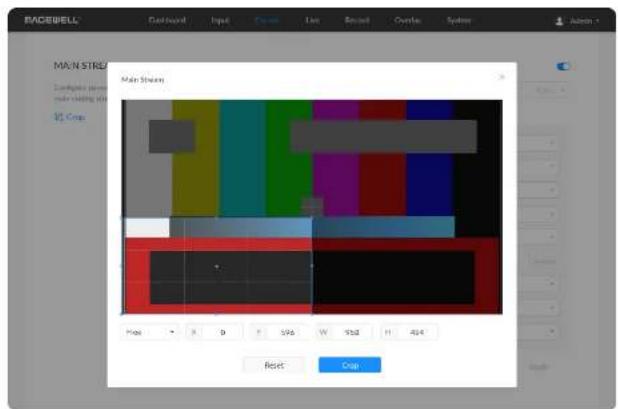
- Crop: click on the Icon, and specify the cropping ratio as Free, 1:1, 3:2, 4:3, 16:9 in the pop-up window. You can drag and drop the crop border to set the crop window. Or specify the left (x) and top (y) edges of the containing block and the specified width (w) and height (h) of the rectangle. The cropped image will be displayed on the Live, Overlay and LCD screens simultaneously. Click 'Reset', the coordinates of the cropping frame will be changed to (0, 0, the resolution WH of the Output configuration).
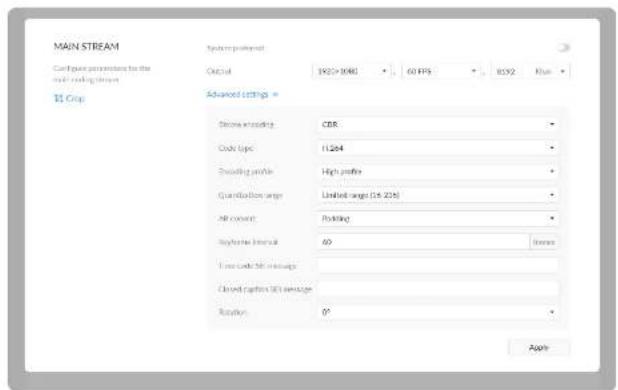
- System preferred: by default, it is off. Turn on the switch, and the output format would be consistent with the input signal. You can check the format on the right side of the thumbnail of the device status. System preferred is not available for NDI-HX3.
- Output: by default, it follows input resolution, frame rate, bitrate. Only the resolution and frame rate can be specified for NDI ^1 HX3, and the bit rate is determined by NDI ^2 and is filled in automatically.
- Bitrate Encoding: options are CBR (default) and VBR. Live stream at CBR (Constant Bitrate) for bandwidth stability. VBR(Variable Bitrate) files vary the amount of output data per time segment. CBR is the only choice for NDI HX3. And you need to set quantization parameters for VBR. The quantization parameter controls the amount of compression for every macroblock in a frame. Large values mean that there will be more compression, lower quality, and lower bandwidth. Lower values mean the opposite.
- Min QP: available when Bitrate Encoding is VBR. The range of values is 0 to 50. The default value is 4. And we recommend you use the default value and do fine adjustment if needed.
- Max QP: available when Bitrate Encoding is VBR. The range of values is 1 to 51. The default value is 40. And the value must be larger than the Min QP value. We recommend you use the default value and do fine adjustment if needed.
• Code type: options are H.264 (default) and H.265(HEVC) encoders. - Encoding profile: for H.264 encoder, the profiles can be High (default)/Main profile/Baseline. For H.265 (HEVC), it can be Main profile.
- Quantization range: options are Full range(0-255) and Limited range(16-235) (default).
• AR convert: options are Ignore, Cropping and Padding (default). - Keyframe interval: options are 0.5, 15-300 frames, the default is 60. A smaller number will result in a larger file size and less buffer time for seeing the first frame. To ensure a clear and smooth live broadcast, it is recommended that the key frame interval be less than or equal to 60 frames. Keyframe interval is fixed at 20 for NDI FHX3 .
- Time code SEI message: options are off (default), system clock, and embedded. Turn on the switch to get A/V sync between multiple devices which support this SEI message as well.
- Closed caption SEI message: turn on the switch to encode closed captions (if present in the input signal) into H.264/H.265 (HEVC) SEI message. Native CEA-608 and 608 over 708 captions are both supported. It is off by default. Note that it is only supported by SDI product.
- Rotation: options are 0°(default), 90°, 180°, and 270°. Rotation will make overlay not working.
Setting SUB STREAM
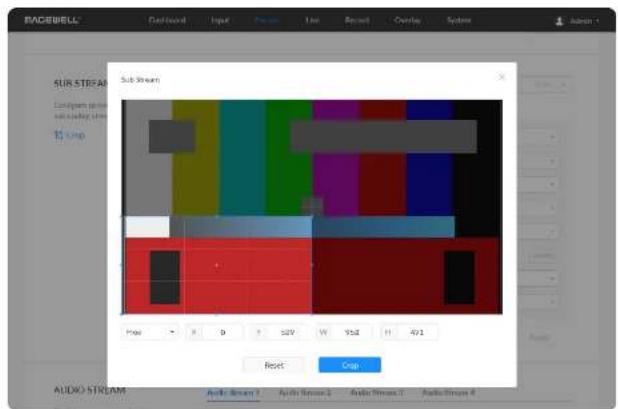
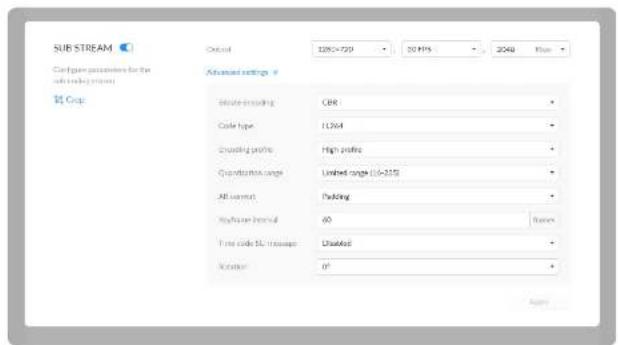
- By default, the sub stream is on. You can turn it off to lower bandwidth usage.
- Crop: click on the Icon, and specify the cropping ratio as Free, 1:1, 3:2, 4:3, 16:9 in the pop-up window. You can drag and drop the crop border to set the crop window. Or specify the left (x) and top (y) edges of the containing block and the specified width (w) and height (h) of the rectangle. The cropped image will be displayed on the Live, Overlay and LCD screens simultaneously. Click 'Reset', the coordinates of the cropping frame will be changed to (0, 0, the resolution WH of the Output configuration).
- Output: by default, it is 1280x720, follow input frame, 2Mbps. Sub stream outputs at 640x360p30, 3Mbps for NDI HX3 .
- Bitrate Encoding: options are CBR (default) and VBR. Live stream at CBR (Constant Bitrate) for bandwidth stability. VBR(Variable Bitrate) files vary the amount of output data per time segment. CBR is the only choice for NDIHX3. And you need to set quantization parameters for VBR. The quantization parameter controls the amount of compression for every macroblock in a frame. Large values mean that there will be more compression, lower quality, and lower bandwidth. Lower values mean the opposite.
- Min QP: available when Bitrate Encoding is VBR. The range of values is 0 to 50. The default value is 4. And we recommend you use the default value and do fine adjustment if needed.
- Max QP: available when Bitrate Encoding is VBR. The range of values is 1 to 51. The default value is 40. And the value must be larger than the Min QP value. We recommend you use the default value and do fine
adjustment if needed.
- Code type: options are H.264 (default) and H.265(HEVC) encoders. H.264 is the only choice for NDI ^® HX3.
- Encoding profile: for H.264 encoder, the profiles can be High (default)/Main profile/Baseline. For H.265 (HEVC), it can be Main profile.
- Quantization range: options are Full range(0–255) and Limited range(16–235) (default).
• AR convert: options are Ignore, Cropping and Padding (default). - Keyframe interval: options are 15-300 frames. The default value is 60. A less number will result in a larger file size and less buffer time for seeing the first frame. To ensure a clear and smooth live broadcast, it is recommended that the key frame interval be less than or equal to 60 frames. Keyframe interval is fixed at 20 for NDI PIX3 .
- Time code SEI message: options are off (default), system clock, and embedded. Turn on the switch to get A/V sync between multiple devices which support this SEI message as well.
- Rotation: options are 0°(default), 90°, 180°, and 270°. Rotation will make overlay not working.
Setting AUDIO
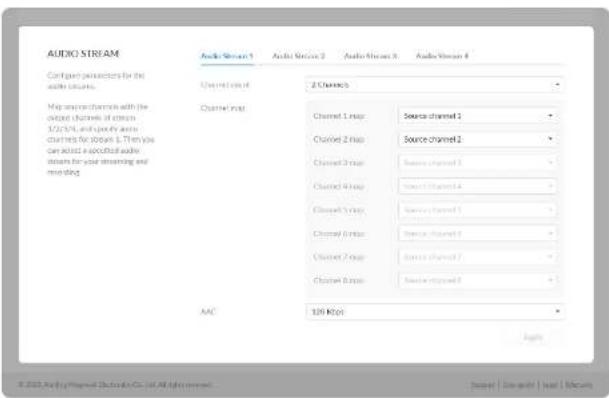
The encoder supports encoding of 4 audio streams, of which stream 1 can be up to 8 channels, and the remaining 3 audio streams are fixed at 2 audio channels.
- Source channel: When an SDI signal with embedded audio is input, up to 8 embedded audio channels can be selected as source channels which can be mapped with output audio channels for Channel Mapping.
- LFE: Low Frequency Effect, the switch is off by default. Available when the Channel count is greater than 2 channles.
- Channel count: for Audio Stream 1, default is 2 channels and it can be 2/4/6/8 channels or follow input. The Audio Stream 2/3/4 streams are fixed at 2 audio channels.
- Channel map: specify mapping relationship between the output channel and the source channel selected in Source channel.
- AAC: from 16 to 256 Kbps, and the default value is 128 Kbps.
Live
The encoder natively supports streaming to YouTube, Facebook, Twitch, as well as self-defined servers.
Managing Live Streaming Sessions
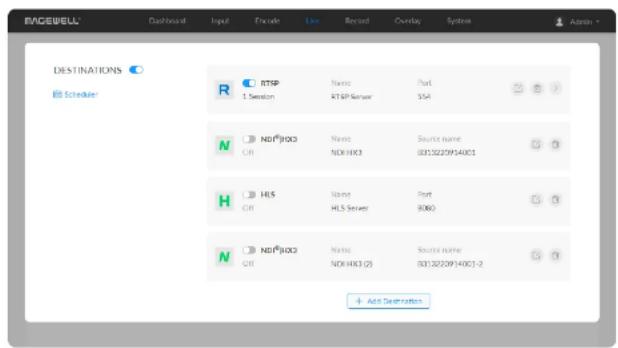
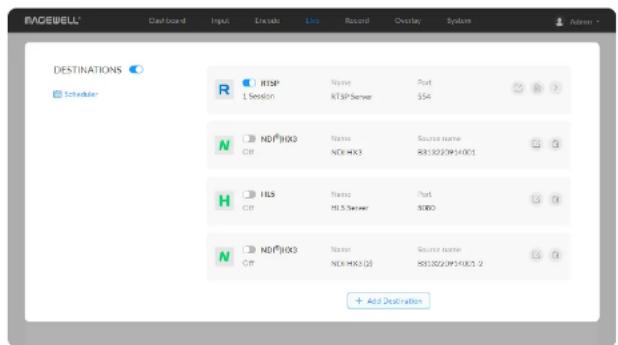
You can manually added, modify, or delete any of streaming sessions listed in the Live tab.
- Click Edit to modify the parameters of the stream.
- Click Delete to remove the source from the list.
- Turn on/off the switch to start/stop streaming.
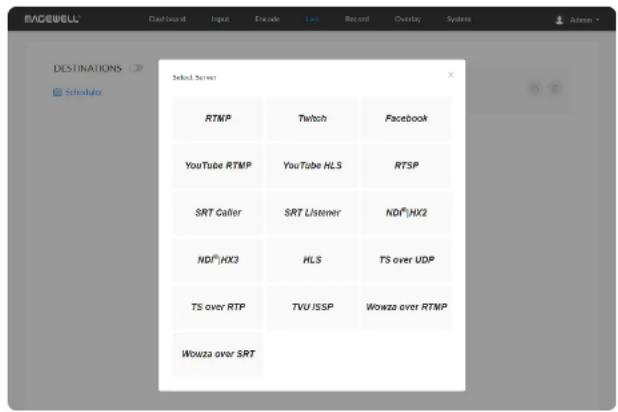
- Click Add and select an RTMP, RTMPS, RTSP, SRT Caller/Listener, NDI HX2 , NDI |HX3 , HLS, TS over UDP/RTP, TVU ISSP, Wowza over RTMP, or Wowza over SRT server to stream to.
Notes
- Supported streaming protocols - RTSP, RTMP, RTMPS, SRT Caller, SRT Listener, NDI®HX2, NDI |H3, HLS, TS over UDP, TS over RTP, and TVU ISSP.
- Allow simultaneous 6 sessions over multiple streaming protocols, containing 1 session of HLS, RTSP, or 2 NDI X2 (if included).
- NDI HX3 stream is exclusive, and other protocol streams cannot be pushed at the same time.
- Specify the main stream or sub stream for each session.
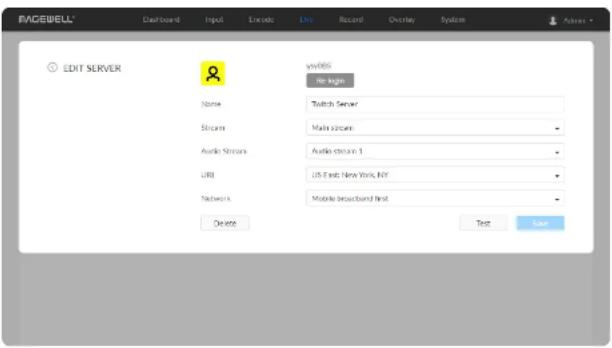
Live Streaming to Twitch
You can stream to Twitch if you have a Twitch account.
⚠️ To ensure smooth live streaming experience, connecting to a wired Ethernet network is recommended.
- Click + Add Destination in the Live tab, select , folTwethe on-screen instructions to log in and select a server.
Your avatar will be displayed after a successful logging-in. - Specify a Name for your streaming session, which can be 1 to 30 characters.
- Choose main or sub stream for streaming, parameters of which can be set in Encode tab.
- Choose an audio stream (1 to 4) for streaming, and the default value is Audio stream 1. Audio encoding parameters can be set in Encode >AUDIO STREAM.
- URL is automatically filled in after successful login, and it is not recommended to change it.
- Choose the prime network for streaming. By default, the network connection priority is: Mobile Broadband > Ethernet > Wi-Fi. The device scans for the available network according to the connection priority and connect to it for streaming. If the current network is disconnected, the unit automatically re-scans according to the priority. Plug a USB modem into your encoder while using mobile network to stream.
- Click Test to check the connection between the server and encoder.
- When prompted, click OK.
- Go back to Live page, turn on before streaming.
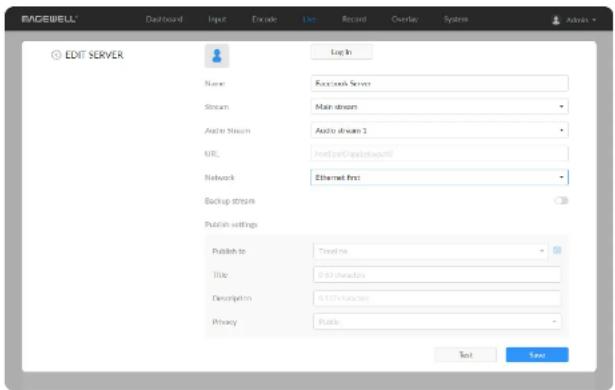
Live Streaming to Facebook Live
You can live broadcast to Facebook if you have a Facebook account.
To ensure smooth live streaming experience, connecting to a wired Ethernet network is recommended.
- Click + Add Destination in the Live tab, select Facebook, enter the Stream Name.
- Click Log In. Follow the on-screen instructions to open Facebook, enter the code prompt, and log in.
⚠️ Your avatar will be displayed after a successful logging-in.
- Specify a Name for your streaming session, which can be 1 to 30 characters.
- Choose main or sub stream for streaming, parameters of which can be set in Encode tab.
- Choose an audio stream (1 to 4) for streaming, and the default value is Audio stream 1. Audio encoding parameters can be set in Encode >AUDIO STREAM.
- Input facebook destination URL.
- Choose the prime network for streaming.
By default, the network connection priority is: Mobile Broadband > Ethernet > Wi-Fi.
The device scans for the available network according to the connection priority and connect to it for streaming. If the current network is disconnected, the unit automatically re-scans according to the priority. Plug a USB modem into your encoder while using mobile network to stream.
- (Optional) Turn on the Backup stream and specify the Stream key.
- Specify Publish settings including Publish to, Title (0-63 characters), Description (0-127 characters), Privacy and Stream ID.
- Click Save.
- Click Test to check the network connection.
- After passing the test, click OK.
- Go back to Live page, turn on before streaming.
Live Streaming to YouTube
If you need low latency, then YouTube RTMP is the better option. However, if you need adaptive bitrate streaming, then YouTube HLS is the better option.
You can stream to YouTube if you have a YouTube account, and you have enabled the Live streaming feature of your channel at least 24 hours before your streaming.
You can stream to YouTube if you have a YouTube account, and you have enabled the Live streaming feature of your channel at least 24 hours before your streaming.
⚠️ To ensure smooth live streaming experience, connecting to a wired Ethernet network is recommended.
⚠️ To enable the Live streaming feature, refer to YouTube Help.
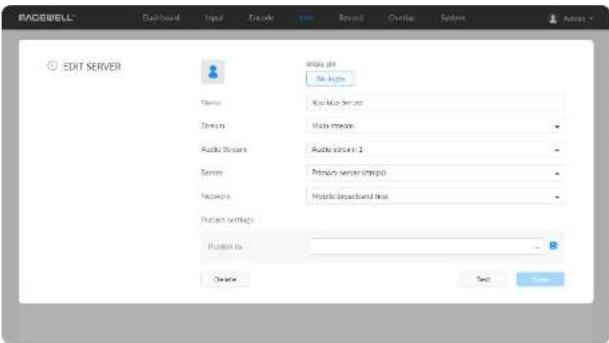
- Click + Add Destination in the Live tab, select YouTube RTMP or YouTube HLS, enter the stream Name, follow the on-screen instructions to log in and select a server.
- Click Log In. Follow the on-screen instructions to open YouTube, enter the code displayed on your device, and log in. Your avatar will be displayed after a successful logging-in.
- Specify a Name for your streaming session, which can be 1 to 30 characters.
- Choose main or sub stream for streaming, parameters of which can be set in Encode tab.
- Choose an audio stream (1 to 4) for streaming, and the default value is Audio stream 1. Audio encoding parameters can be set in Encode >AUDIO STREAM.
- Server is automatically filled in after successful login, and it is not recommended to change it.
- Choose the prime network for streaming. By default, the network connection priority is: Mobile Broadband > Ethernet > Wi-Fi. The device scans for the available network according to the connection priority and connect to it for streaming. If the current network is disconnected, the unit automatically re-scans according to the priority.
Plug a USB modem into your encoder while using mobile network to stream.
- Tap Publish to and select a channel or event for your session.
When choosing Add a new stream, you need to enter title, description and privacy. Then a new live event would be added to your logging-in account automatically. And you can stream to YouTube using streamer without clicking on go live in YouTube Studio.
Choose a channel or event. Then go live in YouTube studio to ensure a successful live broadcast. - Content made for kids switch is off by default. You can go to Youtube Help to get detailed requirements.
- Click Test to check the connection between the server and encoder.
- When prompted, click OK.
- Go back to the Live page, and turn on before streaming.
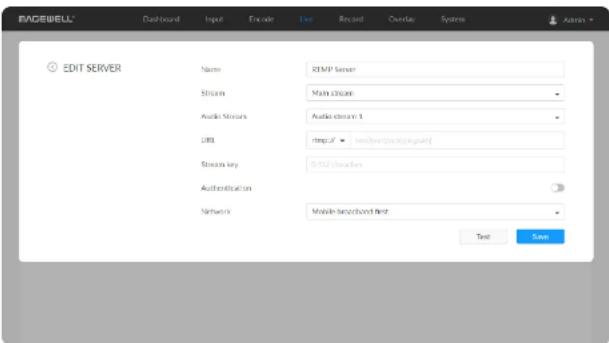
RTMP/RTMPS
- Name: specify a name for current task to facilitate server management, which will be displayed in the server list. The name can be 1\~30 character.
- Stream: choose to deliver a main or sub stream, which can be customized in Encode tab.
- Audio Stream: options are Audio stream 1 \~ 4, and the default is Audio stream 1. Audio stream parameters can be set in "Encode > AUDIO STREAM".
- URL: enter the RTMP URL address, or an RTMP address you have obtained
from the live stream platform. Full address
example.rtmp://192.168.1.136:1935/live. The port number part :1935 can be omitted, and the value range is 1 to 65535. If the RTMP address is a domain name, live can be omitted. If the RTMP address is an IP address, The part live cannot be omitted.
- Stream key: enter the stream key obtained from the live stream platform. If none, leave it empty. The key can be string of 0-512 characters.
- Authentication: turn on if your live streaming service provider requires. Obtain the User Name and Password from your live streaming service provider.
- Network: The device scans for the available network according to the connection priority and connect to it for streaming. If the current network is disconnected, the unit automatically re-scans according to the priority. By default, the network connection priority is: Mobile Broadband > Ethernet > Wi-Fi.
Plug a USB modem into your encoder while using mobile network to stream.
- Test: check the connection between the server and encoder.
- Save: save current configuration.
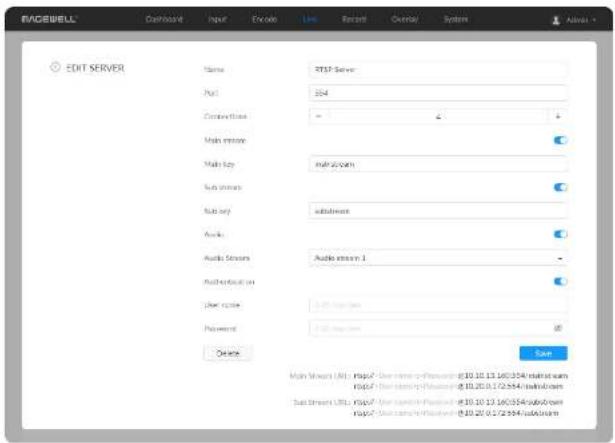
RTSP
- Name: specify a name for current task to facilitate server management, which will be displayed in server list. The name can be 1\~30 character.
- Port: specify RTSP stream port, the value range is 554 (default), 10000-65535.
- Connections: set number of clients for each RTSP stream, 8 clients are supported at most. And you can check the client (session) number at the server list.
- Main stream: turn on to push main stream. Specify parameters in Encode tab. By default, it is on.
- Main key: specify stream key for main stream. The main key should be different from sub key.
- Sub stream: turn on to push sub stream. Specify parameters in Encode tab. By default, it is off.
- Sub key: specify stream key for sub stream. The sub key should be different from main key.
- Audio: turn on to stream audio signal, otherwise audio will not be delivered. The audio signal consists of audio embedded in input signal and LINE IN. By default, it is on.
- Audio Stream: options are Audio stream 1 \~ 4, and the default is Audio stream 1. Audio stream parameters can be set in "Encode > AUDIO STREAM".
- Authentication: turn on if your live streaming service provider requires. Type your user name and password for the streaming service.
• Save: save current configuration.
• The encoder can stream 1 RTSP session with other protocol streams.
• After configuration, the stream URLs display at the end of the page. If you have multiple network connections, there would be multiple stream URLs.
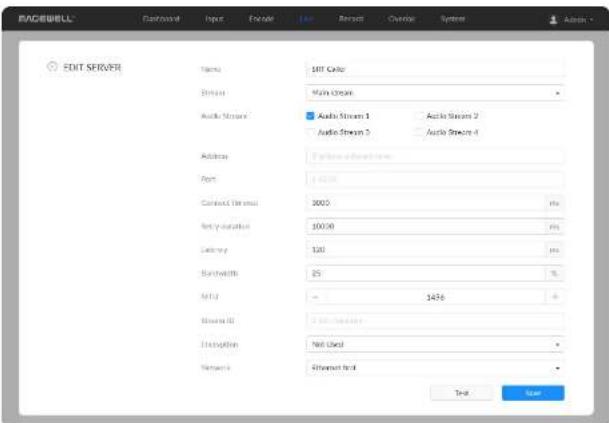
SRT Caller
- Name: specify a name for current task to facilitate server management, which will be displayed in server list. The name can be 1\~30 character.
- Stream: choose to stream main or sub stream, which can be customized in Encode tab.
- Audio Stream: check multiple boxes to choose from Audio stream 1 \~ 4. Each stream will be sent as one track. Audio stream parameters can be set in "Encode > AUDIO STREAM".
- Address: enter the Listener address when Mode is set to Caller. If the SRT listener and caller are on the same LAN, enter the private IP address of the SRT listener on the LAN. If the SRT listener and caller are in different network environments, enter the public IP address of the SRT listener.
- Port: enter the port number specified by the encoder, which ranges from 1 to 65535.
- Connect timeout: specify SRT connection timeout in milliseconds, which ranges from 1000 to 30000ms. The default value is 3000.
- Retry duration: specify retry duration when SRT SRT connection timeout in milliseconds, which ranges from 0 to 10000. The default value is 10000ms.
-
Latency: possible values are 30 \~ 8000ms. The default value is 120ms. We recommend that you set the same latency for SRT caller and listener.
-
Bandwidth: indicate the portion of the total bandwidth of a stream required for the exchange of SRT control and recovery packets. Available values are 5 \~ 100%, and the default value is 25%. A worse network condition requires more bandwidth for overhead to ensure normal transmission.
- MTU: specify maximum transmission unit (MTU) in bytes, ranging from 232 to 1500. The default size is 1496.
- Stream ID: specify Stream ID of 0 to 256 characters which should be consistent with that of its sender.
- Encryption: specify the stream encryption algorithm to ensure the data security, options are not used, AES-128/192/256.
- Passphrase: specify stream key of 10 to 79 characters, which is the same as the SRT listener.
- Network: The device scans for the available network according to the connection priority and connect to it for streaming. If the current network is disconnected, the unit automatically re-scans according to the priority. By default, the network connection priority is: Mobile Broadband > Ethernet > Wi-Fi.
Plug a USB modem into your encoder while using mobile network to stream.
• Test: check the connection between the server and encoder. - Save: save current configuration.
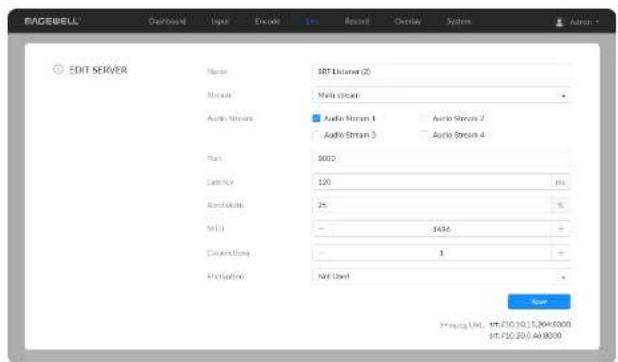
SRT Listener
- Name: specify a name for current task to facilitate server management, which will be displayed in server list. The name can be 1\~30 character.
- Stream: choose to stream main or sub stream, which can be customized in Encode tab.
- Audio Stream: check multiple boxes to choose from Audio stream 1 - 4. Each stream will be sent as one track. Audio stream parameters can be set in "Encode > AUDIO STREAM".
- Port: specify the service port of the encoder, ranging from 8000, and 10000 to 65535. The default value is 8000.
- Latency: options are 30 \~ 8000ms and the default value is 120ms. We recommend that you set the same latency for SRT caller and listener.
- Bandwidth: indicate the portion of the total bandwidth of a stream required for the exchange of SRT control and recovered packets. Available values are 5 \~ 100% and the default value is 25%. A worse network condition requires more bandwidth for overhead to ensure normal transmission.
- MTU: specify maximum transmission unit (MTU) in bytes, ranging from 232 to 1500. The default size is 1496.
- Connections: 8 connections at most.
- Encryption: specify encryption algorithm for stream data security. Options are not used (default), AES-128/192/256.
• Passphrase: specify stream key of 10 to 79 characters, which is the same as the SRT caller. - Save: save current configuration.
• The encoder can stream up to 6 SRT sessions simultaneously, containing
one SRT Listener session at most.
• After configuration, the play URL and passphase are shown in the page below.
• After configuration, the stream URLs display at the end of the page. If you have multiple network connections, there would be multiple stream URLs.
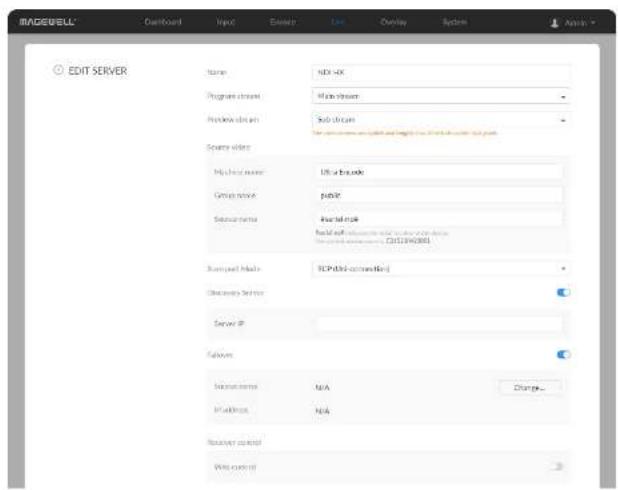
NDI
NDI®HX2 and NDI |HX3 are supported.
- Name: specify a name for current task to facilitate server management, which will be displayed in server list. The name can be 1\~30 character.
- Program stream: Options are Main stream, Sub stream, and full black video stream (640x360@30FPS).
- Preview stream: Options are Main stream, Sub stream, and full black video stream (640x360@30FPS). Both width and height of the stream resolution must be no greater than 640.
- Audio Stream: options are Audio stream 1 \~ 4, and the default is Audio stream 1. Audio stream parameters can be set in "Encode > AUDIO STREAM".
- Source Video
- Machine name Specify the Machine name which is a case-insensitive string of 1 to 30 characters, and should be a combination of A to Z, a to z, 0 to 9 and special characters like _#(). By default, it is the same as the device's model name.
- Group name
Specify the Group name which the source belongs to. It is case-insensitive, and should be a combination of A to Z, a to z, 0 to 9 and special characters like _. Multiple groups are supported, which should be comma-separated.
By default, it is public.
- Source name
By default, it is #serial-no#, serial number.
- Transport Mode
- UDP (Unicast) indicates that the encoder sends a UDP stream directly to the receiver. It is used where lower latency matters. And multiple simultaneous streams will work independently for multiple receivers.
- UDP (Multicast) indicates that the encoder sends the UDP stream to a multicast group. It is used for one-to-many broadcast for lower CPU utilization. Parameters in a multicast configuration include:
• Multicast IP ranges from 224.0.0.0 to 239.255.255.255.
- Subnet Mask can be legitimate value ranging from 255.0.0.0 to 255.255.255.0.
• Time To Live ranges from 1 to 255. The default value is 4.
- RUDP (Unicast) indicates that the encoder sends the reliable UDP stream directly to the receiver.
- TCP (Uni-connection) indicates that the encoder sends the TCP stream directly to the receiver.
-
TCP (Multi-connection) indicates that the encoder sends the TCP stream to more than one receiver.
-
Discovery Server: turn on the switch to auto-detect a source sender in different network segment and ping the sender. And the Server IP should be the IP address of the server running discovery server software. By default, the switch is off.
- Failover: turn on to protect your NDI transmission from failure. If the initial source video fails, the backup device begins to provide a service. The initial source will be automatically switched back to after it recovers. This function is disabled by default.
• Source name shows the backup NDI channel name.
Click Change... and select the failover (backup) video device within the same NDI group as the initial source. - IP Address shows the IP Address of the backup NDI channel which is automatically obtained after you select the backup NDI source.
- Receiver Control: turn on Web control to enable you to open the Web UI by clicking the gear icon in the NDI Studio Monitor application.
- When streaming NDI ^3 HX2, the encoder would send dual streams simultaneously.
- When streaming NDIHX3, the encoder would send the dual streams simultaneously, and sub streams format is fixed as 640x360, 30FPS, 3Mbps.
- The encoder can stream 2 NDI ^® HX2 sessions with other protocol streams.
- When streaming NDI ^TM HX3 session, no other session can be started simultaneously. 1 NDI ^TM HX3 sessions can be started simultaneously.
HLS
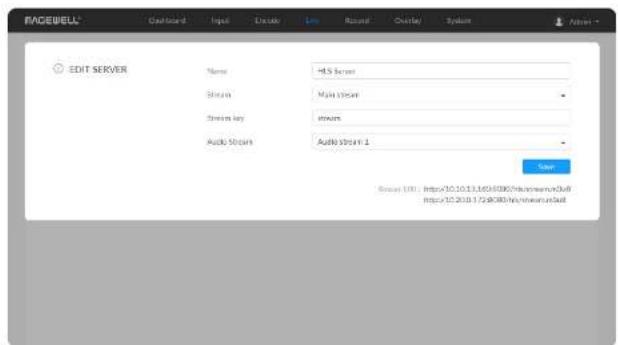
- Name: specify a name for current task to facilitate server management, which will be displayed in server list. The name can be 1\~30 character.
- stream: options are main stream, and sub stream. Modify the stream profile in Encode tab.
- Stream key: set key for your chosen stream. The keys of dual streams should be different.
- Audio Stream: options are Audio stream 1 \~ 4, and the default is Audio stream 1. Audio stream parameters can be set in "Encode > AUDIO STREAM".
- Save: save current server configuration.
• The encoder can stream 1 HLS session with other protocol streams. - After configuration, the stream URLs will display at the end of the setting page. If you have multiple network connections, there would be multiple stream URLs.
TS over UDP/RTP
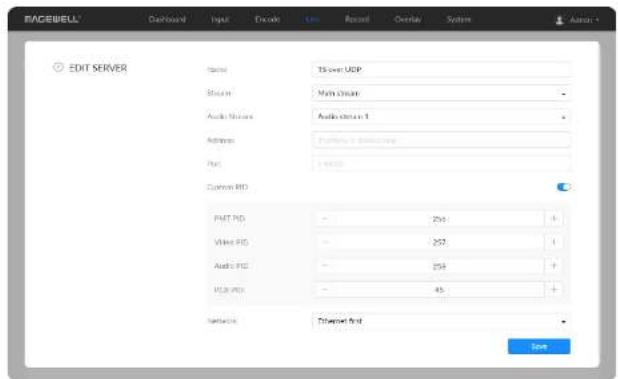
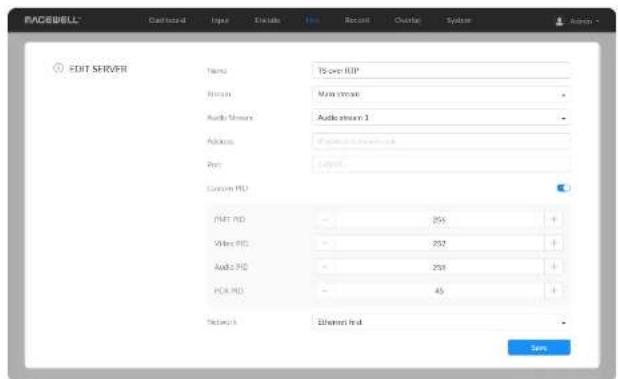
- Name: specify a name for current task to facilitate server management, which will be displayed in server list. The name can be 1\~30 character.
- Stream: options are main stream and sub stream, which can be customized in Encode tab.
- Audio Stream: options are Audio stream 1 \~ 4, and the default is Audio stream 1. Audio stream parameters can be set in "Encode > AUDIO STREAM".
- Address: specify the destination address.
• Port: specify the stream port. The value ranges from 1 to 65535. - Custom PID: PID stands for packet ID. Toggle it on to set the PIDs. PMT PID (program map table) should be different from Video PID, Audio PID and PCR (program clock reference) PID.
- PMT PID: the default value is 256. The value ranges from 16 to 8190.
• Video PID: the default value is 257. The value ranges from 16 to 8190.
* Audio PID: the default value is 258. The value ranges from 16 to 8190. - PCR PID: it is used to sync the audio and video. The default value is 45. The value ranges from 16 to 8190.
• Network: The device scans for the available network according to the connection priority and connect to it for streaming. If the current network is disconnected, the unit automatically re-scans according to the priority.
By default, the network connection priority is: Mobile Broadband > Ethernet > Wi-Fi.
Plug a USB modem into your encoder while using mobile network to stream.
- Save: save current configuration.
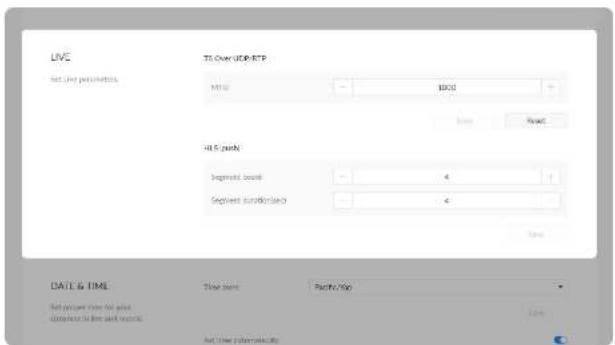
- You can set TS over UDP/RTP MTU at the System > General > LIVE part.
TVU ISSP
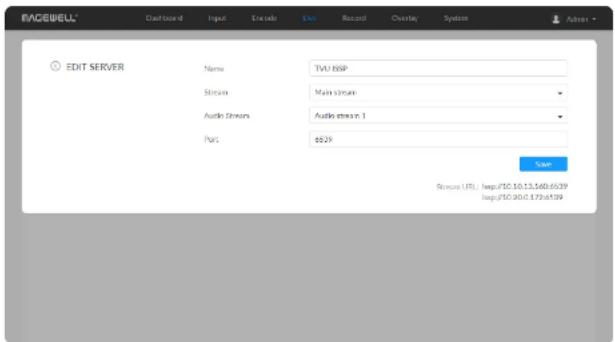
- Name: specify a name for current task to facilitate server management, which will be displayed in server list. The value can be 1 to 30 characters, including A-Z, a-z, 0-9, spaces, _+ and can not begin or end with a space.
- Stream: options are main stream and sub stream, which can be customized in Encode tab.
- Audio Stream: options are Audio stream 1 \~ 4, and the default is Audio stream 1. Audio stream parameters can be set in "Encode > AUDIO STREAM".
- Port: specify the stream port. The value can be 6539 (default), 10000-65535.
- Save: save current configuration.
- The encoder can stream 1 TVU ISSP session with other protocol streams.
- After configuration, the stream URLs display at the end of the page. If you have multiple network connections, there would be multiple stream URLs.
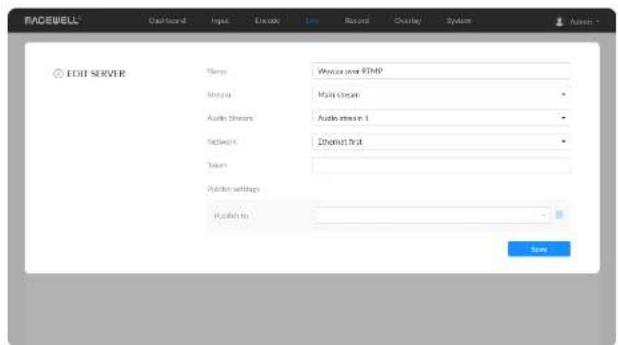
Wowza over RTMP
- Name: specify a name for current task to facilitate server management, which will be displayed in server list. The name can be 1\~30 character.
- Stream: options are main stream and sub stream, which can be customized in Encode tab.
- Audio Stream: options are Audio stream 1 \~ 4, and the default is Audio stream 1. Audio stream parameters can be set in "Encode > AUDIO STREAM".
• Network: The device scans for the available network according to the connection priority and connect to it for streaming. If the current network is disconnected, the unit automatically re-scans according to the priority. By default, the network connection priority is: Mobile Broadband > Ethernet > Wi-Fi.
Plug a USB modem into your encoder while using mobile network to stream. - Token: enter Wowza access token. One token can be used for one RTMP and one RTP session.
• Publish settings: specify publish destination. - Publish to: select a channel or event for your session.
When choosing Add a new stream, you need to enter title, description and privacy. Then a new live event would be added to your logging-in account automatically.
• Live stream name: specify the session name. - Broadcast location: specify the Wowza server.
• Live stream name: specify the session name. • Broadcast location: specify the Wowza server. - Save: save current configuration.
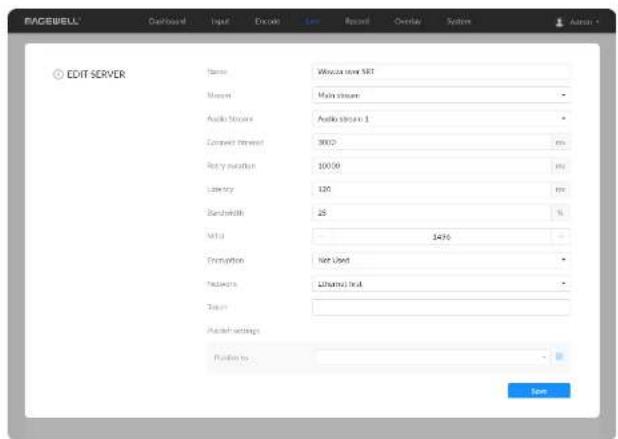
Wowza over SRT
- Name: specify a name for current task to facilitate server management, which will be displayed in server list. The name can be 1\~30 character.
- Stream: options are main stream and sub stream, which can be customized in Encode tab.
- Audio Stream: options are Audio stream 1 \~ 4, and the default is Audio stream 1. Audio stream parameters can be set in "Encode > AUDIO STREAM".
- Connect timeout: specify SRT connection timeout in milliseconds, which ranges from 1000 to 30000ms. The default value is 3000.
- Retry duration: specify retry duration when SRT SRT connection timeout in milliseconds, which ranges from 0 to 10000. The default value is 10000ms.
- Latency: possible values are 30 \~ 8000ms. The default value is 120ms. We recommend that you set the same latency for SRT caller and listener.
- Bandwidth: indicate the portion of the total bandwidth of a stream required for the exchange of SRT control and recovery packets. Available values are 5 - 100%, and the default value is 25%. A worse network condition requires more bandwidth for overhead to ensure normal transmission.
- MTU: specify maximum transmission unit (MTU) in bytes, ranging from 232 to 1500. The default size is 1496.
- Encryption: specify the stream encryption algorithm to ensure the data security, options are not used, AES-128/192/256.
• Passphrase: specify stream key of 10 to 79 characters, which is the same as the sender.
• Network: The device scans for the available network according to the
connection priority and connect to it for streaming. If the current network is disconnected, the unit automatically re-scans according to the priority.
By default, the network connection priority is: Mobile Broadband > Ethernet > Wi-Fi.
Plug a USB modem into your encoder while using mobile network to stream.
- Token: enter Wowza access token. One token can be used for one RTMP and one RTP session.
- Publish settings: specify publish destination.
- Publish to: with token authentication, refresh and select a channel or event for your session.
When choosing Add a new stream, you need to enter title, description and privacy. Then a new live event would be added to your logging-in account automatically.
• Live stream name: specify the session name.
- Broadcast location: specify the Wowza server.
- Save: save current configuration.
Live Schedule
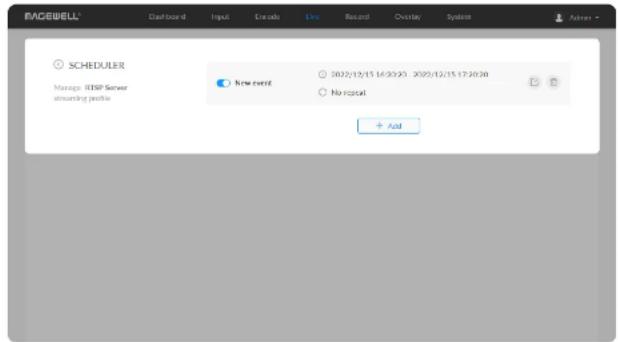
In everyday terms, a schedule will help you keep on top of other tasks and are less likely to procrastinate, whilst still being able to stream on a regular basis. For a streamer, a schedule will also mean that your viewers, followers, and subscribers will know exactly when you will be live and on which days, which is possibly the biggest reason for creating a schedule and sticking to it. Imagine having no clue when the next episode of your favorite TV show airs. By creating a stream schedule, viewers will know when to expect you and are therefore more likely to tune in. Scheduling your stream is easy with the scheduler we provide. Here's a quick tutorial on how to set it up:
- Click the schedule icon.
- Click Add in the window, and specify parameters of the schedule. You can add up to 8 scheduling schemes.
• Description: 1 to 64 characters, including chinese, english, numbers, and special characters, among which one chinese word occupy three characters in length.
• Details: 0 to 64 characters, specifying the scheduling task information
- Begin: Select the start date and specific time of this live broadcast task, or check the Full day.
- End: Select the end date and specific time of this live broadcast task, or check the Full day.
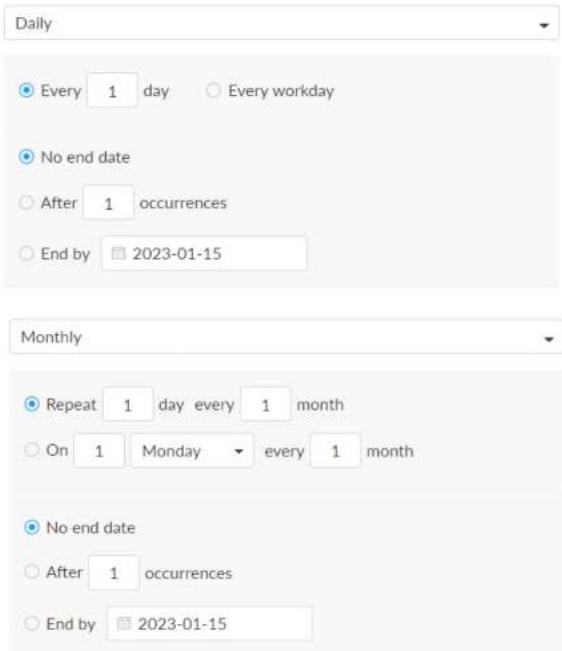
- Repeat event: Support no-repeat (default), daily, weekly, monthly, yearly.
• Daily: The repeat mode can be repeated every N days, or every workday, and the number of repetitions can be set to
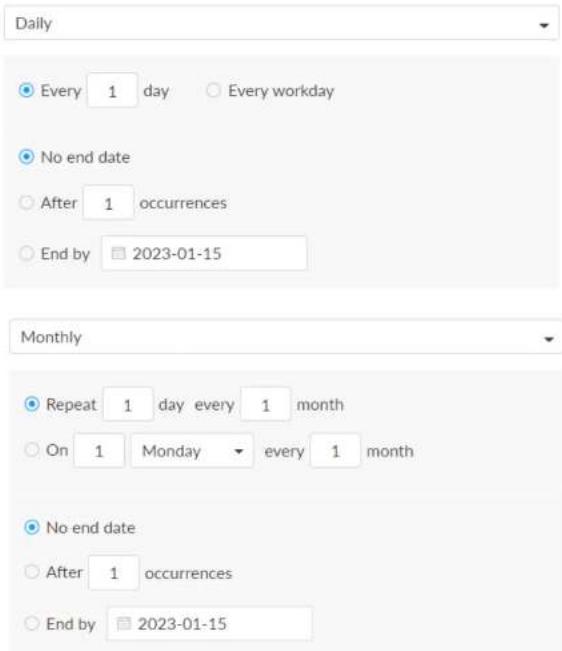
- No end date - default,
- After N occurrences - where Begin and End indicate the first-repeat,
- End by specified date YYYY-MM-DD - the session will not repeat on the end day.
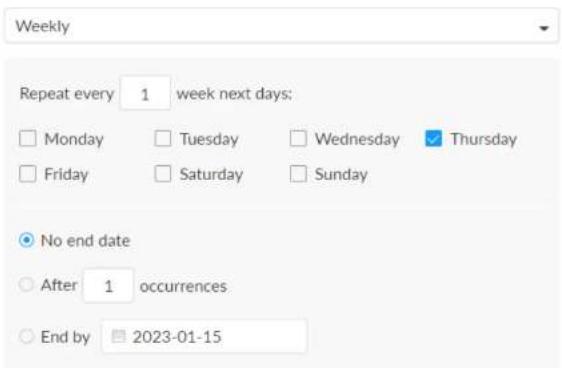
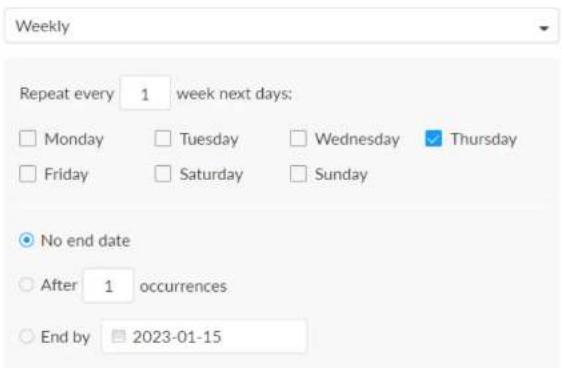
• Weekly: The repeat mode can be Repeat every 1 week next days; multiple choices are available, and the number of repetitions can be set to
- No end date - default,
- After N occurrences - where Begin and End indicate the first-repeat,
- End by specified date YYYY-MM-DD - the session will not repeat on the end day.
• Monthly: The repeating pattern may be repeat N days every N month, or on weekday every N month. And you can set the number of repetitions to
- No end date - default,
- After N occurrences - where Begin and End indicate the first-repeat,
- End by specified date YYYY-MM-DD - the session will not repeat on the end day.
- Yearly: The repeating pattern can be every N day N month, or on N weekday of N month. And you can set the number of repetitions to - No end date - default,
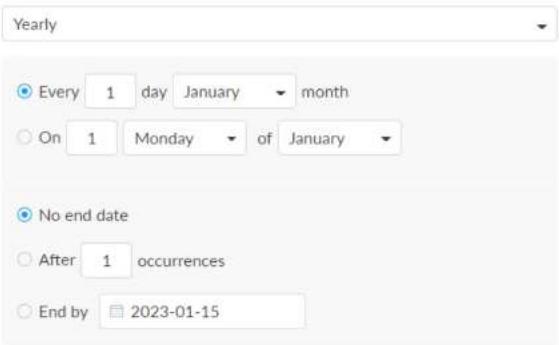
- After N occurrences - where Begin and End indicate the first repeat,
-
End by specified date YYYY-MM-DD - the session will not repeat on the end day.
-
Save: Click to save the current configuration.
- Turn on the switch to make your schedule work.
Record
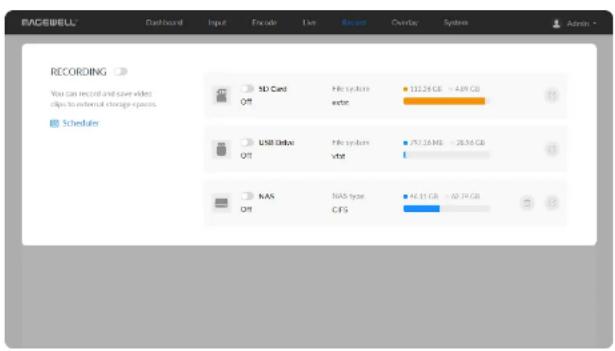
Start/Stop Recording
- To start recording immediately: you need to turn on the switch of one session and the RECORDING switch.
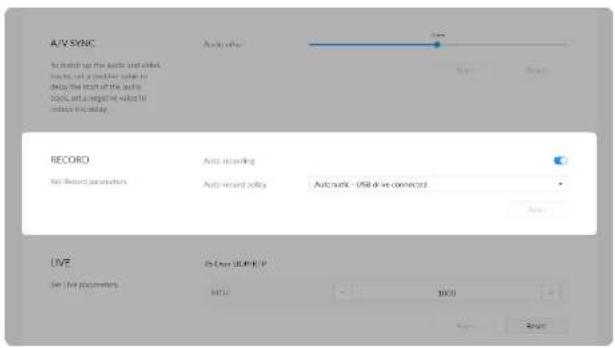
- To start recording automatically: you need to turn on the Auto-recording and the RECORDING switch.
- To schedule a recording: you need to turn on the switches of the specified session(s) and scheduler(s).
Use the schedule function for your live stream, which will be triggered, ended, repeated automatically on a chosen day and time.
• To stop recording immediately:
- Turn off the RECORDING switch to end this round of scheduled recording.
- Turn off the switch of recording session to stop it permanently.
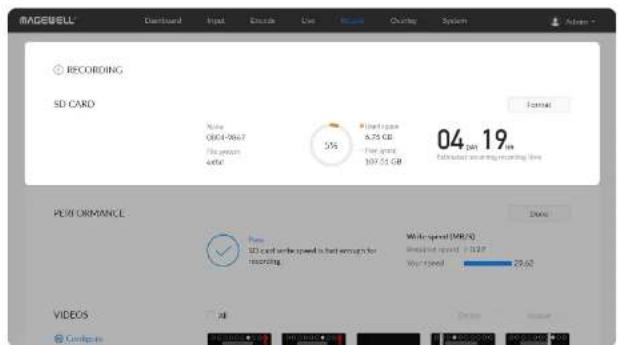
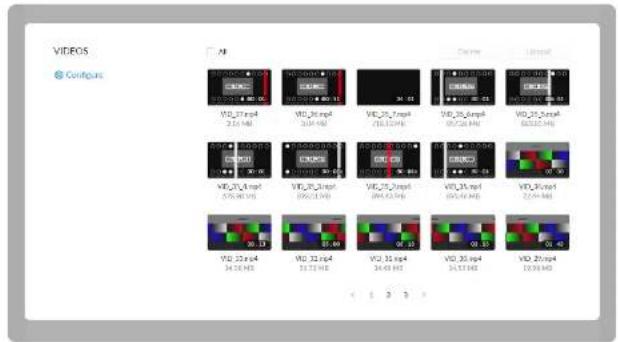
Manage SD card
Click and enter SD Card tab, then you can check and manage your SD card.
- To check SD card, such as File system, Free space, and Estimated remaining recording time. Check remaining time for normal recording, and total recording time for loop recording.
- To format SD card: click to start Format. After formatting, the file system of USB will be changed to exfat.
- To download video clips: move the cursor to a specified clip and click the _ icon to download the chosen one.
• To choose a specific video: move the cursor to a video clip and click ____
• To delete videos: choose one or more, or all clips to delete.
Record to External SD Card
The device supports external SD card in exfat, ntfs, and vfat formats, up to 2T. And a vfat file should be less than 4G. Before recording, please insert the SD Card.
Configure recording parameters
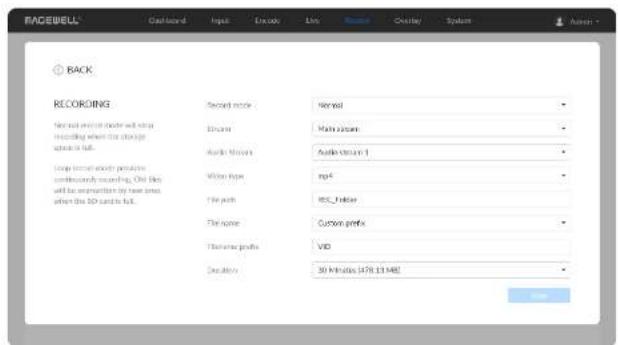
Click Configure button in the 'RECORDING > VIDEOS' section and set recording parameters in the pop-up page.
- Record mode: Options are normal (default) and loop. In normal record mode, the encoder will stop recording when the storage space is full. However, loop record mode provides continuously recording which means that old files will be overwritten by new ones when the storage is full.
• Stream: Options are main (default) and sub stream. - Audio Stream: options are Audio stream 1 \~ 4, and the default is Audio stream 1. Audio stream parameters can be set in "Encode > AUDIO STREAM".
• Video type: Options are mp4 (default), mov, and ts. - File path: REC_Folder by default, and 1 to 255 characters.
- File name: Options are custom prefix (default, from 1 to 32 characters), and creation time.
- Filename prefix: VID by default, 1 to 32 characters.
- Duration: from 5 to 240 minutes. That is, a new file is generated for each specified duration. A new file is generated every time the specified duration is recorded. The file size generated by different recording durations is automatically calculated according to the stream format and is for reference only. Duration can be set to No limit for normal (Record mode) recording in its (Video type) format.
Upload
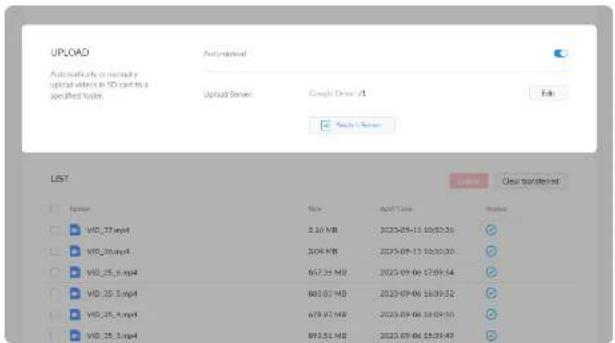
- Auto-upload: off by default. Files recorded to the SD card with the switch on will be automatically uploaded to the specified upload server.
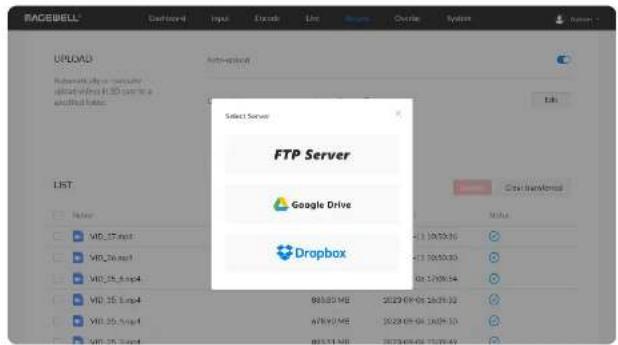
- Upload server: Click "+Add Server" and choose from FTP Server, Google Drive, Dropbox for uploading.
- FTP Server
- Protocol: options are FTP-File Transfer Protocol, SFTP-SSH File Transfer Protocol.
- Host: IP address or domain name of the host.
• Port: specify port number between 1 and 65535. - Directory: specify a fold for saving uploaded files between 0 and 63 characters.
- Encryption: options are Only use plain FTP (insecure), Require explicit FTP over TLS and Require implicit FTP over TLS. Available when Protocol is FTP-File Transfer Protocol.
- Transfer mode: Active or Passive.
- Authentication: turn it on if your service provider requires. Type in your user name and password for the streaming service.
- Network: By default, the network connection priority is: Mobile Broadband > Ethernet > Wi-Fi.
- Test: check the connection between the server and encoder.
- Save: save current configuration.
- Google Drive
Follow the prompts to get the verification code, connect the device, and set the network (the default network connection priority is: Mobile Broadband > Ethernet > Wi-Fi).
- Dropbox
Follow the prompts to log-into Dropbox, and set the network (the default network connection priority is: Mobile Broadband > Ethernet > Wi-Fi).
List
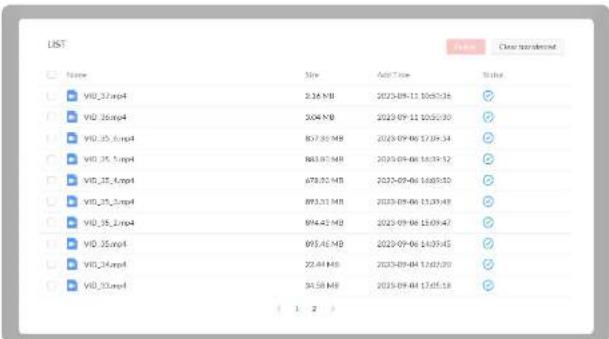
The list shows all the recorded files in SD card. You can check transfer status of them. And you can select multiple files to delete from the SD card, or click on "Clear transferred", the system will automatically delete the files with transfer status from the SD card.
Manage USB Flash Drive
Manage the USB and files stored in the USB Flash Drive page.
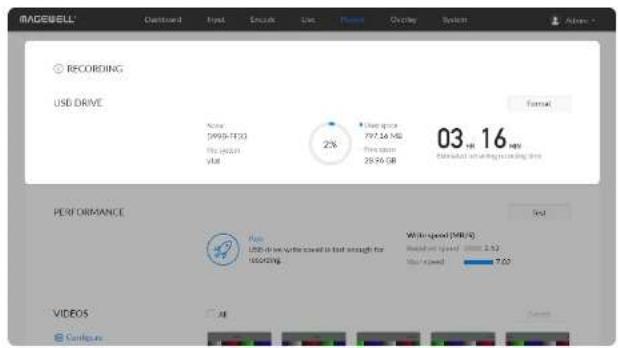
- Check USB Info, such as File system, Free space, and Estimated remaining recording time. Check remaining time for normal recording, and total recording time for loop recording.
We recommend that you use a USB with FAT32/VFAT file system.
• To format USB: click to start Format. When prompted, click YES. The USB Flash Drive data cannot be recovered after formatting. Please be cautious.
After formatting, the file system of USB will be changed to VFAT.
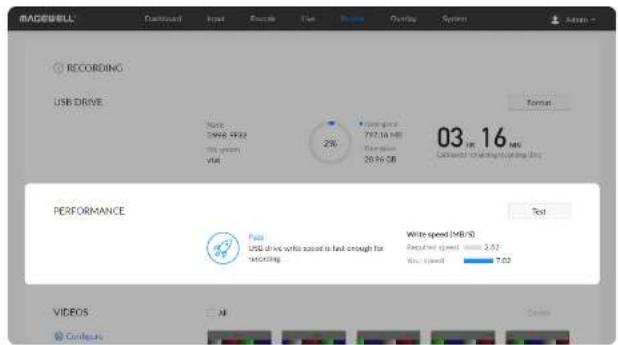
• To test USB Performance
Click Test to start Performance Test.
Test whether the write speed of USB flash drive meets the requirements before recording. If the USB fails the test, please change another one, or the recording may stop automatically.
• To download a clip: move the cursor to a specified clip and click the icon to download the chosen one.
• To choose a specific video: move the cursor to a video and click to download the clip.
• To delete videos: choose one or more, or all clips to delete.
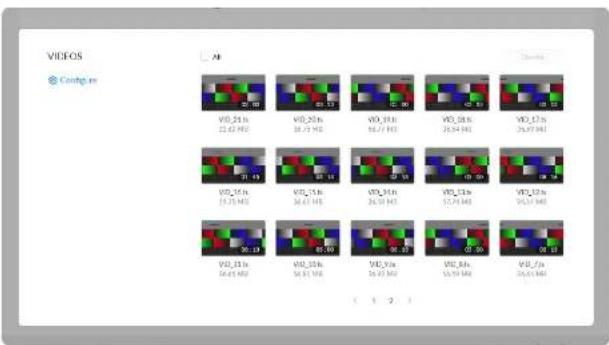
Manage Video Clips in USB
- To download: move the cursor to a specified clip and click the icon to download the chosen one.
- To choose a specific video: move the cursor to a video and click to download the clip.
• To delete videos: choose one or more, or all clips to delete.
Record to External USB Drive
The device supports external USB flash drive in exfat, ntfs, and vfat formats, up to 2T. And a vfat file should be less than 4G. Before recording, please insert the USB.
Configure recording parameters
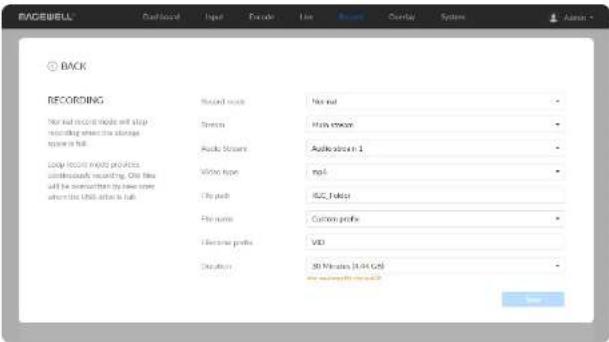
Click Configure button in the 'RECORDING > VIDEOS' section and set recording parameters in the pop-up page.
- Record mode: Options are normal (default) and loop. In normal record mode, the encoder will stop recording when the storage space is full. However, loop record mode provides continuously recording which means that old files will be overwritten by new ones when the storage is full.
Stream: Options are main (default) and sub stream. - Audio Stream: options are Audio stream 1 \~ 4, and the default is Audio stream 1. Audio stream parameters can be set in "Encode > AUDIO STREAM".
• Video type: Options are mp4 (default), mov, and ts.
- File path: REC_Folder by default, and 1 to 255 characters.
- File name: Options are custom prefix (default, from 1 to 32 characters), and creation time.
- Filename prefix: VID by default, 1 to 32 characters.
- Duration: from 5 to 240 minutes. That is, a new file is generated for each specified duration. A new file is generated every time the specified duration is recorded. The file size generated by different recording durations is automatically calculated according to the stream format and is for reference only. Duration can be set to No limit for normal (Record mode) recording in its (Video type) format.
Record to NAS
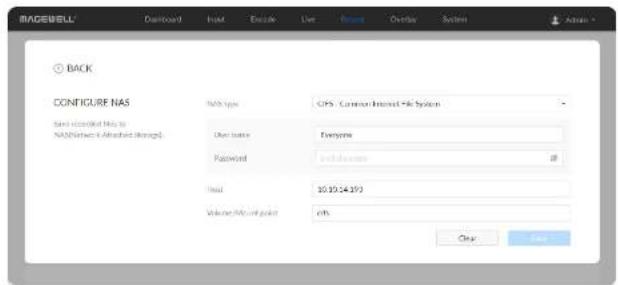
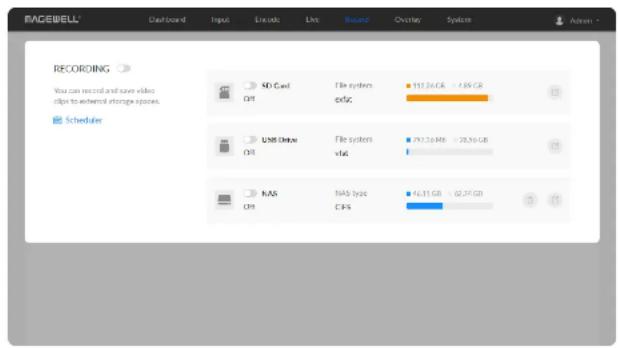
Add a NAS
- NAS type: options are NFS- Network File System (default) and CIFS- Common Internet File System, which also requires User name and Password.
- User name: 1 to 64 characters,
• Password: 1 to 64 characters, - Host: IP address of NAS.
• Volume/Mount point: 1 to 64 characters, and special characters (?<>| are not allowed. By using volume mount points, you can graft or mount a target partition onto a folder on another physical disk. You can also exceed the 26-letter limitation for drive letter references. Create a dependency in the mounted volume disk resource that specifies the disk that is hosting the mount point folder. This makes the mounted volume dependent on the host volume, and it makes sure that the host volume comes online. - Clear: restore all parameters to defaults.
Manage NAS
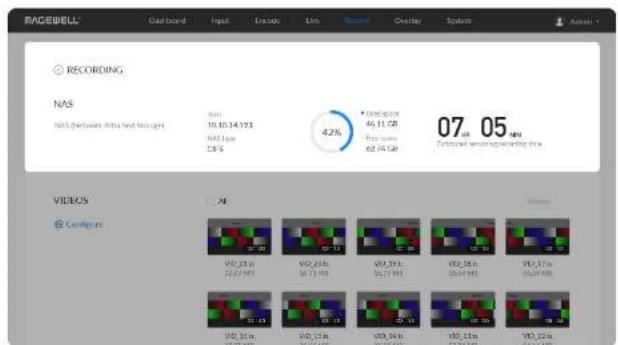
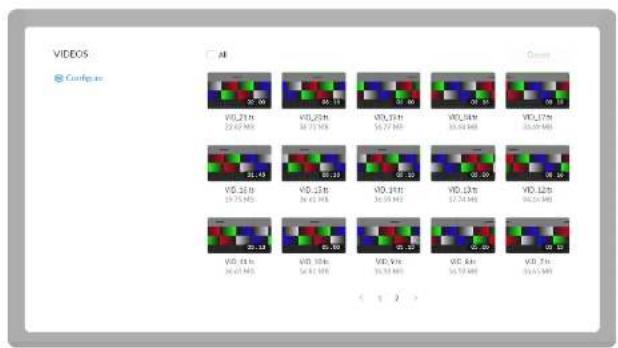
Click and enter NAS tab, then you can check and manage your NAS storage.
- Check NAS Info, such as NAS type, Free/total space. And check remaining time for normal recording, and total recording time for loop recording.
- To download a clip: move the cursor to a specified clip and click the _ icon to download the chosen one.
• To choose a specific video: move the cursor to a video and click to download the clip.
• To delete videos: choose one or more, or all clips to delete.
Configure recording parameters
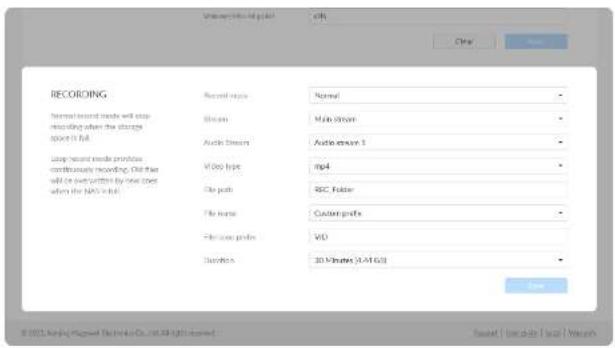
Click Configure button in the 'RECORDING > VIDEOS' section and set recording parameters in the pop-up page.
- Record mode: Options are normal (default) and loop. In normal record mode, the encoder will stop recording when the storage space is full. However, loop record mode provides continuously recording which means that old files will be overwritten by new ones when the storage is full.
• Stream: Options are main (default) and sub stream. - Audio Stream: options are Audio stream 1 \~ 4, and the default is Audio stream 1. Audio stream parameters can be set in "Encode > AUDIO STREAM".
• Video type: Options are mp4 (default), mov, and ts. - File path: REC_Folder by default, and 1 to 255 characters.
- File name: Options are custom prefix (default, from 1 to 32 characters), and creation time.
- Filename prefix: VID by default, 1 to 32 characters.
- Duration: from 5 to 240 minutes. That is, a new file is generated for each specified duration. A new file is generated every time the specified duration is recorded. The file size generated by different recording durations is automatically calculated according to the stream format and is for reference only. Duration can be set to No limit for normal (Record mode) recording in its (Video type) format.
Delete the NAS
Go back to Record tab, you can delete the NAS in the following ways.
- Click the delete button behind the nas and confirm your delete in the pop up window.
- Click the edit button behind the nas and clear all NAS settings.
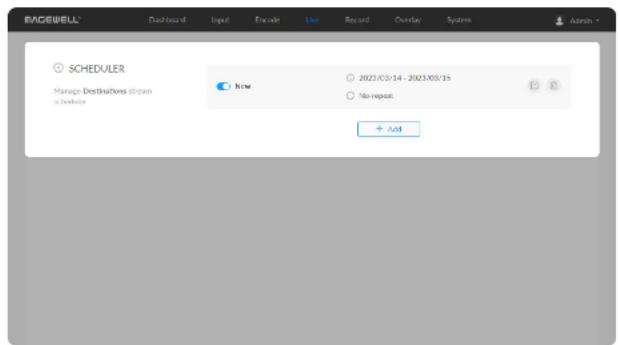
Record Schedule
Set schedule parameters. 8 schedules are supported for recording.
- Click schedule button.
-
Click Add in the window, and specify parameters of the schedule. Each session can add up to 8 scheduling schemes.
-
Description: 1 to 64 characters, including chinese, english, numbers, and special characters, among which one chinese word occupy three characters in length.
• Details: 0 to 64 characters, specifying the scheduling task information. - Begin: Select the start date and specific time of this live broadcast task, or check the Full day.
- End: Select the end date and specific time of this live broadcast task, or check the Full day.
- Repeat event: Support no-repeat (default), daily, weekly, monthly,
yearly.
• Daily: The repeat mode can be repeated every N days, or every workday, and the number of repetitions can be set to
• No end date - default,
- After N occurrences - where Begin and End indicate the first-repeat,
- End by specified date YYYY-MM-DD - the session will not repeat on the end day.
• Weekly: The repeat mode can be Repeat every 1 week next days: multiple choices are available, and the number of repetitions can be set to
- No end date - default,
- After N occurrences - where Begin and End indicate the first-repeat,
- End by specified date YYYY-MM-DD - the session will not repeat on the end day.
• Monthly. The repeating pattern may be repeat N days every N month, or on weekday every N month. And you can set the number of repetitions to
• No end date - default,
- After N occurrences - where Begin and End indicate the first-repeat,
- End by specified date YYYY-MM-DD - the session will not repeat on the end day.
• Yearly: The repeating pattern can be every N day N month, or on N
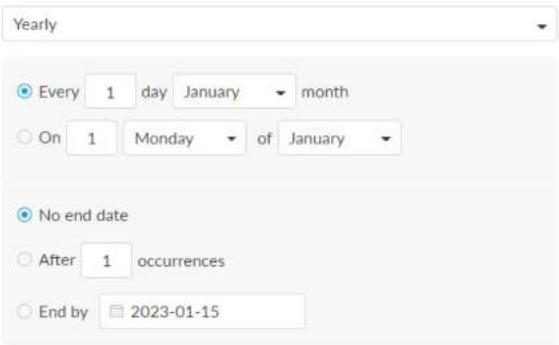
weekday of N month. And you can set the number of repetitions to
- No end date - default,
• After N occurrences - where Begin and End indicate the first-repeat,
- End by specified date YYYY-MM-DD - the session will not repeat on the end day.
- Save: Click to save the current configuration.
- Turn on the switch to make your schedule work.
Overlay
The overlay function is available when the resolutions of the input signal and the mainstream are no greater than 2048x1080, and image rotation of the output signal is 0^ .
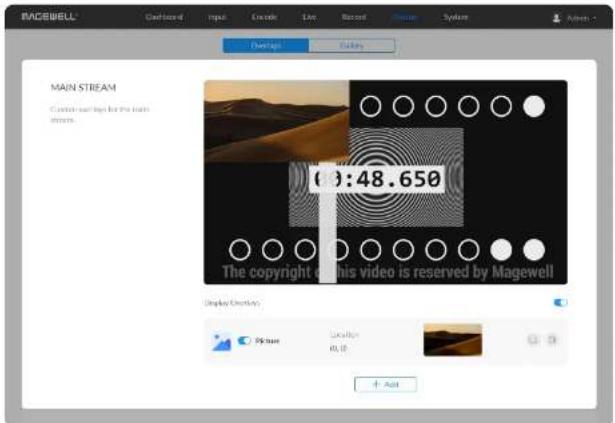
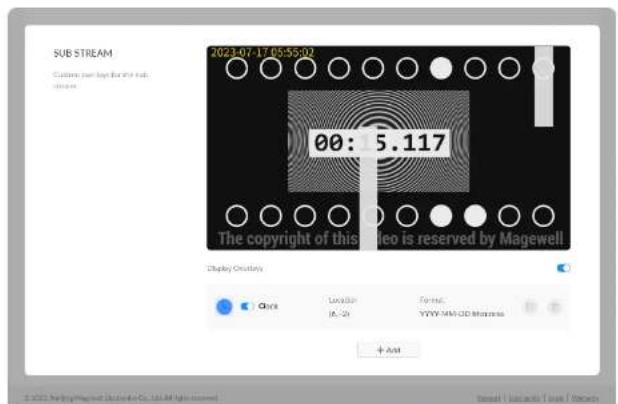
Setting Overlays for the Main and Sub Streams
Display Overlays is off by default. You can preview thumbnails with overlays after turning it on.
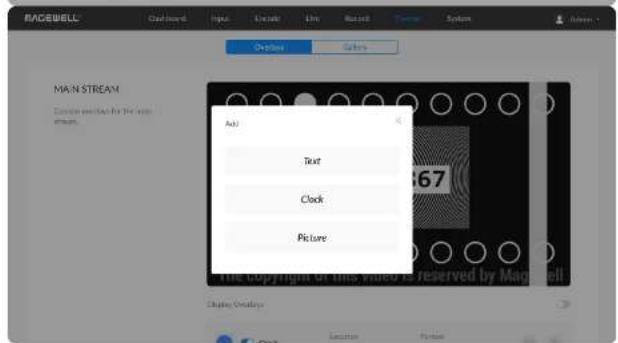
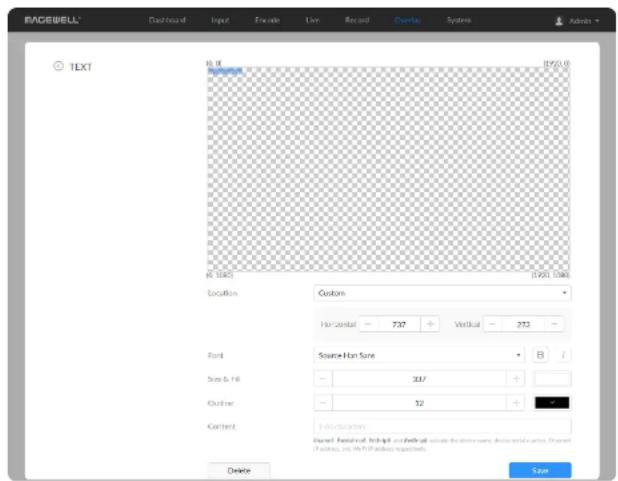
Adding Text
- Location: options are Custom(default), Top left, Top right, Top center, Bottom left, Bottom right, Bottom center, and Center. Or just drag the item on the 1920x1080 canvas and place it at your desired location.
- Horizontal: specify the horizontal coordinates manually when location is Custom.
• Vertical: specify the vertical coordinates manually when location is Custom. - Font: options are Source Han Sans (default), and Lato. Bold and Tilt are also provided.
- Size & Fill: font size is 26px by default. You can set from 6 to 400px. The default fill color is rgba(255, 255, 255, 1), and you can click the color-picker to custom your desired color.
- Outline: the default width of outline is 1px. You can set from 0 to 100px. And the default outline color is rgba(0, 0, 0, 1), and you can click the color-picker to custom your desired color.
• Content: 1 to 63 characters are supported to display. - Save: save current configuration.
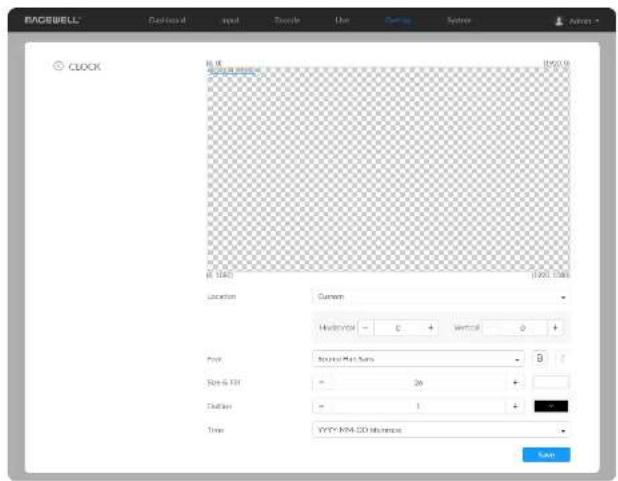
Adding Clocks
- Location: options are Custom(default), Top left, Top right, Top center, Bottom left, Bottom right, Bottom center, and Center. Or just drag the item on the 1920x1080 canvas and place it at your desired location.
- Horizontal: specify the horizontal coordinates manually when location is Custom.
- Vertical: specify the vertical coordinates manually when location is Custom.
- Font: options are Source Han Sans (default), and Lato. Bold and Tilt are also provided.
- Size & Fill: font size is 26px by default. You can set from 6 to 400px. The default fill color is rgba(255, 255, 255, 1), and you can click the color-picker to custom your desired color.
- Outline: the default width of outline is 1px. You can set from 0 to 100px. And the default outline color is rgba(0, 0, 0, 1), and you can click the color-picker to custom your desired color.
• Time: options are as follows.
• YYYY-MM-DD hh:mm:ss
• MM/DD/YYYY hh:mm:ss
- DD/MM/YYYY hh:mm:ss
- YYYY-MM-DD
• MM/DD/YYYY
- DD/MM/YYYY
- nh:mm:ss
• hh:mm
- Save: save current configuration.
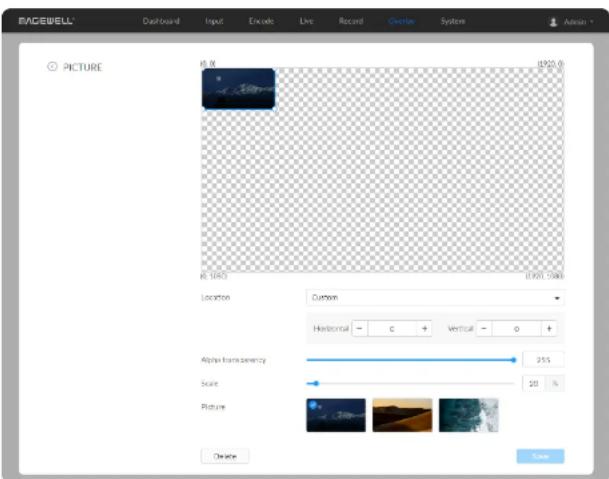
Adding Pictures
- Location: options are Custom(default), Top left, Top right, Top center, Bottom left, Bottom right, Bottom center, and Center. Or just drag the item on the 1920x1080 canvas and place it at your desired location.
- Horizontal: specify the horizontal coordinates manually when location is Custom.
• Vertical: specify the vertical coordinates manually when location is Custom. - Alpha transparency: it can have a value from 0 (0%) to 255 (100%) in opacity.
• Scale: resize your picture between 1% and 400%. By default it is 100%. - Picture: choose a picture from Overlay > Gallery. There is no picture by default.
- Save: save current configuration.
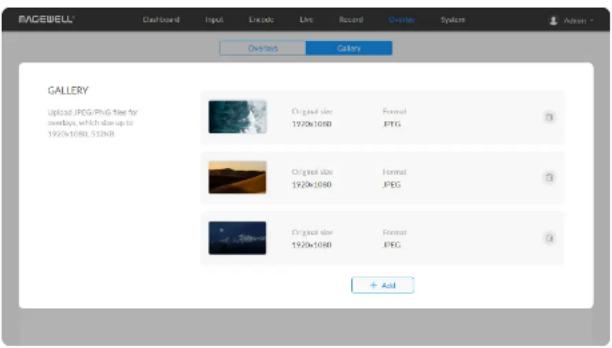
Gallery
- Upload JPEG/PNG files for overlays, up to 1920x1080, 1 M. And you can add 8 pictures at most.
- You can choose the picture in Overlay > Picture after uploading successfully.
- Click delete button to delete current picture from your device.
General
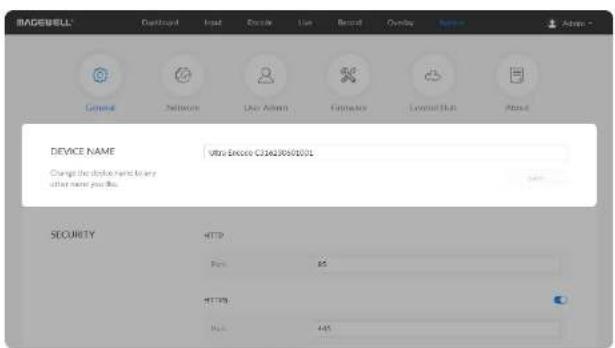
- DEVICE NAME: value range is from 1 to 32 characters, including A-Z, a-z, 0-9, space _ + ' [ ] () and cannot begin or end with a space.
- Save: save current configuration.
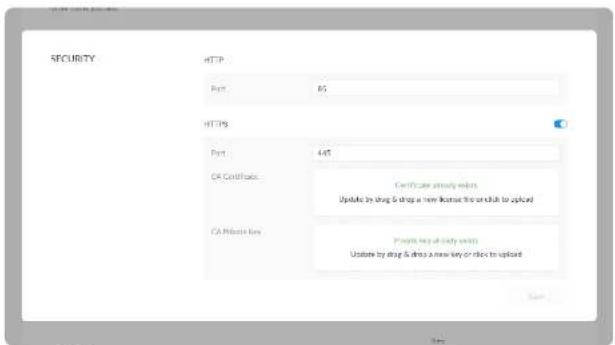
Modify HTTP/HTTPS settings
- Modify HTTP port.
The default port is 80. Modify the port number ranging from 1 to 65535, based on your network condition, then click Save.
- Secure the Control Hub with HTTPS
Turn on HTTPS, then specify the port number ranging from 1 to 65535 for HTTPS. The default port is 443.
- Modify HTTPS port. The default port is 443. Modify the port number ranging from 1 to 65535, based on your network condition, then click Save.
- Import a CA certificate and private key into Control Hub.
Renew certificates by uploading the new files that you want to, without removing existing ones. Then click Save.
3. Re-log into Web UI.
Open your Web browser and type http://IPaddress.new-port, or https://IPaddress to access the SIGN IN page.
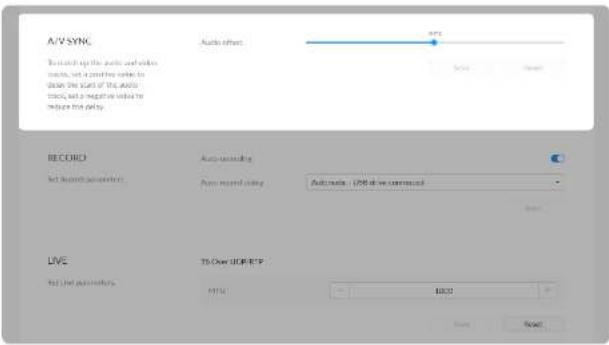
A/V Sync
• Audio offset ranges from -200 to 200ms.
To match up the audio and video tracks, set a positive value to delay the start of the audio track, or set a negative value to reduce the delay.
We recommend that you start your live after this configuration to enjoy the A/V sync adjustment.
- Save: save current configuration.
- Reset: reset parameters to default values.
RECORD
- Auto-recording: it is off by default. If you turn it on, options are Automatic - signal locked and Automatic - USB drive connected (recommended if you need to record to USB). You need to turn on the specified record task switch in the Record tab at the same time to make the auto-recording function work.
- Save: save current configuration.
Live
TS over UDP/RTP
- MTU: specify maximum transmission unit (MTU) in bytes, ranging from 228 to 1500. The default size is 1496.
- Save: save current configuration.
- Reset: reset parameters to default values.
HLS (push)
Configurations will work on both HLS and Youtube HLS sessions.
• Segment count: between 1 and 5.
- Segment duration(sec): between 1 and 4. Lower value results in lower lantency.
- Save: save current configuration.
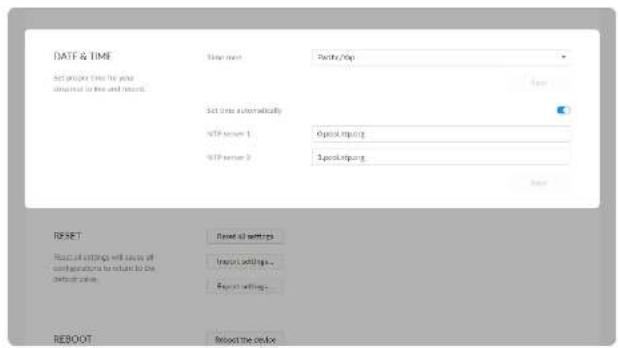
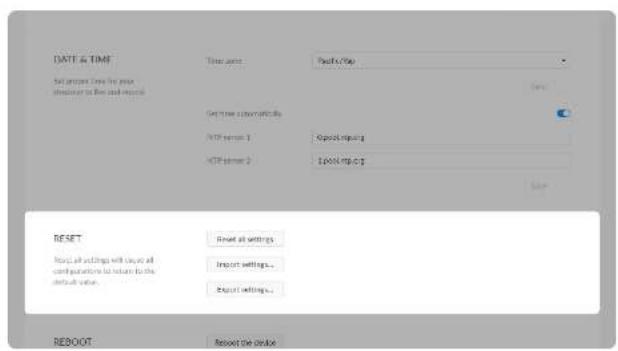
Date & Time
• Time zone: specify a time zone for your device.
- Set time automatically: turn on Set Time Automatically. Then the device's time will synchronized to the world-time servers depending on the timezone you set. Otherwise, you can set time manually.
- NTP server 1: the default server is 0.pool.ntp.org.
• NTP server 2: the default server is 1.pool.ntp.org.
- Save: save current configuration.
Resetting Your Device
- Reset all settings: be cautious that resetting your device would restore configurations to defaults.
- You can Reset all settings on the "SIGN IN" page, when the device is connected to PC via USB NET.
- Import settings... Click the button and select the target JASON format configuration file in the pop-up window, after importing the settings successfully, the device will be reconnected and you need to log in to the Web UI again.
- Export settings... Click the button, set the file name in the pop-up window, click "Export" to download the JASON format configuration file to the default path of your browser. The default file name is Settings_YYYY_MM_DD_HH_MM_SS.json.
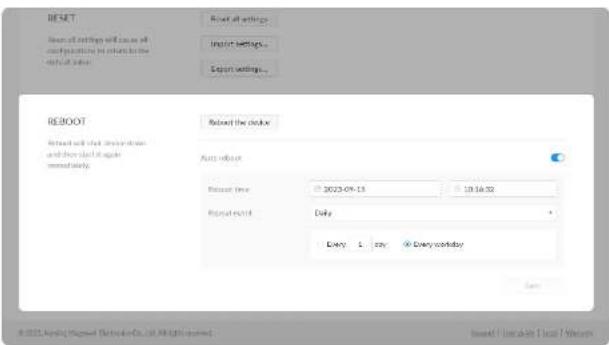
Reboot
- Reboot the device: power off the device and restart it when it does not work.
- Auto reboot: off by default. Turn it on to set Reboot time (YYYY-MM-DD HH-MM-SS), Reboot time, and click Save.
- Repeat event: Support no-repeat (default), daily, weekly, monthly, yearly.
- Daily: The repeat mode can be repeated every N days, or every workday.
• Weekly: The repeat mode can be Repeat every 1 week next days: multiple choices are available.
• Monthly: The repeating pattern may be repeat N days every N month, or on weekday every N month. - Yearly: The repeating pattern can be every N day N month, or on N weekday of N month.
Network
Networking information, including Ethernet, USB NET, mobile network, Wi-Fi and AP, can be set in the Network tab.
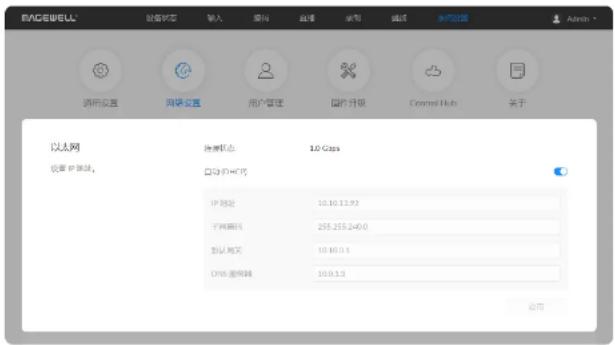
The device automatically detects and connects to the Ethernet when networking to a DHCP-enabled LAN. Or you can set the IP address manually for a fixed IP address or an auto-networking failure.
- DHCP: it is on by default. Turn off the switch to modify current network setting or when being connected to a non-DHCP network.
• IP address: device IP address. - Subnet mask: device subnet mask.
• Network gateway: device gateway.
• DNS: DNS server IP address.
• Apply: make current configuration effective. When prompted, click Yes. - Verify: input new IP address to open the Web UI.
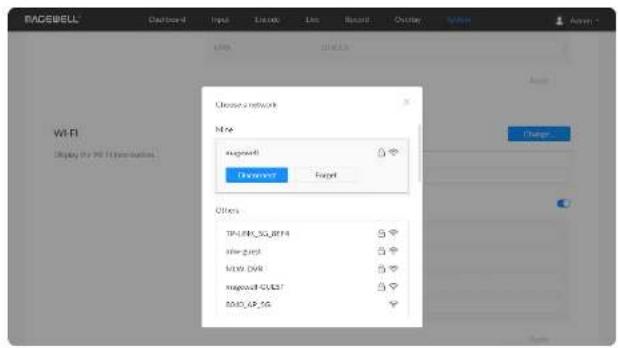
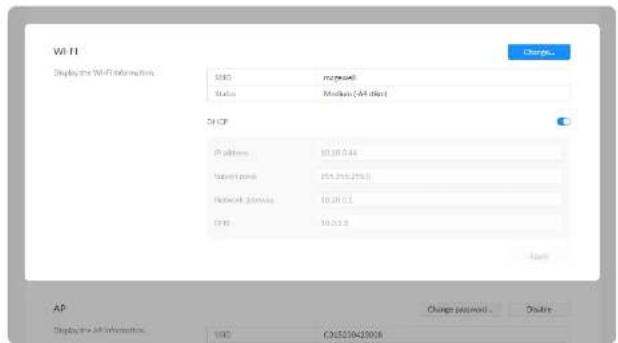
Setting Wi-Fi
16 Wi-Fi network information can be saved for auto-detection.
- Disconnect: click to cut off current Wi-Fi network.
- Change... click to choose a different WLAN to connect to.
• SSID: named after device serial number.
• Status: Wi-Fi signal strength.
• IP address: WLAN IP address. - Subnet mask: WLAN subnet mask.
• Network gateway: WLAN gateway
• DNS: WLAN DNS server IP address.
Searching Wi-Fi Network manually
- Click Change... to choose a different WLAN to connect to,
• Support for joining networks that require identity verification are supported.
- Support to select "other...", enter the network name, choose from None/WEP/WPA/WPA2-PSK/802.1xEAP wireless security protocols, and enter the password.
-
(Optional) Check Connect automatically, then the WI-FI network will be joined automatically.
-
Click connect.
Setting Wi-Fi manually
- Set IP address manually: turn on the switch to modify current network setting or when being connected to a non-DHCP network.
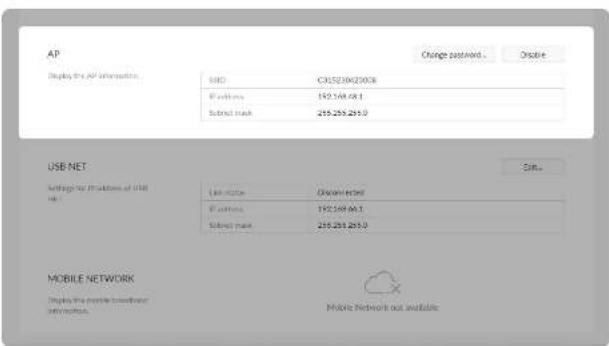
• IP address: device IP address.
- Subnet mask: device subnet mask.
• Network gateway: device gateway.
• DNS: DNS server IP address.
- Apply: make current configuration effective. When prompted, click Yes.
- Verify: input new IP address to open the Web UI.
Setting AP
You device can work as an AP to be joined to for remote web control.
- SSID: by default, it is named after the device serial number.
• IP address: fixed as 192.168.48.1. - Subnet mask: fixed as 255.255.255.0.
- Change password...
- AP password: the default AP password is the last 8-number of the serial number. For example, a serial number 311210101001 indicates the initial AP password is 10101001. It ranges from 8 to 16 characters including A-Z, a-z, 0-9, space _+ ||() and cannot begin or end with a space.
- Disable: click to turn off AP mode. This renders you unable to manage the device over AP, which is not recommended, especially when you are using wireless network or linux/mac OS.
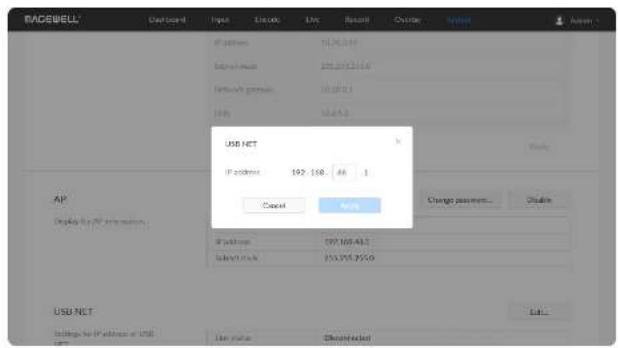
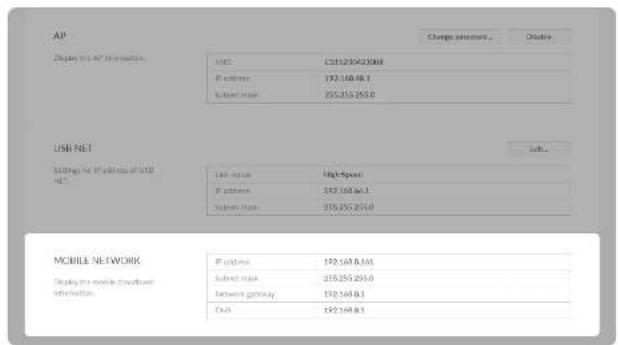
Setting USB NET
You can connect your device to a PC via USB NET for remote control.
- Link status: USB NET connection status.
- IP address: USB NET IP address, 192.168.66.1 by default. You can click Edit... to change it.
- Subnet mask: Subnet mask of USB NET.
- Edit...: enter a new address and click Apply in the prompt window. The IP address will show the changed IP address after modification.
Setting Mobile Network
The encoder supports streaming via a USB modem.
• IP address: IP address assigned by the USB modem.
- Subnet mask: subnet mask.
• Network gateway: gateway.
• DNS: DNS server IP address.
User Admin
Administrator is allowed to perform the following tasks. The User Admin tab is invisible when you log in as a general user.
- Creating/Removing General User Accounts
- Modifying User Password
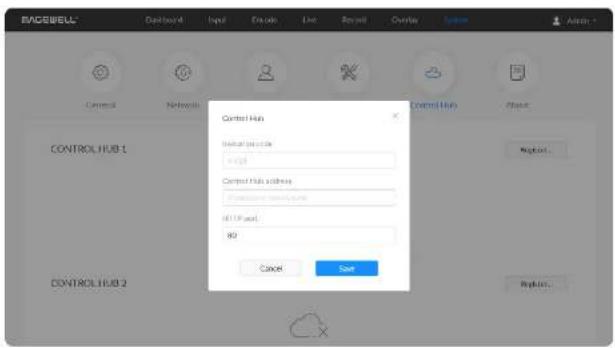
Creating/Removing General User Accounts
After signing in with default admin account, you may need to add general users to give them permissions to do basic operations, like monitoring the device, or setting some of the parameters.
- Access the Web UI, and sign in as administrator.
- Go to User Admin tab.
- Click Add user.
-
Enter username, password, and confirm your password.
-
The username is a string of 3 to 12 characters, which contains the letters A-Z, a-z, numbers 0-9 and underline.
-
The password is a string of 1 to 32 characters, which contains the letters A-Z, a-z, numbers 0-9 and special characters _\~!@#\$%^&*--.
-
Assign the user to an Administrator role or general User role.
-
Administrators have the highest level of access to an account.
- A general user will have limited access to the account as per the permissions given by the Admin. You may not get access to the "User Admin" function.
• The user role can not be changed. You might need to recreate a new
user.
- Click OK.
- Repeat step 3\~5 to add multiple users. You can add up to 15 users.
- To delete a user: Click Delete in the username card. When prompted, click Yes.
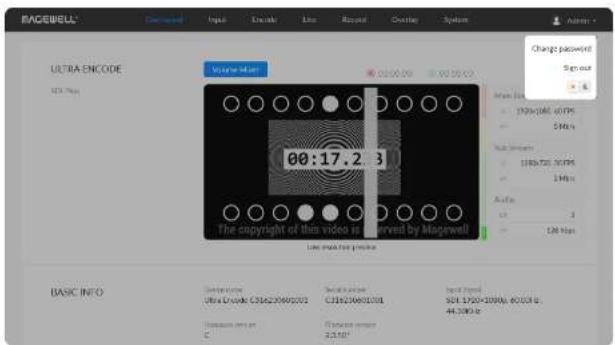
Modifying User Password
Set Password in the following ways.
- Modify user password logged-in via drop-list beside your avatar at the top right
- Modify a specified user password in User Admin tab with admin account
Modifying current logged-in user password
- Log in Web UI.
- Click the drop-list icon beside your avatar icon, and click Change password.
-
In the pop up window, type in your old password, the new password, and confirm your new password.
The password is a string of 1 to 32 characters, which contains letters A-Z, a-z, numbers 0-9 and special characters _\~!@#\$%^&*---. -
Click OK.
Change Password

Old password
1-31 characters

New password
1-31 characters

Confirm password
Verify your new passcode

Cancel
OK
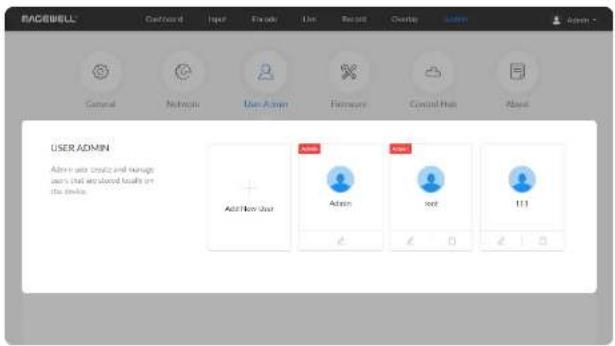
Modifying a specified user password
- Access the Web UI and sign in with the administrator account.
- Go to User Admin tab, then you can change any user's password.
- Click the Set password.
- In the pop up window, type in and confirm your new password. The password is a string of 1 to 32 characters, which contains letters A-Z, a-z, numbers 0-9 and special characters _\~!@^\$%^&*+=.
- Click OK.
Set Password

New password
1-32 characters (A-Z, 2-7, D-9 and _)=@$%^&*+=)
Confirm password
Verify your new paskcode
Cancel
OK
Firmware
Detect and update firmware to the latest version online, or you can manually add a firmware file to update the unit to specified version.
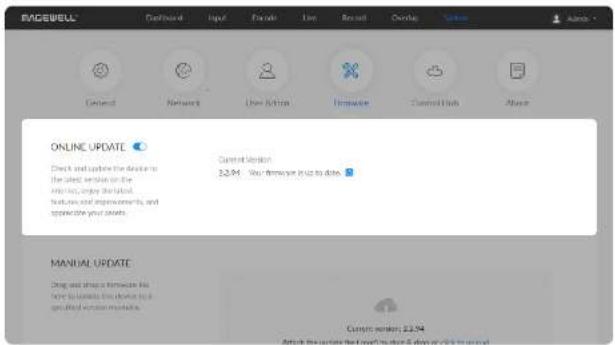
Online Update
By default, the function is on. When a new version is detected, a Firmware icon will flow on the control pane.
- Turn on switch, and the online update function is on. The unit would detect the latest released firmware automatically when connecting to the Ethernet.
- Click icon to check for the latest firmware manually.
- Click Update button to download and install the new version file if any. Do not disconnect from the power source or perform any operation while updating the firmware as this could damage your gear. After a successful update, the device will restart automatically.
- Verify: click checking for updates again.
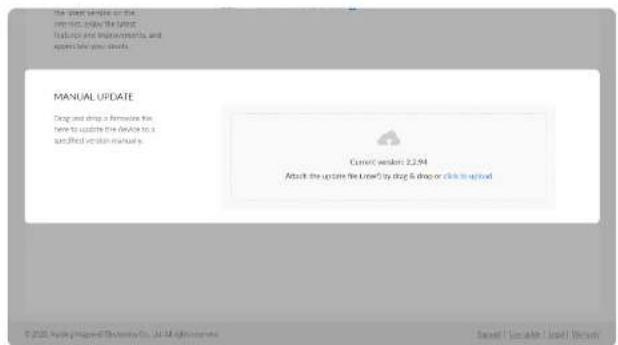
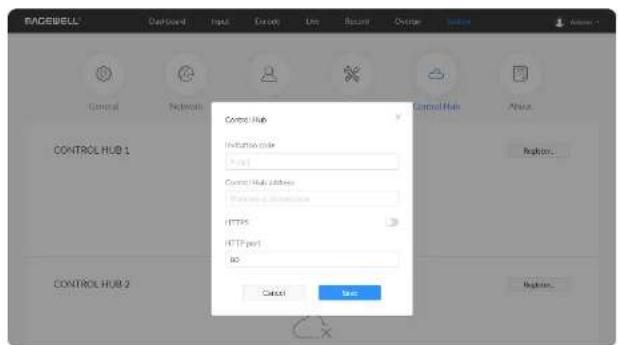
Manual Update
- Click on click to update to select the .mwf firmware update file from your local storage, or just drag and drop the file from your computer into the upload zone.
Download firmware file from our official website.
The device will automatically verify the update file and upload the file after the file verification is passed.
- Click Update to download and install the new version file. Then the device will reboot to complete the update.
Do not disconnect from the power source or perform any operation while updating the firmware as this could demage your gear.
- Verify: check the Firmware version in Dashboard or Firmware tab. It should be the same as your target version number.
Control Hub
You can apply for remotely control using Control Hub. 2 platforms are supported simultaneously, Control Hub 1 and Control Hub 2.
- Click Register... and input parameters in the prompted window. And save after configuration.
- Invitation code: a 4-digital numbers security code obtained from Control Hub. If not leave it empty.
• Control Hub address: input [P address or domian name of Control Hub. - "HTTPS": turn it on when data security matters, and Control Hub enables HTTPS at the same time. It is off by default.
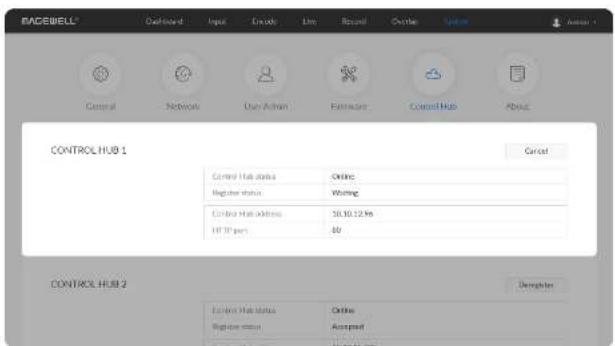
- "HTTPS port": input HTTPS port number between 1 and 65535, which should be consist with that of Control Hub. Port 443 is used by default.
- HTTP port: input HTTP port number between 1 and 65535, which should be consist with that of Control Hub. Port 80 is used by default.
- Click Deregister to stop the remote control from Control Hub.
- Check parameters related to Control Hub management.
- Control Hub status: Online or Offline. Online indicates that the communication between device and Control Hub platform goes well. On the other hand, Offline indicates the communication is interrupted.
- Register status: shows current status of Control-Hub-join permission, including
- Incorrect invitation code: you need to change your registration with correct code.
- Waiting: registration is successfully submitted to Control Hub platform.
- Approved: registration is approved. This device can be remotely controlled.
- Rejected: Registration is denied.
- Deleted: Registration is deleted, you can re-apply for joining the Control Hub.
• Control Hub address: shows the IP address of Control Hub. - HTTP port: shows the HTTP port of device used to communicate with
Control Hub.
About
Obtain basic data for device maintenance in About tab.
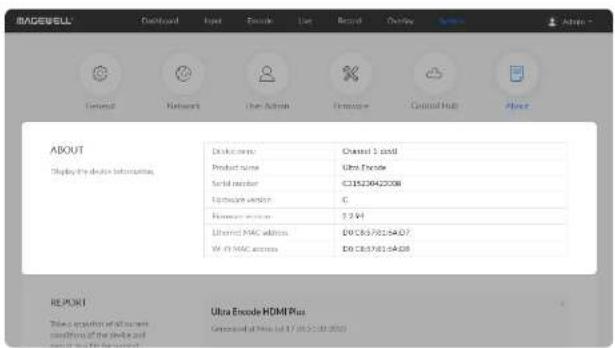
Checking Device Information
- Device name: device name, which can be modified in the System > General > Device name area.
• Product name: device family name. - Serial number: device serial number.
- Hardware version: device hardware version.
- Firmware version: device firmware version, which can be update in the Firmware tab.
- Ethernet MAC address: device Ethernet MAC address.
• Wi-Fi MAC address: device Wi-Fi MAC address.
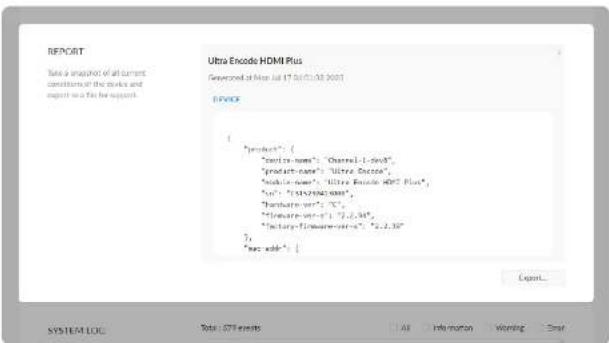
Exporting Reports
Export reports from your encoder when you want to get help from the Magewell Support team. These files will help our support engineers get a better understanding of your device status and other related information.
- Go to About > Report.
- Click Export... to generate a .html file.
- When prompted, click Export.
| SYSTEM LOG Total: 579 words | ||||||
| Level | Code & Time | Detail | ||||
| 1 | 2023-02-17 06:02:01.086 | Interface system 12 may assign IP address 10.200.44 | ||||
| 2 | 2023-02-17 06:02:01.074 | User Admin (10.10.5.00) logged in session: 32 | ||||
| 3 | 2023-02-17 06:02:11.944 | User Admin (10.10.8.22) logged in session: 7 | ||||
| 4 | 2023-02-17 06:02:55.522 | User Admin (10.10.8.22) logged in session: 7 | ||||
| 5 | 2023-02-17 06:02:63.230 | User 111 (10.10.8.22) logged in session: 7 | ||||
| 6 | 2023-02-17 06:02:63.089 | Address user: 117 | ||||
| 7 | 2023-02-17 06:02:64.674 | User Admin (10.10.11.22) logged in session: 5 | ||||
| 8 | 2023-02-17 06:02:70.721 | User Admin (10.10.8.22) logged in session: 7 | ||||
| 9 | 2023-02-17 06:02:49.297 | Video signal lockout: 1920x108@e500 | ||||
| 10 | 2023-02-17 06:02:48.132 | Video signal lockout: 1920x108@e500 | ||||
| 11 | 2023-02-17 06:02:47.898 | Video signal lockout: 1920x108@e500 | ||||
| 12 | 2023-02-17 06:02:46.124 | Audio signal lockout: 44100 to 2 channels, 16 bits | ||||
| 13 | 2023-02-17 06:02:40.016 | Video signal lockout: 1920x108@e500 | ||||
| 14 | 2023-02-17 06:02:39.014 | Video signal lockout: 1920x108@e500 | ||||
| 15 | 2023-02-17 06:02:37.171 | Audio signal lockout: 1920x108@e500 | ||||
| 16 | 2023-02-17 06:02:37.170 | Video signal lockout: 1920x108@e500 | ||||
Clearing/Exporting All Logs
- Access the Web UI and sign in.
- Click and enter the System tab, then select Log
- (Optional) Filter current logs.
By default, all logs are displayed in the table. Log entries can be categorized as "error", "warning", and "information".
• Total shows the total number of filtered events.
• All: Check to show all logs.
The device can store up to 1000 local log entries. After 1000 entries have been recorded, the oldest entry will be deleted before a new one can be added.
• Information. Check to show information logs - which record user actions or significant system events, e.g. login and signal locked.
- Warning: Check to show warning logs - which mean something has not worked as it should. e.g. Ethernet is disconnected or signal is unlocked.
- Error: Check to show error logs - which mean some serious error has happened.
- (Optional) Click Export... to get a .html file of all logs.
When prompted in the window, click Export.
- (Optional) Click Clear to delete all logs.
When prompted in the window, click Yes.
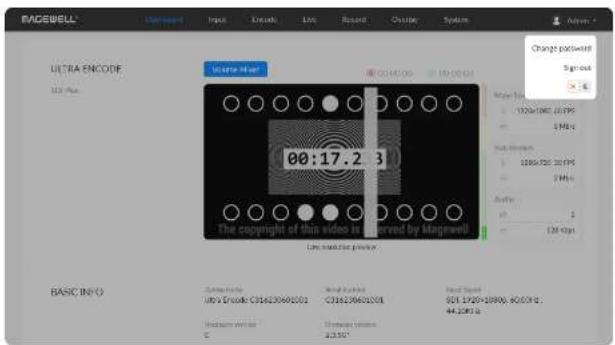
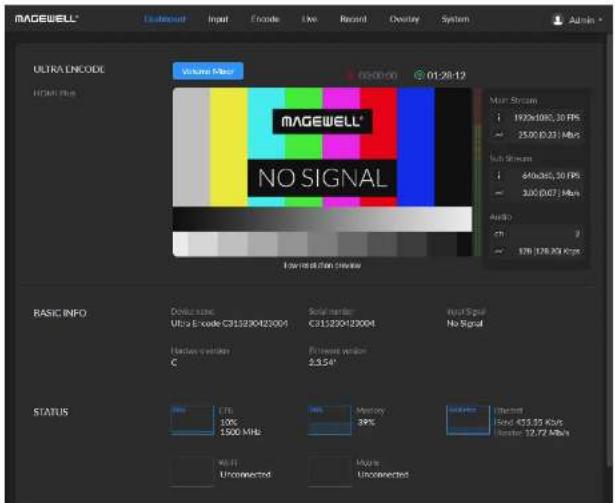
Enable Dark Mode for Your WebGUI
- Log in WebGUI.
- Click the drop-list icon beside your avatar icon, and click to switch between day and night mode.
FAQ
How to turn on/off AP mode
AP mode is on by default. Administrator can go to System > Network > AP section to turn on/off the AP mode and change AP password.
Can I set one live stream server to use the main stream and the other to use the sub stream?
Yes. You can select the main stream or sub stream for each session.
Can Ultra Encode stream to multiple destinations at the same time?
• Supported streaming protocols: RTSP/RTMP/RTMPS/SRT Caller/SRT Listener/NDI®|HX2/NDI®|HX3/HLS/TS over UDP/TS over RTP/TVU ISSP
- Allow simultaneous 6 sessions over multiple streaming protocols, containing 1 session of HLS, RTSP, NDI®|HX2, or 2 NDI®|HX2 (if included)
- Specify main stream or sub stream for each streaming session
- Stream 1 ND!®HX3 sessions, and they cannot stream simultaneously with other tasks
What to do if I forget the Web UI password?
- Forgot admin password:
- Connect the device to your computer using provided USB cable.
-
Type the USB NET IP address 192.168.66.1 in your web browser to access the Web UI.
-
At top right of the "SIGN IN" page, click "Reset all settings" to restore all configurations to defaults, and the "Admin" password will be "Admin" again. Be cautious that resetting your device would restore configurations to defaults.
- Forgot a general user's password:
Sign in Web UI with the administrator account, then go to System > User Admin tab, then you can change the specific user's password.
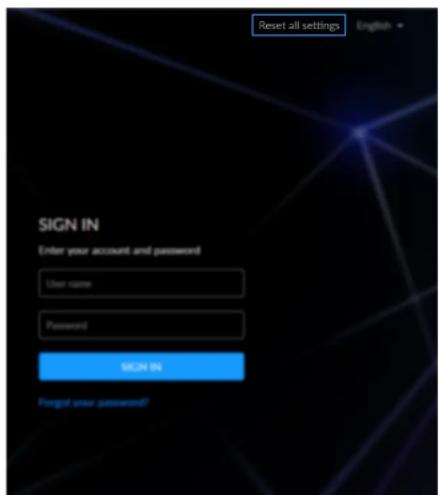
Support
Get the Latest Information
If you have any problems using Magewell products or need more technical information, please visit the following.
- Tutorial video: Magewell TV
- YouTube channel: Magewell Video Capture Device
• Knowledge base: Ultra Encode Support
Technical Support
Ticket System: If you have any questions using Magewell products or need technical assistance, please submit and track your inquiries by clicking here.
Warranty
Limited Warranty
Except otherwise set between you and Magewell in advance in a written form, the free limited warranty service starts from the date on your proof of purchase. The proof can be: sales contract, formal sales receipt, invoice or delivery note. The earliest date of these proofs is the starting date of the free limited warranty.
The period of free limited warranty goes as below:
• Ultra Encode Family: two (2) years;
• The power adapter provided as accessories: one (1) year;
How to get the limited warranty
- Please contact the Magewell support team by email (support@magewell.net) first, to determine whether your problem can only be solved by returning it to Magewell for repair. Magewell might ask you to take photos of the front and back of the defective products.
- Magewell will issue an RMA letter to you if it is confirmed that you need to return the faulty product for further examination or repair. Please fill in the RMA with necessary information as required. If it is regular repair, you will be responsible for the shipping cost, duties and insurance cost (if applicable); if the product is DOA, Magewell will be responsible for the shipping cost.
- If some components need to be replaced, Magewell will decide to repair, renovate or replace the components by itself. Magewell may use new or repaired component to repair the product. The repaired product can be expected to work normally and the performance to remain the same. Repaired products can work in a good working condition and at least function the same as the original unit. The original replaced component will become the property of Magewell and components which are replaced for the client will become his/her property.
- If the product is within warranty, Magewell will repair or replace the faulty units at its own discretion. In circumstances where the faulty unit is replaced by another one, Magewell may use new, repaired or renovated units. The faulty unit will then become the property of Magewell while the replacement unit will become the property of the purchaser.
- If the warranty expires, Magewell will inform the purchaser whether the products can be repaired and the maintenance costs they need to pay. If purchasers
decide to repair, Magewell will repair, renovate, or replace the components after receiving the maintenance costs. If purchasers give up repairing, Magewell will dispose of the faulty unit if the purchaser chooses that option.
- The repaired or replaced product assumes 1) the remaining term of the Warranty of the replaced unit or faulty unit; 2) ninety (90) days from the date of replacement or repair, whichever provides longer coverage for you. The extended warranty is only valid for repaired/replaced components.
- The period of service depends on the client's location (country and area) and the product.
To view the complete warranty policy, please visit www.magewell.com/quality-assurance.
Notice
Copyright © 2023 Nanjing Magewell Electronics Co., Ltd.
All rights reserved. No part of this publication may be reproduced, distributed, or transmitted in any form or by any means, including photocopying, recording, or other electronic or mechanical methods, without the prior written permission of the publisher, except in the case of brief quotations embodied in critical reviews and certain other noncommercial uses permitted by copyright law.
Trademarks
HDMI, the HDMI logo and High-Definition Multimedia interface are trademarks or registered trademarks of HDMI Licensing LLC. Windows is trademark or registered trademark of Microsoft Corporation. OS X and macOS are trademarks or registered trademarks of Apple Inc. NDI is trademark or registered trademark of NewTek Inc. HEVC Advance is a registered trademark of Access Advance LLC. Other trademarks and company names mentioned are the properties of their respective owners.
About this Document
- This document is for reference only. Please refer to the actual product for more details.
• The user shall undertake any losses resulting from violation of guidance in the document.
• In case that PDF document cannot be opened, please upgrade the reading tool to the latest version or use other mainstream reading tools. - This company reserves rights to revise any information in the document anytime; and the revised contents will be added to the new version without prior announcement. Some functions of the products may be slightly different before and after revision.
- The document may include technically inaccurate contents, inconsistencies with product functions and operations, or misprint. Final explanations of the company shall prevail.
- The only warranties for Magewell products and services are set forth in the express warranty statements accompanying such products and services. Nothing herein should be construed as constituting an additional warranty. Magewell shall not be liable for technical or editorial errors or omissions contained herein.


- Key Features System Requirements
- Network
- Web UI Supported Web Browser
- Ultra Encode Family
- Tutorial
- Part 1. Ultra Encode Setup
- Add YouTube streaming session
- Part 2. YouTube Setup
- Installation
- Safety Information
- Electrical Safety Operation Safety
- FCC Compliance Statement
- FCC Statement
- FCC Radiation Exposure Statement
- Indicators
- Get Started With Ultra Encode
- Access Web UI
- Initialization
- Web UI Configuration
- Accessing the Web UI
- Signing In/Out
- Dashboard
- Setting Volume Mixer
- Previewing Thumbnails
- Checking BASIC INFO
- Checking STATUS
- Input
- Set Input Source
- Setting OUTPUT
- Setting Color
- Check VIDEO STATUS
- Check AUDIO STATUS
- Check SDI STATUS
- Check HDMI STATUS
- Check HDMI INFO FRAME
- EDID
- Set SmartEDID TM
- - SmartEDID™
- - Keep last
- - Add audio
- Set INPUT EDID
- Check Loop-through EDID
- No Signal Images
- Encode
- Deinterlacing
- 3D
- Setting MAIN STREAM
- Setting SUB STREAM
- Setting AUDIO
- Live
- Managing Live Streaming Sessions
- Notes
- Live Streaming to Twitch
- Live Streaming to Facebook Live
- Live Streaming to YouTube
- RTMP/RTMPS
- RTSP
- SRT Caller
- SRT Listener
- NDI
- - Group name
- - Source name
- - Transport Mode
- HLS
- TS over UDP/RTP
- TVU ISSP
- Wowza over RTMP
- Wowza over SRT
- Live Schedule
- Record
- Start/Stop Recording
- Manage SD card
- Record to External SD Card
- Configure recording parameters
- Upload
- - FTP Server
- - Google Drive
- - Dropbox
- List
- Manage USB Flash Drive
- Manage Video Clips in USB
- Record to External USB Drive
- Record to NAS
- Add a NAS
- Manage NAS
- Delete the NAS
- Record Schedule
- Overlay
- Setting Overlays for the Main and Sub Streams
- Adding Text
- Adding Clocks
- Adding Pictures
- Gallery
- General
- Modify HTTP/HTTPS settings
- Re-log into Web UI.
- A/V Sync
- HLS (push)
- Date & Time
- Resetting Your Device
- Reboot
- Setting Wi-Fi
- Searching Wi-Fi Network manually
- Setting Wi-Fi manually
- Setting AP
- Setting USB NET
- Setting Mobile Network
- User Admin
- Creating/Removing General User Accounts
- Modifying User Password
- Modifying current logged-in user password
- Modifying a specified user password
- Firmware
- Online Update
- Manual Update
- Control Hub
- About
- Checking Device Information
- Exporting Reports
- Clearing/Exporting All Logs
- Enable Dark Mode for Your WebGUI
- FAQ
- What to do if I forget the Web UI password?
- Support
- Get the Latest Information
- Technical Support
- Warranty
- Limited Warranty
- How to get the limited warranty
- Notice
- Trademarks
- About this Document
Brand : Magewell
Model : Ultra Encode HDMI
Category : Uncategorized