
129N-USBC-KVM-DOCK - Computer Accessories StarTech.com - Free user manual and instructions
Find the device manual for free 129N-USBC-KVM-DOCK StarTech.com in PDF.


| Product Type | USB-C KVM Docking Station |
| Brand | StarTech.com |
| Model Number | 129N-USBC-KVM-DOCK (also 129UE-USBC-KVM-DOCK) |
| Power Supply | DC 20V, 9A (180W) adapter included |
| Host Ports | 2 x USB-C (PC 1 & PC 2) |
| Video Ports | 2 x DisplayPort |
| Peripheral Ports | 1 x USB-A (keyboard/data), 2 x USB-A (downstream), 1 x USB-C (downstream) |
| Supported Operating Systems | Windows, macOS |
| Software | StarTech.com Link application (free download) |
| Key Features | KVM switching, cursor edge scrolling, hotkey switching, KM Master, Ctrl-Alt-Del passthrough |
| Hotkey Switching | Double-press left Shift (default), customizable via app |
| Edge Scrolling | Mouse cursor and keyboard follow between computers |
| KM Master | Enables edge scrolling to computer without app; return with Left Alt + Left Shift |
| Warranty | 3 years |
| Technical Support | Lifetime |
| Box Contents | KVM Dock, power adapter, 2 x USB-C host cables, documentation |
| Safety Precautions | Use only with provided power adapter; avoid exposure to liquids; do not disassemble |
| Cleaning Instructions | Clean with dry, soft cloth; do not use liquids or solvents |
| Repairability | Not user-serviceable; contact StarTech.com support for issues |
| Compliance | ISO 9001 registered manufacturer |
Frequently Asked Questions - 129N-USBC-KVM-DOCK StarTech.com
User questions about 129N-USBC-KVM-DOCK StarTech.com
0 question about this device. Answer the ones you know or ask your own.
Ask a new question about this device
Download the instructions for your Computer Accessories in PDF format for free! Find your manual 129N-USBC-KVM-DOCK - StarTech.com and take your electronic device back in hand. On this page are published all the documents necessary for the use of your device. 129N-USBC-KVM-DOCK by StarTech.com.
USER MANUAL 129N-USBC-KVM-DOCK StarTech.com
USB-C KVM Docking Station Application
For 129N-USBC-KVM-DOCK / 129UE-USBC-KVM-DOCK
natural_image
Blue circular icon with white computer and keyboard symbols (no text or numbers)StarTech.com
Link
For the latest information, technical specifications, and support for this product, please visit www.StarTech.com.
Use of Trademarks, Registered Trademarks, and other Protected Names and Symbols
This manual may make reference to trademarks, registered trademarks, and other protected names and/or symbols of third-party companies not related in any way to StarTech.com. Where they occur these references are for illustrative purposes only and do not represent an endorsement of a product or service by StarTech.com, or an endorsement of the product(s) to which this manual applies by the third-party company in question. Regardless of any direct acknowledgement elsewhere in the body of this document, StarTech.com hereby acknowledges that all trademarks, registered trademarks, service marks, and other protected names and/or symbols contained in this manual and related documents are the property of their respective holders.
Table of Contents
About the Application....1
Requirements....1
Critical Components For Application Use ....2
Hardware Setup....3
Download and Install the Application....4
Windows Installation 4
macOS Installation....5
Application Operation......6
Windows Operation 6
macOS Operation....14
Technical support....21
Warranty information....21
About the Application
The StarTech.com Link application installs onto the computers connected to the StarTech.com KVM Dock, providing users with access to additional features:
Note: To for optimal operation, it's recommended that the StarTech.com Link application be installed on both computers connected to the KVM Dock.
Requirements
• StarTech.com KVM Dock (129N-USBC-KVM-DOCK / 129UE-USBC-KVM-DOCK)
- 2x Computers
- USB-C Port
-
Windows or macOS
-
Up to 2x DisplayPort Enabled Monitors
- USB-A Keyboard
- USB Mouse
Requirements are subject to change. For the latest requirements, please visit www.StarTech.com.
Critical Components For Application Use
129N-USBC-KVM-DOCK / 129UE-USBC-KVM-DOCK Product Diagram
(Side A)
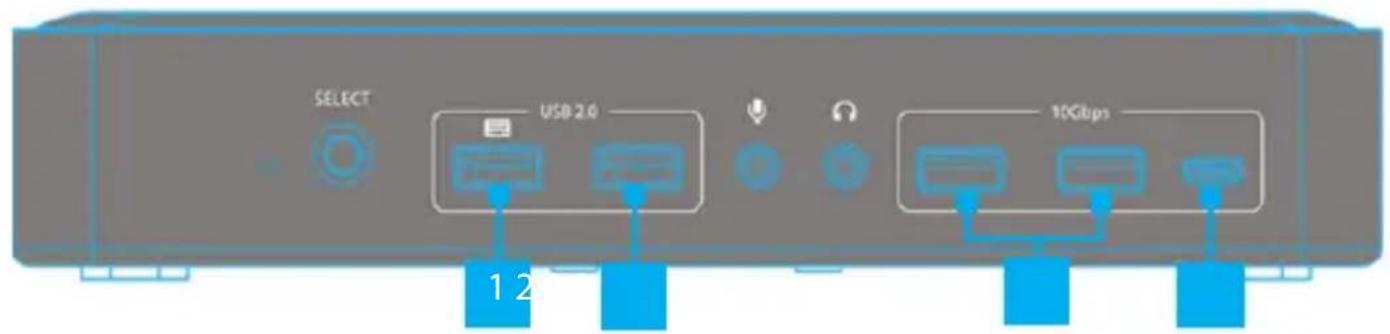
(Side B)
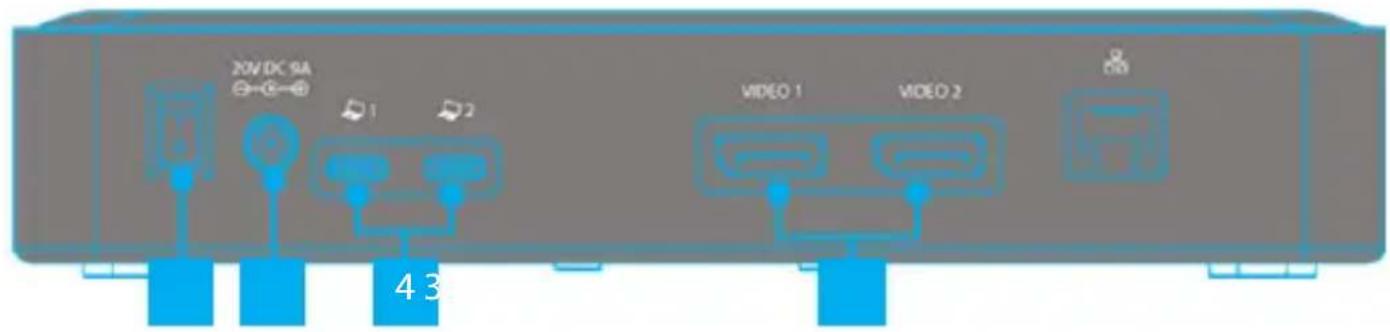
| Critical Components | |
| 1 | USB-A Keyboard/Data Port |
| 2 | USB Data Ports (Downstream) |
| 3 | DisplayPort Video Ports |
| 4 | USB-C Host Ports(PC 1 & PC 2) |
| 5 | DC 20V Port |
| 6 | Power Switch |
Hardware Setup
-
Connect the Power Adapter (included with the KVM Dock) from an AC outlet, to the DC 20V Port, located on the KVM Dock.
-
Connect the desired USB Peripheral Devices to the USB-A Data Ports and USB-C Data Ports, located on the dock.
IMPORTANT NOTE: For hot-key support, the keyboard must be connected to the USB-A Keyboard/Data Port.
-
Connect up to two DisplayPort Enabled Monitors to the DisplayPort Video Ports on the dock.
-
Press the Power Switch into the ON position.
-
Connect a USB-C Host Cable (included with the KVM Dock) to each of the USB-C Host Ports (PC 1 & PC 2) located on the KVM Dock, and to a USB-C Port on each of the Host Computers. If the Host Computer is running Windows and has Internet access it will automatically detect the device and install all the required drivers.
If you're running a non-Windows operating system or the drivers do not automatically install, on one or both, of your computers, disconnect the USB-C Host Cable from the Host Computer(s) that's failing installation, then:
a. Navigate to:
www.StarTech.com/129N-USBC-KVM-DOCK or
www.StarTech.com/129UE-USBC-KVM-DOCK
and click the Drivers/Downloads tab.
b. Under Driver(s), download the Driver Package for your operating system, and follow the steps outlined in the Installation guide, that's included in the Driver Package.
c. Once the installation has completed, reconnect the Host Computer(s) to the KVM Dock.
Note: Drivers must be installed on all Host Computer(s) connected to the KVM Dock.
Download and Install the Application
The StarTech.com Link Application is free to download and install.
Windows Installation
- Navigate to:
www.StarTech.com/129N-USBC-KVM-DOCK or
www.StarTech.com/129UE-USBC-KVM-DOCK
and click the Drivers/Downloads tab.
- Under Software, download the startechlink.zip file.
- Right-click the zip folder that you downloaded, select Extract All, and follow the on-screen instructions.
- In the list of extracted files, open the StarTechLink_Windows folder and right-click the StarTechAppInstall vx.xxx(.exe) file and select Run as Administrator.
- Follow the on-screen prompts to complete the installation.
Note: If the computer has a previous version of the application installed, the on-screen prompt will advise the user to remove the previously installed version of the application. It is recommended that the prompt be used to remove the software. The StarTechAppInstall vx.xxx(.exe) can then be ran again to complete the installation.
macOS Installation
- Navigate to:
www.StarTech.com/129N-USBC-KVM-DOCK or
www.StarTech.com/129UE-USBC-KVM-DOCK
and click the Drivers/Downloads tab.
-
Under Driver(s), download the startechlink.zip file.
-
Double-click the zip folder that you downloaded, macOS will unzip the folder using Archive Utility.
-
Open the StarTechLink_Mac folder, and double-click the StarTech_ForMac(vx_xxx_xx..)(.pkg) installation package.
-
The Install StarTech.com Link installation prompt will open to the Introduction section. Select the Continue button.
-
The Destination Select section will be displayed. Select the Continue button.
-
The Installation Type section will be displayed. Select the Install button.
Note: If a User Name/Password is required, Enter the User Name and Password in the specified fields, and select Install Software. This will be the username and a password of the macOS user account. The account must have administration privileges to complete the installation.
-
The Host Bridge dialog box will appear, Select Open System Preferences.
-
The Security & Privacy prompt will open to the Privacy section. Select the icon displayed next to "Click the lock to make changes".
Note: If a User Name/Password is required, Enter the User Name and Password in the specified fields, and select Install Software.
-
Select StarTech.com Link from the list displayed below "Allow the apps below to control your computer", and close the window.
-
Follow the on-screen prompts to complete the installation.
Application Operation
Windows Operation
Launching the Application
Select the icon to launch the application.
Note: If "User Account Control" (UAC) is shown, select the Yes button.
Application Status
Once the application has been launched, its features can be accessed by right-clicking an icon in the system tray.
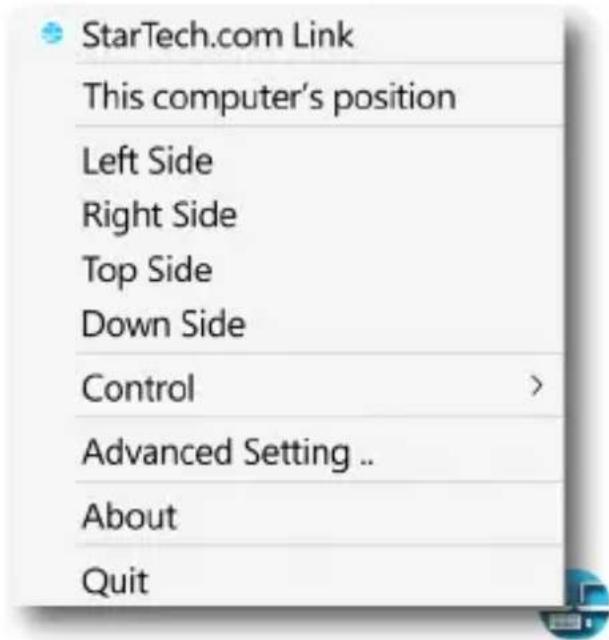
The system tray icon doubles as a status indicator, with color-coded statuses:
A Blue Icon : Indicates the application is running on both computers and a connection has been established.
A Gray Icon : Indicates that the application is running. However, a connection has not been established with the other computer. This icon may appear for several seconds after the application is launched. However, if after several seconds this icon is still displayed, this typically indicates that the second computer does not have the application launched, or that the two computers are running separate versions of the software. In this status, several software features will not be available.
Set Laptop Screen Location for Mouse Cursor/Keyboard Edge Scrolling
The Application enables the KVM Dock to support Cursor Edge Scrolling between computers. The mouse cursor (connected to the dock, or either computer) can navigate from the displays associated with the active computer to the screen integrated into the non-active laptop. The keyboard (connected to the dock, or either computer) will also input to whichever computer the Mouse Curser is currently occupying.
To Set Location for Mouse Cursor Edge Scrolling:
-
Right-click the Application Icon ( ) located in the system tray.
-
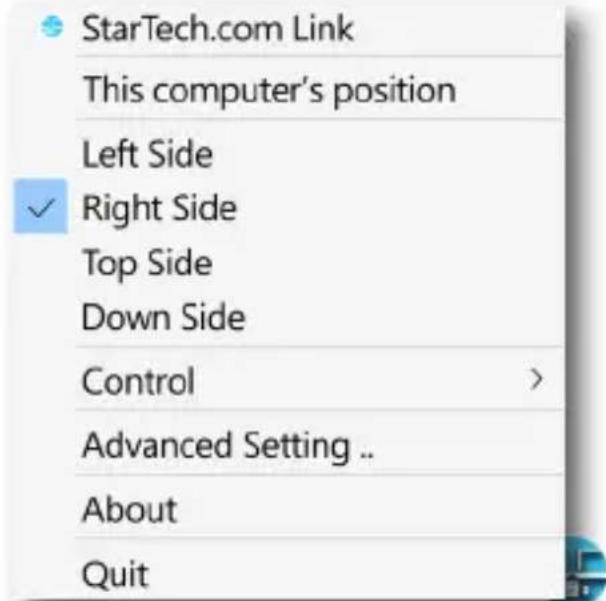
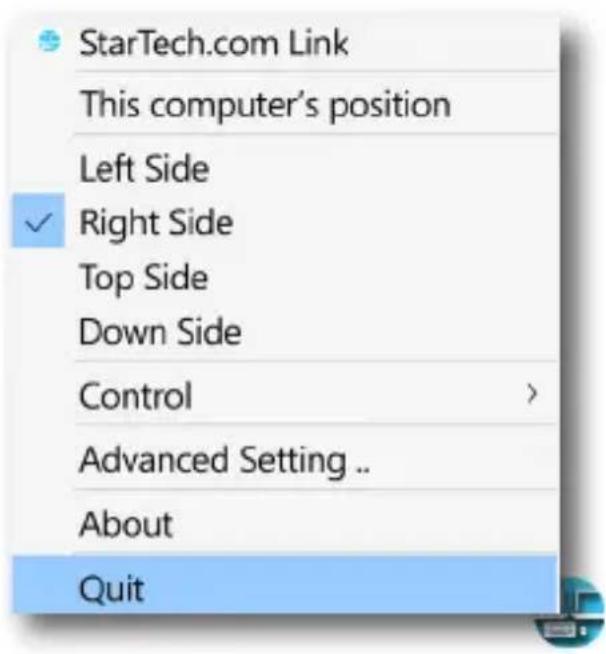
Based on the physical location of this laptop in relation to the Displays that are connected to the KVM Docking Station, select one of the following options from the system tray menu:
-
Left Side
- Right Side
- Top Side
- Down Side
The cursor can now edge scroll from the Displays associated to the active computer to the integrated laptop screen on each connected computer, based on the location selected.
Notes:
- Both computers cannot be assigned the same location. If a newly selected laptop location is assigned to the same location as the other laptop, the other laptop will automatically reassign to the reverse location of what was selected.
- Windows display settings will define all monitor locations for the active computer.
Switch UFP
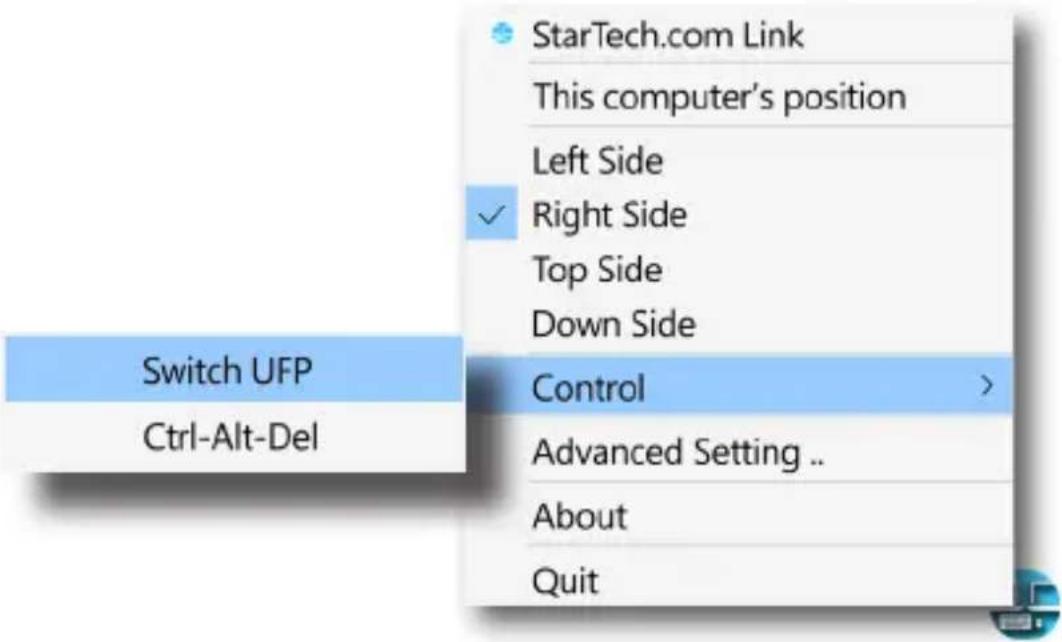
The Application can activate the KVM switch operation of the KVM Dock. This enables users to switch between computers connected to the upstream facing ports (UFP), selecting which Host Port is active, from within the application.
To Switch Between Which Host Port is Active Using the Application:
-
Right-Click the Application Icon (-) located in the system tray.
-
Select Control, then select Switch UFP from the system tray menu.
The connected display, and peripherals will switch between computers connected to the USB-C Host Ports (PC 1 and PC 2).
Ctrl-Alt-Del
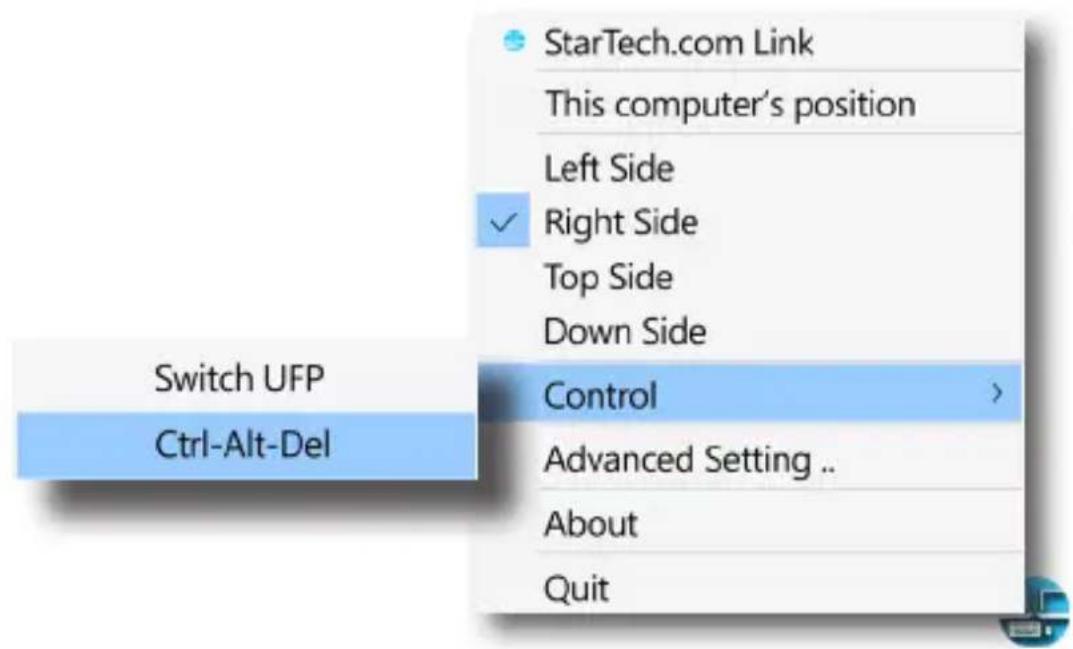
The Application can activate the Ctrl-Alt-Del Menu (Windows Security Menu) on the non-active computer while utilizing the Application's Edge Scrolling feature. This enables users to access the Ctrl-Alt-Del Menu on the non-active computer using the application, as the traditional keyboard shortcut will activate the Ctrl-Alt-Del menu on the active computer.
To Access the Ctrl-Alt-Del Menu on the non-active computer:
- Utilize the Application's Edge Scrolling feature to move the mouse cursor to the non-active computer.
- Right-Click the Application Icon ( ) located in the system tray (on the non-active computer).
- Select Control, then select Ctrl-Alt-Del from the system tray menu.
The non-active computer will launch the Ctrl-Alt-Del Menu.
Change the Hot-Key Switching Button
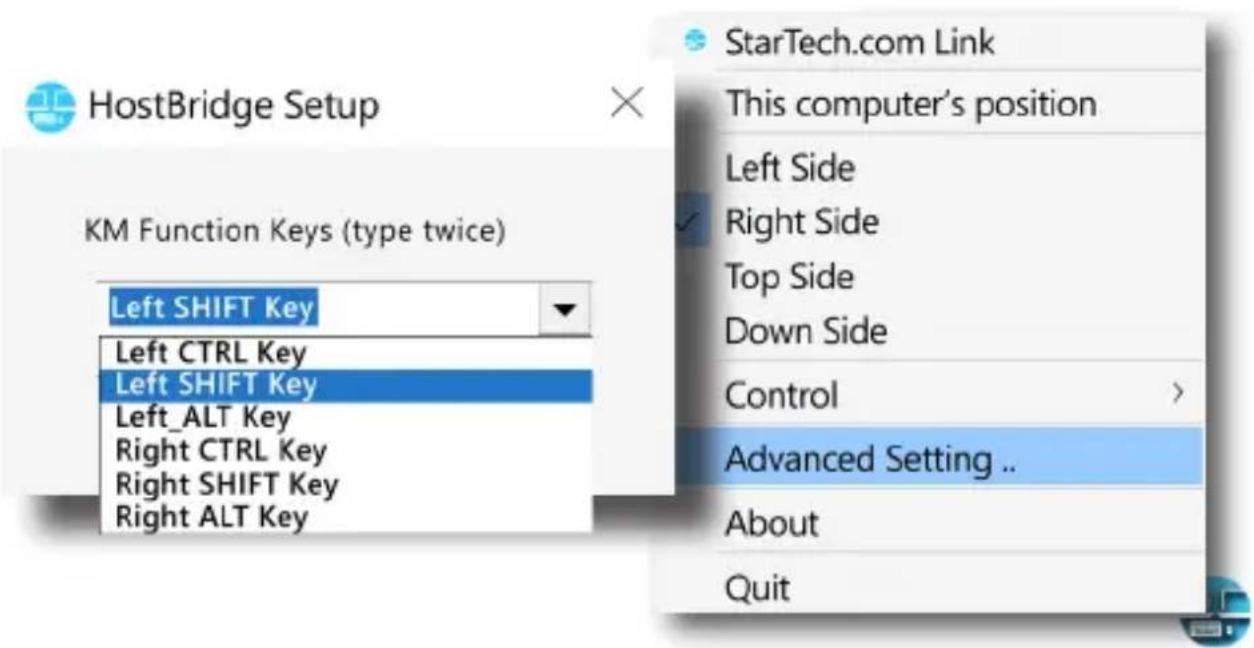
By default the KVM Dock supports hot-key switching, by double-pressing the left-side Shift button on the keyboard that's connected to the USB-A Keyboard/Data Port. However, the application enables changing the hot-key switching button based upon the user's choice.
To Change which keyboard button is double pressed for hot-key switching:
- Right-Click the Application Icon ( ) located in the system tray.
- Select Advanced Setting.. from the system tray menu, to launch the HostBridge Setup window.
- Use the KM Function Keys Box (type twice) box to set your desired button to double-press for hot-key switching, then close the HostBridge Setup Window.
The selected button on the keyboard can now be double-pressed to initiate hot-key switching.
Note: If one of the computers does not have the application installed, the default hot-key sequence will need to be used (left-side shift button).
Note: The keyboard shortcuts on the KVM docking station are optimized for compatibility with conventional Windows keyboards. To ensure seamless functionality, we recommend using keyboards that adhere to standard Windows key layouts.
KM Master for Mouse Cursor/Keyboard Edge Scrolling
The Application features a KM Master function that can support Mouse Cursor/Keyboard Edge Scrolling from a computer with the application installed to a computer that does not have the application installed. Mouse Cursor/Keyboard functions can then return to the computer with the application installed by pressing Left ALT + Left SHIFT at the same time.
To enable KM Master for Mouse Cursor/Keyboard Edge Scrolling from a computer with the application installed to a computer that does not have the application installed:
- Right-Click the Application Icon ( ) located in the system tray.
- Select Advanced Settings.. from the system tray menu, to launch the HostBridge Setup window.
- Place a check in the KM Master box, then close the HostBridge Setup window.
The cursor can now edge scroll from the computer with the application installed to the computer without the application installed.
To return the Mouse Cursor/Keyboard function to the computer with the application installed:
- Press Left ALT + Left SHIFT at the same time, on the keyboard.
The Mouse Cursor/Keyboard functions will now return to the computer with the application installed.
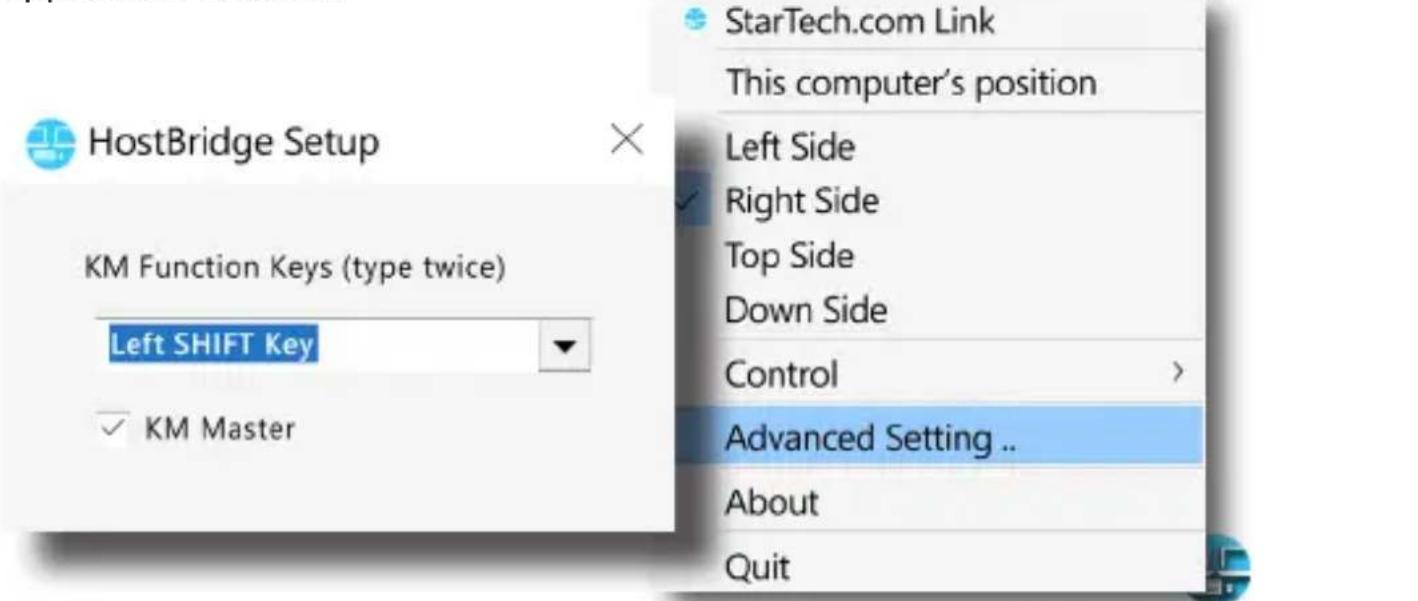
About
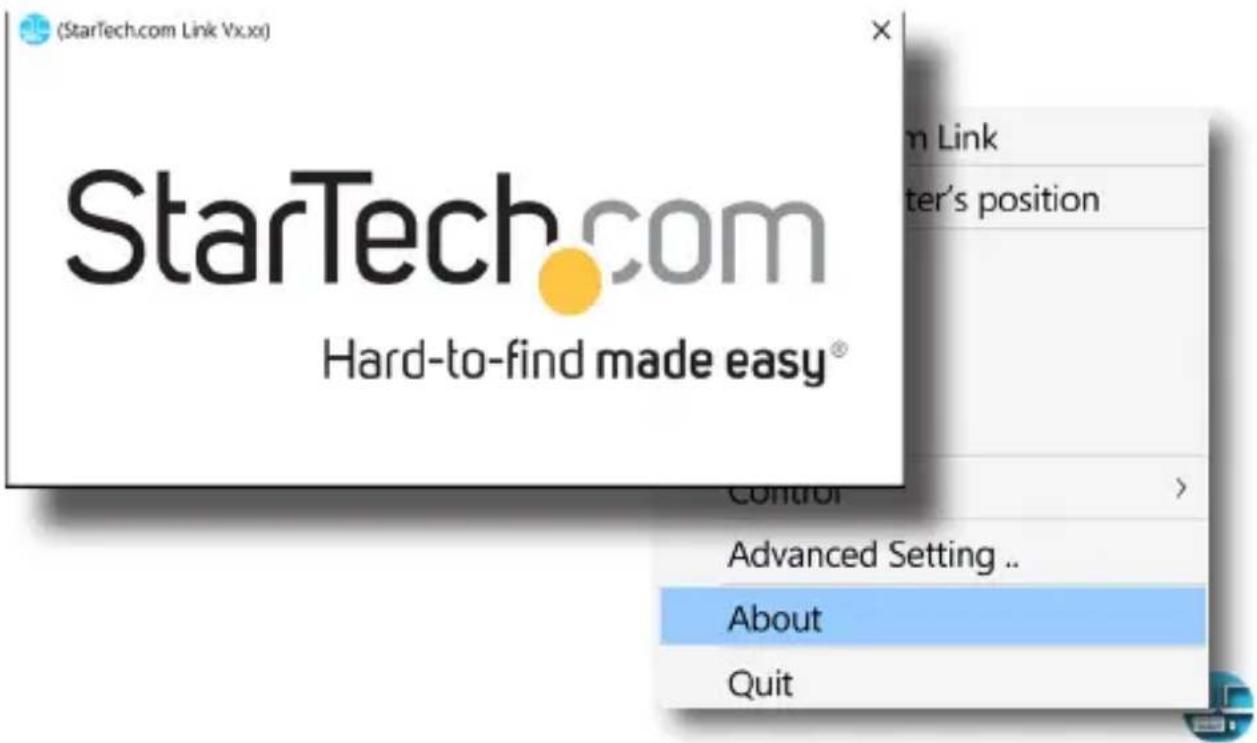
The About menu option enables users to view the version of the software and information about the manufacturer.
To view the version of the software:
- Right-Click the Application Icon ( ) located in the system tray.
- Select About from the system tray menu, to launch the About Window.
The about information will now be displayed.
Quit
To Close the Application:
- Right-Click the Application Icon ( ) located in the system tray.
- Select Quit from the system tray menu.
The application will now close.
macOS Operation
Launching the Application
Select StarTech.com Link from the applications list to launch the application.
Application Status
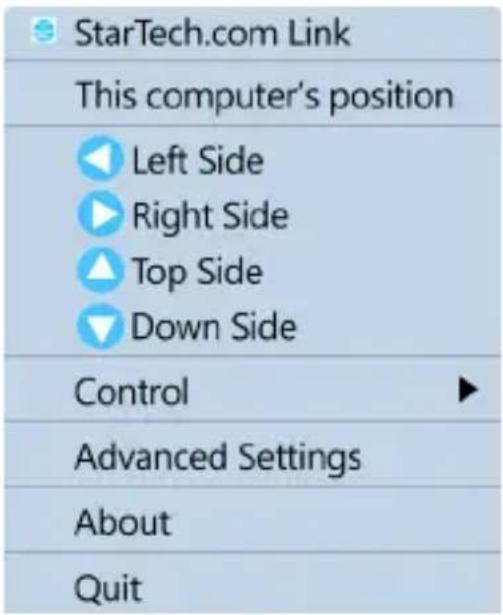
Once the application has been launched, its features can be accessed by clicking the icon in the Dock menu.
natural_image
Blue circular icon with white computer and keyboard symbols (no text or labels)The Dock Menu icon doubles as a status indicator, with color-coded statuses:
A Blue Icon 📋: Indicates the application is running on both computers and a connection has been established.
A Gray Icon : Indicates that the application is running. However, a connection has not been established with the other computer. This icon may appear for several seconds after the application is launched. However, if after several seconds this icon is still displayed, this typically indicates that the second computer does not have the application launched, or that the two computers are running separate versions of the software. In this status, several software features will not be available.
Set Laptop Screen Location for Mouse Cursor/Keyboard Edge Scrolling
The Application enables the KVM Dock to support Cursor Edge Scrolling between computers. The mouse cursor (connected to the dock, or either computer) can navigate from the displays associated with the active computer to the screen integrated into the non-active laptop. The keyboard (connected to the dock, or either computer) will also input to whichever computer the Mouse Curser is currently occupying.
To Set Location for Mouse Cursor Edge Scrolling:
-
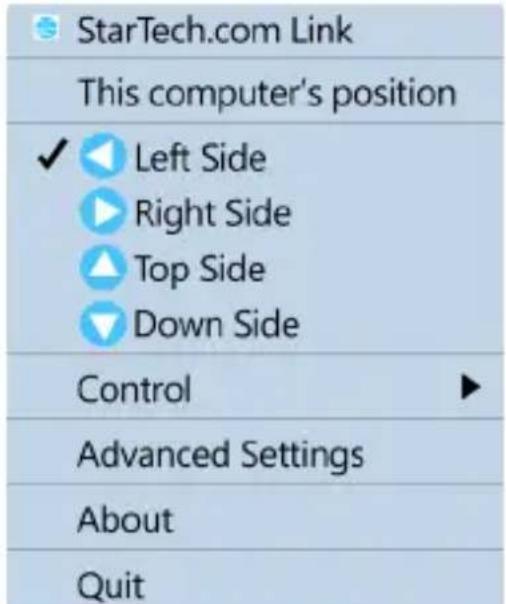
Select the Application Icon ( ) from the Dock menu
-
Based on the physical location of this laptop in relation to the Displays that are connected to the KVM Docking Station, select one of the following options from the system tray menu:
-
Left Side
- Right Side
- Top Side
- Down Side
The cursor can now edge scroll from the Displays associated to the active computer to the integrated laptop screen on each connected computer, based on the location selected.
Notes:
- Both computers cannot be assigned the same location. If a newly selected laptop location is assigned to the same location as the other laptop, the other laptop will automatically reassign to the reverse location of what was selected.
• macOS display settings will define all monitor locations for the active computer.
Switch UFP
The Application can activate the KVM switch operation of the KVM Dock. This enables users to switch between computers connected to the upstream facing ports (UFP), selecting which Host Port is active, from within the application.
To Switch Between Which Host Port is Active Using the Application:
-
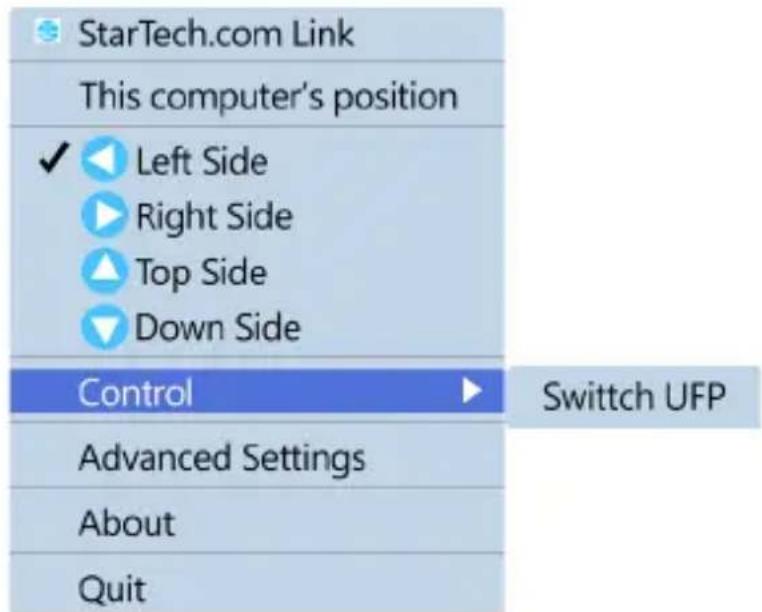
Select the Application Icon ( ) from the Dock menu.
-
Select Control, then select Switch UFP.
The connected display, and peripherals will switch between computers connected to the USB-C Host Ports (PC 1 and PC 2).
Change the Hot-Key Switching Button
By default the KVM Dock supports hot-key switching, by double-pressing the left side Shift button on the keyboard that's connected to the USB-A Keyboard/Data Port. However, the application enables changing the hot-key switching button based upon the user's choice.
To Change which keyboard button is double pressed for hot-key switching:
- Select the Application Icon ( ) from the Dock menu.
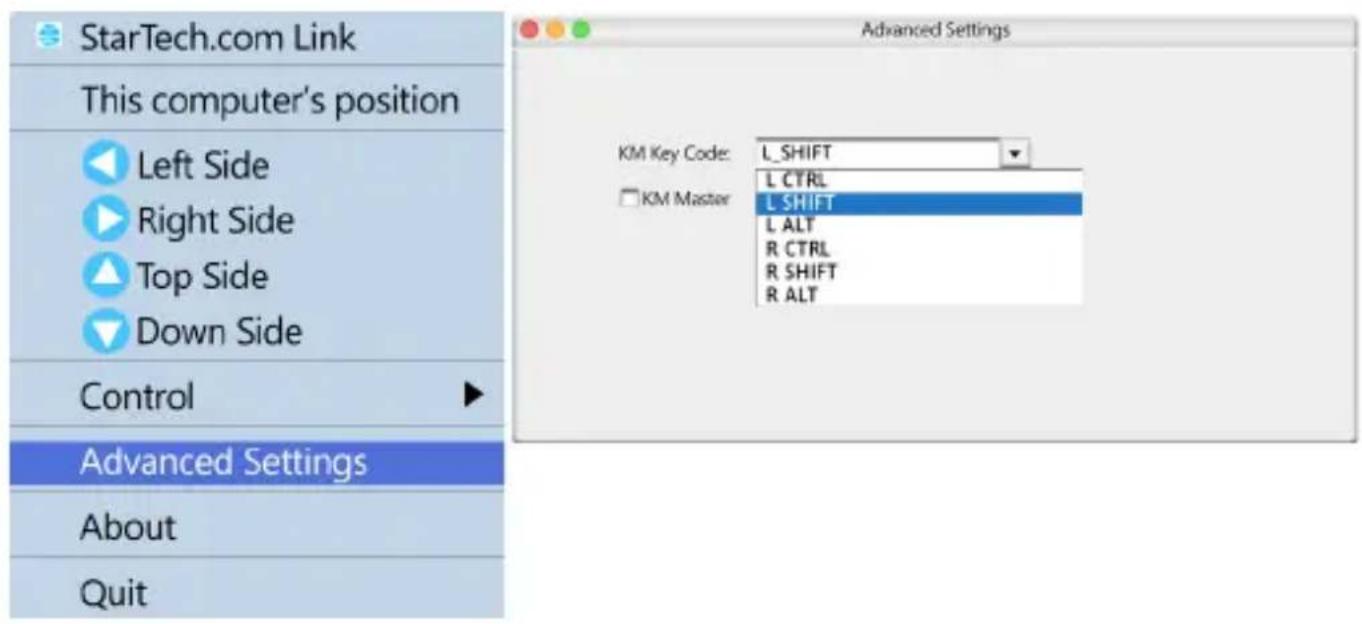
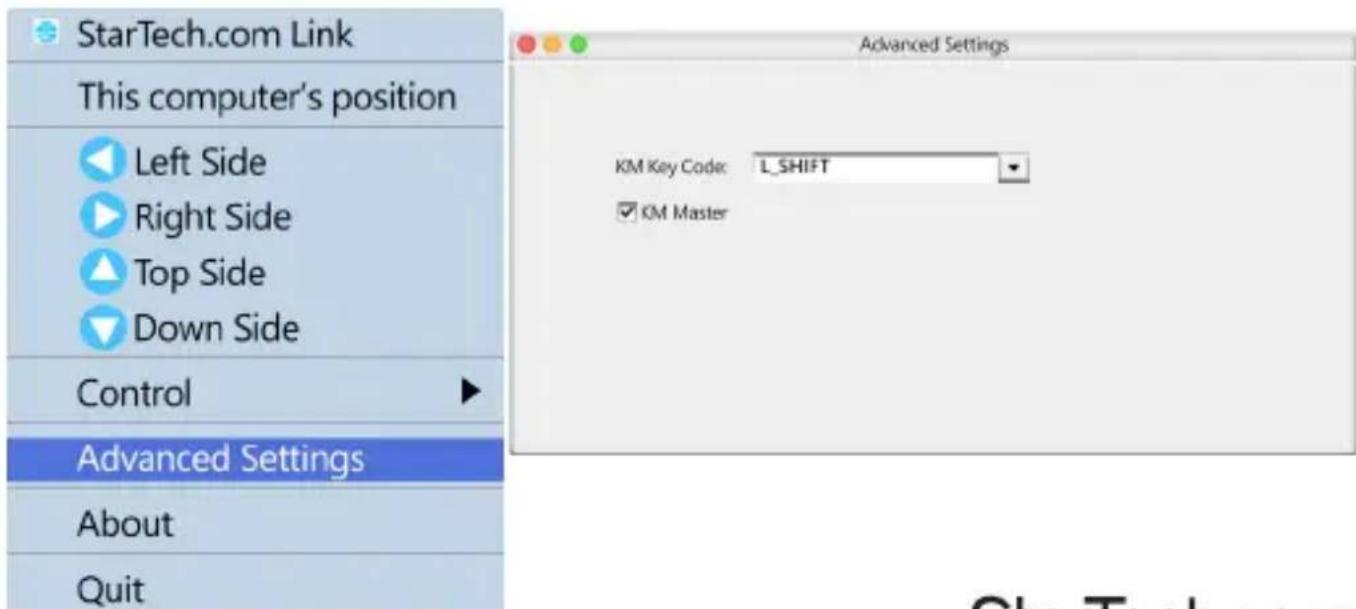
- Select Advanced Settings to launch the Advanced Settings window.
- Use the KM Key Code box to set your desired button to double-press for hot-key switching, then close the Advanced Settings window.
The selected button on the keyboard can now be double-pressed to initiate hot-key switching.
Note: If one of the computers does not have the application installed, the default hot-key sequence will need to be used (left-side shift button).
Note: The keyboard shortcuts on the KVM docking station are optimized for compatibility with conventional Windows keyboards. To ensure seamless functionality, we recommend using keyboards that adhere to standard Windows key layouts.
KM Master Mouse for Cursor/Keyboard Edge Scrolling
The Application features a KM Master function that can support Mouse Cursor/Keyboard Edge Scrolling from a computer with the application installed to a computer that does not have the application installed. Mouse Cursor/Keyboard functions can then return to the computer with the application installed by pressing Left ALT + Left SHIFT at the same time.
To enable KM Master for Mouse Cursor/Keyboard Edge Scrolling from a computer with the application installed to a computer that does not have the application installed:
- Select the Application Icon ( ) located in the system tray.
- Select Advanced Settings from the system tray menu, to launch the Advanced Settings Setup window.
- Place a check in the KM Master box, then close the Advanced Settings window.
The cursor can now edge scroll from the computer with the application installed to the computer without the application installed.
To return the Mouse Cursor/Keyboard function to the computer with the application installed:
- Press Left ALT + Left SHIFT at the same time, on the keyboard.
The Mouse Cursor/Keyboard functions will now return to the computer with the application installed.
About
The About menu option enables users to view the version of the software and information about the manufacturer.
To view the version of the software:
-
Select the Application Icon ( ) from the Dock menu.
-
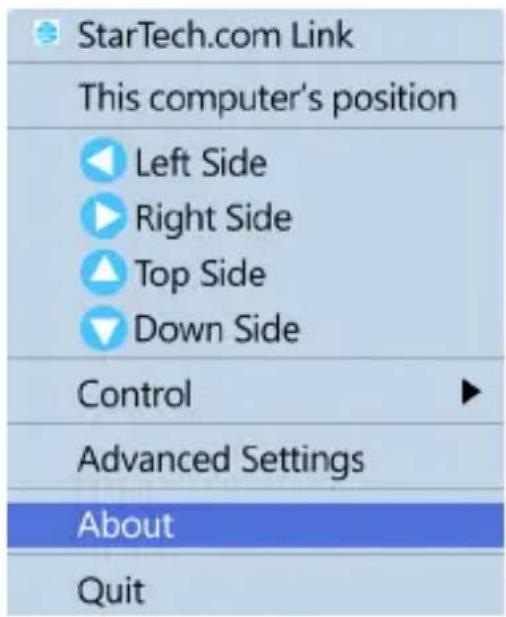
Select About to launch the About Window.
The about information will now be displayed.
Quit
To Close the Application:
- Select the Application Icon ( ) from the Dock menu.
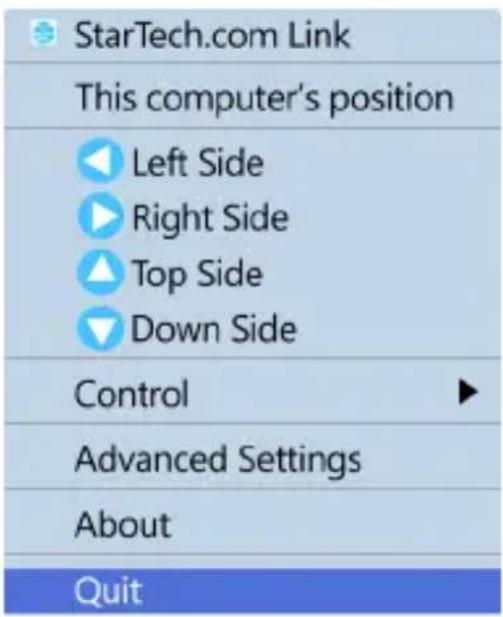
- Select Quit.
The application will now close.
Technical support
StarTech.com's lifetime technical support is an integral part of our commitment to provide industry-leading solutions. If you ever need help with your product, visit www.startech.com/support and access our comprehensive selection of online tools, documentation, and downloads.
For the latest drivers/software, please visit www.startech.com/downloads
Warranty information
This product is backed by a three-year warranty.
StarTech.com warrants its products against defects in materials and workmanship for the periods noted, following the initial date of purchase. During this period, the products may be returned for repair, or replacement with equivalent products at our discretion. The warranty covers parts and labor costs only. StarTech.com does not warrant its products from defects or damages arising from misuse, abuse, alteration, or normal wear and tear.
Limitation of Liability
In no event shall the liability of StarTech.com Ltd. and StarTech.com USA LLP (or their officers, directors, employees or agents) for any damages (whether direct or indirect, special, punitive, incidental, consequential, or otherwise), loss of profits, loss of business, or any pecuniary loss, arising out of or related to the use of the product exceed the actual price paid for the product. Some states do not allow the exclusion or limitation of incidental or consequential damages. If such laws apply, the limitations or exclusions contained in this statement may not apply to you.
Hard-to-find made easy. At StarTech.com, that isn't a slogan. It's a promise.
StarTech.com is your one-stop source for every connectivity part you need. From the latest technology to legacy products — and all the parts that bridge the old and new — we can help you find the parts that connect your solutions.
We make it easy to locate the parts, and we quickly deliver them wherever they need to go. Just talk to one of our tech advisors or visit our website. You'll be connected to the products you need in no time.
Visit www.startech.com for complete information on all StarTech.com products and to access exclusive resources and time-saving tools.
StarTech.com is an ISO 9001 Registered manufacturer of connectivity and technology parts. StarTech.com was founded in 1985.


- USB-C KVM Docking Station Application
- StarTech.com
- Link
- Use of Trademarks, Registered Trademarks, and other Protected Names and Symbols
- Table of Contents
- About the Application....1
- Critical Components For Application Use ....2
- Hardware Setup....3
- Download and Install the Application....4
- Application Operation......6
- Technical support....21
- Warranty information....21
- About the Application
- Requirements
- Critical Components For Application Use
- Hardware Setup
- Download and Install the Application
- Windows Installation
- macOS Installation
- Application Operation
- Windows Operation
- Application Status
- Set Laptop Screen Location for Mouse Cursor/Keyboard Edge Scrolling
- Notes:
- Switch UFP
- Ctrl-Alt-Del
- Change the Hot-Key Switching Button
- KM Master for Mouse Cursor/Keyboard Edge Scrolling
- About
- Quit
- macOS Operation
- Launching the Application
- KM Master Mouse for Cursor/Keyboard Edge Scrolling
- Technical support
- Warranty information
- Limitation of Liability
Brand : StarTech.com
Model : 129N-USBC-KVM-DOCK
Category : Computer Accessories