
TB3DK2DPM2 - Computer Accessories StarTech.com - Free user manual and instructions
Find the device manual for free TB3DK2DPM2 StarTech.com in PDF.


| Product Type | Thunderbolt 3 Dual-4K Docking Station with M.2 SSD Slot and SD 4.0 Card Reader |
| Host Interface | Thunderbolt 3 (USB-C) supporting up to 40Gbps |
| Display Output | Dual 4K (4096x2160p) via DisplayPort 1.2 and Thunderbolt 3 peripheral port; supports daisy chaining |
| M.2 SSD Slot | NVMe PCIe 3.0, M-key, 22x80mm (2280) form factor |
| SD Card Reader | SD, SDHC, SDXC (UHS-II, SD 4.0) |
| USB Ports (Front) | 1x USB-C 10Gbps (data only, no DP Alt Mode), 1x USB-A 5Gbps with BC 1.2 fast charging |
| USB Ports (Rear) | 1x USB-A 5Gbps with BC 1.2 fast charging, 1x Thunderbolt 3 peripheral port |
| Ethernet | Gigabit RJ45 |
| Audio | 3.5mm microphone input and 3.5mm audio output |
| Power Input | DC 20V via included universal power adapter with interchangeable plugs (NA, EU, UK, ANZ) |
| Power Delivery (Host) | Up to 85W to charge connected laptop via Thunderbolt 3 host port |
| Power Delivery (Peripheral) | Up to 15W on Thunderbolt 3 peripheral port; fast charging on USB-A ports (BC 1.2) |
| Compatible Operating Systems | Windows 10, 8.1, 8, 7; macOS 10.12, 10.13, 10.14 |
| LED Indicators | White solid LED indicates power active; off indicates no power |
| Warranty | 3 years |
| Regulatory Compliance | FCC Part 15 Class B, Industry Canada RSS |
| Included Accessories | Thunderbolt 3 cable, universal power adapter, power cords for 4 regions, instruction manual |
| Maintenance | Handle with care; avoid liquid exposure; disconnect power before cleaning |
| Safety Warnings | Install by certified professional; avoid tripping hazards; do not modify product |
Frequently Asked Questions - TB3DK2DPM2 StarTech.com
User questions about TB3DK2DPM2 StarTech.com
0 question about this device. Answer the ones you know or ask your own.
Ask a new question about this device
Download the instructions for your Computer Accessories in PDF format for free! Find your manual TB3DK2DPM2 - StarTech.com and take your electronic device back in hand. On this page are published all the documents necessary for the use of your device. TB3DK2DPM2 by StarTech.com.
USER MANUAL TB3DK2DPM2 StarTech.com
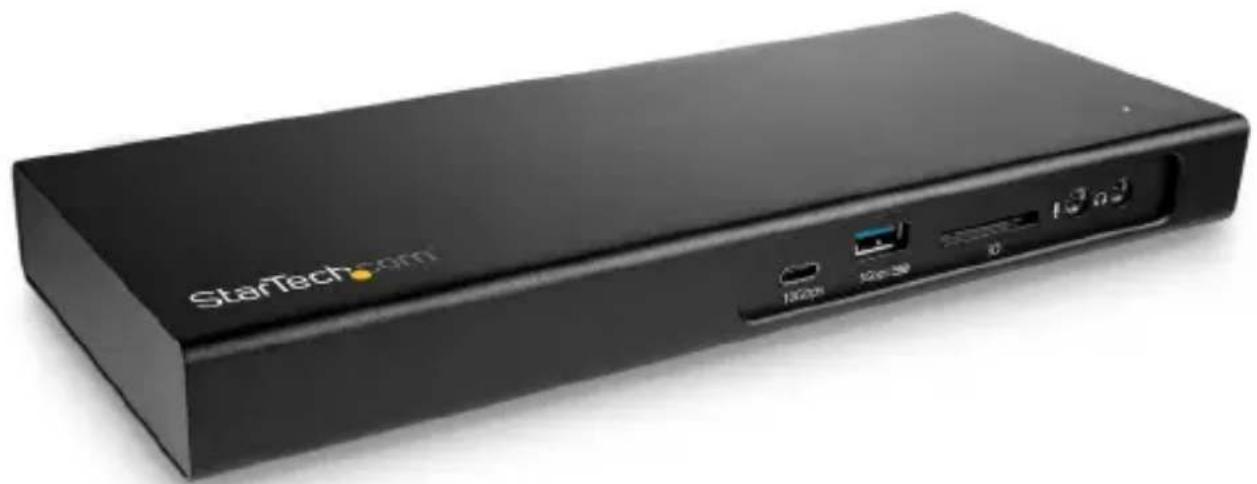
Thunderbolt™ 3 Dual-4K Docking Station for Laptops - PCIe M.2 SSD - SD 4.0
natural_image
Black StarTech Corp. device with ports and indicator lights (no readable text beyond branding)Actual product may vary from photos
User Manual
SKU#: TB3DK2DPM2
For the latest information and specifications visit
www.startech.com/TB3DK2DPM2
Compliance Statements
FCC Compliance Statement
This equipment has been tested and found to comply with the limits for a Class B digital device, pursuant to part 15 of the FCC Rules. These limits are designed to provide reasonable protection against harmful interference in a residential installation. This equipment generates, uses and can radiate radio frequency energy and, if not installed and used in accordance with the instructions, may cause harmful interference to radio communications. However, there is no guarantee that interference will not occur in a particular installation. If this equipment does cause harmful interference to radio or television reception, which can be determined by turning the equipment off and on, the user is encouraged to try to correct the interference by one or more of the following measures:
• Reorient or relocate the receiving antenna.
- Increase the separation between the equipment and receiver.
- Connect the equipment into an outlet on a circuit different from that to which the receiver is connected.
- Consult the dealer or an experienced radio/TV technician for help
This device complies with part 15 of the FCC Rules. Operation is subject to the following two conditions: (1) This device may not cause harmful interference, and (2) this device must accept any interference received, including interference that may cause undesired operation.
Changes or modifications not expressly approved by StarTech.com could void the user's authority to operate the equipment.
Industry Canada Statement
This device complies with Industry Canada licence-exempt RSS standard(s). Operation is subject to the following two conditions:
(1) This device may not cause interference, and
(2) This device must accept any interference, including interference that may cause undesired operation of the device.
To view manuals, videos, drivers, downloads, technical drawings, and more visit www.startech.com/support
To view manuals, videos, drivers, downloads, technical drawings, and more visit www.startech.com/support
Safety Statements
Safety Measures
- Wiring terminations should not be made with the product and/or electric lines under power.
- Product installation and/or mounting should be completed by a certified professional as per the local safety and building code guidelines.
- Cables (including power and charging cables) should be placed and routed to avoid creating electric, tripping or safety hazards.
Mesures de sécurité
To view manuals, videos, drivers, downloads, technical drawings, and more visit www.startech.com/support
Table of Contents
Compliance Statements......i
Safety Statements ....iii
Product Diagram 1
Front View....1
Rear View....1
Bottom View....2
Product Information....2
Package Contents 2
Requirements 2
Installation....4
Connecting....4
Powering 10
Driver Installation....10
Display Configuration.... 11
Connect HDMI, DVI and VGA Displays.... 11
Configure Displays....12
Supported Video Resolutions....12
Video Resolution and Bandwidth Allocation....12
Operation....14
LED Indicators....14
Charge a Device....14
Product Diagram
Actual product may vary from photos
Front View
Rear View
To view manuals, videos, drivers, downloads, technical drawings, and more visit www.startech.com/support
Bottom View
M.2 SSD Slot
Product Information
Package Contents
- Docking Station x 1
• Thunderbolt 3 Cable x 1
• Universal Power Adapter x 1
• Power Cords (NA/JP, EU, UK, ANZ) x 4
• Instruction Manual x 1
Requirements
For the latest requirements, please visit www.startech.com/TB3DK2DPM2.
Power:
• Available AC electrical outlet
To view manuals, videos, drivers, downloads, technical drawings, and more visit www.startech.com/support
Laptop:
- Host Laptop with an available Thunderbolt 3 Port (your Laptop's Thunderbolt 3 port must support USB Power Delivery in order to power and charge your Laptop) x 1
Display:
• DisplayPort Equipped Display x 1
• DisplayPort Cable (for an additional external display) x 1
• USB Type-C or Thunderbolt 3 Equipped Display x 1
- Thunderbolt 3 Cable (for an additional external display) x 1
Note: For dual-display configurations: Use the Docking Station's Thunderbolt 3 Peripheral Port. You may need to purchase a separate adapter to connect an HDMI, a DVI, or VGA display.
Note: For 4K x 2K (4096 x 2160p) resolution, a 4K - capable display is required
• (Optional) Active DisplayPort to HDMI/DVI/VGA Video Adapter x 1 - (Optional) USB-C to HDMI/DVI/VGA/DisplayPort Video Adapter x 1
USB Peripherals:
- (Optional) Keyboard, Mouse, Flash Drive, Printer, Webcam, Drive Enclosure, Display Adapter, Mobile Phone, or Tablet, etc. x 2
• (Optional) USB-A to USB-B Cable x 2
• (Optional) USB-C to USB-C Cable x 2
Thunderbolt 3 Peripherals:
• Thunderbolt 3 Enabled Peripheral Devices x 1
• Thunderbolt 3 Cable x 1
SD Card:
- SD, SDHC™ (Secure Digital High Capacity), or SDXC™ (Secure Digital Extended Capacity) Card x 1
M.2 Drive:
• M-key connector type, 22 x 80 mm (2280) M.2 Drive x 1
To view manuals, videos, drivers, downloads, technical drawings, and more visit www.startech.com/support
Audio:
- Microphone-Enabled Audio Device x 1
- Speaker-Enabled Audio Device (or Headphones) x 1
• 3.5 mm Audio Cable x 2
Operating Systems:
- Windows® 10, 8, 8.1 or 7.
• macOS 10.14, 10.13 or 10.12.
Installation
Connecting
Front Ports
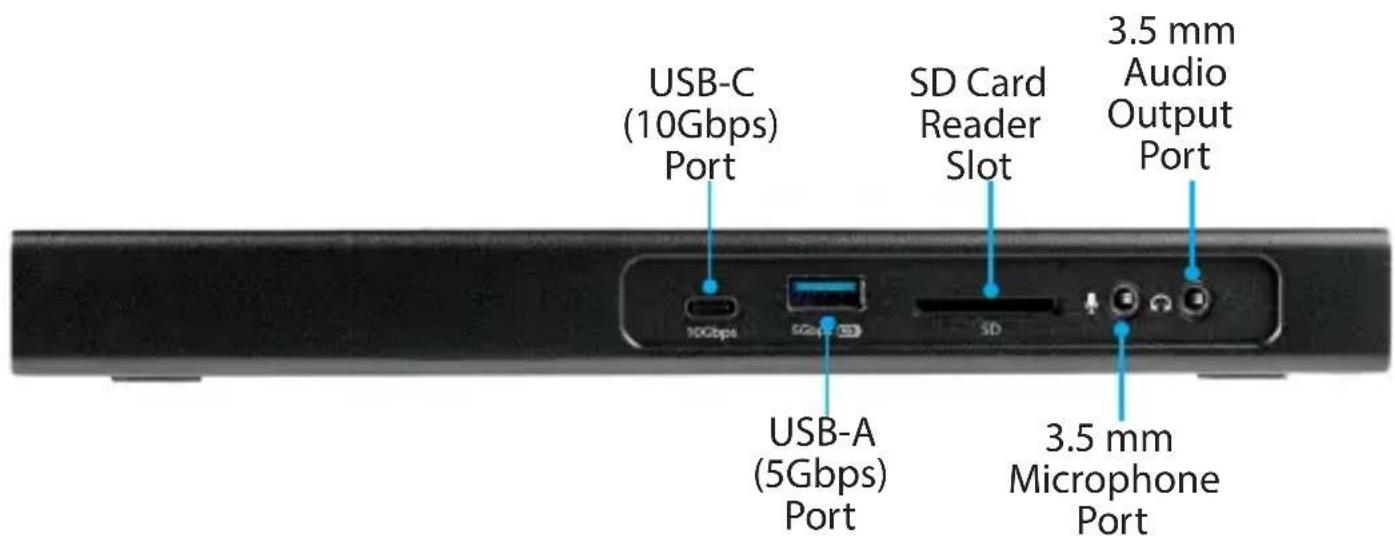
USB-C (10Gbps) Port
The USB-C (10Gbps) Port on the front panel is not a Thunderbolt 3 port. You can use this port to connect peripherals using USB 3.0 (10Gbps) technology. This port supports data throughput only. The port does not support DP Alt Mode or USB Power Delivery.
Note: This USB-C Port will charge at up to 3A when the Docking Station is connected to Host Laptop through the Thunderbolt 3 Host Port.
- Connect a USB-C cable to the USB-C (10Gbps) Port on the front of the Docking Station.
- Connect the other end of the USB-C cable to a USB-C port on your compatible device.
USB-A (5Gbps) Port
The USB-A (5Gbps) Port on the front of the Docking Station can be used to connect compatible USB devices. These ports can be used to connect media devices (External Media Drive) or can be used to connect peripheral devices for use with the connected Host (e.g. Keyboard, Mouse, Web Camera, etc.).
The USB-A (5Gbps) Fast-Charge and Sync Port on the front panel of the Docking
To view manuals, videos, drivers, downloads, technical drawings, and more visit www.startech.com/support
Station is compliant with USB Battery Charging Specification Revision 1.2 (BC 1.2), which means that you can use the USB-A (5Gbps) Port to connect and charge a device faster than you can using a traditional standard USB 3.0 port.
- Connect a USB-A cable into the USB-A Port on the front on the Docking Station.
- Connect the other end of the USB-A cable into a USB port on your compatible device.
SD Card Reader Slot
Installation
- Gently insert your memory card into the SD Card Reader Slot, with the label side facing upward.
Note: The card does not need to be forced into place. - Your computer system will automatically detect the card and install the required driver software.
- To access the content on the SD Card, follow the instructions specific to the OS that you're running.
SD Card Removal
Windows
- On your desktop, click the Safely Remove Hardware icon.
- In the list that appears, click the SD Card.
- When a message appears saying that it's safe to do so, remove the SD Card from the Docking Station by gently pulling it out of the SD Card Reader Slot.
Caution! If you remove the SD Card before it's safe to do so, you could experience lost or corrupted data on your memory card.
macOS
- Close any open windows that list the contents of the SD Card.
- On your desktop, click and drag the USB storage icon to the trash can
To view manuals, videos, drivers, downloads, technical drawings, and more visit www.startech.com/support
icon.
- Wait ten seconds and then remove the SD Card from the Docking Station by gently pulling it out of the SD Card Reader Slot.
Caution! If you remove the SD Card before it is safe to do so, you could experience lost or corrupted data on your memory card.
3.5 mm Microphone Port
- Connect a 3.5 mm Audio Cable to the 3.5 mm Microphone Port on the Docking Station.
- Connect the other end of the 3.5 mm Audio Cable to your Microphone.
3.5 mm Audio Output Port
- Connect the 3.5 mm Audio Cable from your Speakers, Headphones, etc. to the 3.5 mm Audio Output Port on the Docking Station.
Rear Ports
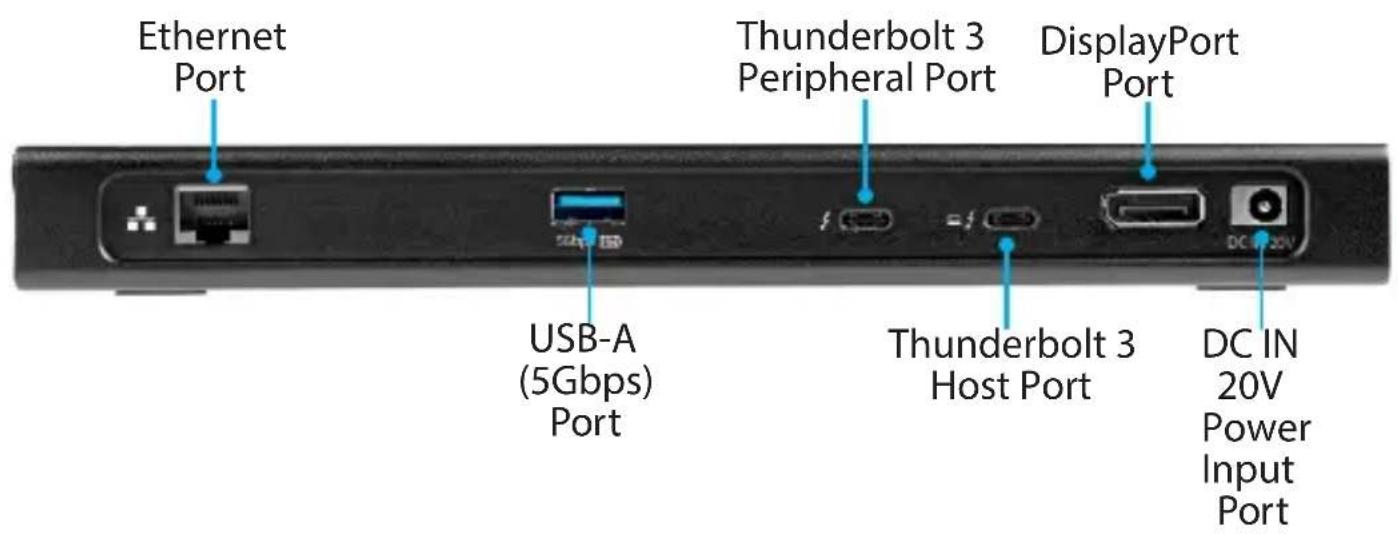
USB-A Port
The USB-A port on the rear of the Docking Station can be used to connect compatible USB devices. These ports can be used to connect media devices (External Media Drive) or can be used to connect peripheral devices for use with the connected Host (e.g. Keyboard, Mouse, Web Camera, etc.).
The USB-A (5Gbps) Fast-Charge and Sync Port on the rear panel of the Docking Station is compliant with USB Battery Charging Specification Revision 1.2 (BC 1.2), which means that you can use the USB-A (5Gbps) Port to connect and charge a device faster than you can using a traditional standard USB 3.0 port.
- Connect a USB-A cable to the USB-A port on the rear of the Docking Station.
- Connect the other end of the USB-A cable to a USB port on your compatible device.
Ethernet Port
- Connect a CAT5e/CAT6 cable's RJ-45 connector to the Ethernet Port on the rear side of the Docking Station.
To view manuals, videos, drivers, downloads, technical drawings, and more visit www.startech.com/support
- Connect the other RJ45 connector to an RJ45 port on your compatible Network Device.
Thunderbolt 3 Peripheral Port
The USB-C ports on the rear panel are Thunderbolt 3 ports with a USB-C connector. The Thunderbolt 3 Peripheral Port can be used to connect a second display through the Thunderbolt 3 port or a USB-C port. When used as a USB-C port, you can connect peripherals using USB 3.1 Gen 2 (10Gbps) technology. This port supports DP Alt Mode and USB Power Delivery with up to 15 Watts of power.
- Connect a USB-C Cable or Thunderbolt 3 Cable to the Thunderbolt 3 Peripheral Port on the rear of the Docking Station.
- Connect the other end of the USB-C or Thunderbolt 3 Cable to a USB port on your compatible device.
Thunderbolt 3 Host Port
The USB-C ports on the rear panel are Thunderbolt 3 ports with a USB-C connector. This port will function as the Host Port for connecting to your Computer. This port supplies up to 85 Watts of power.
Note: This port is recommended for charging as it outputs more power.
- Connect a USB-C Thunderbolt 3 Cable to the Thunderbolt 3 Host Port on the rear of the Docking Station.
Note: Ensure you are connecting to the Host Port. This port is indicated by the small computer icon next to the Thunderbolt 3 icon.
- Connect the other end of the USB-C Thunderbolt 3 Cable to a Thunderbolt 3 Port on your Computer.
DisplayPort Port
This DisplayPort Port (DisplayPort Revision 1.2) is designed to be used with a second Display for the Docking Station.
- Connect a DisplayPort (male to male) cable to the DisplayPort Port on the rear of the Docking Station.
To view manuals, videos, drivers, downloads, technical drawings, and more visit www.startech.com/support
- Connect the other end of the DisplayPort Cable to the DisplayPort port on your DisplayPort Enabled Display Device.
Power Input Port
See Powering section for more details.
Ports on the Bottom
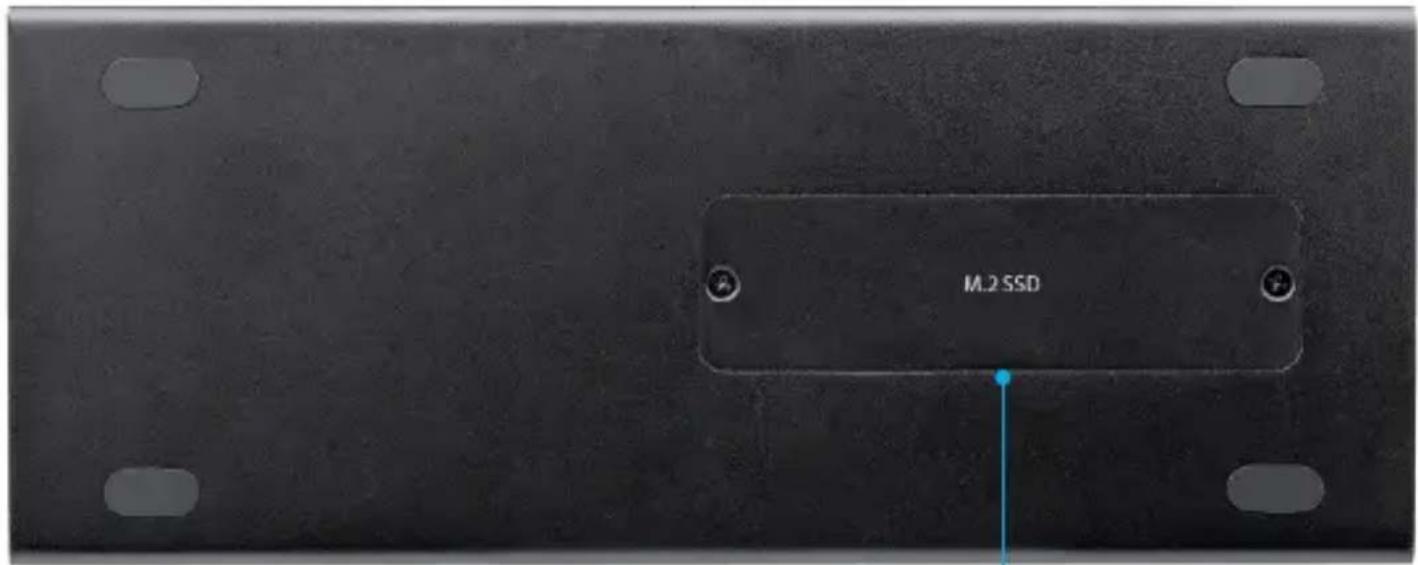
M.2 SSD Slot
The M.2 SSD Slot will house an NVMe PCIe 3.0 internal Solid State Drive. The M-key connector type is compatible with a 22 x 80 mm (2280) M.2 Drive.
Note: SSD Drives require careful handling. If you are not careful with your SSD Drive, lost data may result. Always handle your drive with caution. Be sure that you are properly grounded or discharge yourself of any static electricity build-ups by touching a large grounded metal surface for several seconds before handling your M.2 Drive.
- Turn the Docking Station upside down.
-
Remove the panel on the bottom of the Docking Station:
-
Remove the two screws using a Phillips Head Screwdriver.
-
Carefully flip the Docking Station to release the panel.
-
Remove the Holding Screw for the M.2 Drive using a Phillips Head Screwdriver.
-
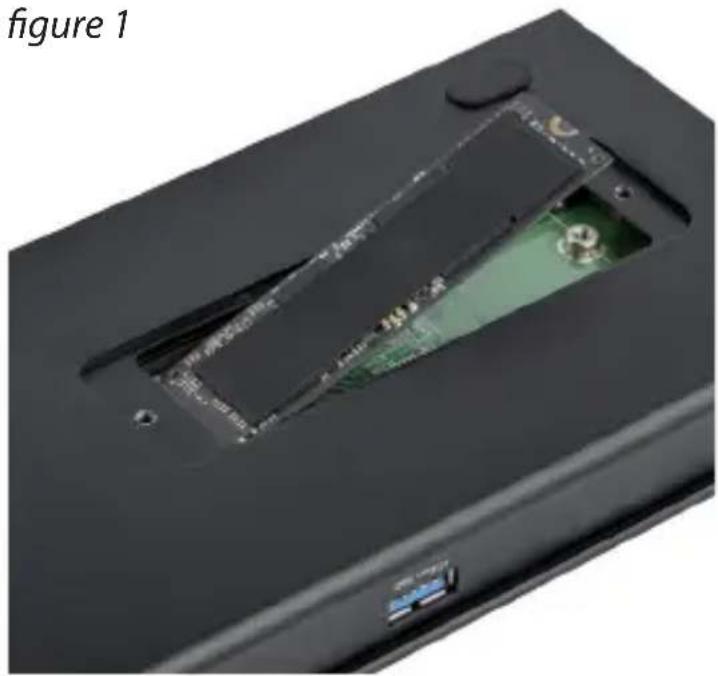
Slide your M.2 Drive into the M-key socket at a 45 degree angle. Note: Ensure your drive is properly seated, with the pins making full contact, before proceeding to the next step. (figure 1)
To view manuals, videos, drivers, downloads, technical drawings, and more visit www.startech.com/support
natural_image
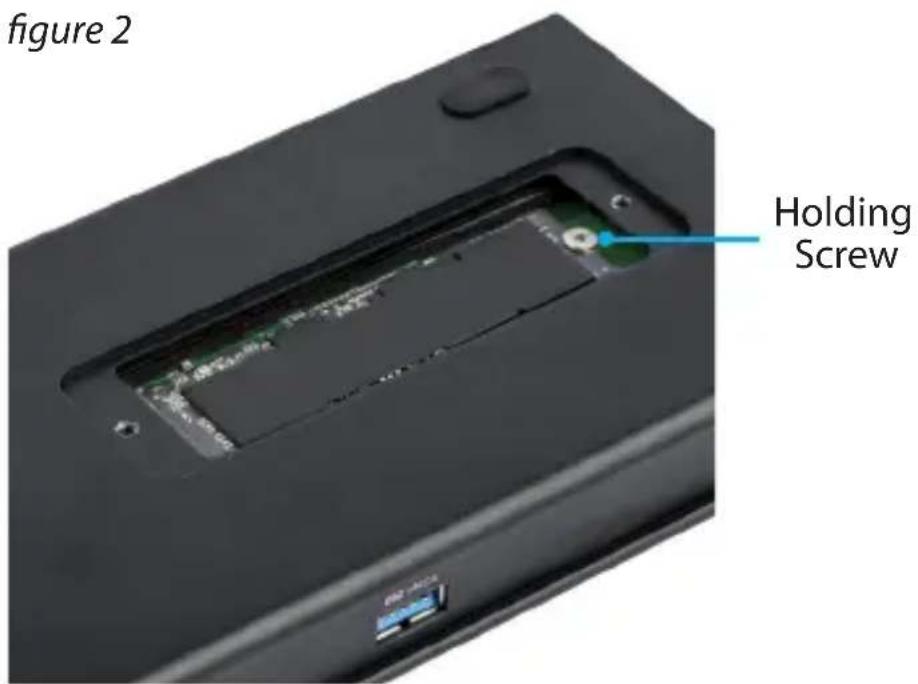
Close-up of a black electronic device casing with visible internal circuit board and connector (no text or symbols)- Gently press down on the M.2 drive until the notch on your M.2 Drive is aligned with the hole for the Holding Screw. Hold the drive in place.
- Secure your M.2 Drive in place by replacing the Holding Screw that was removed in step 3, using a Phillips Head Screwdriver. (figure 2)
To view manuals, videos, drivers, downloads, technical drawings, and more visit www.startech.com/support
- Replace the panel that was removed in step 1 by placing the panel back onto the Docking Station.
- Screw in the two screws that were removed in step one, using a Phillips Head Screwdriver.
Powering
- Connect the Power Cord to the DC IN 20V Power Input Port.
- Connect the other end of the Power Cord to the Universal Power Adapter.
- Connect the Universal Power Adapter to an appropriate power source.
Driver Installation
Install Drivers in Windows 7/8.1/10
When the Docking Station is powered and connected to your laptop, and your laptop has established a network connection, the required drivers will install automatically.
You may see a pop-up message requesting permission to allow the Docking Station to connect to your computer. If a pop-up message appears, do the following:
- Click on the pop-up message.
- Click Always Connect.
- Click OK.
- Follow any other on-screen instructions to complete the installation.
(Optional) Install Ethernet drivers
- Download the latest driver. Use a web browser and navigate to www.StarTech.com/TB3DK2DPM2.
- Click the Support tab.
- Download the Network Card driver.
To view manuals, videos, drivers, downloads, technical drawings, and more visit www.startech.com/support
-
When the download is complete, extract the contents of the compressed file that you downloaded.
-
Navigate to the location where you extracted the driver contents, and open the Windows folder.
-
Double-click the Setup.exe file and follow the on-screen instructions to complete the Ethernet driver installation process.
Display Configuration
Connect HDMI, DVI and VGA Displays
Notes:
- Connect an active adapter to the DisplayPort Port.
- This port does not support Multimode DisplayPort so an active adapter is required.
• The Docking Station lets you connect two 4K displays.
- The maximum available resolution may be limited if your display is connected through a video adapter. Check the documentation of the video adapter to determine its maximum supported resolution.
You can use adapters to connect HDMI, DVI, or VGA displays to the Thunderbolt 3 Peripheral Port and USB Type-C Port:
Connect Multiple Thunderbolt 3 Displays
You can also set up dual displays using multiple Thunderbolt 3 Enabled Displays in a daisy-chain configuration. For example, you can connect a Thunderbolt 3 Enabled Display to the Thunderbolt 3 Peripheral Port on the Docking Station. You can then connect another Thunderbolt 3 device, such as a second Thunderbolt 3 Enabled Display, through the first Thunderbolt 3 Enabled Display.
Note: A maximum of 2 Displays can be used with each Thunderbolt 3 Port.
To view manuals, videos, drivers, downloads, technical drawings, and more visit www.startech.com/support
Configure Displays
Use your Windows operating system to adjust display settings for multiple monitors. Your laptop hardware must support dual external displays through its Thunderbolt 3 port.
Supported Video Resolutions
The Docking Station supports the following maximum resolutions:
| Number of Displays | Ports Maximum Resolution | |
| 1 DisplayPort Port 4096 x 2160p | ||
| 1 | Thunderbolt 3 Peripheral Port | 4096 x 2160p (60Hz) |
| 2 | DisplayPort Port and Thunderbolt 3 Peripheral Port | 4096 x 2160p |
- Depending on the configuration and the supported resolutions of your connected monitor(s), the Docking Station can support video resolutions lower than specified above.
• Video output capabilities are dependent on the video card and hardware specifications of your connected host laptop.
Video Resolution and Bandwidth Allocation
Thunderbolt technology carries video and data bandwidth, and it prioritizes video bandwidth to help ensure seamless display performance. The performance of the remaining dock ports (for example, the USB 3.0 ports) depends entirely on the display and I/O (input and output) configuration that you have used.
When multiple high-resolution displays are connected, the Docking Station
To view manuals, videos, drivers, downloads, technical drawings, and more visit www.startech.com/support
needs to allocate additional bandwidth to the displays, and the extra bandwidth is reallocated from the other I/O ports on the docking station. In this situation there is less bandwidth available for the remaining ports (for example, the USB 3.0 ports).
The bandwidth allocation table outlines the approximate download bandwidth allocation values. The allocation amount depends on the number and the resolution of your connected displays.
- The bandwidth values are approximate and depend on several variables including the number, type, resolution, and refresh rate of your connected display(s).
- When connecting a display to one of the Thunderbolt 3 Ports, a USB-C video adapter may be required, depending on the input of your display.
| Video and I/O Configuration | DisplayPort Resolution | Thunderbolt 3 USB-C Resolution | I/O Bandwidth Remaining |
| Data only(No Displays) | N/A N/A | Download: 22GbpsUpload: 22Gbps | |
| DisplayPort(Single Display - 4K) | 4096 x 2160p(4K) | N/A | Download: 22GbpsUpload: 22Gbps |
| Thunderbolt 3USB-C(Single Display - 4K) | N/A | 4096 x 2160p(4K - 60Hz) | Download: 22GbpsUpload: 22Gbps |
| DisplayPort and Thunderbolt 3USB-C(Two Displays - Dual-4K ) | 4096 x 2160p(4K) | 4096 x 2160p(4K) | Download: 8GbpsUpload: 22Gbps |
To view manuals, videos, drivers, downloads, technical drawings, and more visit www.startech.com/support
Operation
LED Indicators
Power:
Solid LED (White)
- Indicates that the Docking Station is active (the Power Cord is correctly connected to an AC Electrical Outlet).
LED Off
- Indicates that the Power Cord is not correctly connected to an AC Electrical Outlet or the Docking Station is not receiving power.
Charge a Device
If you're only using the front USB-A (5Gbps) Port to charge a device, a connection to a Host Laptop isn't required.
• To charge a device, connect it to the USB-A Port on the front or rear of the Docking Station.
- The Thunderbolt 3 Peripheral Port will also support battery charging up to 15W.
Note: This front and rear USB-A (5Gbps) Ports can only fast-charge connected devices that comply with USB Battery Charging Specification Revision 1.2.
To view manuals, videos, drivers, downloads, technical drawings, and more visit www.startech.com/support
Use of Trademarks, Registered Trademarks, and other Protected Names and Symbols
This manual may make reference to trademarks, registered trademarks, and other protected names and/or symbols of third-party companies not related in any way to StarTech.com. Where they occur these references are for illustrative purposes only and do not represent an endorsement of a product or service by StarTech.com, or an endorsement of the product(s) to which this manual applies by the third-party company in question. Regardless of any direct acknowledgement elsewhere in the body of this document, StarTech.com hereby acknowledges that all trademarks, registered trademarks, service marks, and other protected names and/or symbols contained in this manual and related documents are the property of their respective holders.
Thunderbolt and the Thunderbolt logo are trademarks of Intel Corporation or its subsidiaries in the U.S. and/or other countries.
Technical Support
StarTech.com's lifetime technical support is an integral part of our commitment to provide industry-leading solutions. If you ever need help with your product, visit www.startech.com/support and access our comprehensive selection of online tools, documentation, and downloads.
For the latest drivers/software, please visit www.startech.com/downloads
Warranty Information
This product is backed by a three-year warranty.
StarTech.com warrants its products against defects in materials and workmanship for the periods noted, following the initial date of purchase. During this period, the products may be returned for repair, or replacement with equivalent products at our discretion. The warranty covers parts and labor costs only.
StarTech.com does not warrant its products from defects or damages arising from misuse, abuse, alteration, or normal wear and tear.
Limitation of Liability
In no event shall the liability of StarTech.com Ltd. and StarTech.com USA LLP (or their officers, directors, employees or agents) for any damages (whether direct or indirect, special, punitive, incidental, consequential, or otherwise), loss of profits, loss of business, or any pecuniary loss, arising out of or related to the use of the product exceed the actual price paid for the product.
Some states do not allow the exclusion or limitation of incidental or consequential damages. If such laws apply, the limitations or exclusions contained in this statement may not apply to you.
Hard-to-find made easy. At StarTech.com, that isn't a slogan. It's a promise.
StarTech.com is your one-stop source for every connectivity part you need. From the latest technology to legacy products — and all the parts that bridge the old and new — we can help you find the parts that connect your solutions.
We make it easy to locate the parts, and we quickly deliver them wherever they need to go. Just talk to one of our tech advisors or visit our website. You'll be connected to the products you need in no time.
Visit www.startech.com for complete information on all StarTech.com products and to access exclusive resources and time-saving tools.
StarTech.com is an ISO 9001 Registered manufacturer of connectivity and technology parts. StarTech.com was founded in 1985 and has operations in the United States, Canada, the United Kingdom and Taiwan servicing a worldwide market.
Reviews
Share your experiences using StarTech.com products, including product applications and setup, what you love about the products, and areas for improvement.
Websites
FR: fr.startech.com
NL: nl.startech.com
DE: de.startech.com
IT: it.startech.com
ES: es.startech.com
JP: jp.startech.com



- Thunderbolt™ 3 Dual-4K Docking Station for Laptops - PCIe M.2 SSD - SD 4.0
- Compliance Statements
- FCC Compliance Statement
- Industry Canada Statement
- Safety Statements
- Safety Measures
- Mesures de sécurité
- Table of Contents
- Product Diagram
- Bottom View
- Product Information
- Package Contents
- Requirements
- Power:
- Laptop:
- Display:
- USB Peripherals:
- Thunderbolt 3 Peripherals:
- SD Card:
- M.2 Drive:
- Audio:
- Operating Systems:
- Installation
- Connecting
- Front Ports
- USB-C (10Gbps) Port
- USB-A (5Gbps) Port
- SD Card Reader Slot
- SD Card Removal
- Windows
- macOS
- mm Microphone Port
- mm Audio Output Port
- Rear Ports
- USB-A Port
- Ethernet Port
- Thunderbolt 3 Peripheral Port
- Thunderbolt 3 Host Port
- DisplayPort Port
- Power Input Port
- Ports on the Bottom
- M.2 SSD Slot
- Powering
- Driver Installation
- Install Drivers in Windows 7/8.1/10
- (Optional) Install Ethernet drivers
- Display Configuration
- Connect HDMI, DVI and VGA Displays
- Notes:
- Connect Multiple Thunderbolt 3 Displays
- Configure Displays
- Supported Video Resolutions
- Video Resolution and Bandwidth Allocation
- Operation
- LED Indicators
- Solid LED (White)
- LED Off
- Charge a Device
- Use of Trademarks, Registered Trademarks, and other Protected Names and Symbols
- Technical Support
- Warranty Information
- Limitation of Liability
- Reviews
- Websites
Brand : StarTech.com
Model : TB3DK2DPM2
Category : Computer Accessories