
Mellanox ConnectX-5 - Network card / adapter NVIDIA - Free user manual and instructions
Find the device manual for free Mellanox ConnectX-5 NVIDIA in PDF.


| Product Type | Network Card / Adapter (Ethernet) |
| Brand | NVIDIA (Mellanox) |
| Model | ConnectX-5 Ex (variants: MCX516A-BDAT, MCX515A-GCAT, MCX516A-GCAT, MCX515A-CCAT, MCX516A-CCAT, MCX516A-CDAT) |
| Form Factor | Low profile, PCIe x16 |
| Dimensions | 68.90 mm x 142.24 mm (2.71 in x 5.6 in) |
| Weight | Approximately 200 g (typical for similar adapters) |
| Power Consumption (Typical) | 14.7 W to 19.3 W depending on model |
| Power Consumption (Maximum) | Up to 29.0 W with active cables (MCX516A-CDAT) |
| Data Rates Supported | 1/10/25/40/50/56/100 Gb/s Ethernet |
| Connector Type | Single or Dual QSFP28 (copper and optical) |
| PCI Express Interface | PCIe Gen 3.0 (8 GT/s) or Gen 4.0 (16 GT/s) x16 |
| Key Features | RDMA over Converged Ethernet (RoCE), SR-IOV, NVGRE/VXLAN offload, OVS offload (ASAP2), PeerDirect, Tag Matching, Adaptive Routing |
| Operating Systems Supported | Linux (RHEL/CentOS, Ubuntu, etc.), Windows Server 2012/2016, VMware ESXi 6.5, FreeBSD |
| Firmware Update | Via mlxup utility or integrated driver installation; automatic update available |
| LED Indicators | Bi-color I/O LED per port: Off (no link), Solid Green (link no traffic), Blinking Green (active traffic), Blinking Amber (error) |
| Operating Temperature | 0°C to 55°C |
| Storage Temperature | -40°C to 70°C |
| Humidity | 90% relative humidity (non-condensing) |
| Safety Certifications | CB, cTUVus, CE; Class 1 Laser Product (IEC 60825-1) |
| EMC Certifications | CE, FCC, VCCI, ICES, RCM |
| RoHS Compliance | RoHS R6 |
| Maintenance | Handle with ESD precautions; clean only with dry cloth when unplugged; do not use liquids |
| Spare Parts / Repairability | Bracket (tall/short) replaceable; no user-serviceable internal parts; contact support for firmware or hardware issues |
Frequently Asked Questions - Mellanox ConnectX-5 NVIDIA
./mlnxofedinstall as root. The package includes drivers and firmware.lspci | grep Mellanox. On Windows, open Device Manager and expand 'Network adapters' to see 'Mellanox ConnectX-5 Adapter'. On VMware, use esxcli software vib list../mlxup and answer 'y' to update. The utility can also be integrated into driver installation. A reboot is required after update.User questions about Mellanox ConnectX-5 NVIDIA
0 question about this device. Answer the ones you know or ask your own.
Ask a new question about this device
Download the instructions for your Network card / adapter in PDF format for free! Find your manual Mellanox ConnectX-5 - NVIDIA and take your electronic device back in hand. On this page are published all the documents necessary for the use of your device. Mellanox ConnectX-5 by NVIDIA.
USER MANUAL Mellanox ConnectX-5 NVIDIA
Mellanox ConnectX®-5 Ex Ethernet Single and Dual QSFP28 Port Adapter Cards User Manual
P/N:
MCX516A-BDAT, MCX515A-GCAT, MCX516A-GCAT, MCX515A-CCAT, MCX516A-CCAT, MCX516A-CDAT
Rev 1.6
NOTE:
THIS HARDWARE, SOFTWARE OR TEST SUITE PRODUCT (PRODUCT(S)) AND ITS RELATED DOCUMENTATION ARE PROVIDED BY MELLANOX TECHNOLOGIES AS-IS-WITH ALL FAULTS OF ANY KIND AND SOLELY FOR THE PURPOSE OF AIDING THE CUSTOMER IN TESTING APPLICATIONS THAT USE THE PRODUCTS IN DESIGNATED SOLUTIONS. THE CUSTOMER'S MANUFACTURING TEST ENVIRONMENT HAS NOT MET THE STANDARDS SET BY MELLANOX TECHNOLOGIES TO FULLY QUALIFY THE PRODUCT(S) AND/OR THE SYSTEM USING IT. THEREFORE, MELLANOX TECHNOLOGIES CANNOT AND DOES NOT GUARANTEE OR WARRANTY THAT THE PRODUCTS WILL OPERATE WITH THE HIGHEST QUALITY. ANY EXPRESS OR IMPLIED WARRANTIES, INCLUDING, BUT NOT LIMITED TO, THE IMPLIED WARRANTIES OF MERCHANTABILITY, FITNESS FOR A PARTICULAR PURPOSE AND NONINFRINGEMENT ARE DISCLAIMED. IN NO EVENT SHALL MELLANOX BE LIABLE TO CUSTOMER OR ANY THIRD PARTIES FOR ANY DIRECT, INDIRECT, SPECIAL, EXEMPLARY, OR CONSEQUENTIAL DAMAGES OF ANY KIND (INCLUDING, BUT NOT LIMITED TO, PAYMENT FOR PROCUREMENT OF SUBSTITUTE GOODS OR SERVICES; LOSS OF USE, DATA, OR PROFITS; OR BUSINESS INTERRUPTION) HOWEVER CAUSED AND ON ANY THEORY OF LIABILITY, WHETHER IN CONTRACT, STRICT LIABILITY, OR TORT (INCLUDING NEGLIGENCE OR OTHERWISE) ARISING IN ANY WAY FROM THE USE OF THE PRODUCT(S) AND RELATED DOCUMENTATION EVEN IF ADVISED OF THE POSSIBILITY OF SUCH DAMAGE.

Mellanox Technologies
350 Oakmead Parkway Suite 100
Sunnyvale, CA 94085
U.S.A.
www.mellanox.com
Tel: (408) 970-3400
Fax: (408) 970-3403
© Copyright 2018. Mellanox Technologies Ltd. All Rights Reserved.
Mellanox®, Mellanox logo, Accelio®, BridgeX®, CloudX logo, CompustorX®, Connect-IB®, ConnectX®, CoolBox®, CORE-Direct®, EZchip®, EZchip logo, EZappliance®, EZdesign®, EZdriver®, EZsystem®, GPUDirect®, InfiniHost®, InfiniBridge®, InfiniScale®, LinkX®, Kotura®, Kotura logo, Mellanox CloudRack®, Mellanox CloudXMellanox® Mellanox Federal Systems® Mellanox HostDirect® Mellanox MultiHost®, Mellanox Open Ethernet® Mellanox OpenCloud® Mellanox OpenCloud Logo® Mellanox PeerDirect® Mellanox ScalableHPC®, Mellanox StorageX®, Mellanox TuneX®, Mellanox Connect Accelerate Outperform logoMellanox Virtual Modular Switch®, MetroDX®, MetroX®, MLNX-OS®, NP-1c®, NP-2®, NP-3®, NPS®, Open Ethernet logo, PhyX®, PlatformX®, PSIPHY®, SiPhy®, StoreX®, SwitchX®, Tilera®, Tilera logo, TestX®, TuneX®, The Generation of Open Ethernet logo UFM®, Unbreakable Link® Virtual Protocol Interconnect® Voltaire® and Voltaire logo are registered trademarks of Mellanox Technologiestd.
All other trademarks are property of their respective owners
For the most updated list of Mellanox trademarks visit http://www.mellanox.com/page/trademarks
Table of Contents
Table of Contents 1
List of Tables 4
List of Figures 5
Revision History 6
About This Manual 7
Intended Audience 7
Chapter 1 Introduction....9
1.1 Product Overview.... 9
1.2 Features and Benefits.... 11
1.3 Operating Systems/Distributions 12
1.4 Connectivity 12
Chapter 2 Interfaces ....13
2.1 Ethernet QSFP28 Interface 13
2.2 PCI Express Interface 13
2.3 LED Interface.... 13
Chapter 3 Hardware Installation ..... 14
3.1 System Requirements 14
3.1.1 Hardware.... 14
3.2 Operating Systems/Distributions 14
3.2.1 Software Stacks.... 14
3.3 Safety Precautions 14
3.4 Pre-Installation Checklist 14
3.5 Bracket Installation Instructions 15
3.5.1 Removing the Existing Bracket.... 15
3.5.2 Installing the New Bracket 15
3.6 Card Installation Instructions.... 15
3.7 Cables and Modules 17
3.7.1 Cable Installation.... 17
3.8 Adapter Card Un-installation Instructions 18
3.8.1 Safety Precautions 18
3.8.2 Card Un-installation 18
3.9 Identify the Card in Your System.... 19
3.9.1 On Windows 19
3.9.2 On Linux 21
Chapter 4 Driver Installation ....22
4.1 Linux.... 22
4.1.1 Hardware and Software Requirements.... 22
4.1.2 Downloading Mellanox OFED.... 22
4.1.3 Installing Mellanox OFED 23
4.1.3.1 Installation Script....23
4.1.3.2 Installation Procedure.... 25
4.1.3.3 Installation Results 27
4.1.3.4 Installation Logging 27
4.1.3.5 openibd Script 28
4.1.3.6 Driver Load Upon System Boot.... 28
4.1.3.7 mInxofedinstall Return Codes....29
4.1.4 Uninstalling Mellanox OFED.... 29
4.1.5 Installing MLNX\_OFED Using YUM.... 29
4.1.5.1 Setting up MLNX_OFED YUM Repository 29
4.1.5.2 Installing MLNX_OFED Using the YUM Tool 30
4.1.5.3 Uninstalling Mellanox OFED Using the YUM Tool.... 32
4.1.5.4 Installing MLNX_OFED Using apt-get Tool.... 32
4.1.5.5 Setting up MLNX_OFED apt-get Repository 32
4.1.5.6 Installing MLNX_OFED Using the apt-get Tool 33
4.1.5.7 Uninstalling Mellanox OFED Using the apt-get Tool.... 34
4.1.6 Updating Firmware After Installation 34
4.1.6.1 Updating the Device Online 34
4.1.6.2 Updating the Device Manually 34
4.1.6.3 Updating the Device Firmware Automatically upon System Boot ..... 35
4.1.7 UEFI Secure Boot.... 35
4.1.7.1 Enrolling Mellanox's x.509 Public Key On your Systems 35
4.1.7.2 Removing Signature from kernel Modules 36
4.1.8 Performance Tuning 37
4.2 Windows Driver 38
4.2.1 Hardware and Software Requirements.... 38
4.2.2 Downloading Mellanox WinOF-2 Driver 38
4.2.3 Installing Mellanox WinOF-2 Driver.... 39
4.2.3.1 Attended Installation.... 39
4.2.3.2 Unattended Installation 45
4.2.4 Installation Results 45
4.2.5 Extracting Files Without Running Installation.... 46
4.2.6 Uninstalling Mellanox WinOF-2 Driver 49
4.2.6.1 Attended Uninstallation 49
4.2.6.2 Unattended Uninstallation 49
4.2.7 Firmware Upgrade 49
4.2.8 Deploying the Driver on a Nano Server.... 49
4.2.8.1 Offline Installation.... 49
4.2.8.2 Online Update 50
4.3 VMware Driver 51
4.3.1 Hardware and Software Requirements.... 51
4.3.2 Installing Mellanox NATIVE ESXi Driver for VMware vSphere.... 51
4.3.3 Removing the Previous Mellanox Driver.... 52
4.3.4 Firmware Programming 52
Chapter 5 Updating Adapter Card Firmware....53
5.1 Firmware Update Example 53
Chapter 6 Troubleshooting....54
6.1 General 54
6.2 Linux.... 55
6.3 Windows 56
Chapter 7 Specifications ....57
7.1 MCX516A-BDAT Specifications 57
7.2 MCX515A-GCAT Specifications 58
7.3 MCX516A-GCAT Specifications 59
7.4 MCX515A-CCAT Specifications 60
7.5 MCX516A-CCAT Specifications 61
7.6 MCX516A-CDAT Specifications 62
7.7 Airflow Specifications.... 63
7.8 Adapter Card LED Operations 63
7.9 Board Mechanical Drawing and Dimensions 64
7.10 Bracket Mechanical Drawing.... 65
Appendix A Finding the MAC and Serial Number on the Adapter Card .... 67
Appendix B Safety Warnings 70
Table 1: Revision History Table....6
Table 2: Documents List....7
Table 3: Dual-port 40Gb/s Ethernet Adapter Cards 9
Table 4: Single and Dual-port 50Gb/s Ethernet Adapter Cards ....10
Table 5: Single and Dual-port 100Gb/s Ethernet Adapter Cards ....10
Table 6: Features ....11
Table 7: Hardware and Software Requirements....22
Table 8: Installation Results....27
Table 9: mInxofedinstall Return Codes....29
Table 10: Hardware and Software Requirements....38
Table 11: Software and Hardware Requirements....51
Table 12: General Troubleshooting....54
Table 13: Linux Troubleshooting....55
Table 14: Windows Troubleshooting ....56
Table 15: MCX516A-BDAT Specification Table .....57
Table 16: MCX515A-GCAT Specification Table .....58
Table 17: MCX516A-GCAT Specification Table .....59
Table 18: MCX515A-CCAT Specification Table 60
Table 19: MCX516A-CCAT Specification Table 61
Table 20: MCX516A-CDAT Specification Table 62
Table 21: Airflow Specifications ....63
Table 22: Physical and Logical Link Indications (Ethernet Mode)....63
List of Figures
Figure 1: PCI Device (Example) 20
Figure 2: Installation Results ....46
Figure 3: Mechanical Drawing of the Dual-port Adapter Cards 64
Figure 4: Single-port Tall Bracket 65
Figure 5: Dual-port Tall Bracket 66
Figure 6: MCX516A-BDAT Board Label (Example) 67
Figure 7: MCX515A-GCAT Board Label (Example) 67
Figure 8: MCX516A-GCAT Board Label (Example) 68
Figure 9: MCX515A-CCAT Board Label (Example) 68
Figure 10: MCX516A-CCAT Board Label Example) 68
Figure 11: MCX516A-CDAT Board Label (Example) 69
Revision History
This document was printed on April 24, 2018.
Table 1 - Revision History Table
| Date Rev | Comments/Changes | |
| January 2018 | 1.6 | Added a note to Hardware on page 14. |
| November 2017 | 1.5 | Updated Adapter LED Operations Airflow Specifications on page 67 |
| September 2017 | 1.4 | Added MCX516A-BDAT support across document and added the following:Dual-port 40Gb/s Ethernet Adapter Cards on page 9MCX516A-BDAT Specifications on page 57MCX516A-BDAT Board Label (Example) on page 67.Updated the following sections:Linux on page 22MCX515A-GCAT Specification Table on page 58MCX516A-GCAT Specification Table on page 59MCX515A-CCAT Specification Table on page 60MCX516A-CCAT Specification Table on page 61Airflow Specifications on page 63 |
| August 2017 | 1.3 | Added MCX515A-GCAT and MCX516A-GCAT support across document and added the following:Single and Dual-port 50Gb/s Ethernet Adapter Cards on page 10.MCX516A-BDAT Specifications on page 58MCX516A-GCAT Specifications on page 60Mechanical Drawing of the Single-port Adapter Cards on page 66Single-port Tall Bracket on page 65MCX516A-BDAT Board Label (Example) on page 67MCX516A-GCAT Board Label (Example) on page 68Updated the following specifications tables:MCX515A-CCAT Specifications on page 60MCX516A-CCAT Specifications on page 61MCX516A-CDAT Specifications on page 62 |
| July 2017 | 1.2 | Updated the following specifications tables:MCX515A-CCAT Specifications on page 67MCX516A-CCAT Specifications on page 68MCX516A-CDAT Specifications on page 69Updated Adapter LED Operations Airflow Specifications on page 67 |
| April 2017 | 1.1 | Updated Product Overview on page 9Updated Card Installation Instructions on page 15 |
| April 2018 | 1.0 First | Draft |
| March 2017 | 1.0 First | release |
About This Manual
This User Manual describes Mellanox Technologies ConnectX®-5 Ethernet Single and Dual QSFP28 port PCI Express x16 adapter cards. It provides details as to the interfaces of the board, specifications, required software and firmware for operating the board, and relevant documentation.
Intended Audience
This manual is intended for the installer and user of these cards.
The manual assumes basic familiarity with Ethernet network and architecture specifications.
Related Documentation
Table 2 - Documents List
| Mellanox Firmware Tools (MFT) User Manual Document no. 2204UG | User Manual describing the set of MFT firmware management tools for a single node.Seehttp://www.mellanox.com=>Products =>Software =>Firmware Tools |
| Mellanox Firmware Utility (mlxup) User Manual and Release Notes | Mellanox firmware update and query utility used to update the firmware.Seehttp://www.mellanox.com=>Products =>Software =>Firmware Tools =>mlxup Firmware Utility |
| Mellanox OFED for LinuxUser ManualDocument no. 2877 | User Manual describing OFED features, performance, Band diagnostic, tools content and configuration.Seehttp://www.mellanox.com=>Products =>Software =>InfiniBand/VPI Drivers =>Mellanox OpenFabrics Enterprise Distribution for Linux (MLNX_OFED) |
| Mellanox OFED for Linux Release NotesDocument no. 2877 | Release Notes for Mellanox OFED for Linux driver kit for Mellanox adapter cards:See:http://www.mellanox.com=>Products =>Software =>InfiniBand/VPI Drivers =>Linux SW/Drivers =>Release Notes |
| WinOF-2 for WindowsUser ManualDocument no. MLX-15-3280 | User Manual describing WinOF-2 features, performance, Ethernet diagnostic, tools content and configuration.Seehttp://www.mellanox.com=>Products =>Software =>Windows SW/Drivers |
| Mellanox OFED for Windows Driver Release Notes | Release notes for Mellanox Technologies' MLNX_EN for Linux driver kit for Mellanox adapter cards:Seehttp://www.mellanox.com=>Products =>Software =>Ethernet Drivers =>Mellanox OFED for Windows =>WinOF-2 Release Notes |
| Mellanox VMware for Ethernet User Manual Document no. MLNX-15-4896 | User Manual describing the various components of the Mellanox ConnectX®-4 NATIVE ESXi stack: See =>http://www.mellanox.comProducts =>Software =>Ethernet Drivers =>VMware Driver =>User Manual v4.15.2.0 |
| Mellanox VMware for Ethernet Release Notes | Release notes for Mellanox ConnectX®-4 NATIVE ESXi stack: See =>http://www.mellanox.comSoftware =>Ethernet Drivers =>VMware Driver =>Release Notes |
IEEE Std 802.3 Specification
This is the IEEE Ethernet specification http://standards.ieee.org/getieee802
PCI Express 3.0 Specifications
Industry Standard PCI Express 3.0 Base and Card Electromechanical Specifications https://pcisig.com/specifications
Document Conventions
When discussing memory sizes, MB and MBytes are used in this document to mean size in mega Bytes. The use of Mb or Mbits (small b) indicates size in mega bits. In this document PCIe is used to mean PCI Express.
Technical Support
Customers who purchased Mellanox products directly from Mellanox are invited to contact us through the following methods.
• U R L : http://www.mellanox.com => Support
• E-mail: support@mellanox.com
• Tel: +1.408.916.0055
Customers who purchased Mellanox M-1 Global Support Services, please see your contract for details regarding Technical Support.
Customers who purchased Mellanox products through a Mellanox approved reseller should first seek assistance through their reseller.
Firmware Updates
The Mellanox support downloader contains software, firmware and knowledge database information for Mellanox products. Access the database from the Mellanox Support web page,
http://www.mellanox.com => Support
Or use the following link to go directly to the Mellanox Support Download Assistant page, http://www.mellanox.com/supportdownloader/.
1 Introduction
This is the User Guide for Mellanox Technologies Ethernet adapter cards based on the ConnectX®-5 integrated circuit device. These adapters connectivity provide the highest performing and most flexible interconnect solution for PCI Express Gen 3.0/4.0 servers used in Enterprise Data Centers, High-Performance Computing, and Embedded environments.
This chapter covers the following topics:
• Section 1.1, “Product Overview”, on page 9
• Section 1.2, “Features and Benefits”, on page 11
• Section 1.3, “Operating Systems/Distributions”, on page 12
• Section 1.4, “Connectivity”, on page 12
1.1 Product Overview
The following section provides the ordering part number, port speed, number of ports, and PCI Express speed. Each adapter comes with two bracket heights - short and tall.
Table 3 - Dual-port 40Gb/s Ethernet Adapter Cards
| Ordering Part Number (OPN) | MCX516A-BDAT |
| Data Transmission Rate | Ethernet: 1/10/25/40 Gb/s |
| Network Connector Types | Dual-port QSFP28 |
| PCI Express (PCIe) ScrDes Speed | PCIe Gen 3.0 x16 8.0GT/sPCIe Gen 4.0 x16 16.0GT/sNote: This card has been tested and certified with PCIe 3.0 serv-ers. PCIe 4.0 interface will be tested and certified when servers with Gen 4.0 support become available. |
| RoHS | R6 |
| Adapter IC Part Number | MT28808A0-FCCF-EV |
| Device ID (decimal) | 4121 for Physical Function (PF)4122 for Virtual Function (VF) |
Table 4 - Single and Dual-port 50Gb/s Ethernet Adapter Cards
| Ordering Part Number (OPN) | MCX515A-GCAT - Single-port cardMCX516A-GCAT - Dual-port card |
| Data Transmission Rate | Ethernet: 1/10/25/40/50 Gb/s |
| Network Connector Types | Single and dual-port QSFP28 |
| PCI Express (PCIe) SerDes Speed | PCIe 3.0 x16 8GT/s |
| RoHS | R6 |
| Adapter IC Part Number | MT27808A0-FCCF-EV |
| Device ID (decimal) | 4119 for Physical Function (PF)4120 for Virtual Function (VF) |
Table 5 - Single and Dual-port 100Gb/s Ethernet Adapter Cards
| Ordering Part Number (OPN) | Single-port card: MCX515A-CCATDual-port cards: MCX516A-CCAT, MCX516A-CDAT |
| Data Transmission Rate | Ethernet: 1/10/25/40/50/56/100 Gb/s |
| Network Connector Types | Single and dual-port QSFP28 |
| PCI Express (PCIe) SerDes Speed | MCX515A-CCAT, MCX516A-CCAT: PCIe 3.0 x16 8GT/sNote: PCIe 3.0 x16 bus can supply a maximum bandwidth of 128Gb/s only (=16 * 8GT/s, including overhead), and therefore cannot support 200Gb/s when both network ports of MCX516A-CCAT run at 100Gb/s.MCX516A-CDAT: PCIe 4.0 x16 16GT/sNote: This card has been tested and certified with PCIe 3.0 servers. PCIe 4.0 interface will be tested and certified when servers with Gen 4.0 support become available.Note: PCIe 4.0 x16 bus can supply a maximum bandwidth of 256Gb/s (=16 * 16GT/s, including overhead), and can support 200Gb/s when both network ports of MCX516A-CDAT run at 100Gb/s. |
| RoHS | R6 |
| Adapter IC Part Number | MCX515A-CCAT, MCX516A-CCAT: MT27808A0-FCCF-EVMCX516A-CDAT: MT28808A0-FCCF-EV |
| Device ID (decimal) | MCX515A-CCAT, MCX516A-CCAT: 4119 for Physical Function (PF) and 4120 for Virtual Function (VF)MCX516A-CDAT: 4121 for Physical Function (PF) and 4122 for Virtual Function (VF) |
1.2 Features and Benefits
Table 6 - Features ^a
| PCI Express (PCIe) | Uses PCIe Gen 3.0 (8GT/s) and Gen 4.0 (16GT/s) through an x16 edge connector. Gen 1.1 and 2.0 compatible. |
| Up to 100 Gigabit Ethernet | Mellanox adapters comply with the following IEEE 802.3 standards:- 100GbE/ 50GbE / 40GbE / 25GbE / 10GbE / 1GbE- IEEE 802.3bj, 802.3bm 100 Gigabit Ethernet- IEEE 802.3by, Ethernet Consortium25, 50 Gigabit Ethernet,supporting all FEC modes- IEEE 802.3ba 40 Gigabit Ethernet- IEEE 802.3ae 10 Gigabit Ethernet- IEEE 802.3ap based auto-negotiation and KR startup- Proprietary Ethernet protocols (20/40GBASE-R2, 50GBASE-R4)- IEEE 802.3ad, 802.1AX Link Aggregation- IEEE 802.1Q, 802.1P VLAN tags and priority- IEEE 802.1Qau (QCN)- Congestion Notification- IEEE 802.1Qaz (ETS)- IEEE 802.1Qbb (PFC)- IEEE 802.1Qbg- IEEE 1588v2- Jumbo frame support (9.6KB) |
| Memory | PCI Express - stores and accesses Ethernet fabric connection information and packet data.SPI Quad - includes 128Mbit SPI Quad Flash device (W25Q128FVSIG device by ST Microelectronics)VPD EEPROM - The EEPROM capacity is 128Kbit. |
| Overlay Networks | In order to better scale their networks, data center operators often create overlay networks that carry traffic from individual virtual machines over logical tunnels in encapsulated formats such as NVGRE and VXLAN. While this solves network scalability issues, it hides the TCP packet from the hardware offloading engines, placing higher loads on the host CPU. ConnectX-5 effectively addresses this by providing advanced NVGRE and VXLAN hardware offloading engines that encapsulate and de-capsulate the overlay protocol. |
| RDMA and RDMA over Converged Ethernet (RoCE) | ConnectX-5, utilizing IBTA RDMA (Remote Data Memory Access) and RoCE (RDMA over Converged Ethernet) technology, delivers low-latency and high-performance over Band and Ethernet networks. Leveraging data center bridging (DCB) capabilities as well as ConnectX-5 advanced congestion control hardware mechanisms, RoCE provides efficient low-latency RDMA services over Layer 2 and Layer 3 networks. |
| Mellanox PeerDirectTM | PeerDirectTM communication provides high efficiency RDMA access by eliminating unnecessary internal data copies between components on the PCIe bus (for example, from GPU to CPU), and therefore significantly reduces application run time. ConnectX-5 advanced acceleration technology enables higher cluster efficiency and scalability to tens of thousands of nodes. |
| CPU Offload | Adapter functionality enabling reduced CPU overhead allowing more available CPU for computation tasks.Open VSwitch (OVS) offload using ASAP2(TM)• Flexible match-action flow tables• Tunneling encapsulation / decapsulation |
Table 6 - Features ^a
| Quality of Service (QoS) | Support for port-based Quality of Service enabling various application requirements for latency and SLA. |
| Hardware-based I/O Virtualization | ConnectX-5 provides dedicated adapter resources and guaranteed isolation and protection for virtual machines within the server. |
| Storage Acceleration | A consolidated compute and storage network achieves significant cost-performance advantages over multi-fabric networks. Standard block and file access protocols can leverage RDMA for high-performance storage access.NVMe over Fabric offloads for target machineErasure CodingT10-DIF Signature Handover |
| SR-IOV | ConnectX-5 SR-IOV technology provides dedicated adapter resources and guaranteed isolation and protection for virtual machines (VM) within the server. |
| NC-SI | The adapter supports a Network Controller Sideband Interface (NC-SI), MCTP over SMBus and MCTP over PCIe - Baseboard Management Controller interface. |
| High-Performance Accelerations | Tag Matching and Rendezvous OffloadsAdaptive Routing on Reliable TransportBurst Buffer Offloads for Background Checkpointing |
a. This section describes hardware features and capabilities. Please refer to the driver release notes for feature availability. See Related Documentation.
1.3 Operating Systems/Distributions
• RHEL/CentOS
- Windows
- FreeBSD
• V M w a r e
- OpenFabrics Enterprise Distribution (OFED)
- OpenFabrics Windows Distribution (WinOF-2)
1.4 Connectivity
- Interoperable with 1/10/25/40/50/100 Gb/s Ethernet switches
• Passive copper cable with ESD protection - Powered connectors for optical and active cable support
2 Interfaces
Each adapter card includes the following interfaces:
- “Ethernet QSFP28 Interface”
- “PCI Express Interface”
- “LED Interface”
The adapter card includes special circuits to protect from ESD shocks to the card/server when plugging copper cables.
2.1 Ethernet QSFP28 Interface
The network ports of the ConnectX®-5 adapter card are compliant with the IEEE 802.3 Ethernet standards listed in Table 6, "Features," on page 11. Ethernet traffic is transmitted through the cards' QSFP28 connectors.
2.2 PCI Express Interface
The ConnectX®-5 adapter card supports PCI Express Gen 3.0/4.0 (1.1 and 2.0 compatible) through an x16 edge connector. The device can be either a master initiating the PCI Express bus operations, or a slave responding to PCI bus operations.
The following lists PCIe interface features:
- PCIe Gen 4.0 and 3.0 compliant, 2.0 and 1.1 compatible
• 2.5, 5.0, or 8.0, or 16.0 GT/s link rate x16
• Auto-negotiates to x16, x8, x4, x2, or x1
• Support for MSI/MSI-X mechanisms
2.3 LED Interface
There is one bi-color I/O LED per port located on the adapter card. For LED specifications, please refer to Section 7.8, "Adapter Card LED Operations", on page 63.
3 Hardware Installation
3.1 System Requirements
3.1.1 Hardware

Unless otherwise specified, Mellanox products are designed to work in an environmentally controlled data center with low levels of gaseous and dust (particulate) contamination.
The operation environment should meet severity level G1 as per ISA 71.04 for gaseous contamination and ISO 14644-1 class 8 for cleanliness level.
A system with a PCI Express x16 slot is required for installing the card.
3.2 Operating Systems/Distributions
Please refer to Section 1.3, "Operating Systems/Distributions", on page 12.
3.2.1 Software Stacks
Mellanox OpenFabric software package MLNX_OFED for Linux, WinOF-2 for Windows, and VMware. See Chapter 4, "Driver Installation".
3.3 Safety Precautions

The adapter is being installed in a system that operates with voltages that can be lethal. Before opening the case of the system, observe the following precautions to avoid injury and prevent damage to system components.
- Remove any metallic objects from your hands and wrists.
- Make sure to use only insulated tools.
- Verify that the system is powered off and is unplugged.
- It is strongly recommended to use an ESD strap or other antistatic devices.
3.4 Pre-Installation Checklist
- Verify that your system meets the hardware and software requirements stated above.
- Shut down your system if active.
- After shutting down the system, turn off power and unplug the cord. Remove the card from its package.
- Please note that the card must be placed on an antistatic surface. Check the card for visible signs of damage. Do not attempt to install the card if damaged.
3.5 Bracket Installation Instructions
The card is usually shipped with a tall bracket installed. If this form factor is suitable for your requirements, you can skip the remainder of this section and move to Section 3.6, “Card Installation Instructions”, on page 15. If you need to replace it with the short bracket that is included in the shipping box, please follow the instructions in this section.

Due to risk of damaging the EMI gasket, it is not recommended to replace the bracket more than three times.
To replace the bracket you will need the following parts:
• The new brackets of the proper height
• The 2 screws saved from the removal of the bracket
3.5.1 Removing the Existing Bracket
Remove the two screws holding the bracket in place. The bracket comes loose from the card. Save the two screws.

Be careful not to put stress on the LEDs on the adapter card.
3.5.2 .Installing the New Bracket
- Place the bracket onto the card until the screw holes line up.

Do not force the bracket onto the adapter card. You may have to gently push the LEDs using a small screwdriver to align the LEDs with the holes in the bracket.
- Screw on the bracket using the screws saved from the bracket removal procedure above.
- Make sure that the LEDs on the adapter card are aligned onto the bracket holes.
- Use a torque driver to apply up to 2 lbs-in torque on the screws
3.6 Card Installation Instructions

Please note that the following figures are for illustration purposes only.
- Before installing the card, make sure that the system is off and the power cord is not connected to the server. Please follow proper electrical grounding procedures.
-
Open the system case.
-
Place the adapter in an available PCI Express slot.
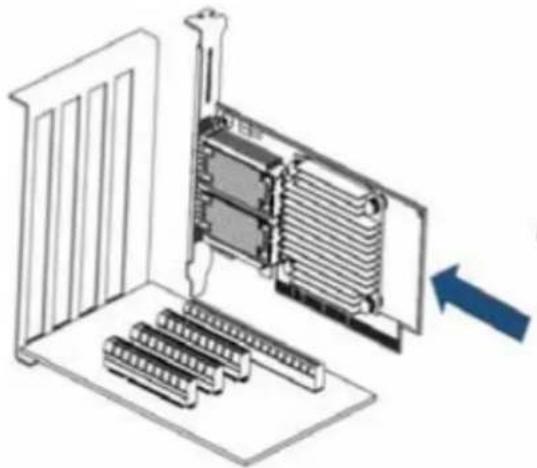
natural_image
Diagram of a server rack with cooling unit and heat exchanger, showing internal structure without any text or symbols- Applying even pressure at both corners of the card, insert the adapter card into the PCI Express slot until firmly seated.
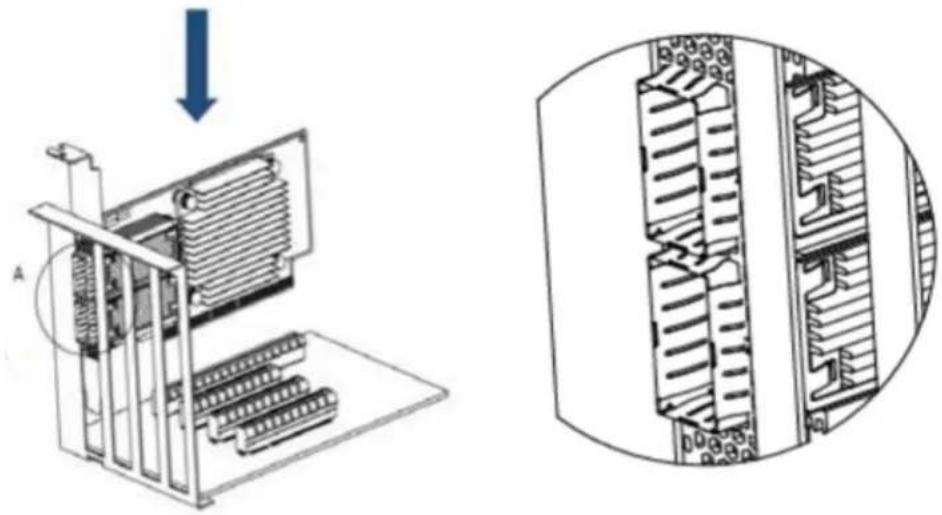
natural_image
Technical diagram showing internal components of a mechanical or electrical device, with an arrow indicating direction and a magnified inset illustrating internal structure (no text or symbols present)- When the adapter is properly seated, the port connectors are aligned with the slot opening, and the adapter faceplate is visible against the system chassis.
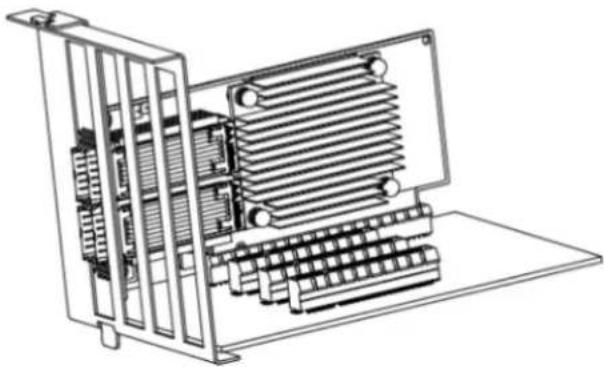
natural_image
Technical line drawing of an electronic device chassis with cooling fins and heat sinks (no text or symbols)- Secure the adapter with the adapter clip or screw.

Do not use excessive force when seating the card, as this may damage the system or the adapter.
- Close the system case.
3.7 Cables and Modules
To obtain the list of supported Mellanox cables for your adapter, please refer to the Cables Reference Table.
3.7.1 Cable Installation
-
All cables can be inserted or removed with the unit powered on.
-
To insert a cable, press the connector into the port receptacle until the connector is firmly seated.
a. Support the weight of the cable before connecting the cable to the adapter card. Do this by using a cable holder or tying the cable to the rack.
b. Determine the correct orientation of the connector to the card before inserting the connector. Do not try and insert the connector upside down. This may damage the adapter card.
c. Insert the connector into the adapter card. Be careful to insert the connector straight into the cage. Do not apply any torque, up or down, to the connector cage in the adapter card.
d. Make sure that the connector locks in place.

When installing cables make sure that the latches engage.

Always install and remove cables by pushing or pulling the cable and connector in a straight line with the card.
- After inserting a cable into a port, the Green LED indicator will light when the physical connection is established (that is, when the unit is powered on and a cable is plugged into the port with the other end of the connector plugged into a functioning port). See Section 7.8, "Adapter Card LED Operations", on page 63.
- After plugging in a cable, lock the connector using the latching mechanism particular to the cable vendor. When data is being transferred the Green LED will blink. See Section 7.8, "Adapter Card LED Operations", on page 63.
- Care should be taken as not to impede the air exhaust flow through the ventilation holes. Use cable lengths which allow for routing horizontally around to the side of the chassis before bending upward or downward in the rack.
- To remove a cable, disengage the locks and slowly pull the connector away from the port receptacle. LED indicator will turn off when the cable is unseated.
3.8 Adapter Card Un-installation Instructions
3.8.1 Safety Precautions

The adapter is installed in a system that operates with voltages that can be lethal. Before un-installing the adapter card, please observe the following precautions to avoid injury and prevent damage to system components.
- Remove any metallic objects from your hands and wrists.
- It is strongly recommended to use an ESD strap or other antistatic devices.
- Turn off the system and disconnect the power cord from the server.
3.8.2 Card Un-installation

Please note that the following images are for illustration purposes only.
- Verify that the system is powered off and unplugged.
- Wait 30 seconds.
-
To remove the card, disengage the retention mechanisms on the bracket (clips or screws).
-
Holding the adapter card from its center, gently pull the adapter card from the PCI Express slot.
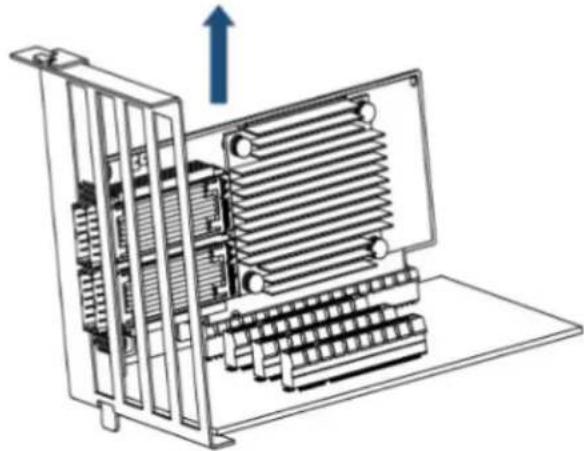
natural_image
Technical line drawing of a server rack with heat exchangers and a blue upward arrow indicating direction (no text or symbols)- When the port connectors reach the top of the chassis window, gently pull the adapter card in parallel to the motherboard.
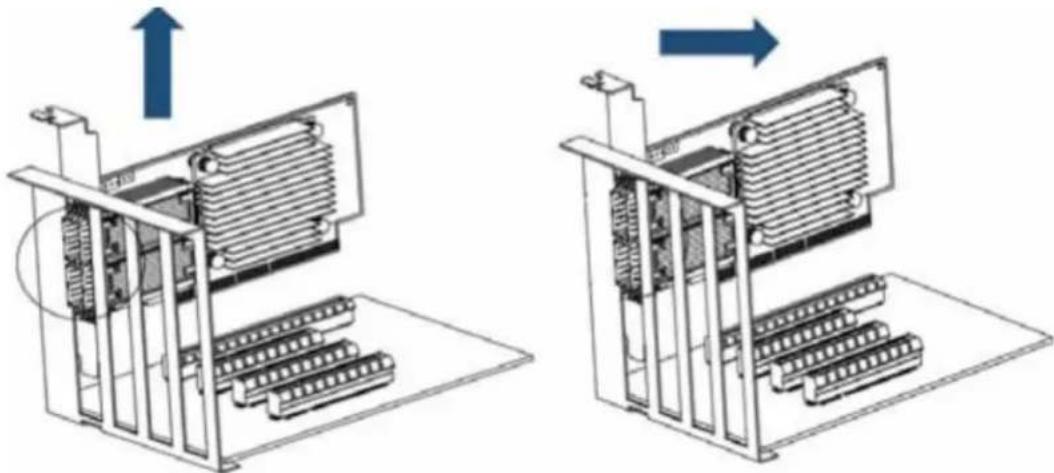
natural_image
Technical illustration of a mechanical assembly with two views showing internal components and directional arrows (no text or symbols)3.9 Identify the Card in Your System
3.9.1 On Windows
- Open Device Manager on the server. Click Start => Run, and then enter "devmgmt.msc".
- Expand System Devices and locate your Mellanox ConnectX-5 adapter card.
-
Right click the mouse on your adapter's row and select Properties to display the adapter card properties window.
-
Click the Details tab and select Hardware Ids (Windows 2012/R2/2016) from the Properties pull-down menu.
Figure 1: PCI Device (Example)
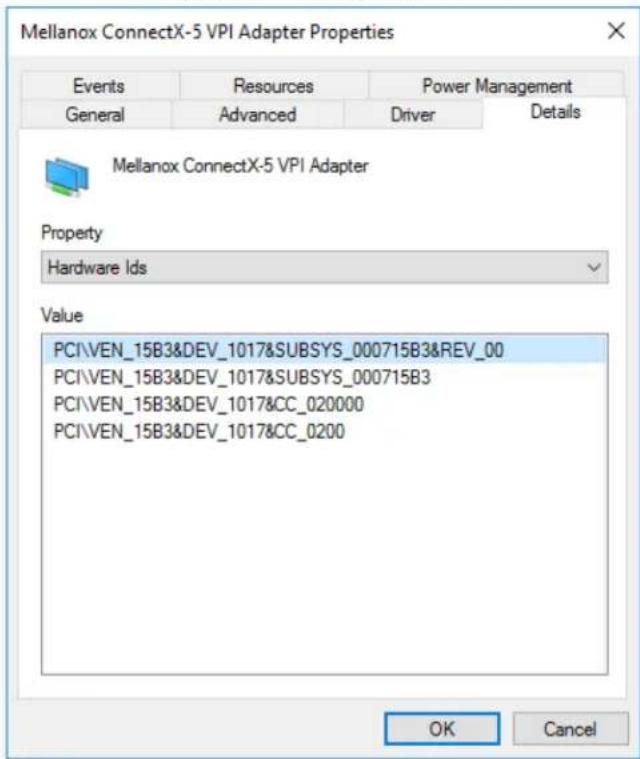
- In the Value display box, check the fields VEN and DEV (fields are separated by '&'). In the display example above, notice the sub-string "PCI\VEN_15B3&DEV_1003": VEN is equal to 0x15B3 – this is the Vendor ID of Mellanox Technologies; and DEV is equal to 1018 (for ConnectX-5) or 1019 (for ConnectX-5 Ex) – this is a valid Mellanox Technologies PCI Device ID.

If the PCI device does not have a Mellanox adapter ID, return to Step 2 to check another device.

The list of Mellanox Technologies PCI Device IDs can be found in the PCI ID repository at http://pci-ids.ucw.cz/read/PC/15b3.
3.9.2 On Linux
Get the device location on the PCI bus by running lspci and locating lines with the string "Mellanox Technologies":
lspci | grep -i Mellanox
Network controller: Mellanox Technologies MT28800 Family [ConnectX-5]
4 Driver Installation
4.1 Linux
For Linux, download and install the latest OpenFabrics Enterprise Distribution (OFED) software package available via the Mellanox web site at: http://www.mellanox.com => Products => Software => Ethernet Drivers => Linux SW/Drivers => Download. This chapter describes how to install and test the Mellanox OFED for Linux package on a single host machine with Mellanox ConnectX-5 adapter hardware installed.
4.1.1 Hardware and Software Requirements
Table 7 - Hardware and Software Requirements
| Requirements | Description |
| Platforms | A server platform with an adapter card based on one of the following Mellanox Technologies’ Ethernet HCA devices:MT4120 - ConnectX-5 (VPI, IB, EN) (firmware: fw-ConnectX5)MT4121 ConnectX®-5 Ex (VPI, IB, EN) (firmware: fw-ConnectX5) |
| Required Disk Space for Installation | 1GB |
| Device ID | For the latest list of device IDs, please visit Mellanox website. |
| Operating System | Linux operating system.For the list of supported operating system distributions and kernels, please refer to the Mellanox OFED Release Notes file. |
| Installer Privileges | The installation requires administrator (root) privileges on the target machine. |
4.1.2 Downloading Mellanox OFED
Step 1. Verify that the system has a Mellanox network adapter (HCA/NIC) installed. The following example shows a system with an installed Mellanox HCA:
<h1 id="lspci-v-grep-mellanox">lspci -v | grep Mellanox</h1>
86:00.0 Network controller [0207]: Mellanox Technologies MT27620 Family Subsystem: Mellanox Technologies Device 0014
86:00.1 Network controller [0207]: Mellanox Technologies MT27620 Family Subsystem: Mellanox Technologies Device 0014
Step 2. Download the ISO image to your host.
The image's name has the format MLNX_OFED_LINUX-
Step a. Scroll down to the Download wizard, and click the Download tab.
Step b. Choose your relevant package depending on your host operating system.
Step c. Click the desired ISO/tgz package.
Step d. To obtain the download link, accept the End User License Agreement (EULA).
Step 3. Use the md5sum utility to confirm the file integrity of your ISO image. Run the following command and compare the result to the value provided on the download page.
md5sum MLNX_OFED_LINUX-<ver>-<OS label>.iso
4.1.3 Installing Mellanox OFED
4.1.3.1 Installation Script
The installation script, mlnxofedinstall, performs the following:
• Discovers the currently installed kernel
- Uninstalls any software stacks that are part of the standard operating system distribution or another vendor's commercial stack
- Installs the MLNX_OFED_LINUX binary RPMs (if they are available for the current kernel)
- Identifies the currently installed InfiniBand and Ethernet network adapters and automatically ^1 upgrades the firmware
Note: If you wish to perform a firmware upgrade using customized FW binaries, you can provide a path to the folder that contains the FW binary files, by running --fw-image-dir. Using this option, the FW version embedded in the MLNX_OFED package will be ignored.
Example:
./mlnxofedinstall --fw-image-dir /tmp/my_fw_bin_files
Usage
./mnt/mlnxofedinstall [OPTIONS]
The installation script removes all previously installed Mellanox OFED packages and re-installs from scratch. You will be prompted to acknowledge the deletion of the old packages.

Pre-existing configuration files will be saved with the extension ".conf.rpmsave".
- If you need to install Mellanox OFED on an entire (homogeneous) cluster, a common strategy is to mount the ISO image on one of the cluster nodes and then copy it to a shared file system such as NFS. To install on all the cluster nodes, use cluster-aware tools (such as pdsh).
- If your kernel version does not match with any of the offered pre-built RPMs, you can add your kernel version by using the "mlnx_add_kernel_support.sh" script located inside the MLNX_OFED package.

On Redhat and SLES distributions with errata kernel installed there is no need to use the mlnx_add_kernel_support.sh script. The regular installation can be performed and weak-updates mechanism will create symbolic links to the MLNX_OFED kernel modules.
The "mlnx_add_kernel_support.sh" script can be executed directly from the mlnxofedinstall script. For further information, please see '--add-kernel-support' option below.

On Ubuntu and Debian distributions drivers installation use Dynamic Kernel Module Support (DKMS) framework. Thus, the drivers' compilation will take place on the host during MLNX_OFED installation. Therefore, using "mlnx_add_kernel_support.sh" is irrelevant on Ubuntu and Debian distributions.
Example
The following command will create a MLNX_OFED_LINUX ISO image for RedHat 6.3 under the /tmp directory.
<h1 id="mlnx_ofed_linux-xx-x-rhel63-x86_64mlnx_add_kernel_supportsh-m-tmpmlnx_ofed_linux-xx-x-rhel63-x86_64-make-tgz">./MLNX_OFED_LINUX-x.x-x-rhel6.3-x86_64/mlnx_add_kernel_support.sh -m /tmp/MLNX_OFED_LINUX-x.x-x-rhel6.3-x86_64/ --make-tgz</h1>
Note: This program will create MLNX_OFED_LINUX TGZ for rhel6.3 under /tmp directory.
All Mellanox, OEM, OFED, or Distribution IB packages will be removed.
Do you want to continue? [y/N]: y
See log file /tmp/mlnx_ofed_iso.21642.log

Building OFED RPMs. Please wait...
Removing OFED RPMs...
Created /tmp/MLNX_OFED_LINUX-x.x-x-rhel6.3-x86_64-ext.tgz
- The script adds the following lines to /etc/security/limits.conf for the userspace components such as MPI:
- * soft memlock unlimited
• * hard memlock unlimited
- These settings set the amount of memory that can be pinned by a user space application to unlimited. If desired, tune the value unlimited to a specific amount of RAM.
For your machine to be part of the InfiniBand/VPI fabric, a Subnet Manager must be running on one of the fabric nodes. At this point, Mellanox OFED for Linux has already installed the OpenSM Subnet Manager on your machine.
For the list of installation options, run: ./mlnxofedinstall --h

The DKMS (on Debian based OS) and the weak-modules (RedHat OS) mechanisms rebuild the initrd/initramfs for the respective kernel in order to add the MLNX_OFED drivers. When installing MLNX_OFED without DKMS support on Debian based OS, or without KMP support on RedHat or any other distribution, the initramfs will not be changed. Therefore, the inbox drivers may be loaded on boot. In this case, openibd service script will automatically unload them and load the new drivers that come with MLNX_OFED.
4.1.3.2 Installation Procedure
Step 1. Login to the installation machine as root.
Step 2. Mount the ISO image on your machine.
<h1 id="mount-o-ro-loop-mlnx-ofed-linux-ver-os-label-cpu-archiso-mnt">mount -o ro, loop MLNX OFED LINUX-<ver>-<OS label>-<CPU arch>.iso /mnt</h1>
Step 3. Run the installation script.
/mnt/mlnxofedinstall
Logs dir: /tmp/MLNX_OFED_LINUX-x.x-x.logs
This program will install the MLNX_OFED_LINUX package on your machine.
Note that all other Mellanox, OEM, OFED, RDMA or Distribution IB packages will be removed.
Those packages are removed due to conflicts with MLNX_OFED_LINUX, do not reinstall them.

Starting MLNX_OFED_LINUX-x.x.x installation ...
.....
.....
Installation finished successfully.

Attempting to perform Firmware update...
Querying Mellanox devices firmware ...

For unattended installation, use the --force installation option while running the MLNX_OFED installation script: /mnt/mlnxofedinstall --force

MLNX_OFED for Ubuntu should be installed with the following flags in chroot environment:
./mlnxofedinstall --without-dkms --add-kernel-support --kernel

In case that your machine has the latest firmware, no firmware update will occur and the installation script will print at the end of installation a message similar to the following:
Device #1:
Device Type: ConnectX-5
Part Number: MCX516A-CDAT
Description: ConnectX®-5 Ex EN network interface card,
100GbE dual-port QSFP28, PCIe4.0 x16, tall bracket, ROHS R6
PSID: MT_2190110032
PCI Device Name: 0b:00.0
Base MAC: 0000e41d2d5cf810
Versions: Current Available
FW 16.22.0228 16.22.0228
Status: Up to date

In case that your machine has an unsupported network adapter device, no firmware update will occur and one of the following error messages below will be printed. Please contact your hardware vendor for help on firmware updates.
Error message 1:
Device #1:

Device Type: ConnectX-5
Part Number: MCX516A-CDAT
Description: ConnectX®-5 Ex EN network interface card,
100GbE dual-port QSFP28, PCIe4.0 x16, tall bracket, ROHS R6
PSID: MT_2190110032
PCI Device Name: 0b:00.0
Base MAC: 0000e41d2d5cf810
Versions: Current Available
FW 16.22.0228 N/A
Status: No matching image found
Error message 2:
The firmware for this device is not distributed inside Mellanox driver: 0000:01:00.0 (PSID: IBM2150110033)
To obtain firmware for this device, please contact your HW vendor.
Step 4. If the installation script has performed a firmware update on your network adapter, complete the step relevant to your adapter card type to load the firmware:
- ConnectX-5/ConnectX-5 Ex - perform a standard reboot Otherwise, restart the driver by running: "/etc/init.d/openibd restart"
Step 5. (InfiniBand only) Run the hca_self_test.ofed utility to verify whether or not the InfiniBand link is up. The utility also checks for and displays additional information such as:
• HCA firmware version
- Kernel architecture
- Driver version
• Number of active HCA ports along with their states
- N o d e G U I D
For more details on hca_self_test.ofed, see the file docs/readme_and_user_manual/hca_self_test.readme.
After installation completion, information about the Mellanox OFED installation, such as prefix, kernel version, and installation parameters can be retrieved by running the command /etc/infiniband/info.
Most of the Mellanox OFED components can be configured or reconfigured after the installation, by modifying the relevant configuration files. See the relevant chapters in this manual for details.
The list of the modules that will be loaded automatically upon boot can be found in the /etc/ infiniband/openib.conf file.
4.1.3.3 Installation Results
Table 8 - Installation Results
| Software | Most of MLNX_OFED packages are installed under the “/usr” directory except for the following packages which are installed under the “/opt” directory:fca and ibutilsThe kernel modules are installed under/lib/modules/`uname -r'/updates on SLES and Fedora Distributions/lib/modules/`uname -r'/extra/mlnx-ofa_kernel on RHEL and other RedHat like Distributions |
| Firmware | The firmware of existing network adapter devices will be updated if the following two conditions are fulfilled:The installation script is run in default mode; that is, without the option --without-fw-update'The firmware version of the adapter device is older than the firmware version included with the Mellanox OFED ISO imageNote:If an adapter’s Flash was originally programmed with an Expansion ROM image, the automatic firmware update will also burn an Expansion ROM image.In case that your machine has an unsupported network adapter device, no firmware update will occur and the error message below will be printed.The firmware for this device is not distributed inside Mellanox driver: 0000:01:00.0 (PSID: IBM2150110033)To obtain firmware for this device, please contact your HW vendor. |
4.1.3.4 Installation Logging
While installing MLNX_OFED, the install log for each selected package will be saved in a separate log file.
The path to the directory containing the log files will be displayed after running the installation script in the following format: "Logs dir: /tmp/MLNX_OFED_LINUX-
Example:
Logs dir: /tmp/MLNX_OFED_LINUX-x.x-x.logs
4.1.3.5 openibd Script
As of MLNX_OFED v2.2-1.0.0 the openbd script supports pre/post start/stop scripts:
This can be controlled by setting the variables below in the /etc/infiniband/openibd.conf file.
OPENIBD_PRE_START
OPENIBD_POST_START
OPENIBD_PRE_STOP
OPENIBD_POST_STOP
Example:
OPENIBD_POST_START=/sbin/openibd_post_start.sh

An example of OPENIBD_POST_START script for activating all interfaces is provided in the MLNX_OFED package under the docs/scripts/openibd-post-start-configure-interfaces/ folder.
4.1.3.6 Driver Load Upon System Boot
Upon system boot, the Mellanox drivers will be loaded automatically.
To prevent automatic load of the Mellanox drivers upon system boot:
Step 1. Add the following lines to the "/etc/modprobe.d/mlnx.conf" file.
blacklist m1x4_core
blacklist m1x4_en
blacklist m1x5_core
blacklist m1x5_ib
Step 2. Set "ONBOOT=no" in the "/etc/infiniband/openib.conf" file.
Step 3. If the modules exist in the initramfs file, they can automatically be loaded by the kernel. To prevent this behavior, update the initramfs using the operating systems' standard tools. Note: The process of updating the initramfs will add the blacklists from step 1, and will prevent the kernel from loading the modules automatically.
4.1.3.7 mlnxofedinstall Return Codes
The table below lists the mlnxofedinstall script return codes and their meanings. Table 9 - mlnxofedinstall Return Codes
| Return Code Meaning | |
| 0 The Installation ended successfully | |
| 1 The installation failed | |
| 2 No firmware was found for the adapter device | |
| 22 Invalid parameter | |
| 28 Not enough free space | |
| 171 | Not applicable to this system configuration. This can occur when the required hardware is not present on the system. |
| 172 | Prerequisites are not met. For example, missing the required software installed or the hardware is not configured correctly. |
| 173 Failed to start the mst driver | |
4.1.4 Uninstalling Mellanox OFED
Use the script /usr/sbin/ofed_uninstall.sh to uninstall the Mellanox OFED package. The script is part of the ofed-scripts RPM.
4.1.5 Installing MLNX\_OFED Using YUM
This type of installation is applicable to RedHat/OL, Fedora, XenServer Operating Systems.
4.1.5.1 Setting up MLNX\_OFED YUM Repository
Step 1. Log into the installation machine as root.
Step 2. Mount the ISO image on your machine and copy its content to a shared location in your network.
<h1 id="mount-o-ro-loop-mlnx_ofed_linux-ver-os-label-cpu-archiso-mnt">mount -o ro, loop MLNX_OFED_LINUX-<ver>-<OS label>-<CPU arch>.iso /mnt</h1>
Step 3. Download and install Mellanox Technologies GPG-KEY:
The key can be downloaded via the following link:
http://www.mellanox.com/downloads/ofed/RPM-GPG-KEY-Mellanox
<h1 id="wget-httpwwwmellanoxcomdownloadsofedrpm-gpg-key-mellanox">wget http://www.mellanox.com/downloads/ofed/RPM-GPG-KEY-Mellanox</h1>
--2014-04-20 13:52:30-- http://www.mellanox.com/downloads/ofed/RPM-GPG-KEY-Mellanox
Resolving www.mellanox.com... 72.3.194.0
Connecting to www.mellanox.com|72.3.194.0|:80... connected.
HTTP request sent, awaiting response... 200 OK
Length: 1354 (1.3K) [text/plain]
Saving to: ?RPM-GPG-KEY-Mellanox?

100%[=====================>] 1,354 --.-K/s in 0s
2014-04-20 13:52:30 (247 MB/s) - ?RPM-GPG-KEY-Mellanox? saved [1354/1354]
Step 4. Install the key.
<h1 id="sudo-rpm-import-rpm-gpg-key-mellanox">sudo rpm --import RPM-GPG-KEY-Mellanox</h1>
warning: rpmts_EdrFromFdno: Header V3 DSA/SHA1 Signature, key ID 6224c050: NOKEY
Retrieving key from file:///repos/MLNX_OFED/<MLNX_OFED file>/RPM-GPG-KEY-Mellanox
Importing GPG key 0x6224C050:
Userid: "Mellanox Technologies (Mellanox Technologies - Signing Key v2) <support@mel-
lanox.com>"
From : /repos/MLNX_OFED/<MLNX_OFED file>/RPM-GPG-KEY-Mellanox
Is this ok [y/N]:
Step 5. Check that the key was successfully imported.
<h1 id="rpm-q-gpg-pubkey-qf-name-version-releasetsummaryn-grep-mellanox-gpg-pubkey-a9e4b643-520791ba-gpgmellanox-technologies-supportmellanoxcom">rpm -q gpg-pubkey --qf '%{NAME}-%{VERSION}-%{RELEASE}\t${SUMMARY}\n' | grep Mellanox gpg-pubkey-a9e4b643-520791ba gpg(Mellanox Technologies <support@mellanox.com>)</h1>
Step 6. Create a yum repository configuration file called "/etc/yum.repos.d/mlnx_ofed.repo" with the following content:.
[mlnx_ofed]
name=MLNX_OFED Repository
baseurl=file:///path to extracted MLNX_OFED package>/RPMS
enabled=1
gpgkey=file:///path to the downloaded key RPM-GPG-KEY-Mellanox>
gpgcheck=1
Step 7. Check that the repository was successfully added.
<h1 id="yum-repolist">yum repolist</h1>
Loaded plugins: product-id, security, subscription-manager
This system is not registered to Red Hat Subscription Management. You can use subscription-manager to register.
repo id repo name status
mlnx_ofed MLNX_OFED Repository 108
rpmforge RHEL 6Server - RPMforge.net - dag 4,597

repolist: 8,351
4.1.5.2 Installing MLNX\_OFED Using the YUM Tool
After setting up the YUM repository for MLNX_OFED package, perform the following:
Step 1. View the available package groups by invoking:
<h1 id="yum-search-mlnx-ofed">yum search mlnx-ofed-</h1>
mlnx-ofed-all.noarch : MLNX_OFED all installer package (with KMP support)
mlnx-ofed-basic.noarch : MLNX_OFED basic installer package (with KMP support)
mlnx-ofed-guest.noarch : MLNX_OFED guest installer package (with KMP support)
mlnx-ofed-hpc.noarch : MLNX_OFED hpc installer package (with KMP support)
mlnx-ofed-hypervisor.noarch : MLNX_OFED hypervisor installer package (with KMP support)
mlnx-ofed-vma.noarch : MLNX_OFED vma installer package (with KMP support)
mlnx-ofed-vma-eth.noarch : MLNX_OFED vma-eth installer package (with KMP support)
mlnx-ofed-vma-vpi.noarch : MLNX_OFED vma-vpi installer package (with KMP support)
Where:
mlnx-ofed-all Installs all available packages in MLNX_OFED.
mlnx-ofed-basic Installs basic packages required for running Mellanox cards.
mlnx-ofed-guest Installs packages required by guest OS.
mlnx-ofed-hpc Installs packages required for HPC.
mlnx-ofed-hypervisor Installs packages required by hypervisor OS.
mlnx-ofed-vma Installs packages required by VMA.
mlnx-ofed-vma-eth Installs packages required by VMA to work over Ethernet.
mlnx-ofed-vma-vpi Installs packages required by VMA to support VPI.
Note: MLNX_OFED provides kernel module RPM packages with KMP support for RHEL and SLES. For other operating systems, kernel module RPM packages are provided only for the operating systems' default kernel. In this case, the group RPM packages have the supported kernel version in their package's name.
Example:
mlnx-ofed-all-3.17.4-301.fc21.x86_64.noarch : MLNX_OFED all installer package for kernel 3.17.4-301.fc21.x86_64 (without KMP support)
mlnx-ofed-basic-3.17.4-301.fc21.x86_64.noarch : MLNX_OFED basic installer package for kernel 3.17.4-301.fc21.x86_64 (without KMP support)
mlnx-ofed-guest-3.17.4-301.fc21.x86_64.noarch : MLNX_OFED guest installer package for kernel 3.17.4-301.fc21.x86_64 (without KMP support)
mlnx-ofed-hpc-3.17.4-301.fc21.x86_64.noarch : MLNX_OFED hpc installer package for kernel 3.17.4-301.fc21.x86_64 (without KMP support)
mlnx-ofed-hypervisor-3.17.4-301.fc21.x86_64.noarch : MLNX_OFED hypervisor installer package for kernel 3.17.4-301.fc21.x86_64 (without KMP support)
mlnx-ofed-vma-3.17.4-301.fc21.x86_64.noarch : MLNX_OFED vma installer package for kernel 3.17.4-301.fc21.x86_64 (without KMP support)
mlnx-ofed-vma-eth-3.17.4-301.fc21.x86_64.noarch : MLNX_OFED vma-eth installer package for kernel 3.17.4-301.fc21.x86_64 (without KMP support)
mlnx-ofed-vma-vpi-3.17.4-301.fc21.x86_64.noarch : MLNX_OFED vma-vpi installer package for kernel 3.17.4-301.fc21.x86_64 (without KMP support)
If you have an operating system different than RHEL or SLES, or you have installed a kernel that is not supported by default in MLNX_OFED, you can use the mlnx_add_kernel_support.sh script to build MLNX_OFED for your kernel.
The script will automatically build the matching group RPM packages for your kernel so that you can still install MLNX_OFED via yum.
Please note that the resulting MLNX_OFED repository will contain unsigned RPMs, therefore, you should set 'gpgcheck=0' in the repository configuration file.
Step 2. Install the desired group.
<h1 id="yum-install-mlnx-ofed-all">yum install mlnx-ofed-all</h1>
Loaded plugins: langpacks, product-id, subscription-manager
Resolving Dependencies
--> Running transaction check
--> Package mlnx-ofed-all.noarch 0:3.1-0.1.2 will be installed
--> Processing Dependency: kmod-isert = 1.0-OFED.3.1.0.1.2.1.g832a737.rhel7ul for package: mlnx-ofed-all-3.1-0.1.2.noarch
......
......
qperf.x86_64 0:0.4.9-9
rds-devel.x86_64 0:2.0.7-1.12
rds-tools.x86_64 0:2.0.7-1.12
sdpnetstat.x86_64 0:1.60-26
srptools.x86_64 0:1.0.2-12
Complete!

Installing MLNX_OFED using the "apt-get" tool does not automatically update the firmware.
To update the firmware to the version included in MLNX_OFED package, run:
# apt-get install mlnx-fw-updater
OR:
Update the firmware to the latest version available on Mellanox Technologies' Web site as described in
4.1.5.3 Uninstalling Mellanox OFED Using the YUM Tool
Use the script /usr/sbin/ofed_uninstall.sh to uninstall the Mellanox OFED package. The script is part of the ofed-scripts RPM.
4.1.5.4 Installing MLNX\_OFED Using apt-get Tool
This type of installation is applicable to Debian and Ubuntu operating systems.
4.1.5.5 Setting up MLNX\_OFED apt-get Repository
Step 1. Log into the installation machine as root.
Step 2. Extract the MLNX_OFED pacakge on a shared location in your network.
You can download it from http://www.mellanox.com > Products > Software> Ethernet Drivers.
Step 3. Create an apt-get repository configuration file called
"/etc/apt/sources.list.d/mlnx_ofed.list" with the following content:
# deb file:/
Step 4. Download and install Mellanox Technologies GPG-KEY.
<h1 id="wget-qo-httpwwwmellanoxcomdownloadsofedrpm-gpg-key-mellanox-sudo-apt-key-add">wget -qO - http://www.mellanox.com/downloads/ofed/RPM-GPG-KEY-Mellanox | sudo apt-key add -</h1>
Step 5. Check that the key was successfully imported.
<h1 id="apt-key-list">apt-key list</h1>
pub 1024D/A9E4B643 2013-08-11
uid Mellanox Technologies <support@mellanox.com>
sub 1024g/09FCC269 2013-08-11
Step 6. Update the apt-get cache.
<h1 id="sudo-apt-get-update">sudo apt-get update</h1>
4.1.5.6 Installing MLNX\_OFED Using the apt-get Tool
After setting up the apt-get repository for MLNX_OFED package, perform the following:
Step 1. View the available package groups by invoking:
<h1 id="apt-cache-search-mlnx-ofed">apt-cache search mlnx-ofed-</h1>
mlnx-ofed-vma-eth - MLNX_OFED vma-eth installer package (with DKMS support)
mlnx-ofed-hpc - MLNX_OFED hpc installer package (with DKMS support)
mlnx-ofed-vma-vpi - MLNX_OFED vma-vpi installer package (with DKMS support)
mlnx-ofed-basic - MLNX_OFED basic installer package (with DKMS support)
mlnx-ofed-vma - MLNX_OFED vma installer package (with DKMS support)
mlnx-ofed-all - MLNX_OFED all installer package (with DKMS support)
Where:
mlnx-ofed-all MLNX_OFED all installer package.
mlnx-ofed-basic MLNX_OFED basic installer package.
mlnx-ofed-vma MLNX_OFED vma installer package.
mlnx-ofed-hpc MLNX_OFED HPC installer package.
mlnx-ofed-vma-eth MLNX_OFED vma-eth installer package.
mlnx-ofed-vma-vpi MLNX_OFED vma-vpi installer package.
Step 2. Install the desired group.
<h1 id="apt-get-install-group-name">apt-get install '<group name>'</h1>
Example:
<h1 id="apt-get-install-mlnx-ofed-all">apt-get install mlnx-ofed-all</h1>

Installing MLNX_OFED using the "apt-get" tool does not automatically update the firmware.
To update the firmware to the version included in MLNX_OFED package, run:
<h1 id="apt-get-install-mlnx-fw-updater">apt-get install mlnx-fw-updater</h1>
OR:
Update the firmware to the latest version available on Mellanox Technologies' Web site as described in
4.1.5.7 Uninstalling Mellanox OFED Using the apt-get Tool
Use the script /usr/sbin/ofed_uninstall.sh to uninstall the Mellanox OFED package. The script is part of the ofed-scripts package.
4.1.6 Updating Firmware After Installation
The firmware can be updated either manually or automatically (upon system boot), as described in the sections below.
4.1.6.1 Updating the Device Online
To update the device online on the machine from Mellanox site, use the following command line:
mlxfwmanager --online -u -d <device>
Example:
mlxfwmanager --online -u -d 0000:09:00.0
Querying Mellanox devices firmware ...

Device #1:
----

Device Type: ConnectX-5
Part Number: MCX516A-CDAT
Description: ConnectX®-5 Ex EN network interface card, 100GbE dual-port QSFP28, PCIe4.0 x16, tall bracket, ROHS R6
PSID: MT_1020120019
PCI Device Name: 0000:09:00.0
Port1 GUID: 0002c9000100d051
Port2 MAC: 0002c9000002
Versions: Current Available
FW 2.32.5000 2.33.5000

Status: Update required

 Found 1 device(s) requiring firmware update. Please use -u flag to perform the update.
4.1.6.2 Updating the Device Manually
To update the device manually, please refer to the OEM Firmware Download page.
In case that you ran the mlnxofedinstall script with the --without-fw-update' option or you are using an OEM card and now you wish to (manually) update firmware on your adapter card(s), you need to perform the steps below. The following steps are also appropriate in case that you wish to burn newer firmware that you have downloaded from Mellanox Technologies' Web site (http://www.mellanox.com > Support > Firmware Download).
Step 1. Get the device's PSID.
mlxfwmanager_pci | grep PSID
PSID: MT_1210110019
Step 2. Download the firmware BIN file from the Mellanox website or the OEM website.
Step 3. Burn the firmware.
mlxfwmanager pci -i <fw file.bin>
Step 4. Reboot your machine after the firmware burning is completed.
4.1.6.3 Updating the Device Firmware Automatically upon System Boot
As of MLNX_OFED v3.1-x.x.x, firmware can be automatically updated upon system boot.
The firmware update package (mlnx-fw-updater) is installed in the "/opt/mellanox/mlnx-fw-updater" folder, and openibd service script can invoke the firmware update process if requested on boot.
If the firmware is updated, the following message is printed to the system's standard logging file:
fw updater: Firmware was updated. Please reboot your system for the changes to take effect.
Otherwise, the following message is printed:
fw updater: Didn't detect new devices with old firmware.
Please note, this feature is disabled by default. To enable the automatic firmware update upon system boot, set the following parameter to "yes" "RUN_FW_UPDATER_ONBOOT=yes" in the openibd service configuration file "/etc/infiniband/openib.conf".
You can opt to exclude a list of devices from the automatic firmware update procedure. To do so, edit the configurations file "/opt/mellanox/mlnx-fw-updater/mlnx-fw-updater.conf" and provide a comma separated list of PCI devices to exclude from the firmware update.
Example:
MLNX EXCLUDE DEVICES="00:05.0,00:07.0"
4.1.7 UEFI Secure Boot
All kernel modules included in MLNX_OFED for RHEL7 and SLES12 are signed with x.509 key to support loading the modules when Secure Boot is enabled.
4.1.7.1 Enrolling Mellanox's x.509 Public Key On your Systems
In order to support loading MLNX_OFED drivers when an OS supporting Secure Boot boots on a UEFI-based system with Secure Boot enabled, the Mellanox x.509 public key should be added to the UEFI Secure Boot key database and loaded onto the system key ring by the kernel.
Follow these steps below to add the Mellanox's x.509 public key to your system:

Prior to adding the Mellanox's x.509 public key to your system, please make sure:
• The 'mokutil' package is installed on your system
• The system is booted in UEFI mode
Step 1. Download the x.509 public key.
<h1 id="wget-httpwwwmellanoxcomdownloadsofedmlnx_signing_key_pubder">wget http://www.mellanox.com/downloads/ofed/mlnx_signing_key_pub.der</h1>
Step 2. Add the public key to the MOK list using the mokutil utility.
You will be asked to enter and confirm a password for this MOK enrollment request.
<h1 id="mokutil-import-mlnx_signing_key_pubder">mokutil --import mlnx_signing_key_pub.der</h1>
Step 3. Reboot the system.
The pending MOK key enrollment request will be noticed by shim.efi and it will launch Mok-Manager.efi to allow you to complete the enrollment from the UEFI console. You will need to enter the password you previously associated with this request and confirm the enrollment. Once done, the public key is added to the MOK list, which is persistent. Once a key is in the MOK list, it will be automatically propagated to the system key ring and subsequent will be booted when the UEFI Secure Boot is enabled.

To see what keys have been added to the system key ring on the current boot, install the 'keyutils' package and run: #keyctl list %:.system_keyring
4.1.7.2 Removing Signature from kernel Modules
The signature can be removed from a signed kernel module using the 'strip' utility which is provided by the 'binutils' package.
<h1 id="strip-g-my_moduleko">strip -g my_module.ko</h1>
The strip utility will change the given file without saving a backup. The operation can be undo only by resigning the kernel module. Hence, we recommend backing up a copy prior to removing the signature.
To remove the signature from the MLNX_OFED kernel modules:
Step 1. Remove the signature.
<h1 id="rpm-qa-grep-e-kernel-ib-mlnx-ofa_kernelisersrpknem-mlnx-rdsmlnx-nfs-rdmamlnx-nvmemlnx-rdma-rxe-xargs-rpm-ql-grepko-xargs-strip-g">rpm -qa | grep -E "kernel-ib |mlnx-ofa_kernel|iser|srp|knem |mlnx-rds|mlnx-nfs-rdma|mlnx-nvme|mlnx-rdma-rxe" | xargs rpm -ql | grep."\.ko$" | xargs strip -g</h1>
After the signature has been removed, a massage as the below will no longer be presented upon module loading:
"Request for unknown module key 'Mellanox Technologies signing key: 61feb074fc7292f958419386ffdd9d5ca999e403' err -11"
However, please note that a similar message as the following will still be presented:
"my_module: module verification failed: signature and/or required key missing - tainting kernel"
This message is presented once, only for each boot for the first module that either has no signature or whose key is not in the kernel key ring. So it's much easier to miss this message. You won't see it on repeated tests where you unload and reload a kernel module until you reboot. There is no way to eliminate this message.
Step 2. Update the initramfs on RHEL systems with the stripped modules.
mkinitrd /boot/initramfs-(uname -r).img(uname -r) --force
4.1.8 Performance Tuning
Depending on the application of the user's system, it may be necessary to modify the default configuration of network adapters based on the ConnectX® adapters. In case that tuning is required, please refer to the Performance Tuning Guide for Mellanox Network Adapters.
4.2 Windows Driver

The snapshots in the following sections are presented for illustration purposes only. The installation interface may slightly vary, depending on the used operating system
For Windows, download and install the latest Mellanox WinOF-2 for Windows software package available via the Mellanox web site at: http://www.mellanox.com => Products => Software => Ethernet Drivers => Download. Follow the installation instructions included in the download package (also available from the download page).
4.2.1 Hardware and Software Requirements
Table 10 - Hardware and Software Requirements
| Description^a | Package |
| Windows Server 2012 R2 | MLNX_WinOF2-1_10_All_x64.exe |
| Windows Server 2012 | MLNX_WinOF2-1_10_All_x64.exe |
| Windows Server 2016 | MLNX_WinOF2-1_10_All_x64.exe |
| Windows 8.1 Client (64 bit only) | MLNX_WinOF2-1_10_All_x64.exe |
| Windows 10 Client (64 bit only) | MLNX_WinOF2-1_10_All_x64.exe |
a. The Operating System listed above must run with administrator privileges.
4.2.2 Downloading Mellanox WinOF-2 Driver
To download the .exe according to your Operating System, please follow the steps below:
Step 1. Obtain the machine architecture.
- To go to the Start menu, position your mouse in the bottom-right corner of the Remote Desktop of your screen.
- Open a CMD console (Click Task Manager-->File --> Run new task, and enter CMD).
- Enter the following command.
echo %PROCESSOR ARCHITECTURE%
On an x64 (64-bit) machine, the output will be "AMD64".
Step 2. Go to the Mellanox WinOF-2 web page at: http://www.mellanox.com => Products => EthernetDrivers => Windows SW/Drivers.
Step 3. Download the .exe image according to the architecture of your machine (see Step 1). The name of the .exe is in the following format MLNX_WinOF2-

Installing the incorrect .exe file is prohibited. If you do so, an error message will be displayed. For example, if you try to install a 64-bit .exe on a 32-bit machine, the wizard will display the following (or a similar) error message:
"The installation package is not supported by this processor type. Contact your vendor"
4.2.3 Installing Mellanox WinOF-2 Driver

WinOF-2 supports adapter cards based on the Mellanox ConnectX®-4 and above family of adapter IC devices only. If you have ConnectX-3 and ConnectX-3 Pro on your server, you will need to install WinOF driver.
For details on how to install WinOF driver, please refer to WinOF User Manual.
This section provides instructions for two types of installation procedures:
• “Attended Installation”
An installation procedure that requires frequent user intervention.
- “Unattended Installation”
An automated installation procedure that requires no user intervention.

Both Attended and Unattended installations require administrator privileges.
4.2.3.1 Attended Installation
The following is an example of an installation session.
Step 1. Double click the .exe and follow the GUI instructions to install MLNX_WinOF2.
Step 2. [Optional] Manually configure your setup to contain the logs option (replace "LogFile" with the relevant directory):
MLNX_WinOF2-1_10 <revision_version> All_x64.exe /v"/1*vx [LogFile]"
Step 3. [Optional] If you do not want to upgrade your firmware version ^1 .
MLNX_WinOF2-1_10 <revision_version> All_x64.exe /v" MT_SKIPFWUPGRD=1"
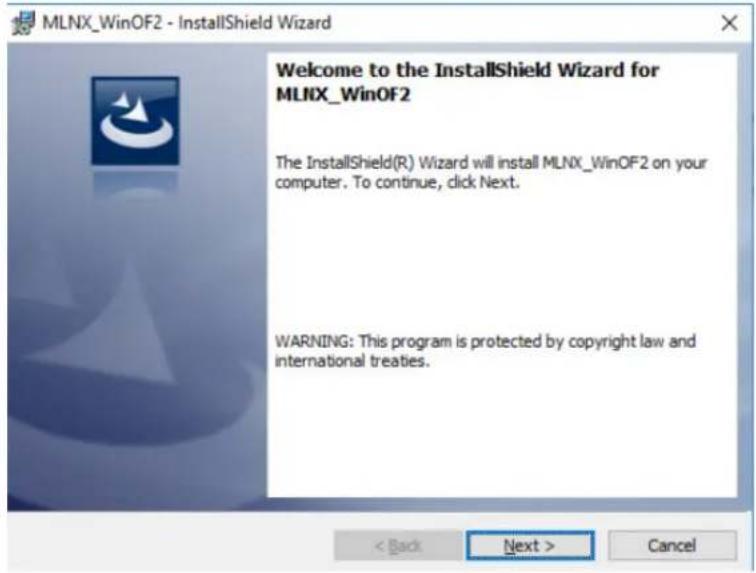
Step 4. Click Next in the Welcome screen.
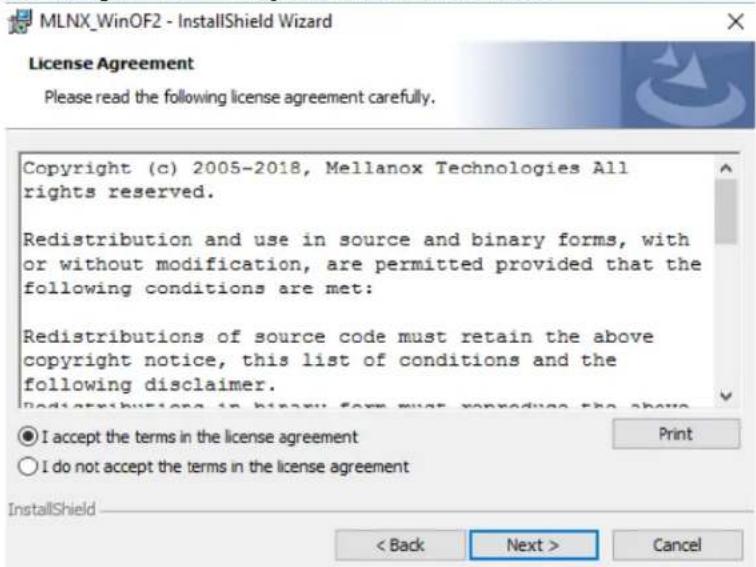
Step 5. Read then accept the license agreement and click Next.
Step 6. Select the target folder for the installation.
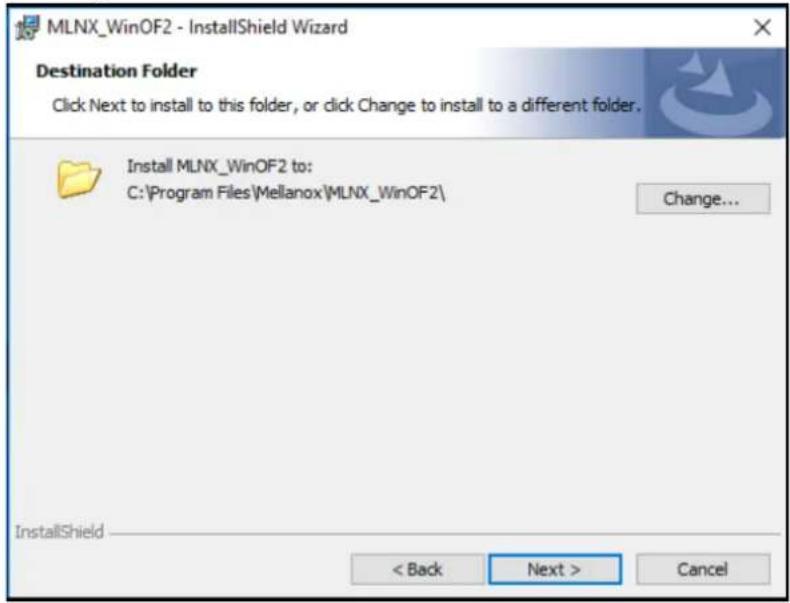
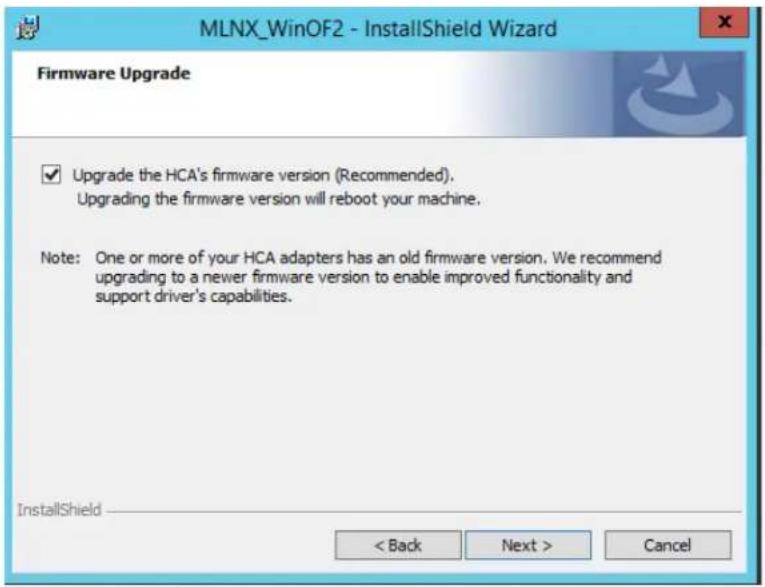
Step 7. The firmware upgrade screen will be displayed in the following cases:
- If the user has an OEM card. In this case, the firmware will not be displayed.
- If the user has a standard Mellanox card with an older firmware version, the firmware will be updated accordingly. However, if the user has both an OEM card and a Mellanox card, only the Mellanox card will be updated.
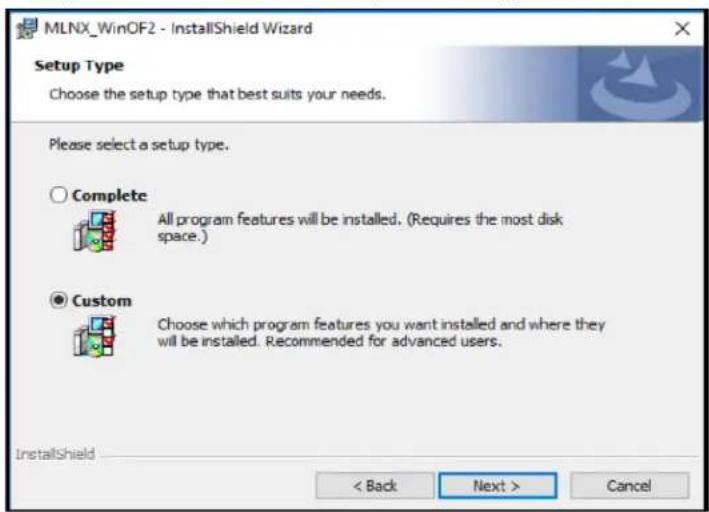
Step 8. Select a Complete or Custom installation, follow Step a and on.
a. Select the desired feature to install:
• Performances tools - install the performance tools that are used to measure performance in user environment
- Documentation - contains the User Manual and Release Notes
- Management tools - installation tools used for management, such as mlxstat
- Diagnostic Tools - installation tools used for diagnostics, such as mlx5cmd
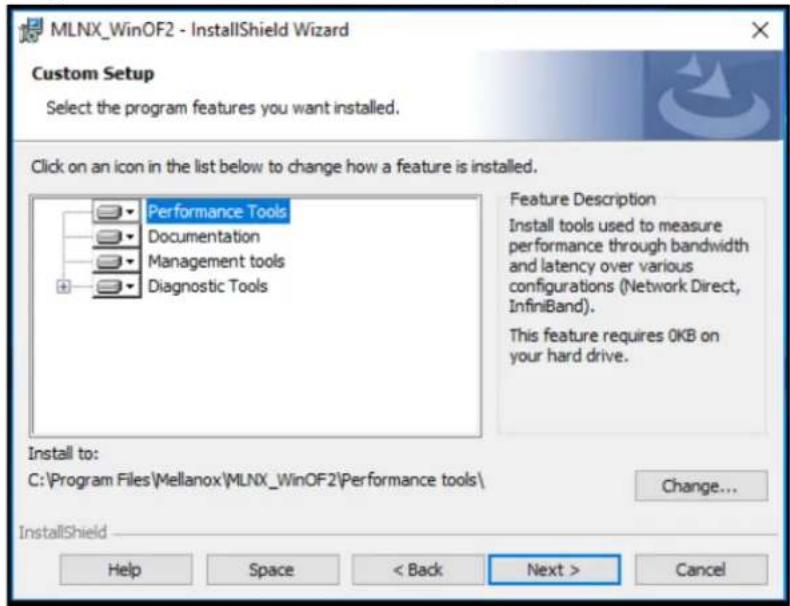
b. Click Next to install the desired tools.
Step 9. Click Install to start the installation.
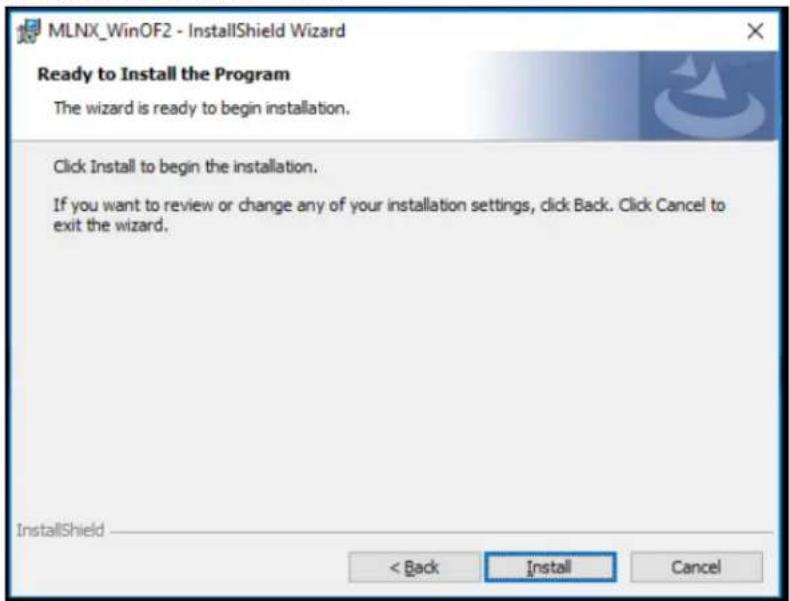
Step 10. In case that firmware upgrade option was checked in Step 7, you will be notified if a firmware upgrade is required (See
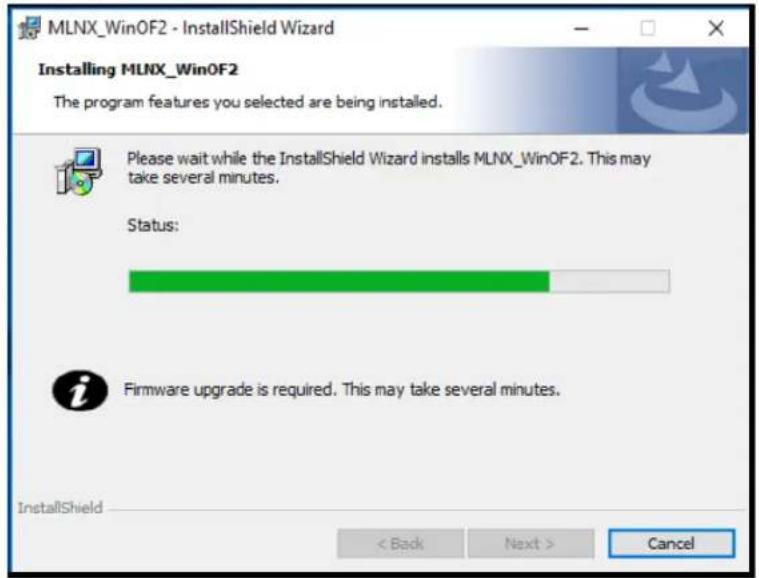
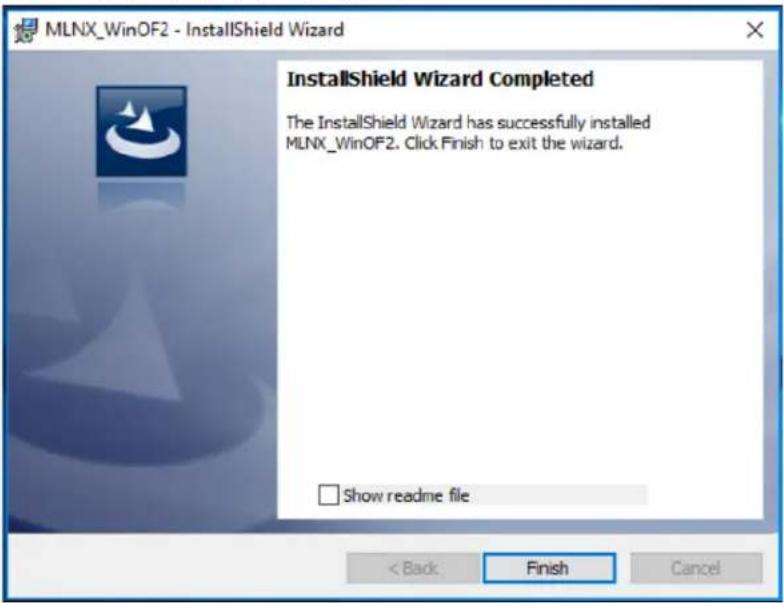
Step 11. Click Finish to complete the installation.
4.2.3.2 Unattended Installation

If no reboot options are specified, the installer restarts the computer whenever necessary without displaying any prompt of learning to the user.
Use the /norestart or /forcerestart standard command-line options to control reboots.
The following is an example of an unattended installation session.
Step 1. Open a CMD console->Click Start->Task Manager File->Run new task->and enter CMD.
Step 2. Install the driver. Run:
MLNX WinOF2-1 10 <revision version> All x64.exe /S /v/qn
Step 3. [Optional] Manually configure your setup to contain the logs option:
MLNX WinOF2-1 10 All x64.exe /S /v/qn /v"/l*vx [LogFile]"
Step 4. [Optional] if you want to control whether to install ND provider or not ^1 .
MLNX WinOF2-1 10 A11 x64.exe /vMT NDPROPERTY=1
Step 5. [Optional] If you do not wish to upgrade your firmware version ^2 .
MLNX_WinOF2-1_10_All_x64.exe /vMT_SKIPFWUPGRD=1

Applications that hold the driver files (such as ND applications) will be closed during the unattended installation.
4.2.4 Installation Results
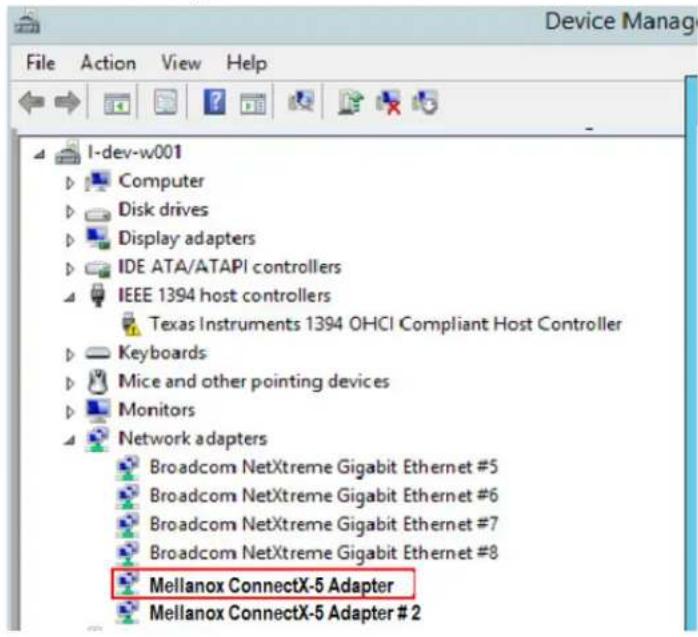
Upon installation completion, you can verify the successful addition of the network card(s) through the Device Manager.
Upon installation completion, the inf files can be located at:
• %ProgramFiles%\Mellanox\MLNX_WinOF2\Drivers\
To see the Mellanox network adapters, display the Device Manager and pull down the “Network adapters” menu.
Figure 2: Installation Results
4.2.5 Extracting Files Without Running Installation
To extract the files without running installation, perform the following steps.
Step 1. Open a CMD console-> Click Start-> Task Manager-> File-> Run new task-> and enter CMD.
Step 2. Extract the driver and the tools:
MLNX_WinOF2-1_10_All_x64 /a
To extract only the driver files.
MLNX WinOF2-1 10 All x64 /a /vMT DRIVERS ONLY=1
Step 3. Click Next to create a server image.
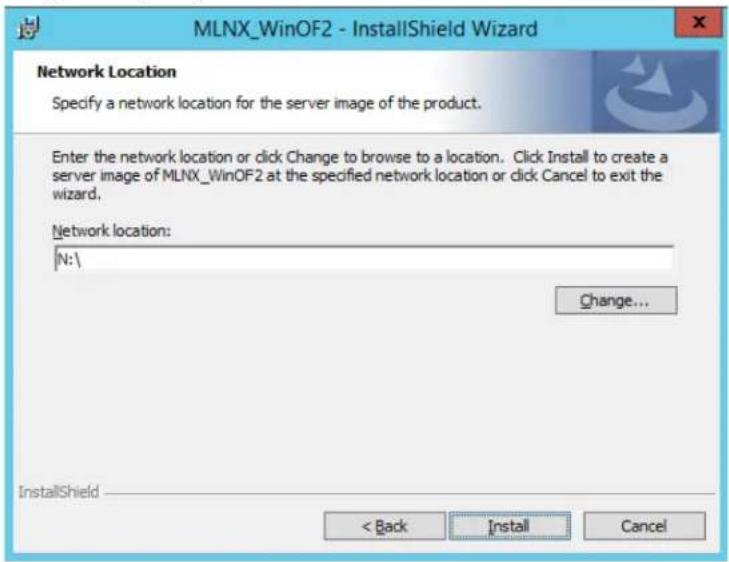
Step 4. Click Change and specify the location in which the files are extracted to.
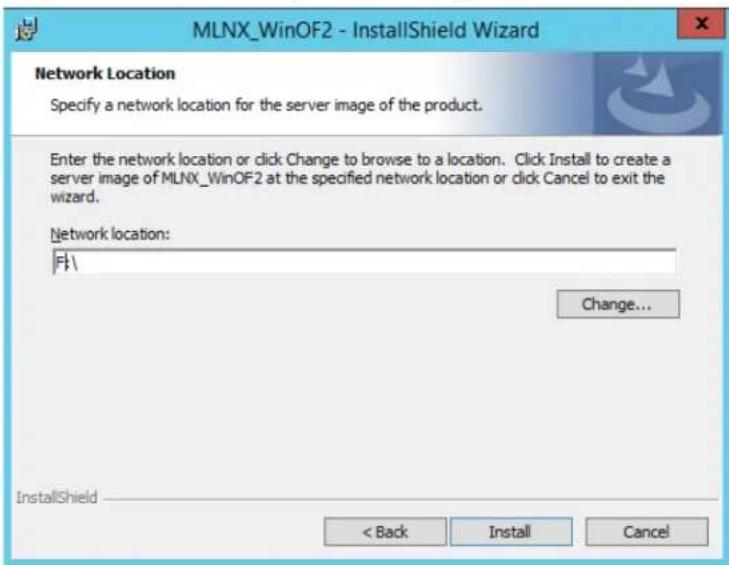
Step 5. Click Install to extract this folder, or click Change to install to a different folder.
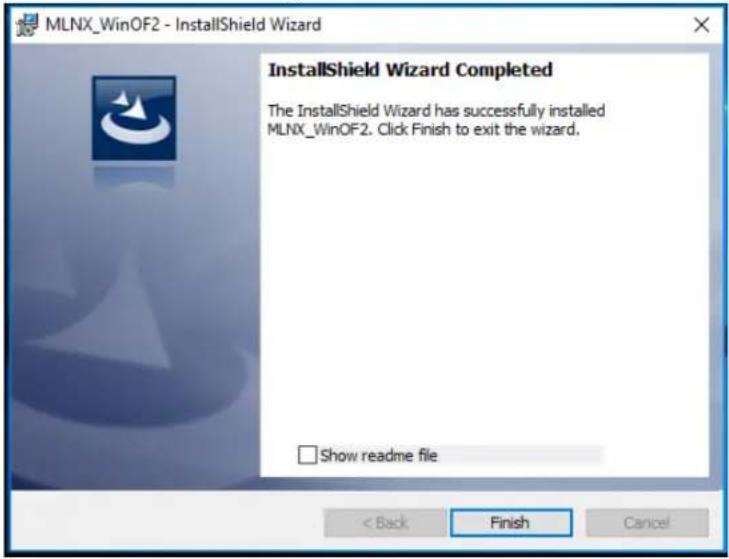
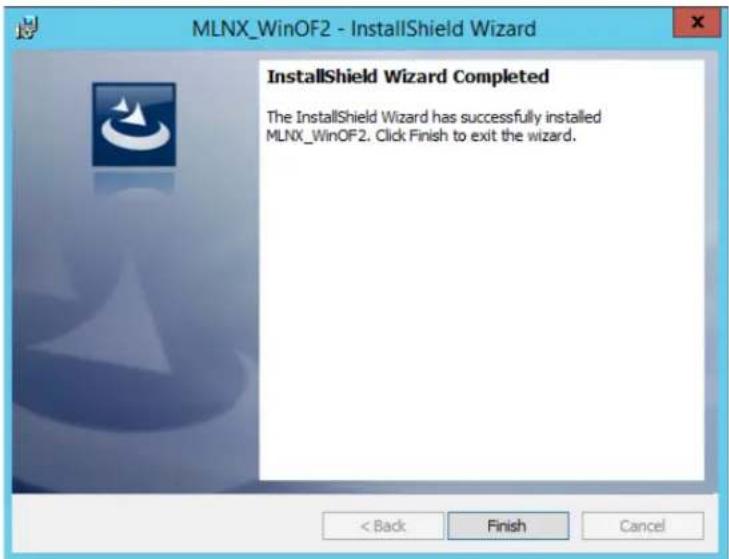
Step 6. To complete the extraction, click Finish.
4.2.6 Uninstalling Mellanox WinOF-2 Driver
4.2.6.1 Attended Uninstallation
To uninstall MLNX_WinOF2 on a single node:
Click Start-> Control Panel-> Programs and Features-> MLNX WinOF2-> Uninstall.
(NOTE: This requires elevated administrator privileges)
4.2.6.2 Unattended Uninstallation

If no reboot options are specified, the installer restarts the computer whenever necessary without displaying any prompt or warning to the user.
Use the /norestart or /forcerestart standard command-line options to control reboots.
To uninstall MLNX_WinOF2 in unattended mode:
Step 1. Open a CMD console-> Click Start-> Task Manager-> File-> Run new task-> and enter CMD.
Step 2. Uninstall the driver. Run:
MLNX_WinOF2-1_10_All_x64.exe /S /x /v"/qn"
4.2.7 Firmware Upgrade
If the machine has a standard Mellanox card with an older firmware version, the firmware will be automatically updated as part of the WinOF-2 package installation.
For information on how to upgrade firmware manually, please refer to MFT User Manual: www.mellanox.com =>Products => Ethernet Drivers => Firmware Tools
4.2.8 Deploying the Driver on a Nano Server
4.2.8.1 Offline Installation
To deploy the Driver on a Nano Server:
Step 1. Go to the Mellanox WinOF web page at http://www.mellanox.com => Products => EthernetDrivers => Windows SW/Drivers.
Step 2. Download the driver (MLNX_WinOF2_MLNX_WinOF2-1_64_mlx5_All_win2016_x64_fre_1_64_15407.exe).
Step 3. Extract the driver to a local directory (see Section 4.2.5, "Extracting Files Without Running Installation", on page 46).
Step 4. Copy the contents of this directory to C:\WS2016TP5_Drivers.
The directory contents should appear as follows:
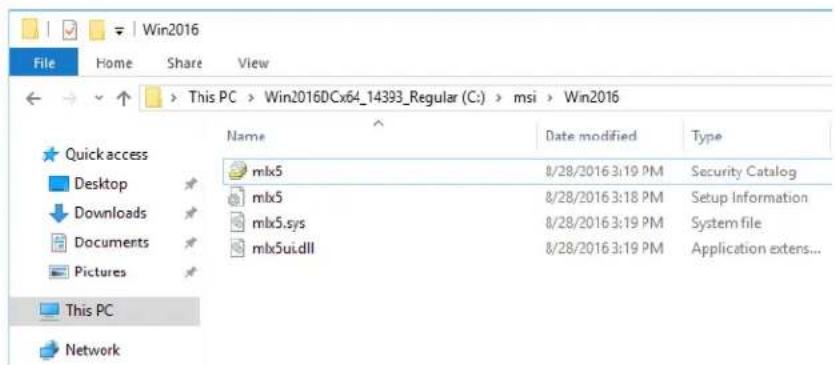
This location should be specified for DriversPath property when injecting driver into the Nano server image:
New-NanoServerImage -MediaPath \\Path\To\Media\en_us -BasePath .\Base -TargetPath .\InjectingDrivers.vhdx -DriversPath C:\WS2016TP5_Drivers
Step 5. Create the Nano server image.
Follow the instructions in the TechNet article for "Getting Started with Nano Server"
4.2.8.2 Online Update
Step 1. Go to the Mellanox WinOF web page at
http://www.mellanox.com => Products => Ethernet Drivers => Windows SW/Drivers.
Step 2. Download the driver package.
Step 3. Extract the Mellanox drivers to a local directory (see Section 4.2.5, "Extracting Files Without Running Installation", on page 46).
Step 4. Open a remote connection to the Nano server.
Step 5. Copy all the driver files to the Nano server
Step 6. Install the driver:
pnputil -I -a <Driver_Folder>\mlx5.inf

When upgrading the driver on a server where the remote connection was done over Mellanox device, there will be a loss of connectivity. To upgrade, it is recommended to run a script that will execute all the required upgrade commands.
4.3 VMware Driver
4.3.1 Hardware and Software Requirements
Table 11 - Software and Hardware Requirements
| Requirements | Description |
| Platforms | A server platform with an adapter card based on one of the following Mellanox Technologies’ HCA devices:ConnectX®-5 (EN) (firmware: fw-ConnectX5)ConnectX®-5 Ex (EN) (firmware: fw-ConnectX5) |
| Device ID For the latest list of device IDs, please visit Mellanox website. | |
| Operating System ESXi 6.5 | |
| Installer Privileges | The installation requires administrator privileges on the target machine. |
4.3.2 Installing Mellanox NATIVE ESXi Driver for VMware vSphere

Please uninstall any previous Mellanox driver packages prior to installing the new version. See Section 4.3.3, "Removing the Previous Mellanox Driver", on page 52 for further information.
To install the driver:
- Log into the ESXi server with root permissions.
- Install the driver.
#> esxcli software vib install -d <path>/<bundle_file>
Example:
#> esxcli software vib install -d /tmp/MLNX-NATIVE-ESX-ConnectX-4-5_4.16.8.8-10EM-650.0.0.4240417.zip
- Reboot the machine.
- Verify the driver was installed successfully.
esxcli software vib list | grep nmix
nnlx5-core 4.16.8.8-10EM.650.0.0.4240417
nnlx5-rona 4.16.8.8-10EM.650.0.0.4240417
MEL PartnerSupported 2017-01-31
MEL PartnerSupported 2017-01-31

After the installation process, all kernel modules are loaded automatically upon boot.
4.3.3 Removing the Previous Mellanox Driver

Please unload the driver before removing it.
To remove all the drivers:
- Log into the ESXi server with root permissions.
- List all the existing NATIVE ESXi driver modules. (see Step 7 in Section 4.3.2)
- Remove each module.
#> esxcli software vib remove -n nmlx5-rdma
#> esxcli software vib remove -n nmlx5-core

To remove the modules, you must run the command in the same order as shown in the example above.
- Reboot the server.
4.3.4 Firmware Programming
- Download the VMware bootable binary images v4.6.0 from the Mellanox Firmware Tools (MFT) site.
• ESXi 6.5 File: mft-4.6.0.48-10EM-650.0.0.4598673.x86_64.vib
MD5SUM: 0804cffe30913a7b4017445a0f0adbe1
- Install the image according to the steps described in the MFT User Manual.

The following procedure requires custom boot image downloading, mounting and booting from a USB device.
5 Updating Adapter Card Firmware
Each card is shipped with the latest version of qualified firmware at the time of manufacturing. However, Mellanox issues firmware updates occasionally that provide new features and bug fixes. To check that your card is programmed with the latest available firmware version, download the mlxup firmware update and query utility. The utility can query for available Mellanox adapters and indicate which adapters require a firmware update. If the user confirms, mlxup upgrades the firmware using embedded images. The latest mlxup executable and documentation are available from http://www.mellanox.com => Products => Software => Firmware Tools.
5.1 Firmware Update Example
[server1]# ./mlxup
Querying Mellanox devices firmware ...

Device Type: ConnectX-5
Part Number: MCX516A-CDAT
Description: ConnectX®-5 Ex EN network interface card, 100GbE dual-port QSFP28,
PCIe4.0 x16, tall bracket, ROHS R6
PSID: MT_2190110032
PCI Device Name: 0000:06:00.0
Base GUID: e41d2d0300fd8b8a
Versions: Current Available
FW 16.00.0000 16.00.0000

Status: Up to date

Device Type: ConnectX-5
Part Number: MCX516A-CDAT
Description: ConnectX®-5 Ex EN network interface card, 100GbE dual-port QSFP28,
PCIe4.0 x16, tall bracket, ROHS R6
PSID: MT_2170110021
PCI Device Name: 0000:07:00.0
Base MAC: 0000e41d2da206d4
Versions: Current Available
FW 16.00.0000 16.00.0000

Status: Update required

Perform FW update? [y/N]: y
Device #1: Up to date
Device #2: Updating FW ... Done

Restart needed for updates to take effect.
Log File: /var/log/mlxup/mlxup-yyyymmdd.log
6 Troubleshooting
6.1 General
Table 12 - General Troubleshooting
| Server unable to find the adapter | ·Ensure that the adapter is placed correctly·Make sure the adapter slot and the adapter are compatible·Install the adapter in a different PCI Express slot·Use the drivers that came with the adapter or download the latest·Make sure your motherboard has the latest BIOS·Try to reboot the server |
| The adapter no longer works | ·Reseat the adapter in its slot or a different slot, if necessary·Try using another cable·Reinstall the drivers for the network driver files may be damaged or deleted·Reboot the server |
| Adapters stopped working after installing another adapter | ·Try removing and re-installing all adapters·Check that cables are connected properly·Make sure your motherboard has the latest BIOS |
| Link indicator light is off | ·Try another port on the switch·Make sure the cable is securely attached·Check you are using the proper cables that do not exceed the recommended lengths·Verify that your switch and adapter port are compatible |
| Link light is on, but with no communication established | ·Check that the latest driver is loaded·Check that both the adapter and its link are set to the same speed and duplex settings |
6.2 Linux
Table 13 - Linux Troubleshooting
| Environment Information | cat /etc/issueuname -acat /proc/cupinfo | grep ‘model name’ | uniqofed_info -sifconfig -aip link showethtool <interface>ethtool -i <interface_of_Mellanox_port_num>ibdev2netdev |
| Card Detection | lspci | grep -i Mellanox |
| Mellanox Firmware Tool (MFT) | Download and install MFT: http://www.mellanox.com/content/pages.php?pg=management_tools&menu_section=34Refer to the User Manual for installation instructions.Once installed, run:mst startmst statusflint -d <mst_device>q |
| Ports Information | ibstatibv_devinfo |
| Firmware Version Upgrade | To download the latest firmware version refer tohttp://www.mellanox.com/supportdownloader |
| Collect Log File | cat /var/log/messagesdmesg >> system.logjournalctl (Applicable on new operating systems)cat /var/log/syslog |
6.3 Windows
Table 14 - Windows Troubleshooting
| Environment Information | From the Windows desktop choose the Start menu and run: msinfo32To export system information to a text file, choose the Export option from the File menu.Assign a file name and save. |
| Mellanox Firmware Tool (MFT) | Download and install MFT:http://www.mellanox.com/content/pages.php?pg=management_tools&menu_section=34Refer to the User Manual for installation instructions.Once installed, open a CMD window and run:WinMFTmst startmst statusflint –dq |
| Ports Information | vstat |
| Firmware Version Upgrade | Download the latest firmware version using the PSID/board ID:http://www.mellanox.com/supportdownloader/flint –d–ib |
| Collect Log File | Event log viewerMST device logs:mst startmst statusflint –ddc >dump_configuration.logmstdump dcmstdump.log |
7 Specifications
7.1 MCX516A-BDAT Specifications
Table 15 - MCX516A-BDAT Specification Table
| Physical | Size: 2.71 in. x 5.6 in. (68.90mm x 142.24 mm) – low profile | |
| Connector: Dual QSFP28 (copper and optical) | ||
| Protocol Support | Ethernet: 40GBASE-CR4, 40GBASE-SR4, 40GBASE-LR4, 40GBASE-ER4, 25GBASE-CR/CR-S, 25GBASE-SR, 25GBASE-LR, 25G Ethernet Consortium, 10GBASE-SR, 10GBASE-LR, 10GBASE-ER, 10GBASE-CX4, SGMII, 1000BASE-X | |
| Data Rate: 1/10/25/40 Gb/s– Ethernet | ||
| PCI Express Gen3/Gen4: SERDES @ 8.0GT/s / 16.0GT/s (respectively), 16 lanes (2.0 and 1.1 compatible) | ||
| Power and Environmental | Voltage: 12V | |
| Power Cable | ||
| Typical Powera | Passive Cables 18.4W | |
| Maximum Power | Passive Cables 21.6W | |
| 1.5 Active Cables 24.9W | ||
| 2.5W Active Cables 26.1W | ||
| Maximum power available through QSFP28 port: 3.5W | ||
| Temperature: Operational | 0°C to 55°C | |
| Non-operational -40°C to 70°C | ||
| Humidity: 90% relative humidityb | ||
| Air Flow: See Airflow Specifications on page 63 | ||
| Regulatory | Safety: CB / cTUVus / CE | |
| EMC: CE / FCC / VCCI / ICES / RCM | ||
| RoHS: RoHS-R6 | ||
a. Typical power for ATIS traffic load.
b. For both operational and non-operational states.
7.2 MCX515A-GCAT Specifications
Table 16 - MCX515A-GCAT Specification Table
| Physical | Size: 2.71 in. x 5.6 in. (68.90mm x 142.24 mm) – low profile | |
| Connector: Single QSFP28 (copper and optical) | ||
| Protocol Support | Ethernet: 50G Ethernet Consortium, 40GBASE-CR4, 40GBASE-SR4, 40GBASE-LR4, 40GBASE-ER4, 25GBASE-CR/CR-S, 25GBASE-SR, 25GBASE-LR, 25G Ethernet Consortium, 10GBASE-SR, 10GBASE-LR, 10GBASE-ER, 10GBASE-CX4, SGMII, 1000BASE-X | |
| Data Rate: 1/10/25/40/50 Gb/s– Ethernet | ||
| PCI Express Gen3: SERDES 8.0GT/s, 16 lanes (2.0 and 1.1 compatible) | ||
| Power and Environmental | Voltage: 12V | |
| Power Cable | ||
| Typical Powera | Passive Cables 12.7W | |
| Maximum Power | Passive Cables 15.1W | |
| 1.5 Active Cables 18.5W | ||
| 2.5W Active Cables 20.7 | ||
| Maximum power available through QSFP28 port: 3.5W | ||
| Temperature: Operational | 0°C to 55°C | |
| Non-operational -40°C to 70°C | ||
| Humidity: 90% relative humidityb | ||
| Air Flow: See Airflow Specifications on page 63 | ||
| Regulatory | Safety: CB / cTUVus / CE | |
| EMC: CE / FCC / VCCI / ICES / RCM | ||
| RoHS: RoHS-R6 | ||
a. Typical power for ATIS traffic load.
b. For both operational and non-operational states.
7.3 MCX516A-GCAT Specifications
Table 17 - MCX516A-GCAT Specification Table
| Physical | Size: 2.71 in. x 5.6 in. (68.90mm x 142.24 mm) – low profile | |
| Connector: Dual QSFP28 (copper and optical) | ||
| Protocol Support | Ethernet: 50G Ethernet Consortium, 40GBASE-CR4, 40GBASE-SR4, 40GBASE-LR4, 40GBASE-ER4, 25GBASE-CR/CR-S, 25GBASE-SR, 25GBASE-LR, 25G Ethernet Consortium, 10GBASE-SR, 10GBASE-LR, 10GBASE-ER, 10GBASE-CX4, SGMII, 1000BASE-X | |
| Data Rate: 1/10/25/40/50/100 Gb/s– Ethernet | ||
| PCI Express Gen3: SERDES @ 8.0GT/s, 16 lanes (2.0 and 1.1 compatible) | ||
| Power and Environmental | Voltage: 12V | |
| Power Cable | ||
| Typical Powera | Passive Cables 14.7W | |
| Maximum Power | Passive Cables 17.2W | |
| 1.5 Active Cables 20.6W | ||
| 2.5W Active Cables 22.8W | ||
| Maximum power available through QSFP28 port: 3.5W | ||
| Temperature: Operational | 0°C to 55°C | |
| Non-operational -40°C to 70°C | ||
| Humidity: 90% relative humidityb | ||
| Air Flow: See Airflow Specifications on page 63 | ||
| Regulatory | Safety: CB / cTUVus / CE | |
| EMC: CE / FCC / VCCI / ICES / RCM | ||
| RoHS: RoHS-R6 | ||
a. Typical power for ATIS traffic load.
b. For both operational and non-operational states.
7.4 MCX515A-CCAT Specifications
Table 18 - MCX515A-CCAT Specification Table
| Physical | Size: 2.71 in. x 5.6 in. (68.90mm x 142.24 mm) – low profile | |
| Connector: Single QSFP28 (copper and optical) | ||
| Protocol Support | Ethernet: 100GBASE-CR4, 100GBASE-KR4, 100GBASE-SR4, 56GBASE-R4, 550G Ethernet Consortium, 40GBASE-CR4, 40GBASE-SR4, 40GBASE-LR4, 40GBASE-ER4, 25GBASE-CR/CR-S, 25GBASE-SR, 25GBASE-LR, 25G Ethernet Consortium, 10GBASE-SR, 10GBASE-LR, 10GBASE-ER, 10GBASE-CX4, SGMII, 1000BASE-X | |
| Data Rate: 1/10/25/40/50/100 Gb/s– Ethernet | ||
| PCI Express Gen3: SERDES @ 8.0GT/s, 16 lanes (2.0 and 1.1 compatible)Note: PCIe 3.0 x16 bus can supply a maximum bandwidth of 128Gb/s only (=16 * 8GT/s, including overhead), and therefore cannot support 200Gb/s when both network ports of MCX516A-CCAT run at 100Gb/s. | ||
| Power and Environmental | Voltage: 12V | |
| Power Cable | ||
| Typical Powera | Passive Cables 14.2W | |
| Maximum Power | Passive Cables 17.0W | |
| 1.5 Active Cables 18.6W | ||
| 2.5W Active Cables 19.7W | ||
| Maximum power available through QSFP28 port: 5W | ||
| Temperature: | Operational 0°C to 55°C | |
| Non-operational -40°C to 70°C | ||
| Humidity: 90% relative humidityb | ||
| Air Flow: See Airflow Specifications on page 63 | ||
| Regulatory | Safety: CB / cTUVus / CE | |
| EMC: CE / FCC / VCCI / ICES / RCM | ||
| RoHS: RoHS-R6 | ||
a. Typical power for ATIS traffic load.
b. For both operational and non-operational states.
7.5 MCX516A-CCAT Specifications
Table 19 - MCX516A-CCAT Specification Table
| Physical | Size: 2.71 in. x 5.6 in. (68.90mm x 142.24 mm) – low profile | |
| Connector: Dual QSFP28 (copper and optical) | ||
| Protocol Support | Ethernet: 100GBASE-CR4, 100GBASE-KR4, 100GBASE-SR4, 56GBASE-R4, 550G Ethernet Consortium, 40GBASE-CR4, 40GBASE-SR4, 40GBASE-LR4, 40GBASE-ER4, 25GBASE-CR/CR-S, 25GBASE-SR, 25GBASE-LR, 25G Ethernet Consortium, 10GBASE-SR, 10GBASE-LR, 10GBASE-ER, 10GBASE-CX4, SGMII, 1000BASE-X | |
| Data Rate: 1/10/25/40/50/100 Gb/s– Ethernet | ||
| PCI Express Gen3: SERDES @ 8.0GT/s, 16 lanes (2.0 and 1.1 compatible)Note: PCIe 3.0 x16 bus can supply a maximum bandwidth of 128Gb/s only (=16 * 8GT/s, including overhead), and therefore cannot support 200Gb/s when both network ports of MCX516A-CCAT run at 100Gb/s. | ||
| Power and Environmental | Voltage: 12V | |
| Power Cable | ||
| Typical Powera | Passive Cables 16.2W | |
| Maximum Power | Passive Cables 19.0W | |
| 1.5 Active Cables 22.3W | ||
| 2.5W Active Cables 24.6W | ||
| Maximum power available through QSFP28 port: 5W | ||
| Temperature: | Operational 0°C to 55°C | |
| Non-operational -40°C to 70°C | ||
| Humidity: 90% relative humidityb | ||
| Air Flow: See Airflow Specifications on page 63 | ||
| Regulatory | Safety: CB / cTUVus / CE | |
| EMC: CE / FCC / VCCI / ICES / RCM | ||
| RoHS: RoHS-R6 | ||
a. Typical power for ATIS traffic load.
b. For both operational and non-operational states.
7.6 MCX516A-CDAT Specifications
Table 20 - MCX516A-CDAT Specification Table
| Physical | Size: 2.71 in. x 5.6 in. (68.90mm x 142.24 mm) – low profile | |
| Connector: Dual QSFP28 (copper and optical) | ||
| Protocol Support | Ethernet: 100GBASE-CR4, 100GBASE-KR4, 100GBASE-SR4, 56GBASE-R4, 550G Ethernet Consortium, 40GBASE-CR4, 40GBASE-SR4, 40GBASE-LR4, 40GBASE-ER4, 25GBASE-CR/CR-S, 25GBASE-SR, 25GBASE-LR, 25G Ethernet Consortium, 10GBASE-SR, 10GBASE-LR, 10GBASE-ER, 10GBASE-CX4, SGMII, 1000BASE-X | |
| Data Rate: 1/10/25/40/50/100 Gb/s– Ethernet | ||
| PCI Express Gen3/Gen4: SERDES @ 8.0GT/s / 16.0GT/s (respectively) (2.0 and 1.1 compatible)Note: PCIe 4.0 x16 bus can supply a maximum bandwidth of 256Gb/s (=16 * 16GT/s, including overhead), and can support 200Gb/s when both network ports of MCX516A-CDAT run at 100Gb/s. | ||
| Power and Environmental | Voltage: 12V | |
| Power Cable | ||
| Typical Powera | Passive Cables 19.3W | |
| Maximum Power | Passive Cables 23.4W | |
| 1.5 Active Cables 26.8W | ||
| 2.5W Active Cables 29.0W | ||
| Maximum power available through QSFP28 port: 5W | ||
| Temperature: Operational | 0°C to 55°C | |
| Non-operational -40°C to 70°C | ||
| Humidity: 90% relative humidityb | ||
| Air Flow: See Airflow Specifications on page 63 | ||
| Regulatory | Safety: CB / cTUVus / CE | |
| EMC: CE / FCC / VCCI / ICES / RCM | ||
| RoHS: RoHS-R6 | ||
a. Typical power for ATIS traffic load.
b. For both operational and non-operational states.
7.7 Airflow Specifications
Table 21 - Airflow Specifications
| Air Flow (LFM) ^a Air Flow Direction - Heat Sink to Port | |||||
| Cable Type | Passive | Active 1.5W | Active 2.5W | Active 3.5W | Active 5W |
| MCX516A-BDAT 300 350 400 400 - | |||||
| MCX515A-GCAT | 300 350 400 400 | - | |||
| MCX516A-GCAT | 350 500 600 650 | - | |||
| MCX515A-CCAT | 300 | 350 | 400 | 400 | 950 |
| MCX516A-CCAT | 350 | 500 | 600 | 650 | 1300 |
| MCX516A-CDAT 400 600 850 | 1000 | 1400 | |||
a. Cells marked with (−) are not applicable
7.8 Adapter Card LED Operations
There is one bi-color I/O LED per port to indicate link status. See Table 22.
Table 22 - Physical and Logical Link Indications (Ethernet Mode)
| LED Color and State | Description |
| Off | A link has not been established |
| Blinking Ambera | 4 Hz blinking Amber indicates a problem with the link |
| Solid Green | Indicates a valid link with no active traffic |
| Blinking Green | Indicates a valid logical link with active traffic |
a. 1 Hz Blinking Amber occurs due to running a beacon command for locating the adapter card.
7.9 Board Mechanical Drawing and Dimensions

All dimensions are in millimeters.
All the mechanical tolerances are +/- 0.1mm.

Fore the 3D Model of the card, please refer to 3D Models.
Figure 3: Mechanical Drawing of the Dual-port Adapter Cards
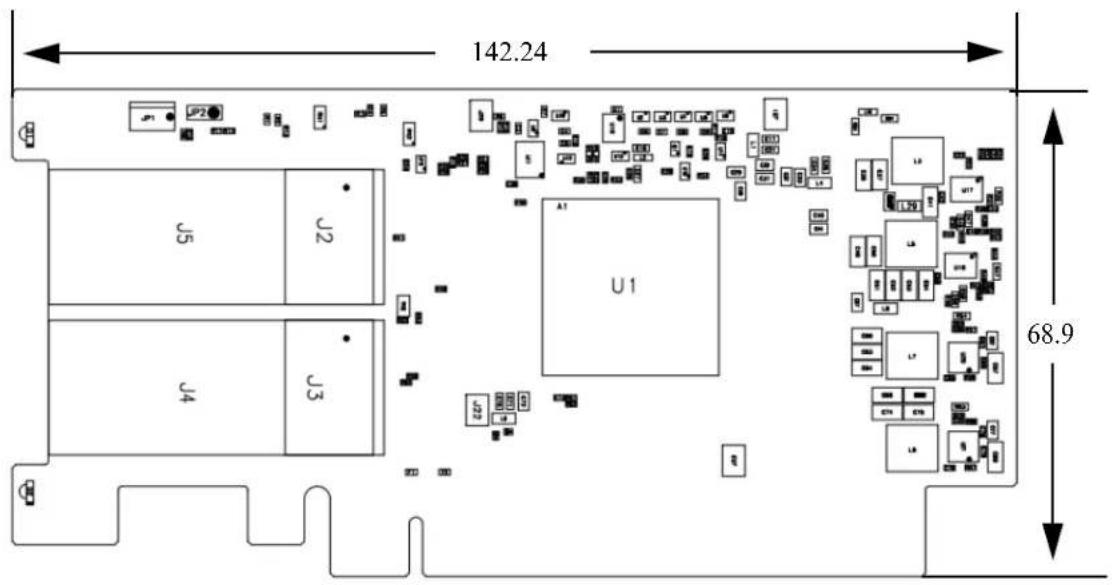
7.10 Bracket Mechanical Drawing
Figure 4: Single-port Tall Bracket
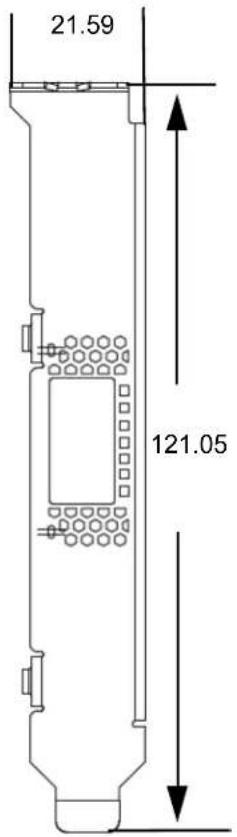
Figure 5: Dual-port Tall Bracket
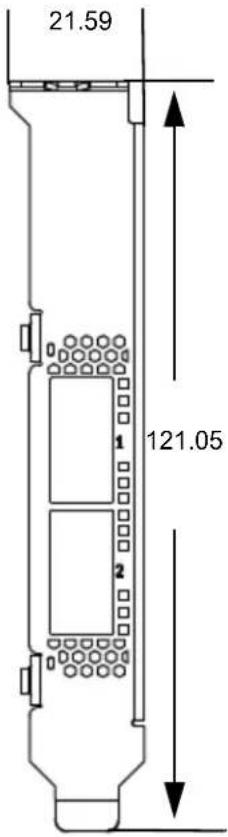
Appendix A: Finding the MAC and Serial Number on the Adapter Card
Each Mellanox adapter card has a different identifier printed on the label: serial number and the card MAC for the Ethernet protocol.

The revision indicated on the labels in the following figures do not necessarily represent the latest revision of the card.
Figure 6: MCX516A-BDAT Board Label (Example)
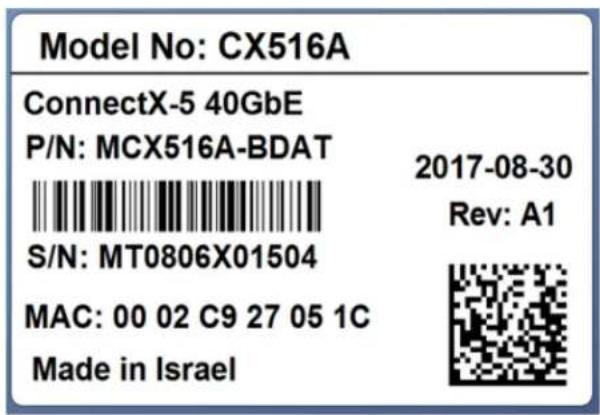
Figure 7: MCX515A-GCAT Board Label (Example)
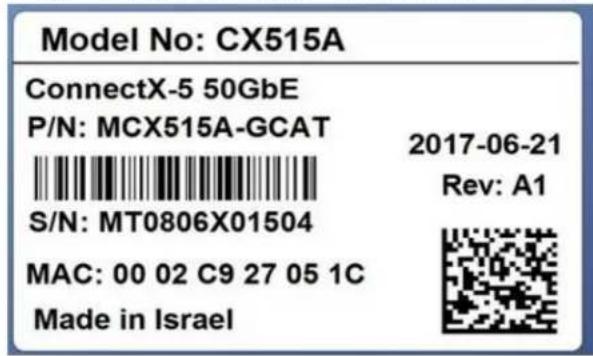
Figure 8: MCX516A-GCAT Board Label (Example)
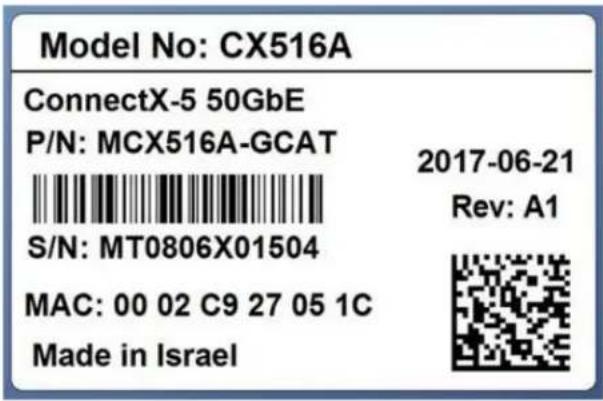
Figure 9: MCX515A-CCAT Board Label (Example)
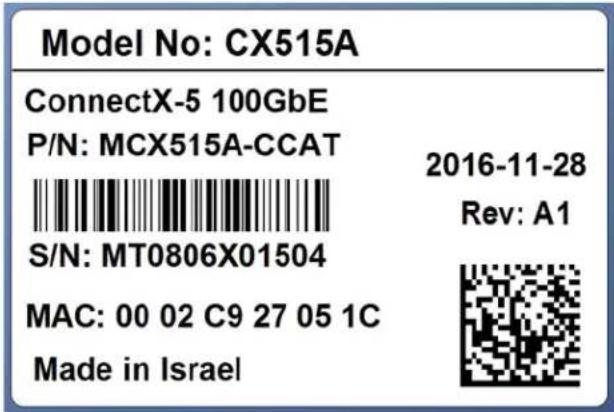
Figure 10: MCX516A-CCAT Board Label Example)
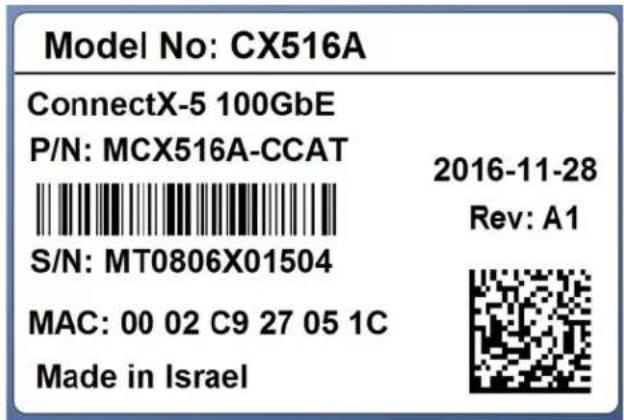
Figure 11: MCX516A-CDAT Board Label (Example)
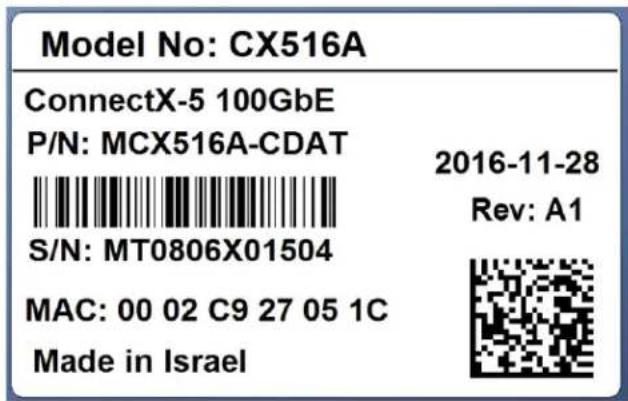
Appendix B: Safety Warnings
1. Installation Instructions

Read all installation instructions before connecting the equipment to the power source.
2. Over-temperature

This equipment should not be operated in an area with an ambient temperature exceeding the maximum recommended: 55^ C ( 131^ F).
To guarantee proper air flow, allow at least 8cm (3 inches) of clearance around the ventilation openings.
3. During Lightning - Electrical Hazard

During periods of lightning activity, do not work on the equipment or connect or disconnect cables.
4. Copper Cable Connecting/Disconnecting

Some copper cables are heavy and not flexible, as such they should be carefully attached to or detached from the connectors. Refer to the cable manufacturer for special warnings and instructions.
5. Equipment Installation

This equipment should be installed, replaced, or serviced only by trained and qualified personnel.
6. Equipment Disposal

Disposal of this equipment should be in accordance to all national laws and regulations.
7. Local and National Electrical Codes

This equipment should be installed in compliance with local and national electrical codes.
8. Hazardous Radiation Exposure

Caution – Use of controls or adjustment or performance of procedures other than those specified herein may result in hazardous radiation exposure.

CLASS 1 LASER PRODUCT and reference to the most recent laser standards: IEC 60 825-1:1993 + A1:1997 + A2:2001 and EN 60825-1:1994+A1:1996+A2:20.
Appendix D: Sicherheitshinweise (Warnings in German)
- Mellanox ConnectX®-5 Ex Ethernet Single and Dual QSFP28 Port Adapter Cards User Manual
- Table of Contents
- Table of Contents 1
- List of Tables 4
- List of Figures 5
- Revision History 6
- About This Manual 7
- Intended Audience 7
- Chapter 1 Introduction....9
- Chapter 2 Interfaces ....13
- Chapter 3 Hardware Installation ..... 14
- Chapter 4 Driver Installation ....22
- Linux.... 22
- Uninstalling Mellanox OFED.... 29
- Installing MLNX\_OFED Using YUM.... 29
- Updating Firmware After Installation 34
- UEFI Secure Boot.... 35
- Performance Tuning 37
- Windows Driver 38
- Installation Results 45
- Uninstalling Mellanox WinOF-2 Driver 49
- Firmware Upgrade 49
- Deploying the Driver on a Nano Server.... 49
- Chapter 5 Updating Adapter Card Firmware....53
- Chapter 6 Troubleshooting....54
- Chapter 7 Specifications ....57
- List of Figures
- Revision History
- About This Manual
- Intended Audience
- Related Documentation
- Document Conventions
- Technical Support
- Firmware Updates
- Introduction
- Product Overview
- Features and Benefits
- Operating Systems/Distributions
- Connectivity
- Interfaces
- Ethernet QSFP28 Interface
- PCI Express Interface
- LED Interface
- Hardware Installation
- System Requirements
- Hardware
- Operating Systems/Distributions
- Software Stacks
- Safety Precautions
- Pre-Installation Checklist
- Bracket Installation Instructions
- Removing the Existing Bracket
- .Installing the New Bracket
- Card Installation Instructions
- Cables and Modules
- Cable Installation
- Adapter Card Un-installation Instructions
- Safety Precautions
- Card Un-installation
- Identify the Card in Your System
- On Windows
- On Linux
- Driver Installation
- Linux
- Hardware and Software Requirements
- Downloading Mellanox OFED
- Installing Mellanox OFED
- Installation Script
- Usage
- Example
- Installation Procedure
- Installation Results
- Installation Logging
- Example:
- openibd Script
- Driver Load Upon System Boot
- mlnxofedinstall Return Codes
- Uninstalling Mellanox OFED
- Installing MLNX\_OFED Using YUM
- Setting up MLNX\_OFED YUM Repository
- Installing MLNX\_OFED Using the YUM Tool
- Uninstalling Mellanox OFED Using the YUM Tool
- Installing MLNX\_OFED Using apt-get Tool
- Setting up MLNX\_OFED apt-get Repository
- Installing MLNX\_OFED Using the apt-get Tool
- Uninstalling Mellanox OFED Using the apt-get Tool
- Updating Firmware After Installation
- Updating the Device Online
- Updating the Device Manually
- Updating the Device Firmware Automatically upon System Boot
- UEFI Secure Boot
- Enrolling Mellanox's x.509 Public Key On your Systems
- Removing Signature from kernel Modules
- Performance Tuning
- Windows Driver
- Hardware and Software Requirements
- Downloading Mellanox WinOF-2 Driver
- Installing Mellanox WinOF-2 Driver
- Attended Installation
- Unattended Installation
- Installation Results
- Extracting Files Without Running Installation
- Uninstalling Mellanox WinOF-2 Driver
- Attended Uninstallation
- Unattended Uninstallation
- Firmware Upgrade
- Deploying the Driver on a Nano Server
- Offline Installation
- Online Update
- VMware Driver
- Hardware and Software Requirements
- Installing Mellanox NATIVE ESXi Driver for VMware vSphere
- To install the driver:
- Removing the Previous Mellanox Driver
- To remove all the drivers:
- Firmware Programming
- Updating Adapter Card Firmware
- Firmware Update Example
- Troubleshooting
- General
- Linux
- Windows
- Specifications
- MCX516A-BDAT Specifications
- MCX515A-GCAT Specifications
- MCX516A-GCAT Specifications
- MCX515A-CCAT Specifications
- MCX516A-CCAT Specifications
- MCX516A-CDAT Specifications
- Airflow Specifications
- Adapter Card LED Operations
- Board Mechanical Drawing and Dimensions
- Bracket Mechanical Drawing
- Appendix A: Finding the MAC and Serial Number on the Adapter Card
- Appendix B: Safety Warnings
- Installation Instructions
- Over-temperature
- During Lightning - Electrical Hazard
- Copper Cable Connecting/Disconnecting
- Equipment Installation
- Equipment Disposal
- Local and National Electrical Codes
- Hazardous Radiation Exposure
- Appendix D: Sicherheitshinweise (Warnings in German)
Brand : NVIDIA
Model : Mellanox ConnectX-5
Category : Network card / adapter