
DC110-SB - Cooler Evakool - Free user manual and instructions
Find the device manual for free DC110-SB Evakool in PDF.


| Product Type | Portable 12V DC Cooler/Freezer |
| Model | DC110-SB |
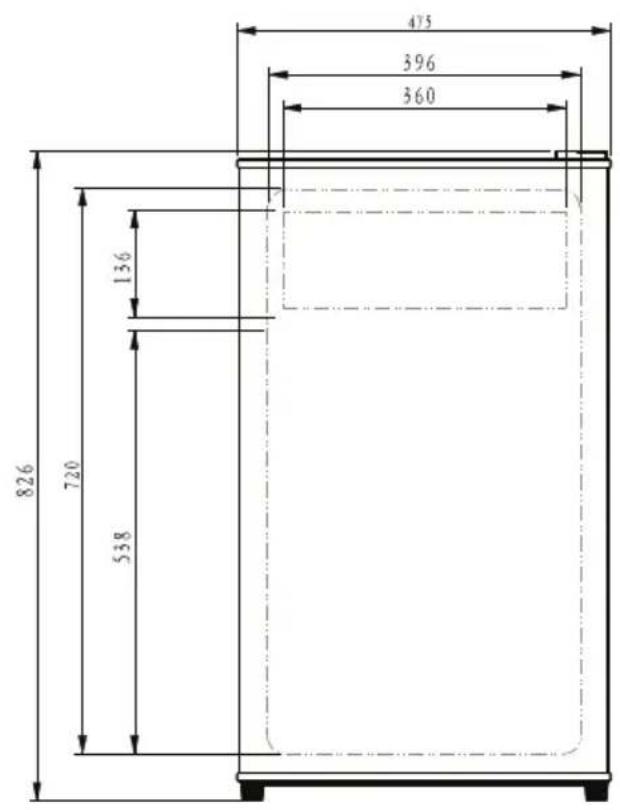
| Capacity | 110 liters |
| Power Supply | DC 12V/24V |
| Compressor | Secop (Danfoss) 12V DC |
| Operating Ambient Temperature | 10°C to 43°C |
| Low Ambient Heater | Automatic activation below 12°C |
| Temperature Control | Rotary dial (0-5), 0=OFF, 5=coldest |
| Door Lock | Lockable (key included) |
| Freezer Compartment | Separate internal compartment |
| Vegetable Crisper | Yes |
| Defrost | Manual, every 1-6 months |
| Ventilation Clearance | Minimum 50mm around unit |
| Cable Requirements (12V) | 2.5mm² up to 2.5m, 4mm² up to 4m, 6mm² up to 6m, 10mm² up to 10m |
| Cable Requirements (24V) | 2.5mm² up to 5m, 4mm² up to 8m, 6mm² up to 12m, 10mm² up to 20m |
| Low Voltage Cut-Out (12V) | 10.4V cut-out, 11.7V cut-in |
| Low Voltage Cut-Out (24V) | 22.8V cut-out, 24.2V cut-in |
| Mounting Kit | Optional (sold separately) |
| Door Reversibility | Yes (user reversible) |
| Warranty | 24 months (5 years on compressor) |
| Cleaning | Mild detergent and damp cloth; do not use harsh chemicals |
| Safety Features | Circuit breaker, low voltage protection, yellow fault LED |
Frequently Asked Questions - DC110-SB Evakool
User questions about DC110-SB Evakool
0 question about this device. Answer the ones you know or ask your own.
Ask a new question about this device
Download the instructions for your Cooler in PDF format for free! Find your manual DC110-SB - Evakool and take your electronic device back in hand. On this page are published all the documents necessary for the use of your device. DC110-SB by Evakool.
USER MANUAL DC110-SB Evakool
natural_image
A smiling man in a yellow apron grilling meat outdoors, with another woman nearby (no visible text or symbols)
CHILLED FOR GOOD TIMES
Please read operating manual carefully before using your unit.
Please keep manual in a safe place and read our warranty statement via our website.
If lost find a digital copy at Evakool.com.au or contact Evakool on 1300 385 665 (1300 EVKOOL).
Contents
1 Safety Instructions 4
2 Notes on Using The Product 4
3 Operation 4
4 Installation Guide 6
5 Cross Flow Ventilation 8
6 Troubleshooting 11
7 Preventative Maintenance & Care 13
8 Warranty Statement 14
9 Product Drawings 15
Key Product Features
- Powered by 12 Volt DC Secop Compressor.
- Reliable electronics, high efficiency, low energy consumption.
- Lockable door for travel.
- Separate freezer compartment.
- Operates in temperatures from 10^ to 43^ ambient temperature in the motor compartment.
- Vegetable crisper.
- Low ambient heater.

1 Safety Instructions
- Warning: Do not use your unit if any cabling is damaged, frayed or exposed.
- Warning: Do not attempt or continue to operate your unit if it is wet.
- When using the unit ensure the circuit being used has a fuse or circuit breaker, located at the battery, the recommended size for DC 12 Volt is 15 Amp, DC 24 Volt is 7.5 Amp.
- Do not place any electrical devices inside the refrigerator as they may become damaged.
2. Notes On Using The Product
- Your unit requires good ventilation; allow a gap of at least 50mm around the refrigerator.
- Do not allow a large amount of frost to build up on the inside walls as this may impair cooling. Defrost regularly by turning the unit off, allowing the frost to melt and wiping out the water. This fridge is not frost-free, we recommend defrosting your fridge every one to six months (dependent on variable factors).
- The lower the ambient temperature, the lower the power usage. In order to maximise efficiency keep the unit in a cool location out of direct sunlight.
- It is recommended to operate the unit on a flat surface, but it will operate at angles up to 30^ .
3. Operation
• Power: DC (12 and 24 Volt)
• Cable Length Specification
The DC cables must have a suitable cross-section for their length (measured from the battery to the unit), according to this table:
| Cable Thickness (Area) 12V Max Cable Length 24V Max Cable Length | |||||
| (mm ^2 ) AWG (m) (ft) (m) (ft) | |||||
| 2.5 14 2.5 | 8 5 16 | ||||
| 4 12 4 13 | 8 26 | ||||
| 6 10 6 20 | 12 39 | ||||
| 10 8 10 33 | 20 66 | ||||
The refrigerator is fitted with an Anderson style plug connection. Ensure cabling to the fridge is also fitted with this style plug, this will guarantee the best connection and minimise voltage drop.
Control Panel

- Connect fridge to 12 or 24V DC.
Power Source Cut Off Voltage Cut In Voltage
| 12V DC 10.4V | 11.7V | |
| 24V DC 22.8V | 24.2V |
- Ensure correct voltage is applied to run the fridge.
- Set thermostat to the desired setting. We recommend starting at 3. Allow 24 hours for the cabinet to come down to temperature and settle in.
- To make the fridge colder, turn dial to a high number and to make the fridge warmer turn to a lower number.
- 0 is the 'OFF' position.
• Note: Always allow 24 hours after any adjustment for temperatures to settle.
Low Ambient Heater
What it does: In low ambient temperatures 12^ C and under, there is not enough heat in the air to cycle the fridge back on, so a heater is needed to assist this to happen. This operation draws as little as 2.42A/hr.
What do I need to do? Absolutely nothing. The heater is controlled electronically, so during the colder months the fridge senses when it is needed and activates this function.
4. Installation Guide
You've bought your refrigerator and you're ready to install it in your car, caravan or camper trailer. Please take the time to read the following information to ensure your refrigerator will run at its peak efficiency and you'll get a long life out of your fridge.
- Unpack your new refrigerator and make sure there is no damage to the cabinet.
- If you have bought a mounting bracket make sure the surface you’ve attached your mounting bracket to is level and solid. Refer to page 7 for instructions on how to install the mounting kit. If you have not purchased a mounting kit and require one, please visit www.evakool.com.au.
- Correct air flow and ventilation, this is probably the most important part of the installation. Please read the Cross Flow Ventilation guide (page 8) for a more information.
Important: The compressor and condensing coil in your fridge is similar to the radiator and motor in your car. The radiator needs cool air passing across it to remove the heat, to stop your engine overheating and eventually failing. The same goes for a refrigerator, if cool air isn't supplied to the condensing coil, the refrigerator will stop preforming and serious damage can be done to the compressor.
- Make sure the unit is easily accessible and easy to remove. In case of a warranty repair, the unit needs to be uninstalled and delivered to EvaKool or a recommended service agent as part of the warranty requirements.
- Electrical wiring and installation, should comply to the proper national regulations. See table on page 4 on correct sizing of cable. We also recommend that the wiring be installed by a licensed installer.
- Installing the drain hose (silicone hose located on the back of your fridge). Your refrigerator will produce moisture inside the cabinet and this will need to be drained away. This is normal because it is not a frost free fridge.
- Drill a hole through the floor behind the fridge.
- Install the silicone hose through the hole.
- Seal drilled hole with silicone to prevent dust, water and pesky critters entering your car, trailer or van.
- Connect the power to your fridge.
Reversing the Door Opening
- If installed, disconnect and uninstall the fridge.
- Ensuring the fridge is OFF and not connected to power, lay the fridge on its back. Ensure the fridge is square and level and the door seal is touching the fridge cabinet.
- Undo the top plastic hinge caps.
-
Unscrew and remove the 4 x screws that hold down the hinge.
-
Unscrew and remove the 2 x screws that hold down the door locking mechanism.
- Remove the plastic caps next to the locking mechanism.
- Swap the door locking mechanism and hinge over to the opposite side and then screw them in place. Do not completely tighten just yet.
- On the base of the cabinet unscrew and remove the 4 x screws that hold down the hinge.
- Unscrew and remove the 4 x screws that hold down the door guide.
- Swap the door guide and hinge over and then screw them in place.
- Proceed to tighten all the screws.
Handy Tips:
- If there are any gaps in the door seal, use a hairdryer to gently heat the door seal and make it soft. This will allow it to take shape of the fridge and seal again. Leave the door seal closed for 30 minutes so it can cool down and take shape.
- Once you've stood the fridge back up and the door seal feels tight (on the hinge side), spray it with a silicon base spray or use a thin layer of Vaseline. This will help the seal slide and not roll over.
Warning: Do not use a cordless screwdriver to reattach the screws as you may cross thread the screws and damage the thread. Always start the thread with a handheld screwdriver.
Installing the Mounting Kit
*This product is not included and can be purchase separately via our website.
The mounting kit consists of the following:
- 1 x top piece – which allows for the door to be left or right opening
- 2 x side pieces
- 4 x screws
- 4 x washers
Each piece included in the mounting kit contains pre-drilled holes. These pre-drilled holes are the ONLY place the mounting kit should be attached, failure to do so may void the warranty of the fridge.
When drilling into the cabinet, use a drill-stop to ensure the drill bit does not pierce the outer skin of the cabinet. We also suggest that it is fitted within the first 50mm of the front of the cabinet.
Once attached, it adds an additional 25mm to the height and 50mm to the width (25mm each side) of the cabinet.
5. Cross Flow Ventilation
Cross flow ventilation ensures that there is sufficient fresh air entering the space where your refrigerator is operating and that the stale hot air is extracted from the area. Fresh air is supplied to the space, through openings or vents, preferable from the outside to reduce the risk of hot air recycling through the condenser. The used hot air is extracted from the space either through natural convection or the use of an extraction fan. This results in cross flow ventilation.
Natural Convection
Warm air naturally will rise up. If you have vents of equal size at the top and bottom of your space, the warm air will naturally rise up and out the top vent which draws cooler air from outside through the bottom vent, this method naturally replaces the hot stale air with fresh cool air automatically. Cross flow, in one vent and out the other.
Extraction Fan
If your space is an odd size, shape or extraction has to go through cupboards or voids, then extraction fans are needed to create the flow of air from your cool air intake vent to your exhaust vent.
Fan Selection
Fan selection is a very important part of this process, the volume of the area where the fridge is kept, needs to be worked out. And the fan selected needs to be able to remove this volume, this is measured in litres per minute (Ltr/Min) or cubic feet per minute (CFM).
The other is static pressure of a fan, and this is its ability to push or pull air through resistance. Eg. Through a vent, the fins on the condenser and around corners and obstructions.
As a general rule of thumb:
• 120mm DC fan (minimum).
- 7 blade and aggressive curved blades (air flow and static pressure).
- If noise is going to be an issue, 40dB-A and under is recommended.
Vent Sizing
The bigger the better. For upright fridges we recommend the supply vent and exhaust vent be 480mm x 250mm, this allows adequate ventilation and replenishment of hot stale air with fresh cooler air.
Do Not:
- Have only one vent to remove hot air, as this does not work. You need air in and air out, cross flow ventilation is the only way air will move.
- This also applies to fans. A sealed compartment with one opening with a fan in it does not remove the air, again you need cross flow, air in and air out.
• Have different size vents, as this limits you to the smallest vent. - Have different size fans for drawing air in and exhausting air out, will limit you to the smallest fan. The rule applies when fitting a fan, if your fan is 120mm then as a minimum your supply opening needs to be the same if not bigger.
- If you are using a supply and extraction fan they have to be the same in their specifications, or you can end up with the air cavitating and not moving at all.
With the introduction of ‘dust free’ caravans and campers, there are a range of issues that may impact the performance and air ventilation to your fridge due to dust reduction filters and extraction fans. It is necessary to use hatches and vents to remove the hot air whilst replacing it with fresh cool air (as seen in the diagram below). This will ensure your fridge will be running at its peak efficiency and guarantee you’ll get a long life from your fridge.

• We recommend 2 vents - 480x250mm.
• One located level with the refrigerator motor.
• Second at the highest point of the fridge cavity, to ensure all hot air escapes.

- 50mm under
- 50mm up the back
- 50mm over the top
If you are installing your fridge next to cabinetry please follow these diagrams:

6. Troubleshooting
The Unit is Not Turning On
- Check whether the unit has been turned on.
- Check the power supply (try a different power source/vehicle/socket).
- Check whether the plug and the socket have a good connection.
- Check whether the circuit breaker has tripped (located on the back of the fridge in the compressor bay).
Low Refrigeration Performance
• Too much product been placed inside the unit.
• There is too much warm product inside the unit.
• The door is unlatched / or open.
• The seal is broken.
- Problems arising from poor ventilation (allow at least 50mm of space around the fridge, see diagram on pages 9 and 10).
• The ambient temperature is too high.
• The temperature setting is too high.
Yellow Fault Light Flashing (Located on the Control Panel)
1 Flash every 4 seconds: Low Voltage
- Try on different power source (vehicle or 240V AC power). If changing power source fixed issue, then possible issue with original power source.
- Ensure cabling between fridge and battery is at least 4mm^2 , if the distance is more than 2 metres then use at least 6mm^2 cable.
2 Flashes every 4 seconds: Fan Issue
• Fan is drawing too many amps (over 0.5 amps), replace fan.
3 Flash every 4 seconds: Compressor Start Issue
- Unplug cable and allow unit to rest for 10 minutes.
- Try on different power source (vehicle or 240V AC power).
• Electronic box fault. - Compressor fault.
4 Flash every 4 seconds: Low Motor Speed
- Reduce products / items inside unit.
- Move so unit is in a lower ambient temperature, clean vents / ensure clear air flow over compressor.
- Fan fault.
5 Flash every 4 seconds: Over Temperature
- Ambient temperature is too high.
- Clean vents / ensure clear air flow over compressor.
- Fan fault.
Can hear the sound of running water, gurgling or swishing from inside the unit
• This is normal, due to the flow of refrigerant in the unit.
Unusual noise when refrigerator is working
• The refrigerator is not placed on a level surface.
If none of the above solves your issues please contact Evakool on 1300 385 665 or visit our website www.evakool.com to find a service agent. Alternatively, email warranty@evakool.com with your purchase and contact details.
7. Preventative Maintenance & Care: Metal & Injection Moulded Products
To ensure a long life and reliable operation of your metal and injection moulded fridge/freezer we recommend following our preventative maintenance and care guide.
Cabinet Care
- The cabinet should be cleaned after every use by wiping both the interior and exterior with a damp cloth, using a mild non-abrasive detergent, and dry thoroughly. The painted metal surfaces can be polished with a car polish and a soft cloth.
- Do not use scourers, harsh cleaning products, solvents, or oil as this will degrade the plastic and can cause damage to painted surfaces.
- Do not leave the cabinet in direct sunlight as this may cause discolouration in the plastic and painted surfaces. Please note: plastic components in all EvaKool fridge/freezers are UV stabilised.
Defrosting
• After use, defrost ice off evaporator; switch off unit and disconnect from power source. Leave the door open to naturally melt any ice built up. Once the ice has melted, ensure the unit is completely dry by draining any residue and wiping down with a towel.
• Always make sure the cabinet is completely dry and the lid left ajar when put in storage. This will ensure no corrosion, mold or odor will form inside the cabinet.
- Do not store electrical devices such as the 12 volt adaptor inside the refrigerator.
Refrigerator Maintenance
- As your EvaKool fridge is a portable appliance it is subjected to a variety of different operating conditions. Every 12 months of use, a general inspection and maintenance should be carried out. We recommend the inspection to be carried out by an approved EvaKool agent. Our service agents can be found via our website (https://www.evakool.com.au/stores?type=2).
Marine Use
- We do not recommend the use of our fridges in a marine environment, as salt can cause corrosion in electronics and metal components. If unit failure is found to be caused by corrosion, warranty will be void.
8. Warranty Statement/Terms & Conditions
Nexberg Pty Ltd trading as EvaKool undertakes to the original purchaser that this product is sold free of defect in materials and/or workmanship under normal use for a period of 24 months. Subject to the following:
- The warranty period commences from the date of purchase by the original purchaser from an authorised EvaKool dealer.
- The Secop compressor in this unit carries a 5 year warranty under normal use.
- EvaKool will honour this warranty on presentation of proof of purchase of the unit to EvaKool or its approved service agent. The service agent will need to provide EvaKool with a photocopy of the proof prior to warranty being honoured.
- EvaKool will not be held responsible for any costs incurred in making a warranty claim.
- Please telephone 1300 385 665 for the name of an authorised service agent or refer to list provided on website (https://www.evakool.com.au/stores?type=2). It is the purchaser's responsibility to freight the unit to and from the service agent.
- EvaKool will not be held responsible for any damage or loss suffered or cost incurred whilst fridge is in transit.
- Warranty repairs may only be carried out by an authorised service agent. EvaKool will not reimburse repair claims carried out by unauthorised service agents. Any unauthorised tampering with any part of the unit will automatically void the warranty.
- Service agents may charge a fee for viewing or testing the unit. This is not covered by EvaKool or this warranty and is payable at the service point unless authorised by EvaKool.
- Any EvaKool authorised service agent in Australia will be able to carry out the service of your unit. If a repair needs to be undertaken and is covered in terms of this warranty a warranty authorisation number must be obtained prior to commencement of any work.
- This warranty does not extend to any products acquired for the purposes of re-supply, to be used up or transformed in a production or manufacture process or in repairing other goods.
- This fridge is intended for recreational use only. If used for commercial use, a 12 month warranty applies.
-
To the extent permitted by law, this warranty does not extend to any claim for damages that you or any other person may have for any loss (including without limitation consequential damages or loss of profit) or damage howsoever caused.
• EvaKool will not accept a warranty claim if: -
Modifications have been carried out to the unit without EvaKool's written authority.
- Damage to or failure of the unit has been caused in EvaKool's opinion by incorrect, extreme or unreasonable use.
-
Damage to or failure of the unit has been caused in EvaKool's opinion by misuse, neglect, accident, impact or similar cause. Refer the preventative maintenance guidelines.
-
EvaKool has total discretion of the variation of the warranty terms.
- Our goods come with guarantees that cannot be excluded under the Australian Consumer Law. You are entitled to a replacement or refund for major failure and for compensation for any other reasonably foreseeable loss or damage. You are also entitled to have the goods repaired or replaced if the goods fail to be of acceptable quality and the failure does not amount to a major failure.
- The above warranty conditions are in addition to any other rights and/or remedies as per the applicable law.
- Failure to follow the guidelines/recommendations in this manual may void the warranty.
• This warranty cannot be varied by others.
Please retain your receipt or proof of purchase for warranty purposes. You can register your warranty online at www.evakool.com.au under contact us and register product warranty.
9. Product Drawings
DC95


DC110

Evakcol®
CHILLED FOR GOOD TIMES
For your nearest stockist contact Evakool
T: 1300 385 665 (1300 EVKOOL)
E: sales@evakool.com
evakool.com.au
For Service and Warranty support contact Evakool
T: 1300 385 665 (EVKOOL)
E: warranty@evakool.com


- Contents
- Key Product Features
- Safety Instructions
- Notes On Using The Product
- Operation
- Control Panel
- Low Ambient Heater
- Installation Guide
- Reversing the Door Opening
- Handy Tips:
- Installing the Mounting Kit
- Cross Flow Ventilation
- Natural Convection
- Extraction Fan
- Fan Selection
- As a general rule of thumb:
- Vent Sizing
- Do Not:
- Troubleshooting
- The Unit is Not Turning On
- Low Refrigeration Performance
- Yellow Fault Light Flashing (Located on the Control Panel)
- Flash every 4 seconds: Low Voltage
- Flashes every 4 seconds: Fan Issue
- Flash every 4 seconds: Compressor Start Issue
- Flash every 4 seconds: Low Motor Speed
- Flash every 4 seconds: Over Temperature
- Can hear the sound of running water, gurgling or swishing from inside the unit
- Unusual noise when refrigerator is working
- Preventative Maintenance & Care: Metal & Injection Moulded Products
- Cabinet Care
- Defrosting
- Refrigerator Maintenance
- Marine Use
- Warranty Statement/Terms & Conditions
- Product Drawings
- Evakcol®
- CHILLED FOR GOOD TIMES
Brand : Evakool
Model : DC110-SB
Category : Cooler