DEC 6104 - Software RCF - Free user manual and instructions
Find the device manual for free DEC 6104 RCF in PDF.


| Product Type | Conference management software |
| Software Name | RCF Forum 6000 (DEC 6104) |
| Version | 1.0 |
| Operating System | Windows XP or later |
| Minimum Disk Space | 8.8 MB |
| Installation Method | CD-ROM or downloaded setup |
| License Type | Single PC, non-exclusive, non-transferable |
| Key Features | Synoptic panel creation, conference mode setting, audio management, video camera control, audio recording, reservation list, public view |
| Maximum Active Microphones | 1 to 6 delegates (configurable) or unlimited in free discussion |
| Audio Outputs | MAIN OUT, teleconference output, console jack outputs |
| Audio Inputs | MIC/LINE INPUT A and B |
| Video Camera Support | Up to 9 cameras, presets per microphone or room |
| Recording Format | Selectable audio compression format |
| Anti-Feedback | Bypass, Soft, or Hard |
| Interpretation Modes | Simultaneous or sequential |
| Reservation List | Queue management for speakers |
| Public View | Display for audience |
| Language Support | Multiple languages (installer and interface) |
| Manufacturer | RCF S.p.A., Reggio Emilia, Italy |
| Warranty | No warranty, no liability for damages |
Frequently Asked Questions - DEC 6104 RCF
User questions about DEC 6104 RCF
0 question about this device. Answer the ones you know or ask your own.
Ask a new question about this device
Download the instructions for your Software in PDF format for free! Find your manual DEC 6104 - RCF and take your electronic device back in hand. On this page are published all the documents necessary for the use of your device. DEC 6104 by RCF.
USER MANUAL DEC 6104 RCF
RCF Forum software licence agreement 3
Installation 6
Using the programme connecting the control unit 8
Creating the lighted display board 10
Conference mode setting 11
Audio settings 13
Managing the video cameras 14
Aiming the video camera to a microphone console: 15
Audio recording management 16
Reservation list 16
Public view 17
ITALIANO
Reggio Emilia - Italy
This is a legal agreement between RCF Spa Reggio Emilia - ITALY and you (either person or corporation) regarding the use of this SOFTWARE. Please read carefully the terms of this License Agreement before installing or using this SOFTWARE. If installing, copying or starting the use of this SOFTWARE, you hereby agree to the terms of this Licence Agreement.
1. GRANT OF LICENCE
RCF Spa grants you the following non-exclusive rights to use the SOFTWARE in accordance with the terms of this Licence Agreement.
a. You may use the SOFTWARE only on a specific single computer at one time. The SOFTWARE use includes the SOFTWARE loading into temporary memory (i.e. RAM) or installing the SOFTWARE into a storage media (i.e. hard disk) of the computer, on which you will use the SOFTWARE.
b. You may make one copy of the SOFTWARE for backup purpose only (CD, DVD or any other media), but other copies are prohibited.
c. Multiple-Shift Usage and Network Usage: you may use the software with whatever available PC. Yet, if you have to change PC, you shall delete the software from the mass storage of the used PC and ask the manufacturer for a new licence code (free of charge), because the old license code will not be valid any more. It is not allowed to store or use the SOFTWARE on more than one PC. The software use in a network or another computer system with several workstations (where the program can be simultaneously used by several computers) is not allowed. If you need to use the software in a network (or another system with several workstations), it will be necessary to purchase several licence codes from RCF Spa.
2. COPYRIGHT
The SOFTWARE and its copyrights are property of RCF Spa and are protected by all international copyright laws and treaties. (therefore, you shall treat the SOFTWARE like any other copyrighted material (i.e., CD, DVD, book).
All rights not mentioned in this manual are reserved by RCF Spa.
Copyright information, the serial number and other software identification features must not be removed, changed or hidden.
3. OTHER RESTRICTIONS
d. You are not allowed to modify, change, try to decompile the SOFTWARE, the copyright information and logos.
e. You shall not loan, rent, lease, sublicense or transfer the SOFTWARE, whole or a part to others. It is allowed to transfer it (and the respective printed materials) to others permanently if you retain no copies of the SOFTWARE and the new owner agrees to the terms of this Licence Agreement. If the SOFTWARE has been updated, any SOFTWARE transfer shall include the most recent update and all prior versions. The new owner shall get a new licence code (free of charge) from the manufacturer to ensure the full software operation.
f. You must not supply the SOFTWARE to others, if these may breach the contract terms to create illegal copies.
g. If this SOFTWARE contains multiple types of media (such as floppy disks and CD-ROM) and these media contain the same software, you may use only the one form of media that is appropriate for your computer. You shall not use the remaining form(s) of media on another computer.
4. NO WARRANTY
RCF Spa does not provide any warranty (either expressed or implied) to any software, including (for instance) merchantability or suitability for a particular purpose.
5. NO LIABILITY
In no event shall RCF Spa be liable to end-users for any damage whatsoever, including but not limited to financial damages for loss of business profits or business information due to the software use or inability to use this product.
RCF FORUM SOFTWARE LICENCE AGREEMENT
The foregoing provision is effective even if RCF Spa has been advised of the possibility of such damages. Even if the SOFTWARE has any material, verifiable and reproducible program errors, RCF Spa shall have no obligation to modify such errors.
6. PC SYSTEM REQUIREMENTS
Due to differences among computers, it is not possible to determine the general system requirements for the optimum operation. In this manual you will find the recommended system requirements that have been evaluated after several tests with various PCs. Even if your PC fulfils the system requirements, problems might occur with this RCFFORUM software, due to special PC hardware or software configurations (it is not possible to guarantee a 100 percent compatibility with the RCFFORUM software).
7. TERMINATION OF THE LICENCE
RCF Spa reserves the right to revoke the licence if you fail to comply with any of the terms of this License Agreement. If the license is revoked, you shall immediately stop using this SOFTWARE.
8. GENERAL
h. Any provision of this Agreement which is prohibited or unenforceable in any jurisdiction shall be ineffective to the extent of such prohibition or unenforceability without affecting, impairing or invalidating the remaining provisions hereof.
i. This License Agreement shall be governed by and construed in accordance with the laws of ITALY (without reference to the principles of conflicts of laws).
RCF S.p.A. would like to thank you for purchasing this product, which has been designed to guarantee reliability and high performance.
Insert the CD containing the installation software into the appropriate player. Make sure the computer on which the software will be used has the minimum requirements necessary (Windows XP® operating system). Explore the contents of the CD using the normal Windows commands, then run the "setup... .exe" file (the three dots indicate a progressive number of the used release).
The following dialogue window will open:
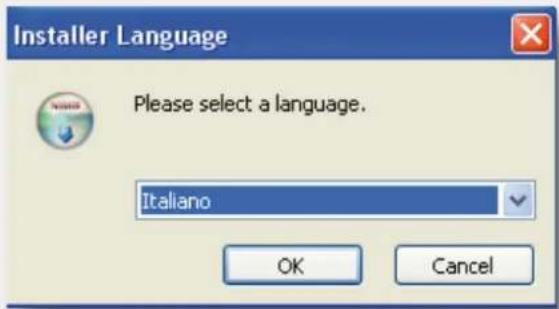
Select the proper language and press "OK" to confirm.
Then the following window opens:
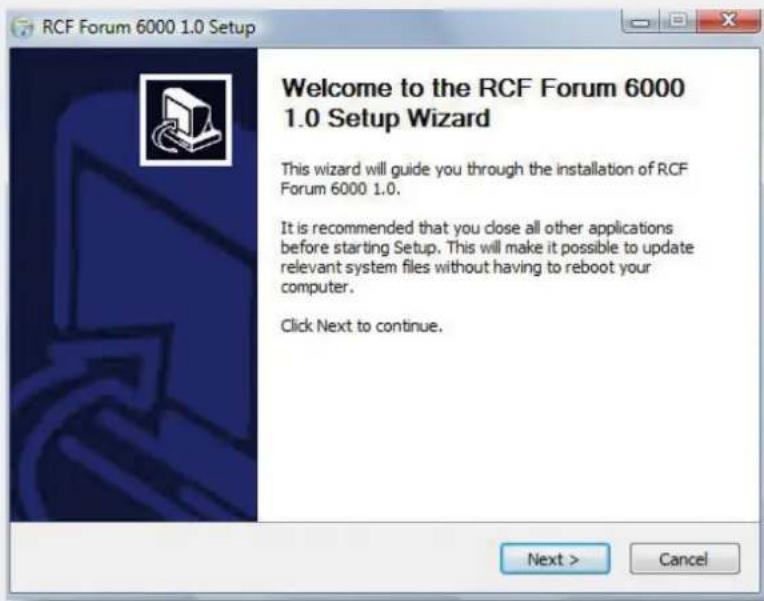
Press "next" to confirm.
You need to accept the licence terms in order to proceed.
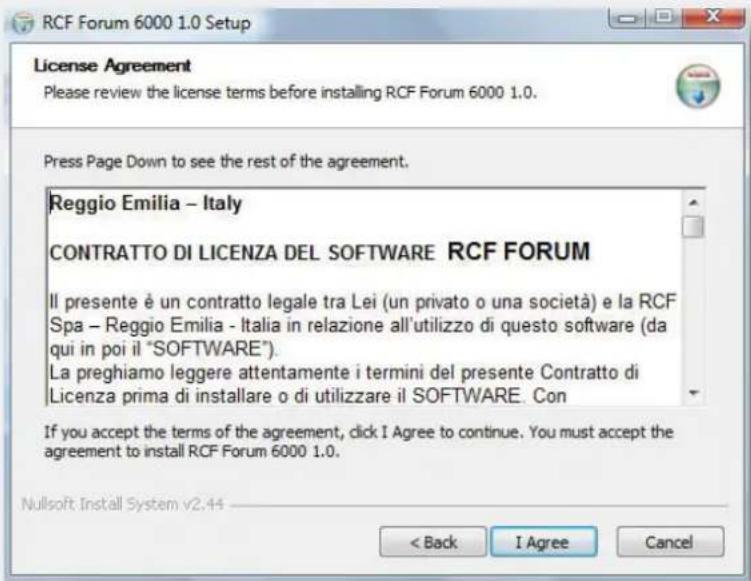
At this point, proceed with the installation by choosing the directory in which the software will be installed.
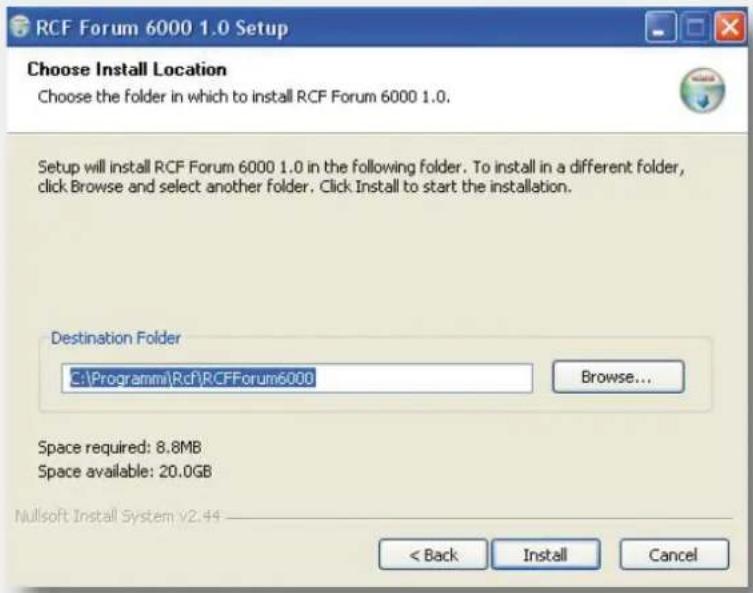
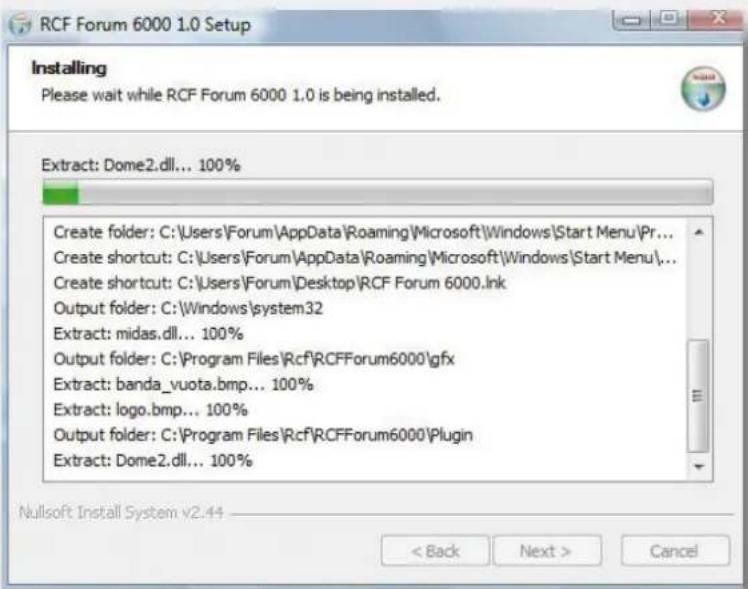
The following window appears during the installation procedure to indicate its state.
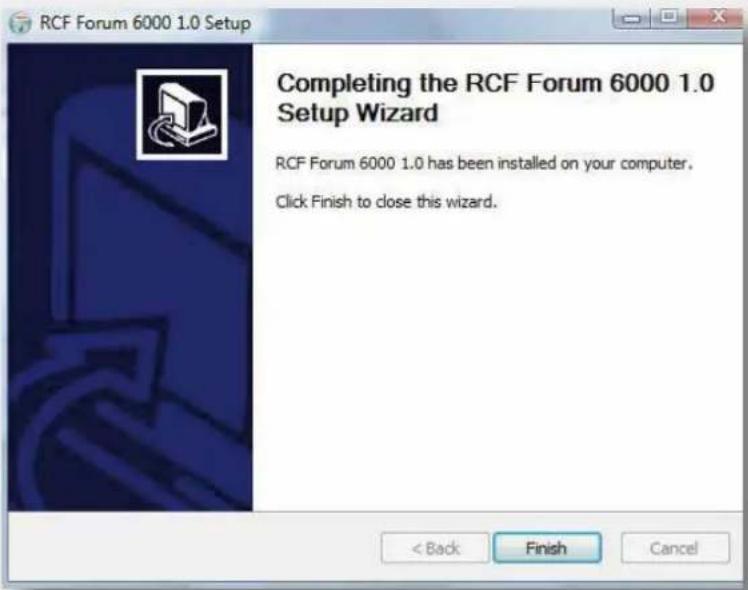
As soon as the installation is completed, click on "Finish".
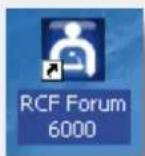
One icon is created on the desktop and there is a new folder in ../ Documents/Forum6000 and in the "Start" bar.
USING THE PROGRAMME CONNECTING THE CONTROL UNIT

Run the Rcf Forum programme by clicking either the icon on the desktop or the links in the Start bar or from the Rcf Forum folder.
The main management window of the programme opens:
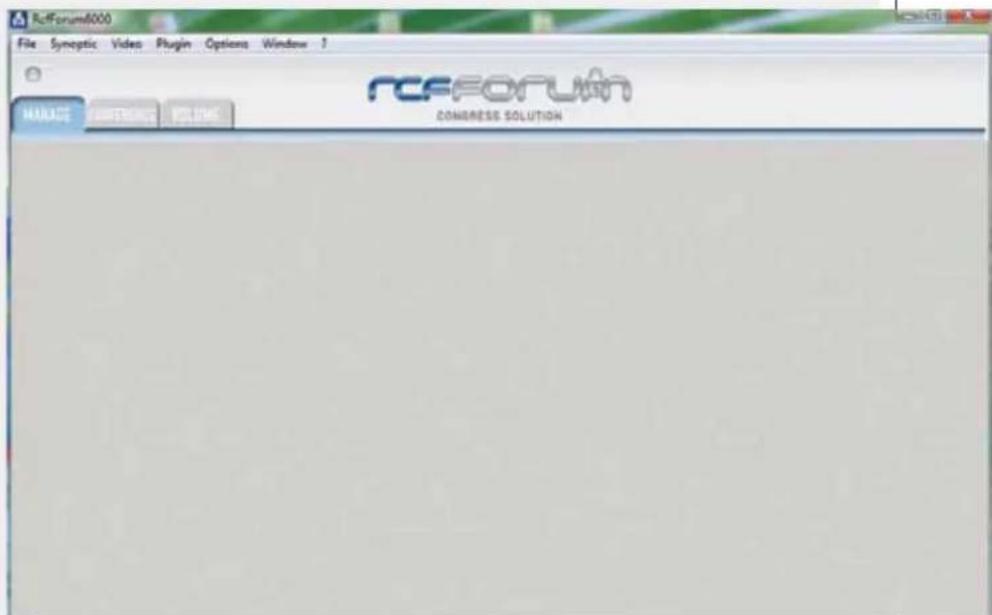
To connect the computer to the control unit, open the "Options" menu and select "Com port setup" to set the proper communication port,
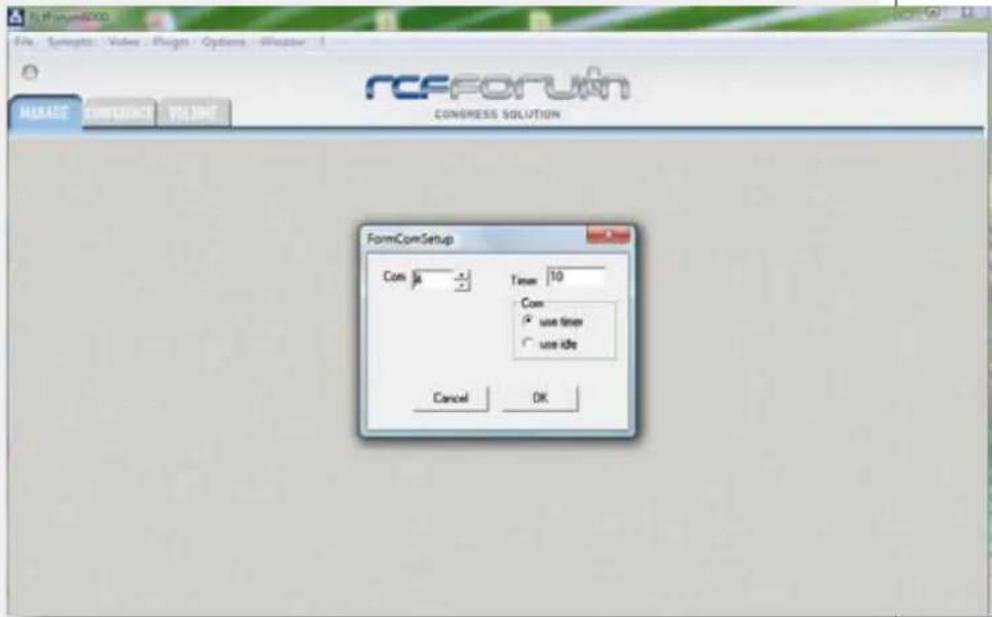
select the "com" port number and then confirm by clicking on OK.
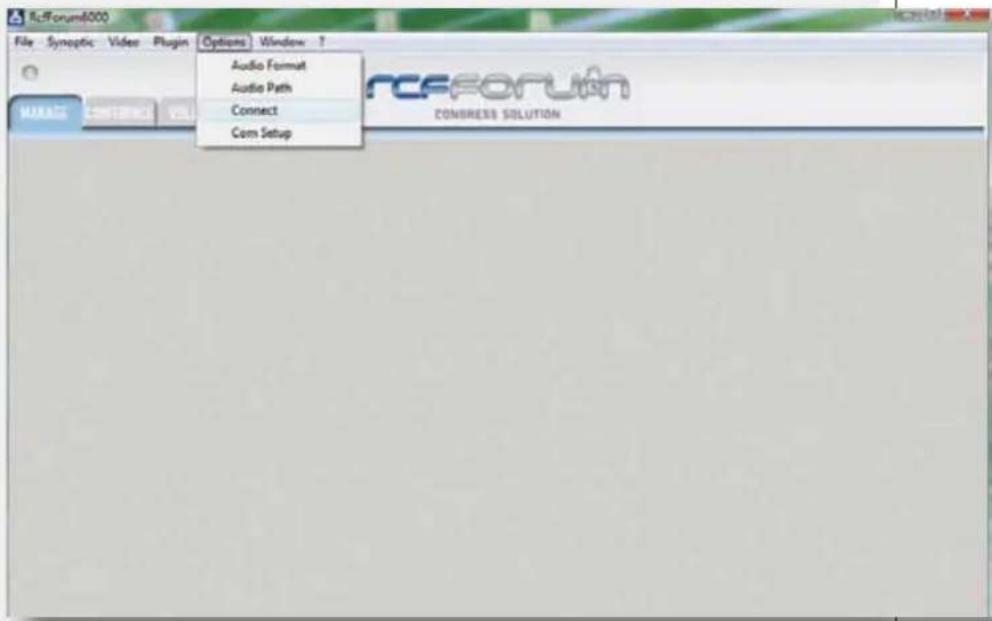
Again, in the "Options" menu, select "Connect central unit":
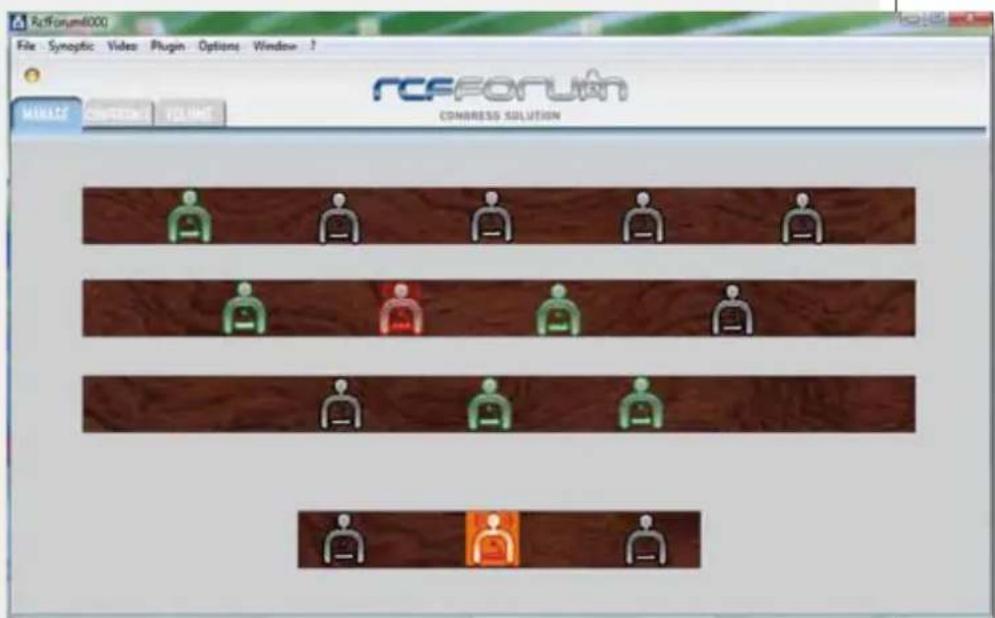
To create the synoptic panel for the conference room, arrange the consoles, assign general information related to delegates and insert an image, open the "SYNOPTIC" window and select "Blocked Consoles".
To insert a background picture in the frame of the synoptic panel, open the "Synoptic" menu, "Load Picture", select and open the desired file.
To move the icons of the consoles within the frame, select the icon and drag it, keeping the mouse left button pressed. To rotate it, press the mouse middle button, keeping the cursor on the icon to be rotated.
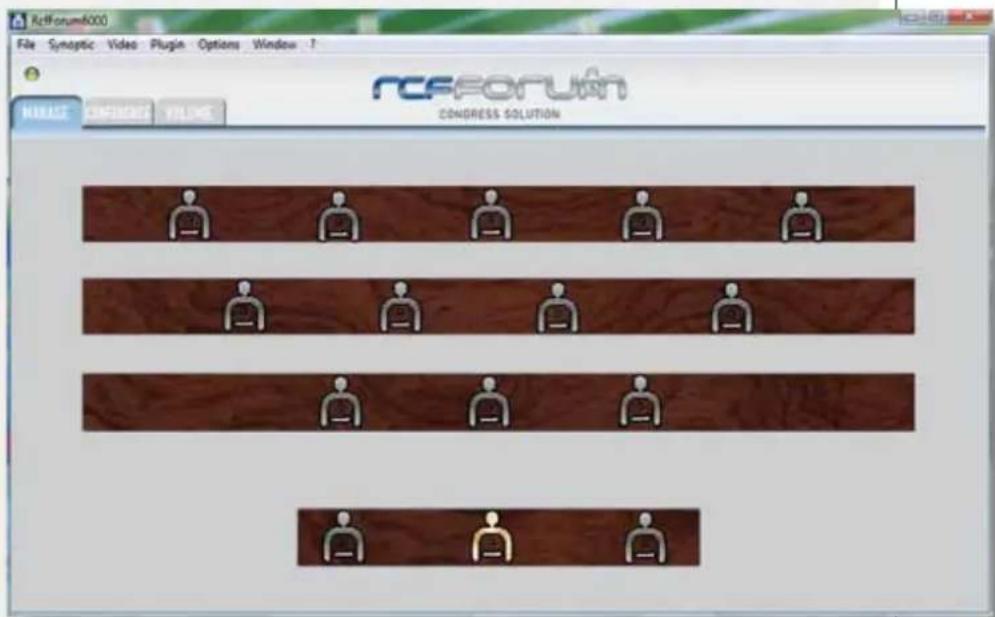
Use the mouse right button to activate and deactivate the console microphone: the ring on the microphone gets lit and, at the same time, the icon turns red.
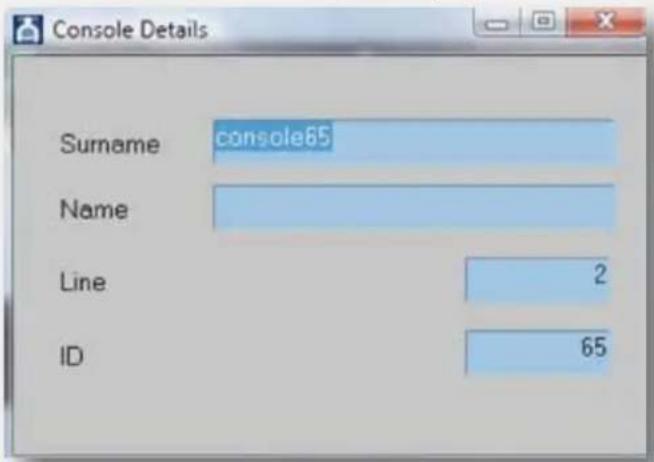
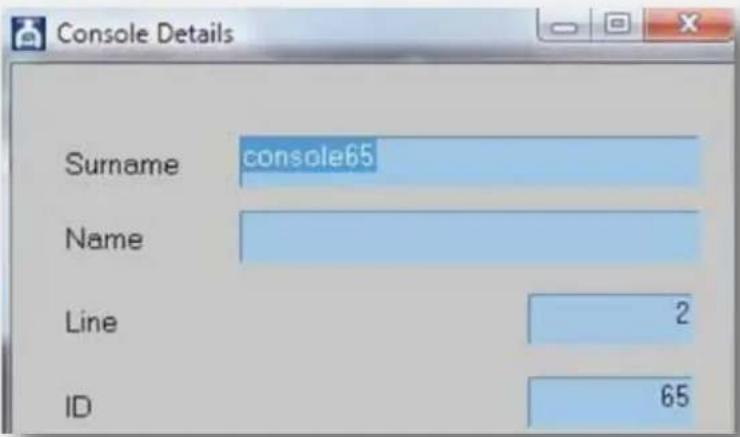
A name can be associated by typing it into the "Name" and "Surname" lines. Double click on a console icon to open its respective window:
CONFERENCE MODE SETTING

Select the "MODE" window to enter the respective window and edit all parameters:
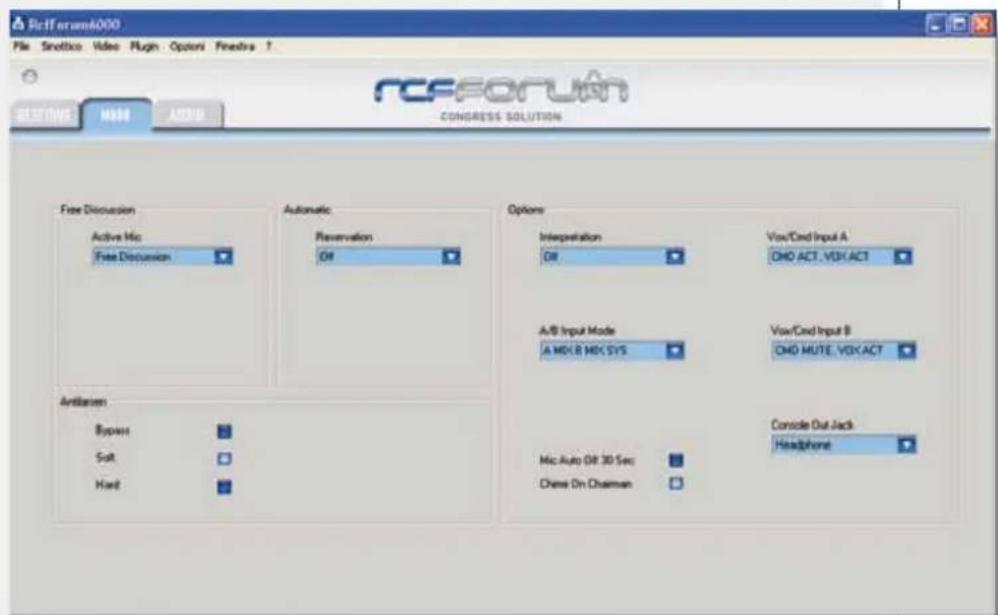
In the first frame "Free discussion - Active Mic", you can select the max. number of delegate open microphones (activated consoles).
ALL DELEGATE OFF: all delegate consoles are forced off.
ALL CONSOLE OFF: all consoles (except interpreters') are forced off.
FREE DISCUSSION: no limitation (free discussion).
MAXMICDEL1 + O/RIDE: 1 delegate open microphone at a time only and overridden by the next delegate.
FROM 1 TO 6: the max. number of delegate open microphones (n) is limited from 1 to 6.
The second frame "Automatic - Reservation" is used to set the delegate booking.
OFF: the delegate booking function is off.
NEXT: only 1 delegate can book after the max. number of open microphones has already been reached. When a delegate turns its microphone off, the booked microphone will automatically turn on.
NEXT + N: Only 1 + n delegates (n = 1 to 9) can book after the max. number of open microphones has already been reached.
THE OPTIONS OF THE FIRST FRAME ARE:
THE OPTIONS OF THE SECOND FRAME ARE:
When a delegate turns its microphone off, the next microphone (the first of the queue) will automatically turn on.
From the third frame "Options" you can select the INTERPRETATION, A & B INPUT MODE, VOX / CMD INPUT A, VOX / CMD INPUT B, CHIME ON CHAIRM, CONSOLE OUT JACK and MIC AUTO OFF options.
OFF: interpreter consoles are disabled.
SIMULTANEOUS: (simultaneous translation) when an interpreter console turns on (note: the other interpreter console automatically turns off), the translated language will be sent to the console jack outputs (console internal loudspeakers are off). The mixed signal of all consoles, IN A, IN B, IN PLAY (and the chime) will be sent to the other 2 system audio outputs (MAIN OUT and the audio output for teleconference).
SEQUENTIAL: (sequential translation) when an interpreter console turns on (note: the other interpreter console automatically turns off), the translated language will be sent to all the 3 system audio outputs (console lines, MAIN OUT and the audio output for teleconference). When the interpreter console turns off, the mixed signal of all consoles, IN A, IN B, IN PLAY (and the chime) will be sent to all the 3 system audio outputs.
CMD ACT, VOX ACT: IN A can be opened by either an external command (command = activation) or if the signal is automatically detected (VOX).
CMD ACT, VOX OFF: IN A can be opened by an external command only (command = activation). VOX function is off.
CMD MUTE, VOX ACT: IN A is opened if there is no external command (command = mute) and the signal is automatically detected (VOX).
CMD MUTE, VOX OFF: IN A is opened if there is no external command (command = mute). VOX function is off.
This setting is like the previous of INPUT A ("VOX / CMD INPUT A"), but regarding the INPUT B.
A MIX B MIX SYS: IN A, IN B and the console signal are mixed.
(A LOCK B) MX SYS: IN A and IN B are interlocked each other (first come – first served basis). IN A / IN B and console signals are mixed.
(A PRIO B) MX SYS: IN A has higher priority than IN B. IN A / IN B and console signals are mixed.
(A MX B) PRIO SYS: IN A and IN B are mixed. IN A / IN B signal has higher priority than consoles.
SYS PRIO (A MX B): IN A and IN B are mixed. The console signal has higher priority than IN A / IN B.
A PRIO (B MX SYS): IN B and console signals are mixed. IN A has higher priority than IN B / consoles.
DISABLED: no signal available on console jack outputs (internal loudspeakers are on).
RECORDING: console jack outputs provide an optimised signal for recording. Console internal loudspeakers keep working when jack outputs are used.
HEADPHONES: the signal for internal loudspeakers is also available on console jack outputs (for headphones). When headphones are used, the internal loudspeaker is off.
KEY ON: the chime is sent when a chairman activates the PRIORITY.
KEY OFF: the chime is NOT sent when a chairman activates the priority.
KEY ON: after 30 seconds of silent (no signal detected by the microphone capsule), the microphone automatically turns off.
KEY OFF: MIC AUTO-OFF function is off.
In the fourth frame "ANTILARSEN" you can set the anti-feedback options:
BYPASS: the anti-feedback processor is disabled.
SOFT: the anti-feedback processor intervention is moderate.
HARD: the anti-feedback processor intervention is significant.
"INTERPRETATION"
"VOX/CMD INPUT A"
"VOX/CMD INPUT B"
"A/B INPUT MODE"
"CONSOLE OUT JACK"
"CHIME ON CHAIRMAN"
"MIC AUTO-OFF"
Select the "AUDIO" window to manage the volume level settings:
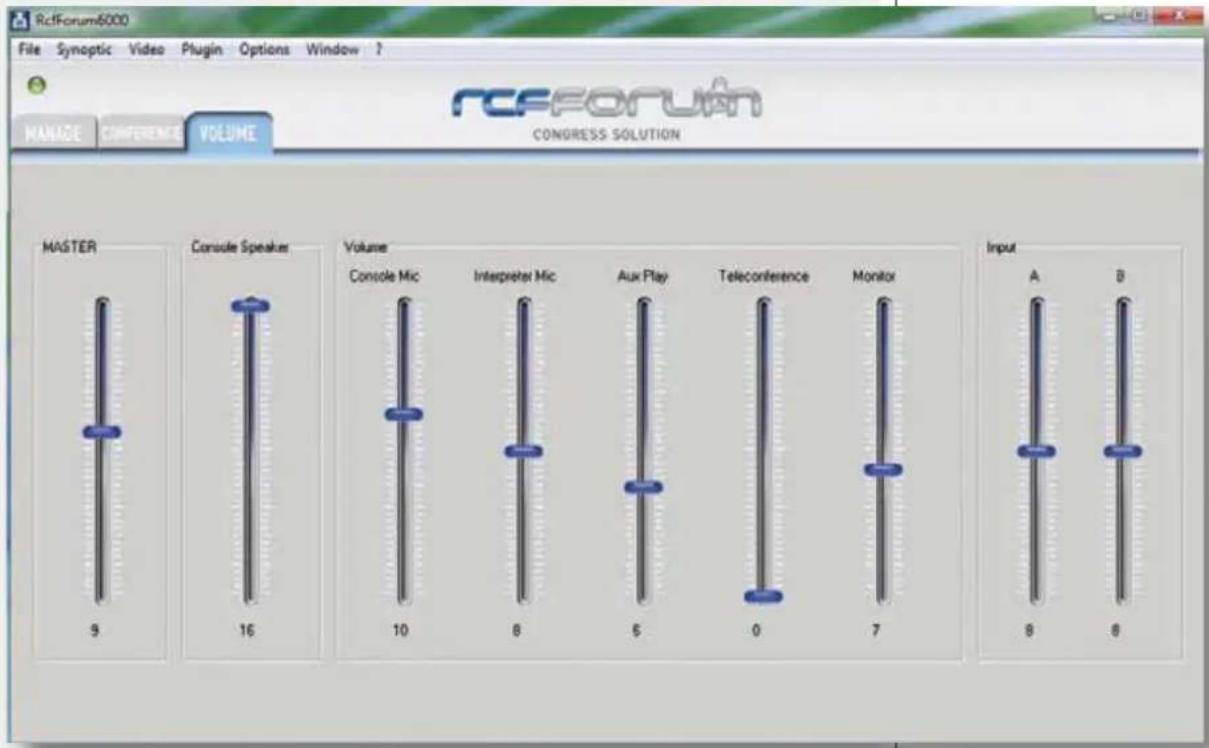
MASTER: MAIN OUT volume.
CONSOLE SPEAKER: console internal loudspeaker volume.
CONSOLE MIC: chairman / delegate console volume.
INTERPRETER MIC: interpreter console volume.
AUX PLAY: PLAY input volume.
TELECONFERENCE: TELECONF. input volume.
MONITOR: master unit internal loudspeaker.
INPUT A: MIC / LINE INPUT A volume.
INPUT B: MIC / LINE INPUT B volume.
To see the image of video cameras, you have to select the second monitor in the dedicated menu (Video/Show):
To use the video camera management SW, select "Plugin / Dome".
The dome setting window opens:
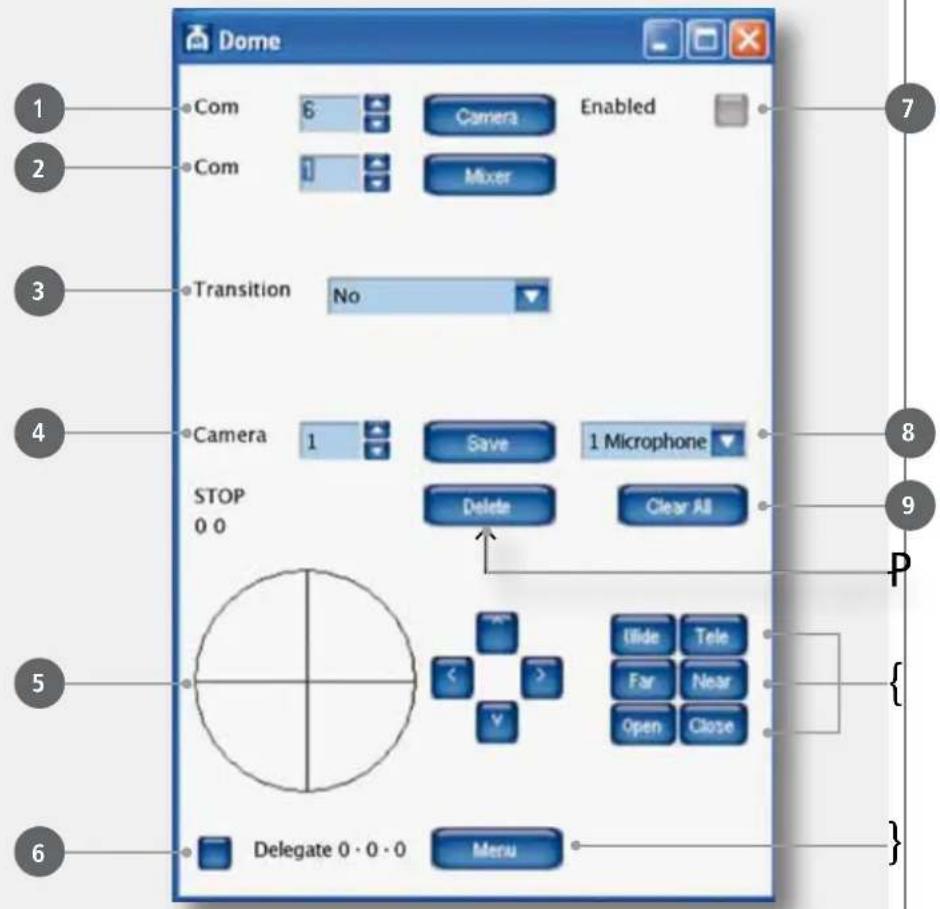
You have to set the number of the communication port used by the PC, in order to move the video cameras and switch the video matrix.
At the point 1, select the number of the communication port between the PC and video cameras.
At the point 2, select the number of the communication port between the PC and the video matrix. Once these parameters have been set, you have to enable the communication ports by clicking on the buttons "Camera", "Mixer" and "Enabled" (point 7); these get lit to confirm the request for connection.
AIMING THE VIDEO CAMERA TO A MICROPHONE CONSOLE
In the synoptic panel, select the microphone console that has to be aimed by a video camera. Select the number of the video camera to be used to frame the microphone console (point 4). Select either "1 Microphone" or "Room" (point 8), according to whether the frame to be saved is a microphone console or a generic image of the room.
Move the video camera by using the joystick simulator (point 5).
Press and hold the mouse left button inside the circle and move up, down, left or right; you can move the selected video camera.
This function makes it possible to move the camera rapidly. For a fine adjustment, use the arrows on the right of the circle.
Use the "Wide" and "Tele" keys to adjust the zoom (point {}).
The focus and the iris of the video camera are automatic. If you want to make a manual adjustment, use the "Far" and "Near" keys for the focus and "Open" and "Close" for the iris (point {}.
Once you have found the correct aim, press "Save" to save it.
Select the type of transition to use in the passage from one image to the next (point 3); there are four transition options:
no = no transition (you see the movement of the video camera)
black = the frame goes to black, the camera moves, and the image reopens from black room = transitions from an image of the room
synoptic = transitions from the image of the synoptic panel
If the button in the left-hand corner (point 6) gets lit when you select a microphone console, this means that a camera aim has already been saved for that particular microphone console. To delete a camera aim, select the microphone console from the lighted display board and press "Delete" (point P).
To delete all the aims, press "Clear All" (point 9): a window appears to confirm.
To access the video camera setting menu, press "Menu" (point }).
The video camera configuration menu opens (above the video image). Use the arrows on the right of the circle to move within the menu.
Move upwards or downwards to access the desired menu item and use the right arrow to enter the submenu.
When the microphone is switched on, the video camera automatically aims according to the presetting. If two or more microphones are switched on, the image of the room will be displayed. When only one microphone is switched on, the video camera returns to aim at the active microphone console.
The passage between one frame and the next always takes place with the type of transition set (point 3).
AUDIO RECORDING MANAGEMENT

When recording, the audio signal should be taken from the DMU 6100 main unit output and connected to the PC sound card input.
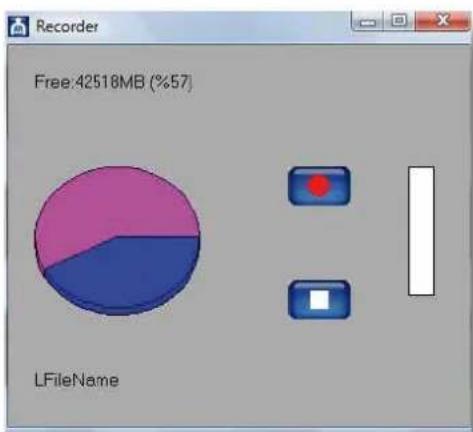
After connecting the main unit, open the "Recorder" section in "Window" menu:
Click on the "Audio Path" button (in the "Options" menu) to see the default path where audio recordings will be saved and to change it.
Click on the "Audio Format" button (in the "Options" menu) to choose the audio compression format for recordings.
To start recording, click on the button. The meter on the right turns green following the sound input level and then it is possible to minimize the "Rcf ForumAudio" window and start the conference.
As soon as the conference ends, restore the "Rcf ForumAudio" window and press to stop recording.
pie
| Segment | Value | |---------|-----------| | Pink | 42518MB | | Blue | 35% |RESERVATION LIST
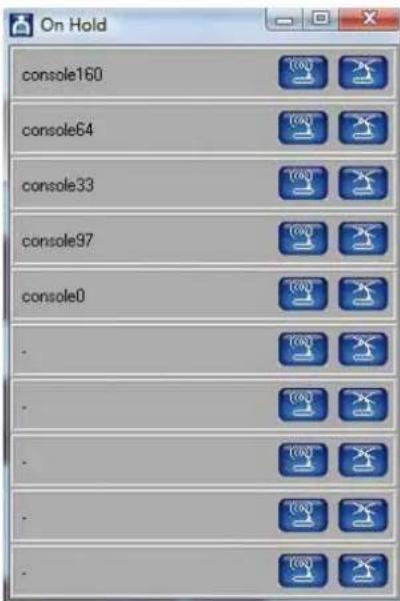
Click on the "On Hold" option in the "Window" menu to see the "Reservation List". The "RESERVATION LIST" shows the name list of the delegates who are booked to speak. At the moment of booking, the keys change colour (from grey to blue) to confirm the booking.


The first key activates the delegate's microphone: the conference manager can re deactivate any microphone present on the list at any moment, without having the booking order.
The second key cancels the delegate from the booking list.
PUBLIC VIEW

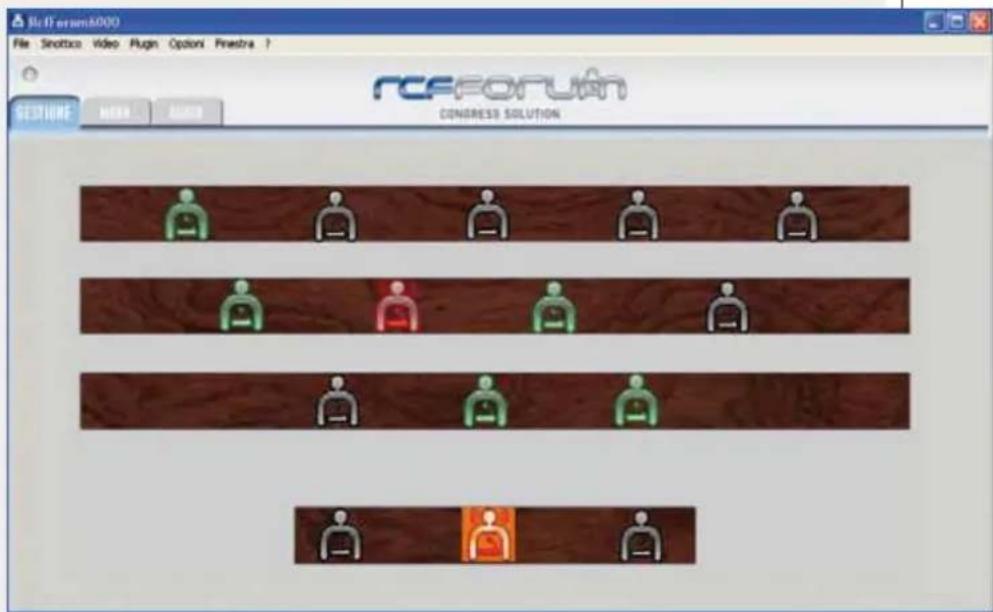
Click on the "Show public view" option in the "Window" menu to see the "Public view".
In the "File" menu, click on "Save" to save the synoptic panel and both MODE and AUDIO settings.
To load a stored configuration, after connecting to the PC to the main unit and turning the system on, click on "Open" in the "File" menu and load the necessary file.
In the synoptic panel, right-click on the chosen icon to enable / disable the respective microphone. In this way, it is possible to activate even more microphones than those already set in the system.
If a microphone included in the booking list is manually activated, this will be turned on without deleting it from the booking list.
Reggio Emilia - Italy
- ITALIANO
- GRANT OF LICENCE
- COPYRIGHT
- OTHER RESTRICTIONS
- NO WARRANTY
- NO LIABILITY
- PC SYSTEM REQUIREMENTS
- TERMINATION OF THE LICENCE
- GENERAL
- RCF S.p.A. would like to thank you for purchasing this product, which has been designed to guarantee reliability and high performance.
- USING THE PROGRAMME CONNECTING THE CONTROL UNIT
- CONFERENCE MODE SETTING
- AIMING THE VIDEO CAMERA TO A MICROPHONE CONSOLE
- AUDIO RECORDING MANAGEMENT
- RESERVATION LIST
- PUBLIC VIEW
Brand : RCF
Model : DEC 6104
Category : Software