
SRK25ZSH-S - Measurement MITSUBISHI - Free user manual and instructions
Find the device manual for free SRK25ZSH-S MITSUBISHI in PDF.


| Product Type | Split-type air conditioner (Indoor unit) |
| Model | SRK25ZSH-S |
| Brand | Mitsubishi Heavy Industries Thermal Systems, Ltd. |
| Refrigerant | R410A (GWP = 2088) |
| Power Supply | 220-240 V, 50 Hz, 1 phase |
| Cooling Capacity | 2.5 kW (approx.) |
| Heating Capacity | 3.2 kW (approx.) |
| Sound Pressure Level | Less than 70 dB(A) (indoor and outdoor) |
| Operation Modes | AUTO, COOL, HEAT, DRY, FAN, ALLERGEN CLEAR, NIGHT SETBACK, SILENT |
| Fan Speeds | AUTO, Hi, Me, Lo, ULo |
| Airflow Direction | Up/Down (flap) and Left/Right (louver), 3D AUTO |
| Timers | ON, OFF, SLEEP, WEEKLY (up to 4 programs per day) |
| Special Functions | HIGH POWER, ECONOMY, 3D AUTO, Child Lock, Self Clean, Auto Restart |
| Remote Control | Infrared, with ACL switch and LCD display |
| Air Cleaning Filters | Allergen Clear Filter (enzymatic) and Photocatalytic Washable Deodorizing Filter |
| Maintenance | Air filter cleaning every 2 weeks; replace allergen clear filter annually |
| Safety Features | Earth leakage breaker required, auto restart after power failure, 3-minute restart delay |
| Compliance | EMC Directive 2014/30/EU, LV Directive 2014/35/EU, WEEE Directive 2012/19/EU |
| Dimensions (Indoor Unit) | 798 x 232 x 298 mm (approx.) |
| Weight (Indoor Unit) | 11 kg (approx.) |
Frequently Asked Questions - SRK25ZSH-S MITSUBISHI
User questions about SRK25ZSH-S MITSUBISHI
0 question about this device. Answer the ones you know or ask your own.
Ask a new question about this device
Download the instructions for your Measurement in PDF format for free! Find your manual SRK25ZSH-S - MITSUBISHI and take your electronic device back in hand. On this page are published all the documents necessary for the use of your device. SRK25ZSH-S by MITSUBISHI.
USER MANUAL SRK25ZSH-S MITSUBISHI
natural_image
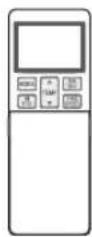
Line drawing of a rectangular air conditioner unit (no text or symbols)SRK25ZSH-S
SRK35ZSH-S
SRK50ZSH-S
CE
This air-conditioner complies with EMC Directive 2014/30/EU, LV Directive 2014/35/EU.
Thank you for purchasing a MITSUBISHI HEAVY INDUSTRIES THERMAL SYSTEMS, LTD. Air-Conditioner. To get the best long-lasting performance, please read and follow this user's manual carefully before using your air-conditioner. After reading, please store the manual in a safe place and refer to it for operational questions or in the event of any irregularities.
This air-conditioner is intended for domestic use.
Do not vent R410A into the atmosphere: R410A is a fluorinated greenhouse gas with a Global Warming Potential (GWP) = 2088.
Refer to a label on outdoor unit for the weight of fluorinated greenhouse gas and CO_2 equivalent.
Your air-conditioner is marked with this symbol. It means that waste electrical and electronic equipment (WEEE as in directive 2012/19/EU) should not be mixed with general household waste. Air-conditioner should be treated at an authorized treatment facility for re-use, recycling and recovery and not be disposed of in the municipal waste stream. Please contact the installer or local authority for more information.
This symbol printed on the batteries attached to your air-conditioner is information for end-users according to the EU directive 2006/66/EC article 20 annex II.
Batteries, at their end-of-life, should be disposed of separately from general household waste. If a chemical symbol is printed beneath the symbol
shown above, this chemical symbol means that the batteries contain a heavy metal at a certain concentration. This will be indicated as follows: Hg:mercury(0.0005%), Cd:cadmium(0.002%), Pb:lead(0.004%)
Please, dispose of batteries correctly at your local community waste collection or the recycling center.
The emission sound pressure level from each Indoor and Outdoor unit is under 70 dB(A).
contents
Safety precautions ......2
Name of each part and its function ....6
Remote control 8
Operation failure with the remote control .....8
Temporary run operation ....8
Installing two air-conditioners
in the same room 9
Child lock 9
Airflow range setting ....10
Operation and display section
for remote control ....11
Current time setting 12
AUTO mode operation ....12
Temperature adjustment during AUTO mode...13
FAN SPEED 13
COOL/HEAT/DRY/FAN mode operation .....14
Air-conditioner operation temperature range....14
Characteristics of HEAT mode operation .....14
Airflow direction adjustment ....15
3D AUTO operation ....15
SLEEP TIMER operation ......16
OFF TIMER operation ....16
ON TIMER operation ......17
SLEEP TIMER + ON TIMER operation .....17
ON TIMER + OFF TIMER operation .....18
ALLERGEN CLEAR operation ....18
WEEKLY TIMER operation ......19
HIGH POWER/ECONOMY operation......23
NIGHT SETBACK operation ....24
SILENT operation ......24
MENU function
Display brightness adjustment .....25
SELF CLEAN operation ....26
PRESET operation ......26
Auto restart function ......27
Tips for effective operation ......27
Maintenance....28
Proper installation ....30
Troubleshooting 30
Notice 31
Contact your dealer ....32
About the multiple air-conditioners ....32
Self diagnosis function ....33
Safety precautions
- Before starting to use the system, please read these “Safety precautions” carefully to ensure proper operation of the system.
- When you have read this user's manual, please keep it safely. If someone else takes over as user, make sure that the manual is also passed on to the new user.
| ⚠ WARNING | Indicates a potentially hazardous situation which, if not avoided, can result in serious consequences such as death or severe injury. |
| ⚠ CAUTION | Indicates a potentially hazardous situation which, if not avoided, can result in personal injury or property damage. |
Please observe these precautions with great care, since they are essential to your safety.
- Symbols which appear frequently in the text have the following meaning:
| Strictly prohibited | Observe instructions with great care | Provide proper earthing |
■ INSTALLATION PRECAUTIONS
| ⚠ WARNING | |
 | The system is for domestic and residential use.If used in severe environments, such as an engineering workplace, the equipment may function poorly. |
 | The system must be installed by your dealer or a qualified installer.It is not advisable to install the system by yourself, as faulty handling may cause leakage of water, electric shock or fire. |
| ⚠ CAUTION | ||
 | Do not install it where flammable gas may leak.Gas leaks may cause fire. | |
 | Make sure that an earth leakage breaker is installed.If you do not install an earth leakage breaker, you may get an electric shock. | Make sure to install the drain hose properly so that all the water is drained out.Improper installation may lead to water drop in the room resulting in wet furniture. |
 | Make sure that the system has been properly earthed.Earth wire should never be connected to a gas pipe, water pipe, lightning conductor or telephone earth wire. Improper installation of the earth wire may cause an electric shock. | |
■ OPERATION PRECAUTIONS
| ⚠ WARNING | ||
 | Children shall not play with the air-conditioner.Do not expose yourself to the cooling air for a long period.This could affect your physical condition and cause health problems. | Gleaning and user maintenance shall not be made by children without supervision.Do not insert anything into the air outlet.This may cause injury, as the internal fan rotates at high speed. |
 | This appliance can be used by children aged from 8 years and above and people with reduced physical, sensory or mental capabilities or lack of experience and knowledge, if they have been given supervision or instruction concerning use of the appliance in a safe way and understand the hazards involved.Store the remote control out of reach of children.Failure to observe this may result in the batteries being swallowed or other accidents. | |
CAUTION

Only use approved fuses.
Use of steel or copper wire instead of an approved fuse is strictly prohibited, as it may cause a breakdown or fire.
Do not handle the switches with wet hands.
This may cause an electric shock.
Do not swing from the indoor unit.
If the indoor unit falls down, you may get injured.
Do not place a flammable insecticide or paint spray near the air-conditioner, nor spray it directly on the system.
This may result in a fire.
Do not expose any combustion appliance directly to the air stream of the air-conditioner.
The combustion appliance may malfunction.
Do not wash the air-conditioner with water.
This could cause an electric shock.
Using a high pressure washer may cause damage to the aluminum fins, resulting in performance decrement.
Do not use for preservation of food, plants or animals, precision devices or works of art.
The system is only intended for use in ordinary domestic rooms. Any other use of the system may damage the quality of food, etc.
Do not place anything containing water, like vases, on top of the unit.
Water entering the unit could damage the insulation and therefore cause an electric shock.
Do not install the air-conditioner where the airflow direction is aimed directly at plants or animals.
This will damage their health.
Do not sit on the outdoor unit nor put anything on it.
If the unit falls down or things drop from it, people could get hurt.
After a long period of use, check the unit's support structure regularly.
If you do not repair any damage right away, the unit may fall down and cause personal injury.
| ⚠ CAUTION | ||
| Do not touch the aluminum fins on the heat exchanger.It may result in injury.Do not place household electrical appliances or household items underneath the indoor or outdoor units.Condensation falling from the unit may stain objects and cause accidents or electrical shock.Do not operate the system without the air filter.It can cause malfunction of the system due to clogging of the heat exchanger. | Do not shut off the power source immediately after stopping the operation.Wait at least 5 minutes, otherwise there is a risk of water leakage or breakdown.Do not control the system with main power switch.It can cause fire or water leakage. In addition, the fan can start unexpectedly, which can cause personal injury.Do not pour liquid into the unit and do not put water container on the unit.Water entering the unit could damage the insulation and therefore cause an electric shock. | |
| You operate air-conditioner together with a combustion appliance, you must regularly ventilate the indoor air.Insufficient ventilation may cause accidents due to oxygen deficiency.Stand firmly on a stepladder or other stable object when removing the inlet panel and filters.Failure to observe this may result in injury through insecure objects toppling over.When you clean air-conditioner, stop the unit and turn off the power source.Never open the panel while the internal fan is rotating.Do not place objects near the outdoor unit or allow leaves to gather around the unit.If there are objects or leaves around the outdoor unit, small animals may enter unit and contact electrical parts and may cause a break-down, smoke or fire. | Contact your dealer to clean inside the indoor unit, do not attempt to do by yourself.The use of a non-approved detergent or improper washing method may damage the unit's plastic components and cause leaks. Damage, smoke, or fire may also happen if the detergent comes in contact with electrical parts or the unit's motor.Stop the unit and turn off the power if you hear thunder or there is a danger of lightning.It may damage the unit.the power cable becomes damaged, contact your dealer or a qualified installer.If it is not replaced, it may cause a breakdown or fire. | |
■ PRECAUTIONS FOR RELOCATION OR REPAIRS
| ⚠ WARNING | ||
| Do not perform any repairs or modifications by yourself. Consult the dealer if the unit requires repair.If you repair or modify the unit, it can cause water leaks, electric shocks or fire. | ||
| Consult your dealer for repairs.Wrong repairs could cause an electric shock, fire, etc.In case the air-conditioner is relocated elsewhere, contact your dealer or a qualified installer.Faulty installation may cause water leakage, electric shock, fire, etc.If you notice anything abnormal (smell of burning, etc.), stop the system, turn off the power source and consult your dealer.Continued use of the system in abnormal circumstances can result in malfunctioning, electric shock, fire, etc. | If the air-conditioner fails to cool or warm the room, it may have a refrigerant leakage. Contact your dealer.If refrigerant needs to be added, check with your dealer for proper instructions.If the refrigerant comes in contact with the bare skin, it may cause cold injury.If the refrigerant gas is inhaled excessively, it may cause deterioration of nerve function like dizziness and headache, or deterioration of heart function like irregular heartbeat and heart palpitation temporarily. If refrigerant unexpectedly leaks from the unit onto a fan heater, stove, hotplate or other heat source, harmful gases could be generated. | |
Name of each part and its function
INDOOR UNIT
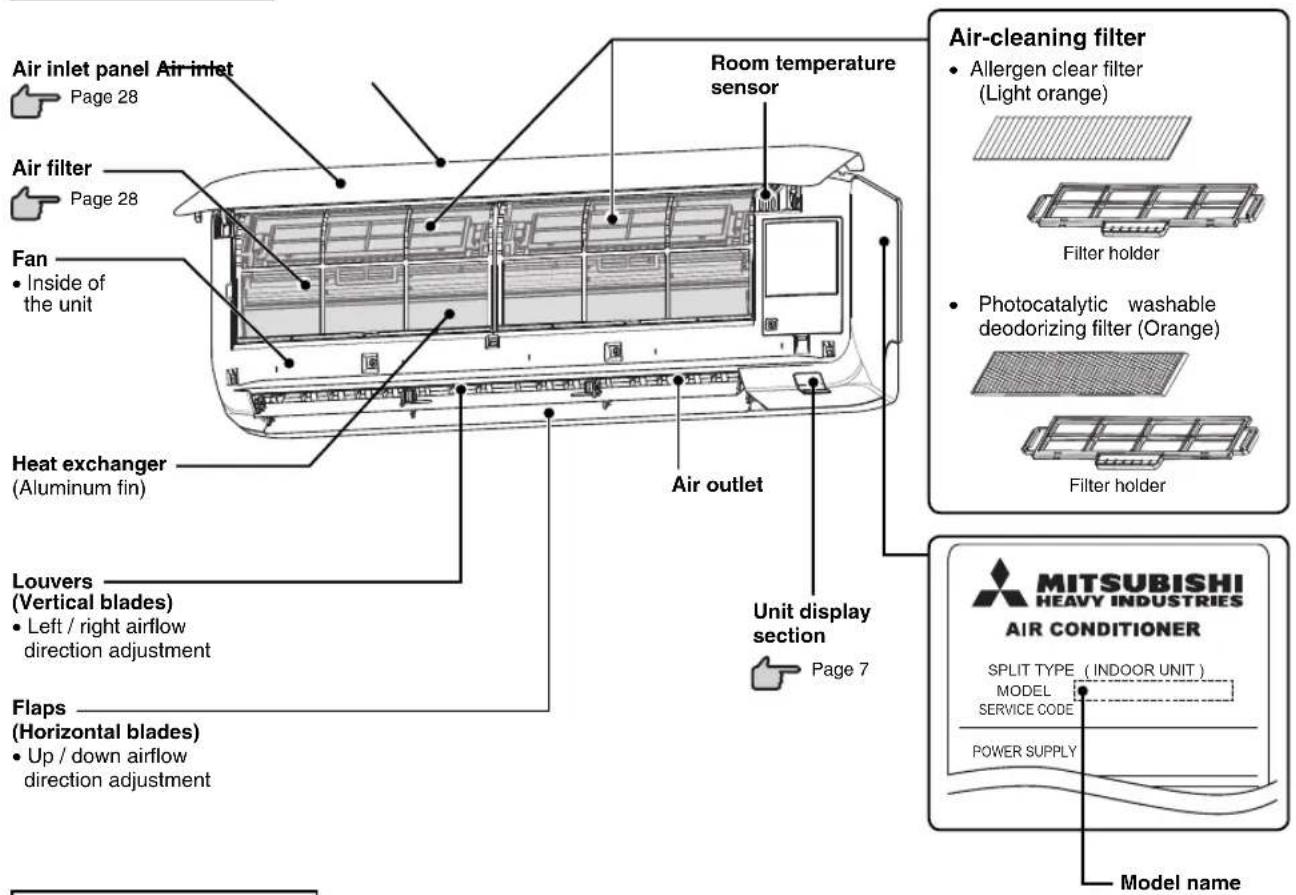
OUTDOOR UNIT
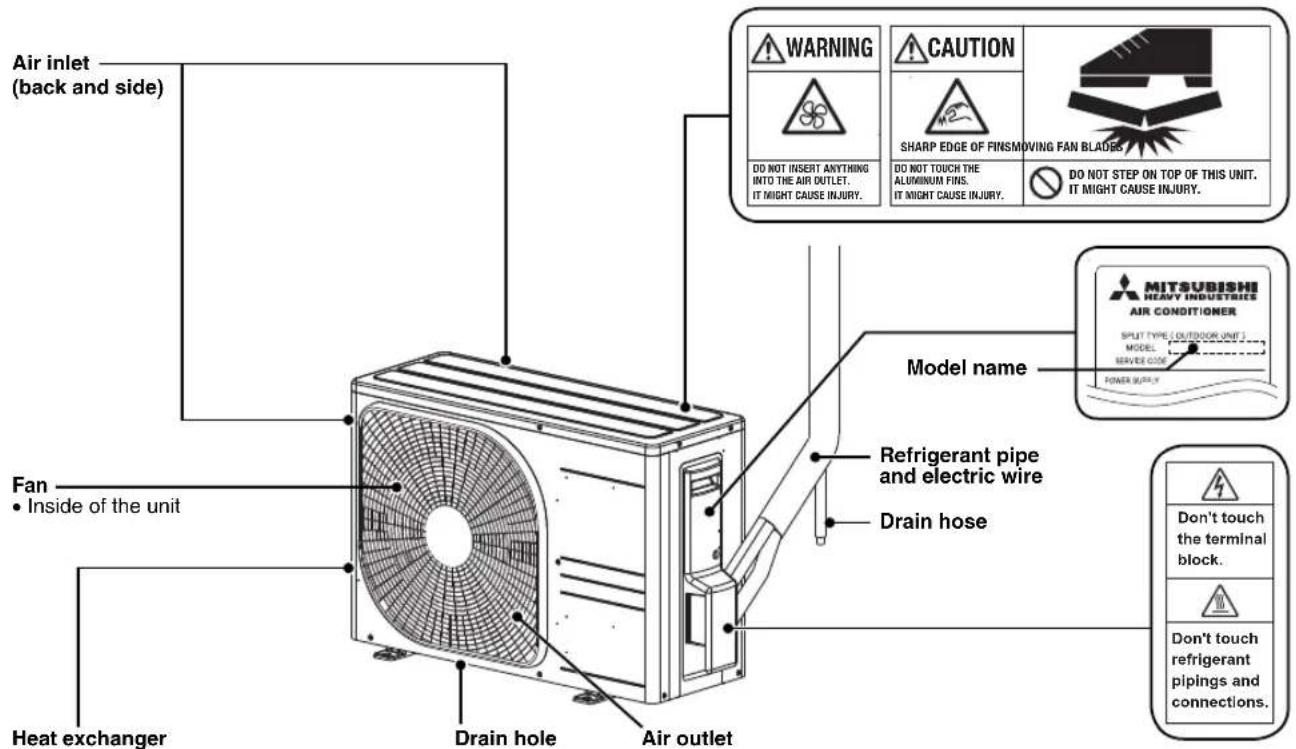
* The appearance varies by models
Unit display section
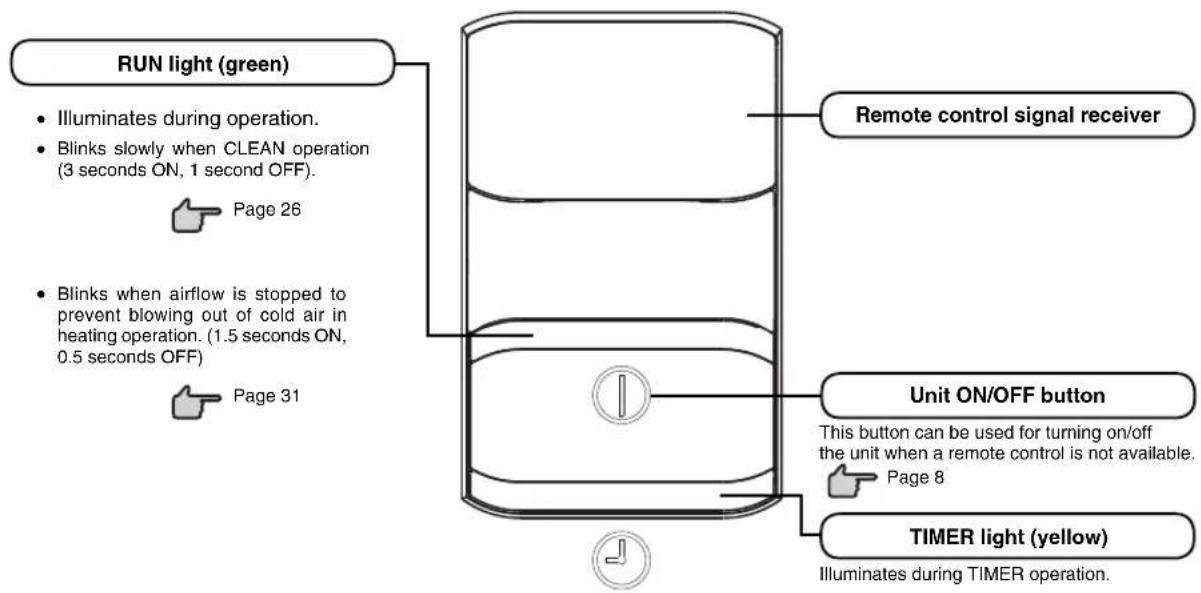
flowchart
graph TD
    A["RUN light (green)"] --> B["ILuminates during operation."]
    B --> C["Blinks slowly when CLEAN operation (3 seconds ON, 1 second OFF)."]
    C --> D["Page 26"]
    A --> E["Blinks when airflow is stopped to prevent blowing out of cold air in heating operation. (1.5 seconds ON, 0.5 seconds OFF)"]
    E --> F["Page 31"]
    A --> G["Remote control signal receiver"]
    G --> H["Unit ON/OFF button"]
    H --> I["This button can be used for turning on/off the unit when a remote control is not available."]
    I --> J["Page 8"]
    A --> K["TIMER light (yellow)"]
    K --> L["Illuminates during TIMER operation."]
- RUN and TIMER lights blink quickly during invalid operation mode.

Page 33
Accessories
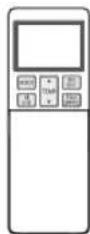
Remote control
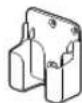
Remote control
holder

Battery ×2
(R03 (AAA, Micro))

Wood screw x2
(for remote control holder mounting)
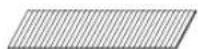
Allergen clear filter (Light orange)
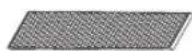
Photocatalytic washable deodorizing filter (Orange)
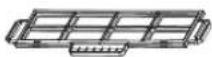
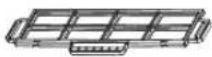
Filter holder ×2
NOTE
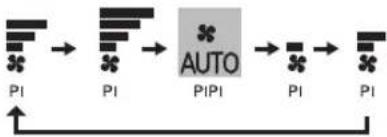
- Buzzer sound for remote control
Buzzer sound (PiPi) is produced when preset temperature is set to 24 °C or, AUTO operation mode is selected or, automatic airflow is selected.
Buzzer sound (Pi) is produced when
air-conditioner is turned off by pressing ON/OFF button (except CLEAN mode).
Airflow setting
flowchart
graph LR
    A["PI"] --> B["PI"]
    B --> C["AUTO"]
    C --> D["PI"]
    D --> E["PI"]
Preset temperature

Remote control
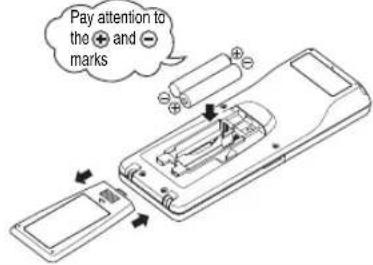
Setting the batteries
1
Pull out the cover.
2
Insert new batteries. R03 (AAA, Micro) x2
3
Close the cover.
4
Press the ACL switch with the tip of a ballpoint pen.
- Set the current time.

Page 12 Step 2
NOTE
- Do not use old and new batteries together.
- Remove the batteries when the remote control is not used for a long period.
- The recommended effective period of a battery conforming to JIS or IEC should be 6 to 12 months with normal use. If used longer, or when an unspecified battery is used, liquid may leak from the battery, causing the remote control to malfunction.
- The recommendable effective period is printed on the battery. This may be shorter due to manufacturing time to the unit. However, the battery may still be in working order after expiry of its nominal life.
■ When the display shows any abnormal condition, press the ACL switch with the tip of a ballpoint pen.
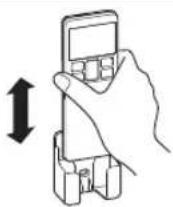
Using the remote control holder
The remote control can be attached to a wall or pillar by using the remote control holder. Before installing the remote control, check that the air-conditioner receives the signals properly.
For installing or removing the remote control, move it up or down in the holder.
The following cases show exhausted batteries. Replace old batteries with new ones.
- Receiving beep is not emitted when a signal is transmitted.
- Display fades away.
Warning note for remote control

Strictly prohibited
- Do not take remote control near high temperature places, such as an electric heating carpet or a stove.
-
Do not put any obstructing obstacles between the remote control and the unit.
-
Do not leave the remote control exposed to direct sunlight or other strong lighting.
-
Do not spill any liquid on the remote control.
-
Do not drop the remote control. Handle with care.
- Do not place heavy objects on the remote control, or step on it.
Operation failure with the remote control
• Are the batteries running down?

"Setting the batteries" above.
Replace the batteries with new ones and retry the operation.
- If the operation fails, operate the unit with temporary run operation function.
Contact your dealer to have the remote control checked.

Below
Temporary run operation
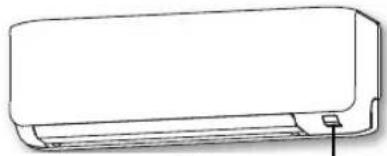
- The unit ON/OFF button on the unit operates ON/OFF temporarily when the remote control is not used.
Operation
• OPERATION MODE : AUTO
• FAN SPEED : AUTO
• AIR FLOW : AUTO
- Operation starts by pressing the unit ON/OFF button; it stops if you press the button again.
natural_image
Line drawing of a rectangular air conditioner unit with a small indicator button (no text or symbols)Unit ON/OFF button
NOTE
- Do not keep pressing the unit ON/OFF button down for 5 seconds or more. (Pressing it 5 seconds or more sets the forced cooling operation used during servicing or when relocating the air-conditioner.)
Installing two air-conditioners in the same room
When two air-conditioners are installed in the same room, use this setting when the two air-conditioners are not operated with one remote control. Set the remote control and indoor unit.
Setting the remote control
1 Pull out the cover and take out batteries.
2 Disconnect the switching line next to the battery with wire cutters.
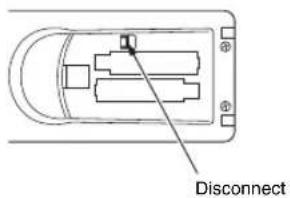
3 Insert batteries. Close the cover.
Setting an indoor unit
1 Turn off the power source and turn it on after 1 minute.
2 Point the remote control (that was set according to the procedure described on the left side) at the indoor unit and send a signal by pressing the ACL switch on the remote control.
Since the signal is sent in about 6 seconds after the ACL switch is pressed, point the remote control at the indoor unit for some time.
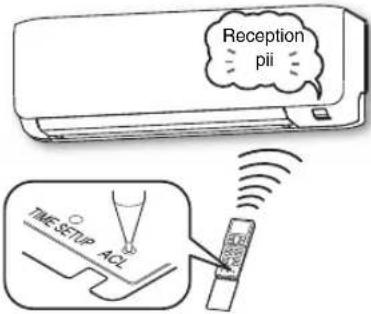
3 Check that the reception buzzer sound "pii" is emitted from the indoor unit.
At completion of the setting, the indoor unit emits a buzzer sound "pii". (If no reception sound is emitted, start the setting from the beginning again.)
Child lock
■ This function locks the remote control operation to prevent an operation error.
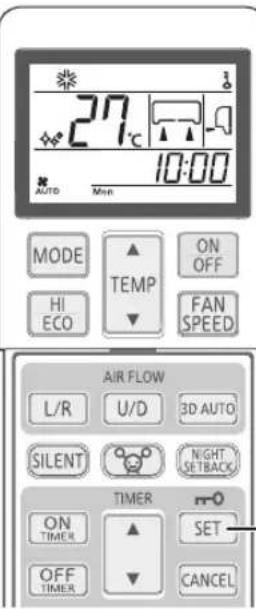
1 Press the SET button for 3 seconds or more.
3 is displayed. When Child lock is set, only the ON/OFF button can be operated.
Releasing procedure
Turn off the light by pressing the SET button for 3 seconds or more.
NOTE
- While Child lock is set, the settings of temperature, fan speed and airflow direction cannot be changed. To change the settings, reset Child lock.
- Child lock will not function during ALLERGEN CLEAR operation.
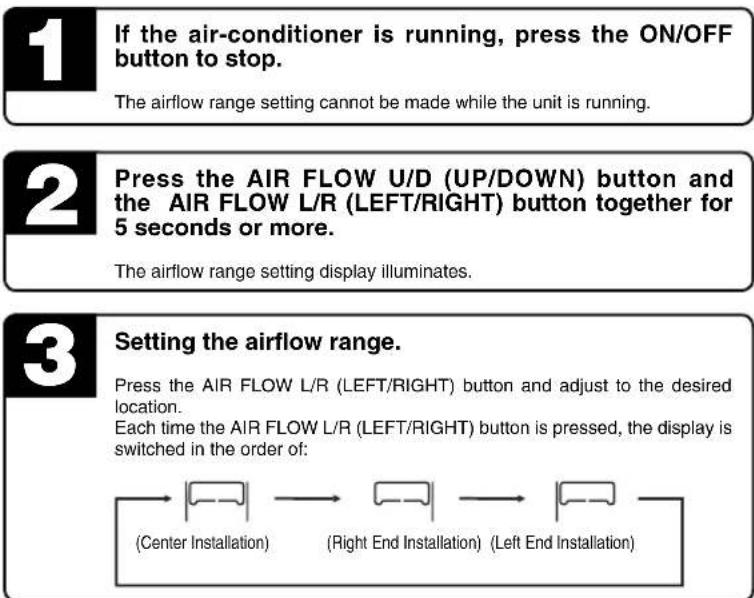
Airflow range setting
■ Take the air-conditioner location into account and adjust the left/right airflow range to maximize air-conditioning.
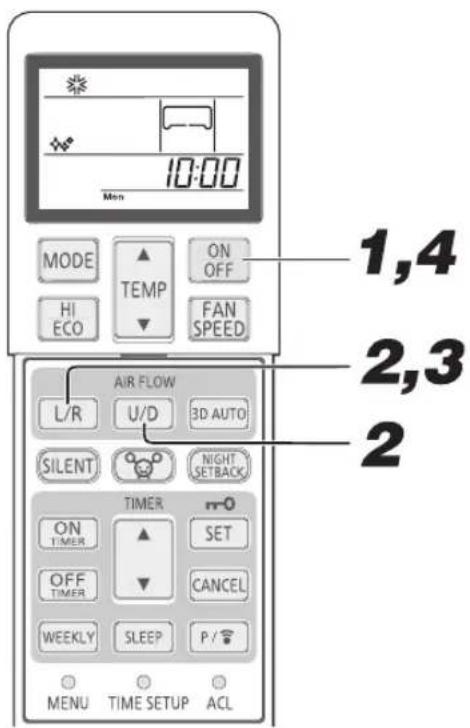

Air-conditioner installation location and airflow range
The diagram below indicates the airflow ranges corresponding to the air-conditioner's installation location. Consider your room's layout and set the airflow range to maximize air-conditioning.
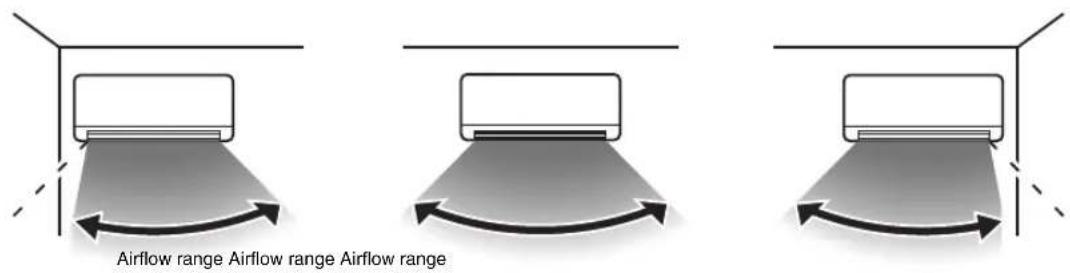
(Left End Installation) (Center Installation) (Right End Installation)
NOTE
- Once the airflow range setting is configured, it is stored in the air-conditioner even if the power source is turned off. To change the airflow range setting, set range again with the remote control.
- During the operation, an airflow range setting cannot be set.
- When the air-conditioner is installed at the location within 50 cm from the wall, it is recommended to change the airflow range setting to "Right End Installation" or "Left End Installation".
Operation and display section for remote control
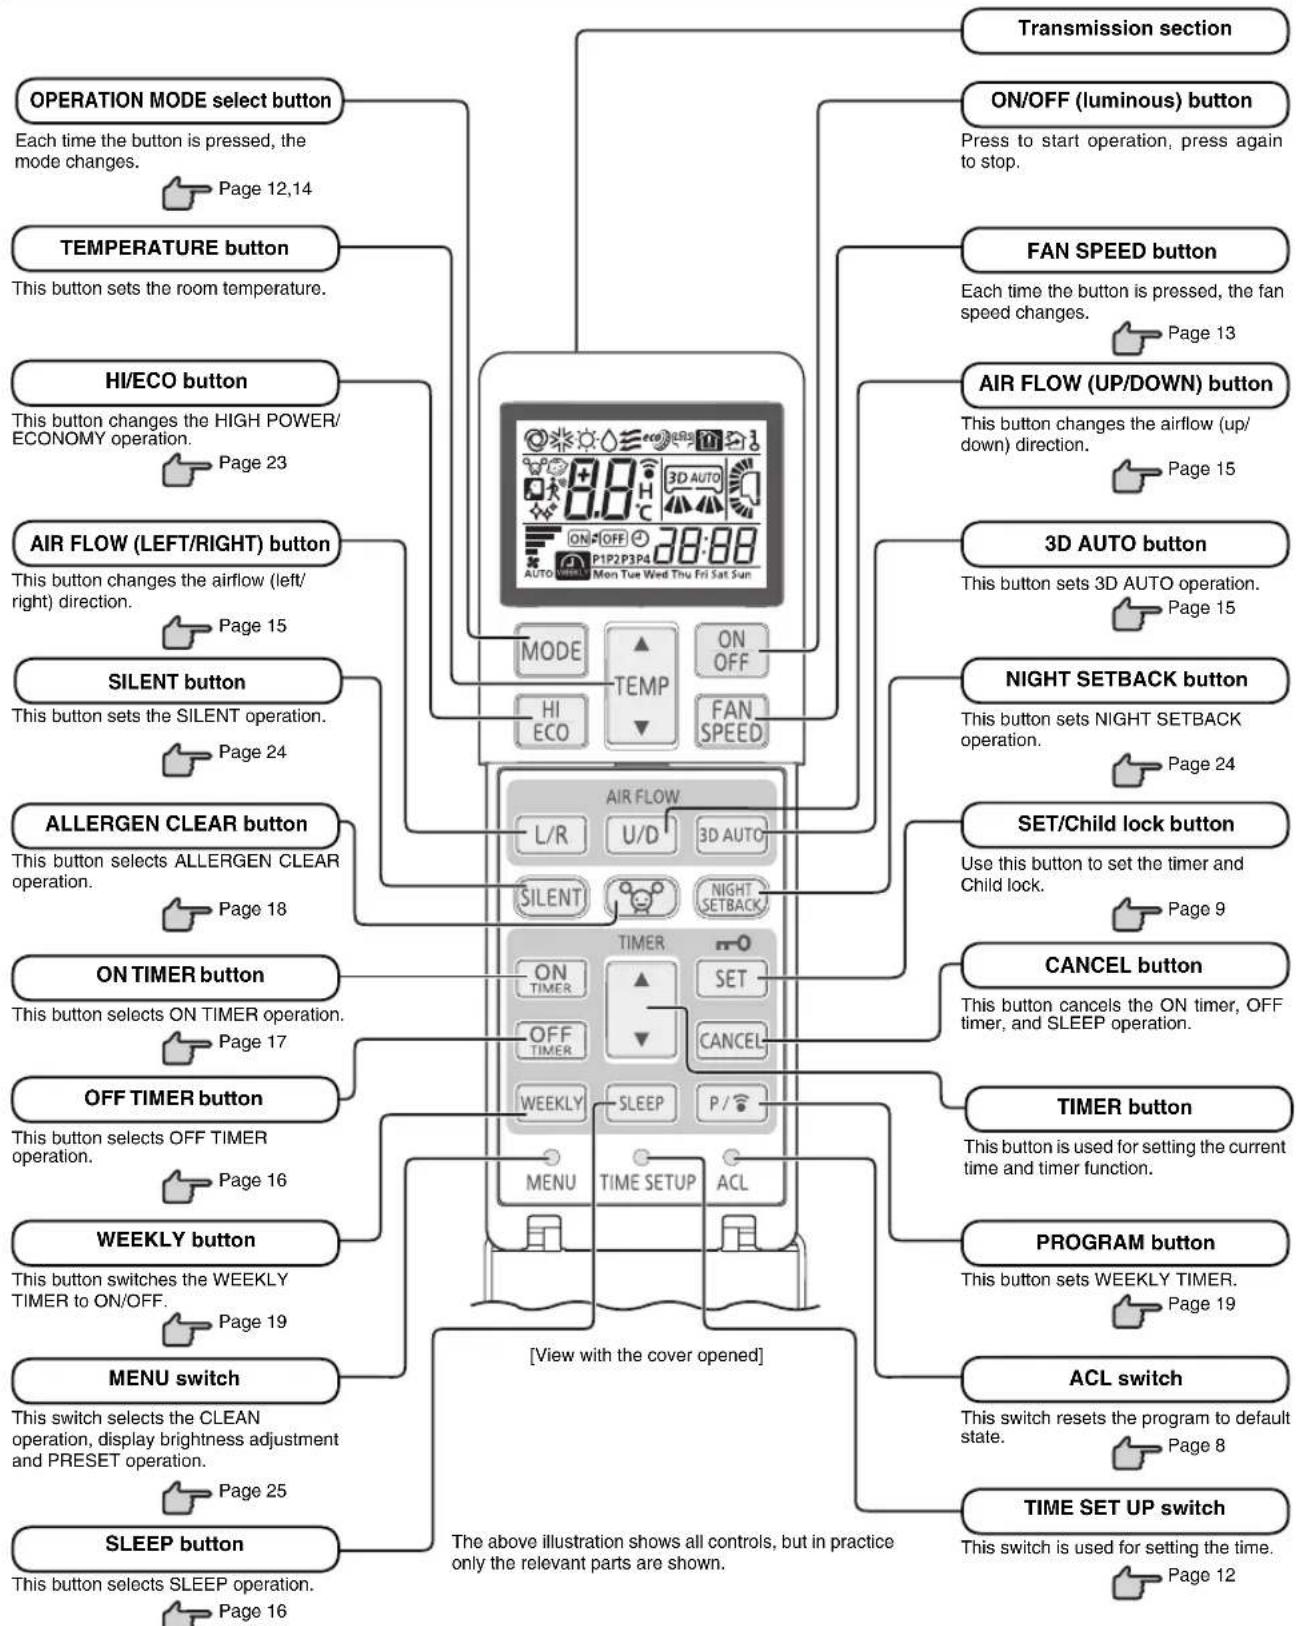
flowchart
graph TD
    A["Operation MODE select button"] --> B["TEMPERATURE button"]
    B --> C["HI/ECO button"]
    C --> D["AIR FLOW (LEFT/RIGHT) button"]
    D --> E["SILENT button"]
    E --> F["ALLERGEN CLEAR button"]
    F --> G["ON TIMER button"]
    G --> H["OFF TIMER button"]
    H --> I["WEEKLY button"]
    I --> J["MENU SWITCH"]
    J --> K["SLEEP button"]

    A --> L["TRANSMISSION SECTION"]
    L --> M["ON/OFF (luminous) button"]
    M --> N["FAN SPEED button"]
    N --> O["AIR FLOW (UP/DOWN) button"]
    O --> P["3D AUTO button"]
    P --> Q["NIGHT SETBACK button"]
    Q --> R["SET/Child lock button"]
    R --> S["CANCEL button"]
    S --> T["TIMER button"]
    T --> U["PROGRAM button"]
    U --> V["ACL switch"]

    A --> W["View with the cover opened"]

    style A fill:#f9f,stroke:#333
    style B fill:#ccf,stroke:#333
    style C fill:#cfc,stroke:#333
    style D fill:#fcc,stroke:#333
    style E fill:#cff,stroke:#333
    style F fill:#ffc,stroke:#333
    style G fill:#fcf,stroke:#333
    style H fill:#cff,stroke:#333
    style I fill:#ffc,stroke:#333
    style J fill:#cfc,stroke:#333
    style K fill:#fcc,stroke:#333
    style L fill:#ffc,stroke:#333
    style M fill:#cfc,stroke:#333
    style N fill:#cfc,stroke:#333
    style O fill:#cfc,stroke:#333
    style P fill:#cfc,stroke:#333
    style Q fill:#cfc,stroke:#333
    style R fill:#cfc,stroke:#333
    style S fill:#cfc,stroke:#333
    style T fill:#cfc,stroke:#333
    style U fill:#cfc,stroke:#333
    style V fill:#cfc,stroke:#333
    style W fill:#cfc,stroke:#333
    style X fill:#cfc,stroke:#333
    style Y fill:#cfc,stroke:#333
    style Z fill:#cfc,stroke:#333
Display in OFF status
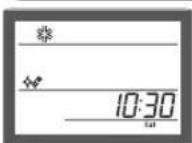
The current time, day of the week, and present OPERATING MODE are displayed while the air-conditioner is turned off.
When each button on the remote control is pressed – with the remote control pointing towards the air-conditioner unit, a signal is transmitted.
When the air-conditioner receives the signal correctly, it will beep.
Transmission procedure
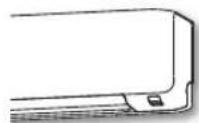
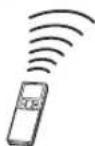
Current time setting
■ When inserting the batteries, the current time is automatically set to time setting mode. Mon and 13:00 are displayed as the current time. Set a correct day of the week and time. Example: Set to Sat 10:30
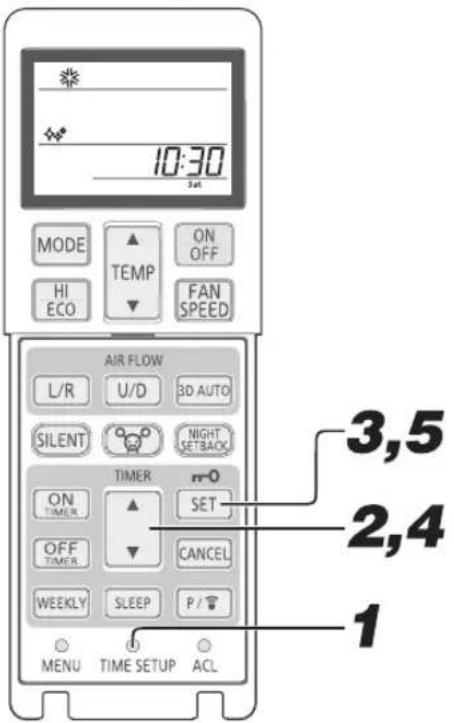
Example: Set to Sat 10:30.
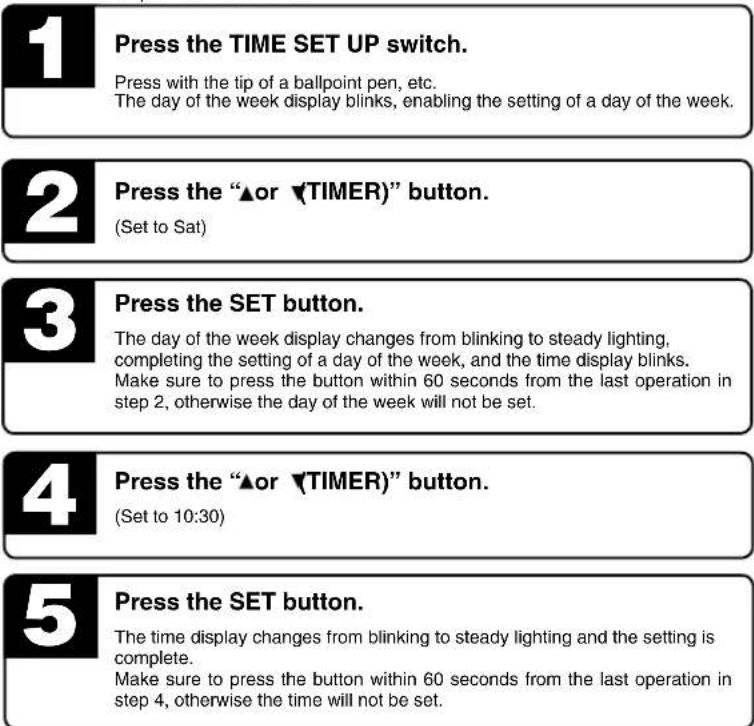
NOTE
- The timer operation works based on the time clock, so set it correctly.
- The remote control data will be reset when the present time is set.
- When the battery of the remote control is replaced or the ACL switch is pressed, the remote control will be set to the initial state. Since the WEEKLY TIMER program is not set in the initial state, set the program according to the setting procedure.
AUTO mode operation
■ Automatically selects the operation mode (COOL, HEAT, DRY) depending on the room temperature when switched on.
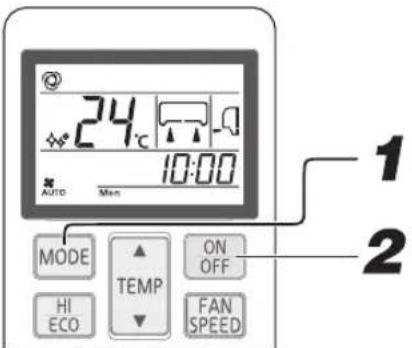
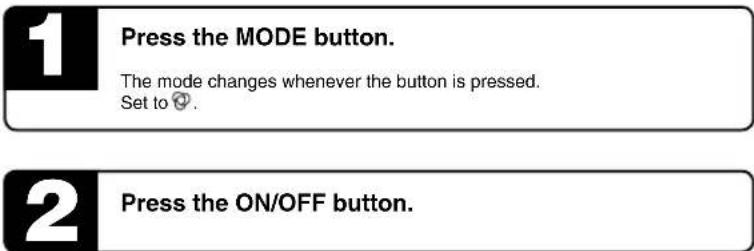
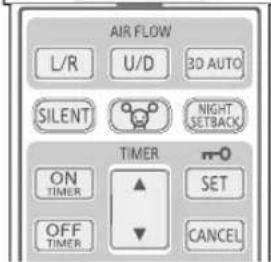
To stop: Press the ON/OFF button.
- If you do not want the AUTO mode program, change to COOL, HEAT, DRY or FAN instead of AUTO.
• Airflow direction adjustment procedure
Page 14


Page 15
Temperature adjustment during AUTO mode
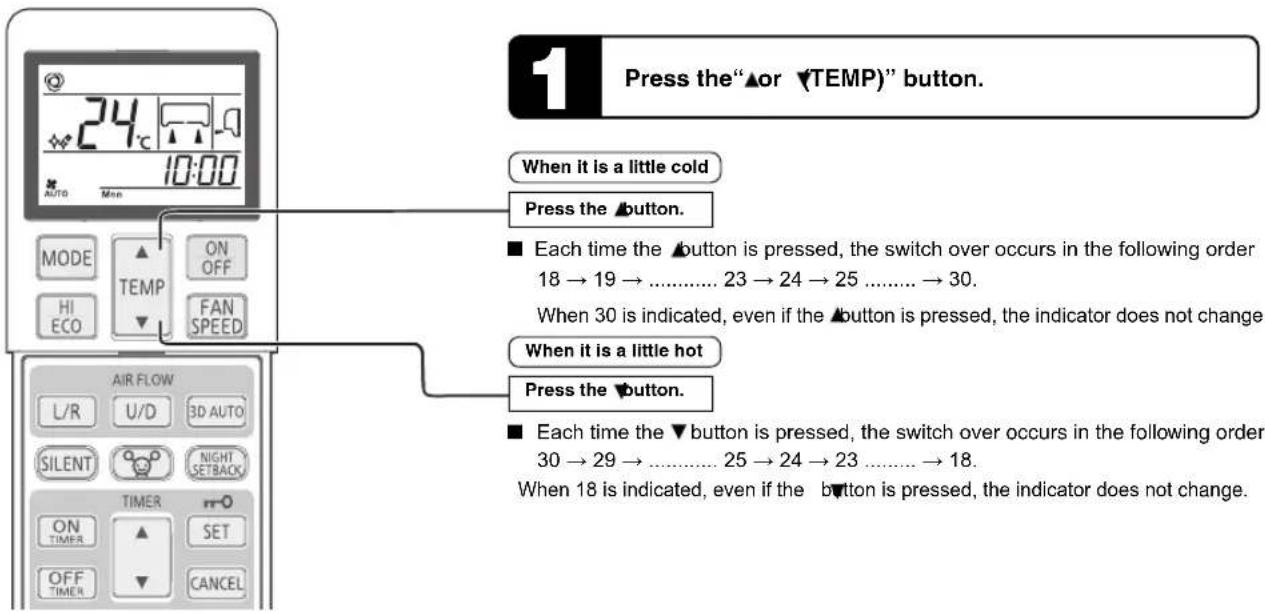
■ Default preset temperature during AUTO mode is 24^ C for both cooling and heating mode. However, it can be adjusted (Minimum 18^ C, Maximum 30^ C) using ▲ button or □ button.
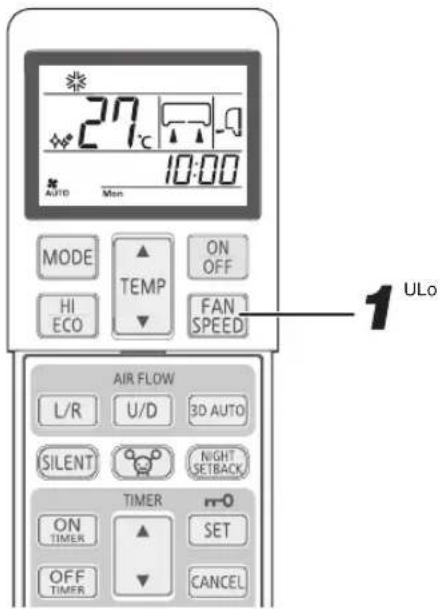
FAN SPEED
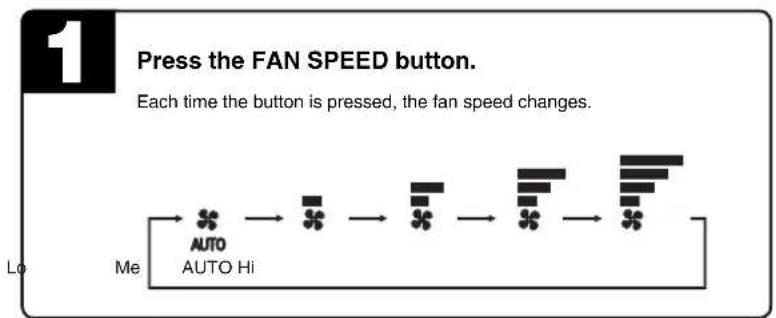
■ The FAN SPEED can be set without DRY mode.
flowchart
graph LR
    A["Me"] --> B["AUTO"]
    B --> C["AUTO Hi"]
    C --> D["+/-"]
    D --> E["+/-"]
    E --> F["+/-"]
    F --> G["+/-"]
    G --> H["+/-"]
    H --> I["+/-"]
    I --> J["+/-"]
    J --> K["+/-"]
    K --> L["+/-"]
    L --> M["+/-"]
    M --> N["+/-"]
    N --> O["+/-"]
    O --> P["+/-"]
    P --> Q["+/-"]
    Q --> R["+/-"]
    R --> S["+/-"]
    S --> T["+/-"]
    T --> U["+/-"]
    U --> V["+/-"]
    V --> W["+/-"]
    W --> X["+/-"]
    X --> Y["+/-"]
    Y --> Z["+/-"]
    Z --> AA["+/-"]
    AA --> AB["+/-"]
    AB --> AC["+/-"]
    AC --> AD["+/-"]
    AD --> AE["+/-"]
    AE --> AF["+/-"]
    AF --> AG["+/-"]
    AG --> AH["+/-"]
    AH --> AI["+/-"]
    AI --> AJ["+/-"]
    AJ --> AK["+/-"]
    AK --> AL["+/-"]
    AL --> AM["+/-"]
    AM --> AN["+/-"]
    AN --> AO["+/-"]
    AO --> AP["+/-"]
    AP --> AQ["+/-"]
    AQ --> AR["+/-"]
    AR --> AS["+/-"]
    AS --> AT["+/-"]
    AT --> AU["+/-"]
    AU --> AV["+/-"]
    AV --> AW["+/-"]
    AW --> AX["+/-"]
    AX --> AY["+/-"]
    AY --> AZ["+/-"]
    AZ --> BA["+/-"]
    BA --> BB["+/-"]
    BB --> BC["+/-"]
    BC --> BD["+/-"]
    BD --> BE["+/-"]
    BE --> BF["+/-"]
    BF --> BG["+/-"]
    BG --> BH["+/-"]
    BH --> BI["+/-"]
    BI --> BJ["+/-"]
    BJ --> BK["+/-"]
    BK --> BL["+/-"]
    BL --> BM["+/-"]
    BM --> BN["+/-"]
    BN --> BO["+/-"]
    BO --> BP["+/-"]
    BP --> BQ["+/-"]
    BQ --> BR["+/-"]
    BR --> BS["+/-"]
    BS --> BT["+/-"]
    BT --> BU["+/-"]
    BU --> BV["+/-"]
    BV --> BW["+/-"]
    BW --> BX["+/-"]
    BX --> BY["+/-"]
    BY --> BZ["+/-"]
| Operation capacity by your choice FAN SPEED | |
| Set automatically by microcomputer AUTO | |
| Silent operation ULo | |
| Energy-saving operation Lo | |
| Standard operation Me | |
| Powerful operation with high capacity Hi |

- When FAN SPEED is changed from Hi to Lo or ULo, the sound of refrigerant may be heard.
COOL/HEAT/DRY/FAN mode operation
Airflow direction adjustment procedure. Page 15

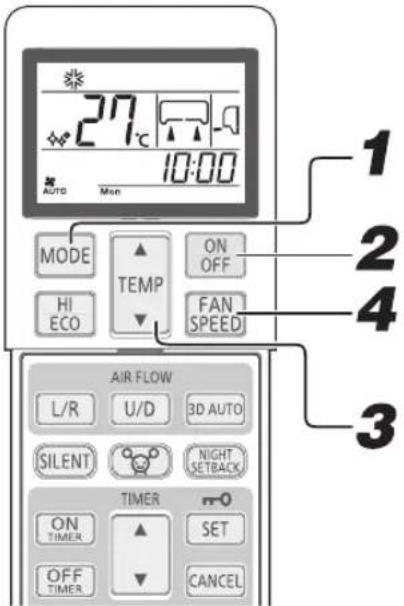
Press the MODE button.
Set to a required mode.
*(COOL), ⚙ (HEAT), △ (DRY), ≡(FAN)

Press the ON/OFF button.

Press the TEMP button.
Press ▲ or ▼ button for the preferred temperature.
Recommendation
| COOL HEAT | DRY | FAN | |
| 26°C - 28°C | 22°C - 24°C | 24°C - 26°C | — |

Press the FAN SPEED button
Set the fan speed as preferred.
A fan speed cannot be set under Dry operation.
NOTE
- In case air is not blown out, when starting the heating operation.
- The operation mode can also be set or changed when the air-conditioner is not in operation.
To stop: Press the ON/OFF button.
Air-conditioner operation temperature range
■ Use within the following operational range. Operating outside of this range may result in the protection devices being activated, preventing the unit from working.
| COOL mode operation | HEAT mode operation | |
| Outside temperature | Approximately -15 to 46 °C Approximately -15 to 24 °C | |
| Inside temperature | Approximately 18 to 32 °C Approximately 10 to 30 °C | |
| Inside humidity | Below approximately 80%The long-term use of the unit with a humidity level exceeding 80% may result in condensation forming on the surface of the indoor unit, leading to water drops. |
Characteristics of HEAT mode operation
Mechanism and capacity of HEAT mode operation
- The unit draws heat from the cold outside air, transfers it to indoors and heats the room. As a characteristic of heat pump system, the heating capacity reduces when the outside air temperature gets colder.
- It may take some time to supply hot air after turning on the air-conditioner.
- If the outside temperature becomes extremely low, it would be better to use an additional source of heating.
Defrosting
If the outside temperature becomes low and humidity is high, the heat exchanger in the outdoor unit may frost over, which prevents efficient heating. If this happens, the automatic defrost function is activated and the heating operation stops for 5 to 15 minutes during defrosting.
- Both indoor and outdoor fans stop and the RUN light blinks slowly (1.5 seconds ON, 0.5 seconds OFF) during defrosting.
- The outdoor unit may release some steam during defrosting. This is to help the defrosting process and is not a defect.
- The HEAT operation resumes as soon as defrosting has been completed.
Airflow direction adjustment
■ Up/down direction can be adjusted with the AIR FLOW U/D (UP/DOWN) button on the remote control. Every time you press this button, the mode changes as follows:
Change on AIR FLOW (UP/DOWN) mode.

flowchart
graph LR
    A[" "] --> B[" "]
    B --> C[" "]
    C --> D[" "]
    D --> E[" "]
    E --> F[" "]
    F --> G[" "]
    style A fill:#f9f,stroke:#333
    style B fill:#f9f,stroke:#333
    style C fill:#f9f,stroke:#333
    style D fill:#f9f,stroke:#333
    style E fill:#f9f,stroke:#333
    style F fill:#f9f,stroke:#333
    note1[" (Flap stopped) "]
    note2[" (Swing) "]
■ Left/right direction can be adjusted with the AIR FLOW L/R(LEFT/RIGHT) button on the remote control. Every time you press this button, the mode changes as follows:
Change on AIR FLOW (LEFT/RIGHT) mode.
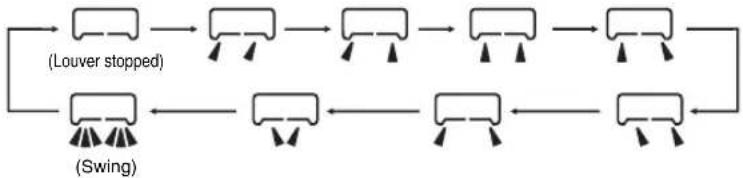
flowchart
graph TD
    A[" "] --> B[" "]
    B --> C[" "]
    C --> D[" "]
    D --> E[" "]
    E --> F[" "]
    F --> G[" "]
    G --> H[" "]
    H --> I[" "]
    I --> J[" "]
    J --> K[" "]
    K --> L[" "]
    L --> M[" "]
    M --> N[" "]
    N --> O[" "]
    O --> P[" "]
    P --> Q[" "]
    Q --> R[" "]
    R --> S[" "]
    S --> T[" "]
    T --> U[" "]
    U --> V[" "]
    V --> W[" "]
    W --> X[" "]
    X --> Y[" "]
    Y --> Z[" "]
    Z --> A
NOTE
- The actual position of the flap and louver may differ from the display shown.
- When heating operation starts, the flap and louver direction is fixed at the horizontal / center position in order to avoid cold draft. It returns to the set position when the warm air supply is started.
- The flap and louver direction will be controlled to the horizontal/center position when the room temperature reaches the set temperature and compressor stops or when defrosting is in operation.
- The airflow direction cannot be set during the period mentioned above. Change the airflow direction settings after the warm air is supplied and the flap/louver goes to the set position.
Memory flap (Flap or louver stopped)
When you press the AIR FLOW (U/D or L/R) button once while the flap or louver is operating, it stops swinging at the position. Since this angle is memorized in the microcomputer, the flap or louver will automatically be set at this angle when the next operation is started.
WARNING
- Do not expose directly to airflow from the air-conditioner for a long time.
CAUTION
- When in COOL or DRY operation, do not operate for a long period with the airflow blowing straight down. Otherwise, condensation may appear on the outlet grill and drip down.
- Do not try to adjust the flaps and louvers by hand, as the control angle may change or the flap or louver may not be closed completely.
- Recommended angle of the flap when stopping
HEAT

(Slant forward blowing)
COOL, DRY
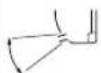
(Horizontal blowing)
3D AUTO operation
■ Fan speed and airflow direction are automatically controlled, allowing the entire room to be efficiently air-conditioned.
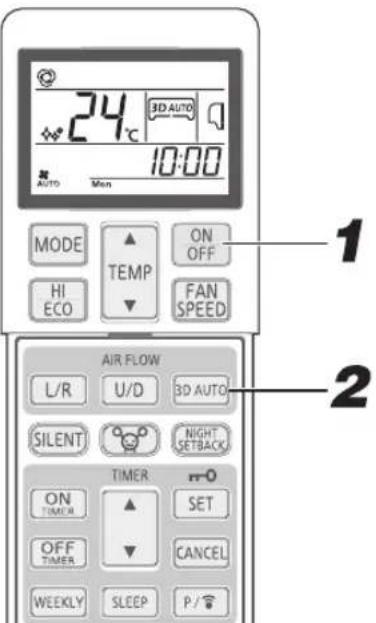
1
Press the ON/OFF button.
2
Press the 3D AUTO button.
Each time the 3D AUTO button is pressed, the display is switched in the order of:

flowchart
graph LR
    A["3D AUTO"] --> B["No display\n(Normal operation)(3D AUTO)"]
Releasing procedure
Press the 3D AUTO button to turn off the 3D AUTO display.
NOTE
- 3D AUTO operation is canceled when you switch the operation mode.
- If 3D AUTO operation is canceled then the airflow direction changes to that used before 3D AUTO was set.
- 3D AUTO operation can be set in AUTO, COOL, or HEAT operation mode only.
SLEEP TIMER operation
■ The unit will stop automatically after the set time lapses.
The set temperature is automatically adjusted according to the lapse time in order to avoid too much cooling or heating.

Page 18
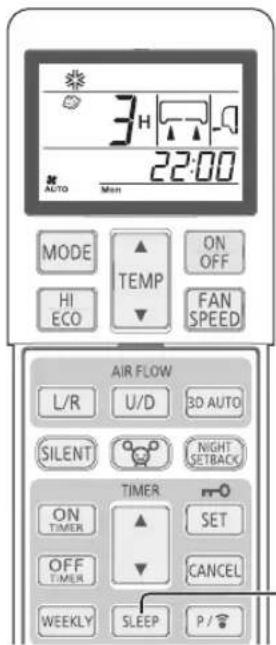
Changing of set time
Set a new time by pressing SLEEP button.
How to cancel
Press the CANCEL button to turn off the SLEEP display.

Press the SLEEP button.
■ If it is pressed while the unit is off
SLEEP TIMER operation starts with the previous operation settings, and the air-conditioner is turned off after the set time lapses.
■ If it is pressed while the unit is running
The air-conditioner is turned off after the set time lapses.
Every time the button is pressed, the display changes as follows:
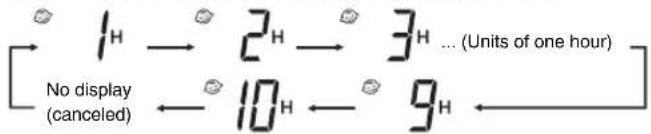
flowchart
graph LR
    A["1H"] --> B["2H"]
    B --> C["3H ... (Units of one hour)"]
    D["No display (canceled)"] --> E["10H"]
    E --> F["9H"]
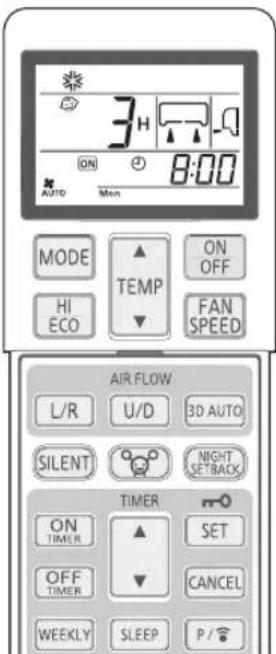
Example: You prefer it to stop after 3 hours.
Set to 3H
The timer light (yellow) is on.

- The unit stops after the set time lapses.

- SLEEP operation will not function during ALLERGEN CLEAR operation.
- SLEEP TIMER cannot be set simultaneously with OFF TIMER.
OFF TIMER operation
■ The unit stops automatically when the set time comes.
With the air-conditioner turned off, start the operation from Step 1. With the air-conditioner running, start from Step 2.
Example: You prefer it to stop 22:30.
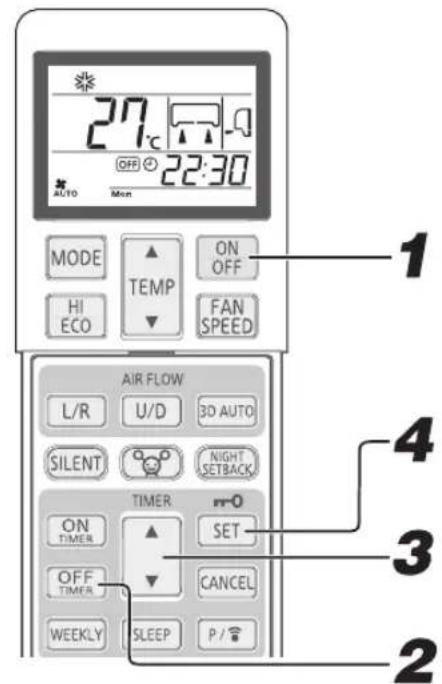
Changing of set time
Set a new time by using the OFF TIMER button.
How to cancel
Press the CANCEL button to turn off the timer display.

Press the ON/OFF button.

Press the OFF TIMER button.
OFF TIMER display is blinking.

Press the "▲or ▼TIMER)" button.
Every time the ▲button is pressed, the display is switched in the order of:

Every time the ▼button is pressed, the display is switched in the order of:

Set at 22:30.

Press the SET button.
The display changes from blinking to steady lighting and the setting is complete.
The timer light (yellow) is on.

- The unit stops at the end of the set period of time.
- Make sure to press the button within 60 seconds from the last operation in step 3, otherwise the setting is not completed.
- The current time is not displayed during OFF TIMER operation.
- OFF TIMER operation will not function during ALLERGEN CLEAR operation.
- Different from SLEEP TIMER operation, automatic set temperature adjustment is not done during OFF TIMER operation.
ON TIMER operation
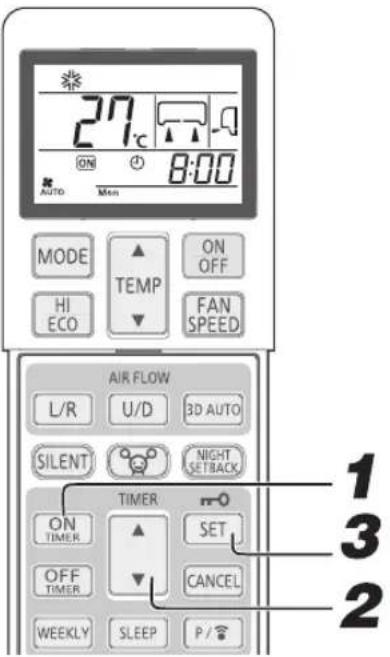
Operation starts 5 to 60 minutes before the set time so that the room temperature reaches the optimum temperature at the set time. ON TIMER operation can be set regardless of whether the air-conditioner is running or not.
Example: When the preferred room temperature is required at 8:00.
Changing of set time
Set a new time by using the ON TIMER button.
How to cancel
Press the CANCEL button to turn off the timer display.

Press the ON TIMER button.
ON TIMER display is blinking.

Press the "▲or ▼TIMER)" button.
Every time the ▲button is pressed, the display is switched in the order of:

Every time the ▼button is pressed, the display is switched in the order of:

Set at 8:00.

Press the SET button.
The display changes from blinking to steady lighting and the setting is complete.
The timer light (yellow) is on.
If ON TIMER setting is performed when air-conditioner is running, air-conditioner operation will stop.
NOTE
• Operation starts 5 to 60 minutes before the set time.
• The timer light (yellow) goes out at the set time.
- Make sure to press the button within 60 seconds from the last operation in step 2, otherwise the setting is not completed.
- The current time is not displayed during ON TIMER operation.
- ON TIMER operation will not function during ALLERGEN CLEAR operation.
- If the ON/OFF button is pressed after setting the ON TIMER, the setting will be canceled.
SLEEP TIMER + ON TIMER operation
■ This is the combined timer operation of SLEEP TIMER and ON TIMER.
Changing of set time
Set a new time by using the SLEEP or ON TIMER button.
Example: When it is required to stop after 3 hours and then start operation at 8:00, near the set temperature.
1 SLEEP TIMER setting
Set by the procedures on page 16.
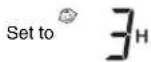
2ON TIMER operation setting
Set by the above procedure mentioned in ON TIMER.
Set to ON 8:00
The setting of the lighting of the timer light (yellow) of this unit is complete.

- After the SLEEP TIMER set time has lapsed, the operation stops, and it starts from 5 to 60 minutes before the ON TIMER's set time.
- The timer light is turned off when ON TIMER set time comes.
How to cancel
Press the CANCEL button to turn off the timer display.
ON TIMER + OFF TIMER operation
This is the combined timer operation of ON TIMER and OFF TIMER.
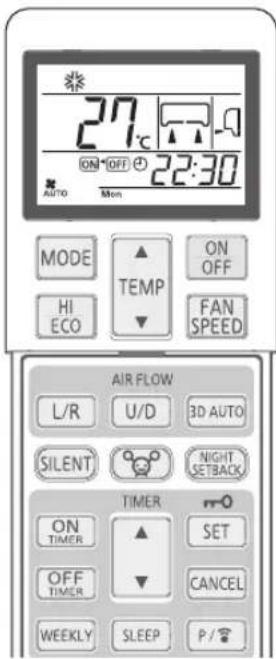
Example: Present time is 21:00. The air-conditioner running.
When it is preferred to stop at 22:30, and then start operation at 8:00, near the set temperature.
1 OFF TIMER operation setting
Set by the procedures on page 16.
Set to OFF 22:30
2ON TIMER operation setting
Set by the procedures on page 17.
Set to ON+OFF 8:00
Timer light (yellow) on the unit will light when the setting is completed.
■ The set time will be displayed on the remote control. The display will change depending on the operational status.
- The air-conditioner stopping.
ON ▶ OFF ⏻ First the air-conditioner starts running with ON TIMER.
After the air-conditioner stops running with OFF TIMER.
- The air-conditioner running.
ON OFF First the air-conditioner stops running with OFF TIMER. After the air-conditioner starts running with ON TIMER.
Changing of set time
Set a new time by using the OFF TIMER or ON TIMER button.
NOTE
- Timer operation can be set only for next 24 hours.
How to cancel
Press the CANCEL or ON/OFF button to turn off the timer display.
Comfort Start-up
In ON TIMER operation, the unit starts the operation a little earlier, so that the room can approach optimum temperature at ON time. This is called "Comfort start-up".
- Mechanism
The room temperature is checked 60 minutes before the ON time. Depending on the temperature at that time, the operation starts 5 to 60 minutes before the timer is at ON.
- The function is available for both COOL and HEAT operation mode (including AUTO). It does not work for DRY mode.
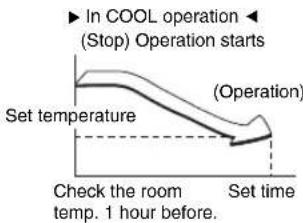
line
| Time | Temperature | | ------------- | ----------- | | Check the room temp. 1 hour before. | 0.8 | | Set time | 0.2 |SLEEP TIMER
When SLEEP TIMER is selected, the set temperature is automatically adjusted after a while, ensuring that the room is not too cold during cooling or too warm during heating.
▶ COOL operation ◀
▶HEAT operation◀
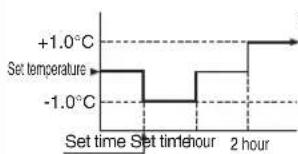
line
| Time | Set Temperature (°C) | |---|---| | 0 | +1.0 | | 1 | -1.0 | | 2 | -1.0 | | 3 | -1.0 | | 4 | -1.0 | | 5 | -1.0 | | 6 | -1.0 | | 7 | -1.0 | | 8 | -1.0 | | 9 | -1.0 | | 10 | -1.0 | | 11 | -1.0 | | 12 | -1.0 | | 13 | -1.0 | | 14 | -1.0 | | 15 | -1.0 | | 16 | -1.0 | | 17 | -1.0 | | 18 | -1.0 | | 19 | -1.0 | | 20 | -1.0 | | 21 | -1.0 | | 22 | -1.0 | | 23 | -1.0 | | 24 | -1.0 | | 25 | -1.0 | | 26 | -1.0 | | 27 | -1.0 | | 28 | -1.0 | | 29 | -1.0 | | 30 | -1.0 | | 31 | -1.0 | | 32 | -1.0 | | 33 | -1.0 | | 34 | -1.0 | | 35 | -1.0 | | 36 | -1.0 | | 37 | -1.0 | | 38 | -1.0 | | 39 | -1.0 | | 40 | -1.0 | | 41 | -1.0 | | 42 | -1.0 | | 43 | -1.0 | | 44 | -1.0 | | 45 | -1.0 | | 46 | -1.0 | | 47 | -1.0 | | 48 | -1.0 | | 49 | -1.0 | | 50 | -1.0 | | 51 | -1.0 | | 52 | -1.0 | | 53 | -1.0 | | 54 | -1.0 | | 55 | -1.0 | | 56 | -1.0 | | 57 | -1.0 | | 58 | -1.0 | | 59 | -1.0 | | 60 | -1.0 | | 61 | -1.0 | | 62 | -1.0 | | 63 | -1.0 | | 64 | -1.0 | | 65 | -1.0 | | 66 | -1.0 | | 67 | -1.0 | | 68 | -1.0 | | 69 | -1.0 | | 70 | -1.0 | | 71 | -1.0 | | 72 | -1.0 | | 73 | -1.0 | | 74 | -1.0 | | 75 | -1.0 | | 76 | -1.0 | | 77 | -1.0 | | 78 | -1.0 | | 79 | -1.0 | | 80 | -1.0 | | 81 | -1.0 | | 82 | -1.0 | | 83 | -1.0 | | 84 | -1.0 | | 85 | -1.0 | | 86 | -1.0 | | 87 | -1.0 | | 88 | -1.0 | | 89 | -1.0 | | 90 | -1.0 | | 91 | -1.0 | | 92 | -1.0 | | 93 | -1.0 | | 94 | -1.0 | | 95 | -1.0 | | 96 | -1.0 | | 97 | -1.0 | | 98 | -1.0 | | 99 | -1.0 | | 100 | -1.0 |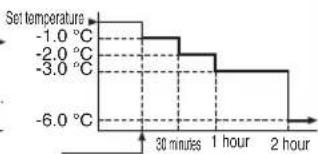
line
| Time | Set Temperature (°C) | | :--- | :--- | | 30 minutes | -1.0 | | 1 hour | -2.0 | | 2 hours | -3.0 | | 30 minutes | -6.0 |ALLERGEN CLEAR operation
■ The power of enzymes is used to eliminate allergy-causing allergens that accumulate on the allergen clear filter.
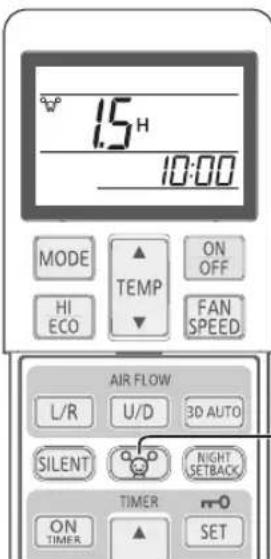
1 Press the ALLERGEN CLEAR button.
To stop: Press the ON/OFF or ALLERGEN CLEAR button.
NOTE
- Since the room temperature may change quite a bit, it is recommended that this be used when no one is in the room. (It completes automatically in approximately 90 minutes.)
- During ALLERGEN CLEAR operation temperature, fan speed, airflow direction and timer operations settings cannot be made.
- In case of SCM multi system, ALLERGEN CLEAR control function is invalid.
- In case of SCM multi system, if ALLERGEN button is pressed by mistake, the indoor unit which received such command will stop.
WEEKLY TIMER operation
■ Up to 4 programs with timer operation (ON TIMER / OFF TIMER) are available for each day of the week. Maximum 28 programs per week are available. Once this has been set, the timer operation will be repeated at the same programs every week unless the WEEKLY TIMER is canceled.
Sample (At cooling season)
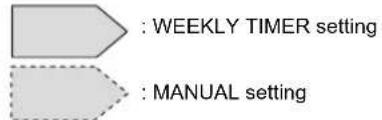
| 6:00 | 8:00 | 10:00 | 12:00 | 14:00 | 16:00 | 18:00 | 20:00 | 22:00 | ||
| Mon | Program 1 ON 6:00 | Program 2 OFF 8:30 | Program 3 ON 17:00 | Program 4 OFF 22:00 | ||||||
| COOL 27°C Fan: AUTO | COOL 28°C Fan: Lo | |||||||||
| Tue | Program 1 ON 5:30 | Change setting | Program 2 OFF 12:00 ON | Program 3 ON 17:00 | Program 4 OFF 22:00 | |||||
| COOL 27°C Fan: AUTO | AUTO 27°C Fan: Me | DRY 26°C | COOL 28°C Fan: Lo | |||||||
| Wed ~ Fri | ON | Program 1 OFF 10:00 ON | Program 2 OFF 14:00 | Program 3 ON 18:00 | Program 4 OFF 22:00 | |||||
| COOL 28°C Fan: ULo | DRY 25°C | COOL 28°C Fan: ULo | ||||||||
| Sat | Program 1 ON 7:30 | Change setting | Program 2,3 No setting | Change setting | Program 4 OFF 22:00 | |||||
| COOL 26°C Fan: Hi | COOL 25°C Fan: Hi | COOL 28°C Fan: ULo | ||||||||
| Sun | Program 2 ON 7:00 | OFF | Program 1 ON 12:00 | Program 3 ON 19:00 | Program 4 OFF 22:00 | |||||
| COOL 28°C Fan: Hi | COOL 26°C Fan: Hi | COOL 27°C Fan: ULo | ||||||||
WEEKLY TIMER ON/OFF setting
■ Switch the WEEKLY TIMER to ON/OFF by using the WEEKLY button.
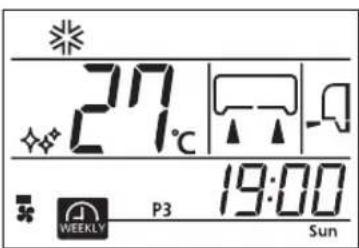

Press the WEEKLY button.
The WEEKLY TIMER becomes effective.
Every time the WEEKLY button is pressed, the display is switched in the order of:

flowchart
graph LR
    A["(WEEKLY TIMER on)"] --> B["No display"]
    B --> C["(WEEKLY TIMER off)"]
When the WEEKLY TIMER is set to ON, the timer light (yellow) of the air-conditioner is on.
When the battery of the remote control is replaced or the ACL switch is pressed, the remote control is set to the initial state. Since the WEEKLY TIMER program is not set in the initial state, set the program according to the setting procedure.
NOTE
- The WEEKLY TIMER is switched to ON/OFF regardless of whether the air-conditioner is running or not.
- The ON TIMER operation of the WEEKLY TIMER is effective regardless of whether the air-conditioner is running or not. When the ON TIMER setting time is reached, the remote control operates according to the contents that are set. The remote control display is also switched to the operation contents that are set. The setting can be changed from the remote control after ON TIMER operation of the WEEKLY TIMER.
The following contents can be set by the ON TIMER.
Operation mode, fan speed, temperature, airflow direction, ECONOMY, 3D AUTO, NIGHT SETBACK, SILENT
Comfort start-up is not performed for WEEKLY TIMER ON TIMER operation.
- OFF TIMER operation of the WEEKLY TIMER is effective only when the air-conditioner is running. When the time set by the OFF TIMER is reached, the air-conditioner stops.
- When multiple program numbers are set for the current day (day of the week), the operation is performed from the earliest time that is set.
- When various timers (ON TIMER, OFF TIMER, and SLEEP TIMER) are operating, the WEEKLY TIMER does not operate even if the time set in the ON TIMER or OFF TIMER is reached. The WEEKLY TIMER becomes effective after various timers are terminated.
- The ON TIMER or OFF TIMER of the same time in the same day of the week cannot be set.
- In case WEEKLY TIMER setting is not sent to the unit, TIMER light will not turn on even if the WEEKLY button is pressed and is displayed on the remote control.
Setting mode
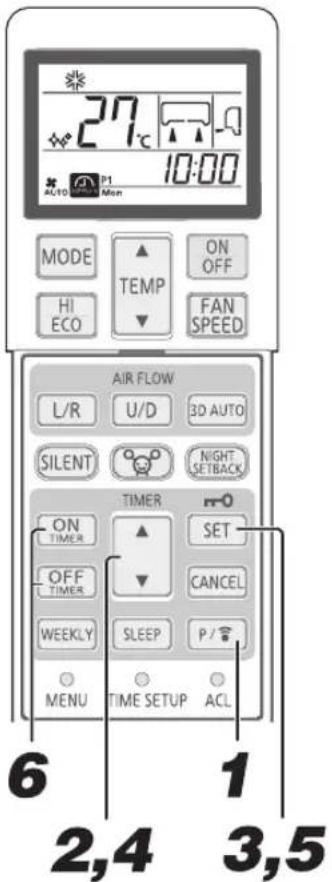
Set after setting the current day of the week and the time.

Press the PROGRAM button.
and current day of the week blink.
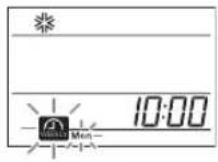

Press the "▲or ▼TIMER)" button.
Select a day of the week to be reserved.
Every time the ▲button is pressed, the display is switched in the order of:

Every time the ▼button is pressed, the display is switched in the order of:

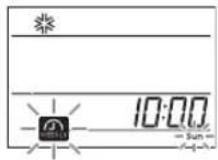

Press the SET button.
The day of the week is determined and the program number blinks.
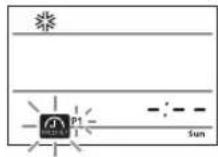

Press the “▲or ▼(TIMER)” button.
Select a program number.
Every time the ▲button is pressed, the display is switched in the order of:

Every time the ▼ button is pressed, the display is switched in the order of:

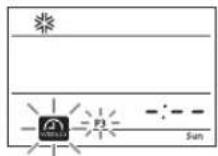

Press the SET button.
When no set contents (ON TIMER or OFF TIMER) are available, both the ON and OFFers blink.
When set contents (ON TIMER or OFF TIMER) are available, either ON or Timer blinks.
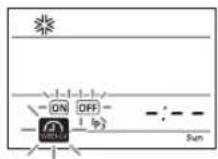
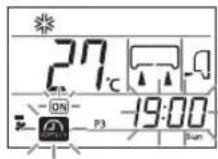

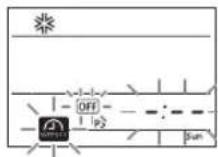
Press the ON TIMER or OFF TIMER button.
ON TIMER or OFF TIMER is determined and time display blinks.
ON TIMER is selected
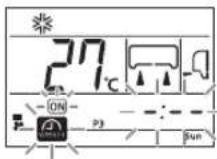
OFF TIMER is selected
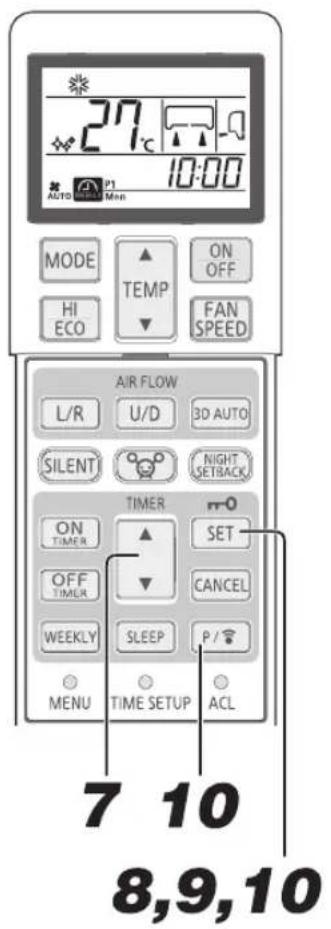

Press the "▲or ▼TIMER)" button.
Set a time.
Every time the ▲button is pressed, the display is switched in the order of:

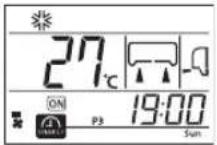
Every time the ▼button is pressed, the display is switched in the order of:

When ON TIMER is selected, go to Step 8. When OFF TIMER is selected, go to Step 9.

Set required operation contents.
When ON TIMER is selected, operation mode, fan speed, and airflow direction can be changed and the ECONO, SILENT or NIGHT SETBACK operation can be set.

Press the SET button.
The time is determined and and blink.
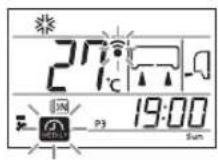

Press the PROGRAM button or SET button.
When the PROGRAM button is pressed, the setting is sent to the air-conditioner. Since it takes 3 seconds for transmission, point the remote control at the remote control signal receiver of the indoor unit during the period. When the setting is received, a buzzer sound (pi, pi, pi) is emitted. When the SET button is pressed, the setting continues from Step 2.
Setting mode
■ Set the same operation contents to the same program number of all the days of the week. In Step 2 above, select "all of the days of the week". When the contents that were individually set exist in the same program number, the contents are overwritten.
NOTE
- If no operation is performed for 60 seconds in setting mode, the setting changes that have been made until then become invalid and the setting mode terminates. Subsequently, and all the program numbers (P1, P2, P3 and P4) blink for 10 seconds. (This blinking can not be observed if setting mode gets terminated while setting only one program.)
- At the end of the setting mode, point the remote control at the air-conditioner and press the PROGRAM button. In this case, check that the air-conditioner emits a reception buzzer sound three times (pi, pi, pi). If the buzzer sound is not emitted, set the mode to the setting mode again by pressing the PROGRAM button and check that the buzzer sound is emitted.
How to cancel the setting
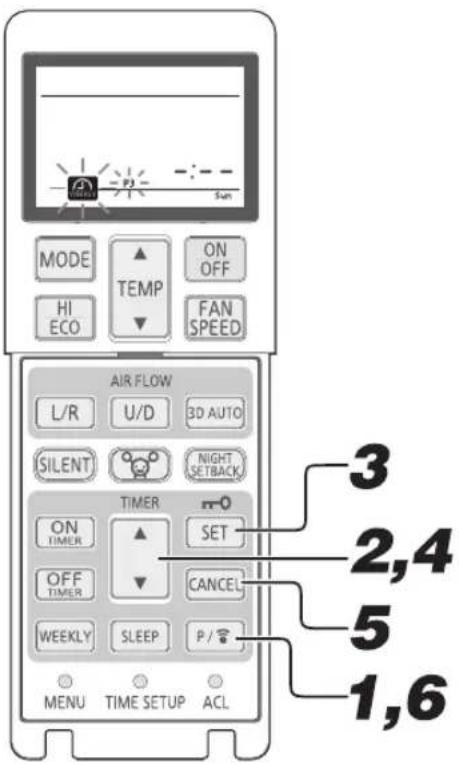
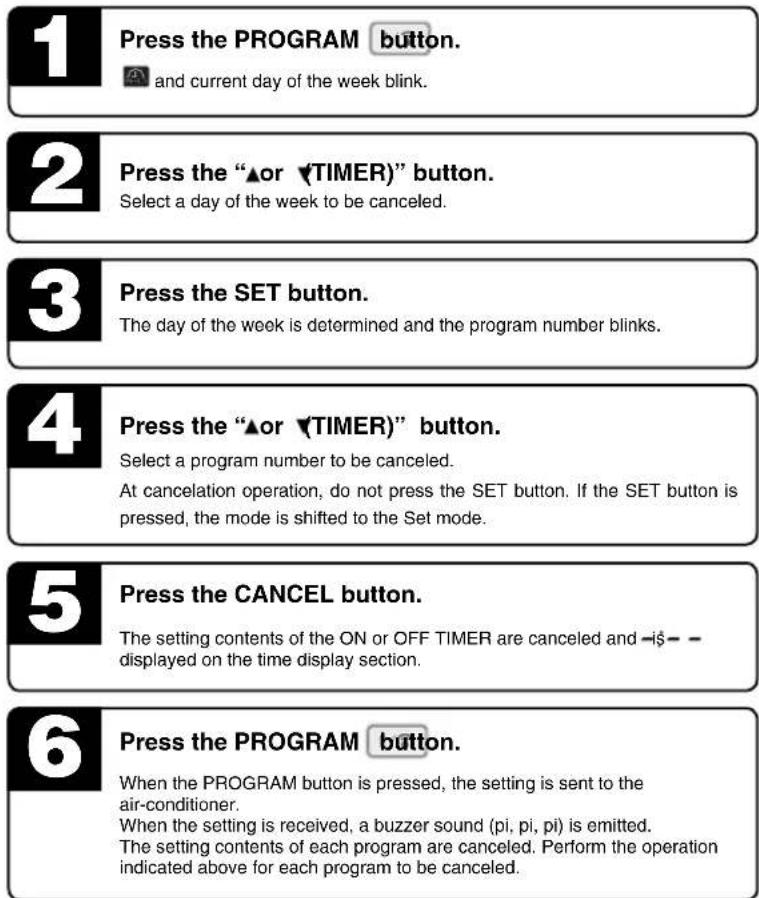
How to cancel the setting
When the same operation contents exist in the same program number of all the days of the week, collective erase is allowed. In Step 2 above, select "all of the days of the week". The procedure from Step 3 is the same as that indicated above. If the operation contents have been changed or erased by individual setting after the collective setting described in page 21, causing setting content discrepancies among the days of the week, collective erase is not allowed.
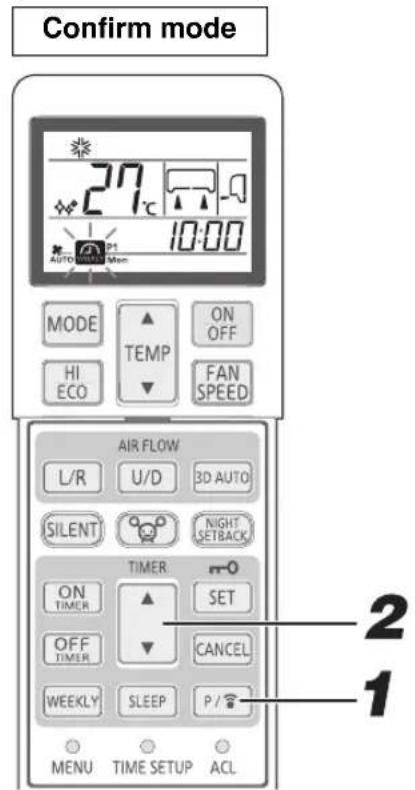
The WEEKLY TIMER setting contents can be confirmed.
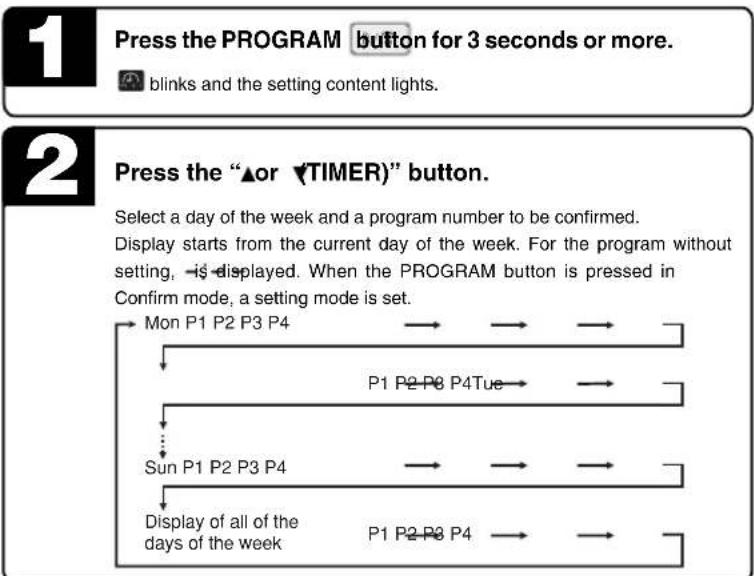
flowchart
graph TD
    A["1 Press the PROGRAM button for 3 seconds or more."] --> B["2 Press the “▲or ▼TIMER)” button."]
    B --> C["Select a day of the week and a program number to be confirmed. Display starts from the current day of the week. For the program without setting, is displayed. When the PROGRAM button is pressed in Confirm mode, a setting mode is set."]
    C --> D["Mon P1 P2 P3 P4"]
    C --> E["P1 P2-P8 P4Tue"]
    C --> F["Sun P1 P2 P3 P4"]
    C --> G["Display of all of the days of the week"]
    G --> H["P1 P2-P8 P4"]
Releasing procedure
The Confirm mode can be terminated by pressing the ON/OFF, CANCEL or SET button.

- If no operation is performed for 60 seconds in Confirm mode, the Confirm mode is terminated.
HIGH POWER/ECONOMY operation
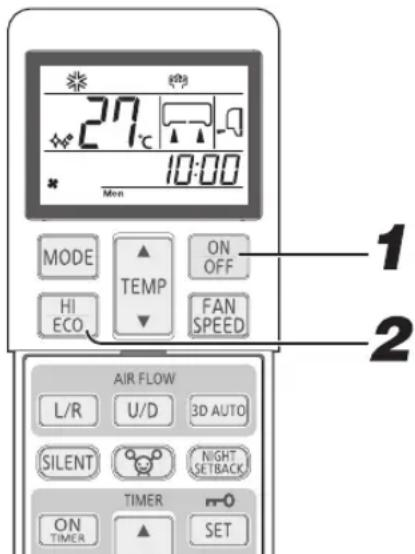
1 Press the ON/OFF button.
2 Press the HI/ECO button. When the operating mode is ALIT
- When the operating mode is AUTO, COOL or HEAT Every time the HI/ECO button is pressed, the display is switched in the order of:

flowchart
graph LR
    A["(HIGH POWER)"] --> B["(ECONOMY)"]
    B --> C["No display"]
    C --> D["(Normal operation)"]
- When the operating mode is DRY or ON TIMER + OFF TIMER Every time the HI/ECO button is pressed, the display is switched in the order of:

flowchart
graph LR
    A["eco"] --> B["No display"]
    C["(ECONOMY) (Normal operation)"]
. HIGH POWER operation
Pressing the HI/ECO button intensifies the operating power and initiates powerful cooling or heating operation for 15 minutes continuously. The remote control displays and the FAN SPEED display disappears.

- During the HIGH POWER operation, the room temperature is not controlled. When it causes an excessive cooling or heating, press the HI/ECO button again to cancel the HIGH POWER operation.
- HIGH POWER operation is not available during the DRY and ON TIMER + OFF TIMER operations.
- When HIGH POWER operation is set after setting ON TIMER operation, HIGH POWER operation will start from the set time.
-
After HIGH POWER operation, the sound of refrigerant flowing may be heard.
-
When the following operations are set, HIGH POWER operation will be canceled.
① When the HI/ECO button is pressed again.
(The operation mode will be changed to the ECONOMY operation)
② When the operation mode is changed.
③ When it has been 15 minutes since HIGH POWER operation has started.
④ When the 3D AUTO button is pressed.
⑤ When the SILENT button is pressed.
⑥ When the NIGHT SETBACK button is pressed
- Not operable while the air-conditioner is OFF.
ECONOMY operation
Pressing the HI/ECO button initiates a soft operation with the power suppressed in order to avoid an excessive cooling or heating. The unit operates 1.5°C higher than the setting temperature during cooling or 2.5°C lower than that during heating. The remote control displays and the FAN SPEED display disappears.

-
It will go into ECONOMY operation at the next time the air-conditioner runs in the following case.
① When the air-conditioner is stopped by ON/OFF button during ECONOMY operation.
② When the air-conditioner is stopped in SLEEP or OFF TIMER operation during ECONOMY operation.
③ When the operation is retrieved from CLEAN or ALLERGEN CLEAR operation. -
When the following operations are set, ECONOMY operation will be canceled.
① When the HI/ECO button is pressed again.
② When the operation mode is changed from DRY to FAN.
③ When the NIGHT SETBACK button is pressed. - Not operable while the air-conditioner is OFF.
NIGHT SETBACK operation
During the cold season, the room temperature can be maintained at a comfortable level during the absence, at night, and while the room is unattended. The air-conditioner maintains the constant temperature at about 10^ C.
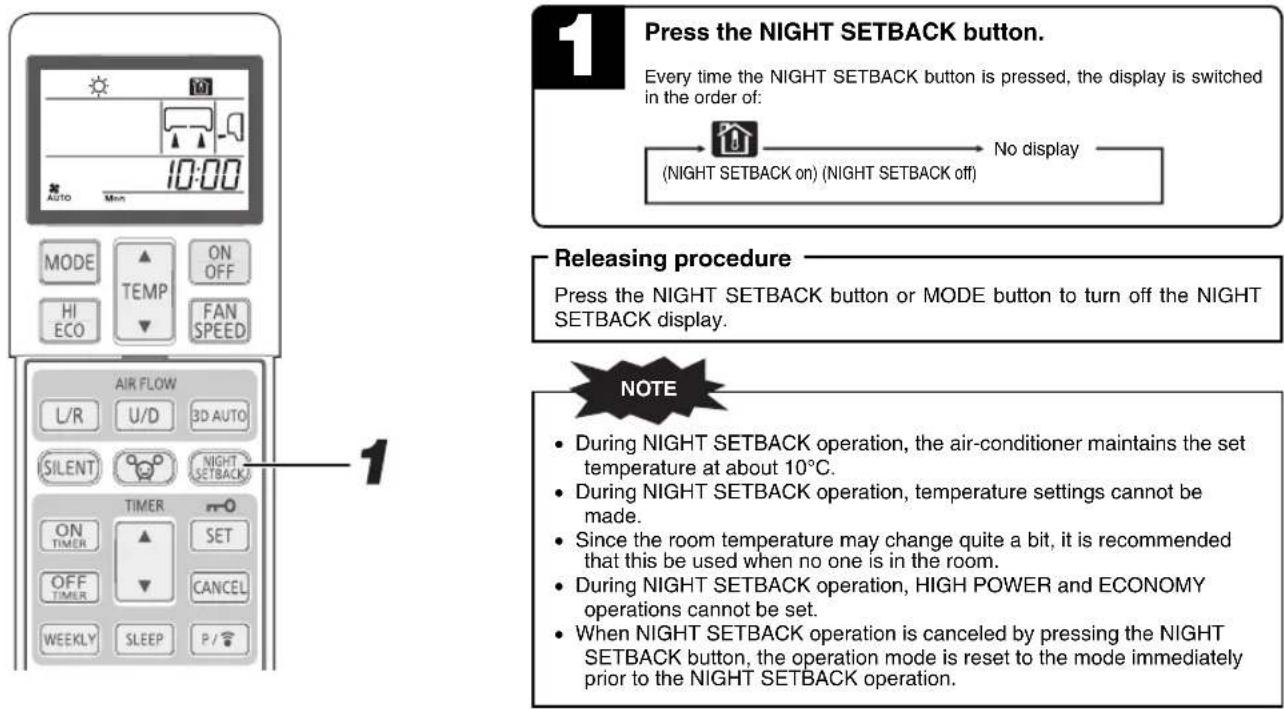
Press the NIGHT SETBACK button.
Every time the NIGHT SETBACK button is pressed, the display is switched in the order of:
(NIGHT SETBACK on) (NIGHT SETBACK off)
No display
Releasing procedure
Press the NIGHT SETBACK button or MODE button to turn off the NIGHT SETBACK display.
NOTE
- During NIGHT SETBACK operation, the air-conditioner maintains the set temperature at about 10°C.
- During NIGHT SETBACK operation, temperature settings cannot be made.
- Since the room temperature may change quite a bit, it is recommended that this be used when no one is in the room.
- During NIGHT SETBACK operation, HIGH POWER and ECONOMY operations cannot be set.
- When NIGHT SETBACK operation is canceled by pressing the NIGHT SETBACK button, the operation mode is reset to the mode immediately prior to the NIGHT SETBACK operation.
SILENT operation
■ When the SILENT operation is set, the unit operates more silently reducing noise from the outdoor unit. With the air-conditioner turned off, start the operation from Step 1. With the air-conditioner running, start from Step 2.
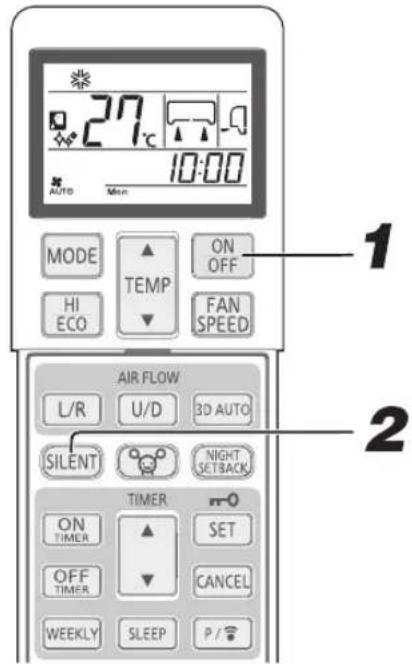

Press the ON/OFF button.

Press the SILENT button.
- When the operating mode is AUTO, COOL, HEAT or NIGHT SETBACK Every time the SILENT button is pressed, the display is switched in the order of:

(SILENT on) (SILENT off)
No display
Releasing procedure
Press the SILENT button to turn off the SILENT display.
NOTE
- During SILENT operation, the maximum cooling and heating capacities deteriorate.
- SILENT operation will not function during DRY and FAN operation.
- In case of following operations, the air-conditioner will resume SILENT operation whenever it turns ON again.
① When the air-conditioner is stopped by ON/OFF button during SILENT operation.
② When the air-conditioner is stopped in SLEEP or OFF TIMER operation during SILENT operation.
③ When the operation is retrieved from CLEAN or ALLERGEN CLEAR operation. - Not operable while the air-conditioner is OFF.
- The noise level of the outdoor unit may not decrease depending on the condition.
• In case of SCM multi system, SILENT control is invalid.
MENU function
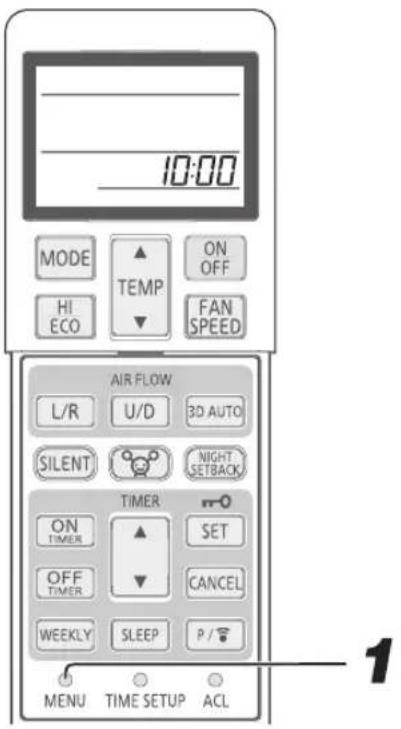
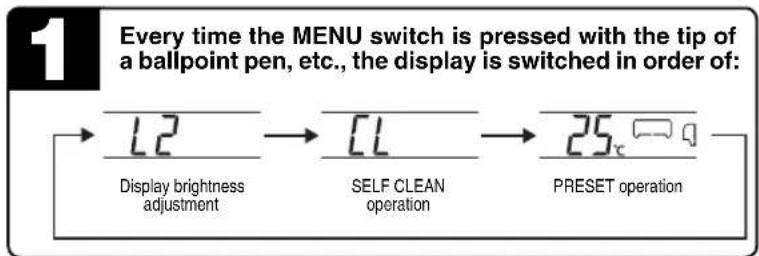
■ MENU function is used for setting the display brightness adjustment, SELF CLEAN operation and PRESET operation.
flowchart
graph LR
    A["Display brightness adjustment"] --> B["SELF CLEAN operation"]
    B --> C["PRESET operation"]
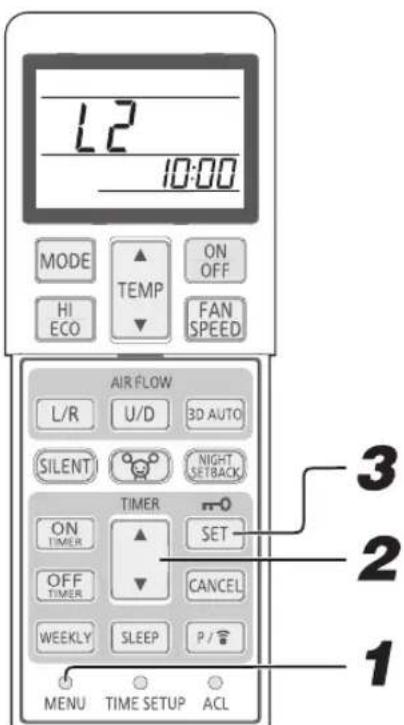
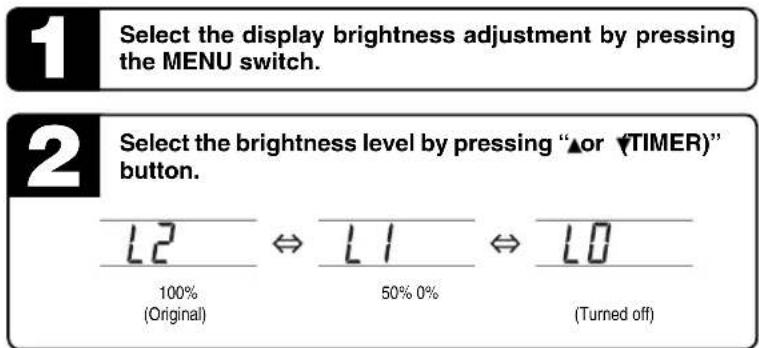
Display brightness adjustment
■ This function can be used when it is necessary to adjust the brightness of unit display.
SELF CLEAN operation
■ CLEAN operation should be run after AUTO, COOL and DRY operation to remove the moisture from inside of the indoor unit and control the growth of mold and bacteria.
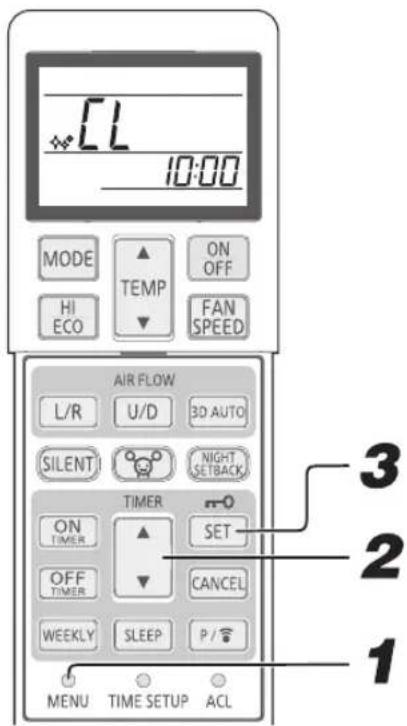
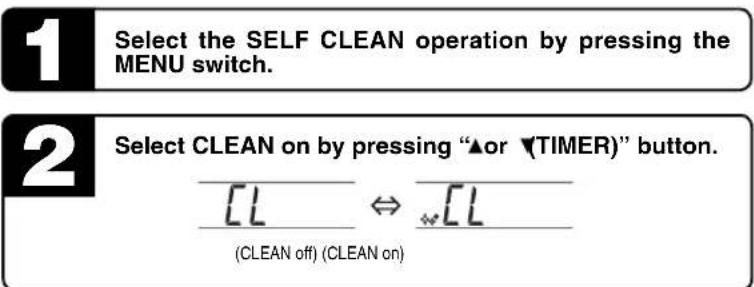

- Two hours later, the air-conditioner stops CLEAN operation automatically. To stop the air-conditioner immediately, press the ON/OFF button.
- CLEAN operation is not operated after HEAT, FAN, OFF TIMER, SLEEP and ALLERGEN CLEAR operations have finished.
- The indoor unit fan runs for about two hours in CLEAN operation.
• The RUN light illuminates during CLEAN operation.
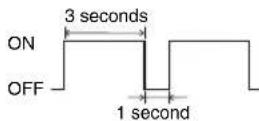
- Pressing the SLEEP button, ALLERGEN CLEAR button or NIGHT SETBACK button during CLEAN operation cancels the CLEAN operation and then the unit is set to SLEEP, ALLERGEN CLEAR or NIGHT SETBACK operation.
- This is not a function for removing mold, germs or grime that have already adhered to the unit.
PRESET operation
■ This operation can save the preferred setting for future operation.
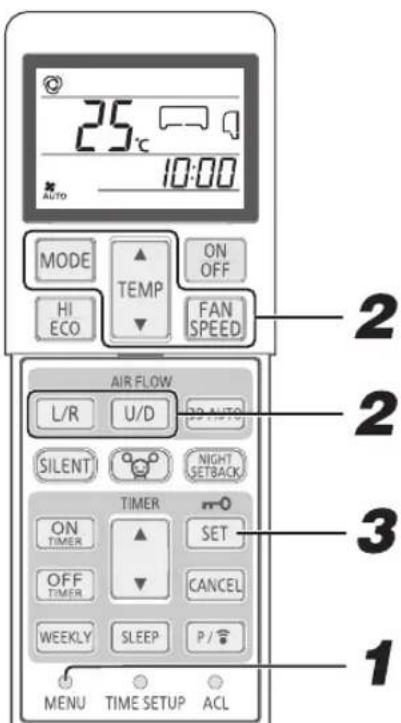
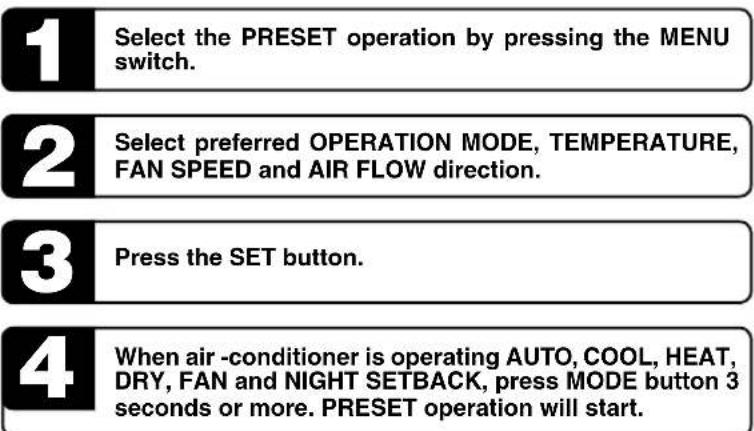

- When pressing MODE button for PRESET operation during the 3D AUTO or HIGH POWER operation, it will be canceled.
- When pressing MODE button for PRESET operation during the ECONOMY operation, it will continue.
Auto restart function
■ Auto restart function records the operational status of the air-conditioner immediately prior to be switched off by a power cut, and then automatically resumes operations after the power has been restored.
■ The following settings will be canceled:
① Timer settings
② HIGH POWER operations
NOTE
- Auto restart function is set at on when the air-conditioner is shipped from the factory. Consult with your dealer if this function needs to be switched off.
- When power failure occurs, the timer setting is canceled. Once power is resumed, set the timer again.
Tips for effective operation
■ Please observe the following for the most economic and comfortable use of your unit.
| Set a suitable room temperature.Excessively high or low temperatures are not good for your health and waste of electricity. | Clean the filters frequently.Clogged filters may block the airflow and cause less efficient operation. | Avoid direct sunlight and draught.Cut out direct sunlight by drawing the curtains or blinds when cooling. Keep windows and doors shut, except when ventilating. |
| Adjust the airflow direction properly.Adjust the up/down and left/right airflow to ensure a steady room temperature. | Operate the unit only when needed.Use the timer properly to operate the unit only when needed. | Keep heat source away when cooling.Keep heat sources out of the room as much as possible. |
Maintenance
Before maintenance During the operational season
Turn off the power source.
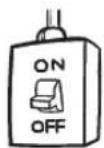
- Do not spill any liquid to the unit.
- Do not touch the aluminum fins on the heat exchanger.
- Stand firmly on a stepladder or other stable object when removing the inlet panel and filter.
Do not use the following items:
• Hot water (40°C or more)
It may deform or discolour the unit.
- Petrol, paint thinner, benzine or cleanser, etc. It may deform or scratch the unit.
Cleaning the air filter
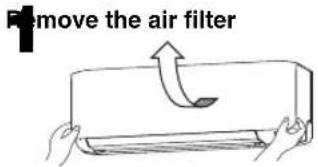
Standard interval is once every two week
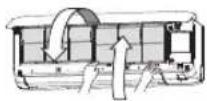
- Pull up the air inlet panel forward.
- Lightly hold the knobs both sides and lift a little to remove the panel forward.
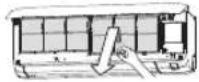
If the filter is very dirty, clean it with warm water (approx. 30°C), and dry it thoroughly.
CAUTION
- Do not clean the filters with boiling water.
- Do not dry them over an open flame.
- Pull them out gently.
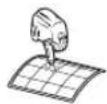
8 Install the air filter
- Hold firmly the filter at both sides as shown at right and insert securely.
- Operating without the air filters will make the unit dusty, and may cause damage.
Cleaning the unit
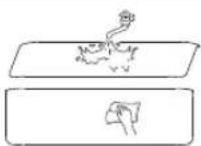
- Wipe the unit with a soft, dry cloth, or use a vacuum cleaner.
- If the unit is very dirty, wipe it with a cloth soaked in warm water.
Cleaning the air inlet panel
- The panel can be washed with water. After washing with water, wipe any moisture off the panel and dry out of direct sunlight.
How to open and close the air inlet panel
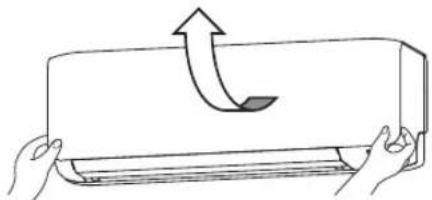
Open
Place fingers at the corners on both sides of the panel and pull up the panel forward so that it will be open by about 70 degrees.
natural_image
Illustration of hands holding a rectangular device with an arrow indicating clockwise motion (no text or symbols)How to remove and install the air inlet panel
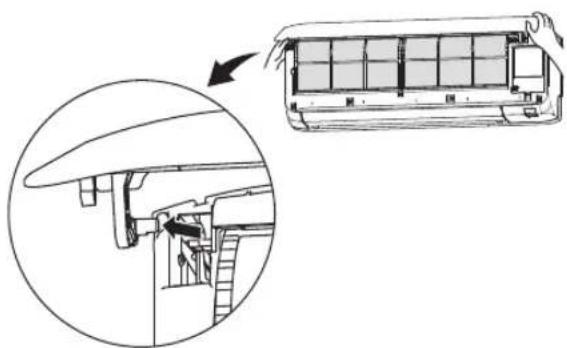
Removing
When removing the air inlet panel for internal cleaning or others, open the panel by 90 degrees and then pull it forward.
natural_image
Diagram showing airflow or ventilation system inside a car air conditioner unit, with no visible text or symbolsClose
Push both corners of the panel evenly and press further lightly at the center.
Installing
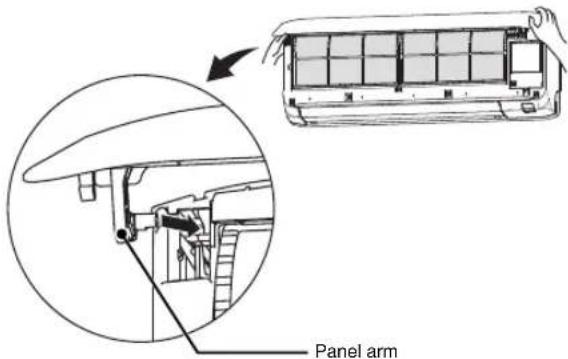
Insert the panel arm into the slot on the front panel from the position shown below, hold the panel at both ends of lower part, lower it downward slowly, then push it slightly until the latch works.
At the end of the season At the
1 Perform the fan operation for 2 to 3 hours. Dry the inside of the unit.
2 Stop the unit and turn off the power source. The unit consumes approx. 4W even when the unit is not operating. Turning off the power source will help saving energy consumption and cost.
3 Clean and reinstall the air filters.
4 Clean both the indoor and outdoor units.
5 Remove batteries from the remote control.
beginning of the season
1 Ensure that the earth wiring is not snapped nor disconnected.
2 Make sure that there is no corrosion or rust on the base frame of the outdoor unit.
3 Make sure that there are no obstacles blocking the airflow around the air intake and outlet openings of the indoor and outdoor units.
4 Turn on the power source.
5 Insert batteries in the remote control.
Installing, inspecting and replacing the air-cleaning filter
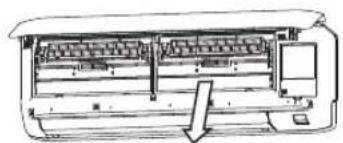
- Open the air inlet panel and remove the air filters. Page 28
- Remove the filter holders, with the air-cleaning filter installed in the holders, from the air-conditioner.
- Remove the allergen clear filter (Light orange) from filter holder and inspect the filter. Use a vacuum cleaner to remove any dust or dirt from the allergen clear filter. Replace the allergen clear filter if it cannot be cleaned or if it has been for about 1 year.
(The allergen clear filter should be replaced after about 1 year of used. However, the actual replacement period may vary depending on the conditions in which the filter is used.)
Remove the photocatalytic washable deodorizing filter (orange) from the filter holder and inspect the filter. Periodically, remove any dust or dirt from the photocatalytic washable deodorizing filter. If the photocatalytic washable deodorizing filter is particularly dirty, it may be washed with water. However, the filter is fragile so be sure to wash it installed in the filter holder to avoid damaging it. After washing the filter, place it in sunlight to dry. Placing the filter in sunlight restores the deodorizing effect.
(Do not dispose of the filter holders. They are reusable.)
- Install the air-cleaning filter in the filter holders, and then install the filter holders in the air-conditioner.
natural_image
Diagram of an air conditioner unit showing internal components and airflow direction (no text or labels)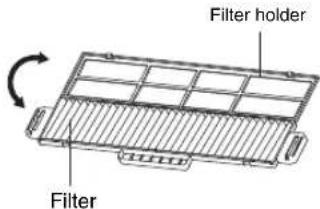
NOTE
-
The allergen clear filter and the photocatalytic washable deodorizing filter may be installed on either the right or left side of the air-conditioner.
• Install the allergen clear filter with the light orange side on front side. -
Install the air filters and close the air inlet panel. Page 28
CAUTION
• The heat exchanger may injure your fingers.
- Stand firmly on a stepladder or other stable object when removing the inlet panel and filters.
For replacing the air-cleaning filter, contact your dealer.
| Item | Feature | Color | |
| Allergen clear filter | The power of enzyme is used to eliminate allergy-causing allergens that accumulate on the filter. | Light orange | |
| Photocatalytic washable deodorizing filter | Sources of odors on the filter are broken up, resulting in a deodorizing effect. | Orange | |
Proper installation
Suitable installation position
- Do not put any obstruction in front of the indoor unit, preventing proper ventilation and functioning.
- Do not install the unit in any of the following places:
- Where there is a danger of leaking flammable gases.
- Where there is substantial splashing of oil.
- Malfunctioning due to corrosion may occur if the unit is installed in a spa where sulfide gases are generated, or in a seaside resort exposed to sea breezes. Contact your dealer.
- The air-conditioner and remote control must be at least 1 meter away from a TV set or radio.
- Drain the dehumidified liquid from the indoor unit into a spot that drains well.
- Malfunctioning due to corrosion may occur if the unit is installed in a spa where sulfide gases are generated, or in a seaside resort exposed to sea breezes. Contact your dealer.
- The air-conditioner and remote control must be at least 1 meter away from a TV set or radio.
- Drain the dehumidified liquid from the indoor unit into a spot that drains well.
Pay attention to operating noises
- When you install the unit, take care to choose a place that can comfortably stand the weight of the unit and does not increase the operating noise or vibration. If vibration is transmitted through the house, fix the unit with the aid of vibration-proof pads between the unit and the fittings.
- Select a place where cold or hot air, operation noises from the indoor and outdoor units do not cause any inconvenience to your neighbours.
- Do not leave any obstacles near the outlet and inlet of the outdoor unit. This may cause malfunctioning and increased operating noise.
- If you hear an irregular noise during operation, contact your dealer.
Inspection and maintenance
Depending on operating environment, the inside of the air-conditioner may become dirty after a few year operations. This will reduce performance. In addition to normal cleaning, we would recommend inspection and maintenance. (This may lead the air-conditioner to having a longer life without any trouble.)
- Contact your dealer, or any distributor, for inspection and maintenance. (There will be a charge for this service).
• We would recommend inspection and maintenance to be carried out during the off-season.
- If the supply cord of this appliance is damaged, it must only be replaced by a repair shop appointed by the manufacturer, because special purpose tools are required.
- Contact your dealer, or any distributor, for inspection and maintenance. (There will be a charge for this service). - We would recommend inspection and maintenance to be carried out during the off-season. - If the supply cord of this appliance is damaged, it must only be replaced by a repair shop appointed by the manufacturer, because special purpose tools are required.
Troubleshooting
Please carry out the following checks before making a service call.
| The air-conditioner does not work at all. | ||
Has the power switch been turned off?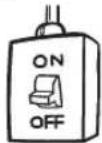 | Has the timer been set in the “ON” position? | Is there a power failure or a blown fuse? |
Poor cooling or heating
| Poor cooling or heating | ||
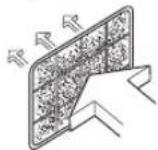
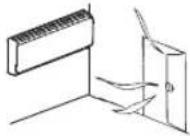
| Have you set the thermostat at a suitable temperature? | Is the air filter clean? (Not clogged?) | Have you left any doors or windows open? |
 |  | |
| Poor cooling | ||
Is there any direct sunlight entering the room?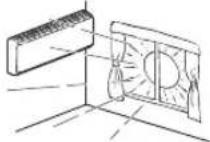 | Is there a heat source in the room?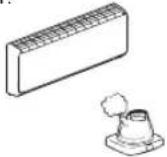 | Are there too many people in the room? |
If the air-conditioner does not operate properly after you have checked the left points, or if any doubt still exists after you have consulted page 31, or if things happen as shown on page 32, switch off the power and contact your dealer.
Notice
Airflow
| Air is not blown out when starting the HEATING operation.RUN light blinks slowly(1.5 seconds ON, 0.5 seconds OFF) | Airflow has stopped to prevent blowing out of cold air until the indoor heat exchanger has warmed up. (2 to 5 minutes) |
| Air is not blown out for 5 to 15 minutes or cool air is blown out for a moment at HEATING operation.RUN light blinks slowly(1.5 seconds ON, 0.5 seconds OFF) | When outdoor temperature is low and humidity is high, the unit sometimes performs defrosting automatically. Please wait. During defrosting, water or steam may release from the outdoor unit. |
| Air is not blown out when starting the DRY operation.(RUN light is on) | The indoor fan may stop to prevent re-evaporation of dehumidified moisture and to save energy. |
Noise
| You hear a slight gurgling sound. | This is caused by refrigerant moving within the unit. |
| You hear a slight cracking sound. | This is caused by heat expansion or contraction. |
| You hear a hissing or clicking sound. | This is caused by the operation of the refrigerant control valves or electric components. |
| Whistling noise is heard from the outdoor unit. | This means that the rotation speed of the compressor is increasing or decreasing. |
| Sometimes a “Shooooo” sound might come for a short time from the unit that is turned off. | This is the sound when operation of another indoor unit is stopped. |
Others
| The unit does not restart immediately after you have stopped it.(RUN light is on) | Restart is blocked for 3 minutes after you have stopped the operation to protect the unit.The 3 minutes protection timer in the microcomputer automatically starts it up again. |
| Some steam releases during COOL operation. | This may occur if the room's temperature and humidity are very high. It disappears as soon as the temperature and humidity decrease. |
| There is a slight smell. | Air blown out during operation may smell. This is caused by tobacco or cosmetics adhering to the unit. |
| After a power cut, the unit does not restart even if power has been restored. | If the auto restart function is not set, the unit will not restart automatically. Use the remote control to start the operation again. |
| Remote control signals are not received. | Remote control signals may not be received if the signal receiver on the air-conditioner is exposed to direct sunlight or other bright light.If so, block the sunlight or reduce the other light. |
| Moisture may form on the air outlet grills. | If the unit is operated for a long time in high humidity, moisture may form on the air outlet grills and start dripping. |
| Fan will not stop immediately after unit operation is stopped. | Indoor fan : Fan will not stop after 2 hours if set to CLEAN operation.Outdoor fan : Fan will not stop about a 1 minute period in order to protect the unit. |
| RUN light stays on even though operation was stopped. | The RUN light illuminates during CLEAN operation.Run light will turn off when CLEAN operation ends. |
Contact your dealer
■ Turn off the power switch immediately and inform your dealer in any of the following situations:
| The fuse or switch blows continuously. | The cable becomes extremely hot.The covering of the cable is cracked. | ||
| The TV, radio or other equipment starts to malfunction. | A switch does not activate properly. A strange noise is heard during operation. | ||
| When abnormalities occur, turn off the power source immediately and turn it on after 3 minutes. Restart the operation with ON/OFF button of the remote control and the abnormalities still continue. | The RUN and TIMER lights on the unit display section blink quickly (0.5 seconds ON; 0.5 seconds OFF) or the lights do not work. | ||
About the multiple air-conditioners
Simultaneous Operation
- The air-conditioners cannot be in different operating modes at the same time, such as one unit being in the "Cool" mode and one unit being in the "Heat" mode.
- When conducting different operations, the air-conditioner that was operated first will be given priority, so the air-conditioner that is operated after that will conduct air blowing operation.
- When you want to give priority to the air-conditioner that was started later, either stop the air-conditioner that has priority or change the operation type of the unit operated first to match that of the unit operated second.
- When other indoor units are operating in different modes, the RUN light illuminates.
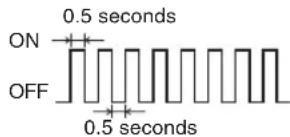
Automatic Operation
- When the remote control operation switch is in the AUTO mode, the air-conditioner automatically selects either COOL, DRY, or HEAT mode when operation is started depending on the room temperature.
- During simultaneous operation of air-conditioners, operation modes may be automatically changed in response to the temperatures of the individual rooms; this will result in the operation of the outdoor unit being stopped. In such a case, COOL or HEAT mode should be used instead of AUTO mode. (This is only relevant when more than one air-conditioner unit is being used.)
Refrigerant (oil) recovery operation
- If the all of the indoor units are not operated at the same time for an extended period, the cooling or heating performance may temporarily decrease. This is in order to control the recovery of the refrigerant (oil) in the stopped indoor unit(s). At this time, the sound of refrigerant flowing may be heard from the stopped indoor unit(s).
Self diagnosis function
We are constantly trying to do better service to our customers by installing such judges that show abnormality of each function as follows
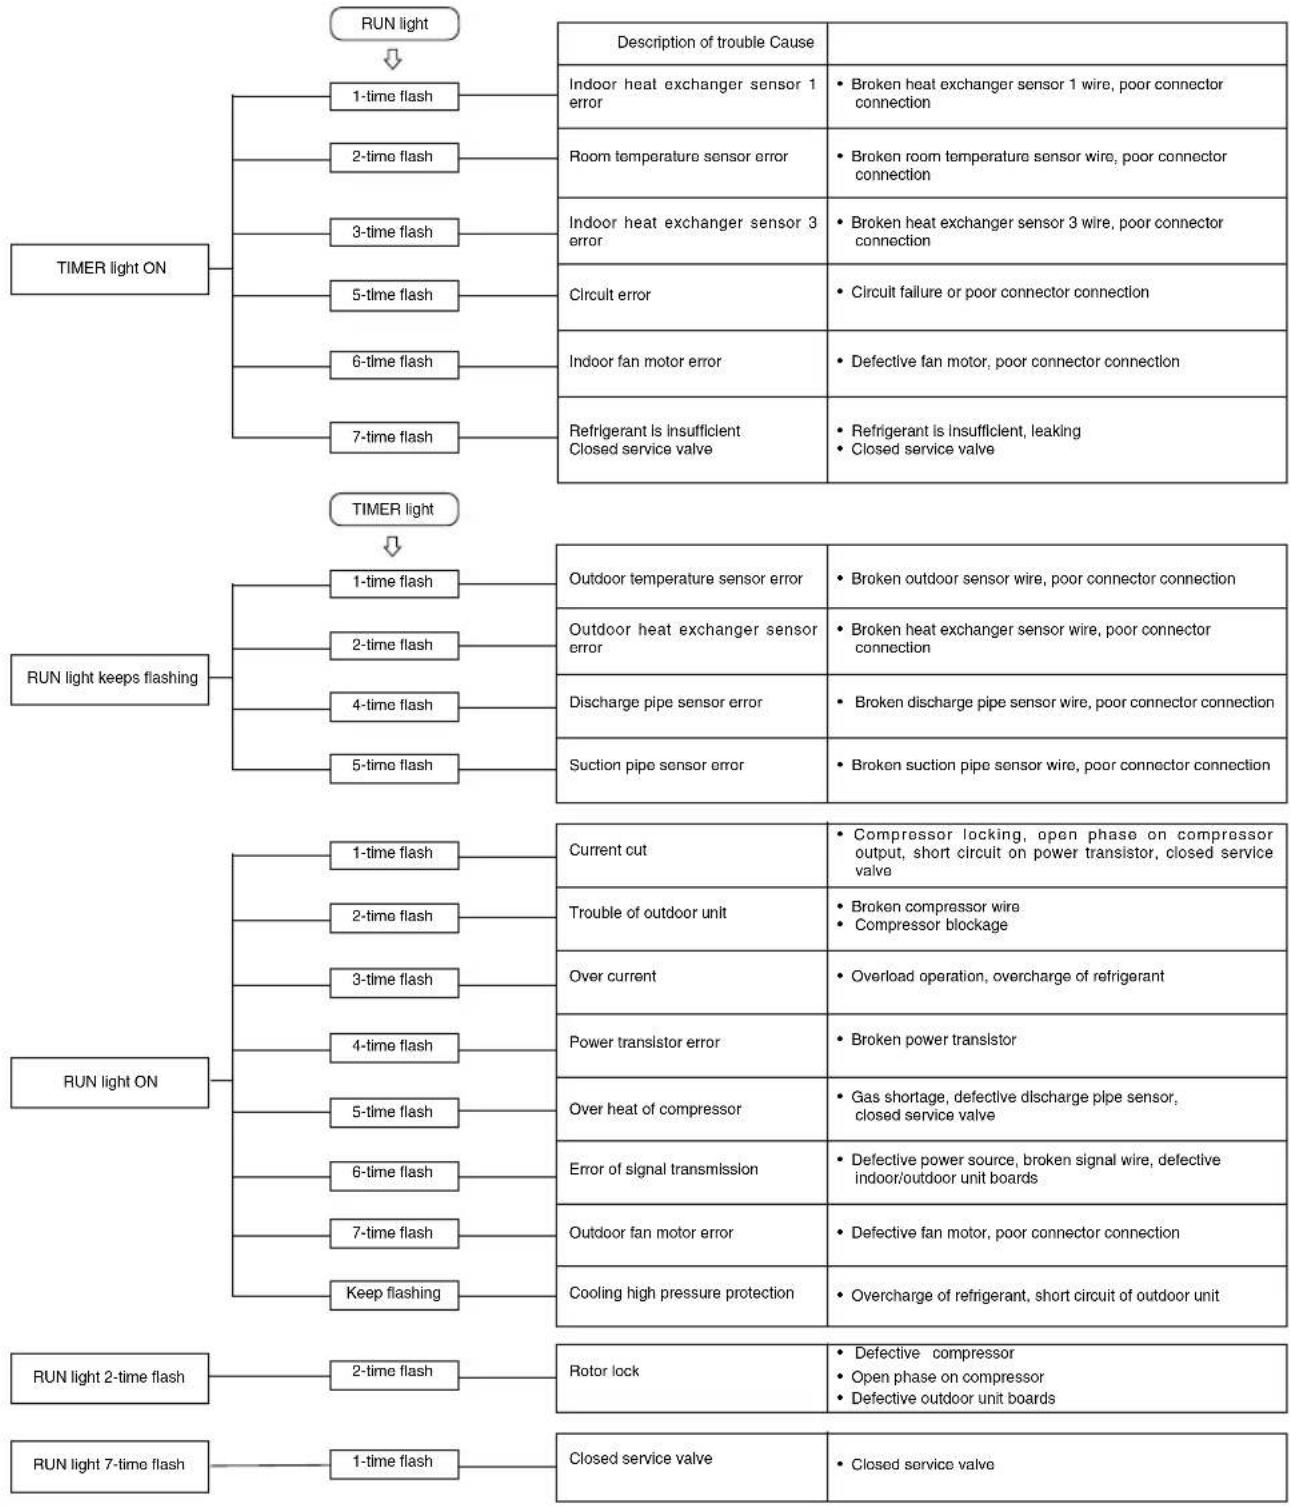
flowchart
graph TD
    A["TIMER light ON"] --> B["1-time flash"]
    A --> C["2-time flash"]
    A --> D["3-time flash"]
    A --> E["5-time flash"]
    A --> F["6-time flash"]
    A --> G["7-time flash"]
    H["TIMER light keeps flashing"] --> I["1-time flash"]
    H --> J["2-time flash"]
    H --> K["4-time flash"]
    H --> L["5-time flash"]
    M["RUN light ON"] --> N["1-time flash"]
    M --> O["2-time flash"]
    M --> P["3-time flash"]
    M --> Q["4-time flash"]
    M --> R["5-time flash"]
    M --> S["6-time flash"]
    M --> T["7-time flash"]
    M --> U["Keep flashing"]
    V["TIMER light 2-time flash"] --> W["2-time flash"]
    V --> X["Rotor lock"]
    Y["TIMER light 7-time flash"] --> Z["1-time flash"]
    style A fill:#f9f,stroke:#333
    style H fill:#f9f,stroke:#333
    style M fill:#f9f,stroke:#333

16-5 Konan 2-chome, Minato-ku, Tokyo, 108-8215, Japan
- CE
- contents
- Safety precautions
- ■ INSTALLATION PRECAUTIONS
- ■ OPERATION PRECAUTIONS
- CAUTION
- Name of each part and its function
- NOTE
- - Buzzer sound for remote control
- Remote control
- Setting the batteries
- Using the remote control holder
- Warning note for remote control
- Strictly prohibited
- Operation failure with the remote control
- Temporary run operation
- Operation
- Installing two air-conditioners in the same room
- Setting the remote control
- Setting an indoor unit
- Child lock
- Airflow range setting
- Air-conditioner installation location and airflow range
- Current time setting
- AUTO mode operation
- Temperature adjustment during AUTO mode
- FAN SPEED
- COOL/HEAT/DRY/FAN mode operation
- Air-conditioner operation temperature range
- Characteristics of HEAT mode operation
- Mechanism and capacity of HEAT mode operation
- Defrosting
- Airflow direction adjustment
- Memory flap (Flap or louver stopped)
- WARNING
- 3D AUTO operation
- SLEEP TIMER operation
- Press the SLEEP button.
- ■ If it is pressed while the unit is off
- ■ If it is pressed while the unit is running
- OFF TIMER operation
- Press the ON/OFF button.
- Press the OFF TIMER button.
- Press the "▲or ▼TIMER)" button.
- Press the SET button.
- ON TIMER operation
- Changing of set time
- How to cancel
- Press the ON TIMER button.
- SLEEP TIMER + ON TIMER operation
- SLEEP TIMER setting
- 2ON TIMER operation setting
- ON TIMER + OFF TIMER operation
- OFF TIMER operation setting
- Comfort Start-up
- SLEEP TIMER
- ALLERGEN CLEAR operation
- Press the ALLERGEN CLEAR button.
- WEEKLY TIMER operation
- Sample (At cooling season)
- WEEKLY TIMER ON/OFF setting
- Press the WEEKLY button.
- Setting mode
- Set required operation contents.
- Press the PROGRAM button or SET button.
- How to cancel the setting
- Releasing procedure
- HIGH POWER/ECONOMY operation
- Press the ON/OFF button.
- Press the HI/ECO button. When the operating mode is ALIT
- HIGH POWER operation
- ECONOMY operation
- NIGHT SETBACK operation
- Press the NIGHT SETBACK button.
- SILENT operation
- Press the SILENT button.
- MENU function
- Display brightness adjustment
- SELF CLEAN operation
- PRESET operation
- Auto restart function
- Tips for effective operation
- Maintenance
- Before maintenance During the operational season
- Do not use the following items:
- Standard interval is once every two week
- Install the air filter
- Cleaning the unit
- Cleaning the air inlet panel
- How to open and close the air inlet panel
- Open
- How to remove and install the air inlet panel
- Removing
- Close
- Installing
- At the end of the season At the
- beginning of the season
- Installing, inspecting and replacing the air-cleaning filter
- Proper installation
- Suitable installation position
- Pay attention to operating noises
- Inspection and maintenance
- Troubleshooting
- Poor cooling or heating
- Notice
- Airflow
- Noise
- Others
- Contact your dealer
- About the multiple air-conditioners
- Simultaneous Operation
- Automatic Operation
- Refrigerant (oil) recovery operation
- Self diagnosis function
Brand : MITSUBISHI
Model : SRK25ZSH-S
Category : Measurement