Soundweb London BLU-USB - Processor BSS Audio - Free user manual and instructions
Find the device manual for free Soundweb London BLU-USB BSS Audio in PDF.


| Product Type | Audio Processor / USB Bridge |
| Brand | BSS Audio |
| Model | Soundweb London BLU-USB |
| Dimensions (H x W x D) | 1.75 x 19 x 6.0 in (44 x 483 x 152 mm) |
| Weight | 2.2 lb (1 kg) |
| Power Supply | External 12V DC power adapter (included) |
| Power Consumption | 5W typical |
| Connectivity | USB 2.0 Type B to host; 2x RJ-45 Soundweb London ports |
| Audio Channels | 2x2 (stereo) USB audio; supports up to 24-bit/96kHz |
| Functions | Bridges Soundweb London network to USB audio; provides audio streaming and control |
| Mounting | 1U rackmount (brackets included) |
| Operating Temperature | 32°F to 104°F (0°C to 40°C) |
| Storage Temperature | -4°F to 158°F (-20°C to 70°C) |
| Humidity | 10% to 90% non-condensing |
| Safety Certifications | CE, FCC Class A, RoHS |
| Maintenance | Wipe with a dry cloth; keep vents clear |
| Spare Parts / Repairability | Contact BSS Audio support; no user-serviceable parts |
| Warranty | 5 years limited warranty |
Frequently Asked Questions - Soundweb London BLU-USB BSS Audio
User questions about Soundweb London BLU-USB BSS Audio
0 question about this device. Answer the ones you know or ask your own.
Ask a new question about this device
Download the instructions for your Processor in PDF format for free! Find your manual Soundweb London BLU-USB - BSS Audio and take your electronic device back in hand. On this page are published all the documents necessary for the use of your device. Soundweb London BLU-USB by BSS Audio.
USER MANUAL Soundweb London BLU-USB BSS Audio
8 x 8 USB / BLU link Bridge
Installation Guide
REGULATORY INFORMATION
An example of this equipment has been tested and found to comply with the following European and international Standards for Electromagnetic Compatibility and Electrical Safety:
Radiated Emissions (EU): EN 55022:2006
Immunity (EU): EN 55024:1998
Electrical Safety (EU): IEC60065-01 + AMD 2
Electrical Safety (USA): UL60065-08


IMPORTANT USER INFORMATION
Do not remove covers. No user serviceable parts inside, refer servicing to qualified service personnel. For continued compliance with international EMC regulations, it is important that all cables be screened, and connected as follows:
- This equipment must be earthed. It should not be necessary to remove any protective earth to prevent ground loops. Any such disconnections are outside the recommended practice of BSS Audio, and will render the EMC or safety certificate void.
This model shall be powered by a certified AC/DC power adaptor with limited power source output rated 12V–24V, 30W maximum. The unit may be supplied together with a certified AC/DC power adaptor from FranMar International Inc., Model FRA030E-S12-4, rated 100–240V\~, 50-60 Hz, 0.7A, Class I.
PRODUCT REGISTRATION / WARRANTY
To register your product, please visit http://bssaudio.com/en-US/support/warranty_registration.
For warranty information, please visit http://bssaudio.com/en-US/support/warranty_policy.
TABLE OF CONTENTS
GETTING STARTED....1
Introduction....1
Included Items....2
Features....2
Interface Overview....3
INSTALLATION....4
Minimum Computer Requirements....4
Installing the Windows Driver....4
Mounting the BLU-USB....5
Assigning BLU link Channels with the DIP Switches....6
Applying Power to the BLU-USB 7
Making Connections....8
BLU link Port Status LED Descriptions....9
Attaching the Cable Cover....10
OPERATION 11
Selecting the USB Mode....11
Clocking & Sample Rate Operation Explained 12
Routing Computer Audio....13
Windows Setup....13
Mac Setup....16
Using ASIO....18
TROUBLESHOOTING 19
DIMENSIONS 20
SPECIFICATIONS 21
GETTING STARTED
Introduction
This guide was written with the aim of guiding you through the installation of a Soundweb™ London BLU-USB interface. We recommend that you read this installation guide before attempting to install and operate the device.
The Soundweb London BLU-USB is an 8 x 8 USB/BLU link bridge — 8 channels from BLU link to USB, and 8 channels from USB to BLU link.
The BLU-USB adds USB audio functionality to a Soundweb London system, using BLU link as the interconnecting audio transport. The BLU-USB can also be connected to other BLU link-compatible devices from Crown ^® , dbx ^® , JBL ^® , Soundcraft ^® , and more.
Multiple BLU-USB devices can exist on a single BLU link bus. This can be useful for applications requiring multiple USB audio locations — for example, in a conferencing environment, where multiple computer audio connections are required around a large conference table.
Other BLU-USB example applications include:
- Conferencing using soft codecs
Interface Cisco Jabber ^® , Microsoft ^® Skype ^® for Business, etc. with a Soundweb London system. - Background music and audio announcement playback
Interface a computer with a Soundweb London system for use as a media server. - Archiving
Interface a computer with a Soundweb London system for courtroom, interview, conference, lecture, or classroom audio capture. - Studio/Live Sound
Provides 8 x 8 bridge between BLU link-equipped audio system and computer for software audio analysis or capture.
The BLU-USB is easy to integrate and use thanks to the following features:
- No programming required.
- BLU link bus sample rate is automatically detected and configured.
- BLU link on-ramp and off-ramp channel bank assignments are made using the set of DIP switches located on the BLU-USB chassis.
- USB mode (2 x 2 or 8 x 8 channel I/O) can be selected using the MODE pushbutton next to the USB port.
- No driver installation necessary when used in 2 x 2 mode.
Included Items
Please ensure all of the following items were included in the box and that no items have been damaged during shipping. If any items are missing or damaged, please contact your dealer at once.
- BLU-USB Interface
- 4 Rubber Feet
• 2 Mounting Brackets
• 4 Fine-Threaded Screws for Mounting to Chassis
• 4 Coarse-Threaded Screws for Mounting to Surface
• 4 Washers for Mounting to Surface - Cable Cover
• Power Supply with IEC Cable* - USB Cable (2 Meter)
Features
- 8 x 8 USB/BLU link Bridge
- No Driver Needed when Operating at 48kHz in Class 1 (2 x 2) Mode
- BLU link Audio Bus Supports 48kHz or 96kHz/24-Bit High-Resolution Audio
- BLU link Sample Rate is Automatically Configured
• Support for Multiple BLU-USBs in a Single BLU link Network - Low-Latency Operation
- Included Power Supply*
- Included Cable Cover for a Clean Look
*Items not included with non-power supply models.
Getting Started
Interface Overview
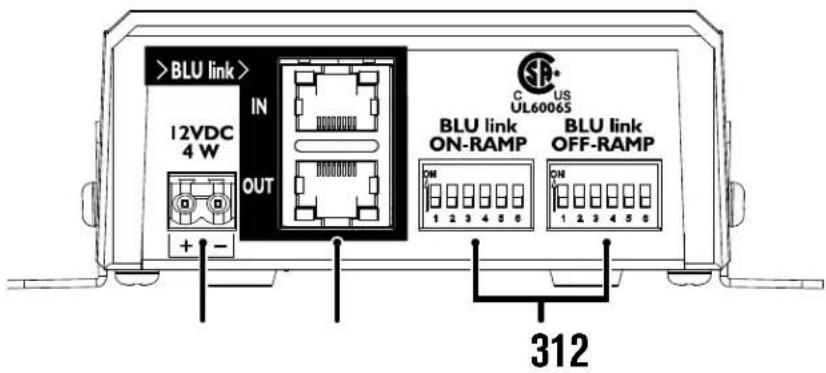
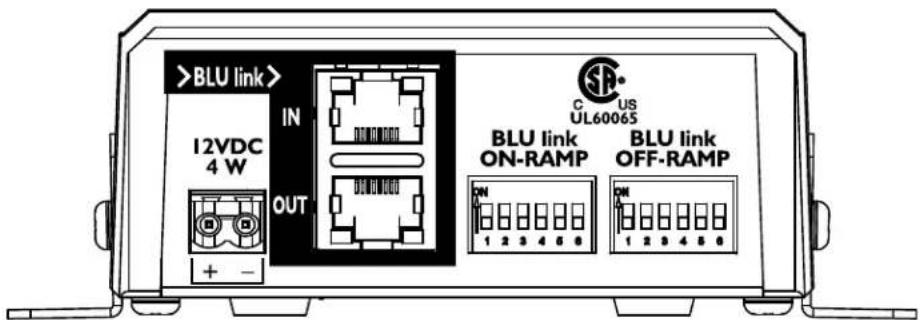
- Power Input Connect the included power supply to this input. See 'Applying Power to the BLU-USB' on page 7 for more information.
- BLU link Input/Output Ports Connect these RJ45 ports to another BLU link-equipped device. See 'Making Connections' on page 8 for more information.
- DIP Switches Use these DIP switches to assign BLU link on-ramp (from computer to BLU link) and off-ramp (from BLU link to computer) channel banks. See 'Assigning BLU link Channels with the DIP Switches' on page 6 for more information.
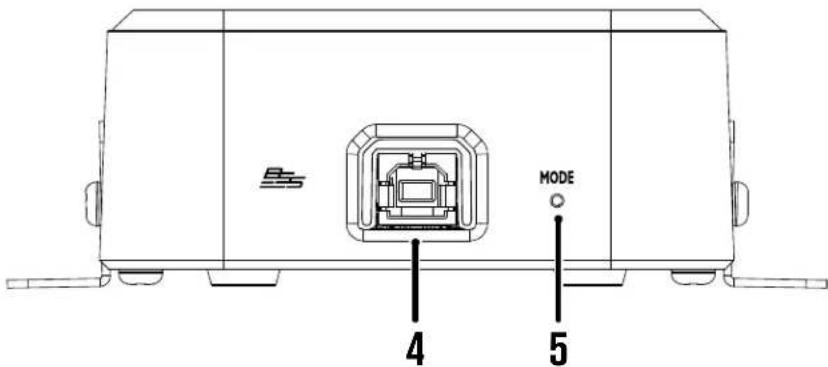
- USB Port Connect this port to the computer's USB port. See 'Selecting the USB Mode' on page 11 for more information.
- MODE Pushbutton This pushbutton selects between the two available USB modes: Class 1 mode (2 x 2 channels) or Class 2 mode (8 x 8 channels). See 'Selecting the USB Mode' on page 11 for more information.

INSTALLATION
Minimum Computer Requirements
Mac®
- OS X® 10.8 or later
• Available USB 1.0 or higher port for Class 1 (2 x 2) Mode
• Available USB 2.0 high speed or higher port for Class 2 (8 x 8) Mode
PC
- Windows ^ 7, 8, 8.1, 10 (32-bit/64-bit)
• Available USB 1.0 or higher port for Class 1 (2 x 2) Mode
• Available USB 2.0 high speed or higher port for Class 2 (8 x 8) Mode
IMPORTANT: If using Windows 7, the Windows KB3033929 update (released March 2015) is required to use the BLU-USB in Class 2 (8 x 8) mode.
Installing the Windows Driver
The Windows driver is only necessary when (1) routing more than 2 channels to/from the Windows computer; and/or (2) operating the BLU link bus at a 96kHz sample rate.
To use the full capabilities of the BLU-USB with a Windows computer, the BLU-USB Windows driver must be installed. The Windows driver provides support for up to 8 x 8 channels of I/O between USB and BLU link, and support for a BLU link bus operating at 96kHz.
To install the Windows driver:
- Go to http://bssaudio.com/en-US/products/blu-usb and download the driver.
- Disconnect the BLU-USB from the computer if it is connected.
- Launch the Driver Installer and follow the on-screen instructions.
NOTE: If using a Mac computer, the BLU-USB will use the Core Audio driver that was installed with OS X, so no additional drivers are necessary.

Installation
Mounting the BLU-USB
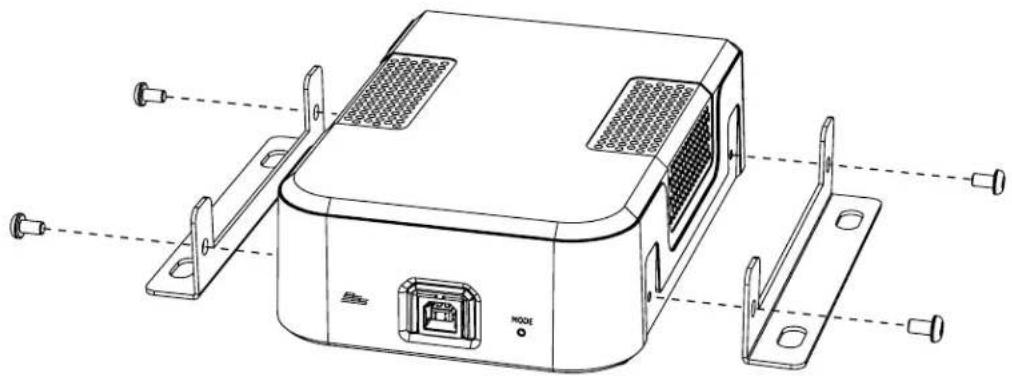
The BLU-USB comes equipped with rubber feet to prevent it from sliding when placed on a desktop or other surface. The BLU-USB can also be mounted to a surface (e.g., wall, desk, conference table, etc.) using the included mounting brackets.
To mount the BLU-USB:
- Mount the included brackets to the side of the BLU-USB chassis using the four included fine-threaded screws.
natural_image
Technical line drawing of a device housing with mounting brackets and connectors (no text or symbols)- Mount the BLU-USB to the surface using the four included coarse-threaded screws and washers.
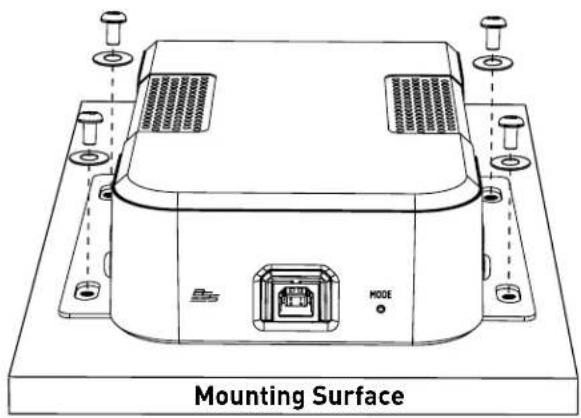
NOTE: For best results, pre-drill the holes in the mounting surface. This can be accomplished by measuring then marking the hole locations, or by placing the BLU-USB in the mounting position then marking the hole locations. Make sure to use a drill bit which is slightly smaller in diameter than the included mounting screws.

Assigning BLU link Channels with the DIP Switches
BLU link on-ramp and off-ramp channels can be assigned in banks of 8 using the DIP switches.
ON-RAMP = From computer to BLU link bus.
OFF-RAMP = From BLU link bus to computer.
The following table shows how to set the DIP switches for the desired bank of channels. This table can also be found printed on the bottom of the BLU-USB chassis.
Channel Assignment
| CHAN | DIP SETTINGS | CHAN | DIP SETTINGS | CHAN | DIP SETTINGS |
| 1 to 8 | ON1 2 3 4 5 6 | 89 to 96 | ON1 2 3 4 5 6 | 177 to 184 | ON1 2 3 4 5 6 |
| 9 to 16 | ON1 2 3 4 5 6 | 97 to 104 | ON1 2 3 4 5 6 | 185 to 192 | ON1 2 3 4 5 6 |
| 17 to 24 | ON1 2 3 4 5 6 | 105 to 112 | ON1 2 3 4 5 6 | 193 to 200 | ON1 2 3 4 5 6 |
| 25 to 32 | ON1 2 3 4 5 6 | 113 to 120 | ON1 2 3 4 5 6 | 201 to 208 | ON1 2 3 4 5 6 |
| 33 to 40 | ON1 2 3 4 5 6 | 121 to 128 | ON1 2 3 4 5 6 | 209 to 216 | ON1 2 3 4 5 6 |
| 41 to 48 | ON1 2 3 4 5 6 | 129 to 136 | ON1 2 3 4 5 6 | 217 to 224 | ON1 2 3 4 5 6 |
| 49 to 56 | ON1 2 3 4 5 6 | 137 to 144 | ON1 2 3 4 5 6 | 225 to 232 | ON1 2 3 4 5 6 |
| 57 to 64 | ON1 2 3 4 5 6 | 145 to 152 | ON1 2 3 4 5 6 | 233 to 240 | ON1 2 3 4 5 6 |
| 65 to 72 | ON1 2 3 4 5 6 | 153 to 160 | ON1 2 3 4 5 6 | 241 to 248 | ON1 2 3 4 5 6 |
| 73 to 80 | ON1 2 3 4 5 6 | 161 to 168 | ON1 2 3 4 5 6 | 249 to 256 | ON1 2 3 4 5 6 |
| 81 to 88 | ON1 2 3 4 5 6 | 169 to 176 | ON1 2 3 4 5 6 | On-Ramp Disabled | ON1 2 3 4 5 6 |
Note 1: Black indicates switch position.
Note 2: Lowest channel of 8 channel range is always output 1 of BLU-USB.
Note 3: On-Ramp = USB audio to BLU link.
NOTE: Channels 1-256 are available when operating at a 48kHz BLU link sample rate; channels 1-128 are available when operating at a 96kHz BLU link sample rate.
IMPORTANT NOTE: BLU link does not support multiple devices assigned to the same on-ramp channels. When assigning the BLU-USB on-ramp channel bank, ensure that channel bank assignment is unique, and that no other BLU link devices on the bus are transmitting on the same channels.

Installation
Applying Power to the BLU-USB
To apply power to the BLU-USB:
- Connect the included power supply's 2-pin Euroblock connector to the BLU-USB's Power input.
- Connect the included IEC power cable from the power supply to the AC mains outlet.
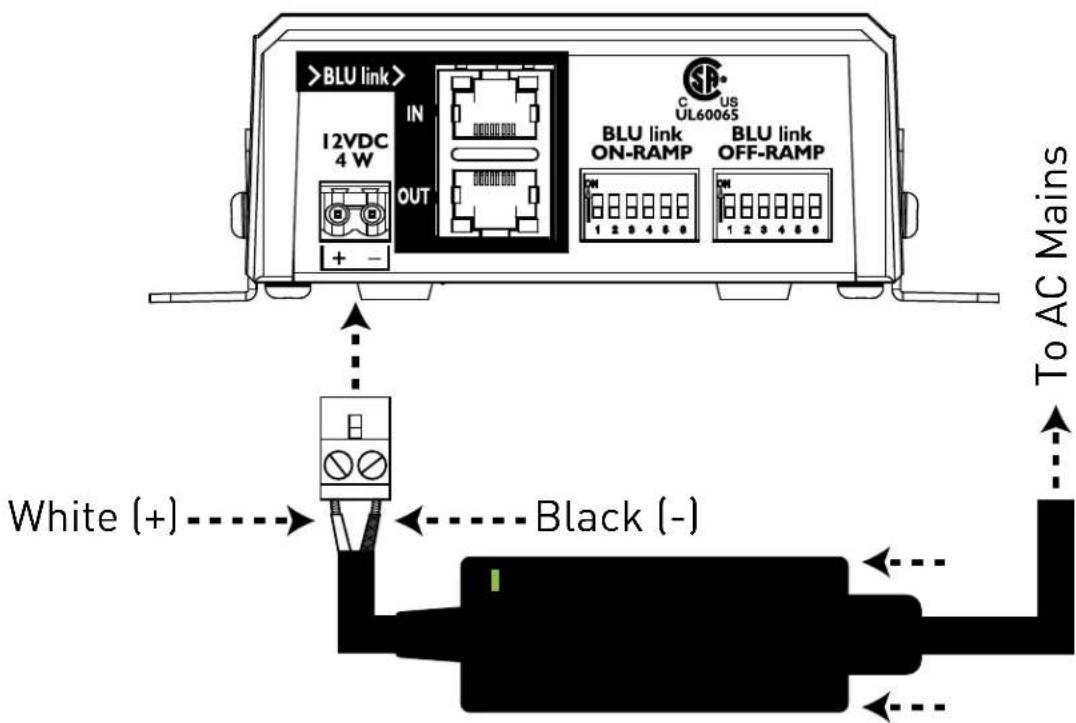
NOTE: The BLU-USB does not support USB bus power and must be powered using the included power supply.
Making Connections
The following diagram shows a typical application using a BLU-USB interface.
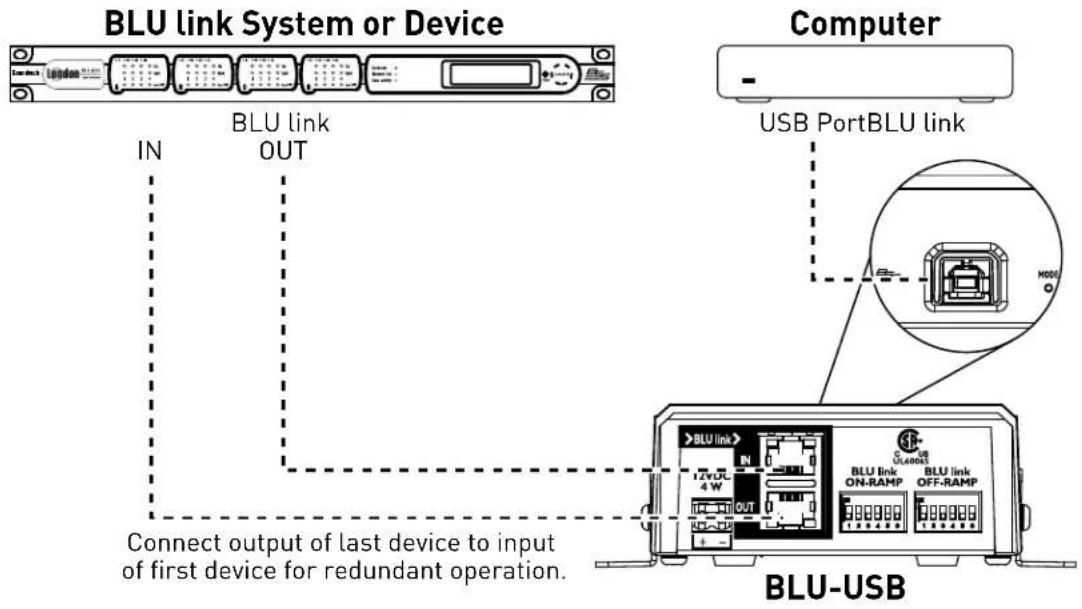
NOTE: All BLU link connections must be made using Category 5e or higher cabling. Connecting the last BLU link device in the chain back to the first device will provide redundant operation — meaning if any one BLU link cable is compromised, the BLU link bus will continue to pass audio.
NOTE: BLU link audio will not pass through an Ethernet switch or router. BLU link connections must be made directly between BLU link devices.
Installation
BLU link Port Status LED Descriptions
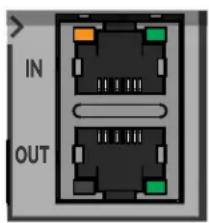
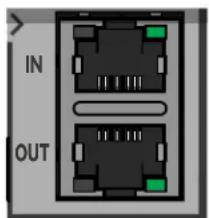
The BLU link ports have LEDs that indicate status as follows:
Both Orange LEDs On
This indicates the device is the BLU link master (meaning it's providing the clock for the entire BLU link bus).
The green LEDs light to indicate the port is linked to the BLU link bus.
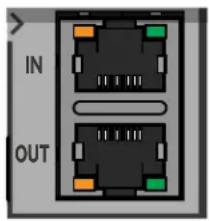
One Orange LED On
This indicates the device is slaved to the BLU link clock received from the connected device.
The green LEDs light to indicate the port is linked to the BLU link bus.
No Orange LEDs On
This indicates the device is not receiving BLU link clock and will not pass audio. This usually indicates the IN and OUT ports are swapped on the device (an OUT port is connected to an OUT port and an IN port is connected to an IN port). Try swapping the connections to solve the problem.
The green LEDs light to indicate the port is linked to the BLU link bus.
NOTE: The BLU link audio bus supports a maximum of 60 BLU link nodes.

Attaching the Cable Cover
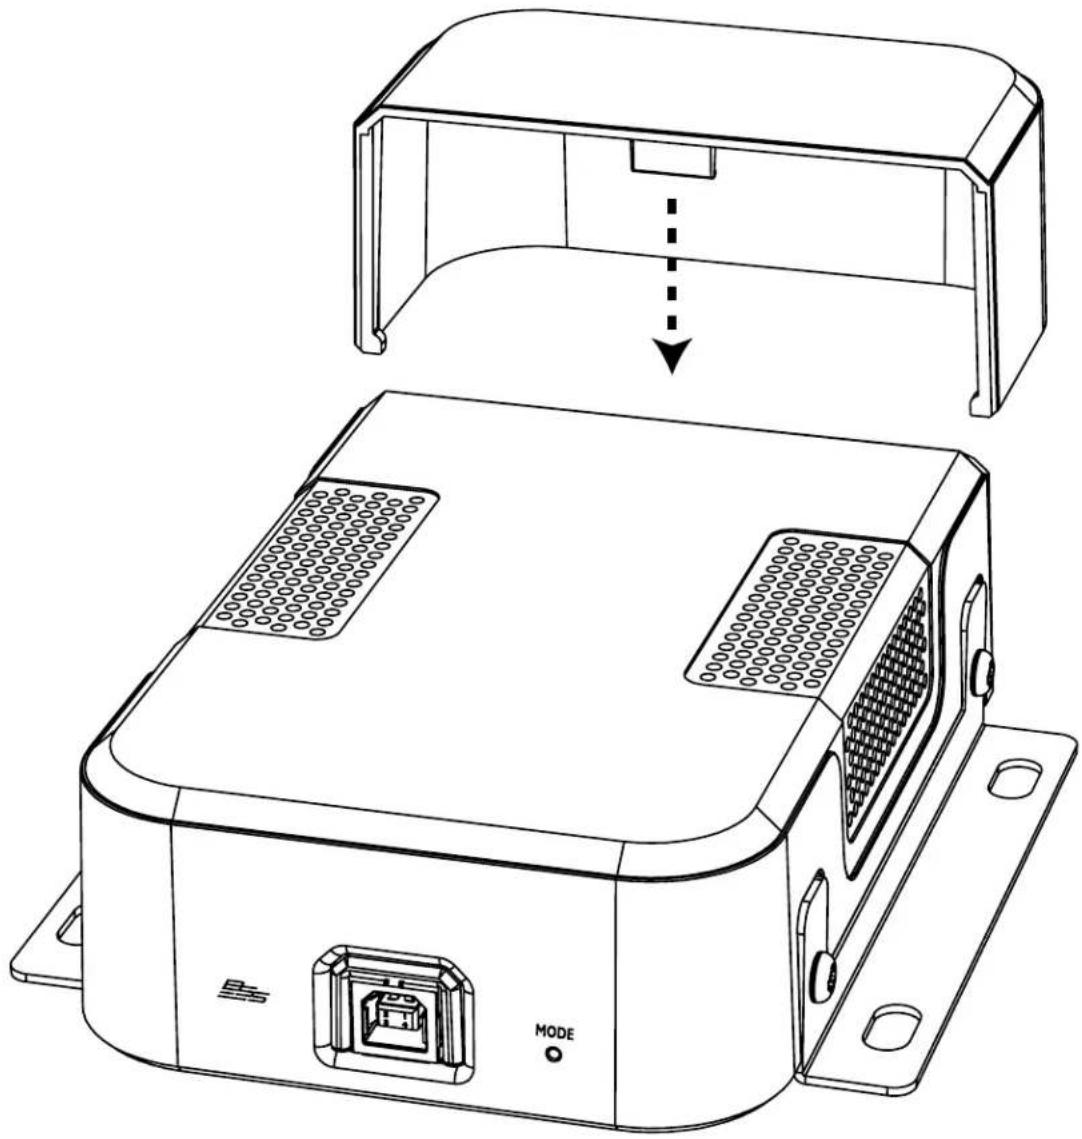
For tabletop or desktop installation, where power and BLU link cables are routed through an access hole in the surface, use the included Cable Cover to hide the cables and access hole for a clean look.
To attach the Cable Cover:
- Line up the Cable Cover with the groove in the BLU-USB chassis and slide it until it clicks into place.
natural_image
Technical line drawing of a device housing with an open lid and internal slots, showing internal structure and mounting points (no text or symbols)
Operation
OPERATION
Selecting the USB Mode
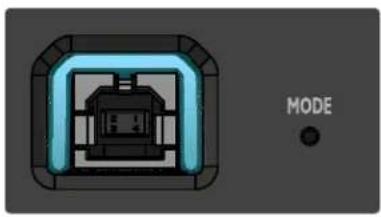
The MODE pushbutton, located next to the USB port, is used to select between the following two USB modes:
natural_image
Simple icon of a device inside a rounded rectangular frame with a central control panel, labeled 'MODE' (no text or symbols on the diagram itself)• Class 1 Mode (Cyan USB Port LED)
This is the default BLU-USB mode. This mode is USB Class 1 compliant and doesn't require any additional drivers be installed to use the BLU-USB with either a Windows or Mac computer.
This mode is limited to 2 x 2 audio channels (1 stereo pair in and out) and only supports a BLU link bus sample rate of 48kHz.
natural_image
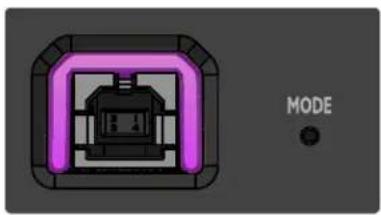
Pure electrical circuit lines without any symbols• Class 2 Mode (Magenta USB Port LED)
This mode is USB Class 2 compliant and requires an additional driver be installed to use the BLU-USB with a Windows computer.
NOTE: Mac computers do not require any additional drivers and will use the Core Audio driver installed with OS X.
This mode provides 8 x 8 audio channels (4 stereo pairs in and out) and supports BLU link bus sample rates of either 48kHz or 96kHz.
To switch between modes:
- Use a small, pointed object — such as the tip of a paperclip — and press and hold the recessed MODE pushbutton until the USB port LED changes color (\~10 seconds). See 'Troubleshooting' on page 19 if the BLU-USB does not properly change modes as shown above.
NOTE: The selected mode will be retained after power cycling the BLU-USB.

Clocking & Sample Rate Operation Explained
The BLU-USB will automatically detect the sample rate of the connected BLU link bus and configure its BLU link sample rate accordingly. Note that computer sample rate must still be set to match the BLU link bus for proper operation, see 'Routing Computer Audio' on page 13.
NOTE: The BLU-USB cannot function as the clock master on a BLU link bus operating at 96kHz. To use a 96kHz BLU link bus with the BLU-USB, the BLU link bus must contain at least one BLU link-equipped device capable of being manually configured for 96kHz BLU link operation (such as a BLU-800, BLU-806, etc.). The BLU-USB can function as the clock master when operating at a 48kHz BLU link sample rate.
When using the BLU-USB, BLU link will always be the clock master and provide the clock for the USB connection. This means that any computer audio played back through USB, which has a sample rate that differs from the BLU link bus, will automatically be sample rate converted before reaching the BLU link audio bus.
NOTE: If the BLU link bus sample rate is changed during operation, some BLU link devices may not automatically switch over to the new sample rate and may stop passing audio due to the mismatch.
If such a condition occurs, it is recommended that BLU link devices be power cycled, or the BLU link connections be disconnected then reconnected so that the new sample rate can be detected.
For BLU link devices that require manual configuration of the sample rate, the sample rate must be changed in the programming to match the other BLU link devices on the bus.
Operation
Routing Computer Audio
Before using the BLU-USB for the first time, you will likely need to select it as the recording and/or playback device in the computer or software application, whichever is applicable for the installation. You may also have to set the USB sample rate/bit rate settings to match the BLU link bus (either 48kHz/24-bit or 96kHz/24-bit).
If using a software application that allows independent audio routing, consult the software application's help for information on configuring audio hardware and routing. When used with multi-track recording software, the BLU-USB's USB mode should be set before selecting the BLU-USB as the software's audio hardware device, see 'Selecting the USB Mode' on page 11.
Windows Setup
To route system audio in Windows:
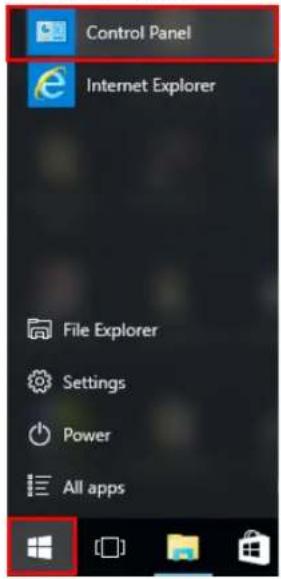
- Click the Windows Start Menu then select the Control Panel.
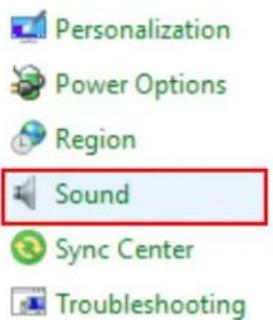
- Click the Sound Icon.

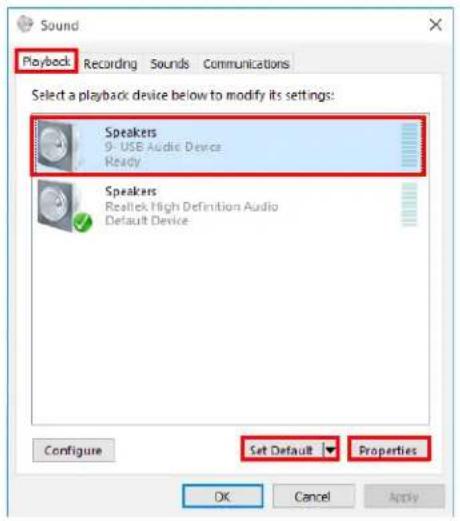
- To on-ramp signals from the computer to the BLU link bus: under the Playback tab, select the BLU-USB from the list then click the Set Default button. When the BLU-USB has been configured as the default playback device it will be indicated with a green check mark. Now click the Properties button.
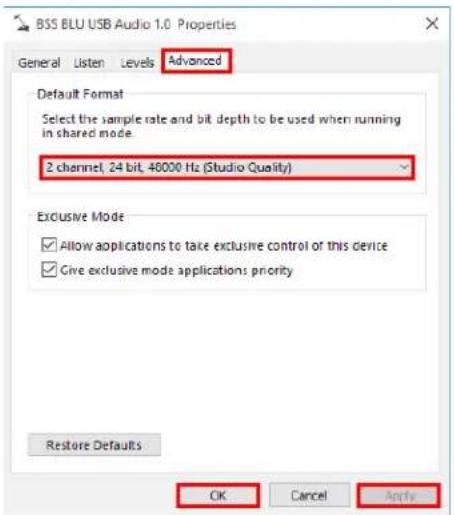
Class 1 (2 x 2) Mode Class 2 (8 x 8) Mode
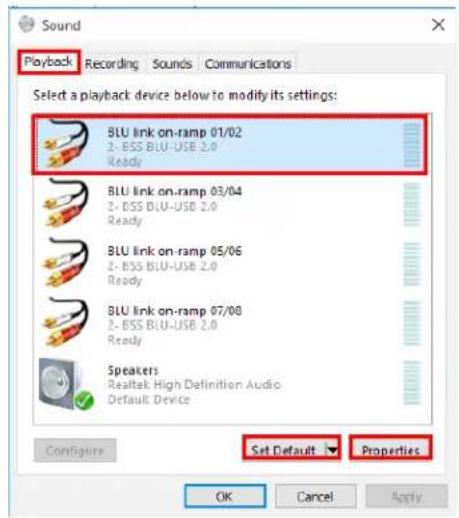
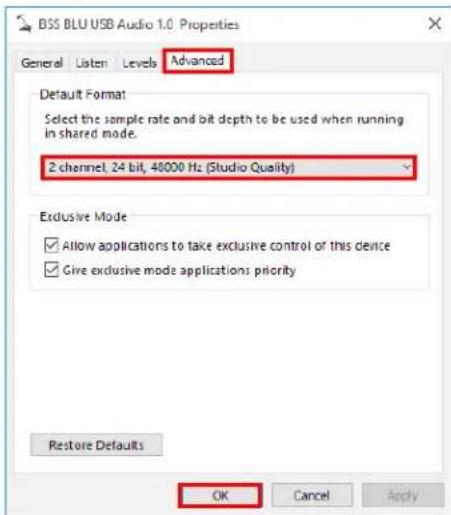
- In the Properties window, go to the Advanced tab then select the sample/bit rate setting which matches the BLU link bus. If using Class 1 mode, you MUST set the sample rate to 48000Hz. If using Class 2 mode, it is recommended to select the "24 bit" setting for best performance. When done, click APPLY then OK.
Operation
- To off-ramp signals from the BLU link bus to the computer: select the Recording tab, select the BLU-USB from the list, then click the Set Default button. When the BLU-USB has been configured as the default recording device it will be indicated with a green check mark. Now click the Properties button.
Class 1 (2 x 2) Mode Class 2 (8 x 8) Mode
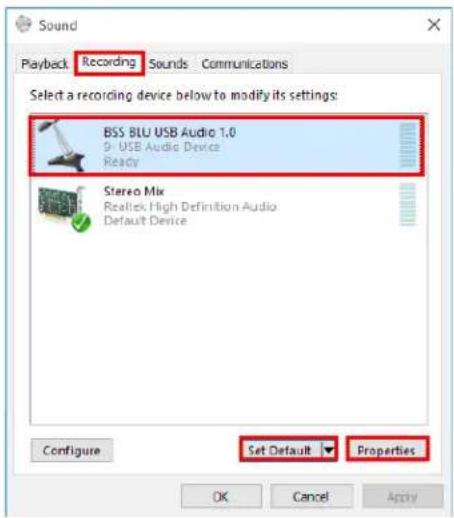
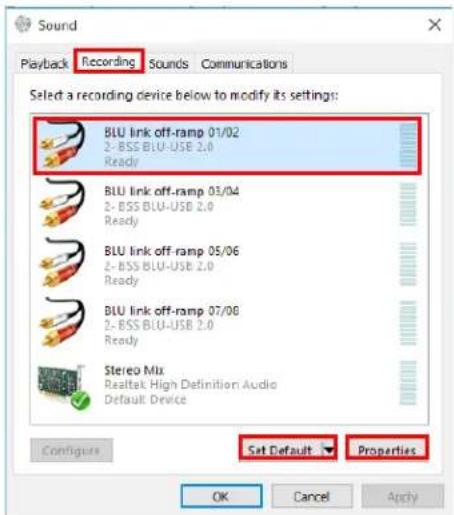
- In the Properties window, go to the Advanced tab then select the sample/bit rate setting which matches the BLU link bus. If using Class 1 mode, you MUST set the sample rate to 48000Hz. If using Class 2 mode, it is recommended to select the "24 bit" setting for best performance. When done, click APPLY then OK.

Mac Setup
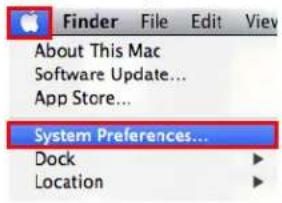
To route system audio in OS X:
- Click the Apple ^® icon then select System Preferences.
- Click the Sound icon.
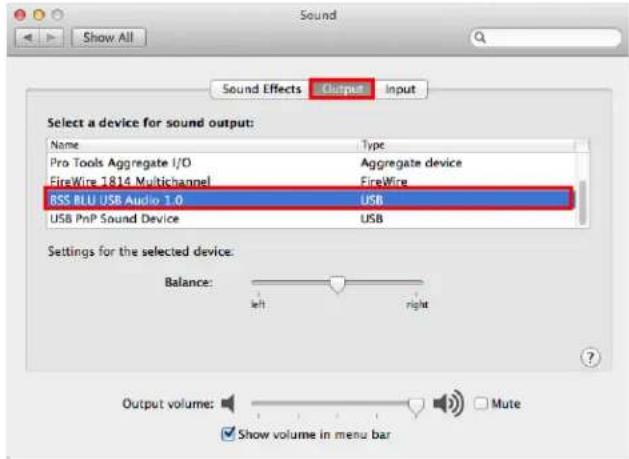
- To on-ramp signals from the computer to the BLU link bus: under the OUTPUT tab, select the BLU-USB as the output device.
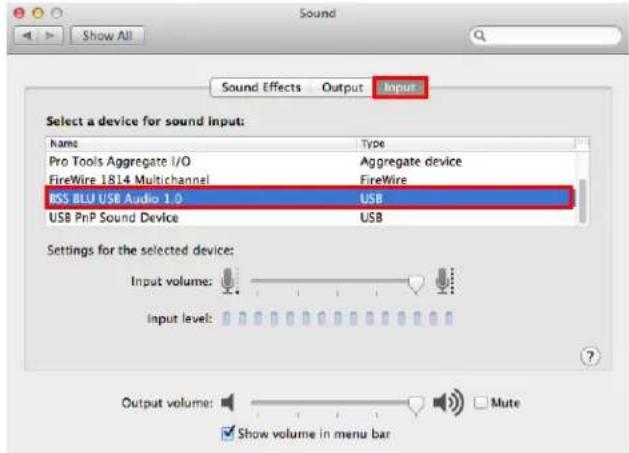
- To off-ramp signals from BLU link to the computer: select the Input tab then select the BLU-USB as the input device. Close the window.

Operation
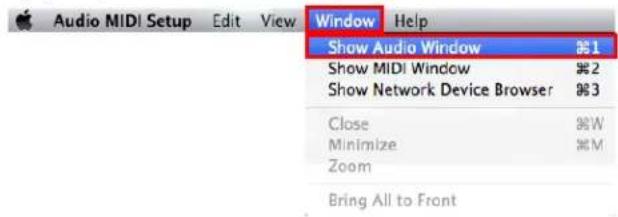
- Go to the computer's Main Hard Drive → Applications → Utilities and launch the Audio MIDI Setup application. If the Audio window doesn't appear, select Window → Show Audio Window.
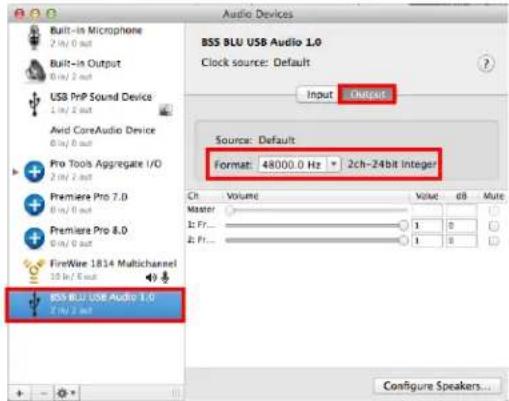
- To on-ramp signals from the computer to the BLU link bus: select the Output tab, select the BLU-USB from the list, then select the sample/bit rate setting which matches the BLU link bus. If using Class 1 mode, you MUST set the sample rate to 48000Hz. If using Class 2 mode, it is recommended to select the "24 bit" setting for best performance.
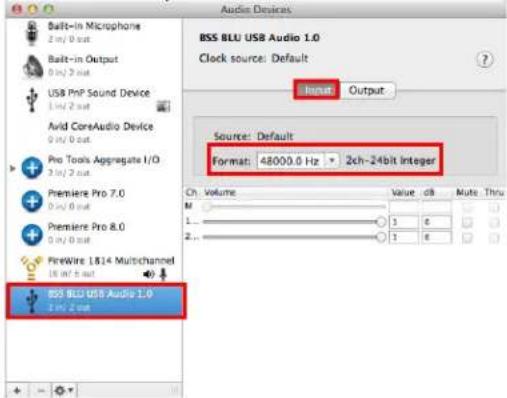
- To off-ramp signals from the BLU link bus to the computer: select the Input tab, select the BLU-USB from the list, then select the sample rate setting which matches the BLU link bus. If using Class 1 mode, you MUST set the sample rate to 48000Hz. When done, close the window.

Using ASIO
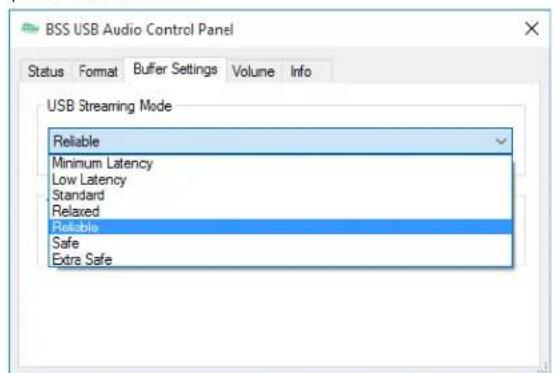
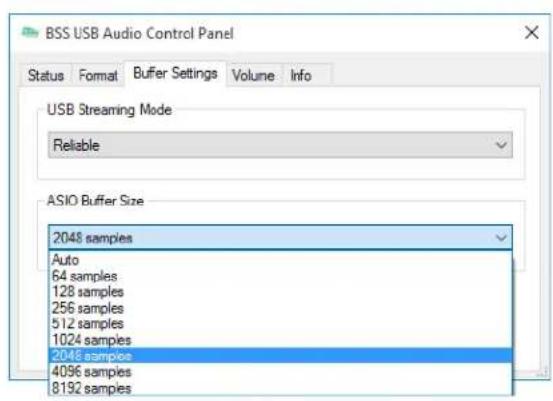
If you are using the BLU-USB's multi-channel functionality with a software program that supports ASIO, you may have to adjust the buffer and latency settings for optimal performance.
To adjust the BLU-USB's ASIO settings:
- From the software program, locate the ASIO control panel. See the software program's help file for further information.
- Once the ASIO control panel has been located, go to the Buffer Settings tab.
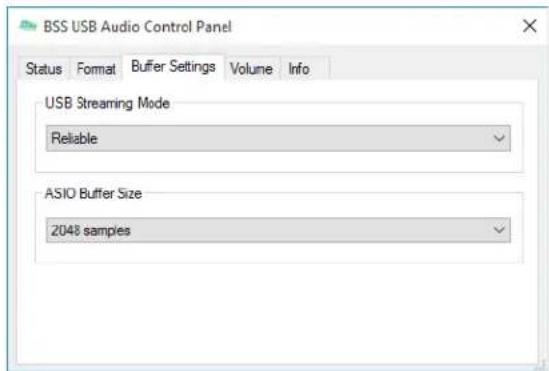
- Try auditioning the different settings and find the USB Streaming Mode and ASIO Buffer Size settings that provide the lowest latency with stable performance.

Troubleshooting
TROUBLESHOOTING
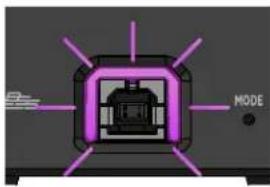
Can't Switch From Class 2 to Class 1 Mode
natural_image
Diagram of a device with purple light beams and labeled 'MODE' (no readable text or symbols beyond label)Issue: This indicates the BLU link bus sample rate has been changed from 96kHz to 48kHz but the BLU-USB did not detect the change and is still operating at a 96kHz sample rate, which Class 1 mode does not support.
Resolution: Power cycle the BLU-USB. This will force the BLU-USB to re-scan the BLU link bus and re-configure
its sample rate accordingly. Note that other auto-sensing BLU link devices may also require a power cycle for the same reason.
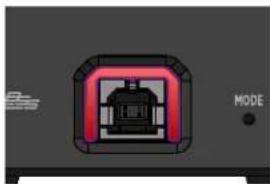
Can't Switch From Class 2 to Class 1 Mode & USB LED Lights Solid Red when Pressing the MODE Pushbutton
natural_image
Pure electrical circuit lines without any symbolsIssue: This indicates the BLU link bus is operating at a 96kHz sample rate, and the BLU-USB cannot be switched to Class 1 mode because that mode does not support 96kHz.
Resolution: Change the master BLU link device to operate at a 48kHz BLU link bus sample rate. All BLU link devices
which require manual sample rate configuration must also be re-programmed to match.
Once the manually-configured BLU link devices have been re-configured, any auto-sensing BLU link devices that have not automatically updated to the new sample rate, including the BLU-USB, should be power cycled so they can detect the new BLU link sample rate and re-configure themselves accordingly.
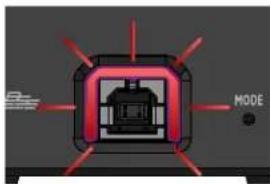
USB LED Flashing Red
natural_image
Diagram of a mechanical or electronic component with red laser lines and a labeled 'MODE' button (no readable text or symbols beyond the label)Issue: This indicates the BLU link bus is operating at a 96kHz sample rate and the BLU-USB is set to Class 1 mode, which does not support a 96kHz sample rate.
Resolution: Either switch the BLU link sample rate to 48kHz in the master BLU link device (then power cycle the BLU-USB if the problem persists) or switch the BLU-USB
to Class 2 mode (see 'Selecting the USB Mode' on page 11 for instructions on switching modes).

NOTE: If you just changed the BLU link sample rate from 96kHz to 48kHz, make sure to wait for the BLU-USB to detect the change before trying to switch to Class 1 mode. If it still won't change, try power cycling the BLU-USB to force it to re-detect the new BLU link sample rate.
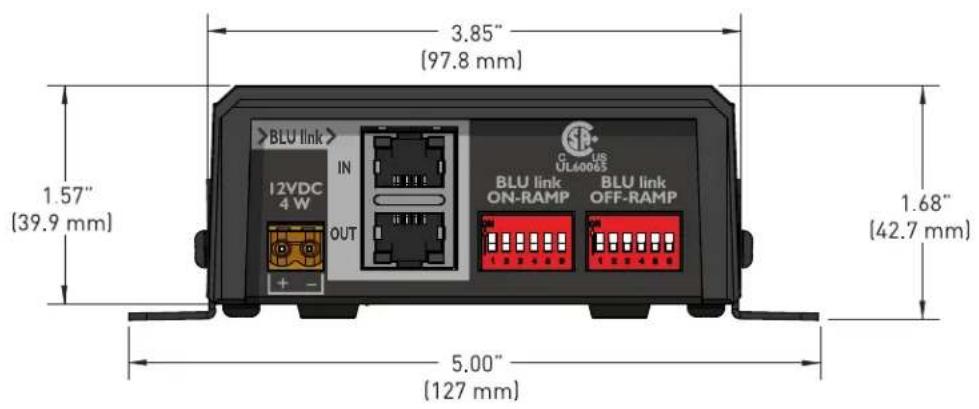
DIMENSIONS
Soundweb™


Specifications
SPECIFICATIONS
COMPUTER AUDIO PLAYBACK
Supported Sound File Sample Rates: 8kHz–192kHz
Supported Sound File Bit Depths: 16-bit, 24-bit [24-bit recommended for best performance]
Supported Drivers: Windows: WDM, ASIO
Mac: Core Audio
BLU LINK BUS
Supported Sample Rates: 48kHz, 96kHz (compatible with Class 2 USB mode only)
Connectors: 2 x RJ45 Ethernet connector
Maximum Cable Length: 100m/328ft on Category 5e cable between devices
Pass-Through Latency: 4/Fs [0.08ms at 48kHz, 0.04ms at 96kHz]
Maximum Nodes: 60
POWER/TEMPERATURE
Mains Voltage: 100-240V AC, 50/60Hz
Power Consumption: 4 Watts
Operating Temperature Range: 5 [41] to 35 [95] degrees C [degrees F]
PHYSICAL
Weight: 1 lb.
0.45 kg
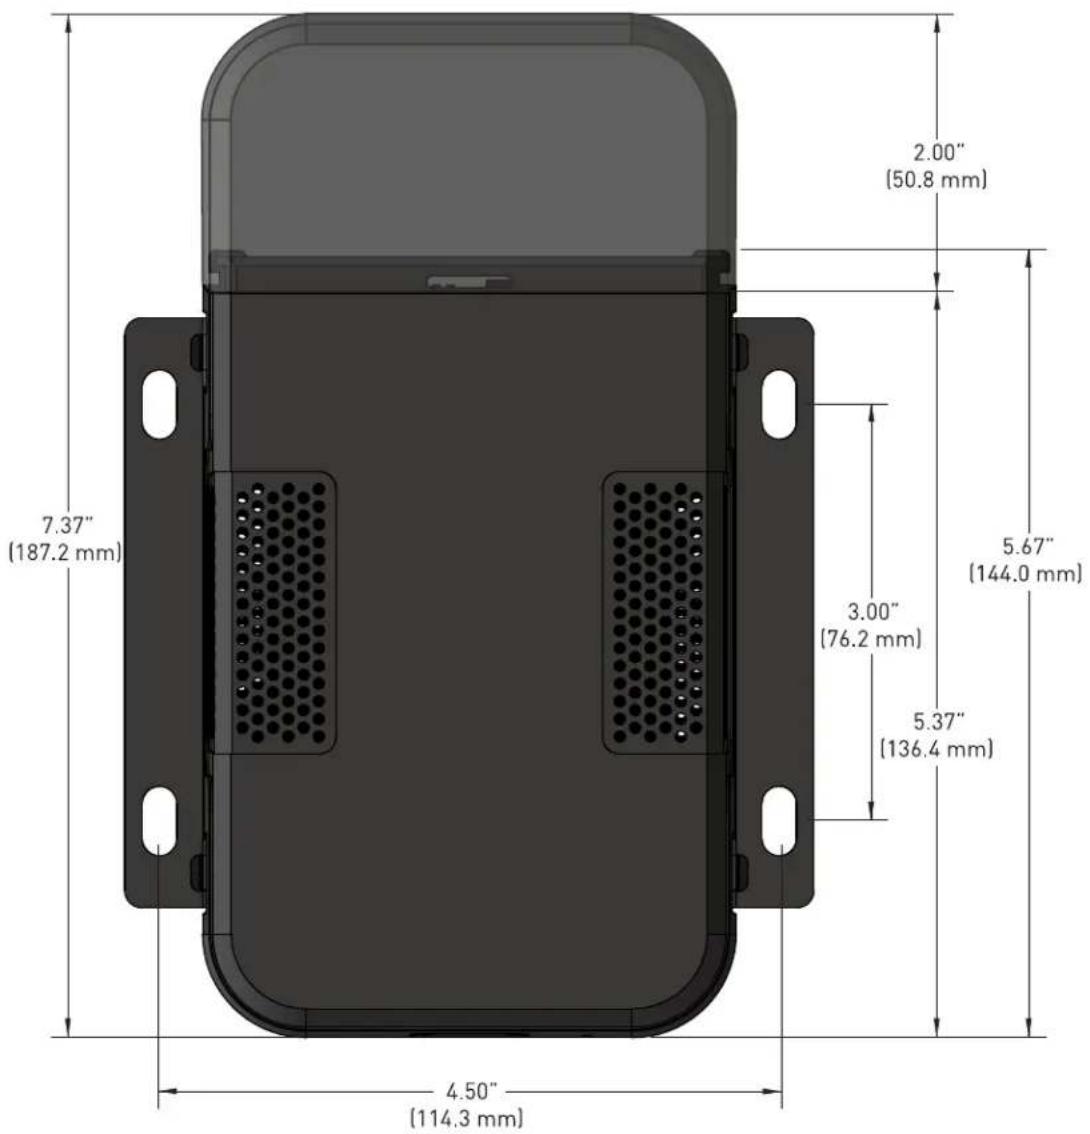
Dimensions: 3.85" (W) x 1.57" (H) x 5.67" (D)
97.8 mm (W) x 39.9 mm (H) x 144.0 mm (D)

Phone: (801) 566-8800
Website: bssaudio.com
Support: bssaudio.com/en-US/support
Soundweb London BLU-USB
Installation Guide
PN: 5078115-A
BSS Audio is a registered trademark of HARMAN
© 2016 HARMAN
All rights reserved
Microsoft, Skype, and Windows are registered trademarks of Microsoft Corporation in the United States and/or other countries. Cisco and Jabber are registered trademarks of Cisco Systems, Inc. in the United States and/or other countries. Mac, OS X, and Apple are trademarks of Apple Inc., registered in the U.S. and other countries.

- x 8 USB / BLU link Bridge
- REGULATORY INFORMATION
- IMPORTANT USER INFORMATION
- PRODUCT REGISTRATION / WARRANTY
- TABLE OF CONTENTS
- GETTING STARTED....1
- INSTALLATION....4
- OPERATION 11
- TROUBLESHOOTING 19
- DIMENSIONS 20
- SPECIFICATIONS 21
- GETTING STARTED
- Introduction
- Included Items
- Features
- Interface Overview
- INSTALLATION
- Minimum Computer Requirements
- Mac®
- PC
- Installing the Windows Driver
- To install the Windows driver:
- Mounting the BLU-USB
- To mount the BLU-USB:
- Assigning BLU link Channels with the DIP Switches
- Applying Power to the BLU-USB
- To apply power to the BLU-USB:
- Making Connections
- BLU link Port Status LED Descriptions
- Both Orange LEDs On
- One Orange LED On
- No Orange LEDs On
- Attaching the Cable Cover
- To attach the Cable Cover:
- Operation
- Selecting the USB Mode
- • Class 1 Mode (Cyan USB Port LED)
- • Class 2 Mode (Magenta USB Port LED)
- To switch between modes:
- Clocking & Sample Rate Operation Explained
- Routing Computer Audio
- Windows Setup
- Mac Setup
- To route system audio in OS X:
- Using ASIO
- To adjust the BLU-USB's ASIO settings:
- Troubleshooting
- Can't Switch From Class 2 to Class 1 Mode
- Can't Switch From Class 2 to Class 1 Mode & USB LED Lights Solid Red when Pressing the MODE Pushbutton
- USB LED Flashing Red
- Specifications
- COMPUTER AUDIO PLAYBACK
- BLU LINK BUS
- POWER/TEMPERATURE
- PHYSICAL
Brand : BSS Audio
Model : Soundweb London BLU-USB
Category : Processor