
Real Pro Ultra EP30004 - Massage device PANASONIC - Free user manual and instructions
Find the device manual for free Real Pro Ultra EP30004 PANASONIC in PDF.


| Brand | Panasonic |
| Model | Real Pro Ultra EP30004 |
| Product Type | Massage Lounger / Massage Chair |
| Power Supply | AC 120 V, 60 Hz |
| Power Consumption | 195 W |
| Dimensions (Not Reclined) | 47.2 x 33.1 x 50 in (120 x 84 x 127 cm) |
| Dimensions (Reclined) | 28.3 x 33.1 x 76.8 in (72 x 84 x 195 cm) |
| Weight of Unit | Approx. 181 lbs (82 kg) |
| Maximum User Weight | 264 lbs (120 kg) |
| Automatic Shut-off | After approx. 15 minutes (5 minutes for Quick Massage) |
| Reclining Angle | Backrest: approx. 120° – 170°; Legrest: approx. 0° – 85° |
| Massage Area (Up-Down) | Approx. 30 in (76 cm) total; massage heads travel approx. 26 in (65 cm) |
| Massage Area (Left-Right) | Approx. 3 – 8 in (7 – 21 cm) adjustable width |
| Massage Types | Shiatsu, Kneading, Swedish, Stretch, Tap, Grasp, Ultra Knead, Full Roll, Air Massage |
| Air Pressure Levels (Calf) | 5 levels: approx. 4 – 32 kPa |
| Body Scanning | Automatic detection of shoulder position for height 4'7" – 6'8" (140 – 185 cm) |
| User Memory | Up to 8 custom programs can be saved |
| Safety Certifications | Grounded plug; child safety lock; automatic shut-off |
| Materials | Synthetic leather covering, fabric seat |
| Cleaning | Wipe with soft dry cloth; mild detergent for stubborn stains; avoid thinners, benzine, alcohol |
| Accessories Included | Armrests (R/L), Pillow, Control Panel Stand, Covers, Allen Key, Sole Reflexology Plates, Attachment Screws, Lock Switch Keys |
| Warranty | Contact Panasonic Consumer Electronics (1-800-338-0552) for details |
Frequently Asked Questions - Real Pro Ultra EP30004 PANASONIC
User questions about Real Pro Ultra EP30004 PANASONIC
0 question about this device. Answer the ones you know or ask your own.
Ask a new question about this device
Download the instructions for your Massage device in PDF format for free! Find your manual Real Pro Ultra EP30004 - PANASONIC and take your electronic device back in hand. On this page are published all the documents necessary for the use of your device. Real Pro Ultra EP30004 by PANASONIC.
USER MANUAL Real Pro Ultra EP30004 PANASONIC
Before operating this unit, please read these instructions completely.
English See pages 1-
48
TABLE OF CONTENTS
IMPORTANT SAFETY INSTRUCTIONS
Basic precautions should always be followed when using an electrical unit, including the following.
Please ensure that you read all instructions before using the Household Massage Lounger.
DANGER – To reduce the risk of electric shock:
- Always unplug this unit from the electrical outlet immediately after using and before cleaning.
WARNING – To reduce the risk of burns, fire, electric shock, or injury to persons:
- Always insert the power plug all the way into the outlet to reduce the risk of short-circuit and fire.
- The unit should never be left unattended when plugged in. Always unplug the unit when not in use.
- The unit is not to be used by people who cannot move or communicate on their own.
- Only use the unit for the purpose described in these instructions.
- Do not stand on the unit.
- Do not use any accessories other than those recommended by the manufacturer.
- Always return the seat to the upright position and make sure the legrest is completely retracted. Be careful that nothing is obstructing the legrest while retracting. Keep children away from the legrest.
- Never operate the unit if it has a damaged power cord or plug. Return the unit to the nearest authorized service center if it is not working properly, if it has been dropped or damaged, or if it has been immersed in water.
- Keep power cords away from heated surfaces. Do not carry the unit by the power cord.
- Never block the air openings during operation and make sure that all air openings are kept free of lint and hair, etc. Do not drop or insert anything into any of the openings of the unit.
- Do not use the unit on top of heating appliances, such as electric carpets, etc. Do not operate the unit under blanket or pillow. Excessive heating can occur and cause fire, electric shock, or injury to persons.
- Do not use the unit in bathrooms or other damp or humid places as this may cause electric shock or cause the unit to malfunction. Do not spill water, etc. onto the control panel.
- Do not use the unit outdoors.
- Do not use or operate where aerosol spray products are being used or where oxygen is being administered.
- When unplugging the unit, turn off all controls before removing the plug from power outlet. Do not use the unit with a transformer as this may lead to malfunction or electric shock.
- Connect this unit to a properly grounded outlet only. See Grounding Instructions.
SAVE THESE INSTRUCTIONS
SAFETY PRECAUTIONS
CAUTION: To avoid the risk of injury:
- Persons with any of the conditions listed below or who are undergoing medical treatment or suffer from medical conditions should consult with their physicians before using the unit:
a) Pregnant women, people who are ill, or in poor physical shape. b) People suffering from back, neck, shoulder, or hip pain. c) People who have a pacemaker, defibrillator, or other personal medical devices prone to electronic interference. d) People suffering from heart disease. e) People who are prohibited from receiving massage by a physician due to thrombosis or aneurism, acute varicose veins, or other circulatory disorders. f) People with irregular curvatures of the spine.
- This unit should not be used by children. Remove the key when not in use and store out of reach of children.
- Sit down slowly after checking the position of the massage heads. Never put any part of your body between the massage heads as the squeezing action of the massage heads may cause injury. Never put your fingers or feet in the gap between the backrest and seat, the backrest and the armrest, the seat and cover under the armrest, or the gap between the legrest and the footrest. Do not place your fingers or any part of your body in the mechanism below the legrest, or between the legrest and footrest.
- Do not use the unit against bare skin. While thin clothing may increase effectiveness, exposing the skin directly to the massager may irritate the skin. Do not use the unit while wearing anything hard on your head like a hair accessory, etc. Do not use the unit for massaging the head, abdomen, front neck, elbows or knees. Do not use excessively strong massage action on the back of the neck.
- When using the body scanning function, always ensure that the shoulder position is correct. If the shoulder position is not correct, use the POSITION button to adjust it properly. You can adjust the shoulder position in this way in the pre-programs, quick massage, self-program and manual operation. Failure to align the shoulder position correctly can lead to injury.
- Do not stretch the back muscles for more than approximately 15 minutes at a time. To avoid overstretching the muscles which may result in discomfort, do not use the unit for more than 5 minutes when first using it. You can gradually increase the duration and strength of the massage as you become used to it. Do not massage any one point for more than 5 minutes at a time.
Excessive massaging can overstimulate the muscles and nerves and result in an adverse effect.
To prevent excessive massaging, do not use the massager for more than a total of 15 minutes each session. After approximately 15 minutes, the massage heads will be retracted and stop moving.
The back cushion can be removed if you want to experience a stronger back massage. Exercise extreme care when you use this mode in order to avoid back pain or injury. Use only for short periods of time (no more than 15 minutes). Reinstall the back cushion if you want to restore to normal massage intensity.
- While using the massager, if you start feeling sick or if the massage seems painful, stop using it immediately. While using the massager, if the pressure seems too strong, the movement of the massage heads can be stopped at any time by pressing the Quick Stop button.
- Do not go to sleep while using the unit. Do not use the unit after drinking alcohol.
- When the seat back is in a reclined position, do not sit on it or sit with your legs resting on the headrest. Do not sit on the legrest as the unit may fall over.
- Do not allow children or pets to play on or around the unit, especially during operation.
- Do not unplug the unit or turn it off during operation. Unplug the unit immediately if there is a power outage.
- Be sure to start on the gentle massage program if using the massager for the first time. The shiatsu massage is stronger and should be enjoyed after one has gotten accustomed to the chair.
- Do not allow children to play on this mechanized furniture or operate the mechanism. Legrest folds down on closing so that a child could possibly be injured. Always leave in an upright and closed position. Keep hands and feet clear of mechanism. Only the occupant should operate it.
- Remove hard objects, such as false fingernails, wristwatches or rings, when massaging hands or arms. Empty pockets of hard objects when massaging the area of the seat.
- Always raise the back cushion to check that the fabric of the unit itself has not been ripped before using the unit. Please also check other areas to ensure that the fabric has not been ripped. No matter how small the rip, if you find one then immediately stop using the unit, unplug the power cord and have the unit repaired at an authorized service center.
OPERATING PRECAUTIONS
WARNING: To avoid damaging the chair, follow these precautions:
- The chair is designed for a maximum user weight of 264 lbs (120 kg). Exceeding the maximum weight may cause permanent damage to the massage mechanism and/or other components of the unit. Any such damage is deemed to be user abuse and is not covered under the Limited Warranty.
- Do not sit on or drop the control panel. Do not pull the control panel cord or the power cord. Be careful not to catch the cord of the control panel between the armrest and the chair back.
- Do not treat the chair roughly, such as turning the chair on its side, turning the chair over or standing on it.
- Do not treat the covering roughly.
- Keep sharp or pointed objects away from the covering of the chair. Be careful not to drop lit ashes, lit cigarettes or matches on the chair.
- Exposure to direct sunlight can cause fading or a change in color of the covering.
- If the massager functions abnormally, immediately turn off the power and have the massager checked by an authorized service center.
- Do not repeatedly operate any switch at short intervals. Such action may cause the switch to malfunction.
- Some noise may be heard coming from the massager while in use. This is due to the structure of the massager and is normal.
- Make sure there are no obstacles behind the chair before reclining it. The chair can be reclined to a maximum angle of 170°. If the back hits a wall or pillar, the chair may malfunction. Be sure to have ample space behind the chair. Recline the chair slowly in order to avoid contact with an obstacle.
- When excessive pressure is applied to the massage heads, they may stop moving for safety. When moving the heads up from the lowered position, one's body weight may stop the heads' movement. In such a case, slightly raise your body and allow the massage heads to move up.
- After each massage, slide the power switch, which is located on the right side of the chair, to the "off" position and turn its lock switch to the "lock" position.
- Do not sit on the chair with wet body or hair.
- The unit must not be used in "wet rooms" (sauna, swimming pool) or outdoors.
- Do not attempt to open or disassemble any part of the unit. Only use an authorized Panasonic servicer to fix your unit.
GROUNDING INSTRUCTIONS
This product must be grounded. If it should malfunction or break down, grounding provides a path of least resistance for electric current to reduce the risk of electric shock. This product is equipped with a cord having an equipment-grounding conductor and a grounding plug. The plug must be plugged into an appropriate outlet that is properly installed and grounded in accordance with all local codes and ordinances.
DANGER
Improper connection of the equipment-grounding conductor can result in a risk of electric shock. Check with a qualified electrician or serviceman if you are in doubt as to whether the product is properly grounded. Do not modify the plug provided with the product – if it will not fit the outlet, have a proper outlet installed by a qualified electrician.
This product is for use on a nominal 120-volt circuit and has a grounding plug that looks like the plug illustrated in Figure A. Make sure that the product is connected to an outlet having the same configuration as the plug. No adapter should be used with this product.

Part names and functions
Main unit
1 Legrest
2 Leg/Sole massage section
- Includes air massage function

- Sole Reflexology Plates
- Removable
- Position adjustment possible
3 Legrest Slide Lever - Extendable length to approx. 5 in. (12 cm) 4 Control Panel See page 7 to 8 5 Retracted position of massage heads 6 Back Cushion 7 Pillow 8 Backrest - Includes integrated massage heads 9 Seat - Includes integrated air massage function
10 Armrest 11 Hand/Arm massage section - Includes integrated air massage function 12 Control Panel Stand Covers - On both the left and right sides
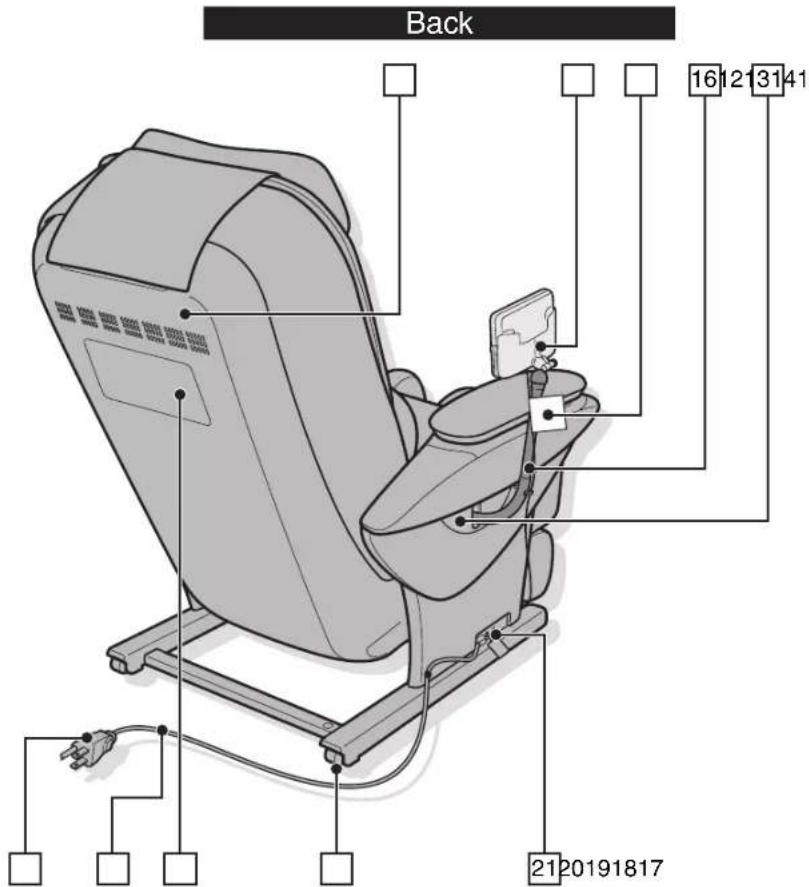
13 Back Cover 14 Control Panel Holder 15 Child Safety Decal 16 Control Panel Stand 17 Power Plug 18 Power Cord 19 Safety Precaution Label 20 Wheels
21 Power Supply Box
Control Panel
1 Off/On
2 Quick Stop
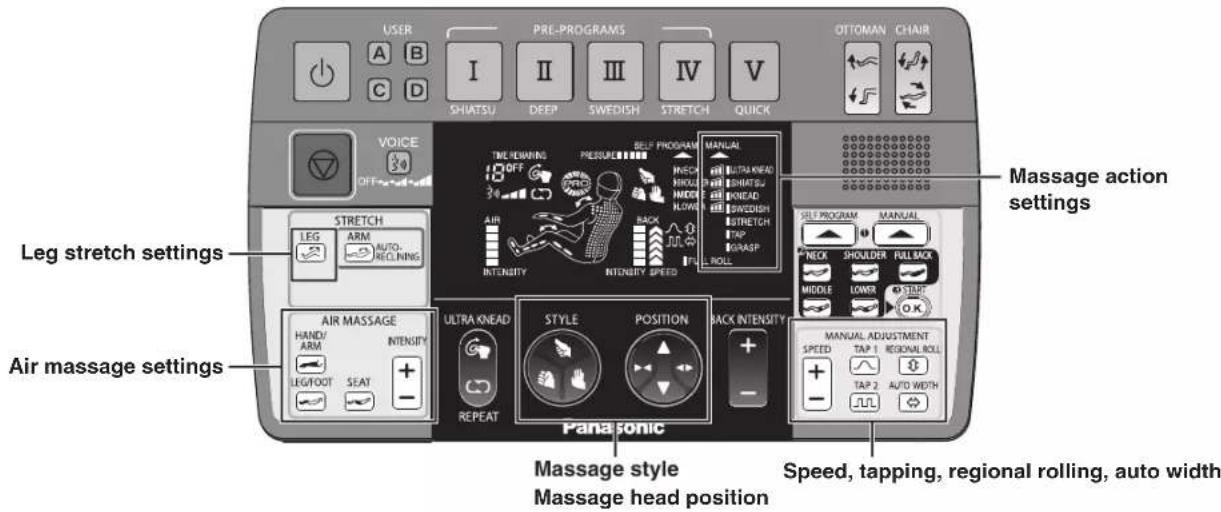
- Press this button to stop the massage immediately.
3 User Memory
• See page 38 to 40
4 Program Selection
• See page 18
5 Ottoman Angle Adjustment
• See page 34
6 Reclining Angle Adjustment
• See page 34
7 Display
This illustration simulates when all lights are illuminated.
See page 8
8 Voice Guidance Volume
See page 36
9 Ultra Knead
"Ultra Knead" is the name of the massage actions.
See pages 26 to 27
10 Repeat
See page 27
11 Massage Style Selection
See page 27
12 Position
See page 28
13 Back Intensity Adjustment
- Adjustment of the massage heads strength
• See page 28
14 Stretch
• See page 33
15 Air Massage Controls
- Selection of the areas to be air massaged
• See page 30
16 Self-Program/Manual Operation Controls
• See page 22 to 23
17 Manual Adjustment Controls
• See page 24 to 26
Display![graph TD A["1 TIME REMAINING"] --> B["2 OFF"] B --> C["3 GPS"] C --> D["4 PRO"] D --> E["5 PRESSURE"] E --> F["6 SELF PROGRAM"] F --> G["7 MANUAL"] G --> H["8"] I["AIR"] --> J["INTENSITY"] J --> K["9 INTENSITY SPEED"] L["BACK"] --> M["10 INTENSITY SPEED"] N["FULL ROLL"] --> O["11 INTENSITY SPEED"] P…](/content/2026/05/896551/images/66503d5472633d60fd8fd26c93f8b270e1f1b4d311ac8b68eb3de9c237ab7a13.jpg)
* This illustration simulates when all lights are illuminated.
1 Voice Guidance Volume Display
• See page 36
Off 3)
Soft

Medium

Loud

2 Time Remaining Display
(During massage)
TIME REMAINING

(After finishing massage)

3 Ultra Knead/Repeat Display
• See page 27
(Ultra knead)

(Repeat)

4 User Memory Display
- Illuminated when operating the User Memory function
• See pages 38 to 40

5 Pressure Display
• Displays the pressure applied by the massage heads
6 Massage Style Display
• Displays the current massage style

Thumb-like action

Palm-like action

Fist-like action
7 Self-Program Setting Display
• See pages 22 to 23
8 Manual Upper Body Massage Display
• See pages 24 to 26
9 Air Intensity Display
• See page 30
10 Stretch Display
- Indicates whether the leg stretch or the arm is on or off
On: Turned on
Off: Turned off
In operation: flashing


11 Massage Area Display
• Flashes to indicate areas currently being massaged
• In the Massage Area Display, positions are estimated. Therefore, there may be some differences between the actual sensation and the display.
12 Back Intensity/Speed Display
- Intensity and speed of the massage heads are displayed.
- The speed is displayed only in the manual operation.
13 Manual Upper Body Complex Operation Display
- Indicates optional operations added to manual upper body operation
• See page 25
TAP 1
TAP 2
REGIONAL ROLL
AUTO WIDTH
Setting up the massage lounger
1 Where to use the unit
Ensure there is adequate space to recline.
Caution
- Do not use the unit in areas with high humidity, such as the bathroom, because this can lead to electric shock or other accidents.
- Place the unit on a totally flat surface. Failure to do so may result in the unit tipping over.
- Do not expose the massage lounger to direct sunlight or high temperatures, such as in front of a heater, etc., as this can cause discoloration or hardening of the synthetic leather.
- Place the unit on a mat to prevent floor damage
- When placing a mat under the unit, the size of the mat should be sufficient (at least 47 x 28 in. (120 x 70 cm)) to cover the areas where the unit touches and where the legrest could touch the floor, as shown in the diagram on the right. Install the unit near a power outlet.
Keep at least 4" (10 cm) away from the wall.
2 Removing everything from the box and installing the unit
- Use care to prevent lower back and other injuries that could occur when lifting this heavy object (approx. 176 lbs. (80 kg)). (The unit must be carried by two persons.)
- When using the wheels to move the unit, place a mat on the floor to protect the floor surface.
To put the unit down on the floor
- Put the unit down slowly and carefully watch your step.
- Put down the legrest by holding it with your hands until it has been set on the floor completely. If you release your hands before the legrest is fully extended, the legrest will forcefully return to the initial position.

Confirm that the main unit and the accessories are in the box.
Main unit
Accessories - Armrests (Right/Left)
- Pillow

• Control Panel Stand
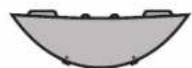
• Control Panel Stand Covers
Small holes on the inside fabric are an intentional part of the functional design.
- Allen Key — 1

- Sole Reflexology Plates

This is installed on the sole massage section prior to leaving the factory.
- Attachment Screws (M6 × 16) — 7
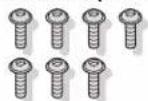
- Lock Switch Keys — 2

One of the lock switch keys has been inserted in the lock switch prior to leaving the factory. The other lock switch key is a spare to be stored for safekeeping out of the reach of children.
Do not remove this tag.
Documents including the Operating Instructions
- Operating Instructions • Child Safety Instructions (Yellow brochure) • How to transport and move (Yellow brochure) • Notes for body scanning (Pink brochure)
- Quick Start Manual
Assembly
1 Attaching the armrests
(On both the right and left sides)
- Insert the armrest into the unit.
- Be careful to avoid pinching your fingers.

- Fasten the armrest with the attachment screws.
Set the two attachment screws in place by hand first, then tighten firmly with the Allen key.
Use this screw.
Attachment screw (M6 × 16).

Make sure that the seat surface is not damaged.

2. Connecting the air plugs (on both the right and left sides).
Insert the air plugs into the unit.

3. Attaching the control panel stand to the right or left side panel of the unit (diagram shows attachment to right armrest).
- Insert the attachment screw into the lower hole first, then tighten lightly by hand.
- Securing the stand with the attachment screws. Tighten the two screws for the remaining two holes lightly by hand, then tighten firmly with the Allen key.

Use this screw: attachment screw (M6 × 16).

× 3
The position of the control panel when seated can be selected by choosing the appropriate hole for the screw.

To attach the control panel stand using the attachment screws, tighten the screws level with the holes as shown in the figure below.
If the screws are tightened at an angle, the hole may become deformed and the screws may become stuck in the middle.

4 Attaching the control panel stand covers (On both the right and left sides)
The method for attaching the covers is the same for both sides. The diagram shows the side where the control panel stand is attached.
Cover for Side WITH Control Panel Stand
Cover for Side WITHOUT Control Panel Stand

- Insert the top tabs on the cover into the bottom notches on the armrest.
- Insert the bottom tabs into the notches on the armrest.
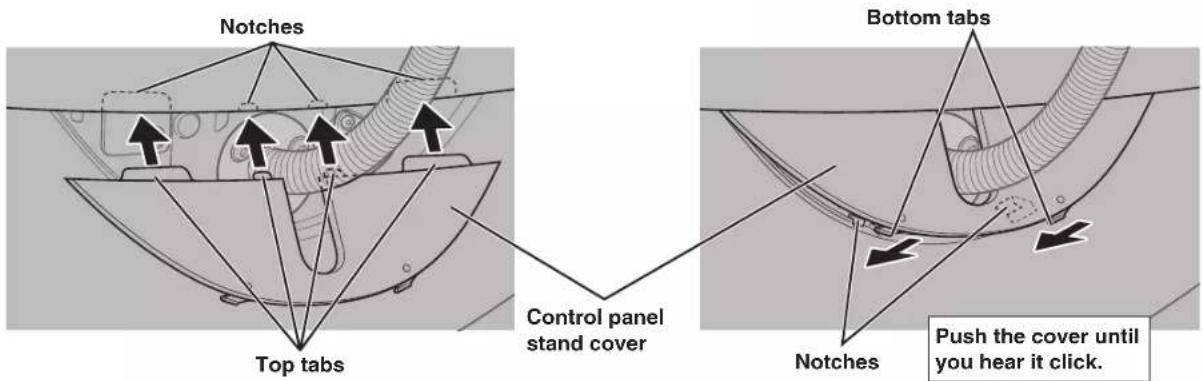
When removing the control panel stand cover
- Insert the head of a flat-tip screwdriver in the gap under the mark (O).
- Push the bottom tab of the cover up to lift the cover.
- Perform the same procedures as 1 and 2 above for the other gap.
- Pull the cover up diagonally.
- Performing this procedure with the allen key or a Phillips screwdriver could damage the unit.

5 Raising the backrest to the upright position
- Insert the power plug into the power outlet.
- Confirm the key lock is set to the "open" position.
- Confirm the power switch is set to the "on" position.
- Press the button on the control panel twice. The backrest will rise to the upright position automatically.

Moving the control panel cord to the left side (when control panel stand is on left side)
- Press the button on the control panel to turn on the power.
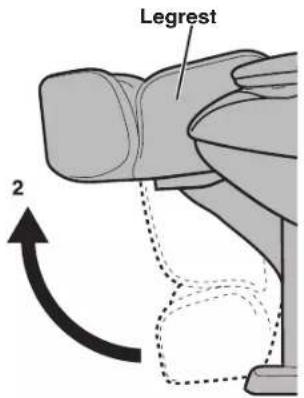
- Press the button on the control panel and hold until the legrest has risen as far as it will go. Continue pressing until a "beep-beep-beep" sound is heard.
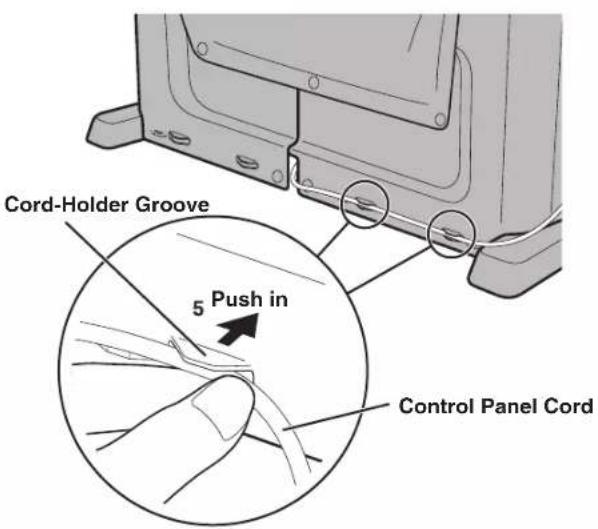
- Remove the control panel cord from the cord-holder groove.
- Move the control panel cord under the legrest to the left side.
- Fasten the control panel cord at two points in the cord-holder groove.


6 Placing the control panel into the control panel stand
- Fit the groove on the side of the control panel to the projection on the inside of the holder.
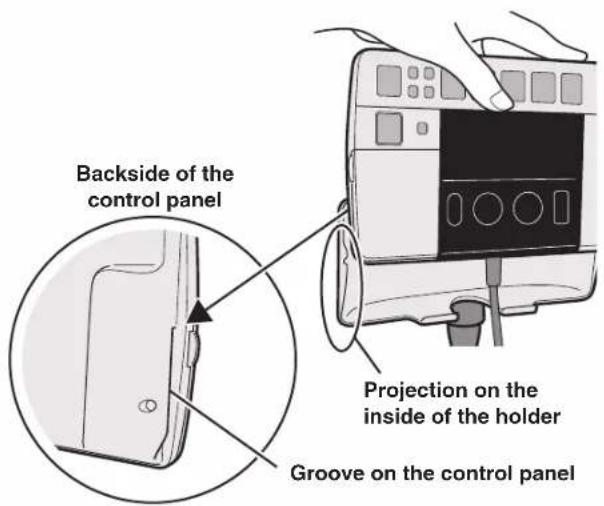
- Fasten the control panel cord using the clip.

Lift the control panel to remove.
7 Attaching the pillow
- Attach the pillow to the velcro fasteners.
• See page 37 for a guide to the position of the pillow

Before sitting down
Check the following before using the unit
1 Check the surrounding area
Make sure there are no objects, people, or pets in the vicinity of the unit.
2 Check the power cord and the power plug
Warning
- Remove dust from the power plug periodically. Failure to observe this precaution may result in defective insulation of the cord due to moisture. Clean dust from the cord using a dry cloth.
- Do not damage the power cord and the power plug. (Do not damage, expose to heat sources, bend, twist, pull forcibly, bundle or place heavy objects on the cord.) Using a damaged power cord and/or the power plug may result in electric shocks, short circuits, or fires. Ask your sales dealer to repair the power cord and/or the power plug, or contact a customer service center.

3 Switching on the power supply
- Insert the power plug into an electrical outlet.
- Turn the lock switch key to the "open" position.
- Slide the power switch to the "on" position.
Warning
- Insert the power plug firmly until it stops completely. Failure to observe this precaution may result in electric shocks or fires due to heat generation.
- Do not exceed the rated values of the plug and the wiring or use any voltage other than the rated voltage. (The unit cannot be used abroad or used with a transformer.) Failure to observe this precaution may result in electric shocks, malfunctioning or fires due to heat generation.
- Do not handle the power plug with wet hands. Doing so may result in electric shocks.


4 Check the unit
- Make sure there are no tears or rips in the fabric.
Warning
- Lift the back cushion and make sure the fabric on the backrest is not torn. (Even if it is torn very slightly, stop using the unit immediately, remove the power plug, and request repairs.) Using the unit with the fabric torn may result in injury or electric shocks.

- Make sure there is no foreign objects on the chair.
Caution
- Sit on the unit after confirming there is no foreign matter between the parts of the unit. (Check for foreign objects on the backrest, leg/sole massage section or hand/arm massage section.)
Failure to observe this precaution may result in accident or injury.
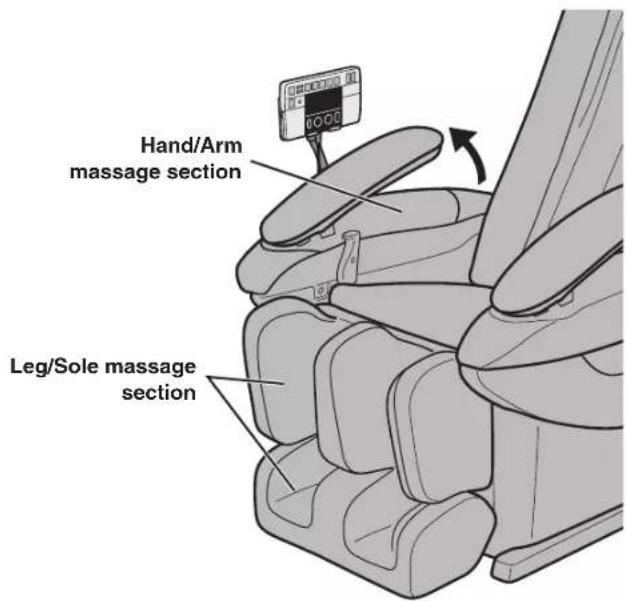
- Make sure the massage heads are in the retracted position.
Caution
- Sit on the unit after confirming the massage heads are in the retracted position.
Failure to observe this precaution may result in accident or injury.
When the massage heads are not in the retracted position
Press the button twice to return the massage heads to the retracted position.
- Make sure the legrest is in the fully lowered position.
Caution
- Do not stand on the legrest or place any object on it when the legrest is not in the fully lowered position.
Failure to observe this precaution may result in accident or injury from the foot part of the legrest turning or the unit tipping over.

To lower the legrest
Make sure the legrest has fully returned to the original position by pulling the legrest slide lever, and then press the button twice.

Program Massages
Pre-Program
Quick Massage
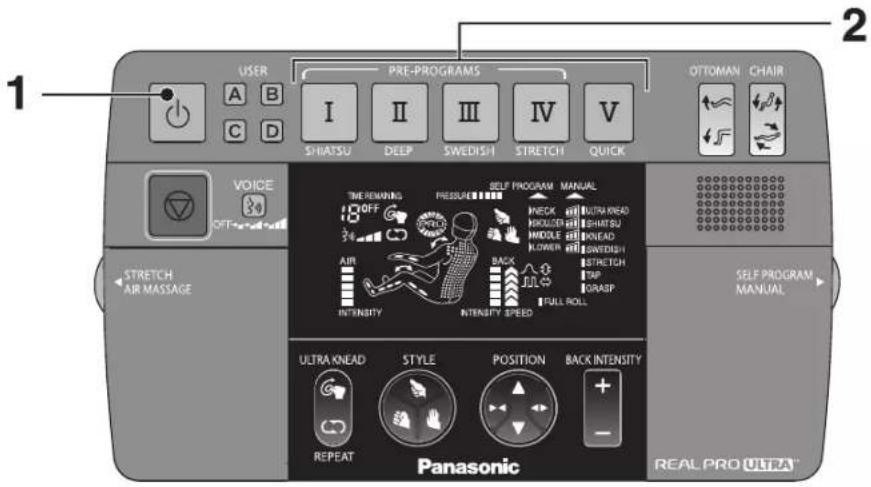
1 Press the button to turn on the power.
• The power will turn off automatically if the massage does not start within 3 minutes after turning on the power.
2 Press one of the flashing buttons program.

Pre-Program and Quick Massage Characteristics (Upper Body) See page 21 for an overview of the respective programs.
SHIATSU
SHIATSU: Uses mainly shiatsu massage to loosen up deep-seated knots of tension. Recommended for those with severe stiffness and tension.
STRETCH
STRETCH: Uses mainly compression to slowly stretch muscles and joints. Recommended when a refreshing stretch is desired.
DEEP
DEEP: Uses mainly kneading to manipulate and loosen muscles. Recommended for those with mild stiffness and tension.
QUICK
QUICK: Covers all areas using a variety of massage actions in a span of just 5 minutes.
SWEDISH
SWEDISH: Uses mainly Swedish massage to gently invigorate and promote circulation. Recommended for those experiencing fatigue and weariness.
- Body scanning will commence when the program is selected.
The body scanning will properly detect height ranges between approximately 4'7" and 6'8" (140 and 185 cm).
Sit as far back in the seat as possible with your head on the pillow.

The unit will automatically recline to the correct measuring position.
Reclined approx. 12°

① NECK (Neck) ② SHOULDER (Shoulder) ③ MIDDLE (Back) ④ LOWER (Lower back)
- Approximately 30 seconds after the body scanning starts, the massage heads slowly lower to the shoulder position, and a soft tapping action begins to determine your shoulder height.


Keep your head on the pillow until the soft tapping begins. Lifting your head from the pillow will result in incorrect determination of the shoulder position.
- Confirm that the shoulder position has been correctly determined according to the position of the soft tapping.

- When the shoulder position is incorrect, adjust the shoulder position while the soft tapping is in progress (for approximately 15 seconds), and use the POSITION button to move the massage heads up or down.
POSITION
A single press of the button will raise or lower the massage heads approximately 0.5" (1.2 cm).
- The massage will start after body scanning is complete.
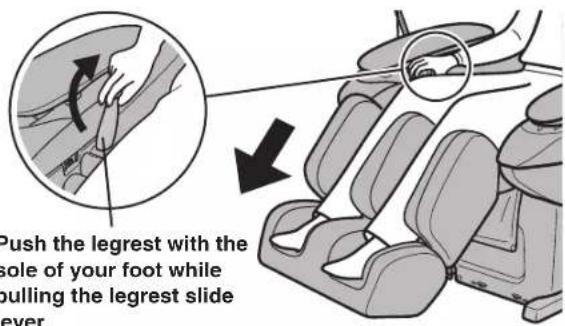
The legrest height will adjust automatically based on the body scanning results. The soles of the feet should be touching the footrest wells. You may still adjust the length of the legrest with the lever on the right side of the seat (see next page). You may also further adjust the height of the ottoman electronically (see page 34).
When the massage starts
Adjust the length of the legrest to accommodate the position of the backs of your calves or knees to fit into the legrest wells.
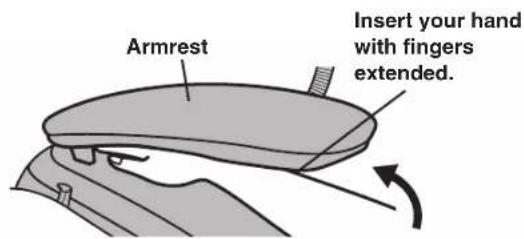
For the hand/arm massage, lift the armrest up and insert your arm.
Caution
- Remove hard objects, such as false fingernails, wristwatches, or rings when massaging the hands or arms.
- Remove hard objects from the pockets of your trousers when massaging seat/thigh.
Failure to do so may result in injury.
During a massage
- To change off/on for "LEG/FOOT," "SEAT," or "HAND/ARM" and adjust its intensity, see page 30.
- If you want to turn the stretch massage off/on, see page 33.
- If you want to adjust the legrest, see page 34 and 35.
- If you want to adjust the intensity and position of the massage on the upper body using the massage heads, see page 27 and 28.
- If you want to adjust the reclining angle, see page 34.
- If you want to use the "ULTRA KNEAD" function or "REPEAT" function, or change the massage style, see page 27. • If you want to finish a massage, see page 41 and 42.
Overview of the Pre-Program and Quick Massage (Upper Body)
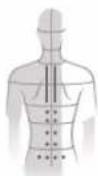
Shiatsu Program (I)
1) Ultra knead/
Shiatsu/Grasp
on Neck/Shoulder Lower back
2) Ultra knead/
Shiatsu on Back/
Lower back
3) Ultra knead/
Shiatsu/Grasp
on Neck/Shoulder
4) Ultra knead/
Shiatsu on Back/
Lower back
5) Ultra knead/
Shiatsu/Grasp
on Neck/Shoulder
6) Ultra knead/
Kneading on
Back/Lower back
7) Finishing
Touches



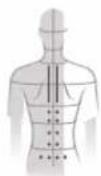

Deep Program (II)
1) Ultra knead/
Kneading/Grasp
of neck/Shoulder
2) Ultra knead/
Kneading of
Back/Lower back
3) Ultra knead/
Kneading/Grasp
of neck/Shoulder
4) Ultra knead/
Kneading of
Back/Lower back
5) Ultra knead/
Kneading/Grasp
of neck/Shoulder Lower back
6) Ultra knead/
Kneading of
Lower back
7) Ultra knead/
Kneading/Grasp
of Shoulder
8) Finishing
Touches
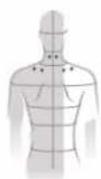


Swedish Program (III)
1) Ultra knead/
Swedish from
Neck to Lower
back
2) Swedish on
Neck/Shoulder
3) Ultra knead/
Swedish on
Back/Lower back
4) Swedish on
Neck/Shoulder
5) Ultra knead/
Swedish on
Back/Lower back
6) Swedish from
Neck to Lower
7) Finishing
Touches


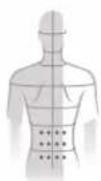


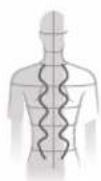
Stretch Program (IV)
1) Kneading fro
Neck to Lower
back
2) Narrow
Pressing
3) Ultra knead
from Neck to
Lower back
4) Narrow
Pressing/
Stretching
5) Ultra knead/
Pressing on
Back/Lower back
6) Narrow
Stretching
(1) This description is for reference only.
7) Swedish/
Stretching on
Back/Lower back
8) Finishing
Touches
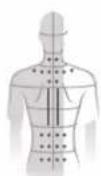


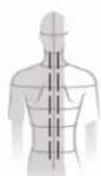


Quick Program (V)
1) Ultra knead/
Shiatsu/Grasp
on Neck/Shoulder Back/Lower back
2) Ultra knead/
Swedish on
3) Finishing
Touches


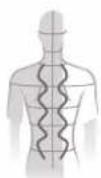
Creating Self-Programs
Self-Program
Self-Program
The Self-Program allows you to create a massage where you determine the time and intensity in neck, shoulders, back, and lower back by selecting from levels 0 (no massage) to 3 (longest and most intense).

1 Press the button to turn on the power.
- The power will turn off automatically if no operation is executed for 3 minutes without performing massage.
2 Open the right cover and press the SELF PROGRAM button.
The self-program setting display on the top right of the display will flash.
![graph TD A["Pressure"] --> B["Self Program"] B --> C["Man"] C --> D["Neck"] C --> E["Shoulder"] C --> F["Middle"] C --> G["Lower"] H["Full Rol"] --> I["NECK"] H --> J["Shoulder"] H --> K["Middle"] H --> L["Lower"]](/content/2026/05/896551/images/49b8d88578ce28be94f8ad8b71397fd87f852512a1170f56aa8135f5a8f5ed5c.jpg)
3 Set the time and intensity for the neck, shoulder, back, and lower back,
respectively

- The level shifts sequentially whenever the button is pressed.
Display![graph LR A["3"] --> B["2"] B --> C["1"] C --> D["0"]](/content/2026/05/896551/images/55a18c332f893822a8d52d1360f40e29f7d486b96e7e540c1a242c1c82a61ae1.jpg)
FULL BACK
- Press the button to shift the levels for "NECK," "SHOULDER," "MIDDLE," and "LOWER" by one up/down at the same time.
- 3 bars represents more time than one bar.
- If all areas are 3 bars, then both time will be equally long and the massage will be strong in all areas.
- If all areas are just one bar, then massage length will be the same, and intensity will be lighter.
4 Press the START button to start the program.
The massage will start after the body scanning.
To change the time and intensity in the middle of a massage
Set the condition again with Steps 3 and 4.
START
- Press the button within approximately 30 seconds after resetting in Step automatically.
3, otherwise the reset will be cancelled
Setting the Time and Intensity
- In the Self-Program, the actions and time for the respective body parts will be set according to the settings picked by the user. Fewer bars means both less time and less strength. If you don't want a massage at all in an area, set the bars to "0".
Massage Sequence
- The massage starts in the area with the highest numbers of bars selected, and moves successively from highest to lowest.
- If the levels of fatigue are the same, the massage will follow the sequence of “NECK,” “SHOULDER,” “MIDDLE,” and then “LOWER.”
Massage actions for the respective level of fatigue

Stronger massage mainly Shiatsu

Massage at an intermediate level, mainly Kneading

Softer massage mainly Swedish

No massage for this part
During a massage
- To change off/on for "LEG/FOOT," "SEAT," or "HAND/ARM" and adjust its intensity, see page 30.
- If you want to turn the stretch massage off/on, see page 33.
- If you want to adjust the legrest, see page 34 and 35.
- If you want to adjust the intensity and position of the massage on the upper body using the massage heads, see page 27 and 28.
- If you want to adjust the reclining angle, see page 34.
- If you want to use the "ULTRA KNEAD" function or "REPEAT" function, or change the massage style, see page 27.
- If you want to finish a massage, see page 41 and 42.
Manual Selection Massages
Manual Operation
Manual Operation
Manual Operation provides a massage of your favorite body part with your favorite action by selecting neck, shoulder, back, or lower back and an action.
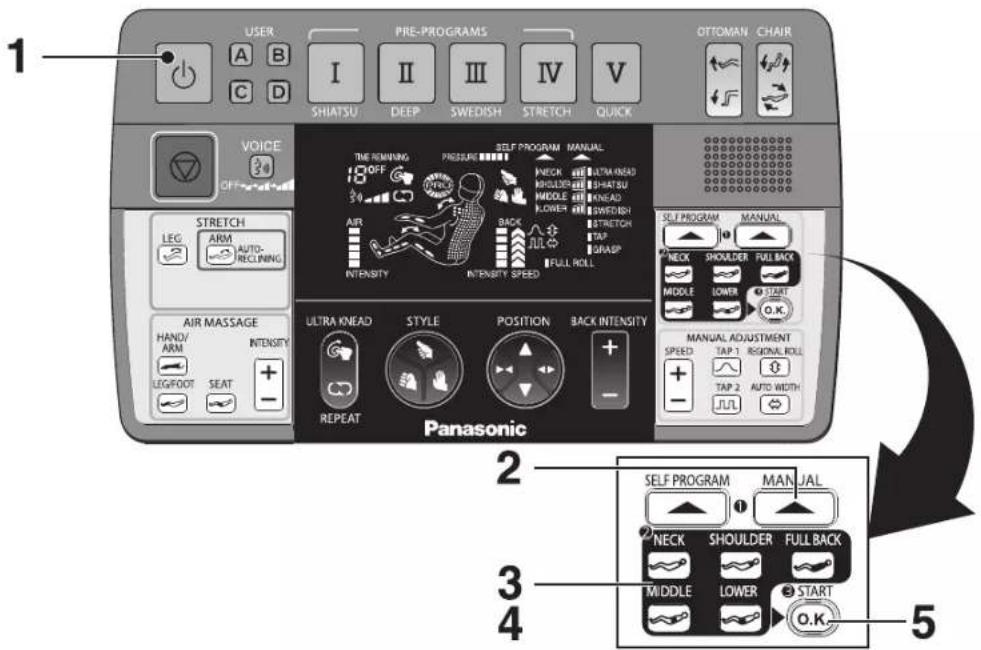
1 Press the button to turn on the power.
- The power will turn off automatically if no operation is executed for 3 minutes without performing massage.
2 Open the right cover and press the button.
The manual setting display on the top right of the display will flash.
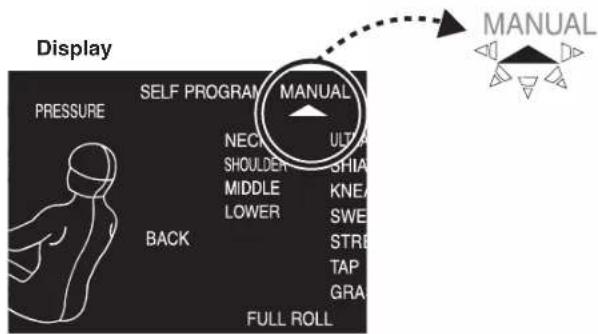
3 Select the location you want to massage

- You can select an action combined with "FULL ROLL" by pressing the button.
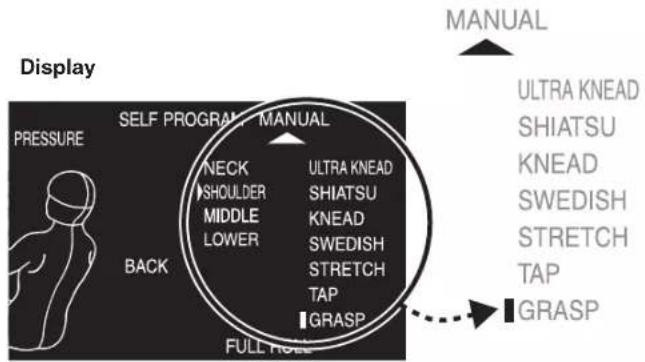
4 Select the massage action

By pushing on the body part again, the massage action will toggle down from ultra knead to tap. Shoulder massage will toggle all the way to grasp.

5 Press the button to start the action.
The massage will start after the body scanning.
Body scanning for Manual Operation
For the Neck/Shoulder: Normal body scanning.
Back/Lower back: Simple body scanning. (The massage heads will not come up to the shoulder position.)
To change an action in the middle of a massage
Select your favorite one again in Steps 3 to 5.
START
- Press the button within approximately 30 seconds after reselecting an action in Step 3, otherwise the reselection will be cancelled automatically.
3, otherwise the reselection will
Adding tapping, regional rolling, auto width
Press the following buttons ( )
• These actions cannot be selected independently. • These actions cannot be added to "GRASP".
Description of Massage action (The figures are images of the respective operations.)
ULTRA KNEAD
Kneading action at small points.
EAD SWED
Action compressing muscle knots vertically.

Deep kneading action. Action of rubbing gently across a wide area.

f rubbing gently across a wide area.


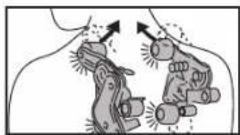

STRETCH
Slow stretching action. Tapping action for right and left alternately.
ROLI


Action like grasping the shoulder.
Action stretching the body along the backbone.


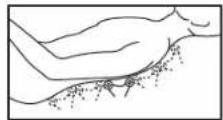
For additional operations
The following variations can be added to the actions listed above.

TAP 1:
Add tapping actions where the speed will increase and decrease gradually.
REGIONAL ROLL

REGIONAL ROLL:
Adding actions that move partly in the vertical direction.

TAP 2

TAP 2:
Adding tapping where the speed is fast and slow reciprocally.
AUTO WIDTH

AUTO WIDTH:
Adding actions that move in the horizontal direction in 1.5" (3.8 cm).
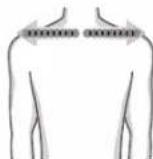
During a massage
- To change off/on for "LEG/FOOT," "SEAT," or "HAND/ARM" and adjust its intensity, see page 30.
- If you want to turn the stretch massage off/on, see page 33.
- If you want to adjust the legrest, see pages 34 and 35.
- If you want to adjust the intensity and position of the massage on the upper body using the massage heads, see pages 27 and 28.
- If you want to adjust the reclining angle, see page 34.
- If you want to change the massage style, see page 27.
- If you want to finish a massage, see pages 41 and 42.
Adjustments During a Massage
ULTRA KNEAD
REPEAT
STYLE
SPEED
BACK INTENSITY
POSITION
ULTRA KNEAD
REPEAT
Changing the program
Only for the Pre-Program, Quick Massage, and Self-Program
Display
Ultra knead function
- When the button is pressed, the Ultra knead action will be repeated on that point for a certain period. For details of the Ultra knead action, see page 26.

This will be turned on when the action is repeated.
Repeat function
- The action at the time when the button is pressed will be repeated.
- For example, 15 seconds of shoulder kneading will become 30 seconds of kneading when the repeat function is pressed.

This will be turned on when the action is repeated.
STYLE
Changing the massage style
For details about the massage style, see page 29.
Display
For the Pre-Program, Quick Massage, and Self-Program
- It is possible to use the selected massage style only. (If the STYLE button is not pressed, the massage style will change automatically during the massage.)
- Press the same STYLE button again to toggle that type of massage off.

Only the selected massage style button will turn on.
For Manual Operation
- It is possible to use the selected massage style. (The preset massage styles are initially set for the respective actions.) Note: "Grasp" cannot be selected as a manual massage style, except in the shoulder area.

Only the selected massage style button will turn on.
SPEED
Adjusting the speed
Display
For the Pre-Program, Quick Massage, and Self-Program
The speed cannot be adjusted.
For Manual Operation
• The speed can be adjusted in 5 steps.


Speed 1 Speed 5 Speed 2 Speed 3 Speed 4
BACK INTENSITY

Adjusting the intensity
The intensity may not change immediately if the button is pressed in the middle of an action.
For the Pre-Program, Quick Massage, and Self-Program
• The intensity can be adjusted in 3 steps.
For Manual Operation
- Adjustment is possible until a "beep-beep-beep" sound indicating the limit point is heard. The adjustable range varies with the actions and body parts. See page 29
Display

POSITION
Adjusting the position
The position may not change immediately if the button is pressed in the middle of an action.
For the Pre-Program, Quick Massage, and Self-Program
Fine adjustment is possible.
(Maximum numbers of adjustment)
At some positions, it is impossible to adjust twice.

(Adjustable range) Approx. 0.9" (2.4 cm)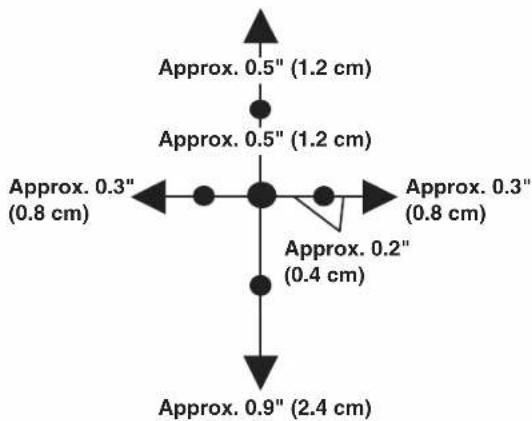
For Manual Operation
- Adjustment is possible until a "beep-beep-beep" sound indicating the limit point is heard. The adjustable range varies with the actions and body parts. See page 29
- For adjustment in the vertical direction, the position will move continuously as long as you press the button.
Details about the massage style
Thumb-like action

Palm-like action

Fist-like action

- Massage head movement is firm with only the upper massage heads moving so that they act like two thumbs. This is shiatsu style massage of acupoints.
- The massage heads remain spread apart, forming a palm which gently presses against the back. There is a gentle 20 degree pivot, which softens the massage feel.
- Upper and lower massage heads pull together to form a "fist", which presses softly on the back. These heads will also pivot up to 20 degrees to soften the direct massage strength.
Width Adjustment Limits
Adjustment of range of intensity
- For a massage of the upper body, the maximum depth and intensity of the massage heads are limited for safety reasons.
- The intensity at Range (B) or (C) in the right figure can be set to stronger than Range (A).
Adjustment is possible until a "beep-beep-beep" indication is sounded.

Range that can be massaged on the upper body

For "FULL ROLL"
(Including actions combined with "FULL ROLL")

Air Massage Adjustments
Air Massage
- When a pre-program and quick massage are selected, the air massage for arm, seat, leg/foot are all automatically turned on.
- When Self-Program and Manual Operation are selected, the air massage for all parts is turned off.
1 Open the left cover.
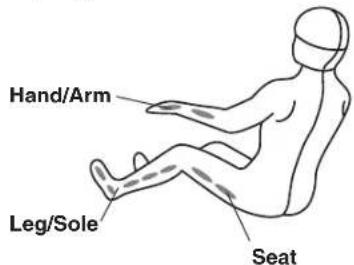
2 Press the HAND/ARM LEG/FOOT SEAT button to turn each off or on.
To execute the air massage only
After turning on the power by pressing the button, press the , ARM LEG/FOOT SEAT , or button.
- The power will turn off automatically if no operation is executed for 3 minutes.

Display
It is possible to confirm whether the air massage is turned on or off on the display. (The lamp is turned on: [ON], the lamp is turned off: [OFF])
Adjusting the intensity
INTENSITY
Press the button to adjust the intensity.
• The intensity can be adjusted in 5 steps.

Air intensity level display
Adjusting the Legrest length
Adjust the legrest so that your feet fit snugly.
For a person who is smaller:
- If the legrest is raised up, the fit with your leg and sole of your foot will be better.

For a person who is tall:
somewhat. Press the button.


the legrest out. Raise the legs slightly and the legrest returns.
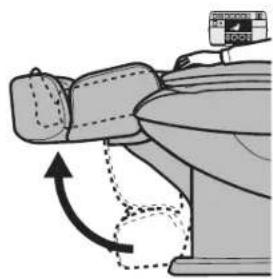
For those who are very tall, or for those who want a complete calf massage, the ottoman pivots down around the ankle.

For the foot reflexology plate
The plate is removable.

To insert the plate
Each plate is slightly different. Be sure to follow the pictures below to insert correctly.
For the left foot For the right foot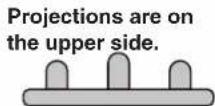

- Remove hard objects, such as false fingernails, wristwatches, or rings when massaging the hands or arms. Failure to do so may result in injury.
Position the forearm and hand at the center of the armrest.

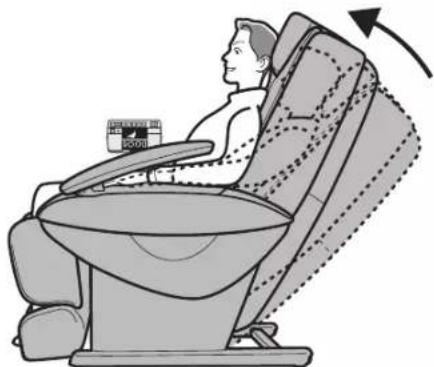
- Raise the backrest if any difficulty is experienced when positioning the hand and forearm.
How to use the hand/arm massage
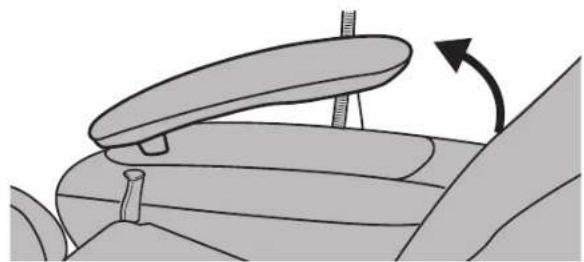
- Lift the hand/arm massage section up.
- Insert the hand with fingers extended.

Using the stretch massage
Warning
- Make sure there are no people or pets behind the unit when the arm stretch function is turned "on." Failure to observe this precaution may result in accident or injury.
Caution
- Do not use with any pre-existing condition of shoulder injury. Doing so may result in injury.
- When Pre-Program and Quick Massage are selected, the leg stretch is turned on and the arm stretch is turned off, respectively. - When Self-Program and Manual Operation are selected, the stretch massage for all parts is turned off.
1 Open the left cover.
2 Press the or button to turn the functions off or on.
To execute the stretch massage only
After turning on the power by pressing the button, press the (stretch legs) or (stretch AUTO-RECLINING
arm) buttons.
- The power will turn off automatically if no operation is executed for 3 minutes.
Display
The display will indicate if the stretch function is turned on or off. (The lamp is turned on: [ON], the lamp is turned off: [OFF])
Operations of the leg stretch
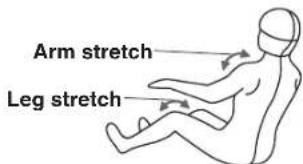
- After grasping the legs with air, the legs are stretched as the legrest is lowered approximately 10 degrees from the massage position.
- Once the legrest returns to the original angle, the legrest is then lowered approximately 30 degrees to stretch the legs further.
- When the operation is complete, the legrest will return to the angle at the time before the operation.
Lowered by approximately 10 degrees
Lowered by approximately 30 degrees

Operations of the arm stretch
- The backrest will come fully up. One arm will inflate to firmly secure the arm/hand in place.
- After the backrest reclines approximately 20 degrees to stretch the arm, the backrest will come back up 5 degrees.
- Then, the backrest will recline approximately 10 degrees to stretch the shoulders and arms further. When the operation is complete, the backrest will return to the angle at the time before the operation.


Ottoman and Backrest height adjustment
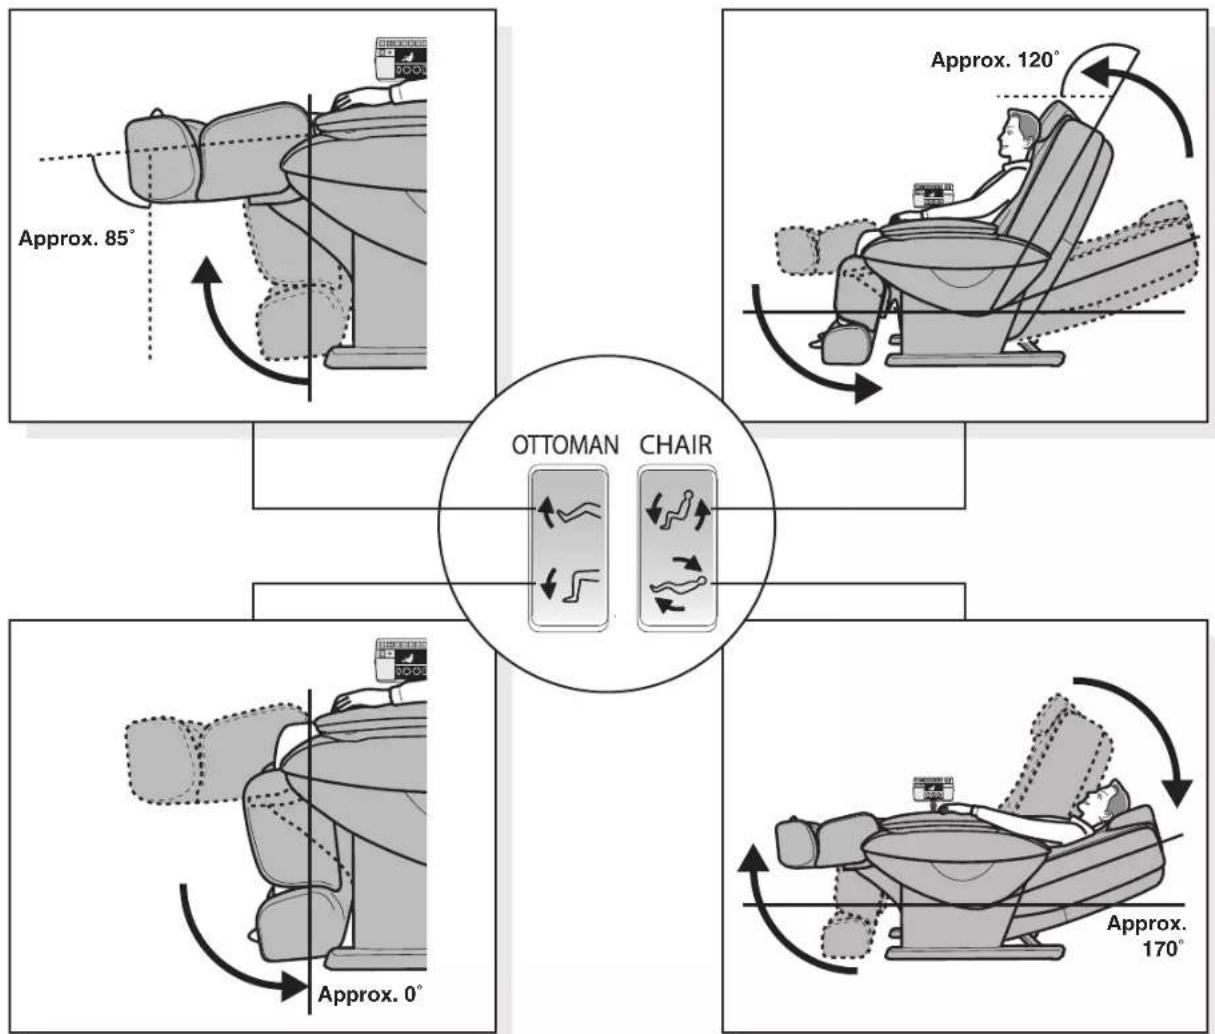
Adjusting the reclining angle and the angle of the legrest
1 Press the button to turn on the power.
2 Press the or button to adjust the angle.
- Movement will continue until a "beep-beep-beep" sound is heard if the buttons are held down. • The legrest will start to move shortly after the backrest.
If the backrest reclines to an angle where you cannot touch the buttons on the control panel from the seat, hold the control panel in your hand.
Extending out the legrest
1 Slide the legrest to your favorite position by pulling the legrest slide lever. (The legrest will slide approximately 5" (12 cm).)

Raise legs slightly and legrest returns.
2 Release the legrest slide lever when it reaches your favorite position.

Adjusting the voice guidance volume
VOICE Press the button to adjust the volume.

![graph LR A["Volume"] --> B["Off" "Soft" "Medium"] B --> C["Default Setting"] C --> D["Loud"] style A fill:#f9f,stroke:#333 style B fill:#ccf,stroke:#333 style C fill:#cfc,stroke:#333 style D fill:#fcc,stroke:#333](/content/2026/05/896551/images/11803f3c9374d193845a832b9b76ff7739680ba66a06cdacb749ffdc971c4151.jpg)
The single beep (when a button is pressed) and the triple beep (when the adjustable setting limit is reached) will always be audible.
Adjusting the control panel stand and pillow
Adjusting the control panel stand
The direction of the pivoting stand can be adjusted.

Adjusting the pillow for correct height during a massage
- Remove the pillow. 2. Adjust the height of the pillow so that the bottom edge is at ear level.
- If positioned too low, the pillow may interfere with a massage of the area around the neck.
- Attach the pillow on the velcro fasteners.


- When the reclining angle changes, the position of the pillow may shift. In that case, adjust the position again.
Advanced user memory function
The user memory function retains the adjustments for a massage, such as "REPEAT" function or "BACK INTENSITY," so that the massage will start with the saved settings.
Saving the user program settings
• See page 39 for the settings that can be saved.
After completing the massage, or when the massage is stopped by pressing the ,the USER

buttons will flash and the unit ready to save any settings that changed during the

massage.
1 Press the button for the program settings that you want to save while the buttons flash (for approximately 15 seconds).
USER


The program settings have been saved when the button you pressed and the user memory display

When the selected button starts flashing quickly
Other settings are already saved.
To update with new program settings, press the same button again.
- To maintain the saved programs, press a different button.
- The operation must be executed within approximately 15 seconds after the button starts flashing quickly.
When you want to use your saved massage settings
1 Press the button to turn on the power.
- The power will turn off automatically if no operation is executed for 3 minutes without performing massage.
2 Press the button used to save your settings.
The user memory display turns on.
3 Select from Pre-Program, Quick Massage, Self-Program, or Manual Operation.
- Massage starts without pressing the button.
- It is also possible to change the settings. In that case, press the button after the settings are changed.
4 The massage will start after body scanning is completed.
Settings that can be saved
The latest settings entered by the user during programs or manual operation will be saved.
For Pre-Program, Quick Massage, and Self-Program
- Settings other than the massage style will be saved as common settings.

Ultra Knead/Repeat/Position
- Settings for 8 different times for the respective programs can be saved.
- If the number of saved settings exceeds 8, the oldest one will be deleted. • See pages 27 to 28 for detailed functions.
Style
• The massage style that is selected last will be saved. - Settings for an entire program will be saved. • See pages 27 and 29 for detailed functions.
For Manual Operation
Note: The following will not be saved:
- Reclining angle • Length of ottoman extension
- Arm stretch settings
- Manual operation settings * Massage intensity
Erasing saved data
1 Press the button to turn on the power.
- The power will turn off automatically if the massage does not start within 3 minutes after turning on the power.
2 Press the button corresponding to the settings you wish to delete.
Only the button pressed will illuminate.
![graph TD A["User"] --> B["Starburst Node A"] B --> C["User"] B --> D["User"] style A fill:#f9f,stroke:#333 style B fill:#ccf,stroke:#333 style C fill:#cfc,stroke:#333 style D fill:#fcc,stroke:#333](/content/2026/05/896551/images/8fb03a69b0669574c345f69c0a0d86c8b280950f0c1f44330a3fc9c6dd3830ae.jpg)
3 Confirm the program selection buttons flash.
![graph LR I["Ⅰ"] --> SHIATSU["SHIATSU"] II["Ⅱ"] --> DEEP["DEEP"] III["Ⅲ"] --> SWEDISH["SWEDISH"] IV["Ⅳ"] --> STRETCH["STRETCH"] V["Ⅴ"] --> QUICK["QUICK"]](/content/2026/05/896551/images/c962dd27436b29245c251eeb58ffdaabc543126b7f426ea3f9cbc60f1dbcdbec.jpg)
4 Press the same button again and hold for 3 or more seconds.
The pressed button will flash.

5 Press the button once again while it is flashing (for approximately 15 seconds).
The change from flashing to steady indicates that the deletion is complete.
![graph TD A["User"] --> B["Key Symbol"] B --> C["Arrow to Left"] B --> D["Arrow to Right"] B --> E["Arrow to Left"] B --> F["Arrow to Right"] G["User"] --> H["Key Symbol"] H --> I["Arrow to Left"] H --> J["Arrow to Right"] H --> K["Arrow to Left"] H --> L["Arrow to Right"]](/content/2026/05/896551/images/0cb1dfa08cf4af526ca1ca960586858c0614f1fefe95932c7194bffa528cb473.jpg)
After completing the massage
The massage will be completed in approximately 15 minutes. For a quick massage, 5 minutes.
- Since the foot section pivots, the legrest will return to a down and retracted position so that you can safely sit up. To return the back of the chair to the original position, press the ⏻ button twice. The chair does not automatically come up since you may be resting comfortably.
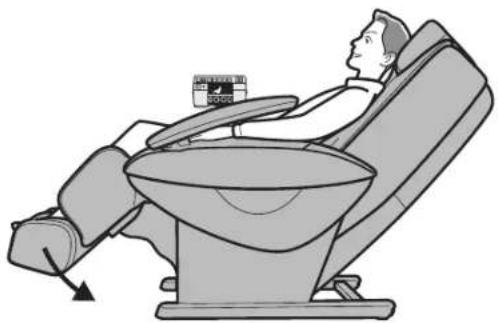
Interrupting the massage
1 Return the legrest to the original position and then press the button.
• The massage heads move to the retracted position. • The legrest lowers and the backrest rises automatically. The backrest will move after the massage heads retract.

When the massage is complete
The buttons will flash and the unit will be ready to save any settings that were changed during the massage.
Not saving the settings
It is not necessary to operate. The operation will complete after approximately 15 seconds.
Saving the settings
See pages 38 to 40 "Advanced user memory function."
Emergency Stop
1 Press the button.
- All operations will stop immediately. The user program will not be saved in this case.
- Get off the unit carefully to prevent the unit from tipping over.
Disconnecting the power
Warning
- After use, always slide the power switch to the "off" position, turn the lock switch to the "lock" position, and remove the lock switch key. Failure to observe this precaution may result in accident or injury due to children playing with the controls.
Caution
- Always hold the power plug, not the power cord, when unplugging from an outlet. Failure to observe this precaution may result in electric shock or short-circuit. - Unplug the power plug from the outlet when the unit is not in use. Failure to observe this precaution may result in electrical fire due to deterioration of insulation caused by dust and moisture. - Keep the lock switch key out of reach of children. Failure to observe this precaution may result in accident or injury due to accidental ingestion or children playing with the controls.
1 Slide the power switch to the "off" position.
2 Turn the lock switch key to the "lock" position.

3 Remove the power plug from the electrical outlet.

4 The lock switch key must be stored out of the reach of children.

Cleaning and Maintenance
Caution
- Always unplug the unit before cleaning it. Never touch a power plug with wet hands. Failure to follow these instructions may lead to electrical shock or burns.
Areas covered with synthetic leather
Wipe these areas with a soft, dry cloth.
- Do not use any leather maintenance tools that are commercially available (chemical cloth or chemicals).
This can cause discoloration or hardening of the synthetic leather.
- If the synthetic leather is particularly dirty, wipe it in the following manner.
- Soak a soft cloth in water or a 3% to 5% solution of mild detergent and wring it out thoroughly.
- Dab the surface with the moistened cloth.
- Rinse the cloth in water, wring it out thoroughly, and then wipe any remaining detergent from the surface.
- Wipe the surfaces with a soft, dry cloth.
- Allow to dry naturally.
- Do not use a hair dryer to dry the surface more quickly.
- Since colors may transfer from clothing to the synthetic leather surface, be careful when using the unit with clothing such as jeans or colored clothes.
- Do not allow these areas to come in contact with plastic for extended periods of time as this may lead to discoloration.
- Do not use thinners, benzine, or alcohol.

Pipe and Plastic Area
1 Wipe the unit with a cloth moistened with mild detergent and thoroughly wrung out.
- Do not use thinners, benzine, or alcohol.
2 Wipe the unit with a cloth moistened with plain water and thoroughly wrung out.
- Be sure you thoroughly wring out the cloth first when cleaning the control panel.
3 Allow the unit to dry naturally.

Seat Fabric
1 Wipe the seat fabric with a cloth soaked in mild detergent and thoroughly wrung out.
- Do not use thinners, benzine, or alcohol.
2 Use water or a mild detergent and brush on areas where the seat fabric is particularly soiled.
- Be careful not to brush the fabric too much to avoid damage.
3 Wipe the unit with a cloth moistened with plain water and thoroughly wrung out.
4 Allow the unit to dry naturally.

Moving the Unit
Caution
• Always return the legrest to its original position before moving the unit. Failure to observe this precaution may result in injury due to the legrest returning to its original position when the unit is being moved. - Do not move the unit while someone is seated in it. Failure to do so may result in accident or injury due to the unit tipping over. - When moving the unit with the wheels, remove all obstacles from around it, make sure the backrest is in the upright position, lift it no higher than waist height (no higher than 32" (80 cm)), and roll it slowly. Failure to do so may cause the unit to tip over, which may lead to damage or injury.
Lifting the Unit
Move the unit by having one person firmly hold onto the fabric section on the underside of the legrest and another person use the groove on the back cover of the backrest.
- Please hold the groove and the legrest securely to avoid dropping the unit as it may damage the floor.

To put the unit down on the floor
Put the unit down carefully, making sure your feet are clear of the base.
Put down the legrest by holding it with your hands until it has been set on the floor completely. If you release your hands before the legrest is fully extended, the legrest will forcibly return to the initial position.
Using the wheels to move the unit
Move the unit by holding onto the fabric section on the underside of the legrest and using the wheels.

To put the unit down on the floor
- Put the unit down carefully, making sure your feet are clear of the base.
- Put down the legrest by holding it with your hands until it has been set on the floor completely. If you release your hands before the legrest is fully extended, the legrest will forcibly return to the initial position.
TROUBLESHOOTING
| Problem Cause and Remedy | |
| Motor NoisesIt sounds and feels like the massage heads are straining to get over wrinkles in the cloth.The motor groans when it comes under load.There is excessive noise during Tapping. (The noise is greater at the top of the massage lounger.)There is a creaking noise when the massage heads are in operation.There is a rattling sound when the massage heads move up or down.The belt can be heard rotating.There is a rubbing sound produced by the massage heads rubbing on the seat fabric.There is a noise when the back cushion moves over the armrest when the seat is reclining.There is a noise when I sit down.There is a strange sound when the massage heads move in and out.There is operational noise when applying air pressure.There is a noise of discharging air.The legrest rattles.There is a humming sound from the pump.There is operational noise of valves under the seat.There is an unstable sound when air escapes during the leg stretch. | These sounds are perfectly normal and will not have any effect on the operation of the unit. |
| The massage heads stop during operation. | If excessive force is applied to the massage heads during operation, in the interests of safety the massage heads may stop moving.If all markings and buttons on the control panel start to flash, which is extremely unusual, turn off the power switch, wait for approximately 10 seconds and then turn the power switch on again.If the massage heads stop again, position yourself so that your back is not completely in contact with the backrest. (Caution should be exercised particularly when used by persons weighing 220 lbs (100 kg) or more.) |
| The massage heads do not come up to the shoulder or neck. | If your head does not contact the pillow or your back does not contact the backrest, the shoulder position may be detected as lower than the actual position during the body scanning. Sit on the seat in the deepest position and put your head on the pillow, and then repeat the operations again from the start.(See page 19) |
| The height of the left and right massage heads is different. | An alternating tapping method is employed, which means that this phenomenon will naturally occur. There is nothing wrong with the unit. |
| It is not possible to recline the unit.The legrest cannot be raised or lowered. | If the unit encounters an obstacle or if excessive force is exerted on it during operation, in the interests of safety the unit will come to a stop.When all displays and buttons are flashing and the backrest or the legrest has stopped, turn off the power of the unit once, turn “on” the power again after approximately 10 seconds, and then operate the unit. |
| Reclining does not take place even though a massage is started in pre-programs.(The seat does not automatically recline.) | In some cases the seat may not automatically recline depending on the position (angle) of the backrest or the legrest. |
| The backrest does not return to the upright position. | If the unit is stopped by automatic shut-off or by pressing thebutton, it will not return automatically. (To return from the reclined position to the original position, press thebutton twice.) |
| The unit will not operate at all.• Upper body (neck to lower back) massage• Lower body (calves to seat) massage• Arm massage | • The power cord has been disconnected. (See page 16)• The power switch on the unit has not been turned on.• A Pre-Program button or Manual Operation button hasn't been pressed after pressing [IMAGE] |
| Sometimes the power won't turn on when is pressed again when a massage has finished. | Approximately 5 seconds are required for program termination after a massage finishes. Wait at least 5 seconds once all movement has stopped before pressing [IMAGE] |
| The unit has been damaged. Stop using the unit immediately. | |
| The power cord or power plug is abnormally hot. Stop using the unit immediately. | |
| Warning• Do not attempt to repair, disassemble or modify the unit.Failure to observe this precaution may result in fire or injury due to malfunctioning. | |
| Caution• Unplug the power plug immediately and contact a customer service center to arrange for repairs if the unit ceases to function or is otherwise not working properly.Failure to observe this precaution may result in electric shock or fire. | |
SPECIFICATIONS
| Power supply AC 120 V 60 Hz | ||
| Power consumption 195 W | ||
| Upper body massage | Massage area (Up-Down) Approx. 30 in. (76 cm) (The massage heads move a total of approx. 26 in. (65 cm)) | |
| Massage area (Left-Right) Distance between massage heads during operation (massage width adjustable) Neck, Shoulder, Back, Lower back: Approx. 3 – 8 in. (7 – 21 cm) | ||
| Massage area (Forward-back) Projected amount of massage head (Intensity adjustable) Approx. 4 in. (10 cm) | ||
| Massage speed Tap: Approx. 250 – 450 cycles/minute (single side) Full roll: Approx. 26 – 92 seconds (both ways) Other than the above: approx. 6 – 50 cycles/minute | ||
| Lateral/Vertical Travel Lateral travel: Approx. 1.5 in. (3.8 cm) left-right auto return Vertical travel (Long): Approx. 30 in. (76 cm) up-down auto return Vertical travel (Short): Approx. 4 in. (10 cm) up-down auto return | ||
| Massage width | Full roll, Vertical Movement: Approx. 3 – 7 in. (7 – 18 cm) Other than the above: Same as massage area (left-right) | |
| Air massage | Air Pressure (Calf) | 5: Approx. 32 kPa 4: Approx. 29 kPa 3: Approx. 21 kPa 2: Approx. 11 kPa 1: Approx. 4 kPa * It may vary with the area slightly. |
| Reclining angle | Backrest: Approx 120° – 170° Legrest: Approx 0° – 85° | |
| Automatic Shut-off | Automatically turns off after approx. 15 minutes (approx. 5 minutes for the quick massage) | |
| Dimensions | When not reclined (H × W × D) | Approx. 47.2 × 33.1 × 50 in. (120 × 84 × 127 cm) |
| When reclined (H × W × D) | Approx. 28.3 × 33.1 × 76.8 in. (72 × 84 × 195 cm) | |
| Weight of Unit | Approx. 181 lbs. (82 kg) | |
| Dimension of box (H × W × D) | Approx. 28.3 × 30.7 × 65.4 in. (72 × 78 × 166 cm) | |
| Weight in box | Approx. 216 lbs. (98 kg) | |
| Maximum user weight | Approx. 264 lbs (120 kg) | |
| Minimum distance from wall | 15.7 in. (40 cm) | |


Panasonic Consumer
Electronics Company
One Panasonic Way 1H-1
Secaucus, New Jersey 07094
1-800-338-0552 for questions and comments.
www.panasonic.com/massage
Panasonic Canada Inc.
5770 Ambler Drive
Mississauga, ON L4W 2T3
905-624-5010
www.panasonic.ca
No. 1 EN, SP, FR Printed in China
Impreso en China
Imprimé en Chine
P93103Z04231


- TABLE OF CONTENTS
- IMPORTANT SAFETY INSTRUCTIONS
- DANGER – TO REDUCE THE RISK OF ELECTRIC SHOCK
- WARNING – TO REDUCE THE RISK OF BURNS, FIRE, ELECTRIC SHOCK, OR INJURY TO PERSONS
- SAVE THESE INSTRUCTIONS
- SAFETY PRECAUTIONS
- CAUTION: TO AVOID THE RISK OF INJURY
- OPERATING PRECAUTIONS
- WARNING: TO AVOID DAMAGING THE CHAIR, FOLLOW THESE PRECAUTIONS
- GROUNDING INSTRUCTIONS
- DANGER
- PART NAMES AND FUNCTIONS
- SETTING UP THE MASSAGE LOUNGER
- WHERE TO USE THE UNIT
- CAUTION
- REMOVING EVERYTHING FROM THE BOX AND INSTALLING THE UNIT
- TO PUT THE UNIT DOWN ON THE FLOOR
- CONFIRM THAT THE MAIN UNIT AND THE ACCESSORIES ARE IN THE BOX
- DOCUMENTS INCLUDING THE OPERATING INSTRUCTIONS
- ASSEMBLY
- ATTACHING THE ARMRESTS
- ATTACHING THE CONTROL PANEL STAND TO THE RIGHT OR LEFT SIDE PANEL OF THE UNIT (DIAGRAM SHOWS ATTACHMENT TO RIGHT ARMREST)
- ATTACHING THE CONTROL PANEL STAND COVERS (ON BOTH THE RIGHT AND LEFT SIDES)
- WHEN REMOVING THE CONTROL PANEL STAND COVER
- RAISING THE BACKREST TO THE UPRIGHT POSITION
- MOVING THE CONTROL PANEL CORD TO THE LEFT SIDE (WHEN CONTROL PANEL STAND IS ON LEFT SIDE)
- PLACING THE CONTROL PANEL INTO THE CONTROL PANEL STAND
- ATTACHING THE PILLOW
- BEFORE SITTING DOWN
- CHECK THE FOLLOWING BEFORE USING THE UNIT
- CHECK THE SURROUNDING AREA
- CHECK THE POWER CORD AND THE POWER PLUG
- WARNING
- SWITCHING ON THE POWER SUPPLY
- CHECK THE UNIT
- PROGRAM MASSAGES
- WHEN THE MASSAGE STARTS
- DURING A MASSAGE
- OVERVIEW OF THE PRE-PROGRAM AND QUICK MASSAGE (UPPER BODY)
- SHIATSU PROGRAM (I)
- DEEP PROGRAM (II)
- SWEDISH PROGRAM (III)
- STRETCH PROGRAM (IV)
- QUICK PROGRAM (V)
- CREATING SELF-PROGRAMS
- SELF-PROGRAM
- SET THE TIME AND INTENSITY FOR THE NECK, SHOULDER, BACK, AND LOWER BACK
- RESPECTIVELY
- PRESS THE START BUTTON TO START THE PROGRAM
- TO CHANGE THE TIME AND INTENSITY IN THE MIDDLE OF A MASSAGE
- SETTING THE TIME AND INTENSITY
- MASSAGE SEQUENCE
- MASSAGE ACTIONS FOR THE RESPECTIVE LEVEL OF FATIGUE
- MANUAL SELECTION MASSAGES
- MANUAL OPERATION
- SELECT THE LOCATION YOU WANT TO MASSAGE
- SELECT THE MASSAGE ACTION
- PRESS THE BUTTON TO START THE ACTION
- BODY SCANNING FOR MANUAL OPERATION
- TO CHANGE AN ACTION IN THE MIDDLE OF A MASSAGE
- ADDING TAPPING, REGIONAL ROLLING, AUTO WIDTH
- DESCRIPTION OF MASSAGE ACTION (THE FIGURES ARE IMAGES OF THE RESPECTIVE OPERATIONS.)
- ULTRA KNEAD
- EAD SWED
- STRETCH
- ROLI
- FOR ADDITIONAL OPERATIONS
- ADJUSTMENTS DURING A MASSAGE
- CHANGING THE PROGRAM
- DISPLAY
- ULTRA KNEAD FUNCTION
- REPEAT FUNCTION
- CHANGING THE MASSAGE STYLE
- FOR THE PRE-PROGRAM, QUICK MASSAGE, AND SELF-PROGRAM
- FOR MANUAL OPERATION
- ADJUSTING THE SPEED
- ADJUSTING THE INTENSITY
- ADJUSTING THE POSITION
- DETAILS ABOUT THE MASSAGE STYLE
- WIDTH ADJUSTMENT LIMITS
- ADJUSTMENT OF RANGE OF INTENSITY
- RANGE THAT CAN BE MASSAGED ON THE UPPER BODY
- AIR MASSAGE ADJUSTMENTS
- AIR MASSAGE
- OPEN THE LEFT COVER
- PRESS THE HAND/ARM LEG/FOOT SEAT BUTTON TO TURN EACH OFF OR ON
- TO EXECUTE THE AIR MASSAGE ONLY
- ADJUSTING THE LEGREST LENGTH
- ADJUST THE LEGREST SO THAT YOUR FEET FIT SNUGLY
- FOR THE FOOT REFLEXOLOGY PLATE
- HOW TO USE THE HAND/ARM MASSAGE
- USING THE STRETCH MASSAGE
- PRESS THE OR BUTTON TO TURN THE FUNCTIONS OFF OR ON
- TO EXECUTE THE STRETCH MASSAGE ONLY
- OPERATIONS OF THE LEG STRETCH
- OPERATIONS OF THE ARM STRETCH
- OTTOMAN AND BACKREST HEIGHT ADJUSTMENT
- ADJUSTING THE RECLINING ANGLE AND THE ANGLE OF THE LEGREST
- EXTENDING OUT THE LEGREST
- ADJUSTING THE VOICE GUIDANCE VOLUME
- ADJUSTING THE CONTROL PANEL STAND AND PILLOW
- ADJUSTING THE CONTROL PANEL STAND
- ADJUSTING THE PILLOW FOR CORRECT HEIGHT DURING A MASSAGE
- ADVANCED USER MEMORY FUNCTION
- SAVING THE USER PROGRAM SETTINGS
- WHEN THE SELECTED BUTTON STARTS FLASHING QUICKLY
- WHEN YOU WANT TO USE YOUR SAVED MASSAGE SETTINGS
- SETTINGS THAT CAN BE SAVED
- FOR PRE-PROGRAM, QUICK MASSAGE, AND SELF-PROGRAM
- ULTRA KNEAD/REPEAT/POSITION
- STYLE
- ERASING SAVED DATA
- PRESS THE BUTTON TO TURN ON THE POWER
- PRESS THE BUTTON CORRESPONDING TO THE SETTINGS YOU WISH TO DELETE
- CONFIRM THE PROGRAM SELECTION BUTTONS FLASH
- PRESS THE SAME BUTTON AGAIN AND HOLD FOR 3 OR MORE SECONDS
- PRESS THE BUTTON ONCE AGAIN WHILE IT IS FLASHING (FOR APPROXIMATELY 15 SECONDS)
- AFTER COMPLETING THE MASSAGE
- INTERRUPTING THE MASSAGE
- RETURN THE LEGREST TO THE ORIGINAL POSITION AND THEN PRESS THE BUTTON
- WHEN THE MASSAGE IS COMPLETE
- EMERGENCY STOP
- PRESS THE BUTTON
- DISCONNECTING THE POWER
- SLIDE THE POWER SWITCH TO THE "OFF" POSITION
- TURN THE LOCK SWITCH KEY TO THE "LOCK" POSITION
- REMOVE THE POWER PLUG FROM THE ELECTRICAL OUTLET
- THE LOCK SWITCH KEY MUST BE STORED OUT OF THE REACH OF CHILDREN
- CLEANING AND MAINTENANCE
- AREAS COVERED WITH SYNTHETIC LEATHER
- WIPE THESE AREAS WITH A SOFT, DRY CLOTH
- PIPE AND PLASTIC AREA
- SEAT FABRIC
- MOVING THE UNIT
- LIFTING THE UNIT
- USING THE WHEELS TO MOVE THE UNIT
- PANASONIC CONSUMER
- ELECTRONICS COMPANY
- PANASONIC CANADA INC
Brand : PANASONIC
Model : Real Pro Ultra EP30004
Category : Massage device