
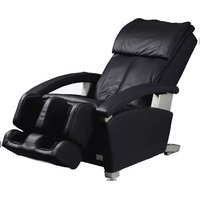
EP-MA10 - Massage device PANASONIC - Free user manual and instructions
Find the device manual for free EP-MA10 PANASONIC in PDF.



| Product Type | Massage Device |
| Brand | Panasonic |
| Model | EP-MA10 |
| Dimensions (approx.) | 40 x 30 x 15 cm |
| Weight (approx.) | 2.5 kg |
| Power Supply | AC 100-240V, 50/60Hz |
| Power Consumption | 20 W |
| Massage Techniques | Kneading, Tapping, Rolling, Shiatsu |
| Massage Areas | Back, Shoulders, Neck, Lower Back |
| Heat Function | Yes |
| Intensity Levels | 3 |
| Timer | 15 minutes auto-off |
| Remote Control | Wired remote included |
| Material | Polyurethane leather, foam padding |
| Cleaning Instructions | Wipe with a soft dry cloth; mild detergent if needed |
| Storage | Store in a cool, dry place |
| Safety Features | Auto shut-off, overheat protection |
| Spare Parts Availability | Replacement pads and remote available from Panasonic service centers |
| Repair Service | Contact Panasonic authorized service centers |
| Warranty | 1 year limited warranty |
Frequently Asked Questions - EP-MA10 PANASONIC
User questions about EP-MA10 PANASONIC
0 question about this device. Answer the ones you know or ask your own.
Ask a new question about this device
Download the instructions for your Massage device in PDF format for free! Find your manual EP-MA10 - PANASONIC and take your electronic device back in hand. On this page are published all the documents necessary for the use of your device. EP-MA10 by PANASONIC.
USER MANUAL EP-MA10 PANASONIC
Operating Instructions
Mode d'emploi Instrucciones de Uso
Household Massage Lounger
Before operating this unit, please read these instructions completely.
IMPORTANT SAFETY INSTRUCTIONS
Basic precautions should always be followed when using an electrical unit, including the following.
Please ensure that you read all instructions before using the Household Massage Lounger.
DANGER
- To reduce the risk of electric shock:
- Always unplug this unit from the electrical outlet immediately after using and before cleaning.
WARNING
– To reduce the risk of burns, fire, electric shock, or injury to persons:
- Always insert the power plug all the way into the outlet to reduce the risk of short-circuit and fire.
- The unit should never be left unattended when plugged in. Always unplug the unit when not in use.
- The unit is not to be used by people who cannot move or communicate on their own.
- Only use the unit for the purpose described in these instructions.
- Do not stand on the unit.
- Do not use any accessories other than those recommended by the manufacturer.
- Always return the seat to the upright position and make sure the legrest is completely retracted. Be careful that nothing is obstructing the legrest while retracting. Keep children away from the legrest.
- Never operate the unit if it has a damaged power cord or plug. Return the unit to the nearest authorized service center if it is not working properly, if it has been dropped or damaged, or if it has been immersed in water.
- Keep power cords away from heated surfaces. Do not carry the unit by the power cord.
- Never block the air openings during operation and make sure that all air openings are kept free of lint and hair, etc. Do not drop or insert anything into any of the openings of the unit.
- Do not use the unit on top of heating appliances, such as electric carpets, etc. Do not operate the unit under blanket or pillow. Excessive heating can occur and cause fire, electric shock, or injury to persons.
- Do not use the unit in bathrooms or other damp or humid places as this may cause electric shock or cause the unit to malfunction. Do not spill water, etc. onto the controller.
- Do not use the unit outdoors.
- Do not use or operate where aerosol spray products are being used or where oxygen is being administered.
- When unplugging the unit, turn off all controls before removing the plug from power outlet. Do not use the unit with a transformer as this may lead to malfunction or electric shock.
- Connect this unit to a properly grounded outlet only. See Grounding Instructions.
SAVE THESE INSTRUCTIONS
SAFETY PRECAUTIONS
CAUTION: To avoid the risk of injury:
- Persons with any of the conditions listed below or who are undergoing medical treatment or suffer from medical conditions should consult with their physicians before using the unit: a) Pregnant women, people who are ill, in poor physical shape. b) People suffering from back, neck, shoulder, or hip pain. c) People who have a pacemaker, defibrillator, or other personal medical devices prone to electronic interference. d) People suffering from heart disease. e) People who are prohibited from receiving massage by a physician due to thrombosis or aneurism, acute varicose veins, or other circulatory disorders. f) People with irregular curvatures of the spine.
- This unit should not be used by children. Remove the key when not in use and store out of reach of children.
- Sit down slowly after checking the position of the massage heads. Never put any part of your body between the massage heads as the squeezing action of the massage heads may cause injury. Never put your fingers or feet in the gap between the backrest and seat, the backrest and the armrest, the seat and cover under the armrest, or the gap between the legrest and the footrest. Do not place your fingers or any part of your body in the mechanism below the legrest, or between the legrest and footrest.
- Do not use the unit against bare skin. While thin clothing may increase effectiveness, exposing the skin directly to the massager may irritate the skin.
Do not use the unit while wearing anything hard on your head like a hair accessory, etc. Do not use the unit for massaging the head, abdomen, front neck, elbows or knees.
Do not use excessively strong massage action on the back of the neck.
- Do not stretch the back muscles for more than approximately 15 minutes at a time. To avoid overstretching the muscles which may result in discomfort, do not use the unit for more than 5 minutes when first using it. You can gradually increase the duration and strength of the massage as you become used to it.
Do not massage any one point for more than 5 minutes at a time.
Excessive massaging can overstimulate the muscles and nerves and result in an adverse effect.
To prevent excessive massaging, do not use the massager for more than a total of 15 minutes each session.
After approximately 15 minutes, the massage heads will be retracted and stop moving.
The back cushion can be removed if you want to experience a stronger back massage. Exercise extreme care when you use this mode in order to avoid back pain or injury. Use only for short periods of time (no more than 15 minutes). Reinstall the back cushion if you want to restore to normal massage intensity.
- While using the massager, if you start feeling sick or if the massage seems painful, stop using it immediately.
While using the massager, if the pressure seems too strong, the movement of the massage heads can be stopped at any time by pressing the Quick Stop button.
- Do not go to sleep while using the unit. Do not use the unit after drinking alcohol.
- When the seat back is in a reclined position, do not sit on it or sit with your legs resting on the headrest.
Do not sit on the legrest as the unit may fall over.
- Do not allow children or pets to play on or around the unit, especially during operation.
- Do not unplug the unit or turn it off during operation. Unplug the unit immediately if there is a power outage.
- Be sure to start on the gentle massage program if using the massager for the first time. The shiatsu massage is stronger and should be enjoyed after one has gotten accustomed to the chair.
- Do not allow children to play on this mechanized furniture or operate the mechanism. Legrest folds down on closing so that a child could possibly be injured. Always leave in an upright and closed position. Keep hands and feet clear of mechanism. Only the occupant should operate it.
- Always raise the back cushion to check that the fabric of the unit itself has not been ripped before using the unit. Please also check other areas to ensure that the fabric has not been ripped. No matter how small the rip, if you find one then immediately stop using the unit, unplug the power cord and have the unit repaired at an authorized service center.
- Sit on the unit after confirming there is no foreign matter between the parts of the unit. (Confirm that there are no foreign objects stuck in the back cushion, leg/sole massage section, or under the seat.) Failure to observe this precaution may result in accident or injury.
- Always return the legrest to its original position before moving the unit. Failure to observe this precaution may result in injury due to the legrest returning to its original position when the unit is being moved.
- Do not leave the removed attachment screws lying unattended. Accidental ingestion may occur.
OPERATING PRECAUTIONS
CAUTION: To avoid damaging the chair, follow these precautions:
- The chair is designed for a maximum user weight of 264 lbs (120 kg). Exceeding the maximum weight may cause permanent damage to the massage mechanism and/or other components of the unit. Any such damage is deemed to be user abuse and is not covered under the Limited Warranty.
- Do not sit on or drop the controller. Do not pull the controller cord or the power cord. Be careful not to catch the cord of the controller between the armrest and the chair back.
- Do not treat the chair roughly, such as turning the chair on its side, turning the chair over or standing on it.
- Do not treat the covering roughly.
- Keep sharp or pointed objects away from the covering of the chair. Be careful not to drop lit ashes, lit cigarettes or matches on the chair.
- Exposure to direct sunlight can cause fading or a change in color of the covering.
- If the massager functions abnormally, immediately turn off the power and have the massager checked by an authorized service center.
- Do not repeatedly operate any switch at short intervals. Such action may cause the switch to malfunction.
- Some noise may be heard coming from the massager while in use. This is due to the structure of the massager and is normal.
- Make sure there are no obstacles behind the chair before reclining it. The chair can be reclined to a maximum angle of 160°. If the back hits a wall or pillar, the chair may malfunction. Be sure to have ample space behind the chair. Recline the chair slowly in order to avoid contact with an obstacle.
- When excessive pressure is applied to the massage heads, they may stop moving for safety. When moving the heads up from the lowered position, one's body weight may stop the heads' movement. In such a case, slightly raise your body and allow the massage heads to move up.
- After each massage, slide the power switch, which is located on the right side of the chair, to the "off" position and turn its lock switch to the "lock" position.
- Do not sit on the chair with wet body or hair.
- The unit must not be used in "wet rooms" (sauna, swimming pool) or outdoors.
- Do not attempt to open or disassemble any part of the unit. Only use an authorized Panasonic servicer to fix your unit.
GROUNDING INSTRUCTIONS
This product must be grounded. If it should malfunction or break down, grounding provides a path of least resistance for electric current to reduce the risk of electric shock. This product is equipped with a cord having an equipment-grounding conductor and a grounding plug. The plug must be plugged into an appropriate outlet that is properly installed and grounded in accordance with all local codes and ordinances.
DANGER
Improper connection of the equipment-grounding conductor can result in a risk of electric shock. Check with a qualified electrician or serviceman if you are in doubt as to whether the product is properly grounded. Do not modify the plug provided with the product – if it will not fit the outlet, have a proper outlet installed by a qualified electrician.
This product is for use on a nominal 120-volt circuit and has a grounding plug that looks like the plug illustrated in Figure A. Make sure that the product is connected to an outlet having the same configuration as the plug. No adapter should be used with this product.

SPECIFICATIONS
| Power Supply: | AC 120 V 60 Hz |
| Rated Current: | 1.6 A |
| Upper Body Massage | |
| Massage Area (Up-Down): | Approx. 21.1 in. (53.5 cm) |
| Massage Area (Left-Right): Distance between Massage Heads during Operation Approx. 1.6 in. - 5.9 in. (4.0 cm - 15.0 cm) | |
| Up-Down Movement Speed: Approx. 18 - 30 sec. return. | |
| Massage Speed: Neck knead: Approx. 9 cycles/min. Neck shiatsu: Approx. 6 cycles/min. Knead: Approx. 24 cycles/min. Roll: Approx. 30 sec./cycle [Movement range: Approx. 21.1 in. (53.5 cm)] Tap: Approx. 380 cycles/min. - 470 cycles/min. | |
| Lower Body Massage | |
| Air Pressure: | Strong: Approx. 27.0 kPa Weak: Approx. 14.0 kPa Medium: Approx. 24.0 kPa |
| Reclining Angle: | Backrest: Approx. 115° - 160° Legrest: Approx. 0° - 85° |
| Automatic Shut-Off: | Approx. 15 min. for both upper and lower body |
| Dimensions | |
| When not reclined. (H × W × D): When reclined. (H × W × D): | Approx. 47.2 in. × 32.3 in. × 48.0 in. (120 cm × 82 cm × 122 cm) Approx. 28.3 in. × 32.3 in. × 71.3 in. (72 cm × 82 cm × 181 cm) |
| Weight of Unit: | Approx. 144 lbs (65 kg) |
| Dimensions of Box (H × W × D): | Approx. 30.7 in. × 30.7 in. × 65.7 in. (78 cm × 78 cm × 167 cm) |
| Weight in Box: | Approx. 172 lbs (78 kg) |
| Maximum User Weight: | Approx. 264 lbs (120 kg) |
| Minimum Distance from Wall: | 16 in. (40 cm) |
For those who weigh 221 lbs (100 kg) or more, the product operations may make more noise and the fabric cover may wear faster.
PART NAMES AND FUNCTIONS
Main unit
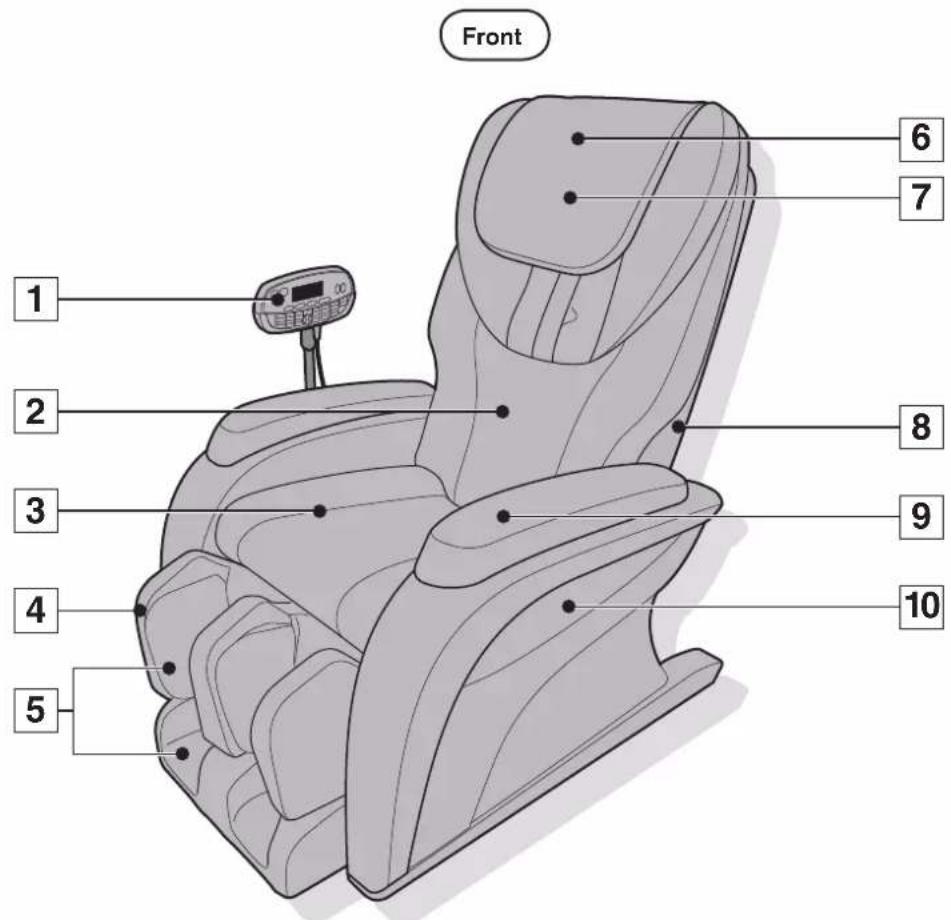
1 Control Panel
See pages 7 to 8.
2 Back Cushion
3 Seat
4 Legrest
5 Leg/Sole massage section
- Includes air massage function.

Sole Shiatsu Sheet
- "Creepers" are provided on the back side.
- Fine adjustment of position possible.
- Removable.
6 Pillow
7 Retracted position of massage heads
8 Backrest
- Includes integrated massage heads.
9 Armrest
10 Left Side Cover

11 Back Cover, 12 Power Plug, 13 Power Cord, 14 Connector, 15 Power Switch Section

① Appliance Inlet
② Lock Switch, ③ Lock Switch Key Tag
- For preventing children from swallowing it by accident.
④ Lock Switch Key, ⑤ Power Switch
- Lock switch is set to "open" and power switch is set to "on" prior to leaving the factory.
16 Control Panel Holder, 17 Control Panel Stand, 18 Child Safety Decal, 19 Right Side Cover, 20 Wheels
For the sole shiatsu sheet
The sole shiatsu sheet is removable.

Opening

To attach the sole shiatsu sheet
Be sure of the proper direction and sides of the sole shiatsu sheet and insert it into the opening.
For the left foot, For the right foot
- Press this button to stop the massage immediately.
3 Display
• This illustration is when all lamps are illuminated.
• See page 8.
4 Auto Program Selection buttons
• See page 17.
5 Ottoman Angle Adjustment button
• See page 16.
6 Reclining Angle Adjustment button
• See page 16.
7 Sound Off/On button
• See page 17.
8 Illumination Off/On button
• See page 17.
9 Lower Body Massage Off/On buttons
• See pages 19 and 21.
10 Lower Body Massage Intensity Adjustment buttons
• See pages 19 and 21.
11 Position buttons
• See pages 18 and 21.
12 Upper Body Massage Intensity Adjustment buttons
• See pages 19 and 21.
13 Upper Body Massage Selection buttons
• See page 20.

1 Sound Off Display
- Displayed when the sound is turned off.
2 Time Remaining Display
3 Shoulder Position Display
4 Upper Body Massage Operation Display
- Displays the current upper body massage operation.
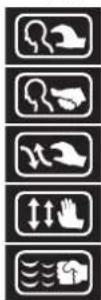
NECK KNEAD
NECK SHIATSU
KNEAD
ROLL
TAP
5 Lower Body Massage Operation Off/On Display
- Displays the current lower body massage operation.

LEG/FOOT
LEG STRETCH
6 Massage Area Display
- Flashes to indicate areas currently being massaged.
7 Lower Body Massage Intensity Display
• See pages 19 and 22.
8 Upper Body Massage Intensity Display
• See pages 19 and 21.
SETTING UP THE MASSAGE LOUNGER
1. Where to use the unit
- Ensure there is adequate space to recline.
- Do not expose the massage lounger to direct sunlight or high temperatures, such as in front of heating sources, because this can cause discoloration or hardening of the synthetic leather.
- Place the unit on a mat to prevent floor damage.
- When placing a mat under the unit, the size of the mat should be sufficient [at least 47.2 in. × 27.6 in. (120 cm × 70 cm)] to cover the areas where the unit touches and where the legrest could touch the floor, as shown in the diagram on the right. • Install the unit near a power outlet. ⚠️ See Warning No. 11 and 12 on page 1.
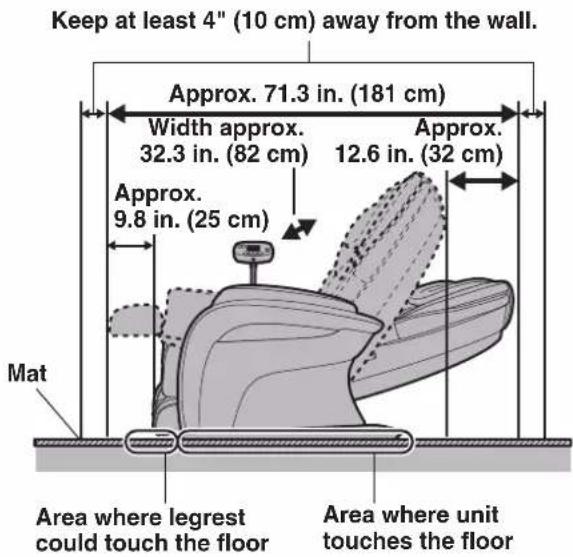
2. Removing everything from the box and installing the unit

- Since the unit is very heavy [approximately 144 lbs (65 kg)], be careful to avoid back injuries. (The unit must be carried by two persons.)
- When using the wheels to move the unit, place a mat on the floor to protect the floor surface.
To put the unit down on the floor
- Put the unit down slowly and carefully watch your step.
- Put down the legrest by holding it with your hands until it has been set on the floor completely. If you release your hands before the legrest is fully extended, the legrest will forcefully return to the initial position.
Confirm that the main unit and the accessories are in the box.
Main unit
Width: Approx. 26.8 in. (68 cm)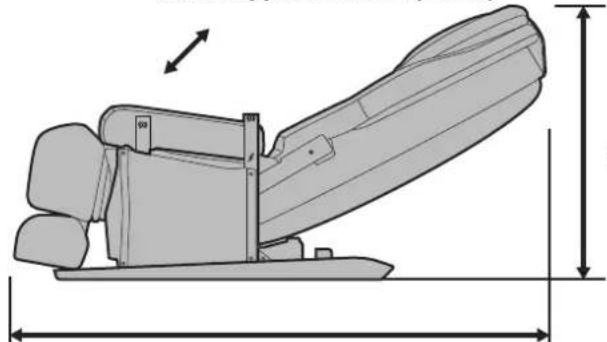
Length: Approx. 61.0 in. (155 cm)
Height: Approx. 28.3 in. (72 cm)
Accessories
Armrests (Right/Left)
Right Side Cover
Cover Allen Key
Lock Switch Key - This is initially inserted in the lock switch of the power switch section prior to leaving the factory.
Control Panel Stand
- The direction of the holder can be adjusted with the revolving ball joint.
Sole Shiatsu Sheet • This is installed on the sole massage section prior to leaving the factory.

(Cross-section)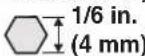
Power cord
Attachment Screws (M6 × 16) — 8 pcs.
ASSEMBLY
1. Attaching the armrests (On both the right and left sides)
1 Insert the armrest into the unit.
- Be careful to avoid pinching your fingers.
- Align the protrusions on the unit with the grooves in the armrest.
- Align the front protrusion on the armrest with the groove on the unit and align the rear protrusion of the armrest with the position of Ⓐ.
- Press the armrest downwards while simultaneously pushing it towards the seat.
Fit the unit protrusions into the armrest on the inward side of the armrest protrusions.

2 Fasten the armrest with the attachment screws.
Set the two attachment screws in place with the allen key first and then tighten firmly.
Attachment Screws (M6 × 16)
Right armrest — 2 pcs.
Left armrest — 2 pcs.
Turn screws clockwise to tighten.

How to tighten the screws
- Put an attachment screw on the edge of the allen key and tighten the screw horizontally to the hole.
- Screw may be damaged if you tighten the screw inserted into the hole crookedly using an allen key.
2. Attaching the control panel stand to the right armrest
1 Insert the attachment screw into the lower holes first and then tighten lightly with the allen key.
2 Securing the stand with the attachment screws.
- Tighten the two screws for the remaining two holes lightly with the allen key and then tighten firmly.
Attachment Screws (M6 × 16) 4 pcs.

How to tighten the screws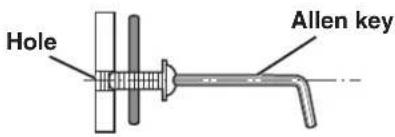
- Put an attachment screw on the edge of the allen key and tighten the screw horizontally to the hole.
- Screw may be damaged if you tighten the screw inserted into the hole crookedly using an allen key.
3. Attaching the side covers (On both the right and left sides)
The method for attaching the covers is the same for both sides. The diagram shows the right side where the control panel stand is attached.
Right Side Cover Left Side Cover
1 Insert the bottom tabs on the cover into the bottom notches on the armrest.
2 Insert the top tabs into the notches on the armrest.

Removing the side cover
1 Insert a flat-tip screwdriver in the area above the mark (O). 2 Push the top tab of the cover down to lift the cover. 3 Perform the same procedures as 1 and 2 above for the other gap. 4 Pull the cover up diagonally.
- Performing this procedure with the allen key or a Phillips screwdriver could damage the unit.
- The cover can be removed with light force instead of forcing it.

4. Connect the power cord to the unit
1. Check for dirt and damage on the appliance inlet of the power switch section and the connector of the power cord. 2. Insert the connector into the appliance inlet. 3. Be sure to push the connector in all the way.

5. Raising the backrest to the upright position
1. Insert the power plug into the power outlet. 2. Confirm the lock switch key is set to the "open" position. 3. Confirm the power switch is set to the "on" position. 4. Press the 📄 button on the control panel twice.
- Press once, and then press again approx. 1 second later. The backrest will rise to the upright position automatically.


6. Placing the control panel into the control panel stand
1. Fit the groove on the side of the control panel to the projection on the inside of the holder.
- Put the control panel cord on the outer side of the armrest before use.
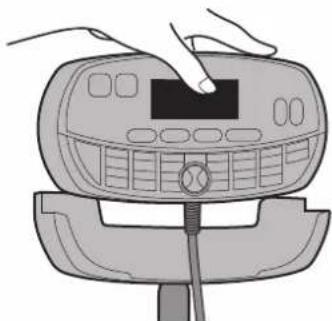
Projection on the inside of the holder
Lift the control panel to remove.

BEFORE SITTING DOWN
Check the following before using the unit
1. Check the surrounding area
Make sure there are no objects, people, or pets in the vicinity of the unit.

2. Check the power cord and the power plug.

See Warning No. 8 on page 1.

3. Be sure to push the connector all the way into the appliance inlet.
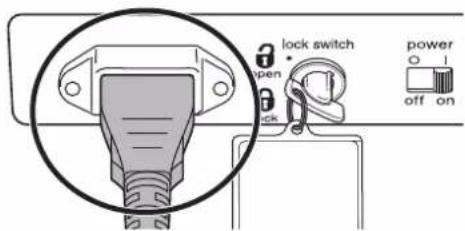
4. Switching on the power supply
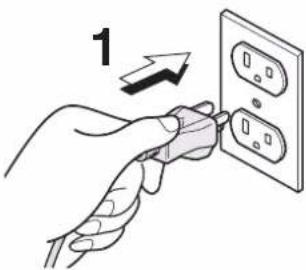
1. Insert the power plug into an electrical outlet. 2. Turn the lock switch key to the "open" position. 3. Slide the power switch to the "on" position.

5. Check the unit
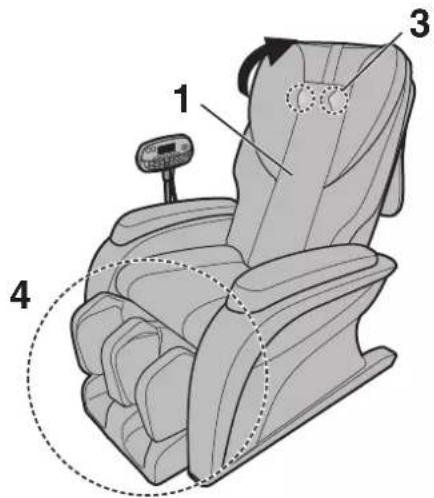
1. Make sure the covering is free of rips or tears.
2. Make sure there are no obstacles between the parts of the unit.
3. Make sure the massage heads are in the retracted position, i.e. they are parked to the left and right in the upper part of the backrest.
If not retracted, press the button to return the massage heads to the retracted position.
4. Make sure the legrest is lowered.
- Do not sit on the legrest when it is raised. Doing so may cause it to collapse down or bend the legrest. The legrest is not meant to support full body weight.

See Caution No. 3, 8 and 13 on page 2 and No. 14 on page 3.
6. Flipping up the pillow

When you flip up the pillow, you can firmly massage your neck and shoulders.
7. Adjusting the reclining angle
1 Press the 📄 button on the control panel to turn on the power.
2 Press and adjust the angle of the backrest and legrest.
- With either button held down, movement will continue until a "beep-beep-beep" sound indicates the legrest or backrest has been raised or lowered as far as possible. • The legrest will start to move shortly after the backrest.
![graph LR A["Approx. 85°"] --> B["OTTOMAN RECLINING"] C["Approx. 0°"] --> B D["Approx. 115°"] --> B E["Approx. 160°"] --> B](/content/2026/06/1379583/images/edcaba303ab30db17830512f97a58ca5df419dd9716166a2e4e0367cdd5e2846.jpg)
*The reclining operation is a function that adjusts the angle of the backrest and legrest. Avoid using it for any other purposes, such as continuous up/down operation etc.
If the power switch is set to "off" or the power plug is disconnected from the electrical outlet with the massage heads not in the retracted position, the massage heads may automatically return to the retracted position when ⏻ is pressed next time you use the unit.
A display shown to the right may appear, but this is not a malfunction. You will be able to use the unit normally after the massage heads stop moving.

SELECTING A MENU AND STARTING THE MASSAGE
The illumination will light up and sound will start when you sit down.
- To stop the sound, press the button ①. is lit on the display. • To stop the illumination, press the button ②. • Color of the illumination will change according to the operation.
- If the illumination does not light up and sound does not start after sitting down, sit back deeply in the chair.

• After 15 minutes of use, we recommend that you take a 10 minute break. - Use the unit up to twice per day, for a total of 30 minutes. ⚠️ See Caution No. 5 on page 2.
1 Press the 📄 button to turn on the power.
- The power will turn off automatically if the massage does not start within 3 minutes after turning on the power.

2 Select the auto program you want.
- Please press one of the flashing buttons.
- If you press another auto program selection button or a manual operation button during your selected auto program massage, the massage will switch to the newly selected massage.
- In auto programs, the leg/foot massage begins at the same time. It is possible to stop or change the intensity of the leg/foot massage during the program. (See page 19.)
- Pressing an auto program selection button automatically moves the backrest and legrest into massage position.
3. Sit as far back in the seat as possible with your head on the pillow.
4. Adjusting shoulder position
- The massage heads will move to the shoulder area while tapping.
- Fine adjust the position of the massage heads to the position of your shoulders when you hear beeps and SHOULDER starts flashing. (The program will start after approximately 15 seconds.)
- The shoulder position can be changed during the auto program massage.


A single press of the button will raise or lower the massage heads approximately 0.6 in. (1.5 cm).
Caution
Keep your head on the backrest while shoulder position is being determined. If the shoulder position cannot be correctly determined, an error message (U10) might be displayed and operations are terminated. (See page 26 for solution.)


Characteristics of Auto program (upper body)
DEEP
The muscles between your neck and lower back will be loosened by mildly strong Knead, Soft Shiatsu and Tap actions.
Recommended for those with severe stiffness, who prefer a stimulating massage.
SWEDISH
This is a mild course without any body shaking motions or stimulating actions, and therefore can be used to relax. The degree of relaxation is increased by gradually weakening the stimulation.
Recommended for those who prefer a gentle massage while watching TV or reading a magazine.
LOWER BACK
This will take care of the stiffness around the lower back by loosening the muscles around the lower back.
Recommended for those who want to mainly loosen the lower back.
NECK/SHOULDER
This will take care of the stiffness around the neck and shoulders by loosening the muscles around the cervical vertebrae.
Recommended for those who want to mainly loosen the muscles around the cervical vertebrae.
Persons whose height is less than 55 in. (140 cm) or more than 72.8 in. (185 cm) are recommended to use the unit in the manner described below when the massage heads do not touch their shoulders.
Height is around 55 in. (140 cm) or less Height is around 72.8 in. (185 cm) or more
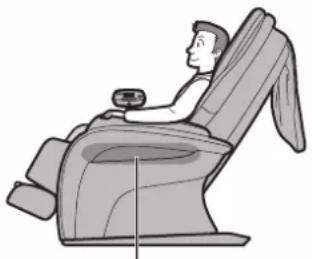
Use by placing a cushion on the seat and sitting as far back as possible.
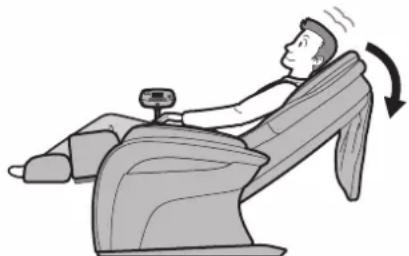
Use by reclining the backrest and sliding your body downward.
5 Making Adjustments
Adjusting the intensity of the upper body massage
Upper body intensity display (3 levels)

Intensity 1, Intensity 2, Intensity 3
Adjusting the intensity of the lower body massage

Lower body intensity display
Intensity 1, Intensity 2, Intensity 3
Turning off the lower body actions

Leg/foot massage is turned off when pressed.
It will turn back on by pressing again.

Leg stretch is turned off when pressed.
It will turn back on by pressing again.
Auto shut-off in auto programs
The massage will end after approximately 15 minutes and the unit will automatically shut off. The massage heads will move to the retracted position and stop. The legrest will automatically lower. If you want to continue using the unit, press the power button. Please rest at least 10 minutes between massages.
Stopping an auto program: Immediately stopping the massage

- Press the OFF/ON button. The massage heads will move to the retracted position, and the backrest and legrest will automatically return to their original position.

- Press the Quick Stop button.
- All movement will stop immediately.
• The power will turn off automatically if the massage does not start within 3 minutes after turning on the power.

2 Select the massage type you want.
- Press the button of the massage you require.
- The unit will automatically recline to the massage position. See page 16 for a fine adjustment.
Massage Actions
NECK KNEAD
Feels like the thumbs of two hands repeatedly kneading from the lower part to the upper part of your neck.
KNEAD
Feels like the fingers and thumbs of two hands squeezing in unison as they carefully work their way upwards to loosen stiffness.
TAP
Feels like the edges of two hands rhythmically tapping to penetrate into the body and relax muscles.
Recommended for use on the fine muscles of the neck or as a finishing massage.
NECK SHIATSU
Feels like the thumbs of two hands repeatedly pressing upward from the lower part to the upper part of your neck.
ROLL
From lower back to neck, you can feel it move 21.1 in. (53.5 cm) up and down the whole of the upper body.
Recommended for overall stretching of the back muscles.
- When the same spot has been massaged continuously for 5 minutes, the massage position is automatically moved upwards by around 1.2 in. (3 cm).
3 Adjust as you like
You can adjust the position or intensity of the massage heads, and you will hear a "beep-beep-beep" sound when it reaches its limit.
Ⓐ Adjusting the Vertical Position of the Massage Heads

- Press the button once to move the position slightly [approx. 0.6 in. (1.5 cm)]. Press and hold the button to move the position continuously; release the button to stop the movement.
⑧ Adjusting the Width between Massage Heads

- Tap, Roll and Neck Shiatsu can be adjusted in 3 steps.
© Adjusting the intensity of the upper body massage

- Adjustment level of intensity is different depending on the action.
It can be adjusted within the range of the left bar of the intensity display.
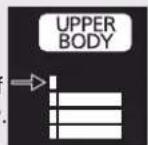
4 Auto shut-off in manual operation
• The massage will end after approximately 15 minutes and the unit will automatically shut off. - The massage heads will move to the retracted position and stop. • The legrest will automatically lower. - If you want to continue using the unit, please press the ⏻ button. Please rest at least 10 minutes between massages.
Adjust the angle of the legrest before starting a massage. (See page 16.)

1 Press the 📊 button.
• The power will turn off automatically if the massage does not start within 3 minutes after turning on the power.
2 Ⓐ Press the Leg/foot Massage button.
⑧ Press the Leg Stretch button.
• The air massage will begin. - Massage intensity is displayed by the indicator.
3 Adjusting the massage intensity
• The intensity is adjustable in 3 steps. - Default is level 2.
Lower body intensity display
4 Auto shut-off in leg/foot massage and leg stretch
• The massage will end after approximately 15 minutes and the unit will automatically shut off. • The legrest will automatically lower. - If you want to continue using the unit press the ⏻ button.
Description of Leg/foot Massage and Leg Stretch
Leg/foot massage
A bottom-to-top squeezing action slowly relaxes and softens to comfortably alleviate tired, swollen legs.
Leg stretch
After the legs have been grasped by the airbags at the massage position, they are slowly stretched as the legrest lowers to approximately a 30° angle.
Approx. 15°
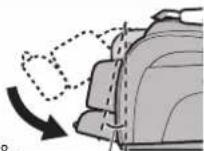
The legrest then rises to approximately a 50° angle, after which it lowers once again to approximately a 15° angle for a deep stretch.
Approx. 50°

The legrest rises again and returns to approximately a 50° angle.
Stopping mid-way through a massage Immediately stopping the massage

- Press the OFF/ON button.
- It will take some time before the air is completely evacuated. (The sound of air escaping may be audible after pressing the OFF/ON button.)

- Press the Quick Stop button.
- All movement will stop immediately.
AFTER COMPLETING THE MASSAGE
Return the seat to the original position
1 Check that there is nothing in the vicinity of the backrest or the legrest. 2 Press the 📄 button twice.
- The backrest and legrest will automatically return to their original positions. The backrest and the legrest can be returned with the reclining button. (See page 16.)
3 Place the control panel in its holder. 4 Return the pillow to its original position if it was flipped.

Disconnect the power
⚠️ See Warning No. 2 on page 1, Caution No. 2 on page 2, and No. 10 on page 3.
1 Slide the power switch to the "off" position. 2 Turn the lock switch key to the "lock" position and remove it. 3 Unplug the power cord. 4 The lock switch key must be stored out of the reach of children.
CLEANING AND MAINTENANCE
⚠️ See Danger No. 1 on page 1.
Leather covering on the pillow, the back cushion and the unit
- Wipe these areas with a soft, dry cloth. (Do NOT use cloths containing any kind of chemical, etc.)
- If the synthetic leather is particularly dirty, soak a soft cloth in water or a 3–5 % solution of mild detergent, wring it out thoroughly and tap the surface with it. Next, rinse the cloth in water, wring it out thoroughly and then wipe any remaining detergent from the surface, wipe the surfaces with a soft dry cloth and allow them to dry naturally. (Do NOT use a hair dryer to try to dry the surfaces more quickly.)
- Wearing of denim, colored, patterned or other clothing with a tendency to fade should be avoided during use, as it could lead to discoloration of the synthetic leather.
- Do not allow these areas to come in contact with plastic for extended periods of time as this may lead to discoloration.
- Please do NOT use thinners, benzine or alcohol.
Pipe and plastic areas
- Wipe the unit with a cloth that has been soaked in a mild detergent and then thoroughly wrung out.
- Next wipe the unit with a cloth that has been moistened with just water and thoroughly wrung out. *Make sure you thoroughly wring out the cloth first when cleaning the control panel.
- Allow the unit to dry naturally.
- Please do NOT use thinners, benzine or alcohol.
Coated fabric
- Wipe the seat fabric with a cloth that has been soaked in a mild detergent solution and then thoroughly wrung out.
- Use a brush to apply a mild detergent to areas where the coated fabric has become particularly soiled. Be careful not to brush the fabric too much as this may damage it.
- Next wipe the fabric with a cloth that has been moistened with just water and then thoroughly wrung out.
- Allow the fabric to dry naturally.
- Please do NOT use thinners, benzine or alcohol.
How to move the unit
Using the wheels to move the unit
- Grasp the legrest to move the unit when using the wheels.
- It is easier to move the unit with the massage heads retracted and the backrest in the upright position. * Place a mat or cloth on the floor and move the unit slowly to prevent floor damage.
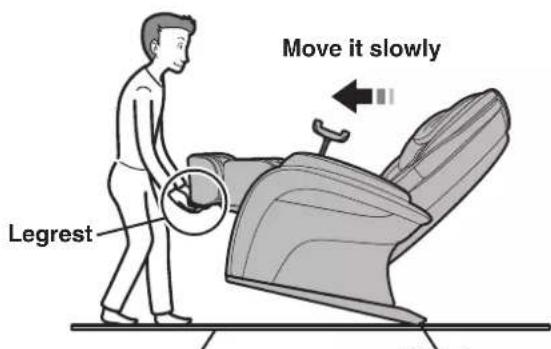
Place a mat on the floor to avoid damaging the floor.
Lifting the unit
- Move the unit by having one person firmly hold onto the fabric section on the underside of the legrest and another person use the groove on the back cover of the backrest. * You may damage the floor by dropping the unit if you do not hold it correctly.

Legrest: Place your fingers in the groove.
TROUBLESHOOTING
Problem
▶ Cause and Remedy
Motor Noises
- It sounds and feels like the massage heads are straining to get over wrinkles in the cloth. • The motor groans when it comes under load.
- There is excessive noise during Tapping. (The noise is greater at the top of the unit.)
- There is a creaking noise when the massage heads are in operation.
- There is a rattling sound when the massage heads move up or down. • The belt can be heard rotating.
- There is a rubbing sound produced by the massage heads rubbing on the seat fabric.
- There is a noise when the back cushion moves over the armrest when the seat is reclining. • There is a noise when I sit down.
- There is a strange sound when the massage heads move in and out.
- When the power switch is turned on there is a humming sound. • Air massage-related sounds. There is a hissing sound of air escaping. There is a humming sound from the pump. • The legrest rattles.
- There is operational noise of valves under the seat.
- There is an unstable sound when air escapes during the leg stretch.
These sounds are perfectly normal and will not have any effect on the operation of the unit.
The massage heads stop during operation.
When excessive force is applied to the massage heads during operation, in the interests of safety the massage heads may stop moving. If all markings and buttons on the control panel start to flash, which is extremely unusual, turn off the power switch, wait for approximately 10 seconds and then turn the power switch on again. If the massage heads stop again, position yourself so that your back is not completely in contact with the backrest.
The illumination does not light up and sound does not start when you sit down on the unit.
• The power cord has been disconnected. (See page 15.) - Sit back deeply in the chair. (See page 17.)
The massage heads do not come up to the shoulder or neck.
The position of the massage heads is incorrect. (See page 18.)
The height of the left and right massage heads is different.
An alternating tapping method is employed, which means that this phenomenon will naturally occur. There is nothing wrong with the unit.
It is not possible to recline the unit.
The legrest cannot be raised or lowered.
If the unit encounters an obstacle or if excessive force is exerted on it during operation, in the interests of safety the unit will come to a stop. If all markings and buttons on the control panel start to flash, which is extremely unusual, turn off the power switch, wait for approximately 10 seconds and then turn the power switch on again.
Reclining does not take place even though a massage is started in auto programs. (The seat does not automatically recline.)
In some cases the seat may not automatically recline depending on the position (angle) of the backrest or the legrest. Automatic reclining will not activate when the backrest is reclined to flat position more than massage position and legrest is in upper position. When you use the manual operation only for legs, automatic reclining will not activate.
The backrest does not return to the upright position.
The backrest will not return to the upright position if the timer is activated or the button is pressed. (Pressing ☐ twice will return the backrest to its original position.) (See page 23.)
The unit will not operate at all.
- The power cord has been disconnected. (See page 15.) - The power switch on the unit has not been turned on. (See page 15.) - An auto program selection button, upper body massage selection button or lower body massage off/on button hasn't been pressed after pressing ⏻. (See pages 17, 20 and 21.)
The unit has been damaged.
▶ Stop using the unit immediately.
The power cord or power plug is abnormally hot.
▶ Stop using the unit immediately.
⚠️ See Caution No. 5 and 13 on page 3.
ERROR DISPLAY
Contents of the error will be displayed in the remaining time display area when an error occurs during the operation.
Time Remaining Display


• For the error "U10" and will flash alternately.
Error display Contents
| For safety reasons, operation will terminate automatically when it cannot detect if someone is seated. If this error occurs even if you are seated, sit back all the way to the backrest, and operate from the start again. |
| Operation is terminated because there is a problem with internal communication. |
| Operation is terminated because there is a problem with the massage mechanism. |
| Operation except for the massage mechanism is terminated because there is a problem with the reclining mechanism or the raise/ lowering mechanism of the legrest. |
* Please contact an authorized service center. Service and maintenance will be carried out smoother if the error number is communicated when contacting.


- OPERATING INSTRUCTIONS
- MODE D'EMPLOI INSTRUCCIONES DE USO
- HOUSEHOLD MASSAGE LOUNGER
- IMPORTANT SAFETY INSTRUCTIONS
- DANGER
- WARNING
- SAVE THESE INSTRUCTIONS
- SAFETY PRECAUTIONS
- CAUTION: TO AVOID THE RISK OF INJURY
- OPERATING PRECAUTIONS
- CAUTION: TO AVOID DAMAGING THE CHAIR, FOLLOW THESE PRECAUTIONS
- GROUNDING INSTRUCTIONS
- SPECIFICATIONS
- PART NAMES AND FUNCTIONS
- MAIN UNIT
- SOLE SHIATSU SHEET
- FOR THE SOLE SHIATSU SHEET
- SOUND OFF DISPLAY
- TIME REMAINING DISPLAY
- SHOULDER POSITION DISPLAY
- UPPER BODY MASSAGE OPERATION DISPLAY
- LOWER BODY MASSAGE OPERATION OFF/ON DISPLAY
- MASSAGE AREA DISPLAY
- LOWER BODY MASSAGE INTENSITY DISPLAY
- UPPER BODY MASSAGE INTENSITY DISPLAY
- SETTING UP THE MASSAGE LOUNGER
- WHERE TO USE THE UNIT
- REMOVING EVERYTHING FROM THE BOX AND INSTALLING THE UNIT
- TO PUT THE UNIT DOWN ON THE FLOOR
- CONFIRM THAT THE MAIN UNIT AND THE ACCESSORIES ARE IN THE BOX
- ASSEMBLY
- ATTACHING THE ARMRESTS (ON BOTH THE RIGHT AND LEFT SIDES)
- INSERT THE ARMREST INTO THE UNIT
- FASTEN THE ARMREST WITH THE ATTACHMENT SCREWS
- ATTACHING THE CONTROL PANEL STAND TO THE RIGHT ARMREST
- INSERT THE ATTACHMENT SCREW INTO THE LOWER HOLES FIRST AND THEN TIGHTEN LIGHTLY WITH THE ALLEN KEY
- SECURING THE STAND WITH THE ATTACHMENT SCREWS
- ATTACHING THE SIDE COVERS (ON BOTH THE RIGHT AND LEFT SIDES)
- REMOVING THE SIDE COVER
- CONNECT THE POWER CORD TO THE UNIT
- RAISING THE BACKREST TO THE UPRIGHT POSITION
- PLACING THE CONTROL PANEL INTO THE CONTROL PANEL STAND
- BEFORE SITTING DOWN
- CHECK THE FOLLOWING BEFORE USING THE UNIT
- CHECK THE SURROUNDING AREA
- CHECK THE POWER CORD AND THE POWER PLUG
- BE SURE TO PUSH THE CONNECTOR ALL THE WAY INTO THE APPLIANCE INLET
- SWITCHING ON THE POWER SUPPLY
- CHECK THE UNIT
- FLIPPING UP THE PILLOW
- ADJUSTING THE RECLINING ANGLE
- SELECTING A MENU AND STARTING THE MASSAGE
- THE ILLUMINATION WILL LIGHT UP AND SOUND WILL START WHEN YOU SIT DOWN
- PRESS THE 📄 BUTTON TO TURN ON THE POWER
- SELECT THE AUTO PROGRAM YOU WANT
- SIT AS FAR BACK IN THE SEAT AS POSSIBLE WITH YOUR HEAD ON THE PILLOW
- ADJUSTING SHOULDER POSITION
- CAUTION
- CHARACTERISTICS OF AUTO PROGRAM (UPPER BODY)
- DEEP
- SWEDISH
- LOWER BACK
- NECK/SHOULDER
- MAKING ADJUSTMENTS
- ADJUSTING THE INTENSITY OF THE UPPER BODY MASSAGE
- ADJUSTING THE INTENSITY OF THE LOWER BODY MASSAGE
- TURNING OFF THE LOWER BODY ACTIONS
- AUTO SHUT-OFF IN AUTO PROGRAMS
- STOPPING AN AUTO PROGRAM: IMMEDIATELY STOPPING THE MASSAGE
- SELECT THE MASSAGE TYPE YOU WANT
- MASSAGE ACTIONS
- NECK KNEAD
- KNEAD
- TAP
- NECK SHIATSU
- ROLL
- ADJUST AS YOU LIKE
- Ⓐ ADJUSTING THE VERTICAL POSITION OF THE MASSAGE HEADS
- ⑧ ADJUSTING THE WIDTH BETWEEN MASSAGE HEADS
- © ADJUSTING THE INTENSITY OF THE UPPER BODY MASSAGE
- AUTO SHUT-OFF IN MANUAL OPERATION
- PRESS THE 📊 BUTTON
- Ⓐ PRESS THE LEG/FOOT MASSAGE BUTTON
- ADJUSTING THE MASSAGE INTENSITY
- AUTO SHUT-OFF IN LEG/FOOT MASSAGE AND LEG STRETCH
- DESCRIPTION OF LEG/FOOT MASSAGE AND LEG STRETCH
- LEG/FOOT MASSAGE
- APPROX. 15°
- APPROX. 50°
- STOPPING MID-WAY THROUGH A MASSAGE IMMEDIATELY STOPPING THE MASSAGE
- AFTER COMPLETING THE MASSAGE
- RETURN THE SEAT TO THE ORIGINAL POSITION
- DISCONNECT THE POWER
- CLEANING AND MAINTENANCE
- LEATHER COVERING ON THE PILLOW, THE BACK CUSHION AND THE UNIT
- PIPE AND PLASTIC AREAS
- COATED FABRIC
- HOW TO MOVE THE UNIT
- USING THE WHEELS TO MOVE THE UNIT
- LIFTING THE UNIT
- TROUBLESHOOTING
- PROBLEM
- CAUSE AND REMEDY
- MOTOR NOISES
- THE MASSAGE HEADS STOP DURING OPERATION
- THE ILLUMINATION DOES NOT LIGHT UP AND SOUND DOES NOT START WHEN YOU SIT DOWN ON THE UNIT
- THE MASSAGE HEADS DO NOT COME UP TO THE SHOULDER OR NECK
- THE HEIGHT OF THE LEFT AND RIGHT MASSAGE HEADS IS DIFFERENT
- IT IS NOT POSSIBLE TO RECLINE THE UNIT
- THE LEGREST CANNOT BE RAISED OR LOWERED
- RECLINING DOES NOT TAKE PLACE EVEN THOUGH A MASSAGE IS STARTED IN AUTO PROGRAMS. (THE SEAT DOES NOT AUTOMATICALLY RECLINE.)
- THE BACKREST DOES NOT RETURN TO THE UPRIGHT POSITION
- THE UNIT WILL NOT OPERATE AT ALL
- THE UNIT HAS BEEN DAMAGED
- THE POWER CORD OR POWER PLUG IS ABNORMALLY HOT
- ERROR DISPLAY
Brand : PANASONIC
Model : EP-MA10
Category : Massage device