
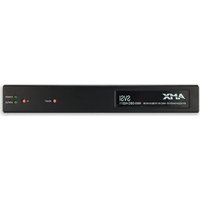
DUX-TX-70 - Audiovisual Equipment AMX - Free user manual and instructions
Find the device manual for free DUX-TX-70 AMX in PDF.


| Product Type | HDMI Extender Kit (Transmitter + Receiver) |
| Model | AMX DUX-TX-70 / DUX-RX-70 |
| Dimensions (W × H × D) | 173 mm × 18 mm × 94.8 mm (6.84" × 0.71" × 3.75") per unit |
| Weight | 400 g per unit |
| Power Supply | 12 VDC, 1.5 A (adapter included) |
| Power Consumption | ≤11.8 W (pair) |
| Video Standard | HDMI 1.4, compatible with HDMI 2.0 (4K@60Hz 4:2:0), HDCP 2.2 |
| Maximum Resolution | 4K@30Hz (over 40 m) / 1080p@60Hz (over 70 m) |
| Transmission Distance | Up to 70 m (230 ft) for 1080p, 40 m (131 ft) for 4K over single CatX cable |
| Cable Type | Cat5e/6/6a/7 (T568B straight-through recommended) |
| IR Control | Bi-directional IR pass-through (source or display location) |
| RS232 | Pass-through for serial communication and firmware upgrade |
| PoE | Yes (DUX-TX-70 powers DUX-RX-70 over CatX) |
| Operating Temperature | 32°F to 113°F (0°C to 45°C) |
| Storage Temperature | -4°F to 140°F (-20°C to 70°C) |
| ESD Protection | ±8 kV air-gap discharge, ±4 kV contact discharge |
| Certification | CE, FCC |
| Cleaning | Use only a dry cloth; do not use liquids |
| Safety | Do not expose to rain, moisture, or heat sources; ensure ventilation |
| Repair | Refer all servicing to qualified service personnel |
Frequently Asked Questions - DUX-TX-70 AMX
User questions about DUX-TX-70 AMX
0 question about this device. Answer the ones you know or ask your own.
Ask a new question about this device
Download the instructions for your Audiovisual Equipment in PDF format for free! Find your manual DUX-TX-70 - AMX and take your electronic device back in hand. On this page are published all the documents necessary for the use of your device. DUX-TX-70 by AMX.
USER MANUAL DUX-TX-70 AMX
Important Safety Instructions 03
Introduction....04
Features....04
Packing List....05
Specifications....06
DUX-TX-70 Transmitter 06
DUX-RX-70 Receiver 07
Cable Specifications 07
Panel 08
DUX-TX-70 Transmitter 08
DUX-RX-70 Receiver....10
Install Hardware....12
Operate with IR 14
Control the Display....14
Control the Source ....15
Operate with RS232....16
RS232 Pinout....16
RS232 for Firmware Upgrading....16
RS232 for Serial Communication....17
Troubleshooting ....18
Important Safety Instructions

NOTE:
We reserve the right to change the content from time to time without notice.

WARNINGS:
To reduce the risk of fire, electric shock or product damage, please observe the following Safety Instructions while installing and operating the product:

Do not expose this apparatus to rain, moisture, dripping or splashing. No objects filled with liquids, such as vases, shall be placed on the apparatus.

Do not install or place this unit in a bookcase, built-in cabinet or in another confined space. Ensure the unit is well ventilated.

To prevent risk of electric shock or fire hazard due to overheating, do not obstruct the unit's ventilation openings with newspapers, tablecloths, curtains, and similar items.

Do not install near any heat sources such as radiators, heat registers, stoves, or other apparatus (including amplifiers) that produce heat.

Do not place sources of naked flames, such as lighted candles, on the unit.

Clean this apparatus only with dry cloth.

Unplug this apparatus during lightning storms or when unused for long periods of time.

Protect the power cord from being walked on or pinched particularly at plugs.

Only use attachments/accessories specified by the manufacturer.

Refer all servicing to qualified service personnel.
Introduction

DUX-TX-70 Transmitter and DUX-RX-70 Receiver are a pair of HDMI extenders used to extend HDMI signals up to 70 meters / 230ft (1080p) or 40 meters/131ft (4K@30Hz) over a single CatX cable.
Through PoE, one power supply to DUX-TX-70 will be able to power both DUX-TX-70 and DUX-RX-70. Via IR pass-through, you can either control the source from the display location or the display from the source location. The two HDMI extenders allow RS232 control via pass-through over a CatX cable.
The DUX-TX-70 and DUX-RX-70 HDMI extenders are ideal for applications at homes, offices, digital entertainment centers, control centers, conference rooms, schools and corporate training spaces, where a long-distance HDMI signal distribution is needed.
Features
- Slim appearance, space saving and easy-to-install.
- For 1080p signal, supports HDMI input and output cables up to 15 meters.
- For 4k@30Hz signal, supports HDMI input cable up to 10 meters and HDMI output cable up to 15 meters.
- HD signal transmission up to 70 meters / 230ft (1080p) or 40 meters / 131ft (4K@30Hz) via a single CatX cable.
- Single CatX cable solution, including transmission of HD Audio/Video, IR control, RS232 pass-through, and PoE (DUX-TX-70 to DUX-RX-70).
- Fully compliant with HDMI 1.4, and compatible with HDMI 2.0 (4K@60Hz 4:2:0).
• HDCP 2.2 compliant. - Bi-directional IR control from source or display location.
• RS232 port for firmware upgrading and serial communication. - Universal power supply of high reliability and energy efficiency for reduced operation cost.
NOTE: The actual signal transmission distance depends on signal resolution and cable quality.
Packing List
DUX-TX-70 Transmitter
• 1 x DUX-TX-70 Transmitter
• 1 x Power Adapter (12 VDC,1.5A)
• 1 x Phoenix Male Connector (3.5 mm, 3 pins)
- 1 x IR Emitter
• 1 x Broadband IR Receiver (30 KHz \~ 50 KHz)
• 2 x Mounting Brackets
• 1 x User Manual
DUX-RX-70 Receiver
• 1 x DUX-RX-70 Receiver
• 1 x Power Adapter (12 VDC,1.5A)
• 1 x Phoenix Male Connector (3.5 mm, 3 pins)
- 1 x IR Emitter
• 1 x Broadband IR Receiver (30 KHz \~ 50 KHz)
- 2 x Mounting Brackets
• 1 x User Manual
Specifications - DUX-TX-70 Transmitter
| Technical | |
| Input 1 x HDMI IN | |
| Input Signal Type TMDS | |
| Input Resolution Support 4K, 1080p, 1080i, 720p, 576p, 480p, 576i, 480i | |
| Input Video Level 0.5-1.2 V p-p | |
| Input DDC Signal 5 V p-p | |
| Output 1 x HDBT OUT | |
| Output Signal Type HDBT | |
| Output Resolution Support 4K, 1080p, 1080i, 720p, 576p, 480p, 576i, 480i | |
| Video Impedance 100 Ω | |
| Maximum Pixel Clock 297 MHz | |
| General | |
| Operating Temperature / RH 32°F | ~ 113°F (0°C ~ 45°C) / 10% ~ 90%, non-condensing |
| Storage Temperature / RH -4°F ~ | 140°F (-20°C ~ 70°C) / 10% ~ 90%, non-condensing |
| Power Supply 12 VDC 1.5A | |
| Power Consumption ≤11.8 W (pair) | |
| ESD Protection | Human-body model:±8 kV (Air-gap discharge)±4 kV (Contact discharge) |
| Surge Protection Voltage: ±1 kV | |
| Electrical Fast Transient/Burst | Data communication cord: 1 kVPower core: 2 kV |
| Net Weight | 400 g |
| Dimension (W × H × D) | 173 mm × 18 mm × 94.8 mm (6.84" × 0.71" × 3.75") |
| Certification | CE, FCC |
Specifications - DUX-RX-70 Receiver
| Technical | |
| Input 1 x HDBT IN | |
| Input Signal Type HDBT | |
| Input Resolution Support 4K, 1080p, 1080i, 720p, 576p, 480p, 576i, 480i | |
| Input Video Level 0.5-1.2 V p-p | |
| Input DDC Signal 5 V p-p | |
| Output 1 x HDMI OUT | |
| Output Signal Type TMDS | |
| Output Resolution Support 4K, 1080p, 1080i, 720p, 576p, 480p, 576i, 480i | |
| Video Impedance 100 Ω | |
| Maximum Pixel Clock 297 MHz | |
| General | |
| Operating Temperature / RH 32°F ~ 113°F (0°C ~ 45°C) / 10% ~ 90%, non-condensing | |
| Storage Temperature / RH -4°F ~ 140°F (-20°C ~ 70°C) / 10% ~ 90%, non-condensing | |
| Power Supply 12 VDC 1.5A | |
| Power Consumption ≤11.8 W (pair) | |
| ESD Protection | Human-body model:±8 kV (Air-gap discharge)±4 kV (Contact discharge) |
| Surge Protection Voltage: ±1 kV | |
| Electrical Fast Transient/Burst | Data communication cord: 1 kVPower cord : 2 kV |
| Net Weight | 400 g |
| Dimension (W × H × D) | 173 mm × 18 mm × 94.8 mm (6.84" × 0.71" × 3.75") |
| Certification | CE, FCC |
Cable Specifications (Straight-through Ethernet cable of T568B is recommended)
| Cable Type | Range | Supported Video |
| Cat6a/7 | 70 m / 230 ft | 1080p@60Hz, 36 bpp |
| 40 m / 131 ft | 1080p@60Hz, 48 bpp1080p@60Hz, 3D4K@30Hz | |
| Cat5e/6 | 60 m / 197 ft | 1080p@60Hz, 36 bpp |
| 35 m / 115 ft | 1080p@60Hz, 48 bpp1080p@60Hz, 3D4K@30Hz |
Panel - DUX-TX-70 Transmitter

Fig 1: DUX-TX-70 - Front Panel
| Item Name Description | ||
| 1 POWER LED | On: DUX-TX-70 is powered on.Off: DUX-TX-70 is powered off. | |
| 2 STATUS LED | Blinking: DUX-TX-70 is working properly.Off: DUX-TX-70 is not working properly. | |
| 3 HDCP LED | On: HDCP video is being transmitted.Blinking: Non-HDCP video is being transmitted.Off: No HDMI signal. | |
| 4 LINK LED | On: DUX-TX-70 and DUX-RX-70 are linked.Off / Blinking: No link or link error. | |

Fig 2: DUX-TX-70 - Rear Panel
| Item Name Description | ||
| 1 DC 12V | Connects the power adapter provided. If DUX-TX-70 is connected to a power supply, DUX-RX-70 can be powered by DUX-TX-70 through PoE. DUX-TX-70 and DUX-RX-70 can also be powered individually. | |
| 2 HDBT OUT Connects to HDMI IN of DUX-RX-70 using a CatX cable. | ||
| 3 IR IN Connects the broadband IR Receiver provided. | ||
| 4 IR OUT Connects the IR Emitter provided. | ||
| 5 RS232 For firmware upgrading or serial communication. | ||
| 6 HDMI IN Connects to an HDMI source using an HDMI cable. | ||
| 7 MODE | NORMAL (Default Setting)RS232 signal can be passed through.DUX-TX-70 cannot be upgraded.UPDATE (Only used for firmware upgrading)DUX-TX-70 can be upgraded.RS232 signal cannot be passed through. | |
Panel - DUX-RX-70 Receiver

Fig 3: DUX-RX-70 - Front Panel
| Item Name Description | ||
| 1 POWER LED | On: DUX-RX-70 is powered on.Off: DUX-RX-70 is powered off. | |
| 2 STATUS LED | Blinking: DUX-RX-70 is working properly.Off: DUX-RX-70 is not working properly. | |
| 3 HDCP LED | On: HDCP video is being transmitted.Blinking: Non-HDCP video is being transmitted.Off: No HDMI signal. | |
| 4 LINK LED | On: DUX-TX-70 and DUX-RX-70 are linked.Off / Blinking: No link or link error. | |
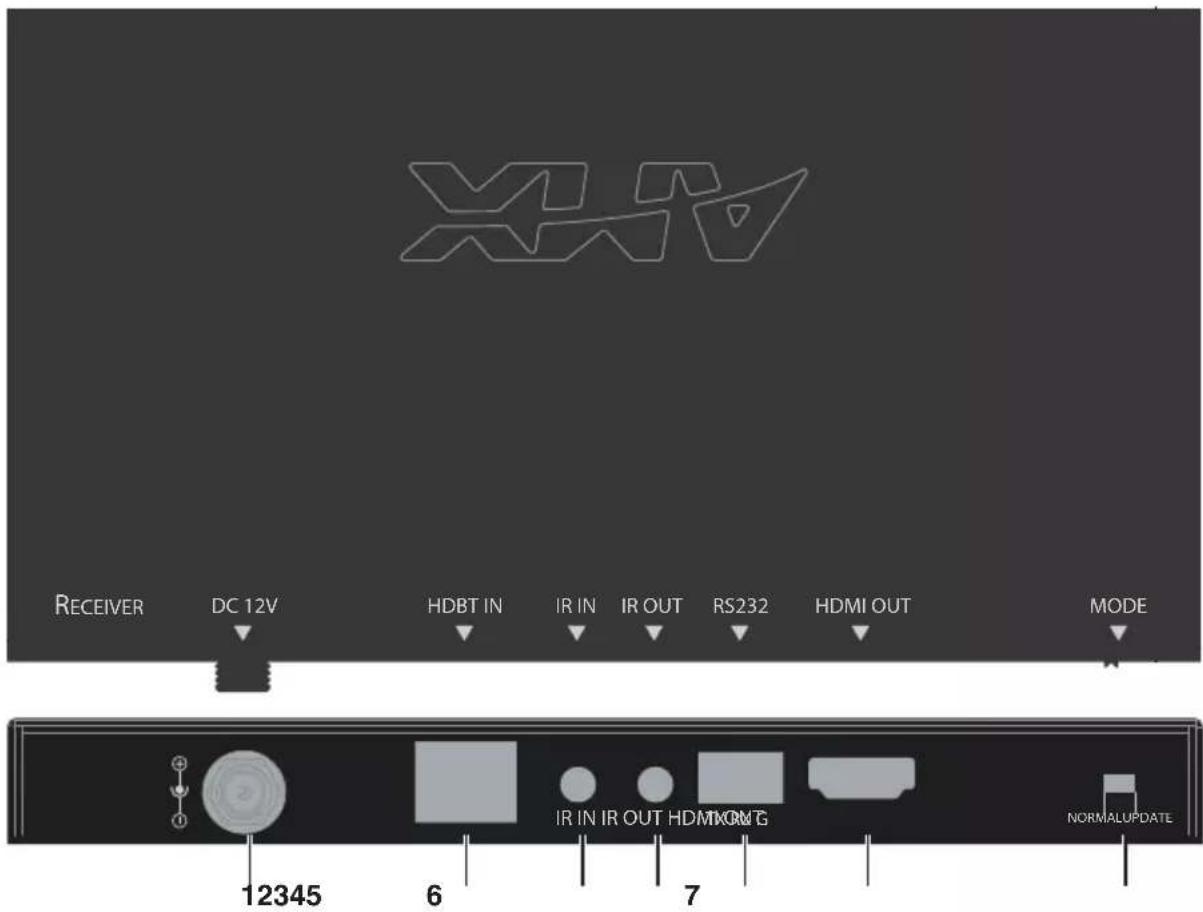
Fig 4: DUX-RX-70 - Rear Panel
| Item Name Description | ||
| 1 DC 12V | Connects the power adapter provided. If DUX-TX-70 is connected to a power supply, DUX-RX-70 can be powered by DUX-TX-70 through PoE. DUX-TX-70 and DUX-RX-70 can also be power individually. | |
| 2 HDBT IN Connects to HDMI OUT of DUX-TX-70 using a CatX cable. | ||
| 3 IR IN Connects the broadband IR Receiver provided. | ||
| 4 IR OUT Connects the IR Emitter provided. | ||
| 5 RS232 For firmware upgrading or serial communication. | ||
| 6 HDMI OUT Connects to an HDMI display using an HDMI cable. | ||
| 7 MODE | NORMAL (Default Setting)RS232 signal can be passed through.DUX-RX-70 cannot be upgraded.UPDATE (Only used for firmware upgrading)DUX-RX-70 can be upgraded.RS232 signal cannot be passed through. | |
Install Hardware
WARNING:
● Before installation, disconnect the power supplies of all the devices.
- Please use quality cables and accessories specified or provided by the manufacturer.
- During installation, connect and disconnect cables with caution.
To install DUX-TX-70 and DUX-RX-70 (See Fig 5: Installation Instruction Chart on Page 13):
- Connect an HDMI source device (e.g. Blu-ray player, game console, satellite/cable TV, media server, etc.) to DUX-TX-70's HDMI IN port via an HDMI cable.
- Connect a display device (e.g. LED/LCD display or projector) to DUX-RX-70's HDMI OUT port via an HDMI cable.
- Connect DUX-TX-70's HDBT OUT port to DUX-RX-70's HDBT IN port via a CatX cable.
- Connect an IR Emitter to IR OUT port of DUX-TX-70 and a broadband IR Receiver to IR IN port of DUX-RX-70. (Or connect a broadband IR Receiver to IR IN port of DUX-TX-70 and an IR Emitter to IR OUT port of DUX-RX-70.)
- Connect the power adapter to DUX-TX-70, then connect the adapter to a power supply. (DUX-TX-70 and DUX-RX-70 can be connected to power individually.)
- Power on all the units and start operation.
Note: When all set, check the LED indicators of both DUX-TX-70 and DUX-RX-70. For LED indication, please refer to page 08 and 10.

flowchart
graph TD
    A["Display Remote"] --> B["DUX-TX-70"]
    B --> C["HDBT OUT"]
    C --> D["IR IN"]
    C --> E["IR OUT"]
    C --> F["TX RX G"]
    C --> G["HDMI IN"]
    G --> H["HDMI Cable"]
    I["Blu-Ray Player"] --> J["DUX-RX-70"]
    J --> K["Display"]
    L["Broadband IR Receiver"] --> M["HDBT IN"]
    N["IR Emitter"] --> O["HDMI Cable"]
    P["CATx Cable"] --> Q["HDBT OUT"]
    R["IR Emitter"] --> S["HDMI Cable"]
    T["Blu-Ray Player Remote"] --> U["Display"]
Fig 5: Installation Instruction Chart
Operate with IR
IR pass-through function allows you to control the source from the display location or the display from source location.
Control the Display
To control the display from the source location:
- Connect a broadband IR Receiver to IR IN port of DUX-TX-70;
- Connect an IR Emitter to IR OUT port of DUX-RX-70.
When all set, the display can be controlled at the source end through a display remote.

flowchart
graph TD
    A["Display Remote"] --> B["Broadband IR Receiver"]
    B --> C["HDBT OUT"]
    C --> D["IR IN"]
    D --> E["IR OUT"]
    E --> F["TX RX G"]
    F --> G["HDMI IN"]
    G --> H["HDMI"]
    I["Blu-Ray Player"] --> J["HDMI"]
    K["DUX-TX-70"] --> L["CATx Cable"]
    M["DUX-RX-70"] --> N["HDBT IN"]
    O["IR Emitter"] --> P["HDMI"]
    Q["Display"] --> R["Display"]
Fig 6: Application Example - Control the Display
Control the Source
To control the source from the display location:
- Connect an IR Emitter to IR OUT port of DUX-TX-70;
- Connect a broadband IR Receiver to IR IN port of DUX-RX-70.
When all set, the source can be controlled at the display location through a source device remote.

flowchart
graph TD
    A["Blu-Ray Player"] --> B["HDMI Cable"]
    C["IR Emitter"] --> B
    B --> D["DUX-TX-70"]
    D --> E["HDBT OUT"]
    E --> F["IR IN"]
    E --> G["IR OUT"]
    E --> H["TX RX G"]
    E --> I["HDMI IN"]
    I --> J["NORMAL UPDATE"]
    K["CATx Cable"] --> L["HDBT IN"]
    L --> M["Broadband IR Receiver"]
    N["Display"] --> O["Blu-Ray Player Remote"]
Fig 7: Application Example - Control the Source
Operate with RS232
RS232 Pinout
The following figure shows the RS232 pinout. Please connect with Phoenix Connectors provided.
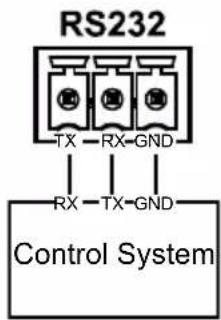
Fig 8: RS232 Pinout
RS232 for Firmware Upgrading
RS232 port of DUX-TX-70 and DUX-RX-70 can be used for firmware upgrading.
To upgrade firmware of DUX-TX-70 or DUX-RX-70:
- Download firmware upgrading execution software (please contact the product manufacturer or your local dealer) to your PC;
- Swith the "MODE" to "UPDATE":
- Connect your PC to RS232 port using a RS232 Cable:
- Click to run the execution software:
- When the upgrading is successful, power cycle the device.
NOTE: DUX-TX-70 and DUX-RX-70 must be upgraded individually.
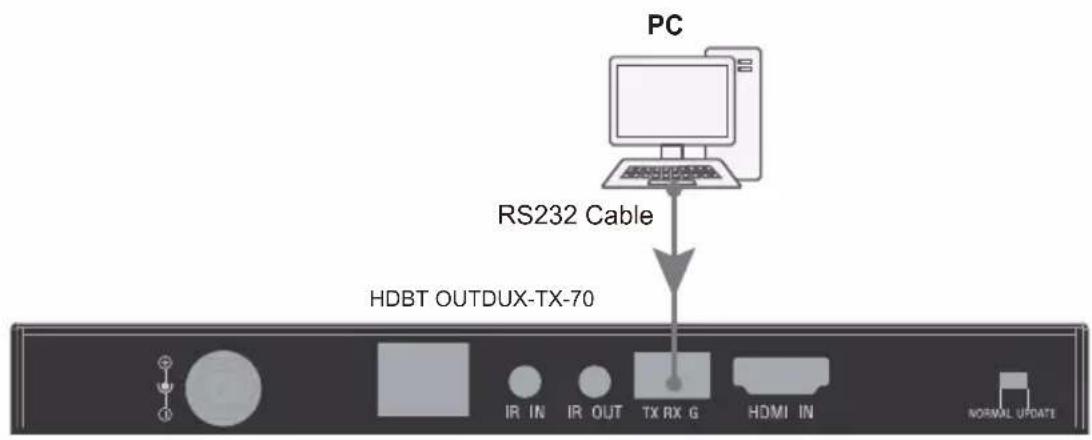
Fig 9: RS232 for Firmware Upgrading
RS232 for Serial Communication
RS232 port of DUX-TX-70 and DUX-RX-70 can also be used for serial communication.
To start serial communications between DUX-TX-70 and DUX-RX-70:
- Connect a RS232 Master (or Client) Device to RS232 port of DUX-TX-70 using a RS232 cable;
- Connect a RS232 Client (or Master) Device to RS232 port of DUX-RX-70 using a RS232 cable;
- Connect HDBT OUT of DUX-TX-70 and HDBT IN of DUX-RX-70 using a CatX cable.
- When all set, serial communication can be realized between the two RS232 devices.

flowchart
graph TD
    A["RS232 Device"] --> B["RS232 Cable"]
    B --> C["HDBT OUT"]
    C --> D["IR IN"]
    C --> E["IR OUT"]
    C --> F["TX RX G"]
    C --> G["HDMI IN"]
    C --> H["NORMAL UPDATE"]
    I["DUX-TX-70"] --> J["DT"]
    K["DUX-RX-70"] --> L["DT"]
    M["CS"] --> N["CS"]
    O["CS"] --> P["CS"]
    Q["CS"] --> R["CS"]
    S["CS"] --> T["CS"]
    U["CS"] --> V["CS"]
    W["CS"] --> X["CS"]
    Y["CS"] --> Z["CS"]
    AA["CS"] --> AB["CS"]
    AC["CS"] --> AD["CS"]
    AE["CS"] --> AF["CS"]
    AG["CS"] --> AH["CS"]
    AI["CS"] --> AJ["CS"]
    AK["CS"] --> AL["CS"]
    AM["CS"] --> AN["CS"]
    AO["CS"] --> AP["CS"]
    AQ["CS"] --> AR["CS"]
    AS["CS"] --> AT["CS"]
    AU["CS"] --> AV["CS"]
    AW["CS"] --> AX["CS"]
    AY["RS232 Device"] --> AZ["RS232 Cable"]
    style A fill:#f9f,stroke:#333
    style K fill:#f9f,stroke:#333
    style I fill:#ccf,stroke:#333
    style M fill:#ccf,stroke:#333
    style AA fill:#ccf,stroke:#333
    style AG fill:#ccf,stroke:#333
    style AK fill:#ccf,stroke:#333
Fig 10: Application Example - RS232 for Serial Communication
Troubleshooting
1. Why the Power LED is off?
- Check that all the devices are on.
- Check that all the cables are qualified and connected properly.
2. Why the Link LED is off or blinking?
- Check that all the devices are on.
- Check that all the cables are qualified and connected properly.
- Check that the length of CatX cable is less than 70 meters (1080P) or 40 meters (4K). For more information, see Cable Specifications in Specifications.
3. Why the display connected to the DUX-RX-70 shows no picture?
- Check that all the devices are on.
- Check that all the cables are qualified and connected properly.
- Check that the Link LED is steady on. For more information, see Q2 above.
- Check that the display works properly, and that the source device has normal signals output.
- Ensure that the display device supports HDCP.
- Ensure the length of CatX cable is less than 70 meters (1080P) or 40 meters (4K). For more information, see Cable Specifications in Specifications.
- Ensure the length of HDMI cables: when transmitting 1080p signal, HDMI input and output cables should be less than 15 meters; when transmitting 4k@30Hz signal, HDMI input cable should be less than 10 meters, HDMI output cable less than 15 meters. For more information, see Cable Specifications in Specifications.
- Check that your display device is switched to the correct source input mode, for example, switching to HDMI 1 if HDMI 1 interface is connected to DUX-RX-70 via an HDMI cable.
- Check that no compatibility issue exists between DUX-RX-70 and the display. If so, replace the display with other models.
4. Why the display connected to the DUX-RX-70 shows snow or mosaic?
- Check that all the cables are qualified and connected properly.
- Check that Ethernet cables are Cat5e/6 or higher gauge.
- Check that the source input device has no such problem as snow, mosaic or with a damaged disc. If so, replace with another qualified input source.
- Check that no compatibility issue exists between DUX-RX-70 and the display. If so, replace the display with qualified models.
AMX DUX SERIES
| DUX-8C | Compact 8x8 HDMI 2.0 matrix switcher for video signals up to 4K@60Hz 4:4:4 (bandwidth 18 Gbps) |  |
| DUX-8D | Dual output 8x8 HDMI 2.0 matrix switcher with 4 mirrored HDBT outputs for video signals up to 4K@60Hz 4:4:4 (bandwidth 18 Gbps) |  |
| DUX-TX | HDMI 1.4 over HDBT TX up to 100m |  |
| DUX-RX | HDMI 1.4 over HDBT RX up to 100m |  |
| DUX-TX-70 | HDMI 1.4 over HDBT TX up to 70m |  |
| DUX-RX-70 | HDMI 1.4 over HDBT RX up to 70m |  |
| DUX-SCL | HDMI scaler up to 4K@60Hz 4:4:4 |  |
| DUX-SRX | HDBT scaling receiver up to 4K@60Hz 4:4:4 |  |
| DUX-MTX | HDMI 1.4 & VGA over HDBT TX up to 100m |  |
| DUX-MTX-WP | HDMI 1.4 & VGA over HDBT wall-plate TX up to 100 m |  |

© 2017 Harman. All rights reserved. ENZO, NetLinx, AMX, AV FOR AN IT WORLD, HARMAN, and their respective logos are registered trademarks of HARMAN. Oracle, Java and any other company or brand name referenced may be trademarks/registered trademarks of their respective companies.
AMX does not assume responsibility for errors or omissions. AMX also reserves the right to alter specifications without prior notice at any time.
The AMX Warranty and Return Policy and related documents can be viewed/downloaded at www.amx.com.
3000 RESEARCH DRIVE, RICHARDSON, TX 75082
AMX.com | 800.222.0193 | 469.624.8000 | +1.469.624.7400 | fax 469.624.7153


- Important Safety Instructions
- NOTE:
- WARNINGS:
- Introduction
- Features
- Packing List
- DUX-TX-70 Transmitter
- DUX-RX-70 Receiver
- Specifications - DUX-TX-70 Transmitter
- Specifications - DUX-RX-70 Receiver
- Cable Specifications (Straight-through Ethernet cable of T568B is recommended)
- Panel - DUX-TX-70 Transmitter
- Panel - DUX-RX-70 Receiver
- Install Hardware
- WARNING:
- To install DUX-TX-70 and DUX-RX-70 (See Fig 5: Installation Instruction Chart on Page 13):
- Operate with IR
- Control the Display
- Control the Source
- Operate with RS232
- RS232 Pinout
- RS232 for Firmware Upgrading
- RS232 for Serial Communication
- Troubleshooting
- Why the Power LED is off?
- Why the Link LED is off or blinking?
- Why the display connected to the DUX-RX-70 shows no picture?
- Why the display connected to the DUX-RX-70 shows snow or mosaic?
Brand : AMX
Model : DUX-TX-70
Category : Audiovisual Equipment