
AVB-WP-TX-MULTI-DXLINK - Audiovisual Equipment AMX - Free user manual and instructions
Find the device manual for free AVB-WP-TX-MULTI-DXLINK AMX in PDF.


| Product Type | Video Wall Processor / Transmitter |
| Brand | AMX |
| Model | AVB-WP-TX-MULTI-DXLINK |
| Dimensions (HxWxD) | 1.75" x 17" x 10" (1U rackmount) |
| Weight | 4.5 lbs (2.0 kg) |
| Power Supply | 100-240V AC, 50/60Hz, 30W |
| Main Functions | Multi-input video wall processing, daisy-chain via DXLink, scaling, bezel compensation |
| Input Support | HDMI, DVI, VGA, DisplayPort |
| Output Support | DXLink over twisted pair, up to 4K60 |
| Control | Ethernet, RS-232, IR, AMX Netlinx |
| Video Wall Layouts | Up to 16x16, custom arrangements |
| Maintenance | Clean housing with soft dry cloth; no liquid cleaners |
| Safety Notice | Operate in dry environment; disconnect power before cleaning |
| Spare Parts / Repair | Contact AMX support; no user-serviceable parts inside |
| Warranty | Limited 3-year warranty |
Frequently Asked Questions - AVB-WP-TX-MULTI-DXLINK AMX
User questions about AVB-WP-TX-MULTI-DXLINK AMX
0 question about this device. Answer the ones you know or ask your own.
Ask a new question about this device
Download the instructions for your Audiovisual Equipment in PDF format for free! Find your manual AVB-WP-TX-MULTI-DXLINK - AMX and take your electronic device back in hand. On this page are published all the documents necessary for the use of your device. AVB-WP-TX-MULTI-DXLINK by AMX.
USER MANUAL AVB-WP-TX-MULTI-DXLINK AMX
DXLink™ Twisted Pair Transmitters/Receiver
DXLink Multi-Format Wallplate Transmitter DXLink Multi-Format Decor Style Wallplate Transmitter (US) DXLink Multi-Format Transmitter Module DXLink HDMI Transmitter Module DXLink HDMI Receiver Module

AMX Domestic Channel Partner Limited Warranty, Disclaimer and License
(Excerpt from CHANNEL PARTNER TERMS AND CONDITIONS Versions 11.17.2011 with updates for previous version 8.25.2010 [sections 6.1 (a), (b) and (f)])
6. LIMITED WARRANTY; RETURN, REPAIR AND REPLACEMENT
6.1 AMX warrants the Products to be free of material defects in materials and workmanship under normal use for three (3) years from the Shipping Date (or such other period as may be specified below), subject to the following limitations and exceptions (“Limited Warranty”). For any Product, “Warranty Period” means the period during which the Limited Warranty is in effect, as set forth herein.
(a) LCD and LED panels are warranted for three (3) years from the Shipping Date, except for the display and touch overlay components, which are warranted for a period of one (1) year from the Shipping Date.
(b) Disk drive mechanisms, pan/tilt heads and external power supplies are warranted for a period of one (1) year from the Shipping Date.
(c) AMX lighting Products are warranted to switch on and off any load that is properly connected to our lighting Products, as long as the AMX lighting Products are under warranty. AMX also warrants the control of dimmable loads that are properly connected to our lighting Products. The dimming performance or quality thereof is not warranted, due to the random combinations of dimmers, lamps and ballasts or transformers.
(d) AMX software and firmware included in the Products is warranted for a period of ninety (90) days from the Shipping Date.
(e) Batteries and incandescent lamps are not covered under the Limited Warranty.
(f) The Warranty Period for AMX AutoPatch EPICA, Enova DGX, Modula, Modula Series 4, Modula Cat Pro Series and 8Y-3000 Product models will continue for the original installation until five (5) years after the issuance of a PDN with respect to termination of the applicable Product model. However, if the Product is moved from its original installation to a different installation, the Warranty Period will automatically become three (3) years from the Shipping Date and, if more than three (3) years have elapsed since the Shipping Date, the Warranty Period will automatically expire.
Version Date: 11-17-11
Note: The complete Warranty is at www.amx.com.
Contents
ESD Warning 1
Important Safety Information and Instructions....2
Product Overview and Specifications....7
Applicability Notice 7
Product Notes 7
Product Compatibility Tables 8
DXLink Transmitter and Receiver Features....9
Common Applications 10
Transmitters....10
Receiver....18
Common Features/Functionality....21
Quick Reference Tables for Modes....23
DXLink Transmitters and Receiver Specifications 25
Installation and Setup....33
Site Recommendations....33
General Hazard Precautions 33
Setup Information....34
Wallplate Transmitters – Attaching Signal/Transport Cables.... 51
Multi-Format TX or HDMI TX – Attaching Signal, Transport, and Control Cables ...... 53
Multi-Format TX or HDMI TX – Applying Power.... 54
HDMI RX – Attaching Signal and Control Cables.... 55
HDMI RX – Applying Power....56
Serial Data Transfer and IR Flow Control....57
Optional: Multi-Format TX, HDMI TX, and HDMI RX – Wiring for Serial Data Transfer...... 57
Optional: Multi-Format TX, HDMI TX, and HDMI RX – IR Control 58
ID Pushbutton Functions .... 59
HDMI RX Scaling Button and Scaling Modes.... 59
Detailed NetLinx (Link/Act and Status) LED Behavior 61
DXLink TX/RX in a Multiple-Stage Switching System 62
Network Configuration....63
Overview 63
Factory Default Parameters....65
Device IDs....66
Using the ID Pushbutton 66
IRL File Transfers 73
Overview 73
Preparing for IRL File Transfers in an Endpoint System ....74
Preparing for IRL File Transfers in an Extender System 75
Transferring IRL Files 76
NetLinx Programming of DXLink Transmitters and Receivers 79
Overview 79
Device Numbering and Ports....79
CHANNELs 81
DXLink Receiver Video SEND_COMMANDs.... 81
DXLink Receiver Audio SEND_COMMANDs....84
DXLink Transmitter Video SEND_COMMANDs 85
DXLink Transmitter Audio SEND_COMMANDs 90
IR SEND_COMMANDs....91
Serial SEND_COMMANDs 95
Common DXLink Transmitter / Receiver SEND_COMMANDs 97
DXLink System SEND_COMMANDs 98
SEND_STRING Escape Sequences 99
Enova DVX Switchers - DXLink SEND_COMMANDs 100
Troubleshooting 101
Overview 101
Basic Troubleshooting ....101
Determining HDCP Compliance....102
Power Issues....102
DXLink Connection Issues....103
Network Setup Issues....104
Technical Support....104
Appendix A – Upgrading the Firmware.... 105
Overview 105
Preparing for KIT File Transfers in an Endpoint System.... 106
Preparing for KIT File Transfers in an Extender System.... 106
Important Upgrade Information ....108
Transferring KIT Files....109
Appendix B – Telnet (Terminal) Commands.... 111
Establishing a Terminal Connection Via Telnet 111
Telnet Username and Password....112
Telnet Commands....113
Master Connection Modes....119
Notes on Specific Telnet Clients 120
Appendix C – Virtual NetLinx Master....121
Overview Virtual NetLinx Master (Masterless).... 121
Setting PC to Static IP Address 121
Creating a Virtual Master 123
Preparing a DXLink Module to Work with a Virtual Master.... 125
Appendix D – Cable Details and Pinout Info ......127
Overview 127
HDMI Connector Cable Pinout 127
HD-15 Connector Cable Pinout 128
DVI Pinout for DVI-to-HDMI Cable Adapter 129
Appendix E – Supported Input Resolutions....131
Available Pixel Display and Refresh Rate....131
Appendix F – Supported Output Resolutions......135
HDMI and DVI Supported Output Resolutions 135
Digital Video Output Resolution Support.... 136
Appendix G – Ground Wire Attachment ....141
Attaching a Ground Wire to a Common Earthed Ground.... 141
Attaching a Ground Wire to Module without Designated Ground.... 142
Appendix H – EDID Programming....143
DGX Configuration Software Overview.... 143
Software Installation on PC 143
DXLink Connection to PC 144
EDID Programmer View 145
Contents
ESD Warning

natural_image
Warning sign depicting a hand holding an object, enclosed in a triangle (no text or symbols)To avoid ESD (Electrostatic Discharge) damage to sensitive components, make sure you are properly grounded before touching any internal materials.
When working with any equipment manufactured with electronic devices, proper ESD grounding procedures must be followed to make sure people, products, and tools are as free of static charges as possible. Grounding straps, conductive smocks, and conductive work mats are specifically designed for this purpose.
Anyone performing field maintenance on AMX DXLink equipment should use an appropriate ESD field service kit complete with at least a dissipative work mat with a ground cord and a UL listed adjustable wrist strap with another ground cord. These items should not be manufactured locally, since they are generally composed of highly resistive conductive materials to safely drain static charges, without increasing an electrocution risk in the event of an accident. ESD protective equipment can be obtained from 3M ^™ , Desco ^® , Richmond Technology ^® , Plastic Systems ^® , and other such vendors.
Important Safety Information and Instructions
When using and installing your AMX product, adhere to the following basic safety precautions. For more information about operating, installing, or servicing your AMX product, see your product documentation.
- Read and understand all instructions before using and installing AMX products.
- Use the correct voltage range for your AMX product.
- There are no user serviceable parts inside an AMX product; service should only be done by qualified personnel.
- If you see smoke or smell a strange odor coming from your AMX product, turn it off immediately and call technical support.
- For products with multiple power supplies in each unit, make sure all power supplies are turned on simultaneously.
- Use surge protectors and/or AC line conditioners when powering AMX products.
- Only use a fuse(s) with the correct fuse rating in your enclosure.
- Make sure the power outlet is close to the product and easily accessible.
● Make sure the product is on or attached to a stable surface. - Turn off equipment before linking pieces together, unless otherwise specified in that product's documentation.
- For safety and signal integrity, use a grounded external power source and a grounded power connector.
- To avoid shock or potential ESD (Electrostatic Discharge) damage to equipment, make sure you are properly grounded before touching components inside an AMX product.
AMX ^® 2013 (Rev J), all rights reserved. No part of this publication may be reproduced, stored in a retrieval system, or transmitted, in any form or by any means, electronic, mechanical, photocopying, recording, or otherwise, without the prior written permission of AMX. Copyright protection claimed extends to AMX hardware and software and includes all forms and matters copyrightable material and information now allowed by statutory or judicial law or herein after granted, including without limitation, material generated from the software programs which are displayed on the screen such as icons, screen display looks, etc. Reproduction or disassembly of embodied computer programs or algorithms is expressly prohibited.
No patent liability is assumed with respect to the use of information contained herein.
Liability Notice
While every precaution has been taken in the preparation of this publication, AMX assumes no responsibility for error or omissions. No liability is assumed for damages resulting from the use of the information contained herein.
Further, this publication and features described herein are subject to change without notice.
US FCC Notice
The United States Federal Communications Commission has specified that the following notice be brought to the attention of the users of this product.
Federal Communication Commission Radio Frequency Interference Statement:
"This equipment has been tested and found to comply with the limits for a Class A digital device, pursuant to Part 15 of the FCC Rules. These limits are designed to provide reasonable protection against harmful interference when the equipment is operated in a commercial environment. This equipment generates, uses, and can radiate radio frequency energy and, if not installed and used in accordance with the instruction manual, may cause harmful interference to radio communications. Operation of this equipment in a residential area is likely to cause harmful interference in which case the user will be required to correct the interference at his own expense.
If necessary, the user should consult the dealer or an experienced radio/television technician for additional suggestions. The user may find the booklet, How to Identify and Resolve Radio-TV Interference Problems, prepared by the Federal Communications Commission to be helpful."
This booklet is available from the U.S. Government Printing Office, Washington, D.C. 20402, Stock N. 004-000-00345-4.
Use shielded cables. To comply with FCC Class A requirement, all external data interface cables and adapters must be shielded.
Lithium Batteries Notice
Switzerland requires the following notice for products equipped with lithium batteries. This notice is not applicable for all AMX equipment.
Upon shipment of the products to Switzerland, the requirements of the most up-to-date Swiss Ordinance Annex 2.15 of SR 814.81 will be met including provision of the necessary markings, documents, and annual reports relative to the disposal of the batteries to the Swiss Authorities.
Trademark Notices
AMX ^® , Enova ^® , AutoPatch ^® , NetLinx ^® , DXLink ^™ , SmartScale ^® , and InstaGate Pro ^® are trademarks of AMX.
Windows is a registered trademark of Microsoft Corporation in the United States and other countries.
3M ^™ , Desco ^® , Richmond Technology ^® , and Plastic Systems ^® are registered trademarks.
Ethernet ^® is a registered trademark of the Xerox Corporation.
ENERGY STAR ^® is a registered trademark of the U.S. Department of Energy and the U.S. Environmental Protection Agency
Other products mentioned herein may be the trademarks of their respective owners.
Warnings and Cautions
This manual uses the following conventions and icons to draw attention to actions or conditions that could potentially cause problems with equipment or lead to personal risk.

ESD Warning: The icon to the left indicates text regarding potential danger associated with the discharge of static electricity from an outside source (such as human hands) into an integrated circuit, often resulting in damage to the circuit.

Warning: The icon to the left indicates text that warns readers against actions or conditions that could cause potential injury to themselves.

Caution: The icon to the left indicates text that cautions readers against actions that could cause potential injury to the product or the possibility of serious inconvenience.
Notices
Product Overview and Specifications
Applicability Notice
The information in this manual applies to the DXLink Multi-Format Transmitter Module, the DXLink HDMI Transmitter Module, the DXLink Multi-Format Wallplate Transmitter, the DXLink Multi-Format Decor Style Wallplate Transmitter (US), and the DXLink HDMI Receiver Module listed in the table below. In this manual, these products will be referred to as the Multi-Format TX, HDMI TX,
Wallplate TX, Decor Wallplate TX, and the HDMI RX. When referring to all four of the transmitter units, the term Transmitters will be used.
DXLink™ Twisted Pair Transmitters and Receiver
| FG # Model Model Number, Description | ||
| FG1010-310 Multi-Format TX AVB-TX-MULTI-DXLINK, DXLINK MULTIFORMAT HDCP TX | ||
| FG1010-300 HDMI-TX* AVB-TX-HDMI-DXLINK, DXLINK HDMI HDCP TX | ||
| FG1010-320-BLFG1010-320-WH | Multi-FormatWallplate TX | AVB-WP-TX-MULTI-DXLINK, DXLINK MUTIFORMATWALLPLATE TX (BLACK or WHITE) |
| FG1010-325-BLFG1010-325-WH | Multi-Format DecorStyle Wallplate TX | AVB-DWP-TX-MULTI-DXLINK, DXLINK MULTI DECOR HDCPTX (BLACK or WHITE) |
| FG1010-500 HDMI-RX AVB-RX-DXLINK-HDMI, DXLINK HDMI HDCP RX W SCALER | ||
* The DXLink HDMI TX Module has been discontinued. This manual contains information on it for support.
Compatibility Note: The Transmitters and the Receiver listed above are compatible with a number of other DXLink products (see the section "Product Compatibility Tables" on page 8). All of the Transmitters are compatible with the Receiver. The Wallplate TX and Decor Wallplate TX must use DXLink power injectors when connecting directly to an HDMI RX; others may cause damage.
Product Notes
The Transmitters and Receiver are designed for transmission of an HDMI signal over twisted pair cable (or a DVI signal via a DVI-to-HDMI cable adapter) up to 328 feet (100 m). Functionality is briefly described below.
Multi-Format TX – The Multi-Format TX receives an HDMI signal or analog video signal (composite, Y/c, Y/Pb/Pr, RGB, RGBS, or RGBHV) and an audio signal from a source device. The audio can be either digital audio embedded with the HDMI signal, digital audio over S/PDIF, or analog stereo audio.
Either analog or digital video is transmitted out of the DXLink output. The active video selection is made using one of two methods: 1) Automatic, which selects digital video as the priority video input or analog video when no digital video is present. 2) Active ICSP command video input selection from a bound NetLinx Central Controller.
Both the video and audio are transported over twisted pair cable to an Enova DGX Digital Media Switcher, an applicable Enova DVX Solution (to an HDMI RX), or directly to an HDMI RX.
The 232 port (RS-232) on the Multi-Format TX supports bidirectional serial data via the twisted pair cable to/from the 232 port on an HDMI RX. The Multi-Format TX also has IR ports.
HDMI TX – The HDMI TX receives an HDMI signal and an audio signal from a source device. The audio can be either digital audio embedded with the HDMI, digital audio over S/PDIF, or analog stereo audio. Both the video and audio are transported over twisted pair cable to an Enova DGX Digital Media Switcher, an applicable Enova DVX Solution (to an HDMI RX), or directly to an HDMI RX. The 232 port (RS-232) on the HDMI TX supports bidirectional serial data via the twisted pair cable to/from the 232 port on an HDMI RX. The HDMI TX also has IR ports.
Wallplate TX and Decor Wallplate TX – These wallplates receive an HDMI signal or analog video signal (composite, Y/c, Y/Pb/Pr, RGB, RGBS, or RGBHV) and an audio signal from a source device. The audio can be either digital audio embedded with the HDMI signal or analog stereo audio.
Either analog or digital video is transmitted out of the DXLink output. The active video selection is made using one of two methods: 1) Automatic, which selects digital video as the priority video input or analog video when no digital video is present. 2) Active ICSP command video input selection from a bound NetLinx Central Controller.
Both the video and audio are transported over twisted pair cable to an Enova DGX Digital Media Switcher, an applicable Enova DVX Solution, or directly to an HDMI RX. Direct connection requires either PDXL-2 (FG1090-170) or PS-POE-AT-TC (FG423-84).
HDMI RX – The HDMI RX receives an HDMI signal with embedded audio over twisted pair cable from a DXLink compatible device (or from a DXLink Transmitter) and sends the signal on to the destination. Audio received on the HDMI RX can also be output on the Stereo Audio Out port if it originated as a 2 channel audio signal. The 232 port (RS-232) on the HDMI RX supports bidirectional serial data via the twisted pair cable to/from the 232 port on the Multi-Format TX or HDMI TX. The HDMI RX features SmartScale® Technology (integrated EDID output scaling) to ensure an appropriate output resolution, plus it supports a Manual (override) option for setting up custom resolutions and a Bypass option. The HDMI RX also has IR ports.
Note: If a DVI-D signal is used (via a DVI-to-HDMI cable adapter), the advanced audio support from HDMI will not be available.
Note: These DXLink products support several different modes which are available for system setup and use. Brief explanations of the modes are provided in the section "Quick Reference Tables for Modes" on page 23 along with page references to complete information.
Product Compatibility Tables
The Transmitters and the Receiver are compatible with the DXLink products listed in the two tables below.
Enova DGX Solutions and DXLink Functions
The following table shows which Enova DGX products support specific DXLink functions.
| DXLink Functions in Enova DGX Solutions | ||
| DXLink Twisted Pair Input Boards DXLink Twisted Pair Output Boards | ||
| DXLink Inputs Up to 8/16/32* | - | |
| Power on DXLink Inputs** Yes- | ||
| DXLink Outputs - Up to 8/16/32* | ||
| Power on DXLink Outputs** | - Y | e |
* Inputs and outputs up to 8, 16, or 32 depending on the system (in increments of 4 inputs or outputs per board).
** For power budget information for system planning when using DXLink Transmitters and Receivers with an Enova DGX Digital Media Switcher, see page 38.
Enova DVX Solutions and DXLink Functions
The following table shows which Enova DVX products support specific DXLink functions.
| DXLink Functions in Enova DVX Solutions* | ||||
| DVX-3155HD | DVX-3150HD | DVX-2155HD | DVX-2150HD | |
| DXLink Inputs 2 | 0 | 2 | 0 | |
| Power on DXLink Inputs | Yes | NA | Yes | NA |
| DXLink Outputs | 2 | 2 | 1 | 1 |
| Power on DXLink Outputs | No | No | Yes | Yes |
* Does not apply to the DVX-2100HD.
DXLink Transmitter and Receiver Features
Note: The Wallplate TX and Decor Wallplate TX have a limited set of features (i.e., no S/PDIF, IR, or serial ports).
- Incorporates HDMI ^ technology
- HDCP 1.3 compatible
- Supports computer video up to 1920x1200, HDTV up to 1080p, as well as 3D support (3D and Deep Color)
- Supports HDMI pass through with embedded digital audio and single link DVI (DVI-to-HDMI cable adapter required)
- Multi-Format TX, Wallplate TX, and Decor Wallplate TX support analog video: composite, Y/c, Y/Pb/Pr, RGB, RGBS, or RGBHV
- Reads the downstream EDID from the switcher (Endpoint Mode) or the sink (Extender Mode)
- Transports video signals over distances up to 328 feet (100 m) via the DXLink connection
- Interruption free content when used in conjunction with a switcher, AMX's exclusive InstaGate Pro® Technology allows audio and video to be switched quickly and easily to every connected display without the difficulties typically associated with HDCP.
- AutoDetect on the TXs and SmartScale® on the RX work to automatically recognize any device's supported resolutions and signal type parameters, allowing switching out source and destination devices without manual setup. Also included is the ability to control detailed timing parameters for customized video output formats. (SmartScale is the ability to configure the scaling output by automatically selecting destination defined resolutions.)
● Supports HDMI embedded digital audio, digital audio over S/PDIF, and analog stereo audio - Standard twisted pair cable saves time and installation effort
- The USB port on the HDMI Receiver passes keyboard and mouse USB signals to control a remote computer. The Transmitter's USB port acts as a Host. (The Transmitter and Receiver USB ports will be supported in a future firmware upgrade.)
- The 232 port (RS-232 serial) supports bidirectional transfer of serial data between Master and TX or RX (Endpoint Mode) or between TX and RX (Extender Mode).
- The IR port supports bidirectional transfer of IR data between Master and TX or RX (Endpoint Mode) or between TX and RX (Extender Mode).
- Power over DXLink (twisted pair cable) support when used with a switcher or with an approved AMX Power over DXLink device (for power budget information when used with an Enova DGX Digital Media Switcher, see page 38).
- A desktop power supply (ENERGY STAR ^® qualified) is provided per module. The Wallplate TX and Decor Wallplate TX receive power from the switcher or can be used with a DXLink power injector (for power budget information, see page 38).
- The modules are compatible with all V Style, versatile mounting options including rack, surface, and pole. The Wallplate TX includes a mounting bracket, and the Decor Wallplate TX mounts in a standard US double-gang box.
- Backed by AMX's 3 year warranty (see www.amx.com)
● 24-hour technical support
Note: Features and specifications described in this document are subject to change without notice.
Common Applications
DXLink Transmitters and Receivers are designed to send audio, video, and control to a remote display across the room, on the other side of the house, or to a classroom down the hall. The installation's requirements dictate the system setup which generally takes one of the following three forms.
- Endpoint Mode (Switcher) – One or more Transmitters and/or Receivers are connected to a switcher* containing an integrated Master (see page 34).
- Endpoint Mode (Standalone) – A standalone DXLink TX/RX pair** are connected directly to each other but, in addition, either the TX or RX is connected to a NetLinx Central Controller via a LAN or directly to the Controller (see page 37).
- Extender Mode (Standalone) – A standalone DXLink TX/RX pair** are connected directly to each other as a simple extender solution (see page 38).
* The switcher can be either an Enova DGX Switcher or an applicable Enova DVX Solution (see page 8).
** A wallplate in a standalone configuration requires power via a DXLink power injector.
Transmitters
Note: If a DVI-D signal is used (via a DVI-to-HDMI cable adapter), the advanced audio support from HDMI will not be available.
DXLink Multi-Format TX (AVB-TX-MULTI-DXLINK) Front View

FIG. 1 Multi-Format TX front view
DXLink HDMI TX (AVB-TX-HDMI-DXLINK) Front View (product discontinued)
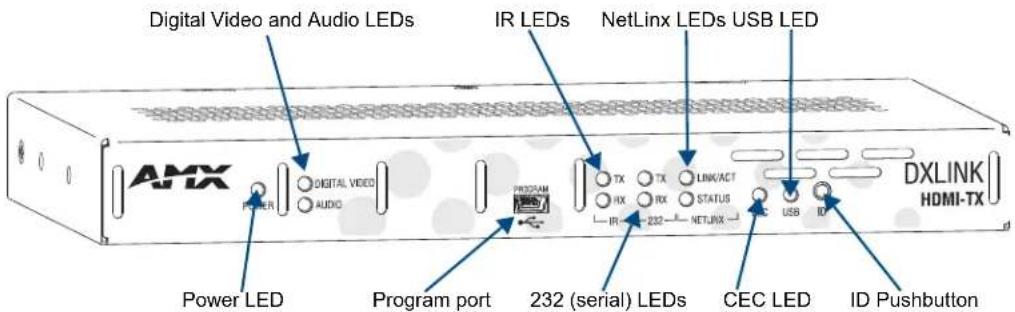
FIG. 2 HDMI TX front view
Components located on front of Multi-Format TX and HDMI TX (left to right):
- Power LED – Indicates when the Multi-Format TX or HDMI TX is powered on.
- Digital Video and Audio LEDs – Indicate the presence of digital video and digital audio signals, including an embedded audio signal on the HDMI path.
- Analog Video LEDs (Multi-Format TX only) – Indicate the type of analog video present through the Multi-Format TX: composite or Y/c; Y/Pb/Pr or RGB; RGBHV or RGBS.
- Program port – This port (USB mini-B connector) supports DGX Configuration software for programming a customer VGA EDID.
- IR LEDs – TX and RX LEDs indicate active IR communication.
- 232 LEDs (RS-232 serial) – TX and RX LEDs indicate active serial communication.
- NetLinx LEDs – Link/Act LED indicates network communication activity. The Status LED indicates unit status.
- CEC LED – CEC is not currently supported.
- USB LED – USB is not currently supported. This functionality will be available in a future firmware upgrade.
- ID Pushbutton – Places the Multi-Format TX or HDMI TX in ID Mode for setting the NetLinx ID (device only) and provides additional functionality, such as placing the device in Static IP Mode or DHCP Mode.
Multi-Format TX and HDMI TX LEDs
| Multi-Format TX and HDMI TX Indicator LEDs | ||
| LED Normal Display Indicates | ||
| Power Green Power is applied to the Transmitter Module | ||
| Digital Video Green A digital video signal is present through the Transmitter Module | ||
| Audio Green Embedded audio signal is present through the Transmitter Module | ||
| Analog Video (Multi-Format TX only) | One of the 3 LEDs will be Green | The type of analog video present through the Multi-Format TX:• C (composite) or Y/c (two component)• Y/PB/PR or RGB (three component)• RGBHV (five component) or RGBS (four component) |
| IR TX Red IR TX active communication | ||
| IR RX Yellow IR RX active communication | ||
| 232 (Serial) TX Red Serial TX active communication | ||
| 232 (Serial) RX Yellow Serial RX active communication | ||
| NetLinx Link/Act | Green Active | LAN connection to an AMX Network (Blinking = #3 Toggle OFF) |
| NetLinx Status | Green LAN connection is active | |
| CEC | OFF | CEC is not currently supported |
| USB Yellow USB is not currently supported (this functionality will be available in a future firmware upgrade) | ||
Note: For detailed behavior of the NetLinx Link/Act and Status LEDs on the module's front, see page 61. For detailed behavior of the RJ-45 connector LEDs on the module's rear, see page 48.
DXLink Multi-Format Wallplate TX (AVB-WP-TX-MULTI-DXLINK) Front View

FIG. 3 Multi-Format Wallplate TX front view, plus left edge and bottom edge views
Components located on front of Wallplate TX:
- HDMI In – HDMI connector (with locking center screw) for digital video and embedded digital audio (supports a DVI-D signal with use of DVI-to-HDMI cable adapter). When more than one audio signal is present, HDMI embedded audio takes precedence over analog audio.
- Digital Video LED – Indicates the unit is configured to pass HDMI with embedded audio (default).
- Video In – An HD-15 connector for analog video: C (composite), Y/c, Y/Pb/Pr, RGB, RGBHV, or RGBS. Pinouts for analog video are on page 128.
- Analog Video LEDs – Illuminates when the Wallplate TX is configured to pass analog video: composite or Y/c; Y/Pb/Pr or RGB; RGBHV or RGBS.
- Audio In Stereo – Audio connector is a 3.5 mm stereo jack. An analog audio signal is only available when HDMI embedded digital audio is not present (or configured for analog audio).
- Audio LED – Indicates the unit is configured to pass analog audio (coupled with digital or analog video path).
- USB Host port – Mini-B USB connector (supports USB host) for receiving keyboard / mouse commands from a specific RX. (USB port will be supported in a future firmware upgrade.)
- Power LED – Indicates when the Wallplate TX is powered on.
Components located on left and bottom edges of Wallplate TX:
- Reset button (left) – Resets the Wallplate TX's CPU (acts like a power cycle soft reboot).
- Program port (left) – This port (USB mini-B connector) supports DGX Configuration software for programming a customer VGA EDID.
- ID Pushbutton (left) – Places the Wallplate TX in ID Mode for setting the NetLinx ID (device only) and provides additional functionality, such as placing the device in Static IP Mode or DHCP Mode.
- NetLinx LEDs (bottom) – Left green LED (L = Link/Act) indicates network communication activity; right green LED (S = Status) indicates unit status.
- DXLink LEDs (bottom) – Left yellow LED indicates HDCP status; right green LED indicates that a valid DXLink connection has been established.
DXLink Decor Wallplate TX (AVB-DWP-TX-MULTI-DXLINK) Front View

FIG. 4 Decor Wallplate TX front view (before customer provided standard decor style front cover plate is attached)
Components located on left and right front sections of Decor Wallplate TX:
- USB Host port – Mini-B USB connector (supports USB host) for receiving keyboard / mouse commands from a specific RX. (USB port will be supported in a future firmware upgrade.)
- Audio In Stereo – Audio connector is a 3.5 mm stereo jack. An analog audio signal is only available when HDMI embedded digital audio is not present (or configured for analog audio).
- Video In – An HD-15 connector for analog video: C (composite), Y/c, Y/Pb/Pr, RGB, RGBHV, or RGBS. Pinouts for analog video are on page 128.
- HDMI In – HDMI connector (with locking center screw) for digital video and embedded digital audio (supports a DVI-D signal with use of DVI-to-HDMI cable adapter). When more than one audio signal is present, HDMI embedded audio takes precedence over analog audio.
● Power LED – Indicates when the Decor Wallplate TX is powered on. - Audio LED – Indicates the unit is configured to pass analog audio (coupled with digital or analog video path).
- Analog Video LEDs — Illuminates when the Decor Wallplate TX is configured to pass analog video: composite or Y/c; Y/Pb/Pr or RGB; RGBHV or RGBS.
- Digital Video LED – Illuminates when the Decor Wallplate TX is configured to pass HDMI with embedded audio (default).
The Decor Wallplate TX has a number of front panel components, some can be seen when a standard decor style front cover plate is attached and some are hidden by the plate (FIG. 4 shows all of them). The cover plate is customer provided to allow matching the individual decor of an environment or matching other standard decor covers in a room/area.
Components located on center front section of Decor Wallplate TX:
- USB Program port – This port (USB mini-B connector) supports DGX Configuration software for programming a customer VGA EDID.
- Reset button – Resets Decor Wallplate TX's CPU (acts like power cycle soft reboot).
- Dip switch – A four-toggle DIP switch is used for enabling/disabling special functionality (see page 40).
- ID Pushbutton – Places the Decor Wallplate TX in ID Mode for setting the NetLinx ID (device only) and provides additional functionality, such as placing the device in Static IP Mode or DHCP Mode.
- DXLink LEDs – HDCP LED indicates HDCP status; DXLink LED indicates that a valid DXLink connection has been established.
- NetLinx LEDs – Status LED indicates unit status; Link/Act LED indicates network communication activity.
Wallplate TX and Decor Wallplate TX Front LEDs
| Wallplate TX and Decor Wallplate TX Indicator LEDs | ||
| LEDs Normal | Display Indicates | |
| Digital Video (default) | Green The Wallplate TX and Decor Wallplate TX have been configured* to pass HDMI (for SEND_COMMAND information, see page 86) | |
| Analog Video One of the 3 LEDs will be Green | The Wallplate TX and Decor Wallplate TX have been configured* to pass one of the following types of analog video (for SEND_COMMAND information, see page 86):• C (composite) or Y/c (two component)• Y/PB/PR or RGB (three component)• RGBHV (five component) or RGBS (four component) | |
| Audio Green The Wallplate TX and Decor Wallplate TX have been configured* to pass analog audio as the audio source being embedded on the DXLink output connection (coupled with either the analog or digital video input path); for SEND_COMMAND information, see page 90 | ||
| Power Green Power (from switcher) is applied to the unit | ||
| LEDs (bottom edge of Wallplate TX) | ||
| NetLinx - L (Link) Green Active LAN connection to an AMX Network (Blinking = #3 Toggle OFF) | ||
| NetLinx - S (Status) Green Off | • Speed status is 100 Mbps• Speed status is 10 Mbps | |
| DXLink Yellow Yellow | Flashing Off | • Authenticated HDCP (handshaking has occurred successfully)• Video is active; no HDCP• No Video |
| DXLink Green Green DXLink connection is established | ||
| LEDs (under customer provided front cover plate on Decor Wallplate TX) | ||
| HDCP (DXLink) Yellow | Flashing Off | • Authenticated HDCP (handshaking has occurred successfully)• Video is active; no HDCP• No Video |
| DXLink | Green | DXLink connection is established |
| Status (NetLinx) | Green Off | • Speed status is 100 Mbps• Speed status is 10 Mbps |
| Link/Act (NetLinx) Green Active LAN connection to an AMX Network (Blinking = #3 Toggle OFF) | ||
* The LEDs for Digital Video, Analog Video, and Audio each indicate the configured state of the connectors, not necessarily the presence of signals through the Wallplate TX and Decor Wallplate TX.
Note: Detailed behavior for the NetLinx-L and NetLinx-S LEDs on the Wallplate TX or Link/Act and Status LEDs on the Decor Wallplate TX are on page 61, and basic information for the LEDs on the RJ-45 connector on the rear of the Wallplate TX and Decor Wallplate TX is on page 48.
Tip: If the Wallplate TX is installed in a location where it is difficult to check the LEDs on the bottom edge, slide a white piece of paper or a small mirror under the edge to view LED status.
Multi-Format TX Rear View

FIG. 5 Multi-Format TX rear view
HDMI TX Rear View (product discontinued)

FIG. 6 HDMI TX rear view
Note: The Multi-Format TX and HDMI TX each have a DIP switch on the bottom (see page 21).
The following components are located on the rear of the Multi-Format TX and HDMI TX Modules (from left to right):
Video In Connector (Multi-Format TX only)
The Video In connector on the Multi-Format TX is an HD-15 connector for analog video (composite, Y/c, Y/Pb/Pr, RGB, RGBHV, or RGBS). Pinouts for analog video are on page 128.
Note: When an analog video source cable is plugged into the Multi-Format TX, the Video LEDs on the front and on the Receiver turn green to show that video is present through the system. In addition, one of the Analog Video LEDs on the front of the Multi-Format TX and the HDMI RX turns green to show the type of video that is present through the system.
HDMI In Connector
The HDMI In connector is for digital video and embedded digital audio. When more than one audio signal is present and the default “auto” mode is enabled, HDMI embedded audio takes precedence over S/PDIF and analog audio.
When a NetLinx Central Controller is connected, an audio format SEND_COMMAND is available (the Transmitter must be set for network connectivity via #3 Toggle) to select the desired audio source (see page 90).
The HDMI connector has a center screw for locking capability. The HDMI connector also supports a DVI-D signal with the use of a DVI-to-HDMI cable adapter.
Note: When a digital video source cable is plugged into the HDMI connector, the Video LEDs on the front of the Multi-Format TX or HDMI TX and Receiver turn green to show that video is present through the system.
Stereo Audio In Jack
The Stereo Audio In jack is a 3.5 mm stereo jack. By default, the stereo audio jack will be third in priority behind the embedded audio on the HDMI input and digital audio on the RCA connector.
When a NetLinx Central Controller is connected, an audio format SEND_COMMAND is available (the Transmitter must be set for network connectivity via #3 Toggle) to select the desired audio source (see page 90).
Digital Audio In Jack
The Digital Audio In jack is an RCA jack for an S/PDIF audio signal. When more than one audio signal is present and the default “auto” mode is enabled, HDMI embedded audio takes precedence over S/PDIF, which takes precedence over analog audio.
When a NetLinx Central Controller is connected, an audio format SEND_COMMAND is available (the Transmitter must be set for network connectivity via #3 Toggle) to select the desired audio source (see page 90).
ICS LAN10/100 Connector
The ICS LAN 10/100 (RJ-45) connector provides for Ethernet 10/100 connectivity (e.g., receiving SEND_COMMANDs and downloading firmware update files). For pinout and LED information, see page 48.
RS-232 (Serial) Port
The RS-232 port (serial data interface) is a 3-position screw terminal block which accepts data from the source device and transfers it via the twisted pair cable to the HDMI RX, which in turn transfers the data to the destination device. The transfer of data can also be made from the destination to the source. In addition to being directly connected to a device, this port can be connected as an independent native NetLinx control port from a networked NetLinx Central Controller.
IR RX Port
The IR RX port is used for IR control (see page 22). This port is a 3.5 mm stereo jack. In addition to being directly connected to a device, this port can be connected as an independent native NetLinx control port from a networked NetLinx Central Controller.
IR TX Port
The IR TX port is used for IR control (see page 22). This port is a 2-way mini-Phoenix connector. In addition to being directly connected to a device, this port can be connected as an independent native NetLinx control port from a networked NetLinx Central Controller.
USB Port
This port will be supported with a future firmware upgrade.
The USB-B port on the rear of the Multi-Format TX and HDMI TX is connected to a PC and supports a USB device. This is the Host port that is used in conjunction with the USB-A port on the rear of the HDMI RX for sending keyboard / mouse commands to a connected PC at the Transmitter.
DXLink Output Connector
The DXLink (RJ-45) connectors transport digital video, embedded audio, Ethernet, and bidirectional control over twisted pair cable to DXLink devices or boards (or an HDMI RX), including digitally transcoded analog video signals. The DXLink path supports HDCP. The DXLink line also supports power from an Enova DGX Switcher and from some Enova DVX Solutions to power the module. For pinout and LED information, see page 48.
Ground Screw
The ground screw is used for creating a technical ground for the ungrounded sources/destinations with respect to the DXLink Transmitters/Receivers and switcher (see page 45).
Power Jack
Important: If desktop power is used to power the Transmitter, only the provided desktop power supply should be used and it must not be altered in any way. Remote power can also be provided via a switcher, PDXL-2 (FG1090-170), or PS-POE-AT-TC (FG423-84).
The power receptacle is a 2.1 mm DC jack for connecting power. Power can come from a locally connected DC supply of 12 V. The automatically adjusting universal 110/220 IEC power supply is provided. The power supply is ENERGY STAR ^® qualified to ensure maximum efficiency and savings.
Note: Transmitter Modules can also be powered via the DXLink connector when attached to a DXLink Input Board in an Enova DGX Switcher. We recommend calculating the power budget for the switcher to maintain the redundancy of its power supplies (see page 38).
Wallplate TX and Decor Wallplate TX Rear View
Located on the rear of the Wallplate TX are a DXLink (RJ-45) connector and a DIP switch.
The Decor Wallplate TX also has its DXLink connector on the rear, but its DIP switch is on the front (see page 21). The front can be covered with a customer provided standard decor style front cover plate.
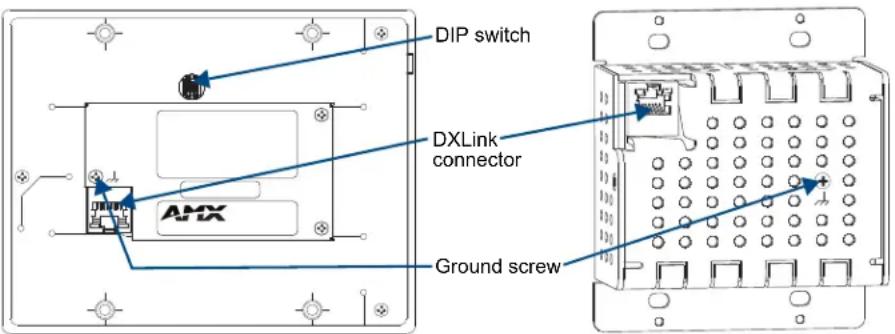
FIG. 7 Wallplate TX rear view (mounting bracket removed) and Decor Wallplate TX rear view
DXLink Output Connector
The DXLink (RJ-45) connectors transport digital video, embedded audio, bidirectional control, and Ethernet (SEND_COMMANDs only) over twisted pair cable to DXLink devices or boards, including digitally transcoded analog video signals. The DXLink path supports HDCP. In addition, the Wallplate TX and Decor Wallplate TX receive power over the DXLink line from an Enova DGX Switcher, some Enova DVX Solutions, or PDXL-2 (FG1090-170) or PS-POE-AT-TC (FG423-84). For pinout and LED information, see page 48.
DIP Switch
The DIP switch is on the rear of the Wallplate TX. It is on the front of the Decor Wallplate TX and can be covered with a customer provided standard decor style front cover plate. For information on the DIP switch, see page 21.
Ground Screw
The ground screw is used for creating a technical ground for the ungrounded sources/destinations with respect to the DXLink Transmitters/Receivers and switcher (see page 45).
Receiver
Note: If a DVI-D signal is used (via a DVI-to-HDMI cable adapter), the advanced audio support from HDMI will not be available.
DXLink HDMI Receiver (AVB-RX-HDMI-DXLINK) Front View

FIG. 8 HDMI RX front view
Note: The HDMI RX has a DIP switch on the bottom; for details, see page 21.
The following components are located on the front of the HDMI RX (left to right):
● Power LED – Indicates when the HDMI RX is powered on.
- Video and Audio LEDs – Indicate the presence of video and embedded audio signals through the HDMI RX.
- Scaling button and LEDs — Use the Scaling button to select one of the 3 scaling options: Bypass, Auto (default), or Manual. For information on using the Scaling button and options for persisting the Scaling Mode, see page 59.
- Program port – This port is a USB mini-B connector.
- IR LEDs – TX and RX LEDs indicate active IR communication.
- 232 (RS-232) LEDs – TX and RX LEDs indicate active serial communication.
- NetLinx LEDs – Link/Act LED indicates network communication activity. The Status LED indicates unit status.
- CEC LED – CEC is not currently supported.
- USB LED – USB is not currently supported. This functionality will be available in a future firmware upgrade.
- ID Pushbutton – Places the HDMI RX in ID Mode for setting the NetLinx ID (device only) and provides additional functionality, such as placing the device in Static IP Mode or DHCP Mode.
Receiver Module LEDs
| HDMI RX Indicator LEDs | ||
| LED Normal Display Indicates | ||
| Power Green Power is applied to the Receiver | ||
| Video Green A video signal is present through the Receiver | ||
| Audio Green An embedded audio signal is present through the Receiver | ||
| Scaling:– Bypass– Auto– Manual | One LED is greenThe other two are off | The Receiver is in one of the three modes for scaling• At initial power up, the Receiver defaults to the Auto scaling option*• Pressing the Scaling button cycles the module through the options: Bypass, Auto, and Manual• If Bypass is solid and Auto is flashing, then the RX is trying to read EDID from the sink |
| IR TX Red IR TX active communication | ||
| IR RX Yellow IR RX active communication | ||
| Serial TX Red Serial TX active communication | ||
| Serial RX Yellow Serial RX active communication | ||
| NetLinx Link/Act | Green Active LAN connection to an AMX Network (Blinking = #3 Toggle OFF) | |
| NetLinx Status | Green LAN connection is active | |
| CEC | OFF | CEC is not currently supported |
| USB Yellow USB is not currently supported (this functionality will be available in a future firmware upgrade) | ||
* When the output cable is disconnected from the HDMI RX or if no EDID can be found on the destination device, the last used Scaling Mode LED will be ON. In either case, the HDMI RX will continue to hold its output resolution to the last known preferred resolution until a power cycle or reconnection of a sink with a valid EDID. On power up without a valid EDID, the default preferred output resolution presented will be 1280x1024 @ 60 Hz until a different EDID is detected.
Note: For detailed behavior of the NetLinx Link/Act and Status LEDs on the module's front, see page 61. For detailed behavior of the RJ-45 connectors' LEDs on the module's rear, see page 48 through page 48.
Receiver Rear View

FIG. 9 HDMI RX rear view
The following components are located on the rear of the HDMI RX (left to right):
Power Jack
Important: If desktop power is used to power the Receiver, only the provided desktop power supply should be used and it must not be altered in any way. Remote power can also be provided via a switcher, PDXL-2 (FG1090-170), or PS-POE-AT-TC (FG423-84).
The power receptacle is a 2.1 mm DC jack for connecting power. Power can come from a locally connected DC supply of 12 V. An automatically adjusting universal 110/220 IEC power supply is provided. The power supply is ENERGY STAR ^® qualified to ensure maximum efficiency and savings.
Note: The HDMI RX can also be powered through the DXLink connector when it is attached to a DXLink Output Board in an Enova DGX Switcher. We recommend calculating the power budget for the switcher to maintain the redundancy of its power supplies (see page 38).
Ground Screw
The ground screw is for creating a technical ground for the ungrounded sources/destinations with respect to the DXLink Transmitters/Receivers and switcher (see page 45).
DXLink Input Connector
The DXLink (RJ-45) connectors transport digital video, embedded audio, Ethernet, and bidirectional control over twisted pair cable to DXLink devices or boards, including digitally transcoded analog video signals. The DXLink path supports HDCP and also supports power over the same path from an Enova DGX Switcher and from some Enova DVX Solutions to power the module. For pinout and LED information, see page 48.
ICS LAN 10/100 Connector
The ICS LAN 10/100 (RJ-45) connector is for Ethernet 10/100 connectivity (e.g., receiving SEND_COMMANDs commands and downloading firmware update files). For pinout and LED information, see page 48.
RS-232 Port
The RS-232 (serial data interface) port is a 3-position screw block which accepts data from the source device and transfers it via the twisted pair cable to the HDMI RX, which in turn transfers the data to the destination device or the transfer of data can also be made from the destination to the source. In addition to being directly connected to a device, this port can be connected as an independent native NetLinx control port from a networked NetLinx Central Controller.
IR RX Port
The IR RX port is used for IR control (see page 22). This port is a 3.5 mm stereo jack. In addition to being directly connected to a device, this port can be connected as an independent native NetLinx control port from a networked NetLinx Central Controller.
IR TX Port
The IR TX port is used for IR control (see page 22). This port is a 2-way mini-Phoenix connector. In addition to being directly connected to a device, this port can be connected as an independent native NetLinx control port from a networked NetLinx Central Controller.
USB Port
This port will be supported with a future firmware upgrade.
The USB-A port supports a USB host and enables USB signaling over HID (Human Interface Devices) only, e.g., keyboard \ mouse. This port is used in conjunction with the USB-B port on the HDMI TX which supports a USB device and connects to the PC.
HDMI Out Connector
The HDMI Out connector is for digital video and embedded audio. The HDMI connector has a center screw for locking capability. The HDMI connector also supports a DVI-D signal (a DVI-to-HDMI cable adapter is required).
Stereo Audio Out Connector
The Stereo Audio Out connector is a 3.5 mm stereo jack. This connector has an analog audio signal available for output whether the embedded audio over the DXLink cable originated as 2 channel digital or analog stereo. If encoded digital audio or multi-channel audio paths are embedded on the HDMI path, then the local analog out will not be available.
Common Features/Functionality
This section covers the DIP switches, the USB port, HDCP compliance, and IR functionality.
DIP Switches
Tip: For easiest access to the DIP switch toggles, we recommend setting them before installation.
A four-toggle DIP switch is on the bottom of the DXLink Modules, on the rear of the Wallplate TX, and on the front of the Decor Wallplate TX (the front can be covered with a customer provided standard decor style front cover plate).
-
1 Toggle is used for enabling/disabling the physical ICS LAN 10/100 port (see page 41).
-
2 Toggle is used for setting the DXLink Modules to either automatically or manually determine the DXLink Mode (see page 41).
-
3 Toggle is used for enabling/disabling network connectivity of the DXLink Transmitter or Receiver to a connected NetLinx Central Controller (used for IR ports, serial ports, and commands to the DXLink unit); see page 42.
-
4 Toggle is not functional.

FIG. 10 DIP switch location on DXLink Modules
Note: The mounting bracket on the Wallplate TX must be removed (unscrew the four screws from the bracket and set it aside) before the DIP switch toggles can be set.
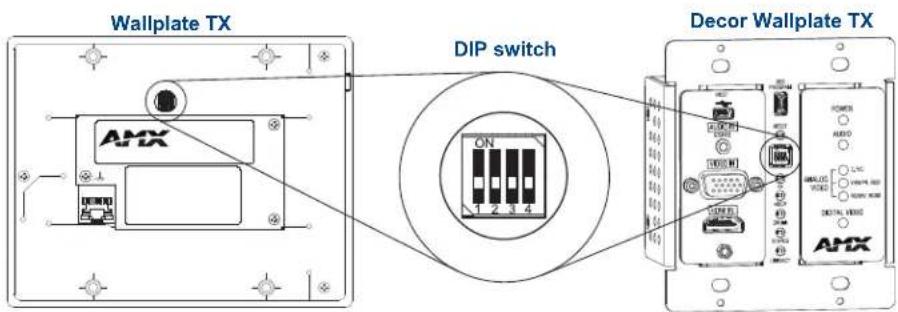
FIG. 11 DIP switch on Wallplate TX (remove mounting bracket) and on Decor Wallplate TX
For complete information on setting DIP switches (including settings for common scenarios), see the section starting on page 40.
USB Port (Rear) – This port will be supported with a future firmware upgrade.
DXLink Multi-Format TX
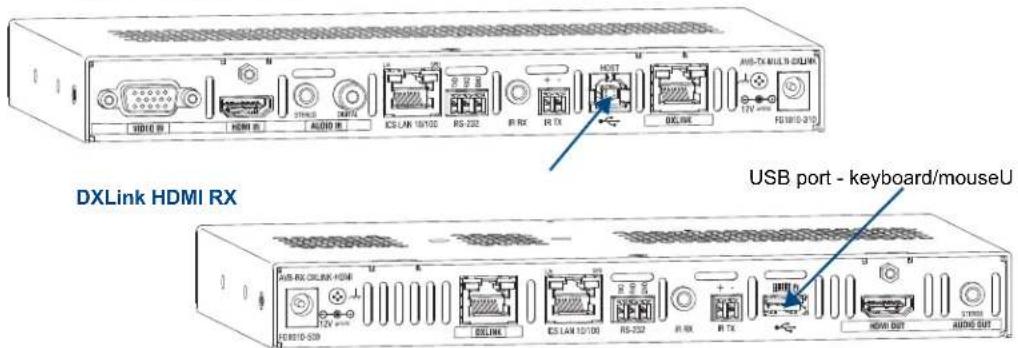
FIG. 12 TX USB port = host (top); RX USB port = keyboard/mouse (bottom)
Multi-Format and HDMI Transmitters
The USB-B port on the rear of the Multi-Format TX and HDMI TX can be connected to a PC to support a USB device. This port is considered the Host port, which is used in conjunction with the USB-A port on the rear of the HDMI RX. As the Host port, it is connected to a PC and passes through information via the DXLink connection to the HDMI Receiver.
HDMI Receiver
The USB-A port on the rear of the HDMI Receiver supports pass through information from the USB Host port on the Transmitter to an HID (Human Interface Device), which is most commonly a keyboard or mouse.
HDCP Compliance
If the connected downstream sink is not HDCP compliant, then the HDMI output on the Receiver will not send the signal. This does not affect additional displays the source may be routed to, i.e., HDCP compliant displays will still show content from the source device even when the source device is also routed to non-compliant displays. Non-compliant devices can be easily identified because they display a dark red image or an orange image to indicate the authentication process failed.
IR Control on HDMI TX, Multi-Format TX, and HDMI RX (Optional)
The following two items are required for IR control. In addition, a compatible remote control unit can be used with the system. (The two items listed are not included with the modules.)
- IR03 – External IR Receiver Module (FG-IR03). The IR03 can be connected to the IR RX port on the Multi-Format TX or HDMI TX or to the IR RX port on the HDMI RX, allowing IR signals to be received from a compatible IR remote control. The IR03 allows the Multi-Format TX or HDMI TX to be placed behind the display device if desired.
- CC-NIRC – NetLinx IR Emitter Cable (FG10-000-11). The CC-NIRC can be connected to the IR TX port on the Transmitter or to the IR TX port on the HDMI RX. This allows IR signals to be sent to the source device from the Multi-Format TX or HDMI TX or to the display device from the Receiver.
Quick Reference Tables for Modes
The modes listed in the following three tables are those supported by DXLink Transmitters and Receivers. The Quick Reference Tables are intended to help users navigate the many modes available for system setup and use. For complete information on any of the modes listed, see the relevant sections or chapter referenced at the end of the Description.
| Quick Reference Table – Modes for Handling System Architecture | |
| Mode Description | |
| DXLink Modes | DXLink Modes refer to the type of physical components and how they are connected to make up the system. When Transmitters and Receivers are cabled into a system and powered on, they automatically detect the DXLink Mode they are being used in. Endpoint Mode:When the system is setup to use Transmitters and/or Receivers with an Enova DGX Digital Media Switcher or an applicable Enova DVX Solution, the system is in Endpoint Mode (see example on page 34).OrWhen a TX is directly connected to an RX but, in addition, the TX and/or RX is connected to a NetLinx Central Controller via a LAN or directly connected to the Controller, the system is in Endpoint Mode (see example on page 37).Extender Mode:When a TX is directly connected to an RX, the system is in Extender Mode (see example on page 38).For further information, reference #2 Toggle DIP switch settings for DXLink Mode (see page 41) and DXLink System SEND_COMMANDs (see page 98). |
| Quick Reference Table – Modes for Handling Addressing/Networking | |
| Mode Description | |
| IP Addressing Mode | IP Addressing Modes refer to network connection settings. By default, all network connection settings are turned OFF.Static IP Mode:This mode configures the network connection to one stable IP address the device will use continuously.DHCP Mode:This mode configures the network connection to choose a new IP address for each network session.To enable network capability, see “Network Configuration” on page 63. |
| ID Mode | ID (Identify) Mode refers to the protocol for enabling a user to establish device addresses. This Mode, accessible through NetLinx Studio, places the entire system on hold while it waits for an event from a NetLinx device in the named system (e.g., pressing the ID Pushbutton on the TX or RX). For further information, see “Assign a Device Address (ID Mode)” on page 67. |
| Ethernet Modes Ethernet | Auto Mode:This mode configures the LAN driver to discover its own settings based on the network it is connected to.Speed/Duplex Mode:This mode configures the LAN driver to calculate its speed as either 10 or 100 and to communicate in either half- or full-duplex.Ethernet Mode discovery and configuration information is available through Telnet commands. For further information, see “Establishing a Terminal Connection Via Telnet” on page 111. |
| Quick Reference Table – Modes for Handling Addressing/Networking (continued) | |
| Master Connection Modes | Master Connection Modes refer to the modes of communication used for connection to the Master as specified via the SET CONNECTION Telnet command.Auto Mode:This mode utilizes TCP communication. It looks for a matching System Number and attempts to come online with the first Master it sees with that System Number.TCP URL Mode:TCP; the Master is specified via URL.UDP URL Mode:UDP; the Master is specified via URL.NDP Mode (Default):UDP; utilizes the NDP binding process to assign the DXLink Module (the physical device) to a Master (or Virtual Master) via NetLinx Studio. Once bound, communications are conducted via UDP.For further information, see “Master Connection Modes” on page 119. |
| IRSEND_COMMAND Modes | IR SEND_COMMAND Modes refer to displaying and setting the IR port active system settings as IR, Serial, or Data modes.GET MODE SEND_COMMAND:The GET MODE SEND_COMMAND reveals the active system (IR, Serial, or Data) settings.SET MODE SEND_COMMAND:The SET MODE SEND_COMMAND changes the active system settings.For further information, see “IR SEND_COMMANDs” on page 91. |
| Quick Reference Table – Modes for Handling Video Processing | |
| Mode Description | |
| Scaling Modes | Scaling Modes refer to how the system alters or maintains a source device's resolution as it is passed along to the destination device. The Scaling Mode can be set on the HDMI RX with the Scaling button (see page 59), or with SEND_COMMANDs (see page 81), or though DGX Configuration Software when scaling is being done via an Enova DXLink Output Board.Auto Mode (Default):• Auto Mode (SmartScale®) allows the destination device to choose the resolution it needs.Manual Mode:• Manual Mode allows the user to configure the resolution the video will display through a destination device.Bypass Mode:• Bypass Mode allows the video signal to display over the destination device without altering the signal's resolution. |
DXLink Transmitters and Receiver Specifications
The specifications apply to the following Transmitters and Receiver:
- FG1010-310 – DXLink Multi-Format Transmitter Module
- FG1010-300 – DXLink HDMI Transmitter Module
- FG1010-320-BL – DXLink Multi-Format Wallplate Transmitter, Black*
- FG1010-320-WH – DXLink Multi-Format Wallplate Transmitter, White*
- FG1010-325-BL – DXLink Multi-Format Decor Wallplate Transmitter (US), Black*
- FG1010-325-WH – DXLink Multi-Format Decor Wallplate Transmitter (US), White*
- FG1010-500 – DXLink HDMI Receiver Module
* A limited set of specifications apply, as the Wallplate TX and Decor Wallplate TX have a limited set of features when compared to the Multi-Format TX and HDMI TX.
| General Specifications | |
| Parameter Value | |
| Approvals CE, UL, cUL, FCC Class A, RoHS | |
| AC Power (Modules Only) • 100 to 240 V | VAC single phase, 50 Hz to 60 HZ• 0.6 A @ 115 VAC max. |
| DXLink Power | • TX and RX Modules:Power can also be supplied by a DXLink Power sourcing device such as an Enova DGX 8/16/32 Digital Media Switcher or compatible Enova DVX All-In-One Presentation Switcher (e.g., -3155HD) or PS-POE-AT-TC High Power PoE Injector (FG423-84) or PoE injector PDXL-2 (FG1090-170). AMX does not support the use of any other power supplies or PoE injectors as these may potentially damage the DXLink equipment.• To use PS-POE-AT-TC or PDXL-2 as a power source, the TX and RX modules require firmware v1.2.40 for TX and v1.0.80 for RX or above.• Power Budget: When installed in conjunction with the Enova DGX Digital Media Switcher, use the Enova DGX Configuration Tool located at www.amx.com/enova to determine the power requirements of the configuration and whether any of the DXLink Transmitters or Receivers should be powered with the local power supplies or the supported Power over DXLink injectors. The configuration tool contains instructions on how to determine power requirements.• Wallplate TX & Decor Wallplate TX:Power must be supplied by a DXLink Power sourcing device such as an Enova DGX 8/16/32 Digital Media Switcher or compatible Enova DVX All-In-One Presentation Switcher (e.g., -3155HD) or PS-POE-AT-TC High Power PoE Injector (FG423-84) or PoE injector PDXL-2 (FG1090-170). AMX does not support this use of any other power supplies or PoE injectors as these may potentially damage the DXLink equipment.• To use PS-POE-AT-TC or PDXL-2 as a power source, the wallplates require firmware v1.2.40 or above. |
| Power Consumption, Local 12 V Supplied (max.) | Multi-Format TX 10 W (13.5 V), HDMI TX 9 W, HDMI RX 18 W |
| Power Consumption, Enova DXLink Power Supplied (max.) | Multi-Format TX 10 W, HDMI TX 9 W, Wallplate TX 7 W, Decor Wallplate TX 7 W, HDMI RX 15 W |
| Thermal Dissipation, Local 12 V Supplied (max.) | Multi-Format TX 34 BTU/hr. (13.5 V), HDMI TX 31 BTU/hr., HDMI RX 61 BTU/hr. |
AMX reserves the right to modify its products and their specifications without notice.
| General Specifications (continued) | |
| Parameter Value | |
| Thermal Dissipation,Enova DXLink Power Supplied (max.) | Multi-Format TX 34 BTU/hr., HDMI TX 31 BTU/hr.,Wallplate TX 24 BTU/hr., Decor Wallplate TX 24 BTU/hr.,HDMI RX 51 BTU/hr. |
| Power Connector (Modules Only) 2.1 mm DC power jack | |
| Operational Temperature 32° F to 104° | F (0°C to 40°C) |
| Storage Temperature -22°F to 158°F (-30°C to 70°C) | |
| Operational Humidity 5 to 85% RH (non-condensing) | |
| Storage Humidity 0 to 90% RH (non-condensing) | |
| Module - DimensionsDepthWidthHeight | 5.15 in. (13.08 cm)8.71 in. (22.12 cm)1.00 in. (2.54 cm) |
| Module - Weight Approximately 1.1 lb. | (0.50 kg) |
| Module - Shipping Weight Approximately | 2.2 lb. (1.00 kg) |
| Modules - Mounting Options | Compatible with all V Style versatile mounting options including rack,surface, or pole (for V Style Mounting kits, see www.amx.com) |
| Wallplate TX - DimensionsDepthWidthHeight | 1.31 in. (3.33 cm)5.98 in. (15.20 cm)4.69 in. (11.90 cm) |
| Wallplate TX - Weight Approximately | 1.4 lb. (0.64 kg) |
| Wallplate TX - Shipping Weight Approximately | 2.0 lb. (0.91 kg) |
| Wallplate TX - Mounting Options Wallplate TX mounts onto standard double-gang US, UK, or EU backboxes | |
| Decor Wallplate TX -DimensionsDepthWidthHeight | 2.25 in. (5.72 cm)3.48 in. (8.84 cm)4.06 in. (10.31 cm) |
| Decor Wallplate TX - Weight Approximately | 0.75 lb. (0.34 kg) |
| Decor Wallplate TX - Shipping Weight | Approximately 1.35 lb. (0.61 kg) |
| Decor Wallplate TX - Mounting | Decor Wallplate TX mounts in standard double-gang US back box |
| MTBF | 381,000 hours |
| Transport Layer Throughput | 10.2 Gbps |
| Twisted Pair Cable Type | Shielded Cat6, Cat6A, Cat7* |
| Twisted Pair Cable Length | Up to 328 ft. (100 m)*Important: DXLink twisted pair cable runs for DXLink equipmentshould only be run within a common building. |
| Modules - Airflow Convection (openings on top of case) | |
| Transmitters and ReceiverInter-compatibility | All DXLink Transmitters can connect directly to the DXLink HDMI RX.The Wallplate TX and Decor Wallplate TX require either PDXL-2(FG1090-170) or PS-POE-AT-TC (FG423-84) to do so. |
* For more details and helpful cabling information, reference the white paper titled “Cabling for Success with DXLink” available at www.amx.com or contact your AMX representative.
AMX reserves the right to modify its products and their specifications without notice.
| General Specifications (continued) | |
| Other AMX Equipment | |
| AMX Products Compatible with All DXLink Transmitters | DXLink HDMI RXEnova DGX Digital Media SwitchersEnova DVX-3155HDEnova DVX-2155HD |
| AMX Products Compatible with DXLink RX | DXLink HDMI TXDXLink Multi-Format TXDXLink Wallplate TXDXLink Decor Wallplate TXEnova DGX Digital Media SwitchersEnova DVX-3155HDEnova DVX-3150HDEnova DVX-2155HDEnova DVX-2150HD |
| Included Accessories Desktop power supply | ENERGY STAR®qualified): 1 per moduleImportant:Onlythe provided desktop power supply should be used, and itmust notbe altered in any way. |
| Compatible / Optional Equipment • CC-NI | RC NetLinx Emitter Cable (FG10-000-11)IR03 External IR Receiver Module (FG-IR03)PDXL-2 (FG1090-170)PS-POE-AT-TC (FG423-84) |
Compatibility Note: DXLink Transmitters and Receivers are compatible with other DXLink products (see the Compatible AMX Products listed in the table above). The Wallplate TX and the Decor Wallplate TX require an approved DXLink power injector (see table above) when connecting directly to an HDMI RX (Transmitters require firmware v1.2.40 or above; Receivers require firmware v1.0.80 or above). AMX does not support the use of power supplies other than the one provided or power injectors other than those listed as they may potentially damage DXLink equipment.
| NetLinx and Control Specifications | |
| ICS LAN / Ethernet Port (Modules Only) | TCP/IP port (ICS LAN 10/100)R J - 4 5 |
| Serial (Modules Only) • Bidirectional RS-232 | Standard NetLinx baud rate 1200 to 115KParity support: Odd/Even/None3.5 mm pluggable Phoenix terminal block |
| IR Control (Modules Only) • Port for use with IR03 Receiver (optional accessory FG-IR03) | Port for use with CC-NIRC Emitter (optional accessory FG10-000-11) |
| USB (HID)This port will be supported with a future firmware upgrade. | Multi-Format TX or HDMI TX: USB type B connectorWallplate TX and Decor Wallplate TX: USB mini-B connectorReceiver Module USB type A connector |
| Advanced Configuration Interface USB mini-B connector (Program port) | |
| ID Pushbutton • Toggle between DHCP and static IP addressing | Places system in NetLinx Device ID assignment modeReset the factory default settingsRestore the factory firmware image |
AMX reserves the right to modify its products and their specifications without notice.
| HDMI Video Specifications | |
| Compatible Formats HDMI, HDCP, DVI (DVI requires conversion cable) | |
| Signal Type Support HDMI, DVI-D (Single Link with a DVI-to-HDMI cable adapter), DisplayPort++ (input only with HDMI cable adapter) | |
| Video Data Rate (max.) 4.95 Gbps / 6.75 Gbps^ | |
| Video Pixel Clock (max.) 165 MHz / 225 MHz^ | |
| Progressive Resolution Support 480p up to 1920x1200 @ 60 Hz (including but not limited to those resolutions listed on page 136 and page 139) | |
| Interlaced Resolution Support | 480i, 576i, 1080i (including but not limited to those resolutions listed on page 136 and page 139) |
| Deep Color Support 24 bit, 30 bit^, 36 bit^ | |
| Color Space Support RGB 4:4:4 | YCbCr^^ 4:4:4 and 4:2:2 |
| 3D Format Support Yes^ (HDMI Primary Formats)Frame Packing 1080p up to 24 HzFrame Packing 720p up to 50/60 HzFrame Packing 1080i up to 50/60 HzTop-Bottom 1080p up to 24 HzTop-Bottom 720p up to 50/60 HzSide-by-Side Half 1080p up to 50/60 HzSide-by-Side Half 720p up to 50/60 Hz | |
| Audio Format Support Dolby TrueHD, Dolby Digital*, DTS-HD Master Audio, DTS*, 2 CH L-PCM, 6 CH L-PCM, 8 CH L-PCM | |
^ Only supported when the DXLink RX scaler is in Bypass mode and the format is 1080p60 or less.
^^ Input signal support for YCbCr 4:4:4 and 4:2:2; output color-space is converted to RGB 4:4:4.
* Dolby Digital and DTS support up to 48 kHz, 5.1 channels.
Note: Interlaced and progressive video are supported into the Transmitter; progressive is only supported out of the Receiver unless in non-scaling Bypass mode.
AMX reserves the right to modify its products and their specifications without notice.
| HDMI Video Specifications (continued) | |
| Audio Resolution 16 bit to 24 bit | |
| Audio Sample Rate 32 kHz, 44.1 | kHz, 48 kHz, 96 kHz, 192 kHz |
| Local Audio Support TX insertion | RX extraction |
| HDCP Support Yes | Supports AMX HDCP InstaGate Pro® Technology.When used with an Enova DGX 8/16/32 Digital Media Switcher or Enova DVX-2155 or -3155, the key support is up to 16 sinks per output, independent of the source device.When used as a single point-to-point solution, key support is defined by the source device. |
| CEC support CEC is not currently supported | |
| TX Input | |
| Input Signal Type • HDMI | DVI-D (Single Link with a DVI-to-HDMI cable adapter)DisplayPort ++ (input only with HDMI cable adapter) |
| DDC/EDID Support | The HDMI EDID in point to point mode is passed up from the sink device.When used with Enova DGX 8/16/32 Digital Media Switcher or Enova DVX-2155, -3155, the HDMI EDID is passed from the Enova Switcher input to the TX and is user re-programmable.The analog video input connection provides a fixed EDID set.For the EDID list, see the specifications in the “Enova DGX DXLink Twisted Pair Boards” chapter in the Installation Manual – Enova DGX 8/16/32 Digital Media Switchers. |
| Input Voltage (nominal) 1.0 Vpp differential | |
| Input Re-clocking (CDR) Yes | |
| Input Equalization Yes, adaptive | |
| Input Connector HDMI Type A female | |
| Propagation Delay (typical) 5 μs | |
| RX Output | |
| Output Signal Type • HDMI | DVI-D (Single Link with a DVI-to-HDMI cable adapter) |
| Output Scaling | SmartScale®, Manual Configuration, Bypass |
| SmartScale® Output Resolution Support | All resolutions between 480p and 1920x1200 @ 60 Hz via automatic SmartScale® query of the display's declared EDID detailed timing definition |
| Output Voltage (nominal) | 1.0 Vpp differential |
| Output Re-clocking Yes | |
| +5 V DDC Pin Output | 50 mA when using DXLink power, 500 mA when using local 12 V supply |
| +5 V USB Output | 150 mA when using DXLink power, 500 mA when using local 12 V supply |
| Output Rise Time / Fall Time | 425 ps typical (20% to 80%) |
| Output Connector | HDMI Type A female |
| Propagation Delay (typical) | 25 ms when scaling; 5 μs when in Bypass mode |
| HDMI Audio Synchronization | Video Formats @ 60 Hz frame rate: Audio is actively delayed to match video within 9 ms leading to 10 ms lagging when scaling. When in Bypass mode, the audio is matched to video within 1 ms. |
AMX reserves the right to modify its products and their specifications without notice.
| Analog Video Specifications | |
| DXLink Multi-Format TX, Multi-Format Wallplate TX, and Decor Wallplate TX | |
| Compatible Formats • RGBHV, RGBS, RGsB• Y/Pb/Pr (HDTV)• Y/c (S-Video), C (Composite) | |
| Progressive Resolution Support 480p up to | 1920x1200 @ 60 Hz |
| Interlaced Resolution Support* 480i, 576i, 1080i | |
| Auto-Adjust Input Supported | |
| RGB Input Signal Level Range 1 Vpp nominal | |
| RGB Input Impedance 75 ohm | |
| HV Sync Input Signal Level Range 2 to 5 Vpp | |
| HV Sync Input Impedance 2.5 pF typical, 10 | pF max. |
| Digital Processing 24 bit, 165 MHz | |
| Y/Pb/Pr Input Signal Level Range • 1.0 Vpp | for Y• 700 mVpp for Pb, Pr |
| Y/Pb/Pr Input Impedance 75 ohm | |
| Y/c (S-Video) Input Signal Level Range • 1.0 | Vpp for Y• 1.0 Vpp for c |
| Y/c (S-Video) Input Impedance 75 ohm | |
| C (Composite) Input Signal Level Range | 1.0 Vpp |
| C (Composite) Input Impedance | 75 ohm |
| Connector | HD-15 (breakout cable required for non-RGB formats) |
* Interlaced video is supported into the Transmitters; progressive is only supported out of the Receiver unless it is in Scaler Bypass mode.
AMX reserves the right to modify its products and their specifications without notice.
| Local Audio Specifications | |
| TX Input | |
| Input Signal Types Stereo analog, S/PDIF* | Video signal must be present to pass audio |
| Analog Input Level (max.) +2 dBu, unbalanced | |
| Analog Input Impedance 10 kohms | |
| Analog to Digital Conversion 48 kHz sample | rate, 24-bit |
| S/PDIF Audio Format Support Dolby Digital, | DTS, 2 CH L-PCM |
| S/PDIF Resolution* 16 to 24 bit | |
| S/PDIF Sample Rate* 32 kHz, 44.1 kHz, 48 kHz, 96 kHz | |
| S/PDIF Input Signal Level Range* 200 mVpp | to 600 mVpp terminated |
| S/PDIF Input Impedance* 75 ohm | |
| Analog to Digital Reference Level +2.5 dBu = | 0 dBfs |
| Connector • 3.5 mm mini-stereo jack (analog stereo) | |
| • RCA jack (S/PDIF)* | |
| RX Output | |
| Output Signal Types Stereo analog | |
| Analog Output Level (max.) +2 dBu, unbalanced | |
| Analog Output Frequency Response | <+0 dB to -0.5 dB, 20 Hz to 20 kHz |
| Analog Audio Output THD+N <0.03%, 1 kHz, | -10 dBu to +2 dBu |
| Analog Audio Out SNR | >85 dB, 20 Hz to 20 kHz, Vin = +2 dBu |
| Audio Synchronization | Video Formats @ 60 Hz frame rate: Audio is actively delayed to match video within 9 ms leading to 10 ms lagging when scaling. When in Bypass Mode, the audio is matched to video within 1 ms. |
| Connector 3.5 mm mini-stereo jack (analog stereo) | |
* S/PDIF specifications do not apply to the Wallplate TX or to the Decor Wallplate TX.
AMX reserves the right to modify its products and their specifications without notice.
Product Overview and Specifications
Installation and Setup
Site Recommendations
When placing the DXLink Transmitters and Receivers in an installation, follow the recommendations and precautions in this section to reduce potential setup and operation hazards.
Environment
☐ Choose a clean, dust free, (preferably) air-conditioned location.
☐ Avoid areas with direct sunlight, heat sources, or high levels of EMI (Electromagnetic Interference).
Multi-Format TX, HDMI TX and HDMI RX Accessibility
Make sure the front of each module is accessible, so that you can monitor the LED indicators. Leaving adequate clearance at the rear will also allow for easier cabling and service.
Power
The power source's electrical outlet should be installed near the module, easily accessible, and properly grounded. Power should come from a building branch circuit. To avoid an overload, note the power consumption rating of all the equipment connected to the circuit breaker before applying power.
General Hazard Precautions
These recommendations address potential hazards that are common to all installations.
Important: DXLink twisted pair cable runs for DXLink equipment should only be run within a common building.
Elevated Operating Temperature
The maximum rated ambient temperature is 104^ (40^) for DXLink Transmitters and Receivers. All equipment should be installed in an environment compatible with the manufacturer's maximum rated ambient temperature. In a closed or multi-unit rack assembly, the operating ambient temperature of the rack environment may be greater than the ambient room temperature.

Caution: To protect the equipment from overheating, do not operate in an area that exceeds 104^ F ( 40^ C) and follow the clearance recommendation below for adequate airflow.
Airflow Restriction
The modules are designed to adequately dissipate the heat they produce under normal operating conditions; however, this design is defeated when high heat producing equipment is placed directly above or below the modules.

Caution: To prevent overheating, avoid placing high heat producing equipment directly above or below the modules. We recommend allowing plenty of clearance above the vent holes on top of the modules. Do not place anything directly on top of the modules that would restrict airflow through the vent holes on top.
Reliable Earthing (Grounding)
Reliable earthing of rack-mounted equipment should be maintained. If not using a direct connection to the branch circuit (e.g., plugging into a power strip), pay particular attention to supply connections (not applicable when power is supplied from an Enova DGX Digital Media Switcher or Enova DVX Solution via a DXLink line). When using DXLink Power from a switcher, we recommend wiring a technical ground for the ungrounded sources/destinations with respect to the DXLink Transmitters/Receivers and switcher (see page 45).
Unpacking Tips
Before fully unpacking the Transmitters and Receivers, inspect the shipping box(es) for any signs of damage. If a box is partially crushed or any sides have been broken open, notify the shipping agency immediately and contact your AMX representative (see the warranty at www.amx.com).
☐ Once unpacking is complete, closely check the physical condition of the units.
□ Collect all documentation.
Note: Please save the original shipping container and packing materials. AMX is not responsible for damage caused by insufficient packing during return shipment to the factory. Shipping boxes are available; for details, contact your AMX representative.
Setup Information
Setup Requirements
● A PC with NetLinx Studio (v3.3 or later) installed.
- An understanding of which DXLink Mode the system will be used in (see below and page 38).
- An understanding of the DIP switch settings (see page 41).
- When used with an Enova DGX Digital Media Switcher – The system’s power requirements must be determined (see page 38).
- When used with an Enova DVX Solution – The SEND_COMMANDs for enabling network activity (Ethernet traffic) over the DXLink line must be used (see page 100).
Important: We recommend that DXLink equipment be installed by a technician with knowledge of networks and experience with NetLinx Studio and its Telnet interface. NetLinx experience should include changing device addresses, binding devices, updating firmware, etc.
The remainder of the “Setup Information” section covers information for system setup, power budget planning, network loop concerns, DIP switch settings, mounting options, chassis grounding, cable requirements and recommendations (including RJ-45 pinouts and LED behavior), and audio type precedence.
The specific installation's requirements dictate the system setup, which generally takes one of the following three forms.
- Endpoint Mode (Switcher) – One or more Transmitters and/or Receivers are connected to a switcher* containing a Master (see below).
- Endpoint Mode (Standalone) – A standalone DXLink TX/RX pair are connected directly to each other but, in addition, either the TX or RX is connected to a NetLinx Central Controller via a LAN or directly to the Controller (see page 37).
- Extender Mode (Standalone) – A standalone DXLink TX/RX pair are connected directly to each other as a simple extender solution (see page 38).
* The switcher can be either an Enova DGX Switcher or an applicable Enova DVX Solution (see “Product Compatibility Tables” on page 8).
Endpoint Mode (Switcher): Example of Typical System Setup
The primary function of the Transmitters and Receivers is to work with compatible DXLink equipment as an endpoint solution for transmission of HDMI over twisted pair cable (or DVI-D signals with the use of a DVI-to-HDMI cable adapter, or analog video signals through a Multi-Format TX, Wallplate TX, or Decor Wallplate TX).
The Transmitter receives an HDMI signal and an audio signal from a source device. The audio can be either digital audio embedded with the HDMI signal, digital audio over S/PDIF (S/PDIF is not available on the Wallplate TX or Decor Wallplate TX), or analog stereo audio. Both the video and embedded audio are transmitted over twisted pair cable to the RJ-45 connector on the DXLink Input Board. The HDMI signal is then routed through any (or all) of the connectors on one or more output boards.
When the HDMI signal is routed through a DXLink Output connector to a DXLink HDMI Receiver, the Receiver sends the HDMI signal with embedded audio on to the destination device. The audio can also be output on the Receiver's stereo audio port.
In a system where DXLink Transmitters and Receivers are used in conjunction with a switcher (e.g., the Enova DGX 16), the cable runs from a Transmitter to a DXLink Input Board and from a Receiver to DXLink Output Board can each be up to 328 feet (100 m).

FIG. 13 Endpoint Mode (Switcher) setup with Enova DGX 16
Tip: For systems with special requirements – Before installing in the final location, place the equipment close together, so that the destination monitor and a PC for control can be seen simultaneously if adjustments are necessary. Scaling adjustments can be made using SEND_COMMANDs (see page 79). For Enova DGX Switchers, DGX Configuration Software can also be used to make scaling adjustments via the switcher (see the switcher's "Instruction Manual").

Caution: Be careful not to create a network (Ethernet) loop. To avoid doing so, see page 40.
Custom EDID Settings
- If Transmitters are part of an Enova DGX endpoint system which requires custom EDID settings, see the switcher's Instruction Manual for information on the EDID programming functionality in DGX Configuration Software (available at www.amx.com). SEND COMMANDs can also be used (see page 79).
- If Receivers are part of an Enova DGX endpoint system which requires scaler control and settings, see the switcher's Instruction Manual for information on the scaling functionality in DGX Configuration Software (available at www.amx.com). SEND_COMMANDs can also be used (see page 79).
Options for System Setup with Enova DGX DXLink Boards
The following table contains options for using DXLink Transmitters and Receivers in conjunction with DXLink Twisted Pair Input and Output Boards in an Enova DGX Digital Media Switcher.
System Setup Options – Enova DGX DXLink Boards with DXLink Transmitters/Receivers
| DXLink Module/Wallplate Input Board Output Board DXLink Module | |||
| HDMI TX Module → | DXLink Twisted Pair → | DXLink Twisted Pair → | HDMI RX Module |
| HDMI TX Module → | DXLink Twisted Pair→ | Any board* → | Not applicable |
| Multi-Format TX Module → | DXLink Twisted Pair → | DXLink Twisted Pair → | HDMI RX Module |
| Multi-Format TX Module → | DXLink Twisted Pair → | Any board * → | Not applicable |
| Multi-Format Wallplate TX → | DXLink Twisted Pair → | DXLink Twisted Pair → | HDMI RX Module |
| Multi-Format Wallplate TX → | DXLink Twisted Pair → | Any board* → | Not applicable |
| Decor Wallplate TX → | DXLink Twisted Pair → | DXLink Twisted Pair → | HDMI RX Module |
| Decor Wallplate TX → | DXLink Twisted Pair → | Any board* → | Not applicable |
| Not Applicable | Any board* → | DXLink Twisted Pair → | HDMI RX Module |
* If the board is an SC Optical Board in an Enova DGX Digital Media Switcher, it will need the appropriate DGX Fiber Module. For information, see the DGX Fiber Module's Instruction Manual.
Options for System Setup with Enova DVX Solutions
The following table contains options for using DXLink Transmitters and Receivers in conjunction with DXLink Input and Output connectors on Enova DVX Solutions. Note that on the input side, four Transmitter options are available. The Transmitters used with the inputs can be of the same type or different, depending on the installation needs.
Unless otherwise indicated, the Enova DVX Solutions in the table below have 2 DXLink input and/or output connectors.
System Setup Options – Enova DVX DXLink Solutions with DXLink Transmitters/Receivers
| DXLink Module/Wallplate Options | Enova DVX Solution | DXLink Module | |
| ...... | DVX-3155HDDVX-2155HD** | ...... | |
| HDMI TX Module →Multi-Format TX Module →Multi-Format Wallplate TX →Decor Wallplate TX → | DXLinkInput connector → | DXLinkOutput connector → | HDMI RX Module |
| ...... | DVX-3150HD | ...... | |
| NA | NA | DXLinkOutput connector → | HDMI RX Module |
| ...... | DVX-2150HD** | ...... | |
| NA | NA | DXLinkOutput connector → | HDMI RX Module |
** These Enova DVX models have 1 DXLink output connector each.
Functions of DXLink Transmitters and Receivers
The diagram in FIG. 14 shows the functions of DXLink Transmitters and Receivers. The example descriptions contain the device HDCP key count when used in conjunction with DXLink Boards in an Enova DGX Digital Media Switcher and when using a Transmitter and Receiver as a standalone pair.

flowchart
graph LR
    A["Source"] -->|TX acts like a sink| B["Switcher"]
    B -->|DXLink In DXLink Out| C["Destination"]
    A -->|HDMI cable| D["Twisted pair cable"]
    B -->|RX acts like a source| E["Twisted pair cable"]
    C -->|HDMI cable| F["Destination"]

flowchart
graph LR
    A["Source"] -->|TX acts like a sink| B["Twisted pair cable"]
    B --> C["Switcher"]
    C --> D["Destination"]
    C --> E["DXLink In"]
    C --> F["HDMI Out"]
    E --> G["HDMI cable"]
    F --> H["HDMI cable"]

flowchart
graph LR
    A["Source"] -->|HDMI cable| B["Switcher"]
    B -->|DXLink Out| C["Destination"]
    B -->|RX acts like a source| D["Destination"]
    B -->|Twisted pair cable| E["Destination"]

flowchart
graph LR
    A["Source"] --> B["TX acts like a repeater"]
    B --> C["Twisted pair cable"]
    C --> D["RX acts like a repeater"]
    D --> E["Destination"]
    B --> F["HDMI cable"]
    C --> G["HDMI cable"]
Example A: When a Receiver acts like a source, its key does not count. Source device sees 1 key (Transmitter). Example B: When a Transmitter acts like a sink, the source device sees 1 key (Transmitter). Example C: When a source device is connected directly to a switcher, the source sees 1 key (switcher input). Example D: When a Transmitter is part of a standalone pair, its key does not count. Source device sees 2 keys.
FIG. 14 Repeater and source functions of TX/RX Modules (A, B, D also apply to Wallplate TX and Decor Wallplate TX)
Endpoint Mode (Standalone): Example of Typical System Setup
A standalone DXLink TX/RX pair are connected directly to each other but, in addition, either the TX or RX is connected to a NetLinx Central Controller via a LAN or directly to the Controller.
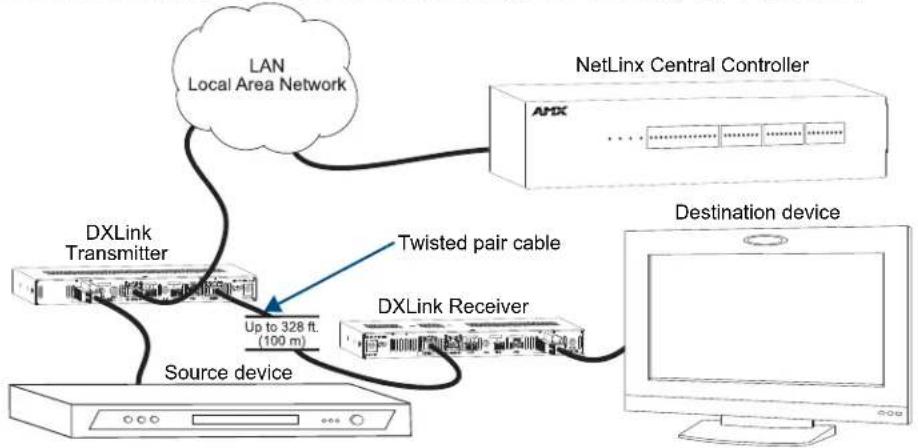
flowchart
graph TD
    A["LAN Local Area Network"] --> B["NetLinx Central Controller"]
    B --> C["DXLink Receiver"]
    C --> D["Destination device"]
    C --> E["DXLink Transmitter"]
    E --> F["Source device"]
    C --> G["Twisted pair cable"]
    G --> H["Up to 328 ft. (100 m)"]
FIG. 15 Endpoint Mode (Standalone) with NetLinx Central Controller
Extender Mode (Standalone): Example of Typical System Setup
A Transmitter and Receiver standalone pair can also work together as an extender solution for transmission of HDMI over twisted pair cable up to 328 feet (100 m). The standalone setup supports DVI-D signals with the use of a DVI-to-HDMI cable adapter. A Multi-Format TX and HDMI RX pair can also support an analog video source.
In Extender systems with a Wallplate TX or Decor Wallplate TX, power can be provided to the units via the DXLink line by connecting a DXLink power injector to the Wallplate and using either the desktop power supply or another DXLink power injector with the HDMI RX.
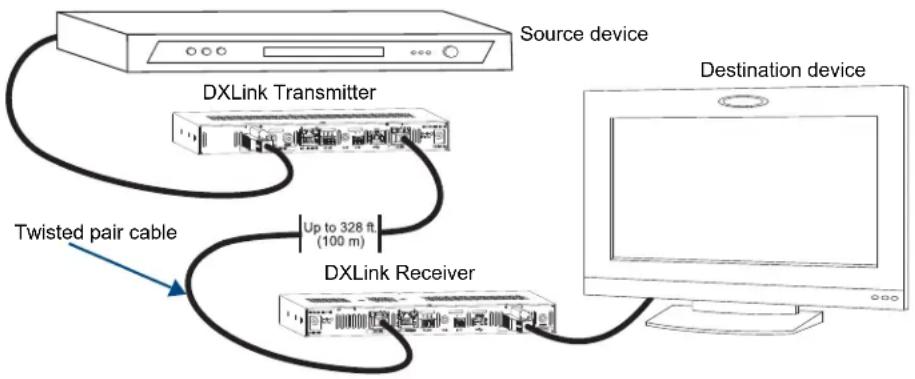
FIG. 16 Extender Mode (Standalone) system
Important Power Considerations for Enova DGX Endpoint Systems
- Local power – Local power (the desktop power supply) always takes precedence over power via the DXLink line from the switcher. However, if a locally powered unit is connected to a switcher and the local power is lost (i.e., unplugged or turned off), the unit will power down and then automatically power back up using power from the switcher via the DXLink connection (increasing the overall power draw on the switcher). When local power is restored, it automatically replaces the power over the DXLink line.
-
DXLink power – When modules are being powered by an Enova DGX DXLink board, PDXL-2, or PS-POE-AT-TC (using power via the DXLink line), to maintain the switcher's power redundancy, we recommend that you:
-
Determine the power budget based on the Input/Output boards used and the quantity of powered endpoints (modules); see below.
- Do not use the local DC power jack on the module (even if the local power adapter is turned off).
Note: When using DXLink Power from an Enova DGX Switcher, we recommend wiring a technical ground for ungrounded sources/destinations with respect to the DXLink Transmitters/Receivers and switcher (see page 45).
Power Budget Planning for System Setup with an Enova DGX
Note: This section does not apply to the Enova DVX Solutions due to their minimal number of DXLink connections.
Before installing an Enova DGX Digital Media Switcher and connecting any required DXLink Transmitters and Receivers, the total power draw for the system should be calculated in order to maintain the redundancy of the power supplies in the enclosure. (Each Enova DGX enclosure ships with two mutually-redundant power supplies.)
Important: If you do not plan to draw power from the Enova DGX enclosure's power supplies, you must power the DXLink Transmitter and Receiver Modules with local power (desktop power supply) or remote power (DXLink power injector), which always overrides power from the switcher. If that power source is turned off, the DXLink Transmitters and Receivers will reboot and then start drawing power from the switcher.
Power Budget Calculation
Calculating the power budget helps determine how many DXLink Transmitters and Receivers can be powered through the Enova DGX Digital Media Switcher while maintaining power redundancy if one of the power supplies should fail. The Enova DGX Configuration Tool is used to determine the switcher's power budget. Simply enter the types of boards and the number of DXLink Transmitters and Receivers to be powered through the switcher, and the calculator shows the resulting power draw. The Enova DGX Configuration Tool is at www.amx.com/enova.
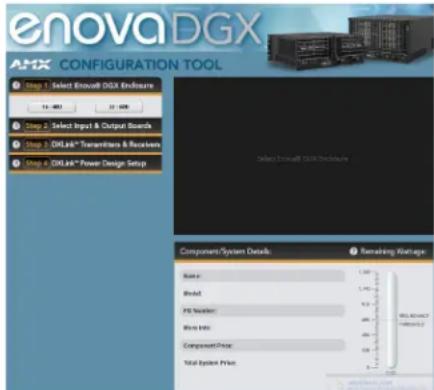
If more DXLink units are required than the switcher can support while maintaining redundancy, any DXLink Modules can be powered using the provided desktop power supplies, PDXL-2 (FG1090-170), or PS-POE-AT-TC (FG423-84).
Important: AMX does not support the use of any power supplies other than the provided ones or power injectors other than the ones approved as they may potentially damage the DXLink equipment.
Foregoing Power Supply Redundancy
Depending on particular Enova DGX input and output board configurations, operating over the redundant power supply level may be necessary on a permanent basis for some installations. While foregoing the benefits associated with a redundant power supply should be understood, operating without redundancy is in no way detrimental to the system, as long as both power supplies are operational. In this case, necessary power will be pulled evenly from both supplies. However, the loss of one power supply will result in the system being non-operational from a normal “non-redundant” system capability perspective.
In the Event of a Power Supply Failure
If an Enova DGX power supply fails, check the following to determine which situation applies:
- Enova DGX 8/16 within its power budget – the system will continue to run; okay to leave it powered until the failed power supply is replaced.
- Enova DGX 8/16 over its power budget – the system will continue to run; however, we do not recommend leaving it powered until the failed power supply is replaced, unless enough DXLink Transmitter or Receiver Modules are removed (or powered locally) to bring the system's power budget within its maximum limit. (Another option is to remove some of the input and/or output boards.)
- Enova DGX 32 within its power budget – the system will continue to run; okay to leave it powered until the failed power supply is replaced.
- Enova DGX 32 over its power budget – the remaining power supply will turn off. If enough DXLink Transmitter or Receiver Modules are removed (or powered locally) to bring the system's power budget within its maximum limit, the system will be able to run until the failed power supply is replaced. (You can also remove some input and/or output boards.)
In all of the situations above, the power supply should be replaced as soon as possible to restore power redundancy to the system or to allow the system to become fully operational again. Unless the Enova DGX Digital Media Switcher has exceeded its power budget, it should operate normally with a failed power supply. For additional information on power supplies and power supply troubleshooting for an Enova DGX Switcher, see the Instruction Manual – Enova DGX 8/16/32 Digital Media Switchers at www.amx.com. For power supply replacement information, contact technical support (see page 104).

Avoiding Network (Ethernet) Loops
Caution: Be careful not to create a network (Ethernet) loop.
Only one connection to a LAN is permitted within a switching system with DXLink support. Network loops must be avoided (see FIG. 17).
Example
In the example in FIG. 17, a network loop was created when the Enova DGX 16 was connected to a LAN and one of its DXLink Transmitters was connected to the same LAN. The DXLink Transmitter must be disconnected from the LAN. The same problem would also occur if an enclosure and one (or more) of its DXLink Receivers were connected to a common LAN. Remember to avoid network loops.
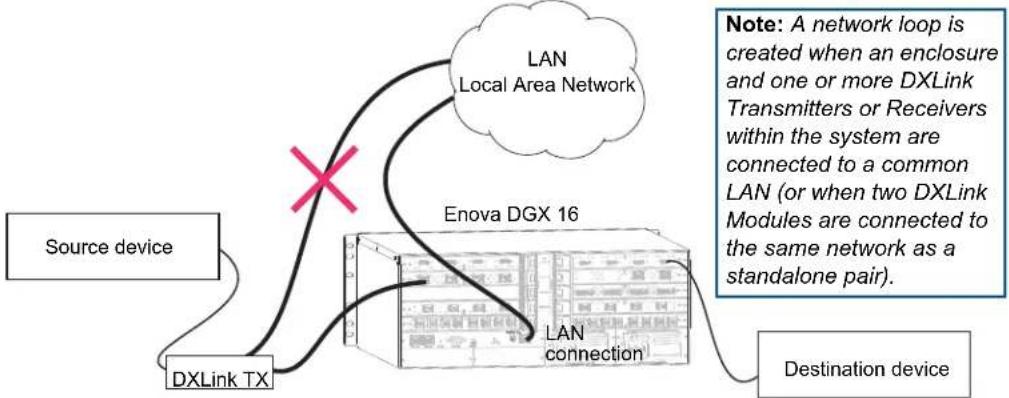
flowchart
graph TD
    A["Source device"] --> B["DXLink TX"]
    B --> C["Enova DGX 16"]
    C --> D["Destination device"]
    E["LAN Local Area Network"] --> C
    F["Note: A network loop is created when an enclosure and one or more DXLink Transmitters or Receivers within the system are connected to a common LAN (or when two DXLink Modules are connected to the same network as a standalone pair)."]
FIG. 17 Avoid network loops
DIP Switch Location
Tip: For easiest access to the DIP switch toggles, we recommend setting them before installation.
DIP switch toggles for enabling/disabling special Receiver/Transmitter functionality are located on the bottom of the Receiver and the Transmitters (FIG. 18), on the rear of the Wallplate TX (left in FIG. 19), and on the front of the Decor Wallplate TX (right in FIG. 19).
Note: DIP switch settings on any of these DXLink products are read only on reboot. After the settings are read, any adjustments of the toggles will not be implemented and will not affect the system.

FIG. 18 DIP switch on bottom of Receiver and Transmitters

FIG. 19 DIP switch on rear of Wallplate TX (remove mounting bracket) and front of the Decor Wallplate TX
Setting DIP Switch #1 to Enable/Disable Access to ICS LAN 10/100 Port
The #1 Toggle is used for enabling/disabling network activity over the physical ICS LAN 10/100 port. It does not affect network activity over DXLink. (For SEND_COMMANDs to disable/enable ICS LAN functionality, see page 98.)
Note: #1 Toggle settings do not apply to Wallplate TX & Decor Wallplate TX – leave #1 Toggle OFF.
Tip: Common setup scenarios and their DIP switch settings are provided in a table on page 43.
#1 Toggle Settings
- OFF (default) – When the #1 Toggle is set to OFF, network activity over the ICS LAN 10/100 port is disabled.
- ON – When the #1 Toggle is set to ON, network activity over the ICS LAN 10/100 port is enabled.
Installation Options
- Option A – For a network connection between a Transmitter and a Receiver where only one of them is connected to a LAN, set the #1 Toggle to ON for the unit that is connected to the network.

Caution: Option A – Do not connect both the Transmitter and the Receiver to a common LAN as a network loop will result. For information on avoiding network loops, see page 40.
- Option B – When a Transmitter or Receiver is connected to a DXLink input or output on an Enova DGX Digital Media Switcher or Enova DVX switcher, the switcher provides a network connection allowing the Transmitter or Receiver to appear in the online tree in NetLinx Studio (#3 Toggle must be set to ON). For connecting the Transmitter or Receiver to other equipment using the ICS LAN 10/100 port, the #1 Toggle must be set to ON.

Caution: Option B – Because the DXLink connection carries network activity passed from the switcher, do not connect the ICS LAN 10/100 port on the Transmitter or Receiver to the same LAN as the switcher because a network loop will result. For information on avoiding network loops, see page 40.
Setting DIP Switch #2 to Set the DXLink Mode
The #2 Toggle can be set to automatically or manually select the DXLink Mode (to either Extender or Endpoint) for a given Transmitter/Receiver Module or pair.
Note: #2 Toggle settings do not apply to Wallplate TX & Decor Wallplate TX – leave #2 Toggle OFF.
Tip: Common setup scenarios and their DIP switch settings are provided in a table on page 43.
#2 Toggle Settings
- OFF (default) – When the #2 Toggle is set to OFF, the Transmitter and Receiver will each auto-discover* what type of DXLink equipment they are connected to and will automatically self-configure to be in one of two DXLink Modes based on the connection:
- Extender Mode – This mode is automatically selected when a TX and RX are connected directly to each other (a standalone pair). The Transmitter and Receiver act like a simple extender, and serial and IR data is passed through them.
- Endpoint Mode – This mode is automatically selected when a module is connected directly to a DXLink port on a switcher. Serial and IR operations are handled by the host providing control of endpoints. The Master's programming specifies where IR and serial commands are sent (this is handled independently from the routing of the video signals).
* Any time the DXLink connection is re-established or power is cycled on a module, the auto-discovery process will take place, as long as the #2 Toggle remains in the OFF position.
- ON – When the #2 Toggle is set to ON, the auto-discover feature is disabled and the module can be manually set to either Endpoint Mode (default) or Extender Mode. In Endpoint Mode, when the module is connected to a switcher or a separate NetLinx Master*, IR and serial operation are only handled via the host.
* When standalone modules need to be controlled by a separate NetLinx Master, then they need to be in Endpoint Mode. Only one must be connected via the ICS LAN 10/100 port to the Master or to a LAN with the Master on it. This requires #1 Toggle to be ON to enable the ICS LAN port. #2 Toggle needs to be ON to place the modules in Endpoint Mode, and #3 Toggle needs to be ON to enable network connectivity.
Note: On either setting, the DXLink Mode may be set via SEND_COMMANDs (see page 98). When #2 Toggle is set to the OFF position, the auto-discovery process will overwrite the DXLink Mode setting. However, when the #2 Toggle is set to the ON position, auto-discovery is disabled and the mode set by SEND_COMMANDs will persist (i.e., the DXLink Mode setting cannot be overwritten).
Setting DIP Switch #3 for Network Connectivity
The #3 Toggle is used for enabling/disabling network connectivity of the DXLink Transmitter or Receiver. If enabled it allows the Transmitter or Receiver to be configured to connect to a NetLinx Central Controller (used for controlling the DXLink unit and allowing Ethernet traffic); see page 42.
Note: Wallplate TX – Before the DIP switch toggles can be set, the mounting bracket must be removed (unscrew the four screws from the bracket and set it aside). Decor Wallplate TX – Set before adding customer provided decor style front cover plate (requires four screws).
Tip: Common setup scenarios and their DIP switch settings are provided in a table on the next page.
#3 Toggle Settings
- OFF (default) – When the #3 Toggle is set to OFF, the Transmitter or Receiver will not try to connect to the network and will not acquire an IP address.
- ON – When the #3 Toggle is set to ON, the Transmitter or Receiver will attempt to connect to the network via DHCP or static IP, depending on how the unit has been set up (see page 59). The Transmitters and Receivers will not display in NetLinx Studio and will not accept commands or queries unless the #3 Toggle is ON.
Note: After the #3 Toggle is set to ON, a network connection is established, and the NetLinx Studio screen is refreshed, Transmitters and Receivers display in the OnLine Tree as Unbound NDP (Network Detect Proxy) Devices. To facilitate IRL and KIT file transfers, they can be bound to the integrated NetLinx Master in a switcher or to another NetLinx Master. A Virtual NetLinx Master can also be used for file transfers.
Scenarios / DIP Switch Settings Table
The following table contains the most common scenarios for setting up Transmitters and Receivers as a standalone pair or with other equipment. Find the scenario in the table that you want to use and then set the Dip switches accordingly. A detailed explanation of functions for each toggle is provided on the two previous pages.
Note: The #1 and #2 Toggles do not apply to the Wallplate TX and Decor Wallplate TX.
Tip: Each toggle's ON position is toward the connectors on the rear of the DXLink Modules or toward the top of the unit for the DXLink Wallplate TX and Decor Wallplate TX (see page 40).
| Common Scenarios DIP Switch Toggle Settings | ||||
| Standalone Setup – TX/RX pair direct connection 1 2 3 4 | ||||
| AV signals only OFF OFF OFF N/A | ||||
| AV with Ethernet pass through to networked device* | ON OFF | OFF N/A | ||
| AV with NetLinx control of TX/RX unit and serial/IR ports** | ON ON | ON N/A | ||
| AV with NetLinx control of TX/RX unit and serial/IR ports, plus Ethernet pass through to networked device* | ON ON | ON N/A | ||
| Switcher Setup – TX/RX with Enova DVX/DGX Switcher 1 2 3 4 | ||||
| AV signals only OFF OFF OFF N/A | ||||
| AV with Ethernet pass through to networked device* | ON | N/A OFF | N/A | |
| AV with NetLinx control of TX/RX unit and serial/IR ports | OFF | N/A ON | N/A | |
| AV with NetLinx control of TX/RX unit and serial/IR ports, plus Ethernet pass through to networked device* | ON | N/A ON | N/A | |
* Connect the ICS LAN 10/100 port of the DXLink unit to the network device (e.g., laptop, IP controlled projector, AMX ICSLan EXB Device). In a standalone setup, connect the ICS LAN 10/100 port of the other DXLink unit to the network.
** In a standalone setup using NetLinx control of the DXLink serial/IR ports, only one of the DXLink units should be connected to the network (the unit with #1 Toggle enabled).
Important: When connecting a Transmitter or a Receiver in a standalone pair setup to a Master (or Virtual Master) for upgrade purposes, #1, #2, and #3 Toggles must be ON.

Mounting Options for Modules (Rack Trays and Mounting Brackets)
Caution: To prevent overheating, avoid placing high heat producing equipment directly above or below the modules. We recommend allowing plenty of clearance above the vent holes on top of the modules. Do not place anything directly on top of the modules that would restrict airflow through the vent holes on top.
The Multi-Format TX, HDMI TX, and HDMI RX are classified as V Style modules, which have optional V Style mounting hardware. These versatile mounting options include rack trays and mounting brackets for desktops, under desks, on walls, and on poles. For details on V Style Mounting Kit options, see www.amx.com.

FIG. 20 V Style mounting hardware
Important: When mounting under a surface, the module should be mounted upright and lowered in the slots to provide an airflow gap between the surface and the vent holes. If not using V Style brackets, be sure to leave a gap between the top of the unit and the surface for heat to escape.
Mounting Options for Wallplates
Wallplate TX – The holes in the Wallplate TX's mounting bracket are designed to accommodate a variety of double-gang back boxes using two or four screws. Two types of screws are provided: standard and metric. Be sure to orient the mounting bracket as shown in FIG. 21.
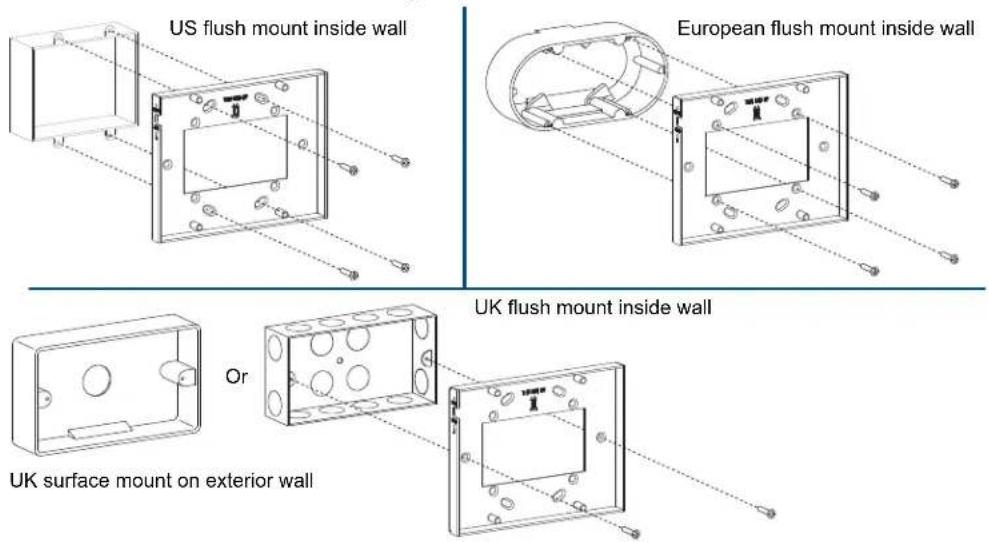
FIG. 21 Wallplate mounting bracket used with variety of double-gang back boxes
Decor Wallplate TX – The Decor Wallplate TX mounts in a standard US double-gang back box. Standard decor style cover plates are customer provided to allow matching the individual decor of an environment or matching other standard decor covers in a room/area.
Attaching a Ground Wire to DXLink Transmitters/Receivers
Note: Technically this type of grounding is only required when a DXLink Transmitter or Receiver is connected to an ungrounded device, but this added grounding measure can be used at the discretion of the installer.
If the system is experiencing problems with delivery of DXLink signals to/from an Enova DGX Digital Media Switcher or Enova DVX Solution, adding a ground wire from the TX/RX to the switcher may improve performance. The problem is likely caused by the use of a single phase powered system that does not provide an earth ground for a source or destination's chassis and shields. This can inject unnecessary AC voltage on the HDMI cable shield that can lead to DXLink signal integrity issues. To check for indications of this type of power in the system, look for a two pronged plug or a cord that has only two wires.
Items Required
Phillips #1 screwdriver
6 foot ground wire with ring terminal ends (provided)
Note: Currently shipping DXLink Transmitters and Receivers provide a designated ground location on the rear of the chassis for attaching a ground wire. For instructions on attaching a ground wire to DXLink Modules without a designated ground location, see page 142.
Attaching a Ground Wire to a Common Earthed Ground
Connect the running end of the ground wire (fixed end attached to a DXLink Transmitter or Receiver) to a common earthed ground (ideally, referenced to the Enova DGX Switcher or Enova DVX Solution).
Important: If one DXLink Transmitter or Receiver is grounded, any remaining ungrounded units that are connected to the same board on the Enova DGX Switcher must also be grounded.
Attaching Ground Wire to Module
Important: Before attaching the ground wire to the chassis, ensure all connectors are clear.
To attach a ground wire to a module:
- If powered, power down the DXLink Module.
- Remove the designated ground screw and washer from the rear of the module.

FIG. 22 Remove designated ground screw and washer
-
Secure the ring terminal of the ground wire against the chassis with the ground screw and washer.
-
Ensure the ground wire is positioned so that it does not interfere with any of the connectors.

FIG. 23 Position ground wire away from connectors
- Attach the ground wire to a common earthed ground (see "Attaching a Ground Wire to a Common Earthed Ground" on the previous page).
- Continue the DXLink Module installation process (or reapply power to the module).
Attaching Ground Wire to Wallplate TX or Decor Wallplate TX
The Wallplate TX and Decor Wallplate TX each have a designated ground screw on the rear; look for the grounding symbol. If the DXLink Wallplate does not have a designated screw, use the screw directly above the DXLink (RJ-45) connector on the rear for grounding.
To attach a ground wire to a DXLink Wallplate or Decor Wallplate TX:
- If powered, power down the unit by removing the DXLink cable from the rear.
- Remove the ground screw and washer for the applicable unit, as indicated in FIG. 24.
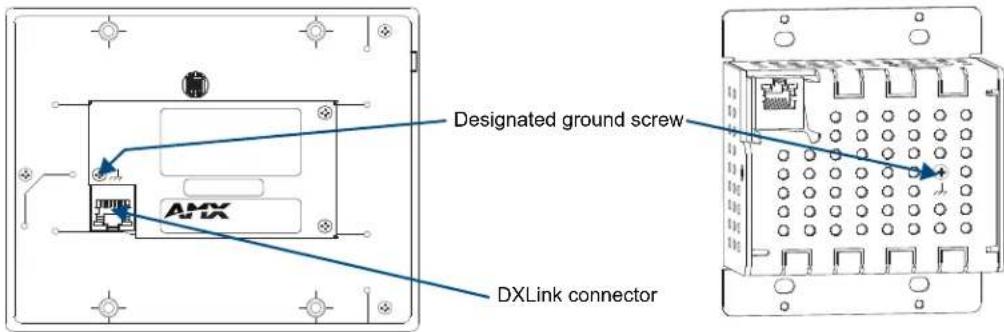
FIG. 24 Wallplate TX and Decor Wallplate TX - Remove ground screw and washer
-
Secure the ring terminal of the ground wire against the chassis with the ground screw and washer.
-
Ensure the ground wire is positioned so that it does not interfere with the DXLink connector.

natural_image
Diagram of an electronic device showing a black cable labeled 'AHX' inserted into a housing panel (no text or symbols beyond label)FIG. 25 Ground wire positioned so it does not interfere with DXLink connector (Wallplate TX shown)
- Attach the ground wire to a common earthed ground (see page 45).
- Continue the installation process (or reattach the DXLink cable from the Enova DGX Switcher to the DXLink unit).
Important Twisted Pair Cable Recommendations
The requirements are the same for the twisted pair cable used with the ICS LAN 10/100 (Ethernet) connector and with the DXLink (RJ-45) connector.
- Twisted pair cable is designed to carry Full HD content over 100 meter (328 ft.) cables with control. For complete cable specifications, see page 26.
- In a typical installation, the cables should be stretched to their full length between the Transmitters and Receivers and the enclosure.
- Cable runs with a minimum specification of ANSI/TIE/EIA 568A-5 and ratings of 250 MHz or better may be used with DXLink equipment. However, cable run topology and environmental influences can affect the overall successful distance capabilities of these runs.
- For successful deployments up to 100 meters without consideration to outside variables, AMX recommends the use of shielded category cable (STP) of Cat6A (or better) versions of shielded twisted pair (STP) for DXLink runs.
For more details and helpful cabling information, reference the white paper titled “Cabling for Success with DXLink” available at www.amx.com or contact your AMX representative.
Important: DXLink twisted pair cable runs for DXLink equipment should only be run within a common building.
Twisted Pair Cable Pinouts
The pinout in FIG. 26 is for twisted pair cable that connects to the ICS LAN 10/100 connector or to the DXLink connector on the Transmitters and Receivers. Use either the T568A or T568B pinout specification for termination of the twisted pair cable used between the modules in a standalone setup or between Transmitters and Receivers and an enclosure in a full system.

flowchart
graph TD
    A["T568A"] -->|8. Brown\n7. Brown/White\n6. Orange\n5. Blue/White\n4. Blue\n3. Orange/White\n2. Green\n1. Green/White| B["T568B"]
    B -->|8. Brown\n7. Brown/White\n6. Green\n5. Blue/White\n4. Blue\n3. Green/White\n2. Orange\n1. Orange/White| C["Up to 100 m"]
    C --> D["T568A"]
    C --> E["T568B"]
FIG. 26 Twisted pair cable pinouts for Ethernet connectors
In a typical installation, the cables should be stretched to their full length between Transmitters and Receivers and the enclosure or between modules in a standalone system. Service loops or coils of the cable may reduce the overall cable performance and should be minimized whenever possible.
RJ-45 LEDs
ICS LAN 10/100 Connector LEDs (modules only)
The following information applies to the LEDs on the ICS LAN 10/100 connector on the modules (FIG. 27). Note that #1 Toggle must be set to ON or ICS LAN functionality will not be provided.

FIG. 27 Module ICS LAN 10/100 connector LEDs
- Link/Activity (L/A) Green LED:
- On – Link status is active (when the Ethernet cable is connected and terminated correctly)
- Off – Link status is not active
• Speed Status (SPD) Yellow LED:
- On – Speed status is 100 Mbps
- Off – Speed status is 10 Mbps
NetLinx Connector LEDs (Wallplate TX/Decor Wallplate TX only)
The following information applies to the NetLinx LEDs on the bottom edge of the Wallplate TX and on the front of the Decor Wallplate TX, which reflect NetLinx communication and status via their DXLink lines (FIG. 28).
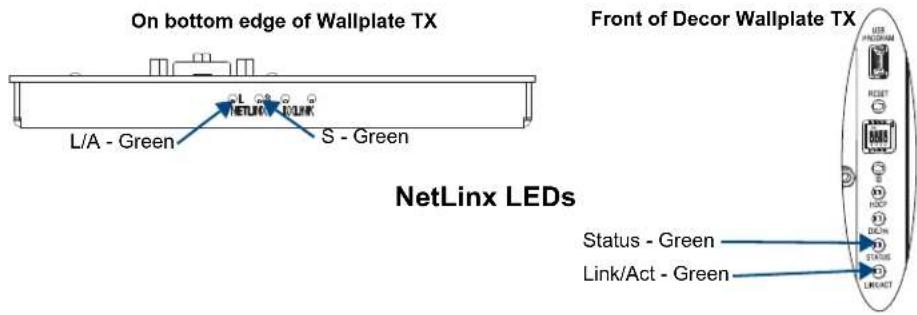
FIG. 28 Wallplate TX/Decor Wallplate TX NetLinx LEDs)
- L/A or Link/Act Green LED – Link/Activity LED indicates network communication activity.
- S or Status Green Led – The Status LED indicates unit status.
Tip: If the Wallplate TX is installed in a location where it is difficult to check the LEDs on the bottom edge, slide a white piece of paper or a small mirror under the edge to view LED status.
DXLink Connector LEDs
The following information applies to the LEDs located on the DXLink (RJ-45) connectors on the rear of all DXLink Transmitters and Receivers. It also applies to the DXLink LEDs on the bottom edge of the Wallplate TX and the DXLink LEDs on the front of the Decor Wallplate TX.
- Yellow:
- On – Authenticated HDCP (handshaking has occurred successfully)
- Flashing – Video active; no HDCP
- Off-No Video
- Green:
- On – DXLink connection established (in Endpoint Mode between TX or RX and switcher; in Extender Mode between TX and RX)
- Off-DXLink connection not established
The LEDs in FIG. 29 provide information for the DXLink connector.
Note: If the RJ-45 connector is upside down compared to the one in FIG. 29, the yellow LED will be on the right and the green LED on the left.

FIG. 29 DXLink (RJ-45) LED; Wallplate TX DXLink LEDs; Decor Wallplate TX DXLink LEDs
Audio Type Precedence
The connectors for bringing audio into the system on the Transmitters are as follows:
- HDMI In connector – Embedded audio signal
- Digital Audio In jack – Digital audio signal (S/PDIF); not available on the Wallplate TX and Decor Wallplate TX
- Stereo Audio In jack – Analog stereo audio signal
The hierarchy for audio type precedence* is listed in the following table for the Transmitters:
| Audio Type Precedence on Transmitters | |
| Incoming Signal Audio Type Selected | |
| HDMI w/ embedded digital audio Embedded digital audio | |
| S/PDIF digital audio only (not applicable for Wallplate TX and Decor Wallplate TX) | S/PDIF digital audio |
| Stereo audio only Analog audio | |
| S/PDIF digital audio and stereo audio (not applicable for Wallplate TX and Decor Wallplate TX) | S/PDIF digital audio |
| HDMI w/ embedded digital audio and S/PDIF digital audio (not applicable for Wallplate TX and Decor Wallplate TX) | Embedded digital audio |
| HDMI w/ embedded digital audio and stereo audio Embedded digital audio | |
| HDMI w/ embedded digital audio, S/PDIF digital audio, and stereo audio (not applicable for Wallplate TX and Decor Wallplate TX) | Embedded digital audio |
The audio selected by the Transmitters is embedded on the HDMI signal (if not already embedded) and sent to the switcher (or to an HDMI RX in a standalone pair) via the DXLink cable.
* Audio precedence as specified in the table above is applicable when the AUDIN_FORMAT_AUTO command is set to ENABLE; this precedence can be overridden by SEND_COMMANDs (see page 90).
The type of audio coming into the Transmitters, the HDMI RX will take the embedded audio it receives from a Transmitter** and output the following types of audio:
- HDMI Out connector – Embedded digital audio signal
- Stereo Audio Out connector – Analog stereo audio signal
** These exceptions apply: In order for audio to be sent out of the analog stereo audio connector on the HDMI RX, it must have originated or be embedded in the HDMI signal on the Enova DGX Digital Media Switcher, Enova DVX Solution, or Transmitter as a 2 channel signal (either analog stereo or 2 channel PCM). Multi-channel (>2 channel) L-PCM formats will pass incomplete audio (only 2 of the multiple channels will be sent). All other audio formats will be muted at the connector.
Wallplate Transmitters – Attaching Signal/Transport Cables
Important: If network connection is required – before attaching cables, set DIP switch #3 Toggle.
Important: Do not use the RJ-45 connector on rear for connecting to a standard Ethernet Network.
To attach signal and transport cables to a Wallplate TX or Decor Wallplate TX:
- Install double-gang back box. (For Wallplate TX mounting options, see page 44. The Decor Wallplate TX uses a standard US double-gang back box).

FIG. 30 Attach signal and transport cables (Wallplate TX shown)
Mount Unit, Set DIP switches, and Cable DXLink –
- Wallplate TX -
a. Remove the four screws from the front that fasten it to the mounting bracket.
b. Important – If a network connection is required, set #3 Toggle to ON (see page 42).
c. Attach bracket (arrows inside point up) to double-gang back box per illustrations on page 44.
d. DXLink connector – Attach a twisted pair cable from the DXLink Input Board on the switcher through the mounting bracket to the DXLink (RJ-45) connector on the rear of the unit.
Decor Wallplate TX -
a. DXLink connector – Attach a twisted pair cable from the DXLink Input Board on the switcher to the DXLink (RJ-45) connector on the rear of the unit.
b. Attach unit to the back box with four screws through the large screw holes.
c. Important – If a network connection is required, set #3 Toggle to ON (see page 42).
-
Wallplate TX - Reattach unit to the mounting bracket with the four screws removed in Step 2a.
-
Decor Wallplate TX -
a. Check LEDs for normal display (see the table on the next page).
b. Attach standard decor style front cover plate (customer provided) to the unit.
Cable front (note that connector arrangement differs between unit types) -
- HDMI In connector – Attach the HDMI cable from the source device to the HDMI In connector.
- Video In connector – Attach the HD-15 cable from the source device to the Video In connector (for VGA, component, S-Video, and composite pinouts, see page 128).
- Stereo Audio In jack (optional) – Plug in the analog audio cable from the stereo audio source into the Stereo Audio In jack. For audio precedence information, see page 50.
- If necessary, set the video and audio formats using SEND_COMMANDs (see page 79).
- USB port (optional) – The USB port will be supported in a future firmware upgrade.
- Wallplate TX - Check LEDs for normal display (see the table on the next page).
Additional Wallplate TX and Decor Wallplate TX Functionality
The following items are on left edge of Wallplate TX and on front of Decor Wallplate TX.
Reset Button
The Reset button resets the unit's CPU (acts like a power cycle soft reboot).
Program Port
This port (USB mini-B connector) supports DGX Configuration software for programming a customer VGA EDID.
ID Pushbutton
The ID Pushbutton places the unit in ID Mode for setting the NetLinx ID (device only) and provides additional functionality, such as placing the unit in Static IP Mode or DHCP Mode (see page 66).
Wallplate TX and Decor Wallplate TX – Indicator LEDs
The Wallplate TX and Decor Wallplate TX receive power from a switcher through the DXLink (RJ-45) connection to a DXLink Input Board in the switcher. They can also receive power via either PDXL-2 (FG1090-170) or PS-POE-AT-TC (FG423-84).
Important: We recommend determining the power budget to maintain power redundancy for the system (see page 38).
Tip: If the Wallplate TX is installed in a location where it is difficult to check the LEDs on the bottom edge, slide a white piece of paper or a small mirror under the edge to view LED status.
| Wallplate TX and Decor Wallplate TX Indicator LEDs | ||
| LEDs Normal | Display Indicates | |
| Digital Video (default) | Green The Wallplate TX and Decor Wallplate TX have been configured* to pass HDMI (for SEND_COMMAND information, see page 86) | |
| Analog Video One of the 3 LEDs will be Green | The Wallplate TX and Decor Wallplate TX have been configured* to pass one of the following types of analog video (for SEND_COMMAND information, see page 86):• C (composite) or Y/c (two component)• Y/PB/PR or RGB (three component)• RGBHV (five component) or RGBS (four component) | |
| Audio Green The Wallplate TX and Decor | Wallplate TX have been configured* to pass analog audio as the audio source being embedded on the DXLink output connection (coupled with either the analog or digital video input path); for SEND_COMMAND information, see page 90 | |
| Power Green Power (from switcher or DXLink power injector) is applied | ||
| LEDs (bottom edge of Wallplate TX) | ||
| NetLinx - L (Link) Green Active LAN connection to an AMX Network (Blinking = #3 Toggle OFF) | ||
| NetLinx - S (Status) | GreenOff | • Speed status is 100 Mbps• Speed status is 10 Mbps |
| DXLink Yellow Yellow | FlashingOff | • Authenticated HDCP (handshaking has occurred successfully)• Video is active; no HDCP• No Video |
| DXLink Green Green DXLink connection is established | ||
| LEDs (on front of Decor Wallplate TX) | ||
| HDCP Yellow | FlashingOff | • Authenticated HDCP (handshaking has occurred successfully)• Video is active; no HDCP• No Video |
| DXLink | Green | DXLink connection is established |
| Status | GreenOff | • Speed status is 100 Mbps• Speed status is 10 Mbps |
| Link/Act | Active LAN connection to an AMX Network (Blinking = #3 Toggle OFF) | |
* The LEDs for Digital Video, Analog Video, and Audio each indicate the configured state of the connectors, not necessarily the presence of signals through the Wallplate TX or Decor Wallplate TX.
Important: If the indicator LEDs for the Wallplate TX or Decor Wallplate TX do not respond with a normal display as stated in the table above, check all of the connections and the suggestions in the "Troubleshooting" chapter (see page 101) before contacting technical support (see page 104).
Multi-Format TX or HDMI TX – Attaching Signal, Transport, and Control Cables
Important: Before attaching cables, be sure to set the DIP switch's toggles if necessary (see page 41).
Important: Do not use the RJ-45 connector labeled "DXLink" for connecting to a standard Ethernet Network.
Note: Power, IR, and RS-232 ports are covered in their own sections.
To attach signal, transport, and control cables to Multi-Format TX or HDMI TX:
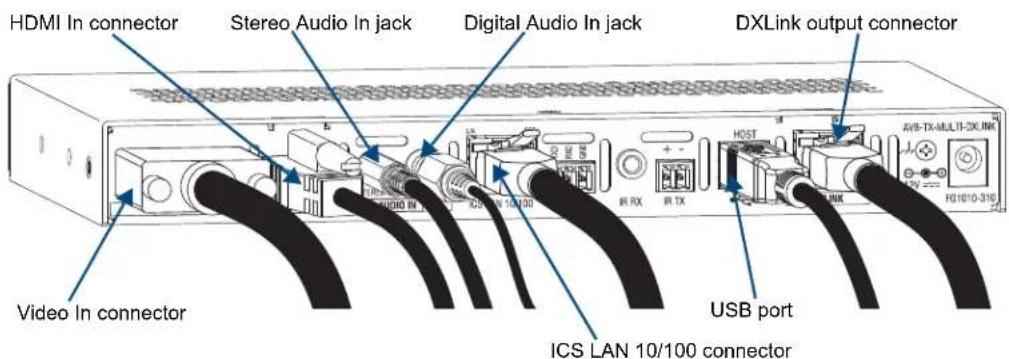
FIG. 31 Attach signal and control cables (Multi-Format TX shown)
- Multi-Format TX only – Attach the HD-15 cable from the source device to the Video In connector (for pinouts for VGA, component, S-Video, and composite, see page 128).
- HDMI In connector – Attach the HDMI cable from the source device to the HDMI In connector.*
- DXLink connector – Attach a twisted pair cable to the DXLink connector for UTP transport to the switcher (or HDMI RX).
- Stereo Audio In jack (optional) – Plug in the analog audio cable from the stereo audio source into the Stereo Audio In jack. For audio precedence information, see page 50.
- Digital Audio In jack (optional) – Insert the S/PDIF (RCA) plug on the digital audio cable from the digital audio source into the Digital Audio In jack. For audio precedence information, see page 50.
- ICS LAN 10/100 connector (optional) - Attach a twisted pair cable from this connector to a LAN.
- If necessary, set the video and audio formats using commands (for NetLinx programming information, see page 79).
- USB port (optional) – The USB port will be supported in a future firmware upgrade.
* DVI cable can be used instead (via a DVI-to-HDMI cable adapter); however, the advanced audio support from HDMI will not be available.
Note: The ID Pushbutton places the module in ID Mode for setting the NetLinx ID (device only) and provides additional functionality, such as placing the device in Static IP Mode or DHCP Mode. For complete information, see page 66.
Multi-Format TX or HDMI TX – Applying Power
Important: If desktop power is used to power the Transmitter, only the provided desktop power supply should be used and it must not be altered in any way. Remote power can only be provided via a switcher or a DXLink power injector. AMX does not support the use of any other power supplies or power injectors as these may potentially damage the DXLink equipment.
Important Power Considerations for Enova DGX Endpoint Systems
- Local power – Local power (desktop power supply) always takes precedence over power via the DXLink line from the switcher. However, if a locally powered module is connected to a switcher and the local power is lost (i.e., unplugged or turned off), the module will power down and then automatically power back up using power from the switcher via the DXLink connection (increasing the overall power draw on the switcher). When local power is restored, it automatically replaces the power over the DXLink line.
-
DXLink power – When modules are being powered by an Enova DGX DXLink board or DXLink power injector (using power via the DXLink line), to maintain the switcher's power redundancy, we recommend that you:
-
Determine the power budget based on the Input/Output boards used and the quantity of powered endpoints (modules); see page 38.
- Do not use local DC power jack on module (even if local power adapter is turned off).
Note: When using DXLink Power from an Enova DGX Switcher, we recommend wiring a technical ground for the ungrounded sources/destinations with respect to the DXLink Transmitters/Receivers and switcher (see page 45).
The following instructions do not apply if you are using power from the switcher via the DXLink line in an endpoint system.
To apply power to the Multi-Format TX or HDMI TX:
- Plug the cord from the desktop power supply (provided) into the power jack on rear of the module (2.1 mm DC jack for 12 V local power).
- Plug the desktop power supply into an AC external power source.
The Power LED on the front of the module turns a constant green, which indicates a ready state.
Some of the additional LEDs also turn a constant green. For normal LED display, see table below.
Multi-Format TX and HDMI TX- Indicator LEDs
The LED indicators are listed in the table as they appear on the front of the module from left to right.
| Multi-Format TX and HDMI TX LEDs | Normal Display Indicates | |
| Power Green Power is applied to the Transmitter | ||
| Digital Video Green A digital signal is present through the Transmitter | ||
| Audio Green A digital audio signal is present through the Transmitter | ||
| Analog Video (Multi-Format TX only) | One of the 3 LEDs is Green | Type of analog video present through the Multi-Format TX:• C (composite) or Y/c (2 component)• Y/PB/PR or RGB (3 component)• RGBHV (5 component) or RGBS (4 component) |
| IR TX Red IR TX active communication | ||
| IR RX Yellow IR RX active communication | ||
| 232 (Serial) TX Red Serial TX active communication | ||
| 232 (Serial) RX Yellow Serial RX active communication | ||
| NetLinx Link/Act | Green | Active LAN connection to an AMX Network (Blinking = #3 Toggle OFF) |
| NetLinx Status | Green LAN connection is active | |
| CEC | OFF | CEC is not currently supported |
| USB Yellow USB is not currently supported. This functionality will be available in a future firmware upgrade. | ||
Multi-Format TX and HDMI TX–LED Troubleshooting
If indicator LEDs for modules do not respond with a normal display as stated in table on previous page:
- Check all power connections.
- Check the “Detailed NetLinx (Link/Act and Status) LED Behavior” section on page 61.
- Try the suggestions in the “Troubleshooting” chapter (see page 101).
For information on restoring the module's default settings on power up, see page 68.
HDMI RX – Attaching Signal and Control Cables
Important: Before attaching cables, be sure to set DIP switch's toggles if necessary (see page 41).
Important: Do not use the RJ-45 connector labeled "DXLink" for connecting to a standard Ethernet Network.
Note: Power, IR, and RS-232 ports are covered in their own sections.
To attach signal, transport, and control cables to the HDMI RX:

FIG. 32 Attach signal and control cables to HDMI RX
- DXLink (input) connector – Attach a twisted pair cable from the switcher (or Multi-Format TX or HDMI TX) to the DXLink connector on the HDMI RX.
- HDMI Out connector – Attach the HDMI cable that goes to the destination device.*
- ICS LAN 10/100 connector (optional) – Attach a twisted pair cable from this connector to a LAN. (For NetLinx programming information, see page 79.)
- USB port (optional) – Connect to a hub using a USB-A cable; connect keyboard and mouse to the hub. (This port is for sending keyboard / mouse commands to a PC.) The USB LED on the front monitors this port. (The USB port will be supported in a future firmware upgrade.)
- Stereo Audio Out connector (optional) – Plug the audio cable (that goes to the audio destination) into the stereo audio jack. For audio precedence information, see page 50. For information on audio SEND_COMMANDs (including enabling the analog audio format), see page 84.
* DVI cable can be used instead (via a DVI-to-HDMI cable adapter); however, the advanced audio support from HDMI will not be available.
Note: The ID Pushbutton places the HDMI RX in ID Mode for setting the NetLinx ID (device only) and provides additional functionality, such as placing the device in Static IP Mode or DHCP Mode. For information, see page 66.
Tip: If scaling adjustments are necessary, use SEND_COMMANDs (see page 79). If connected to an Enova DGX output, use DGX Configuration Software via the switcher for scaling.
HDMI RX – Applying Power
Important: If desktop power is used to power the Receiver, only the provided desktop power supply should be used and it must not be altered in any way. Remote power can only be provided via the switcher, PDXL-2 (FG1090-170), or PS-POE-AT-TC (FG423-84).
Important: The “Important Power Considerations for Enova DGX Endpoint Systems” also apply to the HDMI RX (see page 54).
To apply power to the HDMI RX:
-
Plug the cord from the desktop power supply (provided) into the power jack on rear of the HDMI RX (2.1 mm DC jack for 12 V local power).
-
Plug the desktop power supply into an AC external power source.
The Power LED on the front of the HDMI RX illuminates a constant green, which indicates a ready state. Some of the additional LEDs will also turn a turn a constant green. For normal LED display, see the table below.
Important: If any HDMI Receivers are being powered through an Enova DGX, we recommend determining the power budget to maintain power redundancy for the system (see page 38).
HDMI RX - Indicator LEDs
The LED indicators are listed in the table as they appear on the front of the RX from left to right.
| HDMI RX LED | Normal Display Indicates | |
| Power Green Power is applied to the Receiver | ||
| Video Green A video signal is present through the Receiver | ||
| Audio Green An embedded audio signal is present through the Receiver | ||
| Scaling:– Bypass– Auto– Manual | One LED is greenThe other two are off | Receiver is in one of the three modes for scaling• At initial power up, the Receiver defaults to the Auto scaling option*• Press the Scaling button to turn on the Bypass option or the Manual option |
| IR TX Red IR TX active communication | ||
| IR RX Yellow IR RX active communication | ||
| Serial TX Red Serial TX active communication | ||
| Serial RX Yellow Serial RX active communication | ||
| NetLinx Link/Act | Green Active LAN connection to an AMX Network (Blinking = #3 Toggle OFF) | |
| NetLinx Status | Green LAN connection is active | |
| CEC | OFF | CEC is not currently supported |
| USB Yellow USB connection is active | ||
* When the output cable is disconnected from the HDMI RX or if no EDID can be found on the destination device, the last used Scaling Mode LED will be ON. In either case, the HDMI RX will continue to hold its output resolution to the last known preferred resolution until a power cycle or reconnection of a sink with a valid EDID. On power up without a valid EDID, the default preferred output resolution presented will be 1280x1024 @ 60 Hz until a different EDID is detected.
Receiver – LED Troubleshooting
If the indicator LEDs for the modules do not respond with a normal display as stated in the table above:
☐ Check all power connections.
☐ Check the “Detailed NetLinx (Link/Act and Status) LED Behavior” section on page 61.
☐ Try the suggestions in the “Troubleshooting” chapter (see page 101).
For information on restoring the module's default settings on power up, see page 68.
Serial Data Transfer and IR Flow Control
The illustration in FIG. 33 shows the bidirectional serial data transfer and IR flow control when DXLink Modules are used in Endpoint Mode with an Enova Digital Media Switcher. The switcher has an integrated NetLinx Central Control Processor which provides native AMX control at each remote location fed by a DXLink Transmitter or Receiver. Control is sent over twisted pair cable (via the DXLink ports). This also holds true when Enova DVX Solutions are used.

flowchart
graph TD
    A["DXLink TX"] -->|HDMI| B["Server"]
    C["DXLink"] -->|IR and/or RS-232| B
    D["DXLink"] -->|DXLink| E["Enova DGX 16"]
    F["DXLink RX"] -->|IR and/or RS-232| G["Computer"]
    H["HDMI"] --> B
FIG. 33 Serial data transfer and IR flow control
Optional: Multi-Format TX, HDMI TX, and HDMI RX – Wiring for Serial Data Transfer
The RS-232 (serial) ports are the 3-position screw terminal blocks on the rear of the modules to the right of the ICS LAN 10/100 connector. Wire these ports to supply serial data along with the associated video and audio signals from a source device (over the twisted pair cable between the Multi-Format TX or HDMI TX and the HDMI RX) to a destination device or vise versa from the HDMI RX to the Multi-Format TX or HDMI TX. In addition to being directly connected to a device, this port can be connected as an independent native NetLinx control port from a networked NetLinx Central Controller.
Important: For serial strings to pass through a standalone TX and RX pair (in Extender Mode) without a NetLinx Master acting as the host, DIP switch #2 Toggle must be set to OFF.
The RS-232 port labels are relative to the data flow. On the Multi-Format TX or HDMI TX, data enters the system at the RX label and leaves the system at the TX label on the Receiver (FIG. 34). The flow is reversed from the Receiver to the Transmitter.
Note: On both modules, the RS-232 connector pinout is "TX - RX - Ground."
To wire the RS-232 (serial) connectors on the modules for data transfer:
- Wire the RS-232 connectors on the modules according to the pinout directly above the connector.
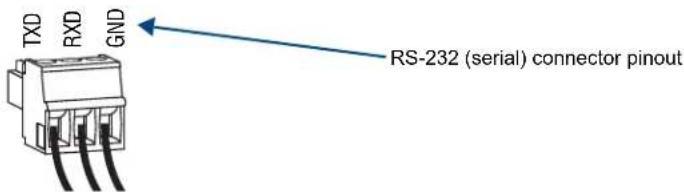
FIG. 34 Wire RS-232 ports for serial data transfer
- Use the command RXON to enable this port on the Transmitter and the Receiver. (For complete Serial SEND_COMMAND programming information, see page 95.)
Serial Control – Endpoint Mode and SEND\_COMMANDs
In Endpoint Mode (modules are connected to a switcher), serial operations are handled by the host providing control of the endpoints. The Master's programming specifies where the serial commands are sent (this is handled independently from the routing of the video signals). For additional information on Endpoint Mode, see page 41. For Serial SEND_COMMANDs, see page 95.
Optional: Multi-Format TX, HDMI TX, and HDMI RX – IR Control
For additional information on the IR03 and CC-NIRC, which are required for IR control, see page 22. (The IR03 and CC-NIRC are not included with the modules.) A compatible remote control unit can also be used with the system. In addition to being directly connected to a device, this port can be connected as an independent native NetLinx control port from a networked NetLinx Central Controller.
Important: When a Transmitter and Receiver are used as a standalone pair, the IR control feature uses a direct pass through in Extender Mode (the #2 Toggle must be set to OFF). When a Transmitter and Receiver are used with a switcher, the integrated Master handles the SEND_COMMANDs (the #2 Toggle on the DIP switch must be set to ON, which places the DXLink Mode in Endpoint for use with the switcher).
The IR Receiver is connected to the IR RX port on the Transmitter, and the IR Emitter is connected to the IR TX port on the Receiver, or the connections can be reversed.
IR03 External IR Receiver Module (not included)

natural_image
Close-up of a black audio adapter with a USB cable and connector (no text or symbols visible)FIG. 35 IR Receiver cable (FG-IR03)
To connect an IR Receiver to a module:
- Connect the jack on the IR03 External IR Receiver Module cable (FG-IR03) to the IR RX port on the module.
- Run the cable and attach the IR receiver bud so that it has a clear line-of-sight with the intended remote control device.
CC-NIRC NetLinx IR Emitter Cable (not included)

natural_image
Black cable with connector and plug, no visible text or symbolsFIG. 36 IR Emitter cable (FG10-000-11)
To connect an IR Emitter to a module:
- Connect the Phoenix connector on the CC-NIRC NetLinx IR Emitter cable (FG10-000-11) to the IR TX port on the module.
- Run the other end of the IR Emitter cable to the display device and locate the IR window.
- Attach the IR Emitter bud over the device's IR sensor by removing the cover on the reverse side of the Emitter and sticking the bud directly over the IR window.
Important: For systems that include a switcher – when installation of the IR Receiver and IR Emitter is complete, load the appropriate driver (for instructions, see page 73) and program the IR remote according to the product's documentation.
IR Control – Endpoint Mode and SEND\_COMMANDs
In Endpoint Mode (modules are connected to a switcher), IR operations are handled by the host providing control of the endpoints. The Master's programming specifies where the IR commands are sent (this is handled independently from the routing of the video signals). For additional information on Endpoint Mode, see page 41. For IR SEND_COMMANDs, see page 91.
ID Pushbutton Functions
The ID Pushbutton is located on the right front of the modules, on the left edge of the Wallplate TX, and on the front of the Decor Wallplate TX.
The ID Pushbutton can be used to perform four types of initial configuration settings:
- Toggle between DHCP and static IP addressing
- Assign a device address
- Reset the factory default settings
- Restore the factory firmware image
The functions performed depend on when and for how long the ID Pushbutton is pressed and held. For complete ID Pushbutton information, see page 66.
Note: ID Pushbutton functions can also be implemented using Telnet commands (see page 111).
HDMI RX Scaling Button and Scaling Modes
The Scaling button is located on the front of the HDMI Receiver Module. Pressing the Scaling button cycles the module through the three scaling options: Bypass, Auto, and Manual.
- Bypass Mode – allows the video signal to display over the destination device without altering the signal's resolution.
- Auto Mode (default) – allows the destination device to choose the resolution it needs (this mode is AMX's SmartScale ^® Technology in action).
- Manual Mode – allows the user to configure the resolution that the video will display through a destination device.
Selecting a Scaling Mode results in the module maintaining or altering the source device's resolution as it is passed along to the destination device.
The Scaling Mode can be set on the HDMI RX with the Scaling button (see instructions below), with DGX Configuration Software, or with SEND_COMMANDs (see page 81).
To set the scaling option (mode):
- Press the Scaling button on the HDMI RX once or twice until the LED for the desired scaling option illuminates solid green.
Bypass Mode
Bypass Mode allows the video signal to display over the destination device without altering the signal's resolution.
Note: Interlaced and progressive video are supported into the Transmitters; progressive is only supported out of the Receiver unless it is in the Bypass mode, which is non-scaling.
Auto Mode
At initial power up, the HDMI RX defaults to the Auto scaling option.
Note: When the output cable is disconnected from the HDMI RX or if no EDID can be found on the destination device, the last used Scaling Mode LED will be ON. In either case, the HDMI RX will continue to hold its output resolution to the last known preferred resolution until a power cycle or reconnection of a sink with a valid EDID. On power up without a valid EDID, the default preferred output resolution presented will be 1280x1024 @ 60 Hz until a different EDID is detected.
Manual Mode
Manual Mode allows the user to configure the resolution that the video will display through a destination device. Manual Mode defaults to 1280x1024p @ 60 Hz. This default resolution can be changed in two ways:
- Use the SEND_COMMAND VIDOUT_RES_REF to set the resolution and refresh rate (for details, see page 81).
- When used as a direct output of an Enova DGX DXLink Output Board, use DGX Configuration Software to set and persist the Manual scaling resolution for the connector on the DXLink Output Board; the DXLink Output Board sends the scaling resolution data to the HDMI RX.
Note: The scaling mode (and the aspect ratio) can also be set on the DXLink Output Board using DGX Configuration Software. The data is persisted on the board and sent to the HDMI RX.
Persistence of Scaling Options
The HDMI RX defaults to “Auto” when power is cycled. The scaling option can be persisted using one of the three following methods:
● Using the Scaling button (see instructions below).
- Using the SEND_COMMAND: PERSISTAV (for details, see page 98).
- Using DGX Configuration Software to set and persist the scaling option for the connector on the DXLink Output Board on the Enova DGX Digital Media Switcher; the DXLink Output Board sends the scaling option data to the HDMI RX.
Using the Scaling Button to Persist a Scaling Option
The factory default is for the HDMI RX to revert to the Auto option if power is cycled. If you want the unit to remain in either Manual or Bypass Mode when power is cycled, use the following instructions.
To persist a scaling option on power cycle:
- Press and release the Scaling button until the LEDs cycle to the option immediately before the one you want to persist.
- Press and hold the Scaling button about 5 seconds until the desired LED blinks green (indicating that option will persist on power cycle), then release.
Detailed NetLinx (Link/Act and Status) LED Behavior
The tables below provide detailed descriptions of all blink patterns for the NetLinx Link/Act and Status LEDs on the front of the Transmitter and Receiver Modules.
Note: The term “light show” refers to the back-and-forth scanning pattern of the LEDs associated with the LEDs on the modules.
Module Operational State as Indicated by LEDs
To determine the operational state (normal boot) of a module by its LEDs, check both the Link/Act and Status LED columns.
| NetLinx LED Behavior and Operational State | ||
| Link/Act LED Status LED | Module Operational State | |
| ON if connected to a system with an integrated Master. Blink OFF with data. | Follow Master's instruction for Blink Message if online with Master, otherwise ON. | Normal Online with Master (rest) |
| OFF ON Normal Boot (DHCP found) | Note: This state continues from the time an IP address is obtained until the device is online with the Master. | |
| Fast blink, then normal operation. | ON Normal Boot (DHCP, no server) | Note: This state continues until a valid IP address is obtained. |
| OFF during light show, then normal operation (OFF until connected to Master). | Fast blink (continues only during light show), then ON until first blink from Master. | Normal Boot (Static IP)Note: This state continues until the device finishes its light show. |
ID Pushbutton Boot State and LED Behavior
To monitor the ID Pushbutton boot state of a module by its LEDs, check both the Link/Act and Status LED columns.
| ID Pushbutton Boot and NetLinx LED Behavior | ||
| ID Pushbutton Boot States Link/Act LED Status LED | ||
| Boot with ID Pushbutton held down. Slow | blink (1 Hz) Slow blink (1 Hz) | |
| ID Pushbutton held down long enough for reset to default parameters. | Fast blink until ID Pushbutton is released, then OFF | Fast blink until ID Pushbutton is released, then OFF |
| ID Pushbutton held down long enough for reset to default firmware image. | Solid ON, transitions to OFF once the unit completes writing to flash and is ready to reboot. | Solid ON, transitions to OFF once the unit completes writing to flash and is ready to reboot. |
| In Auto ID mode. Normal Blink (2 Hz) | ||
| ID Pushbutton held down long enough to accept new ID. | 2 blinks, then normal 2 blinks, then normal | |
| After boot: ID Pushbutton held down, but not long enough for IP mode change. | Slow blink (1 Hz) Slow blink (1 Hz) | |
| After boot: ID Pushbutton held down long enough for IP mode change. | Fast blink, then OFF Fast blink, then OFF | |
Downloading Firmware State and LED Behavior
To monitor the state of a module by its LEDs when downloading firmware, check both the Link/Act and Status LED columns.
| NetLinx LED Behavior when Downloading Firmware | ||
| Downloading Firmware Link/Act LED Status LED | ||
| Downloading firmware to flash due to an upgrade via NetLinx Studio. | Fast blink, alternating with Status LED | Fast blink, alternating with Link/Act LED |
DXLink TX/RX in a Multiple-Stage Switching System
When switching systems with DXLink Technology support (e.g., an Enova DGX Digital Media Switcher and an Enova DVX-3155HD) are connected via their DXLink ports, DXLink Transmitters and Receivers can be used to extend the video and audio transport.
Important: This section does not refer to the linking of enclosures from CPU to CPU, which is not supported in the Enova DGX Digital Media Switcher or the Enova DVX Solutions.
In an installation with DXLink equipment in a multiple-stage switching system, the following apply:
- Network loops must be avoided (see page 40). The DXLink line's Ethernet functionality is disabled between the enclosures; therefore, no IR, serial, or Ethernet communication can be passed between them.
- When two switching systems with DXLink support are connected via their DXLink ports, only video and audio will be passed through the DXLink connection.
- When a DXLink input or output on one switching system determines that it is connected to a DXLink input or output on another switching system, the DXLink port will automatically disable all Ethernet, power, and control on that connection port so that the only things passed down the DXLink line are the video and audio signals.
- When connecting switching systems via DXLink ports, AMX recommends no more than three switcher throughputs (see the “Example” below).
Example
This example shows how DXLink Transmitters and Receivers can be used in a system where switchers are connected via their DXLink ports.
The signal path through three switchers could be: source device → DXLink Transmitter → Enova DVX-3155HD, DXLink input (out a DXLink output) → Enova DGX 32, DXLink input (out a DXLink output) → Enova DGX 16, DXLink input (out a DXLink output) → DXLink Receiver → display device as an HDMI signal.
Network Configuration
Overview
DXLink Modules support two IP Addressing Modes: Static IP and DHCP (with link-local fallback*).
To avoid having a large system consume numerous IP addresses, the Transmitter and Receiver default to disabling the network connection functionality. Therefore, the #3 Toggle must be set to ON before the Transmitter or Receiver can establish a network connection (see page 42).
When #3 Toggle is ON, the DXLink Modules are automatically placed in DHCP Mode, but they can be configured for either of the IP Addressing Modes via two methods:
● The front-panel ID Pushbutton (see page 66)
- Telnet commands (see page 111)
* "Link-local fallback" is a method by which an IP host, as a fallback from DHCP, can derive a local network-unique IP address by negotiating with the other IP hosts on the same network.
Link-local can also be used in its own right as the primary method of IP address allocation. For details, see “DHCP Mode” below.
Static IP Mode - Default Parameters
Important: Static IP Mode will not function until the #3 Toggle on the DIP switch is set to ON (see page 42). The #3 Toggle must be ON before the device is accessible via SEND_COMMANDs.
| Default Parameters For Static IP Mode | |
| Address 192.168.1.2 | |
| Netmask 255.255.255 | 0 |
| Gateway 192.168.1.1 | |
| DNS1 192.168.1.1 | |
| DNS2 192.168.1.1 | |
| DNS3 192.168.1.1 | |
DHCP Mode
Important: DHCP Mode will not function until the #3 Toggle on the DIP switch is set to ON (see page 42). The #3 Toggle must be ON before the device is accessible via SEND_COMMANDs.
DHCP Mode requires a connection to a network with a DHCP server located on it. This connection can be either indirect or direct.
- Indirect connection – In the case of an Enova DGX Digital Media Switcher or an Enova DVX Solution (Endpoint Mode) that is connected to a DHCP server device, the DHCP connection can be propagated through the system's DXLink layer. First you must complete the following:
- Set the #3 Toggle to ON to enable the network connectivity.
- Direct connection – In the case of a standalone pair (Extender Mode), to place the DXLink Modules in DHCP Mode you must complete the following:
- Set the #1 Toggle to ON to enable access to the physical ICS LAN 10/100 port.
- Set the #3 Toggle to ON to enable network connectivity (DHCP).
- Connect the ICS LAN 10/100 port to a network where a DHCP server is located.
When in DHCP Mode (the default setting), the module will attempt to get a DHCP lease (consisting of an IP address, gateway, and other network parameters). Should the attempt fail, the module will then configure itself for a link-local address.
- DXLink Modules utilize a modified link-local addressing procedure. The first address to be tried is a known address in the link-local space: 169.254.2.2. That address will be probed, and if unclaimed will be used by the DXLink Module.
- If 169.254.2.2 is already claimed, the DXLink Module will choose a random address within the 169.252.x.x link-local address space (again probing to ensure that it is unclaimed).
Once the module is operating with a link-local address, it will periodically re-try DHCP and re-assign the IP to a valid DHCP grant if successful.
At any time, if the module determines that its IP address has changed, it will disconnect from the Master (if necessary, depending on the connection state) and then reconnect to the Master.
TCP/IP Address Configuration
DXLink Modules support IPV4 network addresses, gateway addresses, DNS server addresses, and network names. They also support NDP (NetLinx Discovery Protocol) capabilities as well as IP discovery via NetLinx Studio.
Note: NDP is a device discovery method used by NetLinx Masters. With NDP Beacon enabled, the Master will transmit NDP Beacons for AMX's proprietary device discovery.
Telnet IP Configuration Commands
The SET IP and GET IP Telnet commands listed in the tables in Appendix B (which start on page 112) can be sent directly to the device via a Telnet terminal session. These commands can be used for initial network configuration of the DXLink Modules.
• The default Telnet port is 23.
- Telnet is enabled by default.
- A value of 0 disables the telnet server.
For details, see “Appendix B – Telnet (Terminal) Commands” on page 111. The appendix also includes a section on “Master Connection Modes” on page 119.
Factory Default Parameters
| Factory Default Parameters | |
| Parameter Value | |
| MAC Address As set in Factory | |
| Serial Number As set in Factory | |
| Ethernet Mode Auto (i.e., speed, duplex, both, auto) | |
| IP Addressing Mode DHCP | |
| IP Address (for static mode) 192.168.1.2 | |
| Netmask (for static mode) 255.255.255.0 | |
| Gateway (for static mode) 192.168.1.1 | |
| DNS1 (for static mode) 192.168.1.1 | |
| DNS2 (for static mode) 192.168.1.1 | |
| DNS3 (for static mode) 192.168.1.1 | |
| DNS Domain amx.com | |
| Hostname Last 7 digits of the serial number | |
| Master Connection Mode NDP - For details, see page 119. | |
| Master URL (for TCP and UDP URL modes) | “” (blank) |
| Master Connection Port Number (for TCP and UDP URL modes) | 1319 |
| Friendly-Name “” (blank) | Note: If the Friendly Name is non-blank, both Friendly Name and Location are concatenated to make NDPSTRING2, otherwise NDPSTRING2 is generated from the unit's serial number. |
| Location “” (blank) | |
| Stored MAC Address of Master (used for NDP binding) | 00:00:00:00:00:00 |
| ICSP Device Number 0 (0 = receive dynamic device number from Master) | |
| System Number | 0 |
| Telnet Port | 23A value of 0 disables the Telnet server. Telnet is enabled by default. |
| SET BAUD | 9600, N, 8, 1 |
| CTOF Time | 5 (0.5 seconds) |
| CTON Time | 5 (0.5 seconds) |
| Receivers Only | |
| VIDOUT_ASPECT_RATIO | STRETCH |
| VIDOUT_RES_REF | 1280x1024,60 (for Manual Mode) |
| AUDOUT_FORMAT | All |
| Transmitters Only | |
| VIDIN_AUTO_SELECT | ENABLE |
| VIDIN_FORMAT | HDMI (on Port 7), VGA (on Port 8) |
| VIDIN_RES_AUTO | ENABLE |
| VIDIN_RES_REF | 1280x1024,60 |
| VIDIN_PREF_EDID | 1920x1080p,60 |
| VIDIN_EDID | MIRROR OUT 1 (on Port 7), ALL RESOLUTIONS (on Port 8) |
| VIDIN_HDCP | ENABLE |
| VIDIN_VSHIFT | 0 |
| VIDIN_HSHIFT | 0 |
| VIDIN_PHASE | 0 |
| AUDIN_FORMAT_AUTO ENABLE | |
| AUDIN_FORMAT | Analog |
Device IDs
| Device IDs | ||
| Model ID (16-bits) Bound ID (16-bits) Unbound | ||
| HDMI-TX Module(AVB-TX-HDMI-DXLINK) | 0x017C 0x014B | |
| Multi-Format TX Module(AVB-TX-MULTI-DXLINK) | 0x017F 0x014B | |
| Multi-Format Wallplate TX(AVB-WP-TX-MULTI-DXLINK) | 0x017E 0x014B | |
| Decor Wallplate TX(AVB-DWP-TX-MULTI-DXLINK) | 0x018B ____ | |
| HDMI-RX Module(AVB-RX-DXLINK-HDMI) | 0x017D 0x014B | |
Using the ID Pushbutton
The ID Pushbutton is located on the right front of the modules, on the left edge of the Wallplate TX, and on the front of the Decor Wallplate TX.
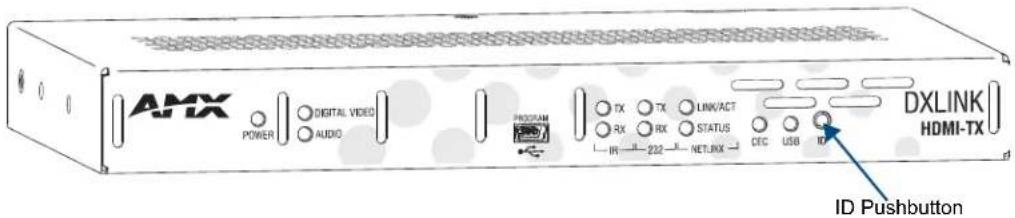
FIG. 37 ID Pushbutton on module (HDMI TX shown)
The ID Pushbutton can be used to perform four types of initial configuration settings:
- Toggle between DHCP and static IP addressing (see below)
- Assign a device address (page 67)
- Reset the unit to its factory default settings, which affects the parameters but not the firmware version (see page 68)
- Restore the unit to its factory firmware image, which affects both the firmware version and the parameters (see page 69)
The functions performed depend on when and for how long the ID Pushbutton is pressed and held. ID Pushbutton functions can also be implemented using Telnet commands (see page 111).
Tip: To monitor the ID Pushbutton boot state of a module by its NetLinx LED behavior, see page 71.
Toggling Between IP Addressing Modes: DHCP and Static IP
DXLink Transmitters and Receivers support both DHCP and static IP addresses. When the #3 Toggle is ON (see page 42), the modules automatically use DHCP with link-local fallback. However, you can use a static IP address which can be set via a Telnet command (SET IP), or you can use the factory default static IP address. The default static IP address can be recalled at any time by resetting the unit to its factory default configuration (see page 68). The default dynamic (DHCP) address is 169.254.2.2.
The ID Pushbutton can be used to toggle between the DHCP and Static IP Modes.
To toggle between DHCP and Static IP Modes:
-
Once the module has booted up, press and hold the ID Pushbutton until the Control/NetLinx LEDs toggle back and forth in unison approximately 10 times.
-
Release when it starts to blink faster.
- When the Pushbutton is released, the module toggles either from static to dynamic (DIICP) IP addressing or vice versa and remains in that mode until the ID Pushbutton is used to set it again or a factory reset is performed.
- The module automatically reboots to complete the process.
Assign a Device Address (ID Mode)
The ID Pushbutton can be used in conjunction with the ID (Identify) Mode feature in NetLinx Studio. A momentary press of the ID Pushbutton assigns a device address to the Transmitter or Receiver (which must be bound to the Master). The device must first be placed in ID Mode in NetLinx Studio or the momentary press will be ignored.
Note: The latest version of NetLinx Studio is available to download and install from www.amx.com. Refer to the NetLinx Studio online help for instructions on using the application.
To set the device address on a Transmitter or Receiver:
- Check to be sure #3 Toggle on the bottom of the Transmitter or Receiver is set to ON.
- In NetLinx Studio's OnLine Tree, select the Master to which the Transmitter or Receiver is bound.
- From the Diagnostic menu, select Device Addressing. The Device Addressing dialog box opens.

- In the ID Mode section, enter the Device and System numbers that you want assigned to the device in the appropriate text boxes.
- Click Start Identify Mode to place the named system in ID Mode.
The button changes to "Cancel Identify Mode" (click to cancel ID Mode).
The text box below the button displays a "Waiting...Press Cancel to Quit" message.
Note: When in ID Mode, the entire system is put on hold while it waits for an event from any NetLinx device in the named system (e.g., pressing the ID Pushbutton on the Receiver). The device that generates the first event is the device that will be "identified."
- Briefly press and release the ID Pushbutton on the Transmitter or Receiver.
The Transmitter or Receiver will exhibit the following behavior:
- Respond with an ID Mode address response.
• Report its old address offline.
• Report its new address online.
The OnLine Tree will refresh to display the new device address for the Transmitter or Receiver.
Note: NetLinx Studio (v3.3 or higher) provides the ability to auto-increment IP Addresses and Hostnames as well as Device and System Numbers. Refer to the NetLinx Studio online help for details.
Reset the Factory Default Settings
During power up – if the ID Pushbutton is held until the Control/NetLinx LEDs toggle back and forth in unison approximately 10 times, then released when the faster blinking starts, the Transmitter or Receiver will reset to its factory default settings, which affect the parameters but not the firmware version.
Factory Parameters\*
- Default static IP address of 192.168.1.2
- Default dynamic (DHCP) address of 169.254.2.2
- Default device number of 0
- NDP mode (see page 119)
- Unbound state
- No IRL files
* For a complete list of factory parameters, see the table on page 65.
Instructions for the modules are given first followed by the instructions for the Wallplate TX and the Decor Wallplate TX, which receive power over DXLink from the switcher.
Important: If a Transmitter or Receiver Module is receiving power from a switcher, disconnect the DXLink connector on the module and reattach to apply power.
To reset a Transmitter or Receiver Module to its factory default settings:
-
Press and hold the ID Pushbutton while plugging in the power connector. Start counting when the NetLinx LEDs begin to flash in unison, not when the power connector is inserted.
-
Once the Transmitter or Receiver Module has started booting up, both NetLinx LEDs flash in unison at the rate of once per second.
● After 10 flashes at that rate, the LEDs will blink in unison at a faster rate.
Note: A press-and-hold of the ID Pushbutton at power up will prevent the Transmitter or Receiver from attempting to come online until the ID Pushbutton is released. The Transmitter or Receiver will only attempt to come online if you release the Pushbutton prior to the faster blink rate.
- At the point that the blink rate increases, release the ID Pushbutton.
- The Transmitter or Receiver will automatically reboot to complete the process.
To reset Wallplate TX or Decor Wallplate TX to its factory default settings:
The ID Pushbutton and the Reset button are located on the left edge of the Wallplate TX and on the front of the Decor Wallplate TX.
-
Press and hold the ID Pushbutton. While the ID Pushbutton is down, press and release the Reset button. Start counting when the NetLinx LEDs begin to flash in unison, not when the Reset button is released.
-
Once the unit has started booting up, both NetLinx LEDs (on bottom edge) flash in unison at the rate of once per second.
● After 10 flashes at that rate, the LEDs will blink in unison at a faster rate.
Note: A press-and-hold of the ID Pushbutton at boot will prevent the unit from attempting to come online until the ID Pushbutton is released. The unit will only attempt to come online if you release the Pushbutton prior to the faster blink rate.
-
At the point that the blink rate increases, release the ID Pushbutton.
-
The unit will automatically reboot to complete the process.
Restore the Factory Firmware Image and Factory Default Parameters
During power up – if the ID Pushbutton is held until the Control/NetLinx LEDs toggle back and forth in unison approximately 30 times (10 slow, 20 fast) and then released when they go solid, the module's factory firmware image will be restored. This procedure affects both the firmware version and the parameters.
Instructions for the modules are given first followed by the instructions for the Wallplate TX and the Decor Wallplate TX, which receive power over DXLink from the switcher, PDXL-2 (FG1090-170), or PS-POE-AT-TC (FG423-84).
Important: If a Transmitter or Receiver Module is receiving power from a switcher, on the module disconnect the RJ-45 cable from the DXLink connector before starting the instructions below.
To restore the Transmitter or Receiver Module to its factory default firmware image:
-
Press and hold the ID Pushbutton while plugging in the power connector (if the power source is a switcher, plug in the RJ-45 connector into the DXLink port instead). Start counting when the NetLinx LEDs begin to flash in unison, not when the power connector is inserted.
-
After the LEDs complete the following sequence, release the ID Pushbutton:
-
Once the Transmitter or Receiver has started booting up, all LEDs flash in unison at the rate of once per second.
● After 10 flashes at that rate, the LEDs will blink in unison at a faster rate.
● After 10 seconds of flashing at the increased rate, all LEDs go to solid on. -
Upon release of the ID Pushbutton, the Transmitter or Receiver executes the following actions:
a. Restores itself to its factory firmware image.
b. Resets to factory default parameters*:
- Deletes all IRL files stored on the device.
- Resets to the default static IP address of 192.168.1.2 and default DHCP address of 169.254.2.2.
- Resets to the default device number of 0 (when bound to a Master, it will receive a dynamic device number from the Master).
- Resets to NDP mode and being unbound.
* For a complete list of factory parameters, see the table on page 65.
- Once all actions in Step 3 are completed, the LEDs all turn off, indicating the Transmitter or Receiver is ready to reboot.
The Transmitter or Receiver automatically reboots to complete the process.
To restore Wallplate TX or Decor Wallplate TX to its factory default firmware image:
Note: The ID Pushbutton and the Reset button are located on the left edge of the Wallplate TX and on the front of the Decor Wallplate TX.
- Press and hold the ID Pushbutton. While the ID Pushbutton is down, press and release the Reset button. Start counting when the NetLinx LEDs begin to flash in unison, not when the Reset button is released.
-
After the LEDs complete the following sequence, release both buttons:
-
Once the unit has started booting up, all LEDs flash in unison at the rate of once per second.
● After 10 flashes at that rate, the LEDs will blink in unison at a faster rate.
● After 10 seconds of flashing at the increased rate, all LEDs go to solid on. -
Upon release, the unit executes the following actions:
a. Restores itself to its factory firmware image.
b. Resets to factory default parameters*:
- Deletes all IRL files stored on the device.
- Resets to the default static IP address of 192.168.1.2 and default DHCP address of 169.254.2.2.
- Resets to the default device number of 0 (when bound to a Master, it will receive a dynamic device number from the Master).
-
Resets to NDP mode and being unbound.
-
Once all actions in Step 3 are completed, the LEDs all turn off, indicating the unit is ready to reboot. The unit automatically reboots to complete the process.
* For a complete list of factory parameters, see the table on page 65.
Tip: To monitor the ID Pushbutton boot state of a module, see the "ID Pushbutton Boot and NetLinx LED Behavior" table on the next page.
ID Pushbutton Boot State and LED Behavior
To monitor the ID Pushbutton boot state of a module by its LEDs, check both the Link/Act and Status LED columns.
| ID Pushbutton Boot and NetLinx LED Behavior | ||
| ID Pushbutton Boot States Link/Act LED Status LED | ||
| Boot with ID Pushbutton held down Slow blink (1 Hz) Slow blink (1 Hz) | ||
| ID Pushbutton held down long enough for reset to default parameters | Fast blink until ID Pushbutton is released, then OFF | Fast blink until ID Pushbutton is released, then OFF |
| ID Pushbutton held down long enough for reset to default firmware image | Solid ON, transitions to OFF once the unit completes writing to flash and is ready to reboot | Solid ON, transitions to OFF once the unit completes writing to flash and is ready to reboot |
| In Auto ID mode Normal Blink (2 Hz) | ||
| ID Pushbutton held down long enough to accept new ID | 2 blinks, then normal 2 blinks, then normal | |
| After boot: ID Pushbutton held down, but not long enough for IP mode change | Slow blink (1 Hz) Slow blink (1 Hz) | |
| After boot: ID Pushbutton held down long enough for IP mode change | Fast blink, then OFF Fast blink, then OFF | |
Network Configuration
IRL File Transfers
Overview
The NetLinx Studio software application (available for free download from www.amx.com) provides the ability to transfer IR Library files to NetLinx devices such as DXLink Transmitters and Receivers.
Endpoint System (with a Switcher)
When a Transmitter and/or a Receiver are being used in conjunction with a switcher as an endpoint system, the switcher's integrated Master is used for the IRL file transfer. FIG. 38 shows a Transmitter and a Receiver bound to the integrated Master in an Enova DGX 32 in NetLinx Studio's OnLine Tree. Follow the instructions on the top of page 74 to prepare an endpoint system for IRL file transfer and the instructions on page 76 for the actual transfer.
![Workspace Bar System 3221 Devices [192.168.44.164] 00000 - NI Master (v4.2.378) 05002 - Enova DGX 32 (v1.2.5.1) Dynamic/Virtual Devices 32001 - DXLINK-HDMI-TX (v1.1.24) 32002 - DXLINK-HDMI-TX (v1.1.24) 32003 - DXLINK-HDMI-TX (v1.1.24) 32004 - DXLINK-HDMI-TX (v1.1.24) [OID=1] - MQX (v3.62) [OID=2] - DXLINK Boot (v1.1.24) [OID=3] - DXLINK App (v1.1.24) [OID=4] - DXLINK Link (3.0.2.0) Port - 1 Port - 2 Port - 3 Port - 4 Port - 5 Port - 6 Port - 7 32005 - NSX Application (v3.3.1.525) 32006 - DXLINK-HDMI-RX (v1.0.67) [OID=1] - MQX (v3.62) [OID=2] - DXLINK Boot (v1.0.67) [OID=3] - DXLINK App (v1.0.67) [OID=5] - DXLINK Link (3.0.2.0) [OID=6] - DXLINK FPGA (v1.0.0.5) Port - 1 Port - 2 Port - 3 Port - 4 Port - 5 Port - 6 Port - 7 Integrated Master Enova DGX 32 DXLink Transmitter Device numbers DXLink Receiver Ports 1-7 on DXLink Transmitter Ports 1-7 on DXLink Receiver](/content/2026/05/1072955/images/c53db2d49828a7b9324d837f3d08c7b24c99b283e5fefc0e6b302fcc122ebf07.jpg)
FIG. 38 NetLinx Studio – Integrated Master, Enova DGX 32, DXLink Transmitter, and DXLink Receiver
Extender System (Standalone)
When a standalone Transmitter and Receiver Module pair are being used as a extender system, the IRL file transfer can be done one of two ways:
- The module can be bound to any Master on the network and then unbound when the file transfer procedure is complete.
- If a Master is not present on the network, a Virtual NetLinx Master can be set up using a PC (see page 121).
Follow the instructions on page 75 to prepare an extender system for IRL file transfer and the instructions on page 76 for the actual transfer.
Preparing for IRL File Transfers in an Endpoint System
To prepare for IRL file transfers in an endpoint system:
-
Check to be sure #3 Toggle on the bottom of the Transmitter or Receiver is set to ON.
-
Verify that you have the latest version of NetLinx Studio on your PC.
If the version is not the latest:
- Use the Web Update option in NetLinx Studio's Help menu to obtain the latest version.
Or
- Go to www.amx.com and login as a Dealer to download the latest version.
-
Download the applicable IRL file from www.amx.com (Partners / Search Devices) to your PC.
-
Verify the following:
a. Verify that an Ethernet/RJ-45 cable is connected from the switcher's integrated Master to the network (e.g., from the LAN 100/1000 port on an Enova DGX 32 to a LAN).
b. Verify that the target Transmitter or Receiver is connected via its DXLink connector to a DXLink Input or Output Board (respectively) on the switcher.
c. Verify that the switcher is powered on.
-
Launch NetLinx Studio and open the OnLine Tree.
-
Bind the target Transmitter or Receiver to the integrated Master:
a. Select and right-click the TX or RX in the Online Tree.
b. From the context sensitive menu, select Network Bind/Unbind Device.
c. Verify that the check box is selected. If not selected, select it now.
d. Click OK.
![Bind/Unbind Device Device to Bind/Unbind [32001:00001] DXLINK-HDMI-TX (v1.0.37) Master Binding (check or uncheck) [Device: System] Master Description [00000:00001] No Master (<4.2.364) OK Cancel](/content/2026/05/1072955/images/b7771dc7b0acdcf899fa3d8fad73e6e1160b238aed08232ffb904071a966ce5c.jpg)
- Determine the Device Number assigned to the target Transmitter or Receiver when it was bound. For the Device Number location, see FIG. 38 on the previous page. The Transmitter or Receiver is ready for the IRL file transfer (see page 76).
Preparing for IRL File Transfers in an Extender System
To prepare for IRL file transfers in an extender system:
-
Check to be sure #3 Toggle on the bottom of the Transmitter or Receiver is set to ON.
-
Verify that you have the latest version of NetLinx Studio on your PC. If the version is not the latest:
- Use the Web Update option in NetLinx Studio's Help menu to obtain the latest version.
Or
- Go to www.amx.com and login as a Dealer to download the latest version.
-
Download the applicable IRL file from www.amx.com (Partners / Search Devices) to your PC.
-
No Master on the network:
a. Use your PC to set up a Virtual NetLinx Master (see page 121) in NetLinx Studio (leave NetLinx Studio open to the OnLine Tree when done).
b. Apply power to the DXLink Module and set it to Static IP Mode.* The default static IP address is 192.168.1.2. (Note that when the DXLink Module is in Static IP Mode, the Link/Act LED will be OFF and the Status LED will be ON.)
Master on the network:
a. Launch NetLinx Studio and open the OnLine Tree.
b. Apply power to the DXLink Module and set it to DHCP Mode.*
-
On the bottom of the module, set the DIP switch's #1 and #3 Toggles to ON. (Remember to set the #1 and #3 Toggles back to OFF when the file transfer is complete if the module does not require network connectivity.)
-
Connect an RJ-45 cable from the ICS LAN 10/100 port on the Transmitter or Receiver Module to the PC running NetLinx Studio.
-
No Master on the network (set a TCP connection from the module to the Virtual NetLinx Master): Note that the module is present on the network but does not display until the following steps are completed and the workspace is refreshed.
a. From the Tools menu, select Telnet Session to open the Telnet Settings window.
b. Click New and enter the TCP/IP Address for the module (192.168.1.2). Click OK.
c. Select the module's address in the List of Addresses and click OK.
d. At the prompt ( > ), enter SET CONNECTION.
e. Enter "T" for TCP/URL.
f. Enter the (Virtual NetLinx) Master IP/URL (192.168.1.100).
Use the defaults for the remaining parameters (press Enter to move from default to default).
Master on the network: Go to Step 8.
- Right-click in the workspace and select Refresh System OnLine Tree. The module appears in the OnLine Tree. Locate the DXLink Module and the virtual device ID assigned to it (32002 in the example). For the Device Number location, see FIG. 38 on page 73. The module is ready for the IRL file transfer.
Transferring IRL Files
The File Transfer tool in NetLinx Studio is used to map IRL files to DXLink Transmitters and Receivers. The instructions below assume that the preparations on the previous pages for either an endpoint system or an extender system have been completed.
To send an IR Library (\*.IRL) file to a Transmitter or Receiver:
- In NetLinx Studio, select Tools > File Transfer to open the File Transfer dialog box.

-
Click Add to open the Select Files for File Transfer dialog box.
-
Open the Other tab (if the file you want to transfer is not included in the open workspace.) The Other tab consists of a display of the different types of files that can be transferred to the Master or System devices on the bus.

- Select the type of file (in this case, IRL/IRV Files) that you want to add to the File list for transfer.

- Click Add.
A standard Open dialog box opens with the Files of type selection set to IR Code files (*.IRL/ *.IRV).
-
Locate and select the IRL file that you want to add.
-
Click Open.
The Enter Device Mapping Information dialog box opens.

Note: IRL files must be sent to Port 3 (IR Device Port) on the Transmitter or Receiver.
-
If the fields are empty – Enter the Device, Port, and System numbers for the selected device. If the fields are populated – Verify that the mapping information is correct for the selected device.
-
IRL files are sent to Port 3 (IR Device Port) on the Transmitter or Receiver.
- Refer to the "Device Numbering" section on page 79 for information on device numbering for the Transmitter or Receiver.
-
If the device's assigned device number has been changed, use the OnLine Tree to determine it.
-
Click OK to return to the Select Files for File Transfer dialog box.
The selected IRL file and its mapping information are indicated in the File and Mapping lists.
- Click OK to close the Select Files for File Transfer dialog box and return to the File Transfer dialog box. The IRL file appears in the File queue.

- Click Send to transfer the file to the Transmitter or Receiver that the file is mapped to.
Additional Documentation
For additional information on using NetLinx Studio, refer to the Operation/Reference Guide – NetLinx Studio v3.3 and the WebConsole & Programming Guide – NetLinx Integrated Controllers (available at www.amx.com).
NetLinx Programming of DXLink Transmitters and Receivers
Overview
Important: Before DXLink TXs and RXs can receive any NetLinx SEND_COMMANDs, the DIP switch's #3 Toggle must be set to ON or the devices will not be accessible from a NetLinx control system.
The DXLink Transmitters and Receivers recognize a select number of SEND_COMMANDs and CHANNELs.
- Receiver Video SEND_COMMANDs – page 81
- Receiver Audio SEND_COMMANDs – page 84
- Transmitter Video SEND_COMMANDs – page 85
- Transmitter Audio SEND_COMMANDs – page 90
- IR SEND_COMMANDs and CHANNELs – page 91
- SERIAL SEND_COMMANDs – page 95
- Common DXLink Transmitter / Receiver SEND_COMMANDs – page 97
- DXLink System SEND_COMMANDs – page 98
- SEND_STRING Escape Sequences – page 99
Note: For a listing of all supported Telnet commands, see page 111.
Device Numbering and Ports
Each DXLink Transmitter and Receiver has its own Device Number (which is assigned when the unit is bound to a Master) and the following ports.
Transmitters and Receivers (Modules)
Port 1 - Serial
Port 2 – Not used
Port 3 - IR TX
Port 4 - IR RX
Port 5 – USB (not supported at time of publication; will be supported in a future firmware upgrade)
Port 6 – Video/Audio Output
Port 7 – Video/Audio Input
Port 8 (Multi-Format TX only) - Analog Video Input
Transmitters (Wallplate TX and Decor Wallplate TX)
Port 1 - Serial
Port 2 - Not used
Port 3 – Not used
Port 4 – Not used
Port 5 – USB (not supported at time of publication; will be supported in a future firmware upgrade)
Port 6 – Video/Audio Output
Port 7 – Video/Audio Input
Port 8 - Analog Video Input
For an example, see the NetLinx Studio illustration in FIG. 39 below.
In NetLinx Studio's OnLine Tree, the DXLink Transmitters and Receivers each display their ports.
![Workspace Bar System 3221 Devices [192.168.44.164] 00000 - NI Master (v4.2.378) 05002 - Enova DGX 32 (v1.2.5.1) Dynamic/Virtual Devices 32001 - DXLINK-HDMI-TX (v1.1.24) 32002 - DXLINK-HDMI-TX (v1.1.24) 32003 - DXLINK-HDMI-TX (v1.1.24) 32004 - DXLINK-HDMI-TX (v1.1.24) [OID=1] - MQX (v3.62) [OID=2] - DXLINK Boot (v1.1.24) [OID=3] - DXLINK App (v1.1.24) [OID=4] - DXLINK Link (3.0.2.0) Port - 1 Port - 2 Port - 3 Port - 4 Port - 5 Port - 6 Port - 7 Ports 1-7 on DXLink Transmitter (device number 32004) 32005 - NSX Application (v3.3.1.525) 32006 - DXLINK-HDMI-RX (v1.0.67) [OID=1] - MQX (v3.62) [OID=2] - DXLINK Boot (v1.0.67) [OID=3] - DXLINK App (v1.0.67) [OID=5] - DXLINK Link (3.0.2.0) [OID=6] - DXLINK FPGA (v1.0.0.5) Port - 1 Port - 2 Port - 3 Port - 4 Port - 5 Port - 6 Port - 7 Ports 1-7 on DXLink Receiver (device number 32006) DXLink Transmitter Port 1 - Serial ICSP (COM) Port 2 - Not used Port 3 - IR Output* Port 4 - IR Input* Port 5 - USB (HID) input and output Port 6 - Audio/Video Output Port 7 - Audio/Video Input Port 8 - Analog Video Input** * IR Input and Output ports are not used on the Wallplate TX or on the Decor Wallplate TX. **Multi-Format TX, Wallplate TX, and Decor Wallplate TX DXLink Receiver Port 1 - Serial ICSP (COM) Port 2 - Not used Port 3 - IR Output Port 4 - IR Input Port 5 - USB (HID) host data Port 6 - Audio/Video Output Port 7 - Audio/Video Input](/content/2026/05/1072955/images/9033c2cc8597d0bd1f2055f6e107880484b90272a917d9940891f3c174334a99.jpg)
FIG. 39 NetLinx Studio OnLine Tree - Ports 1 through 7 on a DXLink HDMI Transmitter and Receiver
Note: For additional information on using NetLinx Studio, refer to the "Operation/Reference Guide – NetLinx Studio v3.3" and the "WebConsole & Programming Guide – NetLinx Integrated Controllers" (available at www.amx.com).
Note: All command text is based on a Unicode index.
Tip: Occasionally new firmware versions affect SEND_COMMANDs. If a command does not produce the expected results, we suggest checking the product's current firmware version against the information in the "Firmware Version" table on page 108.
CHANNELs
Channel Function
255
This channel On indicates that the DXLink Module has a valid UTP (twisted pair cable) connection to a switcher with an integrated Master.
If the channel is Off, the DXLink Module is incorrectly connected.
1-253 Key presses from selected remote control.
Important: Before DXLink TXs and RXs can receive any NetLinx SEND_COMMANDs, the DIP switch's #3 Toggle must be set to ON or the devices will not be accessible from a NetLinx control system.
Note: Since not all devices support both upper and lower case, for best results all commands and parameters should be sent in upper case.
DXLink Receiver Video SEND\_COMMANDs
DXLink Receiver Video SEND_COMMANDs are sent to Port 6.
| Video SEND_COMMANDs (Receivers) | |
| Command Description | |
| ?VIDOUT_SCALERequests the current Scaling Mode that the Receiver is set to. The modes are AUTO (SmartScale®), MANUAL, and BYPASS. | Syntax:SEND_COMMAND,""?VIDOUT_SCALE"Example:SEND_COMMAND dvRX,""?VIDOUT_SCALE"Returns a COMMAND of the form:VIDOUT_SCALE- |
| VIDOUT_SCALESets the Scaling Mode on the Receiver to AUTO (SmartScale®), MANUAL, or BYPASS. | Syntax:SEND_COMMAND,"'VIDOUT_SCALE-'''Variable:scaling mode = AUTO, MANUAL, BYPASSExample:SEND_COMMAND dvRX,"'VIDOUT_SCALE-MANUAL" |
| ?VIDOUT_RES_REFRequests the resolution and refresh rate of the video through the Receiver.Note:If the Scaling Mode is set to Bypass, the response will be "BYPASS." | Syntax:SEND_COMMAND,"'?VIDOUT_RES_REF"Variables:horizontal = An integer value representing the horizontal.vertical = An integer value representing the vertical. May have an additional qualifier such as 'i' or 'p'.rate = An integer value representing the refresh rate.Example:SEND_COMMAND dvRX,"'?VIDOUT_RES_REF"Returns a COMMAND of the form:VIDOUT_RES_REF-, |
| VIDOUT_RES_REFSets the resolution and refresh rate of the video through the Receiver.Important:The variables used must come from the Resolution Names listed in the table in the "Supported Output Resolutions" appendix on page 135.Note:The default for Manual Mode is 1280x1024,60. | Syntax:SEND_COMMAND,"'VIDOUT_RES_REF-x",''Variables:horizontal = An integer value representing the horizontal.vertical = An integer value representing the vertical. May have an additional qualifier such as 'p' or 'i'.rate = An integer value representing the refresh rate.Example:SEND_COMMAND dvRX,"'VIDOUT_RES_REF-1920x1080p,60" |
| Video SEND_COMMANDs (Receivers), continued | |
| ?VIDOUT_RESRequests the resolution and refresh rate of the video through the Receiver.Note:If the Scaling Mode is set to Bypass, the response will be "BYPASS." | Syntax:SEND_COMMAND,""?VIDOUT_RES'"Variables:horizontal = An integer value representing the horizontal.vertical = An integer value representing the vertical. May have an additional qualifier such as 'i' or 'p'.rate = An integer value representing the refresh rate.Example:SEND_COMMAND dvRX,"'?VIDOUT_RES'"Returns a COMMAND of the form:VIDOUT_RES-x,, |
| ?VIDOUT_ASPECT_RATIORequests the aspect ratio preference of the video through the Receiver.(For explanations of the ratio options, see page 83.) | Syntax:SEND_COMMAND,"'?VIDOUT_ASPECT_RATIO'"Variables:ratio = STRETCH (default after FACTORYAV), MAINTAIN, ZOOM, ANAMORPHICExample:SEND_COMMAND dvRX,"'?VIDOUT_ASPECT_RATIO'"Returns a COMMAND of the form:VIDOUT_ASPECT_RATIO- |
| VIDOUT_ASPECT_RATIOSets the aspect ratio preference of the video through the Receiver to Stretch, Maintain, Zoom, or Anamorphic.(For explanations of the ratio options, see page 83.) | Syntax:SEND_COMMAND,"'?VIDOUT_ASPECT_RATIO-''"Variables:ratio = STRETCH, MAINTAIN, ZOOM, ANAMORPHICExample:SEND_COMMAND dvRX,"'?VIDOUT_ASPECT_RATIO-ZOOM'" |
| ?VIDOUT_TESTPATRequests the test pattern setting on the Receiver. | Syntax:SEND_COMMAND,"'?VIDOUT_TESTPAT'"Variables:pattern = OFF, COLOR BAR, GRAY RAMP, SMPTE BAR, HILOTRAK, PLUGE, X-HATCHExample:SEND_COMMAND dvRX,"'?VIDOUT_TESTPAT'"Returns a COMMAND of the form:VIDOUT_TESTPAT- |
| VIDOUT_TESTPATSets the test pattern to display (will not display if an input signal is not present). Can be sent in any Scaling Mode. | Syntax:SEND_COMMAND,"'?VIDOUT_TESTPAT-''"Variables:pattern = OFF, COLOR BAR, GRAY RAMP, SMPTE BAR, HILOTRAK, PLUGE, X-HATCHExample:SEND_COMMAND dvRX,"'?VIDOUT_TESTPAT-COLOR BAR'" |
| ?VIDOUT_MUTERequests the setting for the Mute preference applied to the image from the Receiver (Enable or Disable). | Syntax:SEND_COMMAND,"'?VIDOUT_MUTE'"Example:SEND_COMMAND dvRX,"'?VIDOUT_MUTE'"Returns a COMMAND of the form:VIDOUT_MUTE- |
| VIDOUT_MUTESets the Mute preference of the image from the Receiver to Enable (displays a blank screen) or Disable. | Syntax:SEND_COMMAND,"'VIDOUT_MUTE-'"Example:SEND_COMMAND dvRX,"'VIDOUT_MUTE-ENABLE'" |
Aspect Ratio Options
Stretch (to fit) – This option (default) scales the video to full screen size in both horizontal and vertical directions regardless of the input aspect ratio. No data is cropped. However, the image may be distorted as needed to fill the screen. When Stretch is selected, black bars are not added by the scaler. However, if an image has originated from a source device with either horizontal or vertical black bars (e.g., letter box from a movie), the black bars will be considered as active video and will be included in the stretched video.
Maintain (aspect ratio) – This option maintains the incoming video's aspect ratio, but will scale the image until the display fills either horizontal or vertical direction first. If the vertical direction is filled first, then the video will have pillar box black bars on the sides of the display. If the horizontal direction is filled first, then the video will have letter box black bars on the top and bottom of the display.
Zoom - This option maintains the input aspect ratio while zooming the image to fill the screen in all directions. Image data may be lost on the top and bottom or to the left and right of the displayed image.
Anamorphic - This option is used with anamorphic formatted video sources so that images appear correctly on the display.
DXLink Receiver Audio SEND\_COMMANDs
DXLink Receiver Audio SEND_COMMANDs are sent to Port 6.
| Audio SEND_COMMANDs (Receivers) | |
| Command Description | |
| ?AUDOUT_DELAYRequests the audio delay setting for the Receiver. | Syntax:SEND_COMMAND,""?AUDOUT_DELAY"Example:SEND_COMMAND dvRX,"'?AUDOUT_DELAY"Returns a COMMAND of the form:AUDOUT_DELAY-50 |
| AUDOUT_DELAYSets the audio delay in milliseconds on the Receiver. | Syntax:SEND_COMMAND,"'AUDOUT_DELAY-'''Variable:value = 0 to 200 in millisecondsExample:SEND_COMMAND dvRX,"'AUDOUT_DELAY-50'"Sets the delay for the audio output port to 50 milliseconds.Note:AUDOUT_DELAY will only delay non-compressed 2 channel audio, not S/PDIF, Dolby TrueHD, Dolby Digital, DTS-HD Master Audio, or DTS. |
| ?AUDOUT_MUTERequests the setting for the Mute preference of the audio from the Receiver (Enable or Disable). | Syntax:SEND_COMMAND,"'?AUDOUT_MUTE"Example:SEND_COMMAND dvRX,"'?AUDOUT_MUTE"Returns a COMMAND of the form:AUDOUT_MUTE- |
| AUDOUT_MUTESets the Mute preference of the audio from the Receiver to Enable (no sound) or Disable. | Syntax:SEND_COMMAND,"'AUDOUT_MUTE-''Example:SEND_COMMAND dvRX,"'AUDOUT_MUTE-ENABLE" |
| ?AUDOUT_FORMATRequests the audio format on the Receiver. | Syntax:SEND_COMMAND,"'?AUDOUT_FORMAT"''Variable:format = HDMI, ANALOG, ALLExample:SEND_COMMAND dvRX,"'?AUDOUT_FORMAT"Returns a COMMAND of the form:AUDOUT_FORMAT- |
| AUDOUT_FORMATSets the audio format on the Receiver (default is ALL). | Syntax:SEND_COMMAND,"'AUDOUT_FORMAT-'''Variable:format = HDMI, ANALOG, ALLExample:SEND_COMMAND dvRX,"'AUDOUT_FORMAT-ANALOG" |
DXLink Transmitter Video SEND\_COMMANDs
DXLink Transmitter Video SEND COMMANDs are sent to Port 7 unless otherwise noted.
Note: All text is based on a Unicode index.
| Video SEND_COMMANDs (Transmitters) | |
| Command Description | |
| ?VIDIN_AUTO_SELECTRequests setting for the Auto Select mode for the video input signal on the Multi-Format TX, Wallplate TX, or Decor Wallplate TX (Enable or Disable).Note: This command applies to all DXLink Transmitters except the HDMI TX. | Important: This command must be sent to Port 1. Syntax:SEND_COMMAND,"'?VIDIN_AUTO_SELECT'"Example:SEND_COMMAND dvMFTX,"'?VIDIN_AUTO_SELECT"Returns a COMMAND of the form:VIDIN_AUTO_SELECT-ENABLE |
| VIDIN_AUTO_SELECTEnables or disables the Auto Select mode for the video input signal on the Multi-Format TX, Wallplate TX, or Decor Wallplate TX.Note: This command applies to all DXLink Transmitters except the HDMI TX. | Important: This command must be sent to Port 1. Syntax:SEND_COMMAND,"'VIDIN_AUTO_SELECT-"Variable:value = ENABLE | DISABLEExample:SEND_COMMAND dvMFTX,"'VIDIN_AUTO_SELECT-ENABLE'' |
| ?INPUT-VIDEORequests the video input being used on the Multi-Format TX, Wallplate TX, or Decor Wallplate TX: either the digital video (Input 7) or the analog video (Input 8).The output is always 6.Note: This command applies to all DXLink Transmitters except the HDMI TX. | Important: This command must be sent to Port 1. Syntax:SEND_COMMAND,"'?INPUT-VIDEO,6'"Example:SEND_COMMAND dvMFTX,"'?INPUT-VIDEO,6'"Returns a COMMAND of the form:SWITCH-LVIDEOI806 |
| VIOSets the Multi-Format TX, Wallplate TX, or Decor Wallplate TX to route either the digital video (Input 7) or the analog video (Input 8) to the output (which is always output 6).Note: This command applies to all DXLink Transmitters except the HDMI TX. | Important: This command must be sent to Port 1. Syntax:SEND_COMMAND,"'VIO"Variables:input = 7 for digital video; 8 for analog videooutput = 6Example:SEND_COMMAND dvMFTX,"'VI806'' |
| ?VIDIN_STATUSRequests the status of the video input on the Transmitter.Important: In the case of the Multi-Format TX, Wallplate TX, or Decor Wallplate TX this will only specify the status of the currently routed input port. | Important: Send to Port 7 for digital video or to Port 8 for analog video. Syntax:SEND_COMMAND,"'?VIDIN_STATUS'"Variable:status = NOT ACTIVE, NO SIGNAL, UNKNOWN SIGNAL, VALID SIGNALExample:SEND_COMMAND dvMFTX,"'?VIDIN_STATUS'"Returns a COMMAND of the form:VIDIN_STATUS- |
| Video SEND_COMMANDs (Transmitters), continued | |
| ?VIDIN_FORMATRequests the video format on the Transmitter.Note:All DXLink Transmitters except the HDMI TX support component, S-Video, composite, and VGA signals. | Note:Send to Port 7 or Port 8 Syntax:SEND_COMMAND,"'?VIDIN_FORMAT'"Variable:format (port 8) = COMPONENT, S-VIDEO, COMPOSITE, VGA format (port 7) = HDMI, DVIExample:SEND_COMMAND dvMFTX,"'?VIDIN_FORMAT"Returns a COMMAND of the form:VIDIN_FORMAT- |
| VIDIN_FORMATSets the video format on the Transmitter (prior to sending, VIDIN_AUTO_SELECT must be set to DISABLE).Note:All DXLink Transmitters except the HDMI TX support component, S-Video, composite, and VGA signals | Note:Send to Port 7 or Port 8 Syntax:SEND_COMMAND,"'?VIDIN_FORMAT-'"Variable:format (port 8) = COMPONENT, S-VIDEO, COMPOSITE, VGA format (port 7) = HDMI, DVIExample:SEND_COMMAND dvMFTX,"'?VIDIN_FORMAT-COMPONENT" |
| ?VIDIN_RES_AUTORequests the setting for the Auto mode on the Transmitter (Enable or Disable). | Note:Send to Port 7 or Port 8 Syntax:SEND_COMMAND,"'?VIDIN_RES_AUTO'"Example:SEND_COMMAND dvMFTX,"'?VIDIN_RES_AUTO"Returns a COMMAND of the form:VIDIN_RES_AUTO- |
| VIDIN_RES_AUTOEnables or disables the Auto mode (for automatically determining the resolution) on the Transmitter. | Note:Send to Port 7 or Port 8 Syntax:SEND_COMMAND,"'?VIDIN_RES_AUTO-'"Example:SEND_COMMAND dvMFTX,"'?VIDIN_RES_AUTO-ENABLE" |
| ?VIDIN_RES_REFRequests the resolution and refresh rate of the video through the Transmitter. | Note:Send to Port 7 or Port 8 Syntax:SEND_COMMAND,"'?VIDIN_RES_REF'"Variables:horizontal = An integer value representing the horizontal.vertical = An integer value representing the vertical. May have an additional qualifier such as 'i' or 'p'.rate = An integer value representing the refresh rate.Example:SEND_COMMAND dvMFTX,"'?VIDIN_RES_REF"Returns a COMMAND of the form:VIDIN_RES_REF-,, |
| VIDIN_RES_REFSets the resolution and refresh rate of the video through the Transmitter (disable VIDIN_RES_AUTO prior to sending). | Important: Send to Port 7 or Port 8 Syntax:SEND_COMMAND," 'VIDIN_RES_REF- horizontal>x,,'"Variables:· horizontal = An integer value representing the horizontal.· vertical = An integer value representing the vertical. May have an additional qualifier such as 'i' or 'p'.· rate = An integer value representing the refresh rate. |
| ?VIDIN_PREF_EDIDRequests the preferred resolution of the EDID source for the VGA video input.Note: This command applies to all DXLink Transmitters except the HDMI TX. | Important: Send to Port 8Syntax:SEND_COMMAND," 'VIDIN_PREF_EDID'"Example:SEND_COMMAND dvMFTX," 'VIDIN_PREF_EDID'"Returns a COMMAND of the form:VIDIN_PREF_EDID- |
| VIDIN_PREF_EDIDSets the preferred resolution of the EDID source for the VGA video input.Note: This command applies to all DXLink Transmitters except the HDMI TX. | Important: Send to Port 8Syntax:SEND_COMMAND," 'VIDIN_PREF_EDID -resolution,refresh'"Variable:· resolution,refresh =Examples:SEND_COMMAND dvMFTX," 'VIDIN_PREF_EDID-1920x1080p,60'" |
| ?VIDIN_EDIDRequests which EDID is being presented to the source on the video port addressed by the D:P:S. | Important: Send to Port 8Syntax:SEND_COMMAND," 'VIDIN_EDID'"Example:SEND_COMMAND VIDEO_INPUT_1," 'VIDIN_EDID'"Returns a COMMAND of the form:VIDIN_EDID-See the VIDIN_EDID command for the potential sources. |
| VIDIN_EDIDSets the EDID to be presented to the source on the video input port addressed by the D:P:S. | Important: Send to Port 8 (or Port 7 - only for the last variable listed).Syntax:SEND_COMMAND," 'VIDIN_EDID-'"Variables:source = ALL RESOLUTIONS, USER EDID 1* (Port 8 only)MIRROR OUT 1**(Port 7 only)Example:SEND_COMMAND VIDEO_INPUT_1," 'VIDIN_EDID-ALL RESOLUTIONS'" * "USER EDID 1" must be written to the TX using DGX Configuration Software (see page 147).** The HDMI port mirrors downstream EDID of the connected DXLink device.Tip: For troubleshooting purposes, "MIRROR OUT 1" can be sent to Port 7 of the TX (or Port 6 of the RX), which effectively acts like a hotplug and refreshes the EDID. |
| ?VIDIN_HDCPRequests the video HDCP compliance of the video input port addressed by the D:P:S. | Important: Send to Port 7 Syntax:SEND_COMMAND,""?VIDIN_HDCP'"Example:SEND_COMMAND dvTX,"'?VIDIN_HDCP'"Returns a COMMAND of the form:VIDIN_HDCP- |
| VIDIN_HDCPSets the video input HDCP compliance setting of the video input port addressed by the D:P:S.Caution: For sources (such as DVD and Blu-Ray players) that do not support non-compliant displays, disabling the HDCP compliance isnotrecommended and may affect DXLink performance. | Important: Send to Port 7.Note: When VIDIN_HDCP is disabled, the addressed video input will appear to any source as not being HDCP compliant. For PC sources that encrypt all video when connected to an HDCP compliant display, disabling HDCP compliance on the input will cause the PC to send non-encrypted video which can then be routed to non-compliant displays and video conferencing systems. This command is not applicable to the analog video port.Note: After changing this setting, it may be necessary to disconnect and re-connect PC sourcesSyntax:SEND_COMMAND,"'VIDIN_HDCP--DISABLE>"Example:SEND_COMMAND dvTX,"'VIDIN_HDCP-ENABLE'"Enables the HDCP Compliance of video input port (#1 based on D:P:S). |
| ?VIDIN_VSHIFTRequests the vertical shift value of the analog video input port addressed by the D:P:S.Note: This command applies to all DXLink Transmitters except the HDMI TX. | Important: Send to Port 8 Syntax:SEND_COMMAND,"'?VIDIN_VSHIFT'"Example:SEND_COMMAND dvMFTX,VIDEO_INPUT_8,"'?VIDIN_VSHIFT'"Returns a COMMAND of the form:VIDIN_VSHIFT- |
| VIDIN_VSHIFTSets the vertical shift value of the analog video input port addressed by the D:P:S.Note: This command applies to all DXLink Transmitters except the HDMI TX. | Important: Send to Port 8 Syntax:SEND_COMMAND,"'VIDIN_VSHIFT-'"Variables:value = -10...10Example:SEND_COMMAND dvMFTX,"'VIDIN_VSHIFT-2'"Sets the vertical shifting of analog video input port (#1 based on D:P:S) to 2 (shift upward).SEND_COMMAND dvMFTX,"'VIDIN_VSHIFT--3'"Sets the vertical shifting of analog video input port (#1 based on D:P:S) to -3 (shift downward). |
| ?VIDIN_HSHIFTRequests the horizontal shift value of the analog video input port addressed by the D:P:S.Note: This command applies to all DXLink Transmitters except the HDMI TX. | Important: Send to Port 8 Syntax:SEND_COMMAND,"'?VIDIN_HSHIFT'"Example:SEND_COMMAND dvMFTX,"'?VIDIN_HSHIFT'"Returns a COMMAND of the form:VIDIN_HSHIFT- |
| VIDIN_HSHIFTSets the horizontal shift value of the analog video input port addressed by the D:P:S.Note: This command applies to all DXLink Transmitters except the HDMI TX. | Important: Send to Port 8.Syntax:SEND_COMMAND," 'VIDIN_HSHIFT-''Variables:value = -50...50Examples:SEND_COMMAND dvMFTX, '' 'VIDIN_HSHIFT-2''Sets the horizontal shifting of video input port (#1 based on D:P:S) to 2 (shift to right).SEND_COMMAND dvMFTX, '' 'VIDIN_HSHIFT--3''Sets the horizontal shifting of video input port (#1 based on D:P:S) to -3 (shift to left). |
| ?VIDIN_PHASERequests the input phase of the RGB video input port addressed by the D:P:S.Note: This command applies to all DXLink Transmitters except the HDMI TX. | Important: Send to Port 8.This command is valid only for inputs whose format is set to VGA.Syntax:SEND_COMMAND," ' ?VIDIN_PHASE''Example:SEND_COMMAND dvMFTX, '' ' ?VIDIN_PHASE''Returns a COMMAND of the form:VIDIN_PHASE- |
| VIDIN_PHASESets the input phase of the RGB video input port addressed by the D:P:S.Note: This command applies to all DXLink Transmitters except the HDMI TX. | Important: Send to Port 8.This command is valid only for inputs whose format is set to VGA.Syntax:SEND_COMMAND," 'VIDIN_PHASE-''Variables:value = 0...31Example:SEND_COMMAND dvMFTX, '' 'VIDIN_PHASE-23'' |
DXLink Transmitter Audio SEND\_COMMANDs
DXLink Transmitter Audio SEND_COMMANDs are sent to Port 7.
| Audio SEND_COMMANDs (Transmitters) | |
| Command Description | |
| ?AUDIN_FORMAT_AUTORequests the setting (Enable or Disable) for automatically detecting the audio source format through the TX. | Syntax:SEND_COMMAND,"'?AUDIN_FORMAT_AUTO'"Example:SEND_COMMAND dvTX,"'?AUDIN_FORMAT_AUTO"Returns a COMMAND of the form:AUDIN_FORMAT-AUTO |
| AUDIN_FORMAT_AUTOSets audio source format to automatically detect the audio through the TX. | Syntax:SEND_COMMAND,"'AUDIN_FORMAT_AUTO-'"Example:SEND_COMMAND dvTX,"'AUDIN_FORMAT_AUTO-ENABLE'" |
| ?AUDIN_FORMATRequests the setting for the audio source format. | Syntax:SEND_COMMAND,"'?AUDIN_FORMAT'"Variable:format = HDMI, SPDIF, ANALOGExample:SEND_COMMAND dvTX,"'?AUDIN_FORMAT'"Returns a COMMAND of the form:AUDIN_FORMAT- |
| AUDIN_FORMATSelects the audio input source that will be embedded on the HDMI signal through the TX.Note:When the Multi-Format TX is set to route digital video (input 7), you can select from the HDMI, SPDIF, or ANALOG audio inputs. When it is set to route analog video (input 8), you can only select the SPDIF or ANALOG audio input (see the VIOcommand).Note:S/PDIF signals are not available over the Wallplate TX or Decor Wallplate TX. | Syntax:SEND_COMMAND,"'AUDIN_FORMAT-'"Variable:format = HDMI, SPDIF, ANALOGExample:SEND_COMMAND dvTX,"'AUDIN_FORMAT-ANALOG'"Important:The order of precedence (HDMI embedded audio, S/PDIF, analog) can be overridden with this command; however, you must first send AUDIN_FORMAT_AUTO DISABLE to disable the auto format function, or the audio format will automatically switch back anytime the order of precedence is violated. |
IR SEND\_COMMANDs
On the DXLink Transmitters and Receiver Modules, IR CHANNELS and SEND_COMMANDs are sent to Port 3 (IR output).
IR CHANNELs
Channel Function
1-255 Generate the IR or serial command assigned to that channel.
IR SEND\_COMMANDs
| IR SEND_COMMANDs (Transmitters and Receivers) | |
| Command Description | |
| CAROFFDisable the IR carrier signal until a 'CARON'Send Command is received. | Syntax:SEND_COMMAND," 'CAROFF'"Example:SEND_COMMAND IR_1," 'CAROFF'"Stops transmitting IR carrier signals to the IR port. |
| CARONEnable the IR carrier signals (default). | Syntax:SEND_COMMAND," 'CARON'"Example:SEND_COMMAND IR_1," 'CARON'"Starts transmitting IR carrier signals to the IR port. |
| CHSend IR pulses for the selected channel. | All channels below 100 are transmitted as two digits.If the IR code for ENTER (function #21) is loaded, an Enter will follow the number.If the channel is greater than or equal to (>=) 100, then IR function 127 or 20 (whichever exists) is generated for the one hundred digit.Note:Set the Pulse and Wait times with 'CTON' and 'CTOF' (see the next page).Syntax:SEND_COMMAND," 'CH',"Variable:channel number = 0 to 199 channelsExample:SEND_COMMAND IR_1," 'CH',18"The IR port on the DXLink TX or RX performs the following:Transmits IR signals for 1 (IR code 11).The transmit time is set with the CTON command.Waits until the time set with the CTOF command elapses.Transmits IR signals for 8 (IR code 18).Waits for the time set with the CTOF command to elapse.If the IR code for Enter (IR code 21) is programmed, the module performs the following steps:Transmits IR signals for Enter (IR code 21).Waits for the time set with the CTOF command to elapse. |
| IR SEND_COMMANDs (Transmitters and Receivers), continued | |
| Command Description | |
| CPHalt and clear all active or buffered IR commands, and then send a single IR pulse. | Pulse and Wait times can be set with the 'CTON' and 'CTOF' commands Syntax:SEND_COMMAND," 'CP',""Variable:code = IR port's channel value 0 to 252 (253 to 255 reserved).Example:SEND_COMMAND IR_1," 'CP',2"Clears the active/buffered commands and pulses IR port's channel 2. |
| CTOFSet the duration of the Off time (no signal) between IR pulses for channel and IR function transmissions. Off time settings are stored in non-volatile memory. | This command sets the delay time between pulses generated by the 'CH' or 'XCH' Send Commands in tenths of secondsSyntax:SEND_COMMAND," 'CTOF',""Variable:time = 0 to 255. Given in 1/10th of a second increments. Default is 5 (0.5 seconds).Example:SEND_COMMAND IR_1," 'CTOF',10"Sets the off time between each IR pulse to 1 second. |
| CTONSet the total time of IR pulses transmitted and is stored in non-volatile memory. | This command sets the pulse length for each pulse generated by the 'CH' (see previous page) or 'XCH' (see next page) Send Commands in tenth of a second incrementsSyntax:SEND_COMMAND," 'CTON',""Variable:time = 0 to 255. Given in 1/10th of a second increments. Default is 5 (0.5 seconds).Example:SEND_COMMAND IR_1," 'CTON',20"Sets the IR pulse duration to 2 seconds. |
| GET MODEPoll the IR/Serial port's configuration parameters and report the active mode settings to the device requesting the information.Note: Works with Port 3 only. | Syntax:GET MODEThe port responds with:,,",Example:SEND_COMMAND IR_1," 'GET MODE'"The system could respond with:PORT 3 IR,CARRIER,IO LINK 0 |
| IROFFHalt and clear all active or buffered IR commands being output on the designated port. | Syntax:SEND_COMMAND," 'IROFF'"Example:SEND_COMMAND IR_1," 'IROFF'"Immediately halts and clears all IR output signals on the IR port. |
| SET MODESet an IR port to either IR, Serial, or Data mode. | Syntax:SEND_COMMAND," 'SET MODE',""Variable:mode =• IR (standard IR output with carrier)• SERIAL (IR without carrier and waveform inverted)• DATA (1-way serial/TTL)Example:SEND_COMMAND IR_1," 'SET MODE IR'"Sets the IR_1 port to IR mode for IR control. |
| SPGenerate a single IR pulse. | You can use the 'CTON' to set pulse lengths and the 'CTOF' to set time Off between pulses Syntax:SEND_COMMAND," 'SP',""Variable:code = IR code value 1 to 252 (253 to 255 reserved).Example:SEND_COMMAND IR_1," 'SP',25"Pulses IR code 25 on IR port on RX. |
| XCHTransmit IR codes. | Syntax:SEND_COMMAND," 'XCH'"Variable:channel = 0 to 999.Note: For detailed usage examples, refer to the 'XCHM' command (see page 94). |
| XCHMChanges the IR output pattern for the 'XCH' Send Command. | Syntax:SEND_COMMAND,"'XCHM''Variable:extended channel mode = 0 to 4.Example:SEND_COMMAND IR_1,"'XCHM 3'"Sets the IR device's extended channel command to mode 3.Mode 0 Example (default): [x][x] |
| SEND_COMMAND IR_1,"'XCH 3'"Transmits the IR code as 3-enter.SEND_COMMAND IR_1,"'XCH 34'"Transmits the IR code as 3-4-enter.SEND_COMMAND IR_1,"'XCH 343'"Transmits the IR code as 3-4-3-enter.Mode 1 Example: | |
| SEND_COMMAND IR_1,"'XCH 3'"Transmits the IR code as 0-0-3-enter.SEND_COMMAND IR_1,"'XCH 34'"Transmits the IR code as 0-3-4-enter.SEND_COMMAND IR_1,"'XCH 343'"Transmits the IR code as 3-4-3-enter.Mode 2 Example: | |
| SEND_COMMAND IR_1,"'XCH 3'"Transmits the IR code as 0-0-3.SEND_COMMAND IR_1,"'XCH 34'"Transmits the IR code as 0-3-4.SEND_COMMAND IR_1,"'XCH 343'"Transmits the IR code as 3-4-3.Mode 3 Example: [[100][100]....]] | |
| SEND_COMMAND IR_1,"'XCH 3'"Transmits the IR code as 0-3.SEND_COMMAND IR_1,"'XCH 34'"Transmits the IR code as 3-4.SEND_COMMAND IR_1,"'XCH 343'"Transmits the IR code as 100-100-100-4-3.Mode 4 Example:· Mode 4 sends the same sequences as the 'CH' command.· Only use Mode 4 with channels 0 to 199. | |
Serial SEND\_COMMANDs
On the DXLink Modules, SERIAL SEND_COMMANDs are sent to Port 1.
| Serial SEND_COMMANDs (Transmitters and Receivers) | |
| Command Description | |
| B9MOFFSet the port's communication parameters for stop and data bits according to the software settings on the RS-232 port. | This command works in conjunction with the 'B9MON' command.• Disables 9-bit in 232 mode.• By default, this returns the Communication settings on the serial port to the last programmed parameters.Syntax:B9MOFFExample:SEND_COMMAND SOMEDEVICE_1," 'B9MOFF'"Sets the port settings on SOMEDEVICE to match the port's configuration settings. |
| B9MONOverride and set the current communication settings and parameters on the RS-232 serial port to 9 data bits with one stop bit. | This command works in conjunction with the 'B9MOFF' command.• Enables 9-bit in 232 mode.Syntax:B9MONExample:SEND_COMMAND SOMEDEVICE_1," 'B9MON'"Resets the SOMEDEVICE port's communication parameters to nine data bits and one stop bit. |
| CHARDSet the delay time between all transmitted characters to the value specified (in 100 microsecond increments). | Syntax:SEND_COMMAND," 'CHARD-'''Variable:time = 0 to 10000 (1 second)Example:SEND_COMMAND dvRXRS232," 'CHARD-10'"Sets a 1-millisecond delay between all transmitted characters. |
| CHARDMSet the delay time between all transmitted characters to the value specified (in 1 millisecond increments). | Syntax:SEND_COMMAND," 'CHARDM-'''Variable:time = 0 to 1000 (1 second)Example:SEND_COMMAND dvRXRS232," 'CHARDM-10'"Sets a 10-millisecond delay between all transmitted characters. |
| ESCSEQOFFDisables SEND_STRING escape sequences | Disables SEND_STRING escape sequences (see the "SEND_STRING Escape Sequences" section on page 99). |
| ESCSEQONEnables SEND_STRING escape sequences | Enables SEND_STRING escape sequences (see the "SEND_STRING Escape Sequences" section on page 99). |
| Serial SEND_COMMANDs (Transmitters and Receivers), continued | |
| GET BAUDGet the RS-232 (serial) port's current communication parameters. | The port sends the parameters to the device that requested the information. Syntax:SEND_COMMAND," 'GET BAUD'"Example:SEND_COMMAND dvRXRS232," 'GET BAUD'"The port responds with:Port,,,,, |
| RXCLRClear all characters in the receive buffer waiting to be sent to the Master. | Syntax:SEND_COMMAND," 'RXCLR'"Example:SEND_COMMAND dvRXRS232," 'RXCLR'"Clears all characters in the receive buffer waiting to be sent to the Master. |
| RXOFFDisable the transmission of incoming received characters to the Master (default). | Syntax:SEND_COMMAND," 'RXOFF'"Example:SEND_COMMAND dvRXRS232," 'RXOFF'"Disables the transmission of incoming received characters to the Master. |
| RXONStart transmitting received characters to the Master.Enables sending incoming received characters to the Master. | This command is automatically sent by the Master when a 'CREATE_BUFFER' program instruction is executed. Syntax:SEND_COMMAND," 'RXON'"Example:SEND_COMMAND dvRXRS232," 'RXON'"Sets the RX RS-232 port to transmit received characters to the Master. |
| TXCLRStop and clear all characters waiting in the transmit out buffer and stops transmission. | Syntax:SEND_COMMAND," 'TXCLR'"Example:SEND_COMMAND dvRXRS232," 'TXCLR'"Stops and clears all characters waiting in the RX serial port's transmit buffer. |
| SET BAUD(shown in examples)OrTSET BAUDUse either of these commands to set the serial communication parameters.Note:The DXLink Transmitters and Receiver only support RS-232 serial communication. | Note: This value is not saved in non-volatile memory and is reset to default (9600, N, 8, 1) at power-up. Syntax:SEND_COMMAND," 'SET BAUD,,,,,"Variables:baud = 115200, 76800, 57600, 38400, 19200, 9600, 4800, 2400, 1200, 600, 300, 150.parity = N (none), O (odd), E (even), M (mark), S (space)data = 7 or 8 data bitsstop = 1 or 2 stop bitsNote: The only valid 9 bit combination is (baud),N,9,1.Example:SEND_COMMAND DEVICE_1," 'SET BAUD 115200, N,8,1'"Sets the DEVICE_1 port's communication parameters to 115,200 baud, no parity, 8 data bits, and 1 stop bit. |
Common DXLink Transmitter / Receiver SEND\_COMMANDs
Common NetLinx SEND_COMMANDs for the DXLink Transmitters and Receivers are provided in the following table. These commands can be sent to any port (#3 Toggle must be set to ON).
| Common NetLinx SEND-COMMANDs (Transmitters and Receivers) | |
| Command Description | |
| ?FWVERSIONRequests the firmware version of the TX or RX. | Syntax:SEND_COMMAND,""?FWVERSION"Example:SEND_COMMAND dvRX,"'?FWVERSION"Returns a COMMAND of the form:FWVERSION |
| LED-DISDisable all LEDs to the right of the Program port. | Syntax:LED-DISExample:SEND_COMMAND DEVICE_1,"'LED-DIS'"Disables all LEDs to the right of the Program port on DEVICE_1.Note:This parameter does not get stored in non-volatile memory. LEDs are enabled by default at each power-up. |
| LED-ENEnable all LEDs to the right of the Program port (default). | Syntax:LED-ENExample:SEND_COMMAND DEVICE_1,"'LED-EN'"Enables all LEDs to the right of the Program port on DEVICE_1. |
| REBOOTReboot the module. | Syntax:REBOOTExample:SEND_COMMAND DEVICE_1,"'REBOOT'"Reboots DEVICE_1. |
| SET_NDX_DESCSet Friendly name and location for NDP. | Syntax:Set_NDX_DESC-friendly name:locationMax of 25 characters for friendly name and max of 25 characters for location. If more than 25 characters are sent for either friendly name or location, they will be truncated to a max of 25 characters.Neither the friendly name nor the location should contain a ":" character, as that is used as a delimiter.Note:This command requires a reboot to enable new settings. |
DXLink System SEND\_COMMANDs
DXLink System SEND_COMMANDs are sent to Port 6 or 7 on the Transmitters or Receivers.
| DXLink System SEND_COMMANDs (Transmitters and Receivers) | |
| Command Description | |
| ?DXLINKRequests the current mode for the TX or RX. | Syntax:SEND_COMMAND,""?DXLINK'"Example:SEND_COMMAND dvRX,"'?DXLINK'"Returns a COMMAND of the form:DXLINK- |
| DXLINKSets the TX or RX to Extender Mode (for a standalone, direct connection from module to module) or Endpoint Mode (for use in conjunction with a switcher). | Syntax:SEND_COMMAND,"'DXLINK-''Example:SEND_COMMAND dvRX,"'DXLINK-EXTENDER'" |
| ICSLANSets the ICS LAN connection to Enable or Disable. | Syntax:SEND_COMMAND,"'ICSLAN-''Example:SEND_COMMAND dvRX,"'ICSLAN-ENABLE'" |
| PERSISTAVHDMI Receiver: Only used to save the Receiver's Power-On Scaler settings/ mode to the DGX DXLink Output Boards for DGX Configuration Software.Not required to save A/V settings to the receiver. These are automatically saved when changes are made.All Transmitters: Disables the AUDIN_FORMAT_AUTO and persists the current audio format. | Syntax:SEND_COMMAND,"'PERSISTAV'"Example:SEND_COMMAND dvRX,"'PERSISTAV'" |
| FACTORYAVHDMI Receiver: Clears the persisted settings for the Scaler mode, resolution, aspect ratio policy, and audio output type and restores them to their factory defaults.All Transmitters: Clears the persisted setting for the audio and video formats and restores them to their factory defaults. Also restores the preferred EDID to the factory default on the HD-15 input to 1920x1080P,60.Note:A reboot is required after sending the FACTORYAV command. | Syntax:SEND_COMMAND,"'FACTORYAV'"Example:SEND_COMMAND dvTX,"'FACTORYAV'" |
SEND\_STRING Escape Sequences
The DXLink Modules support several special SEND_STRING escape sequences. If any of the character combinations listed below are found anywhere within a SEND_STRING program instruction, they will be treated as a command and not the literal characters.
Use the ESCSEQON and ESCSEQOFF NetLinx SEND_COMMANDS to control whether these are active or not. The ESCSEQON command must precede the Escape Sequences, otherwise the strings will be processed normally. These commands are sent to Port 1.
| SEND_STRING Escape Sequences | |
| Command Description | |
| 27, 17Send a break character for a specified duration to a specific device. | Syntax:27,17,Variable:time = 1 to 255 (measured in 100 microsecond increments)Example:SEND_STRING RS232_1,"27,17,10"Sends a break character of 1 millisecond to the RS232_1 device. |
| 27, 18, 0Clear the ninth data bit by setting it to 0 on all character transmissions. | Used in conjunction with the 'B9MON' command (see page 95).Syntax:27,18,0Example:SEND_STRING RS232_1,"27,18,0"Sets the RS232_1 device's ninth data bit to 0 on all character transmissions. |
| 27, 18, 1Set the ninth data bit to 1 for all subsequent characters to be transmitted. | Used in conjunction with the 'B9MON' command (page 95).Syntax:27,18,1Example:SEND_STRING RS232_1,"27,18,1"Sets the RS232_1 device's ninth data bit to 1 on all character transmissions. |
| 27, 19Insert a time delay before transmitting the next character. | Syntax:27,19,Variable:time = 1 to 255. Measured in 1 millisecond increments.Example:SEND_STRING RS232_1,"27,19,10"Inserts a 10 millisecond delay before transmitting characters to the RS232_1 device. |
Enova DVX Switchers – DXLink SEND\_COMMANDs
The following table contains two DXLink SEND_COMMANDs that are specifically for Enova DVX Switchers. These commands persist during a power cycle, on reboot, or from a low power setting.
Additional SEND_COMMANDs for Enova DVX Switchers can be found in the specific product manual at www.amx.com.
Important: The #3 Toggle on the Transmitter or Receiver must be set to ON before the commands in the table below are sent to the switcher.
| Enova DVX Solution DXLink SEND-COMMANDs | |
| ?DXLINK_ETHRequests the control setting for the DXLink output card on an Enova DVX Switcher. | Syntax:SEND_COMMAND, " ' ?DXLINK_ETH'"Example:SEND_COMMAND SWITCHER, " ' ?DXLINK_ETH'"Returns a COMMAND of the form:DXLINK_ETH- |
| DXLINK_ETHControls Ethernet traffic through the DXLink output card on an Enova DVX Switcher. | This command instructs the DXLink output card on an Enova DVX Switcher to disable Ethernet traffic or go to Auto mode. In Auto mode, Ethernet traffic is controlled after negotiation through PDIFSyntax:SEND_COMMAND, " 'DXLINK_ETH-''Example:SEND_COMMAND SWITCHER, " 'DXLINK_ETH-AUTO '' |
| ?DXLINK_IN_ETHRequests the control setting for the DXLink input card on an Enova DVX Switcher. | Syntax:SEND_COMMAND, " ' ?DXLINK_IN_ETH'"Example:SEND_COMMAND SWITCHER, " ' ?DXLINK_IN_ETH'"Returns a COMMAND of the form:DXLINK_IN_ETH- |
| DXLINK_IN_ETHControls Ethernet traffic through the DXLink input card on an Enova DVX Switcher. | This command instructs the DXLink input card on an Enova DVX Switcher to disable Ethernet traffic or go to Auto mode. In Auto mode, Ethernet traffic is controlled after negotiation through PDIFSyntax:SEND_COMMAND, " 'DXLINK_IN_ETH-'Example:SEND_COMMAND SWITCHER, " 'DXLINK_IN_ETH-AUTO '' |
Note: For a listing of all supported Telnet commands, see page 112.
Troubleshooting
Overview
The troubleshooting suggestions/strategies provided apply to the Transmitters and the Receiver, unless otherwise noted.
Four potential types of issues are covered in this chapter:
- Basic troubleshooting
• Determining HDCP compliance - Power
- DXLink connections
- Network setup
This chapter also provides technical support contact information on page 104.
Basic Troubleshooting
We suggest using the following general list to rule out basic troubleshooting issues.
☐ Check the power indicator LEDs on all of the equipment. If any are not illuminated, see the "Power Issues" section on the next page.
☐ Check all link and signal connections to make sure everything is physically set up correctly.
☐ Isolate source and destination equipment and cable problems by cabling direct without the DXLink units.
□ Check the DIP switch's toggle settings (see page 40).
☐ SEND_COMMANDs – double-check the command and the port number specified and re-send the command (see page 79).
☐ If any changes have been made, try resetting the unit to the factory defaults (see page 68).
Additional Resources for Troubleshooting Endpoint Systems
Enova DGX Digital Media Switchers
When the DXLink units are used in conjunction with an Enova DGX Switcher, we suggest checking the troubleshooting information in that product's Instruction Manual.
Enova DVX Solutions
When DXLink units are used in conjunction with an Enova DVX Solution, we suggest: pressing the Status button on the front panel and using the UP and DOWN navigational buttons to scroll through the menu options to Diagnostic Codes (the codes can be helpful for technical support if a call is necessary).
Determining HDCP Compliance
A dark red or an orange screen on an output display is the visual cue from DXLink devices that the display device cannot display the HDCP compliant signal from the source.
Power Issues
Upon power up, the Power indicator LED on the front of the DXLink units illuminates solid green. If the Power LEDs on any of the system's equipment are not illuminated:
☐ Check the power cords or DXLink (RJ-45) connection if using power over the DXLink line.
☐ Check the power connections on the switcher if using power over the DXLink line.
☐ Check the power connections on the source and destination devices.
DXLink Power Delivery Issues
Unexpected power interruptions of DXLink Transmitters and Receivers may be caused by the Enova DGX Digital Media Switcher being powered by single phase power. Connecting a ground wire to the DXLink unit's chassis and a common earthed ground (ideally, referenced to the switcher) will stop power interruptions. For information on when and how to attach ground wires to DXLink units, see page 45.
Important Power Considerations for Enova DGX Endpoint Systems
- Local power – Local power (the desktop power supply) always takes precedence over power via the DXLink line from the switcher. However, if a locally powered module is connected to a switcher and the local power is lost (i.e., unplugged or turned off), the module will power down and then automatically power back up using power from the switcher via the DXLink connection (increasing the overall power draw on the switcher). When local power is restored, it automatically replaces the power over the DXLink line.
- DXLink power – When Transmitters/Receivers are being powered by an Enova DGX DXLink board or DXLink power injector (using power via the DXLink line), to maintain the switcher's power redundancy, we recommend that you:
- Determine the power budget based on the Input/Output boards used and the quantity of powered endpoints (Transmitters/Receivers); see page 54.
- Do not use the local DC power jack on the module (even if the local power adapter is turned off).
Power Issues with Enova DGX Endpoint Systems
In an Enova DGX Endpoint System when multiple endpoints (Transmitters/Receivers) cycle their power and the DXLink connection fails, check the following:
☐ Check to be sure that Transmitters/Receivers being powered by the local DC jack have power. (Local power always takes precedence.)
☐ Check to be sure that Transmitters/Receivers intended to be powered via the DXLink line do not have a DC jack plugged in (even if the local power adapter is turned off). This can cause inadvertent ground loops that can negatively affect DXLink power sensing circuits.
DXLink Connection Issues
One method for determining DXLink connection issues is to compare the pattern of the green and yellow DXLink LEDs on the Transmitter or Receiver against the tables below and then check the suggested items in the Troubleshooting column in the second table.
DXLink LED Patterns When Connection is Working as Expected
Check the status of the green and yellow DXLink LEDs (on rear of the modules – on lower edge of the Wallplate TX, or on the front of the Decor Wallplate TX – under customer provided standard decor style cover plate) against the following table to determine the status of the video signal over the DXLink line. All of the green / yellow patterns in this table indicate that the unit is working as expected given its current connections. If the LED pattern does not correspond to any of the green / yellow patterns in this table, check the table below.
| LED Patterns - Working as Expected | ||
| Green Yellow LED Pattern | Description | |
| Solid green | Solid yellow | The DXLink link is established and the video stream is passing HDCP protected content. |
| Solid green | Flashing yellow | The DXLink link is established and the video stream is passing unprotected content. |
| Solid green Off The DXLink links established but no video content is being passed. | ||
| Off Off The DXLink link is not established and the accompanying DXLink unit is not powered on or is not connected. | ||
DXLink LED Patterns When Connection is Failing
If the green / yellow DXLink LEDs on a unit do not have one of the normal patterns as stated in the table above, check the patterns in the table below and then check the items listed in the corresponding Troubleshooting column.
| LED Patterns - Connection Failing | ||||
| Green Yellow LED Pattern Description Problem Symptoms Troubleshooting | ||||
| Solid green Sporadic flashing yellow | Poor DXLink signal quality | Video drops occasionally | Check for:• Cable installation problems• Alien crosstalk• If possible, identify the hostile cable | |
| Fully illuminated, sporadic flashing green | Off | Bad DXLink signal quality | Check for:• Cable installation problems• Alien crosstalk• If possible, identify the hostile cable• Cable quality | |
| Very dimly illuminated, rapid / sporadic flashing green | Off | Very bad DXLink signal quality | No video / audio / Ethernet | Check for:• Cable installation problems• Alien crosstalk• If possible, identify the hostile cable• Cable quality |
Network Setup Issues
The instructions below can be used for first time setup of DXLink Modules on a network with no NetLinx Master (integrated or standalone).
Note: Before setting up the network, we recommend plugging all required Ethernet cables into the network before applying power to the DXLink Modules.
To set the IP, connection, and device parameters on a DXLink Module:
-
Set the DIP switch on the DXLink Module to:
-
1 and #3 Toggles - ON
-
2 and #4 Toggles – OFF
-
Attach the DXLink Module via its ICS LAN 10/100 port to the network or PC.
-
Power up the DXLink Module.
The DXLink Module will get a DHCP address or default to 169.254.2.2 (or if the module is in Static IP Mode, the address will be 192.168.1.2).
-
Establish a Telnet connection to the DXLink Module and set up the network parameters using the following three commands:
-
SET IP
- SET CONNECTION
-
SET DEVICE
-
Enter REBOOT.
Note: If you cannot locate the DXLink Module in the Online Tree, you can reset the factory default by holding the ID button during power up until the LEDs blink in unison and then releasing the ID button. This will revert the DXLink Module to DHCP mode. Start again at Step 1 above.
Technical Support
If this manual has not satisfactorily answered your questions regarding the DXLink Transmitters and Receivers or they are not operating as expected, please contact your AMX representative or technical support. Have the serial numbers for the modules ready. If the modules are connected to a switcher, locate the serial number for the switcher too.* We recommend recording the serial numbers in an easily accessible location.
AMX Contact Information
● 3000 Research Drive, Richardson, TX 75082
800.222.0193
469.624.8000
Fax 469.624.7153
● Technical Support 800.932.6993
www.amx.com
* When DXLink units are used in conjunction with an Enova DVX Solution, having Diagnostic Codes ready can be helpful for technical support in analyzing problems. (Press the Status button on the Enova DVX front panel and use the UP and DOWN navigational buttons to scroll through the menu options to the Diagnostic Codes.)
Appendix A – Upgrading the Firmware
Overview
The NetLinx Studio software application (available for free download from www.amx.com) provides the ability to transfer KIT files to NetLinx devices such as DXLink Transmitters and Receivers. The firmware on the Transmitters and Receiver can be upgraded in the field.
Endpoint System (with a Switcher)
When a Transmitter and/or a Receiver are being used in conjunction with a switcher as an endpoint system, the switcher's integrated Master is used for the KIT file transfer. FIG. 40 shows a Transmitter and a Receiver bound to the integrated Master in an Enova DGX 32 in NetLinx Studio's OnLine Tree. Follow the instructions on the top of page 106 to prepare an endpoint system for KIT file transfer and the instructions on page 109 for the actual transfer.
![Workspace Bar System 3221 Devices [192.168.44.164] 00000 - NI Master (v4.2.378) 05002 - Enova DGX 32 (v1.2.5.1) Dynamic/Virtual Devices 32001 - DXLINK-HDMI-TX (v1.1.24) 32002 - DXLINK-HDMI-TX (v1.1.24) 32003 - DXLINK-HDMI-TX (v1.1.24) 32004 - DXLINK-HDMI-TX (v1.1.24) [OID=1] - MQX (v3.62) [OID=2] - DXLINK Boot (v1.1.24) [OID=3] - DXLINK App (v1.1.24) [OID=4] - DXLINK Link (3.0.2.0) Port - 1 Port - 2 Port - 3 Port - 4 Port - 5 Port - 6 Port - 7 32005 - NSX Application (v3.3.1.525) 32006 - DXLINK-HDMI-RX (v1.0.67) [OID=1] - MQX (v3.62) [OID=2] - DXLINK Boot (v1.0.67) [OID=3] - DXLINK App (v1.0.67) [OID=5] - DXLINK Link (3.0.2.0) [OID=6] - DXLINK FPGA (v1.0.0.5) Port - 1 Port - 2 Port - 3 Port - 4 Port - 5 Port - 6 Port - 7 Integrated Master Enova DGX 32 DXLink Transmitter Device numbers DXLink Receiver Ports 1-7 on DXLink Receiver Ports 1-7 on DXLink Receiver](/content/2026/05/1072955/images/544ac22357e15fc620dbaf73bd3a8748bffc46286d006071e8f928064aa4bd2f.jpg)
FIG. 40 NetLinx Studio – Integrated Master, Enova DGX 32, DXLink Transmitter, and DXLink Receiver
Extender System (Standalone)
When a standalone Transmitter and Receiver Module pair are being used as an extender system, the KIT file transfer can be done one of two ways:
- The module can be bound to any Master on the network and then unbound when the file transfer procedure is complete.
- If a Master is not present on the network, a Virtual NetLinx Master can be set up using a PC (see page 121).
Follow the instructions on the bottom of page 106 to prepare an extender system for KIT file transfer and the instructions on page 109 for the actual transfer.
Preparing for KIT File Transfers in an Endpoint System
To prepare for KIT file transfers in an endpoint system:
-
Check to be sure #3 Toggle on the bottom of the Transmitter or Receiver is set to ON.
-
Verify that you have the latest version of NetLinx Studio on your PC.
If the version is not the latest -
- Use the Web Update option in NetLinx Studio's Help menu to obtain the latest version.
Or
- Go to www.amx.com and login as a Dealer to download the latest version.
-
Download the latest Firmware (KIT) file from www.amx.com on the DXLink Transmitter or Receiver product page to your PC. (Place KIT files on a local drive for speedy throughput.)
-
Verify the following:
a. Verify that an Ethernet/RJ-45 cable is connected from the switcher's integrated Master to the network (e.g., from the LAN 100/1000 port on an Enova DGX 32 to a LAN).
b. Verify that the target Transmitter or Receiver is connected via its DXLink connector to a DXLink Input or Output Board (respectively) on the switcher.
c. Verify that the switcher is powered on.
-
Launch NetLinx Studio and open the OnLine Tree.
-
Bind the target Transmitter or Receiver to the integrated Master: select and right-click the TX or RX; from the context sensitive menu, select Network Bind/Unbind Device (be sure the check box is selected); click OK.
![Bind/Unbind Device Device to Bind/Unbind [05001:00001] EXLIBRK-RDHX-FX (v1.0.37) Master Binding (check or uncheck) [Device:System] Master Description [00000:00001] Nl Master (v4.2.8x4) OK Cancel](/content/2026/05/1072955/images/02337d22909f907669c39bb66d6e8e1c75edfb8fdda09d26f464d2494e447563.jpg)
- Determine the Device Number assigned to the target Transmitter or Receiver when it was bound. For the Device Number location, see FIG. 40 on page 105. The Transmitter or Receiver is ready for the KIT file transfer.
Preparing for KIT File Transfers in an Extender System
To prepare for KIT file transfers in an extender system:
- Verify that you have the latest version of NetLinx Studio on your PC.
If the version is not the latest:
- Use the Web Update option in NetLinx Studio's Help menu to obtain the latest version. Or
-
Go to www.amx.com and login as a Dealer to download the latest version.
-
Download the latest Firmware (KIT) file from www.amx.com on the Transmitter or Receiver product page to your PC. (Place KIT files on a local drive for speedy throughput.)
3. No Master on the network:
a. Use your PC to set up a Virtual NetLinx Master (see page 121) in NetLinx Studio (leave NetLinx Studio open to the OnLine Tree when done).
b. Apply power to module and set it to Static IP Mode.* The default static IP address is 192.168.1.2. (Note that when module is in Static IP Mode, the Link/Act LED will be OFF and the Status LED will be ON.)
Master on the network:
a. Launch NetLinx Studio and open the OnLine Tree.
b. Apply power to module and set it to DHCP Mode.*
-
On the bottom of module, set the DIP switch's #1 and #3 Toggles to ON. (Remember to set the #1 and #3 Toggles back to OFF when the file transfer is complete if the module does not require network connectivity.)
-
Connect an RJ-45 cable from the ICS LAN 10/100 port on the Transmitter or Receiver Module to the PC running NetLinx Studio.
-
No Master on the network (set a TCP connection from the DXLink Module to the Virtual NetLinx Master):
Note: The DXLink Module is present on the network but does not display until the following steps are completed and the workspace is refreshed.
a. From the Tools menu, select Telnet Session to open the Telnet Settings window.
b. Click New and enter the TCP/IP Address for module (192.168.1.2). Click OK.
c. Select the module's address in the List of Addresses and click OK.
d. At the prompt ( > ), enter SET CONNECTION.
e. Enter "T" for TCP/URL.
f. Enter the (Virtual NetLinx) Master IP/URL (192.168.1.100).
Use the defaults for the remaining parameters (press Enter to move from default to default).
Master on the network: Go to Step 7.
- Right-click in the workspace and select Refresh System OnLine Tree. The module will appear in the OnLine Tree and locate the DXLink Module and the virtual device ID assigned to it (32002 in the example). For the Device Number location, see FIG. 40 on page 105. The module is ready for the KIT file transfer.
* Press and hold the ID Pushbutton for at least 10 seconds. The NetLinx LEDs toggle back and forth during this time and then blink faster in unison. Release on the faster blink. When the Pushbutton is released, the module toggles from either static to dynamic IP addressing or vice versa and remains in that mode until the ID Pushbutton is used to reset it. The module automatically reboots to complete the process.
Important Upgrade Information

Caution: Upgrading the firmware is a serious action in that if the upgrade fails, it can leave the system completely non-operational.
In the Event of Power Loss During an Upgrade
If power loss occurs before any firmware information has been transferred – when power is restored, the module will remain operational using the original firmware.
If power loss occurs after some of the firmware information has been transferred but before the transfer is complete – when power is restored, the module will time out and will not operate until a successful upgrade takes place.

Caution: If the application signals a failure, you must immediately reboot the Transmitter or Receiver and attempt to upgrade the firmware again, as the module is in an unknown state and cannot be guaranteed to be operational.
Firmware Versions
The following table contains firmware version information for the DXLink units.
| DXLink Firmware Versions | |||
| Applies to Version | # Date Differences | ||
| HDMI RX 1.0.80 | and earlier | 10/19/2012 | A/V SEND_COMMANDs respond with STRINGsSEND_COMMANDs must be sent in uppercase |
| HDMI RX 1.0.80 | or above | 01/07/13 | Supports PS-POE-AT-TC (FG423-84) and PDXL-2 (FG1090-170) |
| HDMI RX 1.3.X or | above | 03/07/13 | A/V SEND_COMMANDs respond with COMMANDsSEND_COMMANDs are not case sensitiveUpdated VIDOUT_ASPECT_RATIO and VIDOUT_TESTPAT commands. |
| HDMI TX 1.1.26 | and earlier | 9/24/2012 | A/V SEND_COMMANDs respond with STRINGsSEND_COMMANDs must be sent in uppercase |
| Multi-Format TX / Multi-Format Wallplate TX | 1.0.44 7/1 | 19/2012 • A/V | SEND_COMMANDs respond with COMMANDsSEND_COMMANDs are not case sensitive |
| Multi-Format TX / Multi-Format Wallplate TX | 1.0.45 7/1 | 19/2012 • Same as 1.0.44Modified VGA EDIDAdded: VIDIN_PREF_EDID command for VGA input | |
| HDMI TX / Multi-Format TX / Multi-Format Wallplate TX | 1.2.X 10/ | 19/2012 • A/V | SEND_COMMANDs respond with COMMANDsSEND_COMMANDs are not case sensitiveAdded: VIDIN_HDCP command for HDMI input |
| HDMI TX* 1.2.X 10/ | 19/2012 • When loading any 1.2.X version to an HDMI TX, you must send the FACTORYAV command to reset the AV registers (see page 98) | ||
| All Transmitters 1.2.40 or above | 01/07/13 | Supports PS-POE-AT-TC (FG423-84) and PDXL-2 (FG1090-170) | |
| All Transmitters | 1.4.7 | 06/12/13 | Supports 3D, Deep Color, High Bit Rate Audio, and limited Telnet support of SEND_COMMANDs (no queries).Includes new VGA EDID AMX_0500_003.Supports custom VGA EDID using DGX Configuration Software and Program port. |
| HDMI RX | 1.5.8 | 06/12/13 | Supports 3D, Deep Color, and limited Telnet support of SEND_COMMANDs (no queries).Includes v1.0.0.6 FPGA code.Adds “show vs100 stats” Telnet command. |
Transferring KIT Files
The system will be non-operational during the upgrade procedure.
The Firmware Transfers tool in NetLinx Studio is used to map KIT files to DXLink Transmitters and Receivers. The instructions below assume that the preparations on the previous pages for an endpoint system have been completed.
To send a KIT file to a Transmitter or Receiver:
- In NetLinx Studio from the Tools menu, select "Firmware Transfers > Send to NetLinx Device" to open the Send to NetLinx Device dialog box.

- Click Browse (...) to navigate to the target directory. The selected directory path is displayed in the Location text box. KIT files in the target directory display under Files.
- Select the appropriate KIT file from the list.
- Enter the Device and System numbers for the target module in the Device and System text boxes.
- Review the File, Connection, Address, and Target Device information for accuracy before you send.
- Click Send to upgrade the firmware on the DXLink Transmitter or Receiver.
The Power LED blinks during the process for upgrading the firmware (this is normal). The progress of the upgrade displays in the Upload Status field. Status is also indicated in the Status bar at the bottom. The success of the upgrade or any errors that occur will be reported.*
- Close the window when the transfer is complete.
- When the process is complete, cycle power using the new image on the DXLink Module:
a. Unplug the desktop power supply from the AC power source and plug it back in,
b. If the power source is the switcher, unplug the RJ-45 connector from the DXLink port on the module.
- Wait 60 seconds and refresh the System OnLine Tree, and check to be sure the firmware version matches the version selected for the upgrade.
* If an incorrect file has been selected or if the upgrade has failed, the Power LED will briefly illuminate solid green then change to a slow blink. To recover (in either case), reboot the Transmitter or Receiver and browse to select the correct file and then re-send.
Reminders
When the file transfer is complete, remember to do the following:
- Set the #1 Toggle on the DXLink Module to OFF.
- If you set the PC to Static IP Mode for a Virtual NetLinx Master file transfer, return the setting to "Obtain an IP address automatically" (see page 122).
Appendix A – Upgrading the Firmware
Appendix B – Telnet (Terminal) Commands
Establishing a Terminal Connection Via Telnet
Telnet terminal communication is accessed remotely via TCP/IP. The Transmitter or Receiver must have its own TCP/IP address for a Telnet connection. The connection can be started from the Windows taskbar (see below) or in NetLinx Studio (see the following page).
By default, a User Name and Password are not applied to the Telnet port (Port 23). Therefore, the port does not require login credentials.
Welcome Banner with and without Security Enabled:
- Without Telnet security enabled, a session will begin with a welcome banner similar to the following:
Welcome to DXLINK-HDMI-RX 0.0.106.0 Copyright AMX LLC 2011 >
- If Telnet security is enabled, user credentials are required:
Enter username: admin
Enter protected password: ****
Welcome to DXLINK-HDMI-RX 0.0.106.0 Copyright AMX LLC 2011 >
Note: When security is enabled, a user can retry logging in three times before being disconnected (for information on setting a username and password, see page 112).
To establish a terminal connection via Telnet at the CMD prompt:
- From your Windows Taskbar (at the far left), select Start > Run to open the Run dialog box.
- Type cmd in the Open field.

- Click OK to open an instance of the Windows command interpreter (cmd.exe).
- At the prompt (>) , type telnet followed by a space and the Transmitter or Receiver's IP address. Example:
telnet XXX.XXX.XXX.XXX
A Telnet session opens for the Transmitter or Receiver and the welcome banner appears.
- At the prompt, type the Telnet command (see page 113) and press Enter.
To establish a terminal connection via NetLinx Studio:
-
In the Online Tree, select the DXLink unit and right-click to access the short-cut menu.
-
Select Launch Telnet Window via NetLinx Studio.
The Telnet window opens and the welcome banner appears.

- At the prompt ( > ), type the Telnet command and press Enter.
Telnet Username and Password
The following commands are used to set the Telnet username and password for a Telnet connection:
- Set Telnet Username
- Set Telnet Password
By default, both the username and password are blank (empty strings). Performing a factory reset on the device with the Pushbutton will return these values to that default. For details, see page 69.
- Username – Setting the Username will have no effect if the password remains blank (empty string). That is defining the username alone will not result in Telnet prompting for a user login.
- Password – Setting the Password will cause Telnet to prompt for a user login, whether the username has been defined or not. If the username has been defined, this value must be entered. However, since the password can be set independently of the username, it's possible to have a password defined, but the username still at its default (blank, empty string). In this case do not enter anything for the username when prompted. Simply press Enter, which will then present the password prompt. Here, the defined password must be entered in order to successfully open the Telnet session.
Additional Notes
- Both the Telnet username and password are case-sensitive.
- Three consecutive, unsuccessful attempts to log in to Telnet will cause the Telnet window to close. Re-launching Telnet will again present the login prompt, with a fresh "batch" of login attempts.
- If a Telnet login fails because of an incorrect username, an "Invalid Password" message will appear (as opposed to an "Invalid Username" message).
● The username and password are saved after reboot or power cycle. - The username and password are deleted/removed after a factory reset.
Setting a Telnet Username and Password
To set a Telnet username and password:
- Establish a terminal connection via Telnet (see page 111).
- Type Set Telnet Username, and press Enter.
a. The program will prompt you to enter a new Telnet username; enter a username and press Enter.
b. The program will indicate that the username is being stored.
- Type Set Telnet Password, and press Enter.
a. The program will prompt you to enter a password; press Enter twice to clear both the Telnet username and password.
b. Enter a password and press Enter.
c. The program will prompt you to re-enter the password; re-enter the password and press Enter.
d. The program will indicate that the password is being stored.
Telnet Commands
The Telnet commands listed in the table below can be sent directly to the Transmitter or Receiver via a Telnet terminal session.
- The default Telnet port is 23. A value of 0 (zero) disables the Telnet server.
- Telnet is enabled by default.
In the terminal program, type Help or a question mark (?) and press Enter to access the Help Menu and display the terminal commands described in the table below.
| Telnet Commands | |
| Command Description | |
| ? or Help Display the commands listed in this table. | |
| DEVICE STATUS | Displays device status of a specified device, port, system (). Note: Devices other than the DXLink Transmitter or Receiver itself will be ignored. Example:>device status 32002:1:0Device Status----Device 32002 AMX LLC,DXLINK-HDMI-RX, 0.0.106.0 contains7 PortsPort 1 - Channels:255 Levels:8MaxStringLen=64 Types=8 bit MaxCommandLen=64 Types=8 bitThe following input channels are on:NoneThe following output channels are on:NoneLevel 1=0 Supported data types=UByte,UIntLevel 2=0 Supported data types=UByte,UIntLevel 3=0 Supported data types=UByte,UIntLevel 4=0 Supported data types=UByte,UIntLevel 5=0 Supported data types=UByte,UIntLevel 6=0 Supported data types=UByte,UIntLevel 7=0 Supported data types=UByte,UIntLevel 8=0 Supported data types=UByte,UInt> |
| Telnet Commands (continued) | |
| DIPSWITCH Displays the current value for each of the DIP switch's four toggles.Example:>dipswitchDipswitch - ON OFF OFF > | |
| SEND_COMMAND[D:P:S,"command"] | Sends the specified SEND_COMMAND (does not work with queries) to the current DXLink Transmitter or Receiver.Note: P (Port) number must be 1; S (System) number must be 0 (zero).Note: Commands cannot be forwarded to other D:P:S, and asynchronous notifications are not available via Telnet.Example:send_command 6501:1:0,"'VIDIN_AUTO_SELECT-ENABLE'" |
| EXIT Exit the Telnet session | |
| FACTORYFWIMAGE | Resets unit to factory firmware image and reboots DXLink Transmitter or Receiver. |
| GET CONFIG Displays the current connection settings.Example:>get configDevice number: 32001Connection Settings----Mode: UDP URLSystem Number: 1Master IP/URL: 192.168.44.53Master Port: 1319Username:Password:IP Settings----HostName: localhostType: DHCPIP Address: 192.168.44.86Subnet Mask: 255.255.255.0Gateway IP: 192.168.44.2MAC Address: 00:0f:3c:00:55:04DNS Servers----Domain suffix: amx.internalEntry 1: 192.168.40.7Entry 2: 192.168.40.8Note: The system number and IP addressing information displayed is reflective of actual operating values, not stored parameters. | |
| GET CONNECTION Shows the Master connection information.Example:>get connectionConnection Settings----Mode: UDF URLSystem Number: 1Master IP/URL: 192.168.44.53Master Port: 1319Username:Password: | |
| GET DEVICE Displays the device number. | |
| GET DNS Gets the list of DNS entries.Example:>get dnsDNS Servers----Domain suffix: amx.internalEntry 1: 192.168.40.7Entry 2: 192.168.40.8Note: When the DXLink Transmitter or Receiver is in DHCP Mode, these are active values, NOT the stored values that only apply to Static IP Mode. | |
| GET ETHERNET MODE | Displays the current LAN configuration setting.Settings are either "auto" in which the LAN driver will discover its settings based on the network it is connected to orandwhere speed is either 10 or 100 and duplex is either full or half.Example:>GET ETHERNET MODEEthernet mode is auto.Note: See SET ETHERNET MODE on page 117. |
| GET FRIENDLY | Displays the device's friendly name (for NDP). |
| GET IP Displays the IP configuration of a device.The device displays its D:P:S, Host Name, Type (DHCP or Static),IP Address, Subnet Mask, Gateway IP, and MAC Address.Example:>GET IPHostName EXDType DHCPIP Address 192.168.44.86Subnet Mask 255.255.255.0Gateway IP 192.168.44.2MAC Address 00:0f:3c:00:55:04 | |
| GET LOCATION Displays the location parameter for NDP, which is set by using the SET LOCATION command (see page 117). | |
| GET SN Returns the device's serial number. | |
| MSG [ON|OFF] | Enables/Disables extended diagnostic messages.• MSG ON [error|warning|info|debug] sets the terminal program to display log messages generated by the Master.The level of log printed to the terminal window depends both on the level used when sending the message and the output level selected with "msg on."For example if log output is enabled via "msg on warning" then logs produced at levels AMX_ERROR and AMX_WARNING will be displayed, but not logs produced at levels AMX_INFO or AMX_DEBUG.The order of severity from highest to lowest is ERROR, WARNING, INFO, DEBUG.If no severity is supplied with "msg on," the default setting is WARNING.• MSG OFF disables the display.Example:>MSG ONExtended diagnostic information messages turned on.>MSG OFFExtended diagnostic information messages turned off. |
| NDP UNBIND | Clears the NDP binding to a Master (takes effect after next boot). |
| PING [ADDRESS] | Pings an address (IP or URL), to test network connectivity to and confirms the presence of another networked device.The syntax matches the PING application in Windows or Linux.Example:>ping 192.168.29.209192.168.29.209 is alive. |
| REBOOT Reboots the DXLink Transmitter or Receiver.Example:>REBOOTRebooting... | |
| RENEW DHCP | Renews/Releases the current DHCP lease for the DXLink Transmitter or Receiver.Example:>RENEW DHCP |
| RESET FACTORY | Resets the device's stored parameters to factory default state including removal of all security settings, resetting to DHCP.This command will cause an automatic reboot.Note: This command does not reset the device to the factory software image. |
| SET CONNECTION Sets | the Master connection settings interactively, allowing the user to specify the mode (for descriptions of various connection modes, see page 119).If the mode is TCP or UDP, the Master URL and port number can be specified as well.If Auto is selected, the System number can be specified.After all data is entered, if the parameters have changed, the DXLink Transmitter or Receiver will disconnect from the Master, and begin trying to connect with the new settings.Note: These changes do not require a reboot to take effect. |
| SET DEVICE Sets the device number, and stores it in non-volatile memory.Syntax:SET DEVICEThe valid range of device numbers is 0 to 31999.If the user enters a number outside that range, then no change will be made and the DXLink Transmitter or Receiver will issue an error message.A Device Number of '0' means that the DXLink Transmitter or Receiver will accept the auto-assigned device number from the Master.If the new device number is different from the old device number, the DXLink Transmitter or Receiver will disconnect from the Master, and begin trying to connect with the new settings.Note: These changes do not require a reboot to take effect. | |
| SET DNS | Sets the DNS configuration of the DXLink Transmitter or Receiver, only as applied to Static IP Mode (DNS settings in DHCP Mode are received from the DHCP server).Syntax:SET DNSThis command prompts you to enter a Domain Name, DNS IP #1,DNS IP #2, and DNS IP #3.Enter Y (yes) to approve/store the information in the Master.Enter N (no) cancels the operation.Note: The device must be rebooted to enable new settings.Example:>SET DNS-- Enter New Values or just hit Enter to keep current settings --Enter Domain Suffix: amx.comEnter DNS Entry 1 : 192.168.20.5Enter DNS Entry 2 : 12.18.110.8Enter DNS Entry 3 : 12.18.110.7You have entered: Domain Name: amx.comDNS Entry 1: 192.168.20.5DNS Entry 2: 12.18.110.8DNS Entry 3: 12.18.110.7Is this correct? Type Y or N and Enter -> Y Settings written. Device must be rebooted to enable new settings |
| SET ETHERNET MODE | This command sets the current LAN configuration settings per new mode. Syntax: SET ETHERNET MODEValues for newmode are: auto Or 10 full, 100 full, 10 half, or 100 half Note: This command requires a reboot to enable new settings. Examples: set ethernet mode auto set ethernet mode 100 full Note: See GET ETHERNET MODE on page 115. |
| SET FRIENDLY Set the device's friendly name for NDP toSyntax: SET FRIENDLYMaximum length = 25 characters. If the name entered exceeds 25 characters, it will be truncated.The value is stored in non-volatile memory.If no value specified, an automatic name consisting of AMX, the product name, and serial number will be used.Note: This command requires a reboot to enable new settings. | |
| SET IP Sets the IP configuration of a specified device.Enter a Host Name, Type (DHCP or Fixed), IP Address, Subnet Mask, and Gateway IP Address.Note: DHCP implies "DHCP with link-local fallback". Note: For NetLinx Masters, the Host Name can only consist of alphanumeric characters.Enter Y (yes) to approve/store the information into the Master.Enter N (no) to cancel the operation.Note: This command requires a reboot to enable new settings. Example: >SET IP--- Enter New Values or just hit Enter to keep current settings ---Enter Host Name: MLK_INSTRUCTOREnter IP type. Type D for DHCP or S for Static IP and then Enter: DHCPEnter Gateway IP: 192.168.21.2You have entered: Host Name MLK_INSTRUCTORType DHCPGateway IP 192.168.21.2Is this correct? Type Y or N and Enter -> ySettings written. Device must be rebooted to enable new settings.Note: DXLink Modules can also be set to Static IP or DHCP Mode via the front panel ID Pushbutton. | |
| SET LOCATION Sets the location parameter for NDP. Syntax: SET LOCATIONMaximum length = 25 characters. If the name entered exceeds 25 characters, it will be truncated.Note: This command requires a reboot to enable new settings. | |
| SET TELNET PORT Sets | the device's IP port listened to for Telnet connections.Example:>SET TELNET PORTCurrent telnet port number = 23Enter new telnet port number (Usually 23) (0 = disable Telnet):Once you enter a value and press the Enter key, you get the following message:Setting telnet port number to 23New telnet port number set, reboot the device for the change to take effect.Note: This command requires a reboot to enable new settings. |
| SET TELNET USERNAME | Note: This command is supported but is not presently in the Help file list of commands.Sets the Username for a secure Telnet session.Default = blank (no username required)For details, see page 112. |
| SET TELNET PASSWORD | Note: This command is supported but is not presently in the Help file list of commands.Sets the Password for a secure Telnet session.Default = blank (no password required)For details, see page 112. |
| SHOW CONNECTION LOG | Shows the Master connection log for the device. |
| SHOW CONNECTION STATS | Shows the connection statistics for the device.Output similar to the following example:>show connection statsConnection StatisticsTotalLast 15 Minutes----ICSP Messages: 10039 received 333 received10038 transmitted 333 TransmittedBlink Messages: 5014 received 166 receivedIP Statistics:RX packets:29298 errors:0 discarded:0TX packets:15286 errors:0 discarded:0 |
| SHOW LOG Displays the | message logSyntax:SHOW LOG• Useto specify the message number to start displaying.Useto display all messages. |
| SHOW VS100 STATS | Displays DXLink transport information. |
Master Connection Modes
The mode of communication used for connection to the Master is specified via the SET CONNECTION Telnet command (see page 116).
Connection mode setting options are AUTO, TCP URL, UDP URL, or NDP (default) as described:
- AUTO – This mode utilizes TCP communication. It looks for a matching System Number and attempts to come online with the first Master it sees with that System Number.
- TCP URL – TCP; the Master is specified via URL.
- UDP URL – UDP; the Master is specified via URL.
- NDP – UDP; this mode utilizes the NDP binding process to assign the DXLink Module (the physical device) to a Master (or Virtual Master) via NetLinx Studio. Once bound, communications are conducted via UDP.
Note: In URL modes, the Master can use either an IP address or a DNS name.
TCP vs. UDP
- TCP – Protocol has a built-in retry mechanism.
- UDP – Protocol does not have a built-in retry mechanism, but consumes fewer resources on the Master. AMX's UDP implementation of NetLinx employs a retry mechanism to provide the reliability of TCP with the resource efficiency of UDP.
URL vs. NDP vs. Auto
Determining which connection method to use for Master Connection Mode is essentially a matter of deciding what information the device should use to identify the correct Master to connect to.
The default mode is NDP; the mode can be changed via the SET CONNECTION Telnet command (see page 116).
- URL – The device connects to the Master with the specified URL. The device must be configured with the URL of a specific Master via the SET CONNECTION Telnet command (see page 116).
- NDP – The device connects to the Master it's been bound to, which is based on the Master's MAC address. The binding is configured via NetLinx Studio. Once bound, the device must be unbound using either NetLinx Studio or the Telnet NDP UNBIND command before being re-bound to a different Master.
Alternatively, NDP devices can be bound/unbound via options on the Master's Web Configuration pages (System > Manage NetLinx). For details, refer to the NetLinx Integrated Controllers - WebConsole & Programming Guide (System - Manage NetLinx section). - Auto – The device connects to the first Master it finds with the specified System Number. The device must be configured with the desired system number via the SET CONNECTION Telnet command (see page 116).
Use of this method requires that only one Master has any particular system number and is visible to the subnet. If this is the case, then Auto is the simplest choice. However, with Auto, you are not hard-bound to a particular Master. Therefore, if at some point in the future, another Master is configured with the same system number, the result is that the DXLink Module could show up on that other Master.
Notes on Specific Telnet Clients
Telnet and terminal clients exhibit different behaviors in some situations. This section states some of the known anomalies.
Windows Client Programs
Anomalies occur when using a Windows ^® client if you are not typing standard ASCII characters (i.e., using the keypad and the Alt key to enter decimal codes). Most programs will allow you to enter specific decimal codes by holding Alt and using keypad numbers.
Example
For example, hold Alt, hit the keypad 1, then hit keypad 0, then release Alt. The standard line feed code is entered (decimal 10). Windows will perform an ANSI to OEM conversion on some codes entered this way because of the way Windows handles languages and code pages.
The following codes are known to be altered, but others may be affected depending on the computer's setup.
- Characters 15, 21, 22, and any characters above 127.
This affects both Windows Telnet and Terminal programs.
Linux Telnet Client
The Linux Telnet client has three anomalies that are known at this time:
- A null (\00) character is sent after a carriage return.
- If an “Alt 255” is entered, two of the “255” characters are sent (per the Telnet RAFT).
- If the code to return to Command mode is entered (Alt 29 which is ^]), the character is not sent, but the Telnet Command Mode is entered.
Appendix C – Virtual NetLinx Master
Overview Virtual NetLinx Master (Masterless)
A Virtual NetLinx Master can be created using your PC, which allows NetLinx Studio to facilitate direct file transfers to a DXLink Transmitter or Receiver when a Master is not available.
Four basic procedures must be completed for Virtual Master file transfers:
- Set the PC to a static IP address (see below).
- Create a Virtual Master in NetLinx Studio (see page 123).
- Prepare the DXLink Transmitter or Receiver by placing it in Static IP Mode, assigning a device ID, and setting the connection type to TCP (see page 125).
- Transfer the files using a Virtual Master TCP/IP connection (for IRL file transfers, see page 73; for Firmware file transfers, see page 105).
Setting PC to Static IP Address
Important: When you change the PC's settings to a static IP address, the address must be in the same subnet as the DXLink unit (the default static IP address for DXLink Transmitters and Receivers is 192.168.1.2).
Important Information for PCs with Multiple Network Access Points
If the PC has more than one point of network access (multiple NIC cards or wireless networking), check to see if one of the connections uses an IP address of 192.168.1.x before proceeding.
To check for multiple networks:
- Open the PC's Start menu (at the lower left of the desktop on the Taskbar) and select Run.
- Enter cmd and click OK.
- At the prompt, enter ipconfig /all and press the Enter key.
- Check the IP Addresses under Connection.
If the PC or Laptop is currently using a connection with an IP address of 192.168.1.x, you will need to disconnect the connection.
To disconnect a network connection:
-
Modem: From the Start menu on the desktop taskbar, select Settings \ Network Connections.
Wireless: From the Start menu on the desktop taskbar, select Control Panel \ Network and Internet \ Manage Wireless Networks. -
Right-click the network connection and select Disable.
To set a PC to Static IP Mode:
-
From the Start menu on the desktop taskbar, select Settings / Network Connections.
-
Right-click the Local Area Connection and select Properties.
The Local Area Connection Properties dialog box opens.

- From the list of "This connection uses the following items," select Internet Protocol (TCP/IP) and click Properties.
The Internet Protocol (TCP/IP) Properties dialog box opens.

-
Select "Use the following IP address."
-
In the IP address field, enter 192.168.1.100; click in the Subnet mask field to fill it automatically; in the Default gateway field, enter 192.168.1.1.

- Click OK to exit the current dialog box.
- Click Close to exit the final dialog box.
Important: When finished using the PC as a Virtual Master, change the setting in the dialog box shown in Step 5 back to "Obtain an IP address automatically."
Creating a Virtual Master
To create a Virtual Master in NetLinx Studio:
- Open NetLinx Studio.
- From the Settings menu, select Master Communication Settings.
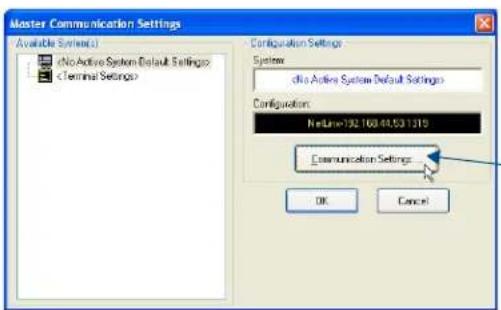
Click to open the Communication Settings dialog box
3. Click Communication Settings on the right.
The Communication Settings dialog box opens.

4. Under Transport Connection Option, select Virtual NetLinx Master.

5. Under Virtual NetLinx Master Options:
a. Optional - Change the Master System Number (default = 1; range = 1 to 65535).
b. Select the desired IP Address in the Available Connections list (this will be the static IP address that the PC was set to in the previous instructions).

-
Click Select.
-
Click OK to save the changes and close the dialog box.
The Virtual Master displays in the NetLinx Studio's OnLine Tree.
Important: When transferring files via a Virtual Master, a direct connection must be made between the module and the PC via the module's ICS LAN 10/100 port.
Preparing a DXLink Module to Work with a Virtual Master
Preparing the DXLink Transmitter or Receiver to work with a Virtual Master requires placing the unit in Static IP Mode, assigning it a device ID, and setting the connection type to TCP.
Note: When using the instructions below, only one DXLink Module can be connected to the Virtual Master at a time because the static IP address is the same for all modules.
To place a DXLink Module in Static IP Mode:
-
Connect the DXLink Module via its ICS LAN 10/100 port to the PC acting as a Virtual Master.
-
Set the DIP Switch's #1, #2, and #3 Toggles to ON.
-
Apply power to the DXLink Module.
-
Once the DXLink Module has booted up (the Power LED on the front of the module turns a constant green, to indicates a ready state), press and hold the ID Pushbutton for at least 10 seconds.
-
The NetLinx LEDs toggle back and forth during this time and then blink faster in unison; release when the faster blink starts.
-
When the Pushbutton is released, the DXLink Module toggles either from static to dynamic (DHCP) IP addressing or vice versa and remains in that mode until the ID Pushbutton is used to set it again.
- The DXLink Module automatically reboots to complete the process.
To assign a device ID and set the connection type:
- From the Tools menu in NetLinx Studio, select Telnet Session. The Telnet Settings dialog box opens.
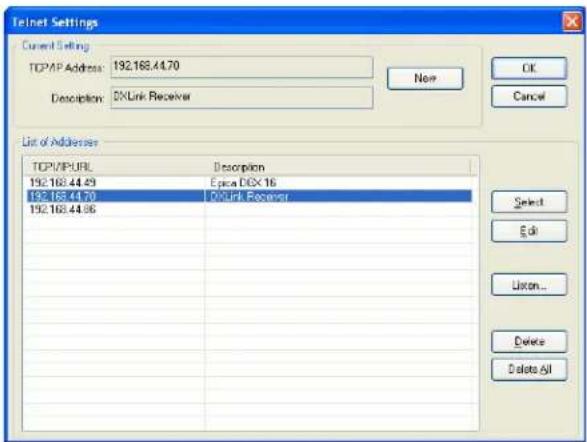
2. Click the New button.
The New Telnet Address dialog box opens.

-
Enter the default static IP address for the module: 192.168.1.2 and click OK.
-
Select the new address in the List of Addresses.
-
Click the Select button and click OK.
-
A Telnet session opens.
-
At the prompt (>) , type SET DEVICE
and press Enter. -
For the variable
, the valid range of device numbers is 0 to 31999. -
Setting a device number does not require a reboot to take effect.
-
At the prompt, type SET CONNECTION and press Enter.
-
Specify TCP for the connection and the PC's static IP address for the Master.
The Transmitter or Receiver displays under the Virtual Master and is now ready for file transfers.
Note: The process can be repeated for additional Transmitters and Receivers.
File transfers via a Virtual Master:
- IRL file transfers, see page 73
- Firmware file transfers, see page 105
Important: Once you have finished using the Virtual Master – If you disabled a network connection before setting the PC's static IP address, be sure to disable the Virtual Master's network connection and enable the original connection.
Appendix D – Cable Details and Pinout Info
Overview
The DXLink units; Multi-Format TX, HDMI TX, Wallplate TX, Decor Wallplate TX, and HDMI RX; all have connectors for HDMI. The Multi-Format units have an additional port for HD-15 connectors.
The following table shows the video connections available on each of the DXLink units.
| Connection | DXLink Units | ||||
| HDMI TX Multi-Format TX Wallplate TX Decor Wallplate TX HDMI RX | |||||
| HDMI | ● | ● | ● | ● | ● |
| HD-15 | ● | ● | ● | ||
Important: System configurations will vary, necessitating different cable requirements for each system. Cables not available through AMX should come from a trusted cable supplier.
Note: When cabling video through either the HDMI port or HD-15 port, installers should be aware of how cabling will affect audio signals. For information on audio precedence, see “Audio Type Precedence” on page 50.
HDMI Connector Cable Pinout
HDMI connectors are found on all DXLink units. These connectors are used to pass HDMI or DVI-D signals (using a DVI-to-HDMI cable adapter) from a source device to a DXLink Transmitter or from a DXLink Receiver to a destination device. The following table provides cable pinout details for HDMI connections.
HDMI Input Pin # Signal Name
| 1 | T | M | D | S | D | a | t | a | 2 | + |
| 2 TMDS Data2 Shield | ||||||||||
| 3 | T | M | D | S | D | a | t | a | 2 | - |
| 4 | T | M | D | S | D | a | t | a | 1 | + |
| 5 TMDS Data1 Shield | ||||||||||
| 6 | T | M | D | S | D | a | t | a | 1 | - |
| 7 | T | M | D | S | D | a | t | a | 0 | - |
| 8 TMDS Data 0 Shield | ||||||||||
| 9 | T | M | D | S | D | a | t | a | 0 | - |
| 10 TMDS Clock+ | Note: DVI-to-HDMI cables may be required for particular system needs (see page 129). | |||||||||
| 11 | TMDS Clock Shield | |||||||||
| 12 TMDS Clock- | ||||||||||
| 13 CEC | ||||||||||
| 14 Reserved, HEC Data | ||||||||||
| 15 SCL | ||||||||||
| 16 SDA | ||||||||||
| 17 DDC/ CEC/ HEC Ground | ||||||||||
| 18 +5 V Power (max 50mA) | ||||||||||
| 19 Hot Plug Detect, HEC Data+ | ||||||||||
FIG. 41 HDMI pinout information and connector pins
HD-15 Connector Cable Pinout
HD-15 connectors are found on the Multi-Format TX, Wallplate TX, and Decor Wallplate TX. These connectors are used to accept a variety of analog video signals from a source device. The following table provides cable pinout details for HD-15 connections for VGA, component, S-Video, and composite.
| HD-15 Connector Cable Pinout | |||||
| Input Pin # | VGA Component S- | Video Composite | |||
| 1 Red Pr | n/c n/c | ||||
| 2 Green | Y Y CVBS | ||||
| 3 | B I u | e | P b | C | |
| 4 n/c | n/c | n/c n/c | |||
| 5 | G N D | n | / c | n/ c | |
| 6 GND - | Red GND - | Pr n/c n/c | |||
| 7 | GND - Green | GND - Y | GND - Luminance | GND - CVBS | |
| 8 | GND - Blue | GND - Pb | GND - Chrominance | n/c | |
| 9 +5 VDC | n/c | n/c n/c | |||
| 10 | GND | n/c | n/c n/c | ||
| 11 | n/c | n/c | n/c n/c | ||
| 12 | DDC_SDA | n/c | n/c n/c | ||
| 13 | H Sync | n/c | n/c n/c | ||
| 14 | V Sync | n/c | n/c n/c | ||
| 15 | DDC_SCL | n/c | n/c n/c | ||
n / c n / c
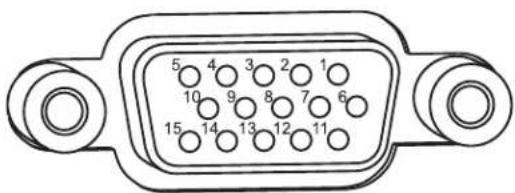
FIG. 42 HD-15 Connector pins
DVI Pinout for DVI-to-HDMI Cable Adapter
The pinout in FIG. 43 is for DVI-to-HDMI cable adapters which can be used with the modules when a DVI-I signal is required.

FIG. 43 DVI pinout for DVI-to-HDMI cable adapter
| DVI Input Pin # Signal Name DVI Output Pin Signal Name | |||
| 1 Data 2- | Data 2- | ||
| 2 Data 2+ | 2 Data 2+ | ||
| 3 Gnd 3 Gnd | |||
| 4 n/c 4 n/c | |||
| 5 n/c 5 n/c | |||
| 6 DDC-CLK 6 DDC-CLK | |||
| 7 DDC-Data 7 DDC-Data | |||
| 8 n/c 8 n/c | |||
| 9 Data 1- | 9 Data 1- | ||
| 10 Data 1+ | 10 Data 1+ | ||
| 11 | Gnd | 11 | Gnd |
| 12 n/c | 12 n/c | ||
| 13 n/c | 13 n/c | ||
| 14 +5 VDC in | 14 +5 VDC out* | ||
| 15 Gnd | 15 Gnd | ||
| 16 Hot-Detect | 16 Hot-Detect | ||
| 17 Data 0- | 17 Data 0- | ||
| 18 Data 0+ | 18 Data 0+ | ||
| 19 Gnd | 19 Gnd | ||
| 20 n/c | 20 n/c | ||
| 21 n/c | 21 n/c | ||
| 22 Gnd | 22 Gnd | ||
| 23 CLK+ | 23 CLK+ | ||
| 24 CLK- | 24 CLK- | ||
| C1 | n/c | C1 | n/c |
| C2 | n/c | C2 | n/c |
| C3 | n/c | C3 | n/c |
| C4 | n/c | C4 | n/c |
| C5 | n/c | C5 | n/c |
*The +5 VDC on output pin 14 supplies a maximum of 55 mA.
Appendix D – Cable Details and Pinout Info
Appendix E – Supported Input Resolutions
Available Pixel Display and Refresh Rate
The available pixel display and refresh rates for the input devices connected to the DXLink Transmitters are listed in this appendix.
The resolutions in the following tables are supported on the DXLink Transmitters and can be set using a SEND_COMMAND. The horizontal/vertical/refresh information from the Resolution Name (in the first column) can be entered in a SEND_COMMAND (VIDIN_PREF_EDID) to specify the preferred resolution for the VGA video input for the Transmitters. For complete command information, see page 87.
DVI, HDMI and VGA Supported Input Resolutions
| DVI, HDMI, and VGA Supported Input Resolutions | |||||||
| Resolution Name | Horizontal Active Pixels | Vertical Active Pixels | Refresh (Hz) | HDMI and DVI Support | VGA Support | Comments | Video Standard |
| 640x400@85 | 640 | 400 | 85 | √ | √ | VESA DMT | |
| 640x480@60 | 640 | 480 | 60 | √ | √ | VESA DMT | |
| 640x480@72 | 640 | 480 | 72 | √ | √ | VESA DMT | |
| 640x480@75 | 640 | 480 | 75 | √ | √ | VESA DMT | |
| 640x480@85 | 640 | 480 | 85 | √ | √ | VESA DMT | |
| 720x400@85 | 720 | 400 | 85 | √ | √ | VESA DMT | |
| 720x480p@60 | 720 | 480 | 60 | √ | √ | 480p | CEA 861 |
| 720x480p@120 | 720 | 480 | 120 | √ | √ | 480p | CEA 861 |
| 720x480p@240 | 720 | 480 | 240 | √ | √ | 480p | CEA 861 |
| 720x576p@50 | 720 | 576 | 50 | √ | √ | 576p | CEA 861 |
| 720x576p@100 | 720 | 576 | 100 | √ | √ | 576p | CEA 861 |
| 720x576p@200 | 720 | 576 | 200 | √ | √ | 576p | CEA 861 |
| 800x500@60 | 800 | 500 | 60 | √ | √ | VESA CVT | |
| 800x600@56 | 800 | 600 | 56 | √ | √ | VESA DMT | |
| 800x600@60 | 800 | 600 | 60 | √ | √ | VESA DMT | |
| 800x600@72 | 800 | 600 | 72 | √ | √ | VESA DMT | |
| 800x600@75 | 800 | 600 | 75 | √ | √ | VESA DMT | |
| 800x600@85 | 800 | 600 | 85 | √ | √ | VESA DMT | |
| 848x480@60 | 848 | 480 | 60 | √ | √ | VESA DMT | |
| 848x480@75 | 848 | 480 | 75 | √ | √ | VESA CVT | |
| 848x480@85 | 848 | 480 | 85 | √ | √ | VESA CVT | |
| 1024x640@60 | 1024 | 640 | 60 | √ | √ | VESA CVT | |
| 1024x768@60 | 1024 | 768 | 60 | √ | √ | VESA DMT | |
| 1024x768@70 | 1024 | 768 | 70 | √ | √ | VESA DMT | |
| 1024x768@75 | 1024 | 768 | 75 | √ | √ | VESA DMT | |
| 1024x768@85 | 1024 | 768 | 85 | √ | √ | VESA DMT | |
| 1152x864@75 | 1152 | 864 | 75 | √ | √ | VESA DMT | |
| Resolution Name | Horizontal Active Pixels | Vertical Active Pixels | Refresh (Hz) | HDMI and DVI Support | VGA Support | Comments | Video Standard |
| 1280x720p@50 | 1280 | 720 | 50 | √ | √ | CEA 861 | |
| 1280x720@60 | 1280 | 720 | 60 | √ | √ | VESA CVT | |
| 1280x720p@60 | 1280 | 720 | 60 | √ | √ | 720p | CEA 861 |
| 1280x720p@100 | 1280 | 720 | 100 | √ | √ | 720p | CEA 861 |
| 1280x720p@120 | 1280 | 720 | 120 | √ | √ | 720p | CEA 861 |
| 1280x768@59 | 1280 | 768 | 59 | √ | √ | VESA CVT | |
| 1280x768@60 | 1280 | 768 | 60 | √ | √ | VESA DMT | |
| 1280x768@74 | 1280 | 768 | 74 | √ | √ | VESA DMT | |
| 1280x768@75 | 1280 | 768 | 75 | √ | √ | VESA DMT | |
| 1280x768@84 | 1280 | 768 | 84 | √ | √ | VESA DMT | |
| 1280x768@85 | 1280 | 768 | 85 | √ | √ | VESA DMT | |
| 1280x800@60 | 1280 | 800 | 60 | √ | √ | VESA CVT | |
| 1280x960@60 | 1280 | 960 | 60 | √ | √ | VESA DMT | |
| 1280x960@85 | 1280 | 960 | 85 | √ | √ | VESA DMT | |
| 1280x1024@60 | 1280 | 1024 | 60 | √ | √ | VESA DMT | |
| 1280x1024@75 | 1280 | 1024 | 75 | √ | √ | VESA DMT | |
| 1280x1024@85 | 1280 | 1024 | 85 | √ | √ | VESA DMT | |
| 1360x764@60 | 1360 | 764 | 60 | √ | √ | VESA CVT | |
| 1360x768@60 | 1360 | 768 | 60 | √ | √ | VESA DMT | |
| 1400x1050@60 | 1400 | 1050 | 60 | √ | √ | VESA DMT | |
| 1400x1050@75 | 1400 | 1050 | 75 | √ | √ | VESA DMT | |
| 1440x900@60 | 1440 | 900 | 60 | √ | √ | VESA DMT | |
| 1440x900@75 | 1440 | 900 | 75 | √ | √ | VESA DMT | |
| 1440x900@85 | 1440 | 900 | 85 | √ | √ | VESA DMT | |
| 1600x1200@60 | 1600 | 1200 | 60 | √ | √ | VESA DMT | |
| 1680x1050@60 | 1680 | 1050 | 60 | √ | √ | VESA CVT | |
| 1920x1080i@50 | 1920 | 540 | 50 | √ | HDMI & DVI only - 1080i | CEA 861 | |
| 1920x1080i@60 | 1920 | 540 | 60 | √ | HDMI & DVI only - 1080i | CEA 861 | |
| 1920x1080p@25 | 1920 | 1080 | 25 | √ | √ | 1080p | CEA 861 |
| 1920x1080p@30 | 1920 | 1080 | 30 | √ | √ | 1080p | CEA 861 |
| 1920x1080p@50 | 1920 | 1080 | 50 | √ | √ | 1080p | CEA 861 |
| 1920x1080@60 | 1920 | 1080 | 60 | √ | VGA only | VESA CVT | |
| 1920x1080p@60 | 1920 | 1080 | 60 | √ | √ | 1080p | CEA 861 |
| 1920x1200@60 | 1920 | 1200 | 60 | √ | √ | Reduced Blanking | VESA CVT |
Composite and S-Video Supported Input Resolutions
| Composite and S-Video Supported Input Resolutions | |||||
| Resolution Name | Horizontal Active Pixels | Vertical Active Pixels | Refresh (Hz) | Comments | Video Standard |
| 720x480i@60 720 | 240 60 480i CEA | ||||
| 720x576i@50 720 | 288 50 576i CEA | ||||
Component Video Supported Input Resolutions
| Component Video Supported Input Resolutions | |||||
| Resolution Name | Horizontal Active Pixels | Vertical Active Pixels | Refresh (Hz) | Comments Video Standard | |
| 720x480i@60 720 | 240 59.9 480i CEA 770.2 | ||||
| 720x480p@60 | 720 | 480 | 59.9 | 480p | SMPTE 293M CEA 770.2 ITU-R BT. 1358 |
| 720x576i@50 720 | 288 50 | 576i | |||
| 720x576p@50 | 720 | 576 | 50 | 576p | ITU-R BT. 1358 |
| 1280x720p@50 | 1280 | 720 | 50 | 720p50 | SMPTE 296M |
| 1280x720p@60 | 1280 | 720 | 59.9 | 720p | SMPTE 296M CEA 770.3 |
| 1440x960p@60 | 1440 | 960 | 59.9 | 960p | |
| 1920x1080i@50 | 1920 | 540 | 50 | 1080i50 | SMPTE 274M |
| 1920x1080is@50 | 1920 | 540 | 50 | 1080i_S295M | SMPTE 295M |
| 1920x1080i@60 | 1920 | 540 | 59.9 | 1080i | SMPTE 274M CEA 770.3 |
| 1920x1080p@50 | 1920 | 1080 | 50 | 1080p50 | SMPTE 274M |
| 1920x1080ps@50 | 1920 | 1080 | 50 | 1080p_S295M | SMPTE 295M |
| 1920x1080p@60 | 1920 | 1080 | 59.9 | 1080p | SMPTE 274M |
Appendix E – Supported Input Resolutions
Appendix F – Supported Output Resolutions
HDMI and DVI Supported Output Resolutions
The resolutions in the following table are supported on the HDMI RX and can be set using a SEND_COMMAND. The horizontal/vertical/refresh information from the Resolution Name (in the first column) can be entered in a SEND_COMMAND command (VIDOUT_RES_REF) to specify scaling parameters for the HDMI RX. For complete command information, see page 81.
Important: The resolutions and timings in the table below can only be changed with SEND_COMMANDs.
| HDMI and DVI Supported Output Resolutions | |||||
| Resolution Name | Horizontal Active Pixels | Vertical Active Pixels | Refresh (Hz) | Comments | Video Standard |
| 640x480@60 640 | 480 60 VESA | DMT | |||
| 640x480@72 640 | 480 72 VESA | DMT | |||
| 640x480@75 640 | 480 75 VESA | DMT | |||
| 800x600@60 800 | 600 60 VESA | DMT | |||
| 800x600@72 800 | 600 72 VESA | DMT | |||
| 800x600@75 800 | 600 75 VESA | DMT | |||
| 1024x768@60 1024 | 768 60 VESA | DMT | |||
| 1024x768@70 1024 | 768 70 VESA | DMT | |||
| 1024x768@75 1024 | 768 75 VESA | DMT | |||
| 1280x720p@50 1280 | 720 50 720p | CEA 861 | |||
| 1280x720p@60 1280 | 720 60 720p | CEA 861 | |||
| 1280x768@60 1280 | 768 60 | ||||
| 1280x800@60 1280 | 800 60 VESA | CVT | |||
| 1280x1024@60 1280 | 1024 60 VESA | DMT | |||
| 1360x768@60 1360 | 768 60 VESA | DMT | |||
| 1440x900@60 1440 | 900 60 VESA | CVT | |||
| 1600x1200@60 1600 | 1200 60 VESA | DMT | |||
| 1680x1050@60 1680 | 1050 60 VESA | CVT | |||
| 1920x1080@60 1920 | 1080 60 1080 | VESA CVT | |||
| 1920x1080p@50 1920 | 1080 50 1080p | CEA 861 | |||
| 1920x1080p@60 1920 | 1080 60 1080p | CEA 861 | |||
| 1920x1200@60 1920 | 1200 60 | Reduced | Blanking | VESA CVT-R | |
Digital Video Output Resolution Support
Important: The resolutions and timings in the lists in this section can only be set using DGX Configuration Software via the Enova DGX Switcher when the DXLink Receiver is being used directly from a DXLink output board.
CEA (RGB Color Space):
640x480p@59Hz
720x480p@59Hz
720(1440)x480i@59Hz
720x480p@60Hz
720x480p@119Hz
720x480p@120Hz
720x480p@239Hz
720x480p@240Hz
720x576p@50Hz
720(1440)x576i@50Hz
720x576p@100Hz
720x576p@200Hz
768x576p@50Hz
960x576p@50Hz
960(1920)x576i@50Hz
1280x720p@23Hz
1280x720p@24Hz
1280x720p@25Hz
1280x720p@29Hz
1280x720p@30Hz
1280x720p@50Hz
1280x720p@59Hz
1280x720p@60Hz
1280x720p@100Hz
1280x720p@119Hz
1280x720p@120Hz
1920x1080p@23Hz
1920x1080p@24Hz
1920x1080i@25Hz
1920x1080p@25Hz
1920x1080i@29Hz
1920x1080p@29Hz
1920x1080i@30Hz
1920x1080p@30Hz
1920x1080p@50Hz
1920x1080p@59Hz
1920x1080p@60Hz
CVR (RGB Color Space):
768x480p@60Hz
800x600p@60Hz
800x600p@120Hz
848x480p@60Hz
960x600p@60Hz
1024x576p@60Hz
1024x640p@60Hz
1024x768p@60Hz
1024x768p@120Hz
1064x600p@60Hz
1152x720p@60Hz
1152x864p@60Hz
1224x768p@60Hz
1280x720p@60Hz
1280x768p@60Hz
1280x768p@120Hz
1280x800p@120Hz
1280x960p@60Hz
1280x1024p@60Hz
1360x768p@60Hz
1360x768p@120Hz
1400x1050p@60Hz
1440x900p@60Hz
1536x960p@60Hz
1600x1000p@60Hz
1600x1200p@60Hz
1680x1050p@60Hz
1704x960p@60Hz
1728x1080p@60Hz
1800x1350p@60Hz
1864x1050p@60Hz
1920x1080p@60Hz
1920x1200p@60Hz
CVT (RGB Color Space):
| 640x360p@85Hz | 1280x720p@50Hz |
| 640x400p@75Hz | 1280x720p@60Hz |
| 640x400p@85Hz | 1280x720p@75Hz |
| 640x480p@75Hz | 1280x720p@85Hz |
| 640x480p@85Hz | 1280x768p@50Hz |
| 768x480p@60Hz | 1280x768p@60Hz |
| 768x480p@75Hz | 1280x768p@75Hz |
| 768x480p@85Hz | 1280x768p@85Hz |
| 800x600p@50Hz | 1280x800p@50Hz |
| 800x600p@60Hz | 1280x800p@75Hz |
| 800x600p@75Hz | 1280x800p@85Hz |
| 800x600p@85Hz | 1280x960p@50Hz |
| 848x480p@50Hz | 1280x960p@60Hz |
| 848x480p@60Hz | 1280x960p@75Hz |
| 848x480p@75Hz | 1280x1024p@50Hz |
| 848x480p@85Hz | 1280x1024p@60Hz |
| 960x600p@50Hz | 1280x1024p@75Hz |
| 960x600p@60Hz | 1280x1024p@85Hz |
| 960x600p@75Hz | 1360x768p@50Hz |
| 960x600p@85Hz | 1360x768p@60Hz |
| 1024x576p@50Hz | 1360x768p@75Hz |
| 1024x576p@60Hz | 1360x768p@85Hz |
| 1024x576p@75Hz | 1400x1050p@50Hz |
| 1024x576p@85Hz | 1400x1050p@60Hz |
| 1024x640p@50Hz | 1400x1050p@75Hz |
| 1024x640p@60Hz | 1440x900p@60Hz |
| 1024x640p@75Hz | 1440x900p@75Hz |
| 1024x640p@85Hz | 1440x900p@85Hz |
| 1024x768p@50Hz | |
| 1024x768p@60Hz | 1536x960p@50Hz |
| 1024x768p@75Hz | 1536x960p@60Hz |
| 1024x768p@85Hz | 1536x960p@75Hz |
| 1064x600p@50Hz | 1600x1000p@50Hz |
| 1064x600p@60Hz | 1600x1000p@60Hz |
| 1064x600p@75Hz | 1600x1200p@50Hz |
| 1064x600p@85Hz | 1600x1200p@60Hz |
| 1152x720p@50Hz | 1680x1050p@50Hz |
| 1152x720p@60Hz | 1680x1050p@60Hz |
| 1152x720p@75Hz | 1704x960p@50Hz |
| 1152x720p@85Hz | 1704x960p@60Hz |
| 1152x864p@60Hz | 1728x1080p@50Hz |
| 1224x768p@50Hz | 1728x1080p@60Hz |
| 1224x768p@60Hz | 1864x1050p@50Hz |
| 1224x768p@75Hz | 1864x1050p@60Hz |
| 1224x768p@85Hz | 1920x1080p@50Hz |
| 1920x1200p@50Hz |
DMR (RGB Color Space):
1280x800p@60Hz
1366x768p@60Hz
1600x900p@60Hz
DMT (RGB Color Space):
640x350p@85Hz
640x400p@85Hz
640x480p@60Hz
640x480p@72Hz
640x480p@75Hz
640x480p@85Hz
720x400p@85Hz
800x600p@56Hz
800x600p@60Hz
800x600p@72Hz
800x600p@75Hz
800x600p@85Hz
848x480p@60Hz
1024x768i@43Hz
1024x768p@a60Hz
1024x768p@70Hz
1024x768p@75Hz
1024x768p@85Hz
1152x864p@70Hz
1152x864p@75Hz
1152x864p@85Hz
1280x800p@60Hz
1280x960p@60Hz
1280x960p@75Hz
1280x960p@85Hz
1280x1024i@43Hz
1280x1024p@60Hz
1280x1024p@75Hz
1280x1024p@85Hz
1360x768p@60Hz
1366x768p@60Hz
1600x1200i@48Hz
1600x1200p@60Hz
Appendix F – Supported Output Resolutions
Appendix G – Ground Wire Attachment
Applicability
This appendix covers attaching a ground wire to a DXLink Module without a designated ground location. If the module has a designated ground screw, see page 45.
If the system is experiencing problems with delivery of DXLink signals to/from an Enova DGX Digital Media Switcher or Enova DVX Solution, adding a ground wire from the TX/RX to the switcher may improve performance. The problem is likely caused by the use of a single phase powered system that does not provide an earth ground for a source or destination's chassis and shields. This can inject unnecessary AC voltage on the HDMI cable shield that can lead to DXLink signal integrity issues. To check for indications of this type of power in the system, look for a two pronged plug or a cord that has only two wires.
Note: Technically this type of grounding is only required when a DXLink Transmitter or Receiver is connected to an ungrounded device, but this added grounding measure can be used at the discretion of the installer.
Items Required
☐ Small adjustable wrench or socket driver
☐ 6 foot ground wire with ring terminal ends (provided)
Note: Currently shipping DXLink Transmitters and Receivers provide a designated ground location on the rear of the chassis for attaching a ground wire. For instructions on attaching a ground wire to DXLink Modules or DXLink Wallplates with a designated ground location, see page 45.
Attaching a Ground Wire to a Common Earthed Ground
Connect the running end of the ground wire (fixed end attached to DXLink Module or Wallplate) to a common earthed ground (ideally, referenced to the Enova DGX Switcher).
Important: If one DXLink Transmitter or Receiver is grounded, any remaining ungrounded units that are connected to the same board on the Enova DGX Switcher must also be grounded.
Attaching a Ground Wire to Module without Designated Ground
Earlier model DXLink Transmitter and Receiver Modules without a designated location support chassis ground attachment through the HDMI jackscrew on the rear of the chassis.
Important: Before attaching the ground wire to the chassis, ensure all connectors are clear.
To attach a ground wire to a module with a jackscrew:
- If powered, power down the DXLink Module.
- Remove the jackscrew and silver washer above the HDMI connector.
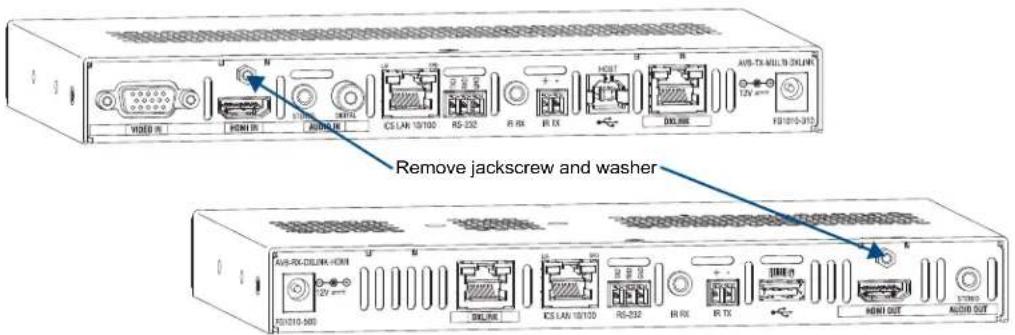
FIG. 44 Remove jackscrew and washer above HDMI connector
- Secure the ring terminal of the ground wire against the chassis with the jackscrew and washer.
- Ensure the ground wire is positioned so that it does not interfere with any of the connectors.

FIG. 45 Position ground wire away from connectors
- Attach the ground wire to a common earthed ground (see "Attaching a Ground Wire to a Common Earthed Ground" on the previous page).
- Continue the installation process (or reapply power to the module).
Appendix H – EDID Programming
DGX Configuration Software Overview
Important: Because signals routed through DXLink Transmitters normally produce a quality image, you will not need the information in this appendix unless the installation has special EDID requirements for VGA.
AMX's DGX Configuration Software has a tabbed view for EDID Programming. This view can be used to re-program the EDID EEPROM chips for the HD-15 connectors on the DXLink Transmitters, allowing for custom configuration of the EDID data that is stored on them.
Note: The remaining tabbed views in the software do not apply to the DXLink units. Scaling and HDCP settings can be applied via SEND_COMMANDs (see the chapter "NetLinx Programming of DXLink Transmitters and Receivers" on page 79). If a DXLink Receiver is connected to an Enova DGX Output Board, DGX Configuration Software can be used via the switcher for scaling (see the "Instruction Manual – Enova DGX 8/16/32."
DGX Configuration Software is available at www.amx.com (on the Multi-Format Transmitter's product page) and includes a standard Help file with detailed information.
PC System Requirements for DGX Configuration Software v1.0.5
☐ Windows 7 and Windows XP Professional
☐ Minimum Hardware: 166 MHz, 128 MB RAM, 36 MB of free disk space*, 800x600 display, serial port, video card with dual outputs (see Caution below)
Recommended Hardware: 2.0 GHz, 512 MB RAM*
* The installation process requires 36 MB of disk space for the DGX Configuration Software installer. Once installed, the program requires 10 MB of disk space.

Caution: We strongly urge the user not to use video cards with DMS-59 connectors. Video cards with DMS-59 connectors have been shown to fail consistently and, in the worst case, can corrupt an EDID data file. A laptop PC with a VGA or DVI out is a good solution. Cards with 2 DVI connectors, 2 VGA connectors, or 1 DVI and 1 VGA connector are also acceptable.
Software Installation on PC
Important: Administrator rights are required to install DGX Configuration Software.
To install DGX Configuration Software:
- From the DXLink Multi-Format Transmitter's product page at www.amx.com (under Application Files on the right) double-click, "DGX Configuration Software."
- Click "I Accept" for the AMX License Agreement, and then select Open to download the file.
- Optional – Select DGX_Config_SoftwareReadMe_vX_X to read about the software before installation.
- Click the application file (which is zipped).
- In the Compressed (zipped) Folders dialog box, click Extract All.
- Select a destination for the files.
- When the download is complete, click the application file and follow the directions in the installation wizard.
DXLink Connection to PC
To use DGX Configuration Software with a DXLink Transmitter:
- Attach one end of a USB mini-B cable to the Program port on the front of the Multi-Format Transmitter (on the Wallplate TX, the Program port is on the left side; on the Decor Wallplate TX, the Program port is in the center on the front under the customer provided cover plate).
- Attach the open end of the USB mini-B cable to the PC where the DGX Configuration Software was installed.
- Apply power to the Transmitter. If power is via the DXLink connection, then apply power to the power sourcing device (i.e., switcher, PDXL-2, or PS-POE-AT-TC).
- On the PC, open the DGX Configuration Software.
Note: The PC will automatically establish a virtual COM port on the Transmitter.
- If changing the communication settings is necessary*:
a. From the Communication menu (in the DGX Configuration Software), select Serial Port.
b. Select Change Settings to change the serial port and/or the baud rate for the PC's serial port. The baud rate for the PC must match the baud rate for the Transmitter. The recommended (default) baud rate setting for serial communication with DXLink Transmitters is 9600.
c. If you changed any of the settings, from the Communication menu select Refresh Device Lists.
- Select the EDID tab in the interface (defaults to the Scaler Mode tab**).

* If you are unsure of the USB Serial Port (COM
** The remaining tabs do not apply to the DXLink Transmitters. Scaling and HDCP settings can be applied via SEND_COMMANDs (see page 79).
General Notes for Working with DGX Configuration Software and DXLink TXs
When the DXLink Multi-Format TX is connected to a PC running DGX Configuration Software, the following applies:
- DGX Configuration Software displays the connected Transmitter only.
- File menu – Select Open File to load an .edid file to the program. Select Save to File to save an .edid file containing the currently displayed settings in the EDID Programmer view.
- Communication menu – Use to change the serial communication settings. This menu also includes the option to “Refresh Device Lists,” which will refresh the device list in the EDID Programmer tab.
- Utilities menu – This menu does not apply to the DXLink Transmitters.
- Help menu – Access the Help file for the program, open a link for the Web Update option (to download updates for the program), and view current version information.
- Messages in the bottom pane of the DGX Configuration Software dialog box report status of operations. Messages can be copied* for technical support purposes.
* Right-click on a message to access a short-cut menu with options to Copy Selected, Copy All, or Clear. When copying multiple messages: either select consecutive items by holding down the Shift key and clicking the first and last item or select nonconsecutive items by holding down the Control key and clicking on each item.
EDID Programmer View
From the EDID Programmer view, EDID EEPROM chips for the HD-15 (VGA) connector on the Transmitter can be re-programmed if necessary.
Note: The EDID Programmer will not work in conjunction with the HDMI connector on the TX.
EDID Overview
EDID (Extended Display Identification Data) is a data structure established by the Video Electronics Standards Association (VESA) to enable plug-and-play support by enabling easy configuration of a computer's graphics subsystem based on the capabilities of the attached display device.
EDID information includes items such as the following:
- Manufacturer's name
- Product type
● Supported video resolutions and refresh rates
• Color space and filter chromaticity - Detailed timings
When a computer is directly connected to a display device, it can use the display device's EDID information to determine an initial compatible video signal to send. With the computer's display controls, the user can modify this selection to another compatible signal based on the provided EDID information.
DXLink Equipment and EDID
In cases where the HD-15 (VGA) input on a DXLink Transmitter are used and a resolution incompatibility exists (or if the source device needs a specific resolution or a limited set of resolutions), the DXLink Transmitters have the ability to update the VGA EDID emulation file (by updating the EEPROM chip) which comes preloaded with an AMX VGA EDID set.
The AMX VGA EDID set consists of a number of common EDID settings (for VGA timing details, see page 131). In most cases, the DXLink Transmitter can be used as is from the factory with no adjustments.
The DGX Configuration Software with EDID programming functionality has been provided for cases where a user defined VGA EDID set is desired (this must be a subset of the supported input resolutions shown in Appendix E; see page 131).
The EDID Programmer view can be used for writing user defined VGA EDID data to the DXLink Transmitter's HD-15 input.
Reading and Saving EDID Data from a DXLink TX's HD-15 (VGA) Input Connector
The DGX Configuration Software reads the EDID data from the USER EDID 1 EEPROM location, regardless of the VIDIN_EDID setting.
Important: Unless a custom EDID has been previously written to the input, attempting to read the EDID will result in a Read Error message.
The EDID data can be read to confirm the correct EDID has been programmed.
To read and save EDID data from a DXLink Transmitter:
- On the PC, open the DGX Configuration Software and select the EDID Programmer tab.
- Under Inputs/Outputs on the left, expand the device tree, and select the HD-15 input.
- Click Read to read the VGA EDID information currently on the HD-15 input.
The EDID data appears in the EDID read-only field on the right.
Tip: In the EDID Programmer view, the Save to File option under the File menu can be used to save the EDID information as an .edid file. The saved file can be opened as a text file (from the File menu, select Open File) and edited or opened and written to an input (click the Write button).
Read Error Message
A Read Error message will appear if the Multi-Format Transmitter has never been programmed with a valid/custom EDID or if the unit has been programmed with a corrupted EDID. A Read Error message will also appear when attempting to read the EDID after sending a FACTORYAV SEND_COMMAND, which re-initializes the VGA USER EDID 1 EEPROM and resets the VIDIN_EDID setting to ALL RESOLUTIONS (which is AMX_0500_003).
Writing EDID Data to a DXLink Transmitter's HD-15 (VGA) Input Connector
The instructions that follow tell how to use the EDID Programmer view to write user defined VGA EDID information to the HD-15 input connector on a DXLink Transmitter. User defined VGA EDIDs are currently available from technical support. A library of VGA EDID files will be available on at www.amx.com in conjunction with a future firmware release.
To write VGA EDID data to a DXLink Transmitter:
- Download the VGA EDID set provided by technical support.
- On the PC, open the DGX Configuration Software and select the EDID Programmer tab.

- Under Inputs/Outputs on the left, expand the device tree, and select the HD-15 input.
- From the File menu, select Open File to select the VGA .edid file that was downloaded in Step 1.
- Click Write to write the VGA EDID information to the HD-15 input.
Tip: You can confirm that the new VGA EDID data was written to the HD-15 input by selecting the HD-15 input and clicking on the Read button or by using the SEND_COMMAND ?VIDIN_EDID, which will return: VIDIN EDID-USER EDID 1.
Important: You can revert to the factory default EDID for the HD-15 input by using the SEND_COMMAND VIDIN_EDID-ALL RESOLUTIONS (i.e., AMX_0500_003).
AMX UNIVERSITY
Increase Your Revenue through education + knowledge
In the ever-changing AV industry, continual education is key to success. AMX University is dedicated to ensuring that you have the opportunity to gather the information and experience you need to deliver strong AMX solutions. Plus, AMX courses also help you earn CEDIA, NSCA, InfoComm, and AMX continuing education units (CEUs).
Visit AMX University online for 24/7/365 access to:
- Schedules and registration for any AMX University course
- Travel and hotel information
- Your individual certification requirements and progress



- DXLink™ Twisted Pair Transmitters/Receiver
- AMX Domestic Channel Partner Limited Warranty, Disclaimer and License
- LIMITED WARRANTY; RETURN, REPAIR AND REPLACEMENT
- Contents
- ESD Warning 1
- Important Safety Information and Instructions....2
- Product Overview and Specifications....7
- Installation and Setup....33
- Network Configuration....63
- IRL File Transfers 73
- NetLinx Programming of DXLink Transmitters and Receivers 79
- Troubleshooting 101
- Appendix A – Upgrading the Firmware.... 105
- Appendix B – Telnet (Terminal) Commands.... 111
- Appendix C – Virtual NetLinx Master....121
- Appendix D – Cable Details and Pinout Info ......127
- Appendix E – Supported Input Resolutions....131
- Appendix F – Supported Output Resolutions......135
- Appendix G – Ground Wire Attachment ....141
- Appendix H – EDID Programming....143
- ESD Warning
- Important Safety Information and Instructions
- Liability Notice
- US FCC Notice
- Lithium Batteries Notice
- Trademark Notices
- Warnings and Cautions
- Product Overview and Specifications
- Applicability Notice
- Product Notes
- Product Compatibility Tables
- Enova DGX Solutions and DXLink Functions
- Enova DVX Solutions and DXLink Functions
- DXLink Transmitter and Receiver Features
- Common Applications
- Transmitters
- Components located on front of Multi-Format TX and HDMI TX (left to right):
- Components located on front of Wallplate TX:
- Components located on left and bottom edges of Wallplate TX:
- Components located on left and right front sections of Decor Wallplate TX:
- Components located on center front section of Decor Wallplate TX:
- Video In Connector (Multi-Format TX only)
- HDMI In Connector
- Stereo Audio In Jack
- Digital Audio In Jack
- ICS LAN10/100 Connector
- RS-232 (Serial) Port
- IR RX Port
- IR TX Port
- USB Port
- DXLink Output Connector
- Ground Screw
- Power Jack
- Wallplate TX and Decor Wallplate TX Rear View
- DIP Switch
- Receiver
- DXLink Input Connector
- ICS LAN 10/100 Connector
- RS-232 Port
- HDMI Out Connector
- Stereo Audio Out Connector
- Common Features/Functionality
- DIP Switches
- Toggle is used for enabling/disabling the physical ICS LAN 10/100 port (see page 41).
- Toggle is used for setting the DXLink Modules to either automatically or manually determine the DXLink Mode (see page 41).
- Toggle is used for enabling/disabling network connectivity of the DXLink Transmitter or Receiver to a connected NetLinx Central Controller (used for IR ports, serial ports, and commands to the DXLink unit); see page 42.
- Toggle is not functional.
- Multi-Format and HDMI Transmitters
- HDMI Receiver
- HDCP Compliance
- IR Control on HDMI TX, Multi-Format TX, and HDMI RX (Optional)
- Quick Reference Tables for Modes
- DXLink Transmitters and Receiver Specifications
- Installation and Setup
- Site Recommendations
- Environment
- Multi-Format TX, HDMI TX and HDMI RX Accessibility
- Power
- General Hazard Precautions
- Elevated Operating Temperature
- Airflow Restriction
- Reliable Earthing (Grounding)
- Unpacking Tips
- Setup Information
- Setup Requirements
- Endpoint Mode (Switcher): Example of Typical System Setup
- Custom EDID Settings
- Options for System Setup with Enova DGX DXLink Boards
- Options for System Setup with Enova DVX Solutions
- Functions of DXLink Transmitters and Receivers
- Endpoint Mode (Standalone): Example of Typical System Setup
- Extender Mode (Standalone): Example of Typical System Setup
- Important Power Considerations for Enova DGX Endpoint Systems
- Power Budget Planning for System Setup with an Enova DGX
- Power Budget Calculation
- Foregoing Power Supply Redundancy
- In the Event of a Power Supply Failure
- Avoiding Network (Ethernet) Loops
- DIP Switch Location
- Setting DIP Switch #1 to Enable/Disable Access to ICS LAN 10/100 Port
- #1 Toggle Settings
- Installation Options
- Setting DIP Switch #2 to Set the DXLink Mode
- #2 Toggle Settings
- Setting DIP Switch #3 for Network Connectivity
- #3 Toggle Settings
- Scenarios / DIP Switch Settings Table
- Mounting Options for Modules (Rack Trays and Mounting Brackets)
- Mounting Options for Wallplates
- Attaching a Ground Wire to DXLink Transmitters/Receivers
- Items Required
- Attaching a Ground Wire to a Common Earthed Ground
- To attach a ground wire to a module:
- Attaching Ground Wire to Wallplate TX or Decor Wallplate TX
- To attach a ground wire to a DXLink Wallplate or Decor Wallplate TX:
- Important Twisted Pair Cable Recommendations
- Twisted Pair Cable Pinouts
- RJ-45 LEDs
- ICS LAN 10/100 Connector LEDs (modules only)
- DXLink Connector LEDs
- Audio Type Precedence
- Wallplate Transmitters – Attaching Signal/Transport Cables
- To attach signal and transport cables to a Wallplate TX or Decor Wallplate TX:
- Decor Wallplate TX -
- Cable front (note that connector arrangement differs between unit types) -
- Additional Wallplate TX and Decor Wallplate TX Functionality
- Reset Button
- Program Port
- ID Pushbutton
- Wallplate TX and Decor Wallplate TX – Indicator LEDs
- Multi-Format TX or HDMI TX – Attaching Signal, Transport, and Control Cables
- Multi-Format TX or HDMI TX – Applying Power
- To apply power to the Multi-Format TX or HDMI TX:
- Multi-Format TX and HDMI TX- Indicator LEDs
- Multi-Format TX and HDMI TX–LED Troubleshooting
- HDMI RX – Attaching Signal and Control Cables
- HDMI RX – Applying Power
- To apply power to the HDMI RX:
- HDMI RX - Indicator LEDs
- Receiver – LED Troubleshooting
- Serial Data Transfer and IR Flow Control
- Optional: Multi-Format TX, HDMI TX, and HDMI RX – Wiring for Serial Data Transfer
- To wire the RS-232 (serial) connectors on the modules for data transfer:
- Serial Control – Endpoint Mode and SEND\_COMMANDs
- Optional: Multi-Format TX, HDMI TX, and HDMI RX – IR Control
- IR03 External IR Receiver Module (not included)
- To connect an IR Receiver to a module:
- CC-NIRC NetLinx IR Emitter Cable (not included)
- To connect an IR Emitter to a module:
- IR Control – Endpoint Mode and SEND\_COMMANDs
- ID Pushbutton Functions
- HDMI RX Scaling Button and Scaling Modes
- To set the scaling option (mode):
- Bypass Mode
- Auto Mode
- Manual Mode
- Persistence of Scaling Options
- Using the Scaling Button to Persist a Scaling Option
- To persist a scaling option on power cycle:
- Detailed NetLinx (Link/Act and Status) LED Behavior
- Module Operational State as Indicated by LEDs
- ID Pushbutton Boot State and LED Behavior
- Downloading Firmware State and LED Behavior
- DXLink TX/RX in a Multiple-Stage Switching System
- Example
- Network Configuration
- Overview
- Static IP Mode - Default Parameters
- DHCP Mode
- TCP/IP Address Configuration
- Telnet IP Configuration Commands
- Device IDs
- Using the ID Pushbutton
- Toggling Between IP Addressing Modes: DHCP and Static IP
- To toggle between DHCP and Static IP Modes:
- Assign a Device Address (ID Mode)
- To set the device address on a Transmitter or Receiver:
- Reset the Factory Default Settings
- Factory Parameters\*
- To reset a Transmitter or Receiver Module to its factory default settings:
- To reset Wallplate TX or Decor Wallplate TX to its factory default settings:
- Restore the Factory Firmware Image and Factory Default Parameters
- To restore the Transmitter or Receiver Module to its factory default firmware image:
- To restore Wallplate TX or Decor Wallplate TX to its factory default firmware image:
- IRL File Transfers
- Endpoint System (with a Switcher)
- Extender System (Standalone)
- Preparing for IRL File Transfers in an Endpoint System
- To prepare for IRL file transfers in an endpoint system:
- Preparing for IRL File Transfers in an Extender System
- To prepare for IRL file transfers in an extender system:
- Master on the network:
- Master on the network: Go to Step 8.
- Transferring IRL Files
- To send an IR Library (\*.IRL) file to a Transmitter or Receiver:
- Additional Documentation
- NetLinx Programming of DXLink Transmitters and Receivers
- Device Numbering and Ports
- Transmitters and Receivers (Modules)
- Transmitters (Wallplate TX and Decor Wallplate TX)
- CHANNELs
- Channel Function
- DXLink Receiver Video SEND\_COMMANDs
- Aspect Ratio Options
- DXLink Receiver Audio SEND\_COMMANDs
- DXLink Transmitter Video SEND\_COMMANDs
- DXLink Transmitter Audio SEND\_COMMANDs
- IR SEND\_COMMANDs
- IR CHANNELs
- Serial SEND\_COMMANDs
- Common DXLink Transmitter / Receiver SEND\_COMMANDs
- DXLink System SEND\_COMMANDs
- SEND\_STRING Escape Sequences
- Enova DVX Switchers – DXLink SEND\_COMMANDs
- Troubleshooting
- Basic Troubleshooting
- Additional Resources for Troubleshooting Endpoint Systems
- Enova DGX Digital Media Switchers
- Enova DVX Solutions
- Determining HDCP Compliance
- Power Issues
- DXLink Power Delivery Issues
- Power Issues with Enova DGX Endpoint Systems
- DXLink Connection Issues
- DXLink LED Patterns When Connection is Working as Expected
- DXLink LED Patterns When Connection is Failing
- Network Setup Issues
- To set the IP, connection, and device parameters on a DXLink Module:
- and #3 Toggles - ON
- and #4 Toggles – OFF
- Technical Support
- AMX Contact Information
- Appendix A – Upgrading the Firmware
- Preparing for KIT File Transfers in an Endpoint System
- To prepare for KIT file transfers in an endpoint system:
- Preparing for KIT File Transfers in an Extender System
- To prepare for KIT file transfers in an extender system:
- No Master on the network:
- Important Upgrade Information
- In the Event of Power Loss During an Upgrade
- Firmware Versions
- Transferring KIT Files
- To send a KIT file to a Transmitter or Receiver:
- Reminders
- Appendix B – Telnet (Terminal) Commands
- Establishing a Terminal Connection Via Telnet
- Welcome Banner with and without Security Enabled:
- To establish a terminal connection via Telnet at the CMD prompt:
- To establish a terminal connection via NetLinx Studio:
- Telnet Username and Password
- Additional Notes
- Setting a Telnet Username and Password
- To set a Telnet username and password:
- Telnet Commands
- Master Connection Modes
- TCP vs. UDP
- URL vs. NDP vs. Auto
- Notes on Specific Telnet Clients
- Windows Client Programs
- Linux Telnet Client
- Appendix C – Virtual NetLinx Master
- Overview Virtual NetLinx Master (Masterless)
- Setting PC to Static IP Address
- Important Information for PCs with Multiple Network Access Points
- To check for multiple networks:
- To disconnect a network connection:
- To set a PC to Static IP Mode:
- Creating a Virtual Master
- Click Communication Settings on the right.
- Under Transport Connection Option, select Virtual NetLinx Master.
- Under Virtual NetLinx Master Options:
- Preparing a DXLink Module to Work with a Virtual Master
- To place a DXLink Module in Static IP Mode:
- To assign a device ID and set the connection type:
- Click the New button.
- Appendix D – Cable Details and Pinout Info
- HDMI Connector Cable Pinout
- HD-15 Connector Cable Pinout
- DVI Pinout for DVI-to-HDMI Cable Adapter
- Appendix E – Supported Input Resolutions
- Available Pixel Display and Refresh Rate
- Appendix F – Supported Output Resolutions
- HDMI and DVI Supported Output Resolutions
- Digital Video Output Resolution Support
- CEA (RGB Color Space):
- CVR (RGB Color Space):
- DMR (RGB Color Space):
- DMT (RGB Color Space):
- Appendix G – Ground Wire Attachment
- Applicability
- Attaching a Ground Wire to Module without Designated Ground
- To attach a ground wire to a module with a jackscrew:
- Appendix H – EDID Programming
- DGX Configuration Software Overview
- PC System Requirements for DGX Configuration Software v1.0.5
- Software Installation on PC
- To install DGX Configuration Software:
- DXLink Connection to PC
- To use DGX Configuration Software with a DXLink Transmitter:
- General Notes for Working with DGX Configuration Software and DXLink TXs
- EDID Programmer View
- EDID Overview
- DXLink Equipment and EDID
- Reading and Saving EDID Data from a DXLink TX's HD-15 (VGA) Input Connector
- To read and save EDID data from a DXLink Transmitter:
- Read Error Message
- Writing EDID Data to a DXLink Transmitter's HD-15 (VGA) Input Connector
- To write VGA EDID data to a DXLink Transmitter:
- AMX UNIVERSITY
- Increase Your Revenue through education + knowledge
Brand : AMX
Model : AVB-WP-TX-MULTI-DXLINK
Category : Audiovisual Equipment