
CRT-200PRO MK2 - Stage lighting Eurolite - Free user manual and instructions
Find the device manual for free CRT-200PRO MK2 Eurolite in PDF.


| Product Type | LED Effect Curtain with PC Control |
| Curtain Dimensions (WxH) | 3 x 2 m |
| Controller Dimensions (LxWxH) | 280 x 158 x 46 mm |
| Curtain Weight | 3.2 kg |
| Controller Weight | 1.3 kg |
| Power Supply | 100-240 V AC, 50/60 Hz via included PSU |
| Power Consumption (Curtain) | 30 W |
| Power Consumption (Controller) | 3 W |
| Pixel Resolution | 17 x 11 pixels |
| Pixel Pitch | 180 mm |
| LED Type | TCL, 5 mm |
| Number of LEDs | 187 |
| DMX Channels | 12 |
| DMX Connection | 3-pin XLR |
| Network Connection | RJ-45 |
| Curtain Outputs | 4 |
| SD Card Slot | Yes (for stand-alone operation) |
| Fabric Properties | Water-repellent, flame-resistant |
| Suspension | Loops all around |
| Curtain Set Includes | LED curtain, PSU, transport bag, data extension cable |
| Controller Set Includes | Controller, power cable, network cable, SD card with LPlayer software, SD card with 4 light programs |
| Protection Class (Curtain) | III |
| Protection Class (Controller) | I |
| Max Ambient Temperature | 45°C |
| Cleaning | Use soft damp cloth; no solvents |
Frequently Asked Questions - CRT-200PRO MK2 Eurolite
User questions about CRT-200PRO MK2 Eurolite
0 question about this device. Answer the ones you know or ask your own.
Ask a new question about this device
Download the instructions for your Stage lighting in PDF format for free! Find your manual CRT-200PRO MK2 - Eurolite and take your electronic device back in hand. On this page are published all the documents necessary for the use of your device. CRT-200PRO MK2 by Eurolite.
USER MANUAL CRT-200PRO MK2 Eurolite
natural_image
Black fabric panel with green and pink dot patterns, mounted on a black frame (no text or symbols)
USER MANUALUSER MANUAL
CRT-200PRO MK2 LED EFFECT CURTAIN

natural_image
Product photo of a black electronic device labeled 'eurolite' with a small electronic device and coiled cable (no visible text or symbols on main subject)

• LED effect curtain with PC control
- 17 x 11 pixels
- 180 mm pitch
- 187 super-bright TCL LEDs (5 mm) provide for an exquisite RGB color mix
• Each LED individually addressable for displaying multimedia content, texts, dynamic light effects, color fades and animations
- Ideal as stage backdrop for bands, clubs and mobile DJs
• Water-repellent and flame-resistant curtain fabric
- Several LED curtains can be combined and run synchronously
• PC, DMX and auto control with the optional network controller
- Easily create your own content with the PC software LPlayer for stunning animations such as video loops, screen captures, logos, running lights and starry sky effects
- Loops all around for easy suspension
- Fast and uncomplicated setup
- Low weight
- Comes with practical transport bag
• Operation with included PSU
- Option: CRT-200PRO MK2 Controller

Inhaltsverzeichnis
1 EINFÜHRUNG......4
1 INTRODUCTION ......22
2 SAFETY INSTRUCTIONS ....23
3 OPERATING DETERMINATIONS....24
4 OPERATING ELEMENTS & CONNECTIONS....25
5 INSTALLATION AND CONNECTIONS....26
6 OPERATION 27
DMX512 Operation 28
DMX Channels 28
PC Operation with the Software LPlayer 29
Installation 29
Configuration 30
Creating Light Programs 34
Exporting Light Programs to SD Cards....38
7 CLEANING AND MAINTENANCE ....39
▼eplacing the Fuse 39
8 TECHNICAL SPECIFICATIONS....39
1
EINFÜHRUNG

natural_image
Black fabric with numbered connectors and a coiled cable, no visible text or symbols
5
natural_image
Black rectangular panel with green and red dots arranged in a grid pattern, supported by a black ladder (no text or symbols)Konfiguration
flowchart
graph TD
    A["MAIN01"] --> B["KS01"]
    B --> C["KS01_001.DAT"]
    B --> D["KS01_002.DAT"]
    B --> E["KS01_003.DAT ..."]
    B --> F["SET.DAT"]
    G["Wechseldat entrager (E)"] --> H["KS01_001.DAT"]
    G --> I["KS01_002.DAT"]
    G --> J["KS01_003.DAT ..."]
    G --> K["SET.DAT"]
7
Thank you for having chosen a EU▼OLITE product. If you follow the instructions given in this manual, we are sure that you will enjoy this device for a long period of time. Please keep this manual for future needs.

CAUTION! Keep this device away from rain and moisture!

For your own safety, please read this user manual carefully before you initially start-up.

This user manual is valid for articles 80503431 and 80503432. You can find the latest update at: www.eurolite.de
Every person involved with the installation, operation and maintenance of this device has to
- be qualified
• follow the instructions of this manual - consider this manual to be part of the total product
- keep this manual for the entire service life of the product
• pass this manual on to every further owner or user of the product - download the latest version of the user manual from the Internet
Delivery Includes
CRT-200PRO MK2 LED Curtain
Set consists of:
- 1 x LED curtain (3 x 2 m) with connection cables
- 1 x Power supply unit with power cable
- 1 x Transport bag
- 1 x Data extension cable
CRT-200PRO MK2 Controller
Set consists of:
- 1 x Controller
- 1 x Power cable
- 1 x Network cable
- 1 x SD card with 4 light programs
- 1 x SD card with LPlayer software
2
SAFETY INSTRUCTIONS

CAUTION!
Be careful with your operations. With a dangerous voltage you can suffer a dangerous electric shock when touching the wires!
This device has left our premises in absolutely perfect condition. In order to maintain this condition and to ensure a safe operation, it is absolutely necessary for the user to follow the safety instructions and warning notes written in this user manual.
Damages caused by the disregard of this user manual are not subject to warranty. The dealer will not accept liability for any resulting defects or problems.
Unpacking
Please make sure that there are no obvious transport damages. Should you notice any damages on the connection panel or on the casing, do not take the speaker system into operation and immediately consult your local dealer.
Protection Class
The display falls under protection class III. The device must be operated with the processor. The processor falls under protection class I. The power plug must only be plugged into a protection class I outlet. The voltage and frequency must exactly be the same as stated on the device. Wrong voltages or power outlets can lead to the destruction of the device and to mortal electrical shock.
Power Cord
Always plug in the power plug least. The power plug must always be inserted without force. Make sure that the plug is tightly connected with the outlet. Never let the power cord come into contact with other cables! Handle the power cord and all connections with the mains with particular caution! Never touch them with wet hands, as this could lead to mortal electrical shock. Never modify, bend, strain mechanically, put pressure on, pull or heat up the power cord. Never operate next to sources of heat or cold. Disregard can lead to power cord damages, fire or mortal electrical shock. The cable insert or the female part in the device must never be strained. There must always be sufficient cable to the device. Otherwise, the cable may be damaged which may lead to mortal damage. Make sure that the power cord is never crimped or damaged by sharp edges. Check the device and the power cord from time to time. If extension cords are used, make sure that the core diameter is sufficient for the required power consumption of the device. All warnings concerning the power cords are also valid for possible extension cords. Always disconnect from the mains, when the device is not in use or before cleaning it. Only handle the power cord by the plug. Never pull out the plug by tugging the power cord. Otherwise, the cable or plug can be damaged leading to mortal electrical shock. If the power plug or the power switch is not accessible, the device must be disconnected via the mains. If the power plug or the device is dusty, the device must be taken out of operation, disconnected and then be cleaned with a dry cloth. Dust can reduce the insulation which may lead to mortal electrical shock.
More severe dirt in and at the device should only be removed by a specialist.
Temperature Fluctuation
If the device has been exposed to drastic temperature fluctuation (e.g. after transportation), do not switch it on immediately. The arising condensation water might damage your device. Leave the device switched off until it has reached room temperature.
Liquids
There must never enter any liquid into power outlets, extension cords or any holes in the housing of the device. If you suppose that also a minimal amount of liquid may have entered the device, it must immediately be disconnected. This is also valid, if the device was exposed to high humidity. Also if the device is still running, the device must be checked by a specialist if the liquid has reduced any insulation. ▼educed insulation can cause mortal electrical shock.
Foreign Objects
There must never be any objects entering into the device. This is especially valid for metal parts. If any metal parts like staples or coarse metal chips enter into the device, the device must be taken out of operation and disconnected immediately. Malfunction or short-circuits caused by metal parts may cause mortal injuries.
Children and Amateurs
Keep away children and amateurs!
Maintenance and Service
There are no serviceable parts inside the speaker system. Maintenance and service operations are only to be carried out by authorized dealers
3
OPERATING DETERMINATIONS
The C▼T-200P▼O MK2 LED curtain makes a stunning stage backdrop. It is made of black cloth, which is flame resistant and water repellent. The 187 super-bright TCL LEDs (17 x 11 pixels) provide for an exquisite ▼GB color mix when displaying multimedia content. The curtain can be operated with the optional controller via SD card or via DMX light controller. It is also possible to remotely control the controller live via a computer with the software LPlayer. LPlayer makes creating content for stunning animations such as video loops, screen captures, logos, running lights and starry sky effects easy. For stand-alone operation without a computer the light programs can be saved to SD cards and played by the controller. The curtain is furnished with loops all around for easy suspension (e.g. from the stand system “Show Stand I” by EU▼OLITE). Delivery includes a practical transport bag.
Power Supply
The processor is allowed to be operated with an alternating voltage of 100-240 V, 50/60 Hz and was designed for indoor use only. The occupation of the connection cables is as follows:
| Cable | Pin | International |
| Brown Live L | ||
| Blue Neutral N | ||
| Yellow/Green | Earth |  |
The earth has to be connected! If the device will be directly connected with the local power supply network, a disconnection switch with a minimum opening of 3 mm at every pole has to be included in the permanent electrical installation. The device must only be connected with an electric installation carried out in compliance with the IEC standards. The electric installation must be equipped with a ▼esidual Current Device (▼CD) with a maximum fault current of 30 mA
Electro-magnetic Emission
LED video walls are electrical installations sending electro-magnetic emissions. Due to their construction, such installations are regulated in the EMC guidelines. For permanent installations, the operator is responsible for the correct operation of his installation. The operator must make sure that his installation complies with the basic requirements and follows the general rules of technology. The operator must make sure that his installation complies with the electro-magnetic compatibility.
Installation
Do not shake the device. Avoid brute force when installing or operating the device. When choosing the installation spot, please make sure that the device is not exposed to extreme heat, moisture or dust. There should not be any cables lying around. You endanger your own and the safety of others! Operate the device only after having familiarized with its functions. Do not permit operation by persons not qualified for operating the device. Most damages are the result of unprofessional operation!
Ambient Conditions
The F symbol means: this device can be installed on normal inflammable surfaces. The symbol -· -m determines the minimum distance from lighted objects. The minimum distance between light output and the illuminated surface must be more than the given value. The maximum ambient temperature T_a = 45^ must never be exceeded. This device must never be
operated or stockpiled in surroundings where splash water, rain, moisture or fog may harm the device. Moisture or very high humidity can reduce the insulation and lead to mortal electrical shocks. When using smoke machines, make sure that the device is never exposed to the direct smoke jet and is installed in a distance of 0.5 meters between smoke machine and device. The ambient temperature must always be between -10°C and +45°C. Keep away from direct insulation (particularly in cars) and heaters. The relative humidity must not exceed 50% with an ambient temperature of 45°C. This device must only be operated in an altitude between -20 and 2000 m over NN.
Transport
Please use the original packaging if the device is to be transported.
Cleaning
Never use solvents or aggressive detergents in order to clean the device! ▼ather use a soft and damp cloth.
Serial Barcode
Never remove the serial barcode from the device as this would make the guarantee void.
Modifications and Guarantee
Please note that damages caused by manual modifications on the device or unauthorized operation by unqualified persons are not subject to warranty. If this device will be operated in any way different to the one described in this manual, the product may suffer damages and the guarantee becomes void. Furthermore, any other operation may lead to dangers like short-circuit, burns, electric shock, crash etc.
WEEE Directive

If the units are to be put out of operation definitively, take them to a local recycling plant for a disposal which is not harmful to the
environment. Do not dispose of as municipal waste. Contact your retailer or local authorities for more information.
4
OPERATING ELEMENTS & CONNECTIONS

| 1 | Display |
| 2 | Button MENU for selecting menu items |
| 3 | Buttons ▲ and ▼ for changing adjustments |
| 4 | Button CFM for programming a playlist |
| 5 | Memory card slot |
| 6 | 3-pin data connectors for the LED curtains |
| 7 | Signal and power indicator |
| 8 | Data output to connect another controller |
| 9 | Data input to connect a computer |
| 10 | DMX output |
| 11 | DMX input |
| 12 | Fuse |
| 13 | Power on/off |
| 14 | Power input |
| 15 | SD card with LPlayer software |
| 16 | SD card with 4 sample light programs |
| 17 | 2-pin power cable |
| 18 | 3-pin data cable |
| 19 | 2-pin power input |
| 20 | Fuse |
| 21 | Power on/off |
| 22 | Power input |

5
INSTALLATION AND CONNECTIONS

natural_image
Black rectangular panel with green and red dots arranged in a grid pattern, supported by a black ladder (no text or symbols)1) Attach the LED curtain via its Velcro loops, e.g. to a truss element. A suitable stand system "Show Stand I" by EU▼OLITE is available as accessory. Smoothen the curtain fabric and take care not to bend the inner cables. Do not step on the curtain to avoid damaging the installed LEDs and electronics.
2) Plug the LED curtain's 3-pin connection cable SIGNAL IN into one of the jacks PORT 1 to 4 on the controller. Lock the connector with the retaining ring. This way, up to four LED curtains may be connected to the controller. If necessary, use the extension cable included in the delivery.
3) Plug the LED curtain's 2-pin power cable DC IN into the jack POWER IN on the power supply unit. Again, lock the connector with the retaining ring. First, connect the power unit supply unit to the mains and then the controller. Both units are designed for 100-240V\~, 50/60 Hz. You can now play one of the programs on the included SD card, create your own programs with the software LPlayer or operate the controller with a DMX lighting console.
Important Notes
1) The LED curtain must be installed in a professional and safe manner. Never block any escape routes with the LED curtain!
2) Do not to bend the inner cables of the LED curtains when disassembling and packing.
3) Do not step on the curtain to avoid damaging the installed LEDs and electronics.
4) Carefully fold the LED curtain and place it in the designated transport bag.
5) During transportation and storage, do not place heavy objects on the transport bag.
6) For installation in public or industrial areas, a series of safety instructions have to be followed. The operator must inform himself on the current safety instructions and consider them. The manufacturer cannot be made liable for damages caused by incorrect installations or insufficient safety precautions!
6
OPERATION
After switching on, the controller requires a short initialization process and is then ready for operation. The display indicates the last operating mode. The controller can be operated in stand-alone mode with SD card ("SD Mode") or in DMX mode ("DMX Mode"). To select the operating mode call menu item "Mode" with the MENU button and select the desired setting with the buttons ▼ and ▲. The controller automatically changes to PC mode ("PLAY-Network") when light programs are played with the software LPlayer.
PLAY No SD Card!
Stand-alone Operation with SD Card
In stand-alone mode the controller uses the SD inserted to play light programs without a computer. The program running speed and the brightness of the LEDs can be adjusted. As the included SD card comes with 4 sample programs the LED curtain can be operated right out of the box. With the software LPlayer it is possible to create your own light programs and save them to the SD card.
1) If necessary, switch to SD card mode. For this, call menu item "Mode" with the MENU button and select the setting "SD Mode" with the buttons ▼ and ▲.
2) To activate playback mode call menu item "PLAY" with the MENU button. Then insert the SD card (labeled with "Program") with the contacts pointing downwards and the notched corner to the right so far into the card slot until it engages. Playback of the first light program will be started. Use the buttons ▼ and ▲ to select another program.
3) To adjust the LED brightness call menu item "Brightness" with the MENU button. Use the buttons ▼ and ▲ to select a value between 0 (dark) und 255 (bright).
4) To adjust the program running speed call menu item "Speed" with the MENU button. Use the buttons ▼ and ▲ to select a value between 1 (slow) and 30 (fast).
5) To adjust the program a playlist call menu item "Program" with the MENU button and confirm with the CFM button. The display shows the program number in the upper line and the file name in the lower line. Select between "YES" and "NO" with the CFM button. Use the buttons ▼ and ▲ to skip to the next program.
6) To indicate the controller's software version call menu item "VERSION" with the MENU button.
Mode SD Mode
PLAY File namexxx.DAT
Brightness 255
Speed 15
Program 1 File namexxx.DAT YES
VERSION KS1000-V213
DMX512 Operation
1) yThe ycontroller yfeatures y3-pin yXLR yjacks yfor yDMX yconnection. yConnect the output of your DMX controller to the DMX input DMX IN of the controller with a DMX cable. Connect the DMX output DMX OUT of the controller to the DMX input of the next unit in the chain. Always connect one output to the input of the next unit until all units are connected
Notes:
At the last unit, the DMX cable has to be terminated. Plug the terminator with ya y120 yΩ yresistor ybetween ysignal y(-) yand ysignal y(+) yin ythe yDMX output of the last unit.
If ythe ycable ylength yexceeds y300 ym yor ythe ynumber yof yDMX ydevices yis greater ythan y32, yit yis yrecommended yto yinsert ya yDMX ylevel yamplifier yto ensure proper data transmission.
2) yTo ybe yable yto yoperate ythe ycontroller ywith ya yDMX ycontroller, yit ymust ybe adjusted to the address provided for it on the controller. For this, call menu item "DMX ADDR" with the MENU button and set the desired address with the buttons ▼ and ▲ between "001" and "512".
3) Then switch to DMX mode. Call menu item "Mode" with the MENU button and select the setting "DMX512" with the buttons ▼ and ▲. You can now operate the controller with your DMX controller.
DMX input

1: Ground
2: Signal (−)
3: Signal (+)
DMX output

Mode DMX512
DMX Channels
| Channel | Function | Remark |
| 1 yAll LEDs on/off y0-128 off, 129-255 on | #1 | |
| 2 yStrobe effect yslow → fast | ||
| 3 yBrightness red y0-100 % | ||
| 4 yBrightness green y0-100 % | ||
| 5 | Brightness blue | 0-100 % |
| 6 | Program running speed | slow → fast |
| 7 | Program 01-15 | remark ^#2 |
| 8 | Program 16-30 | remark ^#2 |
| 9 | Program 31-45 | remark ^#2 |
| 10 | Program 46-60 | remark ^#2 |
| 11 | Program 61-75 | remark ^#2 |
| 12 | Program 76-90 | remark ^#2 |
Remarks:
1 Channel 1 must be off (0-128) in DMX mode.
2 Channels 6-12 allow selecting up to 90 light programs on the SD card. Each program has 15 DMX values. Program no. 1, e.g. is between the values 16-30.
| Program | Wert |
| 1 | 16-30 |
| 2 | 31-45 |
| 3 | 46-60 |
| 4 | 61-75 |
| 5 | 76-90 |
| 6 | 91-105 |
| ... | ... |
PC Operation with the Software LPlayer
The controller can be used in connection with a computer in order to create customized light programs with the software LPlayer. You can run LPlayer live on your computer to directly control. For this, connect the ▼J45 jack OUTPUT to an individual computer or a network e.g. via router. A network cable is included in the delivery. Due to the integrated DHCP function no further network settings are required. When the data connection is established and light programs are played with the software, the controller automatically changes to PC mode and the display indicates "PLAY-Network".
It is also possible to save the programs to an SD card for stand-alone operation without a computer. LPlayer supports the following operating systems: Windows XP, Vista, 7, 8 and 10 (32 and 64 bit).
Installation
Step 1) Navigate to the file "LPlayer.exe" on the included SD card (labeled with "Software") and double-click the file to start the installation. Then follow the instructions of the installation program.
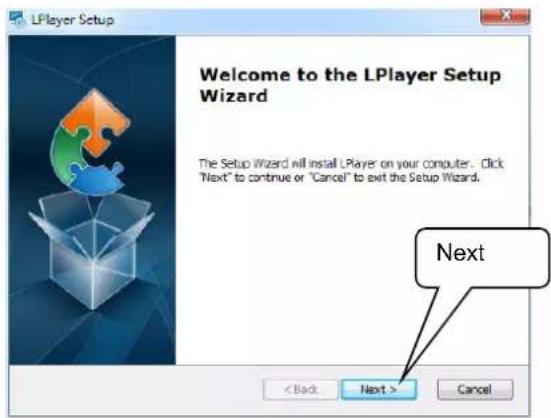
Step 2) Click "Next".
Step 3) Select the installation path.

Step 4) Start the installation.

Step 5) Finish the installation.

Configuration
The software must be configured for use with the controller. All settings can be stored and loaded at any later stage.
Step 1) Start the program.

Step 2) The user interface is shown. Change to the "Setting" tab.
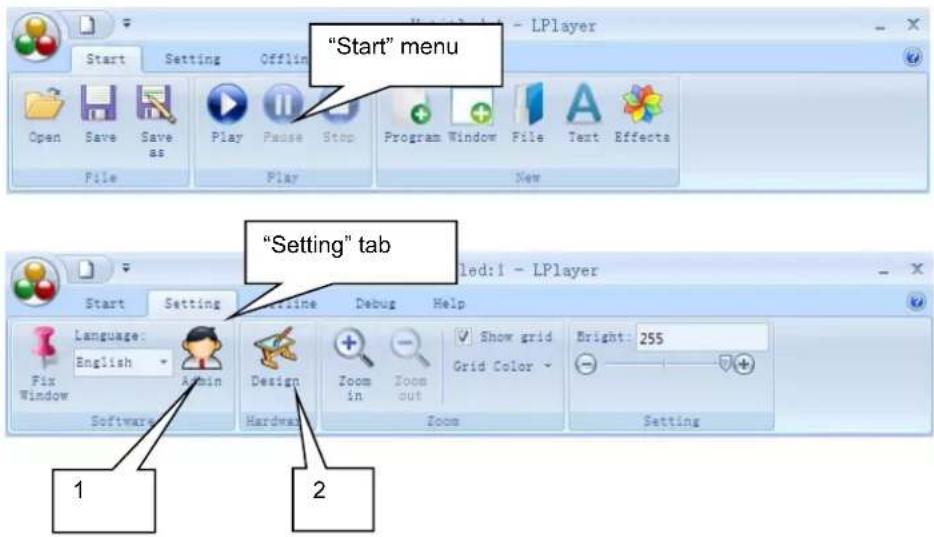
(1) If necessary, define a password for your project with "Admin".
(2) Click "Design" to start the configuration.
Step 3) The project editor is shown.
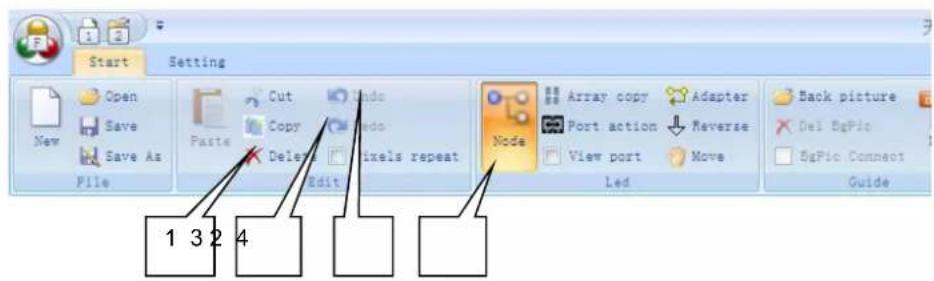
(1) Delete
(2) ▼edo
(3) Undo
(4) Edit mode
Step 4)
Click

and enter the LED curtain's number of pixels in the dialog.
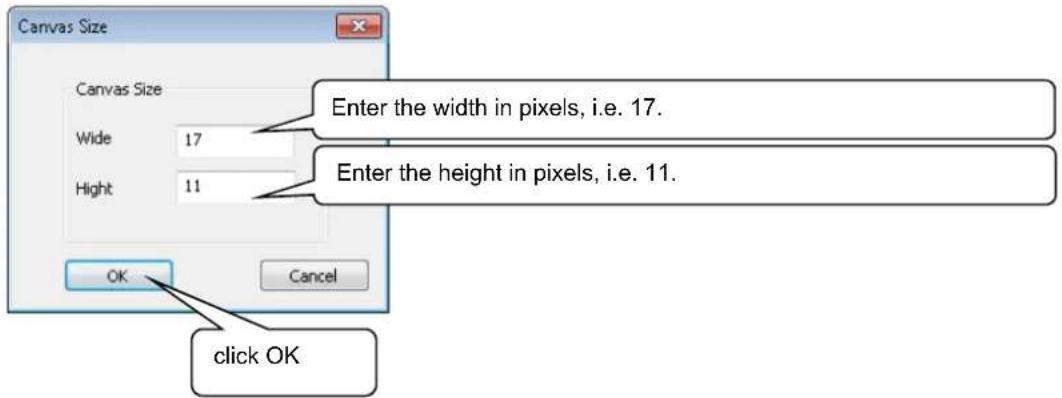
Example calculation:
| Number of LED curtains | Size in meters (WxH) | Number of LEDs | Pixels (WxH) |
| 1 3 x 2 187 | 17 x 11 | ||
| 2 6 x 4 374 | 34 x 22 | ||
| 3 9 x 6 561 | 51 x 33 |
For a single LED curtain the editor looks as follows:

Step 5) Make the following basic adjustments:

Step 6) Drag a window around the pixels with the mouse.
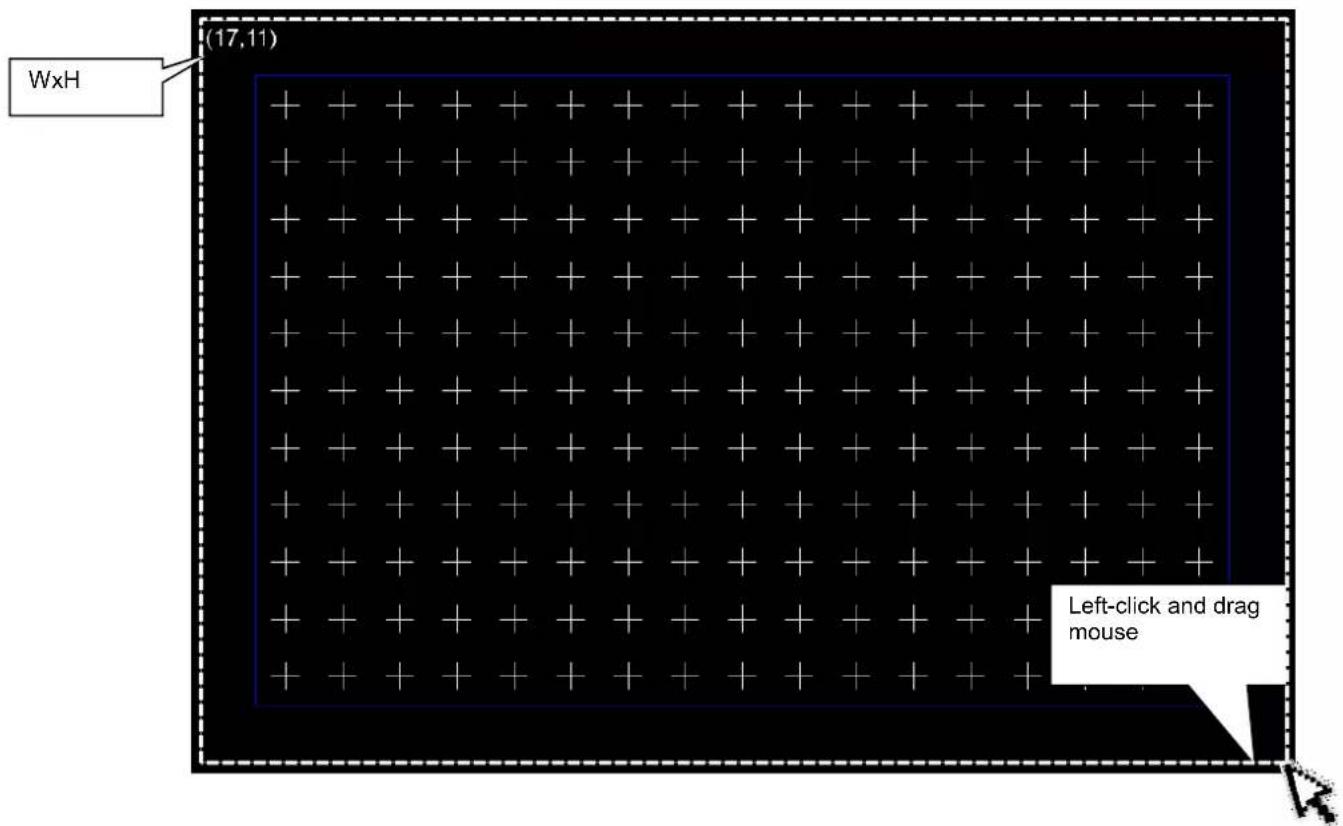
The pixels marked will be displayed in red.

Step 7) ▼epeat the procedure for futher LED curtains. Always select the jack used first and then mark the corresponding piexels. For two LED curtains the editor could look as follows:

Step 8) Store the project settings on your computer and close the window. The program will create two files with the extensions "*CFG" and "*BIN".

Creating Light Programs
You can project e.g. videos and graphics in all popular formats on the LED curtain. Furthermore, it is possible to capture live video directly from your PC and create shows using the software's editors. The light programs created can be used in live mode or you can export them to an SD card for stand-alone operation.

(1) yLoad projects saved on your PC
(2) ySave project
(3) ySave project as...
(4) yPlay, pause, stop
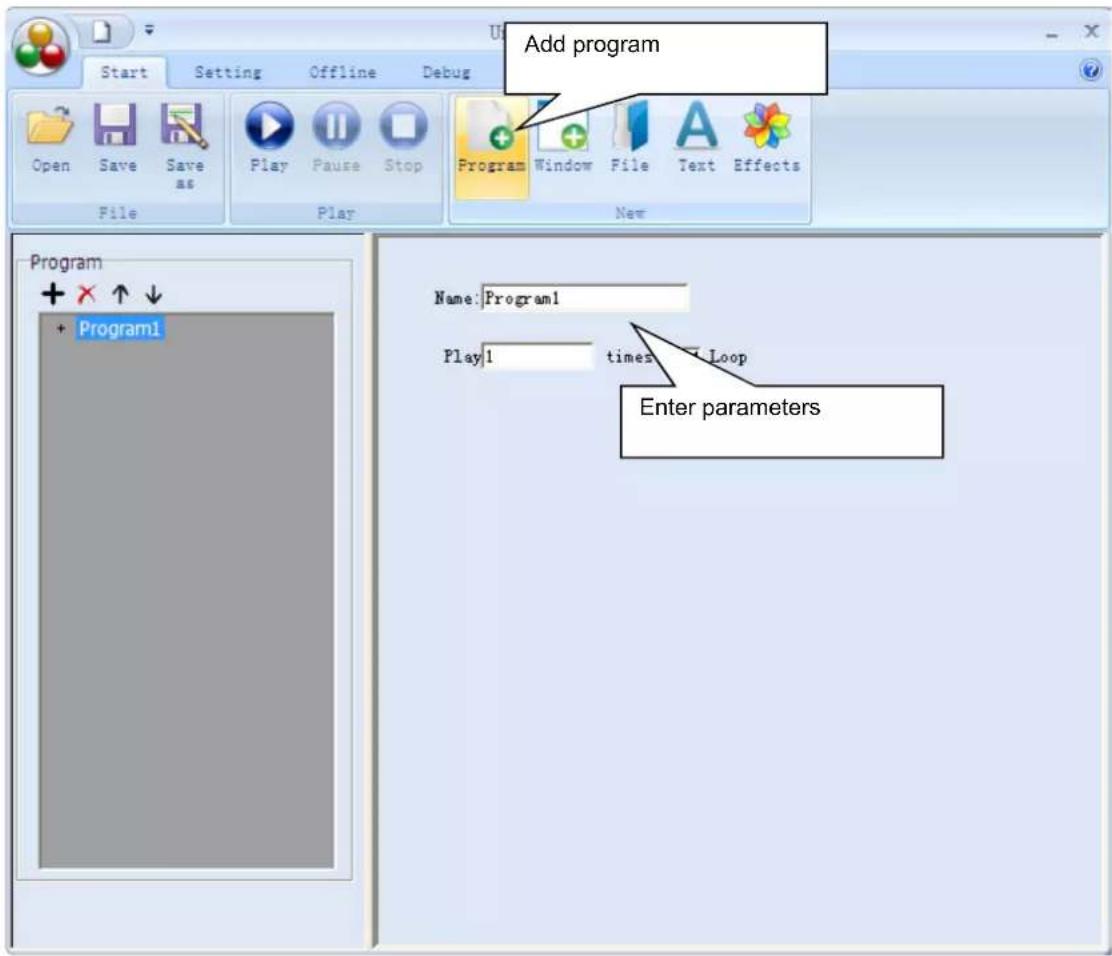
(5) yAdd program
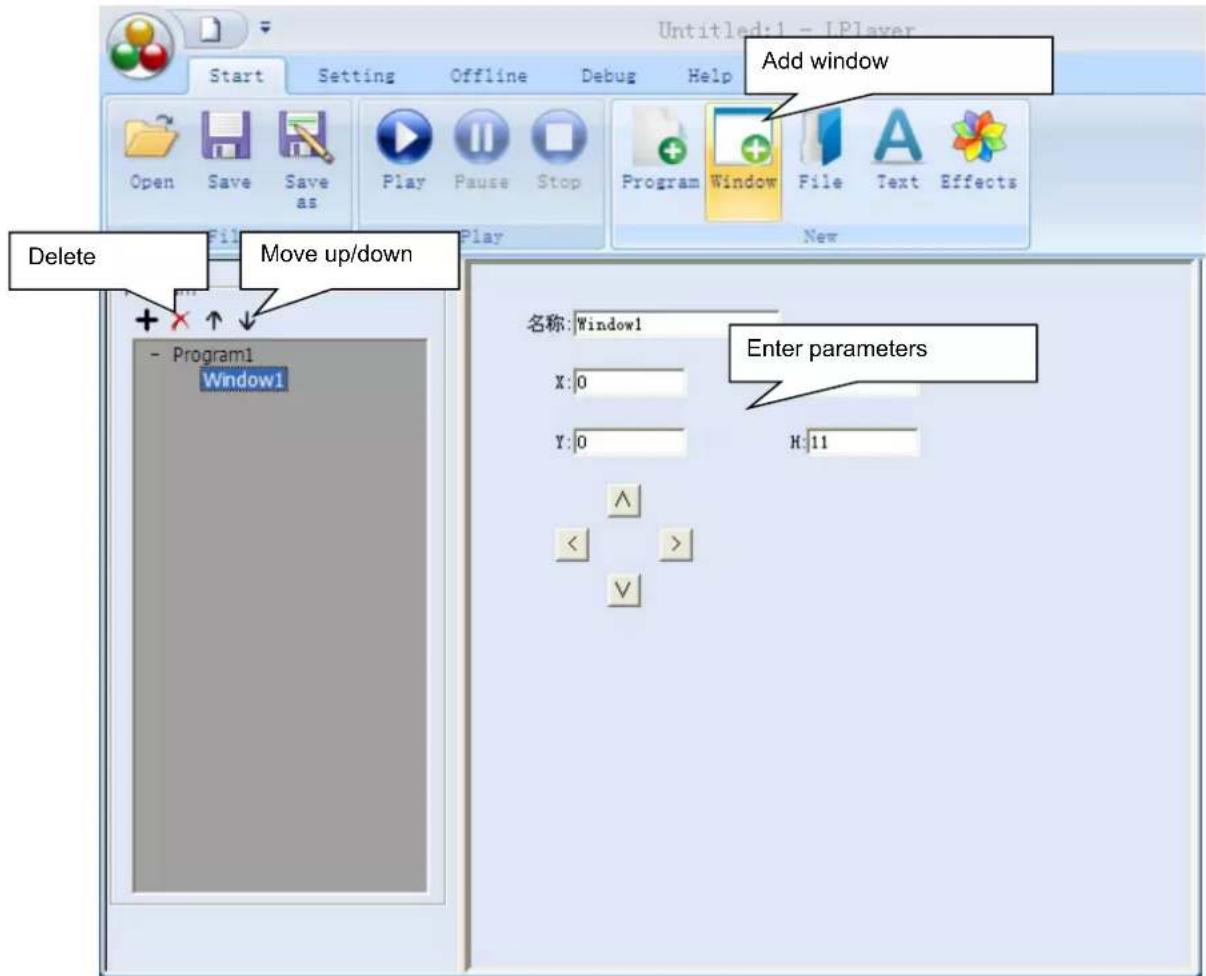
(6) yAdd window
(7) yAdd file
(8) yAdd text
(9) yAdd effects
(10) Editors (video capture, word, excel...)
Step 1) Select „Add program“ and enter your desired parameters.
Step 2) Select "Add window" and enter your desired parameters.
Step 3) Select "Add file".

Step 4) Select "Add text".


Step 5) Select "Add effects".
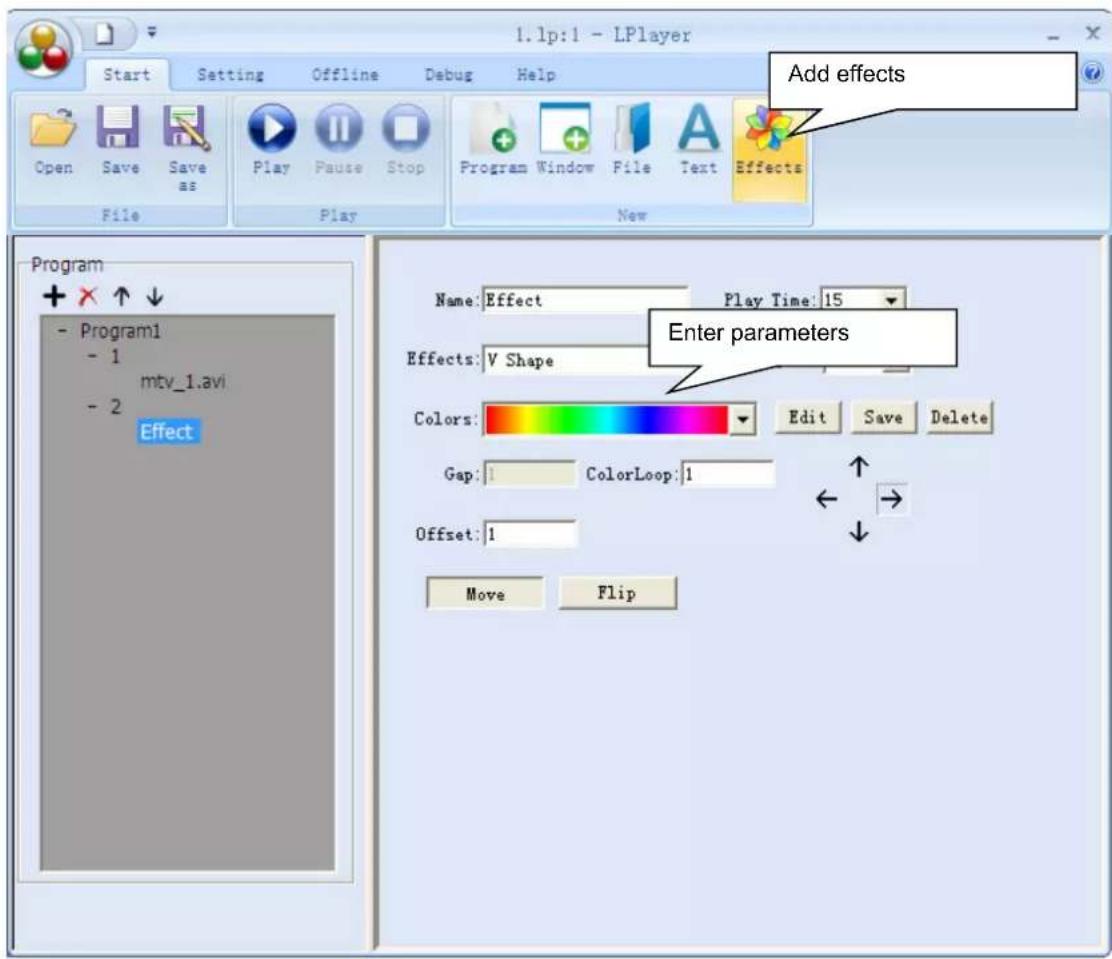
Step 6)
Click

The programs will be displayed on your computer monitor and synchronously on the LED curtain.

As soon as light programs are played with the software, the controller automatically changes to PC mode and the display indicates "PLAY-Network".
PLAY PLAY-Network
Step 7)
Click „Save project as...“ and save your project with the extension “*LP” on the computer.

Exporting Light Programs to SD Cards
Step 1) Change to the "Capture" tab and select "Capture". The current project will be processed for export to an SD card.

Step 2) Click "Output" and save the project on your computer.

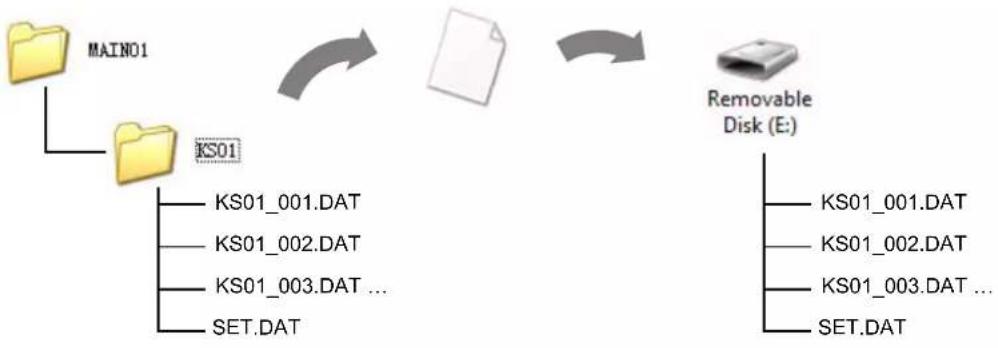
LPlayer will store the data in the folder "MAIN01". The programs can be found in the folder "KS01". A file with the extension "*DAT" will be created for each program. Additionally, a "*SET" file is created that includes general project information.
You should not make any changes to these default folders. Otherwise the controller cannot the reload the data later.
Step 3) Copy the content of the folder "KS01" to the SD card's root directory. You can now play the light programs with the controller.
flowchart
graph TD
    A["MAIN01"] --> B["KS01"]
    B --> C["KS01_001.DAT"]
    B --> D["KS01_002.DAT"]
    B --> E["KS01_003.DAT ..."]
    B --> F["SET.DAT"]
    G["Removable Disk (E)"] --> H["KS01_001.DAT"]
    G --> I["KS01_002.DAT"]
    G --> J["KS01_003.DAT ..."]
    G --> K["SET.DAT"]
7
CLEANING AND MAINTENANCE
We recommend a frequent cleaning of the device. Please use a soft lint-free and moistened cloth. Never use alcohol or solvents! There are no serviceable parts inside the device except for the fuse. Disconnect from mains before starting maintenance operation! Maintenance and service operations are only to be carried out by authorized dealers. Should you need any spare parts, please use genuine parts. If the power supply cable of this curtain becomes damaged, it has to be replaced by authorized dealers only in order to avoid hazards. Should you have further questions, please contact your dealer.
Replacing the Fuse
If the fine-wire fuse of the device fuses, only replace the fuse by a fuse of same type and rating.
Before replacing the fuse, unplug mains lead.
Procedure:
Step 1: Open the fuseholder on the rear panel with a fitting screwdriver.
Step 2: ▼emove the old fuse from the fuseholder.
Step 3: Install the new fuse in the fuseholder.
Step 4: ▼eplace the fuseholder in the housing.
8
TECHNICAL SPECIFICATIONS
CRT-200PRO MK2 LED Curtain
| Power supply: 100-240 V AC, 50/60 Hz | |
| via included PSU | |
| Power consumption: 30 W | |
| ▼esolution (WxH): 17 x 11 pixels | |
| Pixel pitch: 180 mm | |
| LED type: TCL, 5 mm | |
| Dimensions (WxH): | 3 x 2 m |
| Weight: | 3.2 kg |
| Accessory: | Show Stand I Alu, item no.: 59007010 |
CRT-200PRO MK2 Controller
| Power supply: 100-240 V AC, 50/60 Hz | |
| Power consumption: 3 W | |
| Signal connection: | 2 x ▼J-45 |
| Curtain outputs: | 4 |
| Serial connection: | yes |
| DMX channels: | 12 |
| DMX512 connections: | 3-pin XL▼ |
| Dimensions (LxWxH): | 280 x 158 x 46 mm |
| Weight: | 1.3 kg |
Specifications are subject to change without notice due to product improvements
eurolite®
© EUROLITE 2015
Subject to change without prior notice.
00094761.DOCX
Version 1.0
CE
- CRT-200PRO MK2 LED EFFECT CURTAIN
- Inhaltsverzeichnis
- 1
- EINFÜHRUNG
- 5
- Konfiguration
- 7
- Delivery Includes
- CRT-200PRO MK2 LED Curtain
- CRT-200PRO MK2 Controller
- 2
- SAFETY INSTRUCTIONS
- CAUTION!
- Damages caused by the disregard of this user manual are not subject to warranty. The dealer will not accept liability for any resulting defects or problems.
- Unpacking
- Protection Class
- Power Cord
- Temperature Fluctuation
- Liquids
- Foreign Objects
- Children and Amateurs
- Maintenance and Service
- 3
- OPERATING DETERMINATIONS
- Power Supply
- Electro-magnetic Emission
- Installation
- Ambient Conditions
- Transport
- Cleaning
- Serial Barcode
- Modifications and Guarantee
- WEEE Directive
- 4
- OPERATING ELEMENTS & CONNECTIONS
- INSTALLATION AND CONNECTIONS
- Important Notes
- 6
- OPERATION
- Stand-alone Operation with SD Card
- DMX512 Operation
- Remarks:
- Channel 1 must be off (0-128) in DMX mode.
- Channels 6-12 allow selecting up to 90 light programs on the SD card. Each program has 15 DMX values. Program no. 1, e.g. is between the values 16-30.
- PC Operation with the Software LPlayer
- Configuration
- Step 4)
- Click
- Creating Light Programs
- Step 6)
- PLAY PLAY-Network
- Step 7)
- Exporting Light Programs to SD Cards
- CLEANING AND MAINTENANCE
- Replacing the Fuse
- Procedure:
- 8
- TECHNICAL SPECIFICATIONS
- eurolite®
Brand : Eurolite
Model : CRT-200PRO MK2
Category : Stage lighting