
LR4 - Remote control Clas Ohlson - Free user manual and instructions
Find the device manual for free LR4 Clas Ohlson in PDF.


| Product Type | Multimedia Remote Control with Laser Pointer |
| Dimensions | 13 x 3.5 x 2.2 cm (L x W x H) |
| Weight | 78 g (including battery) |
| Power Supply | 1 x AAA/LR03 battery |
| Battery Life | 6 hours |
| Range | Up to 10 metres |
| RF Frequency | 2.4 GHz |
| Interface | USB 2.0 |
| Supported Operating Systems | Windows XP (SP2) or Vista 32-bit |
| Laser Wavelength | 630-680 nm |
| Laser Output Power | Class IIIa, <5 mW; Class II, <1 mW |
| Display | LCD with backlight (activates for 3 seconds) |
| Laser Pointer | 5 selectable icons (dot, circle, arrow, hand, etc.) |
| Timer | Countdown timer with vibration alarm |
| Auto Shut-off | After 30 minutes in Standby mode |
| Modes | Keyboard, Mouse, Media Player, Timer |
| Package Contents | Remote control, USB receiver, instruction manual, AAA battery |
| Care Instructions | Clean with a dry, soft cloth; avoid extreme temperatures |
| Safety Warning | Laser beams can cause eye damage. Do not point into eyes. |
Frequently Asked Questions - LR4 Clas Ohlson
User questions about LR4 Clas Ohlson
0 question about this device. Answer the ones you know or ask your own.
Ask a new question about this device
Download the instructions for your Remote control in PDF format for free! Find your manual LR4 - Clas Ohlson and take your electronic device back in hand. On this page are published all the documents necessary for the use of your device. LR4 by Clas Ohlson.
USER MANUAL LR4 Clas Ohlson
Multimedia Remote Control Laser Pointer
Please read the entire instruction manual before using the product and save it for future reference. We reserve the right for any errors in text or images and any necessary changes made to technical data. If you have any questions regarding technical problems please contact Customer Services.
1. Safety

Caution: Laser beams can cause eye damage. Do not point the laser beam directly into your or anyone else's eyes.
Caution: Use this product only according to the purpose described in this instruction manual. Do not modify the product in any way, since this may increase the risk of someone being exposed to harmful laser beams.
2. Product description
Wireless USB transmitter.
- LR4 is a multimedia remote control with an integrated laser pointer designed to be used in conjunction with a computer.
- Wirelessly controls your most common keyboard/mouse functions and your computer's media player.
• LCD display with backlight. - Ergonomic and easy to use. Settings memory even during battery changes.
• Range up to 10 metres.
• Timer with vibration alarm. - Battery saving feature, automatic shut-off after 30 minutes in “Standby” mode.
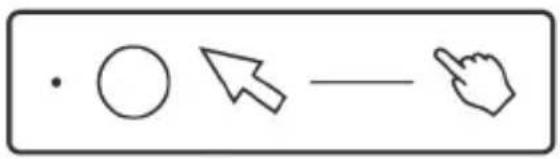
- Laser pointer with 5 different icons.
- Receiver with USB connector.
• Battery: 1 x AAA/LR03. - Requires Windows XP/Vista 32.
3. Package contents
- LR4 remote control
- USB receiver
• Instruction manual - Battery: AAA/LR03
4. Buttons and functions
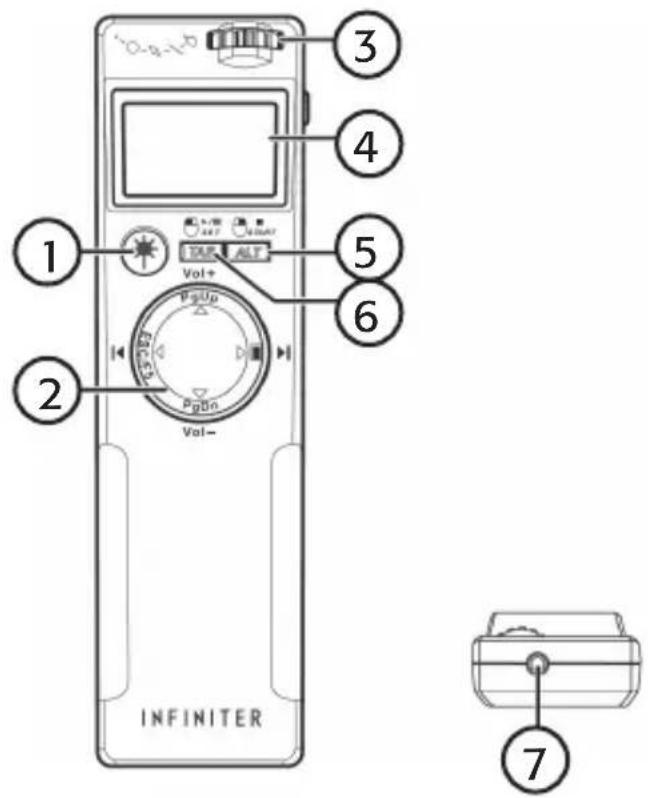
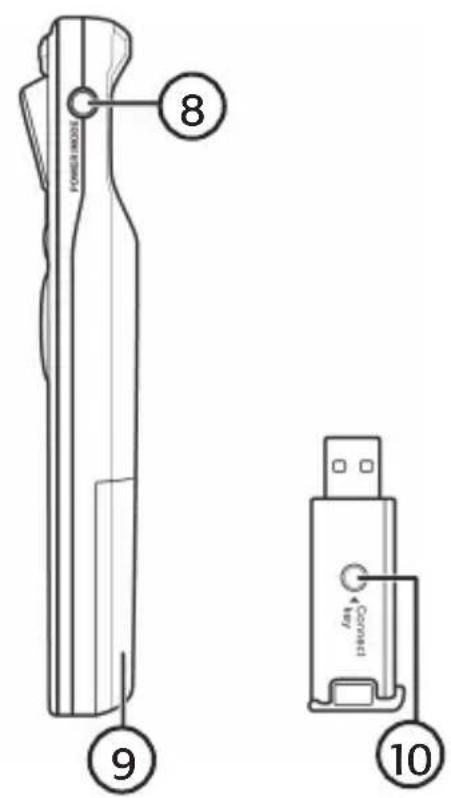
- Laser pointer ON/OFF
- Multi-function control
- Laser pointer icon selector
- LCD display
- START/ALT/RMB
- SET/TAB/LMB
- Laser pointer
- Power switch / Mode switch
- Battery cover
- "Connection" button/ Status-LED
5. Operation
5.1 Inserting the battery
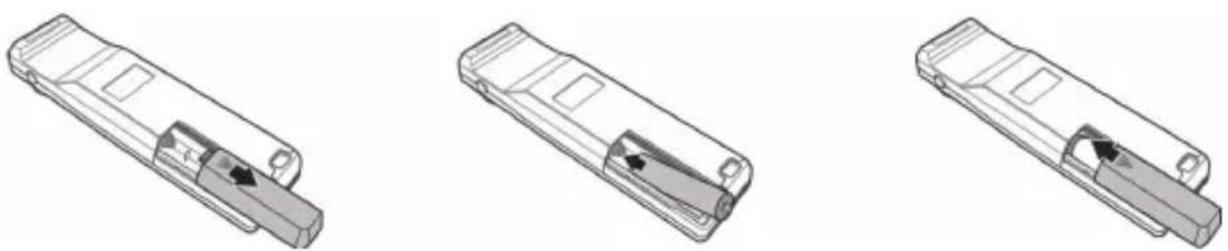
- Press and slide the battery cover downwards in the direction of the arrow.
- Insert the battery according to the markings.
- Replace the battery cover.
N.B. Remove the battery from the product if it is not to be used for an extended period.
5.2 Turning on the remote control
Depress [POWER/MODE] for 2 seconds in order to turn the remote ON/OFF. The display will be lit for approx.3 seconds. After 30 minutes in "Standby" mode the remote will automatically shut off to save the battery.
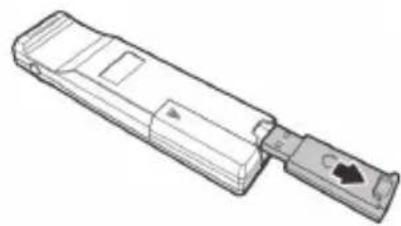
5.3 USB receiver
- Slide out the USB receiver in the direction of the arrow.
- Connect the USB receiver to an available USB port on your computer.
- If you are using Windows XP (with Service Pack 2) or Vista 32 then the USB receiver will be detected and the drive routines will be installed automatically. The USB receiver will then be ready for use.
N.B. If the USB receiver does not detect the signals from the transmitter you must conduct a frequency scan, see
- Troubleshooting.
natural_image
Technical line drawing of a mechanical component with a handle and internal structure (no text or symbols)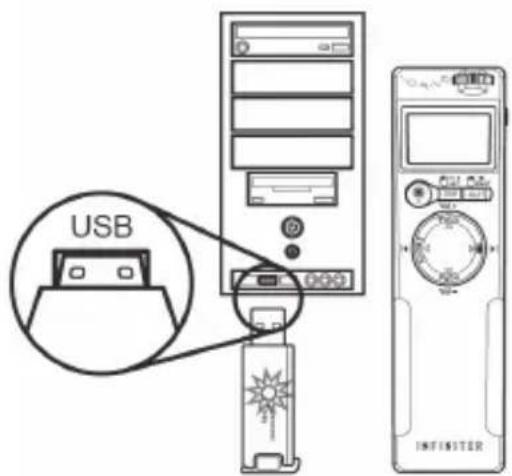
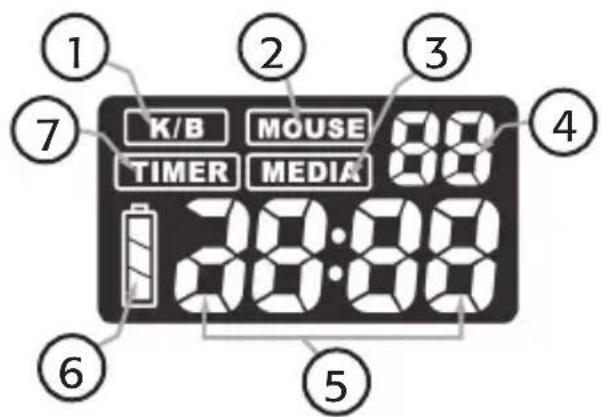
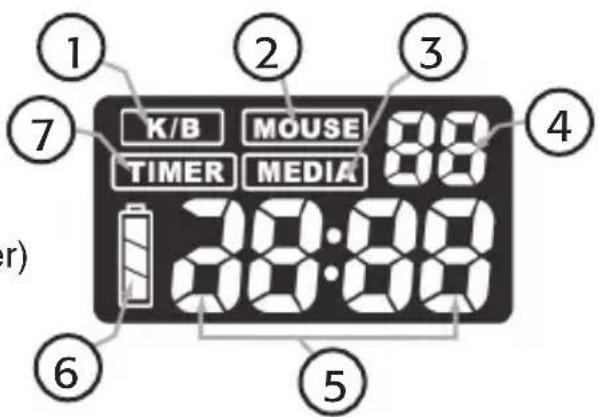
5.4 Display
- Keyboard control
- Mouse control
- Media-Player control
- Countdown timer (seconds)
- Countdown timer (hours, minutes)
- Battery status indicator
- Timer control
5.5 Areas of use
The remote control has four different areas of use. Press [POWER/MODE] on the remote the required number of times to switch between: Keyboard (K/B) – Mouse – Media – Timer – Keyboard, etc.
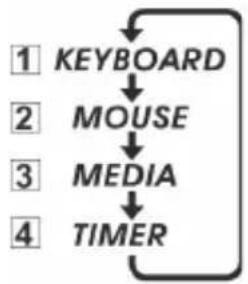
flowchart
graph TD
    A["1"] --> B["KEYBOARD"]
    B --> C["2"] --> D["MOUSE"]
    D --> E["3"] --> F["MEDIA"]
    F --> G["4"] --> H["TIMER"]
K/B (Keyboard)
- Press [POWER/MODE] the required number of times in order to highlight K/B.
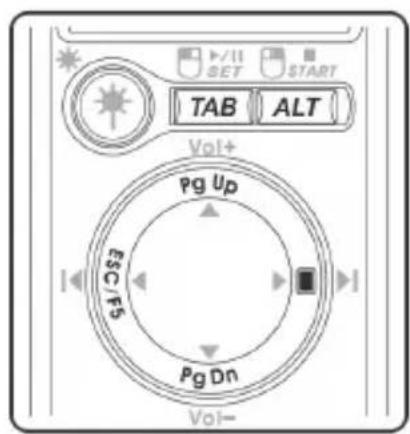
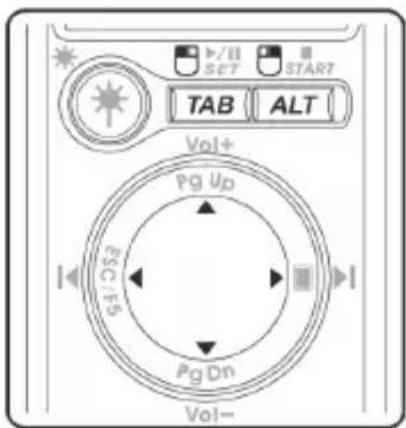
- Then press [ALT] and [TAB] to browse between various files and programs.
- ALT, TAB, PgUp, PgDn and ESC/F5 replace the exact same functions on your keyboard.
- Pressing the upper portion of the multi-function control will display a blank screen.
Mouse
- Press [POWER/MODE] the required number of times in order to highlight MOUSE.
- Press [TAB] to set the control for your left mouse button.
- Press [ALT] to set the control for your right mouse button.
- ◀ ▶ ▲ ▼ on the multi-function control replaces your regular mouse movement.
Media
- Press [POWER/MODE] the required number of times in order to highlight MEDIA.
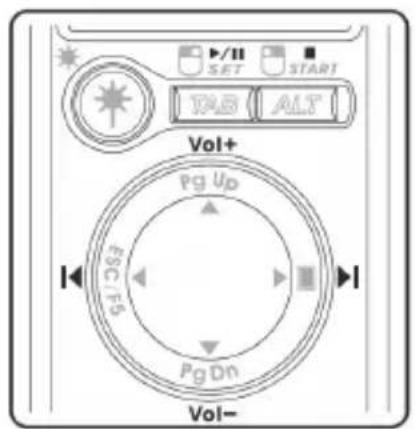
- Press TAB, ALT and ◀ ▶ ▲ ▼ in order to replace the Play – Paus – Stop – Go to previous/next track – Adjust volume commands.
Timer
- Press [POWER/MODE] the required number of times in order to highlight TIMER.
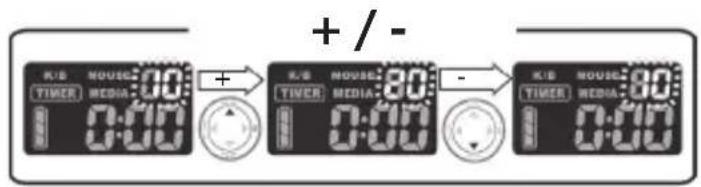
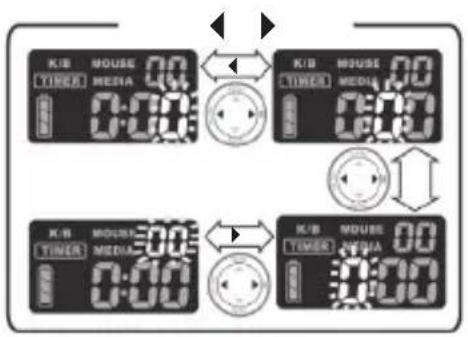
- Press [TAB] in order to open the TIMER settings. Set the countdown timer using this format: Hours: Min: Sec:
- Start the countdown by pressing [ALT]. Press [TAB] to stop TIMER and change the set countdown time.
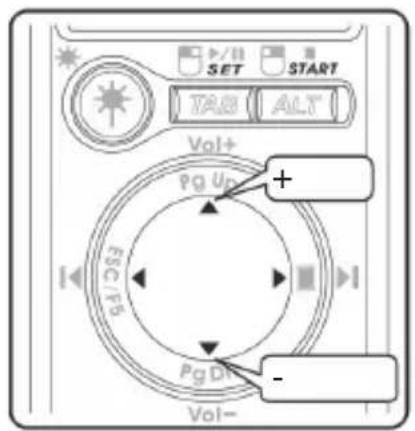
- Use ◀ ▶ to come to the time value (H,M,S) you wish to change and then use ▲ ▼ to change that value.
- Press [ALT] to start the newly set countdown time.
Setting the TIMER count-down time (example):
+/- Increase/decrease value
+ Increase
- Decrease
◀ ▶ Move right/left
Quick setting the TIMER:
Press [TAB] the required number of times for your needs. Each press adds 5 minutes.
5.6 Laser pointer
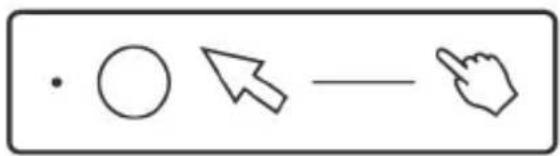
Press and hold [*to activate the laser pointer and turn the control dial above the display to select the desired laser icon.
5.7 Backlight
To activate the backlight for 3 seconds, press [POWER/MODE] or press PgDn on the multi-function control.
6. Care and maintenance
Do not expose the remote to extreme temperatures.
Clean the remote using a dry, soft cloth. Avoid using strong cleaning agents since this can damage the exterior.
7. Troubleshooting
N.B. If the USB receiver does not detect the signals from the transmitter you must conduct a frequency scan:
- Connect the USB receiver to an available USB port on your computer.
- Press [Connect Key] on the USB receiver. The Status LED will begin flashing. If the frequency scan does not succeed within a minute the Status LED will stop flashing.
- Remove the batteries.
- Depress [POWER/MODE] while inserting the battery simultaneously. When the battery is in place the display will come on for about a second.
- Release [POWER/MODE] once the LCD display and Status LED have turned off.
- Once the frequency scan is complete, the remote is ready to use.
8. Consider the environment
Follow local ordinances when disposing of this product. If you are unsure of how to dispose of this product, please contact your municipality.
9. Specifications
Size: 13 x 3.5 x 2.2 cm (L x W x H)
Weight: 78 g (including battery)
Range: Up to 10 metres
RF frequency: 2.4 GHz
Interface: USB 2.0
Supported operating systems: Windows XP or Vista 32
Laser wavelength: 630-680 nm
Output power: CL IIIa, <5 mW, CL II <1 mW.
Power supply: 1 x AAA/LR03 battery
Battery life: 6 hours
Multimedia-fjärrkontroll/laser
Art.nr 38-3314 Modell LR4
natural_image
Technical line drawing of a mechanical component with no visible text or symbols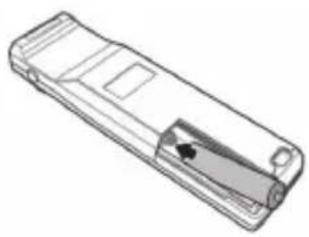
natural_image
Line drawing of a rectangular electronic device with a slot and internal component (no text or symbols)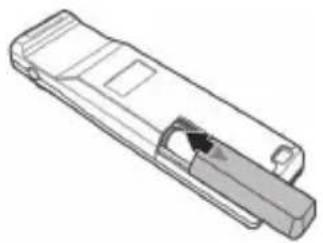
natural_image
Technical line drawing of a mechanical component with a highlighted section (no text or symbols)natural_image
Technical line drawing of a mechanical component with a handle and arrow indicator (no text or symbols)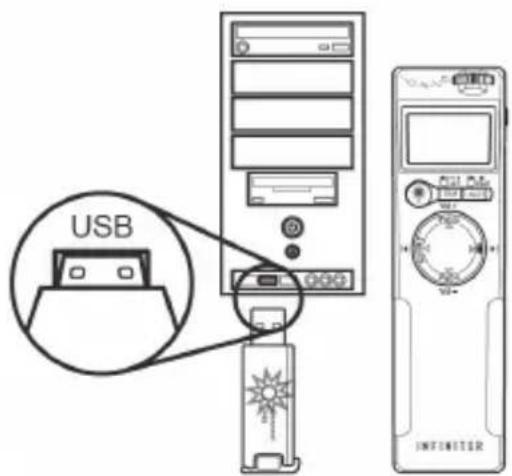
5.4 Displayens visning
- Tangentbordsfunktion
- Musfunktion
- Media-Playerfunktion
- Nedräknande timer (sekunder)
- Nedräknande timer (timmar:minuter)
- Batteriindikator
- Timer-funktion
natural_image
Technical line drawing of a mechanical component with a handle and internal structure (no text or symbols)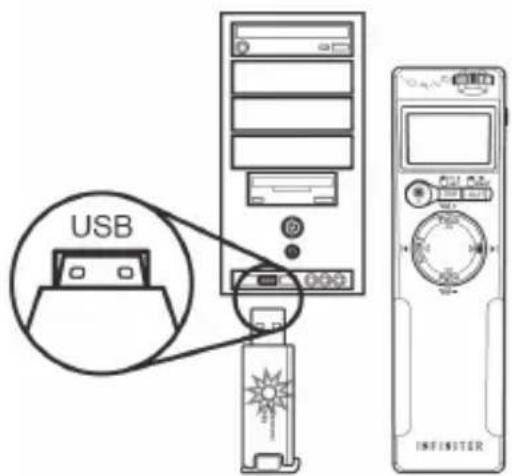
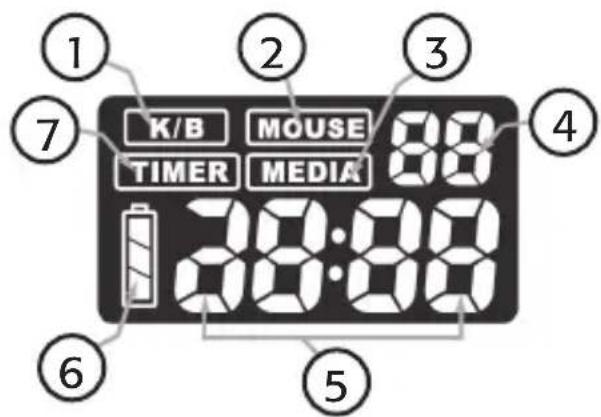
5.4 Displayet
- Tastaturfunksjonen
- Mus-funksjon
- Media-Player-funksjon
- Nedtellingstimer (sekunder)
- Nedtellingstimer (timer - minutter)
- Batteriindikator
- Timer-funksjon
5.5 Bruksområde
natural_image
Technical line drawing of a mechanical component with a handle and internal slots (no text or symbols)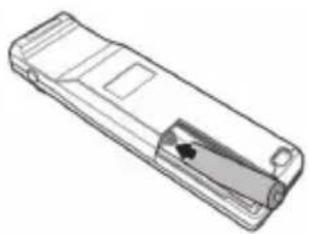
natural_image
Line drawing of a rectangular electronic device with a slot and handle (no text or symbols)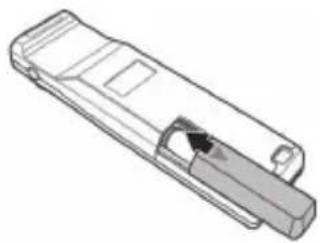
natural_image
Technical line drawing of a mechanical component with a highlighted section (no text or symbols)natural_image
Technical line drawing of a mechanical component with a handle and internal structure (no text or symbols)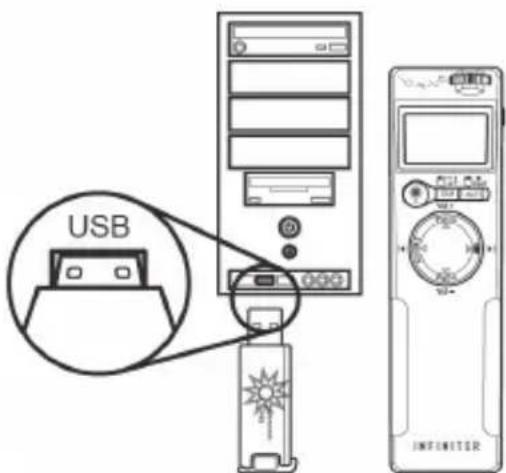
5.4 Näyttö
Timer
5.6 Laserosoitin
For consumer contact, please visit
www.clasohlson.co.uk and click on
customer service.
INTERNET www.clasohlson.co.uk
- Multimedia Remote Control Laser Pointer
- Safety
- Product description
- Package contents
- Buttons and functions
- Operation
- Inserting the battery
- Turning on the remote control
- USB receiver
- Display
- Areas of use
- K/B (Keyboard)
- Mouse
- Media
- Timer
- Setting the TIMER count-down time (example):
- Quick setting the TIMER:
- Laser pointer
- Backlight
- Care and maintenance
- Troubleshooting
- Consider the environment
- Specifications
- Multimedia-fjärrkontroll/laser
- Displayens visning
- Displayet
- Bruksområde
- Näyttö
- Laserosoitin
Brand : Clas Ohlson
Model : LR4
Category : Remote control