
IM-121215 - Ice Maker Emerio - Free user manual and instructions
Find the device manual for free IM-121215 Emerio in PDF.


| Product Type | Ice Maker |
| Brand | Emerio |
| Model | IM-121215 |
| Power Consumption | 120W |
| Voltage | 220-240V ~ 50-60Hz |
| Rated Current | 0.8A |
| Refrigerant | R600a / 23g |
| Ice Cube Production | 9 cubes per batch (approx. 7-15 minutes) |
| Ice Cube Size Options | Small (S) and Large (L) |
| Self-Cleaning Mode | Yes |
| Automatic Shut-off | When ice basket is full ("ICE FULL" indicator) |
| Water Level Indicator | Yes ("ADD WATER" indicator) |
| Control Panel | ON/OFF button, SELECT button, indicator lights |
| Transparent Window | Yes, on top lid |
| Ice Basket Capacity | Approx. 0.6 kg (estimated from ice full sensor) |
| Water Tank Capacity | Not specified (fill to MAX line) |
| Drain Plug | Yes, at bottom of water tank |
| Cooling System | Compressor, refrigerant R600a |
| Safety Features | Ventilation clearance, electrical grounding, no flammable substances |
| Warranty | 2 years |
| Country of Origin | Denmark (Fun Nordic ApS) |
Frequently Asked Questions - IM-121215 Emerio
User questions about IM-121215 Emerio
0 question about this device. Answer the ones you know or ask your own.
Ask a new question about this device
Download the instructions for your Ice Maker in PDF format for free! Find your manual IM-121215 - Emerio and take your electronic device back in hand. On this page are published all the documents necessary for the use of your device. IM-121215 by Emerio.
USER MANUAL IM-121215 Emerio
natural_image
Exterior view of a modern stainless steel watermelon maker with a black lid and white handle (no visible text or symbols)Ismaskine (DK)
Isbitmaskin (NO)
Iskubsmaskin (SE)
Instruction manual – English ...... - 39 -
SIKKERHEDSINSTRUKTIONER
Betjeningspanel
F∅ R ANVENDELSE
natural_image
Pure diagram of a U-shaped pipe or channel with directional arrows indicating flow or movement (no text or symbols)1
natural_image
Line drawing of a small kitchen appliance with a handle and circular vent (no text or symbols)2
natural_image
Line drawing of a portable appliance with handle and circular button (no text or symbols)3
F∅ R BRUK
-
Fjern all emballasjen.
-
Installer håndtaket:
natural_image
Pure diagram of a U-shaped pipe or channel with directional arrows indicating flow or movement (no text or symbols)1
natural_image
Line drawing of a microwave oven with a handle and circular vent (no text or symbols)2
natural_image
Line drawing of a portable appliance with handle and circular button (no text or symbols)3
Kontrollpanel
INNAN ANVÄNDNING
natural_image
Diagram of a U-shaped pipe or channel with directional arrows indicating flow or movement (no text or symbols)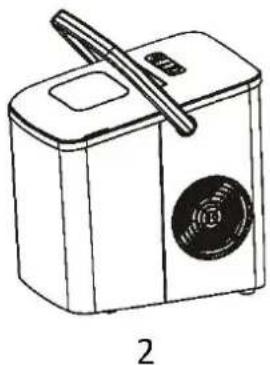
natural_image
Line drawing of a kitchen appliance with a handle and circular button (no text or symbols)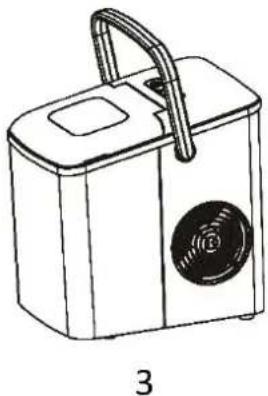
natural_image
Line drawing of a portable kitchen appliance with handle and side panel (no text or symbols)35.
VOR DEM GEBRAUCH
natural_image
Pure diagram of a U-shaped pipe or channel with directional arrows indicating flow or movement (no text or symbols)1
natural_image
Line drawing of a microwave oven with a handle and lid (no text or symbols)2
natural_image
Line drawing of a portable kitchen appliance with handle and side panel (no text or symbols)3
Before use make sure to read all of the below instructions in order to avoid injury or damage, and to get the best results from the appliance. Make sure to keep this manual in a safe place. If you give or transfer this appliance to someone else make sure to also include this manual.
In case of damage caused by user failing to follow the instructions in this manual the warranty will be void. The manufacturer/importer accepts no liability for damages caused by failure to follow the manual, a negligent use or use not in accordance with the requirements of this manual.
- This appliance can be used by children aged from 8 years and above and persons with reduced physical, sensory or mental capabilities or lack of experience and knowledge if they have been given supervision or instruction concerning use of the appliance in a safe way and understand the hazards involved.
- Children shall not play with the appliance.
- Cleaning and user maintenance shall not be made by children without supervision.
- If the supply cord is damaged, it must be replaced by the manufacturer, its service agent or similarly qualified persons in order to avoid a hazard.
- WARNING: fill with potable water only.
- WARNING: Keep ventilation openings, in the appliance enclosure or in the built-in structure, clear of obstruction.
- WARNING: Do not damage the refrigerant circuit.
-
WARNING: Do not use electrical appliances inside the food storage compartments of the appliance, unless they are of the type recommended by the manufacturer.
-
Do not store explosive substances such as aerosol cans with a flammable propellant in this appliance.
-
Children aged from 3 to 8 years are allowed to load and unload refrigerating appliances.
-
WARNING: When positioning the appliance, ensure the supply cord is not trapped or damaged.
-
WARNING: Do not locate multiple portable socket-outlets or portable power supplies at the rear of the appliance.
-
Opening the door for long periods can cause a significant increase of the temperature in the compartments of the appliance.
-
Clean regularly surfaces that can come in contact with food and accessible drainage systems.
-
Clean water tanks if they have not been used for 48 h; flush the water system connected to a water supply if water has not been drawn for 5 days.
-
If the refrigerating appliance is left empty for long periods, switch off, defrost, clean, dry, and leave the door open to prevent mould developing within the appliance.
-
Always disconnect the appliance from the supply if it is left unattended and before assembling, disassembling or cleaning.
-
This appliance is intended to be used in household and similar applications such as: staff kitchen areas in shops, offices and other working environments; farm houses and by clients in hotels, motels and other residential type environments; bed and breakfast type environments; catering and similar non-retail applications.
-
Before inserting the plug into the mains socket, please check that the voltage and frequency comply with the specifications on the rating label.
-
Always plug the appliance into an earthed plug socket.
-
Disconnect the mains plug from the socket when the appliance is not in use and before cleaning.
- Ensure that the mains cable is not hung over sharp edges and keep it away from hot objects and open flames.
- Do not immerse the appliance or the mains plug in water or other liquids. There is danger to life due to electric shock!
- To remove the plug from the plug socket, pull the plug. Do not pull the power cord.
- Do not touch the appliance if it falls into water. Remove the plug from its socket, turn off the appliance and send it to an authorized service center for repair.
- Do not plug or unplug the appliance from the electrical outlet with a wet hand.
- Never attempt to open the housing of the appliance, or to repair the appliance yourself. This could cause electric shock.
- Never leave the appliance unattended during use.
- This appliance is not designed for commercial use.
- Do not use the appliance for other than intended use.
- Do not wind the cord around the appliance and do not bend it.
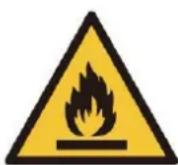
- Do not store or use gasoline and other flammable substances near the ice maker. Do not use ice maker if has leakage of flammable gas, to avoid cause a fire.
- Do not move the appliance while it is switched on, to avoid damaging the cooling system.
- WARNING: Do not use mechanical devices or other means to accelerate the defrosting process, other than those recommended by the manufacturer.
-
Warning: Risk of fire / flammable materials.
-
Do not overturn the appliance. If the ice maker is overturned accidentally, make it stand steadily for 3 hours before power it on again.
- If the ice maker is brought in from outside in wintertime, do not use for a few hours, allowing the unit to warm up to the room temperature before operating.
- Never put flammable, explosive and corrosive articles into the ice maker.
- Please abandon the appliance according to local regulators as it uses flammable blowing gas and refrigerant.
- Regarding the instructions for operation, cleaning and disposal of the appliance, please refer to the below paragraph of the manual.
PARTS DESCRIPTION
- Handle
- Transparent window
- Lid
- Evaporator
- Ice tray
- Ice shovel
- Water tank
- Ice cube basket
- Ice cube scoop
- Control panel
- Infrared light-emitting diode
- Infrared light-receiving diode
- Filter
- Drain plug
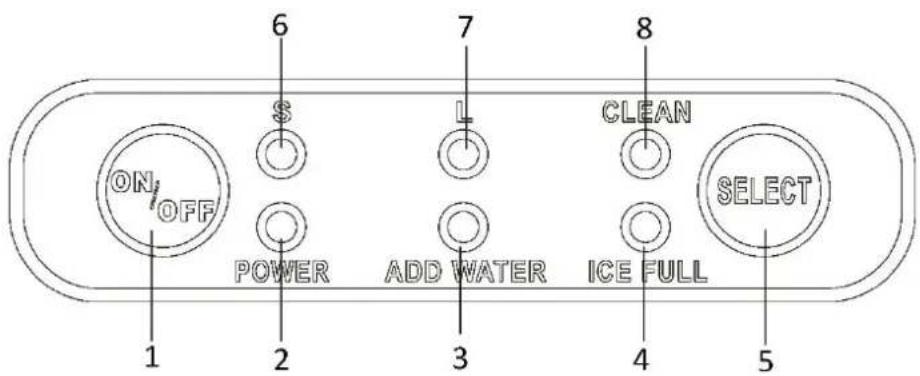
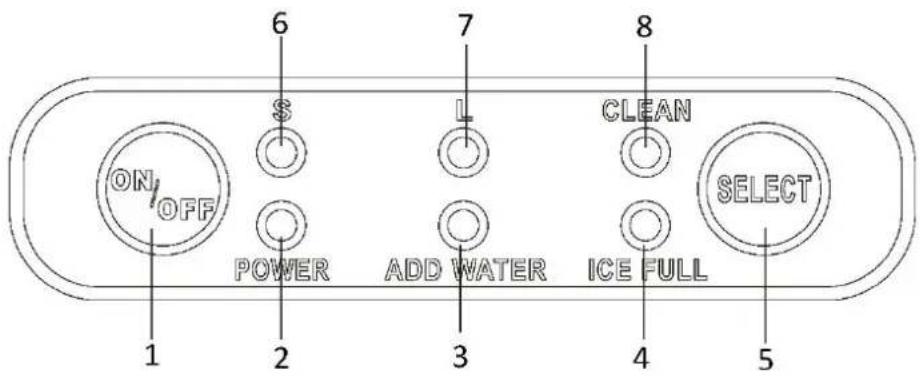
Control panel
- On/off button
- Power indicator light
- Add water indicator light
- Ice full indicator light
- Select button
- Small size ice cube
- Large size ice cube
- Self-clean indicator light
BEFORE USE
- Remove all the packaging.
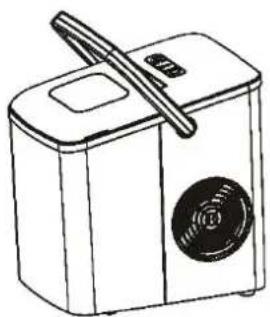
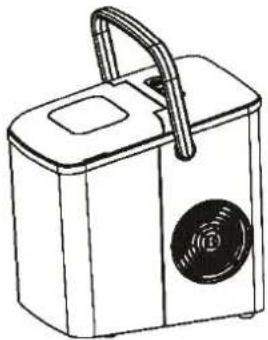
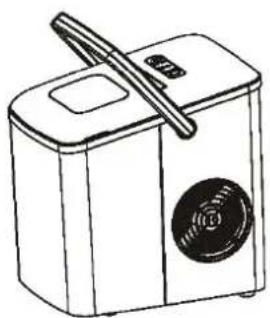
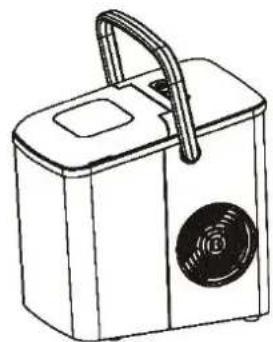
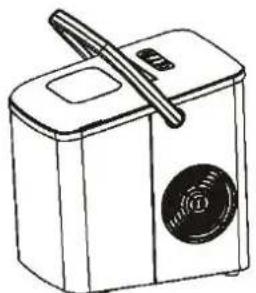
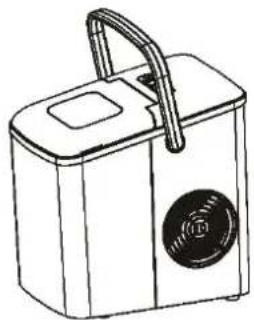
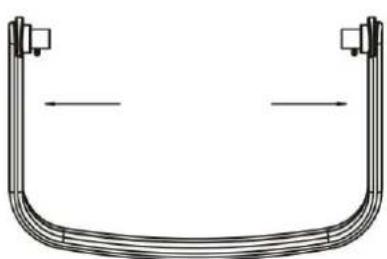
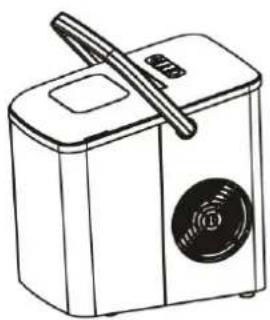
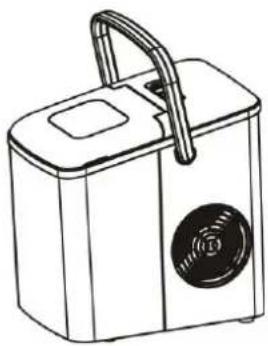
- Install the handle:
a) Pull both sides of the handle outwards; (Fig. 1)
b) Make both sides align with the holes in the housing and release the hands; (Fig. 2)
c) Grasp the center of handle and lift it upwards, check and make sure that there shall be no abnormal condition. (Fig. 3)
natural_image
Pure diagram of a U-shaped pipe or channel with directional arrows indicating flow or movement (no text or symbols)1
natural_image
Line drawing of a microwave oven with a circular vent and handle (no text or symbols)2
natural_image
Line drawing of a portable kitchen appliance with handle and circular vent (no text or symbols)3
-
Place the appliance on a stable and flat surface. Keep the appliance away from heat sources and direct sunlight; keep it in a well-ventilated place and leave at least 6-inch space near the air inlet and outlet.
-
Clean the appliance and its components (See "CLEANING AND MAINTENANCE").
- Do not fill the water tank with hot water. This may damage the appliance. It is best to fill with water of room temperature or lower.
Caution! Do not use outdoors. Do not use the appliance in a too cold or too hot environment. When the environment temperature is lower than 10 °C or higher than 43 °C , the appliance will have problems in making ice. The optimum ambient temperature is around 25 °C .
Note: The incline angle of the ice maker cabinet should not exceed 45^ during transportation or use. Do not turn the ice maker upside down. Doing so could cause the compressor or refrigerating system to operate incorrectly. Please allow time for the fluids in the compressor to settle after the ice maker is moved or transported. Before using the ice maker for the first time, please wait for 3 hours after the unit has been positioned in the proper place.
HOW TO USE
- Ensure that the drain plug at the bottom of the water tank is closed well.
- Open the lid and remove the ice cube basket and scoop.
- Pour drinking water into the water tank. Pay attention do not over the MAX line.
- Replace the ice cube basket and close the lid.
- Plug in the appliance. The "POWER" indicator light will blink. Now the appliance is ready for use.
- Press the "SELECT" button to choose the size of ice cube: "S" = Small; "L" = Large. The corresponding light will be on.
- Press "ON/OFF" button, the appliance starts to work. The "POWER" indicator light will be constant on.
- After about 7-15 minutes (depending on the ambient temperature or the water temperature), the first batch of 9 ice cubes will be produced and dropped into the ice cube basket. You can also check through the transparent window on the top.
- The appliance will continue to make the next batch of ice cubes.
- When you have got your desired amount of ice cubes, stop the ice making cycle by pressing the "ON/OFF" button and unplug the unit from the wall outlet.
- Open the top lid and transfer the ice cubes to a freezer.
- Allow the appliance to reach the room temperature. Empty the water tank after each use.
Note! The produced ice cubes in the basket will melt gradually so please use the scoop to take out the ice cubes in time. The melted water will be collected into the water tank.
Ice full indication
The “ICE FULL” indicator will light up when the ice cube basket is full and then the appliance will stop the ice-making cycle automatically. Gently remove the ice cubes from the basket with the scoop. About 5 seconds later, the appliance will restart its ice making function automatically.
Add water indication
The “ADD WATER” indicator will light up when the water tank is lack of water and the ice-making cycle will stop automatically. At that time, remove the ice cube basket and add water to the water tank, and then press “ON/OFF” button to restart the ice-making cycle.
The appliance will start working automatically after about 20 minutes if you forget to restart the appliance after refill.
How to empty the water tank
Move the appliance forward to a place 60mm away from the working table (A) and open the drain plug (B) to drain out excess water. You can use a container to catch the excess water. Then, replace the drain plug well in position. (Fig. 4)
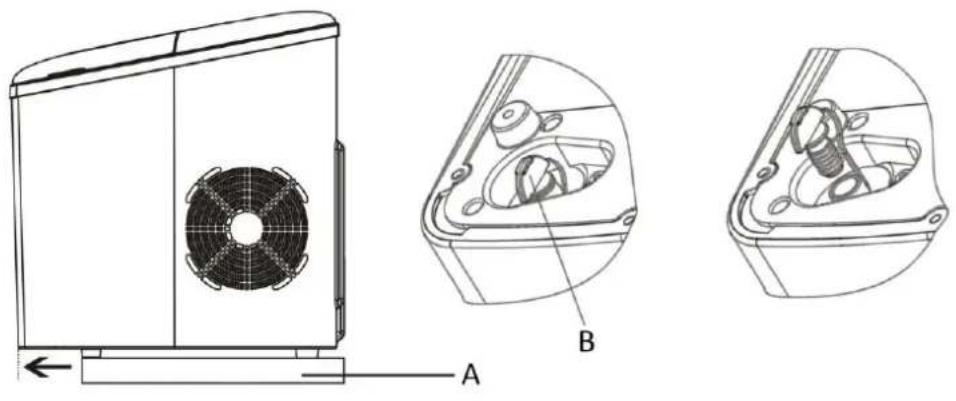
Fig. 4
SELF-CLEANING MODE
This mode can help clean the interior of the appliance.
- Add water into the water tank. Do not over the Max line.
- Plug in the appliance, press the "SELECT" button to choose self-cleaning mode; the "CLEAN" indicator light will be on.
- During self-cleaning mode, pump will draw water into ice making box, then ice making box rotates and pours the water into water tank. This cycle will repeat for 5 times.
- Upon completion, the appliance automatically changes to standby mode.
- Empty the water tank. Leave the lid open to allow it to air dry.
Note: A small amount of neutral cleaner can be added into the water. The ratio shall be 1:0.05 (water: neutral cleaner). When the cleaning is finished, rinse the appliance by repeating once or twice of above steps with clean water.
CLEANING AND MAINTENANCE
- Before cleaning and maintenance, turn off and unplug the appliance and allow it to warm up to room temperature.
- Clean the interior of the appliance with a soft cloth soaked with warm water and vinegar, then rinse with clean water and then drain all the water. Replace the drain plug well in position.
- Wash the ice cube basket and scoop in warm soapy water. Rinse and dry.
- Clean the exterior of the appliance with a soft damp cloth.
- The self-cleaning should be conducted before you use the appliance for the first time or haven't used it for a long time. (See the "SELF-CLEANING MODE" section)
- Please empty the water tank and dry it for storage if the appliance is not used for a long time.
Note:
1) Do not use organic solvent, boiled water, detergent, strong acid and strong alkali etc. for cleaning.
2) Do not clean the evaporator.
3) Do not immerise the appliance in water.
TROUBLE SHOOTING
| Problem | Possible causes | Solution |
| “ADD WATER” indicator lights on | 1.Low water level or lack of water | 1.Stop making ice, refill water and then press “ON/OFF” key to restart. |
| 2.The filter at the bottom of water tank is blocked. | 2.Do cleaning | |
| 3.Pump malfunction. | 3.Send for repair. | |
| “ICE FULL” indicator lights up | 1. Ice basket is full and the infrared light is blocked by the ice. | 1. Remove the ice from ice cube basket. |
| 2. Infrared light-emitting diode & light-receiving diode do not work. | 2. Wipe up the foreign objects on the infrared light-emitting diode & light-receiving diode and restart the ice maker. Send to repair if the Infrared light-emitting diode & light-receiving diode still cannot work. | |
| “ADD WATER” and “ICE FULL” indicators turn on simultaneously | 1. The ice tray is not in the right position. | 1. Unplug the appliance and check if the ice tray is blocked by something. |
| 2. The “ICE FULL” condition cannot be detected as the infrared light module is interfered by the sunlight. | 2. Unplug the appliance and move it to a place which is not exposed to the sunlight, then plug the appliance and activate it again. | |
| The ice collects together. | Making ice takes too much time. | Stop making ice and restart the ice-making cycle after the ice melts. |
| The water temperature is too low. | Fill the water tank with water ranges between 8°C and 25°C. | |
| The ice-making cycle seems normal but no ice is produced. | The ambient temperature or water temperature is too high. | Operate in ambient temperature between 10°C and 43°C and fill the water reservoir with some cold water. |
| Refrigerating system leaks | Need to repair. | |
| Refrigerating system blocks | Need to repair. | |
| Poor ice-making result | 1. Poor heat dissipation. | 1. Leave a 6-inch clearance on all sides of the ice maker for proper ventilation. |
| 2. The water temperature is too high. | 2. Fill the water tank with water ranges between 8°C and 25°C. | |
| 3. The ambient temperature is too high. | 3. Operate the ice maker in ambient temperature between 10°C and 43°C. |
TECHNICAL DATA
Voltage: 220-240V \~ 50-60Hz
Power: 120W
Rated Current: 0.8 A
Refrigerant: R600a/23g
Climatic class: ST/SN/N/T
GUARANTEE AND CUSTOMER SERVICE
Before delivery our devices are subjected to rigorous quality control. If, despite all care, damage has occurred during production or transportation, please return the device to your dealer. In addition to statutory legal rights,
the purchaser has an option to claim under the terms of the following guarantee:
For the purchased device we provide 2 years guarantee, commencing from the day of sale. If you have a defective product, you can directly go back to the point of purchase.
Defects which arise due to improper handling of the device and malfunctions due to interventions and repairs by third parties or the fitting of non-original parts are not covered by this guarantee. Always keep your receipt, without the receipt you can't claim any form of warranty. Damage caused by not following the instruction manual, will lead to a void of warranty, if this results in consequential damages then we will not be liable. Neither can we hold responsible for material damage or personal injury caused by improper use or if the instruction manual are not properly executed. Damage to accessories does not mean free replacement of the whole appliance. In such case please contact our service department. Broken glass or breakage of plastic parts is always subject to a charge. Defects to consumables or parts subjected to wearing, as well as cleaning, maintenance or the replacement of said parts are not covered by the warranty and are to be paid.
ENVIRONMENT FRIENDLY DISPOSAL
Recycling – European Directive 2012/19/EU
This marking indicates that this product should not be disposed with other household wastes. To prevent possible harm to the environment or human health from uncontrolled waste disposal, recycle it responsibly to promote the sustainable reuse of material resources. To return your used device, please use the return and collection systems or contact the retailer where the product was
purchased. They can take this product for environmental safe recycling.
Fun Nordic ApS
Egelund 8
6200 Aabenraa
Denmark
www.funnordic.dk
- SIKKERHEDSINSTRUKTIONER
- Betjeningspanel
- F∅ R ANVENDELSE
- F∅ R BRUK
- Kontrollpanel
- INNAN ANVÄNDNING
- VOR DEM GEBRAUCH
- PARTS DESCRIPTION
- Control panel
- BEFORE USE
- HOW TO USE
- Ice full indication
- Add water indication
- How to empty the water tank
- SELF-CLEANING MODE
- CLEANING AND MAINTENANCE
- TECHNICAL DATA
- GUARANTEE AND CUSTOMER SERVICE
- ENVIRONMENT FRIENDLY DISPOSAL
Brand : Emerio
Model : IM-121215
Category : Ice Maker