
AMS-330 - Radio AIWA - Free user manual and instructions
Find the device manual for free AMS-330 AIWA in PDF.


| Product Type | Internet Radio with DAB+, FM, Bluetooth, and UPnP |
| Model | AMS-330 |
| Brand | Aiwa |
| Dimensions (L x D x H) | 183 x 120 x 115 mm |
| Weight | Approx. 1.2 kg (estimated) |
| Power Input | 5V DC via included adapter (100-240V AC 50/60Hz) |
| Wireless Network | IEEE 802.11 b/g/n, 2.4 GHz |
| Security Protocol | WEP / WPA / WPA2 |
| FM Frequency Range | 87.5 - 108 MHz |
| DAB Frequency Range | 174.928 MHz (5A) - 239.200 MHz (13F), DAB and DAB+ |
| Bluetooth Version | 4.2 |
| Audio Output Power | 3W RMS (mono) |
| Display | 2.4 inch TFT color screen |
| Remote Control | Yes, with 2 x AAA batteries |
| Preset Stations | Up to 250 presets |
| Alarm | Dual alarm with snooze, nap timer |
| Sleep Timer | 15-180 minutes (15 min steps) |
| Equalizer | Yes (via remote) |
| Language Support | 17 languages (including English, German, French) |
| Box Contents | Radio, power adapter, remote control, user manual |
Frequently Asked Questions - AMS-330 AIWA
User questions about AMS-330 AIWA
0 question about this device. Answer the ones you know or ask your own.
Ask a new question about this device
Download the instructions for your Radio in PDF format for free! Find your manual AMS-330 - AIWA and take your electronic device back in hand. On this page are published all the documents necessary for the use of your device. AMS-330 by AIWA.
USER MANUAL AMS-330 AIWA
Important Safety Instructions....1
Battery Instructions....1
Location of Controls....2
Remote Control....3
Switching the radio on....4
Connecting to your WiFi Network....4
Internet Radio....5
Bluetooth 7
Media Center....7
FM Radio....7
DAB Radio....8
Information Center....9
Configuration....9
Trouble Shooting....13
Technical Specification....15
Important Safety Instructions

Warning: To prevent fire or shock hazard, do not expose the unit to rain or moisture.
To avoid electrical shock, do not dismantle. Refer all servicing to qualified service personnel.
- Please read all of the instructions carefully and retain for future reference.
- When using electrical appliances, basic safety precautions should always be followed.
- This appliance is not intended for use by persons (including children) with reduced physical, sensory or mental capabilities, or lack of experience and knowledge, unless they have been given supervision or instruction concerning use of the appliance by a person responsible for their safety.
- This product is not a toy! Children should be supervised to ensure that they do not play with the appliance.
- Any repairs must be done by qualified service personnel. There are no user-serviceable parts inside. Do not attempt to repair by yourself.
- Keep the unit away from sharp edges that could cause damage.
- Keep the unit free from dust and away from heat sources, direct sunlight, humidity, water or other liquids.
- Use only with the provided adaptor.
- Do not operate the product with a damaged adaptor cord or plug, or if the product malfunctions, or is dropped or damaged in any manner.
- If the adaptor cord is damaged, it must be replaced by the manufacturer, its service agent or similarly qualified persons in order to avoid hazard.
- When removing the adaptor plug from the wall outlet, always pull directly on the plug; never pull on the cord.
- Do not immerse the unit in water or other liquids.
- Do not operate the unit if it has been exposed to water, moisture or any other liquid in order to prevent electric shock, explosion and/or injury to yourself and damage to the unit.
- Do not use the unit for anything other than its intended use.
- Do not store the unit in direct sunlight or in high humidity conditions.
- Do not insert foreign objects into any opening on the unit.
- Unplug the adaptor after the unit has been used, before it is cleaned and whilst being repaired.
- Do not use liquid cleaners or aerosol cleaners. Use a damp cloth for cleaning.
- Keep the unit away from flammable materials.
Battery Instructions
- Replace with batteries of the same or equivalent type as recommended.
- Ensure correct polarity when inserting batteries.
- Do not expose batteries to excessive heat sources such as fire and direct sunlight.
- Remove any batteries from the remote control when it is not being used for a long period of time to avoid leakage.
- Keep batteries out of reach of children.
- Rechargeable batteries should only be charged under adult supervision.
- Do not throw in fire, crush, puncture, dismantle or otherwise damage the batteries.
- Do not expose batteries to heat or fire as they may explode.
- Do not dispose of batteries in your household waste. Contact your local council for information on disposal or recycling.


1. Power
On/Standby mode
2. Mode
Press to change the radio mode (Switch between Internet radio / DAB radio / FM radio/ Media Center [UPnP] / Bluetooth)
3. Preset
Press and hold to enter favourite list Press briefly to recall the favourite list
4. Left
Back to previous menu / left cursor
5. Right
Right cursor / Enter edit menu under Favourite list
6. Menu
Access main menu
7. Up / Down / Enter
Rotate to scroll up or down on the main menu / Push to confirm or select menu options / Push to stop or resume playback of radio channel
8. Volume dial
Rotate to adjust the volume level
9. TFT 2.4" color screen
10. Speaker
11. DC IN jack
12. Antenna
Remote Control
The remote control uses 2 x 'AAA' batteries. Open the battery compartment and insert the batteries ensuring correct polarities.
- ⏻: Standby button
- Mute
- 0-9: Favorite station key / input letters and numbers for WiFi Encryption code
- ⚙: Dim the display
- ★: Favorite button, adding station to your favorite list
6.▲: Cursor up - ▼: Cursor down
8.◀ : Cursor left / back to previous menu
9.▶ : Cursor right
10.OK: confirm button - 📋: Alarm button
- Z: Sleep Timer
- Vol+: Volume up
- Vol-: Volume down
- ⬆: Main Menu
17.EQ: Equalizer - :Previous song (for UPnP / Bluetooth)
- ▶: Play/pause (for UPnP / Bluetooth)
-
▶: Next song (for UPnP / Bluetooth)
-
Mode: Switch between Internet Radio, DAB Radio FM Radio, Media Center (UPnP) and Bluetooth

Switching the radio on
Connect the mains adaptor to the radio unit - one end to the DC IN on the radio and the other end to the AC mains wall socket.
Caution: Use only the mains adaptor supplied with the radio. Connecting a power supply with a different rating will cause permanent damage to the radio and may be hazardous.
The radio will power up and display Welcome:

Select the language for the radio menu:
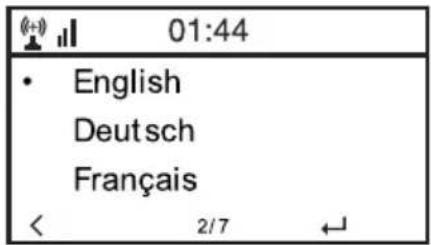
It will ask to set the
Connecting to your WiFi Network
Now you can adjust the network configuration setting. Choose

After the search is done, it will display a list of the available WiFi networks.

Choose your network from the list; enter the password if the network is set with encryption code. If your network does not require any password to access, the WiFi will be connected automatically.

Note: The encryption code would have been set up by the person who set up and configured your network.
Follow the steps below to enter the password of your WiFi network:
- Rotate the [Up/Down/Enter] dial to browse through the characters
- Press the [Right] button to skip to the next entry
- When it is done, push the [Up/Down/Enter] dial to confirm.
The radio will start connecting to the network.
When the WiFi is connected successfully, it will pop to the main menu and you are ready to access available internet radio stations.

Internet Radio
Choose
To start listening to available radio stations, select
My Favorite
This is to show the list of your Favorite stations which have been added to the list.
To preset a station:
When your favourite station is playing and you want to add it to favourite list, press and hold the [Preset] button and
Push [Up/Down/Enter] dial to confirm
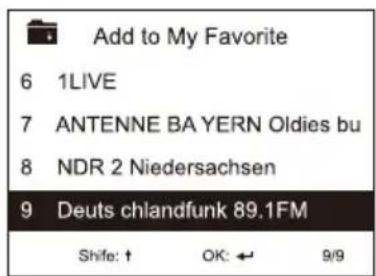
The symbol 📄 on the top row means station is added to favourite list
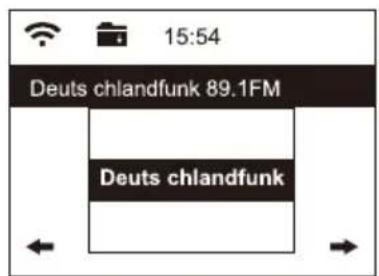
The presets will be stored in ascending order. You can store up to 250 presets.
Note: Presets 1 to 5 are for your favourite channels. The first time you add a preset station, Preset 6 will be recommended. To add a channel to preset 1-5, simply scroll up to the desired preset.
You can edit your favorite list anytime with the options below:
Delete – To delete the selected station
Shift up- To shift the selected station by one level up on the ranking
Shift down – To shift the selected station by one level down on the ranking
Rename – To rename the selected station
Play – press and play the selected station
Navigate to

To recall a preset station:
Press the [Preset] button briefly and choose your desired station.
Local Radio
Select this option to quickly access the radio stations located in your country.
History
The radio will memorise the last 10 listened stations.
Service
Search Stations
You can find your desired radio station by inputting the name of the radio or just a few characters to filter the list.
Add New Radio Station
If you want to add the station and you have the audio stream URL, you can add it through the
MediaYou website as follows, or you can contact MediaYou if the station cannot be located. http://www.mediayou.net/
Please refer to the "Manage My mediaU" under Configuration section below for more details.
When a radio station is playing, press the [Right] button and it will display the station logo (if any). Continue to press the [Right] button to view the radio information.

Bluetooth
The radio receives and plays music streamed by other Bluetooth device.
Choose Bluetooth from the main menu or use the
Once it enters into Bluetooth mode, it will be discoverable from other Bluetooth devices.
- Turn on Bluetooth on the Bluetooth device and look up the device named "Aiwa AMS-330" from the list. Select it to start pairing.
- If the connection is successful, it will show "Connected" on your Bluetooth device list.
- You can start playing music from your Bluetooth device now.
Media Center
UPnP (Universal Plug and Play)
The device supports UPnP and is DLNA-compatible.
This provides the opportunity to stream music from other network devices.
However, this requires you to have a compatible device in your network that can function as a server. This can be something like a network hard drive or a conventional PC for example, Windows 8 via which media sharing is permitted. The folders can then be browsed and played on the Tuner.

Please make sure your PC or laptop is on the same Wi-Fi network as the Radio are you start using this function.
Configuring UPnP server
Before you can stream music from your device (laptop or PC) on to the radio, you must set up the audio files and enable permission for streaming on your device. The exact procedure depends on your device configuration and media player version. In general:
- Save the audio files you wish to play on to the media library.
- Enable media sharing on your media player and if prompted, 'Allow' the radio to access the shared audio files.
- For some devices, you might first need to set up a home network or home group before file sharing is possible.
Note: Refer to your device's documentation for specific information.
Music streaming via UPnP
Once the UPnP server is configured to share media files with your radio, you can start music streaming.
- On the main menu, select
and choose - It may take a few seconds for the radio to complete the scan for available UPnP servers. If no UPnP servers are found, it will show
. - After a successful scan is done, select your UPnP server.
- The radio will show the media categories available from the UPnP server, e.g. 'Music', 'Playlists' etc.
- Choose the media files that you wish to play.
FM Radio
Use the [MODE] button to switch to FM radio. Extend the telescopic antenna to ensure good reception.
Auto Scan
Press and release the [Up/Down/Enter] dial. It will start auto scanning the local FM radio stations that can be received and stores the channels as presets automatically. To play a particular channel from the presets:
-
Press and release the Preset Button to recall the Preset list.
-
Rotate the [Up/Down/Enter] Dial to scroll through the options.
- When you have reached the desired station, press the [Up/Down/Enter] Dial to listen to the channel.
Manual Scan
To seek an FM station manually, press and release the [Left] or [Right] button, the radio will seek the previous or next available station. If you want to fine tune the frequency, rotate the [Up /Down/Enter] Dial.
Note: You may need to move the telescopic antenna in different directions to find the best reception level.
DAB Radio
You can listen to ordinary DAB/DAB+ channels.
Choose the DAB option from the main menu or use the
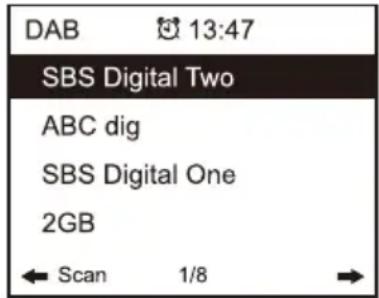
Choose the station you want to listen, and press the

Choose
DAB Slide show
Our radio supports DAB slideshow. If there are images transmitted by the broadcaster, you will see the image appear on the playing screen.
To start the slideshow, press the
To stop playing the station, press the
Information Center
On the main menu, navigate to
Weather Information
The radio supports weather display in standby mode.
Navigate to Information Center> Weather Information, choose the region you want it to display the weather information. After region is selected, continue pressing OK (push the [Up/Down/Enter] Dial) until it shows
The date/time and weather info will alternate every 10 seconds under the standby mode.
When the weather screen is shown, press [Right] button to see the current weather information.
Press the [Right] button again to show the forecast for the next 4 days.
Press the [Right] button again to display the detailed weather information for each of the next 4 days. To view more details for a particular day, rotate the [Up/Down/Enter] Dial to scroll down for more information.
Note: Weather information may vary and whether it will sync to the actual weather depends on the network situation.
System Information
You can view the information of the radio such as the software version / Wireless Mac / IP address etc.
Configuration
Time Display
You can choose the time display in analog or digital form.
Manage my mediaU
You can personalise your own favorite station list through MediaYou website.
Set
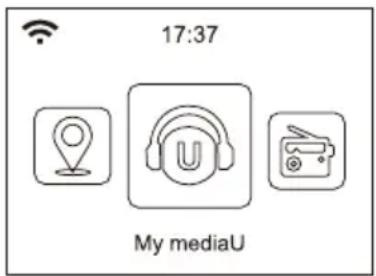
Follow the steps below to sign up on MediaYou:
1) Visit http://www.mediayou.net/
2) Then you have to find out the Mac Address of the radio for registration.
To locate the MAC address, please follow the path below:
2a) Go to Main Menu and select
2b) Go to
2c) Choose
3) Log in to Media You, click Radio, then input the Radio name and Serial number (i.e. MAC Address) and save it.
You can then organise your own favorite stations or add any new station which is not found on the station list. Once the changes are done, your radio will synchronise the changes immediately and you will find your favorite list under
Network
Wireless Network Configuration
Press
Wireless Network (WPS PBC)
The WPS allows to connect the radio with your router by pressing one key on the radio and a WPS key on your router for wifi connection, provided that your router has the WPS function.
Manual Configuration
You can set the DHCP on or off, and enter the SSID name, or delete the connected SSID.
Check network when power on
This is set to enable or disable
Date & Time
The time is set automatically to your local area.
You can choose to manually set the time if you want.
Time Format setting
Time format setting: 12hours / 24hours
Date Format setting
Date format: YYYY/MM/DD, DD/MM/YYYY and MM/DD/YYYY
If manual setup is selected, you will see an added item Daylight Saving Time (DST) setting on the list.
Alarm
Dual alarm clock
There are 2 alarm clocks available and settings as follow:
Schedule the alarm: You can schedule the alarm repeated for every day, particular day in the week or just once.
Alarm sound: Wake to Internet Radio (the radio must be one of the preset stations), Wake to FM, Wake to DAB/DAB+, Wake to Melody or Wake to Beeping sound.
Alarm Volume: adjust your desire volume level.
Note: If the Internet radio does not work due to network issues or other reasons, the alarm switches to melody sound after 1 minute.
NAP Alarm
To set an alarm to ring after a short period of time, you can use this function.
You can select the time from 5 minutes up to 120 minutes. No Snooze function available for the NAP alarm.
Remark: The NAP Alarm will only release beeping sound.
Snooze
When the Alarm sounds, press any key on the radio unit (except Power) to activate the
Timer
Press [Left] or [Right] button to set the timer, then press [Up/Down/Enter] Dial to confirm. When the time is due, it will release some beeping sound. Press the [Up/Down/Enter] to cancel.
Language
There are 17 languages available including English, German and French.
Dimmer
You can adjust the backlight of the LCD using the below settings:
Power Saving
You can set the backlight to dim down when there is no operation in a certain time of period.
Turn on
You can adjust the backlight level for the operation mode, i.e. when you are operating the radio or checking on the menu.
Display
You can choose the display in color or monochrome style.
Power Management
This function is to allow the radio to go Standby if there is no internet signal received in certain time period to save power. The default setting is 15 minutes. When the radio does not receive any internet signal, the radio will go into Standby after 15 minutes. Other options like 5 minutes and 30 minutes are also available.
Sleep Timer
You can set the timer to turn the radio to standby mode after a certain time period, from 15 minutes to 180 minutes in steps of 15 minutes.
Buffer
Sometimes you may experience uneven playback of the internet radio. This can happen if the internet connection is slow or network congestion occurs. To improve the situation, you can choose longer buffer time to get a few seconds of radio stream before beginning to play. The default value is 2 seconds. You can choose 4 or 8 seconds if you prefer to have a longer buffering time.
Weather
The radio will display weather information in standby by default. You can select the regions and temperature unit. You can turn it off by selecting "Show on Standby > Off".
DAB/FM Setup
FM Mode
Option to choose hearing in Stereo or mono.
Note: As the radio is a mono, this option does not apply.
FM Threshold
Option to adjust the scanning threshold to pick up stronger or weaker FM stations. There are two types of threshold, Seek Threshold and Stereo Threshold. A stereo separation adjustment is provided in the FM receiver for lowering the separation level of the left and right signals and approaching the mono reception to reduce the noise when the received signal strength of the FM signal is weak. When the signal strength is strong, the separation level is increased to automatically receive stereo reception. If the “Strong” option is selected, only the radio stations with good separate level will be received (in stereo). On the contrary, if “Weak” option is selected, radio stations with low separation level will be received (in mono).
DAB Threshold
Option to adjust the scanning threshold to pick up stronger or weaker DAB/DAB+ stations.
DAB/FM Information
You can select to enable or disable the DAB/FM information.
Local Radio Setup
The radio will detect the stations in your country automatically. Choose
You can also change to set the State and City of your country as Local Radio. Choose “Manual Setup” to do the setting.
Playback Setup
This is to set the preference of UPnP playback. You can set the playback as Off, Repeat one, Repeat all, Shuffle.
Device
-Rename
This is to set the name of your radio when it becomes a media renderer. The name by default is AirMusic. Choose “Rename” to make the change.
-AirMusic Control App
A remote control App is available which you can install on your mobile device to control the radio. Select this option to view the QR code to download the App.
Key
Press this button if you want to set the [MODE] button as a shortcut key for functions like Alarm or Sleep Timer. In that case, mode must be selected from the on screen menu.
Resume When Power On
The radio will resume playing the last listened station when you power it on next time if ON is selected in this option. The ON is set by default.
Software update
Upgrade information will pop up on the display when there is update version available. It is suggested to check if there is latest software available from time to time.
Reset to default
You can do this factory reset to empty all of the settings and it comes back to default settings. **Please note all the Station presets, Settings and configuration will be lost after you have performed the "Factory Reset".
Trouble Shooting
1. If you have trouble connecting the radio to your wireless network, these steps may help to resolve the problem:
- Confirm that a Wi-Fi or Ethernet Wired connected PC can access the internet (i.e. can browse the web) using the same network.
- Check that a DHCP server is available, or that you have configured a static IP address on the radio.
- Check that your firewall is not blocking any outgoing ports.
- Some access points may be set so that only equipment with registered MAC addresses can connect to them. This is one possible cause of the Internet Radio being unable to connect to the Wi-Fi network, and the Internet Radio display will show Bad ESSID or key. To overcome this problem you will need to add the Internet Radio's MAC address to the list of allowed equipment in your access point. The Internet Radio's MAC address can be found using the menu Information Center > System Information > Wireless Info > MAC address. You will need to refer to the guide for your Access Point in order to enter the Internet Radio as an allowed piece of equipment.
- If you have an encrypted network, check that you have entered the correct key or passphrase into the radio. Remember that text-format keys are case sensitive.
- If your wireless network name (SSID) is 'Hidden'(a setting on the wireless access point), then you can either turn on the name, or you can manually enter the name into the internet radio and media player, Select
Network -> Manual Configuration-> Wireless -> Enter SSID>. Confirm if the Network is encrypted, e.g. requires a WEP or WPA key, then enter the network name.
2. If your radio can connect to the network successfully, but is unable to play particular stations, it may be due to one of the following reasons:
- The station is not broadcasting at this time of the day (remember it may be located in a different time zone).
- The station has too many people trying to attach to the radio station server and the server capacity is not large enough.
- The station has reached the maximum allowed number of simultaneous listeners.
- The station is not broadcasting anymore.
- The internet connection between the server (often located in a different country) and yours is slow. Some internet service providers may fail to stream in certain geographical areas.
3. When you scan for PCs under UPnP function, none can be found, or the PC you are looking for does not appear in the list:
- You have not connected to the wireless Access point. On the internet radio, select 'Configuration', 'Network', 'Wireless network connection' and then select your Wireless network. (You may need to enter a security key to access the network wirelessly).
- You have a firewall set on your PC which is stopping you accessing shared files.
- If you have a third party firewall that will have its own control panel and you will need to consult the manual for your firewall.
- If your PC is connected to a managed network, with a server sometimes the PC being searched for needs to be set to Home group.
4. You can see the PC you want to play music from, but cannot find any folders on the PC:
- You have a firewall running which is preventing the internet radio from seeing the shared folder. As a quick check, you can disable firewalls to see if this overcomes the problem. If this resolves the issue then you can either leave the firewall off or allow file sharing through the fire wall.
Note: If your firewall is required to provide security for your system, it should not be left off.
5. If the Internet Radio keeps re-buffering radio station:
- The Internet Radio is streaming the data from the radio station via your broadband connection, if there is a high error rate on your broadband connection, or the connection is intermittent, then it will cause the Internet Radio to pause until the connection is re-established and it has received enough data to start playing again.
- If your Internet Radio keeps stopping, please check the DSL modem to ensure that the Broadband line is not suffering a high error rate or disconnections. If you are experiencing these problems, you will need to contact your broadband supplier.
6. What is Buffering?
When playing a stream, the Internet Radio/Media player, downloads a small amount of the stream before it starts playing. This is used to fill in any gaps in the stream that may occur if the internet or the wireless network is busy.
The Internet Radio streams music data from the PC while you are listening. If a stream gets blocked or experiences Internet congestion while transferring it may stop/interfere with the quality of play. If this happens, check your internet connection speed- it must be faster than the speed of the streams.
Technical Specification
Power input: 5V →A
Adaptor input: 100-240V\~50/60Hz
Wireless Network: IEEE802.11b/g/n
Wireless Frequency: 2.4 GHz
WiFi Transmission Power: 13.5dBm
Security Protocol: WEP / WPA / WPA2
FM Frequency: 87.5-108MHz
DAB Frequency range: 174.928MHz (5A) - 239.200MHz (13F), support DAB and DAB+
Bluetooth Version: 4.2
Audio output power: 3W (RMS) x 1
Unit Dimension: 183 x 120 x 115 mm (L x D x H)
Note: Specifications may vary without notice
What is included in the box
* Internet Radio
* Power adaptor
* Remote control
* User manual
aiwa
- Important Safety Instructions
- Battery Instructions
- Power
- Mode
- Preset
- Left
- Right
- Menu
- Up / Down / Enter
- Volume dial
- TFT 2.4" color screen
- Speaker
- DC IN jack
- Antenna
- Remote Control
- Switching the radio on
- Connecting to your WiFi Network
- Internet Radio
- My Favorite
- Local Radio
- History
- Service
- Bluetooth
- Media Center
- UPnP (Universal Plug and Play)
- Please make sure your PC or laptop is on the same Wi-Fi network as the Radio are you start using this function.
- Configuring UPnP server
- Music streaming via UPnP
- FM Radio
- Auto Scan
- Manual Scan
- DAB Radio
- DAB Slide show
- Information Center
- Configuration
- Time Display
- Manage my mediaU
- Network
- Date & Time
- Alarm
- NAP Alarm
- Snooze
- Timer
- Language
- Dimmer
- Power Saving
- Turn on
- Display
- Power Management
- Sleep Timer
- Buffer
- Weather
- DAB/FM Setup
- FM Threshold
- DAB Threshold
- DAB/FM Information
- Local Radio Setup
- Playback Setup
- Device
- -Rename
- -AirMusic Control App
- Key
- Resume When Power On
- Software update
- Reset to default
- Trouble Shooting
- If you have trouble connecting the radio to your wireless network, these steps may help to resolve the problem:
- If your radio can connect to the network successfully, but is unable to play particular stations, it may be due to one of the following reasons:
- When you scan for PCs under UPnP function, none can be found, or the PC you are looking for does not appear in the list:
- You can see the PC you want to play music from, but cannot find any folders on the PC:
- If the Internet Radio keeps re-buffering radio station:
- What is Buffering?
- Technical Specification
- What is included in the box
Brand : AIWA
Model : AMS-330
Category : Radio