
AWPZP5 - Radio AIWA - Free user manual and instructions
Find the device manual for free AWPZP5 AIWA in PDF.


| Product Type | Portable AM/FM Radio |
| Brand | Aiwa |
| Model | AWPZP5 |
| Dimensions (W x H x D) | 200 x 120 x 80 mm |
| Weight | 0.5 kg |
| Power Supply | AC 120V 60Hz or 4 x AA batteries |
| Radio Bands | AM (520-1710 kHz), FM (87.5-108 MHz) |
| Speaker | Built-in, 3W output |
| Headphone Jack | 3.5mm stereo |
| Display | Digital LCD with clock |
| Antenna | Built-in ferrite for AM, telescopic for FM |
| Preset Stations | 10 AM / 10 FM presets |
| Alarm Function | Wake to radio or buzzer, with snooze |
| Sleep Timer | Up to 90 minutes |
| Maintenance | Wipe with soft dry cloth; avoid moisture and extreme temperatures |
| Safety | Use specified batteries; do not open casing; keep away from water |
| Spare Parts | User-replaceable batteries |
| Repairability | Refer to qualified service personnel for internal repairs |
| User Manual | Available for free download on notice-facile.com |
Frequently Asked Questions - AWPZP5 AIWA
User questions about AWPZP5 AIWA
0 question about this device. Answer the ones you know or ask your own.
Ask a new question about this device
Download the instructions for your Radio in PDF format for free! Find your manual AWPZP5 - AIWA and take your electronic device back in hand. On this page are published all the documents necessary for the use of your device. AWPZP5 by AIWA.
USER MANUAL AWPZP5 AIWA
Micro Hi-Fi Component System
Operating Instructions
Owner's Record
The model and serial numbers are located on the rear of the unit. Record the serial number in the space provided below. Refer to them whenever you call upon your Aiwa dealer regarding this product.
Model No. ____ Serial No. ____

AWP-ZP5
AWP-ZP3
AWP-ZP1
WARNING
To prevent fire or shock hazard, do not expose the unit to rain or moisture.
To prevent fire, do not cover the ventilation of the apparatus with news papers, table-cloths, curtains, etc. And don't place lighted candles on the apparatus.
To prevent fire or shock hazard, do not place objects filled with liquids, such as vases, on the apparatus.
Do not install the appliance in a confined space, such as a bookcase or built-in cabinet.

This appliance is classified as a CLASS 1 LASER product. This marking is located on the rear exterior.

Don't throw away the battery with general house waste, dispose of it correctly as chemical waste.
NOTICE FOR THE CUSTOMERS IN THE U.S.A.
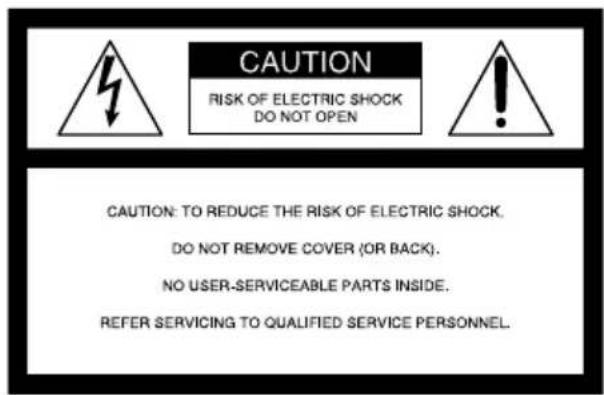
This symbol is intended to alert the user to the presence of uninsulated “dangerous voltage” within the product’s enclosure that may be of sufficient magnitude to constitute a risk of electric shock to persons.

This symbol is intended to alert the user to the presence of important operating and maintenance (servicing) instructions in the literature accompanying the appliance.
CAUTION
The use of optical instruments with this product will increase eye hazard.
WARNING
This equipment has been tested and found to comply with the limits for a Class B digital device, pursuant to Part 15 of the FCC Rules. These limits are designed to provide reasonable protection against harmful interference in a residential installation. This equipment generates, uses, and can radiate radio frequency energy and, if not installed and used in accordance with the instructions, may cause harmful interference to radio communications. However, there is no guarantee that interference will not occur in a particular installation. If this equipment does cause harmful interference to radio or television reception, which can be determined by turning the equipment off and on, the user is encouraged to try to correct the interference by one or more of the following measures:
– Reorient or relocate the receiving antenna.
- Increase the separation between the equipment and receiver.
- Connect the equipment into an outlet on a circuit different from that to which the receiver is connected.
- Consult the dealer or an experienced radio/TV technician for help.
Note to CATV system installer:
This reminder is provided to call the CATV system installer's attention to Article 820-40 of the NEC that provides guidelines for proper grounding and, in particular, specifies that the cable ground shall be connected to the grounding system of the building, as close to the point of cable entry as practical.
CAUTION
You are cautioned that any changes or modifications not expressly approved in this manual could void your authority to operate this equipment.
NOTICE FOR THE CUSTOMERS IN THE U.S.A.
If you have any questions about this product, you may call; Aiwa Customer Information Service Center 1-800-289-2492 or http://www.us.aiwa.com/
The Number below is for the FCC related matters only.
Regulatory Information
Declaration of Conformity
Trade name: AIWA
Model No.: CX-LZP5
Responsible Party: Sony Electronics Inc.
Address: 16450 W. Bernardo Dr, San
Diego, CA 92127 U.S.A.
Telephone No.: 858-942-2230
This device complies with Part 15 of the FCC Rules. Operation is subject to the following two conditions: (1) This device may not cause harmful interference, and (2) this device must accept any interference received, including interference that may cause undesired operation.
NOTICE FOR THE CUSTOMERS IN CANADA
CAUTION
The use of optical instruments with this product will increase eye hazard.
CAUTION
TO PREVENT ELECTRIC SHOCK, MATCH WIDE BLADE OF PLUG TO WIDE SLOT, FULLY INSERT.
Except for European model

ENERGY STAR ^® is a U.S.
registered mark. As an ENERGY
STAR ^® partner, Sony Corporation has determined that this product meets the ENERGY STAR ^® guidelines for energy efficiency.
- Microsoft, Windows and Windows NT are trademarks or registered trademarks of Microsoft Corporation in the United States and/or other countries.
- IBM and PC/AT are registered trademarks of International Business Machines Corporation.
• Macintosh is a trademark of Apple Computer, Inc. in the United States and/or other countries. - Pentium is a trademark or registered trademark of Intel Corporation.
- All other trademarks and registered trademarks are trademarks or registered trademarks of their respective holders.
- TM and ® marks are omitted in this manual.
Table of Contents
How to use this manual....5
Playable discs....5
Getting Started
Hooking up the system....7
Setting the clock....9
CD/MP3 - Play
Loading a disc....10
Playing a disc....10
— Normal Play/Shuffle Play
Playing repeatedly....12
— Repeat Play
Creating your own program....12
— Program Play
Tuner
Presetting radio stations....13
Listening to the radio....15
— Preset Tuning
— Manual Tuning
Using the Radio Data System (RDS)....16
(European model only)
Sound Adjustment
Adjusting the sound ......17
Selecting the sound effect....17
Mixing the sound on a personal computer with another sound source......17
— PC Mixing
(except for AWP-ZP1)
Timer
Falling asleep to music....18
— Sleep Timer
Waking up to music....18
— Play Timer
Display
Turning off the display.... 20
— Power Saving Mode
Viewing information about the disc in the display.... 20
Optional Personal Computer (except for AWP-ZP1)
Connecting a personal computer to the system.... 22
Installing the driver.... 23
Listening to audio files on a personal computer.... 26
Connecting an optional USB component.... 27
(AWP-ZP5 only)
Optional Components
Hooking up optional components...... 28
Listening to audio from a connected component.... 29
Troubleshooting
Problems and remedies.... 30
Messages.... 33
Additional Information
Precautions 34
Specifications 35
List of button locations and reference pages....37
How to use this manual
This manual mainly explains operations using the remote, but the same operations can also be performed using the buttons on the system having the same or similar names.
playable discs
You can play back the following discs on this system. Other discs cannot be played back.
List of playable discs
| Format of discs Disc logo | ||
| Audio CDs |  | |
| CD-R/CD-RW(audio data/MP3 files) |  |  |
 |  | |
Discs that this system cannot play
- An 8 cm disc converted to a standard disc using an adaptor
• C D - R O M s - CD-Rs/CD-RWs other than those recorded in the following formats:
- music CD format
- MP3 format that conforms to ISO9660 ^1) Level 1/Level 2, Joliet, Romeo or Multi Session ^2)
- A disc that has a non-standard shape (e.g., card, heart).
• A disc with paper or stickers on it. - A disc that has the adhesive, cellophane tape, or a sticker still left on it.
1) ISO9660 Format
The most common international standard for the logical format of files and folders on a CD-ROM. There are several specification levels. In Level 1, file names must be in the 8.3 format (no more than eight characters in the name, no more than three characters in the extension “.MP3”) and in capital letters. Folder names can be no longer than eight characters. There can be no more than eight nested folder levels. Level 2 specifications allow file names and folder names up to 31 characters long. Each folder can have up to 8 trees.
For Joliet or Romeo in the expansion format make sure of the contents of the writing software, etc.
2) Multi Session
This is a recording method that enables adding of data using the Track-At-Once method.
Conventional CDs begin at a CD control area called the Lead-in and end at an area called Lead-out. A Multi Session CD is a CD having multiple sessions, with each segment from Lead-in to Lead-out regarded as a single session.
CD-Extra: This format records audio (audio CD data) on the tracks in session 1 and data on the tracks in session 2.
Mixed CD: This format records data on the first track and audio (audio CD data) on the second and subsequent tracks of a session.
Notes on CD-R and CD-RW
- Some CD-Rs or CD-RWs cannot be played on this system depending upon the recording quality or physical condition of the disc, or the characteristics of the recording device. Furthermore, the disc will not play if it has not been correctly finalized. For more information, see the operating instructions for the recording device.
- Discs recorded on CD-R/CD-RW drives may not be played back because of scratches, dirt, recording condition or the driver's characteristics.
- CD-R and CD-RW discs recorded in multi-session that have not ended by “closing the session” are not supported.
- The system may be unable to play MP3 format files that do not have the “.MP3” extension.
- Attempting to play non-MP3 format files that have the “.MP3” extension may result in noise or malfunction.
- With formats other than ISO9660 level 1 and 2, folder names or file names may not be displayed correctly.
-
The following discs take a longer time to start playback.
-
a disc recorded with complicated tree structure.
- a disc recorded in Multi Session.
- a disc to which data can be added (non-finalized disc).
Music discs encoded with copyright protection technologies
This product is designed to playback discs that conform to the Compact Disc (CD) standard. Recently, various music discs encoded with copyright protection technologies are marketed by some record companies. Please be aware that among those discs, there are some that do not conform to the CD standard and may not be playable by this product.
Cautions when playing a disc that is recorded in Multi Session
- If the disc begins with a CD-DA session, it is recognized as a CD-DA (audio) disc, and playback continues until an MP3 session is encountered.
- If the disc begins with an MP3 session, it is recognized as an MP3 disc, and playback continues until a CD-DA (audio) session is encountered.
- The playback range of an MP3 disc is determined by the tree structure of files produced by analyzing of the disc.
- A disc with a mixed CD format will be recognized as a CD-DA (audio) disc.
Getting Started
Hooking up the system
Perform the following procedures 1 to 4 to hook up your system using the supplied cords and accessories. AWP-ZP5 is used for illustration purpose.

1 Connect the speakers.
Connect the right and left speaker cords to the SPEAKERS terminals as shown below.
Main Unit

Speakers

2 Connect the FM and AM antennas.
Set up the AM loop antenna, then connect it.

flowchart
graph LR
    A["Rectangular Component"] --> B["Multi-layered Assembly"]
    B --> C["Close-up of the final component"]
AM loop antenna
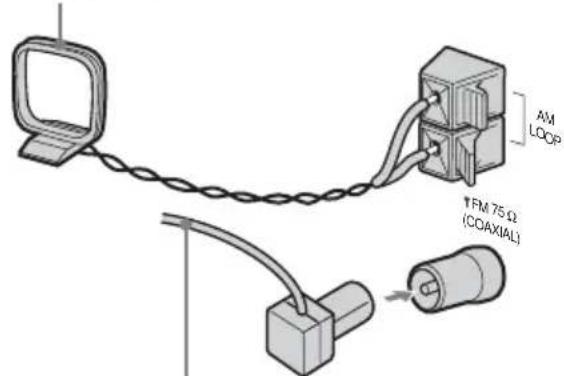
Extend the FM lead antenna horizontally
Note
Keep the antennas away from the speaker cords.
3 For models with a voltage selector, set VOLTAGE SELECTOR to the local power line voltage.
Refer to the print on your system's VOLTAGE SELECTOR for available settings.

110-120V
220-240V
4 Connect the power cord to a wall outlet.
The demonstration appears in the display. When you press I/∅, the system turns on and the demonstration automatically ends. If the plug does not fit the wall socket, detach the supplied plug adaptor (only for models equipped with an adaptor).
Inserting two R6 (size AA) batteries into the remote

natural_image
Diagram showing two mechanical components with arrows indicating movement, no text or symbols presentNote
If you do not use the remote for a long period of time, remove the batteries to avoid possible damage from battery leakage and corrosion.
Tip
When the remote no longer operates the system, replace both batteries with new ones.
When carrying this system
Perform the following procedures to protect the CD mechanism. Use buttons on the unit for the operation.
1 Make sure that the disc is removed from the system.
2 Press FUNCTION repeatedly to switch the function to CD.
3 Hold down ▲ and then press ▶▶▶▶▶ until "STANDBY" appears.
After "STANDBY" disappears, then "LOCK" appears.
4 Unplug the power cord.
Setting the clock
Use buttons on the remote for the operation.
1 Press I/ ^① to turn on the system.
2 Press CLOCK/TIMER SET.
3 Press I◀◀ or ▶▶I repeatedly to set the hour.
4 Press ENTER.
5 Press I◀◀ or ▶▶▶I repeatedly to set the minute.
6 Press ENTER.
The clock starts working.
To adjust the clock
1 Press CLOCK/TIMER SET.
2 Press ◀◀◀ or ▶▶◀ until "CLOCK SET?" appears, then press ENTER.
3 Do the same procedures as steps 3 to 6 above.
Notes
- The clock settings are canceled when you disconnect the power cord or if a power failure occurs.
- You cannot set the clock in Power Saving Mode (page 20).
CD/MP3 – Play
Loading a disc
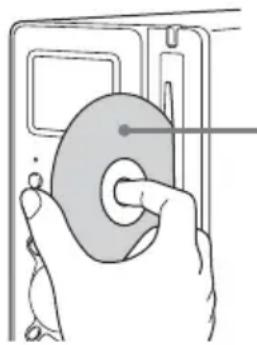
Insert a disc in the disc slot with the label side facing right.
natural_image
Hand inserting a coin into a device (no text or symbols visible)When you play a disc, insert it with the label side facing right.
Notes
- When you turn on the system, the disc is not pulled into the disc slot until “CD No Disc” appears in the display. Do not attempt to push in the disc until “CD No Disc” appears.
- When pressing on the unit and then re-inserting the disc that appears in the disc slot, do not simply push in the disc. Remove the disc from the disc slot and then re-insert it.
- Do not turn off the system with a disc halfway inserted in the disc slot. Doing so may cause the disc to fall.
- Do not use a disc with tape, seals or paste on it as this may cause malfunction.
- Do not load an 8 cm disc with an adaptor. Doing so may cause the system to malfunction.
- When you eject a disc, handle the disc by its edge. Do not touch the surface.
- If you load a disc that is not playable by this system, it will be ejected automatically.
Playing a disc
— Normal Play/Shuffle Play
This system lets you play audio CDs and discs with MP3 audio tracks.
Example: When playing a disc

1 Press CD (or FUNCTION repeatedly) to switch the function to CD.
2 Press PLAY MODE in stop mode repeatedly until the mode you want appears.
| Select To play | |
| No display(Normal Play) | The tracks on the disc in original order. |
| ALBM(Normal Play) | All MP3 audio tracks in the album on the disc in original order.When playing a non-MP3 disc, Album Play performs the same operation as Normal Play (no display). |
| SHUF(Shuffle Play) | All tracks on the disc in random order. |
| ALBM SHUF(Shuffle Play) | The MP3 audio tracks in the album on the disc in random order.When playing a non-MP3 disc, Album Shuffle Play performs the same operation as SHUF Play. |
| PGM(Program Play) | The tracks on the disc in the order you want them to be played (see “Creating your own program” on page 12). |
3 Press ▶ (or CD ▶ on the unit).
Other operations
| To Do this | |
| Stop play Press ■. | |
| Pause Press ■■. Press again to resume play. | |
| Select a track | Press ◀◀ or ▶▶▶ repeatedly. |
| Select an album of MP3 | Press ALBUM + or – repeatedly after step 2. |
| Find a point in a track* | Keep pressing ◀◀ or ▶▶ during playback and release it at the desired point. |
| Switch to CD function from another source | Press CD (or CD ▶ on the unit) (Automatic Source Selection). |
| Remove a disc Press ▲ on the unit. | |
* You may not be able to search between multiple files. Also, the time may not be displayed correctly for some files.
Notes
- You cannot change the play mode during playback.
- Some time may be needed to start playback of discs recorded in complex configurations such as many layers.
- When the disc is inserted, the player reads all the tracks on that disc. If there are many albums or non-MP3 audio tracks on the disc, it may take a long time for play to begin or for the next MP3 audio track to start play.
- Do not save unnecessary albums or tracks other than MP3 ones in the disc to be used for MP3 listening. We recommend that you do not save other types of tracks or unnecessary albums on a disc that has MP3 audio tracks.
- An album that does not include an MP3 audio track is skipped.
• Maximum album number: 150 (including root folder) - The maximum number of MP3 audio tracks and albums that can be contained on a single disc is 300.
- Playback is possible up to 8 levels.
- MP3 audio tracks are sorted by file name and played back in alphabetical order.
- Depending on the encoding/writing software, recording device, or the recording media used at the time an MP3 audio track is recorded, you may encounter such problems as disabled playback, sound interruptions, and noise.
Tip
When disc access takes a long time, set “CD POWER ON” by CD power manage function (page 14).
To play a track by entering the track number
You can also select the track you want using the remote during Normal Play. Press the number button(s). Playback automatically starts.
Playing repeatedly
— Repeat Play
You can play all the tracks or a single track on a disc repeatedly.
Press REPEAT repeatedly during playback until "REP" or "REP1" appears.
REP: For all the tracks up to five times.
REP1: For a single track only.
To cancel Repeat Play
Press REPEAT repeatedly until both “REP” and “REP1” disappear.
Note
When you select “REP1”, that track is repeated endlessly until “REP1” is canceled.
Creating your own program
— Program Play
You can make a program of up to 25 steps.
1 Press CD (or FUNCTION repeatedly) to switch the function to CD.
2 Press PLAY MODE in stop mode repeatedly until "PGM" appears.
3 Press I◀◀ or ▶▶▶I repeatedly until the desired track number appears.
When programing the MP3 audio tracks, press ALBUM + or – to select album, then press ◀◀◀ or ▶▶▶ repeatedly until the desired track number appears.
Selected track number
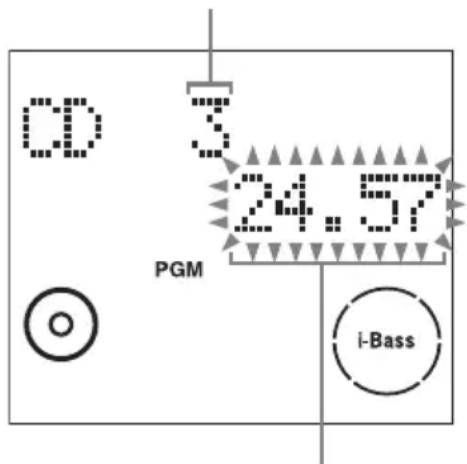
Total playing time
4 Press ENTER.
The track is programmed.
The step number appears, followed by the last programmed track number.
5 To program additional tracks, repeat steps 3 and 4.
6 Press ▶ (or CD ▶ on the unit).
Program Play starts.
Other operations
To Do this
| Cancel Program Play Press PLAY MODE instop mode repeatedly until“PGM” disappears. |
Clear a track from the end Press CLEAR in stop mode.
Tips
- The program you made remains after Program Play finishes. To play the same program again, press ▶ (or CD ▶ on the unit). However, the program is cleared when you press ▲ on the unit.
- “--.-” appears when the total CD program time exceeds 100 minutes, or when you select a CD track whose number is 21 or over, or when you select an MP3 audio track.
Tuner
Presetting radio stations
You can preset up to 20 FM stations and 10 AM stations. You can then tune in any of those stations simply by selecting the corresponding preset number.
Automatic tuning preset
You can automatically tune in all of the stations that can be received in your area and then manually store the radio frequency of the desired stations.
1 Press TUNER BAND (or FUNCTION repeatedly) to switch the function to tuner.
2 Press TUNER BAND repeatedly to select "FM" or "AM".
3 Press TUNING MODE repeatedly until "AUTO" appears in the display.
4 Press TUNING + or -.
The frequency changes as the system scans for a station. Scanning stops automatically when a station is tuned in. At that time, “TUNED” and “STEREO” (for stereo program only) appear.
If "TUNED" does not appear and the scanning does not stop
Set the frequency of the desired radio station as described in steps 3 and 4 of “Manual tuning preset” (page 14).
5 Press TUNER MEMORY.
The preset number flashes. Perform steps 6 and 7 while the preset number flashes.

6 Press I◀◀ or ▶▶▶I repeatedly to select the desired preset number.
7 Press ENTER.
8 Repeat steps 2 through 7 to preset other stations.
Tip
Press ■ to stop scanning.
Manual tuning preset
You can manually tune in and store the radio frequency of the desired stations.
1 Press TUNER BAND (or FUNCTION repeatedly) to switch the function to tuner.
2 Press TUNER BAND repeatedly to select "FM" or "AM".
3 Press TUNING MODE repeatedly until "AUTO" and "PRESET" disappear from the display.
4 Press TUNING + or – repeatedly to tune in the desired station.
5 Press TUNER MEMORY.
6 Press I◀◀ or ▶▶▶I repeatedly to select the desired preset number.
7 Press ENTER.
8 Repeat steps 2 through 7 to preset other stations.
Other operations
| To Do this | |
| Tune in a station with a weak signal | Follow the procedure described in “Manual tuning preset” (page 14). |
| Set another station to the existing preset number | Start over from step 2. After step 5, press ◀◀◀ or ▶▶▶ repeatedly to select the preset number you want to store the station. |
To improve tuner reception
When tuner reception is poor, set CD player power off by CD power manage function. CD power is factory set to on.
1 Press CD (or FUNCTION repeatedly).
2 Press I/⏻ to turn off the system.
3 After "STANDBY" stops flashing, press and hold ■ then I/⏻ on the unit. "CD POWER OFF" appears.
To set CD power on
Repeat the procedures above and "CD POWER ON" appears.
Notes
- When “CD POWER OFF” is selected, disc access time is increased.
- You cannot change the setting in Power Saving Mode (page 20).
To change the AM tuning interval (except for European model)
The AM tuning interval is factory-preset to 9 kHz (or 10 kHz for some areas). To change the AM tuning interval, tune in any AM station first, then turn off the system. While holding ▶▶▶▶▶ on the unit, press I/⏻ on the unit. When you change the interval, all the AM preset stations are erased. To reset the interval, repeat the same procedure.
Note
You cannot change the AM tuning interval in Power Saving Mode (page 20).
Tips
- The preset stations are retained for about a day even if you disconnect the power cord or if a power failure occurs.
- To improve broadcast reception, adjust the supplied antennas, or connect a commercially available external antenna.
Listening to the radio
You can listen to a radio station either by selecting a preset station, or by manually tuning in the station.
Listening to a preset station
— Preset Tuning
Preset radio stations in the tuner's memory first (see “Presetting radio stations” on page 13).
1 Press TUNER BAND (or FUNCTION repeatedly) to switch the function to tuner.
2 Press TUNER BAND repeatedly to select "FM" or "AM".
3 Press TUNING MODE repeatedly until "PRESET" appears in the display.
4 Press I◀◀ or ▶▶I repeatedly to select the desired preset station.
Listening to non-preset radio station
— Manual Tuning
1 Press TUNER BAND (or FUNCTION repeatedly) to switch the function to tuner.
2 Press TUNER BAND repeatedly to select "FM" or "AM".
3 Press TUNING MODE repeatedly until "AUTO" and "PRESET" disappear from the display.
4 Press TUNING + or – repeatedly to tune in the desired station.
Note
When tuner function is selected as the current function and CD is pressed to select CD during “CD POWER OFF”, it may take some time to switch the function (page 14).
Tips
- To improve broadcast reception, adjust the supplied antennas, or connect a commercially available external antenna.
- When using a personal computer and listening to the radio, connecting a commercially available external antenna is recommended.
- When an FM stereo program has static noise, press FM MODE repeatedly until “MONO” appears. There will be no stereo effect, but the reception will improve.
- Press TUNING MODE repeatedly until “AUTO” appears in step 3 above, then press TUNING + or -. The frequency indication changes and scanning stops when the system tunes in a station (Automatic Tuning).
Using the Radio Data System (RDS)
(European model only)
What is the Radio Data System?
Radio Data System (RDS) is a broadcasting service that allows radio stations to send additional information along with the regular program signal. RDS is available only on FM stations.*
Note
RDS may not work properly if the station you are tuned in is not transmitting the RDS signal properly or if the signal is weak.
* Not all FM stations provide RDS service, nor do they provide the same types of services. If you are not familiar with the RDS system, check with your local radio stations for details on RDS services in your area.
Receiving RDS broadcasts
Simply select a station from the FM band.
When you tune in a station that provides RDS services, the station name appears in the display.
To check the RDS information
Each time you press DISPLAY, the display changes cyclically as follows:
Station name ^1) → Preset number ^2) and frequency → Clock display
1) If the RDS broadcast is not properly received, the station name may not appear in the display.
2) Preset number is displayed only if you preset radio stations.
Sound Adjustment
Adjusting the sound
You can reinforce the bass and create a more powerful sound.
Press i-Bass.
Each time you press the button, the display changes as follows:
i-Bass ON* ↔ i-Bass OFF
* The i-Bass indicator changes.
Selecting the sound effect
You can select the sound effect to enjoy more powerful sound.
Press EQ.
Each time you press the button, the display changes cyclically as follows:
To cancel the sound effect
Press EQ repeatedly until "OFF" appears.
Mixing the sound on a personal computer with another sound source
— PC Mixing (except for AWP-ZP1)
You can mix the sound on a personal computer with another sound source.
Press PC MIXING.
Each time you press the button, the mixing changes as follows:
MIXING ON MIXING OFF
Notes
- PC Mixing is not active during PC function.
- In the following cases, PC Mixing is canceled.
- when the function is changed.
– when the system is turned on/off.
Tip
The MIXING indicator lights up while PC Mixing is activated.
Timer
Falling asleep to music
— Sleep Timer
You can set the system to turn off after a certain time, so that you can fall asleep to music.
Press SLEEP.
Each time you press the button, the minute display (the turn-off time) changes cyclically as follows:
$$ \begin{array}{l}\text { AUTO } ^ {*} \rightarrow 9 0 \text { min } \rightarrow 8 0 \text { min } \rightarrow \dots \rightarrow 1 0 \text { min }\\rightarrow \text { OFF }\end{array} $$
* The system automatically turns off in 100 minutes or after the current CD finishes playing.
Other operations
| To Do this | |
| Check the remaining time* | Press SLEEP once. |
| Change the time to turn off | Press SLEEP repeatedly to select the time you want. |
| Cancel the Sleep Timer function | Press SLEEP repeatedly until “OFF” appears. |
* You cannot check the remaining time if you select "AUTO".
Tip
You can use the Sleep Timer, even if you have not set the clock.
Waking up to music
—Play Timer
You can wake up to music at a preset time. Make sure you have set the clock (see “Setting the clock” on page 9).
Use buttons on the remote for the operation.
1 Prepare the sound source you want to play.
- CD: Load a disc. To start from a specific track, make a program (see “Creating your own program” on page 12).
- Tuner: Tune in the preset radio station (see “Listening to the radio” on page 15).
2 Press VOLUME + or - to adjust the volume.
3 Press CLOCK/TIMER SET.
4 Press I◀◀ or ▶▶I repeatedly until "TIMER SET?" appears, then press ENTER.
“ON TIME” appears and the hour indication flashes.
5 Set the time to start playing.
Press ◀◀◀ or ▶▶▶ repeatedly to set the hour, then press ENTER.
The minute indication flashes.
Press ◀◀◀ or ▶▶▶ repeatedly to set the minute, then press ENTER.
6 Set the time to stop playing following the same procedure as step 5.
7 Press I◀◀ or ▶▶▶I repeatedly until the desired sound source appears.
Each time you press the button, the display changes as follows:
$$ \text { TUNER } \leftrightarrow \text { CD PLAY } $$
8 Press ENTER.
“PLAY TIMER”, the start time, the stop time and the sound source appear in turn, then the original display returns.
9 Press I/⏻ to turn off the system.
Other operations
To Do this
| Activate the timer/check the setting | 1 Press CLOCK/TIMER SELECT.2 Press ◀◀◀ or ▶▶▶I repeatedly until “SELECT TIMER ON?” appears, then press ENTER. |
| Change the setting Start over from step 1. | |
| Cancel the timer | 1 Press CLOCK/TIMER SELECT.2 Press ◀◀◀ or ▶▶▶I repeatedly until “SELECT TIMER OFF?” appears, then press ENTER. |
Notes
- If you use the Play Timer and the Sleep Timer at the same time, the Sleep Timer has priority.
- Do not operate the system from the time the system turns on until the play starts (about 15 seconds before the preset time).
- If the system is on about 15 seconds before the preset time, the Play Timer will not be activated.
- You cannot use the optional component connected to MD jacks or USB port (except for AWP-ZP1) as the sound source for Play Timer.
Display
Turning off the display
— Power Saving Mode
The demonstration display (display window and buttons lighting and flashing even when the system power is off) and the clock display can be turned off to minimize the amount of power consumed during standby (Power Saving Mode).
Press DISPLAY repeatedly while the system is off until the demonstration display or the clock display disappears.
To cancel Power Saving Mode
Press DISPLAY while the system is off. Each time you press the button, the display switches cyclically as follows:
Demonstration display → Clock display* → No display (Power Saving Mode)
* The clock is displayed only if you set the clock.
Tips
- I/↓ indicator lights up even in Power Saving Mode.
- The timer continues to operate in Power Saving Mode.
Viewing information about the disc in the display
You can check the playing time and remaining time of the current track or that of the disc.
Checking the remaining time and titles (CD/MP3)
Press DISPLAY during Normal Play.
Each time you press the button, the display changes cyclically as follows:
Current track number and elapsed playing time → Current track number and remaining time ^1) → Remaining time of the disc ^2) → Track title (disc with MP3 audio tracks ^3) only) → Album name (disc with MP3 audio tracks only) → Clock display
1) “--.-” appears when playing back MP3 audio tracks.
2) “--.-” appears in program play mode or when playing back MP3 audio tracks.
3) When you play back a track with an ID3 tag ver.1 or ver.2, the ID3 tag appears. The ID3 tag displays only the track title information.
Checking the total playing time and titles (CD/MP3)
Press DISPLAY in stop mode.
Each time you press the button, the display changes cyclically as follows:
■ When a CD/MP3 is in Normal Play mode
TOC display ^1) or total album number of the disc ^2) or total track number of the current album ^3) Volume label ^4) Album name ^4) Clock display
1) TOC = Table of Contents; displays total number of tracks on the disc, and total playing time of the disc
^2) For discs with MP3 audio tracks in Normal play or SHUF mode
3) For discs with MP3 audio tracks in ALBM or ALBM SHUF mode
4) For discs with MP3 audio tracks, album titles or volume label may not be displayed depending on the play mode.
■ When a CD/MP3 is in Program Play mode
The last track number of the program and the total playing time Total track number of the program Volume label* Clock display
* For discs with MP3 audio tracks
Checking the station name (TUNER)
Press DISPLAY while listening to the radio.
Each time you press the button, the display changes cyclically as follows:
Station name ^1) → Preset number ^2) and frequency → Clock display
1) European model only
2) Preset number is displayed only if you preset radio stations (page 13).
Notes
- The total playing time is not displayed for a disc with MP3 audio tracks.
• ID3 tag applies to version 1 and version 2. - If the MP3 audio track you play back has an ID3 tag, the ID3 tag information is displayed as a track title.
- In the following cases, elapsed playing time and remaining time of the track may not be displayed accurately.
- when an MP3 audio track of VBR (Variable Bit Rate) is played.
- when fast forward or fast reverse is performed.
Optional Personal Computer (except for AWP-ZP1)
Connecting a personal computer to the system
Use the supplied USB cable for the connection. You can listen to the audio recorded in the computer's hard disk or on a CD-ROM loaded on the CD-ROM drive through the system's speakers.

Required system equipment
The following environments are necessary for the computer to connect to the system. The system cannot function in environments other than the following.
• USB port that supports USB 1.1 or higher
• IBM PC/AT compatible or Macintosh
- Operating System installed at the factory:
- For Windows users
Windows 98 Second Edition, Windows 2000 Professional, Windows Millennium Edition, Windows XP Professional/Home Edition
- For Macintosh users
Mac OS 9.0 to 9.2 or X 10.1 to 10.3
Notes
- Operation is not guaranteed for all the recommended computer environments mentioned above.
- Operation is not guaranteed in personally constructed PCs or operating systems.
- Operation is not guaranteed in environments upgraded to the other operating systems.
- You cannot perform system operations from the computer side, or computer operations from the system side.
- Operation is not guaranteed when the computer and the system are connected through a USB hub or a USB extension cable.
- For connection, be sure to use the supplied USB cable and directly connect the USB port of this system and the USB port on the computer. If you connect a keyboard or etc. between this system and the computer, the system cannot function. Also see the operation manuals supplied with the computer.
- When you connect the system and your computer with the supplied USB cable, the computer's audio output device setting automatically switches to USB audio device. To return to the original setting, make the audio output device setting again with “Multimedia” or “Sounds and Multimedia” (for Windows 2000/Me/98 Second Edition) or “Sounds, Speech, and Audio Devices” (for Windows XP) on the Control Panel of the computer.
Installing the driver
When first connecting the computer to the system's USB port, you must install the driver. The driver is supplied as standard with the OS. The installation procedure differs according to the OS type. Also see the operation manual supplied with the computer.
For Windows 98 Second Edition/Windows Millennium Edition
To install the USB driver
1 Connect the system to the computer with the supplied USB cable (see page 22).
2 Start up the computer.
3 Press I/⏻ to turn on the system.
4 Press PC (or FUNCTION repeatedly) to switch the function to PC.
The computer automatically detects the system and begins the device (OS standard driver) installation.
5 Follow the instructions appearing on the monitor.
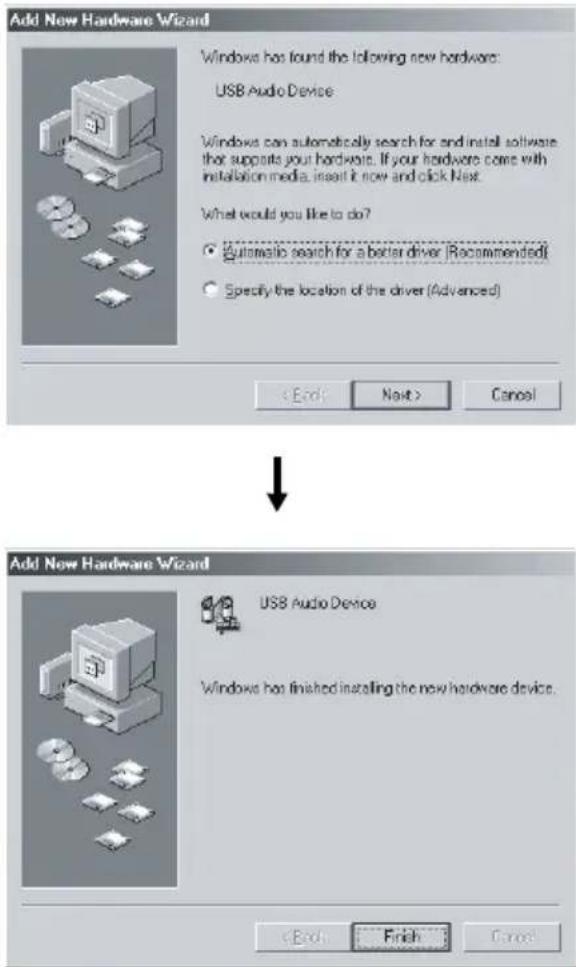
The illustrations above show an example Windows Millennium Edition screen.
Notes
- The OS CD-ROM may be required depending on your computer. In this case, follow the instructions and set the CD-ROM in the drive.
- Do not disconnect or connect the USB cable during detection.
To verify the status of the installed devices
Be sure to check the status of the installed devices after you have installed their drivers.
1 Open the [Control Panel].
In the Start menu, point to [Settings] and click [Control Panel].
2 Double-click the [System] icon. The "System Properties" dialog box appears.
Note
(For Windows Me) If you cannot find the [System] icon, click "View all Control Panel options".
3 Click the [Device Manager] tab.
Make sure that "View devices by type" is selected.
4 Make sure that the following items are listed in the "Device Manager" dialog box.
- "USB Audio Device" under "Sound, video and game controllers"
- "USB Composite Device" under "Universal Serial Bus controllers"

The illustration above shows an example Windows Millennium Edition screen.
Note
If you do not see these items or if a “!” is displayed on top of any of the icons, it means the respective device driver is not installed or recognized by the OS. In this case, install the device driver again.
5 Click [OK] to close the "System Properties" dialog box.
Notes
- Other items in the “Device Manager” list may differ depending on your computer environment.
- If the devices are not recognized, disconnect and reconnect the USB cable, and try to automatically install the drive drivers again. If the devices still are not recognized, reboot the computer.
For Windows 2000 Professional or Windows XP Professional/Home Edition
To install the USB driver
1 Connect the system to the computer with the supplied USB cable (see page 22).
2 Start up the computer.
3 Press I/⏻ to turn on the system.
4 Press PC (or FUNCTION repeatedly) to switch the function to PC.
The computer automatically detects the system and begins the device (OS standard driver) installation. Installation finishes automatically.
Notes
- The OS CD-ROM may be required depending on your computer. In this case, follow the instructions and set the CD-ROM in the drive.
- Do not disconnect or connect the USB cable during detection.
Tip
To not install the driver, follow the instructions appearing on the monitor.
To verify the status of the installed devices
Be sure to check the status of the installed devices after you have installed their drivers.
1 Open the [Control Panel].
In the Start menu, point to [Settings] and click [Control Panel].
(For Windows XP) In the Start menu, click [Control Panel], and then click [Switch to Classic View] on the left panel of the window.
2 Double-click the [System] icon. The "System Properties" dialog box appears.
3 Click the [Hardware] tab.
4 Click the [Device Manager] button.
Make sure that "devices by type" is selected in the "View" menu.
5 Make sure that the following items are listed in the "Device Manager" dialog box.
- "USB Audio Device" under "Sound, video and game controllers"
- "USB Composite Device" under "Universal Serial Bus controllers"
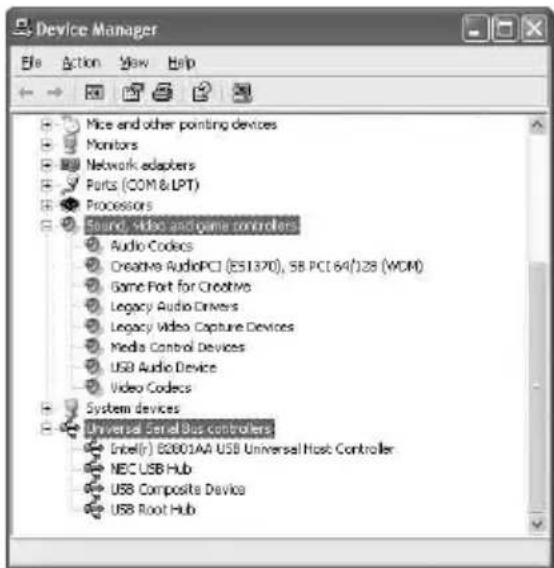
The illustration above shows an example Windows XP Professional screen.
Notes
- Other items in the “Device Manager” list may differ depending on your computer environment.
- If the devices are not recognized, disconnect and reconnect the USB cable, and try to automatically install the drive drivers again. If the devices still are not recognized, reboot the computer.
For Mac OS 9.0 to 9.2
To install the USB driver
1 Connect the system to the computer with the supplied USB cable (see page 22).
2 Start up the computer.
3 Press I/⏻ to turn on the system.
4 Press PC (or FUNCTION repeatedly) to switch the function to PC.
For Mac OS X 10.1 to 10.3
To install the USB driver
1 Connect the system to the computer with the supplied USB cable (see page 22).
2 Start up the computer.
3 Press I/⏻ to turn on the system.
4 Press PC (or FUNCTION repeatedly) to switch the function to PC.
5 Select [System Preferences...] in the Apple menu.
6 Click the [Sound] icon in the [Hardware] menu.
7 Click the [Output] tab, then click to select [ZP Hi-Fi Component System] or [USB Audio DAC] in the [Choose a device for sound output] window.
Listening to audio files on a personal computer
1 Connect the system to the computer with the supplied USB cable (see page 22).
2 Start up the computer.
Wait for the OS to start up properly.
3 Press I/ to turn on the system.
4 Press PC (or FUNCTION repeatedly) to switch the function to PC.
5 Perform the operations on the computer side to start playback.
6 Press VOLUME + or – (or turn VOLUME control on the unit) to adjust the volume.
Notes
- To adjust the volume, operate the computer and system volume control together. Even if you adjust the volume on the computer side, the system volume cannot be adjusted.
- When playing back music through the USB port, do not turn off the system. This may cause the computer to malfunction.
- Before disconnecting the USB cable (supplied), be sure to first quit the software.
- The sound may skip or there may be noise depending on the computer environment.
- Also see the operation manuals supplied with the computer and the music playback software.
Connecting an optional USB component
(AWP-ZP5 only)
This system has two USB hub ports. By using this system's USB hub ports, you can operate USB components from a computer through this system. You can connect an optional USB component with a maximum current consumption of 100 mA or less to each port. For details on compatible USB components, refer to the operating instructions “USB Hub Port Information” provided with this system.
1 Connect the system to a computer with the supplied USB cable (see "Connecting a personal computer to the system" on page 22).
When the system power is turned on, the USB indicator lights up.

2 Connect an optional USB component to this system's USB hub port.
If the USB indicator turns off
The connected USB component has a maximum current consumption in excess of 100 mA, so it cannot be used with this system. The USB STATUS lamp on the unit lights up. In this case, follow the procedures below.
1 Disconnect the optional USB component from this system.
2 When instructions are displayed on the PC monitor, please follow them.
If any instructions are not displayed on the PC monitor, disconnect the USB cable from personal computer and reconnect it.
If the USB STATUS lamp on the unit does not turn off after performing the above measures, restart the computer.
Notes
- You cannot use a USB component with a maximum current consumption in excess of 100mA .
- When connecting this system's USB hub ports to Hi-Speed USB components, the transfer rate will be slower than when connected directly to the computer.
- Operation is not guaranteed for all the recommended USB components.
- Operation is not guaranteed when the computer and the system are connected through a USB hub or a USB extension cable.
- Do not connect a USB bus power hub port (that receives power from other components) to this system's USB ports.
- When the USB component has an AC power adaptor, be sure to connect the AC power adaptor to a power supply.
Tips
- This system's USB hub is a full-speed (maximum transfer rate 12 Mbps), bus power type (type that receives power from a computer).
- You can use the optional USB component even when;
– The system power is turned off.
– The function selection is other than PC.
Optional Components
Hooking up optional components
To enhance your system, you can connect optional components. Refer to the operating instructions provided with each component. AWP-ZP5 is used for illustration purpose.

A MD jacks
Use audio cords (not supplied) to connect an optional analog component (MD deck or VCR, etc.) to these jacks. You can then listen to the sound from the component.
B USB port (except for AWP-ZP1)
Use the supplied USB cable to connect a personal computer (see “Optional Personal Computer (except for AWP-ZP1)” on page 22).
C USB hub ports (AWP-ZP5 only)
Connect an optional USB component (USB memory key, etc.) to these USB hub ports (see "Connecting an optional USB component" on page 27).
Listening to audio from a connected component
1 Connect audio cords.
See “Hooking up optional components” on page 28.
2 Press FUNCTION repeatedly (or MD\* on the unit) until "MD" appears.
Start playing the connected component.
* AWP-ZP1 only
Troubleshooting
Problems and remedies
Should you encounter a problem with your system, do the following:
1 Make sure the power cord and speaker cords are correctly and firmly connected.
2 Find your problem in the troubleshooting checklist below and take the indicated corrective action.
If the problem persists after doing all of the above, consult your nearest Aiwa dealer.
When the I/ ^① indicator flashes
Immediately unplug the power cord and check the following items.
- If your system has a voltage selector, is the voltage selector set to the correct voltage? Check the voltage for your region, then make sure the voltage selector is set correctly.
- Are the + and – speaker cords short-circuited?
- Are you using the supplied speakers?
- Is anything blocking the ventilation holes on the rear of the system?
Check all the above items and fix any problems found. After I/○ indicator stops flashing, reconnect the power cord and turn on the system. If the indicator still flashes, or if the cause of the problem cannot be found even after checking all the above items, consult your nearest Aiwa dealer.
General
The display starts flashing as soon as you plug in the power cord even though you have not turned on the system (see step 4 of "Hooking up the system" (page 7)).
- Press DISPLAY twice while the system is off. The demonstration disappears.
“--:--” appears in the display.
- A power interruption has occurred. Set the clock (page 9) and timer settings (page 19) again.
The clock setting/radio presetting/timer is canceled.
- Redo the following:
- “Setting the clock” (page 9)
- “Presetting radio stations” (page 13)
- “Falling asleep to music” and “Waking up to music” (page 18)
There is no sound.
- Press VOLUME + (or turn VOLUME control on the unit clockwise).
- Make sure the headphones are not connected.
- Check the speaker connections (page 7).
- The system is in pause mode. Press ▶ (or CD ▶ on the unit) to return to normal play mode.
Personal computer sounds are heard when functions other than PC are selected (except for AWP-ZP1).
- Set PC Mixing to off.
There is severe hum or noise.
- Move the system away from the source of noise.
- Connect the system to a different wall outlet.
- Install a noise filter (commercially available) to the mains line.
The timer cannot be set.
- Set the clock again (page 9).
The timer does not function.
- Activate the timer and “ ⏻ PLAY” lights up in the display (page 19).
- Check the timer setting and set the correct time (page 19).
- Cancel the Sleep Timer function (page 18).
- Make sure the clock is correctly set.
The remote does not function.
- Remove the obstacle.
- Move the remote closer to the system.
- Point the remote at the system's sensor.
- Replace the batteries (R6/size AA).
- Locate the system away from the fluorescent light.
The system does not turn off.
- Press DISPLAY repeatedly until the demonstration display disappears.
Speakers
Sound comes from only one channel, or the left and right volumes are unbalanced.
- Check the speaker connections and placement.
CD/MP3 player
"LOCKED" appears.
- Contact your Aiwa dealer or local authorized Aiwa service facility.
The disc does not eject.
- Consult your nearest Aiwa dealer.
Play does not start.
- Check whether a disc is loaded. (The disc indicator lights up when a disc is loaded.)
- Wipe the disc clean (page 35).
- Replace the disc.
- Insert the disc that this system can play.
- Insert the disc correctly.
- Insert the disc in the slot with the label side facing right.
- Remove the disc and wipe away the moisture on the disc, then leave the system turned on for a few hours until the moisture evaporates.
- Press ▶ (or CD ▶ on the unit) to start play.
Disc access takes a long time.
- Set “CD POWER ON” by CD power manage function (page 14).
The sound skips.
- Wipe the disc clean (page 35).
- Replace the disc.
- Try moving the system to a place without vibration (e.g., on top of a stable stand).
- Try moving the speakers away from the system, or placing them on separate stands. When you listen to a track with bass sounds at high volume, the speaker vibration may cause the sound to skip.
Play does not start from the first track.
- Press PLAY MODE repeatedly until both “PGM” and “SHUF” disappear to return to Normal Play.
MP3 audio track cannot be played back.
- Recording was not performed according to the ISO9660 level 1 or level 2 format, Joliet or Romeo in the expansion format.
- The MP3 audio track does not have the “.MP3” extension.
- The file is not stored in MP3 format.
- Discs containing files other than MPEG 1 Audio Layer-3 files cannot be played.
MP3 audio tracks take longer to begin play back than others.
• After the system reads all tracks on the discs, playback may take more time than usual if:
– the number of albums or tracks on the disc is very large.
– the album and track organization structure is very complex.
The album name, track title and ID3 tag do not appear correctly.
- Use a disc that conforms with ISO9660 level 1, level 2, Joliet or Romeo in the expansion format.
• The disc ID3 tag is not ver. 1 or ver. 2. - Only up to 30 characters of ID3 tags are displayed.
- The characters that can be displayed by this unit are as follows:
- Alphabet letters
- Numbers (0 to 9)
- Symbols (< > * +, - / [ ] _)
Other characters may not be displayed correctly.
Tuner
Severe hum or noise/stations cannot be received.
- Set the proper band and frequency (page 13).
- Connect the antenna properly (page 8).
- Find a place and an orientation that provide good reception, then set up the antenna again. If you cannot obtain good reception, we recommend you connect a commercially available external antenna.
- The supplied FM lead antenna receives signals along its entire length, so make sure you extend it fully.
- Keep the antennas away from the system and other components.
- Consult your nearest Aiwa dealer if the supplied AM antenna has come off the plastic stand.
- Try turning off surrounding electrical equipment.
- Set “CD POWER OFF” by CD power manage function (page 14).
A stereo FM program cannot be received in stereo.
- Press FM MODE until “MONO” disappears in the display.
Noise is heard while loading/removing a disc.
- Change the location of the AM antenna.
Personal computer (except for AWP-ZP1)
There is no sound.
- Connect the personal computer properly.
- Press PC (or FUNCTION repeatedly) to select "PC" (page 26).
- Select the standard audio device in the “Multimedia” or “Sounds and Multimedia” (for Windows 2000/Me/98 Second Edition) or “Sounds, Speech, and Audio Devices” (for Windows XP) on the Control Panel of the computer.
Optional components
There is no sound.
- Refer to General item “There is no sound.” (page 30) and check the condition of the system.
- Connect the component properly (page 28) while checking:
- if the cords are connected properly.
- if the cord plugs are firmly inserted all the way.
- Turn on the connected component.
- Refer to the operating instructions supplied with the connected component and start playing.
- Press FUNCTION repeatedly (or MD* on the unit) to select “MD” (page 29).
* AWP-ZP1 only
The sound is distorted.
- Set the volume of the connected component lower.
If the system still does not operate properly after performing the above measures, reset the system as follows:
1 Disconnect the power cord.
2 Reconnect the power cord.
3 Press I/ to turn on the system.
4 Hold down I/⏻ and then press i-Bass on the unit for 2 seconds.
The system is reset to the factory settings. You should set the settings you made, such as the preset stations, clock, and timer.
Messages
One of the following messages may appear or flash in the display during operation.
CD/MP3
CD No Disc
There is no disc in the player.
CD NO STEP
All of the programmed tracks have been erased.
OVER
You have reached the end of the disc while pressing
▶▶ during playback or pause.
Push STOP!
You pressed PLAY MODE during playback.
Reading
The system is reading TOC information of the disc.
Some buttons are not available.
Step Full!
You tried to program 25 or more tracks (steps).
Tuner
Complete!
The preset operation ended normally.
Timer
SET CLOCK!
The clock has not been set, therefore the timer setting is unavailable. Set the clock to the correct time, then set the timer.
SET TIMER!
You cannot select the timer function when the Play Timer is not set.
TIME NG!
The Play Timer start and end times are set to the same time.
Additional Information
Precautions
On operating voltage
Before operating the system, check that the operating voltage of your system is identical with the voltage of your local power supply.
On safety
- The unit is not disconnected from the AC power source (mains) as long as it is connected to the wall outlet, even if the unit itself has been turned off.
- Unplug the system from the wall outlet (mains) if it is not to be used for an extended period of time. To disconnect the power cord (mains), pull it out by the plug. Never pull the cord itself.
- Should any solid object or liquid fall into the system, unplug the system and have it checked by qualified personnel before operating it any further.
- AC power cord must be changed only at the qualified service shop.
On placement
- Do not place the system in an inclined position.
- Do not place the system in locations where it is;
-Extremely hot or cold
– Dusty or dirty - Very humid
– Subject to vibrations
– Subject to direct sunlight.
- Use caution when placing the unit or speakers on surfaces that have been specially treated (with wax, oil, polish, etc.) as staining or discoloration of the surface may result.
On heat buildup
- Although the system heats up during operation, this is not a malfunction.
- Place the system in a location with adequate ventilation to prevent heat build-up in the system.
- If you continuously use this system at a high volume, the cabinet temperature of the top, side and bottom rises considerably. To avoid burning yourself, do not touch the cabinet.
- To prevent a malfunction, do not cover the ventilation hole.
In case color irregularity is observed on nearby a TV screen
With the magnetically shielded type of speaker system, the speakers can be installed near a TV set. However, color irregularity may still be observed on the TV screen depending on the type of your TV set.
If color irregularity is observed...
Turn off the TV set once, then turn it on after 15 to 30 minutes.
If color irregularity is observed again...
Place the speakers farther away from the TV set.
On operation
- If the system is brought directly from a cold to a warm location, or is placed in a very damp room, moisture may condense on the lens inside the CD player. Should this occur, the system will not operate properly. Remove the disc and leave the system turned on for about an hour until the moisture evaporates.
- When you move the system, take out any disc.
If you have any questions or problems concerning your system, please consult your nearest Aiwa dealer.
Notes on discs
- Before playing, clean the disc with a cleaning cloth. Wipe the disc from the center out.
- Do not use solvents such as benzine, thinner, commercially available cleaners or anti-static spray intended for vinyl LPs.
- Do not expose the disc to direct sunlight or heat sources such as hot air ducts, nor leave it in a car parked in direct sunlight.
- Do not use discs encircled with a protection ring. This may cause a malfunction to the system.
- When using discs that have glue or similar tacky substance on the label side of the disc or that used a special ink when the label was printed, there is a chance that the disc or label may become attached to parts inside this unit. When this occurs, it may not be possible to remove the disc, and may also cause this unit to malfunction. Be sure to check that the label side of the disc is not sticky before using. The following types of disc should not be used:
– Rental or used discs with attached seals where the glue extends beyond the seal. The perimeter of the seal on the disc is tacky.
– Discs that have labels printed using a special ink that feels tacky when touched.
- Discs with non-standard shapes (e.g., heart, square, star) cannot be played on this unit. Attempting to do so may damage the unit. Do not use such discs.
Cleaning the cabinet
Clean the cabinet, panel and controls with a soft cloth slightly moistened with mild detergent solution. Do not use any type of abrasive pad, scouring powder or solvent such as thinner, benzine or alcohol.
Disc cleaning
Do not use a commercially available CD/DVD lens cleaning disc with this system, as this may result in malfunction.
Specifications
Main Unit (CX-LZP5/LZP3/LZP1)
Amplifier section
For the U.S. model
AUDIO POWER SPECIFICATIONS
POWER OUTPUT AND TOTAL HARMONIC DISTORTION:
With 6-ohm loads, both channels driven, from 120 – 10,000 Hz: rated 20 watts per channel minimum RMS power, with no more than 10% total harmonic distortion from 250 milliwatts to rated output.
North American model:
Continuous RMS power output (reference):
$$ 2 0 + 2 0 \mathrm{W} $$
$$ (6 \text { ohms at } 1 \mathrm{kHz}, 10 \% $$
$$ \mathrm{THD}) $$
Total harmonic distortion less than 0.9% (6 ohms at 1 kHz, 10 W)
European model:
DIN power output (rated): 16 + 16 W
$$ (6 \text { ohms at } 1 \text { kHz, DIN }) $$
Continuous RMS power output (reference):
$$ 2 0 + 2 0 \mathrm{W} $$
$$ (6 \text { ohms at } 1 \mathrm{kHz}, 10 \% $$
$$ \mathrm{THD}) $$
Music power output (reference):
$$ 4 0 + 4 0 \text { watts (6 ohms at } $$
$$ 1 \mathrm{kHz}, 10 \% \mathrm{THD}) $$
Other models:
The following measured at 110 – 120, 220 – 240 V AC, 50/60 Hz
DIN power output (rated): 16 + 16 W
$$ (6 \text { ohms at } 1 \text { kHz, DIN }) $$
Continuous RMS power output (reference):
$$ 2 0 + 2 0 \mathrm{W} $$
$$ (6 \text { ohms at } 1 \mathrm{kHz}, 10 \% $$
$$ \mathrm{THD}) $$
Inputs
MD (RCA pin jacks): Sensitivity 500 mV,
impedance 47 kilohms
Outputs
Accepts headphones with an impedance of 8 ohms or more
SPEAKERS: Accepts impedance of 6 ohms
USB hub ports (AWP-ZP5 only)
Maximum current
consumption: 100 mA per port
CD player section
System Compact disc and digital
audio system
Laser Semiconductor laser
( = 780 ~nm)
Emission duration: continuous
Frequency response 2 Hz – 20 kHz
Tuner section
FM stereo, FM/AM superheterodyne tuner
FM tuner section
Tuning range
North American model: 87.5 - 108.0 MHz (100-kHz step)
Other models: 87.5 - 108.0 MHz (50-kHz step)
Antenna FM lead antenna
Antenna terminals 75 ohms unbalanced
Intermediate frequency 10.7 MHz
AM tuner section
Tuning range
Pan-American model: 530 - 1,710 kHz
(with the tuning interval set at 10 kHz)
531 - 1,710 kHz
(with the tuning interval set at 9 kHz)
European model: 531 - 1,602 kHz
(with the tuning interval set at 9 kHz)
Other models: 530 - 1,710 kHz
(with the tuning interval set at 10 kHz)
531 - 1,602 kHz
(with the tuning interval set at 9 kHz)
Antenna AM loop antenna, external
antenna terminal
Intermediate frequency 450 kHz
Speaker (SSX-LZP5)
Speaker system 2-way, bass-reflex type,
magnetically shielded type
Speaker units
Woofer: 10 cm dia., cone type
Tweeter: 4 cm dia., cone type
Nominal impedance 6 ohms
General
Power requirements
North American model: 120 V AC, 60 Hz
European model: 230 V AC, 50/60 Hz
Australian model: 230 – 240 V AC, 50/60 Hz
Korean model: 220 V AC, 60 Hz
Taiwan model: 120 V AC, 50/60 Hz
Other models: 110 - 120, 220 - 240 V
AC, 50/60 Hz
Adjustable with voltage selector
Power consumption
European model: 40 W
0.3 W (in Power Saving mode)
North American and Korean models: 40 W
Other models: 45 W
Dimensions (w/h/d) incl. projecting parts and controls
Amplifier/Tuner/CD section:
Approx. 108 × 224.8 × 327.1 mm
Speakers: Approx. 115 × 225 × 223 mm
Mass
Amplifier/Tuner/CD section
AWP-ZP5: Approx. 4.4 kg
AWP-ZP3/ZP1: Approx. 4.2 kg
Speakers: Approx. 3.8 kg net per speaker
Supplied accessories Remote commander (1)
R6 (size AA) batteries (2)
AM loop antenna (1)
FM lead antenna (1)
Speaker cables (2)
USB cable (except for AWP-ZP1) (1)
USB Hub Port Information
(AWP-ZP5 only) (1)
Design and specifications are subject to change without notice.
List of button locations and reference pages
How to use this page
Use this page to find the location of buttons and other parts of the system that are mentioned in the text.

flowchart
graph TD
    A["Illustration number"] --> B["TUNER/BAND 4 1) 6 (13, 15)"]
    B --> C["Name of button/part Reference page"]
    C --> D["↑"]
    C --> E["↑"]
Main unit
ALPHABETICAL ORDER
A-O
ALBUM + 12 (11, 12)
ALBUM-16 (11, 12)
Disc slot 8 (10)
Display window 2
FUNCTION 17 (8, 10, 12, 13, 15, 23, 26, 29)
i-Bass 10 (17, 32)
MD ^1) 6 (29)
P-Z
PC ^2) 3 (23, 26)
PHONES jack 13
Remote sensor 5
TUNER/BAND 4 ^1) 6 (13, 15)
TUNING +/- 9 (13, 15)
USB hub ports ^3) 14 (27, 28)
USB STATUS lamp ^3) 15 (27)
VOLUME control 11 (26)
BUTTON DESCRIPTIONS
I/① (power) 1 (8, 14, 23, 32) CD ▶ (play) 3 1 4 (11)
(eject) 7 (8, 10)
(11, 14) (go back/rewind) 9
▶▶▶▶▶ (fast forward/go forward) 9 (8, 11, 14, 15)
II (pause) 18 (11)
■ (stop) 19 (11, 14)
1) AWP-ZP1 only
2) Except for AWP-ZP1
3) AWP-ZP5 only

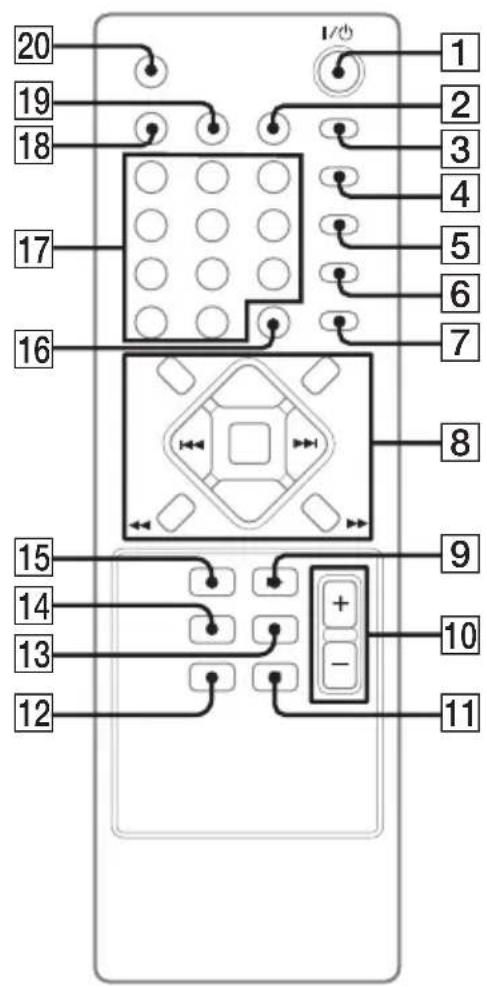
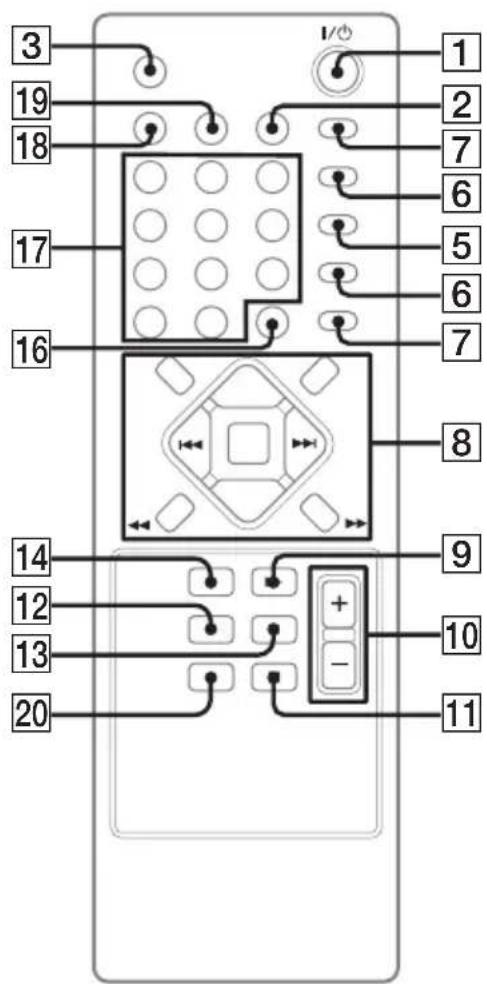
Remote control
ALPHABETICAL ORDER
A-H
ALBUM +/- 8 (11, 12)
CD 14 (10, 12, 14, 15)
CLEAR 16 (13)
CLOCK/TIMER SELECT 19 (19)
CLOCK/TIMER SET 2 (9, 18)
DISPLAY 18 (16, 20)
ENTER 8 (9, 12, 14, 18)
EQ 8 (17)
FM MODE 6 (16)
FUNCTION 20 (10, 12, 13, 15, 23, 26, 29)
1 - 2
i-Bass 8 (17)
Number buttons 17 (11)
PC* 15 (23, 26)
PC MIXING* 4 (17)
PLAY MODE 7 (11, 12)
REPEAT 6 (12)
SLEEP 3 (18)
TUNER BAND 12 (13, 15)
TUNER MEMORY 5 (14)
TUNING MODE 7 (13, 15)
TUNING +/- 8 (13, 15)
VOLUME +/- 10 (18, 26)
BUTTON DESCRIPTIONS
I/⏻ (power) 1 (8, 14, 18, 23, 32)
◀◀/▶▶ (go back/go forward) 8 (9, 11, 14, 18)
◀◀/▶▶ (rewind/fast forward) 8 (11)
▶ (play) 9 (11)
■ (stop) 11 (11, 14)
II (pause) 13 (11)
* This button is not available for AWP-ZP1.
AWP-ZP5/ZP3 AWP-ZP1
- Micro Hi-Fi Component System
- WARNING
- To prevent fire or shock hazard, do not expose the unit to rain or moisture.
- NOTICE FOR THE CUSTOMERS IN THE U.S.A.
- CAUTION
- Note to CATV system installer:
- Declaration of Conformity
- NOTICE FOR THE CUSTOMERS IN CANADA
- Except for European model
- Table of Contents
- Getting Started
- CD/MP3 - Play
- Tuner
- Sound Adjustment
- Timer
- Display
- Optional Personal Computer (except for AWP-ZP1)
- Optional Components
- Troubleshooting
- Additional Information
- How to use this manual
- playable discs
- Discs that this system cannot play
- Notes on CD-R and CD-RW
- Music discs encoded with copyright protection technologies
- Cautions when playing a disc that is recorded in Multi Session
- Hooking up the system
- Connect the speakers.
- Connect the FM and AM antennas.
- Note
- For models with a voltage selector, set VOLTAGE SELECTOR to the local power line voltage.
- Connect the power cord to a wall outlet.
- Inserting two R6 (size AA) batteries into the remote
- Tip
- When carrying this system
- Setting the clock
- To adjust the clock
- Notes
- CD/MP3 – Play
- Loading a disc
- Playing a disc
- — Normal Play/Shuffle Play
- Press PLAY MODE in stop mode repeatedly until the mode you want appears.
- Press ▶ (or CD ▶ on the unit).
- To play a track by entering the track number
- Playing repeatedly
- — Repeat Play
- Press REPEAT repeatedly during playback until "REP" or "REP1" appears.
- To cancel Repeat Play
- Creating your own program
- — Program Play
- Other operations
- Tips
- Presetting radio stations
- Automatic tuning preset
- If "TUNED" does not appear and the scanning does not stop
- Press TUNER MEMORY.
- Manual tuning preset
- To improve tuner reception
- To set CD power on
- To change the AM tuning interval (except for European model)
- Listening to the radio
- Listening to a preset station
- — Preset Tuning
- Listening to non-preset radio station
- Using the Radio Data System (RDS)
- What is the Radio Data System?
- Receiving RDS broadcasts
- To check the RDS information
- Adjusting the sound
- Press i-Bass.
- Selecting the sound effect
- Press EQ.
- To cancel the sound effect
- Mixing the sound on a personal computer with another sound source
- — PC Mixing (except for AWP-ZP1)
- Press PC MIXING.
- Falling asleep to music
- — Sleep Timer
- Press SLEEP.
- Waking up to music
- —Play Timer
- Turning off the display
- — Power Saving Mode
- Press DISPLAY repeatedly while the system is off until the demonstration display or the clock display disappears.
- To cancel Power Saving Mode
- Viewing information about the disc in the display
- Checking the remaining time and titles (CD/MP3)
- Press DISPLAY during Normal Play.
- Checking the total playing time and titles (CD/MP3)
- Press DISPLAY in stop mode.
- ■ When a CD/MP3 is in Normal Play mode
- ■ When a CD/MP3 is in Program Play mode
- Checking the station name (TUNER)
- Press DISPLAY while listening to the radio.
- Connecting a personal computer to the system
- Required system equipment
- Installing the driver
- For Windows 98 Second Edition/Windows Millennium Edition
- To install the USB driver
- To verify the status of the installed devices
- For Windows 2000 Professional or Windows XP Professional/Home Edition
- For Mac OS 9.0 to 9.2
- For Mac OS X 10.1 to 10.3
- Listening to audio files on a personal computer
- Connecting an optional USB component
- (AWP-ZP5 only)
- Connect the system to a computer with the supplied USB cable (see "Connecting a personal computer to the system" on page 22).
- Connect an optional USB component to this system's USB hub port.
- If the USB indicator turns off
- Hooking up optional components
- A MD jacks
- B USB port (except for AWP-ZP1)
- C USB hub ports (AWP-ZP5 only)
- Listening to audio from a connected component
- Connect audio cords.
- Press FUNCTION repeatedly (or MD\* on the unit) until "MD" appears.
- Problems and remedies
- When the I/ ① indicator flashes
- General
- There is no sound.
- There is severe hum or noise.
- The timer cannot be set.
- The timer does not function.
- The remote does not function.
- The system does not turn off.
- Speakers
- Sound comes from only one channel, or the left and right volumes are unbalanced.
- CD/MP3 player
- "LOCKED" appears.
- The disc does not eject.
- Play does not start.
- Disc access takes a long time.
- The sound skips.
- Play does not start from the first track.
- MP3 audio track cannot be played back.
- MP3 audio tracks take longer to begin play back than others.
- The album name, track title and ID3 tag do not appear correctly.
- Severe hum or noise/stations cannot be received.
- A stereo FM program cannot be received in stereo.
- Noise is heard while loading/removing a disc.
- Personal computer (except for AWP-ZP1)
- The sound is distorted.
- If the system still does not operate properly after performing the above measures, reset the system as follows:
- Messages
- CD/MP3
- CD No Disc
- CD NO STEP
- OVER
- Push STOP!
- Reading
- Step Full!
- Complete!
- SET CLOCK!
- SET TIMER!
- TIME NG!
- Precautions
- On operating voltage
- On safety
- On placement
- On heat buildup
- In case color irregularity is observed on nearby a TV screen
- If color irregularity is observed...
- If color irregularity is observed again...
- On operation
- Notes on discs
- Cleaning the cabinet
- Disc cleaning
- Specifications
- Main Unit (CX-LZP5/LZP3/LZP1)
- Amplifier section
- For the U.S. model
- AUDIO POWER SPECIFICATIONS
- North American model:
- European model:
- Other models:
- CD player section
- Tuner section
- Speaker (SSX-LZP5)
- List of button locations and reference pages
- How to use this page
- Main unit
- ALPHABETICAL ORDER
- A-O
- P-Z
- BUTTON DESCRIPTIONS
- Remote control
- A-H
- - 2
Brand : AIWA
Model : AWPZP5
Category : Radio