
SC05F70HQ - Vacuum Cleaner SAMSUNG - Free user manual and instructions
Find the device manual for free SC05F70HQ SAMSUNG in PDF.


| Product Type | Canister Vacuum Cleaner |
| Model | SC05F70HQ |
| Brand | Samsung |
| Color | Black / Red |
| Dimensions (L x W x H) | Approx. 435 x 260 x 320 mm |
| Weight | Approx. 5.5 kg |
| Power Supply | 220-240V AC, 50/60Hz |
| Power Consumption | 2000 W |
| Dust Capacity | 2.0 L |
| Filtration System | HEPA 13 filter |
| Cleaning Radius | 9.0 m |
| Noise Level | Approx. 80 dB(A) |
| Suction Power Control | Electronic slide control |
| Attachments Included | Turbo brush, crevice tool, dusting brush, upholstery nozzle |
| Bagless / Bagged | Bagless |
| Washable Filter | Yes |
| Cable Length | 6.0 m |
| Automatic Cord Rewind | Yes |
| Maintenance | Empty dust bin after each use, clean filters monthly |
| Safety Features | Motor overload protection, thermal cut-off |
Frequently Asked Questions - SC05F70HQ SAMSUNG
User questions about SC05F70HQ SAMSUNG
0 question about this device. Answer the ones you know or ask your own.
Ask a new question about this device
Download the instructions for your Vacuum Cleaner in PDF format for free! Find your manual SC05F70HQ - SAMSUNG and take your electronic device back in hand. On this page are published all the documents necessary for the use of your device. SC05F70HQ by SAMSUNG.
USER MANUAL SC05F70HQ SAMSUNG
Vacuum Cleaner User Manual
Please read the User Manual thoroughly before operating the vacuum.
For indoor use only.
English
imagine the possibilities
Thank you for purchasing a Samsung product.
SAMSUNG
Contents
YOUR VACUUM CLEANER
07
BEFORE USING THE VACUUM CLEANER
08
08 Assembly
09 Using the UV brush (Option)
09 Installing the Dust Sensor (Option)
10 Using accessory
OPERATING CLEANER
12
12 Power cord
12 Check filter
12 ON/OFF
13 Power control
14 Dust Sensor (Option)
MAINTENANCE
15
15 Cleaning the dust bin and grille
18 Cleaning the outlet filter
19 Maintain floor tools
TROUBLESHOOTING
22
PRODUCT FICHE
23
Safety information
SAFETY INFORMATION

Before operating the appliance, please read this manual thoroughly and retain it for your reference.

Because the following operating instructions cover various models, the characteristics of your vacuum cleaner may differ slightly from those described in this manual.
CAUTION/WARNING SYMBOLS USED
| WARNING | Indicates that a risk of death or serious injury exists. |
| CAUTION | Indicates that a risk of personal injury or material damage exists. |
OTHER SYMBOLS USED
| Represents something you must NOT do. | |
| Represents something you must follow. | |
| Indicates that you must disconnect the power plug from the socket. |

This vacuum cleaner is designed for household use only.
Do not use this vacuum cleaner to clean building waste or debris.
Regularly keep the filters in clean conditions to prevent the collection of fine dust in them. Do not use this vacuum cleaner with any of the filters removed.
Failure to meet these requirements could cause injury, damage the vacuum cleaner and void your warranty.
GENERAL
- Read all instructions carefully. Before switching on, make sure that the voltage of your electricity supply is the same as that indicated on the rating plate on the bottom of the cleaner.
- WARNING: Do not use the vacuum cleaner when rug or floor is wet. Do not use to suck up water.
- Close supervision is necessary when any appliance is used by or near children. Do not allow the vacuum cleaner to be used as a toy. Do not allow the vacuum cleaner to run unattended at any time. Use the vacuum cleaner only for its intended use as described in these instructions.
- Do not use the vacuum cleaner without a dust bin. Empty the dust bin before it is full in order to maintain the best efficiency.
- Do not use the vacuum cleaner to pick up matches, live ashes or cigarette butts. Keep the vacuum cleaner away from stoves and other heat sources. Heat can deform and discolour the plastic parts of the unit.
- Avoid picking up hard, sharp objects with the vacuum cleaner as they may damage the cleaner parts.
Do not stand on the hose assembly. Do not put weight on the hose.
Do not block the suction or the exhaust port.
Switch the vacuum cleaner off on the body of the machine before unplugging from the electrical outlet. Disconnect the plug from the electrical outlet before emptying the dust bin. To avoid damage, please remove the plug by grasping the plug itself, not by pulling on the cord.
This appliance can be used by children aged from 8 years and above and people with reduced physical, sensory or mental capabilities or lack of experience and knowledge if they have been given supervision or instruction concerning use of the appliance in a safe way and understand the hazards involved.
Children shall not play with the appliance. Cleaning and user maintenance shall not be done by children without supervision.
Children should be supervised to ensure that they do not play with the appliance.
The plug must be removed from the socket outlet before cleaning or maintaining the appliance.
The use of an extension cord is not recommended.
If your vacuum cleaner is not operating correctly, switch off the power supply and consult an authorized service agent.
If the supply cord is damaged, it must be replaced by the manufacturer or its service agent or a similarly qualified person in order to avoid a hazard.
Don't carry the vacuum cleaner by holding the hose. Use the handle on the vacuum cleaner set.
- Unplug the cleaner when not in use. Turn off the power switch before unplugging.
- For information on Samsung's environmental commitments and product specific regulatory obligations e.g. REACH visit: samsung.com/uk/aboutsamsung/samsungelectronics/corporatecitizenship/data_corner.html
UV BRUSH
- Since the UV rays from the UV Brush damage skin and eyes, never allow the rays to make contact with skin or eyes and do not let children or the elderly use the UV Brush. If used incorrectly it may cause damage to a person's eyesight.
- If the transparent window is broken and the UV rays are exposed directly, turn the power off and contact the service center.
- Do not use the UV Brush for purposes other than the sterilization of mattresses, bedclothes, beds, cushions and so on made from material. The company will not be held liable for any loss due to accidents from using the UV Brush for purposes other than its original purpose as listed above.
- Do not sit on the UV Brush or drop it, and avoid imparting impacts on the product. Failing to do so may result in injury or product damage.
- Do not touch the power terminals on the back of the UV Brush with a metal pin or rod. This may result in electric shock or fire.
- When the UV lamp is out of order, never disassemble or modify the product yourself.
Please contact the manufacturer or service center for a replacement.
- Since an internal discharge occurs within the UV Brush, never use the product near an inflammable spray or substance.
- Take care not to touch the UV lamp window after using the UV Brush for an extended period of time as the surface of the window may be hot.
- The UV Brush may start slowly at a low temperature due to the inherent characteristics of UV lamps. Please keep the UV Brush indoors.
Your vacuum cleaner
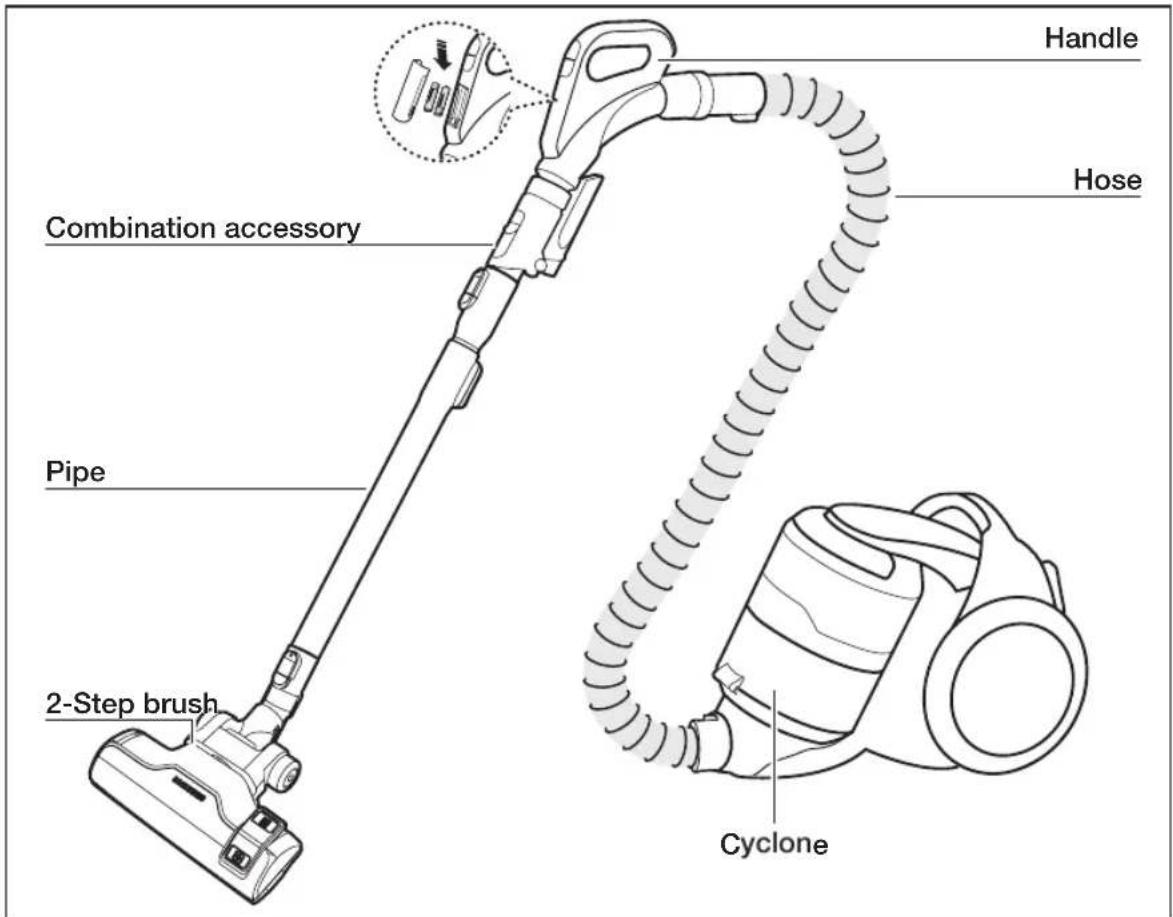
OPTION (Depending on model) *
Power turbo plus *
Parquet master *

Mini turbo * 2-Step brush * ECO carpet * Pipe *

SC20F70U / SC07F80U Series
Handle *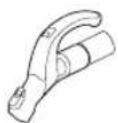
ECO Hard floor *

ECO carpet * Pipe * Dust sensor * Furniture

brush *

UV brush * 2-in-1 accessory *

English - 7
Before using the vacuum cleaner
ASSEMBLY
Connecting the Hose

Connecting the handle and pipe

Connecting the brush

English - 8
USING THE UV BRUSH (OPTION)
Connecting the brush into the hose handle
There will be a "clicking" sound when the UV brush has been installed securely on the hose handle.

BEFORE USING THE VACUUM CLEANER

For safety reasons, UV brushing only runs for 30 minutes and then stops operating. To resume the operation, press the [BRUSH ON/OFF] button again.

The UV brush, which is assembled into the hose handle (not directly connected to the pipe), is dedicated for bedclothes.
INSTALLING THE DUST SENSOR (OPTION)
Assemble the dust sensor
between the brush and the pipe between the pipe and the hose

English - 9
USING ACCESSORY
Combination accessory (Option)


Dusting brush Crevice tool
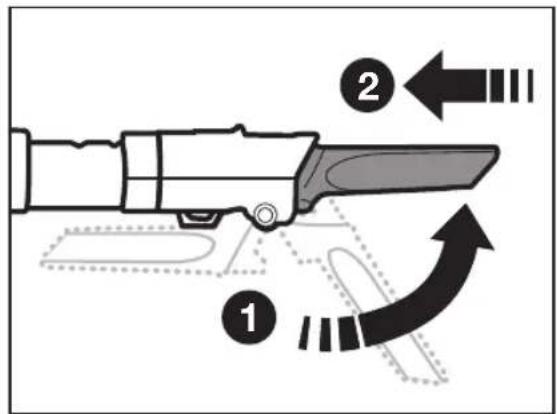
Accessories (Option)
Install the accessory to the handle.
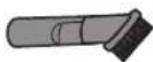
Dusting brush

Crevice tool


Dusting brush - For cleaning moldings, carved articles, etc.
Crevice tool - For cleaning in folds, crevices and corners.
Pipe
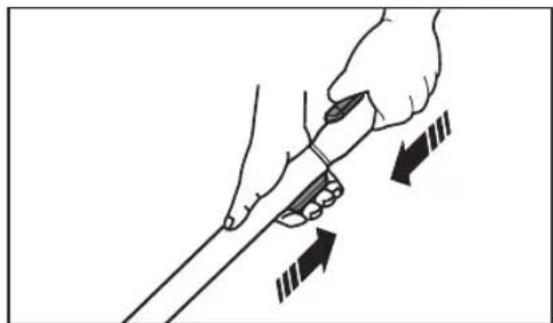
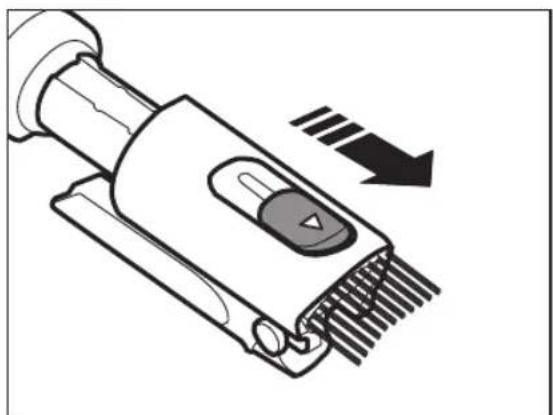
Adjust the length of the pipe by pushing the [PUSH] button on the pipe.
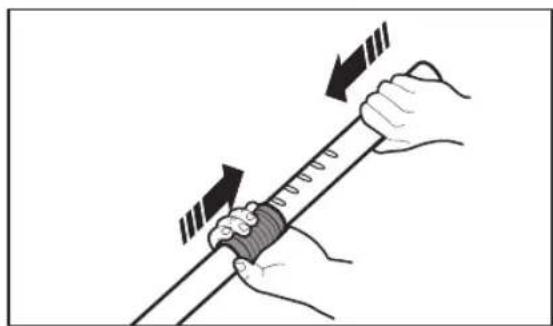
Adjust the length of the pipe by sliding the length control button located in the center of the telescopic pipe.
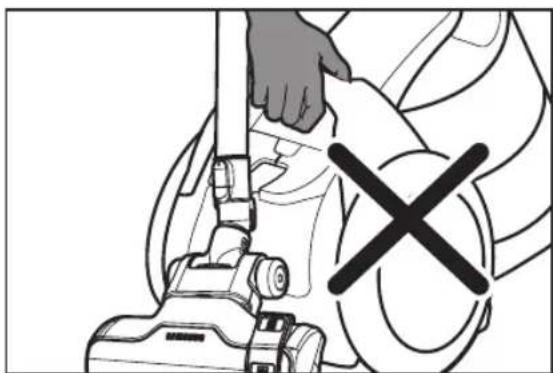
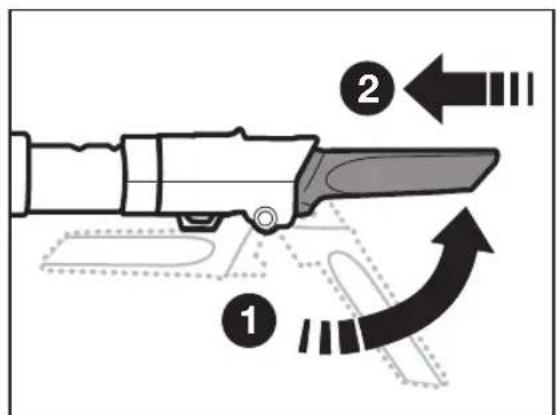
For storage, park the floor nozzle.


Do not pick up the machine while the floor nozzle is parked.

English - 11
Operating the cleaner
POWER CORD
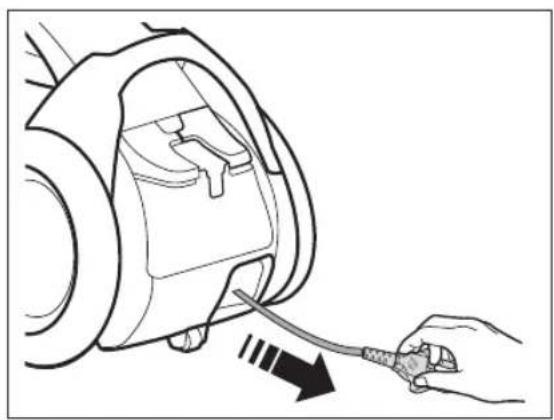


When removing the plug from the electrical outlet, grasp the plug, not the cord.

CHECK FILTER ON/OFF
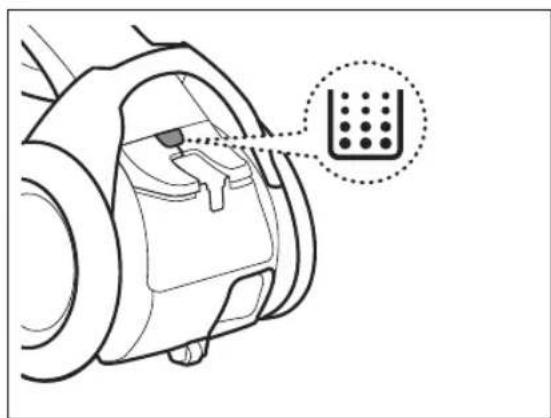

The filter light is illuminated when the dust pack requires checking or emptying.
POWER CONTROL
Hose (controlled by radio frequency signals)

ON/OFF
SC07F80H / SC07F70H / SC08F70H / SC20F70H Series

Select a lower power / higher power

Select a quiet mode

SC07F80U / SC07F70U / SC08F70U / SC20F70U Series

Select a lower power / higher power

UV brush ON/OFF

- UV sterilization cannot be activated by itself.
- Press the [SUCTION (-/+)] and [BRUSH ON/OFF] for operation.


- Don't cover the handle transmitter when you use a handle control.
- If no button is pressed for 30 minutes while cleaning, the power will shut off as a precaution. If this happens, press the button on the main unit or replug the power cord in again.

- Never disassemble or recharge the batteries.
- Never heat up the batteries or throw them into a fire.
- Do not reverse (+), (-) poles.
- Dispose of the batteries properly.
BATTERY TYPE : AAA Size ✗

DUST SENSOR (OPTION)
Dust Sensor Operations
- Indicates the amount of dust being picked up and passing by the sensor which assist the user to clean more efficiently.
- The dust sensor is activated automatically when the cleaner runs and is turned off when the cleaner is stopped.

Green : Amount of dust passing sensor is small.
Red : Amount of dust passing sensor is large.
If the red light does not light up when cleaning a dusty location
- Clean the sensors (2EA) with a dry cloth.
- Take care when you use the cleaner because the dust sensor may malfunction or may break due to an impact.


Installing the Batteries
If the dust sensor does not work, change the batteries.
BATTERY TYPE: AAA Size


Maintenance
CLEANING THE DUST BIN AND GRILLE

Empty the dust bin if dust reaches 'MAX' or the Check filter light is illuminating.

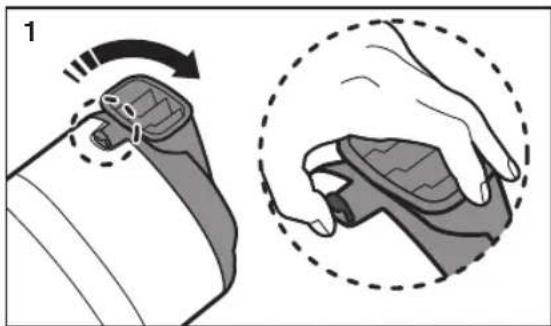
Take the dust bin out by lifting the handle.
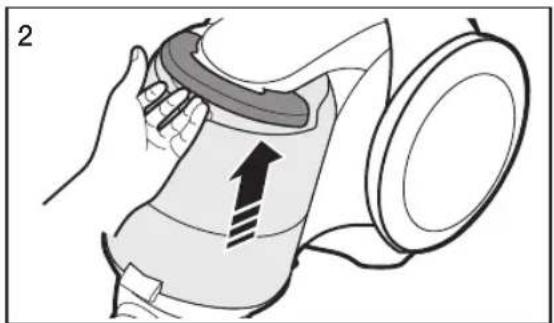
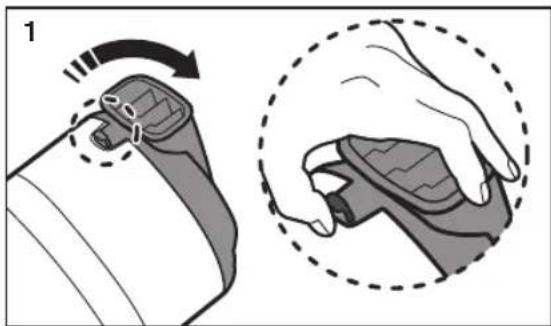
Push the button aside.
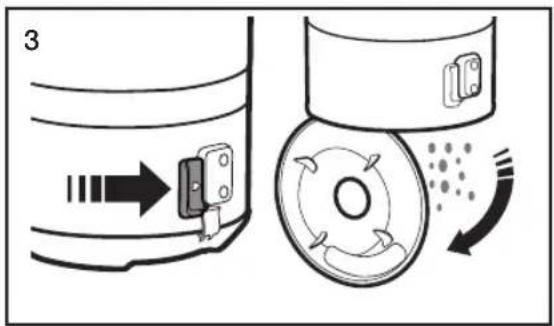
Turn the grille and take it out.

Push the button.
Separate the dust bin from the body.

Clean the dust bin and body with water.
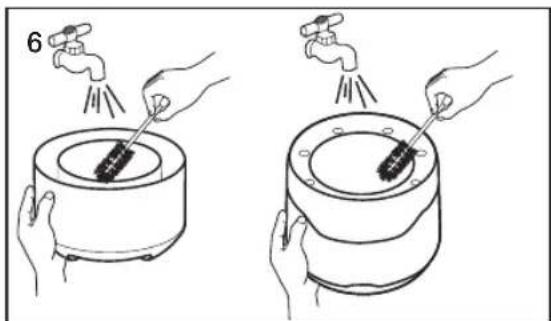
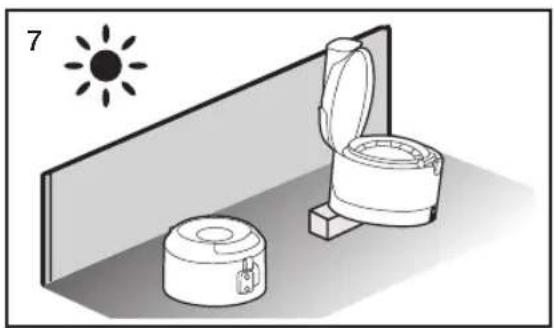
Leave the dust bin and body in the shade until completely dry.
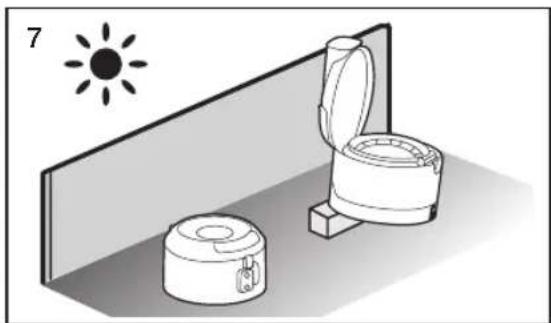

Install the grille and turn it clockwise.

CLEANING THE DUST FILTER


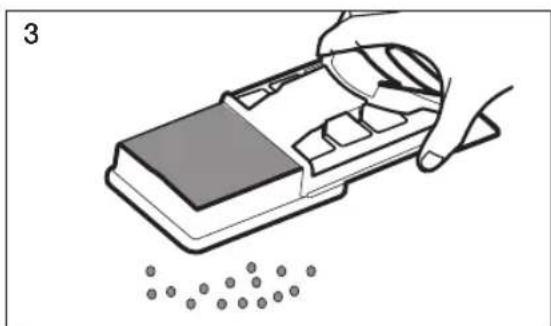
Pull the dust bin cover to open. Remove the filter from the dust bin.

Shake the filter to remove dust, then wash the filter.

Let the filter dry for more than 12 hours.
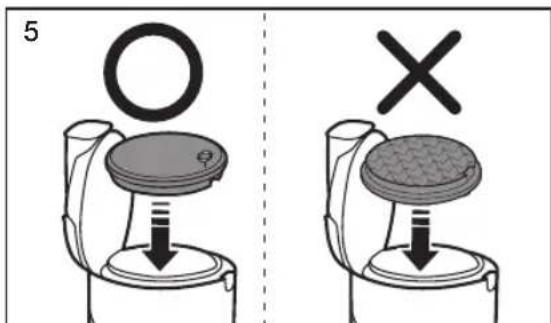
Put the filter into the dust bin.

Make sure the filter is completely dry before putting it back into the vacuum cleaner.
Allow 12 hours for it to dry.
Do not use wet filter.
Replace the dust filter if it becomes damaged or deformed.
The dust bin cover will not close if the filter is not installed correctly.


CLEANING THE OUTLET FILTER


Take the dust bin out by lifting the handle. Pull out the Filter.


Shake the Filter to clean. Install the filter and holder in main body.

- The filter can be replaced and separated from holder by pulling.


- Clean the outlet filter when suction is noticeably reduced continuously or the vacuum cleaner abnormal overheads.
Note: Filters are not washable.
Replace filter if cleaning does not resolve the problem.
- Recommend that Filter should be changed once in 6 month.
MAINTAIN FLOOR TOOLS
2-Step Brush
- Adjust the inlet lever according to the floor surface.

Floor

Carpet
- Remove waste matter completely if the inlet is blocked.

Power Turbo Plus Brush (Optional Accessory)


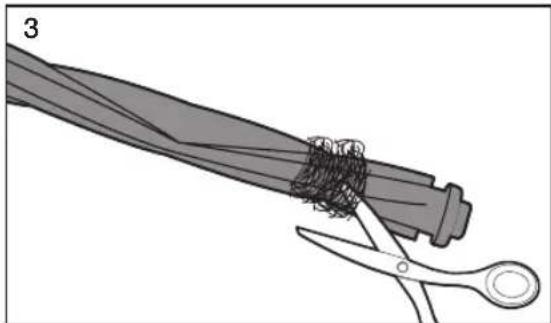

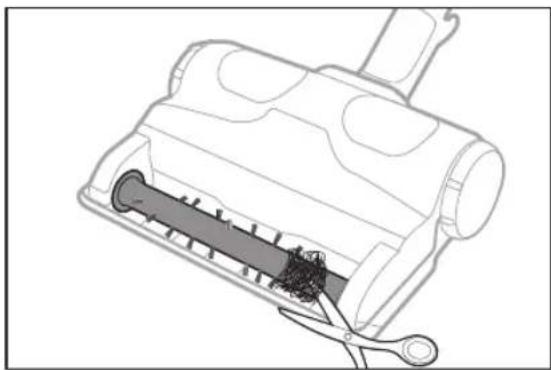
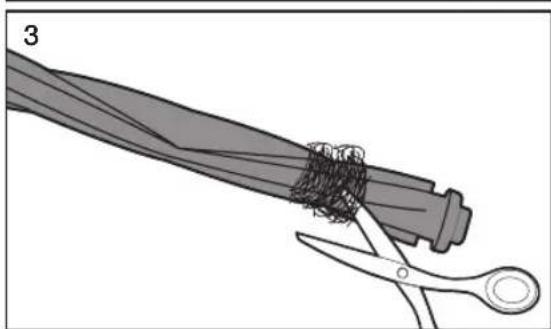
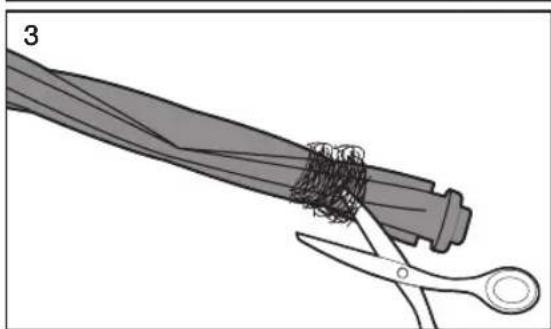
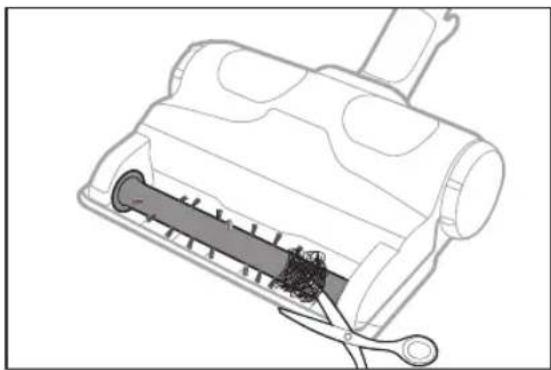
Frequent vacuuming of hair or pet fur may reduce cleaning effectiveness over time due to matters tangled around the drum. In this case, clean the drum with care.
To remove dust from the dust bin of the UV brush (Option)
When the dust bin is filled, turn the [Dust Removal] switch to empty the dust bin.
- While the cleaner is operating (suction), the vacuum will suck the material from the dust bin to the main unit.
- While the [Dust Removal] switch is in the 🔒 position, the suction power of the cleaner is reduced.

Cleaning the UV brush (Cleaning the drum) (Optional Accessory)
Frequent vacuuming of hair or pet fur may reduce cleaning efficiency over time due to matters tangled around the drum. In this case, clean the drum with care.


Mini turbo brush (Optional Accessory)
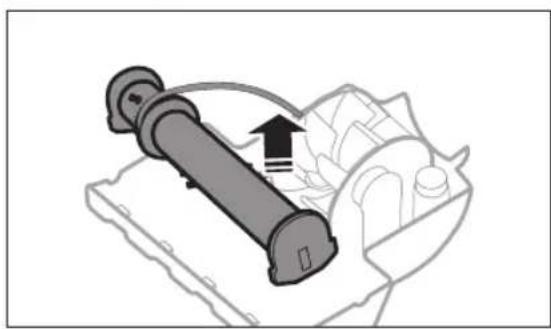
- To check brushroll

Check brushroll, when a clog is present or debris is visible.



- To check belt

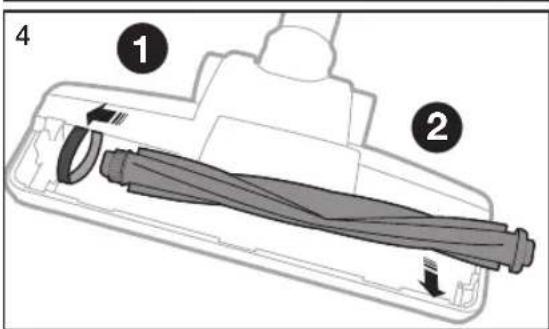
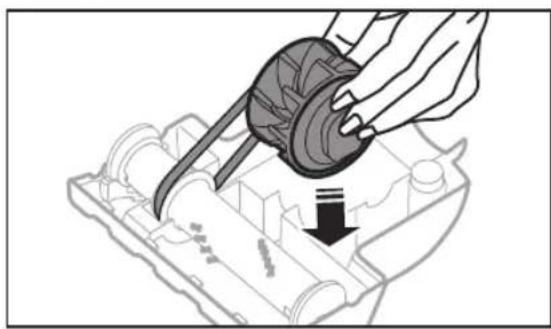
Inspect belt to ensure that it is in good condition.
If belt is broken or cracked, replace belt according to instructions.


Troubleshooting
| PROBLEM SOLUTION | |
| Motor does not start. | Check cable, plug and socket.Leave to cool. |
| Suction force is gradually decreasing. | Check for blockage and remove.Please unclog the intake. |
| In operation, the vacuum cleaner stops after repeating runs and stops three times. | |
| Cord does not rewind fully. | Pull the cord out 2-3 m and push down the cord rewind button. |
| Vacuum cleaner dows not pick up dirt. | Check hose and replace if required. |
| Low or decreasing suction. | Please check filter and, if required, clean as illustrated in the instructions. if filters are out of condition change them to new ones. |
| Body overheating. | Please check filters, if required clean as illustrated in the instruction. |
| Static electricity discharge. | Please decrease power suction.This can also occur when air in the room is very dry.Please ventilate the room till air humidity becomes normal. |
| The vacuum cleaner makes a strange noise. | In order to protect the motor in the cleanr, it rotates slowly when you just turn on the cleaner.(Before the motor stabilizes,) this causes the loud noise at the initial state and it is not failure in the machine. |
This vacuum cleaner is compliant with the following regulations:
- RTTE Directive (1999/5/EC)
- Electromagnetic Compatibility Directive: 2004/108/EEC
- Low Voltage Directive: 2006/95/EC
The official Declaration of Conformity may be found at http://www.samsung.com, go to Support, then search Product Support and enter the model name.
Product fiche
[English]
According to Commission Regulation (EU) No 665/2013 and No 666/2013
| A | Supplier Samsung Electronics., Co. Ltd | |||||
| B | Model | SC07F70HQ | SC07F70HR SC07F70HY SC08F70HQ SC08F70HR SC05F70HQ | |||
| C | Energy Efficiency Class A B | A | + | |||
| D | Annual Energy Consumption (kWh/yr) | 28.0 34.0 22.0 | ||||
| E | Carpet Cleaning Performance Class | C D D | ||||
| F | Hardfloor Cleaning Performance Class | A C A | ||||
| G | Dust Re-Emission Class A A | A | ||||
| H | Sound Power Level (dBA) | 78 | 80 | 78 | ||
| I | Rated Input Power (W) | 700 | 700 | 500 | ||
| J | Type | General purpose vacuum cleaner | ||||
1) Indicative annual energy consumption (kWh per year), based on 50 cleaning tasks. Actual annual energy consumption will depend on how the appliance is used. 2) Measurements for power consumption and performance are based on methods in EN 60312-1 and EN 60704.
SAMSUNG

SC07F80 series
SC07F70 series
SC08F70 series
SC20F70 series
SC05F70 series
Connecting the brush
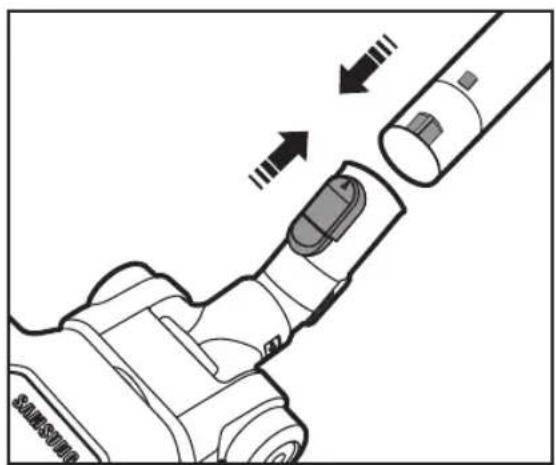
Swedish - 8
USING THE UV BRUSH (OPTIONAL)
Connecting the brush to the hose handle
BEFORE USING THE VACUUM CLEANER

INSTALLING THE DUST SENSOR (OPTIONAL)
Mounting the dust sensor
Swedish - 9
USING ACCESSORIES

Accessories (optional)


English - 11
Using the vacuum cleaner
POWER CORD


English - 13
DUST SENSOR (OPTIONAL)
Dust sensor functions


Maintenance
CLEAN THE DUST CONTAINER AND THE GRILLE

CLEANING THE DUST FILTER

Pull out the filter.




English - 21
Troubleshooting
Danish - 8
USE OF UV BRUSH (ACCESSORY)
BEFORE USING THE VACUUM CLEANER

Danish - 9
USE OF ACCESSORIES

Park the nozzle during storage

Danish - 11
Using the vacuum cleaner
POWER CORD


Hold the plug, not the cord, when unplugging from the outlet.

CHECK FILTER ON/OFF


DUST SENSOR (ACCESSORY)


Maintenance
CLEANING THE DUST CONTAINER AND OPENING


CLEANING THE DUST FILTER

Pull out the filter.


Mini turbo brush (accessory)


- Check the belt

Check the belt to ensure it is in good condition.
Troubleshooting
Connect to the brush

USING THE UV BRUSH (ACCESSORY)
BEFORE USING THE VACUUM CLEANER

INSTALLING THE DUST SENSOR (ACCESSORY)
Install the dust sensor
USING ACCESSORIES


Using the vacuum cleaner
POWER CORD

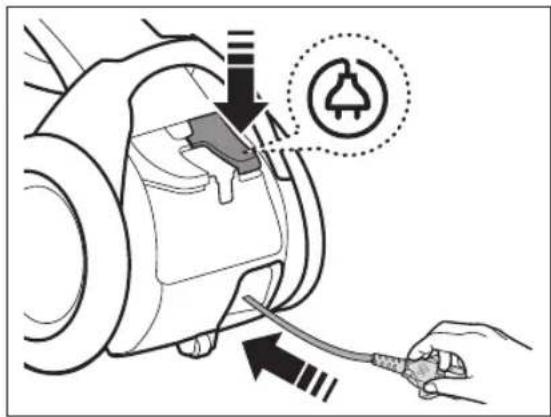

When unplugging from the wall outlet, hold the plug itself, not the cord.
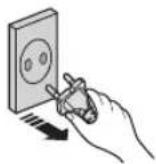
CHECK FILTER ON/OFF


The filter light illuminates when the dust bag requires checking or emptying.
Norwegian - 12
Norwegian - 13
DUST SENSOR (ACCESSORY)

Norwegian - 14
Maintenance
CLEANING THE DUST CONTAINER AND COARSE FILTER

Slide the button to the side.


Replace the coarse filter and turn it clockwise.

Norwegian - 16
CLEANING THE DUST FILTER

Let the filter dry for at least 12 hours.

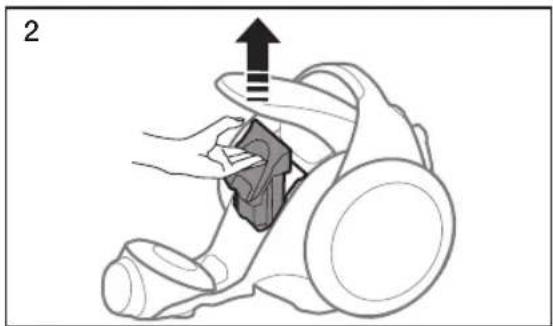


MAINTENANCE OF FLOOR TOOLS
2-step brush
- Adjust the intake lever according to the floor surface.

Floor

Carpet


Norwegian - 20


Norwegian - 21
Troubleshooting
Finnish - 8
USING THE UV BRUSH (OPTIONAL)
BEFORE USING THE VACUUM

Finnish - 9
USING ACCESSORIES



Finnish - 11
Using the vacuum
POWER CORD


Finnish - 13
DUST DETECTOR (OPTIONAL)

Battery installation
Maintenance
CLEANING THE DUST CONTAINER AND GRILLE


Finnish - 16
CLEANING THE DUST FILTER


Finnish - 20


- Checking the belt


Finnish - 21
Troubleshooting
- VACUUM CLEANER USER MANUAL
- CONTENTS
- YOUR VACUUM CLEANER
- BEFORE USING THE VACUUM CLEANER
- OPERATING CLEANER
- MAINTENANCE
- TROUBLESHOOTING
- PRODUCT FICHE
- SAFETY INFORMATION
- GENERAL
- UV BRUSH
- ASSEMBLY
- USING THE UV BRUSH (OPTION)
- CONNECTING THE BRUSH INTO THE HOSE HANDLE
- INSTALLING THE DUST SENSOR (OPTION)
- ASSEMBLE THE DUST SENSOR
- USING ACCESSORY
- COMBINATION ACCESSORY (OPTION)
- ACCESSORIES (OPTION)
- PIPE
- OPERATING THE CLEANER
- POWER CORD
- CHECK FILTER ON/OFF
- POWER CONTROL
- HOSE (CONTROLLED BY RADIO FREQUENCY SIGNALS)
- SC07F80H / SC07F70H / SC08F70H / SC20F70H SERIES
- SC07F80U / SC07F70U / SC08F70U / SC20F70U SERIES
- DUST SENSOR (OPTION)
- DUST SENSOR OPERATIONS
- IF THE RED LIGHT DOES NOT LIGHT UP WHEN CLEANING A DUSTY LOCATION
- INSTALLING THE BATTERIES
- CLEANING THE DUST BIN AND GRILLE
- CLEANING THE DUST FILTER
- CLEANING THE OUTLET FILTER
- MAINTAIN FLOOR TOOLS
- STEP BRUSH
- POWER TURBO PLUS BRUSH (OPTIONAL ACCESSORY)
- TO REMOVE DUST FROM THE DUST BIN OF THE UV BRUSH (OPTION)
- CLEANING THE UV BRUSH (CLEANING THE DRUM) (OPTIONAL ACCESSORY)
- MINI TURBO BRUSH (OPTIONAL ACCESSORY)
- TO CHECK BRUSHROLL
- TO CHECK BELT
- [ENGLISH]
- SAMSUNG
- USING THE UV BRUSH (OPTIONAL)
- CONNECTING THE BRUSH TO THE HOSE HANDLE
- INSTALLING THE DUST SENSOR (OPTIONAL)
- MOUNTING THE DUST SENSOR
- USING ACCESSORIES
- ACCESSORIES (OPTIONAL)
- USING THE VACUUM CLEANER
- DUST SENSOR (OPTIONAL)
- DUST SENSOR FUNCTIONS
- CLEAN THE DUST CONTAINER AND THE GRILLE
- USE OF UV BRUSH (ACCESSORY)
- USE OF ACCESSORIES
- PARK THE NOZZLE DURING STORAGE
- DUST SENSOR (ACCESSORY)
- CLEANING THE DUST CONTAINER AND OPENING
- MINI TURBO BRUSH (ACCESSORY)
- CHECK THE BELT
- USING THE UV BRUSH (ACCESSORY)
- INSTALLING THE DUST SENSOR (ACCESSORY)
- INSTALL THE DUST SENSOR
- CLEANING THE DUST CONTAINER AND COARSE FILTER
- MAINTENANCE OF FLOOR TOOLS
- USING THE VACUUM
- DUST DETECTOR (OPTIONAL)
- BATTERY INSTALLATION
- CLEANING THE DUST CONTAINER AND GRILLE
- CHECKING THE BELT
Brand : SAMSUNG
Model : SC05F70HQ
Category : Vacuum Cleaner