
Onyx Artist - Hi-Fi System MACKIE - Free user manual and instructions
Find the device manual for free Onyx Artist MACKIE in PDF.


| Product Type | Hi-Fi Audio Interface / Mixer |
| Brand | Mackie |
| Model | Onyx Artist |
| Inputs | 2 x XLR-1/4" combo (mic/line), 1 x 1/4" Hi-Z input |
| Outputs | 2 x 1/4" TRS main out, 1 x 1/4" headphone out |
| Sampling Rate | Up to 192 kHz |
| Bit Depth | 24-bit |
| Frequency Response | 20 Hz - 20 kHz (±0.5 dB) |
| Signal-to-Noise Ratio | 110 dB (A-weighted) |
| Total Harmonic Distortion | <0.005% (1 kHz, +4 dBu) |
| Dynamic Range | 110 dB (ADC) |
| Headphone Output Power | 40 mW into 60 ohms |
| Phantom Power | +48V switchable per channel |
| Power Supply | USB bus powered (5V DC) |
| Dimensions (W x H x D) | 7.5 x 4.5 x 1.6 in (19 x 11.4 x 4.1 cm) |
| Weight | 1.5 lbs (0.68 kg) |
| Construction | Metal chassis with rugged knobs |
| Compatibility | Windows, macOS, iOS (class compliant) |
| Included Accessories | USB cable, Quick Start Guide |
| Cleaning | Wipe with dry cloth; avoid solvents |
| Safety | Use only with USB 2.0/3.0 ports; avoid moisture |
| Repairability | No user-serviceable parts; contact Mackie support |
Frequently Asked Questions - Onyx Artist MACKIE
User questions about Onyx Artist MACKIE
0 question about this device. Answer the ones you know or ask your own.
Ask a new question about this device
Download the instructions for your Hi-Fi System in PDF format for free! Find your manual Onyx Artist - MACKIE and take your electronic device back in hand. On this page are published all the documents necessary for the use of your device. Onyx Artist by MACKIE.
USER MANUAL Onyx Artist MACKIE
ONYX™ USB INTERFACES
OWNER'S MANUAL


Important Safety Instructions
- Read these instructions.
- Keep these instructions.
- Heed all warnings.
- Follow all instructions.
- Do not use this apparatus near water.
- Clean only with a dry cloth.
- Do not block any ventilation openings. Install in accordance with the manufacturer's instructions.
- Do not install near any heat sources such as radiators, heat registers, stoves, or other apparatus (including amplifiers) that produce heat.
- Only use attachments/accessories specified by the manufacturer.
- Refer all servicing to qualified service personnel. Servicing is required when the apparatus has been damaged in any way, such as power-supply cord or plug is damaged, liquid has been spilled or objects have fallen into the apparatus, the apparatus has been exposed to rain or moisture, does not operate normally, or has been dropped.
- This apparatus shall not be exposed to dripping or splashing, and no object filled with liquids, such as vases or beer glasses, shall be placed on the apparatus.
- This device complies with Part 15 of the FCC Rules. Operation is subject to the following two conditions: (1) this device may not cause harmful interference, and (2) this device must accept any interference received, including interference that may cause undesired operation.
NOTE: This equipment has been tested and found to comply with the limits for a Class B digital device, pursuant to part 15 of the FCC Rules. These limits are designed to provide reasonable protection against harmful interference in a residential installation. This equipment generates, uses, and can radiate radio frequency energy and, if not installed and used in accordance with the instructions, may cause harmful interference to radio communications. However, there is no guarantee that interference will not occur in a particular installation. If this equipment does cause harmful interference to radio or television reception, which can be determined by turning the equipment off and on, the user is encouraged to try to correct the interference by one or more of the following measures:
- Reorient or relocate the receiving antenna.
- Increase the separation between the equipment and the receiver.
- Connect the equipment into an outlet on a circuit different from that to which the receiver is connected.
- Consult the dealer or an experienced radio/TV technician for help.
CAUTION: Changes or modifications to this device not expressly approved by LOUD Technologies Inc. could void the user's authority to operate the equipment under FCC rules.
WARNING — To reduce the risk of fire or electric shock, do not expose this apparatus to rain or moisture.
- This device complies with FCC radiation exposure limits set forth for an uncontrolled environment. This device should be installed and operated with minimum distance 20cm between the radiator & your body.
- This apparatus does not exceed the Class A/Class B (whichever is applicable) limits for radio noise emissions from digital apparatus as set out in the radio interference regulations of the Canadian Department of Communications.
- This device complies with Industry Canada licence-exempt RSS standard(s). Operation is subject to the following two conditions:
(1) this device may not cause interference, and
(2) this device must accept any interference, including interference that may cause undesired operation of the device.
- Exposure to extremely high noise levels may cause permanent hearing loss. Individuals vary considerably in susceptibility to noise-induced hearing loss, but nearly everyone will lose some hearing if exposed to sufficiently intense noise for a period of time. The U.S. Government's Occupational Safety and Health Administration (OSHA) has specified the permissible noise level exposures shown in the following chart.
According to OSHA, any exposure in excess of these permissible limits could result in some hearing loss. To ensure against potentially dangerous exposure to high sound pressure levels, it is recommended that all persons exposed to equipment capable of producing high sound pressure levels use hearing protectors while the equipment is in operation. Ear plugs or protectors in the ear canals or over the ears must be worn when operating the equipment in order to prevent permanent hearing loss if exposure is in excess of the limits set forth here:
| Duration, per day in hours | Sound Level dBA, Slow Response | Typical Example |
| 8 90 Duo in small club | ||
| 6 | 92 | |
| 4 95 Subway | Train | |
| 3 | 97 | |
| 2 100 Very loud classical music | ||
| 1.5 102 | ||
| 1 105 Walter screaming at Troy about deadlines | ||
| 0.5 110 | ||
| 0.25 or less 1 | 5 Loudest parts at a rock concert | |

Correct disposal of this product: This symbol indicates that this product should not be disposed of with your household waste, according to the WEEE directive (2012/19/EU) and your national law. This product should be handed over to an authorized collection site for recycling waste electrical and electronic equipment (EEE). Improper handling of this type of waste could have a possible negative impact on the environment and human health due to potentially hazardous substances that are generally associated with EEE. At the same time, your cooperation in the correct disposal of this product will contribute to the effective usage of natural resources. For more information about where you can drop off your waste equipment for recycling, please contact your local city office, waste authority, or your household waste disposal service.
Contents Onyx USB Interfaces Features
Important Safety Instructions....2
Table Of Contents......3
Features 3
Introduction 4
Quick Start....4
Hookup Diagrams 5
Front Panel Description ....7
-
XLR and 1/4" Inputs....7
-
+48V Phantom Power Switch 8
-
Hi-Z Switch....8
-
Gain Knobs....8
-
SIG/OL LED 8
-
Monitor Knob....8
-
1/4" Phones Jack ....9
-
Phones Level 9
-
Direct Monitor Switch [Onyx Artist 1•2]....9
-
Mix Knob [Onyx Producer 2•2]....9
-
USB LED 9
-
MIDI LED [Onyx Producer 2•2]....9
Rear Panel Description 10
-
USB Input / Output Jack 10
-
MIDI Input / Output Jacks [Onyx Producer 2•2]......10
-
1/4" Line Outputs....10
-
Kensington Lock 11
Appendix A: Service Info 12
Troubleshooting / Repair 12
Appendix B: Technical Information 13
Onyx USB Interfaces Specifications 13
Onyx USB Interfaces Dimensions 14
Onyx USB Interfaces Block Diagrams 15
Onyx USB Interfaces Limited Warranty 16
- Boutique-quality Onyx™ mic preamps with class-leading fidelity and dynamic range
o XLR/TRS inputs with Hi-Z switch accept mic, line and instrument sources
- 48v Phantom Power for use with studio condenser mics
- High-resolution 2 in x 2 out 24-Bit/192kHz recording
• Zero-latency direct monitoring of analog inputs
• Dedicated outputs for connecting studio monitors
- MIDI I/O for connecting synths, controllers and more [Onyx Producer 2•2]
- Bus-powered for easy mobile recording with no power adapter needed
- USB 2.0 connectivity for fast transfer speed and low latency
- Built-Like-A-Tank™ design to survive day-to-day abuse
- Tracktion™ Music Production Software + DAW Essentials Collection Plug-Ins Included
o 16 plug-ins including Equaliser, Compressor, Reverber8, Limiter, Auto Filter, and more
o Plug-ins compatible with all DAWs (AAX/AU/VST/LinuxVST)
- Compatible with all major DAWs on Mac or PC
- 1.1 lbs / 0.5 kg [Onyx Artist 1•2] - 1.4 lbs / 0.6 kg [Onyx Producer 2•2]


Like us
Follow us
Watch our dang videos
Part No. SW1208 Rev. A 10/17
©2017 LOUD Technologies Inc. All Rights Reserved.
Please write your serial number here for future reference (i.e., insurance claims, tech support, return authorization, make dad proud, etc.)
Purchased at:
Date of purchase:
Introduction
Onyx Artist 1•2
Combining high-resolution 24-bit/192kHz converters with premium Mackie analog circuitry and Built-Like-A-Tank™ hardware design, the bus-powered Onyx™ Artist 1•2 is perfect for singer-songwriters, content creators, and mobile recording.
The Artist 1•2 features an Onyx mic pre with phantom power and a 1/4" line input with Hi-Z instrument switch for quick and easy recording. Plus, with zero-latency direct analog monitoring ensures you can always hear yourself in real time.
With the Onyx Artist 1•2, you have the power to capture your performance and experience media with pristine fidelity at home or on the go. Your Creativity Without Limits – Onyx Series USB Audio Interfaces.
Onyx Producer 2•2
Combining high-resolution 24-bit/192kHz converters with premium Mackie analog circuitry and Built-Like-A-Tank™ hardware design, the bus-powered Onyx™ Producer 2•2 is perfect for home studios, mobile recording, and dual mic applications.
Featuring two XLR/TRS combo inputs with Onyx mic pres, each is equipped with phantom power and Hi-Z instrument switches for maximum versatility. Plus, with zero-latency direct analog monitoring ensures you can always hear yourself in real time. It also has built-in MIDI I/O for controllers, synths, and more.
With the Onyx Producer 2•2, you have the power to capture your performance and experience media with pristine fidelity at home or on the go. Your Creativity Without Limits – Onyx Series USB Audio Interfaces.
Quick Start
We realize that you can't wait to hook up your Onyx USB Interface and try it out. Nevertheless, please take the time to read this page NOW, and the rest can wait until you're good and ready.
- PC users: install the latest driver. Mac users: no driver required.
- Turn down all knobs.
- Disengage all switches.
-
Plug signal sources into the interface, such as:
-
Microphones plugged into the mic inputs. (Engage phantom power if needed.)
-
Line-level sources such as keyboards, drum machines, or MP3 players plugged into the line-level inputs.
-
Connect cords from the line outs to powered speakers (or to an amplifier connected to passive speakers).
- Push the USB cable securely into the interface's USB connector and plug the other end into any open USB slot of the computer.
- Turn the computer on. Make sure the interface powers up.
- Turn the powered studio monitors (or amplifiers) on.
- Be sure that the volume of the input is the same as it would be during normal use.
- Slowly bring up the monitor knob to a comfortable listening level.
Onyx Artist 1•2 Hookup Diagram

flowchart
graph TD
    DAW["DAW"] -->|Signal| Artist1["ONYX Artist 1-2"]
    Artist1 -->|Line Output| LineOutput["Line OUTPUT"]
    Artist1 -->|GAIN| DAC1["10V AC"]
    DAC1 --> GAIN1["GAIN"]
    DAC1 --> MONTO["MONITOR"]
    MONTO --> MONTO1["MONITOR"]
    MONTO1 --> MONTO2["MONITOR"]
    MONTO2 --> MONTO3["MONITOR"]
    MONTO3 --> MONTO4["MONITOR"]
    MONTO4 --> MONTO5["MONITOR"]
    MONTO5 --> MONTO6["MONITOR"]
    MONTO6 --> MONTO7["MONITOR"]
    MONTO7 --> MONTO8["MONITOR"]
    MONTO8 --> MONTO9["MONITOR"]
    MONTO9 --> MONTO10["MONITOR"]
    MONTO10 --> MONTO11["MONITOR"]
    MONTO11 --> MONTO12["MONITOR"]
    MONTO12 --> MONTO13["MONITOR"]
    MONTO13 --> MONTO14["MONITOR"]
    MONTO14 --> MONTO15["MONITOR"]
    MONTO15 --> MONTO16["MONITOR"]
    MONTO16 --> MONTO17["MONITOR"]
    MONTO17 --> MONTO18["MONITOR"]
    MONTO18 --> MONTO19["MONITOR"]
    MONTO19 --> MONTO20["MONITOR"]
    MONTO20 --> MONTO21["MONITOR"]
    MONTO21 --> MONTO22["MONITOR"]
    MONTO22 --> MONTO23["MONITOR"]
    MONTO23 --> MONTO24["MONITOR"]
    MONTO24 --> MONTO25["MONITOR"]
    MONTO25 --> MONTO26["MONITOR"]
    MONTO26 --> MONTO27["MONITOR"]
    MONTO27 --> MONTO28["MONITOR"]
    MONTO28 --> MONTO29["MONITOR"]
    MONTO29 --> MONTO30["MONITOR"]
    MONTO30 --> MONTO31["MONITOR"]
    MONTO31 --> MONTO32["MONITOR"]
    MONTO32 --> MONTO33["MONITOR"]
    MONTO33 --> MONTO34["MONITOR"]
    MONTO34 --> MONTO35["MONITOR"]
    MONTO35 --> MONTO36["MONITOR"]
    MONTO36 --> MONTO37["MONITOR"]
    MONTO37 --> MONTO38["MONITOR"]
    MONTO38 --> MONTO39["MONITOR"]
    MONTO39 --> MONTO40["MONITOR"]
    MONTO40 --> MONTO41["MONITOR"]
    MONTO41 --> MONTO42["MONITOR"]
    MONTO42 --> MONTO43["MONITOR"]
    MONTO43 --> MONTO44["MONITOR"]
    MONTO44 --> MONTO45["MONITOR"]
    MONTO45 --> MONTO46["MONITOR"]
    MONTO46 --> MONTO47["MONITOR"]
    MONTO47 --> MONTO48["MONITOR"]
    MONTO48 --> MONTO49["MONITOR"]
    MONTO49 --> MONTO50["MONITOR"]
    MONTO50 --> MonTo51["Monitor"]
    MonTo51 --> MonTo52["Monitor"]
    MonTo52 --> MonTo53["Monitor"]
    MonTo53 --> MonTo54["Monitor"]
    MonTo54 --> MonTo55["Monitor"]
    MonTo55 --> MonTo56["Monitor"]
    MonTo56 --> MonTo57["Monitor"]
    MonTo57 --> MonTo58["Monitor"]
    MonTo58 --> MonTo59["Monitor"]
    MonTo59 --> MonTo60["Monitor"]
    MonTo60 --> MonTo61["Monitor"]
    MonTo61 --> MonTo62["Monitor"]
    MonTo62 --> MonTo63["Monitor"]
    MonTo63 --> MonTo64["Monitor"]
    MonTo64 --> MonTo65["Monitor"]
    MonTo65 --> MonTo66["Monitor"]
    MonTo66 --> MonTo67["Monitor"]
    MonTo67 --> MonTo68["Monitor"]
    MonTo68 --> MonTo69["Monitor"]
    MonTo69 --> MonTo70["Monitor"]
    MonTo70 --> MonTo71["Monitor"]
    MonTo71 --> MonTo72["Monitor"]
    MonTo72 --> MonTo73["Monitor"]
    MonTo73 --> MonTo74["Monitor"]
    MonTo74 --> MonTo75["Monitor"]
    MonTo75 --> MonTo76["Monitor"]
    MonTo76 --> MonTo77["Monitor"]
    MonTo77 --> MonTo78["Monitor"]
    MonTo78 --> MonTo79["Monitor"]
    MonTo79 --> MonTo80["Monitor"]
As you can see in this hookup diagram, the Onyx Artist 1•2 is the perfect tool for singer-songwriters. Let's look at the inputs first. In this example, a microphone is connected to XLR input 1 and a guitar to 1/4" input 2 (with the Hi-Z switch engaged).
The output section is as straightforward as the input section. Here we connected a pair of MR Series studio monitors to the L/R line output jacks and a pair of headphones are connected to the phones output jack. Lastly, a computer installed with your favorite DAW is connected to the USB port on the rear panel.
That was our part. The next part is up to you... writing and recording!
Onyx Producer 2•2 Hookup Diagram

flowchart
graph TD
    A["DAW"] --> B["ONYX MIC FREAMS"]
    B --> C["1"]
    B --> D["2"]
    C --> E["2.0"]
    D --> F["2.0"]
    E --> G["MIDI OUT IN"]
    F --> H["MIDI OUT IN"]
    G --> I["R"]
    H --> J["L"]
    I --> K["LINE OUTPUT"]
    J --> K
    K --> L["Output Line"]
    M["Radio Player"] --> N["Radio Headset"]
    O["Audio Generator"] --> P["Audio System"]
    Q["Audio System"] --> R["Audio System"]
The Onyx Producer 2•2 is similar to the Onyx Artist 1•2, but with a few more bells and whistles. Here the Onyx Producer 2•2 is designed with the home studio engineer and/or mobile recording engineer in mind. Let's look at the inputs first. Just like with the Onyx Artist 1•2, a microphone is connected to XLR input 1 and a guitar to 1/4" input 2 (with the Hi-Z switch engaged).
As with the previous hookup diagram, the output section here is as straightforward as the input section. Here we connected a pair of XR Series studio monitors to the L/R line output jacks and a pair of headphones are connected to the phones output jack. Additionally, a computer installed with your favorite DAW is connected to the USB port on the rear panel.
Lastly, the only hookup difference between the two Onyx USB Interfaces. Here a synthesizer with MIDI I/O is connected to the MIDI I/O of the Onyx Producer 2•2.
That was our part. The next part is up to you... writing and recording!
Typical Onyx Producer 2·2 Setup

Front Panel Description
For the most part, the front panel is where to connect various sources feeding IN to the Onyx USB Interface. These signals are then routed through the Onyx USB Interface and released through the main OUTPUT jacks on the rear panel.
1. XLR and 1/4" Inputs
Both Onyx USB Interfaces have two input jacks. The Onyx Artist 1•2 has one XLR jack [Ch. 1] and one 1/4" jack [Ch. 2], while the Onyx Producer 2•2 provides dual combo Onyx Wide-Z preamps.
The XLR connectors accept balanced microphone inputs from XLR connectors and the 1/4" connectors accept balanced and unbalanced line-level inputs from 1/4" TRS connectors. The microphone preamps feature our Onyx design, with higher fidelity and headroom rivaling any standalone mic preamp on the market today.
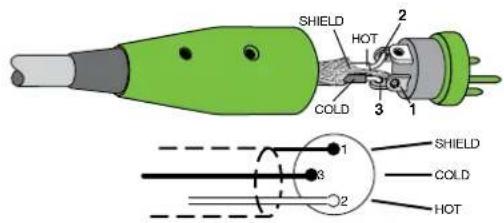
They are wired as follows, according to standards specified by the AES (Audio Engineering Society).
Balanced XLR Wiring:
Shield (Ground) Pin 1
Hot (+) Pin 2
Cold (-) Pin 3
The 1/4" jacks share circuitry (but not phantom power) with the mic preamps, and can be driven by balanced or unbalanced sources.
Additionally, Ch. 2 [Onyx Artist 1•2] and both channels [Onyx Producer 2•2] may accept Hi-Z sources (such as guitars) via the 1/4" input without the need for a separate DI box.
- Unbalanced TS (tip-sleeve) lines can be accommodated via the TRS jack. Make sure the cable terminates with a TS plug (like a guitar plug), or if it's a TRS plug (such as a headphone plug), make sure the ring is tied to the sleeve and that the plug is fully inserted into the jack.
The connectors are wired as follows, according to standards specified by the AES (Audio Engineering Society).
Balanced 1/4" TRS
Hot (+) Tip
Cold (−) Ring
Shield (Ground) Sleeve

Balanced 1/4" Connectors
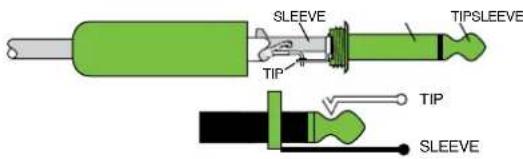
Unbalanced 1/4" TS
Hot (+) Tip
Shield (Ground) Sleeve
Unbalanced 1/4" Connectors

NEVER connect the output of an amplifier directly to a Onyx USB Interface's input jack. This could damage the input circuitry and we wouldn't want that now, would we?
2. +48V Phantom Power Switch
Most modern professional condenser mics require 48V phantom power, which lets the interface send low-current DC voltage to the mic's electronics through the same wires that carry audio. (Semi-pro condenser mics often have batteries to accomplish the same thing.) "Phantom" owes its name to an ability to be "unseen" by dynamic mics (Shure SM57/SM58, for instance), which don't need external power and aren't affected by it anyway.
Press this switch if the microphone requires phantom power. An engaged +48V switch will illuminate green to indicate that phantom power is active. (Always check the LED status before connecting microphones.) This switch affects channels 1 [Onyx Artist 1•2] and both channels [Onyx Producer 2•2].

Never plug single-ended (unbalanced) micro phones, or ribbon mics into the mic input jacks if phantom power is on. Do not plug instrument outputs into the mic
XLR input jacks with phantom power on, unless you know for certain it is safe to do so. Be sure the channel's gain control is turned down when connecting microphones to the mic inputs when phantom power is turned on, to prevent pops from getting through to the speakers.
3. Hi-Z Switch
To connect a guitar directly to the mixer without using a DI Box, press this switch in first; then connect the output from the guitar to the channel's 1/4" TRS input. An engaged Hi-Z switch will illuminate green to indicate that Hi-Z is active. The input impedance is optimized for direct connection and high-frequency fidelity is assured.
Guitars may sound dull and muddy without a DI box or if this switch is not engaged. When disengaged, the 1/4" TRS inputs become line inputs.
4. Gain Knobs
If you haven't already, please read the "Quick Start" section on page 4. Setting the gain correctly will ensure that the preamplifier's gain is not too high, where distortion could occur, and not too low, where the quieter, exquisitely-delicate passages might be lost in background noise.
The gain knobs adjust the input sensitivity of the mic and line inputs. This allows signals from the outside world to be adjusted to run through each input at optimal internal operating levels.
The gain ranges from minimum with the knob fully down, ramping to maximum with the gain knob fully up.

5. SIG/OL LED
This dual-colored LED will illuminate green when the channel's input signal (at least -20 dBu) is present, indicating signal (SIG). It will remain lit non-stop so long as there is signal above -20 dBu present in that channel.
This dual-colored LED will illuminate red when the channel's input signal is too high, indicating a signal overload (OL). This should be avoided, as distortion will occur. If the OL LED comes on regularly, check that the gain knobs are set correctly.
6. Monitor Knob
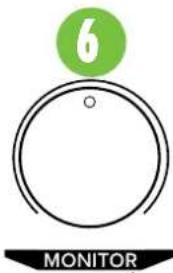
The monitor knob adjusts the volume of the input source's signals going to the L/R line outputs.

WARNING: Always turn the monitor knob all the way down before making connections or trying
something new. Keep it down until all changes have been made, then turn it up slowly. This saves your speakers – and more importantly, your ears – from blowing.
7.1/4" Phones Jacks
This 1/4" TRS connector supplies the output to stereo headphones. The volume is controlled via the phones knob located just above the phones jack. It is the same signal that is routed to the line outputs.
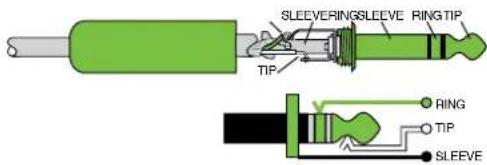
The phones output follows standard conventions:
Left channel Tip
Right channel Ring
Ground
Sleeve
Balanced 1/4" Connectors

WARNING: The headphone amp is loud, and can cause permanent hearing damage. Even intermediate levels may be painfully loud with some headphones. BE
CAREFUL! Always turn the phones level control all the way down before connecting headphones or doing anything new that may affect the headphone volume. Then turn it up slowly as you listen carefully.

8. Phones Level
This knob is used to adjust the volume at the phones output from minimum to maximum gain. The L/R line outputs and phones share the same "mix".

WARNING: Yes, we just mentioned this exact same warning above, but that is how important this is...the headphone amp is loud, and can cause permanent hearing
damage. Even intermediate levels may be painfully loud with some headphones. BE CAREFUL! Always turn this control all the way down before connecting headphones or doing anything new that may affect the headphone volume. Then turn it up slowly as you listen carefully.
9. Direct Monitor Switch [Onyx Artist 1•2]
Engage this switch on the Onyx Artist 1•2 to monitor the input signals. When engaged, the switch illuminates green to let you know that you are now monitoring the levels of the inputs.
The input monitoring occurs in the analog domain, resulting in zero-latency recording.
10. Mix Knob [Onyx Producer 2•2]
The mix knob adjusts the level of inputs 1/2 and DAW playback to be delivered to the phones and line outputs. As an added bonus, this is all at zero-latency!
Knob position (L, C, R):
- Full Left - Input 1/2 = Full Volume DAW = No Volume
- Center – Input 1/2 and DAW = Equal Volume
- Full Right – Input 1/2 = No Volume DAW = Full Volume
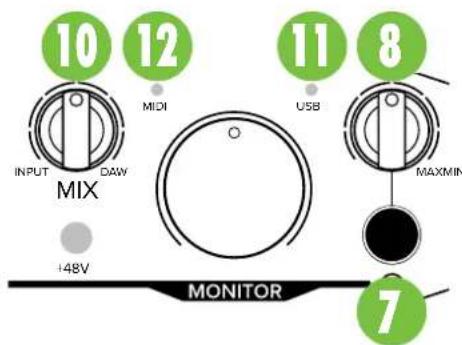
11. USB LED
The USB LED will illuminate green when the computer is powered on and connected successfully and securely (via USB) to the Onyx USB Interface. The USB light informs you that the interface is “enumerated”, and in a functional and happy state.
12. MIDI LED [Onyx Producer 2•2]
The MIDI LED will illuminate green to inform you when data is received at the MIDI input jack of the Onyx Producer 2•2 interface.

Rear Panel Description
If the front panel is where inputs are connected, then it would only make sense that the rear panel is where outputs are connected!
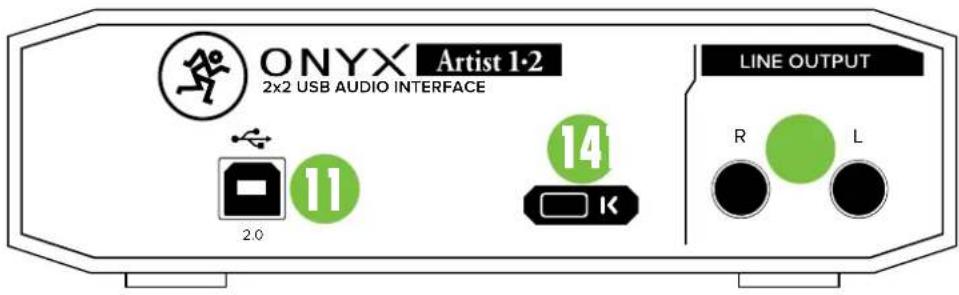
11. USB Input / Output Jack
The built-in USB interface allows for some powerful and flexible routing by transferring digital audio to and from a computer. To use this feature with a PC, first download the PC ASIO driver from http://mackie.com/products/onyx-series-usb-interfaces If connecting to a Mac, it will show up as a 1x2 device [Onyx Artist 1•2] or 2x2 device [Onyx Producer 2•2] with no driver required.
The USB routing of the Onyx USB Interface is a potent thing to behold. Input signals are always sent directly to the computer, yet also routable directly to the L/R line outputs and headphones outputs.
Similarly, stereo playback is always routed back into the interface for monitoring and overdubbing (unless you choose to mute them in software). Since the phones and L/R line outputs have separate volume controls, users are free to monitor using either, neither or both.
As mentioned on the previous page, the USB LED on the front panel will illuminate green when the computer is powered on and connected successfully and securely (via USB) to the Onyx USB Interface.
12. MIDI Input / Output Jacks [Onyx Producer 2•2]
These are standard 5-pin MIDI input and output connectors. Connect this to the MIDI IN/OUT ports on MIDI-equipped device (MIDI IN to MIDI OUT and vice-versa).
The MIDI LED on the front panel will illuminate green to inform you when data is received at the MIDI input jack of the Onyx Producer 2•2 interface.
It will appear as a 2x2 MIDI device to the computer and DAW application. The Onyx Producer 2•2 interface appears as Port 1 in the DAW application.
13. 1/4" Line Outputs
Connect the L/R monitor outputs to the inputs of powered studio monitors or to a power amplifier driving passive speakers. These outputs deliver the main balanced stereo signal.
- The L/R line output connectors accept balanced or unbalanced signals.
- Unbalanced TS (tip-sleeve) lines can be accommodated via the TRS jack. Make sure the cable terminates with a TS plug (like a guitar plug), or if it's a TRS plug (such as a headphone plug), make sure the ring is tied to the sleeve and that the plug is fully inserted into the jack.
The connectors are wired as follows, according to standards specified by the AES (Audio Engineering Society).
Balanced 1/4" TRS
Hot (+) Tip
Cold (−) Ring
Shield (Ground) Sleeve
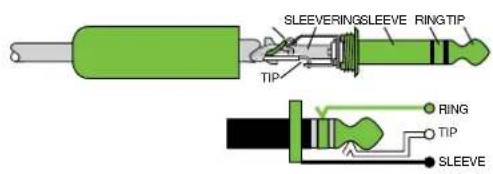
Balanced 1/4" Connectors
Unbalanced 1/4" TS
Hot (+) Tip
Shield (Ground) Sleeve

Unbalanced 1/4" Connectors
14. Kensington Lock
To help prevent theft, the Onyx USB Interfaces have a security slot designed to fit the popular Kensington security locks. A variety of models are available from their website at www.kensington.com.
Appendix A: Service Information
If you think your Onyx USB Interface has a problem, please check out the following troubleshooting tips and do your best to confirm the problem. Visit the Support section of our website (www.mackie.com/support) where you will find lots of useful information such as FAQs and documentation. You may find the answer to the problem without having to send your Onyx USB Interface away.
Troubleshooting
No Power
- The USB LED should come on if the interface is connected to a computer, and the computer is powered on. Check to make sure that the computer's power cord is securely plugged in.
No Sound
- Is the USB LED on the front panel illuminated? If not, refer to "No Power" above.
- Is the signal source turned up? Make sure the signal level from the selected input source is turned up high enough.
- Make sure the gain knob for the selected input(s) are set correctly.
- Make sure the cable connecting the line outputs to the active speakers or power amplifier isn't defective and the amplifier/speaker combination is working correctly.
Bad Sound
- Are the input and output connectors plugged completely into the jacks? Make sure they are plugged all the way in.
- Is it loud and distorted? Make sure the gain knob for the selected input is set correctly. Reduce the signal level on the input source if possible.
- If possible, listen to the signal with headphones plugged into the input source device. If it sounds bad there, it's not the Onyx USB Interface causing the problem.
- Is the input gain set correctly?
- Is the input OL LED on?
- Try the same source signal in the other input, set up exactly like the suspect input.
- Is phantom power required for your microphone?
Noise/Hum/Buzz
- Check the signal cables between the source(s) and the Onyx USB Interface. Make sure all connections are secure. These problems usually produce crackling noises, hum, or buzz. Disconnect them one by one. When the noise goes away, you'll know which input source is causing the problem.
- Make sure the signal cable is not routed near AC cables, power transformers, or other EMI sources (including wall warts and line lumps!). These sources usually produce hum.
- Excessive hiss is an indication of an incorrect gain setting somewhere before the Onyx USB Interface.
- Sometimes it helps to plug all the audio equipment into the same AC circuit so they share a common ground.
Repair
For warranty service, please refer to the warranty information on page 16.
Non-warranty service is available at a factory-authorized service center. To locate the nearest service center, visit www.mackie.com, click "Support" and select "Locate a Service Center or Distributor". Service for an Onyx USB Interface living outside the United States may be obtained through local dealers or distributors.
If you do not have access to our website, please call our Tech Support department at 1-800-898-3211 (normal business hours, Pacific Time), to explain the problem. They will tell you where the nearest factory-authorized service center is located in your area.
Appendix B: Technical Information
Onyx USB Interfaces Specifications
Frequency Response
At minimum gain, +4 dBu / -6 dBFS input
All inputs: ±0.5 dB, 20 Hz – 20 kHz
All outputs: ±0.5 dB, 20 Hz – 20 kHz
Noise Characteristics (RMS, 10 Hz - 22 kHz)
Mic inputs: <-100 dBFS
Line inputs: <-100 dBFS
Instrument input: <-100 dBFS
Line outputs, balanced: <-85 dBu
Headphone outputs: <-75 dBu
Distortion (THD)
+4 dBu / -6 dBFS, 1 kHz input, minimum gain
Mic input:
Line input:
Instrument input:
Line outputs, balanced: <0.001%
Headphone outputs: <0.002%
Maximum Levels (0 dBFS, 1 kHz)
Mic input, gain at minimum: +11 dBu
Line input, gain at minimum: +24 dBu
Instrument input, gain at minimum: +24 dBu
Line outputs, volume at maximum: +10 dBu
Headphone outputs, volume at maximum: +10 dBu
Input Type
Input type: Female XLR balanced/ unbalanced
Female 1/4" balanced / unbalanced
MIDI [Onyx Producer 2•2]
Output Type
Output type: Female 1/4" balanced / unbalanced MIDI [Onyx Producer 2•2]
USB
Format: USB 2.0, 24-bit, 192 kHz
Power Requirements
USB Bus Powered: High-power device
(5V, up to
<0.001%
<0.005%
<0.005% Physical Dimensions and Weight
Onyx Artist 1•2
Height: 2.0 in / 51 mm
Width: 6.4 in / 163 mm
Depth: 4.5 in / 114 mm
Weight: 1.1 lb / 0.5 kg
Onyx Producer 2•2
Height: 2.0 in / 51 mm
Width: 7.4 in / 188 mm
Depth: 4.5 in / 114 mm
Weight: 1.4 lb / 0.6 kg
Disclaimer
LOUD Technologies is always striving to improve our products by incorporating new and improved materials, components and manufacturing methods. Therefore, we reserve the right to change these specifications at any time without notice.
Onyx Artist 1•2 Dimensions

Onyx Producer 2•2 Dimensions

Onyx Artist 1•2 Block Diagram

flowchart
graph TD
    A["1"] --> B["GAIN"]
    C["2"] --> D["GAIN"]
    B --> E["ADC"]
    D --> E
    E --> F["DAC"]
    G["+48V"] --> H["On"]
    I["Off"] --> J["On"]
    K["Direct Monitor"] --> L["On"]
    M["MONITOR"] --> N["On"]
    O["LINE OUTPUT"] --> P["R"]
    Q["Ground"] --> R["Ground"]
Owners' Manual
Onyx Producer 2•2 Block Diagram

flowchart
graph TD
    A["+48V"] --> B["Off"]
    C["On"] --> D["GAIN"]
    E["1"] --> F["ADC"]
    G["2"] --> H["GAIN"]
    I["MIX"] --> F
    J["VOUT"] --> F
    K["LINE OUTPUT"] --> L["R"]
    M["MONITOR"] --> N["Line"]
    O["Ground"] --> P["Ground"]
Please keep your sales receipt in a safe place.
This Limited Product Warranty (“Product Warranty”) is provided by LOUD Technologies Inc. (“LOUD”) and is applicable to products purchased in the United States or Canada through a LOUD-authorized reseller or dealer. The Product Warranty will not extend to anyone other than the original purchaser of the product (hereinafter, “Customer,” “you” or “your”).
For products purchased outside the U.S. or Canada, please visit www.mackie.com to find contact information for your local distributor, and information on any warranty coverage provided by the distributor in your local market.
LOUD warrants to Customer that the product will be free from defects in materials and workmanship under normal use during the Warranty Period. If the product fails to conform to the warranty then LOUD or its authorized service representative will at its option, either repair or replace any such nonconforming product, provided that Customer gives notice of the noncompliance within the Warranty Period to the Company at: www.mackie.com or by calling LOUD technical support at 1.800.898.3211 (toll-free in the U.S. and Canada) during normal business hours Pacific Time, excluding weekends or LOUD holidays. Please retain the original dated sales receipt as evidence of the date of purchase. You will need it to obtain any warranty service.
For full terms and conditions, as well as the specific duration of the Warranty for this product, please visit www.mackie.com.
The Product Warranty, together with your invoice or receipt, and the terms and conditions located at www.mackie.com constitutes the entire agreement, and supersedes any and all prior agreements between LOUD and Customer related to the subject matter hereof. No amendment, modification or waiver of any of the provisions of this Product Warranty will be valid unless set forth in a written instrument signed by the party to be bound thereby.
Need help with the Onyx USB Interface?
- Visit www.mackie.com and click Support to find: FAQs, manuals, and addendums.
- Telephone 1-800-898-3211 to speak with one of our splendid technical support chaps (Monday through Friday, normal business hours, Pacific Time).

MACKIE.
16220 Wood-Red Road NE
Woodinville, WA 98072 • USA
Phone: 425.487.4333
Toll-free: 800.898.3211
Fax: 425.487.4337
www.mackie.com


- ONYX™ USB INTERFACES
- OWNER'S MANUAL
- Important Safety Instructions
- Contents Onyx USB Interfaces Features
- Introduction
- Onyx Artist 1•2
- Onyx Producer 2•2
- Quick Start
- Onyx Artist 1•2 Hookup Diagram
- Onyx Producer 2•2 Hookup Diagram
- Front Panel Description
- XLR and 1/4" Inputs
- Balanced XLR Wiring:
- Balanced 1/4" TRS
- Unbalanced 1/4" TS
- +48V Phantom Power Switch
- Hi-Z Switch
- Gain Knobs
- SIG/OL LED
- Monitor Knob
- 7.1/4" Phones Jacks
- Phones Level
- Direct Monitor Switch [Onyx Artist 1•2]
- Mix Knob [Onyx Producer 2•2]
- USB LED
- MIDI LED [Onyx Producer 2•2]
- Rear Panel Description
- USB Input / Output Jack
- MIDI Input / Output Jacks [Onyx Producer 2•2]
- 1/4" Line Outputs
- Kensington Lock
- Appendix A: Service Information
- Troubleshooting
- No Power
- No Sound
- Bad Sound
- Noise/Hum/Buzz
- Repair
- Appendix B: Technical Information
- Onyx USB Interfaces Specifications
- Frequency Response
- Noise Characteristics (RMS, 10 Hz - 22 kHz)
- Distortion (THD)
- Maximum Levels (0 dBFS, 1 kHz)
- Input Type
- Output Type
- USB
- Power Requirements
- <0.005% Physical Dimensions and Weight
- Disclaimer
- Onyx Artist 1•2 Dimensions
- Onyx Producer 2•2 Dimensions
- Onyx Artist 1•2 Block Diagram
- Onyx Producer 2•2 Block Diagram
- Please keep your sales receipt in a safe place.
- Need help with the Onyx USB Interface?
- MACKIE.
Brand : MACKIE
Model : Onyx Artist
Category : Hi-Fi System