
DVR-204U-K1 - Dictaphone Hikvision - Free user manual and instructions
Find the device manual for free DVR-204U-K1 Hikvision in PDF.


| Product Type | Digital Video Recorder (DVR) |
| Brand | Hikvision |
| Model | DVR-204U-K1 |
| Video Input | Analog and IP cameras (up to 4 channels) |
| Storage | Supports HDD and SSD installation |
| Network Connectivity | Ethernet for remote access and management |
| Mobile App Support | HiLookVision for remote viewing and control |
| Activation | Password-protected first-time activation required |
| Recording Modes | Continuous, scheduled, event-triggered recording |
| Playback | Calendar-based playback with toolbar controls |
| Password Reset | Via email, security questions, or GUID export |
| Safety Compliance | FCC, CE, UKCA, RoHS, WEEE |
| Power Supply | DC power adapter (specific voltage not listed) |
| Operating Environment | Dry, non-corrosive gas; avoid extreme temperatures |
| Installation | Wall or ceiling mountable with proper anchoring |
| Battery | Coin cell battery for RTC (CR2032 type) |
| Warranty | After-sales support in country of purchase only |
Frequently Asked Questions - DVR-204U-K1 Hikvision
User questions about DVR-204U-K1 Hikvision
0 question about this device. Answer the ones you know or ask your own.
Ask a new question about this device
Download the instructions for your Dictaphone in PDF format for free! Find your manual DVR-204U-K1 - Hikvision and take your electronic device back in hand. On this page are published all the documents necessary for the use of your device. DVR-204U-K1 by Hikvision.
USER MANUAL DVR-204U-K1 Hikvision

Regulatory Compliance and Safety Information
Regulatory Compliance and Safety Information
Read all information and instructions in this document carefully before using the device and keep it for further reference.
For more device information and instructions, please visit our website at https://www.hikvision.com. You can also refer to other documents (if any) accompanying the device or scan the QR code (if any) on the packaging to get more information.
About this Document
This Document includes instructions for using and managing the Product. Pictures, charts, images and all other information hereinafter are for description and explanation only.
The information contained in the Document is subject to change, without notice, due to firmware updates or other reasons. Please find the latest version of the Document at the Hikvision website (https://www.hikvision.com). Unless otherwise agreed, Hangzhou Hikvision Digital Technology Co., Ltd. or its affiliates (hereinafter referred to as "Hikvision") makes no warranties, express or implied.
Please use the Document with the guidance and assistance of professionals trained in supporting the Product.
About this Product
This product can only enjoy the after-sales service support in the country or region where the purchase is made.
Acknowledgment of Intellectual Property Rights
Hikvision owns the copyrights and/or patents related to the technology embodied in the Products described in this Document, which may include licenses obtained from third parties.
Any part of the Document, including text, pictures, graphics, etc., belongs to Hikvision. No part of this Document may be excerpted, copied, translated, or modified in whole or in part by any means without written permission.

and other Hikvision's trademarks and logos are the properties of Hikvision in various jurisdictions.
Other trademarks and logos mentioned are the properties of their respective owners.

The terms HDMI and HDMI High-Definition Multimedia Interface, and the HDMI Logo are trademarks
or registered trademarks of HDMI Licensing Administrator, Inc. in the United States and other countries.
LEGAL DISCLAIMER
TO THE MAXIMUM EXTENT PERMITTED BY APPLICABLE LAW, THIS DOCUMENT AND THE PRODUCT DESCRIBED, WITH ITS HARDWARE, SOFTWARE AND FIRMWARE, ARE PROVIDED "AS IS" AND "WITH ALL FAULTS AND ERRORS". HIKVISION MAKES NO WARRANTIES, EXPRESS OR IMPLIED, INCLUDING WITHOUT LIMITATION, MERCHANTABILITY, SATISFACTORY QUALITY, OR FITNESS FOR A PARTICULAR PURPOSE. THE USE OF THE PRODUCT BY YOU IS AT YOUR OWN RISK. IN NO EVENT WILL HIKVISION BE LIABLE TO YOU FOR ANY SPECIAL, CONSEQUENTIAL, INCIDENTAL, OR INDIRECT DAMAGES, INCLUDING, AMONG OTHERS, DAMAGES FOR LOSS OF BUSINESS PROFITS, BUSINESS INTERRUPTION, OR LOSS OF DATA, CORRUPTION OF SYSTEMS, OR LOSS OF DOCUMENTATION, WHETHER BASED ON BREACH OF CONTRACT, TORT (INCLUDING NEGLIGENCE), PRODUCT LIABILITY, OR OTHERWISE, IN CONNECTION WITH THE USE OF THE PRODUCT, EVEN IF HIKVISION HAS BEEN ADVISED OF THE POSSIBILITY OF SUCH DAMAGES OR LOSS.
YOU ACKNOWLEDGE THAT THE NATURE OF THE INTERNET PROVIDES FOR INHERENT SECURITY RISKS, AND HIKVISION SHALL NOT TAKE ANY RESPONSIBILITIES FOR ABNORMAL OPERATION, PRIVACY LEAKAGE OR OTHER DAMAGES RESULTING FROM CYBER-ATTACK, HACKER ATTACK, VIRUS INFECTION, OR OTHER INTERNET SECURITY RISKS; HOWEVER, HIKVISION WILL PROVIDE TIMELY TECHNICAL SUPPORT IF REQUIRED.
YOU AGREE TO USE THIS PRODUCT IN COMPLIANCE WITH ALL APPLICABLE LAWS, AND YOU ARE SOLELY RESPONSIBLE FOR ENSURING THAT YOUR USE CONFORMS TO THE APPLICABLE LAW. ESPECIALLY, YOU ARE RESPONSIBLE, FOR USING THIS PRODUCT IN A MANNER THAT DOES NOT INFRINGE ON THE RIGHTS OF THIRD PARTIES, INCLUDING WITHOUT LIMITATION, RIGHTS OF PUBLICITY, INTELLECTUAL PROPERTY RIGHTS, OR DATA PROTECTION AND OTHER PRIVACY RIGHTS. YOU SHALL NOT USE THIS PRODUCT FOR ANY PROHIBITED END-USES, INCLUDING THE DEVELOPMENT OR PRODUCTION OF WEAPONS OF MASS DESTRUCTION, THE DEVELOPMENT OR PRODUCTION OF CHEMICAL OR BIOLOGICAL WEAPONS, ANY ACTIVITIES IN THE CONTEXT RELATED TO ANY NUCLEAR EXPLOSIVE OR UNSAFE NUCLEAR FUEL-CYCLE, OR IN SUPPORT OF HUMAN RIGHTS ABUSES.
IN THE EVENT OF ANY CONFLICTS BETWEEN THIS DOCUMENT AND THE APPLICABLE LAW, THE LATTER PREVAILS.
© Hangzhou Hikvision Digital Technology Co., Ltd. All rights reserved.
These clauses apply only to the products bearing the corresponding mark or information.
FCC Compliance Statement
Class A or Class B information is marked on device tags.
Please take attention that changes or modification not expressly approved by the party responsible for compliance could void the user's authority to operate the equipment.
This device complies with part 15 of the FCC Rules. Operation is subject to the following two conditions:
(1) this device may not cause harmful interference, and
(2) this device must accept any interference received, including interference that may cause undesired operation.
Note: The Class A equipment has been tested and found to comply with the limits for a Class A digital device, pursuant to
HiLook
part 15 of the FCC Rules. These limits are designed to provide reasonable protection against harmful interference when the equipment is operated in a commercial environment. The Class A equipment generates, uses, and can radiate radio frequency energy and, if not installed and used in accordance with the instruction manual, may cause harmful interference to radio communications. Operation of the Class A equipment in a residential area is likely to cause harmful interference in which case the user will be required to correct the interference at his own expense.
Note: The Class B product has been tested and found to comply with the limits for a Class B digital device, pursuant to Part 15 of the FCC Rules. These limits are designed to provide reasonable protection against harmful interference in a residential installation. The Class B product generates, uses, and can radiate radio frequency energy and, if not installed and used in accordance with the instructions, may cause harmful interference to radio communications. However, there is no guarantee that interference will not occur in a particular installation. If the Class B product does cause harmful interference to radio or television reception, which can be determined by turning the equipment off and on, the user is encouraged to try to correct the interference by one or more of the following measures:
—Reorient or relocate the receiving antenna.
—Increase the separation between the equipment and receiver.
—Connect the equipment into an outlet on a circuit different from that to which the receiver is connected.
—Consult the dealer or an experienced radio/TV technician for help.
EU/UK Compliance Statement


This product and - if applicable - the supplied accessories too are marked with "CE" and comply therefore with the applicable harmonized European standards listed under the Directive 2014/30/EU (EMCD) and Directive 2011/65/EU (RoHS).
Note: The products with the input voltage of within 50 to 1000 VAC or 75 to 1500 VDC comply with Directive 2014/35/EU (LVD), and the rest products comply with Directive 2001/95/EC (GPSD). Please check the specific power supply information for reference.
The full text of the EU declaration of conformity is available at the following internet address: https://www.hikvision.com/en/support/compliance/declaration-of-conformity.
This product and - if applicable - the supplied accessories too are marked with "UKCA" and comply therefore with the following directives: Electromagnetic Compatibility Regulations 2016, Electrical Equipment (Safety) Regulations 2016, the Restriction of the Use of Certain Hazardous Substances in Electrical and Electronic Equipment Regulations 2012.
Warning: In a domestic environment, the class A product may cause radio interference in which case the user may be required to take adequate measures.
Directive 2012/19/EU (WEEE Directive): Products marked with this symbol cannot be disposed of as unsorted municipal waste in the European Union. For proper recycling, return this product to your local supplier upon the purchase of equivalent new equipment, or dispose of it at designated collection points. For more information see: www.recyclethis.info.
According to the Waste Electrical and Electronic Equipment Regulations 2013: Products marked with this symbol cannot be disposed of as unsorted municipal waste in the United Kingdom. For proper recycling, return this product to your local supplier upon the purchase of equivalent new equipment, or dispose of it at designated collection points. For more information see: www.recyclethis.info.
Directive 2006/66/EC and its amendment 2013/56/EU (Battery Directive): This product contains a battery that cannot be disposed of as unsorted municipal waste in the European Union. See the product documentation for specific battery information. The battery is marked with this symbol, which may include lettering to indicate cadmium (Cd), lead (Pb), or mercury (Hg). For proper recycling, return the battery to your supplier or to a designated collection point. For more information see: www.recyclethis.info.
According to the Batteries and Accumulators (Placing on the Market) Regulations 2008 and the Waste Batteries and Accumulators Regulations 2009: This product contains a battery that cannot be disposed of as unsorted municipal waste in the United Kingdom. See the product documentation for specific battery information. The battery is marked with this symbol, which may include lettering to indicate cadmium (Cd), lead (Pb), or mercury (Hg). For proper recycling, return the battery to your supplier or to a designated collection point. For more information see: www.recyclethis.info.
Industry Canada ICES-003 Compliance
Class A or Class B information is marked on device tags. Class A devices meet the CAN ICES-003 (A)/NMB-003(A) standards requirements. Class B devices meet the CAN ICES-003 (B)/NMB-003(B) standards requirements.
Please read all the safety information carefully before using.
- Proper configuration of all passwords and other security settings is the responsibility of the installer and/or end-user.
- Firmly connect the plug to the power socket. Do not connect several devices to one power adapter. Power off the device before connecting and disconnecting accessories and peripherals.
● The socket-outlet shall be installed near the equipment and shall be easily accessible.
- For the device with the sign indicating hazardous live, the external wiring connected to the terminals requires installation by an instructed person.
● This equipment is not suitable for use in locations where children are likely to be present.

Warning:
-
Do not ingest battery. Chemical Burn Hazard!
-
This product contains a coin/button cell battery. If the coin/button cell battery is swallowed, it can cause severe internal burns in just 2 hours and can lead to death.
-
Improper replacement of the battery with an incorrect type may defeat a safeguard (for example, in the case of some lithium battery types).
-
Do not dispose of the battery into fire or a hot oven, or mechanically crush or cut the battery, which may result in an explosion.
-
Do not leave the battery in an extremely high temperature surrounding environment, which may result in an explosion or the leakage of flammable liquid or gas.
-
Do not subject the battery to extremely low air pressure, which may result in an explosion or the leakage of flammable liquid or gas.
-
Dispose of used batteries according to the instructions.
- If smoke, odor, or noise arises from the device, immediately turn off the power, unplug the power cable, and contact the service center.
- Use the device in conjunction with an UPS, and use factory recommended HDD if possible.
- For the device with fan blades or motors, keep body parts away from fan blades or motors. Disconnect the power source during servicing.
- Do not touch the bare components (such as the metal contacts of the inlets) and wait for at least 5 minutes, since electricity may still exist after the device is powered off.
- Never place the device in an unstable location. The device may fall, causing serious personal injury or death.
- If the device uses a 3-prong power supply plug, it must be connected to an earthed mains socket-outlet properly.
Preventive and Cautionary Tips
Before connecting and operating your device, please be advised of the following tips:
- The device shall not be exposed to water dripping or splashing, and no objects filled with liquids, such as vases, shall be placed on the device.
HiLook
- No naked flame sources should be placed on the device, such as lighted candles.
- For the device with ventilation openings, the ventilation openings should not be impeded by covering the ventilation openings with items, such as newspapers, table-cloths, and curtains. The openings shall never be blocked by placing the device on a bed, sofa, rug, or other similar surface.
- The USB port of the equipment is used for connecting to a mouse, keyboard, USB flash drive, or Wi-Fi dongle only. The current for the connected device shall be not more than 0.1 A.
- Under high working temperature (40 °C (104 °F) to 55 °C (131 °F)), the power of some power adaptors may decrease.
-
If the device needs to be installed on the wall or ceiling,
-
Install the device according to the instructions in this manual.
-
To prevent injury, this device must be securely attached to the installation surface in accordance with the installation instructions.
-
If a power adapter is provided in the device package, use the provided adapter only.
- If the device needs to be wired by yourself, select the corresponding wire to supply power according to the electric parameters labeled on the device. Strip off wire with a standard wire stripper at corresponding position. To avoid serious consequences, the length of stripped wire shall be appropriate, and conductors shall not be exposed.
- Make sure that the power has been disconnected before you wire, install, or disassemble the device.
- The device should be placed in a dry environment without corrosive gas (refer to the user manual for details about corrosive gas).
HDD Installation

SSD Installation
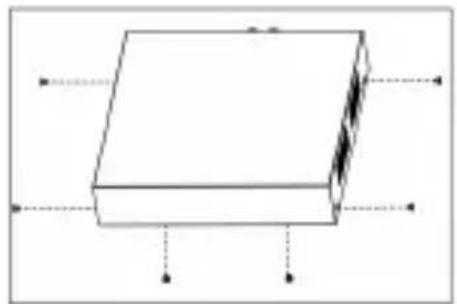


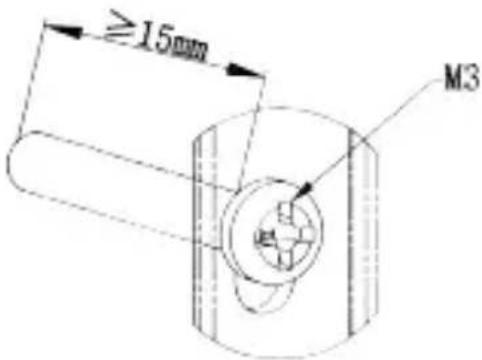
Wall Installation Requirement for Certain Chassis Types
Type 1 Type 2

Startup
Proper startup is crucial to expand the life of NVR/DVR.
Step 1 Plug power supply into an electrical outlet.
Step 2 Press the power button (certain models may have power button on the front or rear panel).
The device begins to start.
Activate Your Device
No operation is allowed before activation. For the first-time access, it requires to set an admin password for device activation. You can also activate the device via web browser, SADP or client software.
Step 1 Enter the new password, and confirm it.
Step 2 Optionally, set reserved email, HiLookVision, security questions, or export GUID for password resetting in the future.
Step 3 Set the password to activate the network camera(s) connected to the device.
Step 4 Save the password and activate the device.
Network Settings
You shall properly configure the network settings before you operate your device over network.
Step 1 Go to Configuration > Network > General.
Step 2 Set network parameters.
Step 3 Click Apply.
Add Network Camera
Before getting live video or record the video files, you shall add network camera to your device.
Step 1 Go to Configuration > Camera.
Step 2 Optionally, for certain DVR models, configure the analog and IP signal input types.
Step 3 Click IP Camera > Custom Add.
Step 4 Set the IP camera parameters and add it.
Step 5 Click Add.
Configure HiLookVision
HiLookVision provides mobile phone application and platform service to access and manage your connected devices, which enables you to get a convenient remote access to the video security system.
Step 1 Go to Configuration > Network > HiLookVision.
Step 2 Enable the function and accept service terms.
Step 3 Set a verification code.
Step 4 Use a smart phone to scan the QR code, and download HiLookVision app.

Step 5 Use HiLookVision to scan the device QR, and bind the device.
Step 6 Optionally, custom the server IP address.
Step 7 Optionally, enable stream encryption. After enabling this function, the user would have to enter verification code in remote access and live view.
Step 8 Optionally, enable time sync function, the device will sync time with HiLookVision instead of NTP server.
Step 9 Click Apply.
Recording Settings
Enusre your device has installed or added a disk.
After a camera is added to your device, the device would automatically record its video, and set its recording type as Continuous by default. You can manually edit the recording settings.
Step 1 Go to Configuration > Record > Schedule or Storage > Schedule > Record.
Step 2 Select a camera.
Step 3 Enable the recording function.
Step 4 Select a recording type and draw the schedule as your desire.
Step 5 Click Apply.
Playback
The recorded files on HDD can be played back. Refer to the user manual for details of each playback mode.
Step 1 Go to Playback.
Step 2 Select camera(s) in the list.
Step 3 Double click a date on the calendar.
Step 4 Use the toolbar at the bottom to control the playing progress.
Français
https://www.hikvision.com/en/support/compliance/declaration-of-conformity.
https://www.hikvision.com/en/support/compliance/declaration-of-conformity.
https://www.hikvision.com/en/support/compliance/declaration-of-conformity.
https://www.hikvision.com/en/support/compliance/declaration-of-conformity.
- amplitude of the source of the source of the source of the source of the source of the source of the source of the source of the source of the source of the source of the source of the source of the source of the source of the source of the source of the source of the source of the source of the source of the source of the source of the source of the source of the source of the source of the source of the source of the source of the source of the source of the source of the source.
https://www.hikvision.com/en/support/compliance/declaration-of-conformity.
.https://www.hikvision.com/en/support/compliance/declaration-of-conformity

Scan to View Product Return Material Authorization (RMA) Policy


- REGULATORY COMPLIANCE AND SAFETY INFORMATION
- ABOUT THIS DOCUMENT
- ABOUT THIS PRODUCT
- ACKNOWLEDGMENT OF INTELLECTUAL PROPERTY RIGHTS
- LEGAL DISCLAIMER
- FCC COMPLIANCE STATEMENT
- HILOOK
- EU/UK COMPLIANCE STATEMENT
- INDUSTRY CANADA ICES-003 COMPLIANCE
- PREVENTIVE AND CAUTIONARY TIPS
- WALL INSTALLATION REQUIREMENT FOR CERTAIN CHASSIS TYPES
- STARTUP
- ACTIVATE YOUR DEVICE
- NETWORK SETTINGS
- ADD NETWORK CAMERA
- CONFIGURE HILOOKVISION
- RECORDING SETTINGS
- PLAYBACK
- FRANÇAIS
Brand : Hikvision
Model : DVR-204U-K1
Category : Dictaphone