
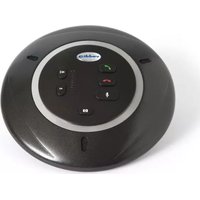
EasyIP CeilingMIC D - Microphone Vaddio - Free user manual and instructions
Find the device manual for free EasyIP CeilingMIC D Vaddio in PDF.


| Product Type | Overhead Ceiling Microphone |
| Model | EasyIP CeilingMIC D (999-85810-000 White, 999-85820-000 Black) |
| Brand | Vaddio (Legrand AV) |
| Audio Connectivity | Dante Networked Audio |
| Microphone Coverage | 360° (three-element design) |
| Digital Signal Processor | Built-in DSP |
| Power Source | PoE+ (Power over Ethernet) |
| Drop Cable Length | Up to 15 ft (4.6 m) |
| Maximum Cable Run from Ceiling Box | Up to 100 ft (30 m) |
| Included Accessories | Interface box, microphone body with strain-relief boot, tile brace, trim plates (2), drop cable, zip tie, strain relief clamp, split grommet |
| Color Options | White, Black |
| Operating Temperature Range | 32°F to 104°F (0°C to 40°C) |
| Environment | Indoor use only, avoid humidity and liquids |
| Installation Requirements | Ceiling mount; requires Cat-5e cable; tools: hole saw, Phillips screwdriver, wire cutters, tape measure, ladder |
| Application | Conference rooms, overhead audio pickup |
Frequently Asked Questions - EasyIP CeilingMIC D Vaddio
User questions about EasyIP CeilingMIC D Vaddio
0 question about this device. Answer the ones you know or ask your own.
Ask a new question about this device
Download the instructions for your Microphone in PDF format for free! Find your manual EasyIP CeilingMIC D - Vaddio and take your electronic device back in hand. On this page are published all the documents necessary for the use of your device. EasyIP CeilingMIC D by Vaddio.
USER MANUAL EasyIP CeilingMIC D Vaddio
Installing CeilingMIC and EasyIP CeilingMIC D Overhead Microphones
This guide contains only the information required to install this product. Refer to the
Complete Manual for CeilingMIC and EasyIP CeilingMIC D Overhead Microphones for additional product information, compliance statements, and warranty information.
Overview
This manual covers:
■ CeilingMIC Conference Room Microphone (worldwide) – 999-85100-000 (white); 999-85150-000 (black)
■ EasyIP CeilingMIC D Overhead Microphone with Dante Networked Audio (worldwide) – 999-85810-000 (white); 999-85820-000 (black)
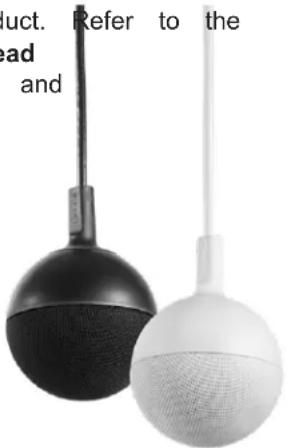
What's in the Box
Make sure you received all the items you expected.
CeilingMIC conference room microphone (worldwide) - 999-85100-000 (white); 999-85150-000 (black)
■ In-ceiling interface box
■ Microphone body and strain-relief boot (white or black)
- Tile brace
- Trim plates, qty. 2, with mounting hardware (white or black)
■ Drop-down cable (white or black)
■ Small zip-tie
■ Strain relief clamp
■ Split grommet
EasyIP CeilingMIC D network-connected overhead microphone (worldwide) - 999-85810-000 (white); 85820-000 (black)
■ In-ceiling interface box
■ Microphone body and strain-relief boot (white or black)
- Tile brace
■ Trim plates, qty. 2, with mounting hardware (white or black)
■ Drop-down cable (white or black)
■ Small zip-tie
■ Strain relief clamp
■ Split grommet
Contact Vaddio Technical Support if you did not receive all the items listed.
Find full product documentation on the applicable product page(s) at legrandav.com.
Features
The CeilingMIC offers the great features and performance you expect from the EasyMic family of mic
The EasyIP CeilingMIC D provides the same capabilities plus Dante connectivity.
■ Three-element design with improved geometry for 360° coverage and better audio pick-up
■ Built-in digital signal processor (DSP)
■ Easy access to the microphone cable connector
■ Designed for customizable ceiling drop cable length
■ EasyIP CeilingMIC D only: Dante networked audio
■ CeilingMIC only: Vaddio EasyMic connectivity
Installation
This section covers:
■ Safety information
■ Tools you will need
■ Cabling notes
■ Installing the CeilingMIC
■ Connection diagrams
■ Tips for a successful audio installation
Safety Information
Warning
Follow standard safety practices when using ladders or lifts. Failure to do so can result in injury or
Note
All above-ceiling work must conform to local building codes and should be performed by qualified personnel.

Preparing for a Successful Audio Installation
Here are a few tips for avoiding common audio problems.
■ The effective range for each Vaddio conference room microphone is about 12 ft. (3.7 m) under most circumstances. Be sure the room design includes enough microphones to provide adequate coverage.
- Because of its geometry, the overhead microphone is less sensitive in a small area directly below it. In a small to medium corporate conference room, it may make sense to suspend the microphone(s) above the conference table.
■ To prevent audio feedback, keep microphones at least 4 ft. (1.2 m) from speakers. More separation is better.
- Place microphones closer to the people talking than to the room's speakers. This helps maintain quality echo cancellation.
- Do not route microphone cables across or beside fluorescent light fixtures. Electrical interference from the ballasts may degrade the audio signal.
■ Mount the overhead microphone away from air vents, to avoid picking up the sounds of the HVAC system.
Tools You Will Need
To install the overhead microphone, you will need:
■ Hole saw for the appropriate type of ceiling
■ #2 Phillips screwdriver
■ Wire cutters
■ Tape measure
■ Ladder or lift
■ Appropriate personal protective equipment
Don't Void Your Warranty!
Caution
This product is for indoor use. Do not install it outdoors or in a humid environment without the ap enclosure. Do not allow it to come into contact with any liquid.
Do not install or operate this product if it has been dropped, damaged, or exposed to liquids. If a happen, return it to Vaddio for safety and functional testing.
Cabling Notes
Ceiling microphones are shipped with one Cat-5e cable to connect to the interface box.
Caution
When building cables for Vaddio products, do not use pass-through RJ-45 connectors. If they are crimped incorrectly, they can cause intermittent connections and degrade signal quality, incorrectly crimped pass-through connectors can also damage the connectors on the product, which will void you warranty.

Intact - will make reliable contact with cable connector

Damaged - Bent contact fingers will NOT make reliable contact with cable connector
Use Cat-5e or better cable. We recommend using high-quality connectors and a high-quality crimping. We recommend shielded cabling if the cables will be coiled, run tightly with other cables, or routed electromagnetic interference such as power lines or fluorescent light fixtures.
Caution
Check your cables. Connecting a cable to the wrong port or using the wrong pin-out can result in and will void the warranty.
Pro Tip
Label all cables at both ends.
Preparing the Ceiling Box
- Remove the cover from the ceiling box.
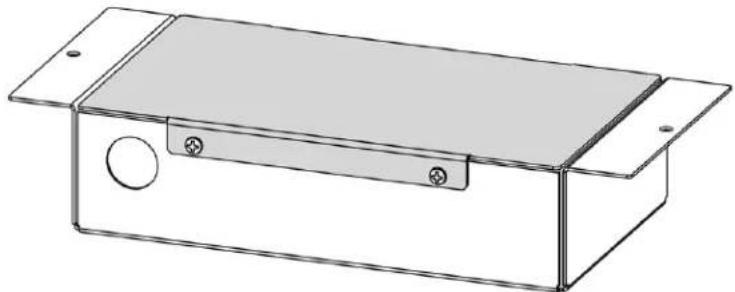
natural_image
Technical line drawing of a rectangular electronic enclosure with mounting flanges and a circular vent (no text or symbols)- Determine the desired length of the drop cable, from the ceiling to the top of the microphone (the strain relief boot). Be sure this leaves enough cable inside the ceiling box to avoid placing connector.
Note
If desired, you can use a Cat-5e cable made to the desired length for the microphone drop-down cable may be up to 15 ft. (4.6 m); contact Vaddio Technical Support if your installation requires cable.
- Thread the drop cable through the opening in the floor of the box.
- Snap the strain relief grommet onto the drop cable at the desired cable lengths and press it into the opening in the floor of the box.
- Connect the drop cable to the port labeled IN FROM MIC.
- If there is excess cable above the grommet, thread a zip tie through the tie loop in the side of the box and secure the cable.
Note
The photo shows the ceiling box for a CeilingMIC. The EasyIP CeilingMIC circuit board.

natural_image
Close-up of a green printed circuit board with visible traces and components, mounted on a black plastic base (no text or symbols)Preparing the Ceiling
Warning
Follow standard safety practices when using ladders or lifts. Failure to do so can result in injury or death.
We like you, we don't want you to be injured or killed, and we hope you understand the gravity
If installing in a hard ceiling:
Using the tile brace as a template, make a hole in the ceiling where the microphone will be mou If installing in a suspended tile ceiling:
-
Remove the ceiling tile where the microphone will be mounted, and make a hole in the ceiling brace as a template.
-
Reinstall the ceiling tile and position the tile brace.
Note
Because the microphone assembly weighs very little, the tile brace does not need to be physically the tile support grid unless this is required by local building codes.
Installing the Ceiling Box
Working above the ceiling:
- CeilingMIC: Route a Cat-5e (or better) cable from the ceiling box to the mixer or other audio c may be up to 100 ft. (30 m.) long.
EasyIP CeilingMIC D: Route a Cat-5e (or better) cable from the ceiling box to the PoE+ switch. be up to 100 ft. (30 m.) long.
- Thread the cable through the opening in the side of the ceiling box.
- Install the split grommet in the opening in the side of the ceiling box to keep the cable from
- Connect the cable to the port labeled OUT TO MIXER.
- Reinstall the cover on the ceiling box.
- Thread the drop cable through the opening in the tile brace and ceiling, and place the ceiling
Connecting the Microphone Body
Working below the ceiling:
- Connect the drop cable to the port in the microphone body.

natural_image
Simple diagram of a mechanical component inside a circular housing, with a tool inserted (no text or symbols)- Fit the strain relief boot over the drop cable.
- Fit the strain relief boot into place in the microphone body.
- Making sure the countersinks face outward, slide both the slotted trim plates over the cable, with opposite sides. Use the 3/4 inch flat head screws to secure the trim plates to the threaded pos of the interface box.



natural_image
Two overlapping circles with small circular holes, no text or symbols present
(Illustration shaded for clarity)
Contact Vaddio Technical Support if you have questions or encounter any problems. Phone 800.572.20 +1.763.971.4400, email av.vaddio.support@legrand.com.
Basic Connections – CeilingMIC
This is a simple installation for a small conference room, using the CeilingMIC with a ConferenceSHC system. In this installation, the CeilingMIC connects to a ConferenceSHOT AV camera with speaker. T connects to a computer over a USB 3 connection, making audio and video available to soft confere applications.

flowchart
graph LR
    A["Video"] --> B["Computer with conferencing application"]
    C["Audio"] --> B
    D["Network"] --> B
    B --> E["Computer with conferencing application"]
    E --> F["Video"]
    E --> G["Audio"]
    E --> H["Network"]
    E --> I["USB"]
This installation is for a larger room, using an AV Bridge MATRIX PRO to manage the room audio four CeilingMIC microphones connect directly to EasyMic ports on the AV Bridge MATRIX PRO. The require an amplifier, as shown by the amplifier symbol in the diagram. This system can include multi
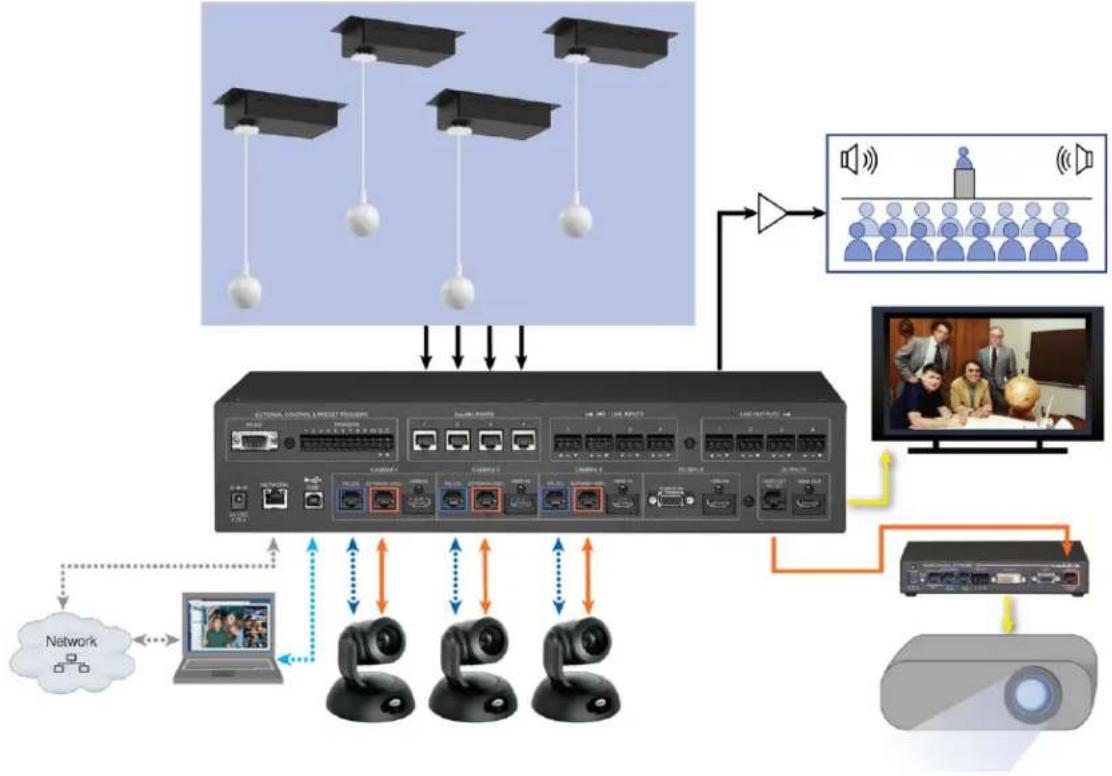
flowchart
graph TD
    A["Server"] --> B["Central Server"]
    B --> C["Video Conference"]
    C --> D["Provision"]
    D --> E["Monitor"]
    E --> F["Desktop"]
    G["Network"] --> H["Laptop"]
    H --> I["Camera Array"]
    I --> J["Data Flow"]
    J --> K["Signal Processing"]
    K --> L["Speaker Group"]
    L --> M["Video Panel"]
    M --> N["Display"]
    style A fill:#f9f,stroke:#333
    style B fill:#ccf,stroke:#333
    style C fill:#cfc,stroke:#333
    style D fill:#fcc,stroke:#333
    style E fill:#ffc,stroke:#333
    style F fill:#cff,stroke:#333
    style G fill:#ffc,stroke:#333
    style H fill:#cfc,stroke:#333
    style I fill:#cfc,stroke:#333
    style J fill:#cfc,stroke:#333
    style K fill:#cfc,stroke:#333
    style L fill:#cfc,stroke:#333
    style M fill:#cfc,stroke:#333
    style N fill:#cfc,stroke:#333
Basic Connections - EasyIP CeilingMIC D
This is a simple installation for a medium to large conference room, using the EasyIP CeilingMIC D system. In this installation, the EasyIP CeilingMIC D microphones pair to an EasyIP Mixer over the EasyIP Mixer also manages speakers and video, and originates a USB 3 stream, making audio and to soft conferencing applications.

flowchart
graph TD
    A["User"] --> B["Network"]
    B --> C["Device"]
    C --> D["Audio Out"]
    D --> E["Line 1"]
    D --> F["Line 2"]
    D --> G["Audio OUT"]
    G --> H["Line 1"]
    G --> I["Line 2"]
    B --> J["Network"]
    J --> K["Video"]
    K --> L["Audio"]
    L --> M["USB 3"]
    style A fill:#f9f,stroke:#333
    style B fill:#ccf,stroke:#333
    style C fill:#cfc,stroke:#333
    style D fill:#fcc,stroke:#333
    style E fill:#ffc,stroke:#333
    style F fill:#fcc,stroke:#333
    style G fill:#fcc,stroke:#333
    style H fill:#fff,stroke:#333
    style I fill:#fff,stroke:#333
EasyIP CeilingMIC D microphones can also be used with other devices that support Dante connectivity. Note
Because EasyIP CeilingMIC D microphones are not directly connected to the device that manages the EasyIP Mixer in the diagram above), they must be paired to the device in order to operate.
To work with EasyIP CeilingMIC D and other Dante devices, you will need to download and install Controller application from Audinate Pty. Ltd.: www.audinate.com/products/software/dante-controller
Things to know about Dante Controller:
■ Dante Controller does not work over Wi-Fi or across subnets. Your computer must be on the same subnet as the Dante devices you need to work with.
■ Device names and IP addresses shown in Dante Controller do not match the corresponding information shown in devices' web interfaces.
Audinate provides information, training, and documentation for Dante technology on their website.
Use, Storage, and Care
Keep this device away from food and liquids. Do not attempt to take this product apart. There are serviceable components inside. Do not operate or store the device under any of the following conditions
■ Temperatures above 104^ F ( 40^ C) or below 32^ F ( 0^ C)
■ High humidity, condensing or wet environments
■ Inclement weather
■ Severe vibration
■ Dry environments with an excess of static discharge
Do not let cats play with overhead microphones, as their claws could snag the fabric.
Vaddio is a brand of Legrand AV Inc. · www.legrandav.com · Phone 800.572.2011 / +1.763.971.4400 · Fax +1.763.971.4464 · Email av.vaddio.support@legrand.com
Visit us at www.legrandav.com for firmware updates, specifications, drawings, manuals, technical support information, and more.
©2020 Legrand AV Inc.
Vaddio is a registered trademark of Legrand AV Inc. Audinate®, the Audinate logo and Dante® a registered trademarks of Audinate Pty Ltd. All other brand names or marks are used for identical purposes and are trademarks of their respective owners. All patents are protected under existing designations. Other patents pending.
A brand of legrand®
Commercial AV Brands Chief | Da-Lite | Middle Atlantic | Projecta | Vaddio
vaddio®

- Installing CeilingMIC and EasyIP CeilingMIC D Overhead Microphones
- Overview
- What's in the Box
- Features
- Installation
- Safety Information
- Warning
- Note
- Preparing for a Successful Audio Installation
- Tools You Will Need
- Don't Void Your Warranty!
- Caution
- Cabling Notes
- Pro Tip
- Preparing the Ceiling Box
- Preparing the Ceiling
- If installing in a hard ceiling:
- Installing the Ceiling Box
- Working above the ceiling:
- Connecting the Microphone Body
- Working below the ceiling:
- Basic Connections – CeilingMIC
- Basic Connections - EasyIP CeilingMIC D
- Use, Storage, and Care
- A brand of legrand®
Brand : Vaddio
Model : EasyIP CeilingMIC D
Category : Microphone