ZWL1126SJSS - Microwave Monogram - Free user manual and instructions
Find the device manual for free ZWL1126SJSS Monogram in PDF.


| Product Type | Built-in Microwave |
| Brand | Monogram |
| Model | ZWL1126SJSS |
| Color | Stainless Steel |
| Capacity | 1.8 cu ft |
| Wattage | 1000 W |
| Voltage | 120 V |
| Dimensions (W x H x D) | 30" x 17" x 20" |
| Weight | 60 lbs |
| Control Type | Touchpad |
| Display | LED |
| Sensor Cooking | Yes |
| Auto Defrost | Yes |
| Convection | No |
| Grill | No |
| Child Lock | Yes |
| Clock Timer | Yes |
| Turntable | Yes |
| Interior Light | Yes |
| Exhaust Fan | 2-speed |
| Ventilation | Recirculating or ducted |
| Installation Type | Over-the-range or under-cabinet |
| Plug Type | 3-prong grounded |
| Cleaning | Wipe with damp cloth; avoid abrasive cleaners |
| Repair | Contact Monogram authorized service |
Frequently Asked Questions - ZWL1126SJSS Monogram
User questions about ZWL1126SJSS Monogram
0 question about this device. Answer the ones you know or ask your own.
Ask a new question about this device
Download the instructions for your Microwave in PDF format for free! Find your manual ZWL1126SJSS - Monogram and take your electronic device back in hand. On this page are published all the documents necessary for the use of your device. ZWL1126SJSS by Monogram.
USER MANUAL ZWL1126SJSS Monogram
Your new Monogram Drawer Microwave makes an eloquent statement of style, convenience and kitchen planning flexibility. Whether you chose it for its purity of design, assiduous attention to detail—or for both of these reasons—you'll find that your Monogram ovens's superior blend of form and function will delight you for years to come.
Your Monogram oven was designed to provide the flexibility to blend in with your kitchen cabinetry. Its sleek design can be beautifully integrated into the kitchen.
The information on the following pages will help you operate and maintain your oven properly.
If you have any questions, visit our Website at: Monogram.com. In Canada: Monogram.ca.
Contents
Consumer Information ..... 2 - 3
Precautions To Avoid Possible
Exposure To Excessive Microwave
Energy 4
Safety Instructions 4 - 7
Features 8
Controls 9
Operating Instructions
Before you Begin ..... 1 0
Set the Clock 10
Set the Power Level ..... 1 0
Sensor Features ....11
Sensor Popcorn 12
Sensor Reheat 12
Sensor Cooking ..... 1 3
Defrost 14
Reheat 15
Beverage Center 15
Melt/Soften/Warm 16
Other Features .....17, 18
Care and Cleaning 19
Troubleshooting Tips ..... 2 0
Things that are Normal ..... 2 0
Warranty 23
Consumer Support.....Back Cover
Consumer Information
| Drawer Microwave | ||
| Before using your oven | Read this manual carefully. It is intended to help you operate and maintain your new oven properly.Keep it handy for answers to your questions. | If you don't understand something or need more help, there is a list of toll-free consumer service numbers included in the back section of this manual.ORVisit our Website at: Monogram.com.In Canada: Monogram.ca. |
| Write down the model & serial numbers | You'll find them on a label under the oven.Fill out and return the Consumer Product Registration Card that is packed with this product. | Before sending in the card, please write the numbers here:Model NumberSerial NumberUse these numbers in any correspondence or service calls concerning your microwave. |
| If you received a damaged oven | Immediately contact the dealer (or builder) that sold you the oven. | |
| Save time & money | Read this manual. Inside you will find many helpful hints on how to use and maintain your oven properly. Just a little preventive care on your part can save you a great deal of time and money over the life of your oven. | You'll find many answers to common problems in the Before You Call for Service section. If you review our chart of Troubleshooting Tips first,you may not need to call for service at all. |
| If you need service | To obtain service, see the Consumer Services page in the back of this manual.We're proud of our service and want you to be pleased. If for some reason you are not happy with the service you receive, here are some steps to follow for further help.FIRST, contact the people who serviced your appliance. Explain why you are not pleased. In most cases, this will solve the problem. | NEXT, if you are still not pleased, write all the details—including your phone number—to:Manager, Customer RelationsMonogramAppliance ParkLouisville, KY 40225 |
PRECAUTIONS TO AVOID POSSIBLE EXPOSURE TO EXCESSIVE MICROWAVE ENERGY
(a) Do Not Attempt to operate this oven with the door open since open-door operation can result in harmful exposure to microwave energy. It is important not to defeat or tamper with the safety interlocks.
(b) Do Not Place any object between the oven front face and the door or allow soil or cleaner residue to accumulate on sealing surfaces.
(c) Do Not Operate the oven if it is damaged. It is particularly important that the oven door close properly and that there is no damage to the:
(1) door (bent),
(2) hinges and latches (broken or loosened),
(3) door seals and sealing surfaces.
(d) The Oven Should Not be adjusted or repaired by anyone except properly qualified service personnel.
WARNING
To reduce the risk of burns, electric shock, fire, injury to persons, or exposure to excessive microwave energy: Use this appliance only for its intended purpose as described in this Owner's Manual.
When using electrical appliances basic safety precautions should be followed, including the following:
- Read all instructions before using this appliance.
■ Read and follow the specific precautions in the PRECAUTIONS TO AVOID POSSIBLE EXPOSURE TO EXCESSIVE MICROWAVE ENERGY section above.
■ Use this appliance only for its intended use as described in this manual. Do not use corrosive chemicals or vapors in this appliance. This drawer microwave is specifically designed to heat, dry or cook food, and is not intended for laboratory or industrial use.
■ Do not attempt to service the microwave oven yourself. If service is desired, this appliance should be serviced only by qualified service personnel. Contact the nearest authorized service facility for examination, repair or adjustment.
■ If the appliance light fails, call for service.
■ Install or locate this appliance only in accordance with the provided installation instructions.
■ This appliance must be grounded. Connect only to a properly grounded outlet. See the GROUNDING INSTRUCTIONS section on page 7.
■ This microwave oven is UL listed for installation under all gas or electric wall ovens and under the following GE cooktops: ZHU36, ZHU30, ZEU36, ZEU30, ZGU385NSMSS, and ZGU384NSMSS.
■ Do not operate this appliance if it has a damaged power cord or plug, if it is not working properly, or if it has been damaged or dropped. - Keep power cord away from heated surfaces.
■ Do not immerse power cord or plug in water.
■ Do not store this appliance outdoors. Do not use this product near water—for example, in a wet basement, near a swimming pool, near a sink or in similar locations.
■ Do not mount this appliance over a sink.
■ Do not operate any heating or cooking appliance beneath this appliance.
■ Do not mount unit over or near any portion of a heating or cooking appliance.
■ Do not store anything directly on top of the appliance surface when the appliance is in operation.
■ Do not cover or block any openings on the appliance.
■ To reduce the risk of fire in the oven cavity:
— Do not overcook food. Carefully attend appliance when paper, plastic or other combustible materials are placed inside the oven while cooking.
— Remove wire twist-ties and metal handles from paper or plastic containers before placing them in the appliance.
— Do not use the appliance for storage purposes. Do not leave paper products, cooking utensils or food in the oven when not in use.
— If materials inside the oven ignite, keep the appliance door closed, turn the appliance off and disconnect the power cord, or shut off power at the fuse or circuit breaker panel. If the door is opened, the fire may spread.
■ When cleaning appliance sealing surfaces that come together on closing the drawer, use only mild, nonabrasive soaps or detergents applied with a sponge or soft cloth. See cleaning instructions on page 19.
READ AND SAVE THESE INSTRUCTIONS
WARNING
■ Do not clean with metal scouring pads. Pieces can burn off the pad and touch electrical parts involving risk of electric shock.
■ Do not climb or sit on the appliance.
- Keep fingers or other objects away from the appliance opening when closing the door.
■ Do not put fingers or clothes around the drawer guides when the appliance is opened or closed because they
could be caught in the guides.
■ Be sure that the food and containers are shorter than the drawer before closing it. You can refer to the height of the side walls of the drawer.
■ As with any appliance, close supervision is necessary when used by children
■ Be careful when touching the floor, door and walls of the oven which may become hot during use.
ARCING
If you see arcing, press the Stop/Clear pad and correct the problem.
Arcing is the microwave term for sparks in the oven. Arcing is caused by:
■ Metal or foil touching the side of the oven.
■ Plates or dishes with metallic trim or glaze with a metallic sheen.
■ Foil not molded to food.
■ Metal, such as twist-ties, poultry pins or gold-rimmed dishes, in the microwave.
■ Recycled paper towels containing small metal pieces being used in the microwave.
FOODS
■ Do not pop popcorn in your drawer microwave unless in a special microwave popcorn accessory or unless you use popcorn labeled for use in microwave ovens.
■ Some products such as whole eggs and sealed containers—for example, closed jars—are able to explode and should not be heated in this drawer microwave. Such use of the drawer microwave could result in injury.
■ Do not operate the microwave without food inside the oven.
- Foods with unbroken outer “skin” such as potatoes, hot dogs, sausages, tomatoes, apples, chicken livers and other giblets and egg yolks should be pierced to allow steam to escape during cooking.
■ Avoid heating baby food in glass jars, even with the lid off. Make sure all infant food is thoroughly cooked. Stir food to distribute the heat evenly. Be careful to prevent scalding when warming formula. The container may feel cooler than the formula really is. Always test the formula before feeding the baby.
■ SUPERHEATED WATER
Liquids, such as water, coffee or tea are able to be overheated beyond the boiling point without appearing to be boiling. Visible bubbling or boiling when the container is removed from the drawer microwave is not always present. THIS COULD RESULT IN VERY HOT LIQUIDS SUDDENLY BOILING OVER WHEN THE CONTAINER IS DISTURBED OR A SPOON OR OTHER UTENSIL IS INSERTED INTO THE LIQUID.
To reduce the risk of injury to persons:
— Do not overheat the liquid.
— Stir the liquid both before and halfway through heating it.
— Do not use straight-sided container with narrow necks.
— After heating, allow the container to stand in the drawer microwave for a short time before removing the container.
— Use extreme care when inserting a spoon or other utensil into the container.
■ Do not overcook potatoes. They could dehydrate and catch fire, causing damage to your oven.
■ Cook meat and poultry thoroughly—meat to at least an INTERNAL temperature of 160^ F and poultry to at least an INTERNAL temperature of 180^ F. Cooking to these temperatures usually protects against foodborne illness.
READ AND SAVE THESE INSTRUCTIONS
COOKWARE
■ Make sure all cookware used in your drawer microwave is suitable for microwaving. Most glass casseroles, cooking dishes, measuring cups, custard cups, pottery or china dinnerware which does not have metallic trim or glaze with a metallic sheen can be used. Some cookware is labeled "suitable for microwaving."
■ If you use a meat thermometer while cooking, make sure it is safe for use in microwave ovens.
■ Some foam trays (like those that meat is packaged on) have a thin strip of metal embedded in the bottom. When microwaved, the metal can burn the floor of the oven or ignite a paper towel.
■ Not all plastic wrap is suitable for use in microwave ovens. Check the package for proper use.
■ Paper towels, waxed paper and plastic wrap can be used to cover dishes in order to retain moisture and prevent spattering. Be sure to vent plastic wrap so steam can escape.
■ Be careful when opening containers of hot food. Use potholders and direct steam away from face and hands.
■ Vent, pierce, or slit containers, pouches, or plastic bags to prevent build-up of pressure.
■ Plastic cookware—Plastic cookware designed for microwave cooking is very useful, but should be used carefully. Even microwave-safe plastic may not be as tolerant of overcooking conditions as are glass or ceramic materials and may soften or char if subjected to short periods of overcooking. In longer exposures to overcooking, the food and cookware could ignite.
Follow these guidelines:
- Use microwave-safe plastics only and use them in strict compliance with the cookware manufacturer's recommendations.
- Do not microwave empty containers.
- Do not permit children to use plastic cookware without complete supervision.
GROUNDING INSTRUCTIONS
WARNING
—Improper use of the grounding plug can result in a risk of electric shock.
This appliance must be grounded. In the event of an electrical short circuit, grounding reduces the risk of electric shock by providing an escape wire for the electric current.
This appliance is equipped with a power cord having a grounding wire with a grounding plug. The plug must be plugged into an outlet that is properly installed and grounded.
Consult a qualified electrician or service technician if the GROUNDING INSTRUCTIONS are not completely understood, or if doubt exists as to whether the appliance is properly grounded.
If the outlet is a standard 2-prong wall outlet, it is your personal responsibility and obligation to have it replaced with a properly grounded 3-prong wall outlet.
Do not under any circumstances cut or remove the third (ground) prong from the power cord.
Do not use an extension cord with this appliance. If the power cord is too short, have a qualified electrician or service technician install an outlet near the appliance.
For best operation, plug this appliance into its own electrical outlet to prevent flickering of lights, blowing of fuse or tripping of circuit breaker.
ADAPTER PLUGS
Usage situations where appliance's power cord will be disconnected infrequently.
Because of potential safety hazards under certain conditions, we strongly recommend against the use of an adapter plug. However, if you still elect to use an adapter, where local codes permit, a TEMPORARY CONNECTION may be made to a properly grounded wall receptacle by the use of a UL listed adapter which is available at most local hardware stores.
The larger slot in the adapter must be aligned with the larger slot in the wall receptacle to provide proper polarity in the connection of the power cord.
CAUTION: Attaching the adapter ground terminal to the wall receptacle cover screw does not ground the appliance unless the cover screw is metal, and not insulated, and the wall receptacle is grounded through the house wiring.
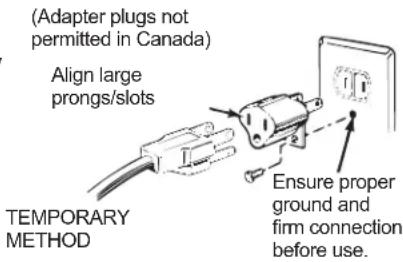
You should have the circuit checked by a qualified electrician to make sure the receptacle is properly grounded.
When disconnecting the power cord from the adapter, always hold the adapter with one hand. If this is not done, the adapter ground terminal is very likely to break with repeated use. Should this happen, DO NOT USE the appliance until a proper ground has again been established.
Usage situations where appliance's power cord will be disconnected frequently.
Do not use an adapter plug in these situations because frequent disconnection of the power cord places undue strain on the adapter and leads to eventual failure of the adapter ground terminal. You should have the 2-prong wall receptacle replaced with a 3-prong (grounding) receptacle by a qualified electrician before using the appliance.
PACEMAKERS
Most pacemakers are shielded from interference from electronic products, including microwaves. However, patients with pacemakers may wish to consult their physicians if they have concerns.
READ AND SAVE THESE INSTRUCTIONS
Throughout this manual, features and appearance may vary from your model.
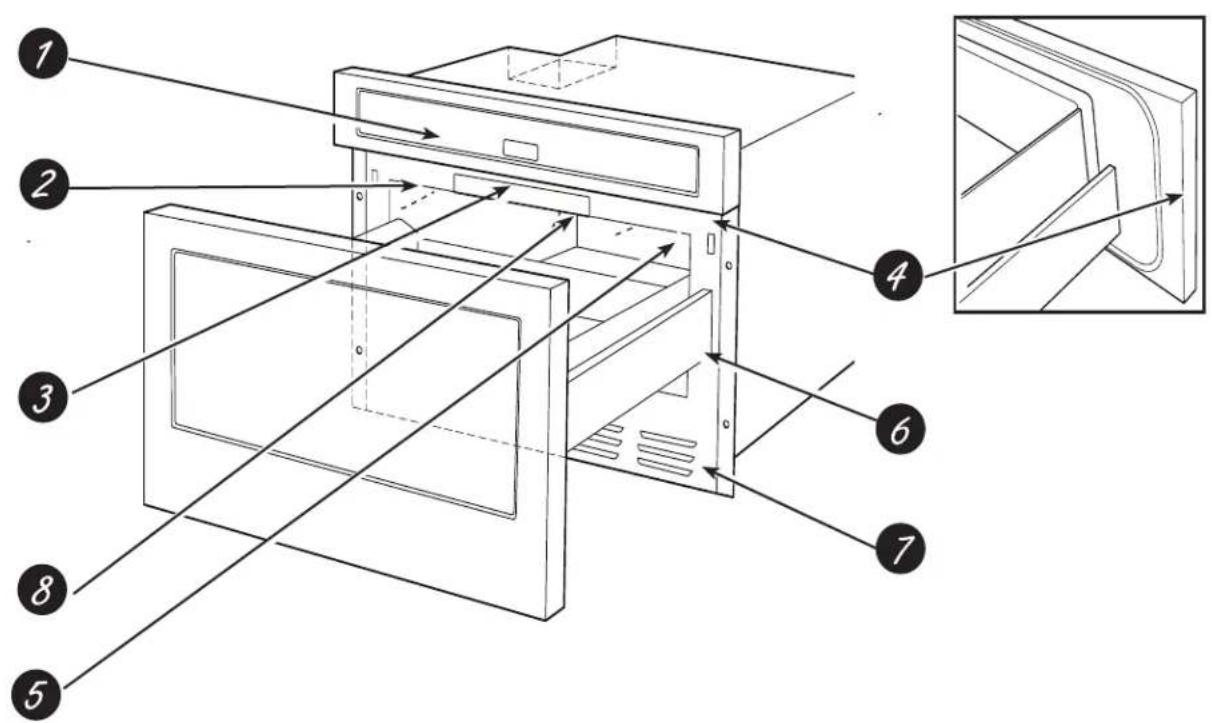
Features of the Oven
1 Control Panel The door must be securely latched for the microwave to operate.
2 Waveguide cover DO NOT REMOVE.
3 Drawer Microwave Menu Label.
4 Drawer Sealing Surfaces.
5 Drawer Light.
6 Drawer Microwave Guides.
7 Vent.
8 Name Plate.
Open the Drawer Microwave fully. The label is beyond the back wall of the microwave cavity facing up from the flat surface.
You can microwave by time or with the convenience features. Not all features on all models.

Cooking Controls
| Press See page below for instructions | |
| Melt See page 16 | |
| Beverage Center See page 15 | |
| Sensor Popcorn See page 12 | |
| Sensor Cook See page 13 | |
| Sensor Reheat See page 12 | |
| Soften See page 16 | |
| Warm See page 16 | |
| Keep Warm See page 17 | |
| Defrost See page 14 | |
| Reheat See page 15 | |
Before Operating
Before operating your new Drawer Microwave make sure you read and understand this Owner's Manual completely. Before the Drawer Microwave can be used, follow these steps:
- Plug in the Drawer Microwave, "ENJOY YOUR MICROWAVE TOUCH CLEAR AND TOUCH CLOCK" will appear in the display.
- Press Stop/Clear.
- Set the clock.
Set the Clock
- Press Timer/Clock and then press 2.
- Touch number pads for correct time of day then press Timer/Clock again.
This is a 12 hour clock. If you attempt to enter an incorrect clock time, "ERROR" will appear in the display. Touch the Stop/Clear pad and re-enter the time.
If the electrical power supply to your Drawer Microwave should be interrupted, the display will intermittently show "ENJOY YOUR MICRO-WAVE TOUCH CLEAR AND
TOUCH CLOCK" after the power is reinstated. If this occurs during cooking, the program will be erased. The time of day will also be erased. Simply touch Stop/Clear pad and reset the clock for the correct time of day.
NOTE: The Drawer Microwave can be programmed with the drawer open except for START/Extra Minute.
Timer
- Press Timer/Clock and then press 1.
- Touch number pads for correct time then press Timer/ Clock again.
To Cancel timer, touch Stop/Clear.
Stop/Clear
Press the Stop/Clear pad to:
- Erase if you make a mistake during programming.
- Cancel timer.
- Stop the Drawer Microwave temporarily during timed cooking.
- Return the time of day to the display.
- Cancel a program during cooking, touch twice for timed cooking.
Open or Close Drawer Microwave
If you wish to use key operation to open/close the Drawer Microwave, touch the OPEN DRAWER or CLOSE DRAWER pad on the control panel to open or close the Drawer Microwave.
To close the Drawer Microwave, push the drawer with light pressure so that the drawer will close automatically. In case the Drawer Microwave is stopped in the middle, open or close the drawer manually to full open or close position by gently pulling or pushing with even pressure near the middle of the drawer.
Time Cooking
Your Drawer Microwave can be programmed for 99 minutes 99 seconds (99.99). Always enter the seconds after the minutes, even if they are both zeros.
EXAMPLE: If you want to cook for 5 minutes at 100%:
- Enter cooking time 5:00
- Then touch START/Extra Minute pad. The power level will automatically be set at 100% unless you change the Power Level.
To Set the Power Level
There are eleven preset power levels. Using lower power levels increases the cooking time, which is recommended for foods such as cheese, milk and long slow cooking of meats. Consult a microwave cookbook or recipes for specific recommendations.
EXAMPLE: If you want to manually defrost for 5 minutes at 30%:.
- Enter Defrost time 5:00
- Then touch Power Level pad 8 times.
- Touch START/Extra Minute pad.
| Touch Power Level Pad Number of Times for Desired Power | Approximate Percentage of Power | Common Words for Power Levels |
| Power Level x 1 100% High | ||
| Power Level x 2 90% | ||
| Power Level x 3 80% | ||
| Power Level x 4 70% Medium High | ||
| Power Level x 5 60% | ||
| Power Level x 6 50% Medium | ||
| Power Level x 7 40% | ||
| Power Level x 8 30% Med Low/Defrost | ||
| Power Level x 9 20% | ||
| Power Level x 10 10% Low | ||
| Power Level x 11 0% |
Sensor features.
The Sensor Features detect the increasing humidity released during cooking. The oven automatically adjusts the cooking time to various types and amounts of food.
Do not use the Sensor Features twice in succession on the same food portion—it may result in severely overcooked or burnt food. Be sure to let the oven cool down for 5-10 minutes before starting the next sensor cook.
If food is undercooked after the countdown, use time cooking for additional cooking time.
- The proper containers and covers are essential for best sensor cooking.
- Always use microwave-safe containers and cover them with lids or vented plastic wrap. Never use tight-sealing plastic covers—they can prevent steam from escaping and cause food to overcook.
- Be sure the outside of the cooking container and the inside of the drawer microwave are dry before placing food in the oven. Beads of moisture turning into steam can mislead the sensor.
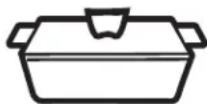
Covered
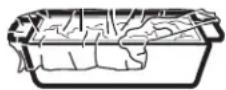
Vented
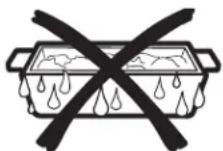
Dry off dishes so they don't mislead the sensor.
Using Sensor Settings:
- After the Drawer Microwave is plugged in, wait 2 minutes before using any sensor setting.
- Be sure the exterior of the cooking container and the interior of the Drawer Microwave are dry. Wipe off any moisture with a dry cloth or paper towel.
- The sensor works with foods at normal storage temperature. For example, popcorn would be at room temperature.
- Any sensor selection can be programmed with More or Less Time Adjustment. See page 17.
- More or less food than the quantity listed in the charts should be cooked following the guidelines in any microwave cookbook.
- During the first part of sensor use, the food name will appear on the display. Do not open the Drawer Microwave or touch Stop/Clear during this part of the cycle. The measurement of vapor will be interrupted. If this occurs, an error message will appear. To continue cooking, touch the Stop/Clear pad and cook manually.
When the sensor detects the vapor emitted from the food, the remainder of cooking/reheating time will appear. The Drawer Microwave may be opened when the remaining time appears on the display. At this time, you may stir or season food, as desired.
- Except for Popcorn, if the sensor does not detect vapor properly when cooking other foods, ERROR will be displayed, and the microwave will turn off.
- Check food temperature after cooking. If additional time is needed, continue to cook manually.
• Each food has a cooking hint. Touch the Help pad when the HELP indicator is lighted in the display
Sensor Popcorn/Sensor Reheat
You can pop popcorn and reheat many foods and you don't need to calculate cooking time or power levels.
Touch Sensor Reheat or Sensor Popcorn and START/
Extra Minute pad.
When the sensor detects the vapor emitted from the food, the remainder of cooking/reheating time will appear.
NOTE: The Sensor Popcorn setting has two choices, follow directions in the display to choose desired option.
| Food Amount Procedure | ||
| Sensor Popcorn | Only 1 package at a time | Use only popcorn packaged for microwave. Try several brands to decide which you like. Do not try to pop unpopped kernels. |
| 2.85 - 3.5 oz Regular/Regular light | Touch Sensor Popcorn pad once. | |
| 1.2 - 1.75 oz Mini/Snack | Touch Sensor Popcorn pad twice. | |
| Sensor Reheat 4 | - 36 oz Place in dish or c | asserole slightly larger than amount to be reheated.Flatten, if possible. Cover with lid, plastic wrap or wax paper. Use covers such as plastic wrap or lids with larger quantities of more dense foods such as stews. After reheating, stir well, if possible. Re-cover and allow to stand 2 to 3 minutes. Foods should be very hot. If not, continue to heat with variable power and time. |
Sensor Cooking
- Touch Sensor Cook pad once.
-
See SensorCook Chart below. Select desired food by touching the number pad. Example, press 5 for baked potatoes.
-
Touch START/Extra Minute pad.
NOTE: To heat or cook other foods or foods above or below the quantity allowed on the Sensor Cook Chart, cook with timed cook.
Sensor Cook Chart
| Number Food Amount Procedure | |||
| 1 Fresh Vegetables: Quick BroccoliBrussel SproutsCabbageCauliflower (flowerets)Cauliflower (whole)SpinachZucchiniBacked Apples | .25 -2.0 lbs.25 -2.0 lbs.25 -2.0 lbs.25 -2.0 lbs1 medium.25 -1.0 lbs.25 -2.0 lbs2-4 medium | Wash and place in casserole. Add no water if vegetables have just been washed. Cover with lid for tender vegetables. Use plastic wrap for tender-crisp vegetables. After cooking, stir, if possible. Let stand, covered, for 2 to 5 minutes. | |
| 2 Fresh Vegetables:LongerCarrots, slicedCorn on the cobGreen BeansWinter Squash:dicedhalves | .25 -1.5 lbs2-4 cobs.25 -1.5 lbs.25 -1.5 lbs1-2 halves | Place in casserole. Add 1 - 4 tablespoons water. Cover with lid for tender vegetables. Use plastic wrap cover for tender-crisp vegetables. After cooking, stir, if possible. Let stand, covered, for 2 to 5 minutes. | |
| 3 | Frozen Vegetables | .25 -1.25 lbs | Add no water. Cover with lid or plastic wrap. After cooking, stir and let stand, covered,for 3 minutes. |
| 4 | Frozen Entrees | 6-17 oz | Use this pad for frozen convenience foods. It will give satisfactory results for most brands. You may wish to try several and choose your favorite. Remove package from outer wrapping and follow package directions for covering. After cooking, let stand, covered, for 1-3 minutes |
| 5 | Baked Potatoes | 1-6 medium | Pierce. Place on paper-towel-lined Drawer Microwave. After cooking, remove from icrowave, wrap in aluminum foil and let stand 5 to 10 minutes. |
| 6 Sweet Potatoes 1-6 medium | |||
| 7 | Ground Meat | .25 -2.0 lbs | Use this setting to cook ground beef or turkey as patties or in a casserole to be added to other ingredients. Place patties on a microwave-safe rack and cover with wax paper. Place ground meat in a casserole and cover with wax paper or plastic wrap. When microwave stops, turn patties over or stir meat in casserole to break up large pieces. Re-cover and touch Start/Extra Minute. After cooking, let stand, covered, for 2 to 3 minutes. |
| 8 | Fish/Seafood | .25 -2.0 lbs | Arrange in ring around shallow glass dish (roll fillet with edges underneath). Cover with vented plastic wrap. After cooking, let stand, covered for 3 minutes. |
| 9 | White Rice | .5 -2.0 cups | Place rice into a deep casserole and add double quantity of water. Cover with lid or plastic wrap. After cooking, stir, cover and let stand 3 to 5 minutes or until all liquid has been absorbed.Rice......Water......Size of casserole.5 Cup......1 Cup......1.5 quart1 Cup......2 Cups......2 quarts1.5 Cups......3 Cups......2.5 or 3 quarts2 Cups......4 Cups......3 quarts or larger |
| 10 | Brown Rice | .5 -2.0 cups | |
Defrost
Use this feature to defrost the foods shown in the DEFROST CHART below.
- Touch Defrost pad. "SEE LABEL SELECT FOOD NUMBER" will appear in the display.
- See Menu Label. Select desired food by touching the number pad. Example: Touch 2 for steaks/chops. "STEAKS CHOPS ENTER WEIGHT" will appear in the display.
- Enter weight by touching number pads.
- Touch START/Extra Minute pad. The oven will stop so that the food can be checked.
- After the first stage, open the Drawer Microwave. Turn steak over and shield any warm portions. Close the Drawer Microwave. Touch START/Extra Minute pad.
-
After the second stage, open the Drawer Microwave. Shield any warm portions. Close the Drawer Microwave. Touch START/Extra Minute pad.
-
After defrost cycle ends, cover and let stand as indicated in the chart below.
NOTE:
- Defrost can be programmed with More or Less Time Adjustment. See page 17.
- To defrost other foods or foods above or below the weights allowed on the DEFROST CHART, see MANUAL DEFROST below.
- Check foods when oven signals. After final stage, small sections may still be icy. Let stand to continue thawing. Do not cook until all ice crystals are thawed.
- Shielding prevents cooking from occurring before the center of the food is defrosted. Use small smooth strips of aluminum foil to cover edges and thinner sections of the food.
Defrost Chart
| Number | Food Amount Procedure | ||
| 1 | Ground Meat | .5 -2.0 lbs | Remove any thawed pieces after each audible signal. Let stand, covered, for 5 to 10 minutes. |
| 2 | Steaks/Chops | .5-3.0 lbs | After each audible signal, rearrange and if there are warm or thawed portions, shield with small flat pieces of aluminum foil. Remove any meat or fish that is almost defrosted. Let stand, covered, for 10 to 20 minutes. |
| 3 | Boneless Poultry | .5 -2.0 lbs | After each audible signal, if there are warm or thawed portions, rearrange or remove. Let stand, covered, for 10 to 20 minutes. |
| 4 | Bone-in Poultry | .5 -3.0 lbs | After each audible signal, rearrange pieces or remove portions should they become warm or thawed. Let stand, covered, for 10 to 20 minutes. |
| 5 Roast | 2.0 - 4.0 lbs Start defrosting with fat side down. After each stage, turn roast over and shield the warm portions with aluminum foil. Let stand, covered, for 30 to 60 minutes. | ||
| 6 Cass | serole Soup | 1-6 cups After each audible signal, break apart and remove any defrosted part. At end, stir well and let stand,covered, for 5 to 10 minutes. | |
Manual Defrost
If the food that you wish to defrost is not listed on the DEFROST CHART or is above or below the limits in the AMOUNT column on the DEFROST CHART, you need to defrost manually.
You can defrost any frozen food, either raw or previously cooked, by using Power Level at 30%. Follow the exact 3-step procedure found under TO SET POWER LEVEL on page 10. Estimate defrosting time and touch Power Level pad eight times for 30% power.
For either raw or previously cooked frozen food the rule of thumb is approximately 4 minutes per pound. For example, defrost 4 minutes for 1 pound of frozen spaghetti sauce.
Always stop the oven periodically to remove or separate the portions that are defrosted. If food is not defrosted at the end of the estimated defrosting time, program the oven in 1 minute increments on Power Level 30% until totally defrosted.
When using plastic containers from the freezer, defrost only long enough to remove from the plastic in order to place in a microwave-safe dish.
Reheat
Reheat automatically computes the correct warming time and microwave power level for foods shown in the chart below.
1 Touch Reheat pad once. "SEE LABEL SELECT FOOD NUMBER" will appear in the display.
2 See Menu Label. Select desired food by touching number pad. Example: Touch 2 for frozen rolls or muffins.
3 Touch the number pad to select quantity. Example: Touch 2 for 2 rolls or muffins.
4 Touch START/Extra Minute pad.
NOTE:
- Reheat can be programmed with More or Less Time Adjustment. See page 17.
- To reheat other foods or foods above or below the quantity allowed on the REHEAT CHART, heat manually.
Reheat Chart
| Number | Food Amount Procedure | ||
| 1 | Fresh rolls/muffins | 1-8 pieces | Use this pad to warm rolls, muffins, biscuits, bagels etc. Large items should be considered as 2 or 3 regular size. Arrange on plate; cover with paper towel. For refrigerated rolls or muffins, it may be necessary to double the entered amount to ensure the proper serving temperature. For example, enter quantity of 2 for 1 refrigerated muffin. |
| 2 | Frozen rolls/muffins | 1-8 pieces | Use this pad to warm frozen rolls, muffins, biscuits, bagels etc. Large items should be considered as 2 or 3 regular size. Arrange on plate; cover with paper towel. |
Beverage Center
Beverage Center enables you to reheat coffee or tea to restore to a more suitable drinking temperature or to make instant coffee or tea.
1 Touch Beverage Center pad once. "SEE LABEL SELECT FOOD NUMBER" will appear in the display.
2 See Menu Label. Select desired selection by touching number pad. Example: Touch 2 to make coffee.
3 Repeating touching same number pad to select quantity. Example: Touch 2 two more times for 2 cups of coffee.
4 Touch START/Extra Minute pad.
Beverage Center Chart
| Number | Food Amount Procedure | ||
| 1 | Reheat beverage | .5 - 2.0 cups | This setting for good for restoring cooled beverage to a better drinking temperature. Touch number 1 pad for a 0.5 cup increase per touch. Stir after heating. |
| 2 Hot | Water 1-6 cups Use this setting for heating | COLD TAP WATER to a temperature somewhat below the boiling point to make instant coffee or tea. Touch number 2 pad for 1 cup increase per touch. Stir liquid briskly before and after heating to avoid “eruption”. | |
NOTE:
- Beverage Center can be programmed with More or Less Time Adjustment. See page 17.
- Should you attempt to enter more or less than the allowed amount, an error message will appear in the display.
Melt/Soften/Warm
Melt, Soften and Warm automatically compute the correct heating time and microwave power level for melting, softening and warming foods shown in the chart below.
- Touch Melt pad once. "SEE LABEL SELECT FOOD NUMBER" will appear in the display.
- See Menu Label. Select desired food by touching number pad. Example: Touch 2 for chocolate.
- Repeating touching same number pad to select quantity. Example: Touch 2 two more times for 1 square.
- Touch START/Extra Minute pad.
NOTE:
- Melt/Soften/Warm can be programmed with More or Less Time Adjustment. See page 17.
- To melt, soften or warm other food or foods above or below the quantity allowed on the MELT/SOFTEN/WARM CHART, use manual operation.
Melt/Soften/Warm Chart
| Button Number | Food Amount Procedure | |||
| Melt | 1 | Butter | 2 tbsp.5 cup | Use a Pyrex measuring cup. Cover with plastic wrap.After touching MELT, touch 1 two times for 2 tbsp.After touching MELT, touch 1 three times for .5 cup. |
| 2 | Chocolate | 1 cup chips1 square | After touching MELT, touch 2 two times for 1 cup chips.After touching MELT, touch 2 three times for 1 square. | |
| Soften | 1 | Ice Cream | 1 pint.5 gallon | DO NOT COVERAfter touching SOFTEN, touch 1 two times for 1 pint.After touching SOFTEN, touch 1 three times for .5 gallon. |
| 2 | Cream Cheese | 3 oz.8 oz. | After touching SOFTEN, touch 2 two times for 3 oz.After touching SOFTEN, touch 2 three times for 8 oz. | |
| Warm | 1 | Syrup | 1/4 cup1/2 cup | Use a Pyrex measuring cup. DO NOT COVERAfter touching WARM, touch 1 two times for 1/4 cup.After touching WARM, touch 1 three times for 1/2 cup. |
| 2 | Dessert toppings | 1/4 cup1/2 cup | After touching WARM, touch 2 two times for 1/4 cup.After touching WARM, touch 2 three times for 1/2 cup. | |
Keep Warm
Keep Warm allows you to keep food warm for up to 30 minutes.
- Touch Keep Warm pad. "ENTER TIME UP TO 30 MINUTES" will appear in the display.
- Enter desired time by touching the number pads.
- Touch START/Extra Minute pad.
The oven will start. The display will show the time remaining and cound down. “KEEP WARM” will appear in the display.
With Manual Cooking
- Enter desired cooking time and power level.
- Touch Keep Warm pad.
- Enter desired warming time up to 30 minutes.
- Touch START/Extra Minute pad.
The operation will start. When the cooking time is complete, a long tone will sound and Keep Warm will start. The display will count down. "KEEP WARM" will be displayed intermittently during the count down.
NOTE:
- If you attempt to enter more than 30 minutes for Keep Warm, an error message will appear in the display.
- Keep Warm cannot be programmed with Sensor Popcorn, Sensor Reheat, Sensor Cook, Defrost or Reheat.
Multiple Sequence Cooking
Your Drawer Microwave can be programmed for up to 4 automatic cooking sequences, switching from one power level setting to another automatically.
Sometimes cooking directions tell you to start on one power level and then change to a different power level. Your Drawer Microwave can do this automatically.
- First enter cooking time. Then touch Power Level pad once for 100% cooking or repeat touching Power Level pad for a lower power level.
2.. Enter second cooking time. Repeat touching Power Level pad for desired level. You can follow this procedure up to 4 times. "TOUCH START" will appear in the display. - Touch START/Extra Minute pad.
NOTE:
- If Power Level pad is touched once, "HIGH" will be displayed.
- If 100% is selected as the final sequence, it is not necessary to touch the Power Level pad.
- If you wish to know power level during cooking, simply touch the Power Level pad. As long as your finger is touching the Power Level pad, the power level will be displayed.
- Keep Warm can be programmed even if 4 cooking sequences have been set.
Extra Minute ^TM
Extra Minute allows you to cook for a minute at 100% by simply touching the Extra Minute pad. You can also extend cooking time in multiples of 1 minute by repeatedly touching the Extra Minute pad during manual cooking.
NOTE:
- To use Extra Minute, touch pad within 5 minutes after cooking, closing the drawer or touching the Stop/Clear pad.
- Extra Minute cannot be used with Sensor settings, Reheat or Defrost.
More or Less Time Adjustment
Should you discover that you like any of the Sensor, Reheat or Defrost settings slightly more done, touch the Power Level pad once after touching your selection. The display will show "MORE".
For slightly less done, touch the Power Level pad twice after touching your selection. The display will show "LESS".
Control Lock
The Control Lock prevents unwanted drawer operation such as by small children. The Drawer Microwave can be set so that the control panel and the automatic door mechanism are deactivated or locked.
TO LOCK
Touch Control Lock pad and hold for 3 seconds. The display shows "LOCK ON".
TO UNLOCK
Touch Control Lock pad and hold for 3 seconds. The display shows "LOCK OFF".
The Control Lock is canceled when the electrical power supply to your oven is interrupted. Set the Control Lock again when power to the oven is restored.
Setup/Help
If the electrical power supply to your Drawer Microwave should be interrupted, the display will intermittently show "ENJOY YOUR MICRO-WAVE TOUCH CLEAR AND TOUCH CLOCK" after the power is reinstated. If this occurs, the Setup/Help option you input will be erased. Simply touch Stop/Clear pad and reset.
Audible Signal Elimination
At the end of a timed cook, beeps will sound. The audible signal can be turned off if you prefer quiet operation.
TO TURN SOUND OFF
- Touch Setup/Help pad. "TOUCH AGAIN" will appear in the display.
- Touch Setup/Help pad again. "SOUND OFF? TOUCH START" will appear in the display.
- Touch START/Extra Minute pad. The display shows "SOUND OFF".
TO TURN SOUND ON
- Touch Setup/Help pad. "TOUCH AGAIN" will appear in the display.
- Touch Setup/Help pad again. "SOUND ON? TOUCH START" will appear in the display.
- Touch START/Extra Minute pad. The display shows "SOUND ON".
End of Cooking Reminder
At the end of timed cooking, the microwave will signal every 10 seconds for the first minute; then every 3 minutes until Stop/Clear pad is touched, up to one hour.
TO TURN REMINDER OFF:
- Touch Setup/Help pad three times. The display shows "REMIND SIGNAL OFF? TOUCH START".
- Touch START/Extra Minute pad. The display shows
TO TURN REMINDER ON:
To turn reminder signal back on
- Touch Setup/Help pad three times. The display shows "REMIND SIGNAL ON ? TOUCH START".
- Touch START/Extra Minute pad. The display shows "REMIND SIGNAL ON".
Auto Start
If you wish to program the Drawer Microwave to begin cooking automatically at a designated time of day, follow this procedure.
- Touch Setup/Help pad 4 times. The display shows "AUTO START TOUCH START".
- Touch START/Extra Minute pad. ENTER START TIME
- Enter start time.
- Touch Timer/Clock pad. "ENTER COOKING TIME" will appear in the display.
- Touch the number pads to enter cooking time. "20.00 TOUCH START OR TOUCH POWER LEVEL" will appear in the display. Touch Power Level pad repeatedly until the desired power level is reached. "TOUCH START" will appear in the display.
- Touch START/Extra Minute pad.
Demonstration Mode
TO SELECT DEMO MODE:
- Touch Setup/Help pad five times. The display shows "DEMO ON? HOLD START 3 SEC".
- Hold START/Extra Minute pad for 3 seconds. The display shows "DEMO ON".
TO CANCEL DEMO MODE:
- Touch Setup/Help pad five times. The display shows "DEMO OFF ? TOUCH START".
- Touch START/Extra Minute pad. The display shows "DEMO OFF".
NOTE:
- Drawer Microwave doesn't heat in Demo Mode.
- Display counts down quickly.
Standby Mode
This microwave will go into standby mode after a period of inactivity. The backlight of the display will automatically dim after 3 minutes if the unit has not been in operation. If the display is in standby mode, simply touch the control panel or open/close the door to return the backlight to maximum brightness.
Exterior
The outside surface is precoated metal and plastic. Clean the outside with mild soap and water; rinse and dry with a soft cloth. Do not use any type of household or abrasive cleaner.
Stainless Steel Surface
The exterior should be wiped often with a soft damp cloth and polished with a soft dry cloth to maintain its beauty. There are also a variety of products designed especially for cleaning and shining the stainless exterior of the oven. We recommend that the cleaner be applied to a soft cloth and then carefully used on the stainless exterior rather than sprayed directly on to it. Follow package directions carefully.
Front side of the Drawer
Wipe the window on both sides with a soft damp cloth to remove any spills or spatters. Metal parts will be easier to maintain if wiped frequently with a soft damp cloth. Avoid the use of spray and other harsh cleaners as they may stain, streak or dull the drawer surface.
Touch Control Panel
If desired, the touch pads may be deactivated before cleaning. See the Control Lock information on page 17 of this manual. Wipe the panel with a cloth dampened slightly with water only. Dry with a soft cloth. Do not scrub or use any sort of chemical cleaners. Close drawer and follow directions on page 17 for turning Control Lock off. Touch Stop/Clear.
Interior
Before cleaning the the Drawer Microwave, touch and hold the Control Lock button for 3 seconds to lock the control pad and the automatic door mechanism. The drawer can be locked in either the open or closed position. The display will show "LOCK ON". This will prevent the drawer from accidentally opening or closing during cleaning.
After cleaning, touch and hold the Control Lock button for 3 seconds to turn the lock off. The display will show "LOCK OFF".
Cleaning is easy because no heat is generated to the interior surfaces; therefore, there is no baking and setting of spills or spattering. To clean the interior surfaces, including drawer sealing surfaces, wipe with a soft damp cloth. DO NOT USE ABRASIVE OR HARSH CLEANERS OR SCOURING PADS. For heavier soil, use mild soap; wipe clean with a soft damp cloth. Do not use any chemical oven cleaners.
Drawer Microwave Guides
Remove the food crumbs from the Drawer Microwave guides. Wipe with a soft dry cloth in order to keep the Drawer Microwave opening and closing smoothly.
Waveguide Cover
ATTENTION: The waveguide cover, located on the inside top of the Drawer Microwave area, is made from mica, so it requires special care. Keep the waveguide cover clean to assure good microwave performance. Carefully wipe with a soft damp cloth any food spatters from the surface of the cover immediately after they occur. Built-up splashes may overheat and cause smoke or possibly catch fire. Do not remove the waveguide cover.
Odor Removal
Occasionally, a cooking odor may remain in the Drawer Microwave. To remove odor, combine 1 cup water, grated peel and juice of one lemon and several whole cloves in a 2-cup glass microwave-safe measuring cup. Boil for several minutes using 100% power. Leave in the Drawer Microwave until water cools. Wipe interior with a soft cloth.
| Problem Possible Cause Solution | ||
| Part or all of Drawer Microwave does not operate | Power cord is not completely connected to the electric outlet | Make sure the power cord is tightly connected to the outlet. |
| Power outage Check house lights to be sure | Call your local electric company for service. | |
| Fuse/circuit breaker at home does not work. | Replace the fuse or reset the circuit breaker. | |
| Drawer is in Demo Mode See page 18 for how to cancel Demo Mode. | ||
| Food in Drawer Microwave is not heated | No power to the appliance See solutions above. | |
| Drawer controls improperly set Check if the controls have been properly set. | ||
| Drawer in Demo Mode See page 18 for how to cancel Demo Mode. | ||
| Drawer Microwave light does not work | Light bulb loose or burned out Call for service. | |
| Touch controls will not operate | Control Lock is on See page 17 for how to unlock. | |
| Display flashes Power failure | Touch Clear pad and reset the clock. If the Drawer Microwave was in use, you must reset the cooking function. | |
| Steam from the vent | During microwaving, steam may come from the right side of the vent | This is normal. |
| Shorted Key Error | A specific key shorts out or becomes stuck for more than 60 seconds | “SHORTED KEY CONTACT SERVICE” error appears in display. Call for service. |
| Food Detect Error | Food has not been inserted before a cooking function was selected after the oven has been sitting idle for more than 5 minutes. | “INSERT FOOD” error message display appears; open drawer and insert food to begin cooking. |
| Food has been left in drawer after the finish of cooking for more than 5 minutes | “CHECK FOOD” error message display appears; open drawer and remove food or check food and close drawer to continue cooking. | |
| Display is dark | Display is in standby mode | Touch the control panel or open/close the drawer. See page 18 for STANDBY MODE. |
Things That Are Normal With Your Drawer Microwave
■ Steam or vapor escaping from around the door.
■ Light reflection around door or outer case.
■ Dimming oven light and change in the blower sound at power levels other than high.
■ Dull thumping sound while oven is operating.
■ TV/radio interference might be noticed while using the microwave. Similar to the interference caused by other small appliances, it does not indicate a problem with the microwave. Plug the microwave into a different electrical circuit, move the radio or TV as far away from the microwave as possible, or check the position and signal of the TV/radio antenna.
WHAT IS COVERED
From the Date of the Original Purchase
YOUR MONOGRAM DRAWER MICROWAVE WARRANTY Staple your receipt here. Proof of the original purchase date is needed to obtain service under the warranty.
LIMITED TWO-YEAR WARRANTY
For two years from the date of the original purchase, Monogram will replace any part of the microwave oven which fails due to a defect in materials or workmanship. During this limited two-year warranty, Monogram will also provide, free of charge, all labor and related service to replace the defective part.
THIRD THROUGH FIFTH-YEAR LIMITED WARRANTY
For the third through fifth years from the date of the original purchase, Monogram will replace the magnetron tube, if the magnetron tube fails due to a defect in materials or workmanship. During this third through fifth-year limited warranty, you will be responsible for any labor or in-home service costs.
All warranty service will be provided by our Factory Service Centers or by our authorized Monogram Customer Care servicers during normal working hours.
Should your appliance need service, during warranty period or beyond, in the U.S.A call 800.444.1845. In Canada: 888.880.3030.
Please have serial and model numbers available when calling for service.
WHAT IS NOT COVERED
■ Service trips to your home to teach you how to use the product.
■ Improper installation, delivery or maintenance. If you have an installation problem, contact your dealer or installer. You are responsible for providing adequate electrical, exhausting, and other connecting facilities.
■ Failure of the product or damage to the product if it is abused, misused (for example, cavity arcing from wire rack or metal/foil), or used for other than the intended purpose or used commercially.
■ Replacement of house fuses or resetting of circuit breakers.
■ Damage to the product caused by accident, fire, floods or acts of God.
■ Incidental or consequential damage caused by possible defects with this appliance.
■ Damage caused after delivery.
■ Product not accessible to provide required service.
■ Service to repair or replace light bulbs, except for LED lamps.
■ Damage to the finish, such as surface rust, tarnish, or small blemishes not reported within 48 hrs of delivery.
EXCLUSION OF IMPLIED WARRANTIES
Your sole and exclusive remedy is product repair as provided in this Limited Warranty. Any implied warranties, including the implied warranties of merchantability or fitness for a particular purpose, are limited to one year or the shortest period allowed by law.
This warranty is extended to the original purchaser and any succeeding owner for products purchased for home use within the USA. If the product is located in an area where service by a Monogram Authorized Servicer is not available, you may be responsible for a trip charge or you may be required to bring the product to an Authorized Monogram Service Location for service. In Alaska, the warranty excludes the service calls to your home.
Some states do not allow the exclusion or limitation of incidental or consequential damages, so the above limitation or exclusion may not apply to you. This warranty gives you specific legal rights, and you may also have other rights which vary from state to state. To know what your legal rights are in your state, consult your local or state consumer affairs office or your state's Attorney General.
Extended Warranties: Purchase a Monogram extended warranty and learn about special discounts that are available while your warranty is still in effect. Visit Monogram.com or call 800.444.1845 to learn more on how to purchase.
Warrantor: GE Appliances, a Haier company
Warrantor in Canada: MC Commercial, Burlington, ON, L7R 5B6
| With the purchase of your new Monogram appliance, receive the assurance that if you ever need information or assistance from Monogram, we will be there. All you have to do is call! | |
| Register Your Appliance | Register your new appliance on-line at your convenience! Timely product registration will allow for enhanced communication and prompt service under the terms of your warranty, should the need arise. You may also mail in the pre-printed registration card included in the packing material.In the US: Monogram.comIn Canada: Prodsupport.mabe.ca/crm/Products/ProductRegistration.aspx |
| Schedule Service | Expert Monogram repair service is only one step away from your door. Get on-line and schedule your service at your convenience any day of the year.In the US: Monogram.com or call 800.444.1845 during normal business hours.In Canada: Monogram.ca or call 888.880.3030 |
| Extended Warranties | Purchase a Monogram extended warranty and learn about special discounts that are available while your warranty is still in effect.In the US: Monogram.com or call 800.444.1845 during normal business hours.In Canada: Monogram.ca or call 800.290.9029 |
| Parts and Accessories | Individuals qualified to service their own appliances can have parts or accessories sent directly to their homes (VISA, MasterCard and Discover cards are accepted). Order on-line today 24 hours every day.In the US: Monogram.com or by phone at 800.444.1845 during normal business hours.Instructions contained in this manual cover procedures to be performed by any user. Other servicing generally should be referred to qualified service personnel. Caution must be exercised, since improper servicing may cause unsafe operation.Customers in Canada should consult the nearest MC Commercial service center, visit our website at Monogram.ca or call 888.880.3030. |
MANUAL DEL PROPIETARIO
Microondas de Cajón
ELEVATE EVERYTHING
MONOGRAM
Introducción
Manager, Customer Relations
Monogram
Appliance Park
Louisville, KY 40225
Funciones del Horno
- Contents
- PRECAUTIONS TO AVOID POSSIBLE EXPOSURE TO EXCESSIVE MICROWAVE ENERGY
- WARNING
- READ AND SAVE THESE INSTRUCTIONS
- ARCING
- FOODS
- ■ SUPERHEATED WATER
- COOKWARE
- Follow these guidelines:
- GROUNDING INSTRUCTIONS
- ADAPTER PLUGS
- PACEMAKERS
- Features of the Oven
- Cooking Controls
- Before Operating
- Set the Clock
- Timer
- Stop/Clear
- Open or Close Drawer Microwave
- Time Cooking
- To Set the Power Level
- Sensor features.
- Using Sensor Settings:
- Sensor Popcorn/Sensor Reheat
- Sensor Cooking
- Defrost
- NOTE:
- Manual Defrost
- Reheat
- Beverage Center
- Melt/Soften/Warm
- Keep Warm
- With Manual Cooking
- Multiple Sequence Cooking
- Extra Minute TM
- More or Less Time Adjustment
- Control Lock
- TO LOCK
- TO UNLOCK
- Setup/Help
- Audible Signal Elimination
- TO TURN SOUND OFF
- TO TURN SOUND ON
- End of Cooking Reminder
- TO TURN REMINDER OFF:
- TO TURN REMINDER ON:
- Auto Start
- Demonstration Mode
- TO SELECT DEMO MODE:
- TO CANCEL DEMO MODE:
- Standby Mode
- Exterior
- Stainless Steel Surface
- Front side of the Drawer
- Touch Control Panel
- Interior
- Drawer Microwave Guides
- Waveguide Cover
- Odor Removal
- Things That Are Normal With Your Drawer Microwave
- WHAT IS COVERED
- YOUR MONOGRAM DRAWER MICROWAVE WARRANTY Staple your receipt here. Proof of the original purchase date is needed to obtain service under the warranty.
- LIMITED TWO-YEAR WARRANTY
- THIRD THROUGH FIFTH-YEAR LIMITED WARRANTY
- WHAT IS NOT COVERED
- EXCLUSION OF IMPLIED WARRANTIES
- MANUAL DEL PROPIETARIO
- Introducción
- Funciones del Horno
Brand : Monogram
Model : ZWL1126SJSS
Category : Microwave