
LM1903E-SP - Lawn mower EGO - Free user manual and instructions
Find the device manual for free LM1903E-SP EGO in PDF.


| Product Type | Cordless Lawn Mower |
| Brand | EGO |
| Model | LM1903E-SP |
| Rated Voltage | 56 V |
| Cutting Width | 47 cm |
| Cutting Height | 20 - 80 mm, 7 adjustable positions |
| Grass Bag Capacity | 55 L |
| Weight (without battery) | 25 kg |
| Blade Type | AB1901 |
| Blade Brake | Yes (stops in less than 3 seconds) |
| Self-Propelled System | Yes, variable speed |
| Compatible Batteries | BA1120E, BA2240E, BA1400, BA2800, BA3360, BA4200, BA1400T, BA2800T, BA4200T |
| Compatible Chargers | CH2100E, CH5500E |
| Guaranteed Sound Power Level | 95 dB(A) |
| LED Lighting | Yes, headlights |
| Full Bag Indicator | Yes |
| Folding Handle | Yes, 3 work positions + storage |
| Overload Protection | Yes, integrated electronic circuit |
| Battery Overheat Protection | Yes |
| Warranty | See egopowerplus.com |
Frequently Asked Questions - LM1903E-SP EGO
User questions about LM1903E-SP EGO
0 question about this device. Answer the ones you know or ask your own.
Ask a new question about this device
Download the instructions for your Lawn mower in PDF format for free! Find your manual LM1903E-SP - EGO and take your electronic device back in hand. On this page are published all the documents necessary for the use of your device. LM1903E-SP by EGO.
USER MANUAL LM1903E-SP EGO
OPERATOR'S MANUAL
56 VOLT LITHIUM-ION
CORDLESS MOWER
MODEL NUMBER LM1900E-SP
EN 56 volt lithium-ion cordless mower 6
natural_image
Technical line drawing of a vehicle chassis frame with visible structural components (no text or symbols)
natural_image
Mechanical assembly diagram showing a hand operating a vehicle chassis with a directional arrow indicating motion (no text or symbols present)
natural_image
Technical line drawing of a mechanical assembly with no visible text or symbols
natural_image
Diagram of a vehicle's internal components and a separate mechanical part, showing no text or symbols.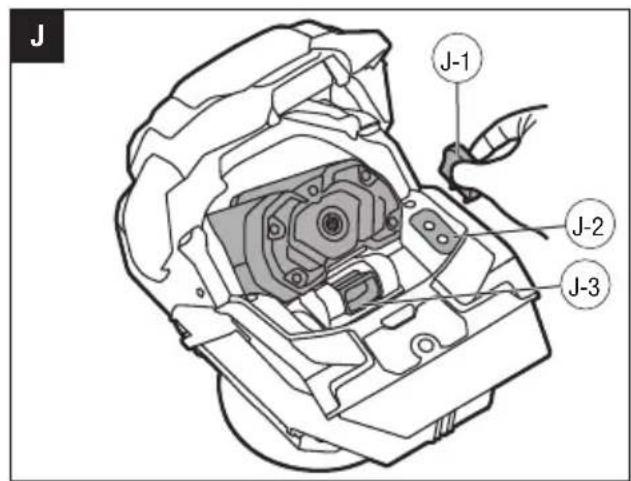


natural_image
Mechanical assembly diagram showing a lever mechanism with a curved arrow indicating motion (no text or symbols present)


natural_image
Technical line drawing of a mechanical frame assembly with an arrow indicating a component (no text or symbols present)
natural_image
Technical line drawing of a mechanical component with no visible text or symbols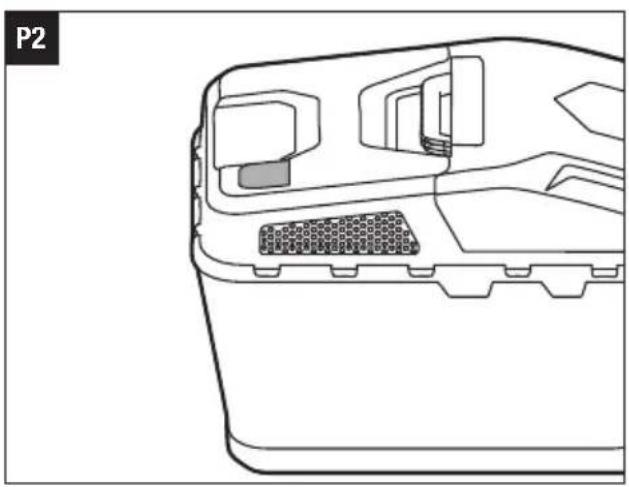
natural_image
Line drawing of a device casing with internal components and a grid pattern (no text or symbols)
natural_image
Mechanical assembly diagram showing a hand using a tool to adjust or install a component on a circular mechanical part (no text or symbols visible)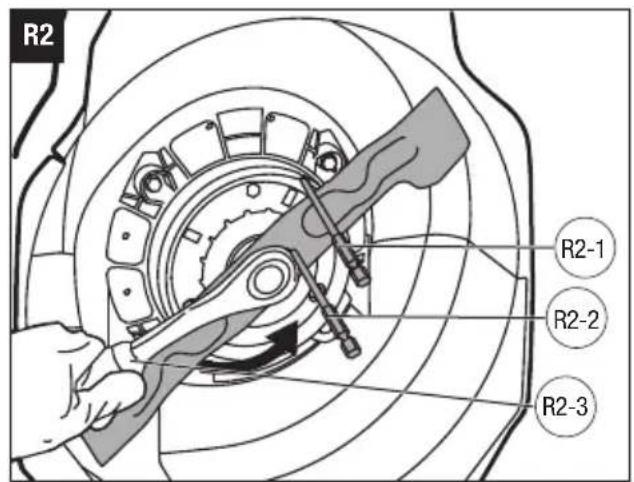

natural_image
Illustration of hands using a tool to adjust or install a mechanical component, no text or symbols present
natural_image
Mechanical assembly diagram showing a hand operating a rotating mechanical component (no text or symbols visible)
natural_image
Technical line drawing of a vehicle chassis with internal components (no text or symbols)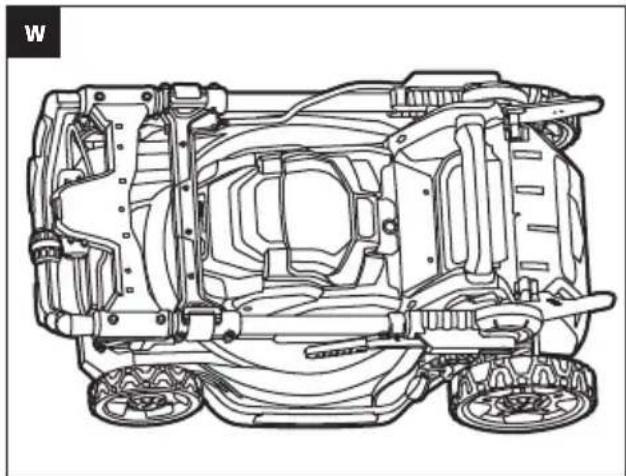
natural_image
Technical line drawing of a vehicle chassis frame with visible structural components (no text or labels)READ ALL INSTRUCTIONS!

READ OPERATOR'S MANUAL
WARNING: To ensure safety and reliability, all repairs and replacements should be performed by a qualified service technician.
Intended use & Foreseeable misuse: The product is intended for mowing grass in domestic gardens only. It must not be used to mow unusually high, dry or wet grass, e.g. pasture grass; or to shred leaves. The product is to be used only for its prescribed purpose. Any other use is deemed to be a case of misuse.
SAFETY SYMBOLS
The purpose of safety symbols is to attract your attention to possible dangers. The safety symbols and the explanations with them deserve your careful attention and understanding. The symbol warnings do not, by themselves, eliminate any danger. The instructions and warnings they give are no substitutes for proper accident prevention measures.
WARNING: Be sure to read and understand all safety instructions in this Operator's Manual, including all safety alert symbols such as "DANGER," "WARNING," and "CAUTION" before using this tool. Failure to follow all instructions listed below may result in electric shock, fire, and/or serious personal injury.
SYMBOL MEANING
SAFETY ALERT SYMBOL: Indicates DANGER, WARNING, OR CAUTION, may be used in conjunction with other symbols or pictographs.
WARNING: The operation of any power tools can result in foreign objects being thrown into your eyes, which can result in severe eye damage. Before beginning power tool operation, always wear safety goggles or safety glasses with side shields and a full face shield when needed. We recommend a Wide Vision Safety Mask for use over eyeglasses or standard safety glasses with side shields.
SAFETY INSTRUCTIONS
This page depicts and describes safety symbols that may appear on this product. Read, understand, and follow all instructions on the machine before attempting to assemble and operate it.
| Safety Alert | Precautions that involve your safety. | |
 | Read Operator's Manual | To reduce the risk of injury, user must read and understand operator's manual before using this product. |
 | Keep Bystanders Away | Ensure that other people and pets remain at least 30m away from the mower when it is in use. |
 | keep feet & hand away | keep feet & hand away |
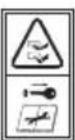 | Beware of Sharp Blades | Blades continue to rotate after the motor is switched off - Remove disabling device before maintenance. Switch off and remove detachable battery pack (or disabling device) before adjusting or cleaning. |
 | Class II Construction | Double-insulated Construction. |
 | CE | This product is in accordance with applicable EC directives. |
 | WEEE | Waste electrical products should not be disposed of with household waste. Take to an authorized recycler. |
 | Noise | Guaranteed sound power level. Noise emission to the environment according to the European community's Directive. |
| IPX4 IP | Symbol | Protection against ingress of water degree 4 |
| V Volt | Voltage |
EN
| mm Millimeter Length or size | ||
| cm Centimeter Length or size | ||
| DirectCurrent | Type or a characteristic ofcurrent | |
| kg Kilogram Weight | ||
SAFETY RULES FOR CORDLESS LAWN MOWER
DANGER: This machine was built to be operated according to the rules for safe operation included in this manual. As with any type of power equipment, carelessness or error on the part of the operator can result in serious injury. This machine is capable of injuring hands and feet and throwing objects. Failure to observe all safety instructions could result in serious injury or death.
WARNING: When using cordless lawn mowers, basic safety precautions should always be followed to reduce the risk of fire, electric shock, and personal injury.
IMPORTANT
READ CAREFULLY BEFORE USE. KEEP FOR FUTURE REFERENCE.
SAFETY RULES FOR CORDLESS LAWNMOWERS: CAUTION-DO NOT TOUCH ROTATING BLADE!
TRAINING
- Read the instructions carefully. Be familiar with the controls and the proper use of the appliance.
■ Never allow people unfamiliar or children with these instructions to use the appliance. Local regulations can restrict the age of the operator.
■ Never mow while people, especially children, or pets are nearby.
■ The operator or user is responsible for accidents or hazards occurring to other people or their property.
PREPARATION
■ While mowing, always wear substantial footwear and long trousers.
■ Do not operate the appliance when barefoot or wearing open sandals. Avoid wearing clothing that is loose fitting or that has hanging cords or ties.
■ Thoroughly inspect the area where the appliance is to be used and remove all stones, sticks, wires, bones, and other foreign objects.
■ Before using, always visually inspect to see that the blades, blade bolts and cutter assembly are not worn or damaged. Replace worn or damaged blades and bolts in sets to preserve balance. Replace damaged or unreadable labels.
OPERATION
■ Mow only in daylight or good artificial light.
■ Avoid operating the appliance in wet grass, where feasible.
■ Always be sure of your footing on slopes.
■ Walk, never run.
■ For wheeled rotary mowers, mow across the face of slopes, never up and down.
■ Exercise extreme caution when changing direction on slopes.
■ Do not mow on excessively steep slopes.
■ Use extreme caution when reversing or pulling the appliance towards you.
■ Stop the blade(s) if the appliance has to be tilted for transportation when crossing surfaces other than grass, and when transporting the appliance to and from the area to be mowed.
■ Never operate the appliance with defective guards or shields, or without safety devices, for example deflectors and/or grass catchers, in place.
■ Switch on the motor according to instructions and with feet well away from the blade(s).
- Do not tilt the appliance when switching on the motor, except if the appliance has to be tilted for starting. In this case, do not tilt it more than absolutely necessary and lift only the part which is away from the operator. Always ensure that both hands are in the operating position before returning the appliance to the ground. Do not start the machine when standing in front of the discharge opening.
■ Do not put hands or feet near or under rotating parts. For rotary mowers, keep clear of the discharge opening at all times.
■ Never pick up or carry an appliance while the motor is running.
■ Switch off and remove detachable battery pack (or disabling device) and make sure that all moving parts have come to a complete stop before adjusting or cleaning:
■ Whenever you leave the machine;
■ Before clearing a blockage and unclogging chute;
■ Before checking, cleaning or working on the appliance;
■ After striking a foreign object. Inspect the appliance for damage and make repairs as necessary.
■ If the appliance starts to vibrate abnormally (check immediately):
■ Inspect for damage;
■ Replace or repair any damaged parts;
■ Check for the tighten any loose parts.
MAINTENACE AND STORAGE
■ Be careful during adjustment of the machine to prevent entrapment of the fingers between moving blades and fixed parts of the appliance.
- Keep all nuts, bolts, and screws tight to be sure the appliance is in safe working condition.
■ Check the grass catcher frequently for wear or deterioration.
■ Replace worn or damaged parts for safety.
■ Cleaning and user maintenance shall not be made by children without supervision.
■ When servicing the blades be aware that, even though the power source is switched off, the blades can still be moved.
■ For rotary mowers, ensure that only replacement cutting means of the right type are used.
PERSONAL SAFETY
Tragic accidents can occur if operator is not alert to the presence of children. Children are often attracted to the mower and mowing activity. They do not understand the dangers. Never assume that children will remain where you last saw them.
- Keep children out of the mowing area and under the watchful care of a responsible adult other than the operator.
■ Be alert and turn the mower off if a child enters the area.
■ Use extreme care when approaching blind corners, doorways, shrubs, trees, or other objects that may obscure your vision of a child who may run into the mower.
■ Children should be supervised to ensure that they are not playing with the mower.
■ Always turn the mower off when removing the battery pack from the tool. Stop the blade(s) if the appliance has to be tilted for transportation when crossing surfaces other than grass, and when transporting the appliance to and from the area to be mowed.
Read this operator's manual carefully in its entirety before attempting to assemble this machine. Read, understand, and follow all instructions on the machine and in the manuals before operation. Be completely familiar with the controls and proper use of this machine before operating it. Keep this manual in a safe place for future and regular reference and for ordering replacement parts.
■ Use the right appliance – Do not use the lawn mower for any job except that for which it is intended.
- Don't overreach – Keep proper footing and balance at all times.
■ Objects struck by the lawn mower blade can cause severe injuries to persons. The lawn should always be carefully examined and cleared of all objects prior to each mowing.
■ Before and while moving backwards, look behind and down for small children and other people.
■ This machine is not a plaything. Therefore, exercise extreme caution at all times. Your unit has been designed to perform one job: to mow grass. Do not use it for any other purpose.
- Don't force the lawn mower – it will do the job better and more safely at the rate for which it was designed.
■ Before using, always visually inspect to see that the blades, blade bolts and cutter assembly are not worn or damaged. Replace worn or damaged blades and bolts and any other components at the same time to preserve balance. Replace damaged or unreadable labels.
■ Use extreme caution when reversing or pulling the appliance towards you.
■ Thoroughly inspect the area where the equipment is to be used. Remove all stones, sticks, wire, toys and other foreign objects that could be tripped over or picked up and thrown by the blade. Thrown objects can cause serious personal injury. Plan your mowing pattern to avoid discharge of material toward roads, sidewalks, bystanders and the like. Also, avoid discharging material against walls or obstructions, which may cause discharged material to ricochet back toward the operator.
■ To help avoid blade contact or an injury from thrown objects, stay in the operator zone behind the handles and keep children, bystanders, helpers and pets at least 30m from the mower while it is in operation. Stop the machine if anyone enters the area.
■ Always wear safety glasses or safety goggles during operation and while performing an adjustment or repair to protect your eyes. Thrown objects that ricochet can cause serious injury to the eyes. Always use a face or dust mask if the operation is dusty.
EN
EN
- Dress properly – Do not wear loose clothing or jewelry. They can be caught in moving parts. Use of rubber gloves and footwear is recommended when working outdoors. Wear sturdy, rough-soled work shoes and close-fitting trousers and shirts. Shirts and trousers that cover the arms and legs and steel-toed shoes are recommended. Never operate this machine in bare feet, sandals, slippery or lightweight (e.g., canvas) shoes.
■ Do not put hands or feet near rotating parts or under the cutting deck. Contact with the blade can injure hands and feet.
■ A missing or damaged discharge cover can cause blade contact or injuries from thrown objects.
■ Many injuries occur as a result of the mower being pulled over the foot during a fall caused by slipping or tripping. Do not hold onto the mower if you are falling, release the handle immediately.
■ Never pull the mower back toward you while you are walking. If you must back the mower away from a wall or obstruction first look down and behind to avoid tripping and then following these steps:
■ Step back from mower to fully extend your arms.
■ Be sure you are well balanced with sure footing.
■ Pull the mower back slowly, no more than half way toward you.
■ Repeat these steps as needed.
■ Do not operate the mower while under the influence of alcohol or drugs.
■ Stay alert – watch what you are doing. Use common sens Do not operate the lawn mower when you are tired.
■ he motor/blade control handle is a safety device. Never attempt to bypass its operation. Doing so makes the safety device inoperative and may result in personal injury through contact with the rotating blade. The motor/blade control handle must operate easily in both directions and automatically return to the disengaged position when released.
- Avoid dangerous environments – Don't use lawn mowers in damp or wet locations.
- Don't use in rain.
■ Always be sure of your footing. A slip and fall can cause serious personal injury. If you feel you are losing your footing, release the motor/blade control handle immediately and the blade will stop rotating within three seconds.
■ Stop the blade when crossing gravel drives, walks or roads.
■ If the equipment should start to vibrate abnormally, stop the motor and check immediately for the cause. Vibration is generally a warning of trouble.
■ Inspect for damage;
■ Replace or repair any user replaceable damaged parts;
■ Check for and tighten any loose parts.
■ Never operate the mower without the proper trailing shield, discharge cover, grass bag, mulching insert, side discharge chute, motor/blade control handle or other safety protective devices in place and working. Never operate the mower with damaged safety devices. Failure to do so can result in personal injury.
■ If situations occur that are not covered in this manual, use care and good judgment. Contact EGO Customer Service for assistance.
■ Use only with the battery packs and chargers listed below:
| BATTERY PACK CHARGER | |
| BA1120E, BA2240E, BA1400, BA2800, BA3360, BA4200, BA1400T, BA2800T, BA4200T | CH2100ECH5500E |
■ The battery pack must be removed from the appliance before it is scrapped.
■ The battery shall be disposed of safely.
Slopes are a major factor related to slip-and-fall accidents, which can result in severe injury. Always be sure of your footing on slopes. Operation on slopes requires extra caution. If you feel uneasy on a slope, do not mow it.
Do:
■ Mow across the face of slopes; never mow up and down. Exercise extreme caution when changing direction on slopes.
■ Watch for holes, ruts, rocks, hidden objects, or bumps which can cause you to slip or trip. Tall grass can hide obstacles.
Do not:
■ Do not mow near drop-offs, ditches or embankments; you could lose your footing or balance.
■ Do not mow slopes greater than 15 degrees.
■ Do not mow on wet grass. Unstable footing could cause slipping.
SERVICE
WARNING: Grass bag components, the discharge cover, side discharge chute, mulching insert and trailing shield are subject to wear and damage, which could expose moving parts or allow objects to be thrown and could increase the risk of injury. For safety protection, frequently check all components and replace damaged components immediately with identical replacement parts, listed in this manual. Contact EGO Customer Service or your closest EGO service center, and repairs or replacements shall be performed by a qualified service technician!
If the mower's built-in overload protection switch frequently trips, contact EGO Customer Service or your closest EGO service center.
■ Do not wash the mower with a hose; avoid getting water in the motor and electrical connections.
■ Remove the key and store the idle lawn mower indoors when not in use. Allow the motor to cool before storing it in any enclosure. The lawn mower should be stored in a dry, high, or locked-up enclosure, out of reach of children.
■ When servicing, use only identical replacement parts listed in this manual. Use of parts that do not meet the original equipment specifications may lead to improper performance and compromised safety.
■ Remove or disconnect the battery pack before servicing, cleaning, or removing material from the lawn mower.
■ Follow instructions for changing accessories.
- Keep handles dry, clean and free from oil and grease.
■ To reduce a fire hazard, keep the motor cover free of grass, leaves and debris build-up.
- Check the blade and motor mounting bolts at frequent intervals for proper tightness. Also, visually inspect the blade for damage (e.g., bending, cracking and wear.). Replace the blade only with the identical replacement blade, listed in this manual.
- Maintain your mower with care – keep the mower blade sharp and clean for the best and safest performance. Mower blades are sharp and can cut. Wrap the blade or wear gloves and use extra caution when servicing it.
■ Never remove or tamper with safety devices. Regularly check their proper operation. Never do anything to interfere with the intended function of a safety device or to reduce the protection provided by a safety device.
■ Always stop the motor before making adjustments to a wheel or a cutting-height adjustment.
■ After striking a foreign object, stop the motor, remove the key, and thoroughly inspect the mower for any damage. Repair the damage before operating the mower.
■ Maintain or replace safety and instruction labels, as necessary. Contact EGO Customer Service or your closest EGO service center, and repairs or replacements shall be performed by a qualified service technician!
■ SAVE THESE INSTRUCTIONS. Refer to them frequently and use them to instruct others who may use this tool. If you lend this tool to someone else, also lend these instructions to them to prevent misuse of the product and possibly injury.
BATTERY USE AND CARE
■ To preserve natural resources, please recycle or dispose of batteries properly. This product contains lithium-ion batteries. Local or national laws prohibit disposal of lithium-ion batteries in ordinary rubbish. Consult your local waste authority for information regarding available recycling and/or disposal options.
Upon removal of the battery pack for disposal or recycling, cover the battery pack's terminals with heavy-duty adhesive tape. Do not attempt to destroy or disassemble the battery pack or remove any of its components. Lithium-Ion batteries, must be recycled or disposed of properly. Also, never touch the terminals with metal objects and/or body parts as a short circuit may result. Keep away from children. Failure to comply with these warnings could result in fire and/or serious injury.
■ UNDER ABUSIVE CONDITIONS, LIQUID MAY BE EJECTED FROM THE BATTERY; AVOID CONTACT. IF CONTACT ACCIDENTALLY OCCURS, FLUSH WITH WATER. IF LIQUID CONTACTS EYES, ADDITIONALLY SEEK MEDICAL HELP. Liquid ejected from the battery may cause irritation or burns.
EN
SPECIFICATIONS
| Voltage | 56 V --- | |
| No-load Speed 3000/min | ||
| Cutting Height 20-80mm | ||
| Cutting Height Positions 7 | ||
| Deck Size 51cm | ||
| Cutting Width 47cm | ||
| Grass Bag Volume 55L | ||
| Mower Weight (Without battery pack and mulching insert) | 25 kg | |
| Self-propel System YES | ||
| Blade Model AB1901 | ||
| Blade Brake YES | ||
| Measured sound power level L_WA | 93.5 dB(A)K=1.82 dB(A) | |
| Sound pressure level at operator's ear L_PA | 80.3 dB(A)K=3 dB(A) | |
| Guaranteed sound power level L_WA (measured according to 2000/14/EC) | 95 dB(A) | |
| Valuation of vibration a_h | Left handle | 1.35 m/s ^2 K=1.5 m/s ^2 |
| Right handle | 1.36 m/s ^2 K=1.5 m/s ^2 | |
■ The declared vibration total value has been measured in accordance with a standard test method and may be used for comparing one tool with another;
■ The declared vibration total value may also be used in a preliminary assessment of exposure.
NOTICE: The vibration emission during actual use of the power tool can differ from the declared value in which the tool is used; In order to protect the operator, user should wear gloves and ear protectors in the actual conditions of use.
DESCRIPTION
KNOW YOUR MOWER (Fig. A & B & C)
- Handle
- Full-grass Indicator
- Grass Bag Handle
- Rear-Discharge Door
- Rear Handle
- Battery-Pack Cover
- Front Wheel
- Mower Deck
- LED Headlight
- Cutting-Height Adjustment Lever
- Rear Wheel
- Grass Bag
- Quick-Adjust Lever
- Handle-Locking Clamp
- Self-propel Speed-control Knob
- Bail Switcg (Switch Lever)
- Side Rail
- Safety Button
- Self-propel Switch
- Safety Key Slot
- Battery-Release Button
-
Switch Button for LED Headlights
-
Power Indicator
OPERATION
ASSEMBLING THE GRASS BAG
1) Assemble the two side clips and the bottom clip to the frame (Fig. D).
| D-1 | Bottom Clip | D-3 | Side Clips |
| D-2 | Frame |
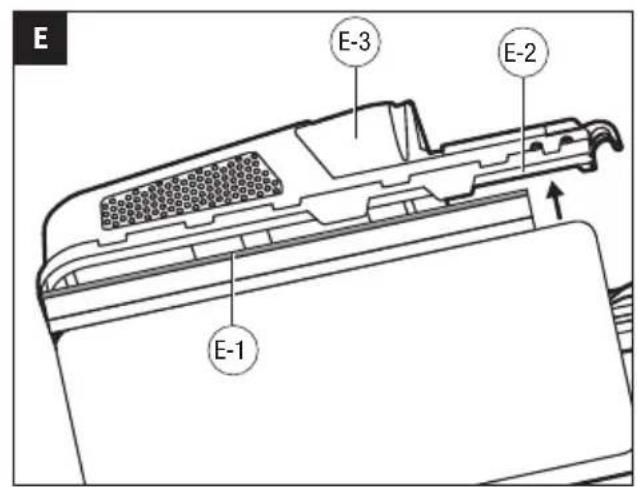
2) Align the ribs with the mounting slots on the bag cover and press the rib down until you hear a "click". (Fig. E).
| E-1 | Ribs | E-3 | Bag Cover |
| E-2 | Mounting Slot |
NOTICE: Under normal usage, bag material is subject to wear. To reduce the risk of injury, frequently inspect the bag assembly and replace if there are any signs of wear or deterioration. Use only grass bags manufactured for this mower.
ADJUSTING THE FOLDABLE HANDLE
WARNING: Do not attempt to start the mower until the handle has been locked at one of the three preset operating positions (UPPER OPERATING POSITION, MIDDLE OPERATING POSITION and LOWER OPERATING POSITION).
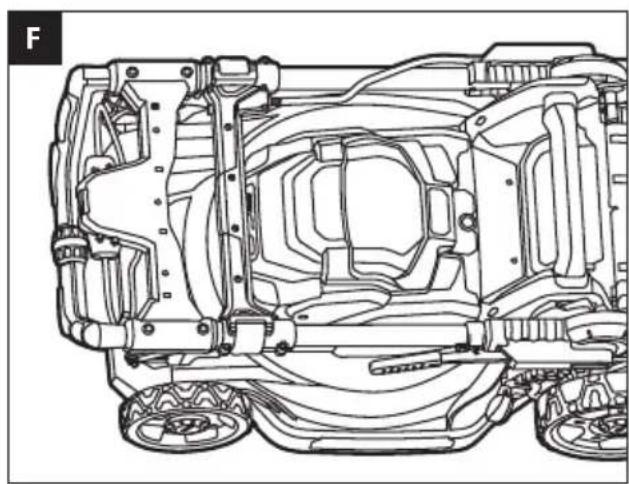
Your mower is shipped with the handle in the compact, LOCKED STORAGE POSITION (Fig. F).
1) Press and hold the quick-adjust lever to release the handle from the LOCKED STORAGE POSITION.
2) Lift the handle from its folded position, then release the lever. Gently pivot the handle upward until you hear and feel the lock pin engage in one of the following different positions as shown in the Fig. G.
Fig. G parts description see below:
| G-1 Locked Storage Position | G-4 Middle Operating Position |
| G-2 Grass Bag Attachment/Removal Position | G-5 Lower Operating Position |
| G-3 Upper Operating Position | G-6 Cutting Height Adjusting Level |
ATTACHING THE GRASS BAG/MULCHING INSERT
WARNING: Do not at any time make any adjustment to the lawn mower without first stopping the motor, removing the safety key and waiting for the blade to stop rotating.
NOTICE: Attach any of the attachments to the lawn mower before mowing.
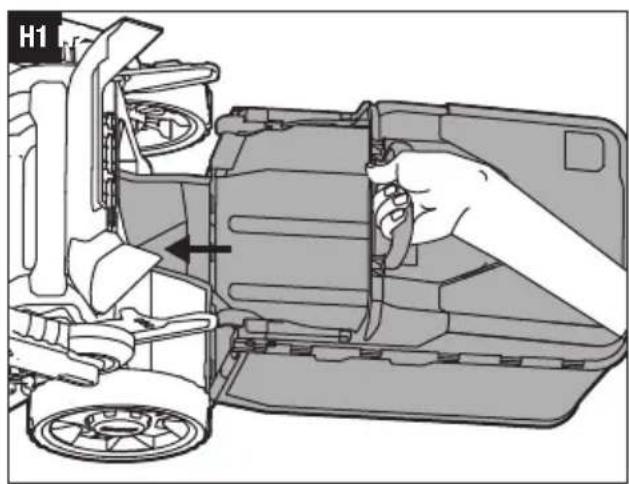
■ To Attach/Remove the Grass Bag (Fig. H1 & H2) Insert the board of the grass bag into the mower and hang the grass bag on the mower.
NOTICE: Remove the pre-installed mulching insert from the mower before attaching the grass bag to the mower.
■ To Attach/Remove the Mulching Insert (Fig. I)
Lift the rear-discharge door and insert the mulching insert into the mower. To remove, just pull it out. Lastly, release the rear-discharge door.
WARNING: Keep your feet away from the deck when adjusting its height. The mower can be set to 7 cutting heights between 20mm and 80mm. Choose the proper cutting height according to the types and conditions of the grass.
NOTICE: When moving the tool, make sure the cutting height is adjusted at the position of 3 or higher. Failure to do so, could result in the damage of the blade.
ATTACHING/DETACHING THE BATTERY PACK (Fig. J)
CHARGE BEFORE FIRST USE.
WARNING: If any parts are broken or missing, do not attempt to attach the battery pack to the mower or operate the mower until the broken or missing parts are replaced. Failure to do so could result in serious injury.
■ To Attach
Push the battery pack into the battery compartment until you hear a "click".
■ To Detach
Depress the battery-release button in the battery compartment.
Fig. J parts description see below:
| J-1 Safety Key |
| J-2 Safety Key Slot |
| J-3 Battery-release Button |
NOTICE: Make sure that the latch on the mower snaps into place and that the battery pack is secured to the mower before starting operation.
STARTING/STOPPING THE MOWER
WARNING: The operation of any lawn mower can result in foreign objects being thrown into your or other's eyes, which can damage eyes severely. Always wear safety glasses while operating the mower, or while performing any adjustments or repairs on it.
WARNING: Ensure that other people and pets remain at least 30m away from the mower when it is in use.
EN
WARNING: The blade will continue to rotate for a few seconds after the mower is turned off. Allow the motor/blade to stop rotating before starting it again. Do not rapidly turn the mower off and on.
DANGER: Rotating blades can cause serious injury. To prevent serious injury, remove the safety key when the mower is unattended, or when adjusting, cleaning, servicing, transporting, lifting, or storing the mower.
NOTICE: The motor cannot be started unless:
■ The handle is locked into one of the three operating positions, see ADJUSTING THE FOLDABLE HANDLE.
■ The side rails are fully extended (Fig. K).
■ Both green handle-locking clamps are securely closed ^2 Turn the self-propel Speed-control knob until you (Fig. L). hear a “click”.
CAUTION: Do not attempt to override the operation of the safety button and bail switch.
To Start (Fig. M1 & M2)
NOTICE: To prevent serious injury, we recommend you to start the mower with self-propel function off.
START THE MOWER WITH SELF-PROPEL FUCTION ON (Fig. M1)
1) Attach the battery pack to the mower, insert the safety key into the key slot and close the battery cover.
2) According to Fig. M1, depress the one of self-propel switch.
3) Turn the self-propel Speed-control knob until you hear a "click".
4) depress the safety button down.
5) With the self-propel and safety button switch depressed, then pull the bail switch upward to meet the handle and release the safety button.
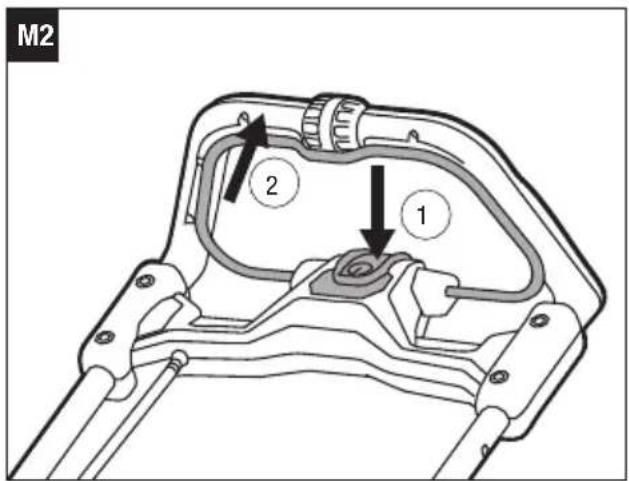
START THE MOWER WITH SELF-PROPEL FUCTION OFF (Fig. M2)
1) Attach the battery pack to the mower, insert the safety key into the key slot and close the battery cover.
2) According to Fig. M2, depress the safety button down.
3) With the safety button depressed, pull the bail switch upward to meet the handle and release the safety button.
To Stop (Fig. N)
1) Fully release the bail switch.
2) The electric brake in the Automatic Braking Mechanism will stop the blade rotation within 3 seconds of the bail switch release.
3) Turn the self-propel Speed-control knob off until it can't be rotated.
VARIABLE-SPEED SELF-PROPEL SYSTEM
The mower is equipped with variable-speed self-propel capability. This system is independent of the blade On-Off switch. it is not dependent on blade rotation.
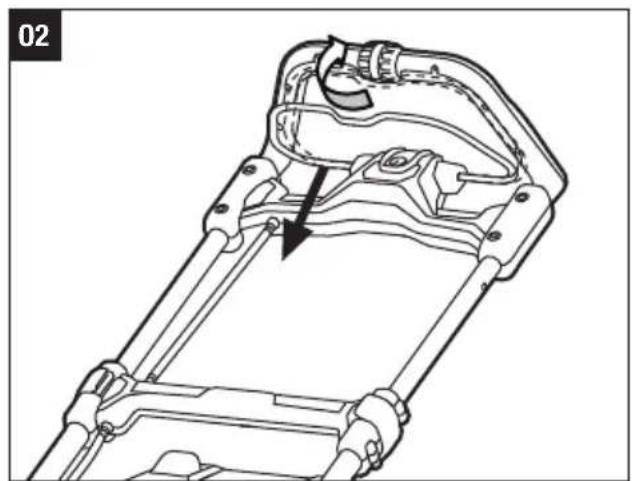
To operate the system without blade rotation (Fig. 01)
1) Press the one of self-propel switches.
d2) Turn the self-propel Speed-control knob until you hear a "click".
To turn the self-propel off, release the self-propel switch and Turn the self-propel Speed-control knob off until it can't be rotated. (Fig. 02)
WARNING: To reduce the risk of injury, never attempt to override the operation of the switch or self-propel system. Use the self-propel for its intended purpose only.
LED HEADLIGHTS (Fig. A-9)
Press the switch button 1s(Fig. C-23) to turn on/off the LED headlights in the front of the battery compartment.
FULL-GRASS INDICATOR (Fig. P1 & P2)
THE GRASS BAG IS NOT FULL (Fig. P1).
THE GRASS BAG IS FULL (Fig. P2). Stop the mower and remove the battery pack, clean your grass bag.
POWER INDICATOR ON THE MOWER (Fig. Q)
The mower is equipped with a power indicator to indicate the charge status of the battery pack and the working status of the mower. The power indicator will illuminate when the blade is rotating or when the LED headlights are turned on.
Fig. Q parts description see below:
Q-1 Power indicator
| Power Indicator on Mower | Meaning Action | |
| Shining green | Mower is working properly | N/A |
| Flashing green | Handle-Locking Clamp/Quick-Adjust Lever is not triggered properly | Re-triggered the handle-locking clamp/quick-adjust Lever |
| Flashing red | The battery is depleted | Stop the mower and charge the battery pack |
| Shining orange | The mower is overheated | Remove the battery from the mower, move them to the shade and cool them at least 15 minutes |
| Flashing orange | The mower is overloaded | Slow down your pace or raise up the cut height to decrease the load |
| Red and green flashing alternately | Communication timeout | Connect EGO |
MOWER OVERLOAD PROTECTION
To prevent overload conditions, do not try to remove too much grass at one time. Slow down your cutting pace or raise the cut height.
Your mower has built-in overload circuit protection. When the mower is overloaded, the motor will stop and the power indicator on the mower will flash orange. Remove the battery pack from the mower. Check to see if grass has collected beneath the deck and clear it if necessary, then install the battery and restart the mower.
BATTERY HIGH TEMPERATURE PROTECTION
The heat dissipates more slowly in hot weather. If the battery temperature exceeds 70^ C during operation, the protection circuit will immediately turn off the mower to protect the battery pack from damage. The power indicator on the mower will shine orange and the LED on the battery will flash orange. Release the bail handle, wait until the battery pack cools down to approximately 67^ C, then restart the mower.
MAINTENANCE
WARNING: To avoid serious personal injury, always remove the safety key from the mower before cleaning, performing any maintenance or transporting the mower.
WARNING: When servicing, use only identical replacement parts. Use of any other parts may create a hazard or cause product damage. To ensure safety and reliability, all repairs and replacements should be performed by a qualified service technician.
GENERAL MAINTENANCE
WARNING: Always remove the safety key and battery pack when servicing or transporting the mower.
The underside of mower deck should be cleaned after each use, as grass clippings, leaves, dirt and other debris will accumulate.
Remove any build-up of grass on or around the drive shaft and the motor fan (do not use water). Wipe the mower clean with a damp cloth.
REMOVING/INSTALLING THE BLADE
WARNING: Always protect your hands by wearing heavy gloves or wrapping the cutting edges with rags or other materials when performing any maintenance on the mower blade. Always remove the battery pack when servicing or transporting the mower.
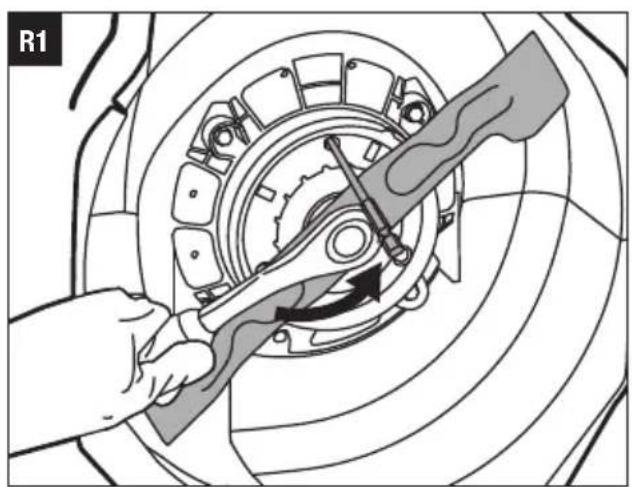
■ To Remove the Blade
Following Fig. R1.
NOTICE: If the bolt rotates with the motor shaft when loosening the bolt, turn the fan by hand to align the through holes in the fan with the holes in the blade, and place another metal rod into the aligned holes (Fig. R2).
■ To Install the Blade
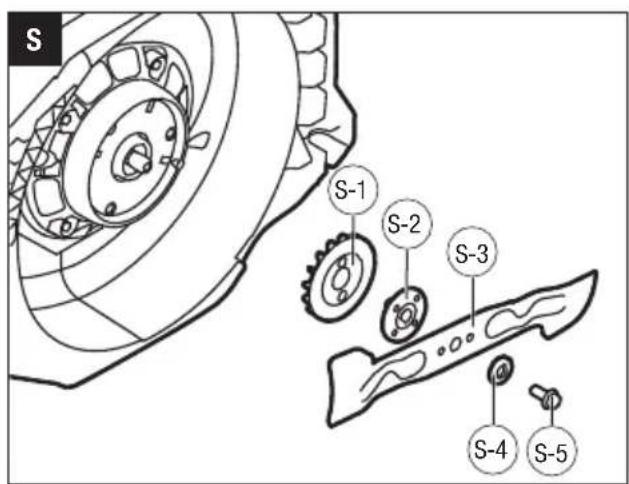
Following the assembly sequence in Fig. S, with the fan blade towards deck and the printed blade side towards outside, align the through holes in the fan with the holes in the blade (Fig. T) and then tighten the blade as Fig. U shown.
Fig. R2 & S parts description see below:
| R2-1 Stabilizer 1 S-2 Inner Flange | |
| R2-2 Stabilizer 2 S-3 Blade | |
| R2-3 14mm Wrench S-4 Outer Flange | |
| S-1 Fan S-5 Bolt |
NOTICE: The recommended torque for tightening the blade bolt is 49-59Nm.
EN
STORING THE MOWER
■ Remove the battery pack from the mower and store it in a cool, dry and clean location. Do not store it next to corrosive materials, such as fertilizer or rock salt.
■ Store the mower in a covered, enclosed space, that is cool and dry and out of the reach of children.
■ Do not cover the lawn mower with a solid plastic sheet. Plastic coverings trap moisture around the mower, which causes rust and corrosion.
■ The mower can be stored upright or flat. (Fig. V & W).

WARNING: If the mower tips over from the upright position, mower damage or personal injury may result. Always keep the mower stable and out of the reach of children when it is in the upright position. If possible, lay it flat for storage.
Protecting the environment

Do not dispose of electrical equipment, battery charger and batteries/rechargeable batteries into household waste!
According to the European law 2012/19/EU, electrical and electronic equipment that is no longer usable, and according to the European law 2006/66/EC, defective or used battery packs/batteries, must be collected separately.
If electrical appliances are disposed of in landfills or dumps, hazardous substances can leak into the groundwater and get into the food chain, damaging your health and well-being.
TROUBLESHOOTING
EN
WARNING: Always remove the safety key and battery pack when servicing or transporting the mower. Always protect your hands by wearing heavy gloves or wrapping the cutting edges with rags or other materials when performing any maintenance on the mower blade.
| PROBLEM | CAUSE SOLUTION | |
| The mower fails to start | ■ The battery pack is depleted.■ The battery pack is not mounted in place in the battery compartment.■ The battery or mower circuitry is too hot.(The power indicator on the mower will illuminate in orange for 10 seconds)■ The side rails are not extended to their maximum length and the clamps are not locked in position.■ The handle is not set at one of the three operating positions.■ The mower deck is clogged with grass and debris. | ■ Charge the battery pack.■ Attach the battery pack to the mower; press it until you hear a click■ Allow the battery pack or mower to cool until the temperature drops below 67°C.■ Fully extend the handle and lock both clamps.■ Adjust the handle to one of the three operating positions.■ Clean the mower deck and make certain that the blade has freedom of movement. |
| The mower cuts unevenly | ■ The blade is dull.■ The cutting height is not set properly.■ The blade is assembled incorrectly. | ■ Sharpen or replace the blade.■ Raise the deck to a higher cutting height setting.■ Reassemble the blade, following the section “INSTALLING THE BLADE” in this manual. |
| The mower stops while mowing | ■ The battery pack is depleted.■ Mower is in overload condition.■ Mower deck is clogged with grass and debris.■ The battery or mower circuitry is too hot. (The power indicator on the mower will illuminate orange for 10 seconds.)■ The side rail is retracted a little by the pushing force applying on the handle. | ■ Charge the battery pack.■ Raise the cutting height or slow down the mowing.■ Unclog the mower deck. Raise the cutting height, or cut a narrow swath.■ Allow the battery pack or mower to cool until the temperature drops below 67°C.■ Unlock the clamps. Fully extend the side rails and lock the clamps again. |
EN
| PROBLEM | CAUSE SOLUTION | |
| The mower does not mulch properly | ■ Wet grass clippings are sticking to the underside of the deck.■ The mower is set to cut too much grass at once. | ■ Wait until the grass dries before mowing.■ Raise the deck to a higher cutting height setting. |
| There is excessive vibration | ■ The cutting blade is loose.■ The cutting blade is unbalanced.■ The cutting blade is bent.■ The motor shaft is bent. | ■ Tighten the blade bolt.■ Balance the blade following the instructions.■ Replace the blade.■ Contact the service center. |
| The handle locking clamps cannot be closed in position. | ■ The side rails are not fully extended. | ■ Fully extend the side rails, then lock the clamps. |
WARRANTY
EGO WARRANTY POLICY
Please visit the website egopowerplus.com for full terms and conditions of the EGO Warranty policy.
LED KOPLAMPEN (afb. A-9)
VEDLIKEHOLD OG LAGRING
LED-frontlykter (Fig. A-9)
GENERELT VEDLIKEHOLD
POLITYKA GWARANCYJNA EGO
CITIȚI MANUALUL DE INSTRUCTIUNI
LUGEGE KASUTUSJUHENDIT
■ ὀσχῶν ὑρος υχδιδ θηρασθηρασθηρασθηρασθηρασθηρασθηρασθηρασθηρασθηρασθηρασθηρασθηρασθηρασθηρασθηρασθηρασθηρασθηρασθηρασθηρα συμείντων.
■ ยกจํา monzol zsomodjon zsfbmblszfrjfo กมqqglsb ยงmlsfymls ยูบoon szŋdʒymsʒymmls. gsshgmdon qosbs omy ยงmlsʃym y6qos zsqosbsmmon zsgosʃsbol q6mbls, ภมqqglsb y6qos gsqosʃnson δsmsbolsgsb ʒs5lub3s3gðywno s6ŋ qos/s6 sbqgfbon ยงmlsʃymls ʒ6nsblszmfŋo6ŋd5b lssdŋdsm s6ŋqosb sb y3sb dols3gb.
zsdmyy6gds 8mzsoon ggldcmysojouo bgluo:
■ ยกจําส่งจําดอน Zincจําดอน damabdʒmgđมอป oblußmýjdzosl ibýmnosq, lssbd đggzqgdmogojn bgnulshyml sýyməsl. fsozombojn, dgnolfszemojn os doygzoom bgnulshymlg yosbsbom os oblußmýjdzosdo sýjgóom y3gms domoogðsl zsmbblszýjfol zsdmygbyðsdqg. ibýmnosq dgnolfszemojn zmbýmnomol oomszgdo os bgnulshyml dsmogdywno zsdmygbyðol gs zsbmbblszýjfol zsdmygbyðsdqg. dgnobsbjom dmdabdʒmgđemol oblußmýjdzos ylszgmmbm sqzomosl lsdmdszemq os mgymnsmýmnso gsdmygbyðolωzol, slg3g lsomspcsbnzm bsfomgydol dʒ3gmolωzol.
□ amplitude of the amplitude of the amplitude of the amplitude of the amplitude of the amplitude of the amplitude of the amplitude of the amplitude of the amplitude of the amplitude of the amplitude of the amplitude of the amplitude of the amplitude of the amplitude of the amplitude of the amplitude of the amplitude of the amplitude of the amplitude of the amplitude of the amplitude of the amplitude of the amplitude of the amplitude of the amplitude of the amplitude of the amplitude of the amplitude of the amplitude of the amplitude of the amplitude of the amplitude of the magnitude.
139600303500
| dsδzs | 56 ʒɒmŋðo --- | |
| qssŋðʒɔnənsʒo ðmŋɡbʒol lɔrbʃsŋg | 3000 ð6/ʃɔn | |
| ʃmɔl lɔdʒənŋg 20-80đđ | ||
| ʃmɔl lɔdʒənŋmɔl ʒmθɔzɔŋðo | 7 | |
| dʃmɡɔmo dsmɔl ʃməs 51bđ | ||
| mɔdʒɔl lɔgʒbğ 47bđ | ||
| ðsɛmsbɔl βsδɔmɔl dɔmʒŋmənəs | 55cm | |
| ʒsθmblsʒmʃtɔl ʃməs (sʒŋdʒməsʒmʃmɔls qss ðsɛmsbɔl qssədsʒmʒdʒədʒmɔl ʒsɪŋðŋ) | 25 38 | |
| ɔmɔom-lʒɛmɔl ðgjsbɔnðo YES | ||
| qssbɔl ðmçŋɡmo AB1901 | ||
| qssbɔl ðŋbɪŋŋfo YES | ||
| zs6bmdoqmo bdolboddqms36nol qmbj L_WA | 93.5φδ(s)K=1.82 φδ(s) | |
| dgg6nol f6bg3nol qmbjdmdbds6m6dcmol y7m6bj L_PA | 80.3 φδ(s)K=3 φδ(s) | |
| zs6ms6b6o6m6dmyco bdolboddqms36nol qmbj L_WA (zs6bmdoqmo 2000/14/EC6m6g7m6znool dobqg3noom) | 95 φδ(s) | |
| zo6d6s3ooul dgg3s3gδsa _h : | ds6m6b6bslsbgtmynfo | 1.35 ∂/φ∂2K=1.5 ∂/φ∂2 |
| ds6x3g6bslsbgtmynfo | 1.36 φ∂2K=1.5 φ∂2 | |
zs8m6lu36g0u bs6m3s/zs8m6m3s
A zsgbmbomgds: zsbmls3ngfou zsdmggbdolssb dglsdqms ygbm lbgygmou ofgbo sb lbgolo ozscngdou dodsmonymgdoon zsdml6mms, hsdsg dglsdqms zsdmofbzomb ozsmou dbodzbgmmgsbo qstosbgds. ymzgcmzol dmo6gjou ylsgmbbmgdou lsomzsg dyjdsmdolssb, sb 6mgs sbqgbo bgmbsfgm 6ggymo6gdsb sb dgtgngdsb.
⚠️ ⁸٤٥٣٥٥٥٥٥٧٨: ⁹٠٥٦٢٥٥٥٥٥٥ ⁷٠٥ ¹٥٥ ⁶٠ ⁵٠ ⁶٠ ⁷.
bghmlshymgdo, hmdmygdoB smsh
gsdmoyg6gds, slg39 2006/66/
modification of a 100%
s3y0dym0g0m6y0o/0s0s6y0y0o,
y6q5 y8m3q9b B5m3g7m5q.
g
658535869079 daonsszugdousu,




- VOLT LITHIUM-ION
- CORDLESS MOWER
- READ ALL INSTRUCTIONS!
- READ OPERATOR'S MANUAL
- SAFETY SYMBOLS
- SYMBOL MEANING
- SAFETY INSTRUCTIONS
- EN
- SAFETY RULES FOR CORDLESS LAWN MOWER
- IMPORTANT
- READ CAREFULLY BEFORE USE. KEEP FOR FUTURE REFERENCE.
- SAFETY RULES FOR CORDLESS LAWNMOWERS: CAUTION-DO NOT TOUCH ROTATING BLADE!
- TRAINING
- PREPARATION
- OPERATION
- MAINTENACE AND STORAGE
- PERSONAL SAFETY
- Do:
- Do not:
- SERVICE
- BATTERY USE AND CARE
- SPECIFICATIONS
- DESCRIPTION
- KNOW YOUR MOWER (Fig. A & B & C)
- ASSEMBLING THE GRASS BAG
- ADJUSTING THE FOLDABLE HANDLE
- ATTACHING THE GRASS BAG/MULCHING INSERT
- ATTACHING/DETACHING THE BATTERY PACK (Fig. J)
- CHARGE BEFORE FIRST USE.
- STARTING/STOPPING THE MOWER
- To Start (Fig. M1 & M2)
- START THE MOWER WITH SELF-PROPEL FUCTION ON (Fig. M1)
- START THE MOWER WITH SELF-PROPEL FUCTION OFF (Fig. M2)
- To Stop (Fig. N)
- VARIABLE-SPEED SELF-PROPEL SYSTEM
- LED HEADLIGHTS (Fig. A-9)
- FULL-GRASS INDICATOR (Fig. P1 & P2)
- THE GRASS BAG IS NOT FULL (Fig. P1).
- POWER INDICATOR ON THE MOWER (Fig. Q)
- MOWER OVERLOAD PROTECTION
- BATTERY HIGH TEMPERATURE PROTECTION
- MAINTENANCE
- GENERAL MAINTENANCE
- REMOVING/INSTALLING THE BLADE
- ■ To Remove the Blade
- ■ To Install the Blade
- STORING THE MOWER
- Protecting the environment
- TROUBLESHOOTING
- WARRANTY
- EGO WARRANTY POLICY
- LED KOPLAMPEN (afb. A-9)
- VEDLIKEHOLD OG LAGRING
- LED-frontlykter (Fig. A-9)
- GENERELT VEDLIKEHOLD
- POLITYKA GWARANCYJNA EGO
- CITIȚI MANUALUL DE INSTRUCTIUNI
- LUGEGE KASUTUSJUHENDIT
- zsdmyy6gds 8mzsoon ggldcmysojouo bgluo:
- zs8m6lu36g0u bs6m3s/zs8m6m3s
Brand : EGO
Model : LM1903E-SP
Category : Lawn mower