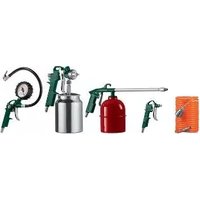
PDLS 5 A1 - Air compressor accessories PARKSIDE - Free user manual and instructions
Find the device manual for free PDLS 5 A1 PARKSIDE in PDF.


| Product Type | Air Tool Accessories Set |
| Model | PDLS 5 A1 |
| Brand | Parkside |
| Included Tools | Air paint spray gun, air spray gun, air tyre inflator, air blow gun |
| Accessories Included | Aluminium suction cup (1000 ml), suction cup (900 ml), compressed air hose PE (5 m) |
| Working Pressure (Air Paint Spray Gun) | Max. 5 bar |
| Working Pressure (Air Spray Gun) | Max. 8 bar |
| Working Pressure (Air Tyre Inflator) | Max. 6 bar |
| Working Pressure (Air Blow Gun) | Max. 5 bar |
| Nozzle Size (Air Paint Spray Gun) | 1.5 mm diameter |
| Nozzle Size (Air Spray Gun) | 3 mm diameter |
| Flow Cup Volume (Air Paint Spray Gun) | Approx. 1000 ml |
| Flow Cup Volume (Air Spray Gun) | Approx. 900 ml |
| Recommended Viscosity (Air Paint Spray Gun) | 18-23 DIN/sec |
| Recommended Viscosity (Air Spray Gun) | Max. 80 DIN/sec |
| Sound Pressure Level (Air Paint Spray Gun) | 81.7 dB(A) |
| Sound Pressure Level (Air Spray Gun) | 85.4 dB(A) |
| Sound Pressure Level (Air Tyre Inflator) | 84.4 dB(A) |
| Sound Pressure Level (Air Blow Gun) | 86.1 dB(A) |
| Intended Use | Spraying paints, varnishes, oils, cleaning agents; inflating tyres; blowing dust and moisture |
| Required Compressed Air | Clean, condensate- and oil-free compressed air |
| Safety Equipment Recommended | Safety goggles, mask with active carbon filter, hearing protection, protective gloves |
| Maintenance | Clean after each use; oil moving parts; do not submerge in cleaning agents |
| Warranty | 3 years |
Frequently Asked Questions - PDLS 5 A1 PARKSIDE
User questions about PDLS 5 A1 PARKSIDE
0 question about this device. Answer the ones you know or ask your own.
Ask a new question about this device
Download the instructions for your Air compressor accessories in PDF format for free! Find your manual PDLS 5 A1 - PARKSIDE and take your electronic device back in hand. On this page are published all the documents necessary for the use of your device. PDLS 5 A1 by PARKSIDE.
USER MANUAL PDLS 5 A1 PARKSIDE
AIR TOOL ACCESSORIES SET PDLS 5 A1
GB IE NI
AIR TOOL ACCESSORIES SET
Translation of the original instructions
DE AT CH
DRUCKLUFT-SET
Before reading, unfold the page containing the illustrations and familiarise yourself with all functions of the device.
NL BE
GB / IE/NI Translation of the original instructions Page 1



Contents
Introduction 2
Intended use 2
Package contents 2
Features 3
Technical data 3
Safety instructions 4
Original accessories/auxiliary equipment 4
Safety instructions for fine spray systems 5
Operation 6
Connecting the appliance 6
Operating the air spray gun 6
Preparing the surface 6
Switching the air spray gun on and off 6
Setting the material volume 7
Maintenance 7
Operating the air paint spray gun 7
Preparing the surface 7
Switching the air paint spray gun on and off 7
Setting the paint volume 8
Setting the paint jet pattern 8
Replacing the nozzle 8
Maintenance 8
Operating the air blow gun 8
Operating the air tyre inflator 9
Storage 9
Disposal....9
Kompernass Handels GmbH warranty 10
Service 11
Importer 11
Translation of the original Conformity Declaration .... 1 1
AIR TOOL ACCESSORIES SET PDLS 5 A1
Introduction
Congratulations on the purchase of your new appliance. You have chosen a high-quality product. The operating instructions are part of this product. They contain important information about safety, usage and disposal. Before using the product, please familiarise yourself with all operating and safety instructions. Use the product only as described and for the range of applications specified. Please also pass these operating instructions on to any future owner.
Intended use
Air paint spray gun PDLS 5 A1-1:
This compressed air-powered appliance is designed solely for the application/spraying of solvent-based and water-soluble paints, glazes, foundation, clear varnishes, vehicle paints, stains, wood preservatives, pesticides, oils and disinfectants. The appliance is not suitable for working with emulsions or latex paints, lye, acidic coatings, granular and gritty spray materials or spray- or drip-resistant materials.
Air spray gun PDLS 5 A1-2:
This appliance is intended for spraying of cleansing agents and spray oils, as well as for waxing and sealing. You can use spray materials of maximum 80 DIN/sec. with the appliance.
Air tyre inflator PDLS 5 A1-3:
The appliance is suitable for pumping up tyres with a Schrader valve. You can read off the tyre pressure with the pressure gauge after inflating it.
Air blow gun PDLS 5 A1-4:
This appliance is intended for cleaning and blowing out objects and difficult-to-accessible locations, and for blowing moist locations dry.
Any other usage or modification of the appliance is deemed to be improper and carries a significant risk of accidents. The manufacturer accepts no responsibility for damage(s) resulting from improper usage. This tool is intended for domestic use only.
Symbols on the compressed air tools:
 | Read the operating instructions before use. |
 | Always wear safety goggles. |
 | Always wear a mask. |
 | Always wear hearing protection. |
 | Always wear protective gloves. |
Package contents
1 Air paint spray gun PDLS 5 A1-1
1 Air spray gun PDLS 5 A1-2
1 Air tyre inflator PDLS 5 A1-3
1 Air blow gun PDLS 5 A1-4
1 aluminium suction cup 1000 ml
1 suction cup 900 ml
1 compressed air hose PE 5 m
1 set of operating instructions
Features
Figure A:
① Nozzle
② Lock nut
③ Air vent
4 Suction cup
5 Compressed air connection to air spray gun
6 Air spray gun trigger
Figure B:
⑦ Paint volume regulating screw
8 Air paint spray gun trigger
9 Compressed air connection to air paint spray gun
10 Aluminium suction cup
11 Lid
12 Fixing nut
⑬ Nozzle head
14 Union nut
15 Regulator
Figure C:
16 Compressed air connection to air blow gun
⑰ Air blow gun trigger
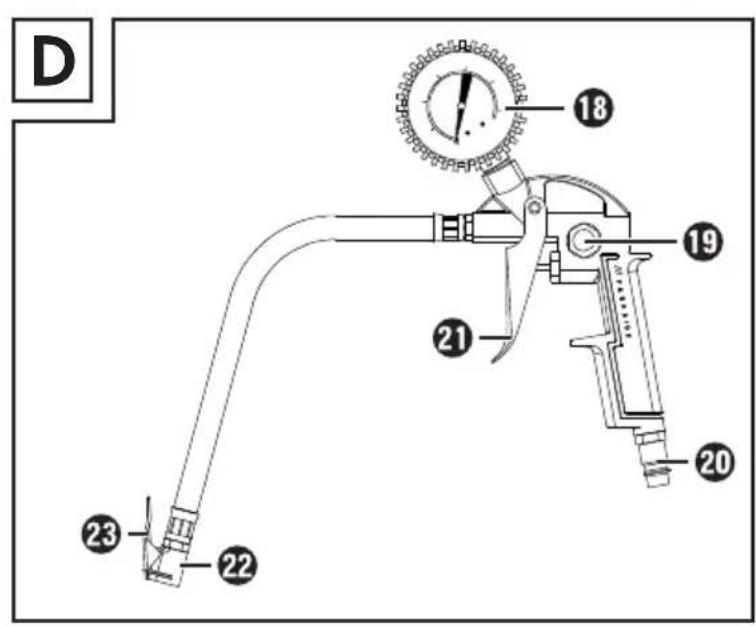
Figure D:
18 Pressure gauge
19 Bleed valve
20 Compressed air connection to air tyre inflator
21 Air tyre inflator trigger
22 Pinch valve
23 Valve stopper
Figure E:
24 Compressor connection
25 Quick coupling
Technical data
Air paint spray gun PDLS 5 A1-1:
Working pressure: max. 5 bar
Nozzle size: ∅ 1,5 mm
Flow cup: approx. 1000 ml
Recommended viscosity: 18-23 DIN/sec.
Air spray gun PDLS 5 A1-2:
Working pressure: max. 8 bar
Nozzle size: ∅ 3 mm
Flow cup: approx. 900 ml
Recommended viscosity: max. 80 DIN/sec.
Air tyre inflator PDLS 5 A1-3:
Working pressure: max. 6 bar
Air blow gun PDLS 5 A1-4:
Working pressure: max. 5 bar
Air hose:
Working pressure: max. 8 bar
Noise emission value:
Noise measurement value determined in accordance with EN 14462. The rated noise level of the power tool is as follows:
Sound pressure level:
Air paint spray gun: L pA = 81.7 dB (A)
Air spray gun: L pA = 85.4 dB (A)
Air tyre inflator: L pA = 84.4 dB (A)
Air blow gun: L pA = 86.1 dB (A)
Uncertainty: K_pA = 2.5 dB
WARNING!

Safetyinstructions

WARNING!
▶ Read all safety warnings and all instructions. Failure to follow the warnings and instructions may result in fire and/or serious injury.
Save all warnings and instructions for future reference!

WARNING! KICKBACK!
▶ Under certain circumstances, high working pressures can cause kickback to occur. This can cause hazards due to the continuous loading.

WARNING! RISK OF INJURY!
▶ Never exceed the maximum permissible operating pressure stated in the section "Technical data". Use a pressure reducer to adjust the working pressure.
RISK OF INJURY! MISUSE! Do not point the appliance towards people or animals.
■ SMOKING PROHIBITED: RISK OF EXPLOSION/FIRE! Do not cause any sparks or ignite any naked flame.

WARNING! RISK OF INJURY!
▶ Never use oxygen or other flammable gases as an energy source.

WARNING! RISK OF INJURY!
▶ First detach the hose from the compressed air source before disconnecting the supply hose from the appliance. In this way, you avoid uncontrollable thrashing about of the supply hose or kickback.
■ Use suitable protective equipment to protect yourself. Wear a mask with an active carbon filter and safety goggles!
- Keep children and other persons away from the tool during operation. Distractions can cause you to lose control.
■ Disconnect the appliance from the compressed air source before starting any repairs or maintenance work, as well as during any breaks in work and before transportation.
■ When undoing the hose coupling, hold the hose firmly in your hand to prevent injuries caused by a thrashing hose.
■ Ensure there is no damage. Check the appliance for any possible defects before use. If the appliance exhibits any faults, it should not be used under any circumstances.
■ Do not kink the appliance's hose. Otherwise, it could get damaged.
■ Please heed the safety instructions provided by the manufacturer of the spray medium.
■ Stay alert, watch what you are doing and use common sense when operating the appliance. Do not use any appliance while you are tired or under the influence of drugs, alcohol or medication.
■ Do not remove any type plates. These contain important information for the safe operation of the appliance.
■ If you are inexperienced with the appliance, seek training in how to use it safely.
Original accessories/auxiliary equipment
■ Use only the additional equipment and accessories specified in the operating instructions. Using accessories other than those recommended in the operating instructions can lead to a risk of injury.
Safety instructions for fine spray systems
- Keep your work area clean, well lit and free of paint and solvents, cloths and other inflammable materials. Possible risk of spontaneous combustion. Have a fully functioning fire extinguisher available at all times.
■ Ensure adequate ventilation in the spray zone and sufficient fresh air in the entire room. Evaporation of flammable solvents will cause an explosive environment.
Do not spray or clean with materials whose ignition point is lower than 21°C. Use materials based on water, non-volatile hydrocarbons or similar materials. The evaporation of volatile solvents will cause an explosive environment.
Do not spray near ignition sources such as static electric sparks, open flames, ignition flames, hot items, motors, cigarettes and sparks caused by plugging in/unplugging power cables or by operating switches. These ignition sources could ignite a fire in the environment.
■ Do not spray any material if you do not know whether it is potentially dangerous. Unknown materials could cause hazardous conditions.
■ Wear additional personal protective equipment such as suitable gloves and a protective mask/respirator when spraying or handling chemicals. Wearing appropriate protective equipment for the conditions reduces your exposure to dangerous substances.
Do not spray yourself, other people or animals. Keep your hands and other body parts out of the spray jet. If the spray jet pierces the skin, seek medical assistance immediately. The sprayed material can even penetrate through a glove and into the skin and thus into your body.
Do not treat such a penetration injury like a normal cut. A high-pressure jet can inject toxins into the body and cause serious injuries. In the event of a chemical penetration of the skin, seek medical assistance immediately.
Be aware of the potential hazards of the sprayed material. Take note of the markings on the container and the manufacturer's information on the sprayed material, including the instructions to use personal protective equipment. The manufacturer's instructions are to be followed to reduce the risk of fire or injuries caused by poisons, carcinogens, etc.
■ Never spray without the nozzle head fitted. Using a special nozzle with the appropriate nozzle head reduces the likelihood of high-pressure jets piercing the skin and injecting poisons into your body.
Operation
Connecting the appliance
The product may only be operated using cleaned, condensate- and oil-free compressed air and may not exceed the maximum operating pressure stated in the section entitled "Technical data" on the appliance.
■ To ensure that you can regulate the air pressure, the compressed air source should be equipped with a (filter) pressure reducer.
You will need a flexible compressed air hose with a quick-disconnect coupling and a suitable compressed air source to operate this appliance. Follow all the operating and safety instructions for the compressed air source and any special instructions regarding paint preparation.
NOTE
Take note of the correct working pressure. Excessively high pressure leads to strong dispersion and overly-rapid liquid evaporation. The surfaces become rough and develop poor adhesion properties. If, however, the working pressure is too low, the paint will not be adequately dispersed. This leads to wavy surfaces and droplets.
Connect the compressed air hose with the quick coupling 25 to the compressed air connection 5, 9 of the relevant appliance. The connection locks automatically.
- Connect the compressed air connection ^24 to the compressed air source.
- Set the working pressure on the filter pressure reducer of the compressed air source to the working pressure stated in the section entitled "Technical data".
Operating the air spray gun Preparing the surface
◆ Carefully cover a large area around the spray surface. Any surface that is not masked could become contaminated.
◆ Ensure that the surface is clean, dry and free of grease.
♦ Polished surfaces should be lightly sanded and the sanding dust removed.
Switching the air spray gun on and off
Working methods:
When thinning, ensure that the spray material and the thinners are suitable for each other. Using an unsuitable thinner can lead to the formation of lumps which, in turn, can block the air spray gun.
◆ Fill the suction cup with the spray material.
♦ Screw the suction cup onto the air spray gun by turning it anticlockwise.
Hold the air spray gun at a constant distance from the object. The ideal spraying distance is approx. 15 cm.
◆ Work out the best settings by carrying out a test.
Do not switch the appliance on/off over the spray surface, rather start/end the spraying process approx. 10 cm from the spray surface.
Switching on:

WARNING!
The air vent on the suction cup mount and must always be free.
▶ Always stop work immediately if compressed air or spray material is discharged from the air vent ③ Eliminate the cause before continuing work.
If you want to work in a position in which the suction cup ④ is being held at an angle, only fill it half full. This ensures that no spray material can get into the air vent ③
To switch on, pull the trigger on the air spray gun 6 and keep it pressed in.
Switching off:
To stop working, simply release the trigger on the air spray gun 6
Setting the material volume
You can regulate the material quantity which is sprayed.
◆ Undo the lock nu ^2
♦ Turn the nozzle into the required position.
♦ Fix the nozzle ① in place with the lock nut ②.
Maintenance

WARNING! RISK OF INJURY! Disconnect the tool from the compressed air supply.
◆ Clean the appliance after every use.

WARNING - PROPERTY DAMAGE!
▶ Never submerse the appliance completely in cleansing agents, otherwise the seals can be damaged.
◆ Rinse the air spray gun out using a container filled with a suitable cleansing agent at low pressure.
◆ Collect the liquid in a container and dispose of the liquid in an environmentally correct manner.
Oil the moving parts on the trigger of the air spray gun 6
Operating the air paint spray gun
Preparing the surface
◆ Carefully cover a large area around the spray surface. Any surface that is not masked could become contaminated.
◆ Ensure that the surface is clean, dry and free of grease.
◆ Polished surfaces should be lightly sanded and the sanding dust removed.
Switching the air paint spray gun on and off
Working methods:
When thinning, ensure that the spray material and the thinners are suitable for each other. Using an unsuitable thinner can lead to the formation of lumps which, in turn, can block the air paint spray gun.
◆ Unscrew the lid from the aluminium suction cup 10
◆ Fill the aluminium suction cup with the spray material.
♦ Screw the lid back on to the aluminium suction cup 10
With the aid of the fixing nu ^12 screw the aluminium suction cup ^10 tightly onto the air paint spray gun in an anticlockwise direction.
Hold the air paint spray gun at a constant distance from the object. The ideal spraying distance is approx. 15 cm.
◆ Work out the best settings by carrying out a test.
Do not switch the appliance on/off over the spray surface, rather start/end the spraying process approx. 10 cm from the spray surface.
Switching on:
To switch on, pull the trigger on the air paint spray gun 8 and keep it pressed in.
Switching off:
To stop working, simply release the trigger on the air paint spray gun 8
Setting the paint volume
You can regulate the paint quantity which is sprayed using the paint volume regulating screw 7
◆ Work out the best settings by carrying out a test.
Setting the paint jet pattern
The appliance has two settings: round jet and broad jet.
 |  |
| Round jet Broad jet | |
■ Use the round jet for small surfaces, corners and edges.
■ You can use the broad jet vertically or horizontally for larger surfaces.
- Turn the regulator ^15 until the desired spray type has been set.
◆ Work out the best settings by carrying out a test.
Replacing the nozzle
♦ Screw off the paint volume regulating screw by turning it in an anticlockwise direction.
◆ Remove the nozzle needle.
◆ Unscrew the union nut ^14 together with the nozzle head ^13
You can now unscrew the nozzle using a hex key.
◆ Reassemble the appliance in reverse order.
Maintenance

WARNING! RISK OF INJURY! Disconnect the tool from the compressed air supply.
◆ Clean the appliance after every use.

WARNING - PROPERTY DAMAGE!
▶ Never submerse the appliance completely in cleansing agents, otherwise the seals can be damaged.
▶ Do not use any hydrocarbon-based solvents like benzene, ethyl chloride, etc., as these could trigger chemical reactions with some of the materials in the air paint spray gun. This can lead to dangerous reactions.
◆ Rinse the air paint spray gun out using a container filled with a suitable cleansing agent at low pressure.
◆ Collect the liquid in a container and dispose of the liquid in an environmentally correct manner.
Oil the moving parts on the trigger of the air paint spray gun 8
If you remove the nozzle during cleaning you must grease it afterwards. Do not use any silicon-based lubricants.
Operating the air blow gun
Switching on:
To switch on, pull the trigger on the air blow gun 17 and keep it pressed in.
Switching off:
To stop working, simply release the trigger on the air blow gun ⑰.
Operating the air tyre inflator
- Keep the valve stoppe ^23 pressed down and push the pinch valve ^23 to the valve on the tyre you wish to inflate. Release the valve stopper ^23
To inflate the tyre, press the trigger on the air tyre inflator 21
Release the trigger on the air tyre inflator ^21 to check the tyre pressure on the pressure gauge ^18 .
◆ Press the trigger if the tyre pressure is too high. This releases air from the tyre.
NOTE
The pressure gauge 18 is not calibrated. You should therefore recheck the tyre pressure using a calibrated appliance at a petrol station or car workshop as soon as possible.
Storage
◆ Store compressed-air appliances only in dry rooms.
Disposal

The packaging consists of environmentally friendly material. It can be disposed of at any local recycling container.
Your local community or municipal authorities can provide information on how to dispose of the worn-out appliance.
Environmental compatibility and material disposal:
■ Paints and lacquers... are considered special waste which must be disposed of accordingly.
■ Observe the local regulations.
■ Observe the manufacturer's instructions.
■ Environmentally harmful chemicals must not be allowed to get into the ground, groundwater or any body of water.
■ Spraying work next to bodies of water or adjoining surfaces thereof (catchment basin) is therefore not permitted.
■ When buying paints, lacquers... pay attention to their environmental compatibility.

Dispose of the packaging in an environmentally friendly manner.
Note the labelling on the packaging and separate the packaging material components for disposal if necessary. The packaging material is labelled with abbreviations (a) and numbers (b) with the following meanings:
1-7: Plastics,
20-22: Paper and cardboard,
80–98: Composites

Your local community or municipal authorities can provide information on how to dispose of the worn-out product.
This appliance has a 3-year warranty valid from the date of purchase. If this product has any faults, you, the buyer, have certain statutory rights. Your statutory rights are not restricted in any way by the warranty described below.
Warranty conditions
The validity period of the warranty starts from the date of purchase. Please keep your original receipt in a safe place. This document will be required as proof of purchase.
If any material or production fault occurs within three years of the date of purchase of the product, we will either repair or replace the product for you at our discretion. This warranty service is dependent on you presenting the defective appliance and the proof of purchase (receipt) and a short written description of the fault and its time of occurrence.
If the defect is covered by the warranty, your product will either be repaired or replaced by us. The repair or replacement of a product does not signify the beginning of a new warranty period.
Warranty period and statutory claims for defects
The warranty period is not prolonged by repairs effected under the warranty. This also applies to replaced and repaired components. Any damage and defects present at the time of purchase must be reported immediately after unpacking. Repairs carried out after expiry of the warranty period shall be subject to a fee.
Scope of the warranty
This appliance has been manufactured in accordance with strict quality guidelines and inspected meticulously prior to delivery.
The warranty covers material faults or production faults. The warranty does not extend to product parts subject to normal wear and tear or fragile parts such as switches, batteries, baking moulds or parts made of glass.
The warranty does not apply if the product has been damaged, improperly used or improperly maintained. The directions in the operating instructions for the product regarding proper use of the product are to be strictly followed. Uses and actions that are discouraged in the operating instructions or which are warned against must be avoided.
This product is intended solely for private use and not for commercial purposes. The warranty shall be deemed void in cases of misuse or improper handling, use of force and modifications/repairs which have not been carried out by one of our authorised Service centres.
Warranty claim procedure
To ensure quick processing of your case, please observe the following instructions:
■ Please have the till receipt and the item number (e.g. IAN 12345) available as proof of purchase.
■ You will find the item number on the type plate, an engraving on the front page of the instructions (bottom left), or as a sticker on the rear or bottom of the appliance.
If functional or other defects occur, please contact the service department listed either by telephone or by e-mail.
■ You can return a defective product to us free of charge to the service address that will be provided to you. Ensure that you enclose the proof of purchase (till receipt) and information about what the defect is and when it occurred.

You can download these instructions along with many other manuals, product videos and software on www.lidl-service.com.
Service
GB Service Great Britain Tel.: 0800 404 7657 E-Mail: kompernass@lidl.co.uk
IE Service Ireland Tel.: 1890 930 034 (0,08 EUR/Min., (peak)) (0,06 EUR/Min., (off peak)) E-Mail: kompernass@lidl.ie
IAN 304736
Importer
Please note that the following address is not the service address. Please use the service address provided in the operating instructions.
KOMPERNASS HANDELS GMBH
BURGSTRASSE 21
DE-44867 BOCHUM
GERMANY
www.kompernass.com
Translation of the original Conformity Declaration
We, KOMPERNASS HANDELS GMBH, document officer: Mr Semi Uguzlu, BURGSTR. 21, DE - 44867 BOCHUM, GERMANY, hereby declare that this product complies with the following standards, normative documents and EC directives:
Machinery Directive (2006/42/EC)
Applied harmonised standards:
EN 1953:2013
EN ISO 12100:2010
EN 4414:2010
Type designation of machine:
Air tool accessories set PDLS 5 A1
Year of manufacture: 07 - 2018
Serial number: IAN 304736
Bochum, 20.07.2018
CE
Semi Uguzlu
- Quality Manager -
We reserve the right to make technical changes in the context of further product development.
Inhoud
Inleiding 14
WAARSCHUWING! LETSELGEVAAR!
WAARSCHUWING! LETSELGEVAAR!
WAARSCHUWING! LETSELGEVAAR!
WAARSCHUWING! LETSELGEVAAR
KOMPERNASS HANDELS GMBH
BURGSTRASSE 21
DE-44867 BOCHUM
DUITSLAND
www.kompernass.com
Semi Uguzlu
DRUCKLUFT-SET PDLS 5 A1
Einleitung
KOMPERNASS HANDELS GMBH
BURGSTRASSE 21
DE-44867 BOCHUM
DEUTSCHLAND
www.kompernass.com
KOMPERNASS HANDELS GMBH
BURGSTRASSE 21
DE-44867 BOCHUM
GERMANY
www.kompernass.com
- AIR TOOL ACCESSORIES SET PDLS 5 A1
- AIR TOOL ACCESSORIES SET
- DRUCKLUFT-SET
- NL BE
- Contents
- Introduction 2
- Safety instructions 4
- Operation 6
- Operating the air spray gun 6
- Operating the air paint spray gun 7
- Operating the air blow gun 8
- Operating the air tyre inflator 9
- Storage 9
- Disposal....9
- Kompernass Handels GmbH warranty 10
- Translation of the original Conformity Declaration .... 1 1
- Introduction
- Intended use
- Air paint spray gun PDLS 5 A1-1:
- Air spray gun PDLS 5 A1-2:
- Air tyre inflator PDLS 5 A1-3:
- Air blow gun PDLS 5 A1-4:
- Package contents
- Features
- Technical data
- WARNING!
- Safetyinstructions
- Save all warnings and instructions for future reference!
- WARNING! KICKBACK!
- WARNING! RISK OF INJURY!
- Original accessories/auxiliary equipment
- Safety instructions for fine spray systems
- Operation
- Connecting the appliance
- NOTE
- Operating the air spray gun Preparing the surface
- Switching the air spray gun on and off
- Working methods:
- Switching on:
- Switching off:
- Setting the material volume
- Maintenance
- WARNING - PROPERTY DAMAGE!
- Operating the air paint spray gun
- Preparing the surface
- Switching the air paint spray gun on and off
- Setting the paint volume
- Setting the paint jet pattern
- Replacing the nozzle
- Operating the air blow gun
- Operating the air tyre inflator
- Storage
- Disposal
- Environmental compatibility and material disposal:
- Warranty conditions
- Warranty period and statutory claims for defects
- Scope of the warranty
- Warranty claim procedure
- Service
- Importer
- Translation of the original Conformity Declaration
- Inhoud
- Inleiding 14
- WAARSCHUWING! LETSELGEVAAR!
- WAARSCHUWING! LETSELGEVAAR
- DRUCKLUFT-SET PDLS 5 A1
- Einleitung
- KOMPERNASS HANDELS GMBH
Brand : PARKSIDE
Model : PDLS 5 A1
Category : Air compressor accessories