
SpinWave Cordless Hard Floor - Steam cleaner BISSELL - Free user manual and instructions
Find the device manual for free SpinWave Cordless Hard Floor BISSELL in PDF.


| Product Type | Cordless Hard Floor Cleaner |
| Brand | BISSELL |
| Model | SpinWave Cordless Hard Floor |
| Power Source | Rechargeable Lithium-Ion Battery |
| Battery Type | Lithium-Ion |
| Charging Time | 4 hours (full charge) |
| Run Time | Up to 20 minutes (approx.) |
| Water Tank Capacity | Two fill lines (approx. 200 ml total) |
| Mop Pad Types | Soft Touch (2) and Scrubby (2) pads |
| Spray Function | Yes – trigger spray nozzle |
| Cleaning Modes | Spinning pads with spray, automatic rotation |
| Weight | Approx. 7.5 lbs (3.4 kg) |
| Dimensions | Approx. 45 x 12 x 10 in (114 x 30 x 25 cm) |
| Color | Black/Blue |
| Materials | Plastic body, fabric mop pads |
| Safety Features | Auto shut-off, standby mode, low battery indicator, do not immerse |
| Maintenance | Machine washable mop pads (warm water, liquid detergent), empty water tank after use |
| Warranty Period | 1 year limited warranty |
| Included Accessories | Handle, body, 2 soft touch pads, 2 scrubby pads, charger adapter, storage tray, 2x 8oz formula |
| Manufacturer Contact | BISSELL Consumer Care: 1-800-237-7691 (US), 1-800-263-2533 (Canada) |
Frequently Asked Questions - SpinWave Cordless Hard Floor BISSELL
User questions about SpinWave Cordless Hard Floor BISSELL
0 question about this device. Answer the ones you know or ask your own.
Ask a new question about this device
Download the instructions for your Steam cleaner in PDF format for free! Find your manual SpinWave Cordless Hard Floor - BISSELL and take your electronic device back in hand. On this page are published all the documents necessary for the use of your device. SpinWave Cordless Hard Floor by BISSELL.
USER MANUAL SpinWave Cordless Hard Floor BISSELL
natural_image
Line drawing of two different vacuum cleaner designs, shown from top and side views (no text or symbols)IMPORTANT SAFETY INSTRUCTIONS
READ ALL INSTRUCTIONS BEFORE USING YOUR SPINWAVE® CORDLESS.
When using an electrical appliance, basic precautions should be observed, including the following:

WARNING
TO REDUCE THE RISK OF FIRE, ELECTRIC SHOCK OR INJURY:
» Do not use outdoors.
» Do not allow to be used as a toy. Close attention is necessary when used by or near children.
» Do not use for any purpose other than described in this user guide. Use only manufacturer's recommended attachments.
» Do not charge with damaged cord or plug. If appliance is not working as it should, has been dropped, damaged, left outdoors, or dropped into water, have it repaired at an authorized service center.
» Do not unplug by pulling on cord. To unplug, grasp the plug, not the cord.
» Do not handle charger, including charger plug and charger terminals, with wet hands.
» Do not put any object into openings. Do not use with any opening blocked; keep openings free of dust, lint, hair, and anything that may reduce air flow.
» Keep hair, loose clothing, fingers, and all parts of body away from openings and moving parts.
» Turn off all controls before plugging or unplugging appliance.
» Use extra care when cleaning on stairs.
» Do not use appliance in an enclosed space filled with vapors given off by oil-based paint, paint thinner, some moth-proofing substances, flammable dust, or other explosive or toxic vapors.
» Use only BISSELL cleaning formulas intended for use with this appliance to prevent internal component damage.
» Do not immerse. Use only on hard floor surfaces moistened by the cleaning process.
» Keep appliance on a level surface.
» Do not carry appliance while in use.
» Do not charge the unit outdoors.
» Use only the charger supplied by the manufacturer to recharge.
» Do not incinerate the appliance even if it is severely damaged. The batteries can explode in a fire.
» Battery cell leaks can occur under extreme conditions. If battery cell contents comes in contact with the
skin or eyes: immediately flush with water for 15 minutes. Seek medical attention if irritation persists.
» Follow all charging instructions and do not charge the battery pack or appliance outside of the temperature range specified in the instructions. Charging improperly or at temperatures outside of the specific range may damage the battery and increase the risk of fire.
» Do not expose a battery pack or appliance to fire or excessive temperature. Exposure to fire or temperature above 130°C or 265°F may cause explosion.
» Do not pull or carry by cord, use cord as a handle, close a door on cord, or pull cord around sharp edges or corners. Do not run appliance over cord. Keep cord away from heated surfaces.
WARNING
RISK OF INJURY. MOP PADS MAY START UNEXPECTEDLY. UNPLUG BEFORE CLEANING OR SERVICING.
SAVE THESE INSTRUCTIONS
This model is for household use only.

WARNING
» Plastic film can be dangerous. To avoid danger of suffocation, keep away from children.
» To reduce the risk of electrical shock, turn power switch OFF and disconnect charger plug from electrical outlet BEFORE performing maintenance or troubleshooting checks.
Thanks for buying a BISSELL® SpinWave® Cordless
We love to clean and we're excited to share one of our innovative products with you. We want to make sure your hard surface floor cleaner works as well as it does today for years to come, so this guide has tips on using, maintaining, and if there's a problem, troubleshooting.
Your cleaner needs a little assembly before getting to work, so flip to the Assembly section on page and let's get started!
What's In The Box?

Handle

natural_image
Line drawing of a vacuum cleaner with a handle and base (no text or symbols)Body of Unit


(2) Soft Touch Pads
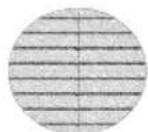

(2) Scrubby Pads
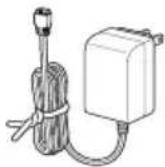
Charging
Adapter
Plug

Storage Tray

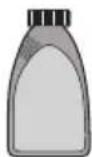
(2) 8oz BISSELL Multi-Surface Formula
NOTE: Standard accessories may vary by model. To identify what should be included with your purchase, please refer to the "Carton Contents" list located on the carton top flap.
Safety Instructions.....2
Product View & Assembly ... 4
Formula 5
Operations 5-11
Maintenance & Care ..... 12-13
Troubleshooting ..... 14
Warranty & Service ..... 15
Product Registration.....16
Get to Know Your SpinWave® Cordless
1 Handle
2 Digital Controls
3 Battery Status Indicator Lights
4 Clean Water Tank
5 Low Profile Foot
6 Power Spin Pads
7 Spray Nozzle
8 Charging Adapter Plug
9 Storage Tray
10 Carry Handle
11 Charging Port


natural_image
Simple line drawing of an oval tray with a numbered label (9) on the top side, no text or symbols present.

Assembly
WARNING
Do not plug in your SpinWave® Cordless until you are familiar with all instructions and operating procedures.
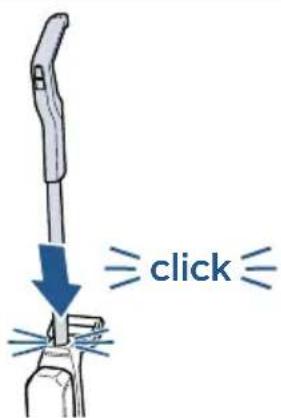
Insert handle into body of unit until you hear a "click".
Cleaning Formulas
WARNING
To reduce the risk of fire and electric shock due to internal component damage, use only BISSELL cleaning formulas intended for use with the hard floor device.
Keep plenty of SpinWave® Cordless formulas on hand so you can clean your sealed hard floors whenever it fits your schedule. Always use SpinWave® Cordless formulas in your machine. Other solutions may harm the machine and may void the warranty.
Multi-Surface Formula Wood
Floor Formula
Great for cleaning ALL sealed hard floors
Restore your sealed wood floors' natural shine
Charging the Battery


natural_image
Line drawing of a mechanical component with a cylindrical shaft and rectangular base (no text or symbols)Before charging, make sure unit is OFF by ensuring the battery status indicator lights are not illuminated.


natural_image
Illustration of a hand using a tool to adjust or install a curved pipe or pipe fitting (no text or symbols present)Insert the charging adapter plug into the charging port on the back, right side of the unit.


natural_image
Illustration of a power adapter connected to two electrical outlets (no text or symbols visible)Plug the adapter into a suitable wall outlet. The battery status indicator lights will illuminate when charging.


For maximum run time, charge unit for 4 hours prior to use. Refer to chart below for understanding the charging status.
NOTE: On first use, make sure unit is fully charged before use. To check the battery status, turn the unit ON by puling the handle back and pressing the power button. Battery is fully charged when all three blue status lights are illuminated.
In Use LED Display
WARNING
Overcharging may cause battery damage, fire or explosion.
Your BISSELL® SpinWave® Cordless machine has an LED light display that will turn on when the power key is pushed to show the battery life status. All LED color is blue.
TIP: Be sure to charge unit when there is less than 10% power left, one LED flashing blue.
 | |
| BATTERY STATUS LIGHT STATUS | |
| 100% to 67% | |
| 66% to 33% | |
| 32% to 10% | |
| >10% | |
| 0% |
NOTE: Keep the temperature range between 40-104 °F when charging the battery, storing unit or during use.
Attaching Mop Pads: Option 1
Your BISSELL® SpinWave® Cordless may have come with two different mop pads:


The Soft Touch Pad is for everyday use on delicate flooring like sealed hardwoods and laminate.
The Scrubby Pad is used to power through tough, sticky messes.
(2) Scrubby Pads(2) Soft Touch Pads

Your SpinWave® Cordless may have come with mop pads attached. If not, to attach mop pads, carefully lay machine down on the floor.
natural_image
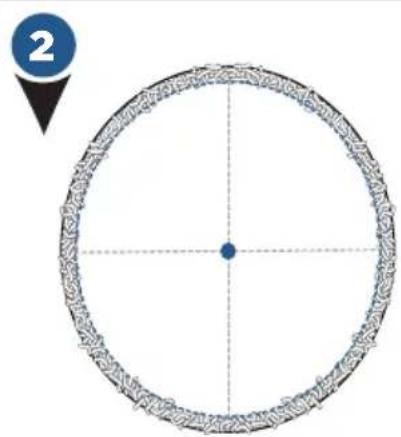
Circular diagram with a central blue dot and dashed cross lines, no text or symbols present.The back of the mop pad has a small dot in the center of the pad.

First, fold the pad in half, making sure the cloth material is inside the fold.

Then, with the mop pad folded, line up the small dot in the center of the pad with the middle screw on the bottom of the foot.

Lastly, line up the edge of the mop pad with the inner ring on the foot, attach the mop pad to the hook and loop material on the bottom of the foot.

natural_image
Illustration of a hand cleaning a car wheel rim with a blue circular component (no text or symbols)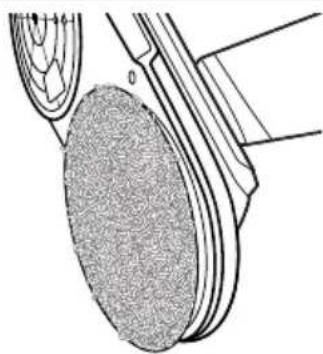
natural_image
Technical line drawing of a mechanical component with a circular feature and internal structure (no text or symbols)Attaching Mop Pads: Option 2
Your BISSELL® SpinWave® Cordless may have come with two different mop pads:


The Soft Touch Pad is best for everyday use on delicate flooring like sealed hardwoods and laminate.
The Scrubby Pad is best used to power through tough, sticky messes.
(2) Scrubby Pads(2) Soft Touch Pads
NOTE: These next steps are to help you apply the mop pads more accurately onto the machine.
natural_image
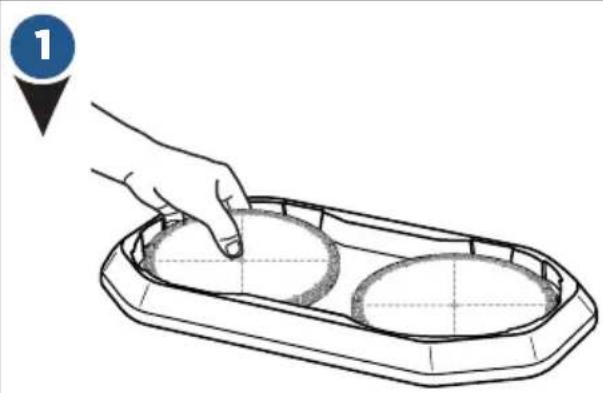
Illustration of a hand placing two circular objects into a tray (no text or symbols)Place clean mop pads upside down in the storage tray. The dot on each mop pad should be facing up.

natural_image
Line drawing of a hand pressing down on a tray with two circular objects, no text or symbols presentHover the unit over the mop pads to align in the center, then place the unit down on the mop pads. Now they are attached to the machine.
Filling Your Clean Water Tank
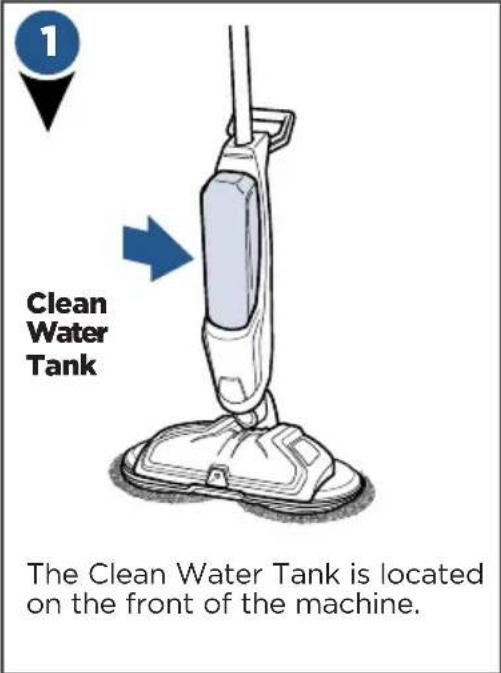


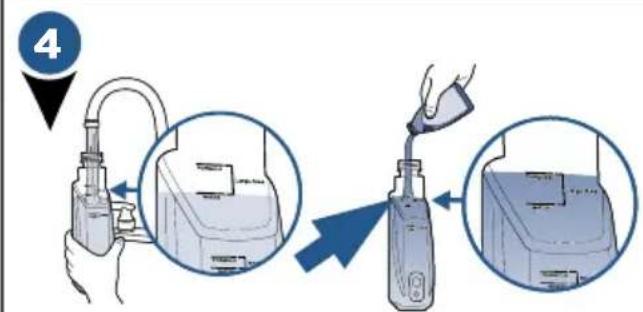
For large area cleaning
a. Fill Clean Water Tank with warm tap water to the second water fill line.
b. Add BISSELL® SpinWave® Cordless formula to the second formula fill line.

For small area cleaning
a. Fill Clean Water Tank with warm tap water to the first water fill line.
b. Add BISSELL® SpinWave® Cordless formula to the first formula fill line.

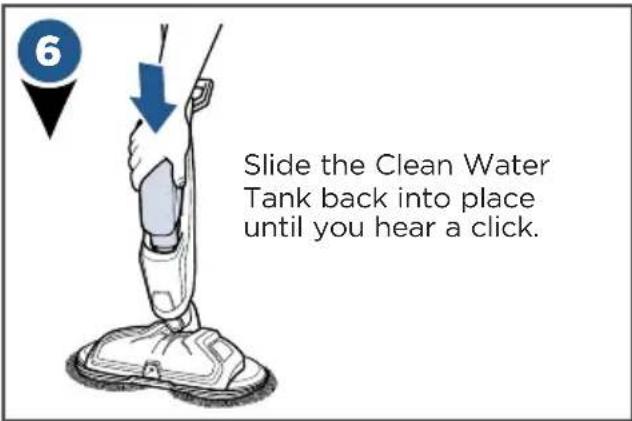
A few notes about filling the Clean Water Tank:
- Fill with warm (140°F/60°C MAX) tap water and add the appropriate BISSELL solution. DO NOT USE BOILING WATER. DO NOT HEAT WATER OR TANK IN MICROWAVE.
Cleaning Sealed Hard Floors
ATTENTION: This machine is designed to be used only on sealed hard floors and should not be used on carpet or rugs. For best cleaning results, sweep or vacuum the floor surface prior to using to avoid scratching or damaging floors from sharp debris.
TIP 1: You may feel a slight vibration when turning on the machine if the mop pads are not aligned correctly. Wait a few seconds for the pads to adjust themselves. If this doesn't occur, turn the machine OFF and replace mop pads following the instructions in "Attaching Mop Pads" sections.
TIP 2: When you press the ON/OFF button to start the unit the LED lights will illuminate, but the mop pads will not start rotating until the unit is reclined.

natural_image
Illustration showing a hand holding a cleaning tool and a close-up of a cleaning device with blue light effects (no text or symbols)When fully charged, press the ON/OFF button and the three LED lights will illuminate.
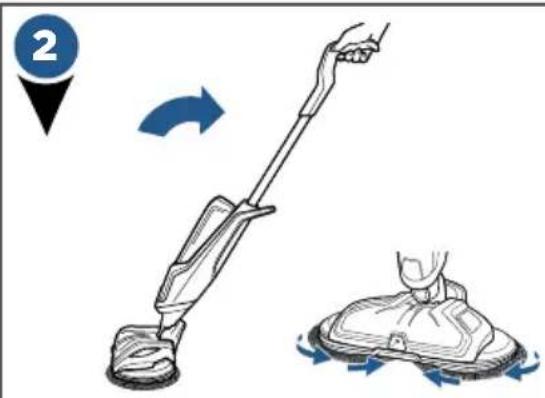
Recline the body of the unit backward to start the rotating mop pads.
TIP 3: For optimum cleaning, perform overlapping cleaning strokes while dispensing cleaning solution. Care should be taken to not overwet the floor surface, especially when cleaning wood and other delicate floor surfaces.
TIP 4: When cleaning near baseboards, edges or furniture you may feel a slight pull from the unit due to bouncing off the surface.
Cleaning Sealed Hard Floors (cont'd)


natural_image
Line drawing of a hand holding a small object near a wrist (no text or symbols)To clean, push the SPRAY button to dispense solution.

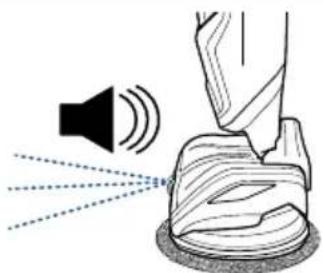
natural_image
Diagram showing sound waves interacting with a speaker and a textured surface (no text or symbols)Solution will spray out of the nozzle on the front of the foot. You should hear a soft buzzing noise each time you press the SPRAY button to indicate solution being dispensed.


natural_image
Illustration of a mushroom-shaped object with a hanging mass, no text or symbols present
natural_image
Illustration of a hand pressing down on a textured surface with a small object nearby (no text or symbols)
natural_image
Illustration of a hand pressing down on a mechanical component (no text or symbols visible)For more difficult and stuck on messes, spray solution directly on mess and line up one of the mop pads parallel to the mess. Move mop pad over mess and slowly move machine back and forth to clean, continuing to spray solution as needed.
NOTE: When finished cleaning, make sure to push the OFF button before standing the machine upright as the mop pads will continue to spin until the machine is turned OFF.
NOTE: If unit is on and gets placed in the upright position while still on, unit will go into standby mode. To power OFF, press the ON/OFF button or the unit will turn off by itself after 10 seconds of no action. You will know it is off when the LED lights are no longer illuminated.


natural_image
Line drawing of a hand holding a finger with a small object on the sleeve (no text or symbols)To power OFF the unit, press the unit ON/OFF button and put unit into upright position. The LED lights will turn off.
Cleaning Your SpinWave®Cordless
WARNING
Do not set the machine on carpet, rug or other fabric surface when mop pad is removed as hook and loop material on foot may damage them.
WARNING
Do not store machine on wet mop pads as they may damage wood or other delicate floors.


natural_image
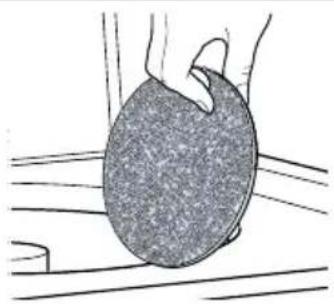
Illustration of a hand holding a mechanical device with a circular component, set against a lined background (no text or symbols)To remove mop pads, simply pull pads off the hook and loop material on the bottom of the machine.

natural_image
Hand holding a textured circular object on a wooden surface (no text or symbols visible)Machine wash separately in warm water. Use only liquid detergents. Do not use bleach or fabric softener. Tumble dry on low. Do not iron. Do not dry clean.


natural_image
Line drawing of a vacuum cleaner with handle and base (no text or symbols)Store upright in storage tray in a dry, protected area until the next use. Since this product uses water, it must not be stored where there is danger of freezing. Store with dry mop pads. Wet mop pads may damage wood and other delicate, sealed hard floors.
NOTE: Any solution remaining in the Clean Water Tank should be emptied prior to machine storage.
NOTE: Store cleaner in a protected, dry area. Since this product uses water, it must not be stored where there is danger of freezing. Freezing may damage internal components and void the warranty.
Disposing the Batteries
WARNING
This product contains lithium-ion rechargeable batteries. According to Federal and State regulations, removal and proper disposal of lithium-ion batteries is required. For removal of batteries in your SpinWave® Cordless, see instructions on this page.

NOTICE: Disconnecting the battery will destroy the appliance and invalidate the warranty.
Before proceeding, ensure that:
-The unit is disconnected from the charger.
-The Clean Water Tank has been removed from unit.
-You have flat-head and Phillips-head screwdrivers and rubber-handled wire cutters.

Insert a screwdriver into the hole on the back of the unit below the Carry Handle in order to disconnect the handle.

natural_image
Diagram of a vacuum cleaner with directional arrows indicating airflow or movement (no text or symbols)With a Phillips-head screwdriver, remove the 5 screws on the back of the unit.

natural_image
Diagram showing a tool being adjusted with a blue arrow, no text or symbols presentInsert flat-head screwdriver between the top front and back plates located between the Carry Handle and main handle to remove the front body plate.

natural_image
Diagram of a car interior showing a front panel and rear seats, with no visible text or symbols.Remove the control panel with battery pack. For leverage, you may need to use the flat-head screwdriver to help remove.

Disconnect the 8 inputs that are connected to the control panel. Then, using a Phillips-head screwdriver, unscrew the two screws on the control board.

natural_image
Technical line drawing showing two views of a mechanical assembly with a numbered marker (6), no text or symbols present.Pull the control panel back from the battery pack. Then, with rubber-handled wire cutters, clip the two metal poles to disconnect the battery pack from the control panel.
NOTE: Keep Battery Pack together - DO NOT separate individual batteries. For specific disposal instructions of batteries, please contact the RBRC (Rechargeable Battery Recycling Corporation) at 1-800-822-8837 or visit www.Call2Recycle.org.
Troubleshooting
WARNING
To reduce the risk of electric shock, turn power switch OFF and disconnect plug from electrical outlet before performing maintenance or troubleshooting checks.
| Problem Possible causes Remedies | ||
| Unit is vibrating/ wobbling | Mop pads are not aligned with foot. | Realign the mop pads on the foot. |
| Reduced spray OR no spray | Clean Water Tank may be empty. | Refill tank. |
| Clean Water Tank may not be seated completely. | Turn power OFF.Remove and Reseat Tank. | |
| System isn't completely primed. | Hold trigger for 10 to 15 seconds to make sure the solution has flowed to the spray tips. | |
| Not holding trigger to spray solution. | Hold trigger continuously while using the machine. | |
| Spray tips on foot clogged. Turn power OFF. Use a pin to clean the spray tip located front and center of the machine. | ||
| Spin plates are not turning or are wobbling | Mop pads are not installed properly. | Turn Power OFF and follow instructions on page 6 for replacing mop pads. |
| Machine is standing upright. Recline machine. | ||
| Machine is leaking | Cap of Clean Water Tank is not closed properly. | Remove the Clean Water Tank and re-apply the cap. |
| Unit will not charge | Charger plug/cord not connected. | Make sure charger plug is completely plugged into wall outlet and charging cord is completely plugged into port on the back of unit. |
| Not the correct charger. Use only the charger that comes with machine. | ||
| All three (3) LED lights flashing | Pads forced to stop spinning, potentially due to stuck debris, compressed under furniture or was briefly stepped on. | Turn the unit off or wait 10 seconds for the lights and machine to turn OFF. Then, press the ON/OFF to start the unit again. |
| Heavy and extended usage may cause internal temperature of machine to warm up slightly past the typical operating temperature. | Press power button on handle one time and wait for unit to cool down and reset. | |
| Two (2) LED lights flashing | Functional issue with machine. Contact us for additional assistance. | |
Warranty
This warranty gives you specific legal rights, and you may also have other rights which may vary from state to state. If you need additional instruction regarding this warranty or have questions regarding what it may cover, please contact BISSELL Consumer Care by E-mail or telephone as described below.
It may be necessary to obtain some of your personal information, such as a mailing address, to fulfill terms of this warranty. Any personal data will be handled pursuant to BISSELL's Privacy Policy, which can be found online at www.BISSELL.com/privacy-policy.
Limited One-Year Warranty
Subject to the *EXCEPTIONS AND EXCLUSIONS identified below, upon receipt of the product BISSELL will repair or replace (with new, refurbished, lightly used, or remanufactured components or products), at BISSELL's option, free of charge from the date of purchase by the original purchaser, for one year, any defective or malfunctioning part.
See information below on "If your BISSELL product should require service".
This warranty applies to product used for personal, and not commercial or rental, service. This warranty does not apply to fans or routine maintenance components such as filters, belts or brushes. Damage or malfunction caused by
negligence, abuse, neglect, unauthorized repair, or any other use not in accordance with the user guide is not covered. This warranty will only be valid if the product is used in the same country in which it was sold.
BISSELL IS NOT LIABLE FOR INCIDENTAL OR CONSEQUENTIAL DAMAGES OF ANY NATURE ASSOCIATED WITH THE USE OF THIS PRODUCT. BISSELL'S LIABILITY WILL NOT EXCEED THE PURCHASE PRICE OF THE PRODUCT.
Some states do not allow the exclusion or limitation of incidental or consequential damages, so the above limitation or exclusion may not apply to you.
\*EXCEPTIONS AND EXCLUSIONS FROM THE TERMS OF THE LIMITED WARRANTY
THIS WARRANTY IS EXCLUSIVE AND IN LIEU OF ANY OTHER WARRANTIES, EITHER ORAL OR WRITTEN. ANY IMPLIED WARRANTIES, WHICH MAY ARISE BY OPERATION OF LAW, INCLUDING THE IMPLIED WARRANTIES OF MERCHANTABILITY AND FITNESS FOR A PARTICULAR PURPOSE, ARE LIMITED TO THE ONE-YEAR DURATION FROM THE DATE OF PURCHASE AS DESCRIBED ABOVE.
Some states do not allow limitations on how long an implied warranty lasts, so the above limitation may not apply to you.
NOTE: Please keep your original sales receipt. It provides proof of date of purchase in the event of a warranty claim.
Service
If your BISSELL product should require service:
Contact BISSELL Consumer Care to locate a BISSELL Authorized Service Center in your area. If you need information about repairs or replacement parts, or if you have questions about your warranty, contact BISSELL Consumer Care.
Website:
www.BISSELL.com/service-centers
E-mail:
www.BISSELL.com/email-us
Call:
BISSELL Consumer Care US Consumers 1-800-237-7691 Canada Consumers 1-800-263-2533 Monday - Friday 8am - 10pm ET Saturday 9am - 8pm ET Sunday 10am - 7pm ET
Please do not return this product to the store.
Other maintenance or service not included in the manual should be performed by an authorized service representative.
For any questions or concerns, BISSELL is happy to be of service.
Contact us directly: US Consumers 1-800-237-7691 Canada Consumers 1-800-263-2533.
Register your product today!
Registering is quick, easy and offers you benefits over the lifetime of your product.
You'll receive:
BISSELL Rewards Points
Automatically earn points for discounts and free shipping on future purchases.
Faster Service
Supplying your information now saves you time should you need to contact us with questions regarding your product.
Product Support
Reminders and Alerts
We'll contact you with any important product maintenance reminders and alerts.
Special Promotions
Optional: Register your email to receive notice of offers, contests, cleaning tips, and more!
Visit www.BISSELL.com/registration!
Visit the BISSELL website: www.BISSELL.com
When contacting BISSELL, have model number of cleaner available.
Please record your Model Number: ____
Please record your Purchase Date: ____
NOTE: Please keep your original sales receipt. It provides proof of purchase date in the event of a warranty claim. See Warranty page for details.
Parts & Supplies
For Parts and Supplies, go to www.BISSELL.com and enter your model number in the search field.
We can't wait to hear from you!
Rate this product and let us (and millions of your closest friends) know what you think!
www.BISSELL.com
- IMPORTANT SAFETY INSTRUCTIONS
- READ ALL INSTRUCTIONS BEFORE USING YOUR SPINWAVE® CORDLESS.
- WARNING
- TO REDUCE THE RISK OF FIRE, ELECTRIC SHOCK OR INJURY:
- SAVE THESE INSTRUCTIONS
- Thanks for buying a BISSELL® SpinWave® Cordless
- What's In The Box?
- Get to Know Your SpinWave® Cordless
- Assembly
- Cleaning Formulas
- Charging the Battery
- In Use LED Display
- Attaching Mop Pads: Option 1
- Attaching Mop Pads: Option 2
- Filling Your Clean Water Tank
- A few notes about filling the Clean Water Tank:
- Cleaning Sealed Hard Floors
- Cleaning Sealed Hard Floors (cont'd)
- Cleaning Your SpinWave®Cordless
- Disposing the Batteries
- Troubleshooting
- Warranty
- Limited One-Year Warranty
- \*EXCEPTIONS AND EXCLUSIONS FROM THE TERMS OF THE LIMITED WARRANTY
- Service
- If your BISSELL product should require service:
- Website:
- E-mail:
- Call:
- Please do not return this product to the store.
- Register your product today!
- You'll receive:
- BISSELL Rewards Points
- Faster Service
- Product Support
- Reminders and Alerts
- Special Promotions
- Visit www.BISSELL.com/registration!
- Visit the BISSELL website: www.BISSELL.com
- Parts & Supplies
Brand : BISSELL
Model : SpinWave Cordless Hard Floor
Category : Steam cleaner