
IAN 288616 - Light therapy AURIOL - Free user manual and instructions
Find the device manual for free IAN 288616 AURIOL in PDF.


| Brand | Auriol |
| Model | IAN 288616 (HG02934) |
| Product type | Dawn simulator alarm clock with light therapy |
| Mains power supply | Power adapter 100-240 V~, 50/60 Hz, output 5 V ⎓, 2.0 A (model 8823-UE) |
| Backup power supply | 3 LR6 (AA, 1.5 V) batteries included |
| Radio frequency band | FM 87.5 – 108 MHz |
| USB output | 5 V ⎓, 1.0 A (for charging other devices) |
| Chromaticity coordinates (light) | x < 0.270 or x > 0.530 ; y < -2.3172 x² + 2.3653 x - 0.2199 or y > -2.3172 x² + 2.3653 x - 0.1595 |
| Main functions | Clock, optical and acoustic alarm, FM radio, ambient light, snooze, dawn simulation |
| Alarm sounds | 10 sounds: stream sound, birdsong, relaxation, rainforest, easy listening, lounge, surf, rain, electronic signal, radio |
| Alarm settings | Hour, minute, snooze/single alarm mode, volume (0-18), brightness (0-18), delay (0-30 min), light color (sunrise or ambient) |
| Display | Backlit display (OFF/LO/ME/HI) |
| Package contents | Alarm clock, power adapter, 3 AA batteries, instruction manual |
| Cleaning and care | Disconnect before cleaning; use a soft, dry cloth |
| Safety instructions | Do not use a non-supplied adapter; do not expose to water; use with caution for children |
| Reset | RESET button in case of malfunction |
| Warranty | 3 years from the date of purchase |
| Protection class | Protection class II (double insulation) |
| Country of origin | Not specified (brand distributed by OWIM GmbH) |
Frequently Asked Questions - IAN 288616 AURIOL
User questions about IAN 288616 AURIOL
0 question about this device. Answer the ones you know or ask your own.
Ask a new question about this device
Download the instructions for your Light therapy in PDF format for free! Find your manual IAN 288616 - AURIOL and take your electronic device back in hand. On this page are published all the documents necessary for the use of your device. IAN 288616 by AURIOL.
USER MANUAL IAN 288616 AURIOL

natural_image
Digital alarm clock with digital display showing 9:30, 4:11, and 5:00 (no text or symbols on face)WAKE-UP LIGHT ALARM CLOCK
GB IE NI
WAKE-UP LIGHT ALARM CLOCK
Operation and Safety Notes
FR BE
RÉVEIL SIMULATEUR D'AUBE
Operation and Safety Notes
Page
5
List of pictograms used....Page 6
Introduction......Page 6
Intended use Page 6
Parts description......Page 6
Scope of delivery....Page 7
Technical Data......Page 7
General safety instructions....Page 7
Safety instructions for batteries/rechargeable batteries....Page 8
Before use....Page 9
Setting the display backlight....Page 10
Adjusting the time Page 10
Alarm functions....Page 11
Setting the alarm....Page 11
Switching off the alarm Page 12
Set radio Page 13
Station scan....Page 13
Save station....Page 13
Rapid Test....Page 13
Lighting....Page 14
Mood light Page 14
Battery operation....Page 14
Replacing Batteries......Page 14
Cleaning and Care....Page 15
Troubleshooting......Page 15
Simplified EU declaration of conformity....Page 15
List of pictograms used

Efficiency level Fuse

Wake-up light alarm clock
- Introduction
We congratulate you on the purchase of your new product. You have chosen a high quality product. The instructions for use are part of the product. They contain important information concerning safety, use and disposal. Before using the product, please familiarise yourself with all of the safety information and instructions for use. Only use the product as described and for the specified applications. If you pass the product on to anyone else, please ensure that you also pass on all the documentation with it.
Intendeduse
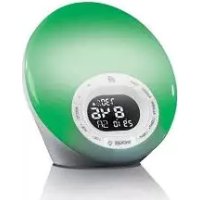
The product displays the time, date and day of the week and features visual and acoustic alarm functions as well as an electronic alarm signal and radio reception.
This product is intended for private use in dry rooms. The product is not intended for commercial use or for use in other applications.
■ Not suitable for household room illumination.
Partsdescription
1 Illuminated panel
2 Control panel
3 LC-display
4 Slide switch
5 RESET button
6 Battery compartment
7 USB charging socket
8 Low voltage jack
9 Cable aerial
10 Speaker
11 Battery compartment cover
12 SNOOZE 📂 button
13 VOL+ button
14 VOL-button
15 CLOCK button
| 16 | RADIO button |
| 17 | ALARM button |
| 18 | TEST button |
| 19 | + button |
| 20 | - button |
| 21 | LIGHT- button |
| 22 | LIGHT+ button |
| 23 | Alarm time display |
| 24 | Alarm mode display |
| 25 | Day of the week display |
| 26 | Frequency display |
| 27 | Clock display |
| 28 | Light display |
| 29 | Mains supply |
| 30 | Low voltage plug |
- Scope of delivery
1 Wake-up light alarm clock
1 Mains supply
3 Batteries LR6 (type AA) (preinstalled)
1 Set of instructions for use
●TechnicalData
Light alarm clock:
Mainssupply:5V ===(direct current), 2.0A
Protection class:
Batteries: 3 batteries LR6 (type AA, 1.5 V) (preinstalled)
Model no.: HG02934
Chromaticity
coordinate: x < 0.270 or x > 0.530 y < -2.3172 x ^2 + 2.3653 x - 0.2199 or y > -2.3172 x ^2 + 2.3653 x - 0.1595
USB output: 5V ===(direct current) 1.0A (for charging other devices use only)
Frequency band: 87.5 MHz to 108 MHz
Mains adapter:
Input: 100-240V\~(alternating current) 50/60 Hz, max. 0.6 A
Output ⚠️⋮: 5 V === (direct current), 2.0 A, low voltage plug ∅ 5.5 mm
Protection class:
Model no.: 8823-EU

Generalsafety instructions
Before using the product, please familiarise yourself with all of the safety information and instructions for use! When passing this
product on to others, please also include all the documents! The light alarm clock is only suited for use with the included mains supply (model no. 8823-EU).

DANGWARNING!
TO LIFE AND RISK OF ACCIDENTS FOR INFANTS
AND CHILDREN! Never leave children unattended with the packaging material. The packaging material represents a danger of suffocation. Children frequently underestimate the dangers.
This product may be used by children age 8 years and up, as well as by persons with reduced physical, sensory or mental capacities, or lacking experience and/or knowledge, so long as they are supervised or instructed in the safe use of the product and understand the associated risks. Do not allow children to play with the product. Cleaning and user maintenance should not be performed by children without supervision.
Before using the product, verify the available mains voltage corresponds with the operating voltage required for the mains supply (100–240V\~ 50/60Hz)!
■ Before using the product, verify the light alarm clock and the mains supply and the
cable connection aren't damaged! Never operate a damaged product!
The product must be plugged into an easily accessible socket so it can easily be unplugged in the event of an emergency.
This product does not contain any parts that can be serviced by the user. The bulbs cannot be replaced.
- Do not place open fire (e.g. candle) on the product.
■ The product is only suited for use with the included mains adapter (8823-EU).
Please note that the power adapter continues to draw a small amount of power even if the product is turned off as long as the power adapter is plugged into a power outlet. To switch the product off completely, unplug the power adapter from the socket.

Safety instructions for batteries/rechargeable batteries
■ DANGER TO LIFE! Keep batteries/rechargeable batteries out of reach of children. If accidentally swallowed seek immediate medical attention.
DANGER OF EXPLO-

SION! Never recharge non-rechargeable batteries. Do not
short-circuit batteries/rechargeable batteries and/or open them. Overheating, fire or bursting can be the result.
■ Never throw batteries/rechargeable batteries into fire or water.
Do not exert mechanical loads to batteries/rechargeable batteries.
Risk of leakage of batteries / rechargeable batteries
- Avoid extreme environmental conditions and temperatures, which could affect batteries/rechargeable batteries, e.g. radiators/direct sunlight.
If batteries / rechargeable batteries have leaked, avoid contact with skin, eyes and mucous membranes with the chemicals! Flush immediately the affected areas with fresh water and seek medical attention!
WEAR PROTECTIVE

GLOVES! Leaked or damaged batteries/rechargeable batteries can cause burns on contact with the skin. Wear suitable protective gloves at all times if such an event occurs.
In the event of a leakage of batteries / rechargeable batteries, immediately remove them from the product to prevent damage.
Only use the same type of batteries / rechargeable batteries. Do not mix used and new batteries / rechargeable batteries.
■ Remove batteries/rechargeable batteries if the product will not be used for a longer period.
Risk of damage of the product
■ Only use the specified type of battery / rechargeable battery!
- Insert batteries/rechargeable batteries according to polarity marks (+) and (-) on the battery/rechargeable battery and the product.
- Clean the contacts on the battery / rechargeable battery and in the battery compartment before inserting!
■ Remove exhausted batteries/rechargeable batteries from the product immediately.
- Before use
Note: Remove all packing materials before use.
Note: Remove protection foil on LC-display before use.
Note: Unplugged from the mains the light alarm clock only has two emergency functions (clock and electronic alarm signal). An electric connection is therefore required prior to use.
☐ First remove the protective film from the LC-display 3 of the light alarm clock.
☐ A plastic strip protrudes from the battery compartment cover [11] on the underside of the light alarm clock. Remove this plastic strip to utilise the inserted batteries.
☐ Plug the low voltage plug 30 of the mains supply 29 into the low voltage jack 8 of the light alarm clock. Then plug the mains supply into an easy to access socket.
Your light alarm clock is now in clock mode. The clock starts at 00:00.
- Setting the display backlight
☐ Use the slide switch 4 to adjust the backlight intensity on the LC-display 3 Choose from the settings OFF, LO, ME and HI.
- Adjusting the time
☐ In clock mode, press the CLOCK button for approx. 3 seconds to enter setup mode.
☐ Press the + button 19 or the - button 20 to change the respective flashing value.
TIP: Holding the + button or the - button will rapidly scan forward or backward through the numbers. When no button is pressed for 30 seconds, the light alarm clock with automatically return to clock mode.
□ Briefly press the CLOCK button to confirm the setting. This will take you to the next clock settings option.
☐ This allows you to successively adjust the following values:
•Year
• Month
• Day
• Hour
• Minute
• 24/12 hour display - in 12 hour mode the time from 12 to 23:59 will show PM next to the time.
• Language for displaying the day of the week - Abbreviations for languages: GE for German, EN for English, FR for French, DU for Dutch, SP for Spanish, IT for Italian.
☐ Set the desired language by pressing the CLOCK button. The light alarm clock will then return to clock mode.
●Alarmfunctions
The light alarm clock features an acoustic and a visual alarm.
The visual alarm is a light which appears in the illuminated panel 1. The brightness is adjustable. You may further set a lead time.
The lead time is the time from the alarm time setting during which the brightness of the light field will gradually increase from zero to the set value (sunrise simulation).
Choose from eight different soundscapes, an electronic alarm sound or radio reception as the acoustic alarm. The volume of the acoustic signal can be selected. The signal starts at the set alarm time at a low volume and adjusts to the set value within a few minutes.
The alarm features an alternate simple alarm function and snooze function.
When selecting the simple alarm function, shut off the alarm with a simple button of a button. When selecting the snooze function the signal will turn off and sound again 10 minutes later. This process can be repeated any number of times until the alarm finally shuts off.
- Setting the alarm
☐ In clock mode, hold the ALARM button 17 for 3 seconds to enter alarm setup mode.
☐ Press the + button 19 or the - button 20 to change the respective flashing value.
TIP: Holding the + button or the - button will rapidly scan forward or backward through the numbers. When no button is pressed for 30 seconds, the light alarm clock with automatically return to clock mode.
□ Briefly press the ALARM button 17 to confirm the setting. This will take you to the next alarm settings option.
- Hour - Minute - Select alarm mode: Chose from the following alarm mode display 24 symbols:

No display : Alarm function deactivated
☐ Select alarm signal: Choose from the following alarm signals, indicated by the numbers 01 to 10 with the note sign ♪ flashing:
Note: 01-08 are indicated by
these symbols: ♪ ⬤
09 is indicated by this symbol:
10 is indicated by this symbol: FM
Select one of the following alarms:
01: Brook
02: Birdsong
03: Relax
04: Tropical rainforest
05: Easy listening
06: Lounge
07: Sea surf
08: Rain
09: Electronic alarm
10: Radio
☐ Acoustic alarm volume: A flashing VO will appear along with a number which can be adjusted from 0 to 18. The higher the number the louder the sound.
☐ Sunlight/Mood light mode: Used to set the colour of the visual alarm. Select from 01 Sunlight mode and 02 Mood light mode.
Note: Please be aware that in Mood lightactivated, hold the SNOOZE 🤘 button 12 for mode you can only choose between 3 seconds or press the ALARM button 17 once. 5 different levels of brightness. The alarm will then remain off until the next
☐ Visual alarm brightness: A flashing number will appear which can be adjusted from 0–18. The higher the number selected, the brighter the illuminated panel 1 will be.
☐ Visual alarm lead time: This sets the duration of the lead time. Choose from the following lead times: OFF (no lead time), 5, 10, 15, 20, 25 or 30 minutes.
Note: During the visual alarm lead time a flashing ⚙ will appear in the LC-display 3. With the visual alarm going off at the same time as the acoustic alarm, the ⚙ symbol will be static.
- Switching off the alarm
If no button is pressed after the alarm automatically activates, the alarm will automatically switch off after one hour and will only reactivate the next time the alarm time occurs.
When the alarm sounds, you can switch it off with the SNOOZE 🤘 button 12.
When using the snooze function, the alarm will sound again in 10 minutes. To completely switch off the alarm with the snooze function
ntactivated, hold the SNOOZE 🎨 button 12 for 3 seconds or press the ALARM button 17 once. The alarm will then remain off until the next alarm time reoccurs.
Note: In clock mode, press the ALARM button 17 once to quickly switch between the "Alarm on" / "Alarm on with snooze" / "Alarm off".
- Set radio
- Station scan
The radio will receive FM stations at frequencies between 87.5 MHz to 108 MHz via the cable aerial 9. To scan for stations proceed as described below:
☐ Press the RADIO button 16. The light alarm clock is now in radio mode. The frequency display 26 will be displayed.
☐ Hold the + button 19 or the - button 20 for 3 seconds. The radio will start scanning for stations. The station scan will stop on the first station found.
☐ When pressing the + button or the - button for 3 seconds again, the radio will continue scanning stations.
☐ The VOL+ button 13 increases the volume.
☐ The VOL- button 14 lowers the volume.
☐ Aim the cable aerial 9 so the radio has optimal reception.
☐ Press the RADIO button for the light alarm clock to return from radio mode to clock mode.
- Save station
With the light alarm clock in radio mode there are 8 memory locations for saving stations.
☐ Hold the RADIO button 16 for 3 seconds until a station you found has been saved. The display will flash the memory location suggested by the radio.
☐ Press the VOL+ button 13 or VOL- button 14 to select the memory location you wish to use. Press the RADIO button to confirm your selection.
☐ To recall a saved station repeatedly press the TEST button 18 with the light alarm clock in radio mode until the desired memory location appears in the LC-display.
☐ When switching the radio off by pressing the RADIO button, the radio will play the last station selected when turned back on.
- Rapid Test
Note: The light alarm clock must be in clock mode for the rapid test.
☐ Press the TEST button 18. The light alarm clock will scan the settings for the selected alarms. The advance alarm will not be run. Instead, the light will be adjusted to the set value, then the alarm will sound.
- Lighting
☐ Press the SNOOZE button 12. A white guide light will appear in the illuminated panel 1.
☐ Press the SNOOZE button 12 again to switch the light off again.
The visual alarm will also work when the light is on. The light will then be deactivated and will reappear after the alarm.
- Mood light
Note: When selecting "02 mood light mode" after this appears for color selection "C1-C8" and then the light intensity can be selected in 5 steps.
The mood light function activates a dim coloured light in the illuminated panel 1.
Press the LIGHT+ button 22 to activate the mood light.
Repeatedly press the LIGHT + button 22 to increase the brightness 1-5, and to switch it off. Or press the LIGHT - button 21 to change the colour scale as follows C1-C9:
Mood light off: → red → orange → yellow → cyan → green → Sky blue → Purple → automatic colour change → colour chosen during automatic
colour changing
Activating the mood light does not impact the functionality of the visual alarm. The mood light will be switched off and on again after the alarm.
● Battery operation
The inserted batteries are only to backup the clock display and alarm function. In the event of a power failure the light alarm clock will automatically switch to battery mode.
The clock will continue running in battery mode. To save energy, only the electronic alarm will sound. All light functions and the radio are non-operational.
Once power returns via the low voltage jack 8 all functions of the light alarm clock will be available again.
● Replacing Batteries
Batteries should be replaced at least once a year to ensure reliable function of the light alarm clock.
☐ To do so, open the battery compartment cover 11 on the underside of the light alarm clock by pressing the latch in the
direction of the arrow and remove the old batteries.
☐ Insert three new batteries type AA, 1.5 V. When inserting the battery ensure the correct polarity. This is shown in the battery compartment 6.
☐ Close the battery compartment cover 11.
- Cleaning and Care
☐ Unplug the mains supply 29 from the socket before cleaning the product.
☐ The product should only be cleaned on the outside with a soft dry cloth.
- Troubleshooting
The product contains delicate electronic components.
For this reason it is possible that it can be disrupted by radio transmitting equipment in the immediate vicinity. Electrostatic discharges can lead to malfunctions. In this case, press the RESET button 5. This will reset the light alarm clock and perform a brief test of the LC-display 3. The light alarm clock is then ready for use again.
Please note, resetting will erase all settings.
● Simplified EU declaration of conformity
Hereby, OWIM GmbH & Co. KG, Stiftsbergstraße 1, DE-74167 Neckarsulm, GERMANY, declares that the product (Wake-up light alarm clock HG02934), is in compliance with Directives 2014/53/EU, 2011/65/EU and 2009/125/EC.
The full text of the EU declaration of conformity is available at the following internet address: www.owim.com
●Disposal
The packaging is made entirely of recyclable materials, which you may dispose of at local recycling facilities.

Observe the marking of the packaging materials for waste separation, which are marked with abbreviations (a) and numbers (b) with following meaning: 1–7: plastics / 20–22: paper and fibreboard / 80–98: composite materials.

The product and packaging materials are recyclable, dispose of it separately for better waste
treatment. The Triman logo is valid in France only.

Contact your local refuse disposal authority for more details of how to dispose of your worn-out product.

To help protect the environment, please dispose of the product properly when it has reached the end of its useful life and not in the household waste. Information on collection points and their opening hours can be obtained from your local authority.
Faulty or used batteries / rechargeable batteries must be recycled in accordance with Directive 2006/66/EC and its amendments. Please return the batteries / rechargeable batteries and / or the product to the available collection points.

Environmental damage through incorrect disposal of the batteries / rechargeable batteries!
Batteries / rechargeable batteries may not be disposed of with the usual domestic waste. They may contain toxic heavy metals and are subject to hazardous waste treatment rules and regulations. The chemical symbols for heavy metals are as follows: Cd = cadmium, Hg = mercury, Pb = lead. That is why you should dispose of used batteries / rechargeable batteries at a local collection point.
- Warranty
The product has been manufactured to strict quality guidelines and meticulously examined before delivery. In the event of product defects you have legal rights against the retailer of this product. Your legal rights are not limited in any way by our warranty detailed below.
The warranty for this product is 3 years from the date of purchase. Should this product show any fault in materials or manufacture within 3 years from the date of purchase, we will repair or replace it – at our choice – free of charge to you.
The warranty period begins on the date of purchase. Please keep the original sales receipt in a safe location. This document is required as your proof of purchase. This warranty becomes void if the product has been damaged, or used or maintained improperly.
The warranty applies to defects in material or manufacture. This warranty does not cover product parts subject to normal wear, thus possibly considered consumables (e.g. batteries) or for damage to fragile parts, e.g. switches, rechargeable batteries or glass parts.
CE
De anvendte piktogrammers legende....Side 19
Indledning....Side 19
- WAKE-UP LIGHT ALARM CLOCK
- RÉVEIL SIMULATEUR D'AUBE
- List of pictograms used....Page 6
- Introduction......Page 6
- General safety instructions....Page 7
- Before use....Page 9
- Set radio Page 13
- Rapid Test....Page 13
- Lighting....Page 14
- Mood light Page 14
- Battery operation....Page 14
- Replacing Batteries......Page 14
- Cleaning and Care....Page 15
- Troubleshooting......Page 15
- Simplified EU declaration of conformity....Page 15
- List of pictograms used
- - Introduction
- Intendeduse
- Partsdescription
- - Scope of delivery
- ●TechnicalData
- Light alarm clock:
- Mains adapter:
- Generalsafety instructions
- DANGWARNING!
- TO LIFE AND RISK OF ACCIDENTS FOR INFANTS
- Safety instructions for batteries/rechargeable batteries
- Risk of leakage of batteries / rechargeable batteries
- WEAR PROTECTIVE
- Risk of damage of the product
- - Before use
- - Setting the display backlight
- - Adjusting the time
- •Year
- ●Alarmfunctions
- The light alarm clock features an acoustic and a visual alarm.
- The alarm features an alternate simple alarm function and snooze function.
- - Setting the alarm
- - Switching off the alarm
- - Set radio
- - Station scan
- - Save station
- - Rapid Test
- - Lighting
- - Mood light
- colour changing
- ● Battery operation
- ● Replacing Batteries
- - Cleaning and Care
- - Troubleshooting
- ● Simplified EU declaration of conformity
- ●Disposal
- Environmental damage through incorrect disposal of the batteries / rechargeable batteries!
- - Warranty
- De anvendte piktogrammers legende....Side 19
- Indledning....Side 19
Brand : AURIOL
Model : IAN 288616
Category : Light therapy