
the Dual Boiler SES920 - Coffee maker SAGE - Free user manual and instructions
Find the device manual for free the Dual Boiler SES920 SAGE in PDF.


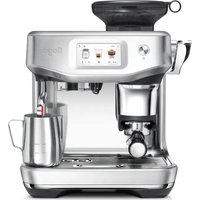
| Product Type | Espresso machine with dual boilers |
| Brand | Sage |
| Model | The Dual Boiler SES920 |
| Water Tank Capacity | 2.5 L, top-fill, removable |
| Group Head | 58 mm, actively heated with embedded element |
| Portafilter | 58 mm, full stainless steel |
| Filter Baskets | Single wall and dual wall (1 & 2 cup) |
| Steam Wand | 360° swivel action with 3-hole tip |
| Hot Water Outlet | Dedicated, separate from steam |
| Warming Tray | Convection heated, for up to 6 cups |
| Tamper | Integrated & removable 58 mm |
| Dosing Tool | Razor™ precision dosing tool for trimming |
| Pressure Gauge | Espresso pressure gauge for extraction monitoring |
| Display | Backlit LCD with shot temp, shot clock, clock modes |
| Programmable Functions | 1 cup & 2 cup volume/duration, pre-infusion duration & power, steam temperature, auto start, clock |
| Water Hardness Setting | Adjustable 1–5 using test strip |
| Cleaning Cycle | Automatic with cleaning disc and tablet (prompt every 200 shots) |
| Descaling | Access point with boiler drain valves; complete process takes approx. 1.5 hours |
| Safety Features | Auto-off (default ON), overheat protection, child safety precautions |
| Included Accessories | Stainless steel frothing jug, cleaning disc, Allen key, cleaning tool, espresso cleaning tablets, water filter & holder, water hardness test strip, Razor™ dosing tool |
| Guarantee | 2-year limited guarantee |
Frequently Asked Questions - the Dual Boiler SES920 SAGE
User questions about the Dual Boiler SES920 SAGE
0 question about this device. Answer the ones you know or ask your own.
Ask a new question about this device
Download the instructions for your Coffee maker in PDF format for free! Find your manual the Dual Boiler SES920 - SAGE and take your electronic device back in hand. On this page are published all the documents necessary for the use of your device. the Dual Boiler SES920 by SAGE.
USER MANUAL the Dual Boiler SES920 SAGE
SES920
Sage®
EN User manual
DK Brugermanual
NO Bruksanvisning
FI Käyttöopas
SE Bruksanvisning


① Top fill 2.5 litre removable water tank / Aftagelig 2,5 l vandtank med påfyldning i toppen / 2,5 l avtakbar vanntank som fylles ovenfra / Päältä täytettävä, irrotettava 2,5 l vesisäiliö / Toppfylld 2,5 l borttagbar vattentank
② POWER button / POWER-knap / POWER-knapp (av/på-knapp) / Virtakytkin / Strömbrytare
③ Backlit LCD interface / Baggrundsbelyst LCD-skærm / LCD-skjerm / Taustavalaistu LCD-näyttö / Bakgrundsbelyst LCD-skärm
④ MENU access and DISPLAY mode buttons / MENU-adgang og DISPLAY-knapper / Knapper til valg av funksjoner og program / Valikko- ja näyttöpainikkeet / Tillång till MENY och DISPLAY-knappar
⑤ Espresso pressure gauge / Espresso-trykmåler / Trykkmåler / Espressopainemittari / Espressomanometer
6 Integrated & removable 58mm tamper / Indbygget og aftagelig 58 mm stamper / Innebygget avtakbar 5,8 cm espressopresse / Integroitu irrotettava 58 mm tampperi / Inbyggd borttagbar 58 mm stamp
⑦ Actively heated 58mm group head with embedded element / Opvarmet 58 mm gruppehoved med indbygget element / Oppvarmet 5,8 cm filterfeste med innebygget element / Lämmitetty 58 mm uuttoyksikkö (gruppo) sisäänrakennetulla elementillä / Aktivt uppvärmd bryggrupp med inbyggt element
58mm full stainless steel portafilter / 58 mm filterholder i rustfrit stål / 5,8 cm filter i rustfritt helstål / 58 mm suodatinkahva ruostumatonta terästä / 58 mm portafilter i rostfritt stål
9 Convection heated 6 cup warming tray / Varmeplade til seks kopper / Oppvarmet koppeunderlag til 6 kopper / Konvektiolämmitetty kuuden kupin lämmitysalusta / Konvektionsuppvämd värmebricka för 6 koppar
10 Manual and programmable 1 & 2 cup volume controls / Manuelle og programmerbare knapper til 1 og 2 kopper / Manuel og programmerbar knapp til 1 og 2 kopper kaffe / Manuaaliset ja ohjelmoitavat 1 & 2 kupillisen säädöt / Manuell och programmerbar volymkontroll för 1 och 2 koppar
⑪ Easy to operate steam lever / Let anvendligt damphändtag / Dampspake som er enkel å bruke / Helppokäyttöinen höyryvipu / Lättanvänt ångreglage
12 Dedicated hot water outlet / Varmtvandsudløb / Eget varmtvannsutløp / Kuumavesisuutin / Särskilt hetvattensutlopp
13 360 swivel action steam wand with 3 hole tip / 360 graders mælkeskummer/dampdyse med tre huller / Svingarm for damp (360 grader) og dyse med 3 hull / 360 astetta kääntyvä höyrytysputki kolmireikäisellä kärjellä / 360° vridbart ångrör med 3-hålsmunstycke
14 De-scale access point / Afkalkningsadgang / Avkalkingsventiler / Kalkinpoistoaukko / Åtkomstpunkt för avkalkning
15 Integrated tool storage tray / Indbygget opbevaring af redskaber / Oppbevaring av redskap / Integroitu työvälineiden säilytystila / Inbyggd förvaring för redskap
16 Drop down swivel foot / Drejbar fod / Nedsenkbar svingfot / Alas laskettava kääntyvä tuki / Nerfällbar vridbar fot
Removable drip tray / Aftagelig drypbakke / Avtakbart brett / Irrotettava tippa-alusta / Borttagbart dropptråg
ACCESSORIES / TILBEH∅R / TILBEH∅R / LISÄVARUSTEET / TILLBEHÖR
Stainless Steel frothing jug / Skummekande i rustfrit stål / Melkemugge i rustfritt stål / Maitokannu ruostumatonta terästä / Mjöllkkanna i rostfritt stål
19 Single wall filter baskets / Filterkurve med enkeltfilter / Filterinnlegg med enkel vegg / Yksiseinäiset suodatinkorit / Enkelväggade filterkorgar
20 Dual wall filter baskets (1&2 cup) / Filterkurve med dobbeltfilter (1 og 2 kopper) / Filterinnlegg med dobbel vegg (til 1 og 2 kopper) / Kaksiseinäiset suodatinkorit (1&2 kupillisen) / Dubbelväggade filterkorgar (för 1 och 2 koppar)
21 Water filter holder with filter / Vandfilter og beholder / Vannfilter og beholder / Vedensuodattimen pidike ja suodatin / Vattenfilterhållare med filter
22 Cleaning disc / Rensedisk / Rengjøringsinnlegg / Puhdistuslevy / Rengöringsskiva
23 Allen key / Unbrakonøgle / Unbrakonøkkel / Kuusiokoloavain / Insexnyckel
24 Cleaning tool / Rengøringsredskab / Rengjøringsredskap / Puhdistusväline / Rengöringsredskap
⑳ Espresso cleaning tablets / Rensetabletter til espressomaskine / Rengjørings tabletter til espressomaskin / Espresso-puhdistustabletit / Espresso rengöringstabletter
26 Water hardness testing strip / Teststrimmel til bestemmelse af vandets hårdhedsgrad / Teststripes til hardhetsgrad på vannet / Veden kovuuden testiliuska / Testremsa för vattenhärdhet
27 Razor precision dosing tool / Razor doseringsredskab / Razor doseringsredskap til nøyaktig dosering / Razor™ -tasausväline täsmäannosteluun / Razor™ trimningsverktyg för precisionsdosering










CARE & CLEANING / PLEJE & RENG∅RING / VEDLIKEHOLD OG RENGJ∅RING / HOITO & PUHDISTUS / SKÖTSEL OCH RENGÖRING
23 24

MENU


25

26

□
2827
29
DESCALE ACCESS

30
ENGLISH
At Sage ® we are very safety conscious.
We design and manufacture consumer products with the safety of you, our valued customer, foremost in mind. In addition we ask that you exercise a degree of care when using any electrical appliance and adhere to the following precautions.
IMPORTANT SAFEGUARDS
READ ALL INSTRUCTIONS BEFORE USE AND SAVE FOR FUTURE REFERENCE
- Remove any packaging material and promotional labels before using the Sage Dual Boiler for the first time.
- To avoid choking hazard for young children, remove and safely dispose the protective cover fitted on the power plug.
- Do not attempt to operate the Sage Dual Boiler by any method other than that it is intended and described in this booklet.
- Before using for the first time please ensure that your electricity supply is the same as shown on the rating label on the underside of the appliance. If you have any concerns please contact your local electricity company.
- Do not place Sage Dual Boiler near the edge of a bench or table during operation. Ensure the surface is level, clean and free of water.
- Any significant spillage onto the surface under or around the appliance, or onto the appliance itself, should be cleaned and dried before continuing to use the appliance.
- Do not place this appliance on or near a hot gas or electric burner, or where it could touch a heated oven.
- Do not operate the Sage Dual Boiler on a sink drain board.
• Always make sure the Sage Dual Boiler is properly assembled before use. The appliance will not operate unless properly assembled. - The Sage Dual Boiler is not intended to be operated by means of an external timer or separate remote control system.
- To protect against electric shock do not immerse, power cord or power plug in water or allow moisture to come in contact with these parts.
- Always ensure the Sage Dual Boiler is turned OFF at the power outlet and unplug the cord Sage Dual Boiler is to be left unattended, not in use, before cleaning, before attempting to move, disassembling, assembling and when storing.
- Do not use any other liquid apart from cold mains/town water. We do not recommend the use of highly filtered, de-mineralised or distilled water.
- Ensure the portafilter is firmly inserted and secured into the group head before starting on extraction. Never remove the portafilter during the brewing process.
- Do not touch hot surfaces. Allow product to cool down before moving or cleaning parts.
- Use caution when using the de-scale feature as hot steam may be released. Before de-scaling, ensure drip tray is inserted.
- Keep the appliance clean. Refer to Care & Cleaning.
IMPORTANT SAFEGUARDS FOR ALL ELECTRICAL APPLIANCES
- Unwind power cord fully before use.
- Do not let the power cord hang over the edge of a table, counter, touch hot surfaces or become knotted.
- This appliance is for household use only. Do not use this appliance for anything other than its intended use. Misuse may cause injury.
- In order to avoid a hazard due to inadvertent resetting of the thermal cut out this appliance must not be supplied through an external switching device such as a timer or connected to a circuit that it regularly switched on and off by the utility.
- This appliance shall not be used by children. Keep the appliance and its cord out of the reach of children.
• Children shall not play with the appliance.
- This appliance is not intended for use by persons with reduced physical, sensory or mental capabilities, lack of experience and knowledge, or children unless they have been given supervision or instruction concerning use of the appliance by a person responsible for their safety. Keep the appliance and its cord out of the reach of children.
- Do not use the appliance if power cord, power plug or appliance becomes damaged in any way.

The symbol shown indicates that this appliance should not be disposed of in normal household waste. It should be taken to a local authority waste collection centre designated for this purpose or to a dealer providing this service. For more information, please contact your local council office.

OPERATION
WARNING
Both the STEAM LEVER and HOT WATER dial must be in the CLOSED position for the machine to enter START UP mode.
BEFORE FIRST USE
MACHINE PREPARATION
- Clean parts and accessories (water tank, portafilter, filter baskets, jug) using warm water and a gentle dish washing liquid and rinse well.
- The water filter located inside the water tank will need to be removed before washing the water tank.
CONDITIONING THE WATER FILTER
Soak filter in a cup of water for 5 minutes.
- Rinse filter under cold running water.
- Wash the stainless steel mesh in the plastic filter compartment with cold water.
- Insert the filter into the filter holder.
- Set Date Dial 2 months ahead.
To install filter, push down to lock into place.
Slide the water tank into position and lock into place.
FIRST USE
INITIAL START UP
- Fill tank with cold tap water.
- Dip Water Hardness Test Strip into water tank for 1 second & set aside.
- Check Steam Lever and Hot Water dial are in the CLOSED position.
- Press POWER On.
- A pumping sound will be heard indicating empty boilers are being filled with water for the first time.
- Machine will prompt you to set water hardness. Refer for test strip for your water hardness. Use the Arrow UP or Arrow DOWN keys to select water hardness 1–5. Press Menu to set. Machine will beep to confirm selection.
• Machine will reach operating temperature and go into STANDBY mode.

NOTE
Do not use highly filtered, demineralised or distilled water in this machine. This may affect the taste of the coffee and how the machine operates.
FLUSHING THE MACHINE
When the machine has reached STANDBY mode, run the following 3 steps:
- Press 2 Cup button to run water through group head.
- Run Hot Water for 30 seconds.
- Activate Steam for 10 seconds.
START UP
- Press the POWER button to switch the machine ON. The POWER button will flash and the LCD screen will display the current boiler temperature.
- When the machine has reached operating temperature, the POWER button light will stop flashing and the MANUAL, 1 CUP and 2 CUP buttons will illuminate.
- The machine is now in STANDBY mode ready for use.

NOTE
You will not be able to select 1 CUP, 2 CUP or CLEANING CYCLE during START UP.
LCD INTERFACE
DISPLAY MODES
- 3 modes can be displayed on the LCD screen: Shot Temp, Shot Clock or Clock.
- Press UP or DOWN arrow to change the display mode between shot clock & clock. Shot temp will be displayed during an extraction.
1. Shot temp
Displays selected extraction temperature (default set at 93°C), but can be changed from 86°C - 96°C. See 'Extraction Temperature'.
2. Shot clock
Temporarily displays duration of last espresso extraction in seconds.
3. Clock
Temporarily displays current time (default set at 12.00am if time has not been set).
GENERAL OPERATION
1 CUP
Press 1 CUP once to extract a single shot of espresso at the pre-programmed duration (30secs) (see fig.1).
2 CUP
Press 2 CUP button once to extract a double shot of espresso at the pre-programmed duration (30secs) (see fig.2).
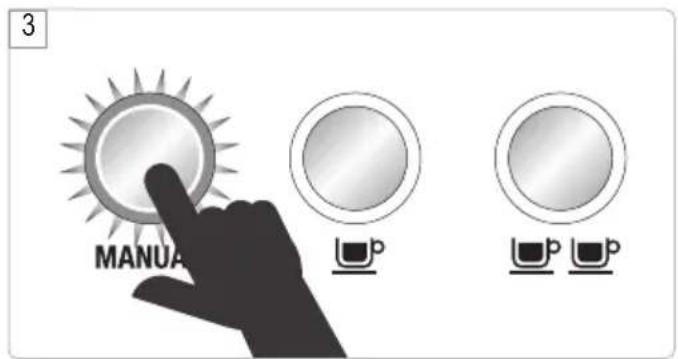
MANUAL
- The MANUAL button allows you to control the espresso pour volume to suit your preference (see fig. 3).

NOTE
To stop an extraction at any time, press the 1 CUP, 2 CUP or MANUAL button and the machine will return to STANDBY mode.
STEAM
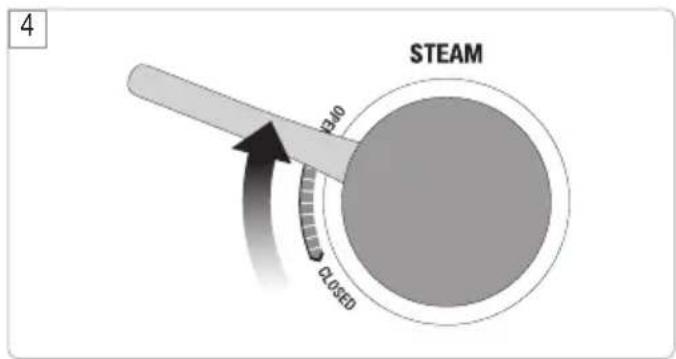
For instant steam, move STEAM LEVER to OPEN position.
The Steam LED will be On (see fig. 4).

CAUTION: BURN HAZARD
Pressurised steam can still be released, even after machine has been switched off. Children must always be supervised.
HOT WATER
Rotate HOT WATER dial to OPEN & CLOSE position to open and close. The Hot Water LED will be On (see fig. 5).

NOTE
You cannot run hot water and extract espresso at the same time.
LCD PROGRAMMING FUNCTIONS
- To program the machine, press MENU button once. The LCD will display all programming functions. Continue to press MENU button to select your desired function (see fig. 6).
- At any stage during programming, press EXIT to return to STANDBY mode.

NOTE
The MENU button is disabled when the machine is extracting espresso or delivering hot water.
SHOT DURATION
1 CUP duration Programming
- Press MENU button until SHOT VOL icon flashes and 1 CUP is displayed on the LCD screen.
- Press 1 CUP button to start water flow from the group head.
- Press 1 CUP again once required extraction duration has been reached.
- The machine will beep twice to indicate the new 1 CUP duration has been set.
2 CUP DURATION PROGRAMMING
- Press MENU button until SHOT VOL icon flashes and 2 CUP is displayed on the LCD screen.
- Press 2 CUP button to start water flow from the group head.
- Press 2 CUP again once required extraction duration has been reached.
- The machine will beep twice to indicate the new 2 CUP duration has been set.
SHOT VOLUME
1 CUP Volume Programming
- Press MENU button until SHOT VOL icon flashes and 1 CUP is displayed on the LCD screen.
- Dose & tamp the portafilter with ground coffee. Press 1 CUP button to start espresso extraction. Press 1 CUP again once desired volume of espresso has been extracted.
- The machine will beep twice to indicate the new 1 CUP volume has been set.
2 CUP VOLUME PROGRAMMING
- Press MENU button until SHOT VOL icon flashes and 2 CUP is displayed on the LCD screen.
- Dose & tamp the portafilter with ground coffee. Press 2 CUP button to start espresso extraction. Press 2 CUP again once desired volume of espresso has been extracted.
- The machine will beep twice to indicate the new 2 CUP volume has been set.
- Press MENU button until SHOT TEMP icon flashes. The LCD will display the current shot temperature setting.
- Press UP or DOWN arrow to adjust SHOT TEMP to the desired setting (range 86°C - 96°C ).

TIP
- We recommend a temperature range of between 90°C - 95°C for optimal flavour.
- Press EXIT button. Machine will beep once to confirm setting.
AUTO START
• To use AUTO START, first ensure clock has been set
- Press MENU button until AUTO START icon flashes and the current Auto Start setting (ON or OFF) is displayed on the LCD screen.
- Press UP or DOWN arrow to set the AUTO START to ON and OFF.
- If AUTO START is On, the LCD will display a Clock icon (see fig. 7).
- Press MENU button and the current Auto Start time will be displayed on the LCD screen.
- Press UP or DOWN arrow to adjust
• AUTO START to the desired time.
- (Default AUTO START time set at 7:00am). Press EXIT button. Machine will beep once to confirm setting.
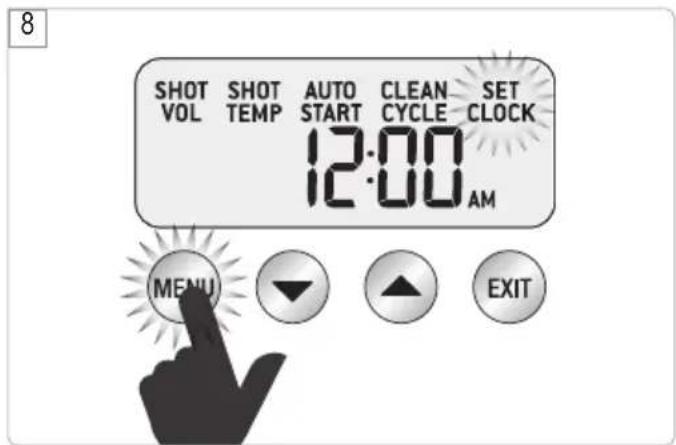
SET CLOCK
- Press MENU button until SET CLOCK icon flashes. The current Clock Time will be displayed on the LCD screen (see fig. 8).
- Press UP or DOWN arrow to adjust the time.
- Press EXIT button. Machine will beep once to confirm setting.
ADVANCED ESPRESSO FUNCTIONS
PRESS & HOLD - 1 CUP
Press & hold 1 CUP to bypass the pre-infusion phase and deliver water to the group head at the full 9 bar pressure. Release button to stop extraction. This function can be used when purging the group head.
PRESS & HOLD - 2 CUP
Press & hold 2 CUP to bypass the pre-infusion phase and deliver water to the group head at the full 9 bar pressure. Release button to stop extraction. This function can be used when purging the group head.
PRESS & HOLD - MANUAL
Press & hold the MANUAL button to deliver water to the group head at low pre-infusion pressure. When MANUAL button is released, water will continue at the full 9 bars of pressure. Press MANUAL button again to stop extraction.
This function can be used to manually control the pre-infusion duration.
ACCESS ADVANCE MENU
TO ACCESS THE ADVANCED MENU:
With machine OFF, press and hold the 1 CUP button, then press the POWER button (see fig. 9).
RESETTING DEFAULT SETTINGS
The machine has the following default settings:
- Temperature - 93°C
- Pre-Infusion – Duration Pr07
- Pre-Infusion – Power PP60
- Steam temperature - 135°C
- Auto Off - ON
- Auto Start - OFF
- Audio - LO
- Water Hardness - 3
- Espresso Volume durations – 30/30 secs
- To reset machine to original default settings, first enter Advanced Menu. rSEt will be displayed on the LCD. Press the MENU button to reset the machine to the default settings. The machine will beep 3 times to confirm (see fig. 10).
- The machine will then prompt you to set the water hardness. Select your water hardness using the UP & DOWN arrows & press MENU to confirm or press EXIT to return to STANDBY mode.
TEMPERATURE UNIT - °C/°F (SEt)
Temperature Unit will be displayed on the LCD screen as SEt (see fig. 11). Press MENU to Select. Use UP and DOWN arrows to select desired temperature unit. Press MENU to set. Machine will beep once to confirm selection. Press EXIT to return to STANDBY mode.
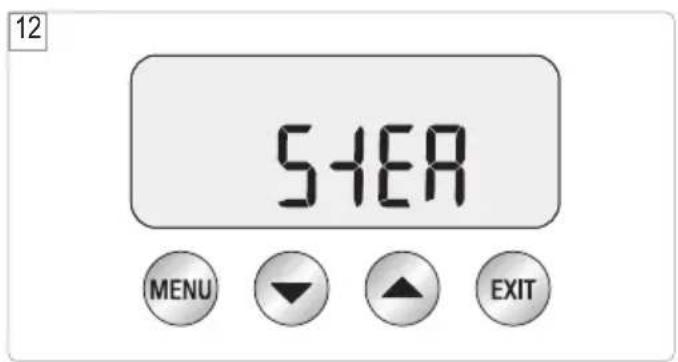
STEAM TEMPERATURE (StEA)
- Adjust Steam Temperature to control the pressure of the steam being delivered.
- Lower steam temperature to texture smaller volumes of milk or have more control. Raise steam temperature to texture larger volumes of milk.
- Press MENU to Select STEAM (see fig. 12).
- Use UP and DOWN arrows to select required steam temperature.
- Press MENU to set.
• Machine will beep once to confirm selection.
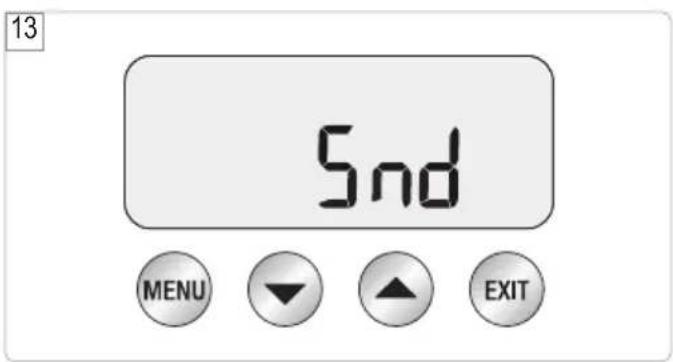
MACHINE AUDIO (Snd)
Machine Audio refers to the volume level of the 'beeps' heard.
- HI - high volume
- LO - low volume
- OFF - volume off
Press the MENU button to select Audio (see fig.13). Press UP or DOWN arrows to select desired volume. Press MENU to set.
Machine will beep once to confirm selection.
VOLUMETRIC CONTROL (vOL)
- Use this function to set Duration or Volume to control the espresso output.
- Press the MENU button to select (see fig. 14). Use the UP or DOWN arrows to select FLo or SEc. Press MENU to set. Machine will beep once to confirm selection.
ADVANCED FEATURES
PRE-INFUSION PROGRAMMING
- With machine in STANDBY mode, press UP and DOWN arrows together to enter Pre-Infusion programming mode.
- Press MENU button to move between Pre-infusion Duration and Power.
PRE-INFUSION DURATION
- The LCD will display the current Pre-Infusion Duration.
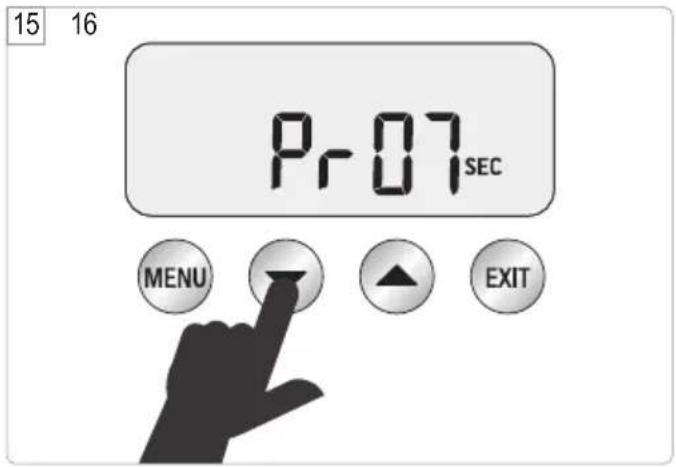
- Press UP or DOWN arrow to vary time (see fig. 15).
• We recommend a range of between 5-15secs as being optimum.
PRE-INFUSION POWER
- The LCD will display current Pre-Infusion Power.
- Press UP or DOWN arrows to vary power (see fig. 16).
- We recommend a range of between 50–65 as being optimum. Press EXIT to confirm setting and return to STANDBY mode.
ALERTS
STEAM LED FLASHING AT START UP
- The machine will not enter START UP mode when the STEAM LEVER is in the OPEN position and the STEAM LED is flashing.
- Move lever to the CLOSED position for the machine to enter START UP mode.
HOT WATER LED FLASHING AT START UP
- The machine will not enter START UP mode when the HOT WATER dial is in the OPEN position and the HOT WATER LED is flashing.
- Move dial to the CLOSED position for the machine to enter START UP mode.
HOT WATER LED FLASHING
- The HOT WATER LED will flash when the HOT WATER function has been operating for longer than 1 minute.
- Move dial to CLOSED position for machine to enter STANDBY mode.
FILL TANK
If FILL TANK icon is displayed on LCD (see fig.17), add water to tank until machine returns to STANDBY mode.
CLEAN ME
- The machine will detect when 200 extractions have been carried out since the last clean cycle.
- The CLEAN ME! Icon will be displayed on the LCD screen the next time the machine enters START UP mode (see fig. 18).
- For information on how to clean the machine, refer to the CARE & CLEANING instructions.
PRE HEATING
HEATING YOUR CUP OR GLASS
A warm cup will help maintain the coffee's optimal temperature. Pre-heat your cup by rinsing with hot water from the Hot Water outlet and place on the cup warming tray.
HEATING THE PORTAFILTER AND FILTER BASKET
A cold portafilter and filter basket can reduce the extraction temperature enough to significantly affect the quality of your espresso. Always ensure the portafilter and filter basket are pre-heated with hot water from the Hot Water outlet before initial use.

NOTE
Always wipe the filter basket dry before dosing with ground coffee as moisture can encourage channelling where water bypasses the ground coffee during extraction.
SELECTING FILTER BASKET
- Use Single Wall filter baskets when grinding fresh whole coffee beans (see fig. 19).
- Use Dual Wall filter baskets if using pre-ground coffee (see fig.20).
- Use the 1 cup filter basket when brewing single cups and the 2 cup filter basket when brewing two cups, stronger single cups or mugs.
THE GRIND
- When grinding coffee beans for espresso, the grind size should be fine but not too fine.
- If the grind is too fine, the water will not flow through the coffee even when under pressure. The resulting espresso will be OVER EXTRACTED, dark in colour and bitter in flavour.
- If the grind is too coarse the water will flow through the ground coffee in the filter basket too quickly. The resulting espresso will be UNDER EXTRACTED, lacking in colour and flavour.
COFFEE DOSING AND TAMPING
- Wipe coffee basket with a dry cloth.
- Using Single Wall filter baskets, grind coffee to fill the coffee basket consistent pressure every time.
- Tap the portafilter several times to collapse and distribute the coffee evenly in the filter basket.
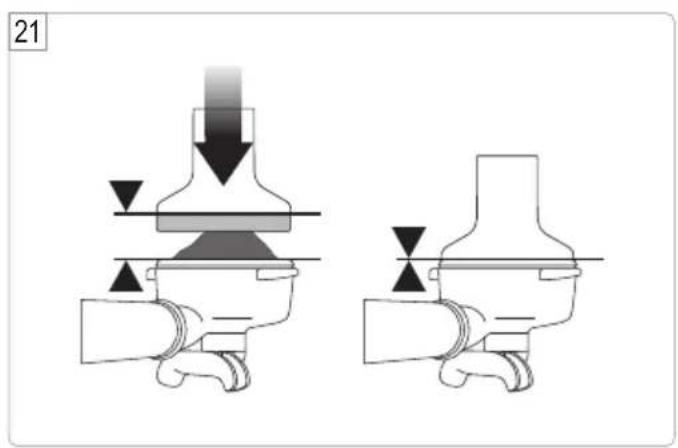
- Tamp down firmly (see fig. 21).
- As a guide to dose, the top edge of the metal cap on the tamper should be level with the top of the filter basket AFTER the coffee has been tamped.
TRIMMING THE DOSE
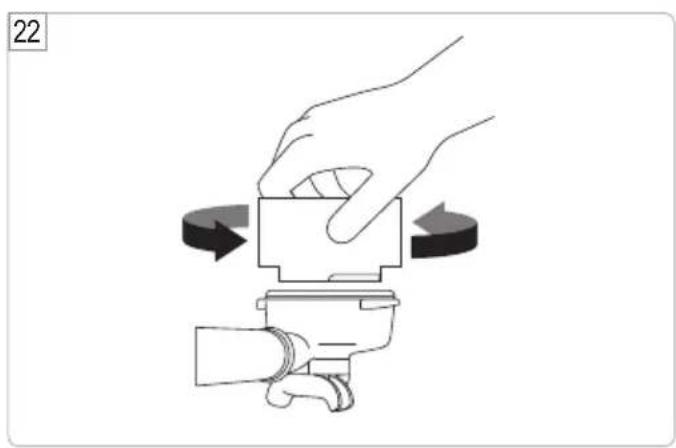
- Insert the Razor™ dosing tool into the coffee basket until the shoulders of the tool rest on the rim of the basket. The blade of the dosing tool should penetrate the surface of the tamped coffee.
- Rotate the Razor™ dosing tool back and forth while holding the portafilter on an angle to trim off excess coffee grinds (see fig.22).
- Wipe excess coffee from the rim of the filter basket to ensure a proper seal is achieved in the group head.
PURGING THE GROUP HEAD
Run a short flow of water through the group head by pressing and holding the 1 CUP button to purge any ground coffee residue from the group head and stabilise the temperature prior to extraction.
INSERTING THE PORTAFILTER
Place the portafilter underneath the group head so that the handle is aligned with the INSERT position. Insert the portafilter into the group head and rotate the handle towards the centre until resistance is felt.
EXTRACTING ESPRESSO
- Place pre-warmed cup(s) beneath the portafilter and press the 1 CUP or 2 CUP button for the required volume.
- As a guide, the espresso will start to flow after 8-10 seconds (infusion time) and should be the consistency of dripping honey.
- If the espresso starts to flow after less than 6 seconds you have either under dosed the filter basket and/or the grind is too coarse. This is an UNDER EXTRACTED shot.
- If the espresso starts to drip but doesn't flow after 15 seconds, the grind is too fine. This is an OVER EXTRACTED shot.
TEXTURING MILK
• Always start with fresh cold milk.
- Fill the jug just below the "V" at the bottom of the spout.
- Position the steam tip above the drip tray and lift the steam lever to purge the steam wand of any condensed water.
- Insert the steam tip 1-2cm below the surface of the milk close to the right hand side of the jug at the 3 o'clock position.
- Lift the steam lever.
- Keep the tip just under the surface of the milk until the milk is spinning clockwise, producing a vortex (whirlpool effect).
- With the milk spinning, slowly lower the jug. This will bring the steam tip to the surface of the milk & start to introduce air into the milk. You may have to gently break the surface of the milk with the tip to get the milk spinning fast enough.
- Keep the tip at or slightly below the surface, continuing to maintain the vortex. Texture the milk until sufficient volume is obtained.
- Lift the handle of the jug to lower the tip beneath the surface, but keep the vortex of milk spinning. The milk is at the correct temperature (60-65°C) when the jug is hot to touch.
- Move the steam lever to the CLOSED position BEFORE taking the tip out of the milk.
- Set the jug to one side, lift the steam lever to purge out any residual milk from the steam wand and wipe steam wand with a damp cloth.
- Tap the jug on the bench to collapse any bubbles.
- Swirl the jug to "polish" and re-integrate the texture.
• Pour milk directly into the espresso.
HINTS AND TIPS
• Always use freshly ground coffee for a superior flavour and body.
- Use freshly roasted coffee beans, with a roasted-on date and use within 15-20 days of roasted-on date.
- Store coffee beans in a cool, dark and dry container. Vacuum seal if possible.
- Buy coffee beans in small batches to reduce the storage time and store no more than one week's supply at any time.
- Grind beans immediately before brewing as ground coffee quickly loses its flavour and aroma.

CARE & CLEANING
CLEANING CYCLE
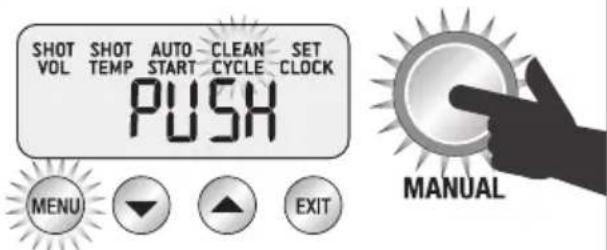
- Press MENU button until CLEAN CYCLE icon flashes and PUSH is displayed on the LCD screen (see fig. 23).
- CLEAN ME! Will be displayed on LCD to indicate when a cleaning cycle is required (approx. 200 shots).
- Insert the supplied cleaning disc, followed by 1 cleaning tablet into the 1 CUP filter basket.
- Insert the portafilter and lock into group head.
- Ensure the water tank is filled with cold tap water.
- Ensure the drip tray is empty & inserted.
- Rinse the filter basket and portafilter thoroughly before use.
• To start the Clean Cycle press the illuminated MANUAL button. - The CLEAN CYCLE icon will flash and the machine will start to countdown from 370 seconds (see fig.24).
- When the cleaning cycle has finished, remove the portafilter and ensure the tablet has completely dissolved. If the tablet has not dissolved, repeat the steps above, without inserting a new tablet.

NOTE
• To purchase filters contact Sage Customer Service Centre.
- Change filters every 2 months. Contact Sage Customer Service Centre for advice.
CLEANING THE STEAM WAND
- Wipe the steam wand with a damp cloth & purge directly after texturing the milk.
- If the any of the holes in the tip of the steam wand become blocked, ensure the STEAM LEVER is in the CLOSED position and clean using the pin on the end of the cleaning tool.
- If steam wand remains blocked, remove the tip using the integrated spanner in the cleaning tool and soak in hot water. Screw tip back onto the steam wand using the integrated spanner in the cleaning tool.
DESCALE (dESC)
- Use this function to access descale procedures when a descale alert is displayed on the LCD (see fig.25).
- Please ensure you allow approximately 1.5 hour to complete the entire descale process and follow the step by step instructions. If you've just finished using your machine, please ensure to turn the machine off and allow to cool for at least 1 hour before starting your descale process.
1 – PREPARE FOR DESCALE
- Empty the drip tray and insert into position.
- Turn the machine off and allow to cool for at least 1 hour. With the machine off, press and hold the 1 CUP button, then press and hold the POWER button together for 3 seconds. rEST will appear on the LCD (see fig. 26).
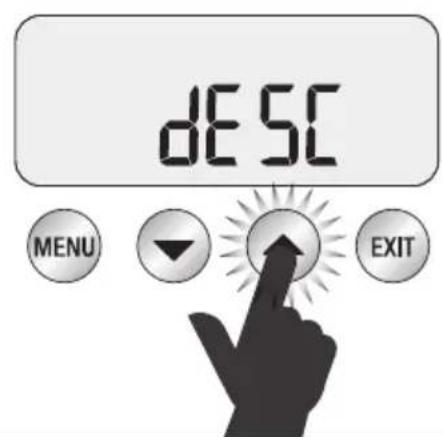
- Press UP or DOWN arrow to set mode, the 'dESC' will appear on the LCD. Press the MENU button to enter Descale mode (see fig.27).
2 - EMPTY BOILERS
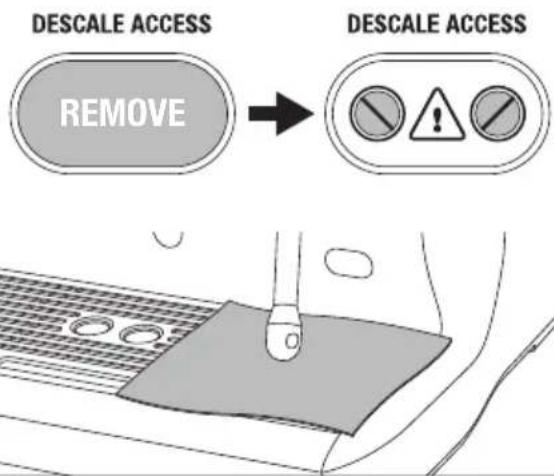
- Remove the grey silicone cover on the lower front panel marked DESCALE ACCESS. Place a cloth over the drip tray to stop steam escaping (see fig. [28]).
- Use a flat-head screwdriver to rotate the right screw counter-clockwise until the valve is fully open. As the valve opens, steam may be released. When the water is completely empty, close the valve by rotating screws clock-wise until seated. Do not overtighten screws to avoid damages to the valves (see fig. 29).
-
Next, repeat the above process on the left screw.
-
Empty the drip tray. Use caution as the drip tray may be hot.
- Empty water tank, remove water filter.
- Dissolve 1 sachet of Sage Descaler into 1 litre of warm water. Pour solution into the water tank.

NOTE
- If there's no water released into the drip tray, press and hold the 1 CUP button for 3 seconds. This will release water from the boiler.
- If water tank has not been removed, replaced or is empty, "FILL TANK" will appear on the LCD.
3-BEGIN DESCALE
Press MANUAL button to proceed.
Machine will fill boilers with descale solution and heat to temperature.
During this time, water may flow through the group head.
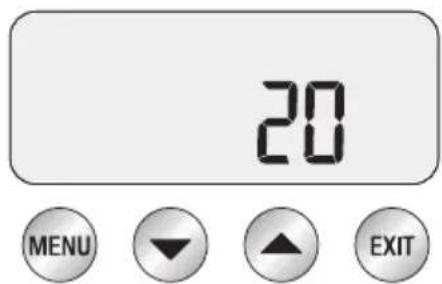
Wait for countdown timer to reach 0. This allows solution to dissolve scale build-up. However you can proceed to the next step at any time by pressing the 1 Cup button (see fig.30).
- Place a cloth over the drip tray to stop steam escaping.
- Empty boilers by repeating steps 2 and 4 in section 2-EMPTY BOILERS.
- Empty drip tray and insert back to place.
- Empty water tank then rinse and fill with clean water to the MAX line. Lock water tank back into position.
4 - FLUSH BOILERS
Press MANUAL button to proceed
During this procedure, the LCD will show countdown time (20 minutes) (see fig. 30).
During this time, the machine will fill boilers with fresh clean water and heat to temperature. You can proceed to the next step at any time by pressing the 1 Cup button.
- Place a cloth over the drip tray to stop steam escaping.
- Empty boilers by repeating steps 2 and 4 in section 2-EMPTY BOILERS.
- Empty drip tray and insert back to place.
- Empty water tank then rinse and fill with clean water to the MAX line. Lock water tank back into position.
5 - REPEAT STEP 4 FLUSH BOILERS
We recommend flushing boilers again to ensure any residual descale solution is released from the boilers.
Press POWER button to escape the Descale mode. The descale process is now complete and ready to use.

TROUBLESHOOTING
| the Hot Water LED flashes when the machine is turned on | Hot Water dial is open. | Turn the Hot Water dial to the CLOSED position |
| the Steam LED flashes when the machine is turned on | Steam Lever is open. | Move the Steam Lever to the CLOSED position. |
| Water does not flow from the group head | Machine has not reached operating temperature.Water tank is empty.Water tank not fully inserted & locked. | Allow time for the machine to reach operating temperature.The POWER light will stop flashing when machine is ready.Fill Tank.Push water tank in fully and close the latch. |
| FILL TANK displayed on LCD, but water tank is full | Water tank is not fully inserted and locked into position. | Push water tank in fully and close the latch. |
| No Steam or Hot Water | Machine is not turned on. | Ensure the machine is plugged in, switched On at the power outlet and the POWER button is ON. |
| No Hot Water | Water tank is empty. | Fill water tank. |
| No Steam | Steam Wand is blocked. | Use the pin on the cleaning tool to clear the holes. If the steam wand continues to be blocked remove the tip of the steam wand using the spanner in the cleaning tool and soak in hot water. |
| The machine is ‘on’ but ceases to operate | Turn machine Off. Wait for 60 minutes and turn machine back ON.If problem persists, call Sage Customer Service. | |
| Steam pouring out of group head | Turn machine Off. Wait for 60 minutes and turn machine back ON.If problem persists, call Sage Customer Service. | |
| Espresso just drips from the portafilter spouts | · Coffee is ground too finely.· Too much coffee in the filter basket.· The filter basket may be blocked. | · Use slightly coarser grind.· Lower dose of coffee using the RAZORTM dosing tool.· Use the fine pin on the provided cleaning tool to clear the outlet hole(s) on the underside of the filter basket. If it continues to be blocked, dissolve a cleaning tablet in hot water and soak filter basket and portafilter in the solution for approx. 20 minutes. Rinse thoroughly. |
| Espresso runs out too quicklyand/orPressure gauge not reaching 9 bar | · The coffee is ground too coarse.· Not enough coffee in the filter basket.· Coffee not tamped firmly enough. | · Use slightly finer grind.· Increase dose of coffee and use the RAZORTM dosing tool to trim off excess coffee after tamping.· Tamp between 15-20kgs of pressure.· If the above suggestions do not help, check the machine. Place an EMPTY Dual Wall filter basket into the portafilter (either 1 CUP or 2 CUP). Press the MANUAL button. If the pressure gauge reads over 5 bar the machine is OK. Ensure correct dose by using the RAZORTM dosing tool. If the dose is correct, make the grind finer.· If the pressure gauge reads below 5 bar, contact Sage Customer Service Centre. |
| Coffee not hot enough · Cups not preheated.· Milk not hot enough (if making a cappuccino or latte etc.) | · Rinse cups under hot water outlet and place on cup warming tray.· Heat milk until side of the jug becomes hot to touch. | |
| No crema · Coffee beans are stale.· Using Single Wall Filter Baskets with pre-ground coffee. | · Buy freshly roasted coffee with a roasted-on date.· Ensure you use Dual Wall.· Filter Baskets with pre-ground coffee. | |
| Espresso runs out around the edge of the portafilterand/orPortafilter comes out of the group head during an extraction | · Portafilter not inserted in the group head correctly· There are coffee grounds around the filter basket rim. Inserted in the group head correctly.· Filter basket rim is wet or underside of portafilter lugs are wet. Wet surfaces reduce the friction required to hold the portafilter in place whilst under pressure during an extraction.· Too much coffee in the filter basket. | · Ensure portafilter is rotated to the right until the handle is past the centre and is securely locked in place. Rotating past the centre will not damage the silicone seal.· Clean excess coffee from the rim of the filter basket to ensure a proper seal in group head.· Always ensure filter basket and portafilter are dried thoroughly before filling with coffee, tamping and inserting into the group head.· Trim coffee dose using the RAZORTM dosing tool after tamping. |
| Unable to set auto start time | · Clock not set. · Set clock. | |
| E1, E2 or E3 error message on LCD screen | · An error that cannot be reset by the user has occurred. | · Contact Sage Customer Service Centre. |
| Coffee puck is sticking to the shower screen | · This is normal and happens occasionally. The dry puck feature creates a slight vacuum on top of the coffee puck which will occasionally hold the puck against the shower screen instead of leaving it in the filter basket. | |
| Pumps continue to operate / Steam is very wet / Hot water outlet leaks | · Using de-mineralised or distilled water which is affecting how the machine is designed to function. | · We recommend using cold, filtered water.· We do not recommend using water with no/low mineral content such as de- mineralised or distilled water. If the problem persists, contact Sage Customer Service Centre. |

GUARANTEE
2 YEAR LIMITED GUARANTEE
Sage Appliances guarantees this product for domestic use in specified territories for 2 years from the date of purchase against defects caused by faulty workmanship and materials. During this guarantee period Sage Appliances will repair, replace, or refund any defective product (at the sole discretion of Sage Appliances).
All legal warranty rights under applicable national legislation will be respected and will not be impaired by our guarantee. For full terms and conditions on the guarantee, as well as instructions on how to make a claim, please visit www.sageappliances.com.
DANSK
TRYK OG HOLD NED - MANUEL INDSTILLING
TEMPERATURENHED - °C/°F (SEt)
FILL TANK (FYLD TANKEN)
INDSÆT FILTERHOLDEREN
3 - BEGYND AFKALKNING
KLARGJ∅RING AV APPARATET
TRYKK OG HOLD - MANUAL-KNAPPEN
PROGRAMMERING AV FOR-TREKKING
2 - T∅MMING AV VARMTVANNSBEHOLDERE
3 - BEGYNN AVKALKING
PAINA & PIDÄ (PRESS & HOLD) - MANUAALISESTI
PUHDISTUSMUISTUTUS (CLEAN ME!)
SUODATINKAHVAN KIINNITYS
2 - BOILERIEN TYHJENNYS
HETVATTNETS LED-LAMPA BLINKAR
BRG Appliances Limited Unit 3.2, Power Road Studios, 114 Power Road, London, W4 5PY Freephone (UK Landline): 0808 178 1650 Mobile Calls (National Rate): 0333 0142 970
DEU
AUT
www.sageappliances.com
Registered in England & Wales No. 8223512 Registered in Germany No. HRB 81309 (AG Düsseldorf) Registered in France No. 879 449 866 RCS
EN Due to continued product improvement, the products illustrated or photographed in this document may vary slightly from the actual product. DEU Aufgrund unserer kontinuierlichen Produktverbesserungen kann die hier gezeigte Abbildung geringfügig vom tatsächlichen Produkt abweichen. FRA En raison de leur amélioration continue, les produits représentés ou photographiés dans le présent document peuvent différer légèrement du produit réel. ITL A causa del continuo miglioramento dei prodotti, il prodotto descritto o illustrato in questo documento può variare leggermente rispetto al prodotto reale. NLD Vanwege voortdurende productverbeteringen, kunnen de afgebeelde producten in dit document licht afwijken van het eigenlijke product. ESP Perfeccionamos nuestros productos continuamente, por lo que el artículo podría diferir ligeramente de la ilustración o la fotografía en este documento. POR Devido à melhoria continua dos produtos, os produtos ilustrados ou fotografados neste documento podem variar ligeiramente do produto real. DK På grund af løbende produktudvikling kan de illustrerede eller fotograferede produkter i dette dokument variere en smule fra det faktiske produkt. SE På grund av kontinuerlig produktförbättring kan produkterna som visas i illustrationema och fotografierna i detta dokument skilja sig något från den faktiska produkten. FI Jatkuvan tuotekehittelyn seurauksena kuvituksen tuotteet eivät välttämättä ole täysin samanlaisia kuin varsinainen tuote. NO På grunn av kontinuerlig produktutvikling kan produktene som er vist eller avfotografert i dette dokumentet, variere noe fra det faktiske produktet.
Copyright BRG Appliances 2021


- SAGE®
- ACCESSORIES / TILBEH∅R / TILBEH∅R / LISÄVARUSTEET / TILLBEHÖR
- CARE & CLEANING / PLEJE & RENG∅RING / VEDLIKEHOLD OG RENGJ∅RING / HOITO & PUHDISTUS / SKÖTSEL OCH RENGÖRING
- ENGLISH
- IMPORTANT SAFEGUARDS
- READ ALL INSTRUCTIONS BEFORE USE AND SAVE FOR FUTURE REFERENCE
- IMPORTANT SAFEGUARDS FOR ALL ELECTRICAL APPLIANCES
- OPERATION
- WARNING
- BEFORE FIRST USE
- MACHINE PREPARATION
- CONDITIONING THE WATER FILTER
- FIRST USE
- INITIAL START UP
- NOTE
- FLUSHING THE MACHINE
- START UP
- LCD INTERFACE
- DISPLAY MODES
- SHOT TEMP
- SHOT CLOCK
- CLOCK
- GENERAL OPERATION
- 1 CUP
- 2 CUP
- MANUAL
- STEAM
- CAUTION: BURN HAZARD
- HOT WATER
- LCD PROGRAMMING FUNCTIONS
- SHOT DURATION
- 2 CUP DURATION PROGRAMMING
- SHOT VOLUME
- 2 CUP VOLUME PROGRAMMING
- TIP
- AUTO START
- SET CLOCK
- ADVANCED ESPRESSO FUNCTIONS
- PRESS & HOLD - 1 CUP
- PRESS & HOLD - 2 CUP
- PRESS & HOLD - MANUAL
- ACCESS ADVANCE MENU
- TO ACCESS THE ADVANCED MENU
- RESETTING DEFAULT SETTINGS
- TEMPERATURE UNIT - °C/°F (SET)
- STEAM TEMPERATURE (STEA)
- MACHINE AUDIO (SND)
- VOLUMETRIC CONTROL (VOL)
- ADVANCED FEATURES
- PRE-INFUSION PROGRAMMING
- PRE-INFUSION DURATION
- PRE-INFUSION POWER
- ALERTS
- STEAM LED FLASHING AT START UP
- HOT WATER LED FLASHING AT START UP
- HOT WATER LED FLASHING
- FILL TANK
- CLEAN ME
- PRE HEATING
- HEATING YOUR CUP OR GLASS
- HEATING THE PORTAFILTER AND FILTER BASKET
- SELECTING FILTER BASKET
- THE GRIND
- COFFEE DOSING AND TAMPING
- TRIMMING THE DOSE
- PURGING THE GROUP HEAD
- INSERTING THE PORTAFILTER
- EXTRACTING ESPRESSO
- TEXTURING MILK
- HINTS AND TIPS
- CARE & CLEANING
- CLEANING CYCLE
- CLEANING THE STEAM WAND
- DESCALE (DESC)
- PREPARE FOR DESCALE
- EMPTY BOILERS
- 3-BEGIN DESCALE
- FLUSH BOILERS
- REPEAT STEP 4 FLUSH BOILERS
- TROUBLESHOOTING
- GUARANTEE
- 2 YEAR LIMITED GUARANTEE
- DANSK
- TRYK OG HOLD NED - MANUEL INDSTILLING
- TEMPERATURENHED - °C/°F (SET)
- FILL TANK (FYLD TANKEN)
- INDSÆT FILTERHOLDEREN
- BEGYND AFKALKNING
- KLARGJ∅RING AV APPARATET
- TRYKK OG HOLD - MANUAL-KNAPPEN
- PROGRAMMERING AV FOR-TREKKING
- T∅MMING AV VARMTVANNSBEHOLDERE
- BEGYNN AVKALKING
- PAINA & PIDÄ (PRESS & HOLD) - MANUAALISESTI
- PUHDISTUSMUISTUTUS (CLEAN ME!)
- SUODATINKAHVAN KIINNITYS
- BOILERIEN TYHJENNYS
- HETVATTNETS LED-LAMPA BLINKAR
- DEU
- AUT
Brand : SAGE
Model : the Dual Boiler SES920
Category : Coffee maker