Gustus Gulliver 1128 90010 - Food processor Eta - Free user manual and instructions
Find the device manual for free Gustus Gulliver 1128 90010 Eta in PDF.


| Product Type | Food processor (Multi-purpose) |
| Bowl Capacity | 6 liters (stainless steel) |
| Weight | Approx 8.1 kg |
| Noise Level | 83 dB(A) |
| Protection Class | I |
| Speed Settings | Variable (MIN, 1-6, MAX) plus Pulse (P) |
| Attachments Included | Mixing whisk, whipping whisk, kneading hook, flexi whisk, mincer (with 3 discs), grating disc adapter (4 discs), glass blender, poppy seed grinder |
| Safety Features | Thermal safety fuse, safety lock on blender cover, multifunctional head security safeguard, overheat protection |
| Material | Plastic housing, stainless steel bowl, glass blender container |
| Cleaning | Removable parts (bowl, lid, attachments) dishwasher safe except mincer body and grating discs; wipe motor unit with damp cloth |
| Maximum Continuous Operation | 30 minutes, then 30 min cool-down |
| Power Supply | Mains voltage (see type label) |
| Input Power | See type label (typical ~1200 W) |
Frequently Asked Questions - Gustus Gulliver 1128 90010 Eta
User questions about Gustus Gulliver 1128 90010 Eta
0 question about this device. Answer the ones you know or ask your own.
Ask a new question about this device
Download the instructions for your Food processor in PDF format for free! Find your manual Gustus Gulliver 1128 90010 - Eta and take your electronic device back in hand. On this page are published all the documents necessary for the use of your device. Gustus Gulliver 1128 90010 by Eta.
USER MANUAL Gustus Gulliver 1128 90010 Eta
Multi-purpose food processor • INSTRUCTIONS FOR USE
GB 40-55
natural_image
Exterior view of a GUSTUS brand kitchen mixer with visible branding and control buttons (no text-heavy elements)
flowchart
graph TD
    A["Step 2: Raw Material Inspection"] --> B["D3"]
    B --> C["D5"]
    C --> D["Intermediate Process"]
    D --> E["D4"]
    E --> F["D2"]
    F --> G["D9"]
    G --> H["D10"]
    H --> I["D8"]
    I --> J["D7"]
    J --> K["D16"]
    K --> L["D15"]
    L --> M["D14"]
    N["Step 1: Assembly"] --> O["D0"]
    O --> P["D13"]
    P --> Q["D1"]
    Q --> R["D11"]
natural_image
Two circular mechanical components with directional arrows and lock symbols, separated by a dashed line (no text or labels)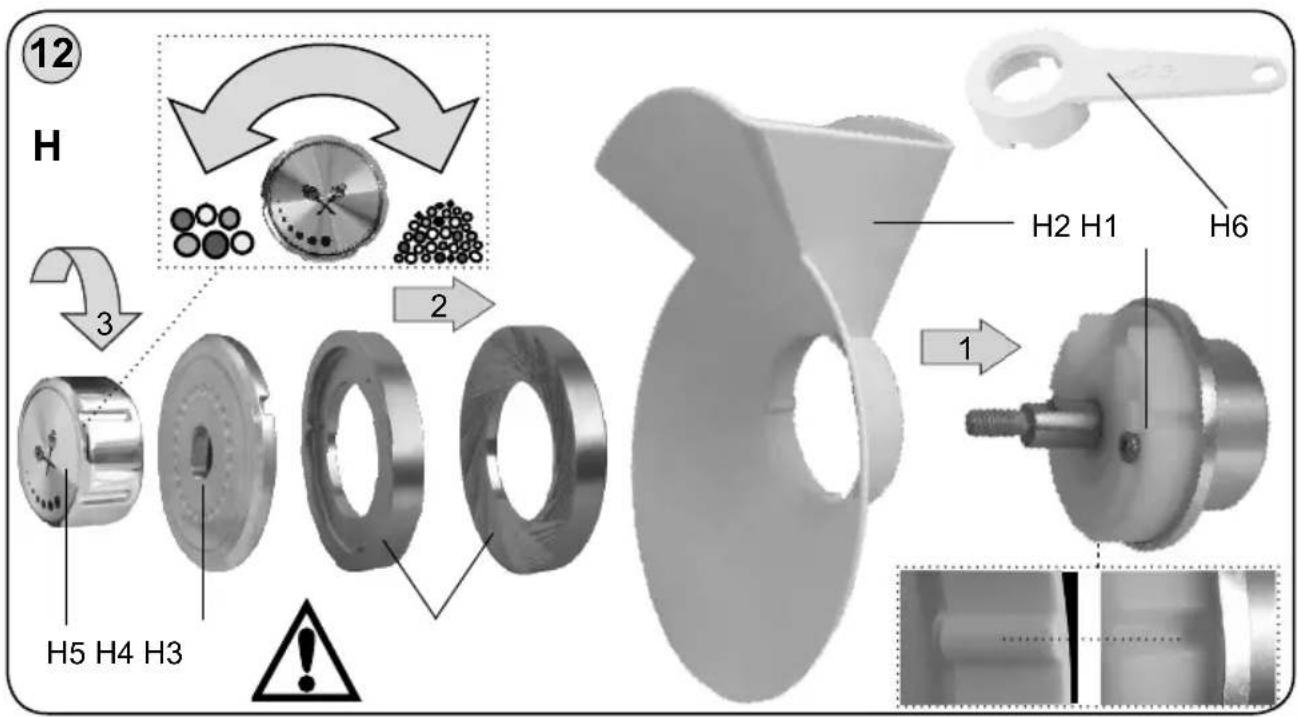
CZ I. BEZPEČNOSTNÍ UPOZORNĚNÍ 8
II. PŘÍPRAVA A POUŽITÍ 11
Multi-purpose food processor
eta 1128
GUSTUS II
USER'S MANUAL
Dear customer, thank you for purchasing our product. Please read the operating instructions carefully before putting the appliance into operation and keep these instructions including the warranty, the receipt and, if possible, the box with the internal packing.
I. SAFETY NOTICE

- Consider the instructions in the user's manual as a part of the appliance and provide it to other users of the appliance.
- Check that the voltage on the type label corresponds to the voltage in electric power socket.
- Do not insert the power plug into the electric power socket and do not pull it out of the electric power socket with wet hands or by pulling on the power cord!
- This appliance shall not be used by children. Keep the appliance and its power cord away from children. Children shall not play with the appliance.
- Appliances can be used by persons with reduced physical, sensory or mental capabilities or lack of experience and knowledge if they have been given supervision or instruction concerning use of the appliance in a safe way and if they understand the hazards involved.
- If the power cord of the appliance is corrupted, it has to be replaced by the manufacturer, its service technician or a similarly qualified person so as to prevent dangerous situations.
- Before exchanging any accessories or accessible parts that are moving during use, before assembly and disassembly, before cleaning and maintenance or after finishing the work, switch off the appliance and disconnect it from mains by unplugging the power cord plug from the electrical socket!
- Always unplug the appliance from power supply if you leave it unattended and before assembly, disassembly or cleaning.
- Never use the appliance if the power cord or power plug are damaged, if the appliance is not correctly operating or if it has fallen on the floor and been damaged, or if it has fallen into water. In such cases take the appliance to a professional service centre to verify its safety and correct function.
- When handling the appliance, especially during installation of any accessories, removing food from containers and cleaning, please proceed carefully – the accessories are sharp. Injury is imminent if the appliance is used contrary to the operation manual.
- When the appliance is in operation, prevent pets, plants or insects to get in contact with it.
- The product is intended for home use and similar (in shops, offices and similar workplaces, in hotels, motels and other residential environments, in facilities providing accommodation with breakfast). It is not intended for commercial use!
- This appliance is not intended for outdoor use.
- Do not place any objects on the top of the appliance.
– Watch the appliance for the entire time of food processing!
- Always use only one function of the appliance, never turn on several functions at the same time (e.g. processing food in the bowl B1 and at the same time in the meat mout A4).
- Never submerge the appliance under water and do not wash under running water!
- The appliance must not be used in damp or wet environment and in any environment with the danger of fire or explosion (spaces where chemicals, fuels, oils, gases, paints and other flammable or volatile materials are stored).
- Do not leave the appliance in operation without supervision and supervise it for the entire time that food is being prepared!
- Do not use safety lock controlled by the blender cover A8 for switching off the appliance!
- It is not allowed to modify the surface of the appliance in any way (e.g. using a selfadhesive wallpaper, foils, etc.)!
- Use the appliance only in the working position in places, where there is no risk of it being knocked over and at a sufficient distance from sources of heat (e.g. fire stoves, electric/gas stoves, cookers, etc.), and wet surfaces (kitchen sinks, wash basins etc.).
- Your foot processor is fitted with an electronic speed sensor control that is designed to maintain the speed under different load conditions. You may therefore hear some variation in speed during the operation as the foot processor adjusts to the load and speed selected - this is normal.
- The appliance is equipped with thermal safety fuse which disconnects current supply incase of engine overloading. If it occurs, unplug the appliance and let the appliance getcooled.
– Before preparation, remove possible packages from food (e.g. paper, a PE bag, etc.).
- Do not turn on the appliance without any ingredients inside!
- Use the appliance only with accessories designed for this model. The use of other accessories may present a danger for the user.
- When mixing or blending liquids, never use a greater volume than is recommended.
- Do not insert accessories into any body cavities.
- Do not exceed the maximum time of uninterrupted operation of the appliance as specified for the respective attachments in the table. Never exceed the total time of 30 minutes of uninterrupted operation. Then let the food processor cool down for at least 30 minutes.
– Before removing the filling opening cover, allow the rotating parts to stop completely.
- Never put fingers into the feeding hole or use a fork, knife, spatula, spoon etc. to do so.
– Due to safety it is not possible to change the attachments while the drive unit is in operation.
- Make sure hair and loose pieces of clothing do not get into the attachments or into the rotating drive to avoid risk of them tangling up in the mixing blade or the rotating drive itself.
- Before removing the extra attachment from the drive unit, allow the rotating parts to stop completely.
- If the processed foods start to stick to the accessories (e.g. on the beather or the whisk or the kneading hook), turn off the appliance and carefully clean the accessories (e.g. with a spatula).
- Never assemble accessories on the top of the drive unit!
- When mounting or removing the bowl, do not apply much pressure on the bowl handle.
– Before connecting the appliance to the mains, make sure it is turned off.
- Do not lift and carry the food processor using the bowl handle, but always use the recesses at the bottom of the drive unit!
- Make sure that the power cord does not come into contact with the rotating part of the appliance.
- Never use the extra attachment if it is not working properly, if it fell to the ground and got damaged. In such cases take the extra attachment to a specialized service to check its safety and proper function.
- When assembling the extra attachment, follow the instructions for use carefully. In order to ensure proper functioning, any other way of assembling the extra attachment is not permissible!
- The assembled extra attachment can be attached and removed only when the drive unit is switched off and the power cord is unplugged from the power socket.
- Do not wind the power cord around the appliance; this will extend its life.
- Never immerse the gearbox into water and never wash it in running water!
- Should excessive vibration occur when using this attachment, either reduce the speed or stop the machine and remove some of the contents.
- ATTENTION: Do not use this processor in series with an external timer, remote controller or any other device that switches on the appliance automatically, since a fire risk exists when the processor is accidentally covered or displaced at the moment it switches on.
- Make sure that the power cord does not come into contact with the rotating part of the appliance.
- The power cord must not be damaged by sharp or hot objects, by an open flame and it must not be submerged under water.
- Never place it on hot surfaces and do not leave it hanging over the edge of a table or a work bench. If the cord is brushed against or pulled by for example children the appliance may tip over or be pulled down and lead to serious injuries!
- If the use of an extension cord is necessary, then it must not be damaged and must meet the valid norms in force.
- Only use the appliance with original accessories from the manufacturer.
- Use this appliance only for the purpose for which it was designed as specified in this user's manual. Never use the appliance for any other purpose.
- WARNING: There is a risk of injury in case of incorrect use (not in accordance with the manual) of the appliance.
- All text in other languages and pictures shown on the packaging, or the product itself, are translated and explained at the end of this language mutation.
- The manufacturer takes no responsibility for damages and injuries caused by the incorrect use of supplementary machines and accessories (e.g. ruining of foods, injury, cuts) and takes no responsibility arising from the warranty on the appliance in the case that the above safety notices were not followed.
II. PREPARATION AND USE
First remove all packaging materials, take out the food processor and all accessories.
Then remove all adhesive foils, stickers and paper from the food processor and accessories. Before the first use, wash all parts, which will be in contact with food, in warm water with a mild detergent, thoroughly rinse in clear water and wipe dry or let dry. Put the assembled food processor with the selected attachments on a flat, stable, smooth and clean worktop, out of reach of children and incapacitated people. Provide sufficient free space for ventilation. The appliance openings allow free airflow for ventilation, and must not be covered or otherwise blocked. The feet must not be removed. Electric power socket must be easily accessible to allow easy disconnecting of the food processor in the case of emergency.
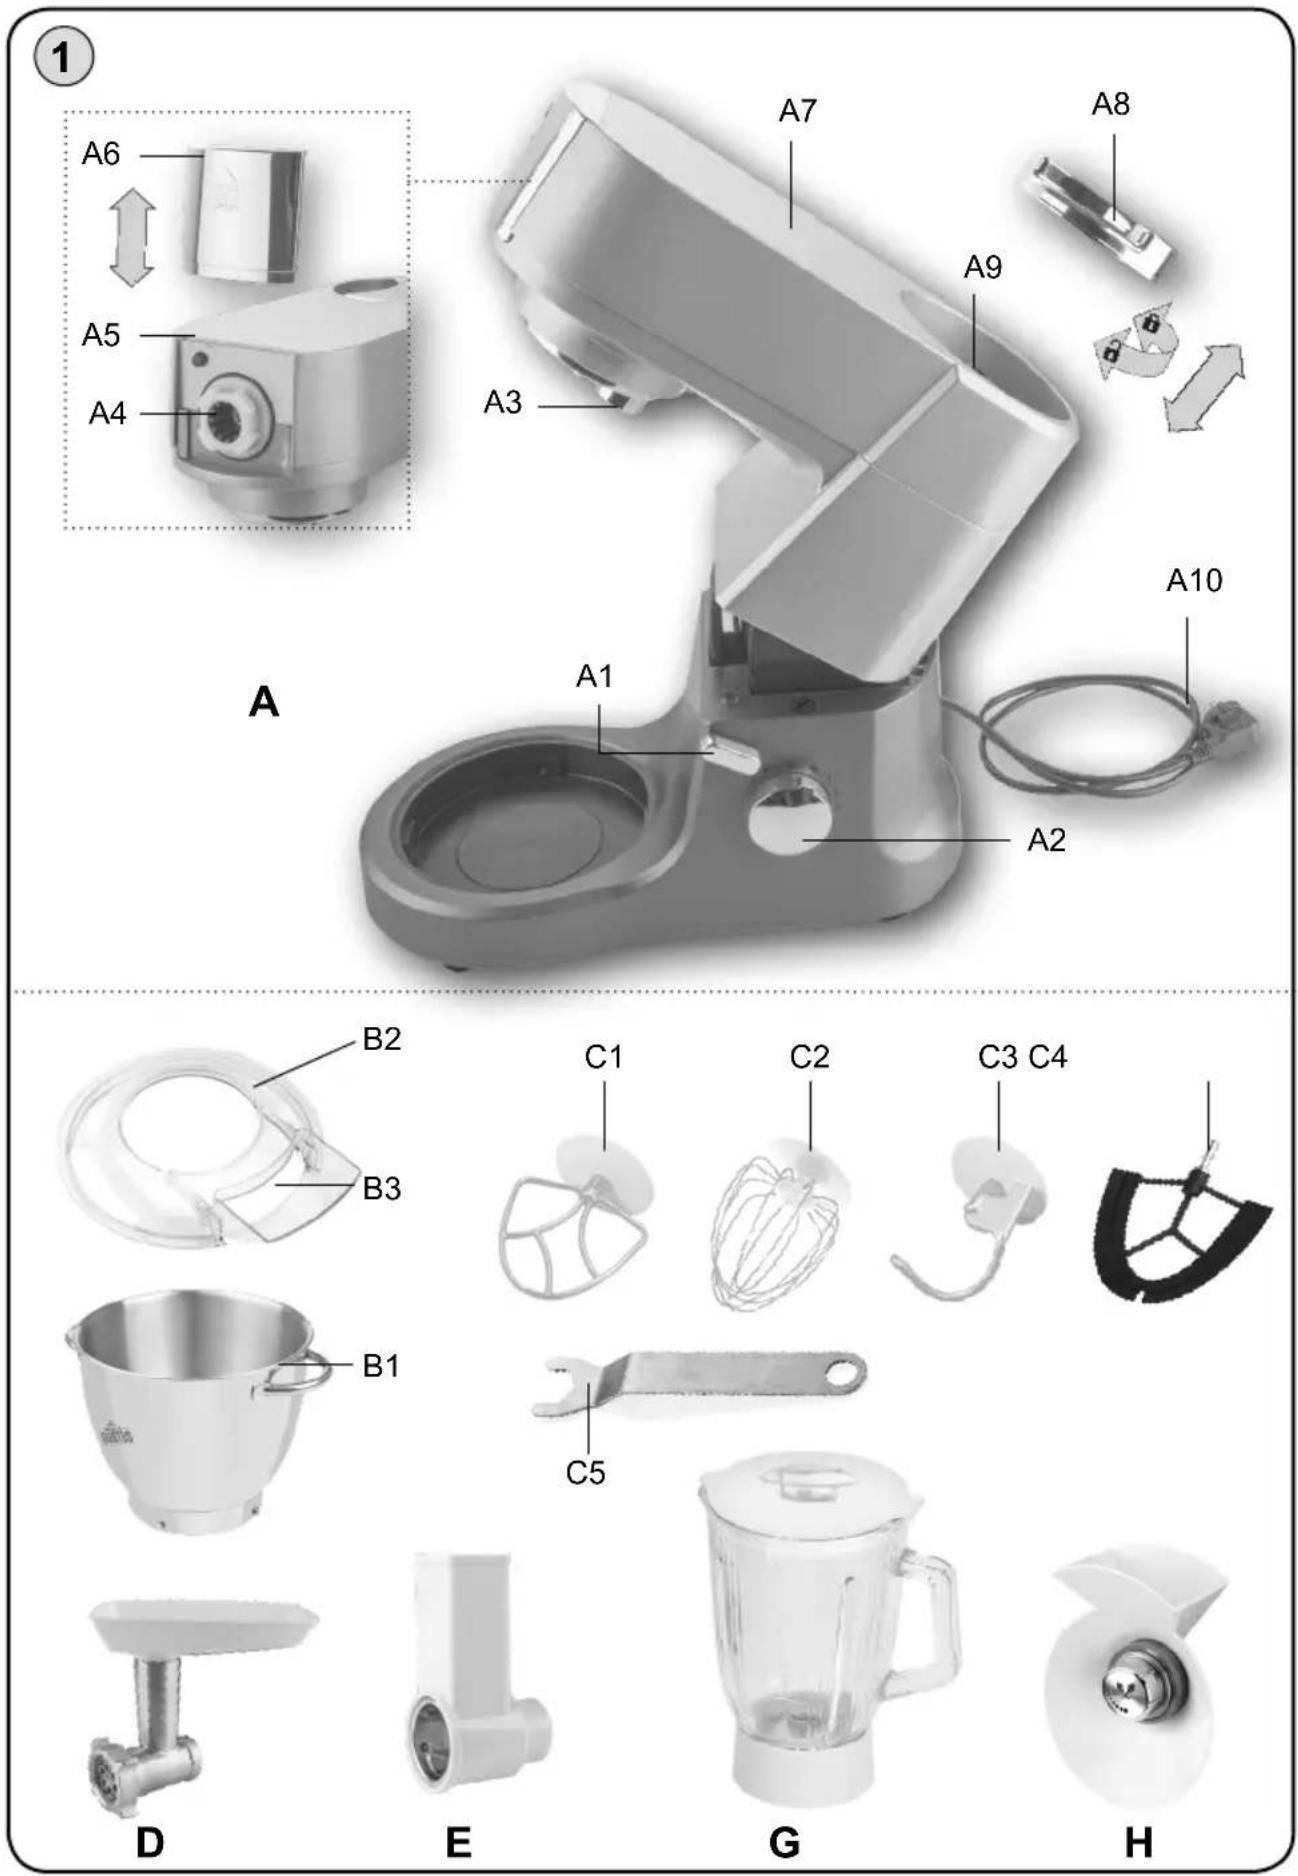
III.1) Food processor (A)
Description (Fig. 1)
A1 – Multifunctional head release lever A6 – Removable cover
A2 – Speed regulating knob A7 – Multifunctional head
A3 – Bottom mount for adapters C1 - C4 A8 – Cover
A4 – Front mount for attachments D, E, H A9 – Blender mount G
A5 – Release button A10 – Power cord
B1 – Stainless bowl
B3 – Filling funnel
B2 – Bowl lid
The model you purchased includes the attachments and adaptors specified in the table at the end of this language version of the manual.
Food processor control
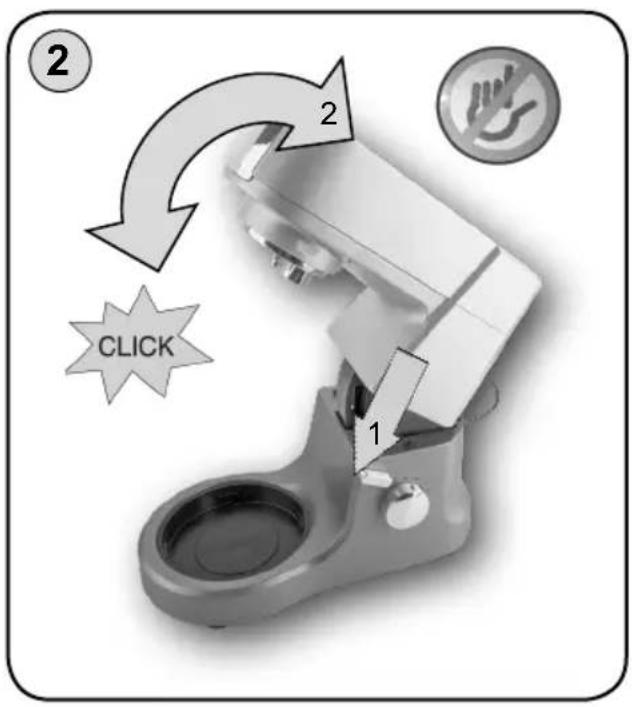
- Tilting the multifunctional head downward/upward (Fig. 2)
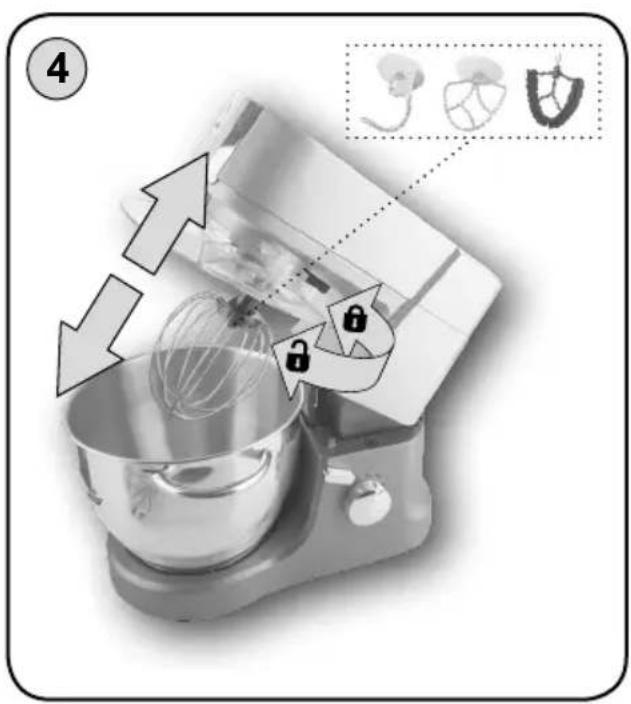
Rotating the release lever A1 slightly will lift the head upward. Rotating the lever A1 further and pushing the unit down will tilt the head downward.
- On/off switching of the food processor
Before you switch on the food processor, plug the power cord A10 into electric socket and the control light speed regulating knob will start on. Then switch on the food processor by rotating the speed regulating knob A2. After you finish working, switch off the food processor by rotating the speed regulating knob to position 0.
- Speed control
Speed is controlled by setting the speed regulating knob A2 to the desired position within the interval MIN - 1 - 2 - 3 - 4 - 5 - 6 - MAX. For short operation time at the maximum speed, the regulating knob can be set to position "P" (PULSE). The regulating knob must be held by hand in this position. Releasing the regulating knob will return it to position 0 and stop rotating.
- Multifunctional head attachment security safeguard
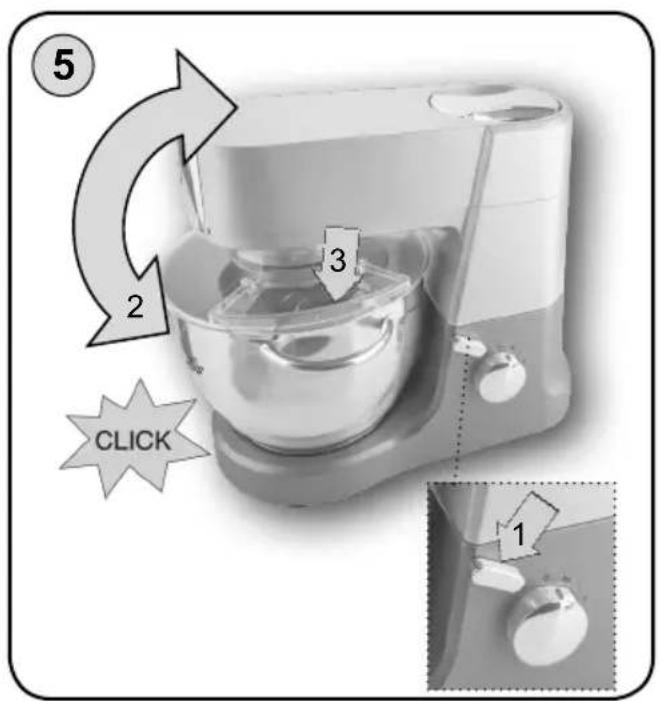
In order to disassemble the food processor and to remove the attachments from A4 front mount for attachments, apply a reverse procedure. Before removing the attachments from the motor unit head, you first have to push the release button A5.
- Blender security safeguard
The food processor cannot be switched on, if the blender cover A8 is removed, and the blender is not correctly fixed.
Food processing time depends on the volume, type and quality of the processed ingredients. It usually takes several minutes under normal conditions.
III.2) Whipping, mixing and flexi whisk, kneading hook
Description (Fig. 1)
C1 – Mixing whisk C3 – Kneading hook
C2 – Whipping (wire) whisk C4 – Flexi (rubber) whisk
C5 – Release lever
Safety hints and tips
- With regard to the bowl size, please note that the food processor is not able to sufficiently whip / knead very small amounts of food. For optimum results input at least 300 g of food (if you are whisking egg-whites, use at least 2 eggs).
- Never fill the bowl with water or other liquid to the maximum level. Respect the maximum allowed capacity (see the Table of Use, Chapter IV.).
- First switch off the food processor, then tilt its multifunctional head upward.
- When tilting the multifunctional head upward, control / slow down its rotation by hand.
- The food processor is fitted with a security safeguard, which will switch off the motor once the multifunctional head is tilted upward (during operation). After the head is titled back into the working position, the motor will remain switched off. To turn it on, you have to return the speed regulating knob A2 to position 0.
Assembly for work with attachments
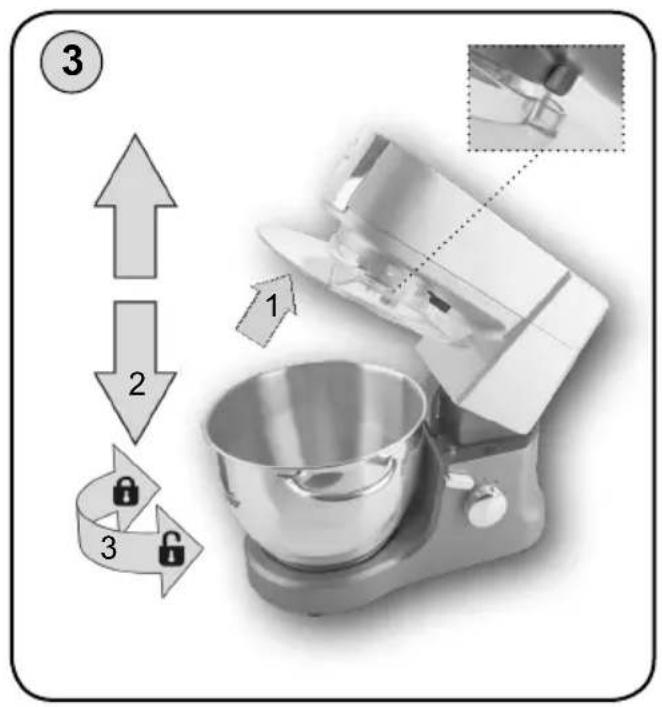
Assemble the food processor according to instructions in Figure No. 2, 3, 4 and 5 by lifting the multifunctional head up and putting the bowl lid on its bottom side. Then put the bowl with the food in the lower section of the food processor. Then install the desired adapter on the mount, and tilt the multifunctional head downward to the working position. Place filling opening cover on the filling opening. Apply reverse sequence to remove/exchange the adapter.
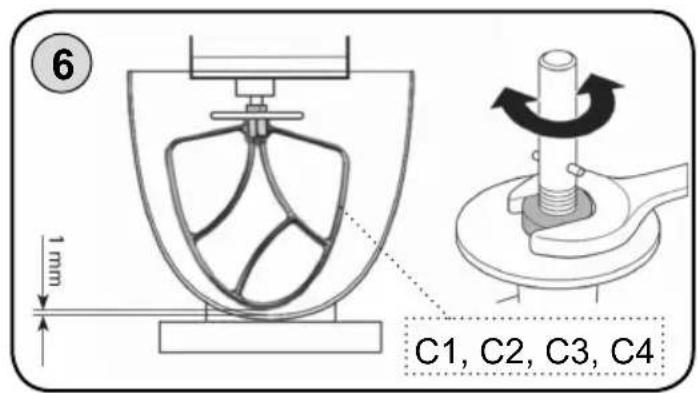
Setting the optimum height of adapters (Fig. 6)
If the adapter hits the bowl bottom or does not reach the ingredients on the bowl bottom, adjust the height. Please proceed as follows: First install the desired adapter in the food processor, and tilt the empty bowl and the multifunctional head A7 downward to the working position. Then hold the adapter in one hand and release the adapter nut by an spanner C5. Adjust the height by rotating the adapter clockwise or anticlockwise by hand. The adapter will move downward or upward inside the unit. The adapter end should be as close as possible to the bowl bottom and walls, but must not touch them. After the height is adjusted, properly tighten the nut.
Use
A) Whipping

- Use the whipping whisk C2 to whip cream, eggs and egg-whites.
- Adjust the processing speed according to the volume, type and quality of the food you are processing, in the interval MIN to MAX.
- The maximum amount of food per processing cycle is 1.2 l.
- Never use the whipping whisk for kneading heavy dough or mixing light dough!
B) Flexi whipping

- Use the whipping whisk C4 to whip dessert creams, instant puddings, mayonnaise, biscuit dough, etc.
- Adjust the processing speed according to the volume, type and quality of the food you are processing, in the interval MIN to 2.
- The maximum amount of ingredients per processing cycle is about 2.5 kg.
- Never use the whipping whisk for kneading heavy dough!
Whipping tips
- Use ingredients of room temperature.
- If the whipping process is not optimal, add a small amount of lemon juice or salt. Cool down creams, whipped creams and skims to 6^ or less.
- Before whipping egg-whites, be sure that the adapter and the container are dry, with no oil residues. Egg-whites should be of room temperature.
- Only use the flexi whisk when a food is placed in the bowl. Using the whisk without any food in the bowl may produce unpleasant (squeaky) sound, which may be prevented by applying a small amount of oil.
- You may add food through the feed tube of the bowl lid B2.
C) Mixing

- Use the mixing whisk C1 for light dough, cake mixtures, cookies, glazes, fillings, mashed potatoes, etc.
- Adjust the processing speed according to the volume, type and quality of the food you are processing, in the interval MIN to MAX.
- The maximum amount of ingredients per processing cycle is about 2.5 kg.
– Never use the mixing whisk for kneading heavy dough!
D) Kneading

- Use the kneading hook C3 for kneading crispy / light / heavy dough.
- Adjust the processing speed according to the volume, type and quality of the food you are processing, in the interval MIN to 2.
- If you process a larger amount of dough, process it in several batches. The maximum amount of ingredients per processing cycle is about 1.6 kg. Do not run more than four consecutive cycles. Make a break of at least 30 minutes before you continue.
Tips
- Use ingredients of room temperature.
- Mix the yeast in advance in lukewarm milk or water.
- Once the dough shape becomes spherical, finish kneading or let the dough rise according to your recipe.
- Ingredients will best mix if you add the liquid first.
- Stop the food processor as necessary to remove the mixture from the kneading hook, using a suitable tool.
- Various flour types may require different amounts of liquid, with the dough stickiness having a considerable influence on the food processor load when switched on.
- If you hear your food processor is stressed too much, switch it off, remove half of the dough batch and separately process each half.
III.3) Mincer (D)
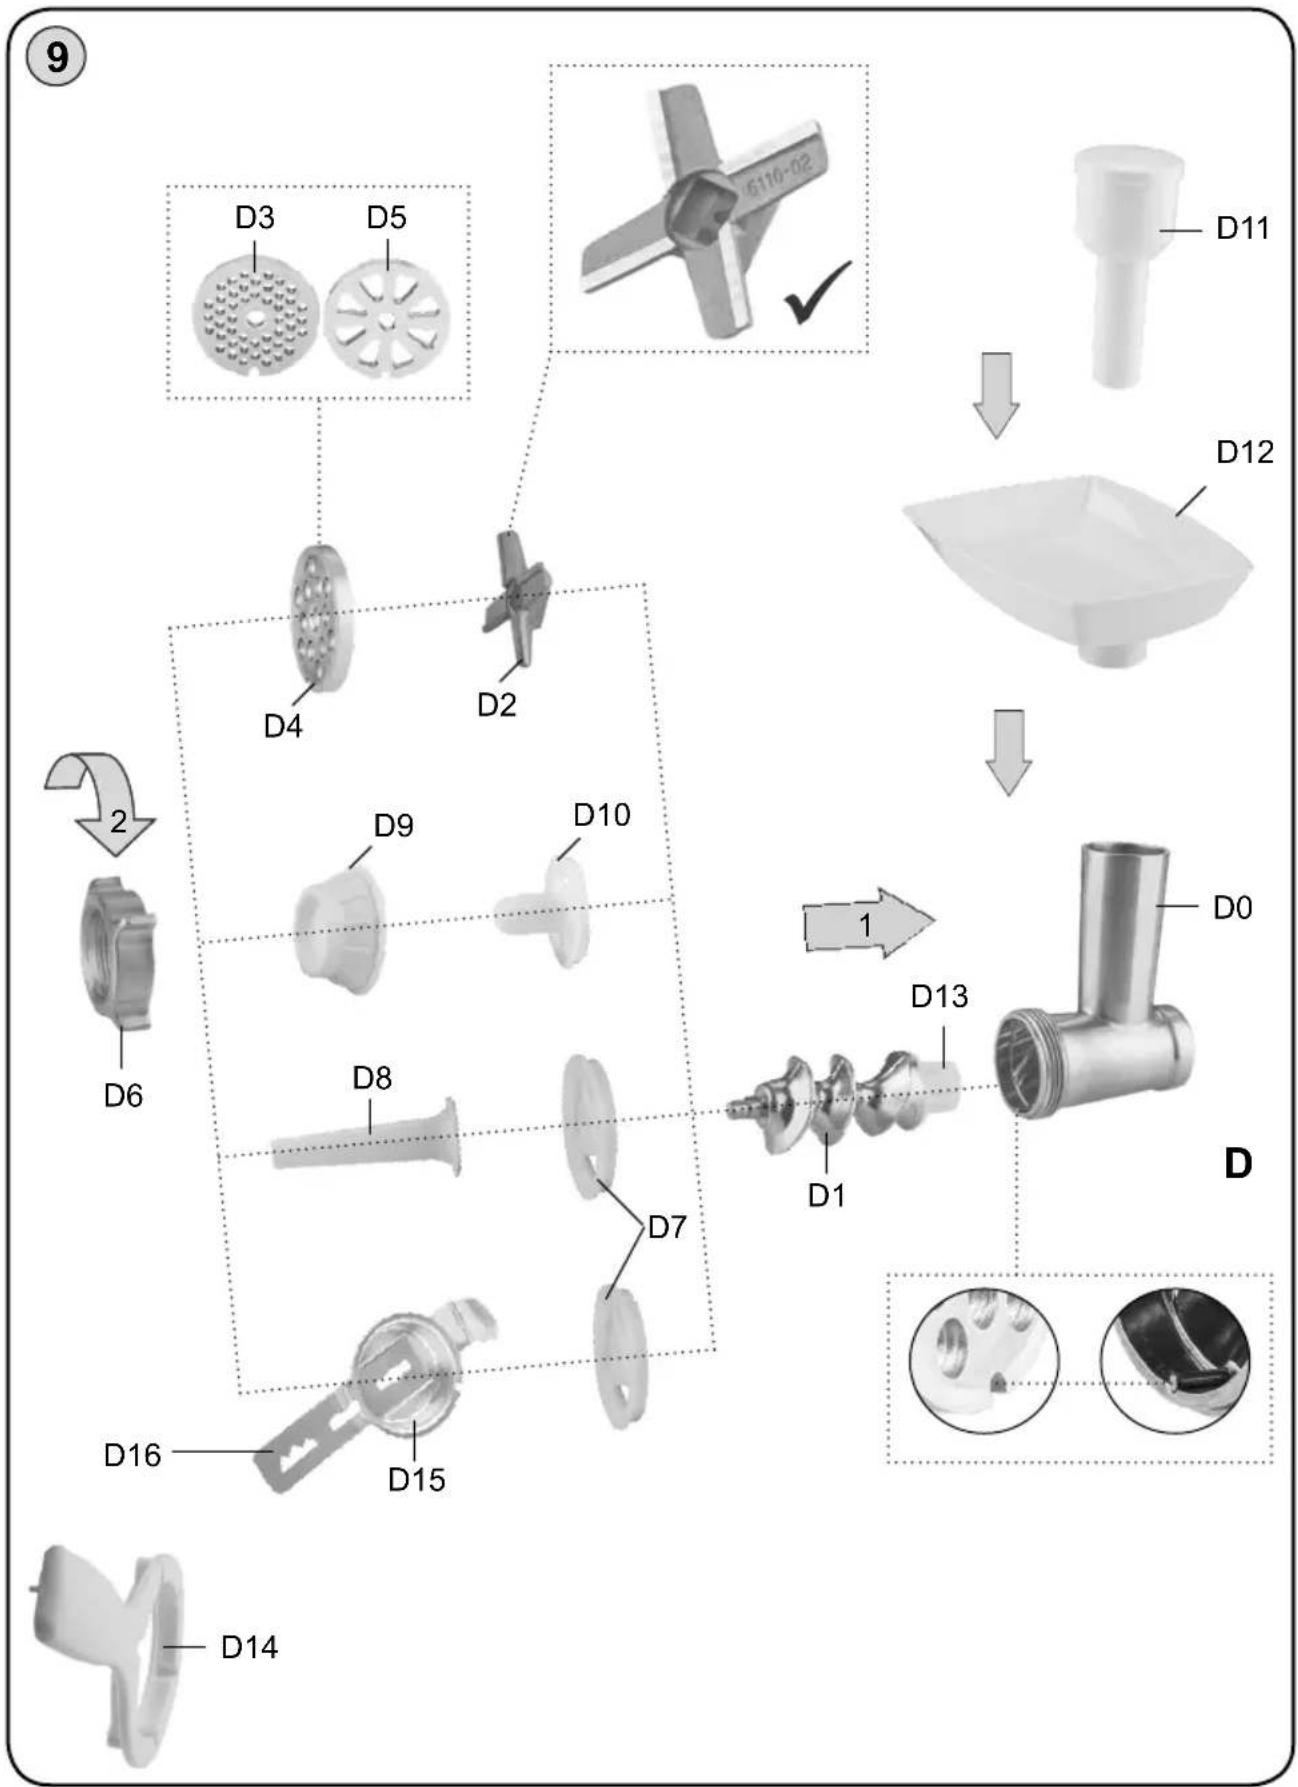
Description (Fig. 9)
D0 – Mincer body D8 – Adapter for smoked food
D1 – Spiral feeder D9 – Former
D2 – Cutting blade D10 – Cone
D3 – Medium mincing disc
D4 – Coarsem mincing disc
D5 – Extra coarse mincing disc
D6 - Nut
D7 – Separátor
D11 - Pusher
D12 - Hopper
D13 - Cogwheel
D14 – Release lever
D15 – Confectionery decoration nozzle holder
D16 – Confectionery decoration nozzle
Safety hints and tips
- We recommend interrupting the operation from time to time, switch off the food processor and remove the food stuck on the attachments (or blocking the attachments).
- Never let the mincer running if the hopper is empty.
- Do not mince frozen meat.
Assembly
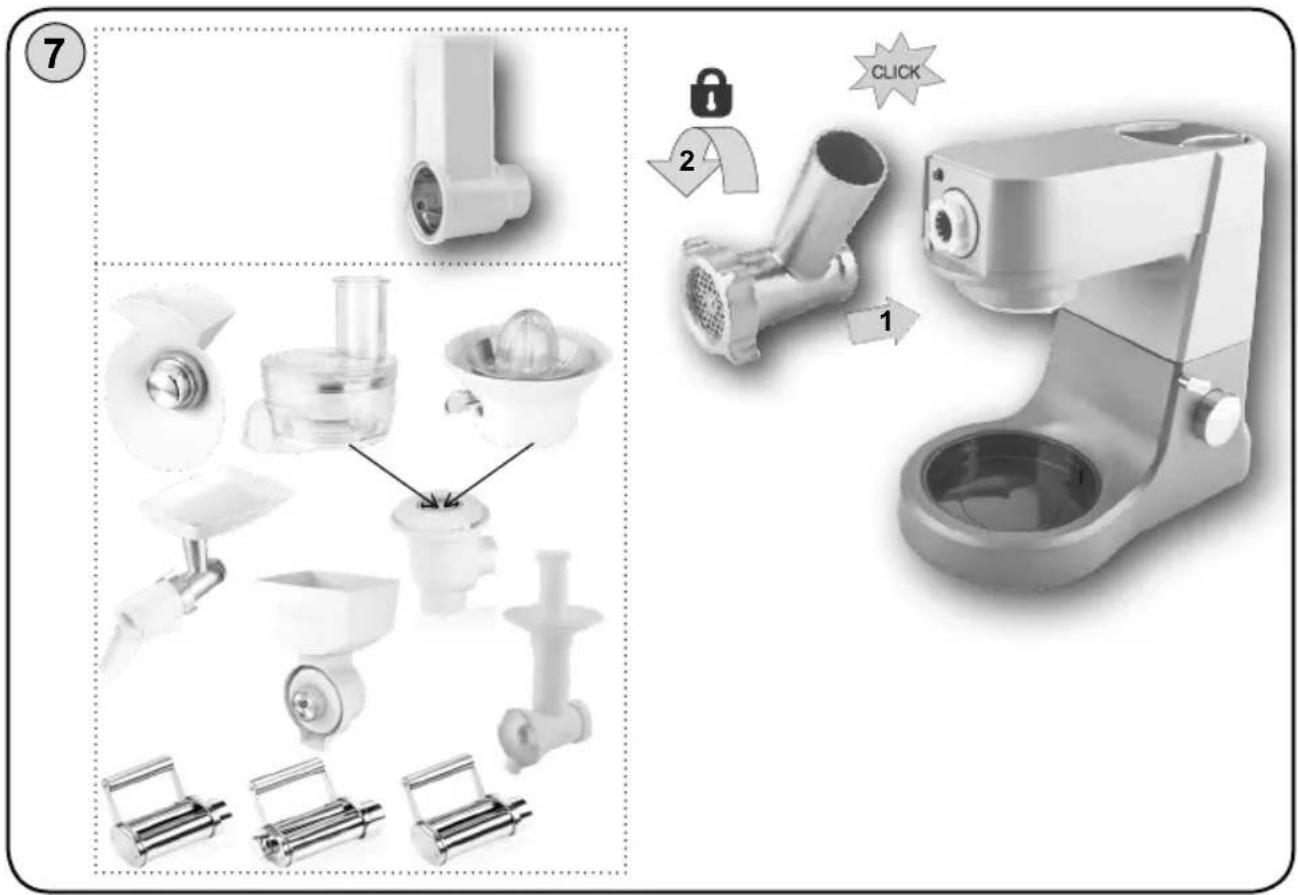
Assemble the mincer according to the intended use (for meat, smoked food, Kebbe) and mount it on the main motor unit – see Figures 7 and 9.
Apply reverse procedure to disassemble the mincer D6 and to remove it from the motor unit head. Loosen the nut D6 using the release lever D14.
A) Meat mincing

The mincer can mince any type of meat, which is free of bones, tendons and skin. Mincing coarseness can be adjusted by using different mincing discs (D3, D4, D5) with various sizes of openings. Cut the meat in advance into cubes of about 3x3x3 cm. Put stainless bowl B1 or any other bowl under the mincer to catch the minced meat. Put the meat cubes into the hopper so that the spiral feeder D1 can take them without being blocked, and slightly push the meat down, using the pusher D11. Proceeding like this will prevent the motor unit from becoming overloaded. The maximum amount of the processed meat is 5 kg.
The maximum permitted processing speed is 6.
Tips
- Regularly check if the mincing disc openings are passable during the meat processing. If the disc openings get blocked while mincing meats of various consistency (for example bacon and liver), the juices may flow along the screw feeder shaft inside the motor unit of the food processor. Therefore pay maximum attention to ensure smooth flow of the processed food through the mincing disc. If the flow is blocked, immediately switch off the food processor, disassemble the mincer and clean all components.
B) Smoked foods (sausages, frankfurters), white pudding, etc.

Put the minced meat into hopper D12. Use the pusher D11 to slightly push the meat inside the mincer. Soak the sausage casings in warm water (for about 10 minutes) to improve their elasticity. Then put it „arranged in folds“ on the outlet piece. Let 5 cm at the end of the casing hang freely, and tie up or skewer it. Switch on the food processor at a speed in the interval MIN to MAX (as needed for the respective product). Put the prepared mixture into the hopper and slightly push it down using the pusher D11. Proceed as appropriate for the respective smoked food (for example sausages, short sausages, etc.) or white pudding.
The maximum amount of the processed meat is 5 kg.
Tips
- We recommend two persons for this procedure. One puts the mixture inside, and the other holds the casing in the proper position on the outlet piece. When filling the casing, proceed so that no air can get inside.
- If the outlet opening of the smoked food adapter D8 gets blocked, switch off the motor unit, remove the attachment and clean it.
C) Kebbe – meat tubes
Put the prepared minced meat into hopper D12. If necessary, use the pusher D11 to push the meat down. The food processor will produce hollow tubes. Cut them to the desired length. Switch on the food processor at a speed in the interval MIN to 3.
Recommended recipe for traditional Kebbe:
- 400 g of lamb - Salt
- 500 g of grinded whole wheat
- 1 chopped big onion
- Black pepper
Kebbe filling:
- 400 g of lamb
- 1 finely chopped onion
- 5 spoons of nuts
-
2 spoons of olive oil
-
1 teaspoon of mustard
- 1 spoon of plain flour
- 1 teaspoon of fresh parsley
- Frying oil
– Yogurt sauce with garlic
Preparation of ingredients:
Soak the corn in hot water for 30 minutes. Pour out the water and dry out the corn with a dry dishcloth. Assemble the mincer for medium coarseness mincing. Mince 400 g of meat, 500 g of wheat, and a big onion. Add salt and pepper. Stir the mixture. Mince the mixture once again using the finest mincing disc.
Filling preparation: Slightly roast the onion and nuts in oil. Add 400 g of the minced lamb and bake the mixture. Add other ingredients and stew for 5 minutes. Pour out the remaining oil and let the filling cool down.
Kebbe preparation: Create tubes using the assembled Kebbe adapter. The tube size depends on your preference. Close one end and put the filling inside. Then close the other end of Kebbe. The recommended maximum size is 8 cm. Heat up the oil (to about 180 °C) and fry Kebbe until golden brown (for about 7 minutes).
Tips
- You can fill the tubes with various types of filling (for example meat or vegetable filling).
- If the outlet opening of former D10 is blocked, switch off the motor unit and clean it.
D) Dough forming (confectionery)

Choose appropriate accessories as required (D0, D1, D6, D7, D11, D12, D15 and D16), follow the procedure indicated in Fig. 9. Put the prepared dough in the hopper D12. If necessary, use the pusher D11 to push the dough down. The food processor will produce dough in the required shape.
Run the food processor at a speed in the interval 1 to 4.
Tipy
— We recommend holding (supporting) the outgoing dough in the desired shape by a tray to prevent tearing.
— Small amount of unprocessed dough will always remain in the mincer body. Therefore we recommend processing larger volumes (at least 300 g).
III.4) Grating disc adapter (E)
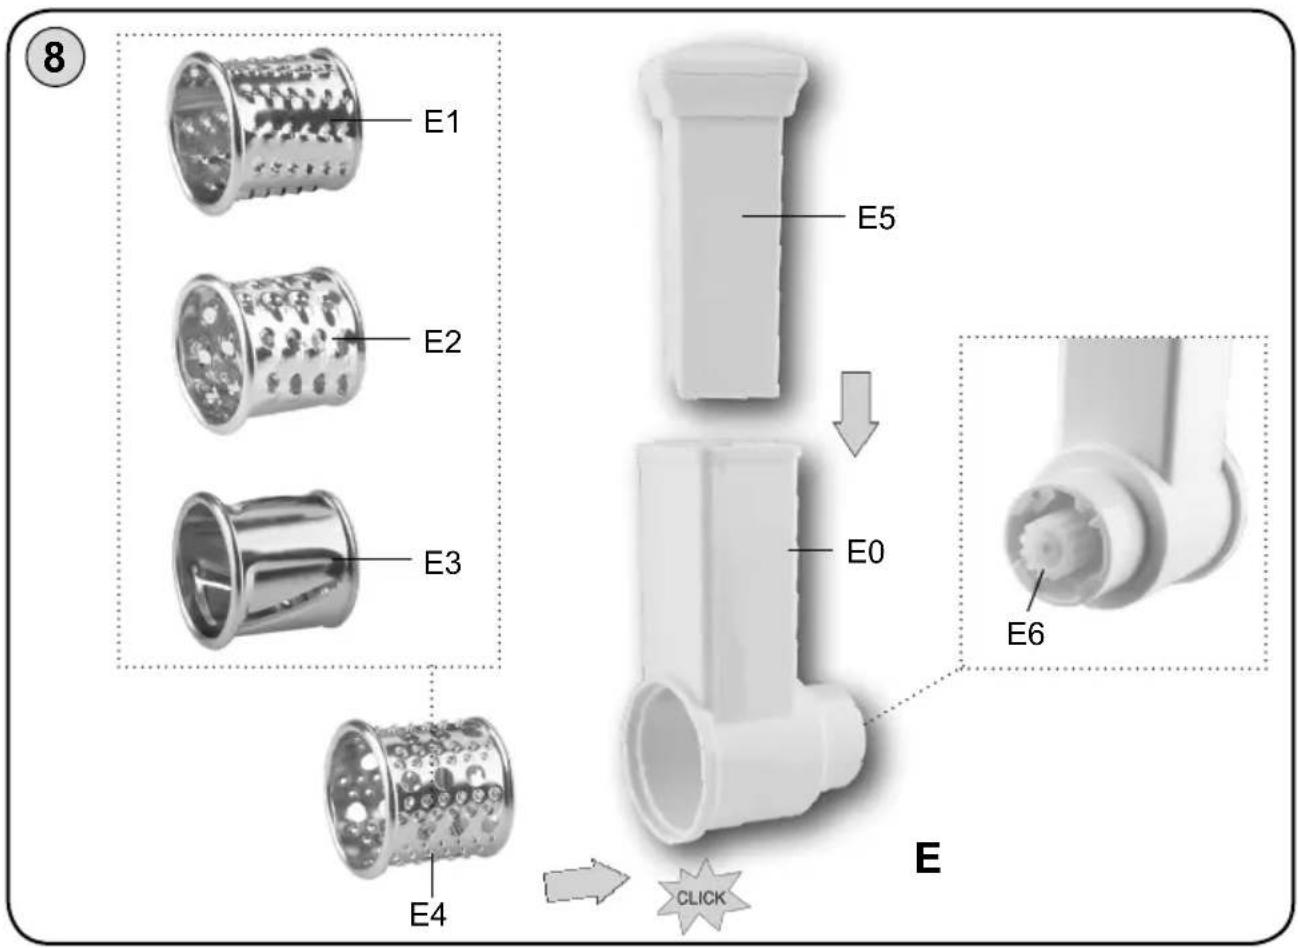
Description (Fig. 8)
E0 – Adapter body E4 – Cheese grater
E1 – Fine grater E5 – Pusher
E2 – Coarse grater E6 – Cogwheel
E3 – Thin slicing grater
Safety hints and tips
- Never push down the grated/sliced fruits or vegetables by fingers! Move the food along the feed tube by the pusher, slowly, while pushing down slightly.
- Be careful when handling the graters. They employ very sharp blades.
- Never use the graters to process hard materials, for example ice cubes, coffee/cereal/corn grains, spices, etc.
- When processing a large amount of food, check if the food is not cumulating above and below the grater.
- If the grating adapter is blocked, switch off the motor unit, disassemble the adapter body and clean it.
Assembly
Assemble the grating adapter and attach to the motor unit head according to Figure 7 and 8. Apply reverse procedure to disassemble the unit and to remove it from the motor unit head.
Preparing the food
The attachments can be used for chopping, slicing, grating and scraping of almost any type of fruits or vegetables. You can slice carrots, potatoes, cabbages, cucumbers, zucchini, beetroots, mushrooms, onions, etc. You can use the E1 - E3 grater to process fruits, vegetables, cheese and food of similar structure. The cheese greater E4 is designed for processing hard cheeses and making bread crumps.
Use
Put a suitable container under the grating adapter outlet. Chop the vegetables into pieces of the size fit for putting them inside the grating adapter feeding tube. Put the pieces into the adapter and slightly push by the pusher. The processed food is going out from the outlet into the provided container.
The recommended processing speed is 3 to MAX.
Tips
- A small amount of food will remain on the grater after each use. This is normal and does not establish a reason for filing a complaint.
- Cut large pieces into smaller ones so that they can be put into the hopper.
- First remove peels if processing citrus fruits.
- Input the food gradually and continuously.
- Do not chop the food too finely. Sufficiently fill the feeding tube to prevent slipping the food away in processing.
- Set low/medium speed when processing soft food, such as cucumbers. To process harder food, such as carrot or hard cheese, set the medium/high/maximum speed.
- Use low speed to grate soft food, otherwise it becomes mushy.
- If you are chopping hard cheese or chocolate, work for a short time, because the food heats up, becomes softer and may get lumpy.
- Before slicing cabbage, cut it into hunks and remove the cabbage stalks.
- When slicing or grating, the pieces of the processed food will be shorter if input vertically, not horizontally.
III.5) Glass blender (F)

Description (Fig. 10)
G1 – Container lid G4 – Knife sealing
G2 – Container support G5 – Removable stopper
G3 – Knife G6 – Glass container
Safety hints and tips
- Do not let the blender running without any food!
- Do not remove the knife support G2 from the glass container!
- Never remove the container lid G1 when the motor unit is running!
- Never pour boiling liquids in the container.
- Before removing the blender lid or container, wait until the rotating parts completely stop.
- When the blender is in the state of idle operation, e.g. the blade fails to touch the foods, unplug the unit until the foods have been relaxed.
Assembly
Assemble the blender and attach it to the blender mount A9 according to Figures 10 a 11. Of the plug for adding liquids G5 you can also insert the in the opening in the lid if you are going to use it. Apply reverse sequence to disassemble the unit and to remove it from the mount.
Before the first use
We recommend washing the glass container before using it for the first time. The knife section is treated with oil not harmful to health for technological reasons. Therefore first fill in the container with warm water (max. 50 °C) with a small amount of detergent. Then put the container on the food processor, set the maximum rotational speed and run for 1 minute. Then rinse the container with clear water.
Use
Remove the lid, put or pour the food into the container and replace the lid. We recommend that you always switch on the blender to minimum revolutions and then gradually increase the performance as required.
The recommended processing speed is 1 to MAX.
Tips
- Never fill the container with liquids producing foam (for example milk) up to „MAX“ level to prevent overspill. We recommend 1 litre at maximum.
III.6) Poppy seed grinder (H)
Description (Fig. 12)
H1 - Feeder (assembled)
H4 – Pressure disc
H2 – Cover with hopper
H5 – Regulating disc
H3 – Grinding discs (2 units) H6 – Key

Safety hints and tips
- Never tighten the grinding discs by force!
- Poppy seed grinder is exclusively designed to process poppy seeds! Do not process other food (such as cereals, flax and sesame seeds, corn, rice, buckwheat, dried mushrooms, herbs, spices and coffee, etc.). Never process wet, damp or frozen poppy seeds!
- Never adjust the grinding coarseness level when the motor unit is running!
- If you need to process a larger amount of poppy seeds, do not exceed the maximum motor unit operation time.
- After grinding large amount of poppy seeds, the grinder components may become hot (e.g. the grinding discs, pressure disc or the feeder). Wait until they cool down before disassembly and cleaning. Hot discs are more difficult to dismantle.
- Do not let the grinder running, if the hopper is empty.
Assembly
Assemble the poppy seed grinder and attach it to the motor unit head according to Fig. 12 and Fig. 7. Put the „fixed“ grinding disc H3 on the feeder, slowly rotate it until three arresting projections of the disc click into three recesses of the feeder.
Then put the "mobile" grinding disc (with the grooves lining up) on the fixed grinding disc. Put the pressure disc H4 on the shaft so that the central projection is aligned with the grinding disc opening. Then rotate the pressure disc until three arresting projections of the disc click into three recesses of the feeder. Finally put on the regulating knob and tighten it.
CAUTION: Never tighten the grinding discs by force!. Apply reverse procedure to disassemble the unit and to remove it from the motor unit head.
Setting the grinding „coarseness/fineness“ (Fig. 12)
The grinding fineness is set by the rotary regulating knob H5. Rotating the knob clockwise will reduce the distance between the grinding discs and change the grinding fineness / coarseness. To release the regulating disc easily H5, use the release key H6.
Use
Pour poppy seeds in the grinder's hopper. The grinding disc grooves will regulate the amount of the processed poppy seeds. Place a suitable container under the grinder to catch the ground poppy seeds, and switch on the food processor. You may add poppy seeds while the grinder is running.
The recommended processing speed is 4 to MAX.
Tips
- We recommend verifying the grinding fineness first, using a small amount of poppy seeds. If the fineness is not optimal, switch off the motor unit and adjust the settings by the regulating knob H5 (rotating anticlockwise = coarser grinding, rotating clockwise = finer grinding).
- Only use high quality poppy seeds. We recommend checking the poppy seeds for any impurities (such as stone fragments), which might damage the food processor (e.g. abrade the grinding discs). Complaints of defects caused by such impurities shall not be acknowledged even if filed within the guarantee period.
- Only use dry poppy seeds for grinding! Poppy seeds must be ground (not pressed) during grinding to be loose, not mushy and not to lose their distinctive flavour.
- Poppy seeds contain oil. To achieve good results, do not set the grinding level too fine.
- Poppy seeds are a simple and living „natural can“. Therefore it reacts hygroscopically and must be stored at a dry place. If the poppy seeds are ground too slowly, with difficulty and if excessive heat is produced, it indicates that the poppy seeds are too damp. Interrupt the grinding process and let the poppy seeds dry out for a sufficient time (for about several hours) so that the excessive humidity can evaporate. You can also use electrical/gas/hot-air oven set to 50 °C (max.) to dry out the poppy seeds.
- If the grinding discs rub/scrape against one another, the finest grinding level is set.
- The processing only takes several minutes, depending on the quantity, type and quality of the poppy seeds and the set grinding fineness level (about 100g / 1 minute).
IV. TABLE OF APPLIANCE USE AND ATTACHMENTS
Please consider the following processing tips as examples and inspiration. They are not intended as complete instructions, they just show possible variants of food processing. Choose the volume of the processed food so that the maximum volume of containers indicated by their gauge marks will not be exceeded. Larger volumes must be divided into several batches, and the container level must be continuously checked. We recommend occasional interrupting of operation, switching off the appliance and removing any food stuck on or blocking the grinding discs, formers or walls of containers, lid or attachments.
| Attachment Food Max. amount Time (min.) Speed | Preparation (mm) | ||||
| Mixing whisk (C1) and Flexi whisk (C4) (marble cake recipe) | Plain flour 1000 g | 2 to 5 | MIN - MAX | -250 ml | |
| Powdered sugar 500 g | |||||
| Milk 400 ml | |||||
| Eggs 8 pcs | MIN - 2Oil | ||||
| Total volume 3200 ml | |||||
| Whipping whisk (C2) | Cream (incl.38% fat) | 1200 ml 10 MIN - MAX | - | ||
| Egg-white | 15 pcs | 5 | MAX | ||
| Kneadinghook (C3)(bread recipe) | Flour 1000 g | 1 minute at MIN, then higher speed (max. 2) for 4 minutes. | - | ||
| Salt 10 g | |||||
| Yeast 15 g | |||||
| Sugar 10 g | |||||
| Water 575 g | |||||
| Fat 10 g | |||||
| Mincer (D) | Beef 5 000 g 10 | 6 30 x 30 | 30 x 30 | ||
| Pork 5 000 g 10 | |||||
| E1 | Cheese 500 g 1 3 - MAX | - | |||
| E2 | Carrot | 1000 g | 1 | 3 - MAX | - |
| E3 | Cucumber | 5 pieces | 1 | 3 - 4 | - |
| E4 | Potatoes | 1 000 g | 1 | MAX | 1 / 2 |
| Blender (G) | Milk 1000 ml | 2 | 1 m MAX cm | - | |
| Carrot 250 g | |||||
| Ice | 340 g | 40 x 40 x 20 | |||
| Poppy seedgrinder (H) | Poppy seeds | 100 g 1 | 4 - MAX | dry poppyseeds | |
V. MAINTENANCE
General information
Do not use harsh and abrasive detergents for maintenance and cleaning! Ensure that the contact surfaces and sealing elements are clean and functional. Plastic parts may be washed in dishwasher. Avoid contact of attachments employing sharp cutting edges/blades (D2, E1 - E4, G3) with hard items, which could blunt them, reducing their effectiveness.
If you clean these items, pay maximum attention as they are sharp! Some foods may colour the respective attachment to a certain extent. However this shall not have any effect on the appliance operability and does not constitute a reason to file a complaint! The colouring will usually spontaneously disappear after some time. Never dry plastic mouldings above a heat source (such as stove, electric/gas oven).
1) Multifunctional head and food processor body
Clean them with a damp cloth soaked in water with a detergent. Avoid water getting in the internal components! If the power cord becomes dirty, wipe it with a damp cloth.
2) Stainless bowl
Clean the component with a damp cloth soaked in water with a detergent. Do not use steel wool, wire brush or bleaching agent for cleaning. Remove lime sediments with vinegar.
B2 - B3 parts may be washed in dishwasher.
3) Whipping/mixing whisks and kneading hook
Immediately after use, wash the attachments in hot water with a detergent and let dry out. C1 - C4 parts may be washed in dishwasher.
4) Mincer D
Immediately after use, wash the attachments in hot water with a detergent and let dry out.
After washing and drying the components, we recommend applying cooking oil on blades, knives and exchangeable discs. For easier cleaning of mincer, mince a piece of hard pastry (e.g. a croissant or a bun) at the end. Never wash D0 - D6 in a dishwasher, because detergents can cause their darkening or corrosion!
5) Grating/slicing adapters E
Immediately after use, wash the attachments in hot water with a detergent and let dry out. Never wash E1 - E4 in a dishwasher!
6) Blender G
Immediately after use, wash the attachments in hot water with a detergent and let dry out. Knife cleaning procedure: pour about 0.5 l of clear water in the container, switch on the appliance and remove the impurities by several pulses. In the case of larger amount of impurities, repeat the procedure several times, or pour 1 litre of water, add a small amount of detergent and switch on the blender for 1 minute. For easier cleaning, take the knife G3 from the blender base G2 according to Fig. 10. To release the knife G3.
Sealing replacement procedure
Proceed according to Fig. 10. If the sealings G4 is worn or damaged, replace it with a new one (of identical type).
7) Poppy seed grinder H
Immediately after use, wash the attachments in hot water with a detergent and let dry out. Proceed with maximum attention when cleaning the grinding discs! Avoid getting the grinding edges/grooves in contact with hard items, which would blunt them and thereby reduce their effectiveness. After washing and drying the components, we recommend applying cooking oil on the grinding and pressure discs. Wipe the feeder H1 with a damp cloth. Do not immerse into water – avoid water getting in the internal components!
VI. STORAGE
Store the properly cleaned appliance including all accessories and attachments at a dry, dustless and safe place, out of reach of children and incapacitated persons.
VII. ENVIRONMENT

If the dimensions allow, there are marks of materials used for production of packing, components and accessories as well as their recycling on all parts. The symbols specified on the product or in the accompanying documentation mean that the used electrical or electronic products must not be disposed of together with municipal waste.
For proper disposal, hand them over at the special collection places where they will be accepted free of charge. Suitable disposal of the product can help to maintain valuable natural resources and to prevent possible negative impacts on the environment and human health, which could be the possible consequences of improper waste disposal. Ask for more details at the local authority or at a collection site. Fines can be imposed for improper disposal of this type of waste in agreement with the national regulations.
If the appliance is to be put out of operation, after disconnecting it from power supply we recommend its cutoff and in this way it will not be possible to use the appliance again.
More extensive maintenance or maintenance requiring intervention in the inner parts of the appliance must be carried out by professional service! Failure to comply with the instructions of the manufacturer will lead to expiration of the right to guarantee repair!
VIII. TECHNICAL DATA
Voltage (V) Shown on the type label of the appliance
Input power (W) Shown on the type label of the appliance
Weight (kg) approx. 8.1
Volume of the stainless steel bowl (I) 6
Protection class of the appliance I.
Input in off mode is < 0.50 W.
Noise level: Acoustic noise level of 83 dB (A) re 1pW
The manufacturer reserves the right to change the technical specifications and accessories for the respective models.
WARNINGS AND SYMBOLS USED ON THE APPLIANCE, PACKAGING OR IN THE INSTRUCTIONS MANUAL:
OPEN
OUSEHOLD USE ONLY.
DO NOT IMMERSE IN WATER OR OTHER LIQUIDS.
THIS BAG IS NOT A TOY.
PLEASE DO NOT OPEN DURING THE OPERATION NEVER PUT INTO THE HANDS WITH POWER ON.


TO AVOID DANGER OF SUFFOCATION, KEEP THIS PLASTIC BAG AWAY FROM BABIES AND CHILDREN. DO NOT USE THIS BAG IN CRIBS, BEDS, CARRIAGES OR PLAYPENS.
Marking and texts on the product and attachments:



CAUTION: Do not put fingers or other items inside

NOTICE: Keep the orientation of the basic components (i.e. cutting blades, grinding discs, sieves and graters)! Pay maximum care when cleaning the cutting blades!
Attachments for the respective ETA Gustus II models:
| Attachment / Typ 1128 / 00 1128 / 10 1128 / 20 1128 / 30 | ||||
| B1 √ √ | √ | √ | ||
| B2 √ √ | √ | √ | ||
| C1, C2, C3, C4, C5 | √ | √ | √ | √ |
| D0 - D16 | X | √ | √ | √ |
| E | X | X | √ | √ |
| G | X | √ | √ | √ |
| H | X | X | X | √ |

Included

| name match illustration | ||
| Mixer | ETA 1128 99 000 |  |
| Grating attachment with disc grater | ETA 0028 95 030(only with ETA 0028 99 999) | 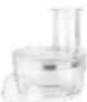 |
| Poppy seed grinder ETA 0028 96 000 |  | |
| Meat grinder (Ø 62 mm) ETA 0028 91 000 |  | |
| Grein mill for cereals, legumes and rice | ETA 0028 96 010ETA 0028 96 020 | 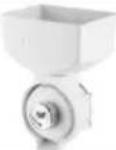 |
| Fruit, berries and vegetable press ETA 0028 98 000 |  | |
| Ice-cream maker ETA 0028 98 030 |  | |
| Attachment for dicing | ETA 0028 95 040(only with ETA 0028 95 030 and ETA 0028 99 999) | 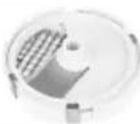 |
| Trenette cutter ETA 0028 92 000 |  | |
| Tagliatelle cutter ETA 0028 93 000 |  | |
| Attachment for rolling dough(for lasagna, raviolli, cannelloni) | ETA 0028 94 000 |  |
| Dies for pasta ETA 0028 97 000 |  | |
| Citrus juicer | ETA 0028 98 020(only with ETA 0028 99 999) |  |
| Gearbox ETA 0028 99 999 |  |
These accessories are not included in box with this product. It is possible to buy.


- CZ I. BEZPEČNOSTNÍ UPOZORNĚNÍ 8
- Multi-purpose food processor
- eta 1128
- GUSTUS II
- USER'S MANUAL
- SAFETY NOTICE
- PREPARATION AND USE
- III.1) Food processor (A)
- Description (Fig. 1)
- Food processor control
- III.2) Whipping, mixing and flexi whisk, kneading hook
- Safety hints and tips
- Assembly for work with attachments
- Setting the optimum height of adapters (Fig. 6)
- Use
- A) Whipping
- B) Flexi whipping
- Whipping tips
- C) Mixing
- D) Kneading
- Tips
- III.3) Mincer (D)
- Description (Fig. 9)
- Assembly
- A) Meat mincing
- B) Smoked foods (sausages, frankfurters), white pudding, etc.
- C) Kebbe – meat tubes
- Recommended recipe for traditional Kebbe:
- Kebbe filling:
- Preparation of ingredients:
- D) Dough forming (confectionery)
- Tipy
- III.4) Grating disc adapter (E)
- Description (Fig. 8)
- Preparing the food
- III.5) Glass blender (F)
- Description (Fig. 10)
- Before the first use
- III.6) Poppy seed grinder (H)
- Description (Fig. 12)
- Setting the grinding „coarseness/fineness“ (Fig. 12)
- TABLE OF APPLIANCE USE AND ATTACHMENTS
- MAINTENANCE
- General information
- 1) Multifunctional head and food processor body
- 2) Stainless bowl
- 3) Whipping/mixing whisks and kneading hook
- 4) Mincer D
- 5) Grating/slicing adapters E
- 6) Blender G
- Sealing replacement procedure
- 7) Poppy seed grinder H
- STORAGE
- ENVIRONMENT
- TECHNICAL DATA
- WARNINGS AND SYMBOLS USED ON THE APPLIANCE, PACKAGING OR IN THE INSTRUCTIONS MANUAL:
- Marking and texts on the product and attachments:
- CAUTION: Do not put fingers or other items inside
- Attachments for the respective ETA Gustus II models:
Brand : Eta
Model : Gustus Gulliver 1128 90010
Category : Food processor