Stretto 2180 90000 - Coffee maker Eta - Free user manual and instructions
Find the device manual for free Stretto 2180 90000 Eta in PDF.


| Product Type | Espresso Coffee Maker |
| Brand | Eta |
| Model | Stretto 2180 90000 |
| Dimensions (H x W x D) | 45.5 x 31 x 13.3 cm |
| Weight | Approximately 3.5 kg |
| Water Tank Capacity | 0.75 L |
| Protection Class | I |
| Voltage | 230 V ~ 50 Hz |
| Power | 1450 W |
| Functions | Espresso, Cappuccino, Latte, Hot Water, Steam |
| Adjustable Coffee Quantity | Yes (25–60 ml for single, 60–110 ml for double) |
| Automatic Shut-off | After 25 minutes of inactivity |
| Heating Surface | Yes (for cup warming) |
| Milk Frother | Steam nozzle with detachable tube and cover |
| Descaling | Required periodically; use descaling solution |
| Safety Features | Overheat protection, child lock (age 8+), grounded plug |
| Accessories Included | Measuring cup, stainless steel filters (1 cup & 2 cup), drip tray, milk frother cover |
| Cleaning | Removable water tank, drip tray, steam nozzle; hand wash recommended |
Frequently Asked Questions - Stretto 2180 90000 Eta
User questions about Stretto 2180 90000 Eta
0 question about this device. Answer the ones you know or ask your own.
Ask a new question about this device
Download the instructions for your Coffee maker in PDF format for free! Find your manual Stretto 2180 90000 - Eta and take your electronic device back in hand. On this page are published all the documents necessary for the use of your device. Stretto 2180 90000 by Eta.
USER MANUAL Stretto 2180 90000 Eta
Espresso coffee maker • USER MANUAL
GB 20-27
natural_image
Modern espresso machine with black handle and metallic casing, no visible text or symbols on the device itself.1
B
CZ I. BEZPEČNOSTNÍ UPOZORNĚNÍ 4
II. POPIS SPOTŘEBIČE 6
III. PŘÍPRAVA K POUŽITÍ 6
IV. POUŽÍVÁNÍ SPOTŘEBIČE 7
V. ÚDRŽBA 9
VI. EKOLOGIE 10
VII. TECHNICKÁ DATA 11
SK I. BEZPEČNOSTNÉ UPOZORNENIA 12
II. OPIS SPOTREBIČA 14
III. PRÍPRAVA NA POUŽITIE 14
IV. POUŽÍVANIE SPOTREBIČA 15
V. ÚDRŽBA 17
VI. EKOLÓGIA 18
VII. TECHNICKÉ ÚDAJE 19
GB I. SAFETY WARNING 20
II. DESCRIPTION OF THE APPLIANCE 22
III. PREPARATION FOR USE 22
IV. USING THE APPLIANCE 23
V. MAINTENANCE 25
VI. ENVIRONMENT 26
VII. TECHNICAL DATA 27
H I. BIZTONSÁGI RENDELKEZÉSEK 28
Espresso coffee maker
eta 2180
STRETTO
INSTRUCTIONS FOR USE
Dear customer, thank you for purchasing our product. Keep these instructions including the warranty, the receipt and, if possible, the box with the internal packing.
I. SAFETY WARNING

GENERAL PROVISIONS:
- Before the first use, read the instructions for use carefully, look at the picture and store the instructions for use for the future. Consider the instructions for use as a part of the appliance and pass them on to any other user of the appliance.
- Check whether the data on the type label correspond with the voltage in your socket. The power cord plug has to be connected to the properly connected and grounded socket according to the national standard.
- This appliance may only be used by children aged 8 years or older, and persons with reduced physical, sensory or mental capabilities or lack of experience and knowledge if they have been given supervision or instruction concerning use of the appliance in a safe way and understand the hazards involved. Children shall not play with the appliance. Cleaning and user maintenance shall not be made by children without supervision. Children younger than 8 years must be kept out of reach of the appliance and its power cord.
- Children must not play with the appliance.
- Before replacing accessories or accessible parts that are moving during operation, before assembly and disassembly, before you fill the water tank, before cleaning and maintenance, before transfer, if the appliance is left unsupervised, or if you finish using it, make sure to switch OFF the appliance and unplug it from the mains by pulling the plug from the socket!
- Before you remove any accessible parts, before maintenance and handling, allow the appliance and any parts thereof to cool down.
- CAUTION – Do not use the appliance with a program, time switch or any other part that turns the appliance on automatically as there is a risk of fire if the appliance is not covered or placed properly.
- WARNING – Some parts of this product may become very hot and cause burns. During operation, the appliance produces hot water and hot steam under pressure. Special attention must be paid to the presence of children and handicapped people.
- WARNING, HOT STEAM – pay extra care when you are using the milk frother and do not touch it until it has cooled down. Bear in mind that hot water might spurt out for a short time during use. Do not touch the metal part of the nozzle during use; use only the plastic part of the milk frother cover A4 to make adjustments.
- For hygienic reasons, clean the steam nozzle by flushing it after each use. After cooling, remove the outer part (tube) and rinse it with lukewarm water.
- When the appliance is in operation, prevent pets, plants or insects to get in contact with it.
- Do not plug the fork of the supply cord into the power outlet and do not unplug the cord with wet hands or by pulling by the supply cord!
- Prevent injuries when handling (e.g. by hot water, steam).
- Never immerse the appliance or its cord (or parts thereof) in water.
- Never transfer the appliance when there is water in the tank! Water might leak into the internal components.
- Never leave the appliance unattended when it is connected to the mains and keep an eye on it the whole time you are making your espresso!
- When transferring the appliance, take it by the outer casing only.
- Leave a space of at least 15mm from all sides of the appliance to ensure proper circulation of air.
- Do not expose the appliance to temperatures under 4^ - if residual water froze in the internal components, it could damage the appliance.
- Use this appliance only for the purpose for which it was designed as specified in this user's manual. Never use the appliance for any other purpose.
- The producer is not responsible for damage caused by improper use of the appliance (e.g. burning, scalding, fire) and its guarantee for the appliance does not apply to situations when the safety warnings above are not complied with.
USE OF THE APPLIANCE:
- The appliance is intended for home use and similar (in shops, offices and similar workplaces, in hotels, motels and other residential environments, in facilities providing accommodation with breakfast). It is not intended for commercial use!
- If you are not going to use the appliance for a longer time, empty the water tank! If you do not brew coffee frequently, replace the water in the water tank regularly (preferably every day) so as to keep it fresh at all times.
- Use cold (lukewarm) clean water only! Never use hot water or other liquids – they could damage the appliance.
- Do not use the hot water feature longer than it takes to use up the capacity of one water tank.
- Use the appliance in the working position only at flat and stable places with no risk of turning over and in sufficient distance from heat sources (e.g. heater, stove, cooker, oven, grill), flammable objects (e.g. curtains, drapes, etc.) and wet surfaces (e.g. sinks, wash basins, etc.).
- Do not place the appliance near objects or under objects which could get damaged by steam, e.g. walls, kitchen cupboards, sideboards, paintings, or curtains. Leaking steam could damage them.
- Do not use the appliance in an environment saturated with explosive or flammable steams.
- Before switching on the appliance ensure that the water level is between MIN and MAX marks.
POWER CORD:
- If the power cord of the appliance is corrupted, it has to be replaced by the manufacturer, its service technician or a similarly qualified person so as to prevent dangerous situations.
-
Never use the appliance if its power cord or plug is damaged, if it does not work properly, if it fell down and was damaged or if it fell to water. In this case take the appliance to a special service to check its safety and proper function.
-
The power cable supplied with the appliance is designed solely for this appliance - never use it for any other purposes. Also, this appliance may only be used with the power cable included in the box. Never use any other cable type (e.g. for a different appliance).
- Never put the power cord on hot surfaces or do not let it hang over the edge of a table or a work top. Plugging or pulling the power cord e.g. by children can result in tilting over or drawing the appliance down and serious injury!
- The power cord must not be damaged with sharp or hot objects, open fire, it must not be sunk into water or bent over sharp edges.
II. DESCRIPTION OF THE APPLIANCE
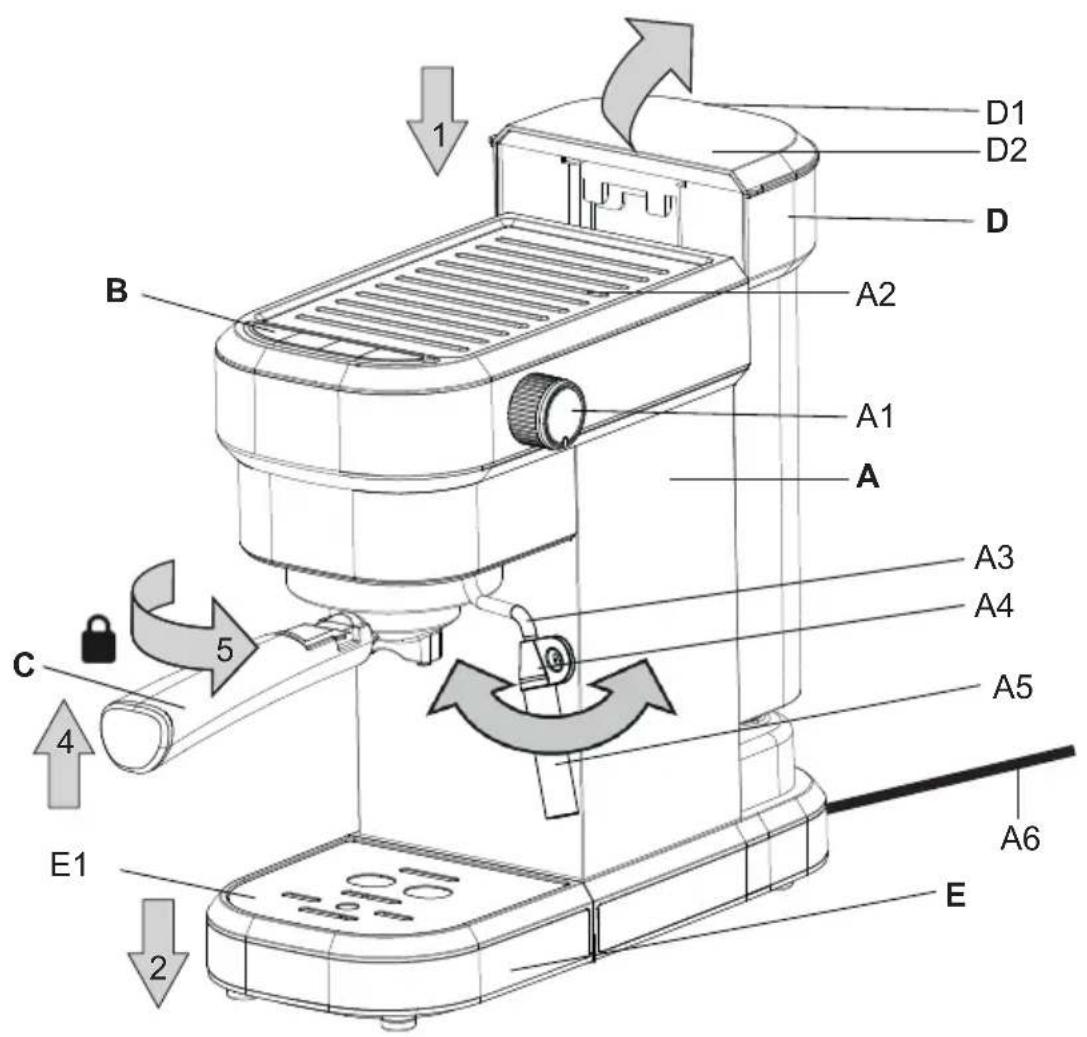
A – The machine body
A1 – steam control knob
A2 – heating surface
A3 - milk frother (steam nozzle)
A4 – milk frother cover
A5 – metal tube
A6 - power cord
D – Water tank
D1 – handle
D2 – hinged lid
E – Drip tray
E1 – drip grille
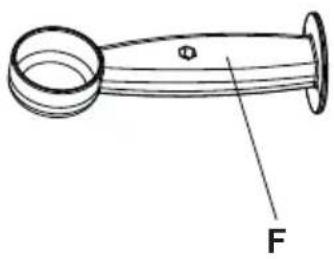
F – Coffee measuring cup with stamper
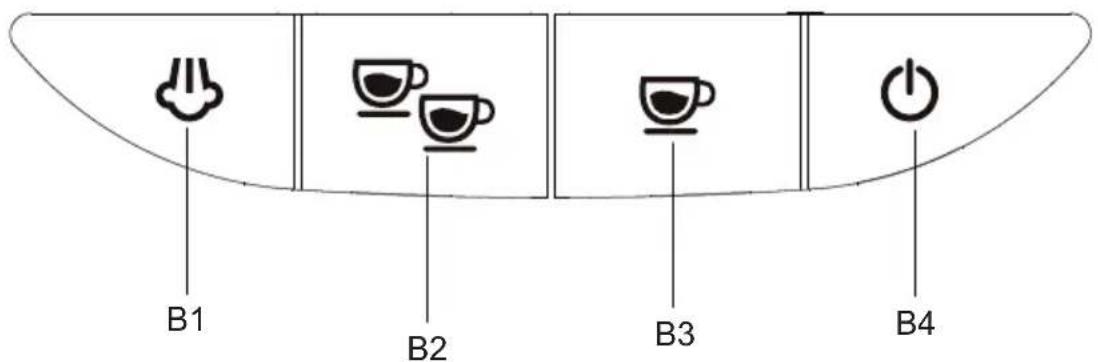
B – Control panel
B1 – steam nozzle button
B2 – button for two cups
B3 – button for one cup
B4 – button ON/OFF
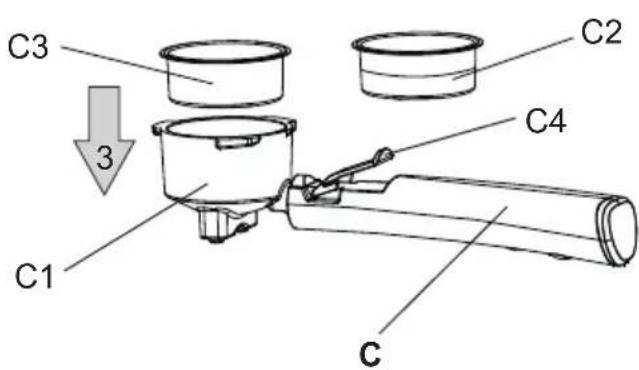
C – Metal lever with plastic handle
C1 – funnel
C2 – stainless steel bowl for one cup
C3 – stainless steel bowl for two cups
C4 – auxiliary handle preventing falling out of the bowl when emptying the coffee grounds
III. PREPARATION FOR USE
Before first use, remove any packaging and protective material (including any protective film) from the appliance and accessories. Wash the water tank D with warm soap water, rinse it with clean water and allow it to dry. Put it into the coffee machine again and press it down as far as it goes.
Location
Place the coffee machine onto a flat and stable surface, near a socket. Keep a minimum distance of 15cm from any wall at all sides.
Filling the tank with water
Remove the tank D from the coffee machine, open the lid D2 and fill it with water preferably at room temperature (the water level must be between the MIN and MAX marks). Then put the tank back in place.
Removing operational components
Looking at the camera that is used more often with the coffee machine (metal lever C, drip tray E), proceed as shown in Fig. 1. Proceed in reverse order to put the components back.
Rinsing the coffee maker
At the first start-up or if you have not used the coffee machine for more than 2 days, flush it using the following procedure:
- Fill tank D with water up to the MAX mark.
- Place lever C and the stainless-steel bowl (C2/C3) on the coffee machine as shown in Figure 1.
- Connect the machine to the mains. network (an acoustic signal will sound and the backlight of buttons B1-B4 will flash) and press button B4. The backlight on button B4 lights up and the backlight on buttons B2 and B3 flash (the coffee machine is warming up). Illuminates continuously when the backlight B2 and B3 light up. Make sure that the rotary control A1 is in the "position."
- Once the coffee machine is warm, press the B2/B3 button and let the hot water to flow through the machine.
- To flush the steam nozzle, first press button B4 (if you have not done so before) and then turn the regulator A1 to the "position (hot water function). When you want to stop the flush, turn the regulator A1 to the "position.
Note
- When flushing out the coffee machine, collect the water into the drip tray E or into a suitable cup. Empty the drip tray regularly.
-- You can cancel the flush at any time by pressing the button B4.
IV. USING THE APPLIANCE
Remarks
- Pressing any button is accompanied by an acoustic signal.
- When making coffee, the coffee machine automatically has a coffee brewing function that cannot be switched off.
- It is important to distinguish between the backlighting of the buttons B2 and B3 slowly and quickly. Slow means warming up, rapid overheating of the unit. If the unit is overheated, the program cannot be started with the buttons B2 and B3 and must be cooled, see cooling function.
- Automatic shut-off after 25 minutes of inaction.
PREPARATION OF ESPRESSO
- Switch on the coffee machine by pressing button B4 and wait for it to warm up.
- Place the stainless-steel bowl (C2/C3) in the funnel C1 of lever C.
- Fill the stainless-steel bowl (C2/C3) with ground coffee to the brim with a measuring cup F. Smother the coffee properly with the stamper (back of the measuring cup F) intended for this purpose.
- Place the lever C on the coffee machine as shown in Fig. 1.
- Place a suitable size cup / cups under the coffee spout.
- Press B2 (for two cups - default 60 ml) or B3 (for one cup - default 30 ml).
- Wait for the coffee to finish (an acoustic signal sounds).
Cup preheat
- For an optimum coffee making process and better taste of your coffee, we recommend that you preheat your cup by filling it with hot water first (e.g. using the hot water function). After the cup has been preheated, pour the water away.
- You can use the heating surface A2 to warm up the cup for your coffee.
MAKING CAPPUCCINO, CAFFÈ LATTE AND ESPRESSO MACCHIATO
The steam nozzle A3 is designed for making espresso beverages containing milk and milk froth. For superior taste and quality of the beverage, use chilled fresh whole milk only.
Recommended procedure
- Fill a container with milk. The container must be sufficiently large as the milk quantity will increase three times as much.
- Firstly, make coffee following the usual procedure as the use of the steam nozzle will increase the temperature in the internal system, which could burn the ground coffee if you proceeded in reverse order.
- Activate the steam nozzle by pressing button B1. Nozzle heating is indicated by blinking the backlight of button B1. When the nozzle is ready, the backlight of button B1 is permanently on. Turn regulator A1 to " and steam nozzle A3 will produce steam.
- Then place the milk container under the steam nozzle so that the nozzle opening slightly touches the milk level and let the steam flow into the milk slowly by turning it counterclockwise. Turn off the steam nozzle by turning the regulator A1 to the "position."
- Pour the frothed milk carefully over the coffee based on the espresso beverage you have selected; you can use a teaspoon to do so.
- Make sure to clean the milk frother immediately after use (components A3, A4, A5) see chapter MAINTENANCE (for basic fast cleaning we recommend that you activate the steam nozzle again for a short time). Milk-caked frother is harder to clean.
Recommendation
- For optimum micro-froth production, we recommend that you use a special milk pot intended for that purpose.
- Another way to make micro-froth (but not larger dense froth) is to tilt the container at a slight angle, not move it and allow the steam to stream into the container, creating an eddy.
INDIVIDUAL INSTALLATION OF COFFEE QUANTITY
The amount of coffee can be adjusted both for two cups (60-110 ml - button B2) and for one cup (25-60 ml - button B3). The procedure is as follows:
- Switch on the coffee machine by pressing button B4 and wait for it to warm up.
- Then press and hold the B2/B3 button until the desired quantity of coffee flows out. When the desired amount of coffee is flowing, release the button (you can hold the button for a maximum of 60 seconds).
- The setting will be saved in the coffee machine memory (an acoustic signal will sound) and will remain stored even after the coffee machine is switched off and unplugged. network.
Remarks
- If you hold the B2/B3 button too short, your settings will not be saved.
- To cancel the individual coffee quantity setting, press button B1 at the same time and B3 for 3 seconds (an acoustic signal sounds). The coffee machine returns to the factory settings.
HOT WATER FUNCTION
- Press B4 to turn on the coffee machine.
- Turn regulator A1 to position , "
- Hot water will flow out of the steam nozzle A3.
- To stop the function, turn the regulator A1 to position „O-
Remark
If the "Hot Water" function is used previously, a small amount of water will flow out of the nozzle at the beginning of this program. This is a normal condition.
COOLING FUNCTION
If you want to make coffee after using the steam nozzle A3, you must first cool the coffee machine because the temperature inside the machine is too high (the backlighting of the buttons B2 and B3 flash quickly). The procedure is as follows:
-
Turn regulator A1 to position "
-
The coffee machine will start pumping and draining the water. This will cool down.
-
When the backlighting of buttons B2 and B3 flash slowly, turn the controller A1 to the position „☐-
-
This will stop the cooling function.
V. MAINTENANCE
Unplug the appliance from power supply by taking the fork of the power cord out of the socket (except for operations which require the coffee machine to remain switched on)! Clean the appliance only when it is cooled down! Do not use rough and aggressive detergents (e.g. sharp objects, scrapers, diluting agents or other solvents)! Wipe the surface of the appliance and its inlet with a damp cloth.
IMPORTANT
Regularly inspect and clean all parts to prevent mould on coffee residues!
Water tank (D)
We recommend that you clean the tank thoroughly and regularly (about once a week). Use regular washing-up liquid and then rinse the tank with clean water (you can also use a dishwasher). So as to prevent build-up of scale deposits, we recommend that you also rinse the tank under running water once a day.
Metal lever with plastic handle (C)
Remove coffee grounds from the stainless steel bowls (C2 and C3) after each use. Rinse the funnel C1 thoroughly under running water. Wash the filters (C2 and C3) in warm water with detergent and then rinse with clean water. Wipe the plastic handle with a damp cloth. Then let everything dry.
Drip tray (E)
Pour the drip tray as required. Wash parts E and E1 with a conventional dishwashing detergent, rinse with clean water and allow to dry.
Steam nozzle (A3)
The nozzle must be cleaned after each use. You can do so by activating it and immersing it in a container of clean water and then wiping it with a dry tissue. Also, clean it regularly by removing the A4 and A5 parts. Rinse the components under running water, let them dry and proceed in reverse order to assemble and place them back. If necessary, clean the openings with a long narrow object (toothpick, needle, etc.).
Descaling
If the coffee preparation time is significantly prolonged, the coffee machine's water system must be cleaned of lime and mineral deposits (scale). Said deposits may be removed with a water solution with a formulation intended for this purpose (e.g. ETA518000201). Always follow the manufacturer's instructions for the product, which are usually on the packaging.
Depending on the water hardness and the frequency of use of the coffee machine, remove scale regularly (recommended at least once a month). The procedure is as follows:
- Fill tank D with the prepared cleaning solution.
- Position lever C correctly.
- Place a suitable container under the coffee spout.
- After the coffee machine has warmed up, use the B2/B3 button to let the cleaning solution flow through the inside of the coffee machine (approx. 1/2 of the reservoir volume D). Use the rest of the solution to clean the steam nozzle using the hot water function.
- When container D is empty, rinse it with clean water. Then fill D-tank only with clean water and repeat the procedure. This will thoroughly flush out the inside of the coffee machine from the cleaning solution.
Expert service must do the large maintenance or to intervene into inside parts of the appliance! Non-observance of the instructions of the manufacturer cancels the right for guarantee repair! If you are unable to fix the problem, or if you need any further information about the appliance or service centres, please contact your distributor.
VI. ENVIRONMENT
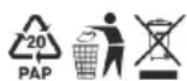
Printed signs of materials used for manufacture, packing, components and accessories, as well as their recycling, are on all the pieces if their dimensions enable it. The symbols on the product or in the accompanying documentation mean that the used electric or electronic products must not be disposed together with municipal wastes. Please, hand them over to the collection points designed for their correct disposal, where they will be accepted free of charge.
By correct disposal of this product you can help to preserve valuable natural resources and help to prevent possible negative impacts to the environment and to human health, which could be the results of incorrect waste disposal. For further details ask the municipal authorities or the nearest collecting point. Penalties can be charged for incorrect disposal of such wastes, according to national regulations. If the appliance is to be put out of operation definitely, we recommend cutting off the feeder cable, to disable its use.
VII. TECHNICAL DATA
Voltage (V) shown on the type label of the appliance
Absorbed power (W) shown on the type label of the appliance
Max. volume (I) 0.75
Weight (kg) approximately 3.5
Protection class of the appliance I.
Size (cm): 13.3 x 31 x 45.5
Input in off mode is <0,50 W
The manufacturer reserves the right to change the technical specifications and accessories for the respective models.
WARNINGS AND SYMBOLS USED ON THE APPLIANCE, PACKAGING OR IN THE INSTRUCTIONS MANUAL:
HOUSEHOLD USE ONLY; DO NOT IMMERSE IN WATER OR OTHER LIQUIDS;
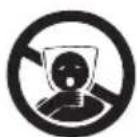

TO AVOID DANGER OF SUFFOCATION, KEEP THIS PLASTIC BAG AWAY FROM BABIES AND CHILDREN. DO NOT USE THIS BAG IN CRIBS, BEDS, CARRIAGES OR PLAYPENS. THIS BAG IS NOT A TOY.
The symbol indicates a WARNING.
Eszpresszó gép
eta 2180
STRETTO
HASZNÁLATI ÚTMUTATÓ
FUNKCJA GORACEJ WODY

- Espresso coffee maker
- eta 2180
- STRETTO
- INSTRUCTIONS FOR USE
- SAFETY WARNING
- GENERAL PROVISIONS:
- USE OF THE APPLIANCE:
- POWER CORD:
- DESCRIPTION OF THE APPLIANCE
- A – The machine body
- D – Water tank
- E – Drip tray
- F – Coffee measuring cup with stamper
- B – Control panel
- C – Metal lever with plastic handle
- PREPARATION FOR USE
- Location
- Filling the tank with water
- Removing operational components
- Rinsing the coffee maker
- Note
- USING THE APPLIANCE
- Remarks
- PREPARATION OF ESPRESSO
- Cup preheat
- MAKING CAPPUCCINO, CAFFÈ LATTE AND ESPRESSO MACCHIATO
- Recommended procedure
- Recommendation
- INDIVIDUAL INSTALLATION OF COFFEE QUANTITY
- HOT WATER FUNCTION
- Remark
- COOLING FUNCTION
- MAINTENANCE
- IMPORTANT
- Water tank (D)
- Metal lever with plastic handle (C)
- Drip tray (E)
- Steam nozzle (A3)
- Descaling
- ENVIRONMENT
- TECHNICAL DATA
- Eszpresszó gép
- HASZNÁLATI ÚTMUTATÓ
- FUNKCJA GORACEJ WODY
Brand : Eta
Model : Stretto 2180 90000
Category : Coffee maker