
CPC-900 - Pan CUISINART - Free user manual and instructions
Find the device manual for free CPC-900 CUISINART in PDF.


| Product Type | Electric Skillet |
| Brand | Cuisinart |
| Model | CPC-900 |
| Dimensions (L x W x H) | 20.5 x 12.5 x 6.25 inches |
| Weight | 8.5 lbs |
| Power Rating | 1500 Watts |
| Voltage | 120 V AC, 60 Hz |
| Temperature Range | 200°F to 450°F |
| Capacity | 6 Quarts |
| Non-Stick Coating | Yes, premium non-stick |
| Removable Probe | Yes, with temperature control |
| Cool-Touch Handles | Yes, stay-cool side handles |
| Glass Lid | Tempered glass with steam vent |
| Dishwasher Safe Parts | Pan and lid are dishwasher safe |
| Functions | Saute, sear, simmer, fry, steam, braise, stew, poach, and more |
| Cleaning Instructions | Wipe with damp cloth; avoid abrasive cleaners |
| Safety Features | Auto shut-off, cool-touch handles, non-slip feet |
| Warranty | Limited 3-year warranty |
| Spare Parts Availability | Replacement parts available via Cuisinart support |
| Accessories Included | Glass lid, temperature probe, instruction manual |
Frequently Asked Questions - CPC-900 CUISINART
User questions about CPC-900 CUISINART
0 question about this device. Answer the ones you know or ask your own.
Ask a new question about this device
Download the instructions for your Pan in PDF format for free! Find your manual CPC-900 - CUISINART and take your electronic device back in hand. On this page are published all the documents necessary for the use of your device. CPC-900 by CUISINART.
USER MANUAL CPC-900 CUISINART
High Pressure Electric Multicooker
CPC-900 Series
For your safety and continued enjoyment of this product, always read the instruction book carefully before using.
IMPORTANT SAFEGUARDS
When using electrical appliances, especially when children are present, basic safety precautions should always be taken, including the following:
- Read all instructions.
- Always attach plug to appliance first, before plugging into wall outlet. To disconnect, turn unit off, then remove plug from outlet.
- Do not place the multicooker in a heated oven or on any stovetop.
- Do not touch hot surfaces of multicooker. Use handles only.
- This appliance should not be used by or near children or individuals with certain disabilities.
- NEVER ATTEMPT TO OPEN LID WHILE THE UNIT IS OPERATING. Do not open the multicooker until the unit has cooled and all internal pressure has been released. If lid is difficult to rotate, this indicates that the cooker is still pressurized. Do not force it to open. Any pressure in the multicooker can be hazardous. See Instructions for Use, page 6.
- Extreme caution must be used when moving a multicooker containing hot liquids or foods.
- Do not use the multicooker for other than its intended use.
- This appliance cooks under pressure. Improper use may result in scalding injury. Make certain unit is properly closed before operating.
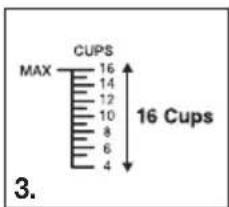
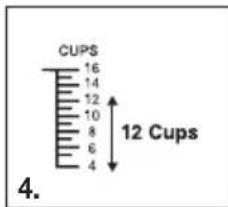
- Do not fill unit over the Max Fill line (16 cups). When cooking foods that expand during cooking, such as dried vegetables, do not fill the unit more than 12 cups. NOTE: This includes legumes, beans, and grains. Overfilling may cause a risk of clogging the pressure limit valve and developing excess pressure.
- To protect against electric shock, do not immerse cord, plugs, or outer vessel in water or other liquids.
- Unplug from outlet when not in use and before cleaning. Allow to cool before putting on or removing parts.
-
Do not operate any appliance with a damaged cord or plug or after the appliance malfunctions or has been damaged in any manner. Return appliance to the nearest authorized service facility for examination, repair, or electrical or mechanical adjustment.
-
Do not let cord hang over edge of table or counter, or touch hot surfaces.
- Use of accessories not specifically recommended by Cuisinart may cause damage to unit.
- Do not use outdoors.
- Do not use under hanging cabinets; steam from pressure release may cause damage.
- Be aware that certain foods, such as applesauce, cranberries, pearl barley, oatmeal and other cereals, split peas, noodles, macaroni, rhubarb, or spaghetti can foam, froth and sputter, and clog the pressure release devices. These foods should not be cooked in a multicooker. NOTE: Your Instruction Booklet may contain recipes that use the above ingredients. You must follow recipe exactly as written.
- Always check the pressure release devices for clogging before use.
- Do not use this multicooker for pressure frying oil.
- Do not operate your appliance in an appliance garage or under a wall cabinet. When storing in an appliance garage, always unplug the unit from the electrical outlet. Not doing so could create a risk of fire, especially if the appliance touches the walls of the garage or the door touches the unit as it closes.
- To prevent risk of explosion and injury, replace seal ring as recommended by the manufacturer. See Operating Instructions.
- Intended for countertop use only.
WARNING:
Spilled food can cause serious burns. Keep appliance and cord away from children. Never drape cord over edge of counter, never use outlet below counter, and never use with an extension cord.
SAVE THESE INSTRUCTIONS
A short power-supply cord is used to reduce the risk resulting from it being grabbed by children, becoming entangled in, or tripping over a longer cord.
CONTENTS
Important Safeguards....2
Special Cord Set Instructions ....3
Parts and Features....3
Getting to Know Your Control Panel....4
Start-Up Screen 5
Before First Use ....6
Instructions for Use....6
Multicooker Functions....6
Operating Instructions....8
Safety Features 9
Cleaning and Maintenance 9
Troubleshooting....11
Warranty 12
Tips and Hints....13
Cooking Guide 14
Recipes....17
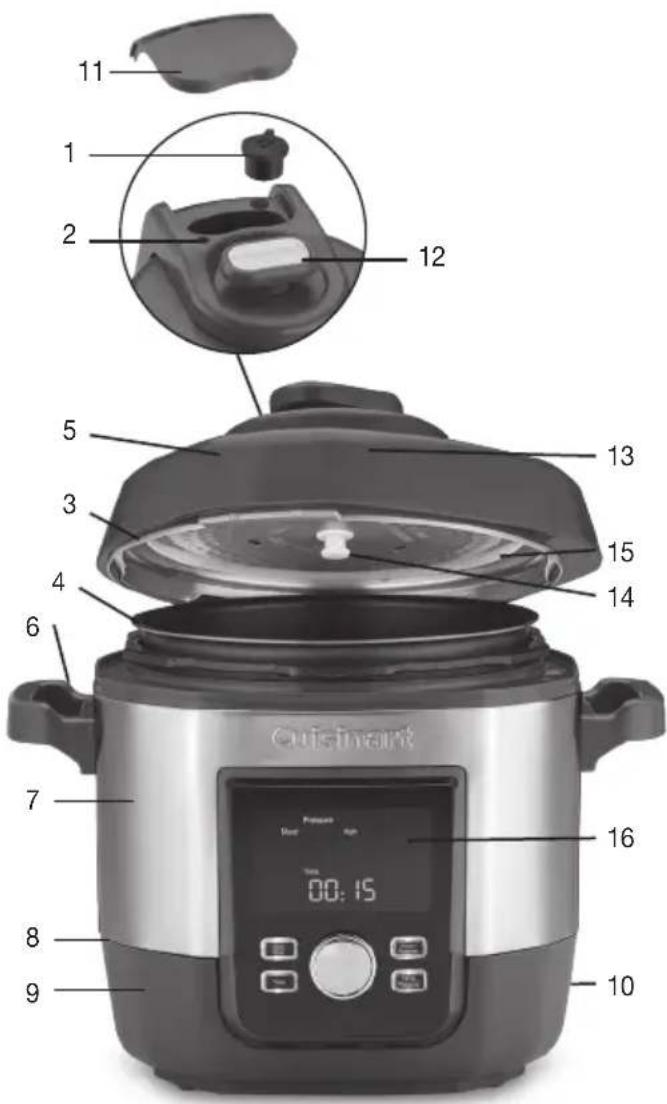
PARTS AND FEATURES
-
Pressure Limit Valve
-
Red Float Valve (Pressure Indicator)
-
Sealing Ring Assembly
-
Cooking Pot
-
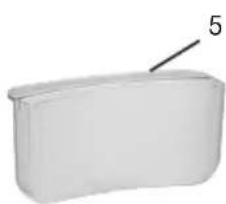
Condensation Collector
-
Unit Handle
-
Outer Body
-
Heating Plate (not shown)
-
Base
-
Power Cord (not shown)
-
Steam Cover
-
Lid Handle
-
Lid
-
Rubber Grommet
-
Upper Ring
-
Control Panel
-
Trivet/Rack – Used for some recipes such as desserts. See Recipe Booklet.
natural_image
White rectangular object with a black arrow pointing to the top-left corner (no text or symbols)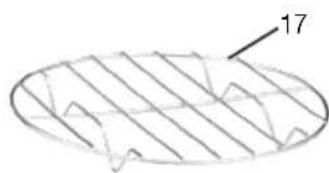
natural_image
Pure geometric diagram of an oval shape with internal diagonal lines and a labeled point '17' (no text or symbols beyond the number)GETTING TO KNOW YOUR CONTROL PANEL
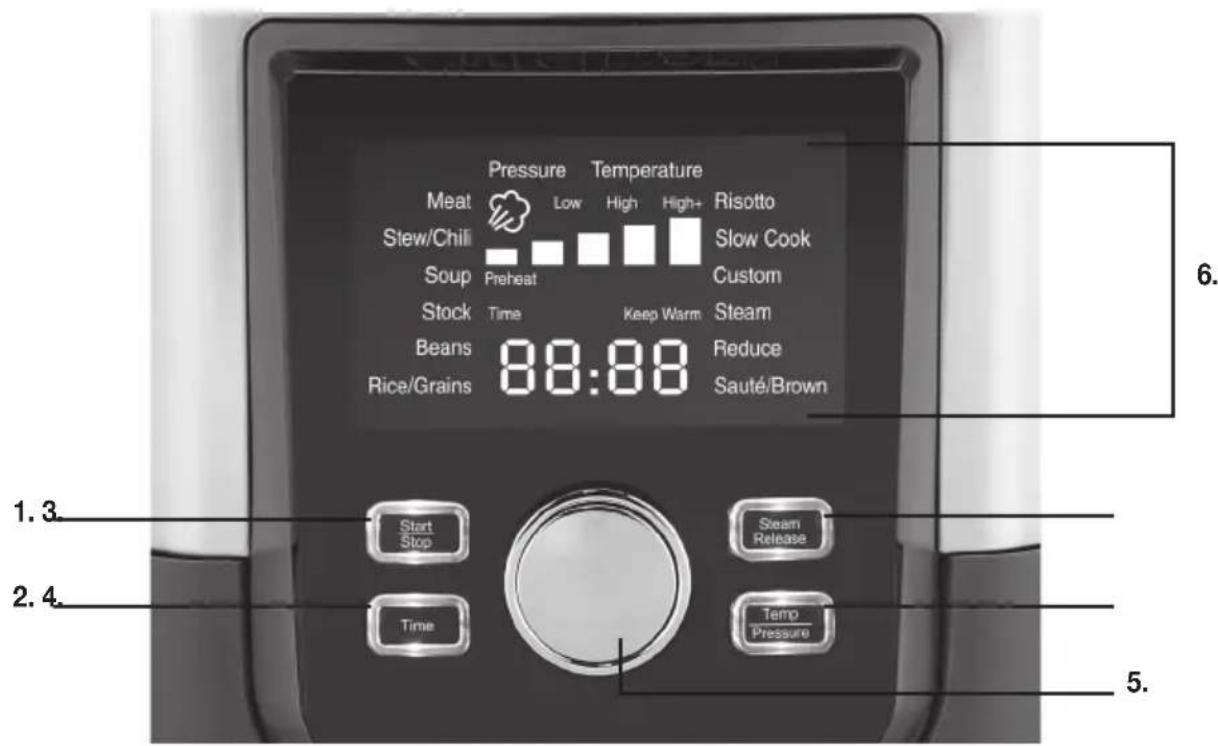
- START/STOP Button
Press to start and stop cooking.
- Time Button
Press to change the cooking time.
- Steam Release Button
Press and hold to automatically open the pressure release valve and release steam.
- Temp/Pressure
Press to change the cooking temperature or pressure setting.
- Select and Confirm Dial
Use to select cooking function. Set the temperature and the timer. Use dial to increase temperature or pressure setting and time, then press dial to confirm your settings.
- Large LCD
The backlit LCD screen is easy to read; it displays the Cooking Function(s), Temperature, Pressure Setting, Timer, Preheat, the Preheat Bars, Keep Warm, and Steam Release icon.
START-UP SCREEN
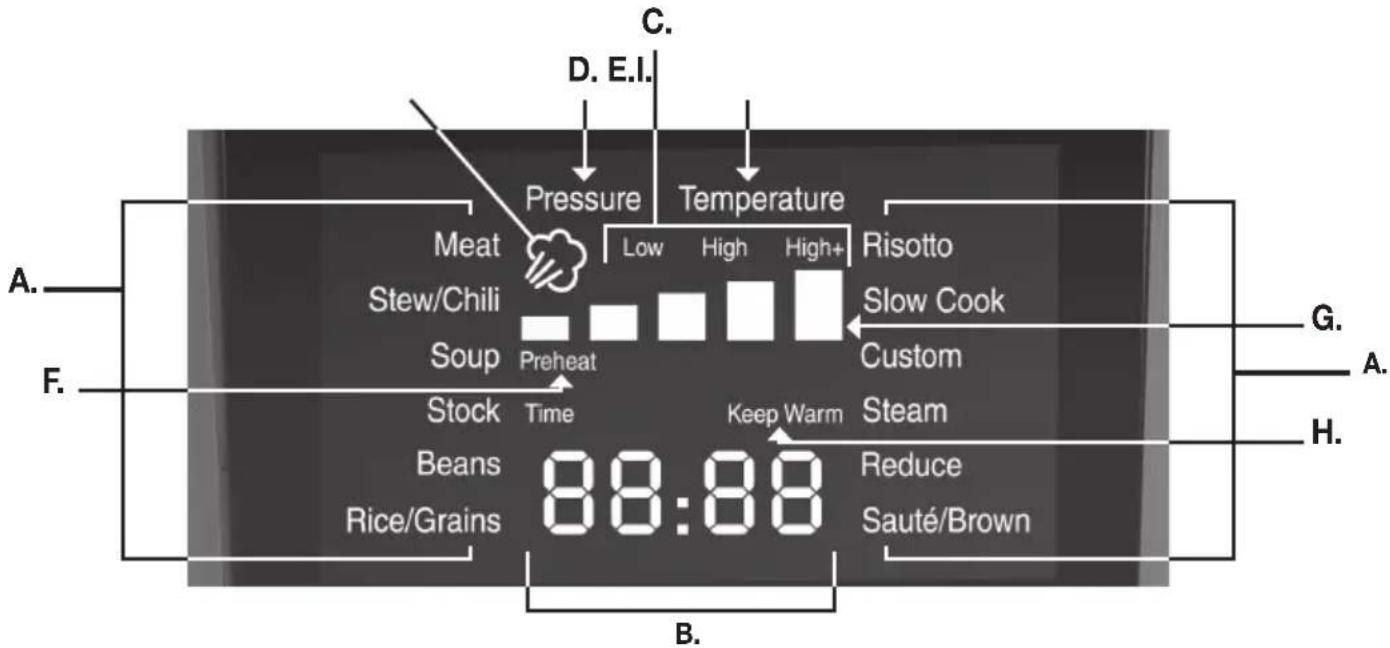
A.CookingFunctions
Pressure cooking functions: Meat, Stew/Chili, Soup, Stock, Beans, Rice/Grains, Risotto, Custom, Steam.
Non-Pressure cooking functions: Slow Cook, Reduce, Sauté/Brown, Keep Warm.
B.TimeDisplay
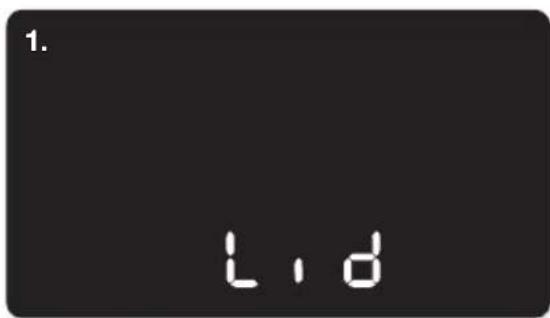
Timer keeps track of your cooking time. The time display will also indicate when the lid is open or closed incorrectly by displaying the word LID (see figure 1).
C.Pressure/TemperatureSettings
Low, High, and High+ pressure settings. Low and High temperature settings.
D.Pressure
Indicates you are cooking with a pressure cooking function.
E. Temperature
Indicates you are cooking with a non-pressure cooking function.
F. Preheat
Appears in the LCD when the unit is preheating.
G.PreheatBars
Appear when, in temperature mode, to show heat-up progress. When pressure cooking, the preheat bars appear to show progress as pressure builds, and decrease as pressure is being released.
H.KeepWarm
Appears when the cooking time is complete, on most functions, and the unit has entered Keep Warm mode. Can also be used to keep cooked food warm for serving.
I. Steam Release Icon
Appears when the Steam Release button is pressed and steam is being released from the unit.
BEFORE FIRST USE
Remove any packing materials and promotional labels from your electric multicooker.
Be sure all parts have been included before discarding any packing materials. You may want to keep the box and packing materials for use at a later date.
Before using your Cuisinart® Electric Multicooker for the first time, remove any dust from shipping by wiping clean with a damp cloth. Thoroughly clean the cooking pot and sealing ring assembly in the dishwasher or with warm, soapy water. Rinse, towel dry, or air-dry, and place in the multicooker.
-
Place the multicooker on a clean, flat surface.
-
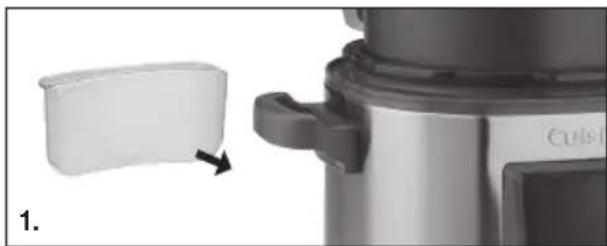
Ensure the condensation collector in rear of the unit is in place (as shown below in figure 1; and #5 on diagram, page 3).
-
Remove the Steam Cover (#11 on diagram). Ensure the pressure limit valve on the hinge area of the lid is in place, as shown in figure 2. NOTE: The pressure limit valve does not click or lock into place. Even though it will have a loose fit, it is safely secured.
natural_image
Close-up of a cooking pan with a label pointing to it, no visible text or symbols on the device itself.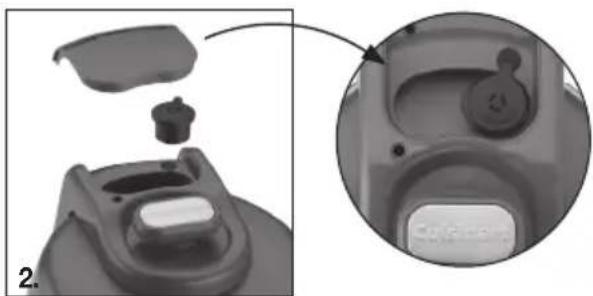
natural_image
Close-up of a mechanical device component with an inset close-up showing internal components (no text or symbols visible)INSTRUCTIONS FOR USE
-
To open lid, grasp handle, turn counterclockwise. Lift to open the lid. The unit will beep two times when turning the handle and two times when the lid is raised.
-
Add food and liquids to the cooking pot as the recipe directs. NOTE: The total volume of food and liquid must not exceed 16 cups/Max Fill line of the cooking pot (figure 3). For foods such as dried vegetables and beans, or rice and grains, the total volume must not exceed 12 cups (figure 4).
NOTE: Overfilling may clog the pressure limit valve, which can cause excess pressure to develop.
Always use at least 12 cup liquid when pressure cooking.
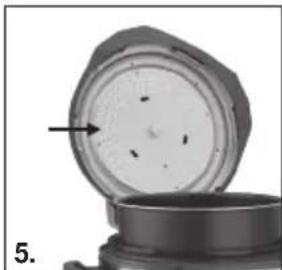
- If sealing ring assembly has been removed from lid, check to ensure flexible ring is securely in place on the metal plate. Then, holding the knob on the metal plate, place the assembly over the center post of inner lid and press down firmly to secure (figure 5). BE SURE KNOB FACES OUT.
natural_image
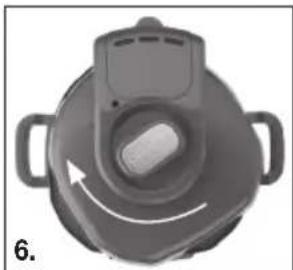
Close-up of a mechanical component with a circular dial and an arrow pointing to it, no visible text or symbols.- To close the lid, remove any food residue from upper rim of cooking pot to ensure a proper seal. Lower the lid, then turn the lid handle clockwise to close into place (figure 6). The unit will beep two times when turning the handle and two times when the lid is lowered. NOTE: If the lid is not closed correctly, scalding may result. LID will appear flashing in the LCD and the unit will beep.
natural_image
Top-down view of a mechanical component with two handles and a central knob, showing rotational motion (no text or symbols)- Position the pressure limit valve (located on hinge area of the lid) as directed in figure 2. The float in handle area must be fully down to properly seal the pot before cooking.
MULTICOOKER FUNCTIONS
Pressure Cooking Functions
- Meat – This preset is programmed for larger pieces or chunks of meat, such as brisket and pork, as well as the perfect setting for cooking a whole chicken. The default is High+ pressure for 35 minutes, but High and Low pressures are available as well. The time is adjustable from 1 minute to 4 hours. In most
cases Natural Pressure Release should be used. The Sauté/Brown function can be used to brown meats prior to cooking to add more flavor, and the Reduce function can be used to simmer the cooking liquid into a flavorful sauce after removing the meat from the cooking pot.
-
Stew/Chili – Whether cooking a hearty beef or lamb stew, or a flavorful ground turkey chili, this is the best setting to use. Be sure to use the Sauté/Brown function to brown the meat prior to cooking, especially if using ground meat. The default is High pressure for 30 minutes, but High+ and Low are available as well. The time is adjustable from 1 minute to 4 hours. In most cases Natural Pressure Release should be used.
-
Soup – This preset can be used to prepare very flavorful soups in a fraction of the time it takes to cook on the stovetop. Place the meat (if using), vegetables and other ingredients into the cooking pot, add enough liquid to cover. Most recipes will require High pressure, but Low and High+ are also available. The default cooking time is 10 minutes.
-
Stock – When preparing richer, longer-cooking stocks, use the Stock preset. This is for poultry, meat, and vegetable stocks. Expert Tip: Save vegetable scraps throughout the week (or month), wrap well and store in the freezer. When you're ready to make a stock, take out those scraps that would otherwise be headed for the garbage or compost, and instead use them to flavor a delicious stock. Add ingredients (bones, meat, vegetables, herbs) plus enough water to cover, being sure not to exceed the Maximum Fill line. The default is High pressure for 30 minutes, but both Low and High+ pressure are available. For richer stocks, cook for 1 hour 30 minutes. Always use Natural Pressure Release to achieve the best results.
-
Beans – This preset can be used to prepare dried beans quicker and tastier than on the stovetop or in the oven. Add beans and other ingredients to cooking pot. Add enough liquid to cover beans by one inch. The default is High pressure for 30 minutes, but be sure to use our Cooking Guide to select the best cooking time for the specific beans that are being prepared.
-
Rice/Grains – Cook a variety of rice and grains using this preset. Use the Cooking Guide on page 16 to determine the appropriate amount of water, as well as cooking pressure and time. Most items use High pressure and Quick Pressure Release. The default is High pressure for 5 minutes.
-
Risotto – This preset offers a (mostly) hands-off approach to risotto. After using the Sauté/Brown function to sauté aromatics and toast the rice, the liquid is added, the lid is closed and, once under pressure, it is only 5 minutes to achieve perfect risotto. Use the Steam Release button to quickly release pressure to ensure the risotto stays nice and creamy. The default is High pressure and the time is 5 minutes.
-
Custom – This preset is to allow full flexibility when pressure cooking. This is perfect for foods that do not fit within the preset programs, such as vegetables, desserts, and other dishes. The default is Low pressure for 1 minute.
-
Steam – A unique program that allows you to steam foods while under pressure. This cuts down the cooking time of most steaming tasks, while retaining important nutrients. This setting only has one temperature, so it is not adjustable. The default time is 20 minutes, but it is adjustable from 1 minute to 2 hours. This program does NOT go into Keep Warm after cooking is complete.
Non-Pressure Cooking Functions
-
Slow Cook – Treat this program like you would any slow cook. It has the option to cook with a Low or High slow-cook temperature, with a timing of 30 minutes to 20 hours. When using the Low temperature, cooking times will usually be on the higher side, 8 to 20 hours. When using the High temperature, cooking times are shorter, usually 2 to 6 hours. The default for this program is High for 4 hours. NOTE: In some rare cases, pressure can build in the unit while using the Slow Cook function. If pressure does build during Slow Cook, simply press the Steam Release button to release pressure.
-
Reduce – This program is primarily used at the end of a pressure cooking or slow cooking task to thicken sauces and reduce liquids. It can also be used to thicken a soup. There is only one temperature and it is not adjustable. The default time is 10 minutes, but is adjustable from 1 minute up to 2 hours.
-
Sauté/Brown – Sometimes recipes call for sautéing vegetables and aromatics before cooking, and other times you may want to brown meat before pressure cooking. This program has both of those options. There are two temperatures, Low for sautéing and High for browning. There is a timer, but unlike other programs, it does not need to be programmed. Sautéing/Browning reduces the time it takes full pressure to build and pressure cooking to begin.
This program is to be used without closing the lid. NOTE: Use a wooden spoon to scrape up brown bits. DO NOT use metal utensils.
- Automatic Keep Warm – All cooking functions, except for Steam, Reduce and Sauté/Brown will automatically go into a Keep Warm program, but this can also be used separately to keep already hot foods warm for serving. This program is NOT to be used to reheat foods. There is one temperature, it is not adjustable, and can be programmed between 30 minutes and 4 hours.
OPERATING INSTRUCTIONS
Plug your multicooker into an electrical outlet. The LCD will illuminate.
Select Cooking Function:
With the unit turned on and the LCD displayed, rotate the Select and Confirm dial to select the desired cooking function. The function will flash. To confirm the cooking function, press the Select and Confirm dial. The selected function is now confirmed and no longer flashing.
Once the cooking function is confirmed, the START/STOP, TIME and TEMP/PRESSURE buttons will flash. At this time you can start cooking by pressing the START/STOP button or change the default temperature and time.
Set Temperature:
Each cooking function has a default cooking temperature (Low, High) or pressure setting (Low, High, and High+). To change the default temperature or pressure setting, press the TEMP/PRESSURE button. The default temperature will flash. Rotate the Select and Confirm dial to the desired temperature / pressure setting. To confirm the temperature / pressure setting, press the Select and Confirm dial.
Set Time:
Each cooking function has a default cooking time. To change the default time, press the TIME button. The default time will flash. Rotate the Select and Confirm dial to increase or decrease the time. To confirm the time, press the Select and Confirm dial.
Once you have confirmed the cooking function, temperature and time, press the START/STOP button to begin cooking. The first preheat bar and the word Preheat will appear in the LCD. NOTE: Preheat and the preheat bars will not appear for Slow Cook, Steam, Reduce or Sauté/Brown.
Changing Settings:
To change any of your settings (cooking function, temperature and time) at any time during use, follow these instructions.
To change the Cooking Function – Press and hold the START/STOP button. Rotate the Select and Confirm dial to select the desired cooking function. The function will flash. To confirm the cooking function, press the Select and Confirm dial. The selected function is now confirmed and no longer flashing. Press the START/STOP button to continue cooking.
To change the Temperature-Press and hold the TEMP/PRESSURE button until the current temperature begins to flash. Rotate the Select and Confirm dial to the desired temperature / pressure setting. The temperature will flash. To confirm the temperature / pressure setting, press the Select and Confirm dial, and the unit will continue cooking.
To change the Time – Press and hold the TIME button until the current time begins to flash. Rotate the Select and Confirm dial to the desired time setting. The time will flash. To confirm the time setting, press the Select and Confirm dial, and the unit will continue cooking.
To stop cooking and return to the start-up screen, press and hold the START/STOP button.
YOU SHOULD NEVER ATTEMPT TO OPEN THE LID WHILE PRESSURE COOKING.
NOTE: During pressure cooking, when the unit has reached full pressure, it is normal to see a small gap between the lid and the housing.
KEEP WARM
Automatic Keep Warm Feature
When timer reaches 00:00, the multicooker automatically shifts to Keep Warm mode. Keep Warm will appear in the LCD and unit will beep 4 times to indicate cooking is complete. The timer will count up to show how long the unit has been in Keep Warm.
Independent Keep Warm Feature
Use to keep cooked food warm for serving.
- Open the lid and place prepared hot ingredients into the cooking pot to be kept warm.
- Close the lid. NOTE: There is no need to rotate lid to the closed position.
- Power on the unit.
- Rotate the Select and Confirm dial until Keep Warm
is flashing. Press the Select and Confirm dial to confirm, then press the START/STOP button to start Keep Warm.
- To adjust the 2-hour default Keep Warm time, press the TIME button and use the Select and Confirm dial to adjust time from 30 minutes up to 4 hours. Press the Select and Confirm dial to confirm the desired time, then press the START/STOP button to start Keep Warm. Timer will begin counting down.
NOTE: Keep Warm time can be adjusted at any time by repeating step 5.
NOTE: The Keep Warm setting should not be used for more than 12 hours. The quality or texture of the food will begin to change after 1 hour on Keep Warm. In the Keep Warm setting, a little condensation in the upper ring is normal.
PRESSURE RELEASE
To Open the Lid
When pressure cooking cycle is finished, the unit will automatically switch to the Keep Warm mode. At this point, you may choose to release pressure in one of three ways – Natural Pressure Release, Quick Pressure Release, or a combination of both. The choice will be dictated by the particular food being cooked and indications in the recipe. If adapting your own recipe for pressure cooking, find a similar recipe in our recipe booklet and use that as a guide.
-
Natural Pressure Release – Allow the unit to remain on Keep Warm. The pressure will begin to drop – time for pressure to drop will depend on the amount of liquid in the multicooker and the length of time that pressure was maintained. As pressure is being released, the preheat bars will count down. Natural Pressure Release could take from 20 to 80 minutes. During this time, cooking continues, so it is not recommended for certain cuts of meats and some desserts. When pressure is fully released, the unit will beep once, all preheat bars will disappear from the screen and the lid will unlock to open.
-
Quick Pressure Release – Following pressure cooking you will hear 4 beeps indicating the process is finished. Press and hold the Steam Release button. The Steam Release icon will appear in the LCD and steam will immediately begin to release through the hinge area of the lid. Keep face and hands away from steam as it is released. Do not release pressure under hanging cabinets, which can be damaged by steam.
As pressure is being released, the preheat bars will count down. When pressure is fully released, the unit will beep once and all preheat bars will disappear
from the screen, the pressure indicator will drop and the lid will unlock to open. Using Quick Pressure Release stops the pressure cooking immediately. If further cooking is necessary, the unit may be returned to Pressure.
- Combination Natural Pressure Release and Quick Pressure Release – Some recipes use a combination of Natural Pressure Release and Quick Pressure Release. Allow Natural Pressure Release for the time indicated in the recipe (food will continue to cook slightly), followed by Quick Pressure Release.
SAFETY FEATURES
There are six safety devices installed in the multicooker to assure its reliability.
1. Open-and-Close Lid Safety Device
The appliance will not start pressurizing until the lid is closed and locked properly. The lid cannot be opened if the appliance is filled with pressure.
2. Pressure Control Device
The correct pressure level is automatically maintained during the cooking cycle.
3. Pressure Limit Valve
The pressure limit valve will release air automatically when the pressure inside exceeds the preset temperature.
NOTE: Overfilling the multicooker (see Instructions for Use) may clog the pressure limit valve, which can cause excess pressure to develop.
4. Pressure Relief Device
When the multicooker reaches the maximum allowable pressure and temperature, the cooking pot will move down until lid separates from the sealing ring, releasing air pressure.
5. Thermal Control
The power will automatically shut off when the cooking pot temperature reaches the preset value, or the multicooker is heating without any food inside.
6. Thermal Fuse
The circuit will be opened when the multicooker reaches the maximum temperature.
CLEANING AND MAINTENANCE
-
Unplug the power cord before cleaning.
-
Clean the outer body with a soft cloth, such as a paper towel or microfiber cloth. Do not immerse the outer body in water or pour water into it.
-
Remove the sealing ring assembly from the inside of the lid by grasping the knob and pulling. Set aside.
-
Ensure red float valve is clean and moves freely.
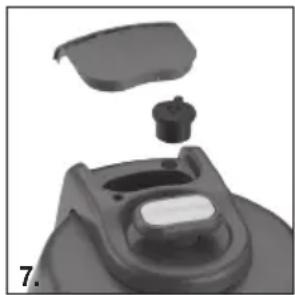
- Remove the Steam Cover and then the pressure limit valve (figure 7) by gripping and pulling firmly upward. Rinse with warm water and dry.
natural_image
3D rendered mechanical component with a lid and base, no visible text or symbols- Clean the upper and underside of the lid with a cloth and warm water, including all areas on the underside. Dry completely, and replace pressure limit valve.
- To clean sealing ring assembly, carefully remove flexible sealing ring and clean in the dishwasher or with a dampened cloth or microfiber cloth. Do not use chemical cleaners. Wash metal plate in the dishwasher or with warm water, dry thoroughly and replace sealing ring.
- To clean the rubber grommet in center of sealing ring assembly, carefully remove it, clean it, and replace it.
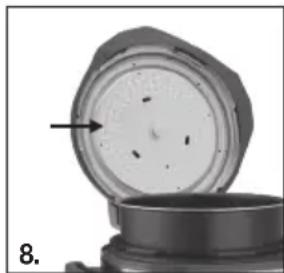
- Replace sealing ring assembly in lid. BE SURE KNOB FACES OUT (figure 8).
natural_image
Close-up of a mechanical component with an arrow pointing to a circular feature, no visible text or symbols.- Cooking pot is dishwasher safe. To hand-clean the pot, use a soft cloth or sponge and wipe. Be careful not to damage the inside coating. Never use harsh chemicals or scouring pads.
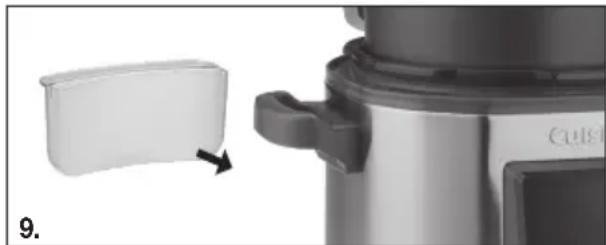
- To clean the condensation collector, remove and clean it with warm, soapy water, then reinstall it (figure 9).
natural_image
Close-up of a kitchen appliance with a white lid and handle, showing a curved arrow indicating rotation (no text or symbols visible)- Any other servicing should be performed by an authorized service representative.
NOTE: If scouring is necessary, use a nonabrasive cleaner or liquid detergent with nylon pad or brush.
TROUBLESHOOTING
| SYMPTOM POSSIBLE | REASONS SOLUTIONS | |
| Lid does not lock. | The sealing ring assembly is not properly installed in lid. | Re-install the sealing ring assembly as instructed in INSTRUCTIONS FOR USE, page 6. |
| Cannot open the lid after releasing the pressure. | The red float valve is still up. | Press the steam release button again. |
| Air escapes from the rim of the lid. | No sealing ring was installed. Install the sealing ring. | |
| Food residue on sealing ring. Clean sealing ring. | ||
| Sealing ring is worn out. Replace the sealing ring. | ||
| Air continuously escapes from the red float valve. | Food stuck on the sealing ring of the red float valve. | Clean the sealing ring. |
| The sealing ring on the float valve is worn out. | Replace the sealing ring. | |
| The red float valve will not rise. | The pressure limit valve is not placed properly. | See Before First Use, #3, page 6. |
| Not enough water. Check recipe for proper quantities. | ||
| Air escaping from the rim of the lid and/or the pressure limit valve. | Call our Consumer Service Center toll free at 1-800-726-0190. | |
| The red float valve could be stuck. | Clean the sealing ring. | |
| Unit shuts off when START is pressed to begin pressure cooking. | Sauté/Brown function was just used and temperature in unit is higher than pressure cooking temperature, so safety shutoff occurs. | After Sauté/Brown, let unit cool down for 2 or 3 minutes before you start pressure cooking, or add 12 cup more liquid to the unit. |
| The word LID appears in LCD. The | lid is not closed properly. | Turn the lid handle clockwise to close the lid into place. |
| The Steam Release icon is flashing. | There is still pressure inside the unit. | Refer to Tips and Hints on pg. 13. |
| It is difficult to close the lid. | The cooking pot is still hot, causing steam to push the lid open. | Allow contents to cool down for several minutes before fully engaging the lid. |
| Air is escaping from the steam cover. | The pressure limit valve is not properly positioned. | Remove the steam cover and ensure the pressure limit valve is properly installed. |
| LCD displays “E1” and beeps 10 times. | Thermal control malfunction | Call our Consumer Service Center toll free at 1-800-726-0190. |
| LCD displays “E2” and beeps 10 times. | Thermal control malfunction | Call our Consumer Service Center toll free at 1-800-726-0190. |
WARRANTY
Limited Three-Year Warranty (U.S. and Canada only)
This warranty is available to U.S. consumers only. You are a consumer if you own a Cuisinart® High Pressure Electric Multicooker that was purchased at retail for personal, family or household use. Except as otherwise required under applicable law, this warranty is not available to retailers or other commercial purchasers or owners. We warrant that your Cuisinart® High Pressure Electric Multicooker will be free of defects in materials and workmanship under normal home use for 3 years from the date of original purchase.
We recommend that you visit our website, www.cuisinart.com for a fast, efficient way to complete your product registration. However, product registration does not eliminate the need for the consumer to maintain the original proof of purchase in order to obtain the warranty benefits. In the event that you do not have proof of purchase date, the purchase date for purposes of this warranty will be the date of manufacture.
CALIFORNIA RESIDENTS ONLY
California law provides that for In-Warranty Service, California residents have the option of returning a nonconforming product (A) to the store where it was purchased or (B) to another retail store that sells Cuisinart products of the same type. The retail store shall then, according to its preference, either repair the product, refer the consumer to an independent repair facility, replace the product, or refund the purchase price less the amount directly attributable to the consumer's prior usage of the product. If neither of the above two options results in the appropriate relief to the consumer, the consumer may then take the product to an independent repair facility, if service or repair can be economically accomplished. Cuisinart and not the consumer will be responsible for the reasonable cost of such service, repair, replacement, or refund for nonconforming products under warranty. California residents may also, according to their preference, return nonconforming products directly to Cuisinart for repair or, if necessary, replacement by calling our Consumer Service Center toll-free at 800-726-0190. Cuisinart will be responsible for the cost of the repair, replacement, and shipping and handling for such nonconforming products under warranty.
HASSLE-FREE REPLACEMENT WARRANTY
Your ultimate satisfaction in Cuisinart products is our goal, so if your Cuisinart ^® High Pressure Electric Multicooker should fail within the generous warranty period, we will repair it or, if necessary, replace it at no cost to you. To obtain a return shipping label, email us at
https://www.cuisinart.com/customer-care/product-return. Or call our toll-free customer service department at 1-800-726-0190 to speak with a representative.
Your Cuisinart® High Pressure Electric Multicooker has been manufactured to the strictest specifications and has been designed for use only in 120-volt outlets and only with authorized accessories and replacement parts. This warranty expressly excludes any defects or damages caused by attempted use of this unit with a converter, as well as use with accessories, replacement parts or repair service other than those authorized by Cuisinart. This warranty does not cover any damage caused by accident, misuse, shipment or other than ordinary household use. This warranty excludes all incidental or consequential damages. Some states do not allow the exclusion or limitation of these damages, so these exclusions may not apply to you. You may also have other rights, which vary from state to state.
Important: If the nonconforming product is to be serviced by someone other than Cuisinart's Authorized Service Center, please remind the servicer to call our Consumer Service Center at 1-800-726-0190 to ensure that the problem is properly diagnosed, the product is serviced with the correct parts, and to ensure that the product is still under warranty.
TIPS AND HINTS
- Many family favorites can be easily adapted for preparation in your Cuisinart® High Pressure Electric Multicooker – soups, stews, side dishes and more.
- The amount of liquid needed when pressure cooking is much less than for traditional cooking methods.
- Never exceed the Maximum Fill amount of the multicooker.
- Make sure the lid is on firmly and tightly, and moved as far clockwise as it will go to allow proper locking.
- Hot foods/liquids will come to pressure more quickly than cold foods/liquids.
- When pressure cooking is completed, follow recipe instructions for releasing pressure. For Quick Pressure Release, it is important to begin immediately upon completion of pressure cooking; otherwise foods will continue to cook, and may overcook.
- Do not store multicooker with lid on tightly. This saves on gasket wear and tear.
- More nutrients are preserved during pressure cooking than with traditional cooking methods, as less liquid is used and thus fewer nutrients are lost to evaporation.
- Always use at least 12 cup of liquid when pressure cooking.
- To adapt your own recipes, find a similar one in our recipe booklet and use it as a guide. In general, cooking time will be at least one-third to one-half of the traditional cooking time. Reduce your cooking liquid by at least half – you may need to “play” with your recipe to get it right. You may wish to add vegetables at the end of cooking to avoid overcooking. You can also use the cooking charts provided as a guide.
- Power loss protection – in the event there is a power outage while using your multicooker, the following will occur:
Power loss for less than 3 minutes: Unit will turn on and cooking will resume.
Power loss for more than 3 minutes: Unit will turn on and Steam Release button will flash, indicating the unit is still under pressure. Press the Steam Release button to release pressure and follow operating instructions to finish cooking.
COOKING GUIDE:
Poultry and Meats....14
Vegetables....15
Rice and Grains....16
Dried Beans.... 16
Recipes....17
PRESSURE HEAT-UP TIMES
When pressure cooking, remember that it will take approximately 5 to 40 minutes (depending on the starting temperature and recipe) for pressure to build and pressure cooking to begin.
SUGGESTED COOKING TIMES FOR POULTRY AND MEATS
Be sure to add at least 1 cup of liquid when pressure cooking meats for 45 minutes or less, and 1½ cups if cooking for longer amounts of time. Be sure to add vegetables, such as chopped onions, carrots and celery, and aromatic herbs such as garlic, parsley, thyme, etc., for added flavor. Most items are cooked on High pressure unless otherwise indicated. For best results and flavor, most poultry and meats benefit from browning first. Cooking times will vary slightly due to individual size of pieces and starting temperatures.
POULTRY AND MEATS
| FOOD COOKING TIME PRESSURE RELEASE METHOD | ||
| CHICKEN | ||
| Whole, up to 4 pounds | 25 to 30 minutes | Quick Pressure Release |
| Chicken Breast, bone in, 3 pounds | 8 to 10 minutes Quick Pressure Release | |
| Boneless Chicken Breast, 2 pounds | 5 to 6 minutes Quick Pressure Release | |
| Thighs/Legs, bone in | 9 to 12 minutes | Quick Pressure Release |
| Thighs/Legs, boneless | 8 to 10 minutes | Quick Pressure Release |
| BEEF | ||
| Pot Roast, Bottom Round, 3 to 31⁄2 pounds | 60 to 90 minutes Natural Pressure Release | |
| Brisket, 21⁄2 to 3 pounds | 55 minutes | Natural Pressure Release |
| Corned Beef Brisket | 60 to 90 minutes | Natural Pressure Release |
| Short Ribs, 2 to 3 inches thick | 50 minutes | Natural Pressure Release |
| Stew - 11⁄2- to 2-inch cubes 20 to 30 minutes | Natural Pressure Release(see recipe for Beef Stew for times with vegetables) | |
| LAMB | ||
| Shanks, four, 12 ounces each | 25 to 30 minutes | Natural Pressure Release |
| Shoulder cubes for stew, about 11⁄2 inches | 20 to 25 minutes | Natural Pressure Release |
| PORK | ||
| Chops, Loin, bone in, 3⁄4 to 1 inch thick | 4 to 5 minutes, brown first Quick Pressure Release | |
| Boneless Shoulder Roast, about 3 pounds | 50 to 55 minutes | Natural Pressure Release |
| Spareribs, cut into 2 to 3 rib pieces | 20 to 30 minutes | Quick Pressure Release |
| VEAL | ||
| Boneless Shoulder Roast | 10 minutes per pound (weight is important to avoid overcooking) | Natural Pressure Release |
| Cubes for stew, 11⁄2 to 2 inches | 15 to 20 minutes | Natural Pressure Release |
VEGETABLES
Vegetables should be well washed and peeled if necessary. Vegetables cook very quickly – be sure to press STOP and use Quick Pressure Release immediately after audible beep sounds. If vegetables require more cooking, turn multicooker off, and cover to steam the vegetables until preferred texture is reached. Add 12 cup water or liquid for cooking. If pressure cooking frozen vegetables, 1 to 2 minutes additional cooking time and longer steaming time may be needed. When cooking vegetables, it is always best to undercook, then allow additional time to steam – to avoid overcooking. All cooking is on High pressure unless otherwise indicated.
| FOOD COOKING TIME PRESSURE RELEASE METHOD | ||
| Artichokes, 4 medium/large,8 to 10 ounces each | 10 to 12 minutes Quick Pressure Release | ease |
| Beans, Green or Yellow Waxy, 112 pounds, cut into 2-inch lengths | 1 to 2 minutes Quick Pressure Release | |
| Beets, medium-large | 15 to 20 minutes | Quick Pressure Release |
| Broccoli, cut into large florets | 2 to 3 minutes | Quick Pressure Release |
| Cauliflower, cut into large florets | 2 to 3 minutes | Quick Pressure Release |
| Carrots, cut into 2-inch lengths –or “baby cut” | 5 minutes Quick Pressure Release | |
| Carrots, 12 -inch slices | 2 to 3 minutes | Quick Pressure Release |
| Corn, 4 to 6 ears (use trivet/rack) | 2 to 3 minutes | Quick Pressure Release |
| Greens, collards, kale, cut into1-inch strips | 5 to 7 minutes Quick Pressure Release | |
| Onions, baby, peeled | 2 to 4 minutes | Quick Pressure Release |
| Parsnips, peeled, cut into2-inch pieces | 3 to 4 minutes Quick Pressure Release | |
| Parsnips, 12 -inch slices | 1 to 2 minutes | Quick Pressure Release |
| POTATOES | ||
| White, medium, quartered | 5 to 7 minutes | Quick Pressure Release |
| Red, new (2 to 3 oz. each) | 5 to 8 minutes | Quick Pressure Release |
| Sweet, 2-inch cubes | 4 to 5 minutes | Quick Pressure Release |
| SQUASH | ||
| Acorn, halved and seeded | 6 to 8 minutes | Quick Pressure Release |
| Butternut, peeled and sliced | 3 to 4 minutes | Quick Pressure Release |
| Spaghetti, halved | 10 to 12 minutes | Quick Pressure Release |
| Squash, Yellow Crookneck orZucchini, cut into 12 -inch slices | 1 to 2 minutes Quick Pressure Release | |
RICE AND GRAINS
| GRAINS (1 CUP) | COOKING TIME MINUTES(HIGH PRESSURE) | LIQUID NEEDED | PRESSURE RELEASE METHOD |
| Barley (pearl) 20 to 25 3 cups Quick | |||
| Brown Rice 20 2 cups Natural | |||
| Bulgur 6 2 cups Quick | |||
| Farro (whole grain) | 18 | 3 cups | Quick |
| Quinoa 5 1 12 cups Quick | |||
| Steel-Cut Oats | 5 | 3 cups | Natural |
| White Rice (long grain) | 4 to 6 | 1 12 cups | Quick |
| Wild Rice | 22 | 3 to 4 cups | Quick |
DRIED BEANS
- Before cooking dried beans, pick over and discard any broken or shriveled beans or bits of dirt and debris. Rinse beans and drain.
- Beans may be soaked overnight, but the multicooker allows you to cook beans without presoaking.
- Onions, garlic, celery, sprigs of fresh herbs or a bay leaf may be added for additional flavor. Do not salt before cooking, as salt inhibits cooking.
- Cook beans in large batches (1 pound beans + 8 cups water + seasonings + onion, garlic, herbs to taste) and freeze in 1-cup amounts to add to other dishes.
- Never fill multicooker more than half full when cooking beans.
- Add 2 teaspoons oil per cup of beans to prevent foaming.
• After cooking beans, clean lid, gasket, pressure limit valve, and red float valve carefully. - When cooking unsoaked beans, use High pressure and Natural Pressure Release.
- When cooking soaked beans, use High pressure and a combination of Natural Pressure Release for 10 minutes and then Quick Pressure Release.
- If beans are not completely cooked (this is partially dependent on the age of the dried beans, something you will have no control over), select Reduce and allow the beans to simmer until cooked tender. As with vegetables, it is better to undercook and allow to simmer to complete cooking.
| BEANS (1 CUP) (+ 8 CUPS WATER) | COOKING TIME (SOAKED OVERNIGHT) | COOKING TIME (UNSOAKED) | YIELD |
| Black Beans | 5 minutes | 10 minutes | 2 cups |
| Cannellini | 4 minutes | 10 minutes | 2 cups |
| Chickpeas (Garbanzo Beans) | 5 minutes | 15 minutes | 212 cups |
| Great Northern | 4 minutes | 10 minutes | 214 cups |
| Lentils | N.A. | 8 to 10 minutes | 2 cups |
| Pinto | 5 minutes | 10 minutes | 214 cups |
| Navy Beans | 5 minutes | 10 minutes | 2 cups |
| Red Beans | 5 minutes | 10 minutes | 2 cups |
| Split Peas | N.A. | 8 to 10 minutes | 2 cups |
RECIPES
Steel-Cut Oats....17
Mixed Grain Breakfast Porridge....18
Oatmeal Breakfast Bowl....18
French Toast Strata....18
Breakfast Bread Pudding....19
Frittata....20
Hard-Boiled Eggs....20
Deviled Eggs 20
Macaroni and Cheese 21
Mashed Potatoes 21
Sautéed Kale....22
"Braised" Collards....22
White Bean Dip 22
Chickpeas with Sausage and Kale 23
Baked Beans....23
Artichokes with Three Sauces....24
Green Beans with Shallots and Pine Nuts......25
Italian Farro and Arugula Salad....25
Tabbouleh....26
Chicken Stock 26
Vegetable Stock 27
Mushroom Stock....27
Brown Beef Stock 28
Seafood Stock....28
Bone Broth 29
Quick Chicken Soup 29
Chicken Tortilla Soup 29
Udon Soup 30
Pho 30
Mushroom Risotto....33
Black Beans and Rice....34
Marinara Sauce....35
Meatballs in Sauce....35
"Baked" Ziti 36
Quick Turkey Chili 36
Traditional Brisket....36
Lamb Shanks with Olives and Prunes ....37
Chicken and Dumplings....38
Honey-Glazed Salmon 39
Asian-Style Pork Ribs 41
Chicken Tikka Masala 41
Chicken Adobo....42
Chicken Tinga 43
Carne con Chili....43
Thai-Style Green Curry Vegetables....44
Pineapple Chipotle Pulled Pork 45
Creamy Rice Pudding 45
Dulce de Leche 45
Chocolate Pudding....46
Black and White Cheesecake....46
"Baked" Apples 47
Cherry Chocolate-Chip Bread Pudding .....48
Pear "Sauce" 48
Steel-Cut Oats
Traditionally, steel-cut oats take care, time and a watchful eye, but in the multicooker it's a hands-off, quick task for perfectly cooked, creamy oats.
Makes about 7 cups
2 cups steel-cut oats (not quick cooking)
2 cinnamon sticks
2 tablespoons pure maple syrup
^3/_4 cup dried fruit
2 pinches ground nutmeg Pinch kosher salt
6 cups water
-
Put all of the ingredients into the cooking pot of the Cuisinart® Multicooker. Secure the lid and select Rice/Grains. Set the pressure to High, the time for 5 minutes, and press Start. When the tone sounds, allow pressure to release naturally.
-
Once pressure has released completely, remove lid and remove the cinnamon sticks.
-
Stir to combine and serve immediately.
Nutritional information per serving ( 12 cup):
Calories 131 (26% from fat) • carb. 22g • pro. 3g
fat 4g • sat. fat 2g • chol. 0mg • sod. 20mg
calc. 8mg • fiber 3g
Mixed Grain Breakfast Porridge
A hearty, healthy, and filling way to start the day.
Makes about 6 cups
1 cup steel-cut oats (not quick cooking)
12 cup short-grain brown rice
12 cup quinoa
23 cup chopped unsalted pecans
^2/_3 cup dried fruit
14 cup unsweetened shredded coconut
2 cinnamon sticks
2 to 4 tablespoons pure maple syrup
2 tablespoons coconut oil
2 pinches ground nutmeg
Pinch kosher salt
5 cups water
- Put all of the ingredients into the cooking pot of the Cuisinart® Multicooker. Secure the lid and select Rice/Grains. Set the pressure to High, set the time for 10 minutes, and press Start. When the tone sounds, allow pressure to release naturally.
- Once pressure is completely released, open the lid and remove the cinnamon sticks.
- Stir to combine and serve immediately.
Nutritional information per serving (1 cup):
Calories 390 (32% from fat) • carb. 61g • pro. 8g
fat 14g • sat. fat 5g • chol. 0mg • sod. 32mg
calc. 45mg • fiber 7g
Oatmeal Breakfast Bowl
Cooking oats in larger batches allows you to be creative with breakfast in the morning. Top warm oats with whatever you have on hand, but we think the mix of yogurt, jam, and fruit is a winning combination.
Makes 4 servings
2 cups cooked steel-cut oats, warm
14 cup seedless raspberry jam
14 cup plain Greek yogurt (any fat variety)
12 cup fresh raspberries
^1/_4 cup chopped pecans
1 teaspoon chia seeds
Divide the oatmeal among four serving bowls. Swirl an even amount of raspberry jam and yogurt into each bowl. Top with the fresh raspberries, pecans, and chia seeds.
Nutritional information per serving (about 1 cup):
Calories 271 (26% from fat) • carb. 44g • pro. 8g
fat 8g • sat. fat 1g • chol. 0mg • sod. 16mg
French toast without standing over the stove. It can be prepped the night before, and then just put into the Cuisinart® Multicooker to be ready for a house full of guests.
Makes 8 servings
4 large eggs
2 cups whole milk*
1 cup heavy cream*
^1/_3 cup pure maple syrup
1 tablespoon pure vanilla extract
2 teaspoons ground cinnamon
1 teaspoon ground nutmeg
14 teaspoon kosher salt
1 loaf challah or brioche bread (about 1 pound), cut into 2-inch pieces Nonstick cooking spray
- Put the eggs, milk, cream, maple syrup, vanilla extract, spices, and salt into a large bowl. Whisk to combine.
- Add the bread pieces to the large bowl and stir to completely coat – press down the bread so each piece is fully submerged. Cover the bowl with plastic wrap and refrigerate for a minimum of 3 hours, or up to overnight.
- Thirty minutes prior to cooking the strata, remove from the refrigerator and allow to rest at room temperature.
- Lightly coat a 2-quart ceramic baking dish, no larger than 7 inches in diameter, with nonstick cooking spray. Transfer the soaked bread mixture to the baking dish. Cover with aluminum foil that has also been coated with nonstick cooking spray.
- Put the rack into the cooking pot of the Cuisinart® Multicooker with 2 cups of water. Cut a piece of aluminum foil that is about 24 inches long. Fold in half lengthwise, then fold in half again two more times to create a strip
about 24 inches in length and 2 inches wide to make a cradle.
-
Put the filled baking dish in the center of the foil strip and then carefully lift and transfer to the rack in the cooking pot.
-
Secure the lid and select Custom. Set the pressure to Low, the time for 45 minutes, and press Start.
-
When the tone sounds, press the Steam Release button to quickly release pressure.
-
Once pressure is completely released, open lid and, using potholders, carefully lift the foil cradle and baking dish out of the cooking pot, and serve immediately.
*The whole milk and cream can be substituted in equal amounts with any dairy-free milk alternative.
Nutritional information per serving:
Calories 376 (44% from fat) • carb. 40g • pro. 10g
fat 18g • sat. fat 10g • chol. 168mg • sod. 368mg
calc. 156mg • fiber 2g
Breakfast Bread Pudding
For the savory breakfast lovers out there, this recipe is very versatile. You can substitute bacon, pancetta, or leave the meat out entirely and pack it full of vegetables.
Makes 8 servings
2 links (about 6 ounces) breakfast sausage, fresh or precooked
1 tablespoon olive oil
1 small shallot, finely chopped
2 garlic cloves, finely chopped
6 large eggs
1 cup whole milk
1 cup heavy cream
1 / 2 teaspoon kosher salt
14 teaspoon paprika
2 pinches freshly ground black pepper
1 loaf challah or brioche bread (about 1 pound), cut into 2-inch pieces
1 cup (about 3 ounces) shredded Gruyère Nonstick cooking spray
-
If using fresh sausage, remove casings. If using precooked sausage, cut into 14 -inch slices; reserve.
-
Put the oil into the cooking pot of the Cuisinart® Multicooker. Select Sauté/Brown. Set the temperature to High, set the time for 10 minutes, and press Start.
-
Once the unit is preheated and the oil is hot, add the sausage. Cook until browned, breaking up fresh sausage, if using. Remove and reserve cooked sausage.
-
Add the shallot and garlic and cook until softened, about 30 seconds. Press Stop.
-
Put the eggs, milk, cream, salt, paprika, and pepper in a large mixing bowl. Whisk to completely combine.
-
Add the bread pieces to the large bowl and stir to completely coat – press down the bread so each piece is fully submerged. Stir in the browned sausage, shallot, garlic, and shredded cheese. Cover the bowl with plastic wrap and refrigerate for a minimum of 3 hours, or up to overnight.
-
Thirty minutes prior to cooking bread pudding, remove from the refrigerator and allow to rest at room temperature.
-
Lightly coat a 2-quart ceramic baking dish, no larger than 7 inches in diameter, with nonstick cooking spray. Transfer the soaked bread mixture to the baking dish. Cover with aluminum foil that has also been coated with nonstick cooking spray.
-
Put the rack into the cooking pot of the Cuisinart® Multicooker with 2 cups of water. Cut a piece of aluminum foil that is about 24 inches long. Fold in half lengthwise, then fold in half again two more times to create a strip about 24 inches in length and 2 inches wide to make a cradle.
-
Put the filled baking dish in the center of the foil strip and then carefully lift and transfer to the rack in the cooking pot.
-
Secure the lid and select Custom. Set the pressure to Low, the time for 45 minutes, and press Start.
-
When the tone sounds, press the Steam Release button to quickly release pressure.
-
Once pressure is completely released, open lid and, using potholders, lift the foil cradle and casserole out of the cooking pot. Serve immediately.
Nutritional information per serving:
Calories 460 (58% from fat) • carb. 30g • pro. 17g
fat 29g • sat. fat 14g • chol. 238mg • sod. 565mg
calc. 223mg • fiber 1g
Frittata
The Cuisinart® Multicooker really can do it all. Be sure to have potholders on hand when inverting the frittata onto a serving plate.
Makes 6 servings
1 tablespoon olive oil
14 to 12 medium leek, thinly sliced
14 teaspoon kosher salt, divided Pinch freshly ground black pepper
8 large eggs
12 cup milk (any fat variety) Nonstick cooking spray
12 cup shredded cheese
1 tablespoon thinly sliced chives
-
Put the olive oil in the cooking pot of the Cuisinart® Multicooker. Select Sauté/Brown. Set the temperature to Low, the time for 5 minutes, and press Start.
-
Once the unit is preheated and the oil is hot, add the leek with a pinch each of the salt and pepper. Sauté until the leek is softened, but does not pick up any color. Remove and cool slightly.
-
Put the eggs, milk, and remaining salt into a large mixing bowl. Whisk until combined.
-
Lightly coat a round ceramic baking/casserole dish, no larger than 7 inches in diameter, with the nonstick cooking spray. Add the egg mixture and then stir in the sautéed leek. Top with the cheese and chives. Cover with aluminum foil that has also been coated with nonstick cooking spray.
-
Put the rack into the cooking pot of the Cuisinart® Multicooker with 2 cups of water. Cut a piece of aluminum foil that is about 24 inches long. Fold in half lengthwise, then fold in half again two more times to create a strip about 24 inches in length and 2 inches wide to make a cradle.
-
Put the filled baking dish in the center of the foil strip and then carefully lift, and transfer to the rack in the cooking pot.
-
Secure the lid and select Custom. Set the pressure to Low, the time for 10 minutes, and press Start.
-
Once the tone sounds, press the Steam Release button to quickly release pressure.
-
When pressure is completely released, carefully open lid and, using potholders,
lift the foil cradle and casserole out of the cooking pot. Uncover and invert frittata onto a serving plate and serve immediately.
Nutritional information per serving:
Calories 164 (64% from fat) • carb. 4g • pro. 6g fat 12g • sat. fat 4g • chol. 257mg • sod. 252mg calc. 113mg • fiber 0g
Hard-Boiled Eggs
The timing in this recipe is for a true hard-boiled egg. To have it a little less done, just reduce the time slightly, about 4 minutes for a medium-cooked egg.
Makes 6 hard-boiled eggs
1 cup water
6 large eggs
Ice bath (bowl of water filled with ice cubes)
-
Insert the rack into the cooking pot of the Cuisinart® Multicooker and add the water.
-
Using a safety pin, pierce a small hole in the bottom (the larger part) of each egg. Place the eggs on the rack.
-
Secure the lid and select Custom. Set the pressure to Low, the time for 6 minutes, and press Start.
-
Once the tone sounds, press the Steam Release button to quickly release pressure.
-
When the pressure is completely released, carefully open the lid and remove the eggs. Immediately place the cooked eggs into the ice bath to prevent overcooking.
-
If not using or consuming the eggs immediately, store in refrigerator until ready to serve.
Nutritional information per egg:
Calories 72 (62% from fat) • carb. 0g • pro. 6g fat 5g • sat. fat 2g • chol. 186mg • sod. 71mg calc. 28mg • fiber 0g
Deviled Eggs
One cannot make hard-boiled eggs without thinking up a great deviled egg recipe. This has the classic flavors, but we encourage topping with bacon bits, chives, or spices to finish.
Makes 12 servings
6 hard-boiled eggs
3 tablespoons mayonnaise
1 tablespoon olive oil
1 teaspoon Dijon mustard
1 teaspoon fresh lemon juice
1 to 2 dashes hot sauce
2 pinches kosher salt Pinch freshly ground black pepper
1 tablespoon fresh herbs Paprika, for garnish
-
Peel and carefully slice eggs in half lengthwise.
-
Remove the yolks and put into the work bowl of a Cuisinart® Food Processor fitted with the metal chopping blade. Process until smooth. Pulse in the remaining ingredients, except for the herbs and paprika, and then process again until smooth. Pulse in the herbs to roughly chop and incorporate. Taste and adjust seasoning as desired. (This mixture can also be mashed with a fork if a food processor is not available.)
-
Spoon or pipe the yolk filling into the center of each egg white. Sprinkle with paprika before serving.
Nutritional information per serving:
Calories 71 (80% from fat) • carb. 0g • pro. 3g
fat 6g • sat. fat 1g • chol. 96mg • sod. 86mg
calc. 15mg • fiber 0g
Macaroni and Cheese
If your kids live on boxed macaroni and cheese, you can duplicate here with this simple recipe. We will be surprised if they can notice a difference!
Makes 11 cups
1 pound dry macaroni (or another similar, small-cut pasta)
4 cups water
1 teaspoon kosher salt
2 cups whole milk
8 ounces cream cheese, room temperature
1 teaspoon dry mustard
1 pound shredded cheese, a mixture of your favorite, good melting cheeses, such as Cheddar, Monterey Jack, Colby, Gouda, etc.
-
Put the pasta, water, and salt into the cooking pot of the Cuisinart® Multicooker.
-
Secure the lid and select Custom. Set the pressure to High, the time for 4 minutes, and press Start.
-
Once the tone sounds, press the Steam Release button to quickly release pressure.
-
When the pressure is completely released, carefully open the lid and first stir in half of the cream cheese and half of the milk. Select Sauté/Brown, set the temperature to Low and stir well. Once those are incorporated, stir in the remaining cream cheese and milk, dry mustard and finish with the shredded cheese.
-
Taste and adjust seasoning as desired.
Nutritional information per serving (1 cup): Calories 410 (49% from fat) • carb. 34g • pro. 17g fat 22g • sat. fat 13g • chol. 69mg • sod. 567mg calc. 373mg • fiber 1g
Mashed Potatoes
Everyone is fighting for oven and stove space during the holidays, so why not move one of those dishes to the Cuisinart® Multicooker?
Makes 5 cups
2 pounds Yukon Gold potatoes, peeled and cut into 1- to 2-inch pieces
12 cup water
4 to 6 tablespoons unsalted butter
^3/_4 cup whole milk
12 teaspoon kosher salt
14 teaspoon freshly ground black pepper
-
Put all of the ingredients into the cooking pot of the Cuisinart® Multicooker.
-
Secure the lid and select Custom. Set the pressure to High, the time for 8 minutes, and press Start.
-
Once the tone sounds, press the Steam Release button to quickly release pressure.
-
When the pressure is completely released, carefully open the lid and transfer to a serving bowl. Mash to desired consistency, taste and adjust seasoning to taste.
Nutritional information per serving ( 12 cup): Calories 228 (40% from fat) • carb. 30g • pro. 4g fat 10g • sat. fat 6g • chol. 28mg • sod. 273mg calc. 59mg • fiber 4g
Sautéed Kale
Having a side dish be cooked in 2 minutes is a small miracle. Here we prove that it is possible!
Makes about 3 cups
1 tablespoon olive oil
1 garlic clove, smashed
14 teaspoon kosher salt, divided
1 bunch curly kale, stems removed and roughly chopped (about 8 to 10 cups, chopped)
12 cup chicken broth, low sodium Pinch crushed red pepper
1. Put the olive oil into the cooking pot of the Cuisinart® Multicooker.
2. Select Sauté/Brown. Set the temperature to Low and press Start.
3. Once the unit is preheated and the oil is hot, add the garlic and a pinch of the salt. Sauté until fragrant and softened.
4. Stir in the kale, broth, remaining salt, and the crushed red pepper. Stir to combine. Press Stop.
5. Secure the lid and select Custom. Set the pressure to High, the time for 2 minutes, and press Start.
6. Once the tone sounds, press Stop and then press the Steam Release button to quickly release pressure.
7. When the pressure is completely released, carefully open the lid and transfer to a serving bowl. Taste and adjust seasoning as desired.
Nutritional information per serving ( 12 cup): Calories 180 (36% from fat) • carb. 21g • pro. 8g fat 7g • sat. fat 2g • chol. 34mg • sod. 575mg calc. 56mg • fiber 4g
"Braised" Collards
A standard side for most Southern barbecues, the Cuisinart® Multicooker seals in the flavor in very little time.
Makes about 4 cups
2 slices thick-cut bacon (extra smoky in flavor, if possible), chopped
1 shallot, thinly sliced
1 head collard greens, thick stems removed and sliced (about 8 cups, sliced)
Pinch kosher salt
2 tablespoons cider vinegar
^3/_4 cup chicken broth, low sodium
- Select Sauté/Brown, set the temperature to High, and press Start.
- Once the unit is preheated, add the bacon to the cooking pot of the Cuisinart® Multicooker. Brown the bacon until it is crispy. Once the bacon is nicely cooked, add the shallot and sauté until softened, about 2 minutes.
- Add the collards, salt, and vinegar. Stir to combine. Press Stop.
- Secure the lid and select Custom. Set the pressure to High, the time for 6 minutes, and press Start.
- When the tone sounds, press the Steam Release button to quickly release pressure.
- Once the pressure is completely released, carefully open the lid and transfer to a serving bowl. Taste and adjust seasoning as desired.
Nutritional information per serving ( 12 cup):
Calories 47 (63% from fat) • carb. 2g • pro. 2g fat 3g • sat. fat 1g • chol. 5mg • sod. 141mg calc. 53mg • fiber 1g
White Bean Dip
The instructions are for soaked beans, which makes for a slightly creamier dip. If times does not permit to soak the beans, the beauty of a multicooker is that they can cook without soaking. The cooking time will need to be adjusted to 10 minutes.
Makes about 3½ cups
12 pound white beans, preferably a softer variety like Great Northern, dried and preferably soaked overnight
8 cups water
1 teaspoon fresh rosemary
1 garlic clove, crushed
12 teaspoon grated lemon zest
1 tablespoon fresh lemon juice
2 tablespoons olive oil
^3/_4 cup water
Pinch crushed red pepper
12 teaspoon kosher salt
- Drain and rinse the soaked beans. Put the beans and the water into the cooking pot of the Cuisinart® Multicooker. Secure the lid.
- Select Beans. Set the time for 4 minutes, and press Start.
- Once the tone sounds, allow the pressure to release naturally for 10 minutes, and then
press the Steam Release button to quickly release pressure.
- When the pressure is completely released, carefully open the lid and drain the beans.
- Allow the beans to cool for about 10 minutes, until they are still warm, but not hot. Transfer the beans to the bowl of a food processor fitted with the chopping blade. Add the remaining ingredients and process until smooth.
- Taste and adjust seasoning as desired.
Nutritional information per serving ( 14 cup):
Calories 132 (13% from fat) • carb. 22g • pro. 8g
fat 2g • sat. fat 0g • chol. 0mg • sod. 242mg
calc. 70mg • fiber 7g
Chickpeas with Sausage and Kale
This is hearty enough to be served as a main dish when served over rice.
Makes about 6 cups
1 tablespoon olive oil
2 garlic cloves, thinly sliced
2 links precooked chicken sausage, sliced*
1 tablespoon white wine
1 bunch Lacinato (flat) kale, chopped into small pieces (4 to 5 cups, chopped)
2 cups cooked chickpeas**
12 cup chicken broth, low sodium
- Put the oil into the cooking pot of the Cuisinart® Multicooker. Select Sauté/Brown, set the temperature to Low, and press Start.
- Once the unit is preheated and the oil is hot, add the garlic and sausage and cook until the sausage is nicely browned. Stir in the wine and cook until completely reduced. Press Stop.
- Add the kale, chickpeas, and broth. Secure the lid and select Custom. Set the pressure to Low, the time for 1 minute, and press Start.
- When the tone sounds, press the Steam Release button to quickly release pressure.
- Once the pressure is completely released, carefully open the lid and transfer to a serving bowl. Taste and adjust seasoning as desired.
*We used the precooked sausage, which is easily sliced. You can also use raw sausage; just take
it out of the casings and crumble while cooking. Be sure to cook through until no longer pink.
**If using chickpeas that were previously cooked in the Multicooker, cook them on the slightly firm side so they hold up well in this dish.
Nutritional information per serving (1 cup):
Calories 180 (36% from fat) • carb. 21g • pro. 8g
fat 7g • sat. fat 2g • chol. 34mg • sod. 575mg
calc. 56mg • fiber 4g
Baked Beans
No summer party is complete without a big pot of baked beans.
Makes about 7 cups
1 pound dried navy beans
8 cups water
8 ounces thick-cut bacon, chopped
1 onion, finely chopped
1 garlic clove, finely chopped
3 cups chicken broth, low sodium
^1/_3 cup pure maple syrup
14 cup packed light brown sugar
2 tablespoons Dijon mustard
2 tablespoons tomato paste
12 teaspoon kosher salt
14 teaspoon freshly ground black pepper
- Put the beans and water into the cooking pot of the Cuisinart® Multicooker.
- Select Beans. Set the time for 8 minutes. Press Start.
- When the tone sounds, press the Steam Release button to quickly release pressure. Press Stop.
- Once the pressure is completely released, carefully open the lid. Drain the beans and reserve. NOTE: These beans are only partially cooked at this step. They will finish cooking with the remaining ingredients.
- Select Sauté/Brown, set the temperature to High, and press Start.
- When the unit is preheated, add the bacon and onion to the cooking pot. Brown the bacon until it is crispy and the onion is golden and softened, about 15 minutes. Press Stop.
- Add the remaining ingredients, including the reserved beans. Secure the lid and select Beans. Set the time to 1 hour and press Start.
-
When the tone sounds, allow the pressure to release naturally.
-
Once the pressure is completely released, carefully open the lid. Stir to combine. Taste and adjust seasoning as desired. If the mixture is too thin to your liking, press Stop and select Reduce. Simmer until mixture is thickened to desired taste.
Nutritional information per serving ( 12 cup):
Calories 226 (31% from fat) • carb. 30g • pro. 10g
fat 8g • sat. fat 2g • chol. 11mg • sod. 399mg
calc. 67mg • fiber 8g
Artichokes with Three Sauces
Perfect artichokes, ready in just 10 minutes! The best part is that these can be made in advance and served at room temperature with any one of our suggested sauces.
Makes 4 artichokes
1 cup water
1 lemon, halved
4 medium artichokes
-
Put water and the juice of lemon half into the cooking pot of the Cuisinart® Multicooker.
-
Prepare artichokes by cutting the stem off at the base to make an even, flat surface. Cut one-third off the top, and trim the outer layers of tough leaves.
-
Rub the cut parts of the artichoke with the remaining lemon half. Place artichokes into the pot. Secure the lid and select Custom. Set the pressure to High, the time for 10 minutes, and press Start. When the tone sounds, use Quick Pressure Release.
-
Once pressure has completely released, remove lid.
-
Serve immediately with melted butter or one of our suggested dipping sauces.
Nutritional information per serving (one artichoke):
Calories 76 (2% from fat) • carb. 17g • pro. 5g
fat 0g • sat. fat 0g • chol. 0mg • sod. 152mg
calc. 71mg • fiber 9g
Garlic-Chile Oil
A simple oil for the artichokes, any leftovers can be used for dipping bread.
Makes 12 cup
12 cup olive oil
4 garlic cloves, thinly sliced
Pinch kosher salt
Pinch freshly ground black pepper
Pinch red pepper flakes
Put the oil and garlic in a small saucepan set over medium heat. Cook until garlic is fragrant, but has not picked up any color, 3 to 5 minutes.
Remove from the heat, add the remaining ingredients and allow to cool. Cover and steep for 1 hour. Strain into a jar or small serving/dipping bowl (discard the garlic).
The oil can be stored at room temperature for 24 hours, or in the refrigerator for up to 1 week (bring to room temperature before serving).
Nutritional information per serving (2 teaspoons):
Calories 82 (98% from fat) • carb. 0g • pro. 0g
fat 9g • sat. fat 1g • chol. 0mg • sod. 12mg
calc. 2mg • fiber 0g
Lemon-Thyme Butter
The melted butter coats the artichoke leaves perfectly, and the hint of lemon brightens up this delicious dipping sauce.
Makes about 12 cup
8 tablespoons (1 stick) unsalted butter
2 tablespoons fresh lemon juice
2 teaspoons fresh thyme leaves
12 teaspoon grated lemon zest
Pinch kosher salt
Put the butter in a small saucepan to melt. Remove from heat and cool slightly. Add the remaining ingredients and stir to combine.
Serve warm.
Nutritional information per serving (1 teaspoon):
Calories 67 (99% from fat) • carb. 0g • pro. 0g
fat 7g • sat. fat 5g • chol. 20mg • sod. 24mg
calc. 1mg • fiber 0g
Hollandaise
This classic sauce can be made in a blender, food processor, or by hand, but we have found in our testing that the hand blender is the quickest and most foolproof way to prepare it.
Makes 1½ cups
4 large egg yolks
1 tablespoon fresh lemon juice
^3/_4 teaspoon kosher salt
12 pound (2 sticks) unsalted butter, melted and kept slightly warm (not hot)
Warm water, as needed
- Put the egg yolks, lemon juice, and salt into the blending cup of a hand blender (or a tall, shatterproof cup would work well). Slowly pour the warm butter into the cup, carefully leaving any white milk solids on the bottom of the pot behind. Allow to rest for about 1 minute.
- Insert the blending shaft into the blending cup so that the blade guard touches the bottom of the cup. Blend, using Low speed if available, keeping the blade on the bottom. Once the ingredients thicken and start to emulsify, continue processing, using a gentle up-and-down motion, until thick and all the ingredients are incorporated.
- If sauce is too thick, blend in warm water, 1 teaspoon at a time, until desired consistency is achieved (approximately 2 tablespoons water total).
- Taste and adjust seasoning as desired. Serve immediately or transfer to a double boiler to keep warm.
Nutritional information per serving (1 tablespoon):
Calories 115 (97% from fat) • carb. 0g • pro. 1g
fat 12g • sat. fat 7g • chol. 76mg • sod. 109mg
calc. 6mg • fiber 0g
Green Beans with Shallots and Pine Nuts
This side dish is elegant enough for a dinner party, yet simple enough to make every day.
Makes about 8 cups
^1/3 cup pine nuts
2 tablespoons unsalted butter
1 medium to large shallot (about 3 ounces), peeled and thinly sliced
^3/4 teaspoon kosher salt
24 ounces green beans, trimmed
2 tablespoons fresh lemon juice
1 cup water
- Put the pine nuts into the cooking pot of the Cuisinart® Multicooker. Select Sauté/Brown. Set the temperature to Low and press Start.
- The pine nuts will cook rather quickly, so be sure to continually stir until they are lightly toasted, about 5 minutes.
- Add the butter to the pot with the shallot to slightly sauté and soften.
- Sprinkle with salt and then add the green beans, lemon juice, and water. Press Stop.
- Secure lid and select Custom. Set the pressure to High, the time for 1 minute, and press Start.
- When the tone sounds, press the Steam Release button to quickly release pressure.
- Once the pressure is completely released, carefully open the lid and stir together, taste, and adjust seasoning as desired.
Nutritional information per serving ( 12 cup):
Calories 64 (73% from fat) • carb. 4g • pro. 2g
fat 5g • sat. fat 1g • chol. 4mg • sod. 151 mg
calc. 17mg • fiber 1g
Italian Farro and Arugula Salad
A showstopper of a salad served either warm or cold.
Makes about 4 cups
1½ cups dried farro
2 ^1/4 cups water
2 cups baby arugula
1 cup artichoke hearts, quartered or halved
1 cup thinly sliced radicchio (about 14 average head)
14 cup extra virgin olive oil
1 to 2 teaspoons fresh lemon juice
1 / 4 teaspoon kosher salt
1 / 8 teaspoon freshly ground black pepper
2 tablespoons shaved Parmesan
-
Put the farro and water into the cooking pot of the Cuisinart® Multicooker. Select Rice/Grains. Set the pressure to High and the time for 18 minutes. Secure the lid and press Start.
-
When the tone sounds, press the Steam Release button to quickly release pressure.
-
Once the pressure is completely released, drain and then transfer the farro to a large serving bowl. Add the remaining ingredients, except for the Parmesan, and toss to combine. Top with the shaved Parmesan and serve immediately.
Nutritional Information per serving ( 12 cup):
Calories 156 (43% from fat) • carb. 19g • pro. 4g
fat 6g • sat. fat 1g • chol. 1mg • sod. 200mg
calc. 21mg • fiber 4g
Tabbouleh
This recipe is great for entertaining.
Makes about 6 cups
1 cup bulgur wheat
2 cups water
2 cups fresh parsley, chopped
12 cup fresh mint, chopped
2 cups grape tomatoes, halved
3 green onions, thinly sliced
2 tablespoons extra virgin olive oil
14 cup fresh lemon juice
14 teaspoon kosher salt
14 teaspoon freshly ground black pepper Pinch ground cumin
- Put the bulgur and water in the cooking pot of the Cuisinart® Multicooker. Secure the lid and select Rice/Grains. Set the pressure to High, the time for 6 minutes, and press Start.
- When the tone sounds, press the Steam Release button to quickly release pressure.
- Once all of the pressure is completely released, carefully open the lid and add the remaining ingredients; toss to combine.
- Taste and adjust seasoning and serve immediately.
Nutritional information per serving ( 12 cup):
Calories 88 (41% from fat) • carb. 12g • pro. 2g
fat 4g • sat. fat 1g • chol. 0mg • sod. 54mg
calc. 41mg • fiber 3g
Chicken Stock
This nourishing stock has many uses. Sip it plain, use it as a base for soups and stews, or store it in 1-cup containers to cook with, or to warm up meals.
Makes about 10 cups
4 pounds chicken parts with bones
3 carrots, cut into 2-inch pieces
2 celery stalks, cut into 2-inch pieces
1 medium onion, cut into about 2-inch chunks
1 garlic clove, peeled
15 parsley stems
3 thyme sprigs
2 teaspoons black peppercorns
2 bay leaves
7 to 8 cups water (being sure not to go above the maximum fill line in the cooking pot)
- Put all of the ingredients into the cooking pot of the Cuisinart® Multicooker. Secure the lid and select Stock. Set the pressure to High, the time for 1 hour 20 minutes, and press Start. When the tone sounds, allow pressure to release naturally.
- Once pressure is completely released, carefully remove lid and strain stock through a fine mesh strainer.
- Cool strained stock to room temperature before transferring to the refrigerator to complete the cooling process. When ready to use or serve, use a spoon to discard the solid fat that sits on top of the stock. Stock may be stored for 7 days in the refrigerator and up to 6 months in the freezer.
NOTE: If time is short, stock can be prepared in 30 minutes – the flavor deepens the longer it cooks.
Nutritional information per serving (1 cup):
Calories 86 (7% from fat) • carb. 1g • pro. 6g
fat 3g • sat. fat 1g • chol. 0mg • sod. 343mg
calc. 0mg • fiber 0g
Vegetable Stock
While this recipe uses whole vegetables, scraps can also be added. Store carrot peels, celery leaves and ends, onion skins, mushroom stems, and herbs in an airtight container in the freezer. Add to the veggie stock ingredients to enhance a flavorful, vegetarian stock.
Makes about 9 cups
1 tablespoon olive oil
8 ounces sliced mushrooms
2 carrots, cut into 2-inch pieces
2 celery stalks, cut into 2-inch pieces
1 leek, cleaned well, trimmed and cut into 2-inch pieces
1 onion, quartered
2 garlic cloves, peeled
2 teaspoons black peppercorns
10 parsley stems
2 thyme sprigs
2 bay leaves
7 to 8 cups water (being sure not to go above the maximum fill line in the cooking pot)
-
Put the oil into the cooking pot of the Cuisinart® Multicooker and select Sauté/Brown. Set the temperature to Low and press Start.
-
Once the oil is hot, add the mushrooms. Cook until the edges of the mushrooms are brown, about 5 minutes. Press Stop.
-
Add the remaining ingredients. Secure the lid and select Stock. Set the pressure to High, the time for 30 minutes, and press Start. When the tone sounds, allow pressure to release naturally.
-
Once pressure has completely released, open the lid and strain through a fine mesh strainer. Discard vegetables.
-
Vegetable stock may be used immediately or allow it to cool to room temperature and refrigerate; it may be stored for 7 days in the refrigerator and up to 6 months in the freezer.
Nutritional information per serving (1 cup):
Calories 39 (3% from fat) • carb. 9g • pro. 1g fat 0g • sat. fat 8g • chol. 0mg • sod. 56mg
calc. 39mg • fiber 2g
Mushroom Stock
We love this as a base for a number of different Asian-style soups, but it is also a great flavor booster in risottos or even beef stews.
Makes about 7 cups
2 tablespoons unsalted butter
1½ pounds mixed mushrooms
12 cup dry white wine
1 leek, trimmed, cleaned and cut into 2-inch pieces
2 celery stalks, cut into 2-inch pieces
2 carrots, cut into 2-inch pieces
1 ounce dried porcini (optional – for a richer tasting stock)
10 parsley sprigs
8 thyme sprigs
2 teaspoons black peppercorns
7 to 8 cups water (being sure not to go above the maximum fill line in the cooking pot)
- Put the butter into the cooking pot of the Cuisinart® Multicooker. Select Sauté/Brown. Set the temperature to High, the time for 20 minutes, and press Start.
- Once the unit has preheated and the butter is melted, add the mushrooms. Stir to coat and then allow to cook until nicely caramelized and brown, about 20 minutes, stirring occasionally. Press Stop.
- Add the remaining ingredients. Secure lid and select Stock. Set the pressure to High, the time for 30 minutes, and press Start.
- When the tone sounds, allow pressure to release naturally.
- Once pressure is completely released, open lid and strain through a fine mesh strainer. Discard solids.
- Mushroom stock may be used immediately or allow it to cool to room temperature and refrigerate; it may be stored for 7 days in the refrigerator and up to 6 months in the freezer.
Nutritional information per serving (1 cup):
Calories 91 (32% from fat) • carb. 9g • pro. 4g fat 3g • sat. fat 2g • chol. 9mg • sod. 38mg
calc. 43mg • fiber 2g
Brown Beef Stock
For a deeper-flavored beef stock, roast the bones before adding to the Multicooker. If short on time, skip this step.
Makes about 8 cups
2 pounds beef chuck, short ribs or shank
2 pounds beef bones
2 large carrots, cut into 2-inch pieces
2 celery stalks, cut into 2-inch pieces
1 large onion, quartered
1 tablespoon olive oil
2 garlic cloves, peeled
1 teaspoon black peppercorns
10 parsley stems
4 thyme sprigs
1 bay leaf
7 to 8 cups water (being sure not to go above the maximum fill line in the cooking pot)
-
Preheat oven to 425°F. Arrange beef, bones, carrots, celery, and onion in a shallow roasting pan. Drizzle with oil and toss to coat. Roast in oven for about 40 minutes, turning ingredients halfway through roasting time. Ingredients on tray should be nicely browned.
-
Put contents of roasting pan minus any excess oil into the cooking pot of the Cuisinart® Multicooker. Add the garlic, peppercorns, herbs, and bay leaf, and then cover ingredients with water. Secure the lid and select Stock. Set the pressure to High, the time for 1 hour 15 minutes, and press Start.
-
When the tone sounds, allow pressure to release naturally.
-
Once pressure is completely released, open lid and strain stock through a fine mesh strainer. Reserve any meat, discard bones and vegetables.
-
Cool strained stock to room temperature before transferring to the refrigerator to complete the cooling process. When ready to serve, use a spoon to discard the solid fat that sits on top of the stock before using. Stock may be stored for 7 days in the refrigerator and up to 6 months in the freezer.
Nutritional information per serving (1 cup):
Calories 17 (2% from fat) • carb. 1g • pro. 3g
fat 0g • sat. fat 0g • chol. 0mg • sod. 893mg
calc. 12mg • fiber 0g
Seafood Stock
A good seafood stock can take seafood-based dishes to the next level. If you cannot find good, fresh seafood, just using frozen shrimp (defrosted) is definitely acceptable, and universally available.
Makes about 7½ cups
2 pounds seafood in their shells (shrimp, lobster, crab)
1 teaspoon olive oil
1 onion, roughly chopped
1 celery stalk, cut into 1-inch pieces
2 garlic cloves, smashed
14 cup dry white wine
1 bay leaf
7 to 8 cups water (being sure not to go above the maximum fill line in the cooking pot)
-
Remove the seafood from their shells and set the shells aside. Wrap seafood and reserve for a separate use.
-
Put the olive oil into the cooking pot of the Cuisinart® Multicooker. Select Sauté/Brown. Set the temperature to High and press Start.
-
Once the unit is preheated and the oil is hot, add the seafood shells and cook, while stirring, until they are red/bright pink, about 3 minutes. Add the onion, celery, and garlic, and stir to coat. Add the wine and cook until completely reduced. Press Stop.
-
Add the remaining ingredients and select Stock. Set the pressure to High, the time for 30 minutes, and press Start.
-
When the tone sounds, allow pressure to release naturally.
-
Once pressure is completely released, open lid and strain through a fine mesh strainer. Discard solids.
-
Seafood stock may be used immediately or allow it to cool to room temperature and refrigerate; it may be stored for 3 days in the refrigerator and up to 3 months in the freezer.
Nutritional information per serving (1 cup):
Calories 19 (29% from fat) • carb. 0g • pro. 0g
fat 1g • sat. fat 0g • chol. 0mg • sod. 27mg
calc. 14mg • fiber 0g
Bone Broth
Bone broth can be made using a variety of meat and poultry bones, or just one type. Here we focus on poultry (chicken, turkey, and/or duck bones) and allow it to cook for 3 hours under pressure. If using beef bones, only cook the mixture for 2 hours.
Makes about 12 cups
4 pounds poultry bones (chicken, turkey, duck)
2 carrots, cut into 2-inch pieces
2 celery stalks, cut into 2-inch pieces
1 medium onion or leek, cut into about 2-inch chunks
1 garlic clove, peeled
10 parsley stems
3 thyme sprigs
2 teaspoons black peppercorns
2 bay leaves
7 to 8 cups water (being sure not to go above the maximum fill line in the cooking pot)
-
Put all of the ingredients into the cooking pot of the Cuisinart® Multicooker. Secure the lid and select Stock. Set the pressure to High, the time for 3 hours, and press Start. When the time expires, allow pressure to release naturally.
-
Once pressure is completely released, carefully remove lid and strain broth through a fine mesh strainer.
-
Cool strained broth to room temperature before transferring to the refrigerator to complete the cooling process. When ready to serve, use a spoon to discard the solid fat that sits on top of the broth before using. Broth may be stored for 7 days in the refrigerator and up to 6 months in the freezer.
Nutritional information per serving (1 cup):
Calories 86 (7% from fat) • carb. 1g • pro. 6g
fat 3g • sat. fat 1g • chol. 0mg • sod. 343mg
calc. 0mg • fiber 0g
Quick Chicken Soup
The Cuisinart® Multicooker makes it possible to achieve a flavorful chicken soup in 25 minutes with no flavor enhancers like salty bouillon cubes.
Makes about 14 cups
3 to 4 pounds boneless, skinless chicken thighs, cut into small pieces
8 cups chicken stock*
1 12 teaspoons kosher salt
14 teaspoon freshly ground black pepper
6 carrots, halved and thinly sliced
3 celery stalks, halved and thinly sliced
2 thyme sprigs
1 bay leaf
Chopped herbs, for garnish (parsley, cilantro, basil, etc.)
12 lemon, for finishing
-
Put the chicken and stock into the cooking pot of the Cuisinart® Multicooker. Secure the lid and select Soup. Set the pressure to High, the time for 20 minutes, and press Start.
-
When the tone sounds, allow pressure to release naturally.
-
Once pressure is completely released, open the lid. Add the salt, pepper, carrots, celery, thyme, and bay leaf to the cooking pot. Secure the lid and select Soup. Set temperature to High, the time for 3 minutes, and press Start.
-
When the tone sounds, press the Steam Release button to quickly release pressure. Remove lid and discard the thyme sprigs. Taste and adjust seasoning as desired. Finish with a squeeze of lemon and chopped parsley before serving.
* Using a homemade chicken stock will make for a heartier soup, but if a lighter soup is desired, use store-bought broth.
NOTE: For chicken noodle soup, add 1 cup of egg noodles with the sliced veggies and increase cooking time to 5 minutes.
Nutritional information per serving (1 cup):
Calories 137 (26% from fat) • carb. 3g • pro. 21g
fat 4g • sat. fat 1g • chol. 81mg • sod. 701mg
calc. 22mg • fiber 1g
Chicken Tortilla Soup
We encourage you to load on the fixings with this popular Mexican-inspired soup.
Makes about 16 cups
1 teaspoon olive oil
1 onion, finely chopped
1 jalapeño, seeded and finely chopped
1 garlic clove, finely chopped
1 teaspoon chili powder
1 / 4 teaspoon ground cumin
1 / 8 teaspoon ground coriander
1 teaspoon kosher salt
1 can (13 to 14 ounces)
diced tomatoes, drained
8 cups chicken stock*
4 pounds boneless, skinless chicken thighs, cut into small pieces
Cilantro, for serving
Diced avocado, for serving
Tortilla strips, for serving
Lime wedges, for serving
- Put the oil in the cooking pot of the Cuisinart® Multicooker. Select Sauté/Brown. Set the temperature to Low and press Start.
- Once the unit is preheated and the oil is hot, add the onion, jalapeño, and garlic. Sauté until fragrant and softened, about 5 minutes. Add the spices and salt, stir to combine. Add the drained tomatoes, stock, and chicken pieces. Press Stop.
- Secure the lid and select Soup. Set the pressure to High, the time to 10 minutes, and press Start.
- When the tone sounds, allow pressure to release naturally.
- Once pressure is completely released, open the lid.
- When serving the soup, top each individual bowl with about a teaspoon each of cilantro leaves, diced avocado, and tortilla strips. Squeeze the lime over each bowl and serve.
* Using a homemade chicken stock will make for a heartier soup, but if a lighter soup is desired, use store-bought broth.
Nutritional information per serving (1 cup):
Calories 157 (32% from fat) • carb. 2g • pro. 24g
fat 5g • sat. fat 1g • chol. 94mg • sod. 588mg
calc. 17mg • fiber 1g
Udon Soup
Making fresh mushroom stock for this soup really enriches the flavor, but if you are short on time, a good quality vegetable or chicken stock can be used.
Makes about 10 cups
8 cups mushroom stock
1 1-inch piece fresh ginger, peeled and thinly sliced
2 garlic cloves, thinly sliced
10 ounces mixed mushrooms, sliced
1 cup cubed kabocha squash (or a
similar squash, such as butternut or buttercup)
2 tablespoons yellow miso
1 tablespoon rice vinegar
1 piece kombu (edible kelp – found in the Asian section of most grocery stores)
1 teaspoon ground turmeric
1 pinch red chili flakes
3 ounces udon noodles (when purchasing udon noodles, they are packaged in 3-ounce bundles)
Sliced scallions, for serving Chopped cilantro, for serving
- Put all ingredients, except for the noodles and garnishes, into the cooking pot of the Cuisinart® Multicooker. Select Soup. Set the pressure to High, the time for 30 minutes, and press Start.
- When the time expires, allow pressure to release naturally.
- Once pressure is completely released, carefully open the lid. Press Stop.
- Select Sauté/Brown, set the temperature to High and press Start. Add the noodles and allow them to cook through, about 5 minutes.
- Transfer the soup into individual serving bowls and top each with the scallions and cilantro.
Nutritional information per serving (2 cups):
Calories 92 (6% from fat) • carb. 16g • pro. 8g
fat 1g • sat. fat 0g • chol. 0mg • sod. 912mg
calc. 32mg • fiber 2g
Pho
Traditional Vietnamese pho simmers for hours and is constantly skimmed to create a deep-flavored, clear broth. Our version is lighter, but takes a fraction of the time and is just as comforting.
Makes about 12 cups
Broth:
2 pounds beef bones
2 pounds mix of beef shank and short rib
1 onion, halved
2 carrots, cut into 2-inch pieces
1 2-inch piece ginger, unpeeled
2 cinnamon sticks
4 star anise pods
3 garlic cloves, peeled
12 bunch cilantro
7 to 8 cups water (being sure not to go above the maximum fill line in the cooking pot)
Soup:
14 cup fish sauce
1 pound flank steak, very thinly sliced
Ingredients for serving:
8 ounces rice noodles, cooked
Fresh basil
Fresh cilantro
Fresh mint
Mung beans
Green onions, thinly sliced
Fresh lime juice
Fish sauce, optional
Chili sauce, optional
Hoisin sauce, optional
- Add the broth ingredients into the cooking pot of the Cuisinart® Multicooker. Secure the lid and select Soup. Set the pressure to High, the time for 1 hour and 30 minutes, and press Start.
- When the tone sounds, allow pressure to release naturally.
- Once pressure is completely released, open the lid. Cool stock and then strain through cheesecloth or fine mesh strainer. Beef may be shredded and used in the soup, or reserved for another use. Discard bones, vegetables, and aromatics.
- When strained stock reaches room temperature, transfer it to the refrigerator. The fat will rise to the top and solidify.
Make the soup:
- When ready to serve, discard the solidified fat with a spoon, add remaining stock to the cooking pot and select Reduce. Set the temperature to High and press Start. Bring stock to a simmer while preparing individual bowls for serving: Put 1 cup cooked rice noodles, 5 hand-torn basil leaves, 1 tablespoon hand-torn cilantro leaves, 5 hand-torn mint leaves, 1 tablespoon mung beans, and 1 teaspoon green onions in each bowl.
-
Just before serving, add the fish sauce and the sliced flank steak to the simmering stock. Once meat is just cooked through, press Stop. Select Keep Warm (unit will stay in Keep Warm mode for 2 hours, or until Stop is pressed).
-
To serve, add about 2 cups of the hot stock, with the cooked steak, to each prepared bowl with a squeeze of lime juice. If desired, stir in a dash of fish sauce, chili sauce, and/or hoisin sauce. Taste and adjust seasoning as desired. Serve immediately.
Nutritional information per serving (2½ cups):
Calories 777 (36% from fat) • carb. 50g • pro. 68g
fat 29g • sat. fat 14g • chol. 98mg • sod. 536mg
calc. 60mg • fiber 3g
Pasta e Fagioli
Try our hearty and healthy vegetarian version of this classic Italian soup.
Makes about 15 cups
1 tablespoon olive oil
1 onion, cut into 12 -inch dice
1 carrot, cut into 12 -inch dice
1 celery stalk, cut into 12 -inch dice
3 garlic cloves, chopped
1 teaspoon dried oregano
1 teaspoon dried basil
1 pound dried cannellini or white beans, rinsed
1 bay leaf
6 cups water
2 cans (14 ounces each) diced tomatoes with juice
1½ teaspoons kosher salt
1 12 cups tubetti, small macaroni, or small shell pasta
3 cups vegetable stock (or broth) Chopped fresh parsley, for serving Freshly grated Parmesan, for serving
- Put the olive oil into the cooking pot of the Cuisinart® Multicooker and select Sauté/Brown. Set the temperature to Low and press Start.
- Once the unit is preheated and the oil is hot, add the onion, carrot, celery, and garlic and sauté until fragrant and soft, about 5 minutes. Press Stop.
- Add the oregano, basil, beans, bay leaf, and water. Secure the lid and select Beans. Set the time for 8 minutes, and press Start.
- When the tone sounds, allow pressure to release naturally.
- Once pressure is completely released, press Stop and carefully open the lid. Add the diced tomatoes, salt, pasta, and broth,
being sure not to exceed the max fill line. Secure the lid again and select Soup. Set the pressure to High, the time for 5 minutes, and press Start.
- When the tone sounds, press the Steam Release button to quickly release pressure.
- Taste and adjust seasoning as desired. Serve with chopped fresh parsley and grated Parmesan.
Nutritional information per serving (1 cup):
Calories 190 (14% from fat) • carb. 36g • pro. 9g
fat 2g • sat. fat 0g • chol. 0mg • sod. 463mg
calc. 77mg • fiber 8g
Lentil Soup
Simple, yet satisfying. This cool weather favorite is ready in no time with the Multicooker!
Makes about 10 cups
1 tablespoon olive oil
1 medium onion, finely chopped
1 medium celery stalk, finely chopped
1 medium carrot, peeled and cut into 14 -inch dice
2 garlic cloves, smashed
14 teaspoon ground cumin
14 teaspoon freshly ground black pepper
^3/_4 teaspoon kosher salt, divided
1 pound dried brown lentils
6 cups vegetable or chicken broth
1 bay leaf
1 can (15.5 ounces) crushed tomatoes
1 tablespoon fresh lemon juice
1. Put the oil into the cooking pot of the Cuisinart® Multicooker. Select Sauté/Brown. Set the temperature to Low and press Start.
2. Once the unit is preheated and the oil is hot, add the onion, celery, carrot, garlic, cumin, pepper, and a pinch of the salt. Stir vegetables and cook until soft and fragrant, about 5 minutes. Press Stop.
3. Add the lentils, broth, bay leaf, and crushed tomatoes. Secure lid and select Soup. Set the pressure to High, the time for 12 minutes, and press Start.
4. When the tone sounds, allow pressure to release naturally.
5. Once pressure is completely released, carefully open the lid and add the remaining
salt and lemon juice. Discard the bay leaf. Taste and adjust seasoning as desired.
- If the soup is too thick for your liking, stir in additional broth while unit is on Keep Warm.
Nutritional information per serving (1 cup): Calories 204 (9% from fat) • carb. 33g • pro. 14g fat 2g • sat. fat 0mg • chol. 0mg • sod. 606mg calc. 49mg • fiber 15g
Vegetarian Bean Chili
The smokiness of the chipotle not only adds a lot of flavor (and some heat), but an unexpected richness to the dish, making this a filling, but healthy, chili.
Makes about 7 cups
2 cups dried beans, soaked overnight, then drained (a mixture of beans works well for this dish – black, kidney, navy, adzuki, garbanzo, etc.)
1 tablespoon olive oil
1 12 -inch piece fresh ginger, peeled and finely chopped
2 garlic cloves, finely chopped
1 small onion, finely chopped
1 teaspoon kosher salt, divided
14 teaspoon freshly ground black pepper, divided
1 bell pepper (yellow or green preferably, for color), cored, seeded and diced
2 teaspoons chili powder
14 teaspoon ground cumin
1 / 4 teaspoon ground cinnamon
1 can (28 ounces)
diced tomatoes, drained
2 tablespoons tomato paste
1 chipotle in adobo sauce, puréed with additional 1 teaspoon adobo sauce
2 cups vegetable broth
Shredded Cheddar or Monterey Jack,
for serving
1. Put the olive oil into the cooking pot of the Cuisinart® Multicooker. Select Sauté/Brown. Set the temperature to Low, and press Start.
2. Once the unit is preheated and the oil is hot, add the ginger, garlic, and onion with a pinch each of the salt and pepper. Cook until softened and the onion is translucent, about 2 to 3 minutes. Add the bell pepper and the spices and cook to meld the flavors, about 3 to 4 minutes. Add the drained beans,
Fresh cilantro, for serving
tomatoes, tomato paste, chipotle and sauce, broth, and remaining salt and pepper. Stir to combine.
- Secure the lid and select Beans. Set the time for 20 minutes and press Start.
- When the tone sounds, allow pressure to release naturally.
- Once the pressure is completely released, carefully open the lid.
- Taste and adjust seasoning as desired.
Nutritional information per serving (1 cup):
Calories 271 (34% from fat) • carb. 31g • pro. 13g
fat 10g • sat. fat 6g • chol. 27mg • sod. 389mg
calc. 183mg • fiber 2g
Mushroom Risotto
Fresh mushrooms star in this simple yet flavorful risotto.
Makes about 8 cups
1 tablespoon olive oil
1 tablespoon unsalted butter
1 medium leek, cleaned well and finely chopped
1 teaspoon kosher salt, divided
14 teaspoon freshly ground black pepper
1 pound sliced mushrooms
3 sprigs fresh thyme
2 cups Arborio rice
1 / 2 cup dry white wine
4 cups mushroom stock*
12 cup frozen peas, not thawed
12 cup shredded fontina (about 114 ounces)
- Put the oil and butter into the cooking pot of the Cuisinart® Multicooker and select Sauté/Brown. Set the temperature to Low and press Start.
- Once the unit is preheated and the oil is hot and butter melted, add the leek with 12 teaspoon of the salt and pepper. Stir and cook until soft and fragrant. Add the sliced mushrooms and thyme, and cook until soft and browned at the edges, about 4 to 5 minutes.
- Add the rice and stir to evenly coat with the other ingredients. Cook until the outer edges are translucent, but the middle is still opaque. Add the wine and stir until the wine evaporates and the pot is just about dry,
about 1 to 2 minutes. Press Stop. Add stock and remaining salt.
- Secure the lid and select Risotto. Set the time for 3 minutes and press Start.
- When the tone sounds, press the Steam Release button to quickly release pressure.
- Once pressure is completely released, carefully open lid and stir in the peas and cheese.
- Remove thyme sprigs, taste and adjust seasoning as desired. Serve immediately.
*If mushroom stock is not available, low-sodium chicken stock or broth may be used.
Nutritional information per first-course serving ( 12 cup):
Calories 152 (16% from fat) • carb. 26g • pro. 6g
fat 3g • sat. fat 1g • chol. 4mg • sod. 342mg
calc. 19mg • fiber 2g
Spring Pea Risotto
Bright and fresh tasting, this risotto stands up nicely on its own, but it can easily be adapted by adding chopped prosciutto or ham.
Makes about 7 cups
1½ tablespoons unsalted butter
12 medium onion, finely chopped
1 garlic clove, finely chopped
1¼ teaspoons kosher salt, divided
14 teaspoon freshly ground black pepper
2 cups Arborio rice
1 / 2 cup dry white wine
4 cups chicken broth, low sodium
2 sprigs fresh thyme
2 cups frozen peas, not thawed
14 cup grated Pecorino Romano
2 tablespoons chopped fresh parsley
1 teaspoon grated lemon zest
1 teaspoon fresh lemon juice Pea shoots and/or microgreens, for serving
- Put the butter in the cooking pot of the Cuisinart® Multicooker and select Sauté/Brown. Set the temperature to Low and press Start.
- Once the unit is preheated and the butter is melted, add the onion, garlic, and a pinch of salt and the pepper. Sauté until softened, about 2 minutes. Add the rice and stir to evenly coat with the other ingredients. Cook until the outer edges are translucent, but the
middle is still opaque. Add the wine and stir until the wine evaporates and the pot is just about dry, about 1 to 2 minutes. Press Stop. Add broth, thyme, and remaining salt.
- Secure the lid and select Risotto. Set the time for 3 minutes and press Start.
- When the tone sounds, press the Steam Release button to quickly release pressure.
- Once pressure is completely released, carefully open lid. Remove the thyme sprigs, stir in the peas, cheese, parsley, lemon zest, and juice.
- Divide the risotto into serving bowls and top with a pinch of pea shoots and/or microgreens.
Nutritional information per
first-course serving ( 12 cup):
Calories 201 (10% from fat) • carb. 35g • pro. 9g
fat 1g • sat. fat 1g • chol. 5mg • sod. 524mg
calc. 3mg • fiber 5g
Seafood Risotto
This dish will make you feel like you are relaxing by the seaside. A crisp, dry white wine is a wonderful accompaniment.
Makes about 10 cups
3 tablespoons unsalted butter, divided
12 pound large shrimp, shells removed
12 pound scallops, tough muscle removed
1 shallot, finely chopped
1 teaspoon kosher salt, divided
1 / 4 teaspoon freshly ground black pepper, divided
2 cups Arborio rice
Pinch saffron
1 / 2 cup dry white wine
4 cups seafood stock
12 pound mussels, cleaned, scrubbed and de-bearded
Chopped parsley, for serving
- Put 2 tablespoons of the butter into the cooking pot of the Cuisinart® Multicooker and select Sauté/Brown. Set the temperature to High and press Start.
-
Once the butter is melted, season the shrimp and scallops with a pinch each of the salt and pepper, and then brown on both sides (this will need to be done in batches to be sure not to overcrowd the pot). Remove and reserve.
-
Add the additional tablespoon of butter and once it is melted, add the shallot. Sauté until softened, about 1 minute.
- Add the rice and saffron and stir to evenly coat with the other ingredients. Cook until the outer edges of the rice are translucent, but the middle is still opaque. Add the wine and stir until the wine evaporates and the pot is just about dry, about 1 to 2 minutes. Press Stop. Add stock and remaining salt and pepper.
- Secure the lid and select Risotto. Set the time for 2 minutes and press Start.
- When the tone sounds, press Stop and then press the Steam Release button to quickly release pressure.
- Once pressure is completely released, carefully open lid, and add the reserved browned seafood and the mussels.
- Select Custom. Set the pressure to High, the time for 1 minute, and press Start.
- When the tone sounds, press the Steam Release button to quickly release pressure.
- Stir well and sprinkle with chopped parsley. Serve immediately.
Nutritional information per
first-course serving ( 12 cup):
Calories 108 (17% from fat) • carb. 16g • pro. 6g
fat 2g • sat. fat 1g • chol. 21mg • sod. 315mg
calc. 9mg • fiber 0g
Black Beans and Rice
A quick version of the classic Cuban side dish.
Makes 8 cups
1 cup dried black beans, soaked overnight
1 tablespoon olive oil
1 jalapeño, seeded and chopped
2 garlic cloves, finely chopped
12 teaspoon ground cumin
4 cups chicken broth, low-sodium, divided
1 bay leaf
2 cups long-grain white rice
1 teaspoon kosher salt
- Drain and rinse soaked beans; reserve.
-
Put the olive oil into the cooking pot of the Cuisinart® Multicooker. Select Sauté/Brown. Set the temperature to Low and press Start.
-
When the unit is preheated and the oil is hot, add the jalapeño and garlic and cook until soft and fragrant, about 3 minutes. Stir in the cumin and rinsed beans with 2 cups of broth and the bay leaf. Press Stop.
- Secure the lid and select Beans. Set the time for 15 minutes and press Start.
- When the tone sounds, press the Steam Release button to quickly release pressure.
- Once the pressure is completely released, press Stop. Carefully open the lid and add the remaining chicken broth, rice and salt. Stir well and select Beans again, setting the time for an additional 3 minutes. Press Start.
- When the time expires, allow the pressure to release naturally.
- Once all the pressure has been released, carefully open the lid and stir together. Taste and adjust seasoning as desired and serve.
Nutritional information per serving (1 cup):
Calories 265 (7% from fat) • carb. 52g • pro. 9g
fat 2g • sat. fat 0g • chol. 0mg • sod. 553mg
calc. 73mg • fiber 4g
Marinara Sauce
This sauce tastes like it has been simmering on the stove all day.
Makes about 5 cups
2 tablespoons olive oil
1 tablespoon unsalted butter
4 garlic cloves, finely chopped
1 12 teaspoons kosher salt, divided
12 teaspoon freshly ground black pepper, divided
2 cans (28 ounces each) whole tomatoes, with juices
1 onion, halved on the root end
12 teaspoon dried oregano
1 sprig fresh basil
14 teaspoon crushed red pepper
1. Put the olive oil and butter into the cooking pot of the Cuisinart® Multicooker. Select Sauté/Brown. Set the temperature to Low, and press Start.
2. Once the unit is preheated and the oil is hot, add the garlic with a pinch of the salt. Cook until fragrant and softened, but where the garlic has picked up no color, about 2 to 3 minutes. Add the remaining ingredients, secure the lid and select Custom. Set the
pressure to High, the time for 20 minutes, and press Start.
- When the tone sounds, allow pressure to release naturally.
- Once the pressure is completely released, carefully open the lid. Press Stop.
- Select Reduce and allow to cook until slightly thickened, about 15 minutes.
- Remove the onion and basil. Mash the sauce together, taste, and adjust seasoning as desired.
Nutritional information per serving ( 12 cup):
Calories 70 (51% from fat) • carb. 7g • pro. 1g
fat 4g • sat. fat 1g • chol. 3mg • sod. 686mg
calc. 30mg • fiber 1g
Meatballs in Sauce
Another family favorite cooked in minutes. Fresh sauce is the way to go for a true, homemade taste, but jarred sauce is a great way to get this on the table even quicker.
Makes about 12 meatballs
1 pound ground beef
12 teaspoon kosher salt
14 teaspoon freshly ground black pepper
13 cup Italian-seasoned breadcrumbs
1 garlic clove, finely chopped
2 tablespoons grated Parmesan
5 cups prepared marinara sauce (use the preceding recipe or store-bought)
- Put all of the ingredients, except for the sauce, in a large mixing bowl. Using your hands, combine gently, but well, so the ingredients are evenly dispersed. Form into 12 golf ball-sized rounds; reserve.
- Put the sauce into the cooking pot of the Cuisinart® Multicooker. Add the meatballs. Secure the lid and select Custom. Set the pressure to High, the time for 5 minutes, and press Start.
- When the time expires, press the Steam Release button to quickly release pressure.
- Once the pressure is completely released, carefully open the lid and serve.
Nutritional information per meatball:
Calories 155 (51% from fat) • carb. 9g • pro. 10g
fat 9g • sat. fat 3g • chol. 27mg • sod. 792mg
calc. 51mg • fiber 1g
"Baked" Ziti
A great way not to heat up your kitchen, especially on hot days. And who knew that a multicooker could make pasta? You will continue to discover so many shortcuts to dinner when using this product.
Makes about 8 cups
1 pound dried ziti
2 cups marinara sauce, divided
2½ cups water
1 cup ricotta
8 ounces mozzarella (2 cups shredded)
14 cup grated Parmesan
5 large basil leaves, thinly sliced
- Put the ziti, 1 cup of the sauce, and water into the cooking pot of the Cuisinart® Multicooker. Secure the lid and select Custom. Set the pressure to High, the time for 5 minutes, and press Start.
- When the tone sounds, press the Steam Release button to quickly release pressure.
- Once the pressure is completely released, carefully open the lid and stir in the remaining ingredients, including the additional cup of sauce.
- Taste and adjust seasoning as desired. Serve warm.
Nutritional information per serving (1 cup):
Calories 271 (34% from fat) • carb. 31g • pro. 13g
fat 10g • sat. fat 6g • chol. 27mg • sod. 389mg
calc. 183mg • fiber 2g
Quick Turkey Chili
A healthier alternative to beef does not mean that you need to skimp on flavor!
Makes about 8 cups
12 pound dried kidney beans*, rinsed
6 cups water
1 tablespoon olive oil
1 pound ground turkey
1 onion, finely chopped
1 bell pepper, any color variety, finely chopped
2 garlic cloves, finely chopped
1 jalapeño, seeded and finely chopped
12 teaspoon kosher salt
1 tablespoon chili powder
12 teaspoon ground cumin
14 teaspoon ground coriander
14 teaspoon dried oregano
1 / 4 teaspoon ground cinnamon
1 bay leaf
1 tablespoon tomato paste
1 can (13–14 ounces) diced tomatoes, with juice
12 cup water
-
Put the beans and water into the cooking pot of the Cuisinart® Multicooker. Select Beans. Set the time for 10 minutes and press Start. When the tone sounds, allow the pressure to release naturally.
-
Once the pressure is completely released, press Stop and carefully open the lid, drain and rinse the beans and reserve.
-
Return the cooking pot to the unit and add the olive oil. Select Sauté/Brown. Set the temperature to High and press Start.
-
When the unit is preheated and the oil is hot, add the ground turkey, in batches if necessary so not to overcrowd, and brown evenly. Remove and reserve. Add the onion, pepper, garlic, and jalapeño, with a pinch of the salt. Sauté until softened and fragrant, about 3 to 4 minutes. Press Stop.
-
Add the rest of the salt and remaining ingredients, with the reserved beans and turkey. Secure the lid and select Stew/Chili. Set the pressure to High, the time for 10 minutes, and press Start.
-
When the tone sounds, allow the pressure to release naturally.
-
Once the pressure is completely released, carefully open the lid, stir, taste and adjust seasoning as desired.
*Dried beans that have been soaked overnight can also be used. If using soaked beans, decrease the cooking time in step 1 to 5 minutes.
Nutritional information per serving (1 cup):
Calories 220 (27% from fat) • carb. 23g • pro. 19g
fat 7g • sat. fat 1g • chol. 39mg • sod. 199mg
calc. 70mg • fiber 9g
Traditional Brisket
A holiday favorite, ready in a fraction of the time, thanks to the Cuisinart® Multicooker.
Makes 10 servings
1 brisket, about 3½ pounds
1 teaspoon kosher salt
12 teaspoon freshly ground black pepper
2 teaspoons olive oil
2 onions, sliced
2 garlic cloves, finely chopped
1 cup dry white wine
2 tablespoons tomato paste
2 medium carrots, sliced
1 cup beef stock
-
Cut the brisket across the grain into 2 pieces. Season the brisket on both sides with the salt and pepper.
-
Put the olive oil into the cooking pot of the Cuisinart® Multicooker and select Sauté/Brown. Set the temperature to High and press Start.
-
When the unit is preheated and the oil is hot, brown the brisket, one piece at a time, about 5 minutes on each side.
-
Once both pieces of the brisket are well browned, remove and reserve. Add the onions and garlic to the pot. Stir well to scrape up any brown bits that may remain on the bottom of the pot. Sweat onions and garlic until soft and fragrant, about 6 minutes. Once soft, add wine and reduce until almost completely evaporated. Stir in the tomato paste and then add the brisket and any accumulated juices back to the pot with the carrots and beef stock. Press Stop.
-
Secure the lid and select Meat. Set the pressure to High+, the time for 1 hour 30 minutes, and press Start.
-
When the tone sounds, allow pressure to release naturally. Once all of the pressure is completely released, carefully open lid and then remove meat; let it rest for at least 10 minutes, tented with aluminum foil. Degrease the sauce by carefully blotting top with layered paper towels. Taste and adjust seasoning as desired.
NOTE: If time allows, and for best results, refrigerate brisket and liquid overnight before slicing and serving.
- Slice the brisket against the grain so that the meat does not fall apart. Serve with sauce.
Nutritional information per serving:
Calories 488 (68% from fat) • carb. 5g • pro. 30g fat 36g • sat. fat 14g • chol. 144mg • sod. 407mg calc. 36mg • fiber 1g
Lamb Shanks with Olives and Prunes
The rich flavors in this dish come together best a day after cooking. If time allows, plan accordingly; you will be happy once you hear the rave reviews.
Makes about 4 to 6 servings
4 lamb shanks (about 3 pounds)
1¼ teaspoons kosher salt, divided
12 teaspoon freshly ground black pepper
2 teaspoons olive oil
1 onion, chopped
4 garlic cloves, finely chopped
1 carrot, sliced
12 cup dry white wine
14 cup tomato paste
2 cups chicken or beef broth, low sodium
1 cup green olives, pitted
1 cup prunes, pitted and chopped
1 teaspoon grated lemon zest Chopped parsley
-
Season the lamb shanks on both sides with 1 teaspoon of the salt and the pepper.
-
Put the olive oil into the cooking pot of the Cuisinart® Multicooker. Select Sauté/Brown, set the temperature to High, and press Start.
-
Once the unit is preheated and the oil is hot, brown the lamb, in 2 batches, about 8 minutes per side. Remove and reserve. Stir in the onion and garlic. Cook until onion and garlic are soft and fragrant, about 2 to 3 minutes. Stir in the carrot and cook for an additional 2 minutes, to allow the carrot to pick up flavor. Add the white wine and, using a heatproof, nonmetal utensil, scrape up the bottom, removing any brown bits that may have been left behind. Cook until the wine reduces by about half, about 1 to 2 minutes. Stir in the tomato paste and cook over the heat for 1 minute before stirring in the broth. Add the shanks back to the pot with the olives, prunes, and remaining salt. Press Stop.
-
Secure the lid and select Meat. Set the pressure to High+, the time for 40 minutes, and press Start.
-
When the tone sounds, allow pressure to release naturally. Once the pressure is completely released, carefully open the lid.
-
Stir in lemon zest and parsley. Taste and adjust seasoning as desired.
Nutritional information per serving (based on 6 servings):
Calories 594 (50% from fat) • carb. 24g • pro. 45g fat 33g • sat. fat 13g • chol. 163mg • sod. 919mg calc. 39mg • fiber 3g
Chicken and Dumplings
A homey dish that never goes out of style, the versatility of the Cuisinart® Multicooker makes this family favorite a breeze. NOTE: If a food processor is not available for making the dumplings, the dough can be prepared by hand.
Makes about 8 servings
2 tablespoons unsalted butter
1 onion, finely chopped
2 celery stalks, finely chopped
2 carrots, finely chopped
1 teaspoon kosher salt, divided
14 teaspoon freshly ground black pepper, divided
1 teaspoon fresh thyme
2tablespoonsunbleached, all-purpose flour
12 cup dry white wine
2 pounds boneless, skinless chicken thighs
1 medium sweet potato, peeled and cubed
1 medium to large Yukon Gold potato, peeled and cubed
2 ^1/2 cups chicken broth, low sodium
2 tablespoons chopped fresh parsley
1 bay leaf
1 cup frozen pearl onions, defrosted
12 cup frozen peas, defrosted
Dumplings:
14 cup fresh parsley leaves
2 teaspoons fresh thyme leaves
2 cups unbleached, all-purpose flour
1 tablespoon baking powder
1 / 2 teaspoon kosher salt
5 tablespoons unsalted butter, cold and cubed
12 cup buttermilk
1 large egg
- Put the butter into the cooking pot of the Cuisinart® Multicooker and select Sauté/
Brown. Set the temperature to Low and press Start.
-
Once the unit has preheated and the butter has melted, add the chopped onion, celery, and carrots and stir to combine. Season with a pinch each of the salt and pepper and add the fresh thyme. Sauté until vegetables are softened and onions are translucent. Stir in the flour and cook for 1 minute. Add the wine and cook until evaporated, about an additional minute. Press Stop.
-
Add the chicken, potatoes/yam, broth, parsley, and bay leaf. Stir to combine.
-
Secure the lid and select Soup. Set the pressure to High, the time for 20 minutes, and press Start.
-
While the mixture is cooking, prepare the dumplings. Put the parsley in the bowl of a Cuisinart® Food Processor fitted with the metal chopping blade. Pulse to chop. Add the thyme, flour, baking powder, and salt and process on Low (if available) until combined. Add the butter and pulse until the butter is the size of peas. Combine the buttermilk and egg and then add to the dumpling mixture. Pulse a few times to combine. Turn dumpling dough onto a clean surface and gently bring together. Divide into 8 pieces. Reserve.
-
When the tone sounds, press Stop. Press the Steam Release button to quickly release pressure. Carefully open the lid and stir in the pearl onions and peas. Select Reduce, set the temperature to High, and press Start. Once mixture comes to a strong simmer, add the dumplings. Close the lid, but do not turn to lock into place. Cook for 10 to 15 minutes, or until the dumplings are cooked through.
Nutritional information per serving:
Calories 427 (33% from fat) • carb. 38g • pro. 29g
fat 16g • sat. fat 8g • chol. 152mg • sod. 804mg
calc. 93mg • fiber 3g
Honey-Glazed Salmon
While the Cuisinart® Multicooker may cook food very quickly, its Low pressure setting is gentle enough for delicate items such as fish. In this recipe, salmon cooks perfectly in just a few minutes. Plus, a touch of sweetness and Asian flavors will appeal to even the pickiest eaters.
Makes 2 to 3 servings
1 pound salmon fillet, about 112 inches thick, skin removed, cut into 2 to 3 pieces
14 teaspoon kosher salt
Pinch freshly ground black pepper
12 cup water
2 tablespoons honey
1½ tablespoons reduced-sodium soy sauce
1 garlic clove, smashed
1 1-inch piece ginger, peeled and thinly sliced
1 green onion, thinly sliced, for serving
1. Season salmon with the salt and pepper and place into the cooking pot of the Cuisinart® Multicooker. In a small bowl, whisk together the water, honey, soy sauce, garlic, and ginger and pour over the salmon fillets. Secure lid and select Custom. Set the pressure to Low, the time for 2 minutes, and press Start.
2. When the tone sounds, press Stop, and then press the Steam Release button to quickly release pressure.
3. Once pressure is completely released, carefully open the lid and transfer salmon to a serving plate, flesh side up. Select Reduce and press Start. Reduce cooking liquid until it thickens slightly. Spoon over salmon and sprinkle with sliced green onion.
Nutritional information per serving (based on 3 servings):
Calories 278 (30% from fat) • carb. 15g • pro. 33g
fat 9g • sat. fat 2g • chol. 68mg • sod. 414mg
calc. 64mg • fiber 0g
Arroz con Pollo
A perfect one-pot meal, in only 30 minutes, total.
Makes about 6 servings
4 pounds boneless, skinless chicken thighs
1½ teaspoons kosher salt, divided
12 teaspoon freshly ground black pepper
1 teaspoon extra virgin olive oil
1 onion, chopped
1 red pepper, chopped
4 garlic cloves, chopped
2 plum tomatoes, cut into 12 -inch dice
14 teaspoon smoked paprika
2 cups long-grain white rice
3 cups chicken broth, low sodium
18 teaspoon saffron threads
1 bay leaf
- Season the chicken on both sides with 1 teaspoon of the salt and the pepper, reserve.
- Put the oil into the cooking pot of the Cuisinart® Multicooker. Select Sauté/Brown. Set the temperature to Low and press Start. Once the unit is preheated and the oil is hot, add the chopped onion, red pepper and garlic. Sauté vegetables until fragrant, about 3 minutes. Add the tomatoes with remaining salt and smoked paprika, cook for a couple of minutes to caramelize, and then stir in the rice. Press Stop.
- Add the reserved chicken, broth, saffron, and bay leaf. Stir together. Secure the lid and select Custom. Set the pressure to High, the time for 15 minutes, and press Start.
- When the time expires, press the Steam Release button to quickly release pressure. Once all the pressure is completely released, carefully open the lid, stir ingredients together and serve immediately.
Nutritional information per serving:
Calories 397 (13% from fat) • carb. 52g • pro. 32g
fat 6g • sat. fat 1g • chol. 108mg • sod. 935mg
calc. 71mg • fiber 2g
Simple Chicken
An easy way to make a tasty and moist whole chicken for the family any night of the week.
Makes 4 to 6 servings
1 whole chicken (3½ to 4 pounds)
1 teaspoon kosher salt
12 teaspoon freshly ground black pepper
2 teaspoons olive oil
2 rosemary sprigs
2 thyme sprigs
2 garlic cloves, smashed
1 bay leaf
12 lemon
1 cup chicken broth, low sodium
-
Season chicken on both sides with salt and pepper.
-
Put 2 teaspoons olive oil into the cooking pot of the Cuisinart® Multicooker. Select Sauté/Brown. Set the temperature to High and press Start.
-
Once the unit is preheated and the oil is hot, add the chicken, breast down. Brown well on both sides, about 5 minutes per side. Press Stop and add the herbs, garlic and bay leaf to the pot. Squeeze the lemon into the pot and add the lemon with the broth.
-
Secure the lid and select Meat. Set the pressure to High, the time for 30 minutes, and press Start.
-
When the tone sounds, press the Steam Release button to quickly release pressure.
-
Once pressure is completely released, carefully open the lid and place chicken on a cutting board. Allow chicken to rest for about 10 minutes, then carve and serve.
Nutritional information per serving (based on 6 servings):
Calories 150 (31% from fat) • carb. 1g • pro. 24g fat 5g • sat. fat 1g • chol. 77mg • sod. 573mg calc. 26mg • fiber 0g
Carne Mechada
A Venezuelan shredded beef dish that is traditionally served alongside rice, beans and plantains. It is also quite tasty in a taco!
Makes about 6 cups
Carne:
3 pounds flank or hanger steak
1 teaspoon kosher salt
12 teaspoon freshly ground black pepper
1 teaspoon vegetable oil
1 onion, sliced
6 garlic cloves, crushed
1 large bay leaf
12 cup Worcestershire sauce
2 cups beef broth, low sodium
Sofrito:
1 teaspoon vegetable oil
1 onion, finely chopped
6 garlic cloves, finely chopped
2 red peppers, cut into thin, 1½-inch-long julienne strips
2 chipotle peppers, puréed
14 cup Worcestershire sauce
12 cup tomato sauce
1½ cups reserved beef cooking liquid
-
Season the beef on both sides with the salt and pepper, cut in half if necessary for browning. Put oil into the cooking pot of the Cuisinart® Multicooker and select Sauté/ Brown. Set the temperature to High and press Start.
-
When the unit is preheated and the oil is hot, add the meat in batches to brown, about 3 to 5 minutes per side. Once meat is browned, remove and reserve. Add the onion and garlic to the pot; with a wooden spoon, scrape up any browned bits that may remain on the bottom of the pot. Cook until soft and fragrant. Stir in the bay leaf, Worcestershire, and beef broth, then add the reserved browned meat back to the pot. Press Stop.
-
Secure lid and select Meat. Set the pressure to High, the time for 1 hour 15 minutes, and press Start.
-
When the tone sounds, let pressure release naturally.
-
Once pressure is completely released, carefully open the lid. Remove the meat and allow to cool before shredding. For maximum flavor, allow meat to chill in refrigerator in the cooking liquid overnight. Before using, shred meat into 1½- to 2-inch-long shreds with a fork or hands.
-
Once the meat has rested and is shredded, make the sofrito. In a clean cooking pot, add the oil and select Sauté/Brown. Set the temperature to High and press Start. When
the unit is preheated and the oil is hot, briefly brown the beef (again), in batches, about 3 to 4 minutes per batch. Reserve the meat and add the onion, garlic, and peppers to the pan, scraping up any brown bits that may remain on the bottom. Stir in the chipotle and then the Worcestershire, tomato sauce, and cooking liquid. Add reserved meat back to pot. Secure lid and select Meat. Set the pressure to High, the time for 3 minutes, and press Start.
- When the tone sounds, press the Steam Release button to quickly release pressure. Once pressure is completely released, remove lid. Taste and adjust seasoning as desired.
Nutritional information per serving ( 12 cup):
Calories 213 (40% from fat) • carb. 6g • pro. 25g
fat 9g • sat. fat 3g • chol. 74mg • sod. 377mg
calc. 42mg • fiber 1g
Asian-Style Pork Ribs
Instead of a slow braise in the oven, using the Multicooker makes these sweet and savory ribs fall-off-the-bone tender in no time.
Makes 1 rack, or 3 12 to 4 cups shredded meat
1 cup hoisin sauce
1 / 2 cup soy sauce, low sodium
1 tablespoon yuzu juice* or fresh lime juice
1 tablespoon mirin
1 tablespoon fish sauce
1 1- to 2-inch piece of ginger, peeled and roughly chopped
2 garlic cloves, peeled
12 cup packed light brown sugar
14 cup plus 1 teaspoon grapeseed or canola oil, divided
1 rack bone-in pork ribs (about 2 to 3 pounds), cut into individual ribs
1 cup water
-
Put the hoisin, soy sauce, yuzu juice, mirin, fish sauce, ginger, garlic, brown sugar, and 14 cup oil in the jar of a blender in the order listed. Blend on high until completely homogenous.
-
Put ribs in a glass or stainless steel bowl and coat completely with the marinade. Cover the bowl tightly with plastic wrap and chill in the refrigerator overnight.
-
Take the meat from the refrigerator and remove as much marinade from each individual rib as possible. Combine 1 cup of the leftover marinade with 1 cup of water and set aside.
- Add the remaining teaspoon of oil to the cooking pot of the Cuisinart® Multicooker. Select Sauté/Brown. Set the temperature to High and press Start. When the unit is preheated and the oil is hot, add the ribs, about 4 to 5 at a time, until browned on all sides, about 1 to 2 minutes per side. Remove and repeat with remaining ribs.
- Once all meat is browned, scrape up any burnt or dark bits from the bottom of the pot and remove. Press Stop. Return all the ribs to the cooking pot and add the marinade/water mixture and secure the lid. Select Meat, set the pressure to High+, the time for 30 minutes, and press Start.
- When the tone sounds, allow pressure to release naturally. Once pressure is completely released, carefully open the lid. Serve the ribs with the cooking liquid drizzled on top.
*Yuzu is a Japanese citrus fruit that is quite sour. Yuzu juice can be found in the Asian aisle of many grocery stores, as well as Japanese specialty stores.
Nutritional information per serving
(based on 4 servings):
Calories 353 (57% from fat) • carb. 14g • pro. 24g
fat 22g • sat. fat 7g • chol. 78mg • sod. 145mg
calc. 40mg • fiber 0g
Chicken Tikka Masala
Slow cooking lends itself to this classic Indian favorite – spices mingle into a beautifully layered sauce.
Makes 6 servings
2 pounds boneless, skinless, chicken thighs, cut into 2-inch pieces
1½ teaspoons kosher salt, divided Pinch freshly ground black pepper
1 tablespoon ghee or a neutral oil, such as grapeseed oil
1 onion, thinly sliced
4 garlic cloves, finely chopped
1 2-inch piece ginger, peeled and finely chopped
1 serrano chile, stemmed and finely chopped
2 teaspoons ground cumin
2 teaspoons garam masala
1 teaspoon hot curry powder
2 teaspoons ground coriander
1 teaspoon paprika
1 teaspoon ground turmeric
1 / 4 teaspoon cayenne pepper
3 tablespoons tomato paste
1 cup plain, whole yogurt, whisked well (this will prevent the sauce from breaking/curdling when it is cooked)
1 can (14.5 ounces) fire-roasted crushed tomatoes
^1/_3 cup light cream Cooked rice, for serving Fresh cilantro, for garnish
- Pat the chicken dry with paper towels and season on both sides with 1 teaspoon of salt and freshly ground black pepper.
- Put the ghee into the cooking pot of the Cuisinart® Multicooker. Select Sauté/Brown and set the temperature to High. Once the unit is preheated and the ghee is hot, start to brown the chicken, 3 to 4 minutes per side, dividing it into three batches, to not overcrowd the pot. Remove and reserve as you go. Add the onion to the pot and cook until translucent, 3 to 4 minutes, stirring occasionally. Add the garlic, ginger, and serrano chile to the pot and cook until fragrant and just starting to caramelize, another 1 to 2 minutes. Add the reserved chicken and drippings back to the pot. Mix in the spices and the tomato paste. Add the whisked yogurt and crushed tomatoes, and allow mixture to come to a simmer. Press Stop.
- Secure the lid and select Slow Cook. Set the temperature to High, the time for 2 hours, and press Start. When there are 30 minutes remaining, open the lid and mix in the cream. Secure the lid again and continue to cook for the remaining time.
- When the tone sounds, open the lid, taste, and adjust seasoning as desired. Serve over rice with fresh cilantro.
Nutritional information per serving:
Calories 294 (39% from fat) • carb. 11g • pro. 33g
fat 13g • sat. fat 4g • chol. 140mg • sod. 1092mg
calc. 108mg • fiber 2g
Chicken Adobo
This sweet and tangy dish is a Filipino staple and it's super easy to make!
Makes 4 servings
4 whole chicken legs, split
1 teaspoon kosher salt
1 tablespoon neutral oil, such as canola or grapeseed
^3/_4 cup reduced-sodium soy sauce
12 cup distilled white vinegar
2 teaspoons brown sugar
10 garlic cloves, crushed
3 to 4 serrano chiles, stemmed and thinly sliced
4 bay leaves
12 teaspoon whole black peppercorns White rice, for serving
- Pat the chicken with paper towels and season with 1 teaspoon salt.
- Put the oil into the cooking pot of the Cuisinart® Multicooker. Select Sauté/Brown and set the temperature to High. Once the unit is preheated and the oil is hot, add half of the chicken pieces to the pot and brown on each side, 3 to 5 minutes. Remove and reserve. Continue with the remaining pieces. Add the reserved chicken and drippings back to the pot. Add the remaining ingredients and allow the mixture to come to a simmer. Press Stop.
- Secure the lid and select Slow Cook. Set the temperature to High, the time for 2 hours and 30 minutes, and press Start.
- When the tone sounds, press Stop and carefully open the lid. Transfer the chicken into a bowl. Select Reduce, the time for 15 minutes, and press Start. Simmer sauce until it thickens. Discard the bay leaves. Strain, if desired, to discard peppercorns. Add the chicken back to the pot with sauce and stir to coat. Serve over rice.
Nutritional information per serving:
Calories 213 (36% from fat) • carb. 6g • pro. 27g
fat 8g • sat. fat 2g • chol. 104mg • sod. 740mg
calc. 30mg • fiber 1g
Chicken Tinga
This saucy Mexican shredded chicken is the perfect filling for your next taco night!
Makes 4 to 6 servings
2 pounds whole chicken legs
1 teaspoon kosher salt
1 tablespoon olive oil
1 small onion, chopped
3 large garlic cloves, finely chopped
4 Roma (plum) tomatoes, cored and chopped
2 tomatillos, waxy skin removed, chopped
2 chipotle peppers in adobo sauce, plus 1 tablespoon additional sauce
12 teaspoon dried Mexican oregano, crumbled
Pinch dried thyme
Pinch dried marjoram
1 cup chicken broth, low sodium
2 tablespoons apple cider vinegar
Corn tortillas, for serving
Fixings: torn fresh cilantro, minced onion, cotija cheese, avocado and lime wedges
- Pat the chicken with paper towels and season with 1 teaspoon salt.
- Put the oil into the cooking pot of the Cuisinart® Multicooker. Select Sauté/Brown, set the temperature to High, and press Start. Once the unit is preheated and the oil is hot, add half the chicken pieces to the pot and brown on each side, 3 to 5 minutes. Remove and continue with the remaining pieces. Reserve chicken. Add the onion to the pot and cook for 3 to 5 minutes, stirring occasionally until translucent. Add the garlic and cook until fragrant, 2 to 3 minutes. Add the reserved chicken and drippings back to the pot, along with the remaining ingredients. Mix well. Bring to a simmer and end the function.
- Secure the lid and select Slow Cook. Set the temperature to High, the time for 2 hours and 30 minutes, and press Start. When the time expires, press Stop and carefully open the lid. Remove the chicken from the pot and allow to rest until it is cool enough to touch.
-
While the chicken is cooling, select Reduce. Set the time for 15 minutes and press Start. Allow sauce to simmer until thickened.
-
Once chicken is cool, shred, discarding skin and bones. Add the chicken back to the reduced sauce. Press Stop and select Keep Warm, if desired. Mix well and season to taste.
- Serve in corn tortillas topped with prepared fixings.
Nutritional information per serving (based on 6 servings):
Calories 155 (38% from fat) • carb. 5g • pro. 19g
fat 6g • sat. fat 1g • chol. 69mg • sod. 1072mg
calc. 25mg • fiber 1g
A take on true Texan beef chili with serious depth of flavor.
Makes 6 to 8 servings
3 pounds beef chuck roast, cut into 1½-to 2-inch pieces
2 teaspoons kosher salt, divided
12 teaspoon freshly ground black pepper
2 tablespoons olive oil
1 onion, chopped
2 jalapeños, stemmed, seeded, and chopped
1 poblano chile, stemmed and chopped
4 garlic cloves, finely chopped
1 tablespoon Ancho chili powder
1 tablespoon New Mexican chili powder
1 teaspoon ground cumin
1 teaspoon Mexican oregano, crumbled
1 teaspoon dried marjoram
1 tablespoon masa harina
1 can (14.5-ounce) fire-roasted, crushed tomatoes
2 bay leaves
8 ounces dark lager-style beer
2 ounces ( 14 cup) brewed espresso, or strong coffee
12 ounce unsweetened chocolate, roughly chopped
Lime wedges and warm flour tortillas, for serving
-
Season the meat on both sides with 1 teaspoon of salt and freshly ground black pepper. (TIP: For optimal browning, pat meat dry with paper towels before seasoning.)
-
Put the olive oil into the cooking pot of the Cuisinart® Multicooker. Select Sauté/Brown.
Set the temperature to High and press Start. Once the unit is preheated and the oil is hot, start to brown the meat, 3 to 4 minutes per side, working in batches, not to overcrowd the pot. Remove and reserve. Add the onion to the pot and cook, stirring occasionally for 2 to 3 minutes. Stir in the jalapeños, poblano, and garlic, cooking another 2 to 3 minutes, until fragrant. Add the reserved meat, along with drippings, back to pot. Add the chili powders, cumin, oregano, marjoram, and masa harina and mix to coat the meat and vegetables. Add the remaining ingredients, including the remaining teaspoon of salt, and allow the mixture to come to a simmer. Once the mixture comes to a simmer, press Stop.
- Secure the lid and select Stew/Chili. Set the pressure to High, the time for 35 minutes, and press Start.
- When the tone sounds, allow the pressure to release naturally. Once all of the pressure is completely released, carefully open the lid. Remove and discard the bay leaves and stir to fully mix. Taste and adjust the seasoning as desired. Serve with lime wedges and warm tortillas for sopping up the sauce!
Nutritional information per serving (based on 8 servings):
Calories 390 (55% from fat) • carb. 8g • pro. 35g
fat 24g • sat. fat 10g • chol. 119mg • sod. 891mg
calc. 49mg • fiber 2g
Thai-Style Green Curry Vegetables
A perfect curry in a hurry for any weekday night, and hearty enough to please non-vegetarians. This dish can easily be made vegan by omitting the fish sauce.
Makes 6 servings
1 tablespoon coconut oil
1 onion, thinly sliced
1 12 tablespoons finely chopped ginger, plus 1-inch piece cut into matchsticks
2 to 3 garlic cloves, finely chopped
1 Thai (green) chile, finely chopped
14 cup Thai green chile paste
1 can (13 to 14 ounces) unsweetened coconut milk, not "lite"
12 cup vegetable broth, low sodium
1 / 2 lime, juiced
1 teaspoon fish sauce (omit for true
vegetarian/vegan recipe)
1 stalk lemongrass, tough outer leaves and bulb removed, cut into 2½- to 3-inch pieces
1 teaspoon kosher salt
1 young Chinese eggplant, or 2 smaller varieties, quartered lengthwise and cut into 12 -inch slices
1 red bell pepper, cut into strips
1 zucchini, about 8 ounces, sliced into 12 -inch rounds
8 ounces green beans, stems trimmed
12 cup packed Thai basil (or regular basil if the Thai variety is not available), cut into chiffonade
Jasmine rice, for serving
Roasted nuts (cashews or peanuts), chopped, for serving
-
Put the coconut oil into the cooking pot of the Cuisinart® Multicooker. Select Sauté/Brown. Set the temperature to Low and press Start. Once the unit is preheated and the oil is hot, add the onion and cook until translucent. Add the chopped ginger, garlic, and chopped chile and cook until fragrant, stirring continuously, 3 to 5 minutes. Stir in the green chile paste and cook an additional 1 to 2 minutes. Add the coconut milk, broth, lime juice, fish sauce (if using), and lemongrass. Allow mixture to come to a simmer. Once mixture is simmering, press Stop.
-
Add the salt, ginger matchsticks, eggplant, red pepper, zucchini, and green beans to the pot. Secure the lid and select Custom. Set the pressure to High, the time for 1 minute, and press Start. When the tone sounds, press Stop and then the Steam Release button to quickly release pressure.
-
Once all of the pressure is completely released, carefully open the lid and stir in the basil. Taste and adjust seasoning as desired. Ladle the curry over warm rice. Top with nuts for a pleasing crunch, if desired.
Nutritional information per serving:
Calories 239 (63% from fat) • carb. 19g • pro. 3g fat 17g • sat. fat 10g • chol. 0mg • sod. 936mg calc. 60mg • fiber 6g
Pineapple Chipotle Pulled Pork
Cutting the pork into smaller pieces before cooking speeds up the cooking time and guarantees each bite will melt in your mouth.
Makes about 4 cups
2 pounds pork butt, cut into 2-inch chunks
1 teaspoon kosher salt
1 teaspoon chili powder
12 teaspoon ground cumin
3 garlic cloves, smashed
1 cinnamon stick
^3/_4 cup pineapple juice
1 / 4 cup water
1 / 3 cup ketchup
1 chipotle, finely chopped
For serving:
Taco shells
Red cabbage, thinly sliced
Diced pineapple (fresh, not canned)
Radish, cut into thin matchsticks
Cilantro, roughly chopped
Lime, cut into wedges
- Season the pork with the salt, chili powder, and cumin. Add the pork and garlic to the cooking pot of the Cuisinart® Multicooker and stir together with the cinnamon stick. Combine the pineapple juice, water, ketchup and chipotle; add to the cooking pot with the pork. Mix all ingredients together well.
- Secure the lid and select Meat. Set the pressure to High+, the time for 1 hour 15 minutes, and press Start.
- When the tone sounds, let pressure release naturally.
- Once the pressure is completely released, carefully open the lid and transfer the pork to a large mixing bowl; shred with 2 forks or your hands (gloves are recommended). Taste and adjust seasoning as desired.*
- Serve approximately 1 tablespoon pulled pork with each taco shell, thinly sliced red cabbage, diced fresh pineapple, radish matchsticks, chopped cilantro, and lime.
*For added flavor, the strained cooking liquid may be reduced into a sauce and added to the shredded pork, tablespoon by tablespoon. This can be done on the Reduce function.
Nutritional information per serving (one taco):
Calories 76 (58% from fat) • carb. 4g • pro. 5g
fat 5g • sat. fat 2g • chol. 16mg • sod. 159mg
calc. 6mg • fiber 0g
Creamy Rice Pudding
Not rich enough for you? Top with sweetened whipped cream and some chopped nuts before serving.
Makes 4½ cups
3 cups Arborio or Carnaroli rice
4 cups whole milk
2 cups heavy cream
2 cups water
1 cup granulated sugar
1 tablespoon plus 1 teaspoon ground cinnamon
1 tablespoon pure vanilla extract
12 teaspoon kosher salt
3 pinches ground nutmeg
- Put rice, milk, cream, water, sugar, cinnamon, vanilla extract, salt, and nutmeg into the cooking pot of the Cuisinart® Multicooker.
- Secure the lid and select Custom. Set the pressure to Low, the time for 15 minutes, and press Start.
- When the tone sounds, press the Steam Release button to quickly release pressure. Once the pressure is completely released, carefully open the lid and stir well. Serve warm.
Nutritional information per serving ( 12 cup):
Calories 304 (35% from fat) • carb. 43g • pro. 6g fat 12g • sat. fat 7g • chol. 42mg • sod. 98mg calc. 83mg • fiber 1g
Dulce de Leche
Keep this on hand to drizzle over ice cream sundaes, waffles, or really anything! It is easy and delicious!
Makes 2 cups
2 cans sweetened condensed milk Pinch kosher salt
12 teaspoon baking soda
- Put the trivet into the cooking pot of the Cuisinart® Multicooker. Add 3 cups of water to the pot.
- Cut a piece of aluminum foil that is about 24 inches long. Fold in half lengthwise, then fold
in half again two more times to create a strip about 24 inches in length and 2 inches wide to make a cradle.
-
Put the ingredients into an oven-safe casserole dish that is no wider than 7 inches. Stir to combine. Cover with foil.
-
Put the filled baking dish in the center of the foil strip and then carefully lift and transfer to the rack in the cooking pot.
-
Secure the lid and select Custom. Set the pressure to High, the time for 40 minutes, and press Start.
-
When the tone sounds, press the Steam Release button to quickly release pressure. Once the pressure is completely released, carefully open the lid and stir. Serve warm.
Nutritional information per serving (2 tablespoons):
Calories 80 (24% from fat) • carb. 13g • pro. 2g
fat 2g • sat. fat 1g • chol. 8mg • sod. 56mg
calc. 70mg • fiber 0g
Chocolate Pudding
This pudding is best eaten warm, but can also be chilled overnight; note that the texture will be denser and thicker when served cold.
Makes about 3 cups
6 ounces semisweet chocolate
4 tablespoons unsalted butter
1½ cups heavy cream
12 cup whole milk
4 large egg yolks
13 cup granulated sugar
2 teaspoons pure vanilla extract
14 teaspoon kosher salt
- Put the chocolate and butter into a heatproof, medium-size mixing bowl.
- In a saucepan set over medium heat, bring the cream and milk to a strong simmer. Pour over the chocolate and let rest for a minute, then stir until the chocolate and butter are completely melted. Reserve and cool slightly.
-
In a separate bowl, combine the egg yolks and sugar; whisk until lightened in color and no longer grainy in texture. Add about 14 cup of the warm chocolate mixture to the eggs and whisk well, then gradually add an additional 12 cup and, again, whisk until smooth. Add the egg mixture to the remaining chocolate mixture, along with the vanilla extract and salt. Whisk until smooth.
-
Transfer the mixture to an ovenproof casserole dish no wider than 7 inches. Cover with foil.
- Put the trivet into the cooking pot of the Cuisinart® Multicooker. Add 3 cups of water to the pot.
- Cut a piece of aluminum foil that is about 24 inches long. Fold in half lengthwise, then fold in half again two more times to create a strip about 24 inches in length and 2 inches wide to make a cradle.
- Put the filled baking dish in the center of the foil strip and then carefully lift and transfer to the rack in the cooking pot.
- Secure the lid and select Custom. Set the pressure to Low, the time for 15 minutes, and press Start.
- When the tone sounds, allow the pressure to release naturally.
- Once all of the pressure is completely released, press Stop and carefully open the lid. Divide into serving dishes and top with a dollop of whipped cream if desired.
Nutritional information per serving (1/3 cup):
Calories 335 (71% from fat) • carb. 22g • pro. 3g
fat 28g • sat. fat 17g • chol. 152mg • sod. 91mg
calc. 58mg • fiber 1g
Black and White Cheesecake
No finicky water baths to worry about when using your Multicooker to bake a cheesecake. You'll never bake it in the oven again after trying this foolproof method!
Makes one 7-inch cheesecake,
6 to 8 servings
Melted butter or nonstick cooking spray
8 chocolate sandwich cookies (or 1 cup chocolate cookie crumbs)
1 tablespoon unsalted butter, melted Pinch kosher salt
1 pound regular cream cheese (2 standard packages), cut into 1-inch pieces, room temperature
1 / 2 cup granulated sugar
14 teaspoon kosher salt
2 large eggs
1½ teaspoons pure vanilla extract
14 cup sour cream
12 cup chopped chocolate sandwich cookies
- Lightly coat a 7-inch round, by 3-inch high springform pan with melted butter or nonstick cooking spray. Place a sheet of plastic wrap (about 16 x 16 inches) on top of a sheet of aluminum foil the same size. Place the springform pan in the center and wrap the exterior tightly.
- Put the chocolate sandwich cookies in a Cuisinart® Food Processor fitted with the metal chopping blade. Pulse a few times to break up, and then process until finely ground. Add the butter and pinch of salt and pulse to combine.* Transfer to the prepared pan and turn to dust the sides of the pan. Press the remainder onto the bottom of the pan. Reserve.
- Put cream cheese, sugar, and salt in the work bowl of a food processor fitted with the metal chopping blade (this can also be done with an electric hand or stand mixer fitted with the mixing beaters/paddle attachment. Mix on a low speed, being careful not to incorporate too much air into the batter). Process until smooth, about 15 to 20 seconds. Add the eggs, and vanilla extract. Process until combined, about 10 seconds. Scrape down the bowl and process for another 5 seconds. Add the sour cream and pulse to combine. Pour the batter into the prepared pan. Add the chopped cookies and stir with a small spatula. Cover cheesecake with a piece of aluminum foil that has been brushed with butter or sprayed with nonstick cooking spray. Make the sides tight, but allow room for the cheesecake to expand.
- Put the rack into the cooking pot of the Cuisinart® Multicooker with 2 cups of water. Cut a piece of aluminum foil that is about 24 inches long. Fold in half lengthwise, then fold in half again two more times to create a strip about 24 inches in length and 2 inches wide to make a “cradle.” Put the filled springform pan in the center of the foil strip and then carefully lift, and transfer to the rack in the cooking pot.
-
Secure the lid and select Custom. Set the pressure to low and the time for 25 minutes. When the tone sounds, allow pressure to release naturally.
-
Once the pressure is completely released, press Stop and open the lid. Carefully lift the springform pan out of the Multicooker using the foil cradle. Remove foil and plastic wrap. If moisture has accumulated on the top, dab gently with a paper towel to remove. Let cool to room temperature, then cover and refrigerate to fully chill. Before serving, remove from springform pan.
*If using already processed cookie crumbs, simply combine the cookie crumbs and 1 tablespoon melted butter in a small bowl.
Nutritional information per serving (based on 8 servings):
Calories 489 (50% from fat) • carb. 33g • pro. 7g fat 28g • sat. fat 15g • chol. 116mg • sod. 405mg calc. 21mg • fiber 1g
"Baked" Apples
These are perfect when served on their own, but even more decadent with a dollop of whipped cream or a scoop of vanilla ice cream.
Makes 4 servings
2 tablespoons old-fashioned, rolled oats
2 tablespoons pecans
2 tablespoons unbleached, all-purpose flour
1 / 4 cup packed light brown sugar
12 teaspoon pure vanilla extract
1 teaspoon ground cinnamon
14 teaspoon ground nutmeg
Pinch ground cardamom
Pinch kosher salt
4 tablespoons unsalted butter, cold and cubed
4 medium to large apples, a sweet-tart variety
12 cup water
12 cup packed light brown sugar
-
Put the first 9 ingredients (through the salt) into the bowl of a Cuisinart ^® Food Processor or chopper fitted with the chopping blade. Process until combined. Add the cold butter and pulse until combined – the mixture should resemble an uneven crumb. Reserve in the refrigerator until ready to stuff the apples.
-
Prepare the apples by coring each, but being careful to keep the bottom intact. The easiest way to do this is to first use a paring knife to cut about a 12 - to 1-inch circle out of the
top of the apple. Then, using a melon baller, scoop out the remainder of the core as best you can, down to just the bottom of the apple (you will want to be sure to remove all of the seeds), making sure the apple remains intact. Repeat with each apple.
- Fill each apple cavity with the crumb topping, packing it in as firmly as possible.
- Put the 12 cup of water and 12 cup of brown sugar into the cooking pot of the Cuisinart ^ Multicooker. Stir to combine. Place the apples into the pot so that they are standing straight up.
- Secure the lid and select Custom. Set the pressure to Low, the time to 5 minutes, and press Start.
- When the tone sounds, let pressure release naturally.
- Once pressure is completely released, carefully open the lid and serve warm.
Nutritional information per apple:
Calories 285 (28% from fat) • carb. 53g • pro. 2g
fat 9g • sat. fat 5g • chol. 20mg • sod. 26mg
calc. 16mg • fiber 5g
Cherry Chocolate-Chip Bread Pudding
This can be prepared a day in advance and then cooked while you and your family are eating dinner, making it a quick way to have a fresh dessert on a weeknight.
Makes 12 servings
3 cups milk*
4 large eggs
1 / 4 cup granulated sugar
14 teaspoon kosher salt
1 teaspoon pure vanilla extract
1 pound challah bread, cut into 1-inch pieces
^3/_4 cup chocolate chips
^3/4 cup dried cherries
Melted butter or nonstick cooking spray
1. Put the milk, eggs, sugar, salt, and vanilla extract into a large mixing bowl. Whisk until well combined (to the point where the sugar has dissolved; this can be done by hand, with a hand mixer or even in a blender). Add the bread pieces, chocolate chips, and dried cherries and stir well, so the bread is fully
coated. Cover with plastic wrap and allow to rest in the refrigerator for a minimum of 3 hours or up to overnight. Bring to room temperature for 30 minutes before cooking.
- Lightly coat a 2-quart ceramic baking dish, no larger than 7 inches in diameter, with melted butter or nonstick cooking spray. Transfer the soaked bread mixture to the baking dish. Cover with aluminum foil that has also been coated with nonstick cooking spray.
- Put the rack into the cooking pot of the Cuisinart® Multicooker with 2 cups of water. Cut a piece of aluminum foil that is about 24 inches long. Fold in half lengthwise, then fold in half again two more times to create a strip about 24 inches in length and 2 inches wide to make a cradle.
- Put the filled baking dish in the center of the foil strip and then carefully lift and transfer to the rack in the cooking pot.
- Secure the lid and select Custom. Set the pressure to Low, the time for 45 minutes, and press Start.
- When the tone sounds, press the Steam Release button to quickly release pressure.
- Once pressure is completely released, open lid and, using potholders, lift the foil cradle and casserole out of the cooking pot. Serve warm.
*In place of the milk, you may substitute nondairy milk, such as almond or rice, for the full amount of milk.
Nutritional information per serving:
Calories 339 (43% from fat) • carb. 40g • pro. 8g
fat 16g • sat. fat 9g • chol. 112mg • sod. 246mg
calc. 95mg • fiber 2g
Pear "Sauce"
While applesauce may be the popular snack and condiment, pears offer a nice change. We used pears that were on the medium-firm side, but any type can be used – adjust cooking time accordingly.
Makes about 3½ cups
6 medium-firm pears (about 3 pounds), peeled, cored and quartered
14 cup water
1 cinnamon stick, halved
1 tablespoon brown sugar
Pinch kosher salt
- Put all ingredients in the cooking pot of the Cuisinart® Multicooker.
- Secure the lid and select Custom. Set the pressure to Low, the time for 8 minutes, and press Start.
- When the tone sounds, allow pressure to release naturally. Once the pressure is completely released, open lid, strain the mixture, transfer the cooked pears to a separate mixing bowl (discard the cinnamon stick halves) and cover with plastic wrap. Allow to sit for 5 minutes.
- After pears have rested, uncover and mash to desired consistency, adding more liquid (warm water works well) if needed. Serve as is, warm or cold, or serve as a condiment with grilled or broiled pork chops.
Nutritional information per serving ( 12 cup):
Calories 95 (2% from fat) • carb. 25g • pro. 1g
fat 0g • sat. fat 0g • chol. 0mg • sod. 22mg
calc. 15mg • fiber 5g
NOTES
NOTES
Cuisinart®
Food Processors
Blenders
Juicers
Cookware
Tools and Gadgets
Cuisinart offers an extensive assortment of top quality products to make life in the kitchen easier than ever. Try some of our other countertop appliances, cookware, tools and gadgets.
www.cuisinart.com
©2020 Cuisinart
East Windsor, NJ 08520
Printed in China
Cuisinart®
natural_image
Cuisine rice cooker with digital display showing time reading of 00:15 (no visible text or symbols on device body)A. Modos de cocción
Modos de cocción a presión: "MEAT" (carne), "STEW/CHILI" (estofado/chile), "SOUP" (sopa), "STOCK" (caldo), "BEANS" (frijoles), "RICE/ GRAINS" (arroz/granos), "RISOTTO" (risotto), "CUSTOM" (cocción a presión a medida), "STEAM" (cocción al vapor).
natural_image
Close-up of a white cooking pot with a black arrow pointing to it, next to a stainless steel cooking pot (no text or symbols visible)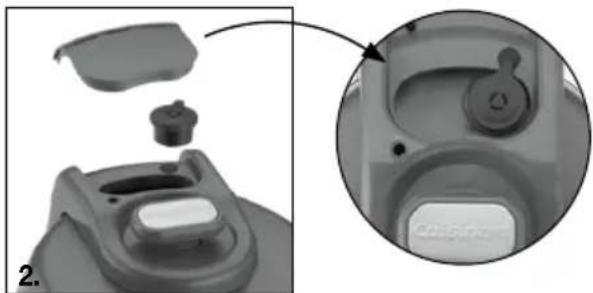
natural_image
Close-up of a mechanical device component with an inset close-up showing internal components (no text or symbols visible)INSTRUCCIONES DE USO
natural_image
Close-up of a mechanical component with an arrow pointing to a circular feature, no visible text or symbols.natural_image
Top-down view of a mechanical component with two handles and a central slot, no visible text or symbolsnatural_image
Close-up of a mechanical device with a lid and internal components (no visible text or symbols)natural_image
Close-up of a mechanical watch with an arrow pointing to the front face (no visible text or symbols)natural_image
Close-up of a kitchen brush and lid with a black arrow indicating a step, no visible text or symbolsEast Windsor, NJ 08520
Impreso en China
19CE060484
IB-16232-ESP
Cuisinart®
natural_image
Cuisine rice cooker with digital display showing time, no visible text or symbols on the device itself.A. Modos de cocción
Modos de cocción a presión: "MEAT" (carne), "STEW/CHILI" (estofado/chile), "SOUP" (sopa), "STOCK" (caldo), "BEANS" (frijoles), "RICE/ GRAINS" (arroz/granos), "RISOTTO" (risotto), "CUSTOM" (cocción a presión a medida), "STEAM" (cocción al vapor).
natural_image
Close-up of a white cooking pot with a side handle, showing a small arrow pointing to it (no text or symbols visible)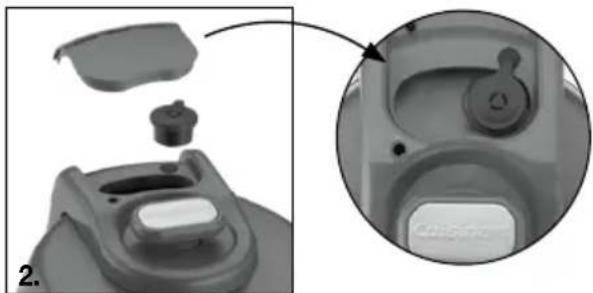
natural_image
Close-up of a mechanical device component with an inset close-up showing internal components (no text or symbols visible)INSTRUCCIONES DE USO
natural_image
Close-up of a mechanical component with an arrow pointing to a circular feature, no visible text or symbols.natural_image
Top-down view of a mechanical component with two handles and a central slot, no visible text or symbolsnatural_image
3D rendered mechanical component with a lid and handle assembly (no visible text or symbols)natural_image
Close-up of a mechanical watch with an arrow pointing to the front face (no visible text or symbols)natural_image
Close-up of a kitchen brush and spatula with a white plastic lid, no visible text or symbolsEast Windsor, NJ 08520
Impreso en China
19CE060484
IB-16232-ESP
- High Pressure Electric Multicooker
- IMPORTANT SAFEGUARDS
- WARNING:
- SAVE THESE INSTRUCTIONS
- CONTENTS
- PARTS AND FEATURES
- A.CookingFunctions
- B.TimeDisplay
- C.Pressure/TemperatureSettings
- D.Pressure
- Temperature
- Preheat
- G.PreheatBars
- H.KeepWarm
- Steam Release Icon
- BEFORE FIRST USE
- INSTRUCTIONS FOR USE
- MULTICOOKER FUNCTIONS
- Pressure Cooking Functions
- Non-Pressure Cooking Functions
- OPERATING INSTRUCTIONS
- Select Cooking Function:
- Set Temperature:
- Set Time:
- Changing Settings:
- YOU SHOULD NEVER ATTEMPT TO OPEN THE LID WHILE PRESSURE COOKING.
- KEEP WARM
- Automatic Keep Warm Feature
- Independent Keep Warm Feature
- PRESSURE RELEASE
- To Open the Lid
- SAFETY FEATURES
- Open-and-Close Lid Safety Device
- Pressure Control Device
- Pressure Limit Valve
- Pressure Relief Device
- Thermal Control
- Thermal Fuse
- CLEANING AND MAINTENANCE
- WARRANTY
- Limited Three-Year Warranty (U.S. and Canada only)
- CALIFORNIA RESIDENTS ONLY
- HASSLE-FREE REPLACEMENT WARRANTY
- TIPS AND HINTS
- COOKING GUIDE:
- PRESSURE HEAT-UP TIMES
- SUGGESTED COOKING TIMES FOR POULTRY AND MEATS
- VEGETABLES
- DRIED BEANS
- RECIPES
- Steel-Cut Oats
- Makes about 7 cups
- Mixed Grain Breakfast Porridge
- Makes about 6 cups
- Pinch kosher salt
- cups water
- Oatmeal Breakfast Bowl
- Makes 4 servings
- 1/_4 cup chopped pecans
- teaspoon chia seeds
- Makes 8 servings
- Nutritional information per serving:
- Breakfast Bread Pudding
- Frittata
- Makes 6 servings
- Hard-Boiled Eggs
- Makes 6 hard-boiled eggs
- Ice bath (bowl of water filled with ice cubes)
- Deviled Eggs
- Makes 12 servings
- Macaroni and Cheese
- Makes 11 cups
- Mashed Potatoes
- Makes 5 cups
- Sautéed Kale
- Makes about 3 cups
- "Braised" Collards
- Makes about 4 cups
- White Bean Dip
- Makes about 3½ cups
- Chickpeas with Sausage and Kale
- Baked Beans
- Artichokes with Three Sauces
- Makes 4 artichokes
- Garlic-Chile Oil
- Lemon-Thyme Butter
- Makes about 12 cup
- Hollandaise
- Makes 1½ cups
- large egg yolks
- Warm water, as needed
- Green Beans with Shallots and Pine Nuts
- Makes about 8 cups
- ounces green beans, trimmed
- tablespoons fresh lemon juice
- Italian Farro and Arugula Salad
- Tabbouleh
- Chicken Stock
- Makes about 10 cups
- Vegetable Stock
- Makes about 9 cups
- Mushroom Stock
- tablespoons unsalted butter
- 1½ pounds mixed mushrooms
- cup dry white wine
- Brown Beef Stock
- Seafood Stock
- Makes about 7½ cups
- Bone Broth
- Makes about 12 cups
- Quick Chicken Soup
- Makes about 14 cups
- Chicken Tortilla Soup
- Makes about 16 cups
- Udon Soup
- Sliced scallions, for serving Chopped cilantro, for serving
- Pho
- Broth:
- to 8 cups water (being sure not to go above the maximum fill line in the cooking pot)
- Soup:
- cup fish sauce
- pound flank steak, very thinly sliced
- Ingredients for serving:
- ounces rice noodles, cooked
- Make the soup:
- Pasta e Fagioli
- Makes about 15 cups
- cups vegetable stock (or broth) Chopped fresh parsley, for serving Freshly grated Parmesan, for serving
- Lentil Soup
- Vegetarian Bean Chili
- Fresh cilantro, for serving
- Mushroom Risotto
- Spring Pea Risotto
- Seafood Risotto
- Black Beans and Rice
- Makes 8 cups
- Marinara Sauce
- Makes about 5 cups
- Meatballs in Sauce
- Makes about 12 meatballs
- "Baked" Ziti
- Quick Turkey Chili
- Traditional Brisket
- Makes 10 servings
- Lamb Shanks with Olives and Prunes
- Makes about 4 to 6 servings
- Nutritional information per serving (based on 6 servings):
- Chicken and Dumplings
- Makes about 8 servings
- 2tablespoonsunbleached, all-purpose flour
- Dumplings:
- Honey-Glazed Salmon
- Makes 2 to 3 servings
- Nutritional information per serving (based on 3 servings):
- Arroz con Pollo
- Makes about 6 servings
- Simple Chicken
- Makes 4 to 6 servings
- Carne Mechada
- Carne:
- pounds flank or hanger steak
- Sofrito:
- Asian-Style Pork Ribs
- Makes 1 rack, or 3 12 to 4 cups shredded meat
- Chicken Tikka Masala
- Chicken Adobo
- Chicken Tinga
- Makes 6 to 8 servings
- Nutritional information per serving (based on 8 servings):
- Thai-Style Green Curry Vegetables
- vegetarian/vegan recipe)
- Pineapple Chipotle Pulled Pork
- pounds pork butt, cut into 2-inch chunks
- For serving:
- Lime, cut into wedges
- Nutritional information per serving (one taco):
- Creamy Rice Pudding
- Makes 4½ cups
- Nutritional information per serving ( 12 cup):
- Dulce de Leche
- Makes 2 cups
- cans sweetened condensed milk Pinch kosher salt
- teaspoon baking soda
- Nutritional information per serving (2 tablespoons):
- Chocolate Pudding
- Black and White Cheesecake
- Makes one 7-inch cheesecake,
- "Baked" Apples
- Cherry Chocolate-Chip Bread Pudding
- Pear "Sauce"
- NOTES
- Cuisinart®
- Modos de cocción
- INSTRUCCIONES DE USO
Brand : CUISINART
Model : CPC-900
Category : Pan