
CPC-610A - Frying Pan CUISINART - Free user manual and instructions
Find the device manual for free CPC-610A CUISINART in PDF.


| Product Type | Electric Pressure Cooker Plus |
| Brand | Cuisinart |
| Model | CPC-610A |
| Capacity | 6 quarts (approx. 5.7 L) |
| Material | Stainless steel outer body; nonstick aluminum cooking pot |
| Power | 1000 W (typical) |
| Voltage / Frequency | 120 V / 60 Hz |
| Functions | Low/High Pressure, Browning, Sauté, Low/High Slow Cook, Steam, Keep Warm |
| Control | Touch-button settings with LED display and countdown timer |
| Safety Devices | 7 devices: Open/close lid safety, pressure control, pressure limit valve, anti-block cover, pressure relief, thermostat, thermal fuse |
| Pressure Release Methods | Natural, Quick, and Combination |
| Automatic Keep Warm | Up to 12 hours |
| Minimum Liquid Requirement | At least 1/2 cup (120 ml) for pressure cooking |
| Maximum Fill Level | 60% of pot volume for most foods; 50% for grains/beans |
| Accessories Included | Trivet, steam basket, condensation collector, sealing ring |
| Cleaning | Cooking pot dishwasher safe; lid and outer body wipe clean; removable condensation collector |
| Warranty | 3-year limited warranty |
| Use | Household use only; not for outdoor use |
| Dimensions (approx.) | 14 x 14 x 12 inches (35 x 35 x 30 cm) |
| Weight (approx.) | 11 lbs (5 kg) |
Frequently Asked Questions - CPC-610A CUISINART
User questions about CPC-610A CUISINART
0 question about this device. Answer the ones you know or ask your own.
Ask a new question about this device
Download the instructions for your Frying Pan in PDF format for free! Find your manual CPC-610A - CUISINART and take your electronic device back in hand. On this page are published all the documents necessary for the use of your device. CPC-610A by CUISINART.
USER MANUAL CPC-610A CUISINART
natural_image
Cuisinart electric pressure cooker with cutlery, displayed alongside a plate of raw meat (no text or symbols on main subject)Cuisinart® Electric Pressure Cooker Plus
CPC-610A
For your safety and continued enjoyment of this product, always read the instruction book carefully before using.
IMPORTANT SAFEGUARDS
When using electrical appliances, basic safety precautions should always be followed including the following:
1. Read all instructions.
-
Do not touch hot surfaces of pressure cooker plus. Use handles only.
-
This appliance should not be used by or near children or individuals with certain disabilities.
4. NEVER ATTEMPT TO OPEN LID WHILE THE UNIT IS OPERATING.
Do not open the pressure cooker plus until the unit has cooled and all internal pressure has been released. If lid is difficult to rotate, this indicates that the cooker is still pressurized. Do not force it to open. Any pressure in the cooker can be hazardous. See Operating Instructions, page 5.
-
Do not place the pressure cooker plus in a heated oven or on any stovetop.
-
Extreme caution must be used when moving a pressure cooker plus containing hot liquids or foods.
-
Do not use the pressure cooker plus for other than intended use.
-
This appliance cooks under pressure. Improper use may result in scalding injury. Make certain unit is properly closed before operating. See Operating Instructions, page 5.
-
Do not fill unit over 35 full. When cooking foods that expand during cooking, such as dried vegetables, legumes, beans, and grains, do not fill the unit over 12 full. Overfilling may cause a risk of clogging the pressure limit valve and developing excess pressure.
-
To protect against electrical shock, do not immerse cord, plugs, or outer vessel in water or other liquids.
-
Unplug from outlet when not in use and before cleaning. Allow to cool before putting on or removing parts.
-
Do not operate any appliance with a damaged cord or plug or after the appliance malfunctions or has been damaged in any manner.
-
Do not let cord hang over edge of table or counter, or touch hot surfaces.
-
Use of accessories not specifically recommended by Cuisinart may cause damage to unit.
-
Do not use outdoors.
-
Do not use under hanging cabinets; steam from pressure release may cause damage.
-
Always attach plug to appliance first, before plugging into wall outlet. To disconnect, turn control to off, then remove plug from outlet.
-
Be aware that certain foods, such as applesauce, cranberries, pearl barley, oatmeal and other cereals, split peas, noodles, macaroni, rhubarb, or spaghetti can foam, froth and sputter, and clog the pressure release devices. These foods should not be cooked in a pressure cooker plus unless following a Cuisinart® Electric Pressure Cooker Plus recipe.
-
Always check the pressure release devices for clogging before use.
-
Do not use this pressure cooker plus for pressure frying oil.
-
Do not operate any appliance with a damaged cord or plug, or after the appliance malfunctions or has been damaged in any manner. Return appliance to the nearest Cuisinart® Authorised Service Facility for examination, repair or adjustment.
-
Do not operate your appliance in an appliance garage or under a wall cabinet. When storing in an appliance garage, always unplug the unit from the electrical outlet. Not doing so could create a risk of fire, especially if the appliance touches the walls of the garage or the door touches the unit as it closes.
-
This appliance is not intended for use by persons (including children) with reduced physical, sensory or mental capabilities, or lack of experience and knowledge, unless they have been given supervision or instruction concerning use of the appliance by a person responsible for their safety.
-
Children should be supervised to ensure that they do not play with the appliance.
SAVE THESE INSTRUCTIONS FOR HOUSEHOLD USE ONLY SPECIAL CORD SET INSTRUCTIONS
A short power-supply cord is provided to reduce the risks resulting from becoming entangled in or tripping over a longer cord.
Longer extension cords are available and may be used if care is exercised in their use.
If a long extension cord is used, the marked electrical rating of the extension cord must be at least as great as the electrical rating of the appliance, and the longer cord should be arranged so that it will not drape over the or tabletop where it can be pulled on by children or tripped over.
CONTENTS
Important Safeguards...... 2
Special Cord Set Instructions ...... 3
Introduction 3
Parts and Features....3
Before First Use 4
Instructions for Use....4
Operating Instructions....5
Pressure Cooker Plus Settings ...... 6
Safety Valves....6
Cleaning 7
Troubleshooting....9
Warranty 9
INTRODUCTION
You're about to experience a better, faster, and healthier way of cooking. Your Cuisinart® Electric Pressure Cooker Plus seals in steam to cook hotter and faster, and it seals in nutrients as well. Cook in less water and experience textures and tastes that are simply sensational.
Features easy touch-button settings, a countdown timer, and a cooking pot big enough for a pot roast with all the fixings. Enjoy!
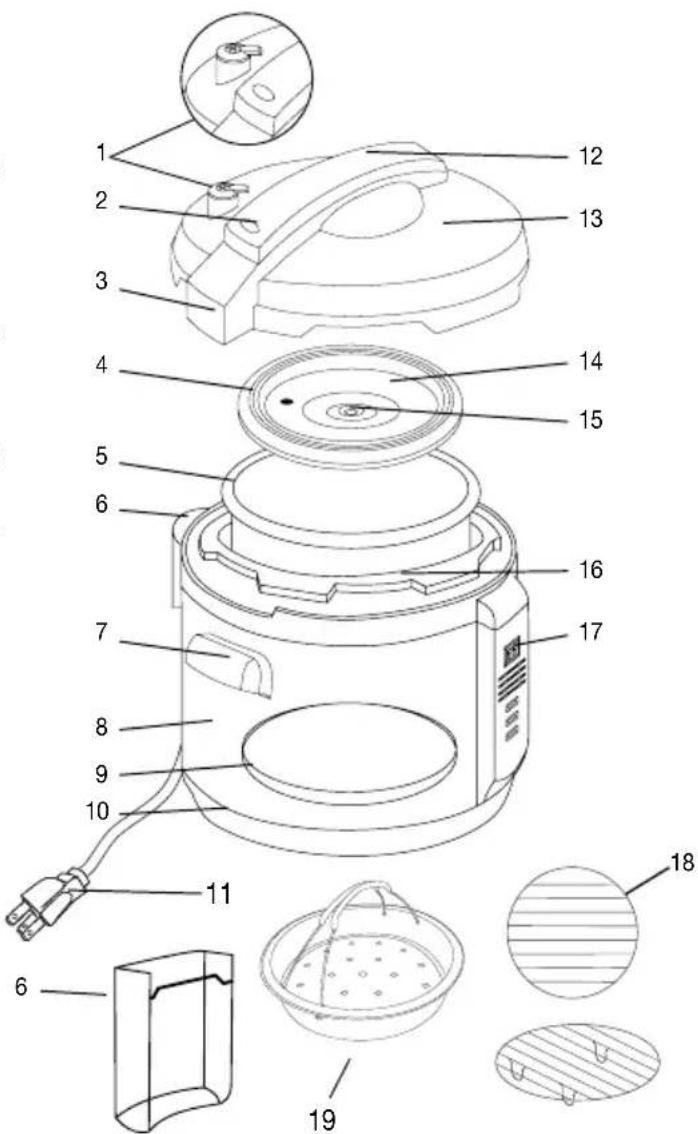
PARTS AND FEATURES
-
Pressure Limit Valve
-
Red Float Valve (Pressure Indicator)
-
Push Rod
-
Sealing Ring
-
Cooking Pot
-
Condensation Collector
-
Handle
-
Outer Body
-
Heating Plate
-
Base
-
Power Cord
-
Lid Handle
-
Lid
-
Sealing Ring Supporting Cover
-
Rubber Grommet
-
Upper Ring
-
Control Panel
-
Trivet - Used for some recipes such as desserts. See Recipe Booklet.
-
Steam Basket
BEFORE FIRST USE
Remove any packaging materials and promotional labels from your electric pressure cooker.
Be sure all parts have been included before discarding any packaging materials. You may want to keep the box and packing materials for use at a later date.
Before using your Cuisinart® Electric Pressure Cooker Plus for the first time, remove any dust from shipping by wiping clean with a damp cloth. Thoroughly clean the lid and the cooking pot. The cooking pot can be cleaned in the dishwasher or with warm soapy water. Rinse with clean water, towel or air dry, and place in the pressure cooker.
-
Place the pressure cooker on a clean, flat surface where you intend to cook.
-
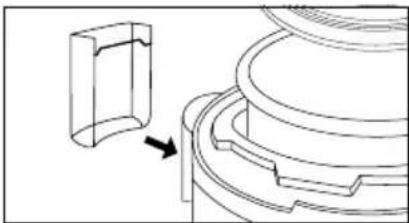
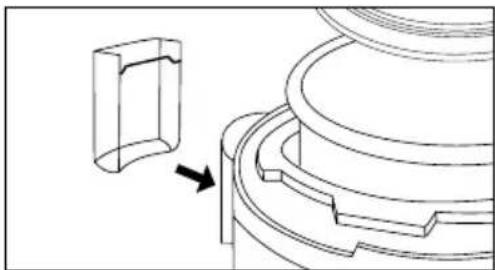
Place the condensation collector in rear of the unit until it clicks into place (as shown below; also see #6 on diagram, page 3).
natural_image
Technical line drawing of a mechanical component with a separate inset showing a curved bracket (no text or symbols)- Place the pressure limit valve on the lid, as shown in figures 5 and 5a. Note: The pressure limit valve does not click or lock into place. Even though it will have a loose fit, it is safely secured.
INSTRUCTIONS FOR USE
Once the pressure cooker plus is assembled properly, you are ready to begin pressure cooking.
-
To remove lid, grasp handle, turn clockwise and lift.
-
Remove cooking pot from pressure cooker and add food and liquids as the recipe directs. Note: The total volume of food and liquid must not exceed 60% of the capacity of the cooking pot (figure 1). For foods such
as dried vegetables and beans, or rice and grains, the total volume must not exceed 50% capacity (figure 2).
Note: Overfilling may clog the pressure limit valve which can cause excess pressure to develop. Always use at least 12 cup liquid when pressure cooking.
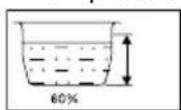
(1)
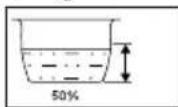
(2)
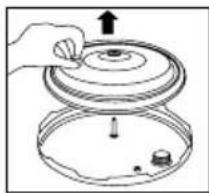
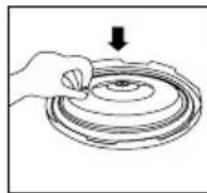
- To lock the lid in place, remove any food residue from upper rim of cooking pot to ensure a proper seal. Make sure sealing ring is securely in place on sealing ring supporting cover (figure 3). Hold knob on sealing ring supporting cover and press firmly over the centre post of inner lid to secure (figure 4). Place lid on pressure cooker plus and turn it counterclockwise into position.
Note: When placing lid on pressure cooker, the float valve should be facing the left.
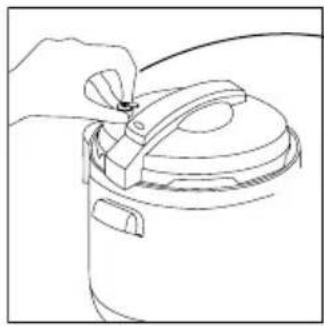
- Position the pressure limit valve
natural_image
Diagram of a hand turning a circular component with an arrow indicating upward motion (no text or symbols)(3)
natural_image
Hand holding a circular object with concentric rings and a downward arrow, no text or symbols present(4)
(located on lid) as directed in figure 5 and 5a, ensuring it is set to the ● position. Note: The pressure limit valve does not click or lock into place. Even though it will have a loose fit, it is safely secured. The float in handle must be fully down to properly seal the pot before cooking.
natural_image
Line drawing of a hand placing a small object into a container (no text or symbols)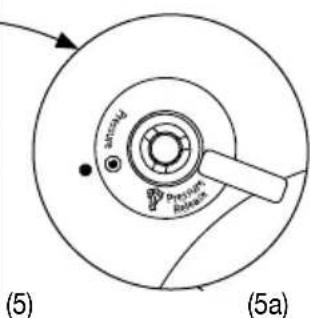
- Plug the power cord into the pressure cooker and then into the wall outlet. The LED display will show --.
OPERATING INSTRUCTIONS
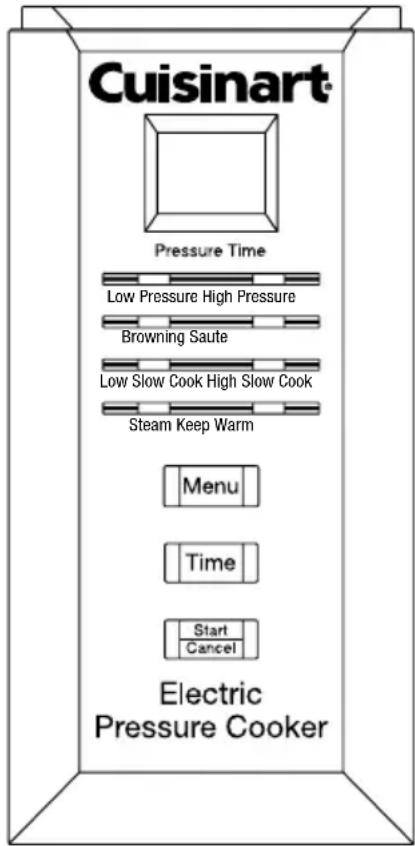
With the unit on and the LED displayed, press the MENU button to select the desired cooking function. The function light will flash.
After Selecting Browning, Sauté
Press START, and unit will begin to heat up. When browning, sautéing is complete, press START/CANCEL to cancel and cover the cooker as directed. Wait 2-3 minutes to allow inner pot to cool slightly. Press menu again and select Low or High Pressure function.
After Selecting Low, High Pressure Steam
Press TIME to select number of minutes needed for pressure cooking. Time increases in 1-minute increments up to 40 minutes. Time increases in 5-minute increments of 40 to 99 minutes.
Once cooking time is programmed, press START/CANCEL to start the cooking process. As the unit heats up and pressure builds, the red float will rise. The amount of liquid and other ingredients in the pressure cooker determines the length of time needed for full pressure to build – generally 5 to 40 minutes depending on the recipe. (A red blinking dot on lower-right hand corner of LED indicates the unit is on and heating up.)
Note: When full pressure is reached, red light in the lower right-hand corner of the LED will stop flashing and remain lit. Pressure cooking will begin and the timer will start to count down.
The raised red float indicates you are cooking under pressure. The lid is double-locked and cannot be opened.
YOU SHOULD NEVER ATTEMPT TO OPEN THE LID WHILE PRESSURE COOKING.
Automatic Keep Warm Feature
When LED display reaches 0.0, the pressure cooker automatically shifts to Keep Warm temperature. The Keep Warm light will turn on and unit will beep to indicate cooking is complete.
NOTE: The Keep Warm setting should not be used for more than 12 hours. The quality or texture of the food will begin to change after 1 hour on Keep Warm. In the Keep Warm setting, a little condensation in the upper ring is normal.
To Reset or Cancel
Users can reset the function or cancel the timing setup anytime by pressing the START/CANCEL button.
To Remove Lid
When pressure cooking cycle is finished, the unit will automatically switch to the Keep Warm position. At this point you may choose to release pressure in one of three ways – Natural Pressure Release, Quick Pressure Release, or a combination of both. The choice will be dictated by the particular food being cooked and indications in the recipe. If adapting your own recipe for pressure cooking, find a similar recipe in our recipe booklet and use that as a guide.
-
Natural Pressure Release – Following pressure cooking, allow the unit to remain on Keep Warm. The pressure will begin to drop – time for pressure to drop will depend on the amount of liquid in the pressure cooker plus and the length of time that pressure was maintained. Natural Pressure Release will take from 12 to 30 minutes. During this time cooking continues, so it is recommended for certain cuts of meats, and some desserts. When pressure is fully released, the float (pressure indicator) will drop and the lid will unlock to open.
-
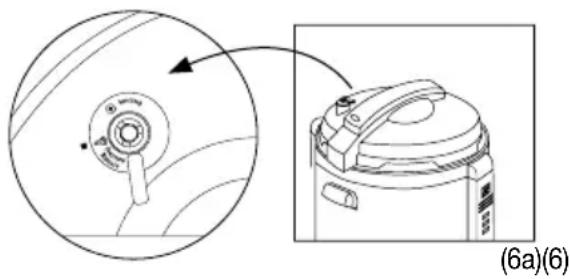
Quick Pressure Release – Following pressure cooking you will hear a series of beeps indicating the process is finished. Turn off and pull the handle of the pressure limit valve forward (see figures 6 and 6a). Do not touch with your hand. Use tongs or another tool.
natural_image
Diagram showing a device with a circular component and an open view of its internal structure, labeled (6a)(6) (no text or symbols on the diagram itself)Steam will immediately begin to release through the valve. Keep face
and hands away from steam as it is released, and do not release pressure under hanging cabinets, which can be damaged by steam.
When pressure is fully released, the pressure indicator will drop and the lid will unlock to open. Using Quick Pressure Release stops the pressure cooking immediately. If further cooking is necessary, the unit may be returned to Pressure, or the food may be further cooked on the Simmer Setting.
- Combination Natural Pressure Release and Quick Pressure Release – For some recipes, we have chosen to use a combination of Natural Pressure Release and Quick Pressure Release. Allow Natural Pressure Release for the time indicated in the recipe (food will continue to cook slightly) followed by Quick Pressure Release.
WARNING: USE EXTREME CAUTION WHEN RELEASING PRESSURE. USE TONGS OR SIMILAR UTENSIL TO PULL HANDLE OF PRESSURE LIMIT VALVE FORWARD.
When the red float is completely down, turn the lid clockwise and lift to remove.
PRESSURE COOKER PLUS SETTINGS
- Low Pressure
- High Pressure
- Browning – This preset temperature allows cooking over high heat, without the lid, before pressure cooking. Browning foods in a small amount of fat in this way seals the outer surfaces of meats and vegetables, producing a visually appealing, flavourful exterior with a moist, tender interior. Browning reduces the time it takes full pressure to build and pressure cooking to begin.
- Sauté – The preset temperature, done prior to pressure cooking with lid removed, allows you to quickly soften vegetables in a small amount of fat or liquid without browning, and to cook items such as rice (Arborio, brown, Carnaroli, white, etc.) for
pilafs and risottos. Sautéing reduces the time it takes full pressure to build and pressure cooking to begin.
- High Slow cook – This is the setting to use when you don't have time for a long, slow cook. It's also the setting to select when "baking" in your pressure cooker.
- Low Slow cook – Low is the standard slow cooker temperature, and is ideal for foods that you start in the morning before work, and enjoy at the end of your day.
- Steam – A healthy option that retains all vitamins and nutrients and most importantly flavour.
- Keep Warm – Holds and keeps cooked food warm for up to 12 hours.
SLOW COOKING
After Selecting Low slow, High slow cook, press TIME to select number of half hour needed for slow cooking. Time increases in 30-minute increments up to 9.5 hours.
Cover the cooker as directed. Turn the pressure limit value to 'Pressure Release' position (see figures 6 and 6a) Press menu button and select Low or High slow cook function.
STEAMING
Press 'Time' to select number of minutes needed for steaming time increases in 1 minute increments. Place trivet inside cooking pot. Add 2 cups of water. Top of trivet should be above water.
Place steaming tray on top of the trivet. Place food inside steaming tray, ensuring food is evenly spaced to allow steam to circulate.
Close and secure lid and leave the pressure valve in the open position.
Press start.
SAFETY VALVES
There are seven safety devices installed in the pressure cooker to assure its reliability.
- Open-and-Close Lid Safety Device
The appliance will not start pressurising until the lid is closed and locked properly.
The lid cannot be opened if the appliance is filled with pressure.
- Pressure Control Device
The correct pressure level is automatically maintained during the cooking cycle.
- Pressure Limit Valve
The pressure limit valve will release air automatically when the pressure inside exceeds the preset temperature.
Note: Overfilling the pressure cooker (see Instructions for Use) may clog the pressure limit valve which can cause excess pressure to develop.
- Anti-Block Cover
Prevents any food material from blocking the pressure limit valve.
- Pressure Relief Device
When the pressure cooker reaches the maximum allowable pressure and temperature, the cooking pot will move down until lid separates from the sealing ring, releasing air pressure.
- Thermostat
The power will automatically shut off
when the cooking pot temperature reaches the preset value, or the pressure cooker is heating without any food inside.
- Thermal Fuse
The circuit will be opened when the pressure cooker reaches the maximum temperature.
CLEANING
-
Unplug the power cord before cleaning.
-
Clean the outer body with a soft cloth such as a paper towel or microfibre cloth. Do not immerse the outer body in water or pour water into it.
-
Rinse with warm water the underside of the lid including the sealing ring, pressure limit valve, air escape and float valve. Dry completely.
-
Clean area under upper ring with dampened cloth or microfibre cloth. Do not use chemical cleaners.
-
Cooking pot is dishwasher-safe. To hand-clean the cooking pot, use a soft cloth or sponge and wipe. Be careful not to damage the inside coating. Never use harsh chemicals or scouring pads.
-
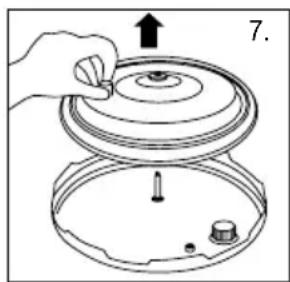
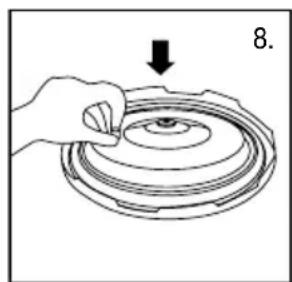
To clean sealing ring, hold the knob on the sealing ring supporting cover and pull the sealing ring up. After cleaning, put the sealing ring supporting cover back.
Note: The side with the knob should face outward. Do not put it upside down (figures 7 and 8).
natural_image
Hand holding a ring-shaped object with concentric rings, no text or symbols visible-
To clean rubber grommet located in centre of sealing ring supporting cover, carefully remove the sealing ring supporting cover and clean the grommet, then replace it.
-
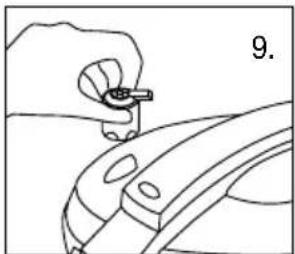
To clean the pressure limit valve, remove and rinse it with water, then replace it (figure 9).
natural_image
Line drawing of a hand holding a tool near a car wheel (no text or symbols)- To clean the condensation collector, remove and clean it with warm soapy water, then reinstall it.
natural_image
Technical line drawing of a mechanical component with a small inset showing a curved cutout (no text or symbols)TROUBLESHOOTING
| Symptom Possible Reasons Solutions | ||
| Lid does not lock | The ring is not properly installed Rein | stall the ring |
| The float is seized by the push rod P | ush the rod with hands | |
| Cannot open the lid after air exhaust | The float is still up Press the float down | |
| Air escapes from the rim of the lid | No sealing ring was installed Install the sealing ring | |
| Food residue on sealing ring Clean sealing ring | ||
| Sealing ring worn out Replace the sealing ring | ||
| Lid not locked properly Rotate lid fully | ||
| Air escapes from the float valve | Food stuck on the sealing ring of the float valve | Clean the sealing ring |
| The sealing ring on the float wore out | Replace the sealing ring | |
| The float will not rise | The pressure limit valve is not placed properly | Place the device to Pressure . |
| Not enough food and water Check recipe for proper quantity | ||
| Air escaping from the rim of the lid and the pressure limit valve | Call our Consumer Service Centre toll free at 1800 808 971 (AUST), 0800 435 000 (NZ) | |
| Unit shuts off when START is pressed to begin Pressure Cooking. | Browning function was just used and temperature in unit is higher than Pressure Cooking temperature, so safety shutoff occurs. | After Browning, let unit cool down for 2 or 3 minutes before you start Pressure Cooking. |
WARRANTY
LIMITED THREE-YEAR WARRANTY
This warranty supersedes all previous warranties on Cuisinart® Electric Pressure Cooker Plus.
This warranty is available to consumers only. You are a consumer if you own a Cuisinart® Electric Pressure Cooker Plus that was purchased at retail for personal, family, or household use. Except as otherwise required under applicable state law, this warranty is not available to retailers or other commercial purchasers or owners.
We warrant that your Cuisinart® Electric Pressure Cooker Plus will be free of defects in material or workmanship under normal home use for three years from the date of original purchase. Please visit our website, www.cuisinart.com.au for the fastest most efficient way to complete your product registration.
or
Call toll-free
1800 808 971 (AUST),
0800 435 000 (NZ),
or
Write to
Cuisinart® Australia
24 Salisbury Road
Asquith NSW 2077
or
Cuisinart® New Zealand
44 Apollo Drive Mairangi Bay
Auckland New Zealand
However, the above registration methods do not eliminate the need for the consumer to maintain the original proof of purchase in order to obtain the warranty benefits. In the event that you do not have proof of purchase date, the purchase date for purposes of this warranty will be the date of manufacture.
If your Cuisinart® appliance should prove to be defective within the warranty period, we will repair it (or, if we think it necessary, replace it) without charge to you.
This warranty expressly excludes any defects or damages caused by accessories, replacement parts, or repair service other than those that have been authorised by Cuisinart®.
This warranty does not cover any damage caused by accident, misuse, shipment or other than ordinary household use.
©2012 Cuisinart
Cuisinart® is a registered trademark of
Cuisinart 150 Milford Road
East Windsor, NJ 0850
1-800-726-0190
Cuisinart Australia
24 Salisbury Road
Asquith NSW 2077
Cuisinart New Zealand
44 Apollo Drive
Mairangi Bay
Auckland, New Zealand
Printed in China
- Cuisinart® Electric Pressure Cooker Plus
- CPC-610A
- IMPORTANT SAFEGUARDS
- Read all instructions.
- NEVER ATTEMPT TO OPEN LID WHILE THE UNIT IS OPERATING.
- SAVE THESE INSTRUCTIONS FOR HOUSEHOLD USE ONLY SPECIAL CORD SET INSTRUCTIONS
- CONTENTS
- INTRODUCTION
- PARTS AND FEATURES
- BEFORE FIRST USE
- INSTRUCTIONS FOR USE
- OPERATING INSTRUCTIONS
- After Selecting Browning, Sauté
- After Selecting Low, High Pressure Steam
- YOU SHOULD NEVER ATTEMPT TO OPEN THE LID WHILE PRESSURE COOKING.
- Automatic Keep Warm Feature
- To Reset or Cancel
- To Remove Lid
- WARNING: USE EXTREME CAUTION WHEN RELEASING PRESSURE. USE TONGS OR SIMILAR UTENSIL TO PULL HANDLE OF PRESSURE LIMIT VALVE FORWARD.
- PRESSURE COOKER PLUS SETTINGS
- SLOW COOKING
- STEAMING
- SAFETY VALVES
- CLEANING
- WARRANTY
- LIMITED THREE-YEAR WARRANTY
Brand : CUISINART
Model : CPC-610A
Category : Frying Pan