FHT-510E - Hedge Trimmer Ferm - Free user manual and instructions
Find the device manual for free FHT-510E Ferm in PDF.


| Product Type | Hedge Trimmer |
| Model | FHT-510E |
| Brand | Ferm |
| Power Source | Corded Electric |
| Voltage | 230 V ~ 50 Hz |
| Power Input | 500 W |
| Blade Length | 50 cm (20 in) |
| Cutting Capacity | 25 mm |
| Blade Material | High-carbon steel, diamond-ground |
| Tooth Spacing | 22 mm |
| Weight | 3.5 kg |
| Dimensions (L x W x H) | 93 x 21 x 18 cm |
| Cable Length | 10 m |
| Sound Pressure Level | 85 dB(A) |
| Vibration Level | 4.2 m/s² |
| Safety Features | Two-hand safety switch, blade guard |
| Maintenance | Clean blades after use, oil periodically |
| Repairability | Spare parts available; blade replacement possible |
| Included Accessories | Blade cover, user manual |
Frequently Asked Questions - FHT-510E Ferm
User questions about FHT-510E Ferm
0 question about this device. Answer the ones you know or ask your own.
Ask a new question about this device
Download the instructions for your Hedge Trimmer in PDF format for free! Find your manual FHT-510E - Ferm and take your electronic device back in hand. On this page are published all the documents necessary for the use of your device. FHT-510E by Ferm.
USER MANUAL FHT-510E Ferm
UK Subject to change
Fig.1
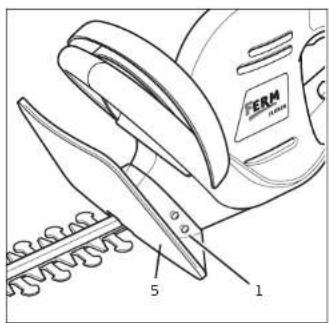
Fig.2 Fig.3


Ferm 552 Ferm
SPARE PARTS LIST FHT-510E
FERM NR DESCRIPTION REF NR
| 501300 SWITCH 4 |
| 501301 CARBON BRUSH ASSEMBLY 22 |
| 501302 SWITCH KEY 26 |
| 501303 ROCKET 27 |
| 501304 BLADE ASSEMBLY 45 |
| 501305 ASSISTANT ROCKET 46 |
| 501306 ROCKET COVER 47 |
| 501307 GUARD 48 |
| 501308 BLADE COVER 54 |

SAFETY AND OPERATING INSTRUCTIONS FHT-510E
For your own safety and for the safety of others, please read these instructions carefully before using this appliance. Keep in a safe place for future reference.
Warning! Always read the instruction for electrical products carefully before use. It will help you understand your product more easily and avoid unnecessary risks.
Keep this instruction manual in a safe place for future use.
TECHNICAL SPECIFICATION
| Model | FHT-510E |
| Voltage | AC 230 V |
| Input power | 500 W |
| No load running speed | 1600 rpm |
| Length of blade | 510 mm |
| Tool class | II |
| Maximum cutting thickness | 14 mm |
| Weight | 3.3 kg |
| Sound pressure level | 83.4 dB(A) |
| Sound power level | 96.4 dB(A) |
| Outdoor noise | 96.4 dB(A) |
| Vibration (back handle) | 1.74 m/s2 |
| Vibration (front handle) | 1.96 m/s2 |
EXPLANATION OF SYMBOLS
CE In accordance with essential applicable safety standards of European directives.
Class II machine – Double insulation – You don't need any earthed plug.
Risk of damaging material and/or physical injuries.
Risk of an electric shock.
Read te instructions.
Do not expose to rain
Remove plug from the mains immediately if cable is damaged or cut
Keep bystanders away.
CONTENTS OF PACKING
I Main Body
1 Safety Guard
4 Screws
1 Blade cover
1 Instruction manual
1 Safety Instructions
I Warranty card
FEATURES
Fig.1
1.Power Cable
2.ON/OFF trigger
-
Power Core Hanger
-
Cutting Blade
-
Safety Guard
-
Safety Switch
-
Blade Cover
-
Cover Fastening Lock
SAFETYINSTRUCTIONS
- Dispose of plastic bags safely - they are a suffocation hazard for young children.
- Keep the area you are working in clean and tidy.
- If you are using a means of support to raise yourself off the ground, ensure that it is stable and cannot topple over - do not overreach at any time.
- Do not use power tools in the rain or wet environments.
- Do not use power tools where there is a risk of fire or explosion - i.e. near flammable liquids or gases.
- Do not allow children into the area where you are working.
• Do not let children or other people touch power tools.
- Do not leave the power tool unattended.
- Store in a dry place well out of reach of children.
• Always use safety glasses and gloves. We also
recommend the use of ear protectors.
- Wear the right clothes - not loose fitting or jewellery and ensure garments cannot come into contact with moving parts.
- If you have long hair, tie it back safely to avoid tangling it in moving parts.
- Before using any power tool, check first for damaged parts and if found do not use it before the part or parts have been replaced with new ones.
- Do not use power tools when you are tired or have been drinking alcohol.
- Do not force the appliance - let it work at the rate for which it was intended.
- Do not overreach while working - you may lose your balance.
- Never use this appliance without the blade guard fitted. It must always remain fitted.
- Only use spare parts and attachments supplied by Ferm. Use of attachments other than those supplied or recommended by Ferm will invalidate your guarantee and could be dangerous.
- Only use this appliance for its intended purpose - trimming hedges and bushes.
• We strongly recommend the use of an RCD (Residual Current Device) of not more than 30 mA, at the plug socket when using this appliance.
- Only use spare parts and attachments supplied by Ferm. Use of attachments other than those supplied or recommended by Ferm will invalidate your guarantee and could be dangerous.
- Do not allow the power cord to lay on or across sharp objects that might pierce the outer insulation. Carry out a visual inspection of the power cord before use and if it is damaged, have it replaced by a specialist service centre. Do not use the appliance if the cord is damaged.

ABOVE ALL-BE CAREFUL!
MAINS PLUG REPLACEMENT
If you are in any doubt whatsoever regarding removing the old plug and reconnecting a new one, you should contact a competent electrician to do it for you.
- Disconnect the plug from the electric socket.
- Cut off the old plug and dispose of it safely. Under no circumstances should anyone be able to find and use a plug with exposed wires.
- Only fit an approved plug with the correctly rated fuse.
- Attach the cores (wires) to their respective terminals.
BROWN-L (Live) BLUE-N (Neutral)
Ensure the outer cable (sheath) is firmly clamped in place to avoid strain on the wires at the terminals.
Connecting to the Power Supply
Your trimmer is supplied with a non-rewireable moulded plug and cable, incorporating a fuse. Should the fuse need to be replaced at any time it must be replaced with an approved to BSI362 fuse the same rating as the one you are replacing. The fuse cover is detachable. Never use the plug with the cover off.

Warning! This appliance is double insulated and MUST NOT BE EARTHED.
If you have to rewire the plug at any time please connect as follows:
Attach the blue cable (Neutral) to the terminal marked N or coloured black or blue.
Attach the brown cable (Live) to the terminal marked L or coloured red or brown.
DOUBLE INSULATED
This power tool is double insulated. All the external parts are insulated from the mains power supply. This makes it unnecessary for this power tool to be earthed.
Using Extension cables
All electrical connections e.g. extension cable, must be of an approved waterproof type for outdoor use and marked accordingly. Extension cables must be three-core, one of which is EARTH.
As a supply for this machine always use an extension cable of at least 0.75 mm ^2 .
Always fully unwind extension cables before use.
SPECIFIC SAFETY WARNINGS

Attention: Danger!
- The cutting elements continue to move after the motor is switch off.
- If the cord becomes damaged during use, disconnect the cord from the power supply immediately. DO NOT TOUCH THE CORD BEFORE
DISCONNECTING THE SUPPLY. Do not use the appliance if the appliance cord or the extension cord are damaged.
- Keep extension cord away from cutting elements.
• Always ensure the guards are fitted when using the tool.
- Check the cable for damage before starting work and replace if necessary.
- Inspect and maintain the trimmer regularly. Have the trimmer repaired only by an authorised repairer.
- Keep your hands and feet away from the cutting area at all times.
• Always hold the trimmer at a safe distance from the body.
• Always wear protective goggles.
• Always wear gloves.
• Only use the trimmer in daylight
- Ensure the ventilation openings are clear of debris at all times.
- Ensure there are no people of animals within 5 metres of your trimming area.
- Remove the plug from the power socket before attempting any maintenance.
• After use the tool should be stored so that the blade is not exposed.
OPERATING INSTRUCTIONS
ASSEMBLY
Fig.2
Attach the safety guard (5) at the front/side of the body in the positions shown. Attach it using the four self-tapping screws (1) supplied.
USING THE CORD GRIP
To help secure the plug to the extension cord, make a loop in the extension cord and attach it to the cord grip as shown (see fig. 3). Once secure, attach the cord to the plug. This will prevent accidental 'pull-out'.
USING YOUR HEDGE TRIMMER
For your own safety and for best results read the following user advice and do not use this product for anything other than its intended purpose.
Switching ON and OFF
Fig. I
- To switch the trimmer on, press the ON/OFF trigger (6) and the start switch (2) at the same time.
• To switch off, release one or both switches.
Note: If you notice a slight burning smell, it is nothing to worry about. It is the electric brake working.
Ideally a hedge should be wider at the bottom than the top. This will improve light penetration, keeping the hedge healthy. If possible, trim both sides of the hedge. When trimming the sides of the hedge, trim from the bottom upwards. This will ensure there are no hedge trimmings obscuring or interfering with your cut strokes.
The blade should not be forced to cut too deep. Cut lightly through the surface of the hedge.
When trimming the top of the hedge, trim away from you but do not over-reach. It is much wiser and safer to move along and cut within your reach remaining on two feet at all times.
Warning! Do not let the blade come into contact with wire meshing or fencing material. It could damage the material and your trimmer.
TROUBLESHOOTING
The following table gives checks and actions that you can perform if your machine does not operate correctly. If this don't identify/remedy the problem, contact your service centre.
Warning! Switch off and remove the plug from the mains before investigating a fault.
1. Machine fails to operate
• Power turned off
Turn power on
s socket faulty Use another socket
• Extension cable damaged
Inspect cable, replace if damaged
- Fuse faulty/blown
Replace fuse
2. Machine overheats
• Air vents blocked
Unblock air vents
- Machine functions intermittently
• Extension cable damaged
Inspect cable, replace if damaged
• Machines internal wiring damaged
Contact service centre
4. Machine does not cut
• Cutting objects too thick
See specification table for maximum cutting
thickness
- Blades worn
Get blades replaced or sharpened
Should you experience any problems at all with this product or require spare parts, ring your nearest authorized dealer.
MAINTENANCE

Make sure that the machine is not live when carrying out maintenance work on the motor.
The Ferm machines have been designed to operate over a long period of time with a minimum of maintenance. Continuous satisfactory operation depends upon proper machine care and regular cleaning.
Cleaning
Regularly clean the machine housing with a soft cloth, preferably after each use. Keep the ventilation slots free from dust and dirt.
If the dirt does not come off use a soft cloth moistened with soapy water. Never use solvents such as petrol, alcohol, ammonia water, etc. These solvents may damage the plastic parts.
Lubrication
The machine requires no additional lubrication.
Faults
Should a fault occur, e.g. after wear of a part, please contact your local Ferm dealer.
In the back of this manual you find an exploded view showing the parts that can be ordered.
ENVIRONMENT
In order to prevent the machine from damage during transport, it is delivered in a sturdy packaging. Most of the packaging materials can be recycled. Take these materials to the appropriate recycling locations. Take your unwanted machines to your local Ferm-dealer. Here they will be disposed off in an environmentally safe way.
GUARANTEE
The guarantee conditions can be found on the separately enclosed guarantee card.
Wear of the cutter is not covered by the guarantee.
CE DECLARATION OF CONFORMITY (UK)
We declare under our sole responsibility that this product conforms with the following standards or standardised documents:
EN 50144-1, EN 50144-2-15, EN 55014-1, EN 55014-2, EN 61000-3-2, EN 61000-3-3
in accordance with regulations:
98/37/EEC, 73/23/EEC, 89/336/EEC
01-01-2004
ZWOLLENL
W. Kamphof
Quality Department
It is our policy to continuously improve our products and we therefore reserve the right to change the product specification without prior notice.
Ferm B.V, Zwolle, The Netherlands
D Deutsch
one of which is EARTH.
Ferm BV, Zwolle, The Netherlands (Holandia)

Ferm BV, Zwolle, The Netherlands
PL Polska
INSTRUKCJA OBSIUGIORAZ
ZAGADNIEńBHP
Ferm BV, Zwolle, The Netherlands
OBSAH SOUPRAVY
I základní výrobek
I bezpećnostni kryt
4 šrouby
I kryt nože
I návod k použití
- Bar and 20 gallons
CARACTERÍSTICAS
98/37/E∅F, 73/23/E∅F, 89/336/E∅F,
Fra 01-01-2004
ZWOLLE-NL
W. Kamphot
Kvalitetsafdeling

Secondo le normative: 98/37/EEC, 73/23/EEC, 89/336/EEC
Dal 01-01-2004
ZWOLLE NL
W. Kamphof
CE EFSAMSVARSERKLÆRING (N)
98/37/EØF, 73/23/EØF, 89/336/EØF
Fra 01-01-2004
ZWOLLE-N
W. Kamphof
Kvalitetsavdeling
98/37/ETY, 73/23/ETY, 89/336/ETY.

01.01.2004 lähtien
ZWOLLE, ALANKOMAAT
W. Kamphof
Laadunvarmistusosasto
- SPARE PARTS LIST FHT-510E
- SAFETY AND OPERATING INSTRUCTIONS FHT-510E
- EXPLANATION OF SYMBOLS
- CONTENTS OF PACKING
- FEATURES
- SAFETYINSTRUCTIONS
- ABOVE ALL-BE CAREFUL!
- MAINS PLUG REPLACEMENT
- BROWN-L (Live) BLUE-N (Neutral)
- Connecting to the Power Supply
- DOUBLE INSULATED
- Using Extension cables
- SPECIFIC SAFETY WARNINGS
- Attention: Danger!
- OPERATING INSTRUCTIONS
- ASSEMBLY
- Fig.2
- USING THE CORD GRIP
- USING YOUR HEDGE TRIMMER
- Switching ON and OFF
- Fig. I
- TROUBLESHOOTING
- Machine fails to operate
- Machine overheats
- Machine does not cut
- MAINTENANCE
- Cleaning
- Lubrication
- Faults
- ENVIRONMENT
- GUARANTEE
- CE DECLARATION OF CONFORMITY (UK)
- EN 50144-1, EN 50144-2-15, EN 55014-1, EN 55014-2, EN 61000-3-2, EN 61000-3-3
- 98/37/EEC, 73/23/EEC, 89/336/EEC
- Ferm B.V, Zwolle, The Netherlands
- D Deutsch
- PL Polska
- INSTRUKCJA OBSIUGIORAZ
- ZAGADNIEńBHP
- OBSAH SOUPRAVY
- CARACTERÍSTICAS
- Fra 01-01-2004
- Dal 01-01-2004
- CE EFSAMSVARSERKLÆRING (N)
- lähtien
Brand : Ferm
Model : FHT-510E
Category : Hedge Trimmer