
FPC600 - Pan Farberware - Free user manual and instructions
Find the device manual for free FPC600 Farberware in PDF.


| Product Type | Programmable Electric Pressure Cooker |
| Brand | Farberware |
| Model | FPC600 |
| Capacity | 6 quarts (5.7 liters) |
| Power | 1200 Watts |
| Electrical Rating | 120 V AC, 60 Hz |
| Weight (approx.) | 11.5 lb (5.2 kg) |
| Dimensions (approx.) | 13.5 x 12.5 x 12 inches (34 x 32 x 30 cm) |
| Housing Material | Brushed stainless steel and molded plastic |
| Inner Pot Material | Heavy-duty aluminum with non-stick coating |
| Functions | Browning (sauté), Steaming, Pressure Cooking (Low/High), Keep Warm |
| Pressure Levels | Low and High (approx. 5.8 psi / 40 kPa and 11.6 psi / 80 kPa) |
| Timer | Up to 99 minutes for Pressure/Steam; Delay up to 2 hours |
| Safety Features | Self-locking lid, safety lock, pressure indicator, pressure regulator knob, dual safety valves, quick steam release button |
| Accessories Included | Removable cooking pot, self-locking lid with rubber gasket, cleaning brush |
| Cleaning & Maintenance | Wash removable pot and gasket with warm soapy water; wipe housing with damp cloth; clean steam valve with brush; do not immerse housing |
| Replaceable Parts | Rubber gasket (P/N 20890) available via consumer service |
| Warranty | 1-year limited warranty |
| Certifications | Grounded 3-prong plug, ETL/Intertek listed (assumed) |
| Additional Features | Power surge protection; idle mode; automatic keep warm after cooking; cancel function for timer |
Frequently Asked Questions - FPC600 Farberware
User questions about FPC600 Farberware
0 question about this device. Answer the ones you know or ask your own.
Ask a new question about this device
Download the instructions for your Pan in PDF format for free! Find your manual FPC600 - Farberware and take your electronic device back in hand. On this page are published all the documents necessary for the use of your device. FPC600 by Farberware.
USER MANUAL FPC600 Farberware
USE & CARE INSTRUCTIONS
PROGRAMMABLE PRESSURE COOKER
FPC600
IMPORTANT SAFEGUARDS
When using electrical appliances, basic safety precautions should always be followed, including the following:
- Read all instructions before using appliance.
- Do not touch hot surfaces. Use handles or knobs.
-
To protect against fire, electric shock and injury to persons, do not immerse cord, plugs, or Pressure Cooker Housing in water or other liquid.
-
Close supervision is necessary when any appliance is used near children. This appliance is not for use by children.
-
Unplug appliance from outlet when not in use and before cleaning. Allow to cool before putting on or taking off parts, and before cleaning the appliance.
-
Do not operate any appliance with a damaged cord or plug or after the appliance malfunctions, or has been dropped or damaged in any manner. Contact Consumer Service.
-
The use of accessory attachments not recommended by the appliance manufacturer may result in fire, electric shock, or injury to persons.
-
Do not use outdoors.
-
Do not let cord hang over edge of table or counter, or touch hot surfaces.
-
Do not place on or near a hot gas or electric burner, or in a heated oven.
-
To disconnect, press the START/STOP Button until the Red STOP Light illuminates and the Pressure Cooker beeps. Then remove plug from wall outlet.
-
Do not use appliance for other than intended use.
-
Extreme caution must be used when moving an appliance containing hot oil or other hot liquids.
-
Oversized foods, metal foil packages, or utensils must not be inserted in the appliance, as they may involve a risk of fire or electric shock.
-
A fire may occur if the appliance is covered or touching flammable material, including curtains, draperies, walls, and the like, when in operation.
-
Do not attempt to dislodge food when appliance is plugged in.
-
Do not fill the unit above the MAX Fill Line. When cooking foods that expand during cooking such as rice or dried vegetables, do not fill the unit over 1/2 full. See “Cooking With Your Pressure Cooker.”
-
Do not cook foods such as applesauce, cranberries, pearl barley, oatmeal or other cereals, split peas, noodles, macaroni, rhubarb, or spaghetti. These foods tend to foam, froth and sputter, and may block the Steam Release Valve.
-
CAUTION: To reduce the risk of electric shock, cook only in the Removable Cooking Pot.
SAVE THESE INSTRUCTIONS
ADDITIONAL IMPORTANT SAFEGUARDS
WARNING: This appliance generates heat and escaping steam during use. Use proper precautions to prevent risk of burns, fires, or other injury to persons or damage to property.
- Keep hands and face away from Steam Release Valve when releasing pressure.
- Use extreme caution when removing the Lid after cooking. Serious burns can result from steam inside.
- Never remove the Lid while the unit is in operation.
- Do not use without the Removable Cooking Pot in place.
- Do not cover the Pressure Valves with anything as an explosion may occur.
- Do not touch the Removable Cooking Pot, any removable parts, or heating parts immediately after using. Let the unit cool completely first.
- To reduce the risk of electric shock, cook only in the Removable Cooking Pot. Do not pour liquid into the Cool-to-the-Touch Housing.
- Clean all parts thoroughly after each use.
- Do not lift Removable Cooking Pot containing food by using Upper Handles on Lid.
3-PRONG GROUNDED TYPE PLUG
This appliance is equipped with a grounded type 3-wire cord (3-prong plug). This plug will only fit into an electrical outlet made for a 3-prong plug. This is a safety feature. If the plug should fail to fit the outlet, contact an electrician to replace the obsolete outlet. Do not attempt to defeat the safety purpose of the Grounding Pin part of the 3-prong plug.
SHORT CORD INSTRUCTIONS
A short power-supply cord is provided to reduce the risk resulting from becoming entangled in or tripping over a longer cord.
Longer detachable power-supply cords or extension cords are available and may be used if care is exercised in their use.
If a longer detachable power-supply or extension cord is used, (1) the marked electrical rating of the cord set or extension cord should be at least as great as the electrical rating of the appliance, and (2) the cord should be arranged so that it will not drape over the countertop or tabletop where it can be pulled on by children or tripped over unintentionally.
If the appliance is of the grounded type, the extension cord should be a grounding-type 3-wire cord.
INTRODUCTION
Congratulations! You are about to learn how to cook and prepare delicious, home made meals in a fraction of the time it normally takes, without sacrificing flavor or nutrition. Your FARBERWARE® Programmable Electric Pressure Cooker is quick, safe and easy to use. And best of all, it can shorten the traditional cooking time of most foods by up to 70%.
- Your Programmable Electric Pressure Cooker cooks like a traditional Pressure Cooker by combining steam heat and pressure for faster cooking times. Since an air-tight seal is formed when the Lid is closed and locked, the heat and steam stay trapped inside the Removable Cooking Pot. As the steam builds, so does the cooking temperature which will get as hot as 250°F, which is 38°F hotter than when food is normally cooked in a regular cooking pot with liquid. This combination of high heat and pressure are what causes the food to cook faster, while retaining water soluble nutrients and flavor.
- Your FARBERWARE® Electric Pressure Cooker is programmable. It has a built-in Thermostat and Timers which eliminate unnecessary guesswork as far as adjusting the heat to maintain pressure or clocking the cooking time as you would do when cooking with a traditional pressure cooker on a stove top burner.
- The 1200 watt Heating Element allows for quick heating and for maintaining even cooking temperature and pressure.
- The large, 6 quart capacity, heavy-duty, non-stick, aluminum Removable Cooking Pot heats up quickly and evenly.
- The FARBERWARE® Programmable Electric Pressure Cooker has a BROWN Function that allows you to sauté or brown food in the Removable Cooking Pot before cooking under pressure.
- The Quick Steam Release Feature allows you to release pressure with the simple push of a button. Only press this Release in short bursts until pressure is reduced, as HOT liquid may be ejected.
- The STEAM Function heats cooking liquid in the Removable Cooking Pot to a boil in a matter of minutes for steaming an endless variety of foods like vegetables and shellfish as well as rice.
- The software is incorporated with a CANCEL Feature for both COOK TIME and DELAY TIME during setup. If it becomes necessary to cancel or reset the time before cooking has begun, simply press the COOK TIME and START/STOP Buttons simultaneously to reset the Cook Time to "01"; or press the DELAY TIME and START/STOP Buttons simultaneously to reset the Delay Time to "00."
- The KEEP WARM Function holds and keeps cooked food warm for an unlimited period of time.
- The sturdy, brushed stainless steel and molded, Cool-to-the-Touch Housing of your FARBERWARE® Programmable Electric Pressure Cooker is both attractive and functional.
GETTING TO KNOW YOUR FARBERWARE®
FPC600 PROGRAMMABLE ELECTRIC
PRESSURE COOKER
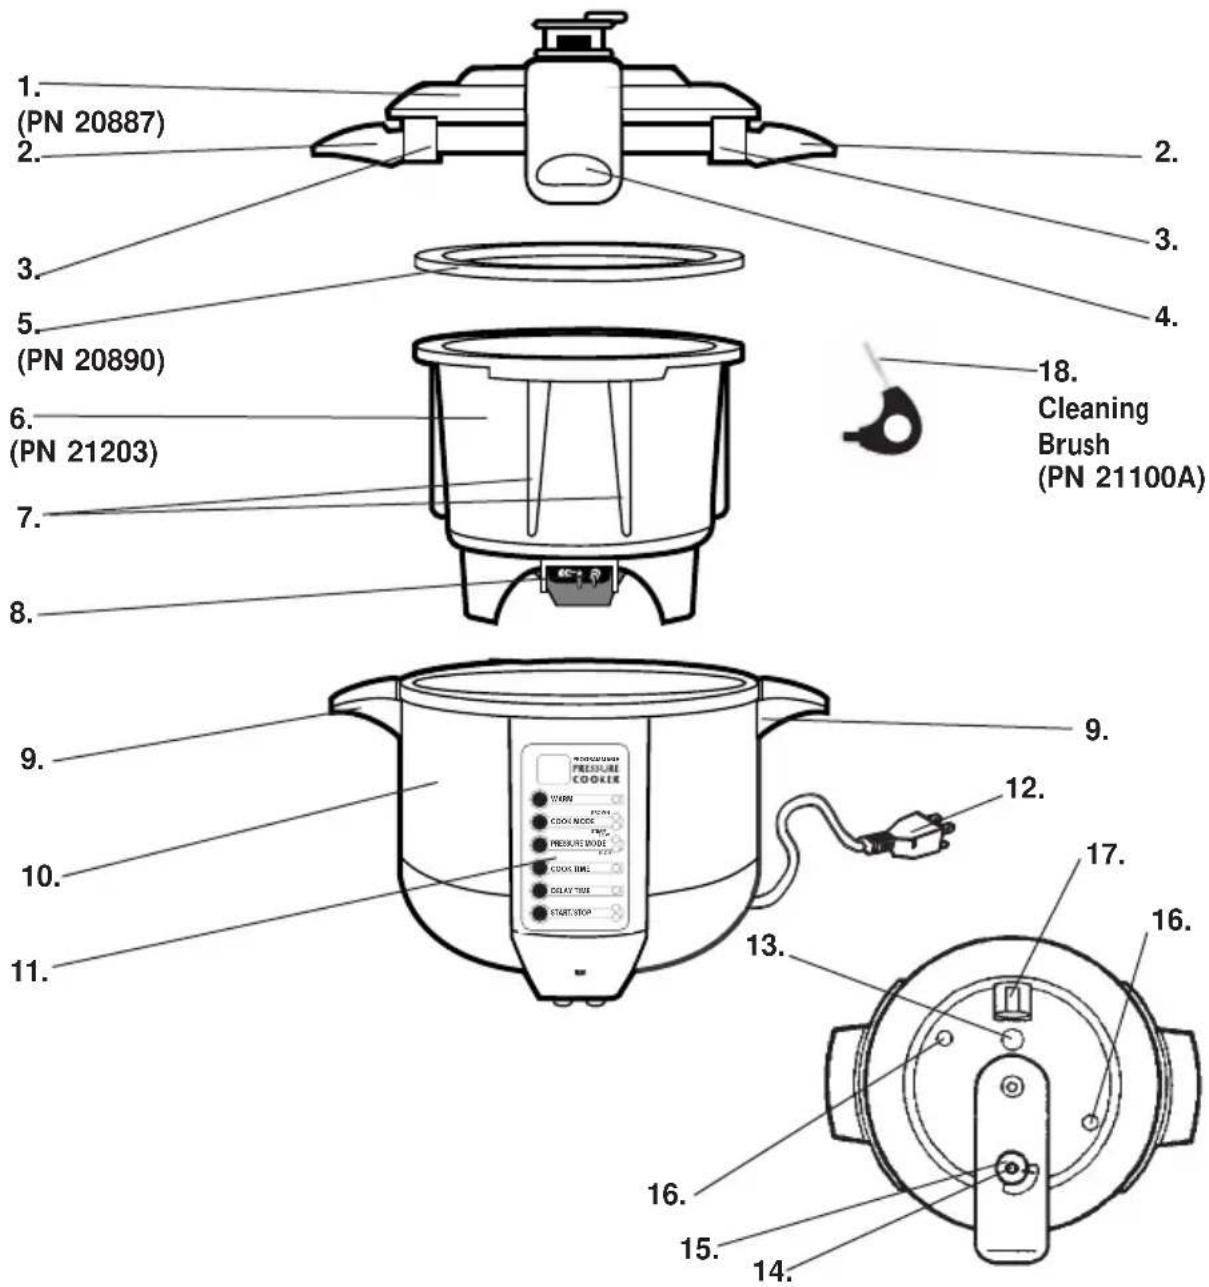
- Self-Locking Lid
- Upper Handles
- Self-Locking Grips
- Quick Steam Release Button
- Rubber Gasket
- Removable Cooking Pot
- Guides
- Heating Element Pins
- Lower Handles
-
Cool-to-the-Touch Housing
-
Control Panel
- Electrical Cord with 3-Prong Grounded Type Plug
- Pressure Indicator
- Steam Release Valve
- Pressure Regulator Knob
- Pressure Safety Valves (2)
- Safety Lock
- Cleaning Brush
CONTROL PANEL OPTIONS
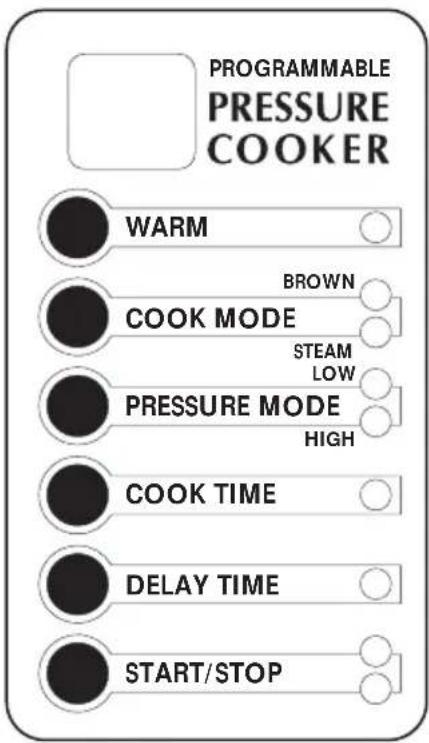
WARM
The KEEP WARM Function holds and keeps cooked food warm for a long period of time. Press WARM Button until the Yellow Indicator Light illuminates. Press START/STOP to activate. The Yellow Indicator Light will flash, indicating WARM is working. To cancel or stop, press and hold START/STOP Button until Red Light illuminates and the Pressure Cooker beeps.
COOK MODE
BROWN or STEAM: For BROWN Function, press COOK MODE Button until the Green Indicator Light next to BROWN is lit. Press the START/STOP Button until the Green Indicator Light illuminates. The Clock will display: "--" indicating that the Cooker is in BROWN Mode and the appliance will begin to heat immediately and will remain hot until START/STOP Button is pressed again to end the BROWN Function.
For STEAM Function and to bring water to a boil, press COOK MODE Button until Red Indicator Light next to STEAM is lit. Press COOK TIME Button to enter the cooking time desired and then press the START/STOP Button. The unit will begin to count down in minutes, and will beep 3 times when finished.
PRESSURE MODE
LOW or HIGH: For cooking food under LOW PRESSURE, press PRESSURE MODE Button until Green Indicator Light is lit; for HIGH PRESSURE, press until Red Indicator Light is lit. Press COOK TIME Button for the cooking time desired and then press the START/STOP Button. The Unit will begin to count down in minutes, and will beep 3 times when finished. Let pressure drop on its own by using the Natural Release Feature, or release immediately by pressing the Quick Steam Release Button in short bursts until pressure is reduced. DO NOT hold this Button down, as hot liquid may be ejected. To cancel or stop cooking before time has elapsed, press and hold the START/STOP Button until the Red Light illuminates and the Pressure Cooker beeps.
CONTROL PANEL OPTIONS (Continued)
COOK TIME
Use this Timer when using the COOK MODE: STEAM Function or the PRESSURE MODE: LOW or HIGH settings. Press COOK TIME Button to set the cooking time desired, up to 99 minutes.
DELAY TIME
Allows you to begin cooking food up to two hours later in 1/2 hour increments.
START/STOP
After choosing the desired program: WARM, COOK MODE: BROWN or STEAM, or PRESSURE MODE: LOW or HIGH, and if appropriate, a cooking time, press START/STOP Button to begin operating the appliance. The Green Indicator Light will be lit when START is chosen. The Red Indicator Light will illuminate for STOP. If you wish to change your selection, or to stop the appliance, press and hold START/STOP until the Red Light illuminates and the Pressure Cooker beeps.
This Pressure Cooker has an IDLE Mode. If you input a COOK TIME and/or DELAY TIME, but forget to select a program or if you forget to press START, the Clock will display "--" after 5 seconds. This feature is for your convenience to show that the program is incomplete. The "--" signal indicates that the Cooker is not programmed properly and will not run.
You can proceed to the program where you left off by pressing the COOK TIME or DELAY TIME Button. Your selected time will reappear. If this time does not appear, or if it is incorrect, simply enter the correct time and then press the START/STOP Button.
USE & CARE INSTRUCTIONS
BEFORE USING THE FIRST TIME
- Before using the Programmable Electric Pressure Cooker for the first time, wash the Removable Cooking Pot with warm soapy water. Rinse off with clean water and towel dry. Wash the Self-Locking Lid and Rubber Gasket with a clean, damp sponge or cloth and warm soapy water. Wipe off with clean water and towel dry.
- Make sure the Rubber Gasket is seated properly around the Lid. To ensure correct fitting of the Rubber Gasket, fill the Removable Cooking Pot two-thirds full with water and run on HIGH PRESSURE as described on page 11, Steps 3 to 8 for 15 minutes. Wait 15 minutes, then release pressure by pressing on the Quick Steam Release Button in short bursts. The Pressure Indicator will drop. Let appliance cool to room temperature. Pour out the water. Rinse and dry the Removable Cooking Pot. The Pressure Cooker is now ready to be used.
For best results, always check that the Pressure Regulator Knob, Pressure Indicator, Steam Release Valve and Safety Valves are in good working order and that there are no foreign particles blocking the Valve openings on the underside of the Lid (see Care and Cleaning Instructions, page 14, Step 7).
POWER SURGE PROTECTION FEATURE
This Pressure Cooker has a Back-Up Feature to prevent malfunction in the event of power surges. If the Pressure Cooker is unplugged or switched off, allow at least 30 seconds for the program to clear before turning the unit back on.
NON-STICK SURFACE
Be sure to always use either plastic or wooden utensils so as not to scratch the non-stick surface. Never use metal tongs, forks, or knives as they can damage the coating on the Removable Cooking Pot.
OPERATING INSTRUCTIONS
-
Plug the cord into a grounded-type 120V AC electrical wall outlet.
-
Position the Removable Cooking Pot in the appliance so that the guide located in the front of the Removable Cooking Pot (with the Heating Element Pins) slides down through the channel located inside the front of the Cool-to-the-Touch Housing.
-
Choose the desired program by pressing either WARM, COOK MODE: BROWN or STEAM, or PRESSURE MODE: LOW or HIGH.
-
If using COOK MODE: STEAM, or PRESSURE MODE: LOW or HIGH, press COOK TIME for the desired cooking time.
-
THE SELF-LOCKING LID MUST BE POSITIONED ON APPLIANCE WHEN COOKING UNDER PRESSURE OR WHEN STEAMING FOOD.
-
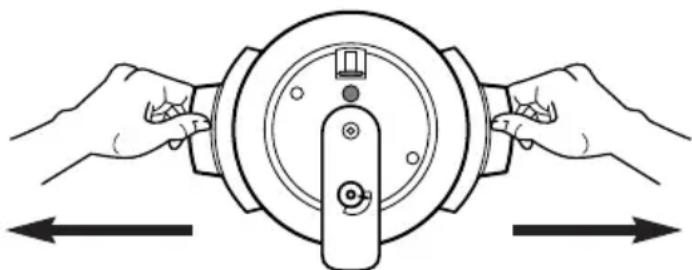
Place the Lid on the Pressure Cooker. To position and lock the Lid in place, pull the Upper Handles apart to hold open the Self-Locking Grips. Place
natural_image
Illustration of two hands operating a mechanical device with directional arrows indicating motion (no text or symbols)Lid on top of the Removable Cooking Pot and release the Upper Handles so that the Self-Locking Grips close onto the rim of the Removable Cooking Pot.
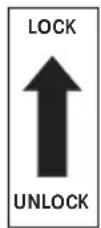
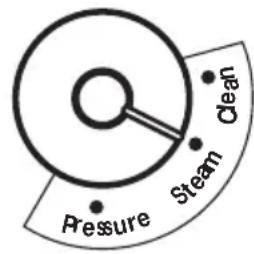
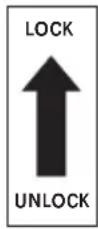
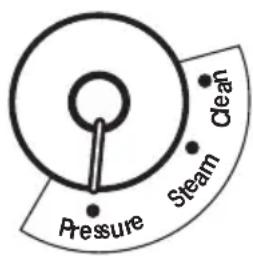
- When cooking under Pressure, slide the Safety Lock to the LOCK position. Turn the Pressure Regulator Knob to PRESSURE. When steaming food, leave the Safety Lock in the UNLOCK position. Turn the Pressure Regulator Knob to STEAM.
-
Press the START/STOP Button to illuminate the Green Indicator Light and to begin cooking. The Pressure Cooker will beep three times at the end of the cooking time.
-
When finished cooking, or to cancel and reset, press and hold the START/STOP Button until it beeps and Red Indicator Light is lit. Otherwise, the Pressure Cooker will beep periodically as a reminder that your cooking is completed.
-
TO REMOVE THE LID, PRESSURE MUST BE RELEASED BEFORE OPENING. The Pressure Indicator will be UP when the Pressure Cooker is under pressure, and DOWN when the pressure is released.
Slide the Safety Lock to the UNLOCK position. Grasp the Upper Handles and pull out simultaneously to unclamp the Self-Locking Grips from the rim of the Removable Cooking Pot.
- Allow the appliance to cool before cleaning it. After it has cooled, unplug it from the wall outlet. Clean by following the Care and Cleaning Instructions on page 14.
COOKING WITH YOUR FARBERWARE® FPC600 PROGRAMMABLE PRESSURE COOKER
WARMING
This Function reheats or keeps cooked food warm for an indefinite period of time. This program can either be used on its own or in conjunction with COOK MODE: STEAM or PRESSURE MODE: LOW or HIGH to keep food warm after cooking.
- Place cooked food in Removable Cooking Pot. Press WARM Button. The Yellow WARM Indicator Light will be lit. To start program, press START/STOP Button. The Green START Indicator Light will be lit and the Yellow WARM Indicator Light will flash.
- If you would like to keep food warm after steaming or cooking with LOW or HIGH PRESSURE cooking, set COOK TIME first. Then press WARM Button. Press the START/STOP Button to begin the cooking process. The Yellow WARM Indicator Light will flash as the appliance automatically goes into WARMING Function after cooking. To end program or to reset, press and hold the START/STOP Button until it beeps and Red Indicator Light is lit.
BROWNING
Braised foods always taste better when browned before cooking in liquid. The FARBERWARE® Programmable Electric Pressure Cooker has a built-in browning cycle.
- Place the Removable Cooking Pot in the Pressure Cooker. Add the appropriate amount of oil as called for in the recipe. With the Lid off, press the COOK MODE Button for BROWN. The Green Indicator Light next to BROWN will be lit.
- Press the START/STOP Button; the Green Indicator Light will be lit and the BROWN Function Green Indicator Light will begin to flash. After approximately five minutes of preheating, add food and begin browning.
- During the BROWN Mode, the Pressure Cooker will beep 3 times every 10 minutes as a warning that this is a high temperature setting. Do not leave the Pressure Cooker unattended while browning foods.
- For best results, food should be patted dry with paper towels and cut into small, uniform pieces. Brown or sauté food in small batches.
- Proceed with recipe and continue cooking.
- There is no time setting for the BROWNING Mode. When desired browning is complete, press the START/STOP Button until it beeps and the Red Indicator Light illuminates.
COOKING WITH YOUR PRESSURE COOKER (Continued)
STEAMING
This Function quickly brings cooking liquid to a boil for steaming food or cooking rice.
- Place the Removable Cooking Pot into the Cool-to-the-Touch Housing.
- To steam food, place a small plastic, heat-resistant steaming rack or basket (NOT INCLUDED) in the bottom of the Removable Cooking Pot. Add just enough water so that the bottom of the rack is above the liquid. Add the food.
Do not fill the Pot more than two-thirds full.
-
Place the Self-Locking Lid onto the Removable Cooking Pot. Keep the Safety Lock in the UNLOCK position. Turn the Pressure Regulator Knob to STEAM.
-
Press the COOK MODE Button for STEAM. The Red Indicator Light next to STEAM will be lit.
-
Press COOK TIME for the desired cooking time, up to 99 minutes. Press the START/STOP Button; the Green Indicator Light will be lit and the Red STEAM Indicator Light will blink slowly and then faster as the temperature increases and the liquid comes to a boil.
-
The Lid can be opened while cooking to check the food.
WARNING: Use caution when opening Lid. Steam escapes as soon as the Lid is opened. Use oven mitts when handling hot materials.
- The Red Indicator Light will illuminate and the appliance will beep three times at the end of the preset cooking time. Press and hold START/STOP Button until it beeps.
TO COOK RICE
- Place the Removable Cooking Pot into the Cool-to-the-Touch Housing.
-
Add rice and water according to the Rice Cooking Chart on page 37 of this book. Then add one tablespoon of vegetable oil to the water for each cup of rice; DO NOT EXCEED 2 CUPS OF RICE. The oil will help reduce excess foaming.
-
Place Lid on Pressure Cooker. Do not lock. Turn the Pressure Regulator Knob to STEAM. Press the COOK MODE Button for STEAM. The Red Indicator Light next to STEAM will be lit.
-
Press the COOK TIME Button until the correct cooking time appears on the Display. (Refer to Rice Cooking Chart on page 37.) Press the START/STOP Button; the Green Indicator Light will be lit and the Red STEAM Indicator Light will blink slowly and then faster as the temperature increases and the water comes to a boil.
-
When finished cooking, press and hold the START/STOP Button until Red Light illuminates and the unit beeps.
COOKING WITH YOUR PRESSURE COOKER (Continued) PRESSURE COOKING
By cooking in the FARBERWARE® Programmable Electric Pressure Cooker at high temperature and pressure you are able to reduce the cooking time of most foods by up to 70 percent.
- Place the Removable Cooking Pot in the Cool-to-the-Touch Housing. Add the ingredients to the Removable Cooking Pot. Brown if desired, as explained previously.
-
When cooking most foods, you should add at least 1 cup (8 ounces) of liquid to the Removable Cooking Pot when cooking under pressure, or refer to amounts in Cooking Charts in the back of this book. Do not fill the Removable Cooking Pot more than one-third when cooking dried beans and legumes; no more than half way when cooking soups and stews; and no higher than the MAX Fill Line when cooking vegetables or whole pieces of meat.
-
Place the Self-Locking Lid on Pressure Cooker. Slide the Safety Lock to LOCK position.
-
Turn the Pressure Regulator Knob to PRESSURE.
-
Press the PRESSURE MODE Button for LOW or HIGH, as called for in the recipe/chart.
-
Press COOK TIME for the cooking time called for in the recipe or recommended in the Suggested Cooking Times section of this book, pages 33-38. The cooking time begins from the moment pressure is reached and does not include preheating.
-
Press START/STOP Button until the Green Indicator Light appears. If cooking under HIGH PRESSURE, the Red Indicator Light will blink slowly; the Green Indicator Light blinks when cooking under LOW PRESSURE. The lights will blink faster as pressure builds and the cooking countdown begins.
-
The Pressure Indicator will rise as pressure builds. After cooking under pressure for the desired programmed time, the Pressure Cooker will beep three times and the Red Light illuminates. Press the START/STOP Button until the Pressure Cooker beeps.
-
Quick Steam Release / Natural Release.
Release pressure using either the Natural Release or Quick Steam Release Feature.
- The Natural Release Feature is preferred when cooking foods like stocks, sauces, and certain large cuts of meat which will benefit from continuing to cook in the Pressure Cooker as the pressure and temperature drop naturally as the unit cools. DO
COOKING WITH YOUR PRESSURE COOKER (Continued)
NOT use with foods that can overcook easily and quickly. When pressure is fully released, the Pressure Indicator will drop.
- To release pressure immediately after cooking, use the Quick Steam Release Feature. Press the Quick Steam Release Button in short bursts only, until pressure is reduced — steam will stop coming out of the Steam Release Valve and the Pressure Indicator will drop.
Caution: Escaping steam is very hot. To avoid serious injuries or burns, keep bare skin, face and eyes away from the Steam Release Valve.
Caution: Do not use the Quick Steam Release Feature for foods with a lot of liquid. There could be an overflow.
-
Once pressure is released, regardless of method, slide the Safety Lock to UNLOCK. Remove the Lid and check the food to see if it has been cooked sufficiently. If not, replace the Lid and slide Safety Lock to LOCK. Repeat Steps 4 to 8, cooking under pressure an additional 2 to 3 minutes.
-
To pressure cook foods like vegetables, add water to the Removable Cooking Pot. Place a small plastic/heat-resistant steaming rack or basket (NOT INCLUDED) in the Removable Cooking Pot. Place the food on the rack. For best results, do not fill beyond the MAX Fill Line; do not pack the food down. Follow the same procedure for cooking under pressure, Steps 3 to 8, using the Quick Steam Release Feature for releasing the pressure (Step 11).
-
Since steam is hotter than boiling water, always take care when opening the appliance after cooking under pressure. Never place your face over the Pressure Cooker when removing the Lid. Also, be aware that hot, boiling liquid increases in volume when under pressure.
CAUTION: NEVER OPEN THE PRESSURE COOKER UNTIL THE RED PRESSURE INDICATOR HAS DROPPED.
When opening the Pressure Cooker after making soups and stock, let the food sit several minutes before removing the Lid to make sure the hot liquid will not boil over.
- Since overcooked food cannot be corrected, it is almost better to err on the undercooked side by cooking an unfamiliar food for a shorter period of time than you may think necessary. You can always go back and continue cooking under pressure a minute or two longer if need be (see Steps 4 through 8).
COOKING WITH YOUR PRESSURE COOKER (Continued)
- It is easy to also adapt your favorite recipe for use in the FARBERWARE® Programmable Electric Pressure Cooker. For the most part, soups, stews, braised and slow-roasted meats and poultry, steamed and braised vegetables, dried beans and legumes, and slow-simmered recipes like tomato sauce, provide the best results. A chart for cooking commonly prepared foods under pressure can be found beginning on page 33 of the Recipe Guide. Bear in mind that the amount of cooking liquid used when adapting a recipe will be much less since you will be cooking in a sealed pot for a much shorter time. You must, however, use sufficient liquid, since the Pressure Cooker is constantly building steam during the entire cooking process. If you run out of liquid, and continue cooking, the food will burn. While there is no universal guide for adapting recipes, trial and error will come into play until you understand how a Pressure Cooker cooks.
When adapting other pressure cooker recipes, use the HIGH PRESSURE Mode and cook for the maximum amount of time. If food is not fully cooked, replace the Lid, and slide the Safety Lock to LOCK position. Cook until done.
- Never try to force open the Self-Locking Lid. Built-in Safety Valves inhibit opening the Lid while there is still pressure in the Removable Cooking Pot. All pressure and steam must first be released as explained in Steps 10 and 11.
- Never deep-fry or pressure-fry in the FARBERWARE® Programmable Electric Pressure Cooker, regardless of whether the Lid is on or off. THIS IS DANGEROUS AND CAN CAUSE A FIRE AND SERIOUS DAMAGE.
- Do not cook dumplings or use ingredients that "foam" when the Lid is closed firmly. These ingredients could block the safety devices. Only cook dumplings and the like, with the Lid removed.
DELAY TIME
- You can cook food up to two hours later when using DELAY TIME in conjunction with the WARM, COOK MODE: STEAM, and PRESSURE MODE: LOW or HIGH programs. It can be set in 1/2 hour increments.
- After selecting the desired cooking program and cooking time, press the DELAY TIME Button for delay time desired.
- Press START/STOP Button until the Green Indicator Light appears. The appliance will begin cooking after the set time has elapsed.
- Do not use the DELAY TIME Function when cooking perishable foods that may spoil if left out at room temperature.
CARE & CLEANING INSTRUCTIONS
- Unplug and let the FARBERWARE® Programmable Electric Pressure Cooker cool to room temperature before cleaning.
- Wash the Removable Cooking Pot with warm soapy water and a clean, soft cloth or sponge. Rinse off with clean water and towel dry.
- Remove the Rubber Gasket from the underside of the Self-Locking Lid. Wash both with warm soapy water and a clean, soft cloth or sponge. Rinse off with clean water and towel dry.
- The Rubber Gasket must always be properly positioned on the underside of the Lid. Check periodically to make sure that it is clean, flexible and not cracked or torn. If damaged, do not use this appliance. Contact the Consumer Service Department toll-free at 1-800-233-9054 for information on purchasing a replacement Gasket. (P/N 20890)
- Wipe the Cool-to-the-Touch Housing clean with a damp soft cloth or sponge. Do not pour any liquid into the Cool-to-the-Touch Housing.
- Never use harsh chemical detergents, scouring pads or powders on any of the parts or components.
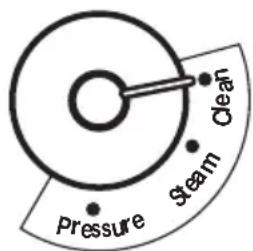
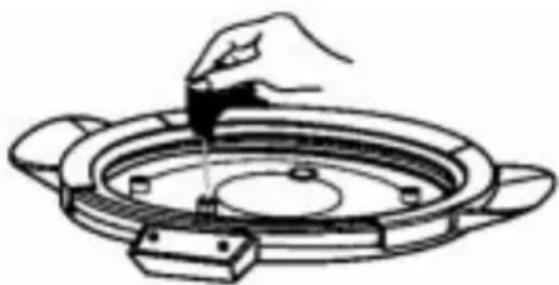
- Always check that the Steam Release Valve and Pressure Safety Valves are in good working order. After unit is cooled, remove the Lid. Turn the Pressure Regulator Knob to CLEAN and carefully remove. Turn Lid over and place on table top (as shown below). Using the brush supplied, check and remove any food or foreign particles that may be
Iodged in the Steam Release Valve. Replace the Pressure Regulator Knob before using again.
Pressure Regulator Knob
natural_image
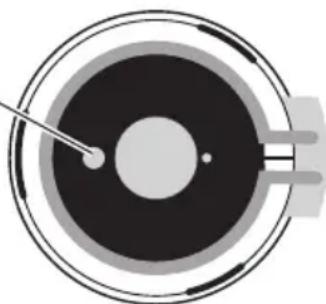
Hand holding a tool interacting with a circular mechanical component (no text or symbols visible)Clean the Sensor Pad (located on bottom of Removable Cooking Pot) after each use.
natural_image
Circular diagram with concentric rings and a pointer, no text or symbols present-
In order to maintain the good performance of your Pressure Cooker, the bottom of the Removable Cooking Pot, in the area of the Sensor Pad, must be cleaned after each use. The Sensor must be free of dirt, food, or residue. To do so, wipe with a soft, damp cloth and be sure to dry thoroughly.
-
Any service requiring disassembly other than the above cleaning must be performed by a qualified electrician.
RECIPE GUIDE
The following recipes have been especially developed for preparing in the FARBERWARE® Programmable Pressure Cooker by leading housewares expert and best-selling cookbook author, Tom Lacalamita, The Kitchen Resource.
A listing of suggested cooking times follows for your convenience.
Baked Beans in a Pot
3 (15-oz.) cans small white beans, drained and rinsed under cold water in a colander
2 tablespoons olive oil
1 small red onion, chopped
1 clove garlic, peeled and minced
1 small rib celery, chopped
1 small carrot, chopped
1 bay leaf
3 tablespoons molasses
3 tablespoons packed brown sugar
1-1/2 teaspoons dry mustard
1/2 teaspoon dried thyme
- Place Removable Cooking Pot in the Pressure Cooker. Add oil.
- Press the COOK MODE Button for BROWN. Press the START/STOP Button.
- Preheat 5 minutes. Add the onion, garlic, celery, and carrot. Sauté until the onion is soft. Do not let brown.
- Add the beans, remaining ingredients, enough water to just cover.
- Place Lid on the Pressure Cooker. Slide the Safety Lock to the LOCK position. Turn the Pressure Regulator Knob to PRESSURE. Press the PRESSURE MODE Button for HIGH and COOK TIME Button until 30 minutes appears on the Display.
- Press START/STOP Button until the Green Indicator Light appears. The Red HIGH PRESSURE Indicator Light will blink slowly and then faster as the cooking countdown begins. The Pressure Indicator will rise as the pressure builds. After cooking under pressure 30 minutes, the Pressure Cooker will beep three times. Press and hold the START/STOP Button until it beeps.
- Immediately press the Quick Steam Release Button using short bursts. Steam will emit from the Steam Release Valve. The Pressure Indicator will drop when all the steam has been released. Slide the Safety Lock to UNLOCK position and remove the Lid.
- Remove the bay leaf before serving beans.
Makes 4 servings
Vegetarian Chili
1 cup (approximately 8 ounces) dried black beans, soaked one hour in boiling water
2 tablespoons olive oil
1 medium onion, chopped
1 clove garlic, peeled and minced
1 medium green pepper, cored, seeded and chopped
1 medium red pepper, cored, seeded and chopped
1 jalapeño pepper, cored seeded and chopped
2 carrots, chopped
2 teaspoons chili powder
2 teaspoons ground cumin
1/2 teaspoon dried oregano
1 (14.5-ounce) can diced tomatoes
1 cup water
salt
2 tablespoons minced fresh cilantro
Optional garnishes:
Chopped black olives
Sour cream
Shredded cheddar cheese
- Drain beans and set aside.
- Place Removable Cooking Pot in Pressure Cooker. Add oil.
- Press the COOK MODE Button for BROWN. Press the START/STOP Button.
- Preheat 5 minutes. Add the onion, garlic, peppers, carrots, chili powder, cumin, and oregano. Sauté until the onion is soft.
- Add the soaked, drained beans, tomatoes, and water. Stir to combine. Place Lid on Pressure Cooker. Slide the Safety Lock to the LOCK position.
- Turn the Pressure Regulator Knob to PRESSURE.
- Press the PRESSURE MODE Button for HIGH PRESSURE.
- Press COOK TIME Button until 30 minutes appears on the Display.
Vegetarian Chili (Continued)
- Press START/STOP Button until the Green Indicator Light appears. The Red HIGH PRESSURE Indicator Light will blink slowly and then faster as the cooking countdown begins. The Pressure Indicator will rise as the pressure builds. After cooking under pressure 30 minutes, the Pressure Cooker will beep three times. Press and hold the START/STOP Button until it beeps.
- Immediately press the Quick Steam Release Button in short bursts. Steam will emit from the Steam Release Valve. The Pressure Indicator will drop when all the steam has been released. Slide the Safety Lock to UNLOCK position and remove the Lid.
- If the beans are not tender, replace Lid and LOCK. Repeat Steps 7 through 10, (setting COOK TIME between 3 - 5 minutes) and cook under pressure an additional 3 to 5 minutes, or until tender.
- Season with salt to taste. Stir in the chopped cilantro. Serve with cooked white rice and optional garnishes, if desired.
Makes 4 to 6 servings
Vegetable Stock
1 medium onion, coarsely chopped
1 leek, trimmed, washed well and chopped
2 unpeeled cloves garlic, crushed
1 carrot, coarsely chopped
1 rib celery, coarsely chopped
2 canned plum tomatoes, coarsely chopped
3 sprigs parsley
1 bay leaf
1/2 teaspoon whole black peppercorns
6 cups water
salt
- Place Removable Cooking Pot in Pressure Cooker. Add all the ingredients, except salt, to the Removable Cooking Pot.
- Place Lid on Pressure Cooker. Slide the Safety Lock to LOCK position.
- Turn the Pressure Regulator Knob to PRESSURE.
- Press the PRESSURE MODE Button for HIGH PRESSURE.
- Press COOK TIME Button until 30 minutes appears on the Display.
- Press the START/STOP Button until the Green Indicator Light appears. The Red HIGH PRESSURE Indicator Light will blink slowly and then faster as the cooking countdown begins. The Pressure Indicator will rise as the pressure builds. After cooking under pressure 30 minutes, the Pressure Cooker will beep three times. Press and hold the START/STOP Button until it beeps. Release pressure using the Natural Release Feature. This will take approximately 30 to 45 minutes.
- Once the Pressure Indicator drops, slide the Safety Lock to UNLOCK position and remove the Lid.
- Remove and discard the solids. Pour the stock through a fine sieve. Season with salt to taste.
Makes approximately 6 cups
Chicken Stock
2 pounds chicken pieces like wings, necks, backs: skin and all visible fat removed
1 large onion, coarsely chopped
2 carrots, coarsely chopped
2 ribs celery, coarsely chopped
2 canned plum tomatoes, coarsely chopped
4 sprigs parsley
1/2 teaspoon whole black peppercorns
6 cups water
salt
- Place Removable Cooking Pot in Pressure Cooker. Add all the ingredients, except salt, to the Removable Cooking Pot.
- Place Lid on Pressure Cooker. Slide the Safety Lock to LOCK position.
- Turn the Pressure Regulator Knob to PRESSURE.
- Press the PRESSURE MODE Button for HIGH PRESSURE.
- Press COOK TIME Button until 30 minutes appears on the Display.
- Press the START/STOP Button until the Green Indicator Light appears. The Red HIGH PRESSURE Indicator Light will blink slowly and then faster as the cooking countdown begins. The Pressure Indicator will rise as the pressure builds. After cooking under pressure 30 minutes, the Pressure Cooker will beep three times. Press and hold the START/STOP Button until it beeps. Release pressure using the Natural Release Feature. This will take approximately 30 to 45 minutes.
- Once the Pressure Indicator drops, slide the Safety Lock to UNLOCK position and remove the Lid.
- Remove and discard the solids. Pour the stock through a fine sieve. Season with salt to taste.
Makes approximately 6 cups
Chicken Soup with Rice
6 cups chicken stock (page 19), or canned, low sodium chicken broth
1 boneless chicken breast, cut into bite-sized pieces
3 carrots, peeled and sliced thin
5 ribs celery, trimmed and sliced thin
2 large leeks, trimmed, washed well, light green and white parts only, sliced thin
1/2 cup uncooked rice
- Place Removable Cooking Pot in Pressure Cooker. Add all the ingredients to the Removable Cooking Pot.
- Place Lid on Pressure Cooker. Slide the Safety Lock to LOCK position.
- Turn the Pressure Regulator Knob to PRESSURE.
- Press the PRESSURE MODE Button for HIGH PRESSURE.
- Press COOK TIME Button until 10 minutes appears on the Display.
- Press the START/STOP Button until the Green Indicator Light appears. The Red HIGH PRESSURE Indicator Light will blink slowly and then faster as the cooking countdown begins. The Pressure Indicator will rise as the pressure builds. After cooking under pressure 10 minutes, the Pressure Cooker will beep three times. Press and hold the START/STOP Button until it beeps.
- Immediately press the Quick Steam Release Button in short bursts. Steam will emit from the Steam Release Valve. The Pressure Indicator will drop when all the steam has been released. Slide the Safety Lock to UNLOCK position and remove the Lid.
Makes 4 servings
Barbecued Chicken
3 tablespoons olive oil
4 to 5 pound chicken, cut into pieces, skin and all fat removed
1-1/2 cups of your favorite barbecue sauce
1 large onion, chopped
1 large green pepper, seeded, cored and chopped
-
Place Removable Cooking Pot in Pressure Cooker. Add oil.
-
Press the COOK MODE Button for BROWN. Press the START/STOP Button.
-
Preheat 5 minutes. Add the chicken, a few pieces at a time, and brown on both sides. Place browned chicken pieces on a dish and set aside.
-
Place the barbecue sauce, chopped onion, green pepper, and browned chicken pieces into the Removable Cooking Pot. Stir to combine. Place Lid on Pressure Cooker. Slide the Safety Lock to LOCK position.
-
Turn the Pressure Regulator Knob to PRESSURE.
-
Press the PRESSURE MODE Button for HIGH PRESSURE.
-
Press COOK TIME Button until 15 minutes appears on the Display.
-
Press the START/STOP Button until the Green Indicator Light appears. The Red HIGH PRESSURE Indicator Light will blink slowly and then faster as the cooking countdown begins. The Pressure Indicator will rise as the pressure builds. After cooking under pressure 15 minutes, the Pressure Cooker will beep three times. Press and hold the START/STOP Button until it beeps.
-
Immediately press the Quick Steam Release Button in short bursts. Steam will emit from the Steam Release Valve. The Pressure Indicator will drop when all the steam has been released. Slide the Safety Lock to UNLOCK position and remove the Lid.
Makes 5 to 6 servings
French Pot-au-feu
Braised Chicken with Vegetables
6 chicken breast halves, boneless, skinless
1/2 teaspoon dried oregano
1/2 teaspoon dried basil
1/2 teaspoon salt
1/4 teaspoon black pepper
3 tablespoons olive oil
6 medium red potatoes, scrubbed and quartered
6 carrots, peeled and quartered
2 ribs celery, quartered
2 leeks, trimmed, washed well, light green and white parts only sliced thin
1 cup chicken or vegetable stock, or canned low sodium broth
-
Rub chicken breast halves with the herbs, salt and black pepper.
-
Place Removable Cooking Pot in Pressure Cooker. Add oil.
-
Press the COOK MODE Button for BROWN. Press the START/STOP Button.
-
Preheat 5 minutes. Brown the chicken, one breast at a time. Scatter the vegetables around the browned chicken. Pour in the broth. Place Lid on Pressure Cooker. Slide the Safety Lock to LOCK position.
-
Turn the Pressure Regulator Knob to PRESSURE.
-
Press the PRESSURE MODE Button for HIGH PRESSURE.
-
Press COOK TIME Button until 15 minutes appears on the Display.
-
Press the START/STOP Button until the Green Indicator Light appears. The Red HIGH PRESSURE Indicator Light will blink slowly and then faster as the cooking countdown begins; the Pressure Indicator will rise as the pressure builds. After cooking under pressure 15 minutes, the Pressure Cooker will beep three times. Press and hold the START/STOP Button until it beeps.
-
Immediately press the Quick Steam Release Button in short bursts. Steam will emit from the Steam Release Valve. The Pressure Indicator will drop when all the steam has been released. Slide the Safety Lock to UNLOCK position and remove the Lid. Remove chicken from bone and serve with the vegetables and cooking liquid.
Makes 6 servings
Sauerbraten
4 to 5 pound chuck or rump roast
salt
black pepper
3 tablespoons vegetable oil
1 cup water
1/2 cup red wine vinegar
1/2 cup dry red wine
1/2 cup brown sugar, packed
1 teaspoon ground cloves
1 teaspoon salt
4 large carrots, coarsely chopped
2 ribs celery, coarsely chopped
2 large onions, coarsely chopped
2 cloves garlic, peeled and crushed
1 cup finely crushed ginger snaps
2 bay leaves
- Pat the roast dry with paper towel. Rub with salt and black pepper.
- Place Removable Cooking Pot in Pressure Cooker. Add oil.
- Press the COOK MODE Button for BROWN. Press the START/STOP Button.
- Preheat 5 minutes. Add the roast and brown evenly on all sides.
- While the meat browns, combine the water, vinegar, wine, sugar, ground cloves, and salt. Set aside.
- Scatter the chopped vegetables, crushed ginger snaps, and bay leaf around the meat. Add the liquid. Place Lid on Pressure Cooker. Slide the Safety Lock to LOCK position.
- Turn the Pressure Regulator Knob to PRESSURE.
- Press the PRESSURE MODE Button for HIGH PRESSURE.
- Press COOK TIME Button until 80 minutes appears on the Display.
- Press the START/STOP Button until the Green Indicator Light appears. The Red HIGH PRESSURE Indicator Light will blink slowly and then faster as the cooking countdown begins; the Pressure Indicator will rise as the pressure builds. After cooking under pressure 80 minutes, the Pressure Cooker will beep three times. Press and hold the START/STOP Button until it beeps.
Sauerbraten (Continued)
- Release pressure using the Natural Release Feature. This will take approximately 30 to 45 minutes.
- Once the Pressure Indicator drops, slide the Safety Lock to UNLOCK position and remove the Lid.
- Remove the meat to a serving platter and cover with foil. Pour the gravy into a food processor, blender, or food mill and process until smooth. Taste and adjust for salt. Slice the meat across the grain into thick slices and serve with the gravy on the side.
Makes 8 to 10 servings
Chicken with Mushrooms\*
3 tablespoons olive oil
2 lbs. chicken breasts, boneless, skinless
1 teaspoon salt
1 large onion, coarsely chopped
8 ounces small mushrooms, halved
2 cans cream of mushroom soup
1/2 cup chicken broth
-
Place the Removable Cooking Pot in the Pressure Cooker. Add oil.
-
Press the COOK MODE Button for BROWN. Press the START/STOP Button.
-
Preheat for 5 minutes. Brown the chicken breasts, two at a time. Remove the browned chicken to a plate while the remaining pieces are browning.
-
When all pieces have been browned, sprinkle chicken with salt.
-
Add onion and mushrooms to the Cooking Pot and sauté until soft and lightly browned.
-
Put chicken back into the Removable Cooking Pot with the onion and mushrooms.
-
Add soup and chicken broth and stir. Place Lid on Pressure Cooker. Slide the Safety Lock to LOCK position.
-
Turn the Pressure Regulator Knob to PRESSURE. Press the PRESSURE MODE Button for HIGH PRESSURE.
-
Press COOK TIME Button until 15 minutes appears on the Display.
-
Press the START/STOP Button until the Green Indicator Light appears. The Red HIGH PRESSURE Indicator Light will blink slowly and then faster as the cooking countdown begins; the Pressure Indicator will rise as the pressure builds. After cooking under pressure 15 minutes, the Pressure Cooker will beep 3 times. Press and hold the START/STOP Button until it beeps.
-
Release pressure using the Natural Release Feature. This will take approximately 30 minutes. Once the Pressure Indicator drops, slide the Safety Lock to UNLOCK position and remove the Lid.
Makes 4 to 6 servings
*Recipe from the Salton Test Kitchen
Beef Stew
3 pounds boneless beef chuck, trimmed of all fat and cut into 3/4-inch cubes
1 teaspoon salt
1/4 teaspoon black pepper
3 tablespoons olive oil
1 large onion, chopped
3 cloves garlic, peeled and minced
1-1/2 teaspoons dried thyme
3 cups baby carrots
2 all-purpose potatoes, peeled and cut into 1-inch pieces
3 cups frozen cut green beans
40 ounces tomato sauce
2 bay leaves
salt
black pepper
1 tablespoon minced parsley
- Season meat with salt and pepper.
-
Place Removable Cooking Pot in Pressure Cooker. Add oil.
-
Press the COOK MODE Button for BROWN. Press the START/STOP Button.
-
Preheat 5 minutes. Add meat in small batches and brown evenly on all sides. Place browned meat on a dish and set aside. Add onion and garlic to Pressure Cooker and sauté 3 to 5 minutes, or until soft. Return the browned meat to the Cooking Pot. Add the remaining ingredients, except the parsley. Season with salt and pepper to taste. Stir well. Place Lid on Pressure Cooker. Slide the Safety Lock to LOCK position.
-
Turn the Pressure Regulator Knob to PRESSURE.
-
Press the PRESSURE MODE Button for HIGH PRESSURE.
-
Press COOK TIME until 30 minutes appears on the Display.
-
Press the START/STOP Button until the Green Indicator Light appears. The Red HIGH PRESSURE Indicator Light will blink slowly and then faster as the cooking countdown begins; the Pressure Indicator will rise as the pressure builds. After cooking under pressure 30 minutes, the Pressure Cooker will beep 3 times. Press and hold the START/STOP Button until it beeps.
-
Immediately press the Quick Steam Release Button in short bursts. Steam will emit from the Steam Release Valve. The Pressure Indicator will drop when all the steam has been released. Slide the Safety Lock to UNLOCK position and remove the Lid. Add parsley. Taste and adjust for salt and pepper.
Makes 8 to 10 servings
Italian Meat Sauce
3 tablespoons olive oil
1 large onion, minced
2 carrots, minced
2 ribs celery, minced
1-1/2 pounds lean ground beef
1/3 cup minced parsley
8 cups tomato purée
1-1/2 teaspoons sugar
2 teaspoons salt
3/4 teaspoon black pepper
- Place Removable Cooking Pot in Pressure Cooker. Add oil.
- Press the COOK MODE Button for BROWN. Press the START/STOP Button.
- Add the onion, carrot, and celery and sauté until soft. Add the ground beef and parsley. Brown until the meat is no longer pink. Add the remaining ingredients. Place Lid on Pressure Cooker. Slide the Safety Lock to LOCK position.
- Turn the Pressure Regulator Knob to PRESSURE.
- Press the PRESSURE MODE Button for HIGH PRESSURE.
- Press COOK TIME Button until 30 minutes appears on the Display.
- Press the START/STOP Button until the Green Indicator Light appears. The Red HIGH PRESSURE Indicator Light will blink slowly and then faster as the cooking countdown begins; the Pressure Indicator will rise as the pressure builds. After cooking under pressure 30 minutes, the Pressure Cooker will beep three times. Press and hold the START/STOP Button until it beeps. Release pressure using the Natural Release Feature. This will take approximately 30 to 45 minutes.
- Once the Pressure Indicator drops, slide the Safety Lock to UNLOCK position and remove the Lid.
Makes 8 to 10 servings
Candied Yams
3 long strips orange peel
4-1/2 pounds sweet potatoes, peeled and cut into 1/2-inch thick slices
3/4 cup packed brown sugar
1-1/2 teaspoons ground cinnamon
Pinch salt
1 cup orange juice
1-1/2 tablespoons butter
- Place the Removable Cooking Pot in the Pressure Cooker.
- Place orange peel in bottom of pot. Add sweet potato slices in layers, sprinkling each layer with brown sugar and cinnamon, ending with a final layer of brown sugar and cinnamon. Sprinkle with salt and drizzle with the orange juice. Dot with butter.
- Place Lid on Pressure Cooker. Slide the Safety Lock to LOCK position.
- Turn the Pressure Regulator Knob to PRESSURE.
- Press the PRESSURE MODE Button for LOW PRESSURE.
- Press COOK TIME Button until 8 minutes appears on the Display.
- Press the START/STOP Button until the Green Indicator Light appears. The Green LOW PRESSURE Indicator Light will blink slowly and then faster as the cooking countdown begins; the Pressure Indicator will rise as the pressure builds. After cooking under pressure 8 minutes, the Pressure Cooker will beep three times. Press and hold the START/STOP Button until it beeps.
- Immediately press the Quick Steam Release Button in short bursts. Steam will emit from the Steam Release Valve. The Pressure Indicator will drop when all the steam has been released. Slide the Safety Lock to UNLOCK position and remove the Lid.
- Carefully remove the sweet potatoes with a spatula to a serving bowl. Pour any accumulated syrup over the sweet potatoes. If the sweet potatoes are not tender, leave in the Pressure Cooker. Press WARM Button and let food remain covered with the Lid for 5 to 10 minutes. Season with salt to taste.
Makes 6 servings
Stuffed Artichokes
3/4 cup water
1/2 teaspoon salt
1 bay leaf
4 medium-sized artichokes
2 extra-large eggs, beaten
3 tablespoons grated Pecorino Romano cheese
1 clove garlic, peeled and minced
1 tablespoon minced parsley pinch black pepper
1 tablespoon olive oil
-
Place Removable Cooking Pot in Pressure Cooker. Add the water, salt, and bay leaf.
-
Cut off stems from artichokes. Tear off and discard the top two or three layers of tough, outer leaves. Cut off 1/2-inch to 1-inch from the tops of the artichokes. Carefully open and expose the removable leaves and choke. Pull out and remove any thorny leaves. With a teaspoon, scoop out and discard any fuzzy matter from the center choke. Place artichokes in Removable Cooking Pot, standing upright.
-
Combine the eggs, grated cheese, garlic, parsley, and black pepper in a small mixing bowl. Drizzle an equal amount of egg mixture over each artichoke. Drizzle with the olive oil.
-
Place Lid on Pressure Cooker. Slide the Safety Lock to LOCK position.
-
Turn the Pressure Regulator Knob to PRESSURE.
-
Press the PRESSURE MODE Button for HIGH PRESSURE.
-
Press COOK TIME Button until 7 minutes appears on the Display.
-
Press the START/STOP Button until the Green Indicator Light appears. The Red HIGH PRESSURE Indicator Light will blink slowly and then faster as the cooking countdown begins; the Pressure Indicator will rise as the pressure builds. After cooking under pressure 7 minutes, the Pressure Cooker will beep three times. Press and hold the START/STOP Button until it beeps.
-
Immediately press the Quick Steam Release Button in short bursts. Steam will emit from the Steam Release Valve. The Pressure Indicator will drop when all the steam has been released. Slide the Safety Lock to UNLOCK position and remove the Lid.
-
Carefully remove the artichokes with a slotted spoon to small bowls. Pour some cooking liquid over each artichoke.
Makes 4 servings
Risotto
3 tablespoons unsalted butter
1 small onion, finely chopped
1 cup Italian arborio or other short grain rice
2-1/4 cups chicken or vegetable stock or canned, low-sodium broth
1/3 cup grated Parmesan cheese
black pepper
- Place Removable Cooking Pot in Pressure Cooker. Add butter.
- Press the COOK MODE Button for BROWN. Press the START/STOP Button.
- Add the chopped onion and sauté until soft. Add the rice and sauté 2 minutes. Pour in the stock or broth and stir to mix. Place Lid on Pressure Cooker. Slide the Safety Lock to LOCK position.
- Turn the Pressure Regulator Knob to PRESSURE.
- Press the PRESSURE MODE Button for HIGH PRESSURE.
- Press COOK TIME Button until 10 minutes appears on the Display.
- Press the START/STOP Button until the Green Indicator Light appears. The Red HIGH PRESSURE Indicator Light will blink slowly and then faster as the cooking countdown begins; the Pressure Indicator will rise as the pressure builds. After cooking under pressure 10 minutes, the Pressure Cooker will beep three times. Press and hold the START/STOP Button until it beeps.
- Immediately press the Quick Steam Release Button in short bursts. Steam will emit from the Steam Release Valve. The Pressure Indicator will drop when all the steam has been released. Slide the Safety Lock to UNLOCK position and remove the Lid. Stir in the Parmesan cheese and black pepper to taste.
Makes 4 servings
Golden Spanish Rice
3 tablespoons olive oil
1 large onion, chopped
2 large red peppers, cored, seeded and chopped
5 cloves garlic, minced
15 ounces yellow rice mix, available in the Latin food section of most supermarkets
2 (14.5-ounce) cans diced tomatoes with garlic
1 (14-ounce) can artichoke hearts, drained
1-1/2 cups frozen green peas
Water (amount called for on rice mix package), plus 1/2 cup
Optional: 1 pound cooked shrimp
- Place Removable Cooking Pot in Pressure Cooker. Add oil.
- Press the COOK MODE Button for BROWN. Press the START/STOP Button. Add the chopped onion, red pepper, and garlic and sauté until soft. Add the dry rice mix, tomatoes, artichokes, and peas. Pour in the amount of water called for on the rice mix package. Stir to mix. Place Lid on Pressure Cooker. Slide the Safety Lock to LOCK position.
- Turn the Pressure Regulator Knob to PRESSURE.
- Press the PRESSURE MODE Button for HIGH PRESSURE.
- Press COOK TIME Button until 25 minutes appears on the Display.
- Press the START/STOP Button until the Green Indicator Light appears. The Red HIGH PRESSURE Indicator Light will blink slowly and then faster as the cooking countdown begins; the Pressure Indicator will rise as the pressure builds. After cooking under pressure 25 minutes, the Pressure Cooker will beep three times. Press and hold the START/STOP Button until it beeps.
- Release the pressure using the Natural Release Feature. Slide the Safety Lock to UNLOCK position and remove the Lid. Add the optional cooked shrimp, if desired, and stir.
Makes 6 servings
Stuffed Apples
6 large firm apples like Rome, Jonagold, Cortland or Winesap
1/2 cup packed brown sugar
1/3 cup chopped walnuts
1/2 teaspoon cinnamon
2 tablespoons unsalted butter
1 cup apple juice or cider
- Place Removable Cooking Pot in Pressure Cooker.
- Core apples, cutting to, but not through the bottoms.
-
Combine the sugar, walnuts, and cinnamon in a small bowl. Spoon mixture into the apples and place in the Removable Cooking Pot. Dot the apples with the butter. Sprinkle any remaining sugar mixture over apples. Pour the apple juice or cider into the Removable Cooking Pot.
-
Place Lid on Pressure Cooker. Slide the Safety Lock to LOCK position.
-
Turn the Pressure Regulator Knob to PRESSURE.
-
Press the PRESSURE MODE Button for LOW PRESSURE.
-
Press COOK TIME Button until 12 minutes appears on the Display.
-
Press the START/STOP Button until the Green Indicator Light appears. The Green LOW PRESSURE Indicator Light will blink slowly and then faster as the cooking countdown begins; the Pressure Indicator will rise as the pressure builds. After cooking under pressure 12 minutes, the Pressure Cooker will beep three times. Press and hold the START/STOP Button until it beeps.
-
Immediately press the Quick Steam Release Button in short bursts. Steam will emit from the Steam Release Valve. The Pressure Indicator will drop when all the steam has been released. Slide the Safety Lock to UNLOCK position and remove the Lid.
-
Carefully remove the apples with a slotted spoon to small bowls. Drizzle with some of the cooking liquid. If necessary, leave apples in the Pressure Cooker on WARM Function 5 to 10 minutes, covered with the Lid.
Makes 6 servings
SUGGESTED COOKING TIMES
The following cooking times are provided as a guide to be used when cooking in the FARBERWARE® Programmable Electric Pressure Cooker. Cooking times can vary depending on the quality and the individual piece sizes of the food being cooked; maximum and minimum cooking times are given in some instances. When uncertain how long to cook something, always start with the shortest cooking time since you can always continue cooking for an additional couple of minutes until the desired texture is reached. All cooking times listed begin once full pressure is reached.
Vegetables
APPROXIMATE COOKING TIMES
HIGH PRESSURE
Fresh Vegetables Cooking Time Water
Asparagus, thick whole 2 to 3 min. 1/2 cup
Asparagus, thin whole 2 to 2-1/2 min. 1/2 cup
Beans, green or wax, whole or piece 2 to 3 min. 1/2 cup
Beans, lima, shelled 3 to 4 min. 1/2 cup
Beets, small, whole 14 to 17 min. 1-1/2 cups
Beets, large, halved 26 to 30 min. 2 cups
Beets, 1/4-inch slices 7 to 8 min. 3/4 cup
Broccoli, florets 3 to 4 min. 1/2 cup
Broccoli, spears
4 to 5 min. 1/2 cup
Brussels Sprouts, whole
6 to 7 min. 1 cup
Cabbage, red or green, 1/4-inch shreds
2 to 3 min. 1/2 cup
Cabbage, red or green, quartered
5 to 6 min. 3/4 cup
Carrots, whole
8 to 10 min. 1 cup
Carrots, 1-inch chunks
4 to 6 min. 3/4 cup
Carrots, 1/4-inch slices
2 to 3 min. 1/2 cup
Cauliflower, florets 3 to 4 min. 1/2 cup
FRESH VEGETABLES APPROXIMATE COOKING TIMES
Fresh Vegetables Cooking Time Water
Collard Greens, coarsely chopped 7 to 9 min. 1 cup
Corn, on-the-cob 5 to 7 min. 3/4 cup
Corn, kernels 2 to 3 min. 1/2 cup
Eggplant,
sliced 1/8- to 1/4-inch slices 2 to 3 min. 1/2 cup
Eggplant, 1/2-inch chunks 3 to 4 min. 1/2 cup
Escarole, coarsely chopped 3 to 4 min. 1/2 cup
Kale, coarsely chopped 3 to 4 min. 1/2 cup
Okra, small pods 3 to 4 min. 1/2 cup
Onions, whole 1-1/2-inch diameter 3 to 4 min. 1/2 cup
Parsnips, 1-inch chunks 5 to 7 min. 1/2 cup
Parsnips, 1/4-inch slices 2 to 3 min. 1/2 cup
Peas, shelled 2 to 3 min. 1/2 cup
Potatoes, New Red, small whole 12 to 14 min. 1 cup
Potatoes, Red, 1-1/2-inch chunks 13 to 15 min. 1 cup
Potatoes, New White, small whole 12 to 15 min. 1 cup
Potatoes, White, 1-1/2-inch chunks 8 to 10 min. 1 cup
Pumpkin, 2-inch chunks 12 to 15 min. 3/4 cup
Rutabaga, 1-inch chunks 6 to 8 min. 3/4 cup
Spinach, fresh, coarsely chopped 2 to 3 min. 1/2 cup
Spinach, fresh, whole leaves 3 to 4 min. 1/2 cup
Squash, acorn, halved 9 to 10 min. 1 cup
Squash, butternut, 1-inch chunks 6 to 7 min. 3/4 cup
Squash, pattypan, 2 lbs. halved 10 to 11 min. 1-1/2 cups
Squash, spaghetti, 2 lbs. halved 9 to 10 min. 1-1/2 cups
Squash, summer, zucchini or yellow, 1/2-inch slices 2 to 3 min. 1/2 cup
Sweet Potato, 1-1/2-inch chunks 8 to 10 min. 1 cup
Swiss Chard, coarsely chopped 3 to 4 min. 1/2 cup
Tomatoes, quartered 2 to 3 min. 1/2 cup
Turnips, small quartered 5 to 7 min. 1/2 cup
Turnips, 1-1/2-inch chunks 5 to 7 min. 1/2 cup
FROZEN VEGETABLES APPROXIMATE COOKING TIMES
LOW PRESSURE
Beans, green, wax or French cut 1 min. 1/2 cup
Beans, lima 2 min. 1/2 cup
Broccoli, chopped, florets, or spears 2 min. 1/2 cup
Brussels Sprouts 2 min. 1/2 cup
Cauliflower, florets 1 min. 1/2 cup
Corn, kernels 1 min. 1/2 cup
Corn, on the cob 3 min. 1/2 cup
Mixed Vegetables 2 min. 1/2 cup
Peas (not split) 1 min. 1/2 cup
Peas and Carrots 1 min. 1/2 cup
Spinach 1 min. 1/2 cup
Fruits
APPROXIMATE COOKING TIMES
LOW PRESSURE
Apricots, fresh whole or halved
Berries, fresh
Cherries, fresh
Peaches, fresh halved
Pears, fresh halved
Plums, fresh
Prunes
Quince, fresh quartered
Raisins
Cooking Time
2 to 3 min.
1 min.*
1 min.*
3 min. 1/2 cup
3 to 4 min.
1 min.
4 to 5 min.
5 min. 3/4 cup
4 to 5 min.
Water
1/2 cup
1/2 cup
1/2 cup
1/2 cup
1/2 cup
3/4 cup
3/4 cup
*Set Timer to 1 minute using either LOW or HIGH PRESSURE. As soon as the pressure builds, the Red Pressure Indicator will rise. Stop cooking by pressing the START/STOP Button until the Red STOP Light illuminates and the Pressure Cooker beeps once. Lower pressure immediately by pressing the Quick Steam Release Button in short bursts.
Dried Beans and Legumes
APPROXIMATE COOKING TIMES\*
HIGH PRESSURE
NATURAL RELEASE FEATURE
Beans & Legumes Cooking Time Water\*\*
Yield
Cooked
Adzuki, 1 cup dry 9 to 13 min. 3 cups 2 cups
Black Beans, 1 cup dry 15 to 18 min. 3 cups 2 cups
Black Eyed Peas, 1 cup dry 14 to 17 min. 3 cups 2-1/4 cups
Chickpeas (garbanzo),
1 cup dry 30 to 35 min. 3 cups 2-1/2 cups
Great Northern, 1 cup dry 28 to 33 min. 3 cups 2-1/4 cups
Kidney Beans, red or white,
1 cup dry 28 to 33 min. 3 cups 2 cups
Lentils, green, brown, or red,
2 cups dry 10 to 12 min. 6 cups 4 cups
Navy Beans 1 cup dry 14 to 17 min. 3 cups 2 cups
Pinto Beans, 1 cup dry 16 to 19 min. 3 cups 2-1/4 cups
* All beans and dried legumes, with the exception of lentils, should soak in a large, covered bowl in boiling water one hour before cooking. The actual cooking times will vary depending on how old the beans are.
**Add one tablespoon of vegetable oil to reduce excess foaming.
Rice
APPROXIMATE COOKING TIMES\*
STEAM FUNCTION
Grains Cooking Time Water\*\*
Yield
Cooked
Rice, Basmati, 1 cup dry 25 to 28 min. 2-1/4 cups 3 cups
Rice, white, converted
or long grain,
1 cup dry 25 to 28 min. 2-1/4 cups 3 cups
Rice, white, arborio
or short grain
1 cup dry 17 to 20 min. 2-3/4 cups 3 cups
Rice, brown, 1 cup dry 30 to 35 min. 2-1/2 cups 2-1/4 cups
Rice, wild, 1 cup dry 55 to 60 min. 3-1/2 cups 2-1/4 cups
*Actual cooking times may vary depending on how old the grain is.
**Add one tablespoon of vegetable oil to reduce excess foaming.
Meat & Poultry
APPROXIMATE COOKING TIMES
HIGH PRESSURE
NATURAL RELEASE FEATURE
Meat & Poultry Cooking Time Cooking
Liquid
Beef/Veal, roast or brisket, 3 lbs., 2 to 3 in. thick 40 to 45 min. 1-1/2 cups
Beef, roast, 4 to 5 lbs., 5 to 6 in. thick 70 to 80 min. 1-1/2 cups
Beef, stew meat, 1 in. cubes 15 to 20 min. 1-1/2 cups
Beef, corned, 4 lbs.
60 to 70 min. 2 cups
Meatballs, up to 2 lbs., browned
8 to 10 min. 1 cup
Pork, roast, 4 lbs.
50 to 60 min. 1-1/2 cups
Pork, ribs, 4 lbs.
25 to 30 min. 1-1/2 cups
Chicken, whole, 3 to 4 lbs.
30 to 35 min. 1 cup
Chicken, pieces, 2 to 3 lbs.
12 to 15 min. 3/4 cup
Cornish Hens, Three
10 to 12 min. 3/4 cup
Ham, pre-cooked, 7 lbs.
35 to 40 min. 1-1/2 cups
Shellfish and Fish
APPROXIMATE COOKING TIMES
HIGH PRESSURE
Fish, whole, 1 to 2 lbs., gutted
8 to 10 min.
1 cup
Fish, steaks, 1-1/2 to 2 in. thick
5 to 8 min.
1 cup
FARBERWARE®
ONE-YEAR LIMITED WARRANTY
This FARBERWARE® product warranty extends to the original consumer purchaser of the product.
Warranty Duration: This product is warranted to the original consumer purchaser for a period of one (1) year from the original purchase date.
Warranty Coverage: This product is warranted against defective materials or workmanship. This warranty is void if the product has been damaged by accident, in shipment, unreasonable use, misuse, neglect, improper service, commercial use, repairs by unauthorized personnel or other causes not arising out of defects in materials or workmanship. This warranty is effective only if the product is purchased and operated in the USA, and does not extend to any units which have been used in violation of written instructions furnished by FARBERWARE®, or to units which have been altered or modified or to damage to products or parts thereof which have had the serial number removed, altered, defaced or rendered illegible.
Warranty Disclaimers: This warranty is in lieu of all warranties expressed or implied and no representative or person is authorized to assume for FARBERWARE® any other liability in connection with the sale of our products. There shall be no claims for defects or failure of performance or product failure under any theory of tort, contract or commercial law including, but not limited to, negligence, gross negligence, strict liability, breach of warranty and breach of contract. Some states do not allow the exclusion or limitations of implied warranties or consequential damages, so the above limitations or exclusions may not apply to you.
FARBERWARE® is not responsible or liable for indirect, special or consequential damages arising out of or in connections with the use or performance of the product or other damages with respect to loss of property, or loss of revenues or profit.
Legal Remedies: This warranty gives you specific legal rights, and you may also have other rights that vary from state to state.
Warranty Performance: During the above one-year warranty period, a product with a defect will be either repaired or replaced with a reconditioned comparable unit (at FARBERWARE®'s option) when the product is returned to the FARBERWARE® facility listed below. The repaired or replacement product will be in warranty for the balance of the one-year warranty period and an additional one-month period. No charge will be made for such repair or replacement.
Service and Repair
If service is required, you should first call toll-free 1-800-233-9054 between the hours of 8:00 am and 5:00 pm Central Standard Time and ask for CONSUMER SERVICE. Please refer to Model FPC600 when you call.
In-Warranty Service for a product covered under the warranty period, no charge is made for service and return postage. Please return the product insured, packaged with sufficient protection, and postage and insurance prepaid to the address listed below. Call for return authorization.
Out-of-Warranty Service: There will be charges rendered for repairs made to the product after the expiration of the aforesaid one (1) year warranty period, after purchaser is advised appropriately. Include \$10.00 (U.S.) for return shipping and handling.
FARBERWARE® cannot assume responsibility for loss or damage during incoming shipment. For your protection, carefully package the product for shipment and insure it with the carrier. Be sure to enclose the following items with your unit: any accessories related to your problem; your full return address and daytime phone number; a note describing the problem you experienced; a copy of your sales receipt or other proof of purchase to determine warranty status. C.O.D. shipments cannot be accepted.
Return the appliance to: ATTN: Repair Department, FARBERWARE®
708 South Missouri St. Macon, MO 63552
Any questions or comments can be directed to Salton, Inc. at the above address or by calling or E-Mailing the following:
TOLL FREE: 1-800-233-9054, Mon. - Fri., 7:30 a.m. - 6:00 p.m. CST
E-mail: farberware-electric@saltonusa.com
Please refer to Model FPC600 when you call, write or E-Mail.
FARBERWARE® and MILLENNIUM® are registered trademarks of Farberware Inc.®
Manufactured and sold pursuant to a license from Farberware Inc.®
- USE & CARE INSTRUCTIONS
- PROGRAMMABLE PRESSURE COOKER
- IMPORTANT SAFEGUARDS
- SAVE THESE INSTRUCTIONS
- ADDITIONAL IMPORTANT SAFEGUARDS
- 3-PRONG GROUNDED TYPE PLUG
- SHORT CORD INSTRUCTIONS
- INTRODUCTION
- CONTROL PANEL OPTIONS
- WARM
- COOK MODE
- PRESSURE MODE
- CONTROL PANEL OPTIONS (Continued)
- COOK TIME
- DELAY TIME
- START/STOP
- BEFORE USING THE FIRST TIME
- POWER SURGE PROTECTION FEATURE
- NON-STICK SURFACE
- OPERATING INSTRUCTIONS
- COOKING WITH YOUR FARBERWARE® FPC600 PROGRAMMABLE PRESSURE COOKER
- WARMING
- BROWNING
- COOKING WITH YOUR PRESSURE COOKER (Continued)
- STEAMING
- TO COOK RICE
- COOKING WITH YOUR PRESSURE COOKER (Continued) PRESSURE COOKING
- CAUTION: NEVER OPEN THE PRESSURE COOKER UNTIL THE RED PRESSURE INDICATOR HAS DROPPED.
- CARE & CLEANING INSTRUCTIONS
- RECIPE GUIDE
- Baked Beans in a Pot
- Vegetarian Chili
- Optional garnishes:
- Vegetarian Chili (Continued)
- Vegetable Stock
- Chicken Stock
- Chicken Soup with Rice
- Barbecued Chicken
- French Pot-au-feu
- Braised Chicken with Vegetables
- Sauerbraten
- Sauerbraten (Continued)
- Chicken with Mushrooms\*
- Beef Stew
- Italian Meat Sauce
- Candied Yams
- Stuffed Artichokes
- Risotto
- Golden Spanish Rice
- Optional: 1 pound cooked shrimp
- Stuffed Apples
- SUGGESTED COOKING TIMES
- Vegetables
- APPROXIMATE COOKING TIMES
- HIGH PRESSURE
- Fresh Vegetables Cooking Time Water
- FRESH VEGETABLES APPROXIMATE COOKING TIMES
- FROZEN VEGETABLES APPROXIMATE COOKING TIMES
- LOW PRESSURE
- Fruits
- Dried Beans and Legumes
- APPROXIMATE COOKING TIMES\*
- NATURAL RELEASE FEATURE
- Beans & Legumes Cooking Time Water\*\*
- Rice
- STEAM FUNCTION
- Grains Cooking Time Water\*\*
- Meat & Poultry
- Meat & Poultry Cooking Time Cooking
- Shellfish and Fish
- FARBERWARE®
- ONE-YEAR LIMITED WARRANTY
- Service and Repair
Brand : Farberware
Model : FPC600
Category : Pan