
CM3000S - Coffee maker Farberware - Free user manual and instructions
Find the device manual for free CM3000S Farberware in PDF.


| Product Type | Coffee Maker |
| Brand | Farberware |
| Model | CM3000S |
| Capacity | 12 Cups (60 oz) |
| Power | 1200 W |
| Voltage | 120 V, 60 Hz |
| Dimensions (W x D x H) | 10 x 8 x 12 inches |
| Weight | 4.2 lbs |
| Programmable Timer | Yes, 24-hour |
| Auto Shut-off | Yes, 2 hours |
| Brew Pause | Yes, pour a cup mid-brew |
| Water Level Indicator | Yes, visible window |
| Permanent Filter | No, uses #4 paper filters |
| Carafe Type | Glass, 12-cup |
| Warming Plate | Yes, keeps coffee warm |
| Clean Function | Descaling cycle |
| Cord Storage | Yes, under unit |
| Safety Features | Boil-dry protection, cool-touch handle |
| Material | Plastic housing, glass carafe |
| Warranty | 1 year limited |
Frequently Asked Questions - CM3000S Farberware
User questions about CM3000S Farberware
0 question about this device. Answer the ones you know or ask your own.
Ask a new question about this device
Download the instructions for your Coffee maker in PDF format for free! Find your manual CM3000S - Farberware and take your electronic device back in hand. On this page are published all the documents necessary for the use of your device. CM3000S by Farberware.
USER MANUAL CM3000S Farberware
Accessories/Parts (USA)
1-800-738-0245
For online customer service
and to register your product, go to
www.prodprotect.com/applica
Please Read and Save this Use and Care Book
IMPORTANT SAFEGUARDS
When using electrical appliances, basic safety precautions should always be followed including the following:
ORead all instructions.
Do not touch hot surfaces. Use handles or knobs.
To protect against fire, electric shock and injury to persons do not immerse cord, plugs or appliance in water or other liquid.
○Close supervision is necessary when any appliance is used by or near children.
OUnplug from outlet when not in use and before cleaning. Allow to cool before putting on or taking off parts, and before cleaning the appliance.
Do not operate any appliance with a damaged cord or plug, or after the appliance malfunctions or has been damaged in any manner. Return appliance to the nearest authorized service facility for examination, repair or adjustment.
The use of accessory attachments not recommended by the appliance manufacturer may result in fire, electric shock or injury to persons.
Do not use outdoors.
Do not let cord hang over edge of table or counter, or touch hot surfaces.
Do not place on or near a hot gas or electric burner, or in a heated oven.
To disconnect, turn any control to OFF, then remove plug from wall outlet.
Do not use this appliance for other than intended use.
- Keep lid on the carafe when in use.
○Scalding may occur if the lid is removed during the brewing cycles.
The carafe is designed for use with this appliance. It must never be used on a range top.
Do not set a hot carafe on a wet or cold surface.
Do not use a cracked carafe or a carafe having a loose or weakened handle.
- Do not clean carafe with cleansers, steel wool pads or other abrasive material.
This appliance is not intended for use by persons (including children) with reduced physical, sensory or mental capabilities, or lack of experience and knowledge, unless they have been given supervision or instruction concerning use of the appliance by a person responsible for their safety.
○ Children should be supervised to ensure that they do not play with the appliance.
SAVE THESE INSTRUCTIONS.
This product is for household use only.
POLARIZED PLUG (120V Models Only)
This appliance has a polarized plug (one blade is wider than the other). To reduce the risk of electric shock, this plug is intended to fit into a polarized outlet only one way. If the plug does not fit fully into the outlet, reverse the plug, if it still does not fit, contact a qualified electrician. Do not attempt to modify the plug in any way.
TAMPER-RESISTANT SCREW
Warning: This appliance is equipped with a tamper-resistant screw to prevent removal of the outer cover. To reduce the risk of fire or electric shock, do not attempt to remove the outer cover. There are no user-serviceable parts inside. Repair should be done only by authorized service personnel.
ELECTRICAL CORD
a) A short power-supply cord (or detachable power-supply cord) is to be provided to reduce the risk resulting from becoming entangled in or tripping over a longer cord.
b) Longer detachable power-supply cords or extension cords are available and may be used if care is exercised in their use.
c) If a long detachable power-supply cord or extension cord is used,
1) The marked electrical rating of the detachable power-supply cord or extension cord should be at least as great as the electrical rating of the appliance,
2) If the appliance is of the grounded type, the extension cord should be a grounding-type 3-wire cord, and
3) The longer cord should be arranged so that it will not drape over the countertop or tabletop where it can be pulled on by children or tripped over.
Note: If the power supply cord is damaged, it should be replaced by qualified personnel; in Latin America, by an authorized service center.
Product may vary slightly from what is illustrated.
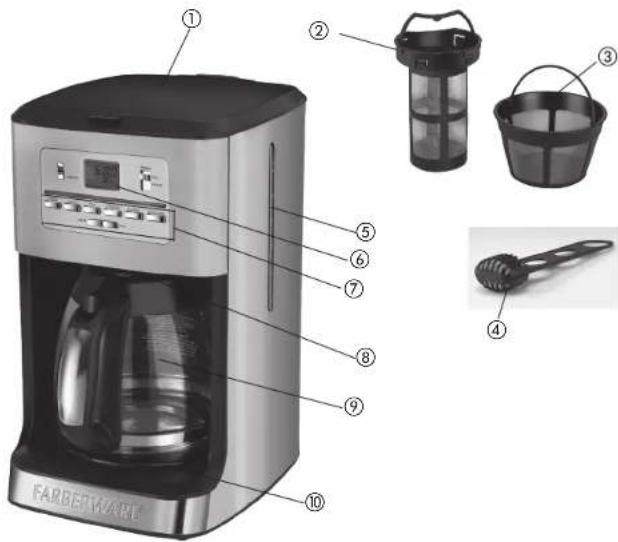
- Cover
† 2. Permanent tea filter (Part # CM3000S-03)
† 3. Permanent coffee filter (Part # CM3000S-04)
† 4. Removable water filter (Part # CM30005-01)
5. Easy-view water window
6. Blue backlit digital display
7. Control panel
8. Sneak-A-Cup® interrupt feature (coffee only)
9. Duralife™ glass carafe (Part # CM3000S-05)
10. Nonstick "keep hot" carafe plate
† 11. Removable filter basket (not shown) (Part # CM3000S-02)
12. Built-in cord storage (not shown)
Note: † indicates consumer replaceable/removable parts
How to Use
This product is for household use only.
GETTING STARTED
- Please go to www.prodprolect.com/applica to register your warranty and for information about replaceable parts.
- Wash removable parts as instructed in CARE AND CLEANING section.
- Open cover and pour fresh cold water into the water reservoir up to 12-cup (MAX) mark.
- Place permanent filter or paper 8 – 12 cup basket-style paper filter into filter basket
- Close cover.
- Make sure the carafe lid is in place and place empty carafe on the "Keep Hot" carafe plate.
- Plug electric cord into an outlet.
- Brew water through appliance following the BREWING COFFEE instructions – without adding coffee grounds.
- Discard water from the carafe; rinse permanent filter or discard paper filter.
- Turn off the appliance, unplug and allow it to cool down.
USING WATER FILTER
Note: Replace carbon filter every 60 brewing cycles (after using AUTO CLEAN cycle) or every 2 months after removing it from the sealed package. Call 800 number on the front cover for replacements.
- Remove carbon filter from packing material.
- Press latch on filter holder to open and place carbon filter inside.
- Close the filter holder tightly until it snaps into place.
- Place filter holder inside the water reservoir and insert it into the recess at the bottom left corner.
REPLACING WATER FILTER
- Press latch on filter holder to open.
- Dispose of old carbon filter.
- Remove new carbon filter from packing material.
- Place new carbon filter inside filter holder.
- Close the filter holder tightly until it snaps into place.
- Place filter holder inside the water reservoir and insert it into the recess at the bottom left corner.
SETTING THE CLOCK
- Plug appliance into standard electrical outlet.
- The digital clock display flashes 12:00.
Note: You must set the clock in order to use the DELAYED BREWING feature. - To change the time: Press HOUR button until the correct time appears on the display. When the time passes noon "PM" illuminates to let you know you are in PM time. If the "PM" is not illuminated it is AM time.
- Repeat the same procedure with the MIN button to select the minutes.
Note: If the appliance is unplugged or power is interrupted even momentarily, the time may need to be reset.
BREWING COFFEE
-
Open cover.
-
Fill water reservoir using the carafe with desired amount of cold tap water. Do not exceed the 12-cup (MAX) level on the water reservoir.
Important: There are two overflow holes at the back of the coffeemaker. Be careful not to overfill the water reservoir to avoid leaking onto the counter or work surface.
-
Insert removable filter basket into filter basket holder.
-
Place permanent filter or an 8–12 cup basket-style paper filter into the removable filter basket.
Note: Make sure to lock the removable filter basket in place, the basket handle should be in front position.
-
Add desired amount of ground coffee.
-
Close cover.
-
Make sure carafe lid is properly attached to the empty carafe. Close the lid.
Note: Coffee may overflow if carafe lid is not properly placed.
-
Place empty carafe on the "Keep Hot" carafe plate.
-
Plug power cord into an outlet.
-
If regular brew strength is desired, your coffeemaker is set to brew coffee. (Make sure the BREW button is in the "Full" position.)
-
If strong coffee is desired, press the brew strength button to select the strong brew. (Make sure the BREW button is in the "Full" position.).
-
Press ON/OFF button; its light illuminates and brewing begins.
-
When coffee stops flowing into carafe, the brew cycle is complete. Cofleemaker beeps when brew cycle is finished. The time since brewing will be visible at the bottom of the digital display.
-
Once coffee grounds have cooled, carefully open the cover and, using basket handle, remove and discard used grounds. Close cover.
-
The coffeemaker will keep brewed coffee hot for 2 hours and then automatically turn off. (See KEEPING COFFEE HOT - AUTO OFF section.)
-
To turn off the coffeemaker at any time press the ON/OFF button. The ON/OFF light shuts off. Unplug appliance when not in use.
BREWING 1 TO 4 CUPS
Note: This feature slows down the brewing to extract the best flavor when brewing a small amount of coffee.
-
Add the appropriate amount of water for the number of cups to be brewed (from 1 - 4)
-
Fill the permanent filter or paper filter with desired amount of coffee grounds.
-
Press the BREW button down so that the button is in the 1 - 4 CUP position.
Note: When using this feature coffee will be brewed at regular strength only.
- Press the ON/OFF button, its light illuminates and the brewing cycle begins.
Note: Press the ON/OFF button to cancel this function.
SNEAK-A-CUP ^ FEATURE (TO BE USED ONLY FOR COFFEE)
Remove the carafe and brewing is paused. The carafe must be placed back on the carafe plate in 30 seconds to prevent overflow. Brewing begins again.
Important: The Sneak-A-Cup ^® feature cannot be used when making tea because the filter basket holder is removed when brewing tea. You must wait until the tea has finished brewing.
KEEPING COFFEE and TEA HOT - AUTO OFF FUNCTION
Once coffee has brewed, the coffeemaker will keep the "Keep Hot" carafe plate hot between 1 and 2 hours then it shuts off automatically. During that time the time since brewing is visible at the bottom of the display.
There are 2 preset AUTO OFF times you can select:
Press the AUTO OFF button to select 2 hours.
Press the AUTO OFF button a second time to select 1 hour.
Note: The coffeemaker shuts off when the selected AUTO OFF time is reached.
BREW STRONG
-
If stronger coffee is desired, press the BREW STRG button before pressing the ON/OFF button. Its light illuminates and function is activated.
-
If using delayed brewing, follow steps 1 through 5 under DELAYED BREWING, press the BREW STRG button and then press the AUTO button. To cancel, press the BREW STRG button again and the light will turn off.
BREWING TEA
Note: It is not necessary to set the clock to brew tea unless you want to use DELAYED BREWING.
- Open cover.
- Fill water reservoir with desired amount of cold tap water. Do not exceed the 12-cup (MAX) level on the water reservoir.
- Remove the permanent filter and the filter basket from the coffeemaker to avoid getting coffee flavor in the tea.
- Close cover. Fill the removable stainless steel permanent tea filter with the desired amount of loose tea leaves.
- Insert the tea filter with the arc at the top of the basket placed toward the pour spout on the carafe; press down until it is securely in place.
- Make sure carafe lid is properly attached to the carafe. Close the lid.
Note: Hot water may overflow if carafe lid is not properly placed.
- Place carafe on the "Keep Hot" carafe plate.
- Plug power cord into an outlet.
- Press the TEA button. Its light illuminates.
- Press the ON/OFF button; its light illuminates and brewing begins.
- When water stops flowing into carafe, the tea will be held for 5 minutes to steep.
- When tea is ready, the coffeemaker beeps when steeping cycle is complete. The time since brewing is illuminated at the bottom of the LCD.
Important: Sneak-A-Cup ^® feature cannot be used when making tea. You must wait until the tea has finished brewing.
- The coffecemaker will keep brewed tea hot for 2 hours and then automatically turn off. (See KEEPING COFFEE and TEA HOT - AUTO OFF section.)
Note: Coffeemaker shuts off after 2 hours if the AUTO OFF time is not changed to 1 hour.
-
To turn off the coffecemaker at any time press the ON/OFF button. The ON/OFF light shuts off.
-
Unplug appliance when not in use.
Note: Do not leave tea in the tea pot or tea leaves in the stainless steel permanent filter overnight.
DELAYED BREWING FOR COFFEE AND TEA
FOR COFFEE
- Follow steps 1 through 10 under BREWING COFFEE.
- Make sure clock has been set to correct time of day.
- Press the program (PROG) button.
- The digital clock will display 12:00.
Note: If the coffecemaker has not been unplugged the last delayed brewing time will appear on the digital display.
- To change the time: press HOUR button until the desired correct time appears on the display. Repeat with the MIN button.
Note: If the hour is not changed the clock will CONTINUE TO FLASH 12:00.
- Press the AUTO button to activate the delayed brewing. The AUTO light illuminates.
- To check the preset auto time, press program (PROG) button and hold it. Once button is released, the clock time displays again.
- If you want to change the preset auto time, press the (AUTO) button to cancel the preset time. The light will turn off.
- Follow steps 3 through 6 under DELAYED BREWING.
- To cancel delayed brewing, press the AUTO button. The AUTO light shuts off. To brew coffee immediately press the ON/OFF button.
FOR TEA
- Follow steps 1 through 10 under BREWING TEA.
- Follow steps 2 through 10 for DELAYED BREWING for coffee.
- Swirl the brewed tea before serving.
- Remove the tea leaves before serving to avoid bitterness and oversteeping.
- The best way to measure tea is by weight not by volume: use 4 to 5 grams to 8 ounces of water.
- Keep tea fresh; buy smaller quantities more often to preserve flavor.
- Store tea in a tightly sealed opaque container.
- If making tea for iced tea, double the amount of tea used in brewing.
Care and Cleaning
This product contains no user serviceable parts. Refer service to qualified service personnel.
CLEANING
- Be sure the unit is unplugged and has cooled.
- Open the cover.
- To remove the filter basket, grip the handle and lift straight up. Discard the paper filter, if used, and the coffee grounds.
- Wash the filter basket, permanent coffee filter, tea filter, carafe and carafe lid in dishwasher, top rack or wash by hand in hot water and soap.
- Wipe the appliance's exterior surface, control panel and "Keep Hot" plate with a soft damp cloth. Do not use abrasive cleansers or scouring pads. Never immerse the coffeemaker in water.
- To clean the inside of the cover, open the cover and leave in the open position. Wipe surfaces with a damp cloth.
AUTO CLEAN
We recommend cleaning your coffeemaker once a month.
Important: Remove the water filter holder with carbon filter before activating the AUTO CLEAN.
- Combine 6 cups of white vinegar and 4 cups of cold water in carafe.
- Pour into water reservoir.
- Place an 8 to 12 cup cupcake style paper filter in the removable filter basket. Insert filter basket into filter basket holder and close lid.
-
Make sure the lid of the carafe is in place and place empty carafe on the "Keep Hot" carafe plate.
-
Plug power cord into an outlet.
- Press AUTO CLEAN to activate cleaning cycle; the AUTO CLEAN light flashes.
- Part of the mixture will brew through. Remaining mixture will be held in coffeemaker for 30 minutes before completing its brew through.
Note: The entire cleaning cycle will take 45-60 minutes to complete.
- When the coffeemaker completes the AUTO CLEAN cycle, it beeps and shuts off automatically.
- Brew fresh water through appliance following instructions given in GETTING STARTED before brewing coffee again.
WATER FILTER HOLDER
- Press latch on filter holder to open.
- Take out carbon filter.
- Place carbon filter on top of a paper towel.
- Filter holder is top rack dishwasher safe or it may be hand washed in warm, sudsy water.
- Rinse carbon filter with tap water.
- Place carbon filter back inside filter holder.
- Close the filter holder tightly until it snaps into place.
- Place filter holder inside the water reservoir and insert it into the recess at the bottom right hand corner.
Note: To replace filter see WATER FILTER REPLACEMENT section.
Note: Replace carbon filter every 60 brewing cycles or every 2 months after removing it from the sealed packaging.

WARNING
RISK OF FIRE OR ELECTRIC SHOCK. DO NOT OPEN.
The lightning symbol refers to "dangerous voltage"; the exclamation symbol refers to maintenance instructions. See below.
Warning: To reduce the risk of fire or electric shock, do not remove the cover of the coffeemaker. There are no user-serviceable parts inside. Repair should be done by authorized service personnel only.
NEED HELP?
For service, repair or any questions regarding your appliance, call the appropriate 800 number on cover of this book. Please DO NOT return the product to the place of purchase. Also, please DO NOT mail product back to manufacturer, nor bring it to a service center. You may also want to consult the website listed on the cover of this manual.
Three-Year Limited Warranty (Applies only in the United States and Canada)
What does it cover?
- Any defect in material or workmanship provided; however, Applica's liability will not exceed the purchase price of product.
For how long?
- Three years from the date of original purchase with proof of such purchase.
What will we do to help you?
- Provide you with a reasonably similar replacement product that is either new or factory refurbished.
How do you get service?
- Save your receipt as proof of date of sale.
- Check our on-line service site at www.prodprotect.com/applica, or call our toll-free number, 1-800-231-9786, for general warranty service.
- If you need parts or accessories, please call 1-800-738-0245.
What does your warranty not cover?
• Damage from commercial use
• Damage from misuse, abuse or neglect
- Products that have been modified in any way
- Products used or serviced outside the country of purchase
- Glass parts and other accessory items that are packed with the unit
- Shipping and handling costs associated with the replacement of the unit
- Consequential or incidental damages (Please note, however, that some states do not allow the exclusion or limitation of consequential or incidental damages, so this limitation may not apply to you.)
How does state law relate to this warranty?
- This warranty gives you specific legal rights, and you may also have other rights that vary from state to state or province to province.
Copyrights and Trademarks of Farberware Licensing Company, LLC, including FARBERWARE™ and FARBERWARE®, are used under license from Farberware Licensing Company, LLC
Made and Printed in People's Republic of China
San Jose, Costa Rica
Tel.: (506) 257-5716 / 223-0136
Ecuador
Col. Centro, Cuauhtemoc,
México, D.F
Tel. 01 800 714 2503
Nicaragua
ServiTotal
City Market Nivel Plaza Local 153
Diagonal Hotel Melia,
Caracas,
Tel. (582) 324-0969
www.applicaservice.com
servicio@applicamail.com
(C1425FUG) C.A.B.A. Argentina
C.U.I.T No. 30-70706168-1
Importado por / Imported by:
RAYOVAC DE MÉXICO SA DE C.V
- Please Read and Save this Use and Care Book
- IMPORTANT SAFEGUARDS
- SAVE THESE INSTRUCTIONS.
- This product is for household use only.
- POLARIZED PLUG (120V Models Only)
- TAMPER-RESISTANT SCREW
- ELECTRICAL CORD
- How to Use
- GETTING STARTED
- USING WATER FILTER
- REPLACING WATER FILTER
- SETTING THE CLOCK
- BREWING COFFEE
- Important: There are two overflow holes at the back of the coffeemaker. Be careful not to overfill the water reservoir to avoid leaking onto the counter or work surface.
- BREWING 1 TO 4 CUPS
- SNEAK-A-CUP ^ FEATURE (TO BE USED ONLY FOR COFFEE)
- BREW STRONG
- BREWING TEA
- Important: Sneak-A-Cup ® feature cannot be used when making tea. You must wait until the tea has finished brewing.
- DELAYED BREWING FOR COFFEE AND TEA
- FOR COFFEE
- FOR TEA
- Care and Cleaning
- CLEANING
- AUTO CLEAN
- Important: Remove the water filter holder with carbon filter before activating the AUTO CLEAN.
- WATER FILTER HOLDER
- WARNING
- RISK OF FIRE OR ELECTRIC SHOCK. DO NOT OPEN.
- NEED HELP?
- Three-Year Limited Warranty (Applies only in the United States and Canada)
- What does it cover?
- For how long?
- What will we do to help you?
- How do you get service?
- What does your warranty not cover?
- How does state law relate to this warranty?
- Ecuador
- Nicaragua
- Importado por / Imported by:
Brand : Farberware
Model : CM3000S
Category : Coffee maker