
FAC400C - Coffee maker Farberware - Free user manual and instructions
Find the device manual for free FAC400C Farberware in PDF.


| Product Type | 10-Cup Thermal Coffee Maker |
| Brand | Farberware |
| Model | FAC400C / FAC400CB |
| Capacity | 10 cups (5 oz American) / 12 cups (4 oz European) |
| Voltage | 120 V AC |
| Power Consumption | Approximately 1000 W |
| Dimensions (approx.) | 12 x 8 x 10 inches |
| Weight (approx.) | 4 lbs |
| Carafe Type | Thermal carafe with locking lid |
| Filter Type | #4 cone-shaped paper or permanent gold filter |
| Key Features | Swing-out filter holder, removable water reservoir, drip stop assembly, auto-pause and serve, hinged water reservoir lid |
| Drip Stop | Automatic Auto-Pause Drip Stop (up to 1 minute) |
| Cleaning | Wash carafe and lid with warm soapy water; wipe base with damp cloth; rinse reservoir with cold water |
| Decalcification | Use 2 tbsp white vinegar per carafe of cold water; repeat every 40-80 cycles |
| Replacement Parts | Filter Holder (31105B), Drip Stop Assembly (31106B), Carafe with Lid (31107B), Carafe Lid Only (31108B), Hinged Lid (31109), Water Reservoir (31110) |
| Warranty | 1 year limited |
| Safety Certifications | Polarized plug; short cord; UL listed (assumed) |
| Intended Use | Household use only |
Frequently Asked Questions - FAC400C Farberware
User questions about FAC400C Farberware
0 question about this device. Answer the ones you know or ask your own.
Ask a new question about this device
Download the instructions for your Coffee maker in PDF format for free! Find your manual FAC400C - Farberware and take your electronic device back in hand. On this page are published all the documents necessary for the use of your device. FAC400C by Farberware.
USER MANUAL FAC400C Farberware
natural_image
Black-and-white photo of a modern kitchen blender with a white lid and black handle, placed on a dark surface (no visible text or symbols)USE & CARE INSTRUCTIONS
10 CUP THERMAL COFFEE MAKER
FAC400CB
IMPORTANT SAFEGUARDS
When using electrical appliances, basic safety precautions should always be followed, including the following:
- Read all instructions.
- Do not touch hot surfaces. Use handles or knobs.
- To protect against electric shock, do not place cord, plugs, or appliance in water or other liquid.
- Close supervision is necessary when any appliance is used by or near children.
- Unplug from outlet when not in use and before cleaning. Allow to cool before putting on or taking off parts, and before cleaning the appliance.
- Do not operate any appliance with a damaged cord or plug or after the appliance malfunctions, or has been damaged in any manner. Contact Consumer Service for examination, repair or adjustment.
- The use of an accessory not evaluated for use with this appliance may cause injuries.
- Do not use outdoors.
- Do not let cord hang over edge of table or counter, or touch hot surfaces.
- Do not place on or near a hot gas or electric burner, or in a heated oven.
- To disconnect, press the ON/OFF Switch to (O) OFF, then remove plug from wall outlet.
- Do not use appliance for other than intended use.
- Be certain Lids are securely in place before operating appliance.
- Scalding may occur if the Lids are removed during the brewing cycle.
SAVE THESE INSTRUCTIONS
THIS PRODUCT IS FOR HOUSEHOLD USE ONLY
ADDITIONAL IMPORTANT SAFEGUARDS
WARNING: This appliance generates heat and escaping steam during use. Proper precautions must be taken to prevent the risk of burns, fires, or other injury to persons or damage to property.
- All users of this appliance must read and understand this Use & Care Instruction Manual before operating or cleaning this appliance.
- The cord to this appliance should be plugged into a 120V AC electrical outlet only.
- Use water only in this appliance! Do not put any other liquids or food products in this appliance. Do not mix or add anything to the water placed in this appliance, except as instructed in the User Maintenance Instructions to clean the appliance.
- DO NOT attempt to move an appliance containing hot liquids. Allow appliance to cool completely before moving.
- Keep appliance at least 4 inches away from walls or other objects during operation. Do not place any objects on top of appliance while it is operating. Place the appliance on a surface that is resistant to heat.
- If this appliance begins to malfunction during use, immediately unplug the cord. Do not use or attempt to repair the malfunctioning appliance.
- If this appliance falls or accidentally becomes immersed in water or any other liquid, unplug it immediately. Do not reach into the water! Do not use this appliance after it has fallen into or has become immersed in water. Contact Consumer Service for examination and repair.
- Do not leave this appliance unattended during use.
- The appliance must be left to cool down sufficiently before adding more water to avoid splattering.
- Always use fresh, cool water in your appliance. Warm water or other liquids, except as listed in cleaning section, may cause damage to the appliance.
- DO NOT put Carafe into a microwave.
12 DO NOT lift Hinged Water Reservoir Lid or the Swing-Out Filter Holder until brewing is complete, and all parts have cooled. - The Carafe is designed for use with this appliance. It must never be used on a range top.
- Do not use a damaged Carafe or a Carafe having a loose or weakened handle.
- CAUTION: To prevent injury when utilizing the Drip Stop feature, replace Carafe within 1 minute of removing during brewing process.
POLARIZED PLUG
This appliance has a polarized plug (one blade is wider than the other). To reduce the risk of electric shock, this plug is intended to fit into a polarized outlet only one way. If the plug does not fit fully in the outlet, reverse the plug. If it still does not fit, contact a qualified electrician. Do not attempt to modify the plug in any way.
SHORT CORD INSTRUCTIONS
A short power-supply cord is provided to reduce the risk resulting from becoming entangled in or tripping over a longer cord.
Do not use an extension cord with this product.
PLASTICIZER WARNING
CAUTION: To prevent Plasticizers from migrating from the finish of the counter top or table top or other furniture, place NON-PLASTIC coasters or place mats between the appliance and the finish of the counter top or table top.
Failure to do so may cause the finish to darken, permanent blemishes may occur or stains can appear.
ELECTRIC POWER
If the electrical circuit is overloaded with other appliances, your appliance may not operate properly. It should be operated on a separate electrical circuit from other appliances.
WARNING
TO REDUCE THE RISK OF FIRE OR ELECTRIC SHOCK, DO NOT REMOVE THE BOTTOM COVER. NO USER-SERVICEABLE PARTS INSIDE. REPAIR SHOULD BE DONE BY AUTHORIZED SERVICE PERSONNEL ONLY.
COFFEE YIELD
NOTE: A 5 oz. cup is the American industry standard and is used by most Coffee Maker manufacturers.
Your Coffee Maker and Thermal Carafe will brew and serve:
12 (4 oz.) European size cups, or
10 (5 oz.) American size cups
GETTING TO KNOW YOUR FARBERWARE® 10 CUP COFFEE MAKER
PRODUCT MAY VARY SLIGHTLY FROM ILLUSTRATIONS
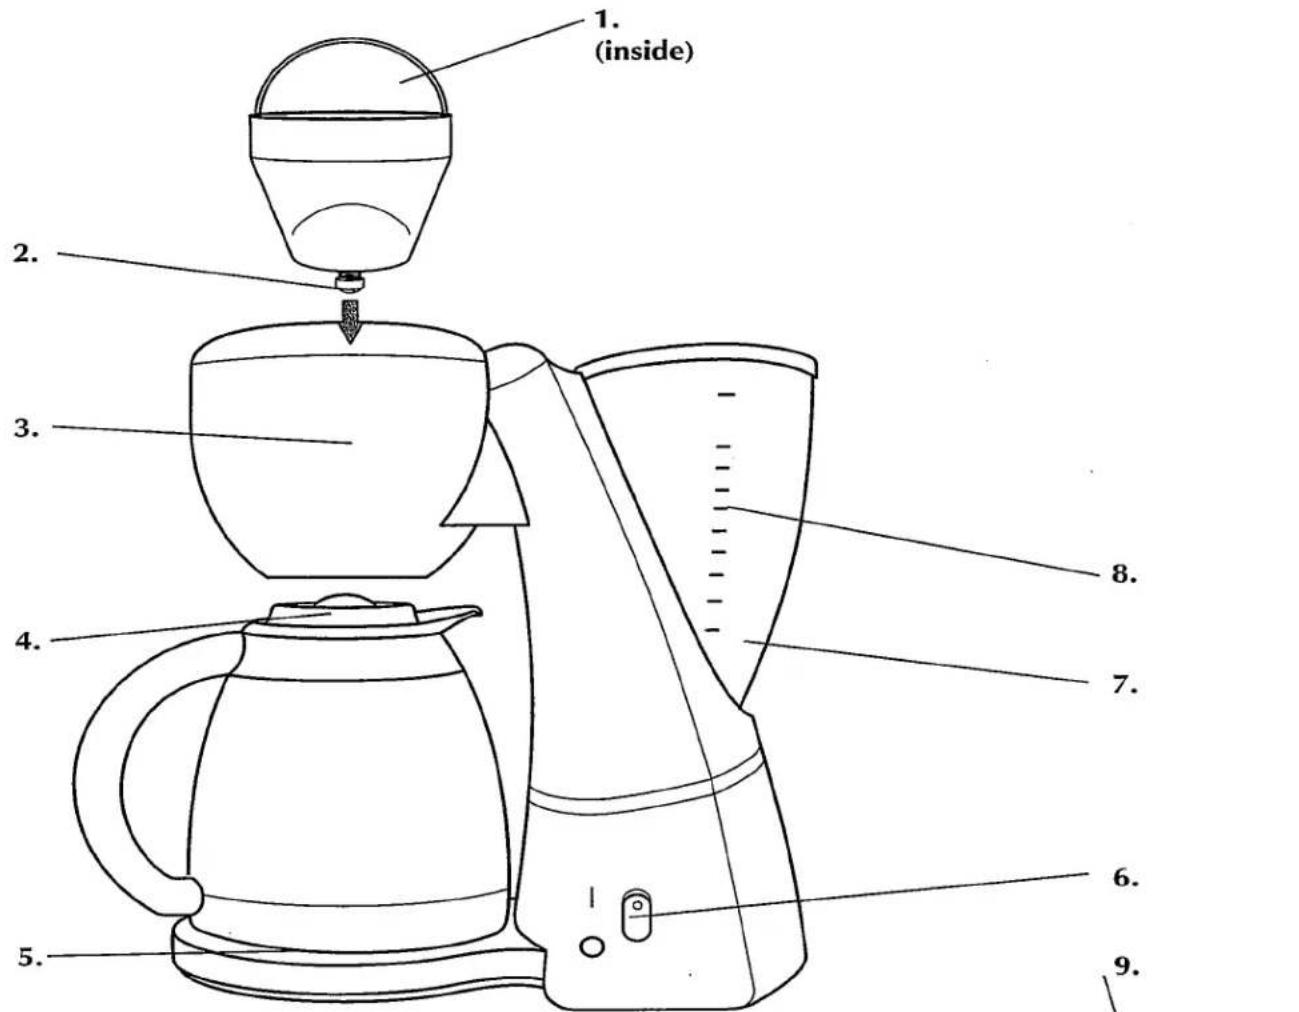
Figure 1
-
Removable Filter Holder (P/N 31105B)
-
Drip Stop Assembly (P/N 31106B)
-
Swing-Out Filter Holder
-
Thermal Carafe with Lid (P/N 31107B) (Carafe Lid only) (P/N 31108B)
-
Base Plate
-
On/Off Switch
-
Removable Water Reservoir
-
Water Level Indicator
-
Swing-Out Filter Holder Release Button
10.Hinged Water Reservoir Lid with Handle (P/N 31109)
- Removable Water Reservoir (P/N 31110)

Figure 2
BEFORE BREWING COFFEE FOR THE FIRST TIME
CAUTION: To protect against electric shock, do not immerse the Coffee Maker or allow power cord to come into contact with water or other liquids.
-
After carefully unpacking from carton, the inside of your Coffee Maker and Thermal Carafe must be cleaned.
-
Place the Coffee Maker onto a flat, level work surface.
-
Brew 10 cups of fresh water only. Follow the OPERATING INSTRUCTIONS, but do not add coffee filter or coffee grounds into the Removable Filter Holder.
-
When all the water has brewed into the Thermal Carafe, press the ON/OFF Switch to (O) OFF. The ON Light will turn off.
-
Allow the Coffee Maker to cool for 15 minutes, discard the water from the Carafe, then repeat steps 2 and 3.
COFFEE FILTERS
Cone-shaped paper filters are available locally at grocery stores and where coffeemakers are sold. Standard #4 filters should be used. Permanent gold filters may also be purchased, eliminating the need for disposable paper filters.
The use of basket-style paper filters is not recommended, since they do not conform to the shape of the Removable Filter Holder and may cause coffee to back up and spill over during brewing.
HINTS FOR BEST RESULTS
- We recommend using coffee which has been ground specifically for automatic drip coffee makers. This type of coffee is prepared specifically for your Coffee Maker's brewing system and promotes fuller extraction to provide rich, full-bodied coffee.
- Use only cone-shaped filters with this Coffee Maker. Cone-shaped paper filters are available locally at grocery stores. Use standard #4 filters. Do not use basket-style paper filters.
- A clean Coffee Maker is essential for making great tasting coffee. Regular cleaning, as specified in the User Maintenance Instructions, is highly recommended.
• Always use fresh, cold water in your Coffee Maker.
- Store coffee in a cool, dry place. Once coffee has been opened, keep it tightly sealed in the refrigerator to maintain freshness.
- For optimum coffee, buy whole beans and grind them finely just before brewing.
OPERATING INSTRUCTIONS
-
Place the Thermal Coffee Maker on a flat, level surface.
-
Press the Swing-Out Filter Holder Release Button to open the Swing-Out Filter Holder.
-
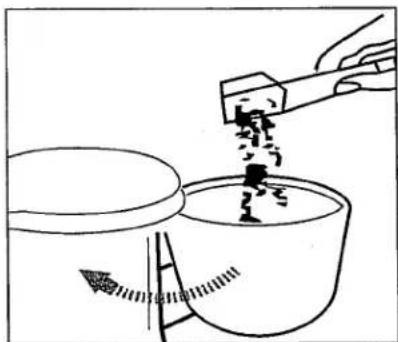
Place a #4 cone-shaped paper filter, or a permanent gold filter, into the Removable Filter Holder. Measure one level tablespoon of drip or regular grind coffee for each cup of coffee desired. (See Figure 3.) For stronger or milder coffee, adjust amount of coffee to suit your taste.
natural_image
Simple line drawing of a hand pouring liquid into a container with a ladder, no text or symbols presentFigure 3
NOTE: We recommend using coffee ground specifically for automatic drip coffeemakers.
-
Close the Swing-Out Filter Holder by gently pushing forward until the Swing-Out Filter Holder clicks into place.
-
Remove Water Reservoir by raising the Hinged Water Reservoir Lid and lifting Water Reservoir Handle. (See Figure 4.)
-
Fill the Water Reservoir with cold water to the desired level. No less than 2 cups are recommended. Close the Hinged Lid.
IMPORTANT: Always use fresh, cool water in your appliance. Warm water or other liquids, except as listed in the Use & Care Instructions, may cause damage to the appliance.
NOTE: The amount of brewed coffee will always be less than the amount of water placed into the Coffee Maker, since about 10% is absorbed by the coffee grounds and filter.
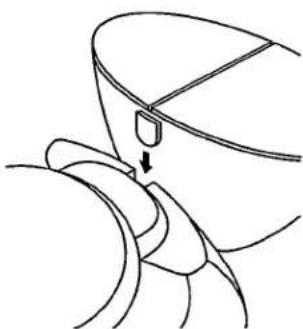
- Return the Water Reservoir back into the Base by slipping the hook on the side of the Water Reservoir into the slot located on the Coffee Maker Base. (See Figure 5.)

natural_image
Line drawing of a coffee maker with handle and spout, showing mechanical components and motion arrows (no text or symbols)Figure 4
natural_image
Line drawing of a mechanical component with a downward arrow indicating a step (no text or symbols)Figure 5
OPERATING INSTRUCTIONS (CONTINUED)
NOTE: For optimal thermal retention, preheat the Thermal Carafe by rinsing it with hot water.
- When you are ready to brew coffee, replace the empty Carafe on the Base Plate, making sure that the Lid is in the OPEN position; the arrow on the Lid will face the spout of the Carafe. (See Figure 7.)
- Plug the appliance into a standard 120V AC electrical outlet.
- Press the On/Off Switch. The Light will illuminate and the unit will begin brewing.
- To pour a cup of coffee before the brew cycle is complete, simply remove the Thermal Carafe from the Base Plate and pour. Brewing will continue, but dripping will automatically pause. Return the Thermal Carafe to the Base Plate.
CAUTION: To prevent injury when utilizing Auto-Pause Drip Stop feature, replace Carafe within 1 minute of removing during brewing process.
- Upon completion of the brew cycle, turn off the unit, and wait until dripping has stopped before removing the Carafe. If you wish to remove the Thermal Carafe to a more convenient location, seal the Thermal Carafe by turning the Carafe Lid clockwise until tight and it is in the LOCKED POSITION. (See Figure 6.) The Thermal Carafe will maintain the serving temperature for several hours.
To pour coffee from the Carafe, turn Carafe Lid until arrows are aligned and it is in the OPEN POSITION. (See Figure 7.)

natural_image
Diagram of a circular mechanical component with internal flow arrows and a handle (no text or symbols)Figure 6
LOCKED POSITION
Turn the Carafe Lid clockwise until tight. The Thermal Carafe will maintain the serving temperature for several hours.

natural_image
Top-down schematic of a mechanical component with concentric circles and radial arrows (no text or symbols)Figure 7
OPEN POSITION
Turn the Lid clockwise until the arrow on the Lid faces the front spout of the Carafe. Use while brewing and pouring coffee.
OPERATING INSTRUCTIONS (CONTINUED)
- When not in use, unplug the Coffee Maker from the wall outlet. Allow the unit to cool completely before cleaning. See User Maintenance Instructions.
DRIP STOP ASSEMBLY
This FARBERWARE® Coffee Maker has an Automatic Auto-Pause Drip Stop Assembly. During the brewing cycle, the Carafe can be removed to pour a cup of coffee from the Carafe. The Drip Stop Assembly will prevent the Coffee Maker from continuing to brew coffee for up to 1 minute until the Carafe is returned to its proper position.
IMPORTANT: The Carafe must be replaced on the Base Plate, under the Filter Holder within 1 minute to prevent the Filter Holder from overflowing.
TO BREW A SECOND POT OF COFFEE
To brew a second pot of coffee, turn the Coffee Maker OFF for 15 minutes and allow it to cool. Dispose of used coffee grounds and used coffee filter, rinse Carafe and the Removable Filter Holder in water. Place a fresh filter in the Filter Holder and repeat steps for brewing coffee.
CAUTION: Failure to allow Coffee Maker to cool may cause water to overheat and spray hot steam. The hot steam can cause severe burns.
USER MAINTENANCE INSTRUCTIONS
This appliance requires little maintenance. It contains no user-serviceable parts. Any servicing requiring disassembly other than cleaning must be performed by a qualified appliance repair technician.
CARE AND CLEANING
CAUTION: Be sure to unplug this appliance before cleaning. To protect against electrical shock, do not immerse cord, plug or unit in water or other liquid.
- The Thermal Carafe and Lid may be washed with warm, soapy water. Simply open the Lid by turning it in a counter-clockwise position and close the Lid by turning it in clockwise position.
- Never use harsh or abrasive cleaners on any part or parts of your Coffee Maker.
- The Filter Holder may be cleaned by wiping out the inside with a clean damp cloth.
- The Base Plate may be wiped with a clean, damp cloth when necessary.
IMPORTANT: Never immerse the Base Plate in water or other liquid.
-
Do not try to clean the inside of the Removable Water Reservoir with a cloth because this will leave a residue of lint and may clog your Coffee Maker. Just rinse with cold water periodically.
-
Do not place the Thermal Carafe on or near a hot gas or electric burner, in a heated oven, or in a microwave.
MINERAL DEPOSITS/DECALCIFYING
Your Coffee Maker must be cleaned when you begin to notice excessive steaming or the brewing time increases considerably. This condition is caused by a buildup of lime and mineral deposits from your water. If the pumping action stops before all the water has been pumped out of the machine, then the appliance requires decalcification.
The frequency of decalcification depends on the hardness of water used. The table on the following page lists the suggested decalcification intervals.
SUGGESTED DECALCIFICATION INTERVAL
Type of water
Soft water
Hard water
Frequency of Decalcification
every 80 brewing cycles
every 40 brewing cycles
HOW TO DECALCIFY YOUR COFFEE MAKER
- You will know when your Coffee Maker requires decalcifying when you notice an obvious slow down in brewing time.
- We recommend decalcifying your Drip Coffee Maker with a solution of white vinegar and cold water. A solution of 2 tablespoons white vinegar in 1 Thermal Carafe of cold water works best.
- Pour the solution into the Water Reservoir, then close the Hinged Lid and put the empty Thermal Carafe and Filter Holder into place. Press the On/Off Switch. The Light will illuminate and the unit will begin "brewing" the vinegar solution.
- When the vinegar solution has finished brewing, empty the Thermal Carafe and rinse it out with clean water. Refill the Water Reservoir with cold water only, and run a second "brew" cycle. This will rinse out any remaining vinegar solution.
- We recommend decalcifying your Drip Coffee Maker 4 times a year or at any time the brewing time slows down.
FARBERWARE®
ONE-YEAR LIMITED WARRANTY
Warranty: This Farberware® product is warranted by Salton, Inc. to be free from defects in materials or workmanship for a period of (1) year from the original purchase date. This product warranty covers only the original consumer purchaser of the product.
Warranty Coverage: This warranty is void if the product has been damaged by accident in shipment, unreasonable use, misuse, neglect, improper service, commercial use, repairs by unauthorized personnel, normal wear and tear, improper assembly, installation or maintenance abuse or other causes not arising out of defects in materials or workmanship. This warranty is effective only if the product is purchased and operated in the USA, and does not extend to any units which have been used in violation of written instructions furnished with the product or to units which have been altered or modified or to damage to products or parts thereof which have had the serial number removed, altered, defaced or rendered illegible.
Implied Warranties: ANY IMPLIED WARRANTIES WHICH THE PURCHASER MAY HAVE ARE LIMITED IN DURATION TO ONE (1) YEAR FROM THE DATE OF PURCHASE. Some states do not allow limitations on how long an implied warranty lasts, so the above limitation may not apply to you.
Warranty Performance: During the above one-year warranty period, a product with a defect will be either repaired or replaced with a reconditioned comparable model (at our option) when the product is returned to the Repair Center, or the purchase price refunded. The repaired or replacement product will be in warranty for the balance of the one-year warranty period and an additional one-month period. No charge will be made for such repair or replacement.
Service and Repair: Should the appliance malfunction, you should first call toll-free 1 (888) 881-8101 between the hours of 9:00 am and 5:00 pm Central Standard Time and ask for CONSUMER SERVICE stating that you are a consumer with a problem. Please refer to model number FAC400CB when you call.
In-Warranty Service (USA): For an appliance covered under the warranty period, no charge is made for service or postage. Call for return authorization 1 (888) 881-8101.
Out-of Warranty Service: A flat rate charge by model is made for out-of-warranty service. Include \$10.00 (U.S.) for return shipping and handling. We will notify you by mail of the amount of the charge for service and require you to pay in advance for the repair or replacement.
For Products Purchased in the USA, but Used in Canada: You may return the product insured, packaged with sufficient protection, and postage and insurance prepaid to the USA address listed below. Please note that all customs duty / brokerage fees, if any, must be paid by you and we will require you to pay the cost of customs duty / brokerage fees to us in advance of our performing any service.
Risk During Shipment: We cannot assume responsibility for loss or damage during incoming shipment. For your protection, carefully package the product for shipment and insure it with the carrier. Be sure to enclose the following items with your appliance: any accessories related to your problem, your full return address and daytime phone number, a note describing the problem you experienced, a copy of your sales receipt or other proof of purchase to determine warranty status. C.O.D. shipments cannot be accepted.
To return the appliance, ship to:
ATTN: Repair Center
Salton, Inc.
708 South Missouri Street
Macon, MO 63552
To contact us, please write to, call, or email:
Salton, Inc.
P.O. Box 7366
Columbia, MO 65205-7366
1-888-881-8101
E-mail: Farberware-electric@Saltonusa.com
Limitation of Remedies: No representative or person is authorized to assume for Salton, Inc. any other liability in connection with the sale of our products. There shall be no claims for defects or failure of performance or product failure under any theory of tort, contract or commercial law including, but not limited to negligence, gross negligence, strict liability, breach of warranty and breach of contract. Repair, replacement or refund shall be the sole remedy of the purchaser under this warranty, and in no event shall Salton be liable for any incidental or consequential damages, losses or expenses. Some states do not allow the exclusion or limitation of incidental or consequential damages, so the above limitation or exclusion may not apply to you.
Legal Rights: This warranty gives you specific legal rights, and you may also have other rights which vary from state to state.
For more information on Salton products, visit our website: www.eSalton.com
©2004 Salton, Inc. All rights reserved.
FARBERWARE® is a registered trademark of Farberware Inc.®
Manufactured and sold pursuant to a license from Farberware Inc.®
- USE & CARE INSTRUCTIONS
- CUP THERMAL COFFEE MAKER
- IMPORTANT SAFEGUARDS
- SAVE THESE INSTRUCTIONS
- THIS PRODUCT IS FOR HOUSEHOLD USE ONLY
- ADDITIONAL IMPORTANT SAFEGUARDS
- POLARIZED PLUG
- SHORT CORD INSTRUCTIONS
- PLASTICIZER WARNING
- ELECTRIC POWER
- WARNING
- COFFEE YIELD
- GETTING TO KNOW YOUR FARBERWARE® 10 CUP COFFEE MAKER
- BEFORE BREWING COFFEE FOR THE FIRST TIME
- COFFEE FILTERS
- HINTS FOR BEST RESULTS
- OPERATING INSTRUCTIONS
- OPERATING INSTRUCTIONS (CONTINUED)
- DRIP STOP ASSEMBLY
- TO BREW A SECOND POT OF COFFEE
- USER MAINTENANCE INSTRUCTIONS
- CARE AND CLEANING
- MINERAL DEPOSITS/DECALCIFYING
- SUGGESTED DECALCIFICATION INTERVAL
- HOW TO DECALCIFY YOUR COFFEE MAKER
- FARBERWARE®
- ONE-YEAR LIMITED WARRANTY
Brand : Farberware
Model : FAC400C
Category : Coffee maker