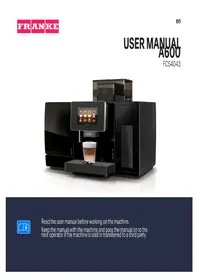
USER MANUAL A600 FRANKE

Read the user manual before working on the machine.
Keep the manual with the machine and pass the manual on to the next operator if the machine is sold or transferred to a third party.

IT'S ALL ABOUT THE MOMENT
TABLE OF CONTENTS
1 For your safety 6 1.1 Intended use 6 1.2 Prerequisites for using the coffee machine 7 1.3 Explanation of safety instructions 7 1.4 Safety concerns when using the coffee machine 8 2 Explanation of symbols 11 2.1 Symbols used in the manual 11 2.2 Symbols used in the software 11 3 Scope of delivery 15 4 Identification 17 4.1 Position of type plates 17 4.2 Type code 19 5 Description of machine 21 5.1 Coffee machine 21 5.2 Add-on units 24 5.3 Overview of operating modes 27 5.4 Franke Digital Services (option) 29 6 Installation 30 6.1 Preparations 30 6.2 Dimensions 30 6.3 Requirements of the water supply 31 7 Filling and emptying 35 7.1 Filling beans 35 7.2 Fill powder. 36 7.3 Filling the cooling unit 36 7.4 Filling the Flavor Station FS EC 38 7.5 Setting the grind coarseness 39 7.6 Emptying the bean hopper 41 7.7 Empty the powder hopper. 41 7.8 Emptying the grounds container 42 7.9 Empty the drip tray 43 7.10 Emptying the cooling unit 44 8 Preparing beverages 47 8.1 Preparing beverages with Quick Select 47 8.2 Preparing beverages with Cash Register 47 8.3 Preparing beverages with ground coffee 48 8.4 Preparing hot water 49
| 8.5 | Steam dispenser (Autosteam/Autosteam Pro) 50 | |
| 8.6 | Preparing beverages using the touchpad 50 | |
| 9 | Cleaning 51 | |
| 9.1 | Introduction 51 | |
| 9.2 | Required cleaning accessories 51 | |
| 9.3 | 5-step method 51 | |
| 9.4 | Starting the cleaning process 52 | |
| 9.5 | Cleaning the aerator 53 | |
| 9.6 | Weekly cleaning 53 | |
| 9.7 | Replace water filter 55 | |
| 9.8 | Rinsing the coffee machine 56 | |
| 10 | Configuration 58 | |
| 10.1 | Call up the maintenance level 58 | |
| 10.2 | PIN codes 58 | |
| 10.3 | My settings menu tree | 58 |
| 10.4 | Input methods | 59 |
| 10.5 | My settings 59 | |
| 11 | Individualization and data transfer | 72 |
| 11.1 | Overview | 72 |
| 11.2 | Individualization and data transfer menu tree | 73 |
| 11.3 | Manage Digital Signage via USB stick | 74 |
| 11.4 | Multimedia functions | 74 |
| 11.5 | Configure application | 75 |
| 11.6 | Loading/backing up data | 77 |
| 11.7 | Restore default values | 78 |
| 11.8 | Activating configurations | 78 |
| 12 | Troubleshooting | 80 |
| 12.1 | Error messages | 80 |
| 12.2 | Troubleshooting the system | 81 |
| 12.3 | Tips for good coffee beverages | 82 |
| 12.4 | Help with problems concerning product quality | 83 |
| 13 | Decommissioning | 84 |
| 13.1 | Preparing for decommissioning | 84 |
| 13.2 | Short-term decommissioning (up to 3 weeks) | 84 |
| 13.3 | Long-term decommissioning | 84 |
| 13.4 | Transport and storage | 84 |
| 13.5 | Recommissioning after prolonged periods of storage or non-use | 85 |
| 14 | Disposal of parts | 86 |
| 15 | Technical data | 87 |
15.1 Capacities in accordance with DIN 18873-2:2016-02 87 15.2 Electrical connection data 87 Index 89
1 FOR YOUR SAFETY
1.1 Intended use
1.1.1 Coffee machine
- The A600 is a commercial machine for preparing beverages and is intended for use in food services, offices and other similar environments.
- The A600 is designed to process whole coffee beans, ground coffee, powder that is suitable for automatic devices, and fresh milk.
- The A600 is intended for the preparation of beverages in accordance with this manual and the technical data.
- The A600 is intended for operation indoors.
Please note
- The A600 is not suitable for use outdoors.
1.1.2 Add-on units
Cooling unit
- The cooling unit is intended exclusively to keep milk cool for the preparation of coffee drinks with a Franke coffee machine.
- Only use precooled milk (2-5 °C).
- Remove the milk when the cooling unit is not in use. Store the milk in a suitable refrigerator.
- Use only the recommended cleaners. Other cleaners may leave residues in the milk system.
- The cooling unit is intended exclusively for operation indoors.
- Please also observe the Declaration of Conformity delivered with the device.
Flavor Station
- The Flavor Station is intended exclusively for the automatic conveyance of syrups and other fluid aromas for the preparation of drinks.
Please note
- The Flavor Station is not designed to pump viscous fluids such as chocolate sauce.
- The Flavor Station is not suitable for the storage of alcoholic or explosive substances.
Cup warmer
- The cup warmer is intended only for preheating coffee cups and glasses used when preparing drinks.
Please note
- Drinking containers made of paper or plastic must not be used. The cup warmer is not designed to dry dish towels or other cloths. It is not necessary to cover the cups to warm them.
Accounting system
- Depending on the version, the accounting system can be used for various methods of payment. Examples: Payment with coins, cards, or mobile payment systems.
1.2 Prerequisites for using the coffee machine
- The A600 is intended for use by trained personnel or as a self-service machine.
- Self-service machines must always be monitored to protect the users.
- Each operator of the A600 must have read and understood the manual. This does not apply to its use in the self-service area.
- Do not operate the A600 or add-on units until you have completely read and understood this manual.
- Do not use the A600 or add-on units if you are not familiar with the various functions.
- Do not use the A600 if the connection lines of the A600 or the add-on units are damaged.
- Do not use the A600 unless the A600 or the add-on units have been cleaned or filled as intended.
- Children under the age of 8 are not permitted to use the A600 and the add-on units.
- Children or persons with restricted physical, sensory or mental abilities, or lack of experience and knowledge, may only use the A600 and the add-on units under supervision or after adequate instruction by a person responsible for their safety; they are not permitted to play with the A600 and the add-on units.
- Children are not permitted to clean the A600 and the add-on units.
1.3 Explanation of safety instructions
To ensure personal safety and the protection of material goods, observation of these safety instructions is imperative.
Symbol and signal word indicate the severity of the hazard.

WARNING
WARNING indicates a potential danger. DANGER indicates an imminent danger which, if not avoided, will result in death or serious injury.

CAUTION
CAUTION indicates a hazardous situation which, if not avoided, could result in minor or moderate injury.

NOTICE
NOTICE directs your attention to the risk of damage to machinery.
1.4 Safety concerns when using the coffee machine

WARNING
Risk of fire
If the power cord is electrically overloaded, the heat generated can cause a fire.
a) Never use power outlet strips, multi-sockets or extension cords to connect the coffee machine to the power supply.

WARNING
Risk of fatal injury from electrocution
Damaged power cords, pipes or plugs can lead to electrocution.
a) Do not connect any damaged power cords, pipes or plugs to the power grid. b) Replace damaged power cords, pipes or plugs. If the power cord is permanently assembled, contact the service technician. If the power cord is not permanently assembled, order and use a new, original power cord. c) Ensure that the machine/appliance and the power cord are not near any hot surfaces such as gas or electric stoves or ovens. d) Ensure that the power cord is not pinched and does not chafe on sharp edges. e) Only pull on the plug and not on the cable when disconnecting the device from the power grid.

WARNING
Risk of fatal injury from electrocution
Liquid/moisture entering the machine or leaks can lead to electrocution.
a) Never point a liquid or steam jet at the machine. b) Do not pour any liquids on the machine. c) Do not immerse the machine in liquid. d) Disconnect the machine from the power supply in the event of a leak or if liquid/moisture enters the machine.

WARNING
Risk of fatal injury from electrocution
Work, repairs or servicing improperly performed on electrical systems can lead to electrocution.
a) Have repairs on electrical parts carried out by service technicians using original spare parts. b) Have servicing carried out by authorized persons with corresponding qualification only.

WARNING
Risk of scalding
Hot water is released during rinsing.
a) Keep hands away from the spouts and nozzles during this process. b) Do not place anything on the drip grid. c) IN CASE OF SCALDING: Immediately cool the affected area and, depending on the severity of the injury, consult a doctor.

WARNING
Risk of scalding
Hot beverages can lead to scalding.
a) Always be careful with hot beverages. b) Use only suitable drinking vessels.

WARNING
Risk of scalding
Hot liquids and steam escape during cleaning and can lead to scalding.
a) Keep hands away from the spouts and nozzles during this process.

WARNING
Risk of injury
If objects find their way into the bean hopper or grinder, splinters may be ejected, leading to injury.
a) Never insert any objects into the bean hopper or grinder.

CAUTION
Cutting injuries/crushing
The powder hoppers worm gear mechanism can cause cuts or crushing injuries.
a) Exercise care when cleaning the powder hopper.

CAUTION
Irritation from cleaners
Cleaning tablets, milk system cleaning agent, and descaler can lead to irritation of the skin or eyes.
a) Observe the hazard warnings on the label of the respective cleaner. b) Avoid contact with your eyes and skin. c) Wash your hands after coming into contact with cleaning supplies. d) Cleaning supplies must be kept away from beverages.

CAUTION
Inadequate cleaning can result in food residues accumulating in the machine and at the spouts, thereby contaminating products.
a) Do not use the machine unless it has been cleaned according to the instructions. b) Clean the machine daily in accordance with the instructions. c) Inform operating personnel of the necessary cleaning measures.

CAUTION
Residues may build up in the machine if not used for a long time.
a) Clean the machine if it is not used for extended periods (more than 2 days).

CAUTION
Using a water filter for too long can lead to the build-up of algae.
a) Replace the water filter when prompted to do so by the machine.

CAUTION
Mold can form on the coffee grounds.
a) Empty and clean the grounds container at least once a day.

NOTICE
Machine damage caused by limescale build-up
If the water hardness is set incorrectly, limescale can build up in the coffee machine. Limescale deposits may damage the coffee machine.
a) Measure the water hardness during commissioning. Then set the water hardness in the Commissioning menu on the basis of the measurement. Determining the water hardness with a measuring strip [32]

NOTICE
Risk of damage to the coffee machine
If the spout cleaning device is placed on the drip grid too soon, the dispensing spout will move toward the spout cleaning device. This may damage the coffee machine and/or the spout cleaning device.
a) Only place the spout cleaning device on the drip grid when prompted to do so, and only once the dispensing spout has been fully lowered.
2 EXPLANATION OF SYMBOLS
2.1 Symbols used in the manual
2.1.1 Orientation
Symbol Description

Clean components using the 5-step method.

This symbol indicates tips, tricks and additional information

Prerequisites for additional steps

Result or intermediate result for additional steps
2.2 Symbols used in the software
2.2.1 Symbols used for navigation and operation
Symbol Designation Description

Cancel button Cancel preparation

Select next/previous Page Scroll through menus with multiple pages

Start button Start preparation
2.2.2 Symbols on the dashboard and on the user interface

When a symbol is illuminated on the dashboard, additional information and instructions can be displayed by tapping the symbol. If an error occurs, refer to the Troubleshooting [▶ 80] chapter for help.
Symbol Designation Description
Franke logo Call up the maintenance level

Bean left/right Active grinder
Symbol Designation Description
 | Double product Produce double beverage quantity (double production) |
 | Ground coffee |
 | Energy-saving mode Switch the machine into energy-saving mode |
 | Servicing/cleaning Machine must be cleaned and/or serviced |
 | Rinse Machine must be rinsed or machine is rinsing |
 | Filter Replace the filter cartridge in the water tank (optional for internal water tank) |
 | Water filter |
 | Milk system cleaning agent Milk system cleaning agent is empty (CleanMaster) |
 | Grounds container Grounds container must be emptied |
 | Drip tray Drip tray is full or not installed correctly |
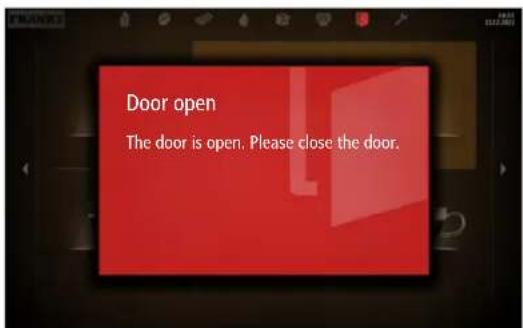
 | Door The door is open |
 | Water tank Water tank is empty or missing |
 | Payment Payment active |
 | First Shot Preheat system |
 | Service/configuration/administration |
 | Brightness Set brightness |
 | Individualization Customize beverages and display |
Symbol Designation Description
| Screen saver |
| Advertising images |
| Favorites Favorites button, can be assigned to a function that is used frequently |
| Product |
| Coffee bean Bean hopper is empty or not installed correctly |
| Milk Milk container is empty or not installed correctly |
| Cold milk |
| Powder resource Powder hopper is empty or not installed correctly |
| Info |
| Event log List of event and error messages |
| Individual products counter |
| Inactive |
| Data transfer Data is being transferred |
2.2.3 Depiction of error messages
Highlighted products cannot be prepared. The illuminated symbol on the dashboard takes you to the error message.

If the entire system is affected by an error, the error message will appear automatically.
Color code for error messages
Temporary interruption System still fully functional System has limited functionality Some or all resources are locked
3 SCOPE OF DELIVERY
| Item description Item number |
 | Coffee machine A600 (FCS4043) |
 | Manual set 560.0001.463 / 560.0001.731 |
 | Cleaning tablets (100 pcs.) 5 |
 | Cleaning tablets (China) 5 |
 | Cleaning tablets (USA/Canada) 567.0000.002 |
 | Milk system cleaning agent (dosing bottle) 567.0000.005 |
 | Milk system cleaning agent (dosing bottle) (USA/Canada/Mexico) 567.0000.006 |
 | Milk system cleaning agent (cartridge) 567.0000.009 |
 | Milk system cleaning agent (cartridge) (USA/Canada/Mexico) 567.0000.004 |
 | Measuring cup 1000ml 560.0002.653 |
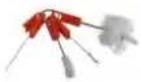 | Cleaning brushes 560.0003.728 |
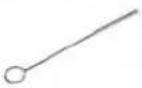 | Twisted-in-wire brush (Option SU05) 560.0001.019 |
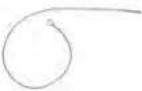 | Hose brush (option FM/MS) 560.0007.380 |
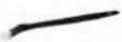 | Paint brush 560.0003.716 |
| Item description Item number |
| Microfiber cloth 560.0002.315 |
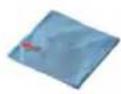 | | |
| Grinder adjustment wrench 560.0003.876 |
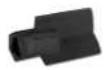 | | |
| Aerator/hose wrench 560.0522.696 |
 | | |
| Filter holder (optional for internal water tank) | 560.0003.964 |
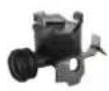 |
| Filter cartridge (optional for internal water tank) | 560.0004.630 |
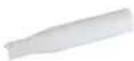 |
| Water hardness test strip (optional for internal water tank) | 560.0004.060 |
 |
| Drip grid extension 560.0484.609 | |
 | | |
| Drip grid extension (option single-piece drip grid extension (USA)) | 560.0574.078 |
 |
4 IDENTIFICATION
4.1 Position of type plates
4.1.1 Coffee machine
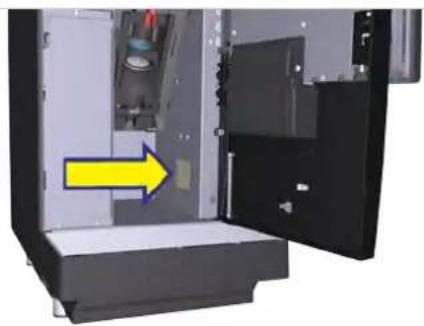
The type plate for the coffee machine is located on the right interior wall.
4.1.2 Cooling unit SU12/UT12
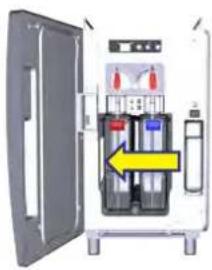
The type plate for the SU12 cooling unit is located on the left-hand side in the cooling chamber.
4.1.3 SU05 cooling unit
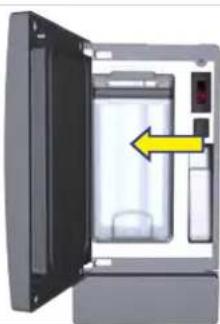
The type plate for the SU05 cooling unit is located on the left inner wall.
4.1.4 FSU
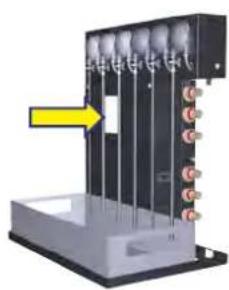
The type plate for the under-counter Flavor Station (FSU, FSU60 CM) is located on top of the left-hand side of the housing.
4.1.5 FS (option)
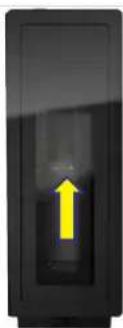
The type plate for the FS Flavor Station is located in the interior on the rear panel.
4.1.6 CW (option)

The type plate for the cup warmer is located in the interior on the rear panel.
4.1.7 AC200 (Option)
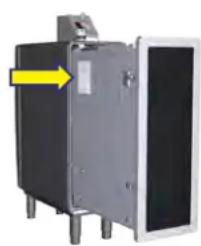
The type plate of the AC200 is located on the left-hand side of the pullout.
4.2 Type code
4.2.1 Coffee machine
Type code Description
A600 Coffee machine (fully automatic)
Series: A
Overall size: 600
1G 1 grinder
2G 2 grinders
11C Iced Coffee Module
1P 1 powder dosing unit
2P 2 powder dosing units
CM CleanMaster
EC EasyClean
FM FoamMaster (cold and warm milk, cold and warm milk foam)
H1 Left-hand hot water spout
H2 Center hot water spout
MS MilkSystem
NM NoMilk (coffee machine without milk system)
S1 Steam wand
S2 Autosteam (steam wand with temperature sensor)
S3 Autosteam Pro (steam wand with temperature sensor and programmable milk foam consistency)
TS TwoStep (manual milk foam production using steam plant)
W2 Water connection, optional internal water tank
4.2.2 Add-on units
Type code Description
SU05 Cooling unit (5 l) positioned next to the coffee machine
Type code Description
SÜ12 Cooling unit (12 l or 2 x 4.5 l) right next to the coffee machine
KE200 Cooling unit (4 l) positioned next to the coffee machine
MU Milk pump module
UC05 Base cooling unit (5 l), positioned directly below the coffee machine
UC09 Base cooling unit (9 l), positioned directly below the coffee machine
UT12 Under-counter cooling unit (12 l or 2 x 4.5 l)
FS30 Flavor Station with 3 flavor pumps
FSU30 Under-counter Flavor Station with 3 flavor pumps
CW Cup warmer
AC Accounting system
CC Coin changer
CL Cashless
CV Coin validator
FM FoamMaster (cold and warm milk, cold and warm milk foam)
EC EasyClean
CM CleanMaster
MS MilkSystem
Twin Modified cooling unit for the simultaneous use with two coffee machines
5 DESCRIPTION OF MACHINE
5.1 Coffee machine
The A600 coffee machine is available with numerous options. To provide you with an overview of your machine, a sample configuration is illustrated here. Please note that your coffee machine may look different from the configuration shown here.
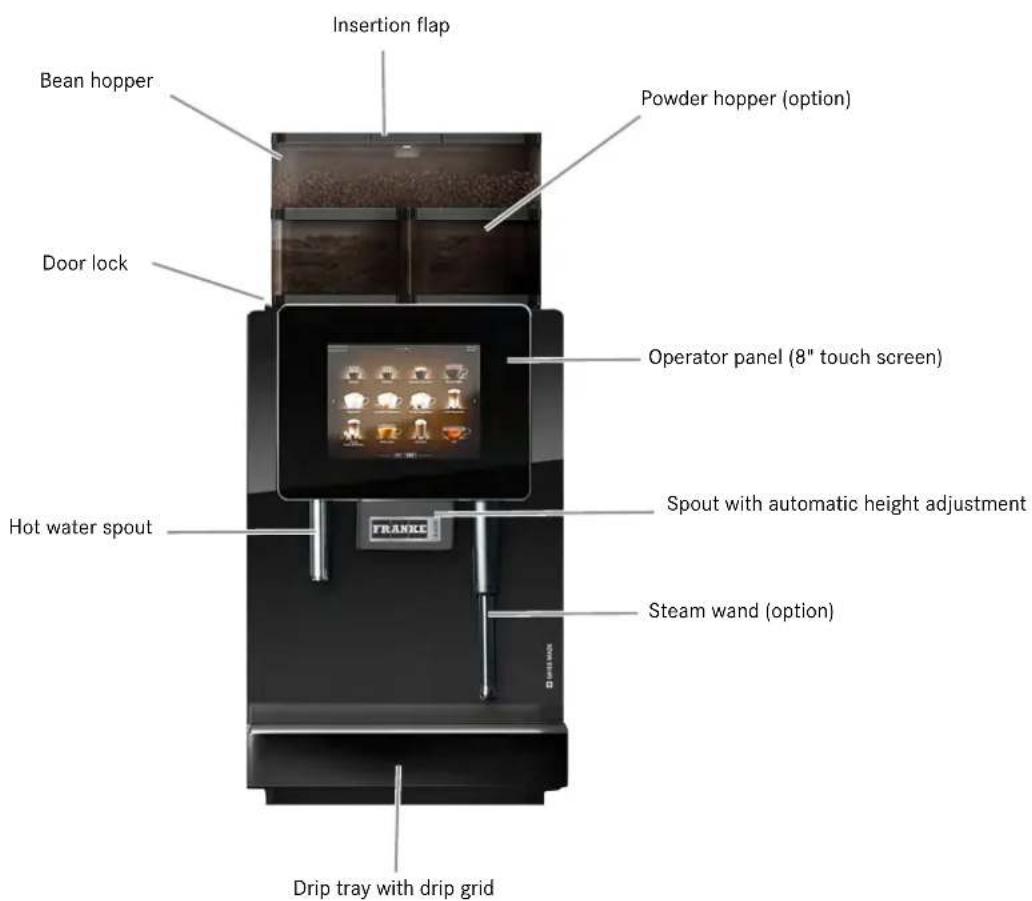
5.1.1 Standard
- 8" touch screen
- One grinder (rear LH)
- Hot water spout
- Spout with automatic height adjustment
- Main water connection
- Support for video files
- Feet, 40 mm
5.1.2 Options
- iQFlow
- CleanMaster
- Second grinder (rear RH)
- Powder hopper
- Second powder hopper (front RH)
- Iced Coffee Module (right-front)
- Steam wand
- Autosteam (steam wand with temperature sensor)
- Autosteam Pro (steam wand with temperature sensor and programmable milk foam consistency)
- Two milk types
- Grounds ejection
- Lockable bean and powder hopper
- Cup sensor
- Optical Cup Recognition
- First Shot
- Feet, 7 mm
- Adjustable feet, 70 mm
- Adjustable feet, 100 mm
- Touchpad as accessibility feature for wheelchair users
- Tank kit (not in conjunction with Iced Coffee Module)
- Franke Digital Services
5.1.3 Coffee machine components

5.2 Add-on units
5.2.1 Parts of the cooling unit
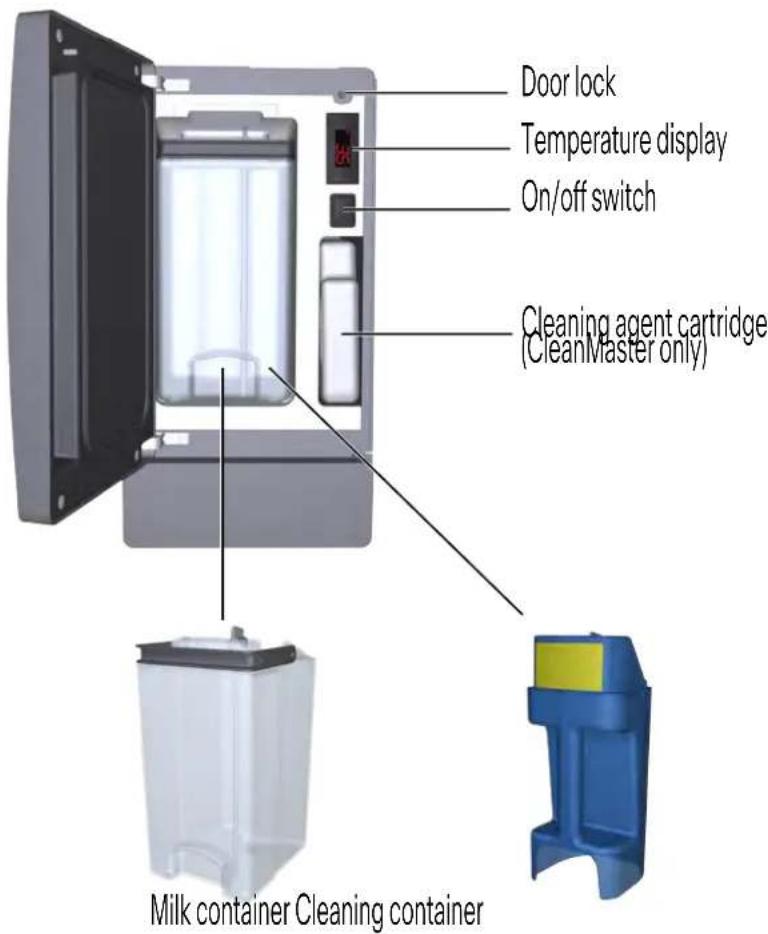
SU05
5.2.2 Flavor Station FS/FSU EC
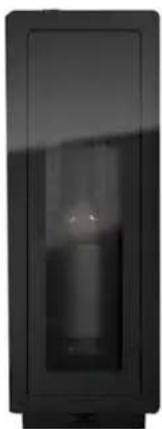

Our Flavor Station is available to you as an option for unusual creations. You can use the Flavor Station to extend your range with up to six different flavors.
5.2.3 Cup warmer
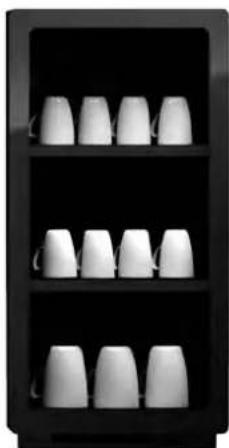
To enjoy coffee at its best, you need pre-heated cups. The cup warmer with four heatable shelves fits perfectly to your coffee machine.
5.2.4 Accounting system
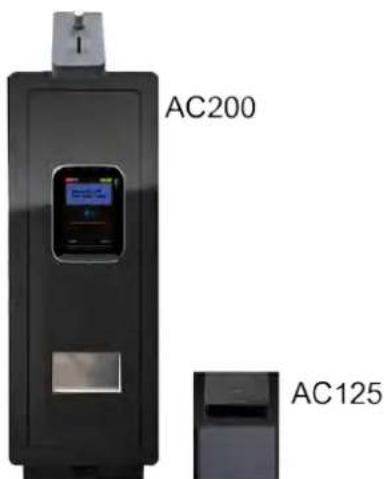
The accounting system processes all payment transactions and records all accounting data.
Interfaces:
- VIP
Payment systems:
- Coin validator
- Coin changer
- Card readers
5.2.5 Iced Coffee Module
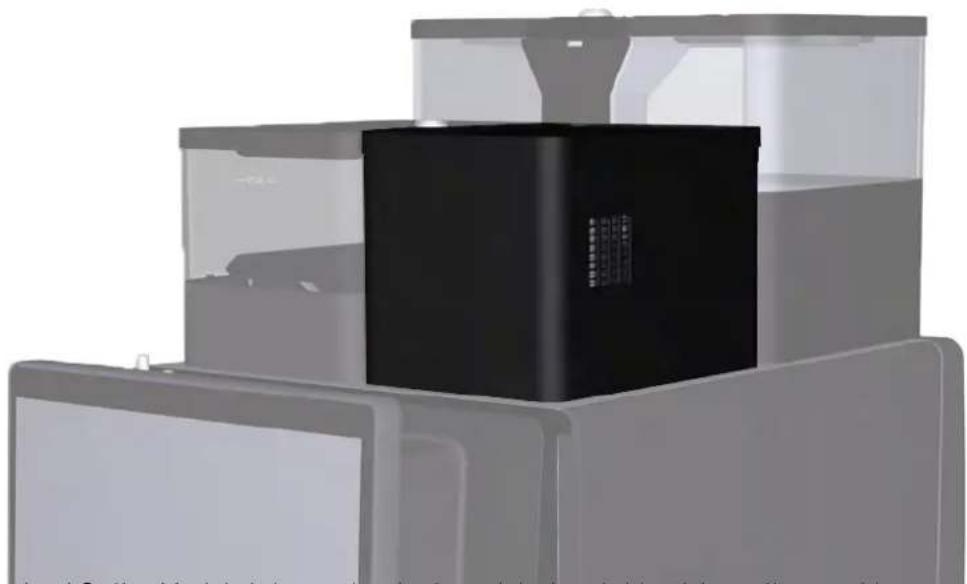
- The Iced Coffee Module is located at the front right-hand side of the coffee machine.
- The Iced Coffee Module actively cools the freshly brewed coffee to below 40 °C.
- The module is available as an optional extra and cannot be retrofitted.
- The Iced Coffee Module is cleaned as part of the existing coffee machine cleaning process. This means that no additional manual cleaning work is required, and there is no need for a separate cleaner.

Iced Coffee, Iced Espresso, Iced Americano, Iced Caffè Latte, Iced Cappuccino, Iced Latte Macchiato
The Iced Coffee Module opens up a great many possibilities with regard to the beverages you can make, e.g. Iced Espresso, Iced Coffees and Iced Americano. These beverages can also be combined with milk, milk foam and/or syrup.
5.3 Overview of operating modes

The suitable operating mode depends on the utilization of your coffee machine, your product range and the preferences of your customers.
Your service technician will be happy to help you set the appropriate operating mode.
5.3.1 User interface
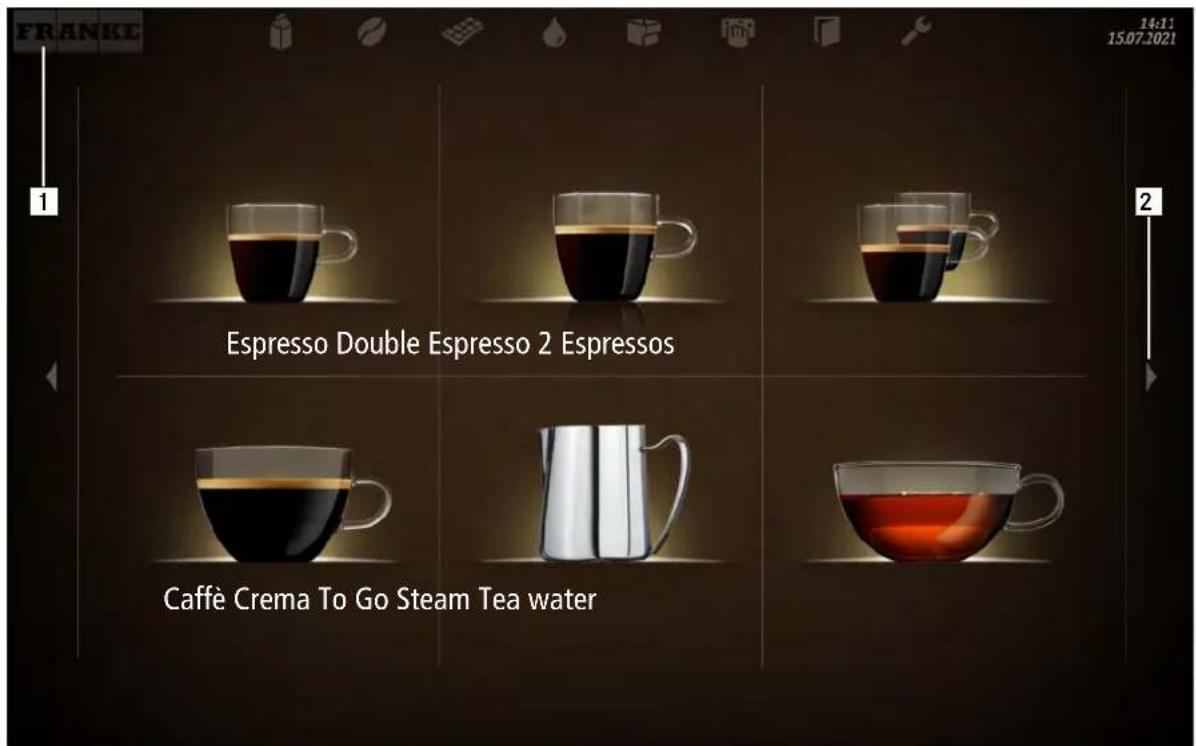
1 Use the Franke logo to switch between the maintenance level and product selection 2 Scroll forwards or backwards
5.3.2 Cash Register operating mode
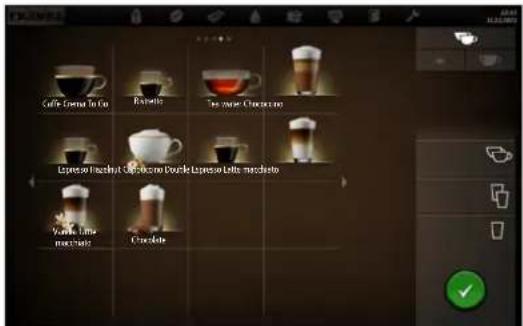
Cash Register is the operating mode for non-self-service utilization. You can add additional orders while your coffee machine is preparing a product.
Structure of the user interface
- Level 1: Product selection, up to 5 pages. Column with the possible options, the production status, and the waiting list
- Level 2: Display of 4, 9, or 16 product buttons per page
Individual adaptations
- Display: 2x2, 3x3, or 4x4 products per page
- Depiction: Photo-realistic, drawn
5.3.3 Quick Select operating mode
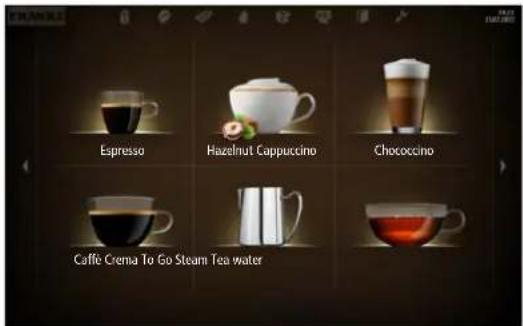
The Quick Select operating mode is the standard setting for self-service. Once your customer has selected a beverage, he/she can adapt it in the second step if product options are activated.
Structure of the user interface
- Level 1: Product selection, up to 5 pages; 6, 12 or 20 product buttons can be displayed per page
- Level 2: Customize beverages, select product options, initiate beverages preparation process
Individual adaptations
- Display: 2x3, 3x4 or 4x5 products per page
- Activate Credit Mode
- Individual arrangement of beverages
5.3.4 Operating modes in combination with Credit Mode

The Credit Mode works with every operating mode and makes the product prices, credit and lack of credit clear on the operator panel.

In the Drink Selection status, you cannot add any drink options with the Credit Mode configuration.
You can activate the Credit Mode in the My settings menu under 1 Set machine > 1.12 Payment. Select Activate payment.

Display
- Product prices
- Credit
- Missing credit
Menu item 1.12 Payment
5.4 Franke Digital Services (option)
Developed specially for the Franke coffee machine fleet, our digital services give you control and a clear overview of all activities and information about the coffee machines. Centrally controlled remote maintenance, such as software and configuration updates, means that on-site interventions are not required. You can obtain additional information from your Franke service technician or on the Franke website.
6 INSTALLATION
6.1 Preparations
- The main power connection for the coffee machine must be protected by a residual current circuit-breaker (RCCB).
- Each terminal of the power supply must be able to be interrupted using a switch.
- The water connection must comply with the requirements of the water supply [31] and local and national rules and regulations.
- The coffee machine must be connected to the water supply with the supplied hose kit. Do not use any other water hoses that happen to be present.
- Prepare a stable, ergonomic surface (min. load capacity: 150 kg). The operator panel should be at eye level.

You must have completed these preparations before one of our service technicians can install the coffee machine for you. Your service technician will install your coffee machine and carry out the initial commissioning process. He will instruct you in the basic functions.
6.2 Dimensions

All dimensions are specified in mm.

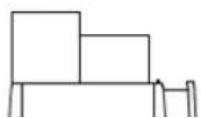

Hose feedthrough in the counter

NOTICE
Overheating damage
If the clearances around and above the machine are too small, heat may accumulate in the machine and lead to faults.
a) Maintain the prescribed installation dimensions and clearances. b) Take care to ensure that the clearance spaces are not blocked.
Minimum clearances
- To the rear panel: 50 mm
- Above: 200 mm (for filling and removal of the bean hopper)
To the side: 100 mm (or equivalent on the side)
Connection to the main water supply: G3/8" compression fitting and metal hose, length = 1500 mm
mm
Only connect with the hose kit provided.
- The main water connection must meet the requirements of the technical data and comply with applicable federal, state, and local regulations.
- The main water connection must have a backflow prevention device.
- The main water connection must be equipped with a shut-off valve and a check valve with an upstream filter accessible for inspection. It must be possible for the filter to be removed for cleaning.
- Water from the household decalcification system must not be used.
- Filter with at least 100 loops/inch (UL)
6.3.2 Determining the water hardness with a measuring strip

NOTICE
Machine damage caused by limescale build-up
If the water hardness setting is incorrect, limescale can build up in the coffee machine. Limescale deposits may damage the coffee machine.
a) Measure the water hardness during commissioning. Then set the water hardness in the Commissioning menu on the basis of the measurement.
The hardness level of the water in use determines the capacity of the water filter. If the hardness level in the machine program is known, it will automatically request a filter change at the correct time.
![Art. 110047 Total Hardness Test Gesamthärte-Test M Merck Millipore EMD Millipore Dip briefly (1 s) shake off excess. Compose after 1 min. Kurz eintsuche (1 s), leicht abschüften. Vergleichen nach 1 min. 5 x green / grün [ ] 0 °d / 0 °/ / 0 °f 1 x red / rot [ ] >5 °d / >6 °/ / >9 °f 2 x red / rot [ ]…](/content/2026/05/874550/images/c535b85bb9220096d92c030dcb96af1101604222106290379c23609db1fb0781.jpg)
Packaged water hardness measuring strip
- Remove the measuring strip from the packaging.

- Dip the measuring strip into the water for 1 second.
- Gently shake off any excess water.

⇒ The color of the measuring strip will change.
- After one minute, read off the water hardness level. The water hardness corresponds to the number of red-colored fields.
- Enter the measured result into the maintenance menu of the machine under Water settings.
Hardness level Result shown on the measuring strip
11x red >5° dH/>6°e/>9°fH
2 2 x red >10° dH/>13°e/>18°fH
Water hardness
| Hardness level Result shown on the measuring strip | Water hardness |
| 3 3 x red >15° dH/>19°e/>27°fH | |
| 4 4 x red >20° dH/>25°e/>36°fH | |
| 5 5 x red >25° dH/>31°e/>45°fH | |
| Claris water filter capacity | |
| Water hardness 12 3 4 5 | |
| Filter volume 500 | 300 | 200 | 150 | 100 | | |
| Service life in months 10 | 8 6 | 4 2 |
6.3.3 Water quality
| Total hardness: | 4-8° dH GH (German total hardness) |
| 7-14° fH GH (French total hardness) |
| 4,2-8,3 GPG |
| 70-140 ppm (mg/l) |
| Carbonate hardness | 3-6° dH KH / 50-105 ppm (mg/l) |
| Acid content/pH value | 6.5-7.5 pH |
| Chlorine content | < 0.5 mg/l |
| Chloride content | < 30 mg/l |
| TDS (total dissolved solids) | 30-150 ppm (mg/l) |
| Electrical conductivity (measured) | 50-200 μS/cm (microsiemens) |
| Iron content | < 0.3 mg/l |
- Color: Clear
- Taste: Fresh and pure taste
- Aroma: No perceptible aroma
- No rust particles in the water
- Reverse osmosis: The water must have a dissolved solids content of at least 30-50 ppm (30-50 mg/l) in order to prevent the boiler being overfilled.
Evaluating the risk of corrosion
| The following formula can be used for evaluation: |
| Calculated conductivity = measured conductivity [μS/cm] - (measured total hardness [dH GH] x constant) |
| - Measured conductivity in μS/cm |
| - Measured total hardness in dH GH |
| - Constant = 30 [μS/cm]/[ dH GH] |
| Calculated conductivity | Risk of corrosion |
| <200 μS/cm | low |
| 200 – 500 μS/cm | increased |
| >500 μS/cm | high |
Calculation example:
- Measured conductivity 700 μS/cm
- Measured total hardness 18 dH GH
- Calculated conductivity = 700 μS/cm - (18 x 30 μS/cm) = 160 μS/cm
The result of the calculation is 160 μS/cm and means that there is a low risk of corrosion.
6.3.4 Water outlet
- Drain hose: D = 20 mm, L = 2000 mm
- Connection to a lower-lying siphon
7 FILLING AND EMPTYING
7.1 Filling beans

WARNING
Risk of injury
If objects find their way into the bean hopper or grinder, splinters may be ejected, leading to injury.
a) Never insert any objects into the bean hopper or grinder.

NOTICE
Poor beverage quality
The oil from the coffee beans is deposited on the inside of the bean hopper as a thin film of oil. This deposited oil ages quickly and impairs the taste of the beverages produced.
a) Remove the oil film from the inside of the bean hopper on a daily basis. b) To do this, use a dry cloth or a cloth moistened only with water. c) Do not use any cleaners, as these alter the taste of the coffee.

Fill the bean hopper with coffee beans.
Fill the powder hopper with powder suitable for automatic coffee makers.

- Lift off the bean hopper lid.
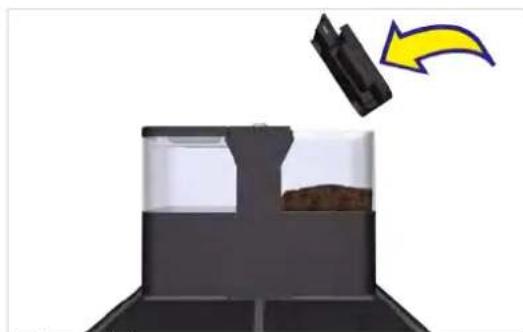
- Fit the lid.
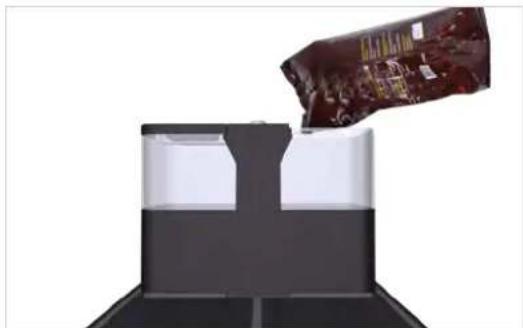
- Fill coffee beans.
7.2 Fill powder.
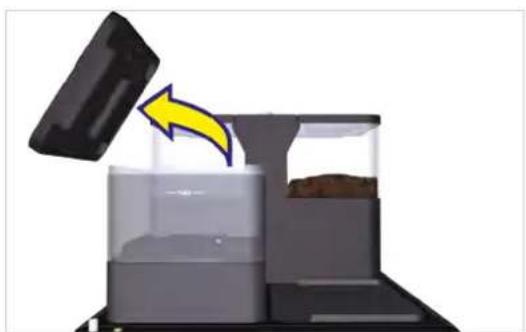
- Lift off the powder hopper lid.
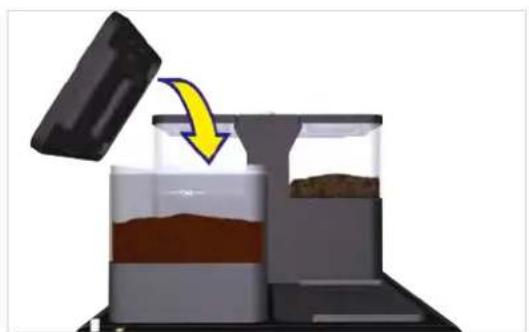
- Fit the lid.
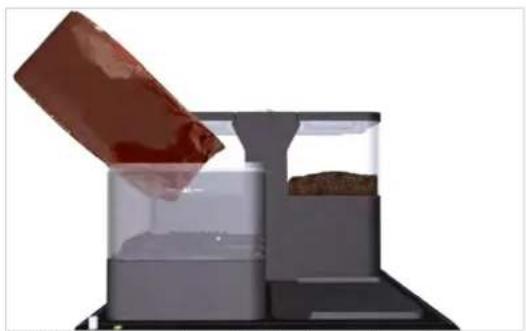
- Fill with powder suitable for automatic beverage dispensers.
7.3 Filling the cooling unit

CAUTION
Germs in unpasteurized milk
Germs in unpasteurized milk could pose a health hazard.
a) Do not use any unpasteurized milk. b) Only use pasteurized or long-life milk.

NOTICE
Machine damage
Using incorrect liquids can damage the machine.
a) Only fill the milk container with milk. b) Use water and a mild cleaner to clean the milk container.

Spoiled milk
Insufficient cooling or hygiene can cause milk to spoil.
a) Only use precooled milk (2-5 °C). b) Only store milk in the cooling unit during operating hours. Outside operating hours, e.g. overnight, store the milk in a refrigerator. c) Clean the machine and cooling unit once a day. d) Only touch the suction hose, the inside of the milk container, and the milk container lid after sanitizing your hands, or when wearing single use gloves. e) Place the container lid with the suction hose on a clean surface only.

The milk system is prepared semi-automatically after a cleaning or a filling procedure. Please observe the instructions in the event messages. Access to the event messages is through the dashboard.
7.3.1 SU05 cooling unit
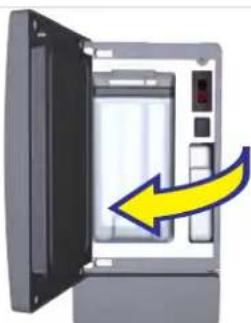
- Open the door.
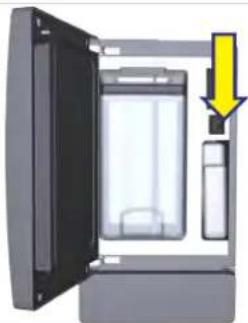
- Switch on the cooling unit.
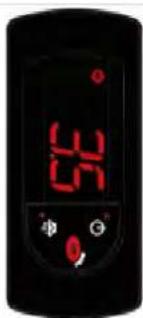
⇒ The current cooling chamber temperature is displayed.
- Remove the milk container lid and suction hose and place them on a clean surface.
- Fill the container with a maximum of 5 l of cooled milk.
- Attach the milk container lid.
- Push the milk container all the way into the cooling chamber.

- Close the door.
7.3.2 Cooling unit SU12/UT12
- Open the door.
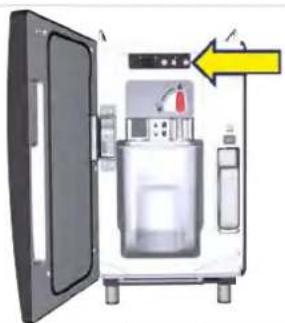
- Switch on the cooling unit.
⇒ The current cooling chamber temperature is displayed.

- Only pull out the milk container until the point where the sliding cover of the container lid is fully visible.

- Push the sliding cover backwards.
- Fill the milk container with cooled milk.
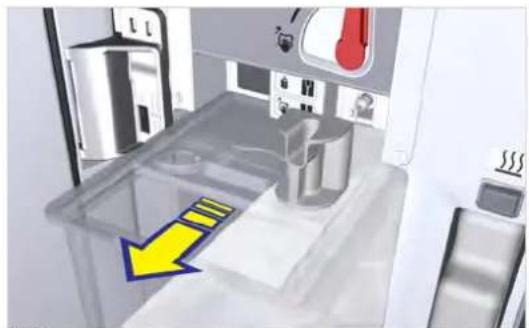
- Close the slide lock.

- Push the milk container all the way into the cooling chamber.

- Close the door.
7.4 Filling the Flavor Station FS EC

The switch for switching the Flavor Station on is located inside, on the left-hand side of the rear panel.
- Use the key to unlock the Flavor Station.

- Press the release button and open the Flavor Station.
- Switch on the Flavor Station.
- Lift the bottle holders.
- Place the bottles in the Flavor Station.
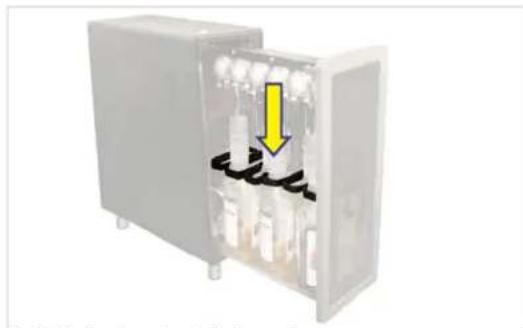
- Pull the bottle holders down.
- Slide the hose connection upwards and onto the hose.

- Insert the hose into the bottle.
- Push the hose connection into the top of the bottle.
- Close the Flavor Station.
7.5 Setting the grind coarseness

WARNING
Risk of injury
If objects find their way into the bean hopper or grinder, splinters may be ejected, leading to injury.
a) Never insert any objects into the bean hopper or grinder.

Grinder adjustment wrench (560.0003.876)

Changing the grind coarseness affects the coffee quantity. The grinders must therefore be calibrated after adjusting the grind coarseness.
If required, the grind coarseness can be set in stages for each grinder.
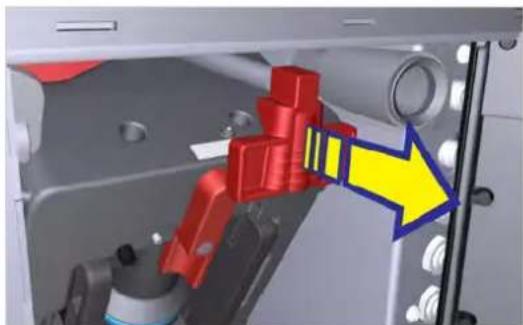
- Pull the locking slide towards the front up to the stop.
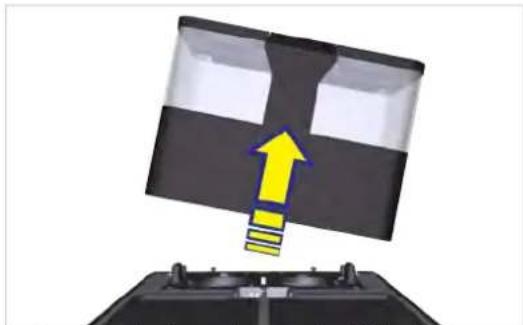
- Remove the bean hopper by lifting it upwards.
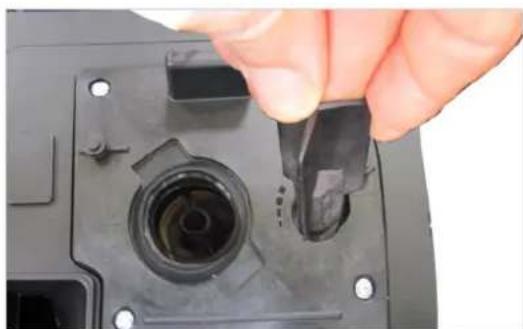
- If necessary, adjust the grind coarseness using the grinder adjustment wrench.
⇒ Turn counterclockwise for a finer grind. Turn clockwise for a coarser grind.
- Check the grind produced and adjust if necessary.
⇒ +2: very coarse / 0: normal / -2: very fine
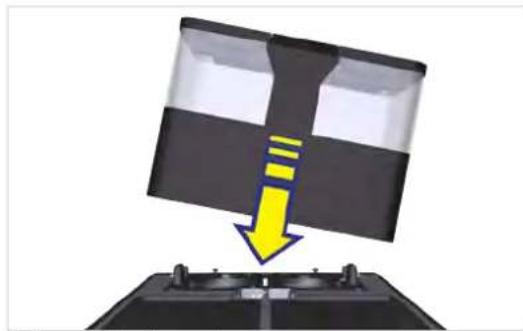
- Attach the bean hopper.
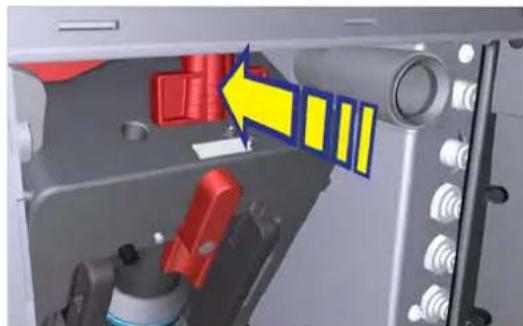
- Push the locking slide all the way in.

NOTICE
Impairment of function
If the bean hopper and powder hopper are not locked correctly, the function of the coffee machine and the product quality may be impaired.
a) Push the locking slide all the way in.
7.6 Emptying the bean hopper

- Pull the locking slide towards the front up to the stop.
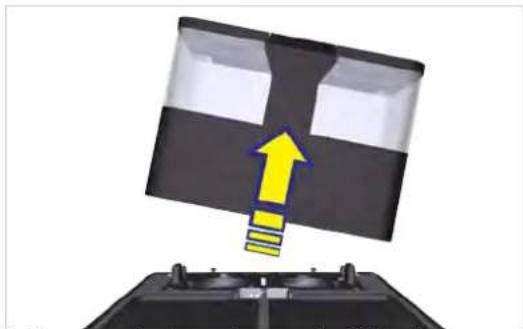
- Remove the bean hopper by lifting it upwards.
- Empty, clean, and dry the bean hopper.
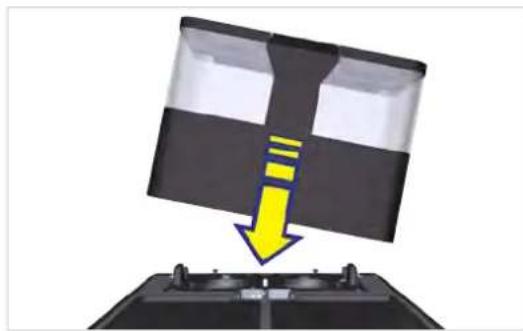
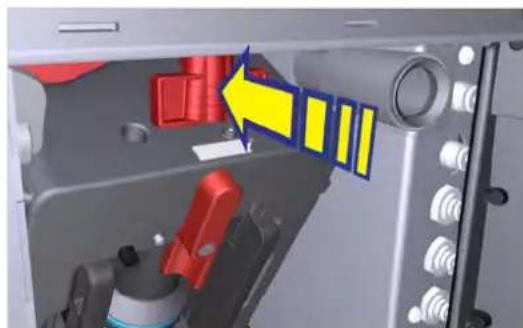
- Push the locking slide all the way in.

NOTICE
Impairment of function
If the bean hopper and powder hopper are not locked correctly, the function of the coffee machine and the product quality may be impaired.
a) Push the locking slide all the way in.
7.7 Empty the powder hopper.

CAUTION
Cutting injuries/crushing
The powder hopper's worm gear mechanism can cause cuts or crushing injuries.
a) Exercise care when cleaning the powder hopper.

NOTICE
Contamination from powder
Powder can fall from the powder hopper.
a) Always transport the powder hopper in an upright position and ensure it is closed.
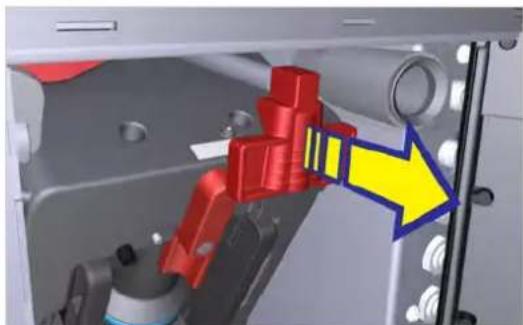
- Pull the locking slide towards the front up to the stop.
- Empty, clean, and dry the powder hopper.

- Attach the powder hopper.
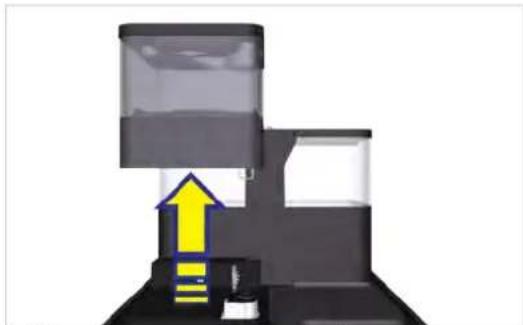
- Lift and remove the powder hopper.

- Push the locking slide all the way in.

NOTICE
Impairment of function
If the bean hopper and powder hopper are not locked correctly, the function of the coffee machine and the product quality may be impaired.
a) Push the locking slide all the way in.
7.8 Emptying the grounds container

NOTICE
Coffee residue can lead to the formation of mold.
a) Empty and clean the grounds container at least once a day.
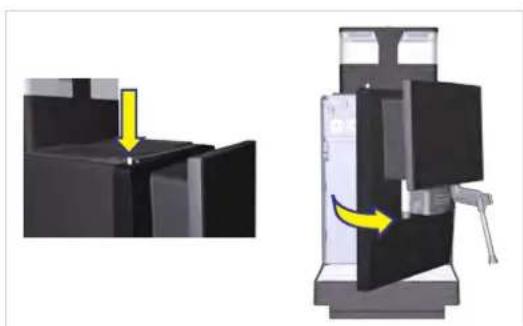
- Open the door of the coffee machine.
⇒ The message Door open appears on the user interface.
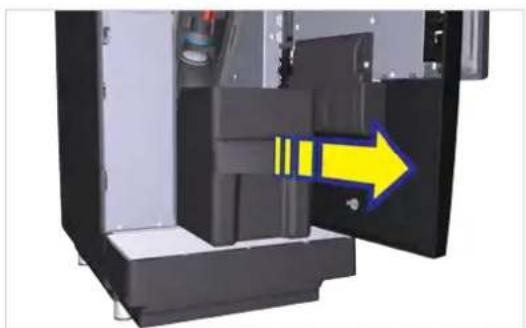
- Remove the grounds container.
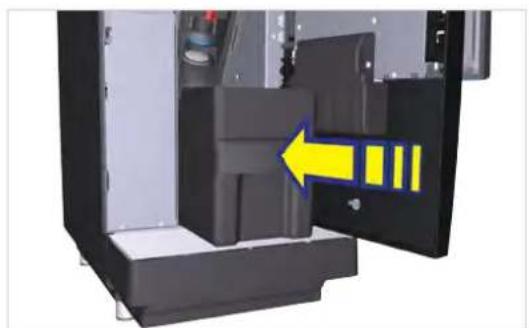
- Insert the grounds container and close the door.
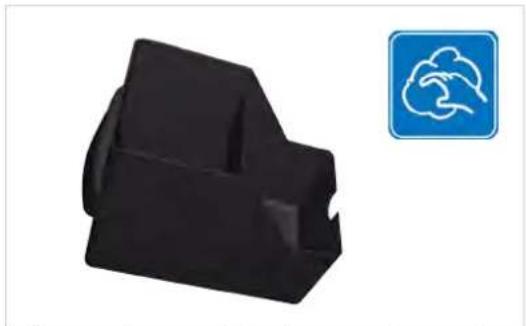
- Empty, clean, and dry the grounds container.
7.9 Empty the drip tray

Clean the drip tray when a message appears on the control panel asking you to do so.

NOTICE
Improper handling
Liquid may leak out of the drip tray.
a) Transport and empty the drip tray carefully.
√ The full drip tray message is displayed on the control panel.
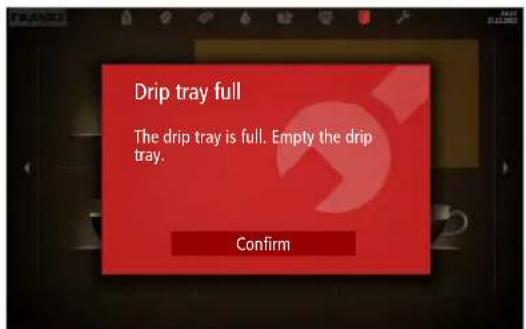
- Pull out the drip tray.
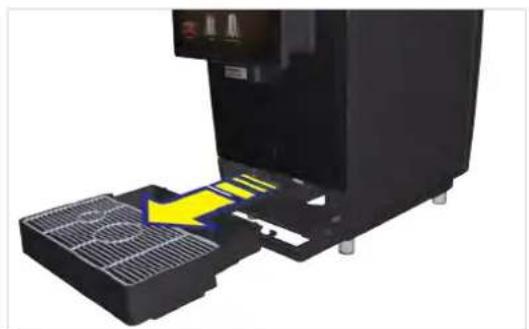
- Remove the drip grid.
- Remove the drip tray.
- Clean and dry the drip tray and drip grid.
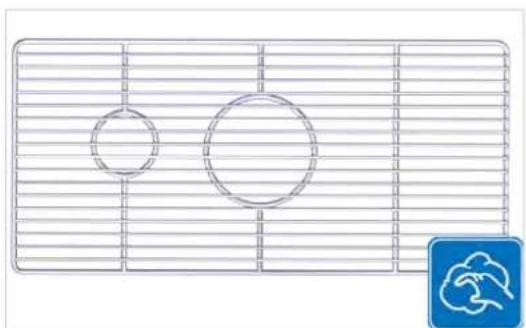
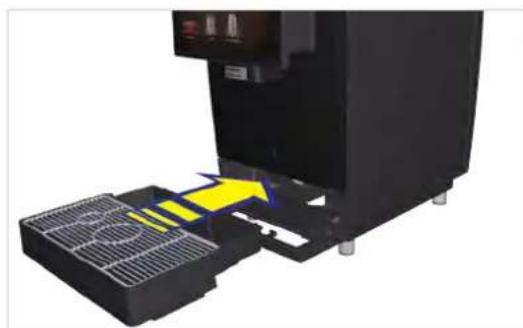
- Place the drip grid on the drip tray.
- Push the drip tray into the machine.
- Tap Confirm.
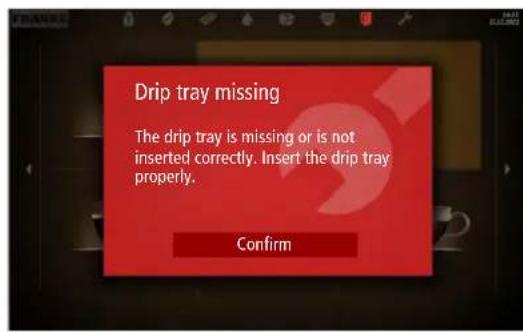
7.10 Emptying the cooling unit

NOTICE
Spoiled milk
Insufficient cooling or hygiene can cause milk to spoil.
a) Only use precooled milk (2-5 °C). b) Only store milk in the cooling unit during operating hours. Outside operating hours, e.g. overnight, store the milk in a refrigerator. c) Clean the machine and cooling unit once a day. d) Only touch the suction hose, the inside of the milk container, and the milk container lid after sanitizing your hands, or when wearing single use gloves. e) Place the container lid with the suction hose on a clean surface only.

NOTICE
Blockage of the milk system
Fibers from unsuitable cleaning cloths can enter the milk/media system and cause a blockage. This can damage the machine.
a) Use a microfiber cloth to clean the milk container.
7.10.1 SU05 cooling unit

- Open the door.
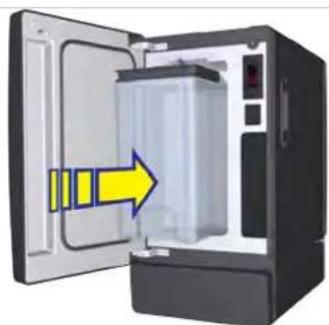
- Insert the cleaned milk container.
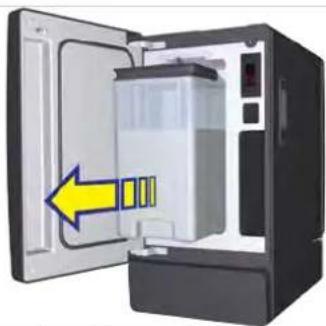
- Pull out the milk container.
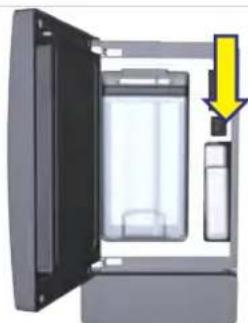
- Store the milk in a refrigerator, or dispose of it if necessary.
- Switch off the cooling unit if it is no longer required. Leave the door to the switched-off cooling unit slightly open to prevent odors from building up inside.
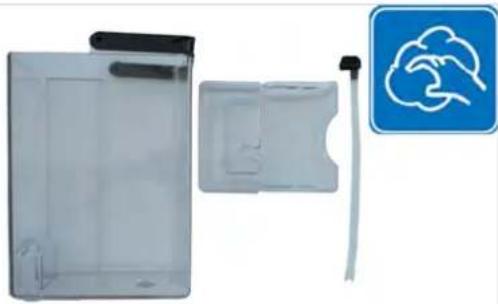
- Clean the milk container, the parts that feed the milk into the system, and the cooling chamber.
7.10.2 Cooling unit SU12/UT12
- Open the door.
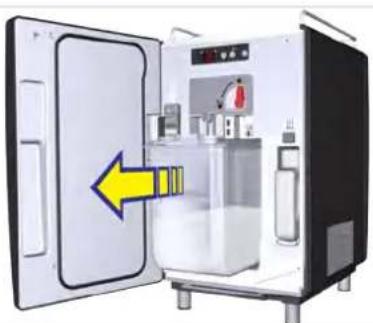
- Pull out the milk container.
- Store the milk in a refrigerator, or dispose of it if necessary.
- Clean the milk container, milk container lid, reversible adapter, suction hoses, and cooling chamber.
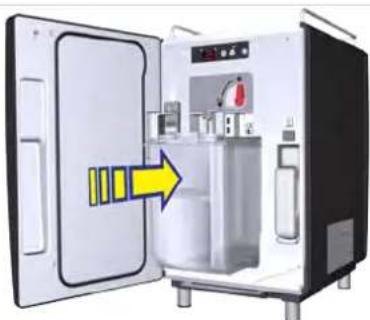
- Insert the cleaned milk container.
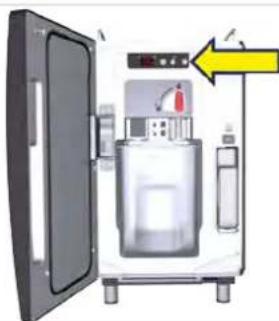
- Switch off the cooling unit if it is no longer required.
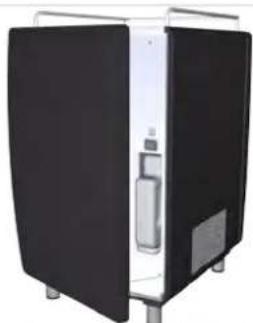
- Leave the door to the switched-off cooling unit slightly open to prevent odors from building up inside.
8 PREPARING BEVERAGES

WARNING
Risk of scalding
Hot beverages can lead to scalding.
a) Always be careful with hot beverages.
b) Use only suitable drinking vessels.
8.1 Preparing beverages with Quick Select
- Place an appropriate drinking vessel under the dispensing spout.
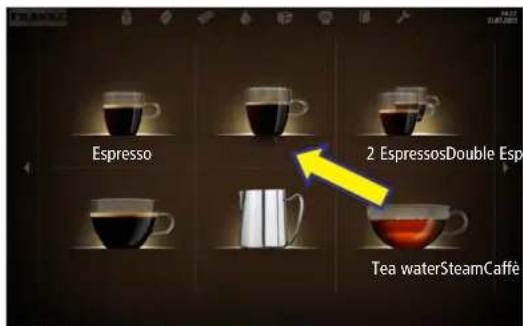
- Select a product.
→ The product preview will appear.
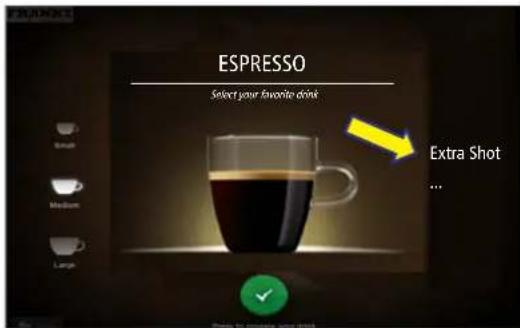
- Select product options.
- Press the green button to start preparation.
→ The beverage is prepared.
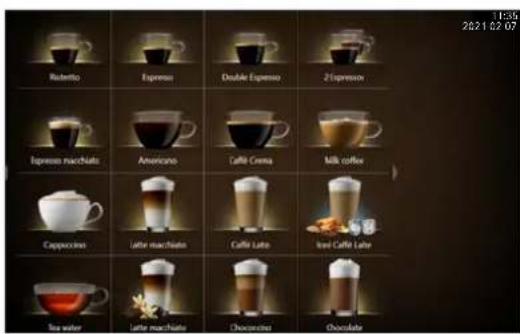
⇒ The product selection screen appears when the product is ready.
8.2 Preparing beverages with Cash Register

When preparing several products one after the other, please observe the following:
a) Have sufficient drinking vessels ready to use. b) You can continuously add new products to the waiting list during the preparation. c) You can select and clear products from the waiting list.
- Place an appropriate drinking vessel under the dispensing spout.
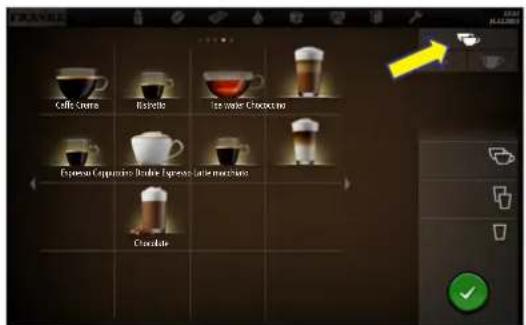
- Select product options.
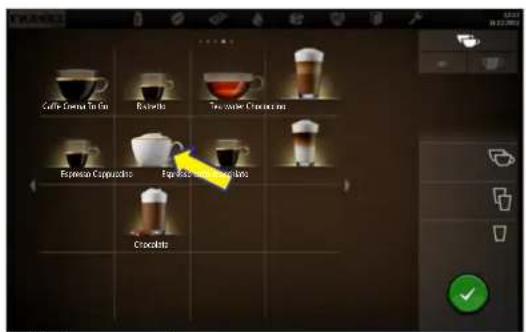
- Select a product. → The preparation begins.
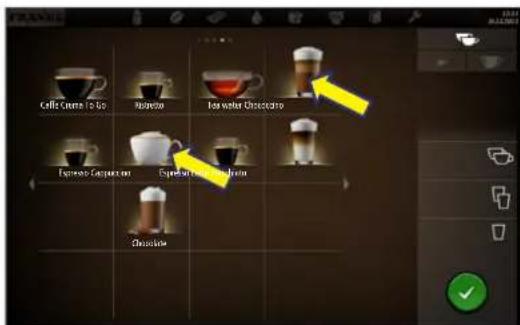
- Add more products to the waiting list as needed.
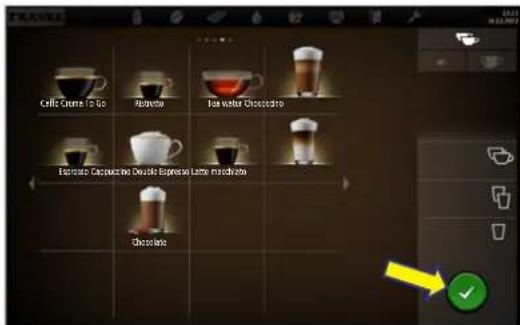
- Start the preparation of each of the products in the queue list by pressing the green button.
→ The next preparation begins. → The product selection appears. → All products are ready.
8.3 Preparing beverages with ground coffee
Only ground coffee may be used. Instant coffee made from dried coffee extract cannot be used.

- Place an appropriate drinking vessel under the dispensing spout.

- Press the Decaffeinated coffee selection button.
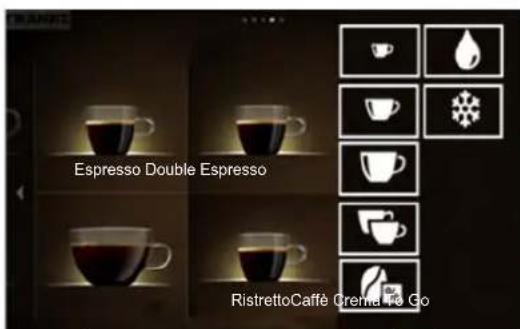
⇒ The Decaffeinated coffee selection button illuminates. → This message appears.

- Open the insertion flap.
- Fill powder.
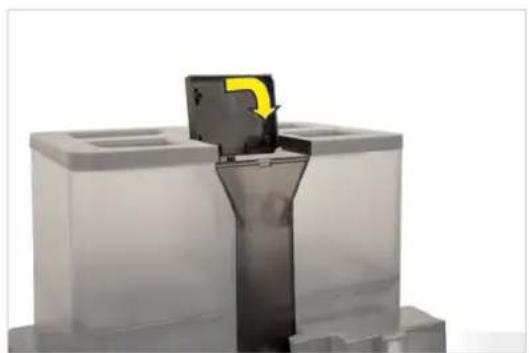
- Close the insertion flap.
- Confirm the message by pressing OK.
→ The preparation begins. → The product selection appears. → The product is ready.
8.4 Preparing hot water

You can stop the hot water spout at any time by pressing the cancel button.
Example: Quick Select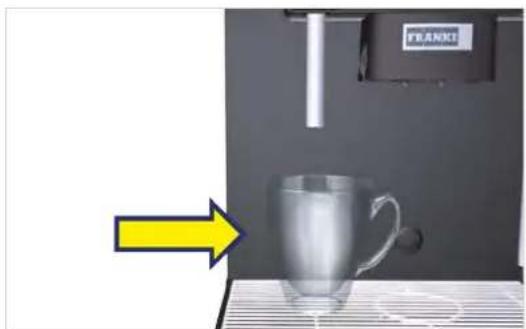
- Place an appropriate drinking vessel under the hot water spout.
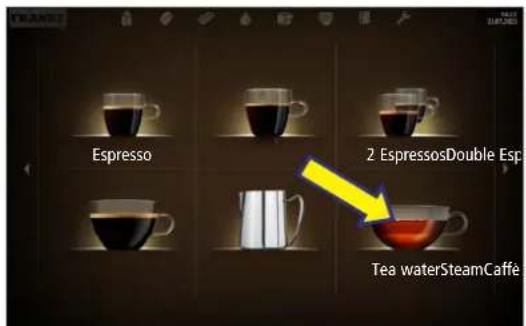
- Select Tea water.

- Select the cup size.
Hot water is dispensed until the cycle is complete.
8.5 Steam dispenser (Autosteam/Autosteam Pro)

Autosteam is suitable for manually heating and foaming/frothing of milk and for heating other drinks.

Using the purging function will remove any condensation from inside the steam wand.
- Press the evaporation button.
- Hold a suitable container under the steam wand.
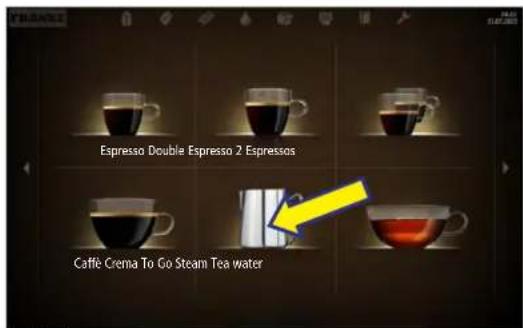
- Select steam output.
⇒ The wand will start producing steam.
⇒ The steam will automatically stop when your beverage has reached the specified temperature. ⇒ The beverage overview screen appears.
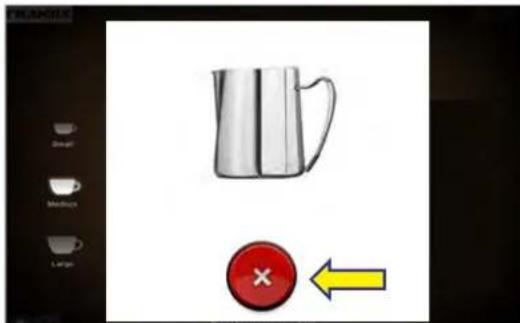
- If applicable, press the cancel button to stop the steam.
- Press the evaporation button.
8.6 Preparing beverages using the touchpad

The touchpad is an accessibility feature for wheelchair users.
- Place an appropriate drinking vessel under the dispensing spout.

- Use the touchpad to move the cursor to the required place on the screen.
- Tap on the touchpad once.
⇒ The coffee machine performs the chosen action.
9 CLEANING
9.1 Introduction
The perfect coffee experience depends on a perfectly cleaned coffee machine, cooling unit and Flavor Station (option). Increase your product quality! Clean your coffee machine and add-on units at least once a day and more frequently if necessary.
The automatic cleaning process involves cleaning the coffee, cooling unit and Flavor Station (if applicable).

NOTICE
Dirty components
Dirty components can have a negative effect on the function of the machine and the quality of beverages.
a) Clean the removable components using the 5-step method.

The removable components of the coffee machine, cooling unit, CleanMaster and Flavor Station (optional) are not dishwasher-safe.

Rinsing is not a substitute for daily cleaning! Rinsing is necessary to remove residue build-up in the coffee and milk systems.
The machine automatically rinses after certain time intervals as well as when it is switched on or off.
9.2 Required cleaning accessories
- Cleaning tablets
- Microfiber cloth
- Paint brush
- Brush set
- Cleaning agent cartridge (for cooling unit/flavor station with EC)
- Spout cleaning device (if the hot water also comes from the central spout)
9.3 5-step method

Clean the removable components of your coffee machine using the 5-step method. The display shows you the components that can be removed during cleaning.

NOTICE
Cleaning the cooling unit containers and accessories
Clean the containers and accessories, such as the lid, suction hose, suction nozzle, etc. using the 5-step method.
- Remove coarse dirt with a cleaning brush or paint brush.
- Soak the components in hot water with a mild cleaner.
- Wash the components.
- Rinse the components thoroughly.
- Dry the components.
Carry out any additional cleaning needed by hand
- Inner side of the door and door gasket on cooling unit
- Inner surfaces and shelf (if applicable) in the cooling chamber
9.4 Starting the cleaning process
9.4.1 Starting cleaning via the Cleaning and Maintenance menu

WARNING
Risk of scalding
Hot liquids and steam escape during cleaning and can lead to scalding.
a) Keep hands away from the spouts and nozzles during this process.

When the cleaning cycle is complete, the machine either switches back to the maintenance level or the energy saving mode. Your service technician can set the desired option for you.
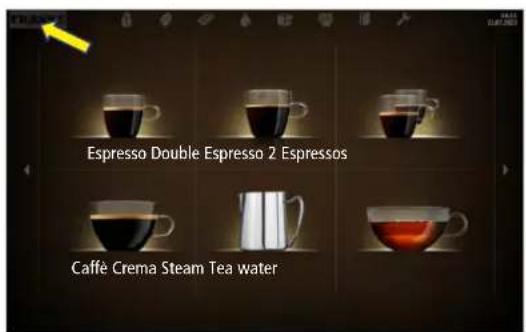
- Tap the Franke logo.
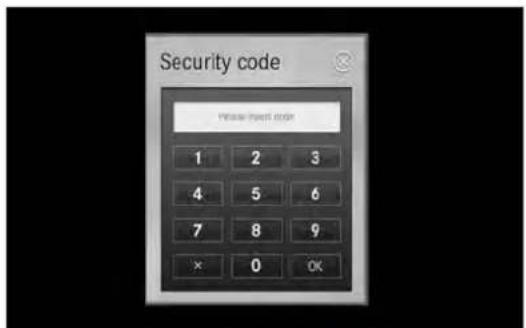
- Enter the PIN. PIN codes [▶ 58]
- Press ok.
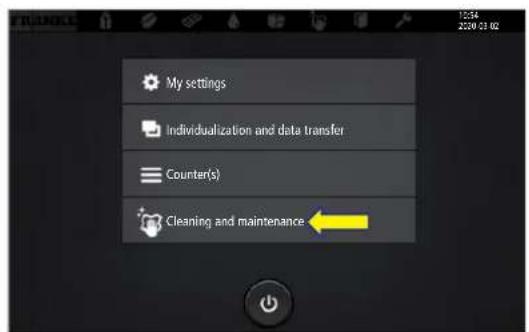
- Select Cleaning and Maintenance.
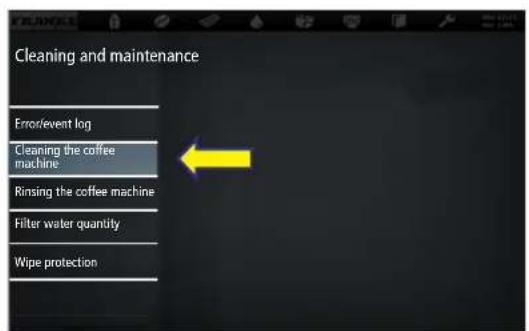
- Select clean coffee machine.
- Confirm message with yes to begin the cleaning process.
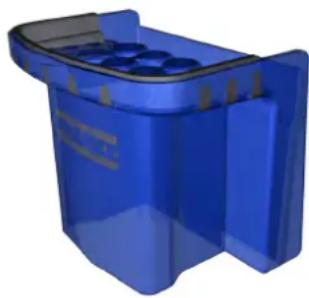
- Follow the instructions on the user interface and confirm the completed steps by selecting Next.
→ The machine shows the next step.
9.5 Cleaning the aerator
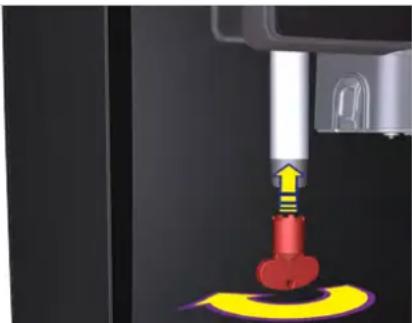
- Remove the aerator for hot water with the tool and descale.
- Have the spout cleaning device ready and position it under the lowered spout when prompted.
- Follow the instructions on the user interface and confirm the completed steps by selecting Next. ⇒ The machine shows the next step.
- Screw the aerator back in.
9.6 Weekly cleaning

Clean the machine components listed in this chapter at least once a week, in addition to the daily cleaning process. Clean the machine immediately if you notice any soiling. Observe the cleaning instructions for this.
9.6.1 Cleaning the machine surface
- Clean the surface of the machine with a damp cloth.
- If necessary, use a mild cleaner. NOTICE! Do not use abrasive cleaners.
9.6.2 Cleaning the bean hopper and powder hopper

CAUTION
Moisture within the bean hopper may lead to the growth of mildew.
a) Do not bring the bean hopper into direct contact with water. b) Use only a damp cloth for cleaning. c) Ensure that the bean hopper is completely dry before attaching it.

CAUTION
Cutting injuries/crushing
The powder hopper's worm gear mechanism can cause cuts or crushing injuries.
a) Exercise care when cleaning the powder hopper.
Use a dry cloth or one that has been moistened with water only. Do not use any cleaners, as these alter the taste of the coffee.
- Open the door of the coffee machine.

- Pull the locking slide towards the front up to the stop.
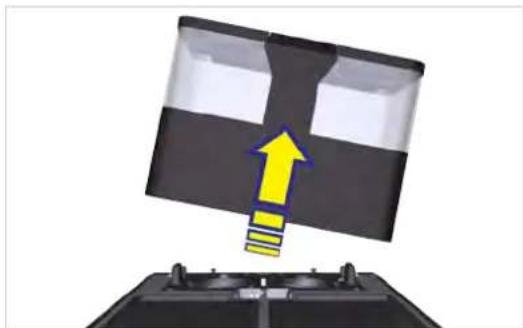
- Remove the bean hopper by lifting it upwards.
- Empty the bean hopper and powder hopper (if present).
- Remove the oil film on the inside of the bean hopper using a cloth.
- Clean the powder hopper with a cloth. Use detergent if necessary. Wipe the inside of the hopper with a dry cloth.
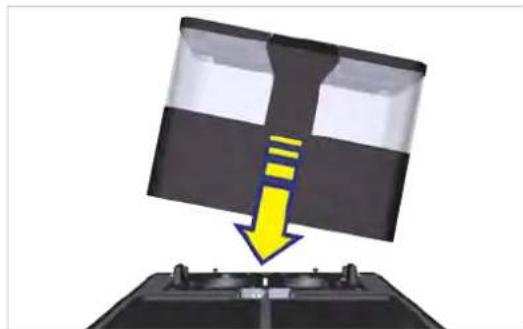
- Attach the bean hopper and powder hopper (if applicable).
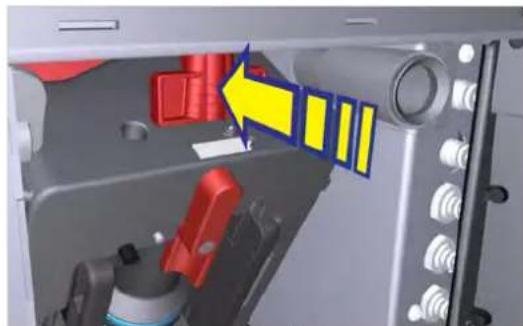
- Push the locking slide all the way in.
- Close the door.
9.6.3 Cleaning the screen
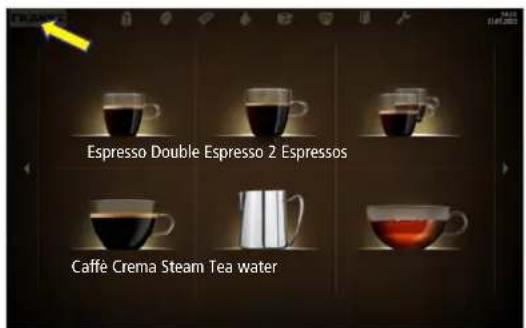
- Tap the Franke logo.
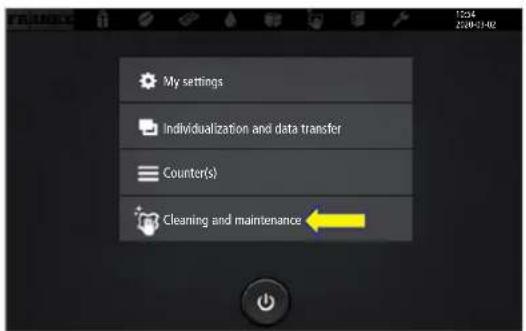
- Select Cleaning and Maintenance.
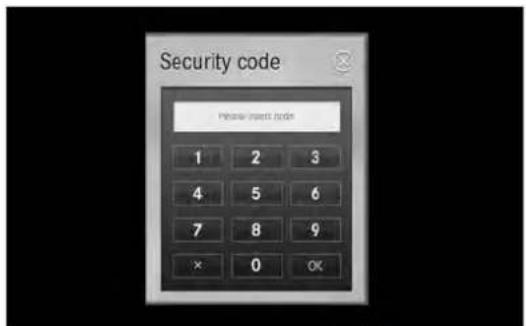
- Enter the PIN. PIN codes [58]
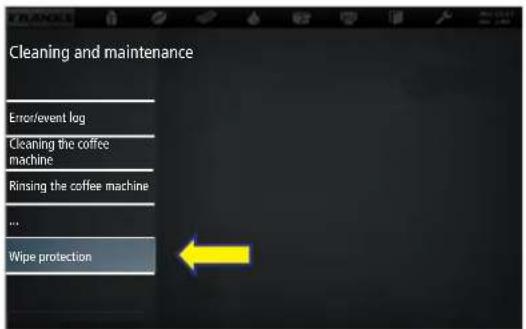
- Select wipe protection.
- Press ok.
⇒ The user interface is locked for 20 seconds.
- Clean the screen.
→ The maintenance level appears.
9.7 Replace water filter
CAUTION
Health hazard due to algae formation
Using a water filter for too long can lead to the build-up of algae.
a) Replace the water filter when prompted to do so by the machine.


- Tap the Franke logo.
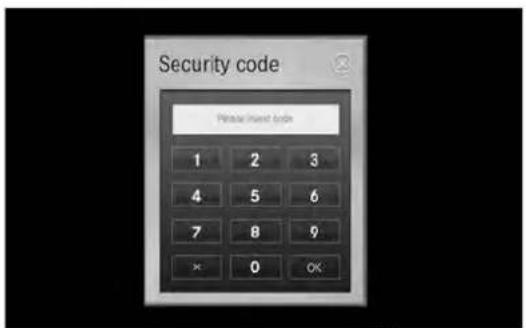
- Enter the PIN. PIN codes [58]
3. Press ok.
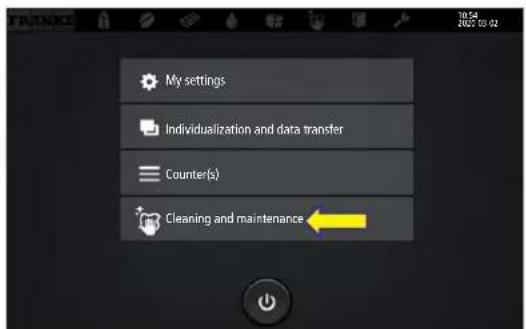
4. Select Cleaning and Maintenance.
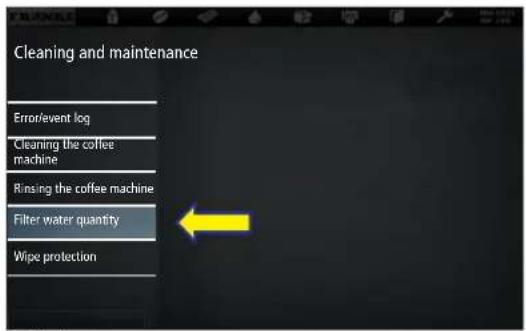
5. Select Filter water quantity.
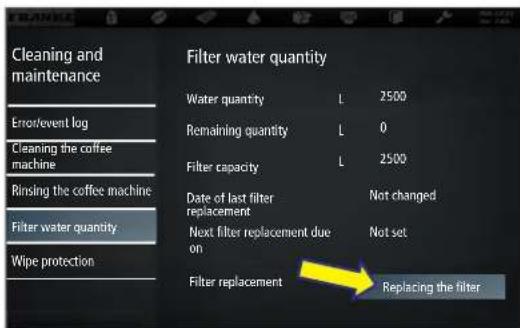
→ The guided filter replacement procedure starts.
- Follow the instructions on the user interface and confirm the individual steps by selecting Continue.
⇒ The machine shows the next step.
→ Filter replacement is completed.
- Dispose of the water filter. Disposal of parts [86]
9.8 Rinsing the coffee machine

WARNING
Risk of scalding
Hot water is released during rinsing.
a) Keep hands away from the spouts and nozzles during this process. b) Do not place anything on the drip grid. c) IN CASE OF SCALDING: Immediately cool the affected area and, depending on the severity of the injury, consult a doctor.

Rinsing is not a substitute for daily cleaning! Rinsing is necessary to remove residue build-up in the coffee and milk systems.
The machine automatically rinses after certain time intervals as well as when it is switched on or off.

1. Tap the Franke logo.
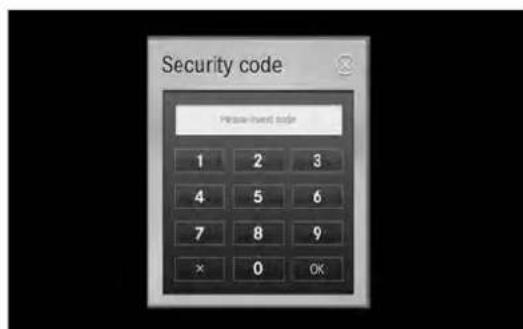
2. Enter the PIN. PIN codes [58]
- Press ok.
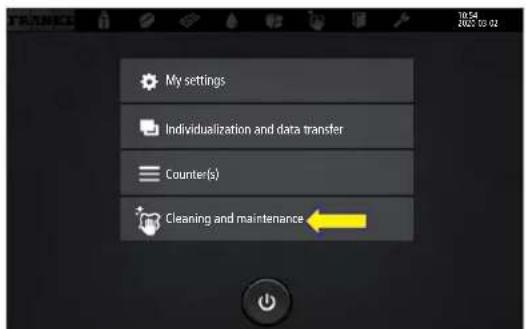
- Select Cleaning and Maintenance.
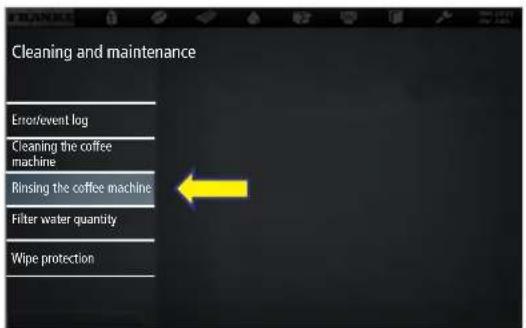
- Tap Rinse coffee machine and confirm.
→ The coffee machine is rinsed.
10 CONFIGURATION
10.1 Call up the maintenance level
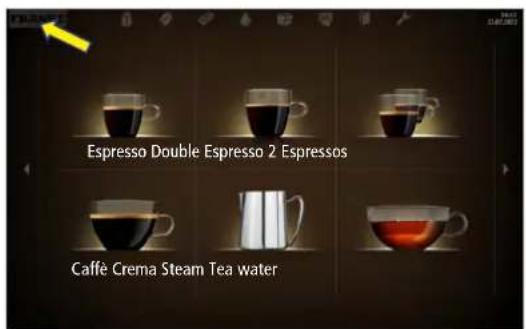
- Tap the Franke logo.
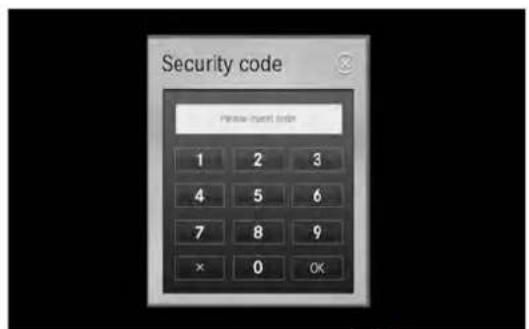
- Enter the PIN. PIN codes [58]
- Press ok.
10.2 PIN codes
Default PIN codes are assigned at the factory:
Owner Specialist Operator
Default PIN 1111 2222 7777
My PIN


The PINs for key (secured) products and On/Off machine can be viewed and changed with the owner role in the My settings > Access rights menu.
![graph TD A["My settings"] --> B["0 Commissioning"] B --> C["1 Set machine"] C --> D["2 Customize beverages"] D --> E["3 Date and time"] E --> F["6 Access rights"] C --> G["1.1 Language"] G --> H["1.2 Operating mode"] H --> I["1.3 Selection buttons"] I --> J["1.4 Cleaning"] J --> K["1.7 Temperatures"…](/content/2026/05/874550/images/cbf3219680610890b23b68f55f2c2798e6e3dd781494d52743e5bfd286e5ac3f.jpg)

Depending on the configuration of your machine, individual menu items may or may not be displayed.
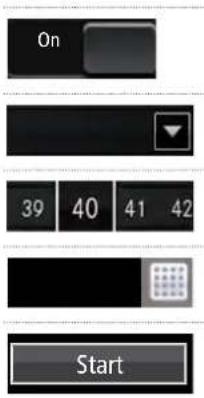
Tap the switch to switch between Yes/No or On/Off. The visible value is active.
Tap the arrow to display the selection and to select the option.
Drag the scale to adjust parameters. The framed value is active.
Tap the keyboard to enter text or numbers.
Press the button to carry out the corresponding settings, e.g. Start, Test.
10.5 My settings


Here you will find information regarding the hardware and software versions of the machine and the configuration.
![graph TD A["My settings"] --> B["1 Set machine"] B --> C["1.1 Language"]](/content/2026/05/874550/images/c99e986f20dee8000c0504964617ef1a1ad070cec4c75cae278d7a5d6fb485f0.jpg)
Select language de, en, fr, bg, cs, da,
es, es-US, et, fi, fr-
CA, hr, hu, it, ja, ko,
It, lv, nl, no, pl, pt-BR,
ro, ru, sk, sl, sr, sv, tr,
th, uk, zh-CN, zh-
TW, ar
The language is switched immediately on the user interface
![graph TD A["My settings"] --> B["1 Set machine"] B --> C["1.2 Operating mode"]](/content/2026/05/874550/images/3eae625161c28e488abb4ba0bd7167fd21c77886d3068cd4bb5ec2a5b65255f0.jpg)
Operating mode
Usage scenario > Non-self-service
Usage scenario - Non-self-service
- (Self-service)
Products per page - 4
- 9
- 16
- Number of products displayed simultaneously
- Default: 4
Depiction - Photo-realistic
- Iconized
Default: Photo-realistic
Automatic mode - Yes
- No
- Yes: All pre-selected products are dispensed without additional button input
- No: Each product must be triggered with the start button
- Default: No
Pause between products 1–10 seconds - Appears if automatic mode is activated
- Increment: 1
Shot timer - Yes
- No
| Parameter Value range Remarks |
| Purge the steam wand - Yes | - No | Default: No |
| Usage scenario > Self-service |
| Parameter Value range Remarks |
| Usage scenario - Self-service | - (Non-self-service) | |
| Operating mode - Quick Select | - Inspire Me | - Default: Quick Select- In the Self-service usage scenario, the user can choose between Quick Select and Inspire Me (Inspire Me not available for A400). |
| Products per page - 6 | - 12- 20 | - Number of products displayed simultaneously- Default: Depends on the coffee machine |
| Adapt beverages - Yes | - No | - Possibility for self-service customers to modify the selected beverage in accordance with the allocation of the selection buttons- Default: No |
| Custom images - Yes | - No | - Activate customized images- For Self-service usage scenario, Quick Select operating mode- Default: No |
| Usage scenario > Personalized |
| Parameter Value range Remarks |
| Operating mode Personalized If a configuration has been imported in Individual Operating Mode (Advanced Mode), nothing can be configured under the menu item 1.2 Operating mode. |
| Options |
| Parameter Value range Remarks |
| Key (secured) products - Yes | - No | - Selected products can be blocked with the Key (secured) products option- Key (secured) products can be prepared only after a PIN code has been entered (see Menu 6 Access rights)- Default: No |
| Hide cancel button - Yes | - No | - Display the button for canceling the product- Default: No |
| Audible signal for beverage preparation | - Yes- No | Beeps when the product is ready |
Parameter Value range Remarks
| Audible signal for error messages | - Yes | Beeps in a 3-second cycle if a resource is missing |
| - No |
Configuring the screen
Parameter Value range Remarks
| Display brightness 15–100 % Default: 85% |
Menu item 1.3 Selection buttons
| My settings | 1 Set machine | 1.3 Selection buttons |
Parameter Value range Remarks
| Product options – Small |
| - Medium | - A maximum of twelve selection buttons can be assigned with various product options in the service menu. The product options appear in the Beverage Selection status |
| - Large |
| - 2x |
| - Decaf | - With up to eight configured selection buttons, buttons 1–4 are displayed on the left-hand side, with the rest on the right-hand side |
| - Flavor 1-3 |
| - Extra Shot | - If more than eight selection buttons are configured, buttons 1–6 are displayed on the left-hand side, with the rest on the right-hand side |
| - Iced |
| - Espresso Shot | - Nine or more buttons are displayed at a reduced size |
| Recommendation: |
| - Selection buttons on the left-hand side: Select beverage size. |
| - Selection buttons on the right-hand side: Select additional settings. |
| Text display – Function |
| - Free text | - Default: Function: Labeling corresponds to the name of the selected product option. |
| - No text | - Free text: Enter your own labeling for the selection buttons. |
| - No text: Switch off labeling. |
| Price Amount – Store surcharge for the option. |
| | - The total price is calculated by the machine |
| - Default: 0.00 |
| PLU PLU No. – Store PLU number for price calculation (if PLU numbers are used). |
|
|
![graph TD A["My settings"] --> B["1 Set machine"] B --> C["1.4 Cleaning"]](/content/2026/05/874550/images/8c407b424af6bfc06d878a0d4f85f0696dbe5c9462b1e969e5946a517a750f0a.jpg)
| Buzzer – Yes | - No | Audible prompt for actions during cleaning. |
| - No: Audible signal not activated. |
| - Yes: Audible signal active |
| - Default: No |
![graph TD A["My settings"] --> B["1 Set machine"] B --> C["1.7 Temperatures"]](/content/2026/05/874550/images/c2b400dc737c87b7407057049b3ff6e6087af7cada1e5cc70f430b9640b3e2d1.jpg)
Consider the location, room temperature, and capacity utilization of the machine for these settings.
| Coffee -20 to +20% – The temperature in the brew boiler is configured by the service technician– The set temperature can be adjusted by percentage using the slider control |
| Steam -20 to +20% – The temperature in the steam boiler is configured by the service technician– The set temperature can be adjusted by percentage using the slider control |
| Hot water/steam 0 to 14% – The temperature in the hot water/steam boiler is configured by the service technician– The set temperature can be adjusted by percentages using the slide control |
| Tea water -20 to +20% – The temperature in the hot water, boiler is configured by the service technician– The set temperature can be adjusted by percentages using the slide control |

![graph TD A["My settings"] --> B["1 Set machine"] B --> C["1.11 Flavor"]](/content/2026/05/874550/images/99027423667847f1188bb94d398e4314201113cf16aff6c44be04b891bdf61a6.jpg)
| Counting active – Yes | - No | - Yes: Flavor products are counted- No: Flavor products are not counted- Default: No |
Flavor 1-3
| Flavor 1-3 List of syrup types – Only the flavor types stored here will be available later for the beverage settings– If User-defined is selected, the flavor types can be named according to preference |
| Flavor name 1-3 User-defined Any name can be entered for the flavor typesNote: The manually-entered flavor type names will not be translated if the language setting is changed |
| Only a small amount of syrup left0-5000 ml – Input the remaining amount for which the syrup type almost empty message appears– Default: 200 ml |
| Syrup empty 0-5000 ml – Input of remaining amount for which the syrup type empty message appears. The syrup type is then blocked– Default: 10 ml |
![graph TD A["My settings"] --> B["1 Set machine"] B --> C["1.14 Edge lighting"]](/content/2026/05/874550/images/2cce35a3fff1b8daf2cba2d6694e9d93f7613caf5e58daae2e6ae80cce075cbf.jpg)
| Select lighting - Off | | - off: No edge lighting |
| - Red, green, blue, yellow, cyan, magenta, white | - Red, green, etc.: Edges illuminated in the selected color |
| - Flash: Flashing light |
| - Flashing | - Color gradient: Color changes continuously |
| - Color gradient | - User-defined: Colors can be defined individually by the input of RGB values |
| - User-defined | - Default value: Color gradient |
Red lighting
0-100 % To input RGB values when a user-defined color has
Green lighting
been selected for the lighting
Blue lighting
Error display on edge lighting - Yes
- No
- Yes: Error display on edge lighting active
- No: No error display via edge lighting

You can save each product in three user-specific variations. The original cannot be changed.
Only parameters that are relevant for the product are displayed.
The percentage specifications are always based on the preset value.
For tips on setting the parameters, see the chapter Help with problems concerning product quality [83].
All values configured in menu 2 are saved in the configuration and can be re-imported.
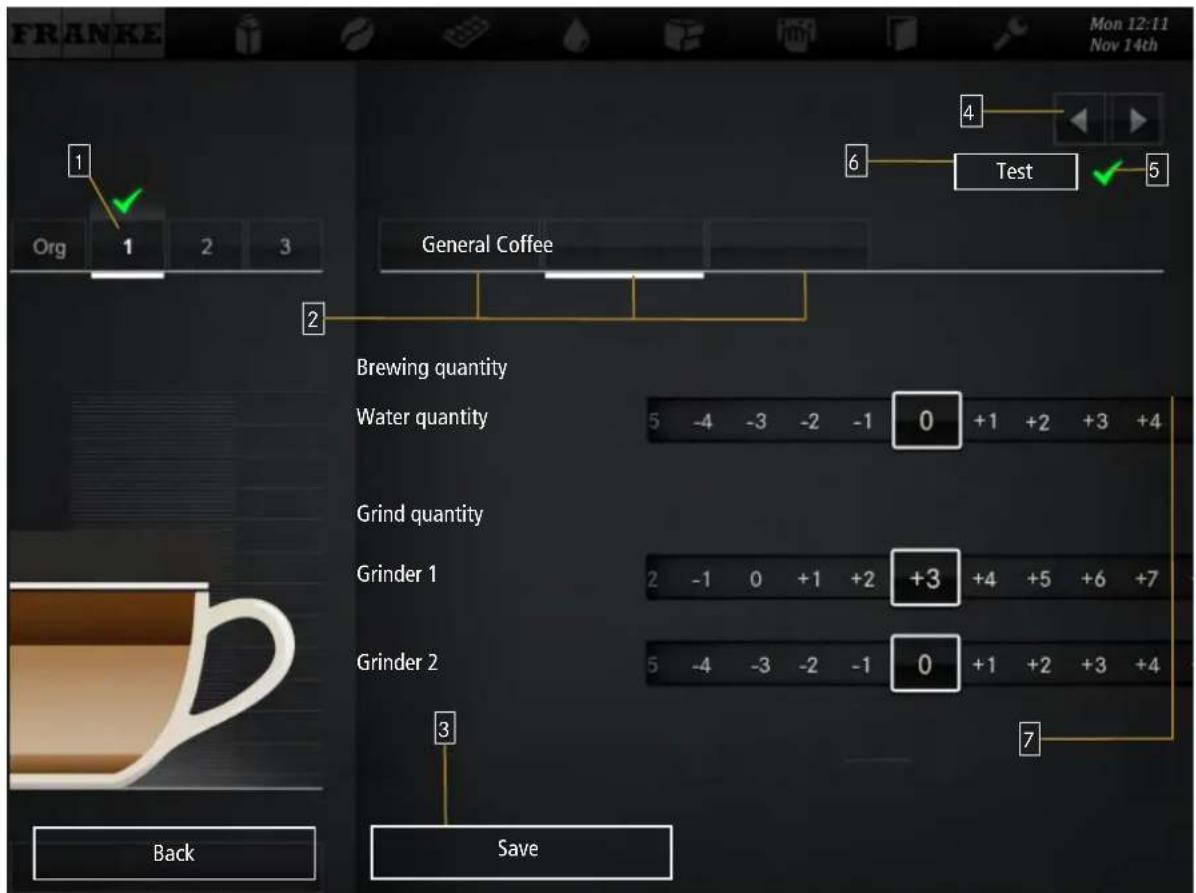
1 Select variant 2 Select area 3 Save settings 4 Select product 5 Confirm variant 6 Prepare a test product 7 Adjust parameters
Setting beverages
Select a product Use the selection arrows to select the product 4,1
to be defined, then select the variation to be edited
Change product name General Enter product name and select product text 2,7
Adjust price (only available, General Determine PLU, prices, and tokens; select the 7
when payment is activated) Free option
Adjust water quantity, grinders, Coffee Adjust parameters 2,7 brewing quantity, and pressure
Adjust milk quantity Milk Adjust the milk quantity in percent 2,7
Adjust the foam quantity Foam Adjust the foam quantity in percent 2,7
Prepare a test product Test Press Test to prepare the selected product using the modified settings
Assign a beverage variation that is to be prepared with this product selection. Select the variant, then confirm with the checkmark.
Save beverage settings. Save.
10.5.4 Menu 3 Date and time
![graph TD A["My settings"] --> B["3 Date and time"] B --> C["3.1 On/Off machine"]](/content/2026/05/874550/images/4d03ee6c3433af6703be61f96464a489a08caf484363abbe9dd611bcfc133d27.jpg)
| Parameter | Value range | Remarks |
| With PIN | - Yes | - Yes: The coffee machine can only be switched on or off using the PIN code |
| - No |
Menu item 6.7 On/Off machine
- No: The coffee machine can be switched on or off without the PIN code
- Default: No
Menu item 3.2 Date and time
![graph TD A["My settings"] --> B["3 Date and time"] B --> C["3.2 Date and time"]](/content/2026/05/874550/images/f1868a60cd81d86c25337ecfa84b496459084e27ec9507ffc95fb7f32ea74279.jpg)
Parameter Value range Remarks
12/24-hour display - 12 hours
- 24 hours
Day 0-31 Set the day
Month 0–12 Set the month
Year 0–63 Set the year
Hour 0-23/0-11 Set the hour
Minute 0-59 Set the minute
Time zone Time zone selection list – Select the time zone from the list
- Default: UTC+0100 (Europe) Zurich
Menu items 3.3-3.6 Timer 1-4![graph TD A["My settings"] --> B["3 Date and time"] B --> C["3.3 Timer 1"] D["My settings"] --> E["3 Date and time"] E --> F["..."]](/content/2026/05/874550/images/6ba7d9205fda22e4b9891cef67ab0ec2a9b3f1865a73f6f9ac5210f559f4cfcb.jpg)
Switching on automatically
Active - Yes
Switch timer on or off
- No
Hour 0-23/0-11 Select switch-on time (hour)
Minute 0-59 Select switch-on time (minute)
Monday, Tuesday,
- Yes
Wednesday, Thursday,
- No
Friday, Saturday, Sunday
Activate or deactivate the timer for each day
Switching off automatically
Active - Yes
Switch timer on or off
- No
Hour 0-23/0-11 Select switch-off time (hour)
Minute 0-59 Select switch-off time (minute)
Monday, Tuesday, - Yes
Wednesday, Thursday, - No
Friday, Saturday, Sunday
Activate or deactivate the timer for each day
![graph TD A["My settings"] --> B["4 Nutritional value information"] B --> C["4.1 Milk"]](/content/2026/05/874550/images/6fda55957ed84bea50433579f6a5f5c4fedd3a3d3f9efdf0e30fe3c1a0502550.jpg)
Milk type 1/Milk type 2
Nutritional values per 100 ml
Sugars 0.0–500.0 g Enter sugar content in g per 100 ml
Increment 0.1
Total fat 0.0-50.0 % Enter fat content in %
Increment 0.1
Protein 0.0–30.0 g Enter protein content in g per 100 ml
Increment 0.1
Calories 0–2000 kcal Enter calorific value in kilocalories (kcal)
Increment 1
[List of common allergens and ingredients] - Yes - Enter ingredients or allergens for the milk type used
- Default: No
Other allergens User-defined Enter ingredients or allergens that are not included in the list
My settings
4 Nutritional value information
4.2 Flavor
My settings
4 Nutritional value information
4.3 Powder
Powder dosing unit position 3/4
Nutritional values per 100 ml
Sugars 0.0–500.0 g Enter sugar content in g per 100 ml
Increment 0.1
Total fat 0.0-50.0 % Enter fat content in %
Increment 0.1
Protein 0.0–30.0 g Enter protein content in g per 100 ml
Increment 0.1
Calories 0–2000 kcal Enter calorific value in kilocalories (kcal)
Increment 1
[List of common allergens] - Yes - Enter ingredients or allergens for the milk type
[gens and ingredients] - No used
- Default: No
Other allergens User-defined Enter ingredients or allergens, that are not included
in the list

The access rights option makes it possible to assign different PIN codes for different tasks and roles. Three access levels (owner, specialist, and operator) can be defined for accessing the maintenance level.
6.2 Owner 1111
6.3 Specialist 2222
6.4 Operator 7777
6.6 Key (secured) products
6.7 On/Off machine
My settings
6 Access rights
6.2 Owner
Change PIN
Enter new PIN
- Authorizations: Access to My settings, Retrieve counter
- Default PIN: 1111
PIN set - Yes
- No
- Yes: PIN is set and is used
- No: PIN is not used
My settings
6 Access rights
6.3 Specialist
Change PIN
Enter new PIN
- Authorizations: Limited access to My settings, Retrieve product counter
- Default PIN: 2222
PIN set - Yes
- No
- Yes: PIN is set and is used
- No: PIN is not used
Activate user profile – Yes
- No
- Yes: User profile is activated and being used
- No: User profile is not active
My settings
6 Access rights
6.4 Operator
Change PIN
Enter new PIN
- No access to My settings, Retrieve product counter, Retrieve counter
- Default PIN: 7777
PIN set - Yes
- No
- Yes: PIN is set and is used
- No: PIN is not used
Activate user profile – Yes
- No
- Yes: User profile is activated and being used
- No: User profile is not active
My settings
6 Access rights
6.6 Key (secured) products
Change PIN Enter new PIN Default PIN: 8888
| PIN set – Yes | - No | - Yes: PIN is set and is being used for key (secured) products |
| - No: PIN is not used |
| Activate user profile – Yes | - No | - Yes: User profile is activated and being used |
| - No: User profile is not active |
My settings
6 Access rights
6.7 On/Off machine
Change PIN Enter new PIN Default PIN: 9999
| PIN set – Yes | - No | - Yes: PIN is set and is used |
| - No: PIN is not used |
| Activate user profile – Yes | - No | - Yes: The user profile is activated and being used |
| - No: The user profile is not active |
11 INDIVIDUALIZATION AND DATA TRANSFER
11.1 Overview
This menu provides you with the following options:
– Use existing Franke media for screen savers or as advertising media - Upload and view your own media objects on the machine - Use your own media for screen savers or as advertising media - Configure the behavior of the different operating modes and the screen saver - Save settings - Create regular backups of your machine to a USB stick - Perform downloaded digital services updates
11.2 Individualization and data transfer menu tree
![graph TD A["Individualization and data transfer"] --> B["1 Digital Signage"] B --> C["2 Customize display"] C --> D["3 Save/load data"] D --> E["3.1 Back up data"] E --> F["3.2 Load backup"] F --> G["3.3 Back up XML data"] G --> H["3.12 Load license"] C --> I["2.13 Configure application"]](/content/2026/05/874550/images/3fc4092450a95ca2c29da386354abfd80c38543dfb5f6879528c06d47433d789.jpg)

By using 4 Set default values, selected parameters can be reset to the configured values.
The menu items 5 Import FPC, 6 Import PKT and 7 Import MMK are active if a USB stick with valid resources (FPC, PKT and/or MMK) is connected.
8 Eject USB stick logs off connected USB sticks. If a USB stick is being used, the menu item will appear in green; otherwise it appears in orange.
The multimedia functions can only be used in Quick Select [ 47] operating mode.
11.3 Manage Digital Signage via USB stick
You can maintain the selection and display times of your advertising media (digital signage) in a freely accessible web tool. To do this, export and import the corresponding file with a USB stick.
![graph LR A["Device"] -->|Data Transfer| B["Laptop"] B -->|Data Transfer| A](/content/2026/05/874550/images/fc34c6b5ee6ac8f2dbb5f8574854da71839876037486117055fdca0558d0572b.jpg)
√ The coffee machine has software version 4.0 or higher.
- Connect a USB stick to the machine.
- Go to menu item Individualization and data transfer > 1 Digital Signage.
- Tap the Export Digital Signage button.
- For the parameter Eject USB stick select the value Yes.
- Tap the Export button.
⇒ The coffee machine saves the *.bundle file to the USB stick.
- Remove the USB stick.
- Connect the USB stick to any computer.
- In the browser, go to the website http://iot.franke.com/digital-signage.
- Transfer the *.bundle file from the USB stick to the website via drag&drop or file explorer.
⇒ The configuration options for Digital Signage are displayed.
- Make the desired settings.
- Rename the file via the pencil icon in the upper left corner, if desired.
- Tap the Download button at the bottom left of the window.
⇒ The web page asks whether the changes made should be saved.
- Confirm the question.
- Select the Manual value.
- Tap the Download bundle button.
⇒ The downloaded *.bundle file ends up in the download folder of the computer.
- Move the *.bundle file to the USB stick.
- Remove the USB stick.
- Connect a USB stick to the machine.
- Go to menu item Individualization and data transfer > 1 Digital Signage,
20.Tap the Import Digital Signage button. 21. Select the revised *.bundle file. 22. Tap the Download and Install button.
⇒ The coffee machine adopts the new settings.
- Use image files or video files as advertising media
- Use image files or video files as a screen saver
Version Example: 3.30 Display of the current version
Standard language Display of the set standard language. The machine
will revert to this language after a set waiting time.
11.5.1 Language settings
Language change - Yes
Activate/deactivate language change
- No
Timeout for language change 20-120 s Wait time, after
which the coffee machine reverts
back to the standard language set under Menu 1 Set machine > 1.1 Language
Language 1-6 - Language 1:
The customer sees the flags corresponding to the up to 6 configured languages. The customer can use these flags to switch from the standard language to the language they require
- ...
- Language 6: Pop-up list with the available languages/flags
11.5.2 Operating mode
Operating mode – Self-service –
Quick Select
- Non-self-service - Cash Register
Hide cancel button – Yes
- No
Display clock
-Yes
- No
Display brightness
15-100%
Audible signal for beverage preparation
-Yes
Audible signal for error messages
- No
- Yes
- No
11.5.3 Display [Operating mode]
![FRANKE A600 - Display [Operating mode] - 1](/content/2026/05/874550/images/2cf0ab1bc5a02fd970f0404cf5eac588d195f8f30d97619d1f26c402fae799f8.jpg)
Depending on the operating mode, different display parameters are available.
11.5.4 Cup detection
Setting Value range Remarks
| Filter beverages – Yes | - No | Yes: The product range is automatically based on the size of the cup under the spout.No: The product range is not filtered. |
| Allow wrong cup – Yes | - No | Yes: Beverages can be prepared if the cup under the spout does not match the selected cup size on the screen.No: The machine will not start preparing beverages until the correct size of cup is under the spout. |
| Select lighting – Off |
| - Color gradient | |
| - Flashing | |
| - User-defined | |
| - Red | |
| - Green | |
| - Blue | |
| - etc. | |
| Error display via edge lighting – Yes | If an error or message occurs, the edge lighting flashes in the respective color (yellow, orange or red). |
|
11.5.6 Nutritional value settings
Parameter Value range Remarks
| Display nutritional value information | - Yes- No | - Activate/deactivate the display of nutritional value information- The nutritional information can be entered in chapter Menu 4 Nutritional value information [68] |
| Further nutritional value information | Free text input | |
11.5.7 Payment
Parameter Value range Remarks
| Select – Coins |
| - Credit card- Customer card- Contactless card payment- Cell phone- Banknotes | |
| Display pop-up window – Yes | - No | Activate/deactivate payment pop-up window |
11.5.8 Transaction approval (API)
Parameter Value range Remarks
| Activate transaction approval – Yes |
| - No |
| Allow Remote Control – Yes |
| - No |
11.6 Loading/backing up data
11.6.1 Back up data
Desired action Menu item Information/instruction
| Export a configuration and media | 3.1 Back up data – Export configuration |
| - Back up Franke media |
| - Back up your own media |
| - Eject USB stick |
| - Display of file name |
11.6.2 Load data
Desired action Menu item Information/instruction
| Import configuration and media | 3.2 Load backup – Load backed up data (configuration, Franke media, your own media)– Eject USB stick |
11.6.3 Back up XML data
Back up XML data 3.3 Back up XML data Export operating data such as maintenance data, error logs, or product and machine counters
- Eject USB stick
- Display of file name
11.6.4 Load license
Load license 3.12 Load license Import license
11.7 Restore default values
Set default values 4 Set default values In the selected areas, restore the default values (e.g.
variable and fixed data) or delete counters (product and machine counters) and files (product and error log, files)
Confirm changes that have been made by tapping Apply.
11.8 Activating configurations
If updates (menu bundle, software version, etc.) are transferred to the coffee machine via Dashboard Provisioning or Deployment, or via USB stick, they must be activated on the coffee machine. The available update packages can be viewed in the Individualization and data transfer menu on the coffee machine.
√ A configuration, a menu bundle, or a new software version was loaded onto the coffee machine via the Provisioning or Deployment dashboard.
- Tap the Franke logo.
- Enter the PIN.
- Press OK.
In addition to the Individualization and data transfer menu, the number of available updates can be viewed.
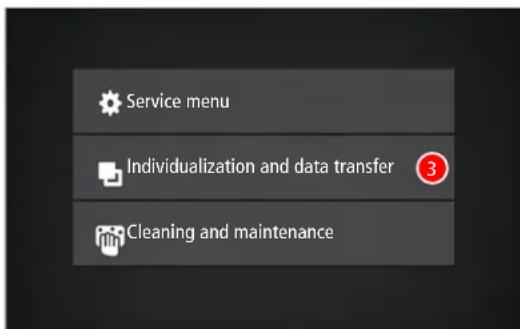
- Select the Individualization and data transfer menu.
- Select menu item 9, Update packages.
- Select the desired update package and press the Download and import button.
⇒ The update package is imported.
- Press the Install button.
→ The update package is installed.
12 TROUBLESHOOTING
12.1 Error messages
When an error occurs, the machine displays an error message which provides instructions on how to rectify the issue.
Non-self-service mode
When the non-self-service mode is selected, an error is indicated via a highlighted symbol. Tap the symbol for further information.

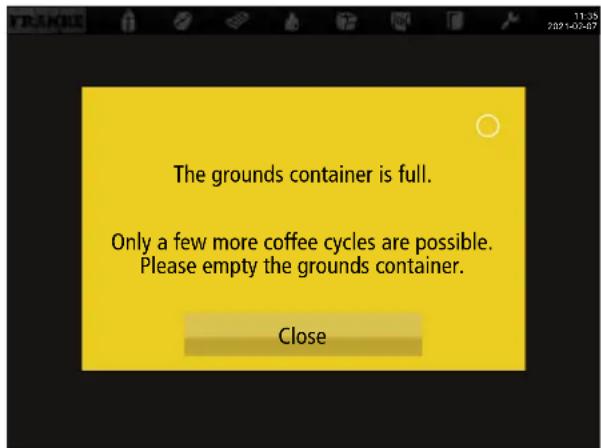
Self-service operating mode
When the self-service mode is selected, an error is indicated via a colored triangle in the upper right-hand corner of the operator panel. Tap the symbol for further information.


If the entire system is affected by an error, error messages will appear automatically. The machine must be restarted in the event of serious errors.
a) To restart the machine, switch it off via the main switch. b) Wait a minute and then switch it back on again. c) Check the power supply if the machine fails to start. d) Contact your service technician if the machine cannot be started or if you are unable to rectify the error.
12.1.1 Color code for error messages

Temporary interruption
System still fully functional
System has limited functionality
Some or all resources are locked
12.2 Troubleshooting the system
Error message/problem Possible cause Measure
| Error message E663empty drip tray appears even though the drip tray has been emptied | Sensor signal disturbed by debris inside the drip tray | Clean and dry the inside of the drip tray.Additionally, clean and dry the mounting bay of the drip tray |
| Sensor signal disturbed by damp back of the drip tray | Clean and dry the back of the drip tray |
| Milk is frozen Cooling unit target temperature is set too low | Set target temperature 1-2 °C higher-SU05 cooling unit: Press and hold the Set button on the temperature controller until the target temperature flashes. Use the navigation buttons to increase the target temperature. Use the Set button to confirm the new target temperature.- KE200: A temperature controller is located to the rear of the KE200. Use this to set the required temperature |
| Milk is frozen (water in the cooling chamber) | The cooling unit door seal is not leak-tight | Make sure that the seal is fitted correctly and that the door closes properly |
| Cooling unit milk temperature is not being reached | Inadequate air circulation around cooling unit | Ensure that the required minimum clearance is present between the cooling unit and the wall (at least 50 mm) |
| No milk or just milk foam | Suction hose/milk line has a leak Check | the position of the spout insert and, if necessary, clean it. SU05 cooling unit: Check the O-ring on the suction hose coupling. Check the suction hose and, if necessary, replace it |
| Milk is not flowing correctly out of the milk spout | The milk spout was not installed correctly when it was last cleaned | Start the coffee machine cleaning process, and install the milk spout as per the instructions on the touch screen. The milk spout is also part of the care kit, see Care kit |
Error message/problem Possible cause Measure
| Error message E79 Flow meter error | Water flow disrupted Check the water tank/main water connection couplingIf the error message appears while a product is being dispensed, the brewing module strainer is probably blocked- Increase the grind coarseness and/or reduce the grind quantity- Remove the brewing module and rinse it out- Start the coffee machine cleaning process | |
| Touch screen not re-sponding correctly | Overloaded machine software There are two different troubleshooting methods:- Method 1: Press and hold the red button on the right-hand side of the operator panel for 10 seconds to restart- Method 2: Disconnect the coffee machine from the power grid. Wait 1 minute before reconnecting the coffee machine to the power grid. Briefly press the red button on the right-hand side of the operator panel to switch it on | |
| Water level in the water tank is not detected | Residues or deposits on the inner wall of the water tank | Clean and rinse the water tank thoroughly |
12.3 Tips for good coffee beverages

NOTICE
Poor beverage quality
The oil from the coffee beans is deposited on the inside of the bean hopper as a thin film of oil. This deposited oil ages quickly and impairs the taste of the beverages produced.
a) Remove the oil film from the inside of the bean hopper on a daily basis. b) To do this, use a dry cloth or a cloth moistened only with water. c) Do not use any cleaners, as these alter the taste of the coffee.

The aromas of the coffee beans evaporate in the bean hopper as a result of heat and air exchange. The quality will have already deteriorated after 3 hours.
a) Coffee beans should not be moist. b) Seal any open coffee bean packs in an airtight manner. c) Do not store coffee beans in a refrigerator or freezer. d) Only fill the coffee beans into the bean hopper that you will need for the next 3 hours.
12.4 Help with problems concerning product quality
Problem Possible causes Possible remedy
| Coffee tastes stale Grind too coarse Select a finer grind Setting the grind coarseness |
| Too little coffee Increase coffee quantity Setting drinks |
| Temperature too low Increase temperature Setting drinks |
| Coffee is old Use fresh coffee |
| Bean hopper not locked correctly Check locking of the bean hopper Filling beans |
| Coffee tastes strange Poor grind Contact customer service |
| Minimal coffee usage Pour a small amount of coffee beans into the bean hopper |
| Spoiled coffee beans Replace coffee beans |
| Cleaner residue Rinse the machine |
| Dirty cup | Check the dishwasher |
| Poor water quality (chlorine, hard-ness, etc.) | Have water quality tested [33] Water quality |
| Coffee tastes bitter | Temperature too high | Reduce coffee temperature Setting drinks |
| Grind too fine | Select a coarser grind Set the grind coarseness |
| Coffee quantity too low | Increase coffee quantity Setting drinks |
| Roast too dark | Use lighter coffee roast |
| Coffee tastes sour | Temperature too low Increase coffee temperature Setting drinks |
| Roast too light | Use darker coffee roast |
| Grind too coarse Select a finer grind Set the grind coarse-ness |
| Consistency of powder products | Viscous | Use less powder, use more water |
| Watery | Use more powder, use less water |
| Powder clumping or moist | Clean and dry powder system |
| Taste of powder products | Too sweet | Use less powder, use more water |
| Not sweet enough | Use more powder, use less water |
| Strange taste | Clean powder system |
13 DECOMMISSIONING
13.1 Preparing for decommissioning
- Clean the machine using the automatic cleaning function.
- Empty the bean hopper and powder hopper.
- Clean the bean hopper and powder hopper.
- Clean the grounds container.
- Empty the milk container.
- Clean the milk container and container lid.
- Clean the inside of the milk hose with a brush.
- Clean the suction filter with a twisted-in-wire brush.
- Clean the reversible adapter.
13.2 Short-term decommissioning (up to 3 weeks)
√ The machine remains in place. 1. Clean the machine using the automatic cleaning function. Cleaning [51] 2. Go to the energy-saving mode. 3. Disconnect the machine from the power supply.
- Close the water supply if the machine has a main water connection.
- Clean any add-on units.
- Switch off the add-on units and disconnect them from the power grid.
13.3 Long-term decommissioning

NOTICE
Functionality of the machine is impaired in the event of long-term decommissioning and storage.
If you plan to start using your machine again at a later date, it is essential that service measures are implemented. The coffee machine must be maintained, installed, and cleaned before preparing any beverages.
a) Contact the Franke Service team for information regarding proper decommissioning and storage. b) Have your coffee machine drained by your service technician. c) Remedial maintenance may be required when commissioning the machine if it has been stored in excess of 6 months.
13.4 Transport and storage

Protect the machine from mechanical damage and adverse environmental conditions during transport and storage.
Protect the machine against the following:
- Vibrations
- Dust
- Sunlight
- Falling or tipping over
- Slipping during transport
- Frost in case the machine has not been drained and emptied completely. The following conditions must be fulfilled:
- Permissible storage temperatures if the machine is completely drained and emptied: 5-32 °C
- Relative humidity: Max. 80 %
- Permanent and sufficient stability and fixing
- The machine should be in an upright position
- The machine should be empty and the system drained
- The machine and loose parts should be packaged, preferably in their original packaging
13.5 Recommissioning after prolonged periods of storage or non-use

NOTICE
Deterioration in storage
Parts may no longer function as they should if they have been stored or unused for periods in excess of 6 months.
a) Contact your service technician for information regarding repairing and recommissioning your machine.
14 DISPOSAL OF PARTS
Disposal of consumables
- Beans, powder and coffee grounds can be composted.
- Observe the information on the label when disposing of any unused cleaning supplies.
- Dispose of the fluids from the cleaning container or the drip tray in the wastewater system.
Disposal of the machine and other devices

The appliance complies with European Directive 2012/19/EU regarding Waste Electrical and Electronic Equipment (WEEE) and must not be disposed of with household waste.
Dispose of electronic parts separately.

Dispose of plastic parts in accordance with their marking.
Two people are required for transporting the coffee machine.
15 TECHNICAL DATA
Device type A600 (FCS4043)
Dimensions: Width/height/depth (mm) 340/540/600
Weight (kg) 38
Bean hopper capacity (kg) 0.6 or 1.2
Twin bean hopper capacity (kg) 2 x 0.6 or 2 x 1.2
Bean hopper capacity, one grinder (kg) 1.8
Powder hopper tall, capacity (kg) 1
Powder hopper low, capacity (kg) 0.6
Noise emission (dB(A)) < 70
Ambient temperature (°C) 10-40
Humidity (%) Max. 80
Water tank (l) 4
External wastewater tank volume (l) 16
Grounds container capacity (with grounds ejection 60-110 cakes, depending on the grind quantity option)
Brew boiler Volume (l): 0.9
Hot water/steam boiler Volume (l): 0.9
Operating pressure (bar): 12
Operating pressure (bar): 3
15.1 Capacities in accordance with DIN 18873-2:2016-02
| Hourly capacity | Single preparation (cups per hour) | Double preparation (cups per hour) |
| Espresso | 150 | 194 |
| Coffee/Café crème | 100 | 121 |
| Hot water (200 ml) | 164 | - |
| Cappuccino | 98 | 160 |
| Latte macchiato | 102 | 155 |
| Milk coffee | 124 | 186 |
| Chocolate | 111 | - |
15.2 Electrical connection data
| Voltage | Main power connection | Power rating (max.) | Fuse | Frequency |
| 200 V | 2LPE | 4700 W | 30 A | 50-60 Hz |
| 200 V | 2LPE | 2450 W | 16 A | 50-60 Hz |
| 200 V | 3LPE | 6800 W | 30 A | 50-60 Hz |
| 200-220 V | 2LPE | 4500-5300 W | 30 A | 60 Hz |
| Voltage Main power connection | Power rating (max.) Fuse Frequency |
| 220 V | 1LNPE 2400 W 16 A 50 Hz | |
| 220-240 V | 1LNPE 2100-2300 W 10 A 50-60 Hz | |
| 220-240 V | 1LNPE 2400-2800 W 16 A 50-60 Hz | |
| 220-240 V | 1LNPE 4400-5500 W 30 A 50-60 Hz | |
| 220-240 V | 3LPE 5600-7900 W 30 A 50-60 Hz | |
| 380 V | 3LNPE | 6300 W 16 A 50-60 Hz |
| 380-415 V | 3LNPE | 6300-7500 W 16 A 50-60 Hz |
INDEX
Numeric
5-step method 11, 51

Ambient conditions 87

Operating mode
Cash Register 28
Non-self-service mode 80
Quick Select 28
Self-service 80
Screen
Cleaning 55
Wipe protection 55
Beans
Disposal 86

Cancel button 11
Capacities 87
Cleaning 52
Cleaning tablets 15
Credit Mode 29

Dashboard 11
Decommissioning 84
Determine water hardness 32
Dimension 30
Disposal 86
Drip grid 43
Drip grid extension 16
Drip tray 43

Electronic parts
Disposal 86
Error messages 80

Troubleshooting
Machine error 80
Error message
Color code 14
Depiction 14

Beverage
Preparing 47,48,50
Grind coarseness
Grinder adjustment wrench

Intended use 6

Coffee beans
Filling 35
Coffee machine
Cleaning 52
Coffee grounds
Disposal 86
Plastic parts
Disposal 86

Lime deposits 10

Manual set 15
Measuring cup 15
Media
Backup 77
Loading 77
Milk
Filling 37
Minimum clearances 31

Operator panel 43

PIN codes 58
Product quality 83
Powder
Disposal 86
R
Disposal of fluid 86
Cleaning agents
Disposal 86
Requirements 11
S
Safety 7
Spout 47, 48, 50
Start button 11
Symbols
Dashboard 11
Instructions 11
Software 11
Symbols 11
T
Tips 11
Transport 86
Drip tray
Disposal of fluid 86
Troubleshooting 82
Type code 19,20
Type plate 17
U
User manual 15
W
Water connection
Requirements 32
Wastewater tank (external) 87
Water quality 33
Water tank 87
Wipe protection 55

6A Handley Page Way,
Old Parkbury Lane,
Colney Street,
St Albans
Hertfordshire, AL2 2DQ
England
Tel.: +44 1923 635700
Fax: +44 1923 635701
www.franke.com
Franke Coffee Systems
Americas
800 Aviation Parkway
Smyrna, TN 37167
USA
Tel: +1 615 462 4265
Fax: +1 615 462 4400
www.franke.com
coffee.franke.com